Go Back
- 1 pound fresh strawberries - 1 cup granulated sugar - ½ cup water - 1 teaspoon vanilla extract - 1 tablespoon lemon juice - Optional: Edible glitter - Medium saucepan - Candy thermometer - Baking sheet - Parchment paper - Look for ripe and firm strawberries. - Check for uniform color and no bruises. - Consider organic options for better flavor. Selecting the right strawberries is key to making great candied strawberries. Fresh, ripe berries taste the best. When you shop, pick strawberries that feel firm. They should not be mushy or soft. Look for bright red color. Avoid any that have dark spots or bruises. These may not taste good. If you can, choose organic strawberries. They often have better flavor. Plus, they are free from many pesticides. Organic strawberries can make your treat taste even better and feel healthier. Now, let’s gather your ingredients. You will need fresh strawberries, sugar, water, vanilla, and lemon juice. Don’t forget the edible glitter if you want some sparkle! This simple list makes the process fun and easy. For the equipment, grab a medium saucepan, a candy thermometer, a baking sheet, and parchment paper. These tools help you create the perfect candied strawberries. You can find most of these items in your kitchen. If not, they are easy to buy. Ready to dive into the fun of making candied strawberries? Let’s get started! For the full recipe, check the section above. - Rinse and dry the strawberries thoroughly. - Remove stems carefully. Start by rinsing your strawberries under cool water. This step is key for cleaning any dirt. After rinsing, use a paper towel to dry them well. A dry strawberry will hold the candy better. Next, gently remove the green stems from each berry. I like to twist them off to keep the fruit intact. - Combine sugar, water, vanilla, and lemon juice in a saucepan. - Boil the mixture to hard crack stage at 300°F. Now it's time to make the candy syrup. In a medium saucepan, mix the sugar, water, vanilla, and lemon juice. Stir until the sugar fully dissolves. This step is important to avoid grainy candy. Increase the heat to high and let it boil. Use a candy thermometer to check the temp. You want it to reach 300°F, known as the hard crack stage. This can take about 8-10 minutes. - Dip strawberries into the hot syrup. - Drain excess syrup and set on lined baking sheet. Once the syrup is ready, remove it from the heat. Let it cool for just a minute. Now, dip each strawberry into the hot syrup. Make sure to coat it well. I find using a fork or skewer helps with dipping. Allow the excess syrup to drip off. Finally, place the coated strawberries on a baking sheet lined with parchment paper. If you want some sparkle, sprinkle edible glitter while the syrup is still warm. Let the strawberries cool for about 30 minutes. This helps the candy coating harden. To make delicious candied strawberries, start by ensuring your strawberries are completely dry. Any water left on them can ruin the candy coating. After rinsing, pat them dry using a paper towel. Next, monitor the syrup temperature closely. Use a candy thermometer to reach the hard crack stage at 300°F. This step is key for a crunchy coating. You can add fun flavors to your syrup. Consider using cinnamon or almond extract for a twist. These flavors can enhance the taste of your strawberries. You can also try different types of sugar. For example, brown sugar gives a richer flavor and a unique texture. Experiment and find what you like best! Make your candied strawberries shine at any gathering. Place them on a decorative platter or in a tall glass. This adds height and interest to your display. You can also use edible glitter to give them a sparkling finish. For parties, serve them on skewers for easy eating. This will delight your guests and make your treat stand out! {{image_2}} To make chocolate-covered candied strawberries, start with fully cooled, candied strawberries. Melt your choice of chocolate in a bowl. You can use dark, milk, or white chocolate. Each type gives a different taste. Dip each strawberry into the melted chocolate. Make sure to coat them well. Let the excess chocolate drip off. Place them on parchment paper to set. For an extra touch, drizzle more chocolate on top for a fancy look. You can mix strawberries with other fruits for fun flavors. Try using bananas, blueberries, or pineapple. Cut the fruits into bite-sized pieces for easy coating. For candy coating, dip each piece in the hot syrup just like the strawberries. This method works well for any fruit with a firm texture. Mixing colors makes your dish more vibrant and appealing. Get creative with seasonal themes for your candied strawberries. For holidays, use colors like red and green for Christmas. For Halloween, try orange and black sprinkles. You can also use flavors that match the season. Use pumpkin spice in the syrup for fall, or mint for spring. These small changes can make your treats festive and fun for any event. To keep your candied strawberries fresh, use an airtight container. This helps to prevent moisture from ruining their crisp coating. Store them at room temperature, away from direct sunlight. A cool, dry place works best. Avoid the fridge, as this can make the coating sticky. Candied strawberries stay fresh for about one day. After that, they may lose their crunch. Look for signs of spoilage, like a sticky coating or a change in color. If they look dull or feel wet, it’s best to throw them away. You can freeze candied strawberries, but the texture may change. If you want to freeze them, place them on a baking sheet. Make sure they are not touching. Freeze them until solid, then transfer to a freezer bag. To serve, thaw them in the fridge for a few hours. This helps keep their shape better than thawing at room temperature. To check the syrup's temperature, use a candy thermometer. Clip it to the side of the pan. Make sure the tip is in the syrup but not touching the bottom. When the thermometer reads 300°F, the syrup is ready. This is called the hard crack stage. - Stir the mixture gently at first to help dissolve the sugar. - Avoid stirring once it starts boiling. This can cause crystal formation. - If you don’t have a thermometer, test the syrup by dropping a little into cold water. If it forms a hard ball, it’s ready. Yes, you can use other fruits! Many fruits work well with candy coating. Here’s a list of suitable alternatives: - Apples: Slice them into wedges for easier dipping. - Bananas: Cut into thick slices for a fun treat. - Pineapple: Use fresh chunks for a tropical twist. - Grapes: These can be dipped whole for bite-sized snacks. - Oranges: Use segments or slices for a juicy option. Before dipping, make sure to wash and dry the fruits well. This helps the syrup stick better. You can find candied strawberries at many places. Look for them in: - Local candy shops: Many make their sweets fresh. - Farmers' markets: Some vendors offer homemade treats. - Online retailers: Websites like Etsy or Amazon often sell them. When buying, check for quality. Look for shiny, well-coated strawberries. If possible, ask about their freshness. Candied strawberries are coated in a sugar syrup, which hardens when cooled. The process involves boiling sugar and water to a high temperature. This creates a crunchy shell. Caramelized strawberries use sugar heated until it melts and turns brown. This gives a rich, deep flavor. The strawberries are usually cooked in the sugar until soft and glossy. Both methods are tasty but yield different textures and flavors. Candied strawberries are crunchy, while caramelized ones are chewy and sweet. This blog post covered how to make candied strawberries, step by step. You learned about the key ingredients and required equipment. We also shared tips for selecting strawberries and achieving the perfect candy coating. Plus, there are fun variations and storage tips to keep your treats fresh. Candied strawberries are a delight and perfect for any occasion. Enjoy experimenting with flavors and presentations! I hope you create sweet memories with this simple yet tasty treat.

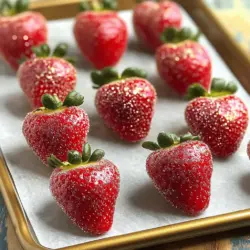
Candied Strawberries

Looking to impress your guests with a delicious treat? Our easy guide to making candied strawberries is just what you need! Discover the simple steps for coating ripe strawberries in a delightful candy syrup, plus tips for selecting the best berries. With fun variations and presentation ideas, you can create a stunning dessert that stands out at any event. Click to explore these mouthwatering recipes and start your sweet adventure today!

Ingredients
  

1 pound fresh strawberries, stems removed

1 cup granulated sugar

½ cup water

1 teaspoon vanilla extract

1 tablespoon lemon juice

Edible glitter (optional, for sparkle)

Instructions
 

Rinse the strawberries gently under cool water and pat them dry with a paper towel. Ensure they are completely dry to help the sugar stick better.

    In a medium saucepan, combine the granulated sugar, water, vanilla extract, and lemon juice. Place the saucepan over medium heat and stir until the sugar dissolves completely.

      Increase the heat to high and let the mixture come to a boil without stirring. Allow it to boil until it reaches a temperature of 300°F (hard crack stage) on a candy thermometer (about 8-10 minutes).

        Once the syrup reaches the right temperature, remove it from the heat immediately to prevent burning. Allow it to cool for about 1-2 minutes until it thickens slightly.

          Carefully dip each strawberry into the hot syrup, ensuring that they are evenly coated. You can use a fork or skewer for easier dipping.

            Allow any excess syrup to drip off, then place the candied strawberries on a baking sheet lined with parchment paper.

              If desired, sprinkle edible glitter over the strawberries while the syrup is still warm to give them a sparkling finish.

                Leave them to cool completely at room temperature for about 30 minutes to harden the candy coating.

                  Once set, serve immediately or store them in an airtight container at room temperature for up to a day.

                    Prep Time: 15 minutes | Total Time: 45 minutes | Servings: 8