![- 6 oz dark chocolate (70% cocoa), chopped - 4 oz milk chocolate, chopped - 4 oz white chocolate, chopped - 3 tablespoons unsalted butter - 4 large eggs, separated - 1/4 cup granulated sugar - 1 1/2 cups heavy cream, divided - 1 teaspoon vanilla extract - A pinch of salt - Cocoa powder for dusting Using the right measurements is key for this mousse. If you need a bit of change, here are some tips: - Dark chocolate: You can swap it with semi-sweet chocolate if you prefer a milder taste. - Milk chocolate: Try using a milk chocolate with a higher cocoa percentage for a richer flavor. - White chocolate: If you want dairy-free, look for dairy-free white chocolate options. - Heavy cream: Coconut cream can be a great substitute for a non-dairy option. These swaps will still give you a great mousse cake! High-quality chocolate can take your mousse to the next level. Here’s why: - Flavor: Good chocolate has a richer taste. It enhances the overall flavor of the cake. - Texture: Quality chocolate melts smoother. This gives your mousse a creamy feel. - Ingredients: High-quality chocolate has fewer additives. You get pure cocoa flavor without unwanted fillers. When you use better chocolate, your mousse cake will impress everyone who tries it. For the best results, check out the [Full Recipe] for detailed steps and tips. Step 1: Melting the Chocolates Start by chopping the dark and milk chocolates. Place them in a heatproof bowl with the unsalted butter. Set this bowl over a pot of simmering water, known as a double boiler. Stir until the mix melts smoothly. This step is key for rich flavors. Let the melted chocolate cool slightly. Step 2: Creating Dark Chocolate Mousse In a different bowl, whisk the egg yolks with granulated sugar. Keep whisking until the mix gets thick and light in color. Next, stir in the cooled dark chocolate mixture. Add half a cup of heavy cream and mix well. Now, gently fold in whipped cream until you see no streaks. Set this aside. Step 3: Milk Chocolate Mousse Process Repeat the same process for the milk chocolate. Melt it in the double boiler. Combine it with egg yolks and sugar, just like before. After mixing, add another half cup of heavy cream. Fold this milk chocolate mix into the dark chocolate mousse gently. Step 4: Making White Chocolate Mousse For the last mousse, melt the white chocolate in the same way. Once melted, whisk it with egg yolks and sugar. Add heavy cream again, mixing well. Fold this final mousse into the dark and milk chocolate blend. You’ll have a rich, three-layered mousse now. Step 5: Whipping the Cream In a chilled bowl, take the last half cup of heavy cream. Whip until you form soft peaks. This will give your mousse a light texture. Carefully fold this whipped cream into the chocolate mixture. Make sure it’s fully mixed but still fluffy. Step 6: Assembling the Cake Now you can assemble your cake. Use a prepared cake pan or jars. Start with a layer of dark chocolate mousse at the bottom. Then add a layer of milk chocolate mousse. Finally, top it with white chocolate mousse. Smooth the tops with a spatula for an even look. Step 7: Chilling the Mousse Place your assembled cake in the fridge. Chill it for at least 4 hours, or overnight if you can wait. This step helps the mousse set properly, making it easy to slice. Step 8: Serving Suggestions When ready to serve, take it out of the fridge. Carefully remove the cake from the pan. Dust the top with cocoa powder for a beautiful finish. Each slice can be garnished with fresh berries or a dollop of whipped cream for an elegant touch. For the Full Recipe, check out the complete ingredients and steps. When making a triple chocolate mousse cake, avoid these common mistakes: - Overheating the chocolate: Melt chocolate on low heat. High heat can burn it. - Not whipping the cream enough: Soft peaks are key. If you whip too little, the mousse will be thin. - Folding too hard: Use a gentle folding motion. This keeps air in and helps the mousse stay light. To get the perfect mousse texture, follow these tips: - Use cold bowls: Chill your mixing bowls and beaters. Cold helps the cream whip faster. - Separate eggs carefully: Make sure no yolk gets in the whites. Even a pinch can stop them from whipping. - Add flavors: A splash of vanilla extract can boost the chocolate taste. For even layers in your mousse cake, do this: - Use a piping bag: Fill a piping bag with mousse. This helps you control the amount in each layer. - Level the layers: After adding each layer, gently shake the pan. This helps settle the mousse evenly. - Chill between layers: If you want distinct layers, chill each layer for about 30 minutes before adding the next. Remember to check out the Full Recipe for all the details on making your cake. Enjoy your baking adventure! {{image_2}} You can easily customize the flavor of your triple chocolate mousse cake. Here are some ideas: - Coffee: Add a splash of brewed espresso to the dark chocolate layer for a rich depth. - Mint: Mix in a few drops of peppermint extract for a refreshing twist. - Orange: Add some orange zest to the white chocolate mousse for a citrus kick. - Spices: A pinch of cinnamon or cayenne can elevate the flavor profile. These additions can create new dimensions in the cake, making it truly yours. You can adapt this recipe for different dietary needs. Here’s how: - Gluten-Free: The cake is naturally gluten-free as it does not use flour. Just double-check all chocolate labels. - Dairy-Free: Use dairy-free chocolate and coconut cream instead of heavy cream. This keeps the mousse light and fluffy. These swaps ensure that everyone can enjoy this dessert without worry. The way you present your cake adds to its charm. Here are some fun ideas: - Fresh Berries: Top each slice with raspberries or strawberries for a pop of color. - Whipped Cream: A dollop of whipped cream enhances the rich chocolate. - Chocolate Shavings: Use a vegetable peeler to create shavings from extra chocolate. - Nuts: Toasted hazelnuts or almonds can add a nice crunch. These garnishes not only look great but also enhance the flavors of your mousse cake. For the full recipe, visit the link provided. To keep your Triple Chocolate Mousse Cake fresh, store it in the fridge. Use an airtight container to prevent it from absorbing other smells. If you made the cake in jars, simply cover them with lids. This cake tastes best chilled, so keep it cool until you’re ready to serve. You can freeze leftovers if needed. Cut the cake into slices for easy servings. Wrap each slice tightly in plastic wrap. Then place them in a freezer bag. This helps to keep the flavors intact. When you’re ready to eat, let the slices thaw in the fridge overnight. The mousse can last for about 3 to 4 days in the fridge. After that, the texture may change. If you freeze it, the mousse can last up to 2 months. However, it’s best to enjoy this sweet treat fresh for the best taste and texture. Yes, you can use different chocolates. You can mix dark, milk, and white chocolates. Each type brings a unique taste and texture. If you want a sweeter mousse, use more milk chocolate. For a richer flavor, add more dark chocolate. You can also try flavored chocolates, like hazelnut or orange, for a twist. Just remember, the balance of flavors is key. The mousse is set when it is firm to the touch. After chilling, gently press the top with your finger. If it holds its shape, it’s ready. You can also check by tilting the pan. If the mousse does not move, it is set. Chill for at least four hours, or overnight for best results. This time allows the layers to meld and create a smooth texture. You can serve many things with this cake. Fresh berries, like strawberries or raspberries, add a nice tartness. A dollop of whipped cream enhances the creaminess. Mint leaves can add a pop of color and flavor. You could also pair it with a scoop of vanilla ice cream for extra richness. Each option adds a fun twist to your dessert experience. For the full recipe, check out the details above. In this article, we explored the process of making a triple chocolate mousse cake. We discussed the ingredients, measurements, and the benefits of using high-quality chocolate. The step-by-step guide included melting chocolates and creating three types of mousse. We also shared tips to avoid common mistakes and ways to enhance your cake's presentation. Remember, the right storage keeps your mousse fresh. With this knowledge, you can create a delicious treat that impresses all. Enjoy your mousse cake journey!](https://mycookingcast.com/wp-content/uploads/2025/05/06e5c968-a0f6-426f-b854-b6e429d860e0-768x768.webp)
If you love chocolate, this Triple Chocolate Mousse Cake will make your heart sing. Imagine smooth layers of dark, milk, and white chocolate, all coming together for the ultimate dessert experience. In this post, I’ll share simple steps and tips to create this rich and indulgent treat. Whether you’re a novice baker or a pro, you’ll find helpful insights to impress anyone. Let’s dive into the world of chocolate bliss!
Ingredients
List of Ingredients
– 6 oz dark chocolate (70% cocoa), chopped
– 4 oz milk chocolate, chopped
– 4 oz white chocolate, chopped
– 3 tablespoons unsalted butter
– 4 large eggs, separated
– 1/4 cup granulated sugar
– 1 1/2 cups heavy cream, divided
– 1 teaspoon vanilla extract
– A pinch of salt
– Cocoa powder for dusting
Measurements and Substitutions
Using the right measurements is key for this mousse. If you need a bit of change, here are some tips:
– Dark chocolate: You can swap it with semi-sweet chocolate if you prefer a milder taste.
– Milk chocolate: Try using a milk chocolate with a higher cocoa percentage for a richer flavor.
– White chocolate: If you want dairy-free, look for dairy-free white chocolate options.
– Heavy cream: Coconut cream can be a great substitute for a non-dairy option.
These swaps will still give you a great mousse cake!
Benefits of Using High-Quality Chocolate
High-quality chocolate can take your mousse to the next level. Here’s why:
– Flavor: Good chocolate has a richer taste. It enhances the overall flavor of the cake.
– Texture: Quality chocolate melts smoother. This gives your mousse a creamy feel.
– Ingredients: High-quality chocolate has fewer additives. You get pure cocoa flavor without unwanted fillers.
When you use better chocolate, your mousse cake will impress everyone who tries it.
Step-by-Step Instructions
Detailed Preparation Steps
Step 1: Melting the Chocolates
Start by chopping the dark and milk chocolates. Place them in a heatproof bowl with the unsalted butter. Set this bowl over a pot of simmering water, known as a double boiler. Stir until the mix melts smoothly. This step is key for rich flavors. Let the melted chocolate cool slightly.
Step 2: Creating Dark Chocolate Mousse
In a different bowl, whisk the egg yolks with granulated sugar. Keep whisking until the mix gets thick and light in color. Next, stir in the cooled dark chocolate mixture. Add half a cup of heavy cream and mix well. Now, gently fold in whipped cream until you see no streaks. Set this aside.
Step 3: Milk Chocolate Mousse Process
Repeat the same process for the milk chocolate. Melt it in the double boiler. Combine it with egg yolks and sugar, just like before. After mixing, add another half cup of heavy cream. Fold this milk chocolate mix into the dark chocolate mousse gently.
Step 4: Making White Chocolate Mousse
For the last mousse, melt the white chocolate in the same way. Once melted, whisk it with egg yolks and sugar. Add heavy cream again, mixing well. Fold this final mousse into the dark and milk chocolate blend. You’ll have a rich, three-layered mousse now.
Step 5: Whipping the Cream
In a chilled bowl, take the last half cup of heavy cream. Whip until you form soft peaks. This will give your mousse a light texture. Carefully fold this whipped cream into the chocolate mixture. Make sure it’s fully mixed but still fluffy.
Step 6: Assembling the Cake
Now you can assemble your cake. Use a prepared cake pan or jars. Start with a layer of dark chocolate mousse at the bottom. Then add a layer of milk chocolate mousse. Finally, top it with white chocolate mousse. Smooth the tops with a spatula for an even look.
Step 7: Chilling the Mousse
Place your assembled cake in the fridge. Chill it for at least 4 hours, or overnight if you can wait. This step helps the mousse set properly, making it easy to slice.
Step 8: Serving Suggestions
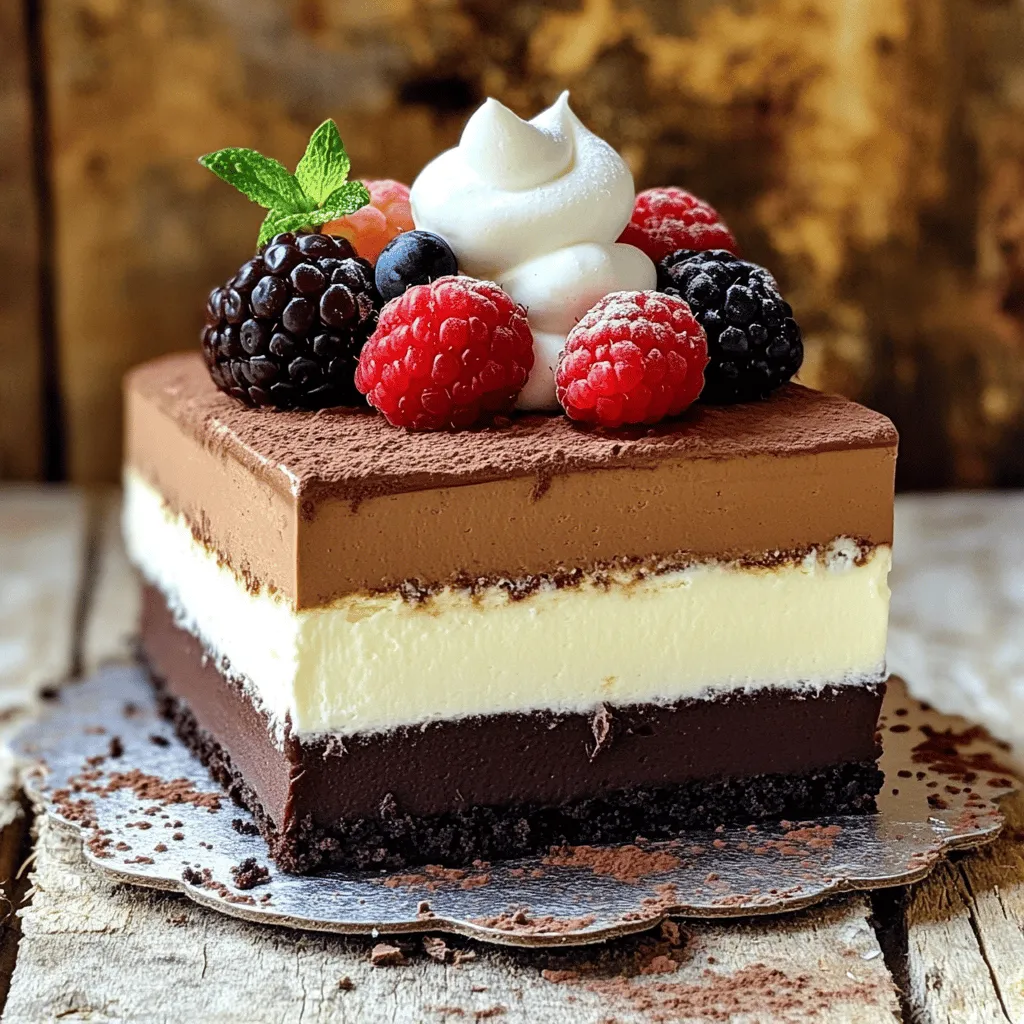
When ready to serve, take it out of the fridge. Carefully remove the cake from the pan. Dust the top with cocoa powder for a beautiful finish. Each slice can be garnished with fresh berries or a dollop of whipped cream for an elegant touch.
Tips & Tricks
Common Mistakes to Avoid
When making a triple chocolate mousse cake, avoid these common mistakes:
– Overheating the chocolate: Melt chocolate on low heat. High heat can burn it.
– Not whipping the cream enough: Soft peaks are key. If you whip too little, the mousse will be thin.
– Folding too hard: Use a gentle folding motion. This keeps air in and helps the mousse stay light.
Expert Tips for Perfect Mousse Texture
To get the perfect mousse texture, follow these tips:
– Use cold bowls: Chill your mixing bowls and beaters. Cold helps the cream whip faster.
– Separate eggs carefully: Make sure no yolk gets in the whites. Even a pinch can stop them from whipping.
– Add flavors: A splash of vanilla extract can boost the chocolate taste.
How to Achieve Even Layers
For even layers in your mousse cake, do this:
– Use a piping bag: Fill a piping bag with mousse. This helps you control the amount in each layer.
– Level the layers: After adding each layer, gently shake the pan. This helps settle the mousse evenly.
– Chill between layers: If you want distinct layers, chill each layer for about 30 minutes before adding the next.Enjoy your baking adventure!
Variations
Flavor Additions and Alternates
You can easily customize the flavor of your triple chocolate mousse cake. Here are some ideas:
– Coffee: Add a splash of brewed espresso to the dark chocolate layer for a rich depth.
– Mint: Mix in a few drops of peppermint extract for a refreshing twist.
– Orange: Add some orange zest to the white chocolate mousse for a citrus kick.
– Spices: A pinch of cinnamon or cayenne can elevate the flavor profile.
These additions can create new dimensions in the cake, making it truly yours.
Dietary Adaptations (Gluten-Free, Dairy-Free)
You can adapt this recipe for different dietary needs. Here’s how:
– Gluten-Free: The cake is naturally gluten-free as it does not use flour. Just double-check all chocolate labels.
– Dairy-Free: Use dairy-free chocolate and coconut cream instead of heavy cream. This keeps the mousse light and fluffy.
These swaps ensure that everyone can enjoy this dessert without worry.
Decorative Presentations (Garnishing Ideas)
The way you present your cake adds to its charm. Here are some fun ideas:
– Fresh Berries: Top each slice with raspberries or strawberries for a pop of color.
– Whipped Cream: A dollop of whipped cream enhances the rich chocolate.
– Chocolate Shavings: Use a vegetable peeler to create shavings from extra chocolate.
– Nuts: Toasted hazelnuts or almonds can add a nice crunch.
These garnishes not only look great but also enhance the flavors of your mousse cake.
Storage Info
How to Properly Store Triple Chocolate Mousse Cake
To keep your Triple Chocolate Mousse Cake fresh, store it in the fridge. Use an airtight container to prevent it from absorbing other smells. If you made the cake in jars, simply cover them with lids. This cake tastes best chilled, so keep it cool until you’re ready to serve.
Freezing Tips for Leftovers
You can freeze leftovers if needed. Cut the cake into slices for easy servings. Wrap each slice tightly in plastic wrap. Then place them in a freezer bag. This helps to keep the flavors intact. When you’re ready to eat, let the slices thaw in the fridge overnight.
How Long Will the Mousse Last?
The mousse can last for about 3 to 4 days in the fridge. After that, the texture may change. If you freeze it, the mousse can last up to 2 months. However, it’s best to enjoy this sweet treat fresh for the best taste and texture.
FAQs
Can I Use Different Types of Chocolate?
Yes, you can use different chocolates. You can mix dark, milk, and white chocolates. Each type brings a unique taste and texture. If you want a sweeter mousse, use more milk chocolate. For a richer flavor, add more dark chocolate. You can also try flavored chocolates, like hazelnut or orange, for a twist. Just remember, the balance of flavors is key.
How Do I Know When the Mousse is Set?
The mousse is set when it is firm to the touch. After chilling, gently press the top with your finger. If it holds its shape, it’s ready. You can also check by tilting the pan. If the mousse does not move, it is set. Chill for at least four hours, or overnight for best results. This time allows the layers to meld and create a smooth texture.
What Can I Serve with Triple Chocolate Mousse Cake?
You can serve many things with this cake. Fresh berries, like strawberries or raspberries, add a nice tartness. A dollop of whipped cream enhances the creaminess. Mint leaves can add a pop of color and flavor. You could also pair it with a scoop of vanilla ice cream for extra richness. Each option adds a fun twist to your dessert experience.
In this article, we explored the process of making a triple chocolate mousse cake. We discussed the ingredients, measurements, and the benefits of using high-quality chocolate. The step-by-step guide included melting chocolates and creating three types of mousse. We also shared tips to avoid common mistakes and ways to enhance your cake’s presentation. Remember, the right storage keeps your mousse fresh. With this knowledge, you can create a delicious treat that impresses all. Enjoy your mousse cake journey!
![- 6 oz dark chocolate (70% cocoa), chopped - 4 oz milk chocolate, chopped - 4 oz white chocolate, chopped - 3 tablespoons unsalted butter - 4 large eggs, separated - 1/4 cup granulated sugar - 1 1/2 cups heavy cream, divided - 1 teaspoon vanilla extract - A pinch of salt - Cocoa powder for dusting Using the right measurements is key for this mousse. If you need a bit of change, here are some tips: - Dark chocolate: You can swap it with semi-sweet chocolate if you prefer a milder taste. - Milk chocolate: Try using a milk chocolate with a higher cocoa percentage for a richer flavor. - White chocolate: If you want dairy-free, look for dairy-free white chocolate options. - Heavy cream: Coconut cream can be a great substitute for a non-dairy option. These swaps will still give you a great mousse cake! High-quality chocolate can take your mousse to the next level. Here’s why: - Flavor: Good chocolate has a richer taste. It enhances the overall flavor of the cake. - Texture: Quality chocolate melts smoother. This gives your mousse a creamy feel. - Ingredients: High-quality chocolate has fewer additives. You get pure cocoa flavor without unwanted fillers. When you use better chocolate, your mousse cake will impress everyone who tries it. For the best results, check out the [Full Recipe] for detailed steps and tips. Step 1: Melting the Chocolates Start by chopping the dark and milk chocolates. Place them in a heatproof bowl with the unsalted butter. Set this bowl over a pot of simmering water, known as a double boiler. Stir until the mix melts smoothly. This step is key for rich flavors. Let the melted chocolate cool slightly. Step 2: Creating Dark Chocolate Mousse In a different bowl, whisk the egg yolks with granulated sugar. Keep whisking until the mix gets thick and light in color. Next, stir in the cooled dark chocolate mixture. Add half a cup of heavy cream and mix well. Now, gently fold in whipped cream until you see no streaks. Set this aside. Step 3: Milk Chocolate Mousse Process Repeat the same process for the milk chocolate. Melt it in the double boiler. Combine it with egg yolks and sugar, just like before. After mixing, add another half cup of heavy cream. Fold this milk chocolate mix into the dark chocolate mousse gently. Step 4: Making White Chocolate Mousse For the last mousse, melt the white chocolate in the same way. Once melted, whisk it with egg yolks and sugar. Add heavy cream again, mixing well. Fold this final mousse into the dark and milk chocolate blend. You’ll have a rich, three-layered mousse now. Step 5: Whipping the Cream In a chilled bowl, take the last half cup of heavy cream. Whip until you form soft peaks. This will give your mousse a light texture. Carefully fold this whipped cream into the chocolate mixture. Make sure it’s fully mixed but still fluffy. Step 6: Assembling the Cake Now you can assemble your cake. Use a prepared cake pan or jars. Start with a layer of dark chocolate mousse at the bottom. Then add a layer of milk chocolate mousse. Finally, top it with white chocolate mousse. Smooth the tops with a spatula for an even look. Step 7: Chilling the Mousse Place your assembled cake in the fridge. Chill it for at least 4 hours, or overnight if you can wait. This step helps the mousse set properly, making it easy to slice. Step 8: Serving Suggestions When ready to serve, take it out of the fridge. Carefully remove the cake from the pan. Dust the top with cocoa powder for a beautiful finish. Each slice can be garnished with fresh berries or a dollop of whipped cream for an elegant touch. For the Full Recipe, check out the complete ingredients and steps. When making a triple chocolate mousse cake, avoid these common mistakes: - Overheating the chocolate: Melt chocolate on low heat. High heat can burn it. - Not whipping the cream enough: Soft peaks are key. If you whip too little, the mousse will be thin. - Folding too hard: Use a gentle folding motion. This keeps air in and helps the mousse stay light. To get the perfect mousse texture, follow these tips: - Use cold bowls: Chill your mixing bowls and beaters. Cold helps the cream whip faster. - Separate eggs carefully: Make sure no yolk gets in the whites. Even a pinch can stop them from whipping. - Add flavors: A splash of vanilla extract can boost the chocolate taste. For even layers in your mousse cake, do this: - Use a piping bag: Fill a piping bag with mousse. This helps you control the amount in each layer. - Level the layers: After adding each layer, gently shake the pan. This helps settle the mousse evenly. - Chill between layers: If you want distinct layers, chill each layer for about 30 minutes before adding the next. Remember to check out the Full Recipe for all the details on making your cake. Enjoy your baking adventure! {{image_2}} You can easily customize the flavor of your triple chocolate mousse cake. Here are some ideas: - Coffee: Add a splash of brewed espresso to the dark chocolate layer for a rich depth. - Mint: Mix in a few drops of peppermint extract for a refreshing twist. - Orange: Add some orange zest to the white chocolate mousse for a citrus kick. - Spices: A pinch of cinnamon or cayenne can elevate the flavor profile. These additions can create new dimensions in the cake, making it truly yours. You can adapt this recipe for different dietary needs. Here’s how: - Gluten-Free: The cake is naturally gluten-free as it does not use flour. Just double-check all chocolate labels. - Dairy-Free: Use dairy-free chocolate and coconut cream instead of heavy cream. This keeps the mousse light and fluffy. These swaps ensure that everyone can enjoy this dessert without worry. The way you present your cake adds to its charm. Here are some fun ideas: - Fresh Berries: Top each slice with raspberries or strawberries for a pop of color. - Whipped Cream: A dollop of whipped cream enhances the rich chocolate. - Chocolate Shavings: Use a vegetable peeler to create shavings from extra chocolate. - Nuts: Toasted hazelnuts or almonds can add a nice crunch. These garnishes not only look great but also enhance the flavors of your mousse cake. For the full recipe, visit the link provided. To keep your Triple Chocolate Mousse Cake fresh, store it in the fridge. Use an airtight container to prevent it from absorbing other smells. If you made the cake in jars, simply cover them with lids. This cake tastes best chilled, so keep it cool until you’re ready to serve. You can freeze leftovers if needed. Cut the cake into slices for easy servings. Wrap each slice tightly in plastic wrap. Then place them in a freezer bag. This helps to keep the flavors intact. When you’re ready to eat, let the slices thaw in the fridge overnight. The mousse can last for about 3 to 4 days in the fridge. After that, the texture may change. If you freeze it, the mousse can last up to 2 months. However, it’s best to enjoy this sweet treat fresh for the best taste and texture. Yes, you can use different chocolates. You can mix dark, milk, and white chocolates. Each type brings a unique taste and texture. If you want a sweeter mousse, use more milk chocolate. For a richer flavor, add more dark chocolate. You can also try flavored chocolates, like hazelnut or orange, for a twist. Just remember, the balance of flavors is key. The mousse is set when it is firm to the touch. After chilling, gently press the top with your finger. If it holds its shape, it’s ready. You can also check by tilting the pan. If the mousse does not move, it is set. Chill for at least four hours, or overnight for best results. This time allows the layers to meld and create a smooth texture. You can serve many things with this cake. Fresh berries, like strawberries or raspberries, add a nice tartness. A dollop of whipped cream enhances the creaminess. Mint leaves can add a pop of color and flavor. You could also pair it with a scoop of vanilla ice cream for extra richness. Each option adds a fun twist to your dessert experience. For the full recipe, check out the details above. In this article, we explored the process of making a triple chocolate mousse cake. We discussed the ingredients, measurements, and the benefits of using high-quality chocolate. The step-by-step guide included melting chocolates and creating three types of mousse. We also shared tips to avoid common mistakes and ways to enhance your cake's presentation. Remember, the right storage keeps your mousse fresh. With this knowledge, you can create a delicious treat that impresses all. Enjoy your mousse cake journey!](https://mycookingcast.com/wp-content/uploads/2025/05/06e5c968-a0f6-426f-b854-b6e429d860e0-250x250.webp)
