
Are you craving a sweet treat but short on time? You’ll love these No-Bake Chocolate Coconut Bars! They are quick to make and require no oven, perfect for any busy day. With simple ingredients and easy steps, you can whip up a delicious snack that satisfies your sweet tooth. Let’s dive into this tasty recipe and learn how to create your own no-bake bars now!
Ingredients
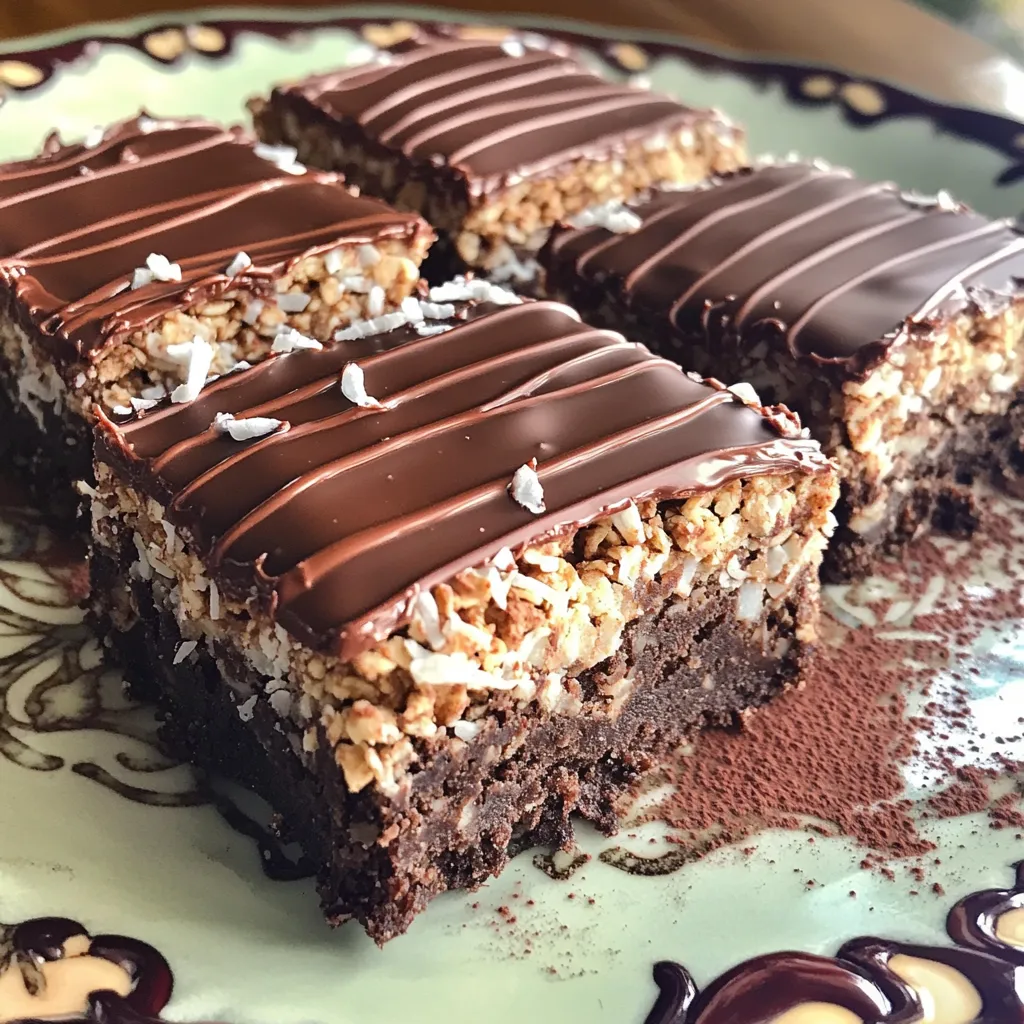
Full ingredients list
To make these no-bake chocolate coconut bars, gather these items:
– 1 cup rolled oats
– 1 cup unsweetened shredded coconut
– 1/2 cup almond butter (or peanut butter)
– 1/2 cup honey or maple syrup
– 1/4 cup cocoa powder
– 1/2 teaspoon vanilla extract
– Pinch of salt
– 1/4 cup dark chocolate chips (optional for topping)
These ingredients come together to create a tasty treat. Each plays a key role in flavor and texture.
Substitutions for key ingredients
You can switch some ingredients if you need to. Here are a few ideas:
– Use peanut butter instead of almond butter if you prefer.
– Maple syrup can replace honey for a vegan option.
– Any nut butter will work in place of almond butter.
– If you don’t have cocoa powder, try using carob powder for a different taste.
These swaps keep the bars delicious while fitting your needs.
Suggested toppings and enhancements
Adding toppings can make your bars even better. Here are some fun ideas:
– Drizzle with extra melted dark chocolate for richness.
– Sprinkle more shredded coconut on top for added texture.
– Add chopped nuts for a crunchy bite.
– Try sea salt flakes to balance the sweetness.
These enhancements can elevate your no-bake chocolate coconut bars to a new level!
Step-by-Step Instructions
Preparation of dry ingredients
Start by gathering your dry ingredients. You need rolled oats, shredded coconut, cocoa powder, and a pinch of salt. In a large mixing bowl, combine these ingredients well. Mixing them evenly helps the flavors blend nicely. Make sure there are no clumps. This simple step lays the foundation for your bars.
Mixing wet ingredients
Next, take a smaller bowl. Add almond butter or peanut butter along with honey or maple syrup. Stir until smooth and well mixed. The goal is to create a creamy texture. Then, add vanilla extract to this mixture. This little step adds a nice flavor boost to your bars.
Combining mixtures and setting in dish
Now, it’s time to combine the wet and dry mixtures. Pour the wet mix into the bowl with the dry mix. Use a spatula or your hands to mix everything together. You want a sticky and cohesive dough. Once mixed, prepare an 8×8 inch baking dish. Line it with parchment paper, leaving some paper hanging over the sides. This will help you lift out the bars later. Press the mixture firmly into the dish. Use your hands or a flat object to pack it down evenly.
Topping with chocolate
If you want a chocolate topping, melt dark chocolate chips in a microwave-safe bowl. Heat them in 30-second bursts, stirring in between. Once melted, drizzle the chocolate over the pressed mixture. Spread it evenly with a spatula for a smooth finish. This adds a delicious layer to your bars. After that, refrigerate for at least one hour. This helps the bars set, making them easier to cut later.
Tips & Tricks
Tips for achieving the best texture
To get the best texture in your no-bake chocolate coconut bars, follow these tips:
– Use fresh ingredients: Fresh oats and coconut make a big difference.
– Mix well: Ensure the dry and wet ingredients blend evenly. This helps with stickiness.
– Press firmly: Pack the mixture tightly in the dish. This keeps your bars from crumbling.
– Chill properly: Let the bars set in the fridge for at least an hour. This helps them firm up.
How to store and serve the bars
Storing your no-bake chocolate coconut bars is simple:
– Use airtight containers: Keep them in an airtight container to stay fresh.
– Refrigerate: Bars stay best in the fridge. They will last up to a week.
– Serve chilled: Enjoy them cold for a refreshing treat. You can also serve them at room temperature.
Common mistakes to avoid when making the bars
Avoid these common mistakes for perfect bars:
– Skipping the salt: A pinch of salt boosts flavor. Don’t skip it!
– Not packing down: Failing to pack the mixture can lead to crumbly bars.
– Overmixing: Mix just enough to combine everything. Overmixing can make the texture off.
– Not using parchment paper: Always line your dish with parchment for easy removal.
Variations
Adding nuts or seeds for extra crunch
You can easily add nuts or seeds to your bars. Choose almonds, walnuts, or sunflower seeds. Just chop them into small pieces. Mix them into the dry ingredients before adding the wet ones. This will give your bars a nice crunch. Plus, they add extra flavor and nutrition.
Flavor variations (e.g., mint or orange)
Want to change the flavor? Add a few drops of mint or orange extract. This gives your bars a fresh twist. You can also mix in some orange zest for a more intense taste. Just remember to adjust the wet ingredients a bit if you add more liquid flavorings.
Keto or vegan adaptations
For a keto version, swap honey for a sugar-free sweetener like erythritol. Use almond butter or sunflower seed butter as your base. To make these bars vegan, simply replace honey with maple syrup or agave nectar. Both options work well without changing the taste. Enjoy these tasty bars while sticking to your dietary goals!
Storage Info
Best practices for storing bars
To keep your No-Bake Chocolate Coconut Bars fresh, store them in an airtight container. This way, they stay moist and tasty. Place a piece of parchment paper between layers if you stack them. This trick helps prevent sticking. Make sure to seal the container tightly to keep out air and moisture.
Shelf life at room temperature vs. refrigeration
These bars can last up to a week at room temperature. However, I recommend refrigerating them for the best taste and texture. In the fridge, they can last up to two weeks. The cool storage keeps them firm and prevents melting. If you live in a hot area, always store them in the fridge.
Freezing instructions for long-term storage
For longer storage, you can freeze the bars. Wrap each bar tightly in plastic wrap. Place the wrapped bars in a freezer-safe bag or container. They can last up to three months in the freezer. When you want to eat one, just take it out and let it thaw at room temperature for about 30 minutes. Enjoy a sweet treat anytime!
FAQs
Can I use other nut butters?
Yes, you can. Almond butter is my favorite, but peanut butter works too. You can also try cashew or sunflower seed butter. Each nut butter adds a unique taste and texture. Just make sure it is creamy. This helps the bars stick together well.
How do I make these bars vegan?
To make the bars vegan, use maple syrup instead of honey. Also, choose a plant-based nut butter. Almond butter and peanut butter are great choices. Finally, check that your chocolate chips are dairy-free. This makes the bars completely vegan and delicious.
Can I add protein powder to the recipe?
Absolutely! Adding protein powder boosts the nutrition. You can mix in about a quarter cup of your favorite protein powder. This can make the bars more filling and great for snacks. Just remember to adjust the other ingredients if needed.
What can I use instead of honey or maple syrup?
If you want an alternative, try agave syrup or brown rice syrup. Both work well and add sweetness. You can even use date syrup for a richer flavor. Just make sure the texture stays sticky enough to hold the bars together.
This blog covered everything you need to know about making delicious bars. We explored the full ingredients list and highlighted some great substitutes. I shared step-by-step instructions to simplify the process and offered tips for achieving the best texture. Variations let you customize your bars, while storage info ensures they stay fresh.
Remember, making these bars is easy and fun. You can experiment with flavors and toppings. Enjoy your homemade treat, and share with friends!

