Looking for a sweet treat that’s quick and easy? You’ll love these No Bake Chocolate Coconut Almond Bars. With just a few simple ingredients, you can whip up a delicious snack in no time. These bars are chewy, chocolatey, and packed with flavor. Plus, they’re healthy enough for guilt-free munching. Stick around to learn how to make this satisfying treat that will delight your taste buds!
Ingredients
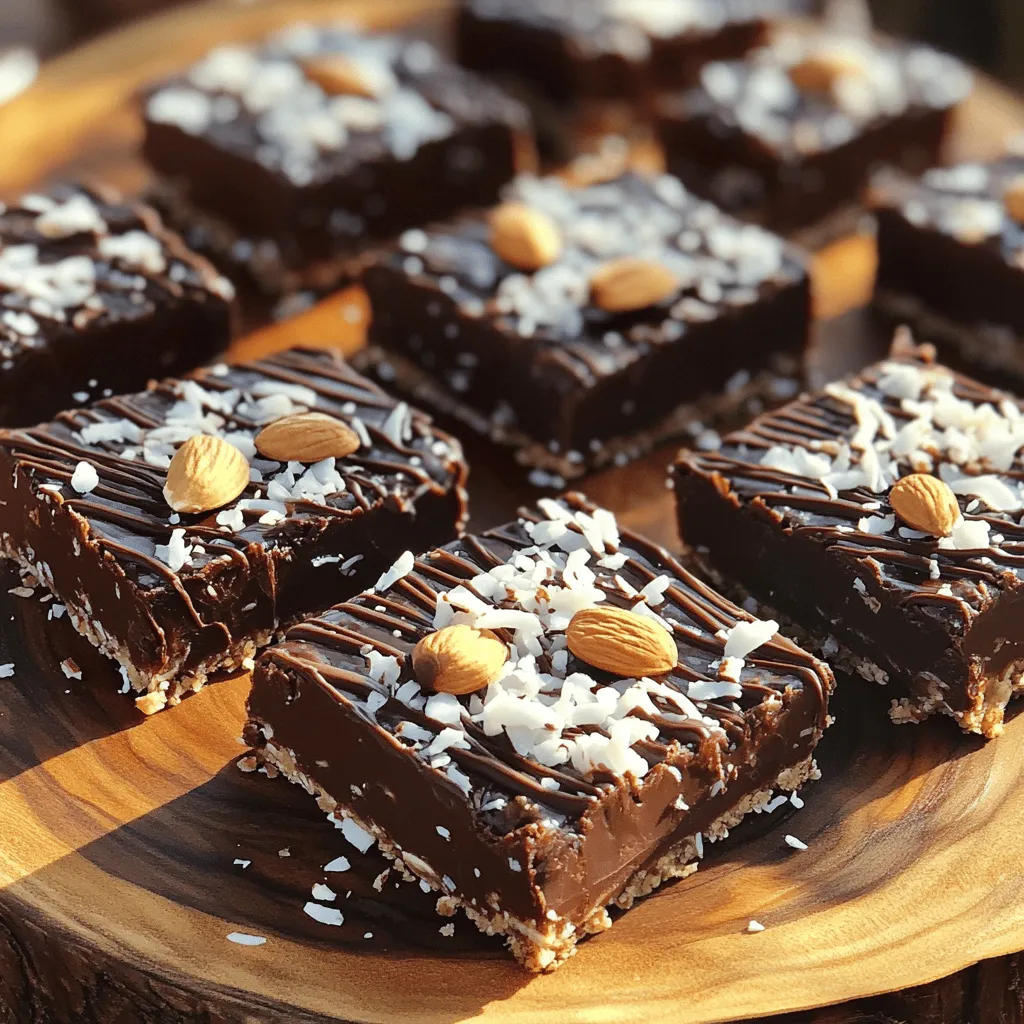
List of Required Ingredients
– 1 cup rolled oats
– 1 cup almond flour
– 1/2 cup unsweetened shredded coconut
– 1/2 cup almond butter
– 1/3 cup pure maple syrup or honey
– 1/4 cup cocoa powder
– 1 teaspoon vanilla extract
– 1/4 teaspoon sea salt
– 1/4 cup dark chocolate chips for topping
– Extra shredded coconut for garnish
To make these bars, gather all your ingredients. Each one plays a part in the flavor and texture. The rolled oats give a hearty base. Almond flour adds a nutty taste and helps bind everything. The unsweetened shredded coconut brings a touch of sweetness without being too much. Almond butter is a must for creaminess. You can use any nut butter if you prefer. Pure maple syrup or honey sweetens the bars and keeps them moist.
Cocoa powder packs a rich chocolate flavor while the vanilla extract adds depth. Sea salt highlights the sweetness and makes all the flavors pop. The dark chocolate chips on top provide a lovely finish. Finally, extra shredded coconut makes for a pretty garnish.
Optional Add-ins for Flavor
– Nuts (e.g., walnuts or pecans)
– Seeds (e.g., chia or sunflower seeds)
If you want to mix things up, consider adding nuts or seeds. Walnuts or pecans will add crunch. Chia or sunflower seeds offer a boost of nutrition. These add-ins can enhance the flavor and texture of your bars. Feel free to experiment based on what you like!
Step-by-Step Instructions
Preparation Steps
– In a large bowl, combine 1 cup rolled oats, 1 cup almond flour, 1/2 cup shredded coconut, 1/4 cup cocoa powder, and 1/4 teaspoon sea salt. Mix these dry ingredients well. This step is key for even flavor.
– In another bowl, whisk together 1/2 cup almond butter, 1/3 cup maple syrup (or honey), and 1 teaspoon vanilla extract. Make this mixture smooth and creamy.
– Pour the wet mixture into the dry ingredients. Stir with a spatula or your hands until fully mixed. The mixture should feel moist and sticky.
Pressing and Melting
– Line an 8×8 inch baking dish with parchment paper. Leave some paper hanging over the edges for easy removal.
– Press the mixture into the dish firmly. Use the back of a spatula or your hands to make it compact and level. This helps the bars hold together.
– To melt the chocolate, place 1/4 cup dark chocolate chips in a small bowl. Heat in the microwave in 20-second intervals. Stir in between until it’s smooth and melted.
Final Touches
– Pour the melted chocolate over the pressed mixture in the baking dish. Spread it evenly using a spatula.
– Sprinkle some extra shredded coconut on top for garnish. This adds a nice touch to the look.
– Refrigerate the bars for 1 to 2 hours until they are firm.
– Once set, lift the bars out using the parchment paper. Cut them into squares or rectangles. Enjoy your tasty treat!
Tips & Tricks
Best Practices for Texture
To make sure your No Bake Chocolate Coconut Almond Bars are just right, focus on two key steps.
– Ensuring the mixture is moist and sticky: When mixing, combine the dry and wet ingredients well. The almond butter and syrup should coat the oats and flour. If the mixture feels dry, add a bit more almond butter or syrup. This helps bind everything together.
– Properly pressing the mixture into the dish: Line your baking dish with parchment paper. Press the mixture firmly and evenly into the dish. Use your hands or a spatula to pack it down. A compact layer helps the bars hold their shape when cut.
How to Store the Bars
Storing your bars correctly keeps them fresh and tasty.
– Recommended storage methods: Place the bars in an airtight container. If you stack them, use parchment paper between layers to prevent sticking. This keeps them looking nice.
– Shelf life and freezing tips: In the fridge, the bars last about one week. For longer storage, freeze them. Wrap them tightly in plastic wrap, then place them in a freezer bag. They can last up to three months. When ready to eat, thaw them in the fridge overnight. This keeps the texture just right.
Variations
Flavor Variations
You can easily change the taste of these bars. Try using different nut butters. Peanut butter gives a rich flavor, while cashew butter adds creaminess. You can also mix in extra flavors. A dash of cinnamon can warm up the taste. Espresso powder brings a nice coffee twist.
Dietary Modifications
You can adapt these bars to fit various diets. For a vegan option, swap honey for maple syrup. This keeps it plant-based. If you need gluten-free bars, almond flour and oats work well. Make sure your oats are certified gluten-free to avoid cross-contamination. Enjoy these fun twists while still keeping them healthy!
Storage Info
Best Storage Practices
To keep your No Bake Chocolate Coconut Almond Bars fresh, I recommend using airtight containers. They help prevent moisture and keep the bars safe from odors. You can also use parchment paper. This allows for easy removal if you stack the bars in the container.
Temperature is key. If you store the bars in the fridge, they will stay firm and last longer. They can sit at room temperature for a short time, but I prefer the fridge. This keeps the chocolate from melting and the bars hold their shape better.
Freezing Instructions
Want to keep them for longer? Freezing is a great option! You can wrap each bar in plastic wrap and place them in a freezer-safe bag. This helps keep them fresh for up to three months.
When you’re ready to enjoy a bar, remove it from the freezer. Let it thaw at room temperature for about 15-20 minutes. This helps the texture stay nice and chewy. You can also pop it in the fridge for a slower thaw, which works well too. Enjoy your tasty treat!
FAQs
Can I use other sweeteners instead of maple syrup?
Yes, you can use honey or agave syrup as sweeteners. Both options work well. They add sweetness and help bind the bars together. Just remember, honey is not vegan, but agave is. If you prefer a lower-glycemic option, try using coconut sugar.
How long do the bars last in the fridge?
These bars can last up to a week in the fridge. Store them in an airtight container to keep them fresh. If you want to enjoy them longer, you can freeze them. They freeze well for up to three months.
Can I skip the chocolate topping?
You can skip the chocolate topping if you prefer a lighter snack. The bars still taste great without it. If you want a different flavor, consider adding a layer of almond butter instead. It adds creaminess and pairs well with the other flavors.
Are these bars gluten-free?
Yes, these bars are gluten-free. The main ingredients, oats and almond flour, do not contain gluten. Just make sure to use certified gluten-free oats to avoid cross-contamination. This makes them a perfect snack for those with gluten sensitivity.
The recipe showcases simple ingredients to make tasty and healthy bars. You learned how to combine oats, nut butter, and chocolate for a delicious treat. I shared tips on storage, flavor variations, and dietary options. With these steps, you can easily create your own bars. Experiment with different add-ins, and enjoy your homemade snacks!