![For a great apple crisp, gather these main ingredients: - 6 medium apples (Granny Smith or Honeycrisp), peeled, cored, and sliced - 1 tablespoon lemon juice - 1 teaspoon ground cinnamon - 1/2 teaspoon nutmeg - 1 cup brown sugar, packed - 1 cup old-fashioned oats - 1/2 cup all-purpose flour - 1/2 cup unsalted butter, melted - 1/4 teaspoon salt - Ice cream or whipped cream (for serving, optional) When measuring your ingredients, be precise. Use a dry measuring cup for the oats and flour. Pack the brown sugar tightly for the best sweetness. I suggest using a kitchen scale for the butter. One stick of butter is usually 1/2 cup. This helps keep all flavors balanced. I love serving apple crisp warm. Top it with a scoop of ice cream or a dollop of whipped cream. A sprinkle of cinnamon on top adds a nice touch. For a twist, try adding caramel sauce. This makes a delightful contrast to the tart apples. Enjoy your sweet treat! Start by gathering your ingredients. You will need six medium apples. I like to use Granny Smith or Honeycrisp for their crispness. Peel, core, and slice the apples. This takes about 10 minutes. Next, toss the apple slices in a bowl with one tablespoon of lemon juice. The lemon juice keeps the apples fresh. Add one teaspoon of ground cinnamon and half a teaspoon of nutmeg. Mix well until the apples are coated. Then, take a greased 9x13 inch baking dish. Spread the apple mixture evenly in the dish. This helps with even cooking. In another bowl, mix one cup of brown sugar, one cup of old-fashioned oats, half a cup of all-purpose flour, and half a cup of melted butter. Add a pinch of salt (one-fourth teaspoon) to balance the sweetness. Stir until the mixture is crumbly. Preheat your oven to 350°F (175°C). Once it's ready, pour the oat mixture over the apples. Spread it evenly to cover all the fruit. This will create a nice layer on top. Bake the dish in the preheated oven for 40 to 45 minutes. You want the apples to be tender and the topping to be golden brown. After baking, remove the dish from the oven. Let it cool for 10 to 15 minutes. This cooling time helps the crisp set. You can serve it warm in individual bowls. For a special touch, add a scoop of ice cream or a dollop of whipped cream on top. Sprinkle extra cinnamon for a nice look. Enjoy your Classic Apple Crisp Delightful and Easy Dessert! For the complete recipe, refer to the [Full Recipe]. To make the best apple crisp, choose the right apples. I like to use Granny Smith or Honeycrisp apples. Granny Smith adds tartness, while Honeycrisp gives a sweet crunch. Mix different types for great flavor. Aim for six medium apples, peeled, cored, and sliced for your crisp. The topping is key to a great apple crisp. For the best texture, use old-fashioned oats and brown sugar. Combine them with flour and melted butter. This mix should feel crumbly. Spread it evenly over the apples. Bake until golden brown. A perfect topping is crunchy and sweet. Sometimes, your apple crisp might not turn out right. If your topping is too soggy, try using less butter. You can also bake it longer to dry it out. If your apples are too firm, slice them thinner next time. Remember to let it cool for a bit before serving. This helps set the topping and makes it easier to scoop. For the full recipe, check out the detailed steps and measurements. Enjoy making your classic apple crisp! {{image_2}} You can make a gluten-free apple crisp with a few easy swaps. Use gluten-free oats instead of regular oats. Replace all-purpose flour with almond flour or a gluten-free flour blend. The taste remains great, and everyone can enjoy it. To make a vegan apple crisp, use coconut oil or vegan butter in place of regular butter. For the topping, swap brown sugar with coconut sugar or maple syrup. This keeps the taste rich and sweet while being kind to our furry friends. Feel free to play with flavors in your apple crisp. Add chopped nuts like walnuts or pecans for crunch. You can mix in dried fruit such as raisins or cranberries for extra sweetness. Spices like ginger or cardamom can also bring a new twist. Personalize your dish to match your taste! For the complete recipe, check out the [Full Recipe]. To keep your apple crisp fresh, store it in an airtight container. Let it cool fully before sealing. Place the container in the fridge. It will stay good for about 3 to 5 days. If you want to store it longer, freezing is a great option. When you're ready to enjoy your apple crisp again, preheat your oven to 350°F (175°C). Place the crisp in a baking dish, cover it with foil, and heat it for about 15 to 20 minutes. This helps keep the topping crispy. You can also microwave individual servings for about 30 seconds or until warm. To freeze apple crisp, let it cool completely. Cut it into portions and wrap each piece in plastic wrap. Then, place the wrapped portions in a freezer bag or container. It can stay in the freezer for up to 3 months. When ready to eat, thaw it in the fridge overnight, then reheat as mentioned earlier. Enjoy your Classic Apple Crisp even after a long time! To make Classic Apple Crisp without oats, use crushed nuts or flour. You can mix 1 cup of finely chopped nuts with the same amount of flour. Combine this with melted butter and sugar. This mixture will provide a nice crunch. Spread it over the apples just like the oat topping. Bake it as usual for a delicious result. This option is great for those who prefer a nutty flavor. Yes! You can use many fruits in a crisp. Pears, peaches, or berries work well. Each fruit brings a unique flavor. For a berry crisp, mix blueberries and strawberries. For a stone fruit crisp, use ripe peaches or plums. Just remember to adjust the sugar based on the fruit's sweetness. This keeps your dessert balanced and tasty. Classic Apple Crisp can be stored for up to five days. Place it in an airtight container in the fridge. If you want to keep it longer, freeze it for up to three months. Let it cool completely before freezing. To reheat, bake it in the oven until warm. Enjoy it warm for the best taste! You can find the Full Recipe for more guidance. This guide covers everything you need for a delicious apple crisp. We explored the key ingredients and provided easy steps for preparation and baking. You learned tips for choosing the best apples and perfecting the topping. Variations and storage tips help you enjoy it longer. Remember, making apple crisp can be simple and fun. Experiment with flavors and enjoy your sweet treat with friends and family.](https://mycookingcast.com/wp-content/uploads/2025/07/39aa255b-5793-48f5-819c-1a907d5f3bc7-768x768.webp)
Are you ready to whip up a warm and comforting dish that will impress everyone? Classic Apple Crisp is a delightful dessert that combines sweet, juicy apples with a crispy topping. It’s easy enough for a weeknight treat and delicious enough for special occasions. In this post, I’ll guide you through simple steps, tips, and fun variations. Let’s turn those apples into something extraordinary!
Ingredients
Main Ingredients for Classic Apple Crisp
For a great apple crisp, gather these main ingredients:
– 6 medium apples (Granny Smith or Honeycrisp), peeled, cored, and sliced
– 1 tablespoon lemon juice
– 1 teaspoon ground cinnamon
– 1/2 teaspoon nutmeg
– 1 cup brown sugar, packed
– 1 cup old-fashioned oats
– 1/2 cup all-purpose flour
– 1/2 cup unsalted butter, melted
– 1/4 teaspoon salt
– Ice cream or whipped cream (for serving, optional)
Measurement Details
When measuring your ingredients, be precise. Use a dry measuring cup for the oats and flour. Pack the brown sugar tightly for the best sweetness. I suggest using a kitchen scale for the butter. One stick of butter is usually 1/2 cup. This helps keep all flavors balanced.
Optional Serving Suggestions
I love serving apple crisp warm. Top it with a scoop of ice cream or a dollop of whipped cream. A sprinkle of cinnamon on top adds a nice touch. For a twist, try adding caramel sauce. This makes a delightful contrast to the tart apples. Enjoy your sweet treat!
Step-by-Step Instructions
Preparation Steps
Start by gathering your ingredients. You will need six medium apples. I like to use Granny Smith or Honeycrisp for their crispness. Peel, core, and slice the apples. This takes about 10 minutes. Next, toss the apple slices in a bowl with one tablespoon of lemon juice. The lemon juice keeps the apples fresh. Add one teaspoon of ground cinnamon and half a teaspoon of nutmeg. Mix well until the apples are coated.
Then, take a greased 9×13 inch baking dish. Spread the apple mixture evenly in the dish. This helps with even cooking. In another bowl, mix one cup of brown sugar, one cup of old-fashioned oats, half a cup of all-purpose flour, and half a cup of melted butter. Add a pinch of salt (one-fourth teaspoon) to balance the sweetness. Stir until the mixture is crumbly.
Baking Process
Preheat your oven to 350°F (175°C). Once it’s ready, pour the oat mixture over the apples. Spread it evenly to cover all the fruit. This will create a nice layer on top. Bake the dish in the preheated oven for 40 to 45 minutes. You want the apples to be tender and the topping to be golden brown.
Cooling and Serving Instructions
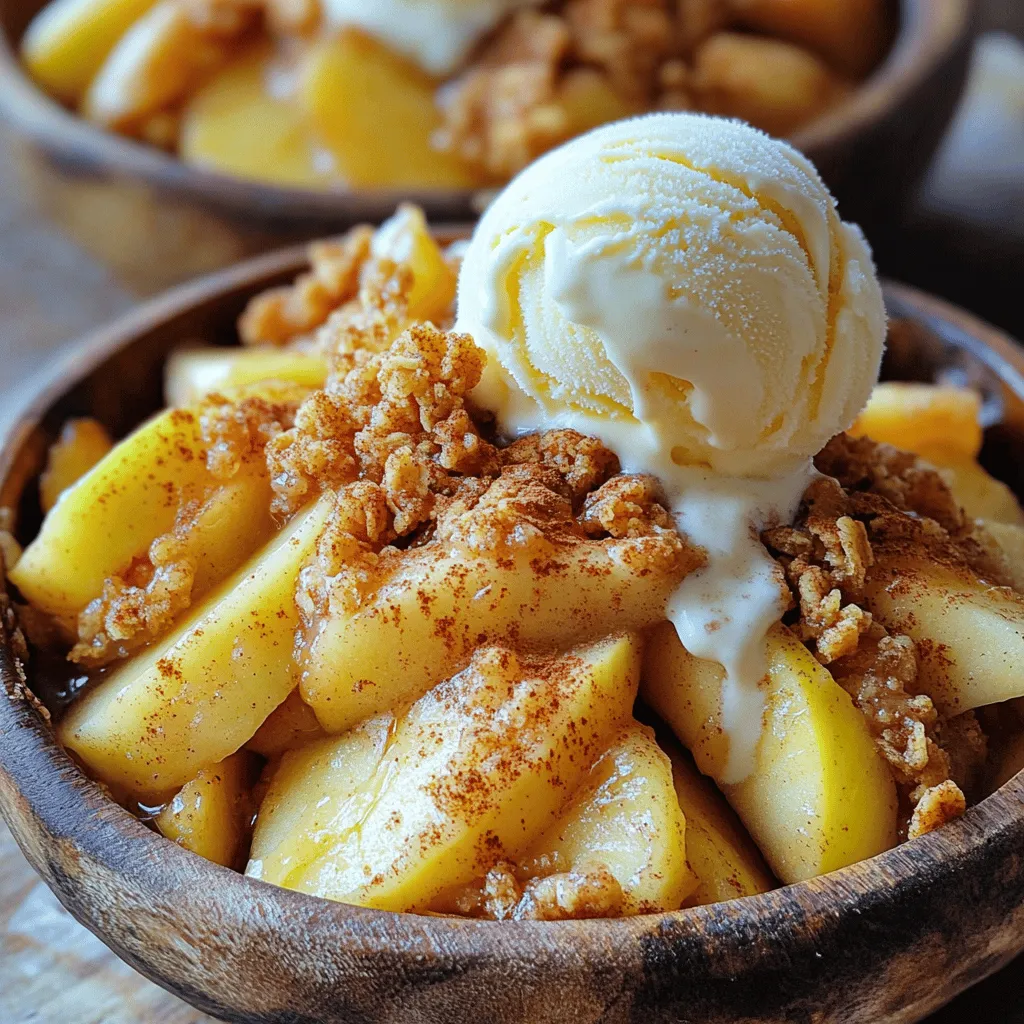
After baking, remove the dish from the oven. Let it cool for 10 to 15 minutes. This cooling time helps the crisp set. You can serve it warm in individual bowls. For a special touch, add a scoop of ice cream or a dollop of whipped cream on top. Sprinkle extra cinnamon for a nice look. Enjoy your Classic Apple Crisp Delightful and Easy Dessert!
Tips & Tricks
Selecting the Best Apples
To make the best apple crisp, choose the right apples. I like to use Granny Smith or Honeycrisp apples. Granny Smith adds tartness, while Honeycrisp gives a sweet crunch. Mix different types for great flavor. Aim for six medium apples, peeled, cored, and sliced for your crisp.
Achieving the Perfect Crisp Topping
The topping is key to a great apple crisp. For the best texture, use old-fashioned oats and brown sugar. Combine them with flour and melted butter. This mix should feel crumbly. Spread it evenly over the apples. Bake until golden brown. A perfect topping is crunchy and sweet.
Troubleshooting Common Issues
Sometimes, your apple crisp might not turn out right. If your topping is too soggy, try using less butter. You can also bake it longer to dry it out. If your apples are too firm, slice them thinner next time. Remember to let it cool for a bit before serving. This helps set the topping and makes it easier to scoop.Enjoy making your classic apple crisp!
Variations
Gluten-Free Apple Crisp Option
You can make a gluten-free apple crisp with a few easy swaps. Use gluten-free oats instead of regular oats. Replace all-purpose flour with almond flour or a gluten-free flour blend. The taste remains great, and everyone can enjoy it.
Vegan Alternatives
To make a vegan apple crisp, use coconut oil or vegan butter in place of regular butter. For the topping, swap brown sugar with coconut sugar or maple syrup. This keeps the taste rich and sweet while being kind to our furry friends.
Flavor Additions and Customizations
Feel free to play with flavors in your apple crisp. Add chopped nuts like walnuts or pecans for crunch. You can mix in dried fruit such as raisins or cranberries for extra sweetness. Spices like ginger or cardamom can also bring a new twist. Personalize your dish to match your taste!
Storage Info
Proper Storage Methods
To keep your apple crisp fresh, store it in an airtight container. Let it cool fully before sealing. Place the container in the fridge. It will stay good for about 3 to 5 days. If you want to store it longer, freezing is a great option.
Reheating Instructions
When you’re ready to enjoy your apple crisp again, preheat your oven to 350°F (175°C). Place the crisp in a baking dish, cover it with foil, and heat it for about 15 to 20 minutes. This helps keep the topping crispy. You can also microwave individual servings for about 30 seconds or until warm.
Freezing Tips
To freeze apple crisp, let it cool completely. Cut it into portions and wrap each piece in plastic wrap. Then, place the wrapped portions in a freezer bag or container. It can stay in the freezer for up to 3 months. When ready to eat, thaw it in the fridge overnight, then reheat as mentioned earlier. Enjoy your Classic Apple Crisp even after a long time!
FAQs
How do I make Classic Apple Crisp without oats?
To make Classic Apple Crisp without oats, use crushed nuts or flour. You can mix 1 cup of finely chopped nuts with the same amount of flour. Combine this with melted butter and sugar. This mixture will provide a nice crunch. Spread it over the apples just like the oat topping. Bake it as usual for a delicious result. This option is great for those who prefer a nutty flavor.
Can I use other fruits in a crisp?
Yes! You can use many fruits in a crisp. Pears, peaches, or berries work well. Each fruit brings a unique flavor. For a berry crisp, mix blueberries and strawberries. For a stone fruit crisp, use ripe peaches or plums. Just remember to adjust the sugar based on the fruit’s sweetness. This keeps your dessert balanced and tasty.
How long can Classic Apple Crisp be stored?
Classic Apple Crisp can be stored for up to five days. Place it in an airtight container in the fridge. If you want to keep it longer, freeze it for up to three months. Let it cool completely before freezing. To reheat, bake it in the oven until warm. Enjoy it warm for the best taste!
This guide covers everything you need for a delicious apple crisp. We explored the key ingredients and provided easy steps for preparation and baking. You learned tips for choosing the best apples and perfecting the topping. Variations and storage tips help you enjoy it longer. Remember, making apple crisp can be simple and fun. Experiment with flavors and enjoy your sweet treat with friends and family.
![For a great apple crisp, gather these main ingredients: - 6 medium apples (Granny Smith or Honeycrisp), peeled, cored, and sliced - 1 tablespoon lemon juice - 1 teaspoon ground cinnamon - 1/2 teaspoon nutmeg - 1 cup brown sugar, packed - 1 cup old-fashioned oats - 1/2 cup all-purpose flour - 1/2 cup unsalted butter, melted - 1/4 teaspoon salt - Ice cream or whipped cream (for serving, optional) When measuring your ingredients, be precise. Use a dry measuring cup for the oats and flour. Pack the brown sugar tightly for the best sweetness. I suggest using a kitchen scale for the butter. One stick of butter is usually 1/2 cup. This helps keep all flavors balanced. I love serving apple crisp warm. Top it with a scoop of ice cream or a dollop of whipped cream. A sprinkle of cinnamon on top adds a nice touch. For a twist, try adding caramel sauce. This makes a delightful contrast to the tart apples. Enjoy your sweet treat! Start by gathering your ingredients. You will need six medium apples. I like to use Granny Smith or Honeycrisp for their crispness. Peel, core, and slice the apples. This takes about 10 minutes. Next, toss the apple slices in a bowl with one tablespoon of lemon juice. The lemon juice keeps the apples fresh. Add one teaspoon of ground cinnamon and half a teaspoon of nutmeg. Mix well until the apples are coated. Then, take a greased 9x13 inch baking dish. Spread the apple mixture evenly in the dish. This helps with even cooking. In another bowl, mix one cup of brown sugar, one cup of old-fashioned oats, half a cup of all-purpose flour, and half a cup of melted butter. Add a pinch of salt (one-fourth teaspoon) to balance the sweetness. Stir until the mixture is crumbly. Preheat your oven to 350°F (175°C). Once it's ready, pour the oat mixture over the apples. Spread it evenly to cover all the fruit. This will create a nice layer on top. Bake the dish in the preheated oven for 40 to 45 minutes. You want the apples to be tender and the topping to be golden brown. After baking, remove the dish from the oven. Let it cool for 10 to 15 minutes. This cooling time helps the crisp set. You can serve it warm in individual bowls. For a special touch, add a scoop of ice cream or a dollop of whipped cream on top. Sprinkle extra cinnamon for a nice look. Enjoy your Classic Apple Crisp Delightful and Easy Dessert! For the complete recipe, refer to the [Full Recipe]. To make the best apple crisp, choose the right apples. I like to use Granny Smith or Honeycrisp apples. Granny Smith adds tartness, while Honeycrisp gives a sweet crunch. Mix different types for great flavor. Aim for six medium apples, peeled, cored, and sliced for your crisp. The topping is key to a great apple crisp. For the best texture, use old-fashioned oats and brown sugar. Combine them with flour and melted butter. This mix should feel crumbly. Spread it evenly over the apples. Bake until golden brown. A perfect topping is crunchy and sweet. Sometimes, your apple crisp might not turn out right. If your topping is too soggy, try using less butter. You can also bake it longer to dry it out. If your apples are too firm, slice them thinner next time. Remember to let it cool for a bit before serving. This helps set the topping and makes it easier to scoop. For the full recipe, check out the detailed steps and measurements. Enjoy making your classic apple crisp! {{image_2}} You can make a gluten-free apple crisp with a few easy swaps. Use gluten-free oats instead of regular oats. Replace all-purpose flour with almond flour or a gluten-free flour blend. The taste remains great, and everyone can enjoy it. To make a vegan apple crisp, use coconut oil or vegan butter in place of regular butter. For the topping, swap brown sugar with coconut sugar or maple syrup. This keeps the taste rich and sweet while being kind to our furry friends. Feel free to play with flavors in your apple crisp. Add chopped nuts like walnuts or pecans for crunch. You can mix in dried fruit such as raisins or cranberries for extra sweetness. Spices like ginger or cardamom can also bring a new twist. Personalize your dish to match your taste! For the complete recipe, check out the [Full Recipe]. To keep your apple crisp fresh, store it in an airtight container. Let it cool fully before sealing. Place the container in the fridge. It will stay good for about 3 to 5 days. If you want to store it longer, freezing is a great option. When you're ready to enjoy your apple crisp again, preheat your oven to 350°F (175°C). Place the crisp in a baking dish, cover it with foil, and heat it for about 15 to 20 minutes. This helps keep the topping crispy. You can also microwave individual servings for about 30 seconds or until warm. To freeze apple crisp, let it cool completely. Cut it into portions and wrap each piece in plastic wrap. Then, place the wrapped portions in a freezer bag or container. It can stay in the freezer for up to 3 months. When ready to eat, thaw it in the fridge overnight, then reheat as mentioned earlier. Enjoy your Classic Apple Crisp even after a long time! To make Classic Apple Crisp without oats, use crushed nuts or flour. You can mix 1 cup of finely chopped nuts with the same amount of flour. Combine this with melted butter and sugar. This mixture will provide a nice crunch. Spread it over the apples just like the oat topping. Bake it as usual for a delicious result. This option is great for those who prefer a nutty flavor. Yes! You can use many fruits in a crisp. Pears, peaches, or berries work well. Each fruit brings a unique flavor. For a berry crisp, mix blueberries and strawberries. For a stone fruit crisp, use ripe peaches or plums. Just remember to adjust the sugar based on the fruit's sweetness. This keeps your dessert balanced and tasty. Classic Apple Crisp can be stored for up to five days. Place it in an airtight container in the fridge. If you want to keep it longer, freeze it for up to three months. Let it cool completely before freezing. To reheat, bake it in the oven until warm. Enjoy it warm for the best taste! You can find the Full Recipe for more guidance. This guide covers everything you need for a delicious apple crisp. We explored the key ingredients and provided easy steps for preparation and baking. You learned tips for choosing the best apples and perfecting the topping. Variations and storage tips help you enjoy it longer. Remember, making apple crisp can be simple and fun. Experiment with flavors and enjoy your sweet treat with friends and family.](https://mycookingcast.com/wp-content/uploads/2025/07/39aa255b-5793-48f5-819c-1a907d5f3bc7-250x250.webp)
