Chocolate Chip Scones Fresh and Flaky Recipe

WANT TO SAVE THIS RECIPE?

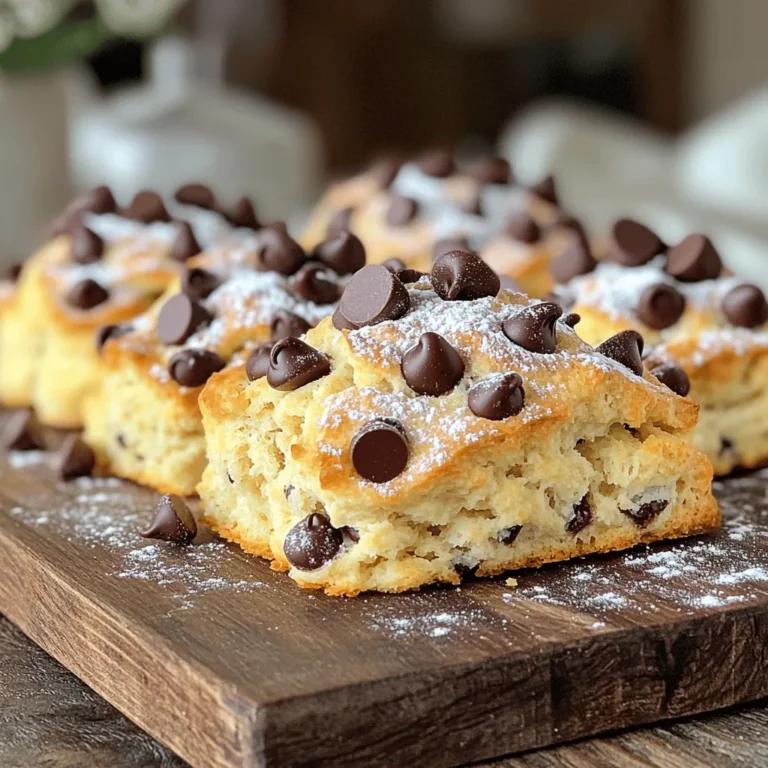
Are you ready to bake the best chocolate chip scones? With a fresh and flaky texture, this recipe will make your kitchen smell like heaven. I’ll guide you step by step, from the ingredients to the perfect bake. You’ll learn tips to ensure a light and fluffy treat, plus some fun variations to try. Grab your apron and let’s get started on making these delicious scones!

Ingredients

List of Ingredients for Chocolate Chip Scones

To make these scones, you need the following ingredients:

– 2 cups all-purpose flour

– 1/3 cup granulated sugar

– 1 tablespoon baking powder

– 1/2 teaspoon salt

– 1/2 cup unsalted butter, cold and cubed

– 1/2 cup heavy cream

– 1 large egg

– 1 teaspoon vanilla extract

– 1 cup semi-sweet chocolate chips

– 1/4 cup chocolate chips, for topping

– Optional: powdered sugar for dusting

Measurement Details

Make sure to measure each ingredient carefully. Use a dry measuring cup for flour and sugar. Spoon the flour into the cup, then level it off with a knife. For the butter, ensure it is cold. This will help your scones stay flaky.

Essential Tools Needed

You will need a few tools to make these scones:

– A mixing bowl for dry ingredients

– A separate bowl for wet ingredients

– A pastry cutter or your hands to mix butter with flour

– A whisk for mixing wet ingredients

– A baking sheet lined with parchment paper

– A rolling pin to flatten the dough (optional)

– A knife or pastry cutter to slice the dough into wedges

Having the right tools makes the process smooth and fun. Enjoy making your chocolate chip scones using this recipe.

Step-by-Step Instructions

Prepping the Oven and Baking Sheet

First, preheat your oven to 400°F (200°C). This ensures your scones bake evenly. Next, line a baking sheet with parchment paper. This helps prevent sticking and makes cleanup easy.

Mixing Dry Ingredients

In a large bowl, combine the dry ingredients. Use 2 cups of all-purpose flour, 1/3 cup of granulated sugar, 1 tablespoon of baking powder, and 1/2 teaspoon of salt. Whisk them together well. This step helps to mix everything evenly and adds air to your mixture.

Incorporating Wet Ingredients and Chocolate Chips

In another bowl, whisk together the wet ingredients. Use 1/2 cup of heavy cream, 1 large egg, and 1 teaspoon of vanilla extract. Once mixed, pour the wet ingredients into the dry ones. Gently stir until just combined. Be careful not to over-mix. Then, fold in 1 cup of semi-sweet chocolate chips. This adds richness and flavor.

Forming and Cutting the Dough

Turn the dough onto a lightly floured surface. Knead it gently for just a few turns, about 2-3 times. Pat the dough into a circle that is about 1-inch thick. Cut the circle into 8 wedges and place them on your prepared baking sheet. For an extra touch, sprinkle 1/4 cup of chocolate chips on top of each scone. Now, they’re ready for the oven!

For the full recipe, follow the detailed steps above.

Tips & Tricks

Ensuring Perfect Texture

To get the best texture in your scones, keep your butter cold. Cold butter makes the scones flaky. When you mix in the butter, aim for coarse crumbs. You want small pieces, not melted butter. This step is key to achieving that perfect, tender bite.

Best Practices for Mixing

Mix the dry ingredients well before adding wet ones. This helps to evenly distribute the baking powder and salt. When you add the wet ingredients, mix gently. Over-mixing can make the scones tough. Just mix until you see no dry flour. Folding in the chocolate chips should also be gentle.

How to Store Leftover Scones

Store leftover scones in an airtight container. This keeps them fresh longer. You can keep them at room temperature for a day or two. For longer storage, place them in the fridge. To enjoy later, you can reheat them in the oven. This brings back their fresh-baked taste. If you want to freeze them, wrap each scone in plastic. Then put them in a freezer bag. They can last for up to three months.

Variations

Adding Different Types of Chips

You can make your chocolate chip scones even more fun by using different types of chips. White chocolate chips bring a creamy sweetness. Milk chocolate chips offer a rich and smooth taste. You can mix and match these chips. Try one type or combine them for a flavor boost. Each option changes the taste and look of your scones. Experiment and see what you like best!

Substituting Other Flavors

Adding new flavors can make your scones unique. Almond extract adds a nice nutty taste. You can also add orange zest for a fresh, citrusy twist. Just replace some of the vanilla extract with these flavors. A little goes a long way! Try these ideas to find what you enjoy. Mixing flavors can open up a world of tasty options.

Gluten-Free Options

If you need gluten-free scones, it’s easy to adapt this recipe. Use a gluten-free flour blend in place of regular flour. Many blends work well for baking. Make sure to check that the blend includes xanthan gum. This helps give your scones the right texture. Follow the same steps in the recipe. You’ll still get delicious, flaky scones! Enjoy your gluten-free treat with full flavor. For the full recipe, follow the steps above.

Storage Info

How to Properly Store Scones

To keep your chocolate chip scones fresh, store them in an airtight container. This helps to lock in moisture and maintain their soft texture. Place a piece of parchment paper between layers if you stack them. It prevents sticking and keeps them nice.

Freezing Instructions

You can freeze scones for later enjoyment. First, let the scones cool completely. Then, wrap each scone tightly in plastic wrap. Place them in a freezer-safe bag or container. They will last up to three months in the freezer. When you’re ready to enjoy, just thaw them in the fridge overnight.

Reheating Tips for Optimal Freshness

To reheat scones, preheat your oven to 350°F (175°C). Place the scones on a baking sheet. Heat them for about 5 to 10 minutes. This will restore their flaky texture. You can also use a microwave, but be careful; it may make them a bit chewy. For the best results, stick with the oven. Enjoy your fresh and flaky chocolate chip scones!

FAQs

How to Make Chocolate Chip Scones Fluffier?

To make your chocolate chip scones fluffier, use cold butter. Cut the butter into small pieces and mix gently. This helps keep the butter from melting too much. Also, do not over-mix the dough. When you mix the wet and dry ingredients, stop when you see no dry flour. This keeps air pockets in the dough, making it rise better.

Can I use whole wheat flour for the recipe?

Yes, you can use whole wheat flour. It adds a nutty flavor and more fiber. However, it may make the scones denser. To keep them light, mix half whole wheat flour and half all-purpose flour. This gives you the best of both worlds: health and fluffiness.

What can I serve with chocolate chip scones?

You can serve chocolate chip scones with many delicious items. Here are some suggestions:

– Fresh fruit like berries or sliced bananas

– Whipped cream or clotted cream

– Cream cheese or flavored spreads

– Jam or fruit preserves

– A cup of tea or coffee

These pairings enhance the scone experience and add nice flavors. For the full recipe, check out the earlier section.

You learned how to make chocolate chip scones from scratch. We covered ingredients, measurements, and tools. Then, we went through each step to bake them perfectly. I also shared tips for great texture and storage. You can try fun flavor variations too!

Now, you can enjoy baking and sharing these tasty scones. With a few simple changes, make them your own. Happy baking!

To make these scones, you need the following ingredients: - 2 cups all-purpose flour - 1/3 cup granulated sugar - 1 tablespoon baking powder - 1/2 teaspoon salt - 1/2 cup unsalted butter, cold and cubed - 1/2 cup heavy cream - 1 large egg - 1 teaspoon vanilla extract - 1 cup semi-sweet chocolate chips - 1/4 cup chocolate chips, for topping - Optional: powdered sugar for dusting Make sure to measure each ingredient carefully. Use a dry measuring cup for flour and sugar. Spoon the flour into the cup, then level it off with a knife. For the butter, ensure it is cold. This will help your scones stay flaky. You will need a few tools to make these scones: - A mixing bowl for dry ingredients - A separate bowl for wet ingredients - A pastry cutter or your hands to mix butter with flour - A whisk for mixing wet ingredients - A baking sheet lined with parchment paper - A rolling pin to flatten the dough (optional) - A knife or pastry cutter to slice the dough into wedges Having the right tools makes the process smooth and fun. Enjoy making your chocolate chip scones using this recipe. First, preheat your oven to 400°F (200°C). This ensures your scones bake evenly. Next, line a baking sheet with parchment paper. This helps prevent sticking and makes cleanup easy. In a large bowl, combine the dry ingredients. Use 2 cups of all-purpose flour, 1/3 cup of granulated sugar, 1 tablespoon of baking powder, and 1/2 teaspoon of salt. Whisk them together well. This step helps to mix everything evenly and adds air to your mixture. In another bowl, whisk together the wet ingredients. Use 1/2 cup of heavy cream, 1 large egg, and 1 teaspoon of vanilla extract. Once mixed, pour the wet ingredients into the dry ones. Gently stir until just combined. Be careful not to over-mix. Then, fold in 1 cup of semi-sweet chocolate chips. This adds richness and flavor. Turn the dough onto a lightly floured surface. Knead it gently for just a few turns, about 2-3 times. Pat the dough into a circle that is about 1-inch thick. Cut the circle into 8 wedges and place them on your prepared baking sheet. For an extra touch, sprinkle 1/4 cup of chocolate chips on top of each scone. Now, they’re ready for the oven! For the full recipe, follow the detailed steps above. To get the best texture in your scones, keep your butter cold. Cold butter makes the scones flaky. When you mix in the butter, aim for coarse crumbs. You want small pieces, not melted butter. This step is key to achieving that perfect, tender bite. Mix the dry ingredients well before adding wet ones. This helps to evenly distribute the baking powder and salt. When you add the wet ingredients, mix gently. Over-mixing can make the scones tough. Just mix until you see no dry flour. Folding in the chocolate chips should also be gentle. Store leftover scones in an airtight container. This keeps them fresh longer. You can keep them at room temperature for a day or two. For longer storage, place them in the fridge. To enjoy later, you can reheat them in the oven. This brings back their fresh-baked taste. If you want to freeze them, wrap each scone in plastic. Then put them in a freezer bag. They can last for up to three months. {{image_2}} You can make your chocolate chip scones even more fun by using different types of chips. White chocolate chips bring a creamy sweetness. Milk chocolate chips offer a rich and smooth taste. You can mix and match these chips. Try one type or combine them for a flavor boost. Each option changes the taste and look of your scones. Experiment and see what you like best! Adding new flavors can make your scones unique. Almond extract adds a nice nutty taste. You can also add orange zest for a fresh, citrusy twist. Just replace some of the vanilla extract with these flavors. A little goes a long way! Try these ideas to find what you enjoy. Mixing flavors can open up a world of tasty options. If you need gluten-free scones, it's easy to adapt this recipe. Use a gluten-free flour blend in place of regular flour. Many blends work well for baking. Make sure to check that the blend includes xanthan gum. This helps give your scones the right texture. Follow the same steps in the recipe. You’ll still get delicious, flaky scones! Enjoy your gluten-free treat with full flavor. For the full recipe, follow the steps above. To keep your chocolate chip scones fresh, store them in an airtight container. This helps to lock in moisture and maintain their soft texture. Place a piece of parchment paper between layers if you stack them. It prevents sticking and keeps them nice. You can freeze scones for later enjoyment. First, let the scones cool completely. Then, wrap each scone tightly in plastic wrap. Place them in a freezer-safe bag or container. They will last up to three months in the freezer. When you're ready to enjoy, just thaw them in the fridge overnight. To reheat scones, preheat your oven to 350°F (175°C). Place the scones on a baking sheet. Heat them for about 5 to 10 minutes. This will restore their flaky texture. You can also use a microwave, but be careful; it may make them a bit chewy. For the best results, stick with the oven. Enjoy your fresh and flaky chocolate chip scones! To make your chocolate chip scones fluffier, use cold butter. Cut the butter into small pieces and mix gently. This helps keep the butter from melting too much. Also, do not over-mix the dough. When you mix the wet and dry ingredients, stop when you see no dry flour. This keeps air pockets in the dough, making it rise better. Yes, you can use whole wheat flour. It adds a nutty flavor and more fiber. However, it may make the scones denser. To keep them light, mix half whole wheat flour and half all-purpose flour. This gives you the best of both worlds: health and fluffiness. You can serve chocolate chip scones with many delicious items. Here are some suggestions: - Fresh fruit like berries or sliced bananas - Whipped cream or clotted cream - Cream cheese or flavored spreads - Jam or fruit preserves - A cup of tea or coffee These pairings enhance the scone experience and add nice flavors. For the full recipe, check out the earlier section. You learned how to make chocolate chip scones from scratch. We covered ingredients, measurements, and tools. Then, we went through each step to bake them perfectly. I also shared tips for great texture and storage. You can try fun flavor variations too! Now, you can enjoy baking and sharing these tasty scones. With a few simple changes, make them your own. Happy baking!

Chocolate Chip Scones

Indulge in the ultimate treat with these decadent chocolate chip scones! Bursting with rich chocolate flavor, these scones are easy to make and perfect for breakfast or a sweet snack. With simple ingredients, quick instructions, and tips for the best results, you’ll have a delicious batch ready in no time. Click through to explore the full recipe and elevate your baking game today!

Ingredients
  

2 cups all-purpose flour

1/3 cup granulated sugar

1 tablespoon baking powder

1/2 teaspoon salt

1/2 cup unsalted butter, cold and cubed

1/2 cup heavy cream

1 large egg

1 teaspoon vanilla extract

1 cup semi-sweet chocolate chips

1/4 cup chocolate chips, for topping

Optional: powdered sugar for dusting

Instructions
 

Preheat your oven to 400°F (200°C) and line a baking sheet with parchment paper.

    In a large mixing bowl, whisk together the flour, sugar, baking powder, and salt until well combined.

      Add the cold, cubed butter to the flour mixture. Using a pastry cutter or your fingers, work the butter into the flour until the mixture resembles coarse crumbs.

        In a separate bowl, whisk together the heavy cream, egg, and vanilla extract.

          Pour the wet ingredients into the dry ingredients, then gently mix until just combined. Avoid over-mixing.

            Fold in the chocolate chips until evenly distributed throughout the dough.

              Turn the dough onto a lightly floured surface and knead gently just until it comes together—about 2-3 turns.

                Pat the dough into a circle about 1-inch thick. Cut the circle into 8 wedges and place them on the prepared baking sheet.

                  Sprinkle the reserved chocolate chips on top of each scone for an extra touch of decadence.

                    Bake in the preheated oven for 15-20 minutes or until the scones are lightly golden brown.

                      Remove from the oven and let them cool for a few minutes on the baking sheet before transferring them to a wire rack.

                        Optionally, dust with powdered sugar before serving for an extra special touch.

                          Prep Time: 20 minutes | Total Time: 40 minutes | Servings: 8

                            WANT TO SAVE THIS RECIPE?

                            Leave a Comment

                            Recipe Rating