Skip to content
DisclaimerTerms Of UseGDPR PolicyCookie Policy

My Cooking Cast

  • Home
  • Drinks
  • Appetizers
  • Dinner
  • Dessert
  • About
  • Contact
  • Privacy Policy
DisclaimerTerms Of UseGDPR PolicyCookie Policy

Emma

- 1 cup all-purpose flour - 1 teaspoon baking powder - 1/2 teaspoon baking soda - 1/2 teaspoon salt - 1 teaspoon ground cinnamon - 1/2 teaspoon ground ginger - 1/4 teaspoon nutmeg - 1/2 cup vegetable oil - 3/4 cup brown sugar, packed - 1/4 cup granulated sugar - 2 large eggs - 1 teaspoon vanilla extract - 1 cup grated carrots - 1 cup crushed pineapple, drained - 1/2 cup shredded coconut - 1/2 cup chopped walnuts (optional) Making Tropical Pineapple Carrot Cake starts with great ingredients. Each one plays a key role in the taste and texture. All-purpose flour gives the cake structure. It holds everything together. Use fresh flour for the best result. Baking powder and baking soda help the cake rise. They make it light and fluffy. Without them, the cake may be dense and heavy. Spices like cinnamon, ginger, and nutmeg add warmth and depth. They make your cake taste cozy and inviting. Brown and granulated sugars sweeten the cake. Brown sugar adds moisture and a slight caramel flavor. Granulated sugar helps with a light crumb. Wet ingredients like vegetable oil, eggs, and vanilla extract keep the cake moist. The oil makes it rich. The eggs help bind the ingredients together. Vanilla adds a lovely aroma. Carrots provide moisture and sweetness. They also add a nice texture. Crushed pineapple brings a tropical twist. Make sure to drain it well for the right consistency. Shredded coconut gives a chewy texture and enhances the tropical feel. Chopped walnuts are optional but add crunch and flavor. This balanced mix of ingredients makes the cake delightful and moist. For the full recipe, refer to the complete guide above. First, preheat your oven to 350°F (175°C). This step is key for even baking. Next, take a 9-inch round cake pan. Grease it with butter or oil and sprinkle flour to coat it. You can also line the pan with parchment paper for easy removal. In a medium bowl, whisk the dry ingredients together. Combine 1 cup of all-purpose flour, 1 teaspoon baking powder, 1/2 teaspoon baking soda, and 1/2 teaspoon salt. Add 1 teaspoon ground cinnamon, 1/2 teaspoon ground ginger, and 1/4 teaspoon nutmeg. Mix until all the spices are evenly spread. In a large mixing bowl, combine 1/2 cup vegetable oil, 3/4 cup packed brown sugar, and 1/4 cup granulated sugar. Use an electric mixer on medium speed. Beat these until well blended and smooth. This step adds moisture and sweetness. Now, add 2 large eggs to your sugar mixture, one at a time. Mix well after each addition. Then stir in 1 teaspoon vanilla extract. Gradually add the dry ingredients to the wet mixture. Mix just until combined. Be careful not to overmix; this keeps the cake light. Next, fold in the fun stuff! Add 1 cup grated carrots, 1 cup crushed pineapple (make sure it's drained), and 1/2 cup shredded coconut. You can also include 1/2 cup chopped walnuts if you like. Stir gently until everything is mixed evenly. Pour the batter into the prepared cake pan. Smooth the top with a spatula to make it even. Bake in your preheated oven for 30-35 minutes. Check for doneness by inserting a toothpick in the center. If it comes out clean, your cake is ready! Let it cool in the pan for about 10 minutes, then move it to a wire rack to cool completely. After it cools, you can frost it with cream cheese frosting. For the full recipe, check the previous section. To make a great Tropical Pineapple Carrot Cake, follow a few key steps. First, measure your ingredients carefully. Use a kitchen scale for accuracy if you can. This will help you get the right texture. Next, mix your dry and wet ingredients separately. This keeps the cake fluffy. Also, make sure to drain the crushed pineapple well. Too much liquid can make your cake soggy. One common mistake is overmixing the batter. Mix just until the ingredients combine. Overmixing can lead to a dense cake. Another mistake is not cooling the cake properly. Allow your cake to cool in the pan for ten minutes. Then, transfer it to a wire rack. This step helps keep the cake moist and prevents sticking. You can boost the flavor with add-ins. Consider adding golden raisins or chopped dried mango. These add sweetness and texture. You can also use a mix of nuts. Pecans or macadamia nuts work well. For a tropical twist, try adding a splash of coconut extract. This will make your cake taste even more delightful. For the full recipe, check out the details above! {{image_2}} You can make this cake gluten-free with a few changes. Replace the all-purpose flour with a gluten-free blend. Look for a blend that contains xanthan gum. This helps the cake rise and stay moist. You may need to adjust the baking time slightly, so keep an eye on it while it bakes. To make this cake vegan, swap the eggs with flaxseed meal. Mix one tablespoon of flaxseed meal with three tablespoons of water for each egg. Let it sit for a few minutes until it thickens. Use plant-based oil instead of vegetable oil. For the frosting, choose a vegan cream cheese brand or make your own with cashews. You can add more flavors to your cake. Try mixing in some chopped nuts for crunch. Pecans or almonds work great. Adding dried fruits like raisins or coconut can enhance the taste. Don't forget about spices! A bit of cardamom or allspice can add warmth. You can also play with citrus zest, like orange or lemon, for a fresh twist. For the full recipe, check out the Tropical Pineapple Carrot Cake 🥕. To keep your Tropical Pineapple Carrot Cake fresh, wrap it tightly. Use plastic wrap or aluminum foil. You can also place it in an airtight container. This helps keep moisture in and prevents the cake from drying out. Store it at room temperature for up to three days. If you live in a warm area, put it in the fridge. You can freeze the cake for longer storage. First, let it cool completely. Then wrap it well with plastic wrap. Use two layers to prevent freezer burn. After that, place it in a freezer-safe bag or container. The cake will last in the freezer for up to three months. When you're ready to eat it, let it thaw in the fridge overnight. Your cake will stay fresh for about three days at room temperature. If you store it in the fridge, it can last up to a week. For the best taste, enjoy it within the first few days. To keep it moist, always cover the cake after slicing. If you notice any changes in smell or texture, it’s best to toss it. For more details, check out the Full Recipe to ensure your cake remains delightful and moist! You can use applesauce or mashed bananas. Use 1/4 cup for each egg. This keeps the cake moist and adds natural sweetness. You can also use a flaxseed mixture. Mix one tablespoon of flaxseed meal with three tablespoons of water. Let it sit for a few minutes until it thickens. Yes, you can! If you skip the pineapple, try adding more grated carrots or shredded apples. This will keep the cake sweet and moist. You can also add a splash of juice for some tropical flavor. Check the cake with a toothpick. Insert it into the center of the cake. If it comes out clean, the cake is ready. It should also spring back when gently pressed. Once the cake cools completely, use cream cheese frosting. This adds a rich flavor. Spread it evenly on top and let it drip down the sides. For a fun touch, sprinkle some toasted coconut on top. Yes, you can make the cake one day before serving. Wrap it tightly in plastic wrap. Store it at room temperature. Frost it just before serving for the best taste. - Full Recipe: Tropical Pineapple Carrot Cake 🥕 This blog shared a simple recipe for Tropical Pineapple Carrot Cake. We explored each ingredient and the steps to create it. You learned useful tips to avoid mistakes and variations to try. Remember, storing your cake correctly keeps it fresh longer. Baking can be fun and rewarding. Enjoy sharing this cake with friends and family. Your next baking adventure awaits!

Tropical Pineapple Carrot Cake Delightful and Moist

Get ready to enjoy a slice of sunshine with my Tropical Pineapple Carrot Cake! This cake is a perfect mix

To make One-Pan Lemon Garlic Chicken and Veggies, you'll need fresh and simple ingredients. Here’s what to gather: - 4 boneless, skinless chicken thighs - 1 tablespoon olive oil - 4 cloves garlic, minced - 1 lemon, zest and juice - 1 teaspoon dried oregano - 1 teaspoon paprika - Salt and pepper to taste - 2 cups broccoli florets - 1 red bell pepper, sliced - 1 medium zucchini, sliced - Fresh parsley, chopped (for garnish) Each ingredient adds flavor and nutrition to this dish. The chicken thighs bring protein, while the veggies add color and crunch. The lemon and garlic create a bright, zesty taste that makes this meal special. You can find the Full Recipe above for detailed steps. Enjoy the cooking process! 1. Preheating the Oven First, you need to preheat your oven to 400°F (200°C). This ensures even cooking. 2. Creating the Marinade In a large bowl, mix together one tablespoon of olive oil, four minced garlic cloves, lemon zest, lemon juice, one teaspoon of dried oregano, one teaspoon of paprika, salt, and pepper. This marinade adds great flavor. 3. Marinating the Chicken Add four boneless, skinless chicken thighs to the bowl. Make sure each piece is coated well in the marinade. Let them sit for about 15-20 minutes. If you have more time, let them marinate longer for extra flavor. 4. Preparing the Vegetables While the chicken marinates, prepare the veggies. Toss two cups of broccoli florets, one sliced red bell pepper, and one sliced zucchini with a bit of olive oil, salt, and pepper in another bowl. This step makes the veggies tasty and bright. 1. Arranging Ingredients in Skillet In a large oven-safe skillet or baking dish, place the marinated chicken thighs in the center. Surround them with the prepared vegetables. The colors will look beautiful together. 2. Pouring Over Remaining Marinade Pour any leftover marinade over the chicken and veggies. This adds more flavor and moisture while they cook. 3. Baking Time and Temperature Bake everything in the preheated oven for 25-30 minutes. Your chicken should reach an internal temperature of 165°F (75°C), and the veggies should be tender. Use a meat thermometer to check. 1. Resting the Dish Once done, take the dish out of the oven. Let it rest for about 5 minutes. This helps the juices settle and keeps the chicken moist. 2. Garnishing with Parsley Finally, sprinkle freshly chopped parsley on top before serving. This adds a pop of color and fresh flavor. Enjoy your one-pan lemon garlic chicken and veggies! You can find the Full Recipe for more details. Best Time to Marinate For the best flavor, marinate your chicken for at least 15-20 minutes. If you can, let it sit longer. Up to two hours will deepen the taste. Keep it in the fridge while it marinates. Adjusting Seasonings Taste your marinade! You can add more lemon juice for brightness. If you like it spicy, add a pinch of cayenne. Remember, balance is key. Use salt and pepper to enhance flavors. Ensuring Chicken Doesn’t Dry Out To keep your chicken juicy, don’t overbake it. Use a meat thermometer; cook until it reaches 165°F. Let the chicken rest for 5 minutes after baking. This helps the juices stay inside. Achieving Perfectly Cooked Veggies Cut veggies into similar sizes. This helps them cook evenly. Don’t overcrowd the pan. If they are too close, they’ll steam instead of roast. Aim for a slight char for extra flavor. Pairing Ideas for Sides Serve your chicken and veggies with rice or quinoa. A fresh salad pairs well, too. You could also offer crusty bread to soak up the juices. These sides will round out the meal nicely. Best Drinks to Accompany the Meal A chilled glass of white wine works wonders here. Lemonade is a great non-alcoholic choice. Sparkling water with a slice of lemon also refreshes the palate. Enjoy your meal with these delightful drinks! {{image_2}} Different Protein Options You can change the chicken in this dish. Try chicken breasts, drumsticks, or even turkey. For a meatless option, use firm tofu or chickpeas. These swaps keep the meal tasty and fun. Vegetable Alternatives Feel free to mix in different veggies. Carrots, green beans, or asparagus work great. You can even add potatoes for a heartier dish. Just remember to cut them to a similar size for even cooking. Adding Spices or Herbs Want to boost the flavor? Add fresh herbs like thyme or rosemary. A pinch of red pepper flakes can also give it a nice kick. Experiment with spices like cumin or coriander for new tastes. Incorporating Other Citrus Fruits Lemon is fantastic, but you can also use lime or orange. These fruits add a different twist. Just remember to adjust the zest and juice amounts for balance. Stovetop Cooking You can easily make this dish on the stovetop. Just heat a skillet over medium heat. Cook the chicken for about 6-7 minutes per side, then add the veggies. Cover and cook until everything is tender. Grill Instructions Grilling adds a smoky flavor. Marinate the chicken as usual. Preheat your grill to medium heat and cook the chicken for 6-8 minutes per side. Add the veggies to a grill basket for even cooking. For the full recipe, check out the detailed instructions in the earlier section. Enjoy your cooking! To keep your One-Pan Lemon Garlic Chicken and Veggies fresh, use airtight containers. Glass or plastic containers work well. Make sure to cool the food before sealing it. This helps prevent moisture buildup. You have two main options for storing leftovers: refrigerating or freezing. If you plan to eat within three days, refrigerate. For longer storage, freeze the leftovers. When it comes to reheating, you have two choices: microwave or oven. The microwave is quick, but the oven gives better results. For the microwave, place the chicken and veggies in a safe dish. Heat on medium power until warm. Stir halfway through to heat evenly. If you use the oven, preheat it to 350°F (175°C). Place your dish in the oven for about 15-20 minutes. This way, the chicken stays juicy and the veggies stay crisp. In the refrigerator, your One-Pan Lemon Garlic Chicken and Veggies last up to three days. Keep an eye on it and avoid eating if it smells off. When frozen, the dish can last up to three months. Make sure to label the container with the date. This helps you keep track of freshness. You can use chicken breasts or drumsticks instead of thighs. Breasts cook faster but can dry out. Drumsticks stay juicy but may need more time. Choose what you like best! Yes, you can! Marinate the chicken and chop the veggies a day before. Store them in the fridge, and then bake when you're ready. This makes it easy for busy days. The chicken should reach 165°F (75°C) for safe eating. Use a meat thermometer to check. This ensures your chicken is cooked through and safe to enjoy. The veggies should be tender and bright in color. You can poke them with a fork. If they are soft, they’re ready to eat. Keep an eye on them while baking. Absolutely! Fresh herbs add great flavor. Use about three times more fresh herbs than dried. Chop them and mix them into the marinade or sprinkle them on top before serving. This blog post covered a delicious chicken recipe from start to finish. You learned about the key ingredients, preparation steps, and cooking tips. We discussed how to marinate chicken well and cook veggies perfectly. Additionally, I shared fun ways to swap ingredients and variations to try. Remember, great meals come from experimenting. Play with flavors, and don't hesitate to make it your own! Enjoy your cooking journey and share this tasty dish with friends and family. You can create something special that everyone will love.

One-Pan Lemon Garlic Chicken and Veggies Delight

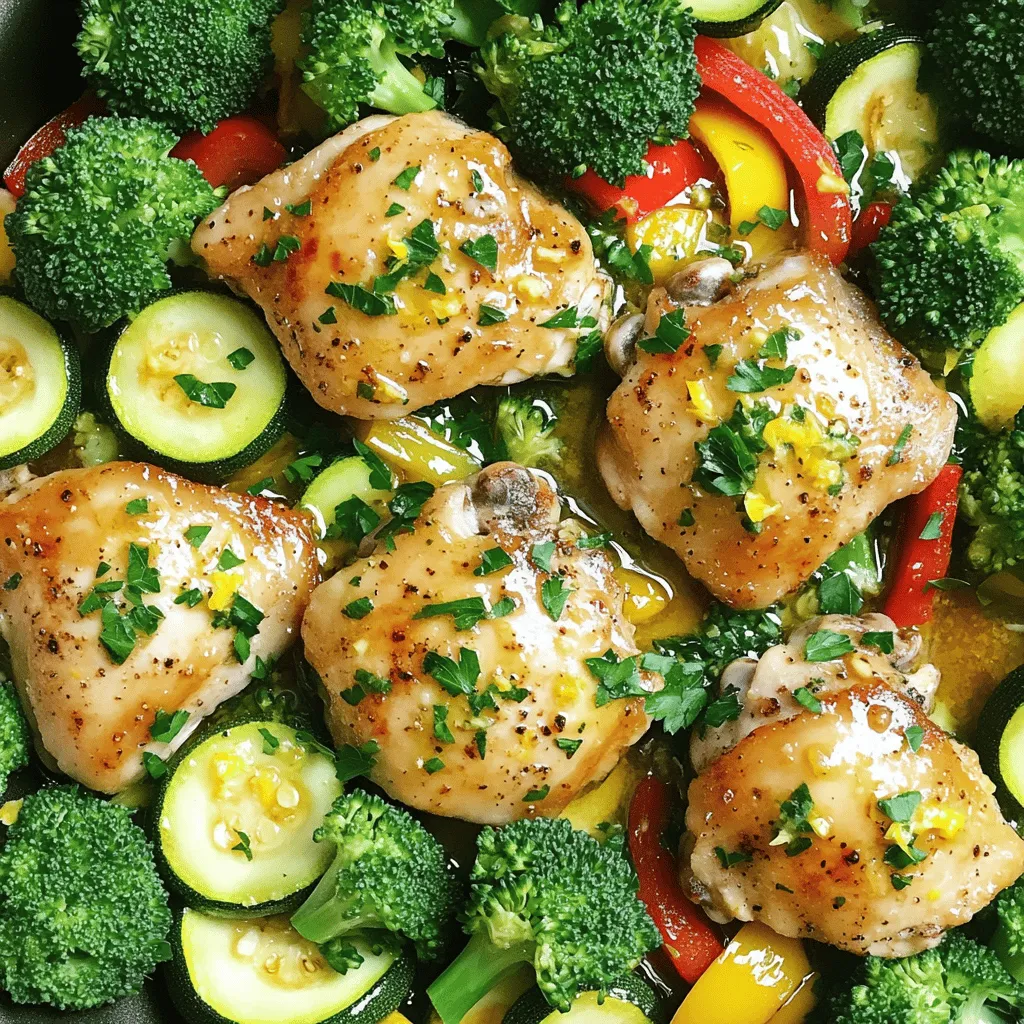
Looking for a simple, tasty meal? My One-Pan Lemon Garlic Chicken and Veggies Delight is the answer! This dish makes

To make easy veggie quesadillas, gather these ingredients: - 4 large whole wheat tortillas - 1 cup shredded cheese (cheddar or a blend) - 1 bell pepper, diced (any color) - 1 small zucchini, diced - 1 cup spinach, chopped - 1 small red onion, sliced - 1 cup canned black beans, drained and rinsed - 1 teaspoon cumin - 1 teaspoon paprika - Salt and pepper to taste - 2 tablespoons olive oil - Optional: Salsa and sour cream for serving Cheese makes a big difference in flavor. Here are some great choices: - Cheddar - Monterey Jack - Mozzarella - Pepper Jack for a spicy kick - A blend of your favorites for more taste Feel free to swap in your favorite vegetables! Here are some ideas: - Corn for sweetness - Mushrooms for earthiness - Broccoli for crunch - Carrots for color - Avocado for creaminess Try different combos to find your perfect mix! For the full recipe, check out the details above. Start by washing all your veggies. Dice the bell pepper and zucchini into small pieces. Slice the red onion thin. Chop the spinach, too. This will help them cook evenly. Rinse the black beans in a strainer. They add protein and flavor to your quesadillas. Heat a large skillet over medium heat. Add one tablespoon of olive oil. Toss in the sliced onion and sauté for 2-3 minutes. When they soften, add the bell pepper and zucchini. Cook for 3-4 minutes until they are tender. Stir in the spinach and black beans. Add cumin, paprika, salt, and pepper. Cook for 2 more minutes. The spinach will wilt nicely. Now, in the same skillet, add another tablespoon of olive oil. Place one tortilla in the skillet. On one half, sprinkle cheese, then layer the veggie mix, and top with more cheese. Fold the tortilla to make a half-moon shape. Cook for 3-4 minutes until the bottom is golden. Flip it carefully and cook for another 3-4 minutes. The cheese should melt perfectly. Remove from heat and cut into wedges. Repeat with the rest of the tortillas and filling. Serve the quesadillas warm on a bright platter. Small bowls of salsa and sour cream make great dips. For a fun twist, add fresh cilantro or jalapeño slices on top. Enjoy these easy veggie quesadillas with friends or family. They make a tasty snack or meal any time. Check the Full Recipe for more details. To get a perfect crispy quesadilla, use medium heat. If the heat is too high, the outside burns before the cheese melts. Use enough oil in the skillet, but not too much. A light coating works best. Flip the quesadilla gently, using a spatula. Cook each side until golden brown, about 3-4 minutes. This way, you’ll get a crunchy shell with gooey cheese inside. Serve your quesadillas with fresh salsa and sour cream. These dips add a nice touch. You can also add guacamole for creaminess. A side of fresh salad can help balance the meal too. If you want a kick, try jalapeño slices or hot sauce. To make your quesadillas even tastier, add spices. A pinch of chili powder can give a nice heat. Fresh herbs like cilantro or parsley can brighten the flavor. For a twist, try adding avocado slices or corn. You can even mix in some cooked chicken or shrimp for more protein. Each of these ideas can take your quesadillas to the next level. For the full recipe, check out the earlier section. {{image_2}} You can easily make gluten-free quesadillas. Use gluten-free tortillas instead of whole wheat. Many brands offer tasty options. Check your local store for these. They work just as well and keep the taste great. To make these quesadillas vegan, skip the cheese or use vegan cheese. There are many delicious plant-based cheeses available. You can also add more beans or avocado. This adds creaminess without any dairy. Feel free to mix up the fillings. Try adding corn, mushrooms, or diced tomatoes. Sweet potatoes and butternut squash make great choices too. You can even use leftover cooked veggies. Just remember to drain any excess moisture. This keeps your quesadillas from getting soggy. The Full Recipe gives you the basics, but your creativity can shine through. Don't be afraid to experiment with flavors and textures! To keep your leftover quesadillas fresh, let them cool completely. Then, wrap each quesadilla in plastic wrap or aluminum foil. You can also place them in an airtight container. This method helps to keep them moist and tasty. Store them in the fridge for up to three days. When you're ready to enjoy your leftover quesadillas, take them out of the fridge. You can reheat them in a skillet for about 3-4 minutes on medium heat. This method keeps the quesadillas crispy. If you prefer, you can use a microwave. Heat them for about 30 seconds to 1 minute. However, this may make them a bit soft. If you want to save quesadillas for later, freezing is a great option. Wrap each cooled quesadilla tightly in plastic wrap, then place them in a freezer-safe bag. Label the bag with the date. They can last for up to two months in the freezer. When you're ready to eat, thaw them in the fridge overnight before reheating. For more details and a full recipe, check out the [Full Recipe]. The best cheese for quesadillas is a melty cheese. I love using cheddar. It adds a nice flavor. You can also try Monterey Jack or a blend of cheeses. These options melt well and taste great. Yes, you can make these quesadillas ahead of time. Prepare the filling and store it in the fridge. When you're ready to eat, just assemble and cook the quesadillas. This saves time on busy days. Veggie quesadillas pair well with many sides. I suggest salsa, guacamole, or sour cream for dipping. A fresh salad or some chips can also make a nice side. You can even add some fruit for a sweet touch. Check out the Full Recipe for more ideas! In this post, we covered all aspects of making delicious quesadillas. We discussed essential ingredients, cooking steps, and tips for perfect results. You can customize these with your favorite cheeses and veggies. I shared storage tips so you can enjoy leftovers too. Remember, the key to great quesadillas is the right combination of fillings and cooking method. With practice, you will create tasty dishes every time. Enjoy your quesadilla journey!

Easy Veggie Quesadillas Quick and Tasty Recipe

If you’re craving a quick and tasty meal, try these easy veggie quesadillas! They’re simple to make and packed with

- 3 ripe bananas, mashed - 1/3 cup melted coconut oil - 1/2 cup brown sugar - 1/4 cup honey - 2 large eggs, beaten - 1 teaspoon vanilla extract To make banana bread, start with ripe bananas. They should be soft and brown. The riper they are, the sweeter your bread will taste. Next, use melted coconut oil. It adds moisture and a slight coconut flavor. For sweetness, mix brown sugar and honey. This combo gives a rich taste. Eggs and vanilla extract are also key. Eggs help bind the bread together. They also add richness and moisture. Vanilla adds a lovely aroma. - 1 teaspoon baking soda - Pinch of salt - 1 1/2 cups all-purpose flour - 1/2 teaspoon cinnamon (optional) Baking soda is a leavening agent. It helps the bread rise, making it fluffy. A pinch of salt balances the sweetness. All-purpose flour gives the bread structure. If you love spice, add cinnamon. It pairs well with banana and chocolate. - 1 cup dark chocolate chips - Nuts or seeds For an extra treat, fold in dark chocolate chips. They melt beautifully and add a rich flavor. You can also add nuts or seeds for crunch. Walnuts or pecans work well. They add texture and nutty flavors. For the full recipe, check out the [Full Recipe]. 1. Preheat oven and prepare the loaf pan First, set your oven to 350°F (175°C). Take a 9x5 inch loaf pan. Grease it with non-stick spray or line it with parchment paper. This helps the bread come out easily after baking. 2. Mix wet ingredients In a large bowl, mash the ripe bananas. Use a fork until smooth. Then, pour in the melted coconut oil. Mix well so the oil combines with the bananas. 1. Incorporate sweeteners and dry ingredients Next, add the brown sugar and honey into the banana mix. Stir until everything is blended. Beat in the eggs and vanilla extract. In another bowl, combine the baking soda, salt, and flour. If you want, add cinnamon here too. 2. Fold in optional ingredients Slowly add the dry mix to the wet mix. Stir gently until just combined. Be careful not to over-mix. Now fold in the dark chocolate chips. Make sure they spread evenly in the batter. 1. Pour batter and smooth the top Pour the batter into your prepared loaf pan. Use a spatula to smooth the top. This helps it bake evenly. 2. Baking time and checking for doneness Bake for 50-60 minutes. To check if it's done, insert a toothpick in the center. If it comes out clean, your bread is ready. Let it cool for about 10 minutes in the pan. Then, transfer it to a wire rack to cool completely. For the full recipe, refer to the section above to ensure every detail is followed for delicious results! To get the best texture in your chocolate chip banana bread, avoid over-mixing. Mix the wet and dry ingredients separately before combining them. When you mix them together, stir just until you see no more flour. This helps keep the bread soft and fluffy. Tweaking moisture levels is also key. If your bananas are small, you may need to add a bit more oil. A tablespoon or two of yogurt can add moisture too. Always check the batter; it should be thick but pourable. You can add more flavor to your bread. A pinch of nutmeg or a dash of vanilla can make a big difference. You might even try adding a bit of orange zest for a fresh twist. If you need to change ingredients for dietary needs, you can use maple syrup instead of honey. Swap regular flour for almond flour for a gluten-free option. Each change can lead to a new, tasty bread! Serving your chocolate chip banana bread can be fun. Slice it warm and add a pat of butter on top. You can also serve it with fresh fruit or whipped cream for a special treat. For garnishing, sprinkle some extra chocolate chips or chopped nuts on the top after baking. This gives it a nice look and adds texture. Try to arrange the slices on a colorful plate for a beautiful presentation. Feel free to explore the [Full Recipe] for more details on making this delightful treat! {{image_2}} You can make a yummy banana bread without chocolate. To do this, skip the chocolate chips. Replace them with nuts or dried fruit. You can use walnuts or raisins for added flavor. To keep it sweet, add an extra tablespoon of honey or sugar. You might also try pure maple syrup for a new taste. This bread will still be moist and full of banana flavor. If you need a gluten-free option, use almond flour or coconut flour. They work well and add a nice flavor. Use 2 cups of almond flour or 1 ½ cups of coconut flour. You might need to add a little more liquid. For a vegan version, swap the eggs for flax eggs. Mix 1 tablespoon of ground flaxseed with 3 tablespoons of water. Let it sit for a few minutes until it thickens. This will help bind the ingredients just like eggs. Seasonal fruits can add fun new flavors to your banana bread. In summer, try adding blueberries or strawberries. In fall, you can mix in chopped apples or pumpkin puree. If you have special occasions, add nuts like pecans or almonds for crunch. You can even sprinkle some cinnamon or nutmeg for a festive touch. This keeps your banana bread fresh and exciting! For the full recipe, check out the details above. To keep your chocolate chip banana bread fresh, try these tips: - Let the bread cool completely. - Wrap it tightly in plastic wrap. - Place it in an airtight container. These steps help keep moisture in and air out. You can also use a resealable bag. Just make sure to squeeze out the air before sealing. If you want to keep your banana bread longer, freezing is a great option. Here’s how to do it: - Slice the bread into pieces. - Wrap each slice in plastic wrap. - Place the wrapped slices in a freezer bag. To thaw, just take out a slice and leave it at room temperature. You can also use a microwave for quick thawing. For best results, eat it within three months. Chocolate chip banana bread stays fresh for a few days at room temperature. Here are the details: - At room temperature: 2-3 days. - In the fridge: up to a week. Storing in the fridge can dry it out, so only do this if you need to keep it longer. Enjoy your delicious bread at its best! You can find the full recipe [Full Recipe]. Yes, you can make banana bread without chocolate chips. If you want to change the flavor, try adding nuts or dried fruit. Walnuts and pecans work well. You can also use spices like cinnamon for warmth. Just remember, if you skip the chocolate, you might want to add a bit more sugar to keep it sweet. You can check if the banana bread is done by using a toothpick. Insert it into the center of the loaf. If it comes out clean, your bread is ready. You can also look for a golden-brown top. The edges should pull away from the pan slightly, showing it's baked well. While you can use green bananas, they won’t taste as sweet. Ripe bananas have that rich flavor we love in banana bread. If you can, let your bananas ripen until they turn brown. This way, they will add the best flavor and moisture to your bread. This chocolate chip banana bread recipe blends tasty ingredients and simple steps. We discussed essential items like ripe bananas, coconut oil, and sweeteners. You learned about mixing techniques to achieve a perfect texture and creative variations for dietary needs. In my experience, this recipe is a crowd-pleaser. With proper storage, your banana bread will stay fresh and delicious. Don't hesitate to explore different flavor options for a unique twist. Enjoy baking and sharing your banana bread!

Chocolate Chip Banana Bread Delightfully Easy Recipe

If you love banana bread and chocolate, you’re in for a treat! My Chocolate Chip Banana Bread recipe is both

To make this tasty 30-minute garlic butter shrimp, you need the following items: - 1 pound large shrimp, peeled and deveined - 4 tablespoons unsalted butter - 4 cloves garlic, minced - 1 teaspoon red pepper flakes - Juice of 1 lemon - 1 tablespoon fresh parsley, chopped - Salt and pepper to taste - Cooked rice or pasta for serving Each ingredient plays a key role in building flavor. The shrimp should be large and fresh, as they absorb the garlic butter well. Unsalted butter allows you to control the salt. Garlic adds depth, while red pepper flakes provide a nice kick. Lemon juice brightens the dish, and parsley adds freshness. Don't forget the salt and pepper to enhance all the flavors. For more details, you can check the Full Recipe. Enjoy every bite of this quick and tasty meal! - Rinse and dry the shrimp, then season with salt and pepper. - Prep your cooking area by gathering all your tools and ingredients. - Melt the butter in a large skillet over medium heat until it bubbles. - Add minced garlic and sauté for about 30 seconds. Don't let it burn! - Place the seasoned shrimp in the skillet in a single layer. - Cook the shrimp for 2-3 minutes on one side until they turn pink. - Flip the shrimp and cook for another 2-3 minutes. - Sprinkle red pepper flakes over the shrimp. Squeeze the lemon juice on top. - Stir to mix well and finish cooking until shrimp are opaque. - Remove from heat and stir in chopped parsley. - Prep Time: 5 minutes - Cook Time: 25 minutes - Total Time: 30 minutes You can find the full instructions in the [Full Recipe]. Enjoy your tasty dish! To perfect your garlic butter shrimp, be careful with the garlic. When you sauté it, watch the heat. Garlic can burn quickly, and burned garlic tastes bitter. You want it to be fragrant and golden, not dark. Adjust the red pepper flakes to suit your taste. If you love heat, add more flakes. If you prefer mild, use less. This dish is flexible, so make it how you like! Presentation matters! Serve your shrimp over a bed of rice or pasta. This adds color and makes the dish pop. Garnish with lemon wedges and parsley. The bright lemon adds freshness, and parsley gives a lovely green touch. Don't forget the bread! A piece of crusty bread is perfect for soaking up the tasty garlic butter sauce. It makes the meal more enjoyable and satisfying. Check out the Full Recipe for more details! {{image_2}} You can boost the taste of your garlic butter shrimp with a few simple tweaks. Adding white wine to the pan gives a rich depth of flavor. Just pour in a splash after sautéing the garlic. Let it simmer for a minute before adding the shrimp. This adds a nice zing. Incorporating fresh vegetables also enhances the dish. Try adding sliced bell peppers or a handful of spinach. These veggies add color, nutrition, and taste. Toss them in the skillet with the garlic for a quick sauté. You’ll get a bright and vibrant meal. If you want a lighter dish, swap the butter for olive oil. This change keeps the shrimp tasty but cuts the calories. Use the same amount of oil as butter when you cook. The shrimp will still turn out nice and juicy. You can also replace shrimp with chicken or tofu for a different twist. If you choose chicken, cut it into bite-sized pieces and cook until golden. For tofu, use firm tofu and sauté until crispy. Both options bring new flavors and textures to the meal. For the full recipe and step-by-step instructions, check out the [Full Recipe]. To keep your garlic butter shrimp fresh, store leftovers in an airtight container. This will help keep the shrimp moist and flavorful. You can refrigerate them for up to 2 days. If you wait longer, the shrimp may lose their texture and taste. When it's time to enjoy your leftovers, reheat them gently in a skillet. This method helps maintain the shrimp's soft texture. Heat on low to avoid overcooking. Stir occasionally to warm them evenly. If you like, add a tiny bit of butter to enhance that rich flavor again. Enjoy every bite! Total cooking time is approximately 30 minutes. This includes prep and cooking. You can have a delicious meal ready in no time. Yes, just ensure they are fully thawed and patted dry before cooking. This helps them cook evenly and prevents excess water in the dish. It pairs well with rice, pasta, or a fresh salad. You can choose what you like best. Each option soaks up the garlic butter flavor nicely. The spiciness can be adjusted using red pepper flakes to your preference. Add more for heat or less for a milder taste. Customize it to fit your family's liking. For the full recipe, check out the details I shared earlier. Garlic butter shrimp is a simple and tasty dish. You learned how to prepare and cook it with fresh ingredients. Remember to watch the garlic closely to avoid burning. For added flavor, feel free to swap shrimp for chicken or tofu. Store any leftovers in the fridge for a few days. Overall, this dish is quick, easy, and perfect for any meal. Enjoy making it as much as I enjoy sharing it!

30-Minute Garlic Butter Shrimp Flavorful Quick Meal

Looking for a quick, tasty meal? Try my 30-Minute Garlic Butter Shrimp! This dish bursts with flavor and takes just

To make the Maple Pecan Sweet Potato Casserole, you need: - 4 large sweet potatoes, peeled and cubed - 1/4 cup maple syrup - 1/4 cup unsweetened almond milk (or regular milk) - 1 teaspoon vanilla extract - 1/2 teaspoon cinnamon - 1/4 teaspoon nutmeg - Salt to taste - 1 cup pecans, chopped - 1/2 cup brown sugar - 1/4 cup rolled oats - 2 tablespoons melted coconut oil (or butter) Sweet potatoes are full of vitamins and minerals. They give you energy and help your eyes. Maple syrup adds natural sweetness and contains antioxidants. Almond milk is lower in calories than regular milk, making it a great choice. Pecans are rich in healthy fats. They also help boost heart health. Cinnamon and nutmeg enhance flavor and may improve digestion. This mix of ingredients ensures a tasty and nutritious dish. If you need to change the recipe for dietary needs, there are options. For a vegan version, use almond milk and coconut oil. You can swap sweet potatoes with butternut squash for a different taste. If you have nut allergies, try sunflower seeds instead of pecans. Use brown sugar alternatives like coconut sugar if needed. Always adjust the flavors to suit your needs while keeping the dish delicious. For the complete recipe, check the Full Recipe. Start by gathering your ingredients. You need four large sweet potatoes, maple syrup, almond milk, vanilla extract, spices, pecans, brown sugar, oats, and coconut oil. Peel and cube the sweet potatoes. This makes them cook faster and easier to mash later. Next, fill a large pot with water and bring it to a boil. Add a pinch of salt to the water. Once the water boils, add your cubed sweet potatoes. Cook them for about 15 to 20 minutes, or until they are tender when pierced with a fork. Drain the sweet potatoes and let them cool slightly. Now, take a large mixing bowl and mash the sweet potatoes with a potato masher. You want them smooth and creamy. Add the maple syrup, almond milk, vanilla extract, cinnamon, nutmeg, and salt. Stir everything together well. Once mixed, transfer the sweet potato mix to a greased 9x13-inch casserole dish. Spread it out evenly. In a different bowl, combine the chopped pecans, brown sugar, rolled oats, and melted coconut oil. Make sure everything is well coated. Sprinkle the pecan mixture over the sweet potato layer in your casserole dish. Preheat your oven to 350°F (175°C). Place your casserole in the oven and bake for 25 to 30 minutes. Look for a golden brown and bubbly top. This means it is ready! After baking, remove the casserole from the oven. Let it cool for a few minutes before serving. This step helps the flavors to settle. You can find the full recipe above. Enjoy your delicious Maple Pecan Sweet Potato Casserole! You can prepare this dish in advance. Cook the sweet potatoes and mash them. Mix in all the other ingredients. Place the sweet potato mixture in a casserole dish and cover it. Keep it in the fridge overnight. The next day, take it out, add the pecan topping, and bake! To boost the flavors, consider adding a pinch of ginger. Fresh ginger adds warmth. You can also swap the maple syrup for honey for a different taste. A sprinkle of sea salt enhances sweetness, making each bite pop. One mistake is overcooking the sweet potatoes. They should be tender but not mushy. Another error is not letting the casserole cool before serving. Cooling helps set the layers. Lastly, ensure you mix the topping well. Uneven topping can lead to dry spots in your dish. For the full recipe, check out the earlier section. Enjoy your cooking! {{image_2}} You can switch up the nuts in this casserole. Try walnuts or almonds if you want a change. Each nut adds its own flavor and crunch. Walnuts give a rich taste, while almonds bring a light crunch. Just chop them up, and mix them in the topping. You can even toast the nuts for more flavor. Spices can change the taste of your dish. Add ginger for a warm kick. You could also try a dash of allspice for a deeper flavor. A splash of orange extract can brighten the dish. Mix and match to find what you love. Each spice brings a new twist to your Maple Pecan Sweet Potato Casserole. If you want a lighter version, swap out some ingredients. Use less sugar or try maple syrup as a sweetener. You can replace brown sugar with coconut sugar for a lower glycemic index. Almond milk is a great dairy-free option. For the topping, use less coconut oil or butter. These small changes keep the dish tasty and guilt-free. Store any leftover Maple Pecan Sweet Potato Casserole in an airtight container. It keeps well in the fridge for about three to four days. Make sure to let it cool down before sealing it. This helps keep the casserole fresh and tasty. If you want to save it for later, freezing is a great option. First, let the casserole cool completely. Then, cut it into portions for easy reheating. Wrap each piece tightly in plastic wrap, then place them in a freezer-safe bag. It can last up to three months in the freezer. When you want to eat it, just thaw it in the fridge overnight. To reheat, place the casserole in the oven at 350°F (175°C). Cover it with foil to keep it moist. Heat for about 20-25 minutes or until it is warm throughout. You can also microwave individual portions for a quick meal. Just cover them and heat in 30-second intervals until hot. Enjoy the flavors just like when it was fresh! Yes, you can use other potatoes like Yukon gold or russet potatoes. However, sweet potatoes give the best flavor and texture. They are sweet and creamy. If you choose another type, adjust the cooking time. You want them soft enough to mash easily. To make this dish vegan, swap regular milk with unsweetened almond milk. Use coconut oil instead of butter. The maple syrup is already vegan. This keeps the sweet flavor while being plant-based. Your guests will love it just as much! This casserole pairs well with roasted vegetables or a fresh green salad. It also goes nicely with grilled meats or a hearty veggie dish. The sweet and nutty flavors complement savory meals perfectly. You can even make it a main dish for a vegetarian feast! You can store leftovers in the fridge for about 3-5 days. Place it in an airtight container for best results. Reheat in the oven or microwave before serving. It still tastes great after a few days! Yes, you can prep this casserole a day ahead. Make the sweet potato mix and the topping separately. Store them in the fridge. When you're ready to bake, just assemble and pop it in the oven. This saves time on busy days! For the full recipe, check out the Maple Pecan Sweet Potato Casserole section! In this post, we covered essential ingredients, step-by-step instructions, and handy tips. You learned about key ingredient benefits, popular substitutions, and ways to enhance flavor. We also discussed storing and reheating methods to keep your dish fresh. With my tips, you can avoid common mistakes and try fun variations. Remember, cooking is about creativity. Don't hesitate to make it your own. Whether for a family meal or a gathering, this Maple Pecan Sweet Potato Casserole will impress. Enjoy your cooking adventure!

Maple Pecan Sweet Potato Casserole Tasty and Easy

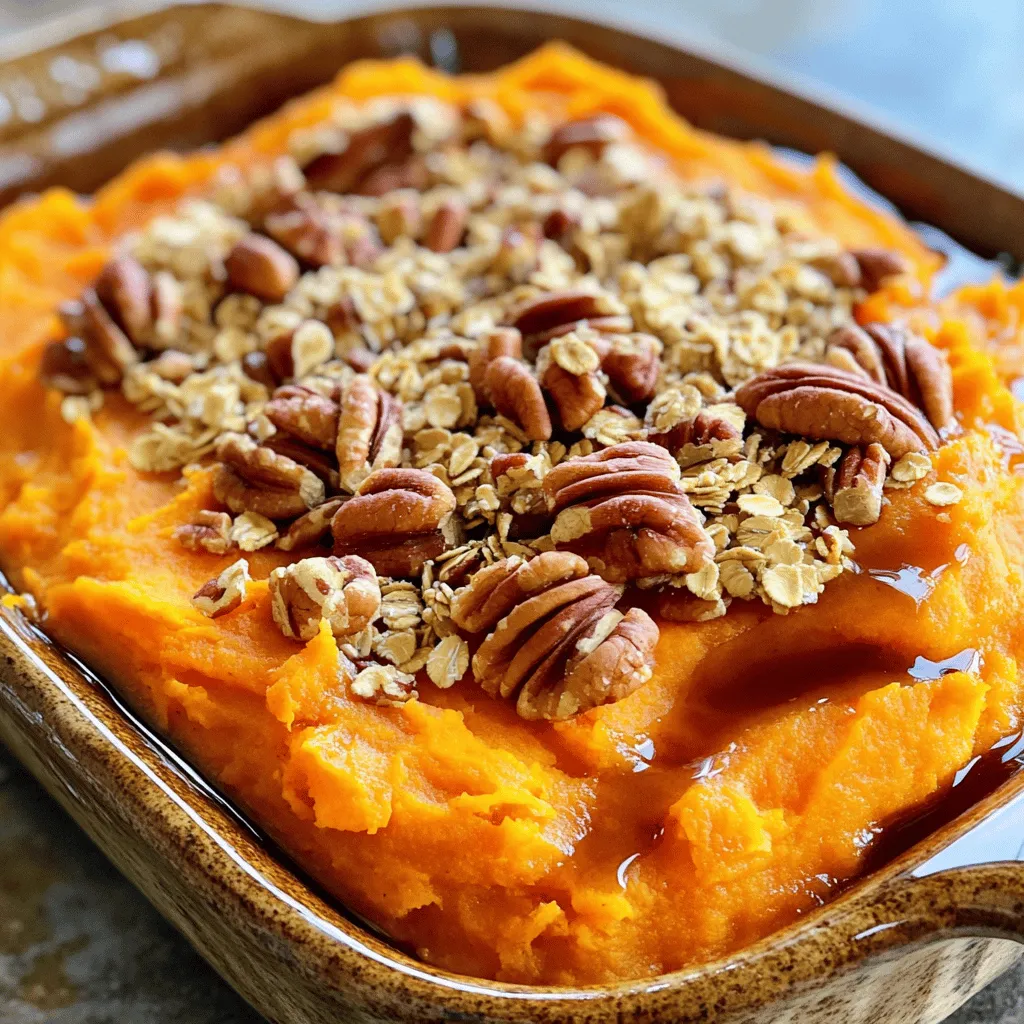
Get ready to impress with a dish that’s both simple and delicious! My Maple Pecan Sweet Potato Casserole combines sweet

To make a great Zucchini Noodle Primavera, gather these main ingredients: - 4 medium zucchinis, spiralized into noodles - 1 bell pepper (red, yellow, or orange), thinly sliced - 1 cup cherry tomatoes, halved - 1 cup broccoli florets - 1 medium carrot, julienned - 2 cloves garlic, minced - 1/4 cup fresh basil leaves, chopped - 3 tablespoons olive oil - Salt and pepper to taste - 1/4 teaspoon red pepper flakes (optional) - Grated Parmesan cheese (for serving) These ingredients create a colorful and tasty dish. The zucchini noodles serve as a fresh base. The variety of veggies adds flavor and crunch. You can add more flavors to your dish with these options: - 1/2 cup sliced mushrooms - 1 small onion, thinly sliced - Lemon juice or zest for brightness - Nuts like pine nuts or walnuts for crunch These extras can personalize your dish. They add depth and texture, making each bite exciting. For this recipe, make sure you have the right tools: - A spiralizer or vegetable peeler for zucchini - A large skillet for cooking - A cutting board and knife for prep - Measuring cups and spoons for accuracy Having the right equipment makes cooking easier. It ensures you prepare your Zucchini Noodle Primavera quickly and efficiently. Don't forget to check the [Full Recipe] for more details! Start with fresh, crisp veggies. Use a spiralizer for the zucchinis. You want long, thin noodles. Slice your bell pepper into thin strips. Cut your cherry tomatoes in half. Julienne the carrot into thin matchsticks. Break the broccoli into small florets. This helps them cook evenly. Make sure your garlic is minced well. This will add great flavor. In a large skillet, heat 2 tablespoons of olive oil over medium heat. Add the minced garlic and cook for about 1 minute until it smells great. Next, toss in the bell pepper, carrot, and broccoli. Sauté these for about 4-5 minutes. Look for a slight softness in the veggies. Add the halved cherry tomatoes next. Cook for another 2-3 minutes until they start to break down. In a separate pan, add the zucchini noodles with 1 tablespoon of olive oil. Sauté these for 2-3 minutes. You want them tender but still crunchy. Once done, mix the sautéed veggies with the zucchini noodles in the large skillet. Toss everything together until it’s well combined. Season with salt, pepper, and red pepper flakes if you like a little heat. Add the chopped fresh basil and give it one last toss. Serve hot and sprinkle with grated Parmesan cheese if you want. For the complete recipe, check out the Full Recipe. To spiralize zucchini, use a spiralizer. This tool makes perfect noodles. Choose firm, fresh zucchinis. Cut off both ends before spiralizing. Aim for medium-sized zucchinis for better texture. If you don’t have a spiralizer, a vegetable peeler works, too. Just create thin strips. Keep the skin on for added color and nutrients. Cook zucchini noodles quickly. Sauté them for about 2-3 minutes. This keeps them crisp and tender. Overcooking makes them mushy. Always add salt at the end. Salt draws out moisture. If you want to reduce moisture, sprinkle salt on raw noodles. Let them sit for 10 minutes, then pat dry. This trick helps them stay firm when cooked. Add fresh herbs for bright flavor. Basil and parsley are great choices. You can also try thyme or oregano. For heat, include red pepper flakes. A squeeze of lemon juice adds zing. Experiment with different cheeses, too. Feta or goat cheese can add creaminess. Don’t forget to taste as you cook. Adjust salt and pepper to your liking. For the full recipe, check out the details above! {{image_2}} You can make Zucchini Noodle Primavera heartier by adding protein. Grilled chicken or shrimp works great. For chicken, cook it in the skillet before adding veggies. Dice it into bite-sized pieces. For shrimp, sauté it until it turns pink. This adds flavor and makes the dish more filling. You can also use tofu if you want a meat-free option. This dish is already gluten-free with zucchini noodles! But if you want more variety, consider using gluten-free pasta. Look for options made from rice or quinoa. These will cook similarly, giving you a tasty base. Just ensure the sauce is also gluten-free by checking labels. To make this dish vegan, skip the Parmesan cheese. You can sprinkle nutritional yeast for a cheesy taste. If you want to keep it vegetarian, just add the cheese. Both options keep the dish delicious. You can also add more veggies like spinach or mushrooms for extra texture and flavor. For the full recipe, check out the details above and enjoy your cooking! To store leftover Zucchini Noodle Primavera, first let it cool down. Place it in an airtight container. Make sure to remove as much air as you can. This helps keep the dish fresh. Store it in the fridge for up to three days. If you want to keep it longer, consider freezing. When ready to eat the leftovers, you can reheat them easily. The best way is to use a skillet. Heat it over medium heat and add a splash of olive oil. Add the noodles and veggies. Stir them for about 3-5 minutes. This method keeps them tasty and prevents sogginess. You can also use a microwave. Place it in a bowl, cover it, and heat for 1-2 minutes. Stir halfway through for even heating. If you want to freeze Zucchini Noodle Primavera, here's how. First, cook the dish completely. Then, let it cool to room temperature. Once cool, transfer it to a freezer-safe container. Make sure to label it with the date. You can freeze it for up to three months. When you're ready to eat, thaw it overnight in the fridge. Reheat as mentioned before. This way, you enjoy a fresh meal even after freezing. For the full recipe, refer to the earlier sections. Yes, you can prepare zucchini noodles ahead of time. Spiralize them and store them in the fridge. Use a paper towel to absorb excess moisture. This helps keep them fresh and crisp. Enjoy them within two days for the best taste and texture. If you want a change, try other veggie noodles. You can use butternut squash or carrots. Spaghetti squash also works well. These alternatives give a fun twist to your dish. They add different flavors and textures, too. To make this dish more filling, add protein. Cooked chicken, shrimp, or tofu are great options. You can also mix in beans or lentils for extra heartiness. Serve with whole grain bread or a side salad for a complete meal. Yes, this recipe is great for meal prep. You can store it in airtight containers. It stays fresh for up to four days in the fridge. Reheat it gently on the stove or in the microwave. This makes it easy to enjoy a healthy meal later. For the full recipe, check out the details above! Zucchini Noodle Primavera offers a fresh, healthy meal option. We explored key ingredients and steps to make it. You learned about tips for texture and flavor too. Variations make this dish adaptable for any diet. Proper storage keeps leftovers tasty for later. In the end, this recipe is simple, fun, and full of flavor. Enjoy your cooking adventure!

Zucchini Noodle Primavera Delicious and Fresh Dish

Welcome to my kitchen, where I’ll share a vibrant dish: Zucchini Noodle Primavera! This fresh meal bursts with flavor and

- 1 pound boneless, skinless chicken breasts, diced - 2 cups penne pasta - 4 cups chicken broth - 1 cup heavy cream - 1 cup grated Parmesan cheese - 2 tablespoons olive oil - 3 cloves garlic, minced - 1 teaspoon dried Italian seasoning - 1 teaspoon salt - ½ teaspoon black pepper - 2 cups fresh spinach - Fresh basil for garnish (optional) - Calories: Approximately 600 per serving - Protein: 40 grams - Carbohydrates: 50 grams - Fats: 25 grams - Fiber: 3 grams In this Instant Pot creamy chicken pasta recipe, fresh ingredients shine. The chicken adds protein and flavor. The penne pasta cooks perfectly in the broth. Heavy cream makes the sauce rich and smooth. Grated Parmesan cheese gives a nice salty bite. I love using olive oil to sauté the chicken. It helps to brown the meat and adds a lovely flavor. Garlic brings warmth and depth. I often use dried Italian seasoning for that classic taste. Salt and black pepper balance all the flavors. Fresh spinach adds a pop of color and nutrients. You can also add fresh basil for a lovely finish. Tracking nutritional information is key. This dish is hearty but still offers a good balance of nutrients. You can adjust ingredients based on your needs. For example, you could use less cream for a lighter meal. This recipe offers a complete meal in one pot. It’s easy to make and full of flavor. Don't forget to check the Full Recipe for detailed steps! - Set your Instant Pot to the sauté function. - Add 2 tablespoons of olive oil. - Once hot, add 1 pound of diced chicken. - Cook for 5-7 minutes until the chicken is browned. - Add 3 cloves of minced garlic. - Sauté for 1-2 minutes until fragrant. - Pour in 4 cups of chicken broth. - Add 2 cups of penne pasta and stir well. - Mix in 1 teaspoon of dried Italian seasoning. - Add 1 teaspoon of salt and ½ teaspoon of black pepper. - Stir everything together. - Close the lid and set the valve to sealing. - Cook on high pressure for 4 minutes. - Once done, perform a quick release by turning the valve to venting. - Open the lid and stir in 1 cup of heavy cream. - Add 1 cup of grated Parmesan cheese and mix until smooth. - Fold in 2 cups of fresh spinach until wilted. - Your meal is ready to serve, and it looks amazing! You can find the full recipe to guide you through each step! To make your pasta just right, avoid overcooking it. The Instant Pot cooks pasta fast. Use the timing in the recipe for best results. If you use a different pasta type, adjust the liquid. Some pasta absorbs more water. Keep an eye on your liquid levels as you cook. Boost the taste of your dish by adding extra herbs or spices. Italian seasoning works great, but feel free to experiment. Fresh herbs like thyme or rosemary can add depth. You can also toss in some vegetables. Spinach is a great choice, but you can add bell peppers or peas too. Pair your creamy chicken pasta with simple side dishes. A fresh salad or garlic bread complements it well. For wine lovers, a light white wine is perfect. A Sauvignon Blanc or Pinot Grigio can enhance the meal. Enjoy the flavors together for a delightful dining experience. {{image_2}} You can easily change the protein in this dish. Use shrimp for a seafood twist. Shrimp cooks quickly and adds a fresh taste. You can also try sausage for a heartier flavor. Sausage brings a nice spice that works well with the cream sauce. If you want a lighter option, substitute turkey for chicken. Turkey is lean and packed with protein. For a plant-based choice, use tofu. Tofu absorbs flavors well and makes the meal filling. If you need gluten-free options, select gluten-free pasta. Many brands offer pasta that cooks just like regular penne. This way, you can enjoy the same creamy goodness without gluten. For those avoiding dairy, try coconut milk or cashew cream. Both give a rich texture without the dairy. You can also use nutritional yeast as a cheese substitute. It adds a cheesy flavor without any dairy. Want to enhance the taste? Add sun-dried tomatoes for a burst of flavor. Their sweetness pairs beautifully with the cream. You might also enjoy the briny taste of olives. They add a Mediterranean twist to your dish. For a bright touch, squeeze in some lemon juice or add lemon zest. This small addition lifts the dish and adds a refreshing element. These simple changes can make your creamy chicken pasta even more exciting. For the full recipe, check out the details above. To store your leftovers, first let the pasta cool down. Then, place it in an airtight container. This will keep it fresh. You can store it in the fridge for up to three days. Make sure to label the container with the date you made it. For longer storage, freezing is a great option. Divide the pasta into single servings. Use freezer-safe containers or bags. Squeeze out as much air as you can to prevent freezer burn. You can freeze the pasta for up to three months. When you are ready to eat it, thaw it overnight in the refrigerator. This helps keep the texture nice. You can also thaw it in the microwave if you're in a hurry. To reheat your pasta, use a microwave or a stovetop. If using a microwave, place the pasta in a bowl and add a splash of water or cream. This helps keep it moist. Cover the bowl with a lid or a paper towel. Heat it in short intervals, stirring in between. Aim for a temperature of 165°F to ensure it is hot all the way through. If reheating on the stovetop, add a bit of broth or cream in a pan. Heat over low until warm. Stir often to keep it from sticking. Enjoy your creamy chicken pasta just like the first time! The total cooking time is about 30 minutes. This includes a 10-minute prep time and 20 minutes for cooking. You can enjoy a delicious meal in no time! Yes, you can use frozen chicken breasts. Just add an extra 2-3 minutes to the cooking time. Make sure to check that the chicken reaches a safe internal temperature of 165°F. You can serve this dish with many sides. Here are some popular choices: - Garlic bread - Caesar salad - Steamed broccoli - Roasted vegetables Garnishing with fresh basil adds a nice touch, too! Yes, you can easily double this recipe. Just make sure your Instant Pot is large enough. Adjust the ingredients accordingly, but the cooking time stays the same. Enjoy more of this creamy goodness! This blog post covered a tasty creamy chicken pasta recipe. We went through key ingredients and their nutritional value. I shared step-by-step instructions for making this dish in an Instant Pot. You also learned tips for perfecting the pasta, serving suggestions, and fun variations. Now, it’s time to get cooking and enjoy this simple and delicious meal. With a few adjustments, you can make it your own. Bon appétit!

Instant Pot Creamy Chicken Pasta Simple and Tasty Meal

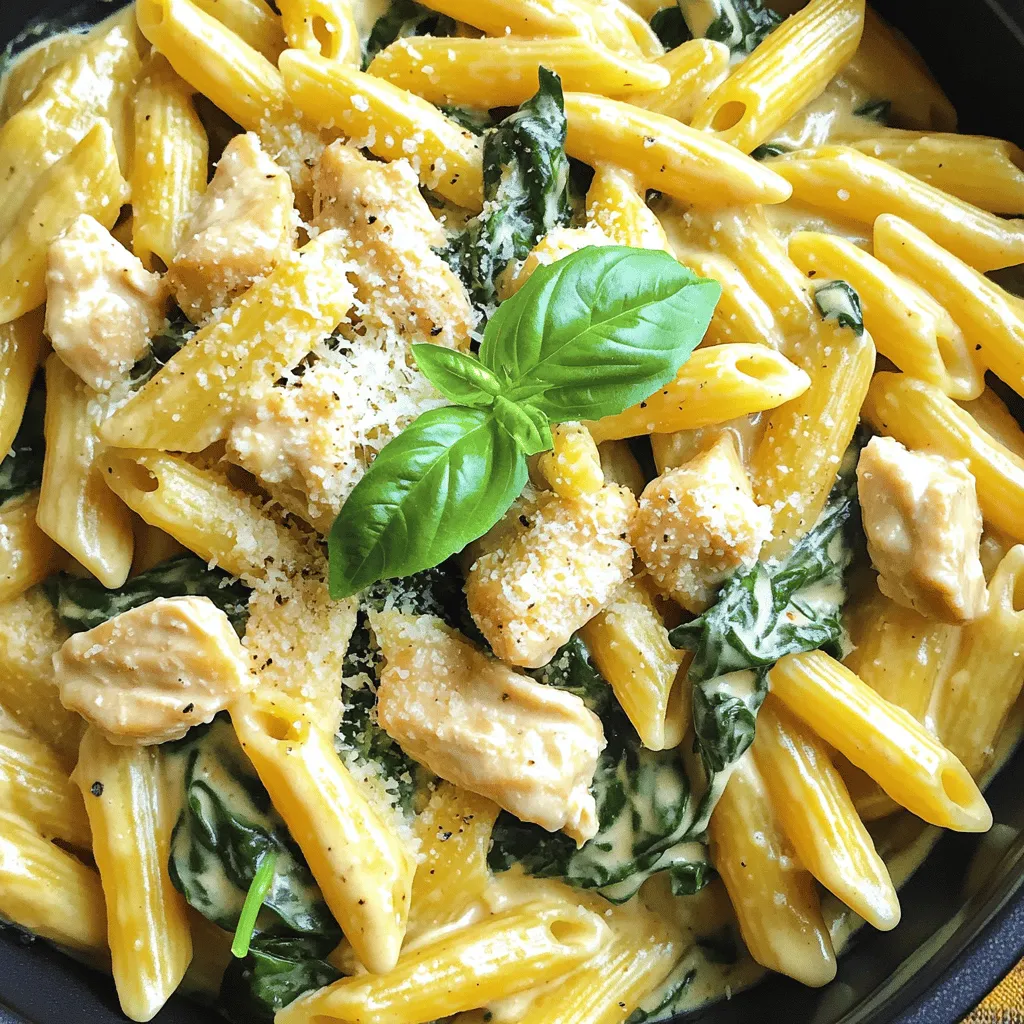
Looking for a quick, tasty dinner? This Instant Pot Creamy Chicken Pasta is the answer! In just a few steps,

- 1 block (14 oz) firm tofu, pressed and cubed - 2 tablespoons soy sauce - 1 tablespoon sesame oil - 1 tablespoon cornstarch - 2 cups mixed vegetables (bell peppers, broccoli, snap peas, carrots) - 2 cloves garlic, minced - 1-inch piece of ginger, grated - 2 green onions, chopped - 1 tablespoon rice vinegar - 1 tablespoon sesame seeds - Cooked rice or quinoa, for serving Tofu is the star here. It gives protein and a lovely texture. Firm tofu works best. It holds its shape during cooking. Pressing it removes extra water. This makes the tofu crispier when cooked. Soy sauce adds salt and umami flavor. You can choose low-sodium soy sauce to cut back on salt. Sesame oil brings a nutty taste and richness to the dish. It’s best to use toasted sesame oil for more flavor. Mixed vegetables add color and nutrients. Bell peppers bring sweetness, while broccoli offers crunch. Snap peas add a fresh snap, and carrots give a touch of earthiness. Feel free to use your favorites. If you want a different protein, try tempeh or chickpeas. You can also skip the tofu for a veggie-only dish. For soy sauce, use tamari for a gluten-free option. If sesame oil is not available, try olive oil, but the flavor will change. You can swap the mixed vegetables with any seasonal produce you have. Zucchini, mushrooms, or cabbage can all work well. For rice vinegar, apple cider vinegar can be a good substitute. It has a similar tangy flavor. First, press the tofu. Place it between paper towels. This removes extra moisture. Let it sit for about 15 minutes. This step helps the tofu get crisp. After pressing, cut the tofu into small cubes. Aim for bite-sized pieces. This makes cooking faster and easier. Next, marinate the tofu. In a bowl, mix the cubed tofu with soy sauce and sesame oil. Let it sit for at least 10 minutes. The longer it sits, the more flavor it gains. Then, sprinkle cornstarch over the tofu cubes. Gently toss to coat them. This will help create a nice crust when you fry it. Now, it's time to cook the tofu. Heat a non-stick skillet or wok over medium-high heat. Add sesame oil to the pan. Once hot, add the tofu cubes. Cook them until they turn golden brown. This usually takes about 4 to 5 minutes. Make sure to stir occasionally. Once the tofu is crispy, transfer it to a plate and set it aside. In the same skillet, add minced garlic and grated ginger. Sauté for about 30 seconds. You want to smell that great aroma! Next, add your mixed vegetables. Stir-fry them for 4 to 5 minutes. They should be crisp and tender. After that, return the cooked tofu to the skillet. Add the leftover soy sauce and rice vinegar. Toss everything together gently. Cook for another minute to heat it through. Finally, serve the stir-fry over cooked rice or quinoa. Garnish with sesame seeds and chopped green onions. Enjoy your tasty creation! For the complete recipe, check the Full Recipe. To get crispy tofu, start with firm tofu. Press it well to remove moisture. Lay it between paper towels and place a weight on top for 15 minutes. Once dry, cut it into cubes. Coat the cubes with cornstarch. This step adds crunch when frying. Heat oil in a skillet over medium-high heat. Cook the tofu until golden brown, about 4-5 minutes. Flip the cubes gently to ensure all sides get crispy. The best veggies for stir-frying are colorful and quick-cooking. I love using bell peppers, broccoli, snap peas, and carrots. These add great flavor and texture. You can also try zucchini or mushrooms for variety. Make sure to cut them into bite-sized pieces. This helps them cook evenly and quickly. Stir-fry them until they are crisp-tender. This keeps them vibrant and fresh. If you like spice, add some heat to your stir-fry! You can include red pepper flakes or sliced jalapeños. Start with a small amount and adjust to your taste. Another option is to add sriracha or chili paste for a kick. Mix it in with the soy sauce for even flavor. This adds complexity and makes your dish exciting. Enjoy the heat with your crispy tofu and fresh veggies! For the full recipe, check out Quick Veggie Stir-Fry with Tofu. {{image_2}} You can keep this dish fully vegan with simple swaps. Use tamari instead of soy sauce for a gluten-free option. For extra flavor, add a splash of coconut aminos. If you want creaminess, toss in some avocado after cooking. Want to switch up the protein? Try chickpeas or tempeh instead of tofu. Both add great texture and taste. If you like, use edamame for a fun twist. These options are packed with protein and nutrients. Use seasonal veggies for the best flavor. In spring, add asparagus or snap peas. Summer works well with zucchini or bell peppers. In fall, consider adding squash or Brussels sprouts. Winter is perfect for hearty veggies like kale or carrots. Each season brings new colors and tastes to your stir-fry. For the full recipe, check the reference section. To store your leftover quick veggie stir-fry with tofu, let it cool first. Place the stir-fry in an airtight container. This keeps it fresh. Store it in the fridge for up to 3 days. If you want to enjoy it later, consider freezing it. When you're ready to eat the leftovers, you can reheat them easily. Use a microwave for quick heating. Place your stir-fry in a microwave-safe bowl. Heat it for 1-2 minutes, stirring halfway to warm evenly. You can also reheat it in a pan. Add a splash of water to avoid drying it out. Stir over medium heat for about 5 minutes. If you want to freeze your stir-fry, do it right after cooking. Make sure it cools completely first. Then, transfer it into freezer-safe bags or containers. Remove as much air as possible. You can freeze it for up to 3 months. When you’re ready to eat, thaw it in the fridge overnight. Reheat it as mentioned above for a tasty meal. For the full recipe, check out the earlier sections. To make this dish gluten-free, simply swap the soy sauce with gluten-free tamari. Many tamari brands offer great taste without gluten. Always check the label to be sure. Yes, you can prepare parts of this recipe in advance. You can press and cube the tofu a day ahead. You can also chop the vegetables and store them in the fridge. Just remember to cook everything fresh when you are ready to eat. This keeps your meal tasty and crisp. You can serve this stir-fry with cooked rice or quinoa for a hearty meal. You can also add a side of fresh salad or steamed dumplings. For a fun twist, try pairing it with spring rolls. If you're looking for more flavor, serve it with a drizzle of sriracha or hoisin sauce. For the full recipe, check out the earlier section! This blog post covered how to make a tasty veggie stir-fry with tofu. We explored key ingredients, cooking steps, and tips for crispiness. You learned about tasty variations and how to store your leftovers. Cooking can be fun and easy with just a few tricks. Experiment with flavors and ingredients to make it your own. Enjoy your meal and share your tasty results!

Quick Veggie Stir-Fry with Tofu Tasty and Easy Meal

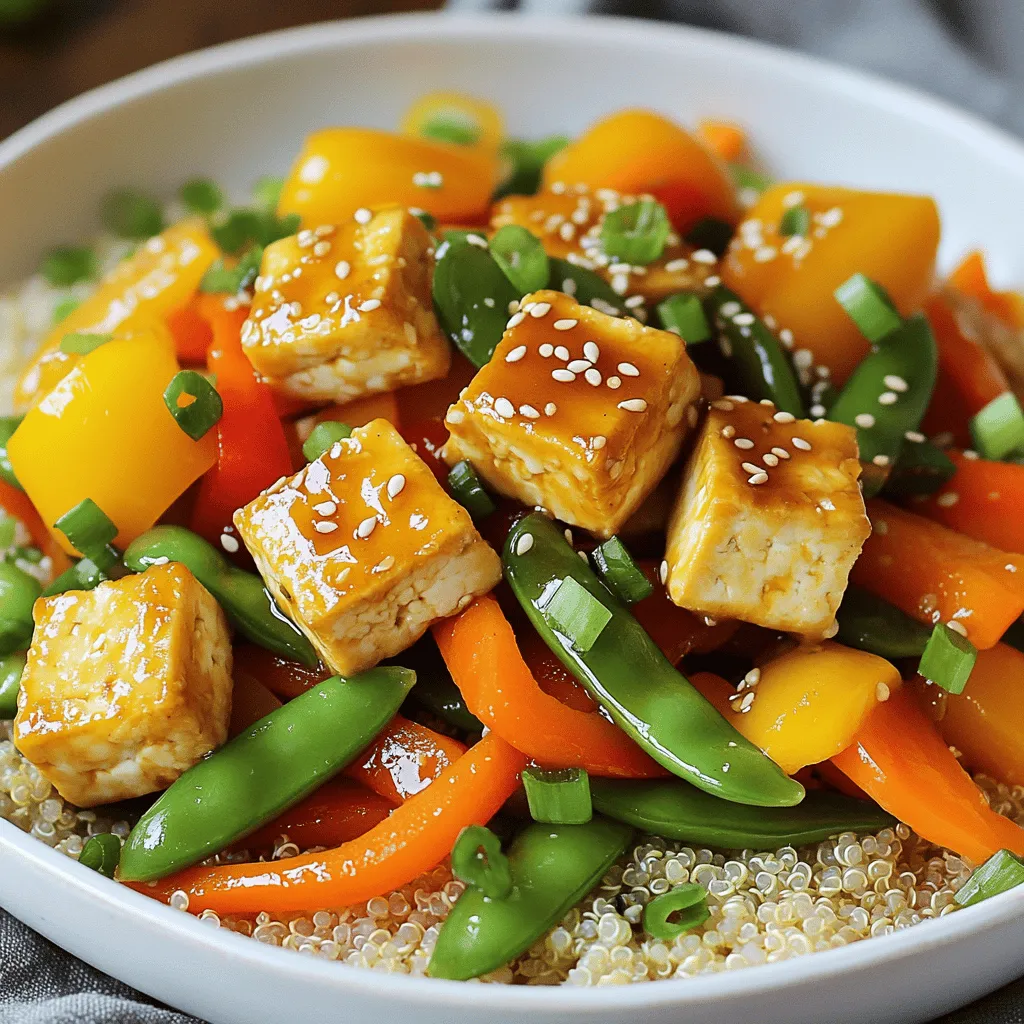
Looking for a quick and tasty meal? This Quick Veggie Stir-Fry with Tofu hits the mark! It’s easy to make

- 1 cup rolled oats - 1 cup natural peanut butter (smooth or crunchy) - 1/2 cup honey or maple syrup - 1/2 cup unsweetened cocoa powder - 1/4 cup dark chocolate chips - 1/4 cup shredded coconut (optional) - 1/4 teaspoon sea salt - 1 teaspoon vanilla extract To make no-bake chocolate peanut butter bars, you need simple ingredients. Each item plays a key role in the taste and texture. The rolled oats give the bars a hearty base. They add fiber, which is good for digestion. You can choose either smooth or crunchy peanut butter. Both taste great, but smooth gives a creamier texture, while crunchy adds a fun bite. Using honey or maple syrup adds sweetness and binds the mixture. I prefer honey for its rich flavor, but maple syrup works well too. Unsweetened cocoa powder gives the bars a deep chocolate taste without extra sugar. Dark chocolate chips add little bursts of flavor in every bite. You can skip them if you want a less sweet treat. If you like, shredded coconut gives a tropical twist. It’s optional, but it adds a nice chew. Finally, a pinch of sea salt balances the sweetness. The vanilla extract adds depth and warmth to the overall flavor. - Calories per serving: About 150 - Macronutrient breakdown: - Fats: 9g - Proteins: 4g - Carbs: 15g These bars are tasty and nutritious! Each serving packs a good amount of healthy fats and proteins. They make a great snack or dessert. You can customize these bars with extra ingredients. Here are some ideas: - Chopped nuts for crunch - Chia seeds for added fiber - Dried fruits like raisins or cranberries for sweetness Feel free to mix and match until you find your favorite combo! First, gather your ingredients. You need rolled oats, cocoa powder, and sea salt. Mix these dry ingredients in a large bowl. It should look like a chocolatey blend. Next, you need to heat the wet ingredients. In a separate bowl, combine natural peanut butter and honey. Microwave this for about 20-30 seconds. This makes it easier to mix. Stir in vanilla extract until it's smooth. Now, it’s time to combine the dry and wet. Pour the peanut butter mix into the bowl with the dry ingredients. Stir well until the oats are fully coated. The mix should be thick and sticky. After that, add the dark chocolate chips and coconut if you like. Gently fold these in until they are just combined. Prepare your baking dish by lining it with parchment paper. Leave some paper hanging over the edges for easy removal. Next, pour the mixture into the dish. Press it down firmly with your hands or a spatula. This makes an even layer. Now, put it in the fridge for at least one hour. This helps the bars set properly. After they are firm, lift them out using the paper overhang. Cut them into squares or rectangles as you like. You can find the Full Recipe for more details. Enjoy! - Overheating peanut butter: Heat the peanut butter just enough. If it gets too hot, it may lose its flavor and texture. Aim for a warm, but not bubbling, mixture. - Not mixing well enough: Mix the dry and wet ingredients thoroughly. This ensures every bite is rich and flavorful. If you skip this step, some bars might taste dry. - How to adjust for thicker or thinner bars: If you want thicker bars, add more oats. For thinner bars, reduce the oats. You can also adjust the peanut butter or honey amount. Just remember, these changes affect the taste and feel of the bars. - Ideas for serving and garnishing: Stack the bars neatly on a plate. Sprinkle extra shredded coconut or chocolate chips on top. This adds a nice touch. For a special treat, drizzle melted chocolate over the bars before serving. This makes them look even more inviting. Try these tips to make your no-bake chocolate peanut butter bars shine. For all the details, check the Full Recipe! {{image_2}} You can easily change the flavor of your bars. Try using almond or cashew butter instead of peanut butter. Each nut butter adds a unique taste. For sweetness, swap honey for agave syrup or maple syrup. These choices can alter the flavor profile nicely. Want to make it vegan? Use maple syrup and nut butter that’s vegan. You can also use gluten-free oats to make it gluten-free. This way, more people can enjoy the bars without worry. Get creative with the seasons! In fall, add pumpkin spice to the mix. This gives your bars a warm, cozy flavor. In summer, try adding fresh berries or nuts for a refreshing twist. Adapting your bars keeps them exciting all year round. Store your no-bake chocolate peanut butter bars in an airtight container. This keeps them fresh and prevents drying out. You can refrigerate them for a cool treat. If you want to keep them longer, freezing is a great option too. Just make sure to wrap them well to avoid freezer burn. At room temperature, these bars last about 3 to 5 days. If you store them in the fridge, they can stay fresh for up to 2 weeks. Freezing extends their life to about 2 to 3 months. When you want to eat them, just take out what you need. If your bars are cold from the fridge, they may be hard. To soften them, let them sit at room temperature for about 10 minutes. You can also warm them slightly in the microwave for 10 to 15 seconds. This makes them easier to bite into without losing their shape. No-bake chocolate peanut butter bars can last up to one week in the fridge. Store them in an airtight container to keep them fresh. If you freeze them, they can last about three months. Just let them thaw in the fridge before you eat them. Yes, you can use almond butter instead of peanut butter. Almond butter will change the flavor a bit, but it still tastes great. Just make sure to choose a smooth or crunchy almond butter, just like with peanut butter. For a vegan option, use maple syrup instead of honey. Maple syrup gives a nice sweetness and works well in this recipe. It mixes easily with the other ingredients and keeps the bars moist. Absolutely! Adding protein powder is a great way to boost nutrition. Just mix in a scoop when combining the dry ingredients. This will enhance the bars' protein content without changing the taste too much. Yes, refrigerating the bars is important. It helps them set and keeps them firm. If you skip refrigeration, the bars may be too soft and hard to cut. For full instructions, check the Full Recipe. We covered the key ingredients for no-bake chocolate peanut butter bars. You learned how to mix and set your bars, along with tips to avoid common mistakes. Explore flavor variations and how to store them properly. These bars are simple and fun to make. Experiment with ingredients for unique tastes. Enjoy your delicious creations and share them with others!

No-Bake Chocolate Peanut Butter Bars Easy Treat

Are you ready for a quick and tasty treat? These No-Bake Chocolate Peanut Butter Bars are easy to make and

Older posts
Newer posts
← Previous Page1 … Page92 Page93 Page94 … Page105 Next →
© 2025 My Cooking Cast • Built with GeneratePress

Our Policies

  • Privacy Policy
  • GDPR Policy
  • Terms Of Use
  • Copyright Policy
  • Cookie Policy
  • Disclaimer

More Information​

  • Home
  • Contact
  • About
  • Dinner
  • Appetizers
  • Dessert
©2025, My Cooking Cast About Privacy Policy Back To Top