Skip to content
DisclaimerTerms Of UseGDPR PolicyCookie Policy

My Cooking Cast

  • Home
  • Drinks
  • Appetizers
  • Dinner
  • Dessert
  • About
  • Contact
  • Privacy Policy
DisclaimerTerms Of UseGDPR PolicyCookie Policy

Emma

To make Easy Chocolate Chip Cookies, you need simple ingredients. Here is what you will need: - 1 cup unsalted butter, softened - 3/4 cup brown sugar, packed - 1/2 cup granulated sugar - 1 teaspoon vanilla extract - 2 large eggs - 2 1/4 cups all-purpose flour - 1 teaspoon baking soda - 1/2 teaspoon salt - 2 cups semi-sweet chocolate chips - 1/2 cup chopped walnuts (optional) - 1/4 teaspoon cinnamon (for a twist) Each ingredient plays an important role in your cookies. The butter gives them a rich flavor and soft texture. Brown sugar adds moisture and a hint of caramel taste. Granulated sugar helps create that sweet crunch. Vanilla extract brings warmth to the flavor. Eggs bind everything together. Flour gives structure. Baking soda helps the cookies rise. Salt balances the sweetness. Chocolate chips provide that classic gooey goodness. Walnuts add a nice crunch if you like. Lastly, cinnamon gives a unique twist to your cookies. For the full recipe, check out Choco-Wonder Chocolate Chip Cookies . First, turn your oven to 350°F (175°C). This is the perfect temperature for baking. While it heats up, grab two baking sheets. Line them with parchment paper. This helps the cookies not stick. It also makes cleanup easier. Next, take a large mixing bowl. Add the softened butter, brown sugar, and granulated sugar. Use a mixer or a wooden spoon to beat them together. Mix until the mixture looks light and fluffy. This step makes the cookies soft and tasty. Then, pour in 1 teaspoon of vanilla extract. Add two large eggs, one at a time. Make sure to mix well after each egg. Now, grab another bowl. In this bowl, whisk together the flour, baking soda, salt, and cinnamon. Mixing these dry ingredients first helps the cookies rise. Slowly add this mixture to the wet ingredients. Stir just until all the flour is mixed in. Do not overmix! Then, fold in the 2 cups of semi-sweet chocolate chips. If you want, add 1/2 cup of chopped walnuts. This gives a nice crunch. Your dough should feel thick and sticky. Now you’re ready to bake! Check the [Full Recipe] for more details on how to drop the dough and bake your cookies. To get a great cookie, pay attention to your butter. Use soft, not melted butter. This helps your cookies rise and stay soft. Mix the butter with the sugars until fluffy. This adds air and makes them light. Don’t overmix your dough. Stir until just combined for a better texture. Many mistakes can ruin your cookies. One common error is not measuring ingredients properly. Always use the right tools. Level off your flour with a knife for accuracy. Another mistake is baking at the wrong temperature. Always preheat your oven before baking. Lastly, don’t skip the cooling time. Letting cookies cool helps them firm up. You can swap ingredients for special diets. If you need dairy-free cookies, use coconut oil instead of butter. For gluten-free cookies, try almond flour or a gluten-free blend. If you want to cut sugar, use applesauce or mashed bananas. These options keep your cookies tasty and fun for everyone. For the full recipe, check out the Full Recipe section! {{image_2}} You can switch up your chocolate chip cookies by using different types of chocolate chips. Semi-sweet chips are classic, but you can also try milk chocolate or dark chocolate. For a more intense flavor, use bittersweet chocolate. You can even mix them! The combinations can change the taste and sweetness of your cookies. Want to add some crunch or chew? Consider adding nuts or dried fruits. Chopped walnuts or pecans give a nutty flavor. You could also try almonds for a different twist. For a fruity kick, add dried cranberries or raisins. These additions make your cookies more interesting and add texture. If you want a vegan version, you can easily make changes. Replace the butter with coconut oil or a vegan butter substitute. Use flaxseed meal mixed with water instead of eggs. Just mix one tablespoon of flaxseed meal with three tablespoons of water. Let it sit until it thickens! Lastly, choose dairy-free chocolate chips. This way, everyone can enjoy these cookies. For the full recipe, check out the Choco-Wonder Chocolate Chip Cookies . To keep your baked cookies fresh, let them cool completely. Once cooled, place them in an airtight container. This keeps moisture in and helps maintain their softness. If you want to keep them longer, you can layer cookies with parchment paper. This helps prevent them from sticking together. You can freeze cookie dough for later use. After mixing the dough, scoop it into balls and place them on a baking sheet. Freeze the dough balls for about an hour, then transfer them to a freezer bag. Label the bag with the date and type of cookie. You can bake them straight from the freezer. Just add a couple of extra minutes to the baking time. To keep cookies at their best, store them in a cool, dry place. Avoid direct sunlight or heat, as this can dry them out. If you have different types of cookies, store them separately. Mixing soft and crunchy cookies can change their texture. For soft cookies, adding a slice of bread to the container can help maintain moisture. For the full recipe, check out the detailed guide! Chocolate chip cookies last about one week at room temperature. Store them in an airtight container. If you want them to last longer, freeze them. They stay good for about three months in the freezer. Yes, you can use whole wheat flour. The cookies may be denser and have a nuttier flavor. Start with a 50-50 mix of whole wheat and all-purpose flour for the best results. If you don’t have brown sugar, use white sugar. You can also mix white sugar with a bit of molasses. Use one tablespoon of molasses for each cup of white sugar. Yes, you can bake cookies without eggs. Use a flaxseed meal or applesauce as an egg substitute. Mix one tablespoon of flaxseed meal with three tablespoons of water to replace one egg. Use a quarter cup of applesauce as another option. In this blog post, I covered the essential ingredients for easy chocolate chip cookies and shared step-by-step instructions. You learned valuable tips for the perfect cookie texture and common baking mistakes to avoid. We explored fun variations, storage tips, and answered frequently asked questions. Baking cookies can be simple and fun. With practice, you’ll master your favorites and impress everyone. Enjoy baking delicious treats!

Easy Chocolate Chip Cookies Quick and Delicious Recipe

Looking for a quick and easy way to satisfy your sweet tooth? I’ve got the perfect recipe for you—Easy Chocolate

- 1 pound fresh strawberries - 1 cup granulated sugar - ½ cup water - 1 teaspoon vanilla extract - 1 tablespoon lemon juice - Optional: Edible glitter - Medium saucepan - Candy thermometer - Baking sheet - Parchment paper - Look for ripe and firm strawberries. - Check for uniform color and no bruises. - Consider organic options for better flavor. Selecting the right strawberries is key to making great candied strawberries. Fresh, ripe berries taste the best. When you shop, pick strawberries that feel firm. They should not be mushy or soft. Look for bright red color. Avoid any that have dark spots or bruises. These may not taste good. If you can, choose organic strawberries. They often have better flavor. Plus, they are free from many pesticides. Organic strawberries can make your treat taste even better and feel healthier. Now, let’s gather your ingredients. You will need fresh strawberries, sugar, water, vanilla, and lemon juice. Don’t forget the edible glitter if you want some sparkle! This simple list makes the process fun and easy. For the equipment, grab a medium saucepan, a candy thermometer, a baking sheet, and parchment paper. These tools help you create the perfect candied strawberries. You can find most of these items in your kitchen. If not, they are easy to buy. Ready to dive into the fun of making candied strawberries? Let’s get started! For the full recipe, check the section above. - Rinse and dry the strawberries thoroughly. - Remove stems carefully. Start by rinsing your strawberries under cool water. This step is key for cleaning any dirt. After rinsing, use a paper towel to dry them well. A dry strawberry will hold the candy better. Next, gently remove the green stems from each berry. I like to twist them off to keep the fruit intact. - Combine sugar, water, vanilla, and lemon juice in a saucepan. - Boil the mixture to hard crack stage at 300°F. Now it's time to make the candy syrup. In a medium saucepan, mix the sugar, water, vanilla, and lemon juice. Stir until the sugar fully dissolves. This step is important to avoid grainy candy. Increase the heat to high and let it boil. Use a candy thermometer to check the temp. You want it to reach 300°F, known as the hard crack stage. This can take about 8-10 minutes. - Dip strawberries into the hot syrup. - Drain excess syrup and set on lined baking sheet. Once the syrup is ready, remove it from the heat. Let it cool for just a minute. Now, dip each strawberry into the hot syrup. Make sure to coat it well. I find using a fork or skewer helps with dipping. Allow the excess syrup to drip off. Finally, place the coated strawberries on a baking sheet lined with parchment paper. If you want some sparkle, sprinkle edible glitter while the syrup is still warm. Let the strawberries cool for about 30 minutes. This helps the candy coating harden. To make delicious candied strawberries, start by ensuring your strawberries are completely dry. Any water left on them can ruin the candy coating. After rinsing, pat them dry using a paper towel. Next, monitor the syrup temperature closely. Use a candy thermometer to reach the hard crack stage at 300°F. This step is key for a crunchy coating. You can add fun flavors to your syrup. Consider using cinnamon or almond extract for a twist. These flavors can enhance the taste of your strawberries. You can also try different types of sugar. For example, brown sugar gives a richer flavor and a unique texture. Experiment and find what you like best! Make your candied strawberries shine at any gathering. Place them on a decorative platter or in a tall glass. This adds height and interest to your display. You can also use edible glitter to give them a sparkling finish. For parties, serve them on skewers for easy eating. This will delight your guests and make your treat stand out! {{image_2}} To make chocolate-covered candied strawberries, start with fully cooled, candied strawberries. Melt your choice of chocolate in a bowl. You can use dark, milk, or white chocolate. Each type gives a different taste. Dip each strawberry into the melted chocolate. Make sure to coat them well. Let the excess chocolate drip off. Place them on parchment paper to set. For an extra touch, drizzle more chocolate on top for a fancy look. You can mix strawberries with other fruits for fun flavors. Try using bananas, blueberries, or pineapple. Cut the fruits into bite-sized pieces for easy coating. For candy coating, dip each piece in the hot syrup just like the strawberries. This method works well for any fruit with a firm texture. Mixing colors makes your dish more vibrant and appealing. Get creative with seasonal themes for your candied strawberries. For holidays, use colors like red and green for Christmas. For Halloween, try orange and black sprinkles. You can also use flavors that match the season. Use pumpkin spice in the syrup for fall, or mint for spring. These small changes can make your treats festive and fun for any event. To keep your candied strawberries fresh, use an airtight container. This helps to prevent moisture from ruining their crisp coating. Store them at room temperature, away from direct sunlight. A cool, dry place works best. Avoid the fridge, as this can make the coating sticky. Candied strawberries stay fresh for about one day. After that, they may lose their crunch. Look for signs of spoilage, like a sticky coating or a change in color. If they look dull or feel wet, it’s best to throw them away. You can freeze candied strawberries, but the texture may change. If you want to freeze them, place them on a baking sheet. Make sure they are not touching. Freeze them until solid, then transfer to a freezer bag. To serve, thaw them in the fridge for a few hours. This helps keep their shape better than thawing at room temperature. To check the syrup's temperature, use a candy thermometer. Clip it to the side of the pan. Make sure the tip is in the syrup but not touching the bottom. When the thermometer reads 300°F, the syrup is ready. This is called the hard crack stage. - Stir the mixture gently at first to help dissolve the sugar. - Avoid stirring once it starts boiling. This can cause crystal formation. - If you don’t have a thermometer, test the syrup by dropping a little into cold water. If it forms a hard ball, it’s ready. Yes, you can use other fruits! Many fruits work well with candy coating. Here’s a list of suitable alternatives: - Apples: Slice them into wedges for easier dipping. - Bananas: Cut into thick slices for a fun treat. - Pineapple: Use fresh chunks for a tropical twist. - Grapes: These can be dipped whole for bite-sized snacks. - Oranges: Use segments or slices for a juicy option. Before dipping, make sure to wash and dry the fruits well. This helps the syrup stick better. You can find candied strawberries at many places. Look for them in: - Local candy shops: Many make their sweets fresh. - Farmers' markets: Some vendors offer homemade treats. - Online retailers: Websites like Etsy or Amazon often sell them. When buying, check for quality. Look for shiny, well-coated strawberries. If possible, ask about their freshness. Candied strawberries are coated in a sugar syrup, which hardens when cooled. The process involves boiling sugar and water to a high temperature. This creates a crunchy shell. Caramelized strawberries use sugar heated until it melts and turns brown. This gives a rich, deep flavor. The strawberries are usually cooked in the sugar until soft and glossy. Both methods are tasty but yield different textures and flavors. Candied strawberries are crunchy, while caramelized ones are chewy and sweet. This blog post covered how to make candied strawberries, step by step. You learned about the key ingredients and required equipment. We also shared tips for selecting strawberries and achieving the perfect candy coating. Plus, there are fun variations and storage tips to keep your treats fresh. Candied strawberries are a delight and perfect for any occasion. Enjoy experimenting with flavors and presentations! I hope you create sweet memories with this simple yet tasty treat.

Candied Strawberries Easy and Fun Recipe Guide

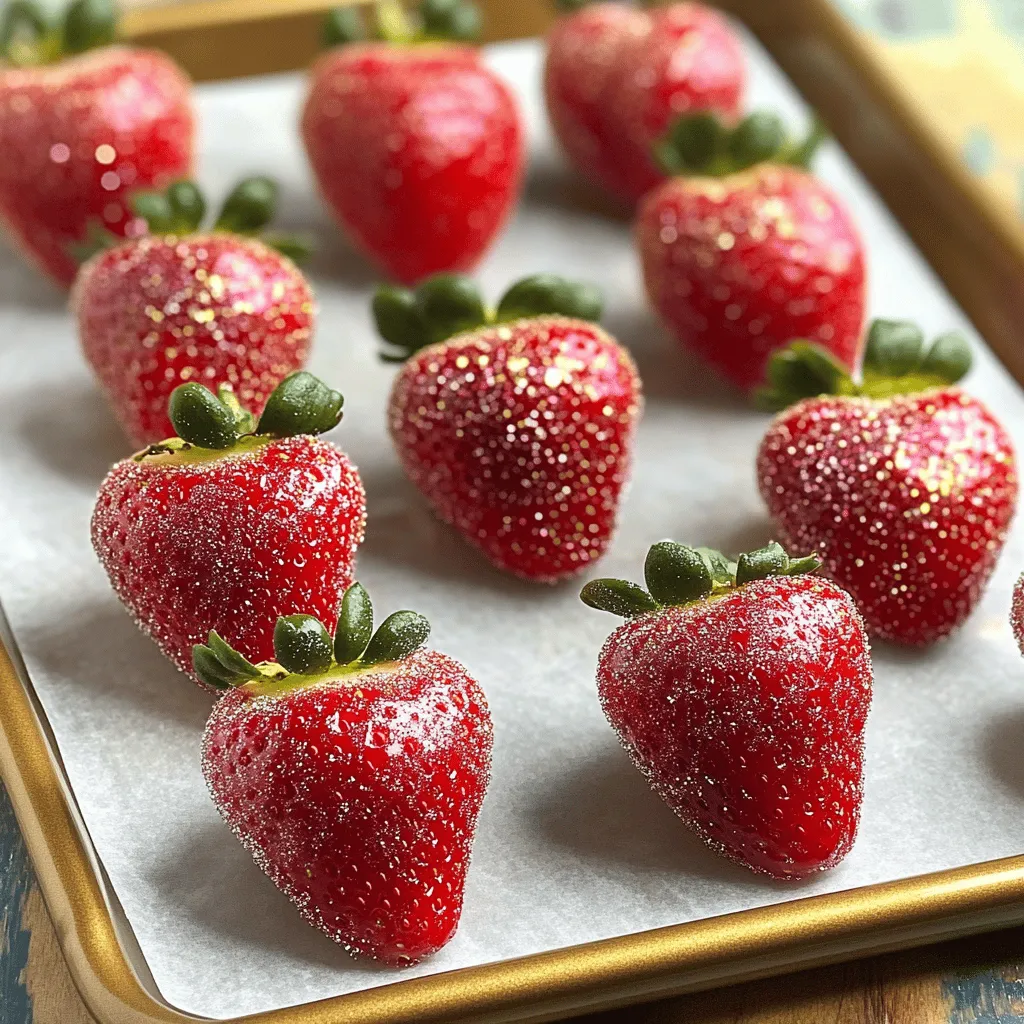
Are you ready to add a sweet twist to your dessert table? Candied strawberries are a fun and easy treat

- 1/2 lb ground pork - 1 cup napa cabbage, finely chopped - 2 green onions, chopped - 1 tablespoon soy sauce - 1 teaspoon ginger, grated - 1 teaspoon garlic, minced - 1 package potsticker wrappers - 1 cup mushrooms, finely chopped - 1 cup carrots, grated - 1/2 cup bell peppers, finely chopped - 1 tablespoon soy sauce - 1 teaspoon sesame oil - 1 teaspoon garlic, minced - 1/2 lb ground chicken - 1/2 cup green beans, finely chopped - 1 tablespoon sriracha - 1 tablespoon soy sauce - 1 teaspoon ginger, grated - 1/2 lb shrimp, peeled and chopped - 1/4 cup cilantro, chopped - 1 tablespoon lime juice - 1 teaspoon garlic, minced - 1 cup sweet potato, cooked and mashed - 1/4 cup feta cheese, crumbled - 1 tablespoon mint, chopped - 1 teaspoon lemon juice These ingredients are the base for making potstickers five different ways. Each recipe uses fresh and simple items. You can mix and match flavors to find your family's favorites. If you want to explore all the methods, check the Full Recipe for detailed steps. To make potstickers, start by preparing your fillings. For Classic Pork Potstickers, mix these ingredients in a bowl: - 1/2 lb ground pork - 1 cup napa cabbage, finely chopped - 2 green onions, chopped - 1 tablespoon soy sauce - 1 teaspoon ginger, grated - 1 teaspoon garlic, minced For Vegetable Delight Potstickers, use: - 1 cup mushrooms, finely chopped - 1 cup carrots, grated - 1/2 cup bell peppers, finely chopped - 1 tablespoon soy sauce - 1 teaspoon sesame oil - 1 teaspoon garlic, minced For Spicy Chicken Potstickers, combine: - 1/2 lb ground chicken - 1/2 cup green beans, finely chopped - 1 tablespoon sriracha - 1 tablespoon soy sauce - 1 teaspoon ginger, grated For Shrimp & Cilantro Potstickers, you need: - 1/2 lb shrimp, peeled and chopped - 1/4 cup cilantro, chopped - 1 tablespoon lime juice - 1 teaspoon garlic, minced Lastly, for Sweet Potato & Feta Potstickers, mix together: - 1 cup sweet potato, cooked and mashed - 1/4 cup feta cheese, crumbled - 1 tablespoon mint, chopped - 1 teaspoon lemon juice Now it's time to assemble! Take a potsticker wrapper and spoon about 1 tablespoon of filling in the center. Wet the edges of the wrapper with a little water. Fold it in half and pinch to seal, creating pleats if you like. Repeat this until you use all your filling. For cooking, heat 1 tablespoon of oil in a non-stick skillet over medium-high heat. Place your potstickers in the skillet and cook for about 2-3 minutes or until the bottoms are golden brown. Carefully add 1/4 cup of water to the skillet. Cover immediately to steam the potstickers. Lower the heat and let them steam for about 5-7 minutes until the water is gone. After that, remove the lid and let them crisp for another minute. To serve, take the potstickers out of the skillet and place them on a serving platter. They taste great hot with soy sauce, chili oil, or any dipping sauce you enjoy. For more details, check the Full Recipe. To get that perfect crisp, start with a hot skillet. Heat oil over medium-high heat until it shimmers. Place your potstickers in the pan without crowding them. Cook until the bottoms turn golden brown, about 2-3 minutes. Then, add water carefully and cover. This steams them, making them tender inside. When the water evaporates, uncover and let them fry for another minute. This double cooking method gives you that crispy texture you want. Filling potstickers can be tricky, but practice makes perfect. Use about 1 tablespoon of filling for each wrapper. Too much filling makes sealing hard. Wet the edges of the wrapper with water to help it stick. Pinch tightly to seal, and create pleats for a nice look. Make sure there are no air pockets inside. This keeps them from bursting while cooking. Dipping sauces really enhance your potstickers. I love simple soy sauce mixed with a splash of rice vinegar. For a spicy kick, add sriracha or chili oil. You can also mix soy sauce with sesame oil and chopped green onions. Sweet soy sauce pairs well with shrimp potstickers. Each dip brings out different flavors, so try a few! For more ideas, check the Full Recipe. {{image_2}} You can use many proteins for potstickers. If you want to switch things up, try these options: - Ground chicken: Use it for a leaner option. - Tofu: Crumble firm tofu for a plant-based choice. - Ground beef: Ideal for a richer flavor. - Turkey: A great low-fat alternative. Each protein adds unique flavor and texture. Mix it with your favorite veggies and seasonings for the best results. Making gluten-free potstickers is easy. Use gluten-free wrappers instead of traditional ones. You can find these in many stores. For the filling, focus on safe ingredients like: - Ground meats: Chicken, pork, or beef are all gluten-free. - Vegetables: Always a safe choice. - Gluten-free soy sauce: This keeps the taste without the gluten. Experimenting with these options can lead to delicious results! Vegetables can add color and flavor to potstickers. You can mix and match to your taste. Here are some ideas: - Mushrooms and spinach: This combo is earthy and tasty. - Carrots and zucchini: These add sweetness and crunch. - Bell peppers and corn: Bright and colorful for a fun twist. - Kale and leeks: A hearty mix that packs a punch. Combine any of these veggies with seasonings like garlic or soy sauce for a flavorful filling. Enjoy the creativity in your cooking! For more detailed steps, check out the Full Recipe. To store uncooked potstickers, place them on a baking sheet lined with parchment paper. Make sure they do not touch each other. Cover the sheet with plastic wrap and put it in the fridge. They will stay fresh for about 24 hours. If you want to keep them longer, freeze them. Once frozen, transfer them to a freezer bag. They can last up to three months in the freezer. Cooked potstickers can be stored in an airtight container. Allow them to cool completely before sealing. They can stay in the fridge for up to three days. If you want to keep them longer, you can freeze them as well. Just make sure to place a piece of parchment paper between layers to avoid sticking. To reheat cooked potstickers, use a non-stick skillet. Add a small amount of oil and heat over medium. Place the potstickers in the pan and add a splash of water. Cover the pan to steam and heat them through. This method keeps them crispy. You can also microwave them for a quick option. Place them on a microwave-safe plate, cover with a damp paper towel, and heat in short bursts until warm. Enjoy your potstickers with your favorite dipping sauce! For the full recipe, refer to the [Full Recipe]. Potstickers are made of a thin wrapper filled with tasty ingredients. Common fillings include ground meats, vegetables, and herbs. You can find many types of potstickers, such as pork, chicken, shrimp, or vegetable blends. The wrappers are usually made from flour and water, giving them a chewy texture. To make potstickers from scratch, follow these easy steps: 1. Make the dough: Mix flour and water until the dough forms. Knead it for a few minutes. 2. Roll out the dough: Divide the dough into small pieces and roll each into thin circles. 3. Prepare the filling: You can use any filling you like. For example, mix ground pork, chopped cabbage, soy sauce, and ginger. 4. Fill the wrappers: Spoon a small amount of the filling onto each wrapper. Wet the edges, fold, and seal them well. 5. Cook: Heat oil in a pan, place the potstickers, and fry until golden. Then, add water, cover, and steam until cooked. This method gives you fresh, homemade potstickers that taste amazing. Check out the Full Recipe for more details. Yes, you can freeze potstickers. To freeze, place uncooked potstickers on a baking sheet, ensuring they don’t touch. Freeze them for about an hour, then transfer them to a freezer bag. They can last up to three months in the freezer. When ready to cook, you can cook them straight from frozen; just add a few extra minutes to the cooking time. The main difference lies in their cooking methods. Potstickers are usually pan-fried first, then steamed. This gives them a crispy bottom and a soft top. Dumplings, on the other hand, can be boiled or steamed without frying. The flavors and fillings may be similar, but the texture is what sets them apart. We explored various potsticker recipes, from classic pork to sweet potato and feta. You learned how to prepare fillings, assemble, and cook them perfectly. I shared tips for crispy results and tasty dips too. Experiment with different proteins and veggies for fun variations. Proper storage and reheating will keep your potstickers fresh. Enjoy making these tasty bites at home. Try out your favorite recipe and share your success!

Potstickers 5 Ways for Delicious Family Meals

Looking to spice up your family meals? Potstickers are the perfect choice! In this article, I’ll guide you through five

To make Easter chicks cupcakes, you need simple ingredients. This fun recipe creates 12 yummy cupcakes. Each cupcake is cute and perfect for spring. Here is a list of the main baking ingredients you will need: - 1 ¾ cups all-purpose flour - 1 ½ teaspoons baking powder - ½ teaspoon baking soda - ¼ teaspoon salt - ½ cup unsalted butter, softened - 1 cup granulated sugar - 2 large eggs - 2 teaspoons vanilla extract - 1 cup buttermilk - Yellow food coloring These ingredients create a soft and moist cupcake that everyone will love. Now, let's add some fun decorations. Here are the items you will need: - 1 cup buttercream frosting (store-bought or homemade) - ½ cup shredded coconut - Candy eyes - Mini chocolate chips - Yellow jelly beans (for decoration) These toppings help make your cupcakes look like little chicks. The coconut gives a fuzzy look, while the jelly beans add a fun hat. Enjoy the process of decorating; it’s where your creativity shines! To start, preheat your oven to 350°F (175°C). Line a cupcake pan with paper liners. In a medium bowl, whisk together the flour, baking powder, baking soda, and salt. Set this mix aside for later. In a large mixing bowl, beat the softened butter and granulated sugar with an electric mixer. You want it to be light and fluffy, which takes about 3-4 minutes. Now, add the eggs one at a time, mixing well after each. Stir in the vanilla extract next. Gradually add the dry mix and buttermilk to the butter mixture. Start and end with the dry mix. Mix until just combined. Now, add a few drops of yellow food coloring and stir until you reach the shade you like. Once your batter is ready, fill each cupcake liner about two-thirds full. Bake the cupcakes in your preheated oven for 18-20 minutes. To check if they are done, insert a toothpick in the center. If it comes out clean, they are ready. Allow the cupcakes to cool completely on a wire rack before frosting. This step is key, as hot cupcakes can melt the frosting. While the cupcakes cool, prepare the buttercream frosting. You can either make it from scratch or use store-bought frosting. Once the cupcakes are cool, spread a generous layer of frosting on each one. Next, press shredded coconut onto the frosting to create a soft, fuzzy look. Now comes the fun part! Use the buttercream to attach candy eyes and mini chocolate chips to create the chick's face. For an extra cute touch, place a yellow jelly bean on top as a little hat. These steps transform simple cupcakes into delightful Easter chicks. To see the full recipe, check out the details above. To get soft and fluffy cupcakes, use room-temperature ingredients. This allows the butter and sugar to blend better. Mix until just combined to avoid dense cupcakes. Over-mixing can lead to tough texture. Always measure your flour correctly to prevent dry batter. Use a kitchen scale for accuracy if you can. For the cutest chicks, spread frosting thickly. Use a spatula to create a smooth surface. Press shredded coconut into the frosting for a fuzzy look. Place candy eyes carefully to give each chick personality. Add mini chocolate chips for the beak. Finish with a yellow jelly bean on top as a fun hat. One common mistake is not cooling cupcakes fully before frosting. This can melt the frosting and make it runny. Another mistake is skipping the food coloring. It adds a festive touch that makes all the difference. Also, be cautious with the coconut. Too much can hide your cute chicks! For the Full Recipe, check back for the detailed steps to make these adorable Easter Chicks Cupcakes. Enjoy your baking! {{image_2}} You can make gluten-free Easter chicks cupcakes using gluten-free flour. Simply swap all-purpose flour for a gluten-free blend. This change helps keep the texture light and fluffy. Ensure your baking powder is gluten-free, too. Follow the rest of the recipe as is. These gluten-free treats will still be fun and tasty. To create vegan-friendly cupcakes, replace eggs with flax eggs. Mix one tablespoon of ground flaxseed with three tablespoons of water. Let it sit for a few minutes until it thickens. Use plant-based butter and non-dairy milk instead of regular butter and buttermilk. This will keep the cupcakes moist and delicious. They’ll still look like cheerful chicks! If you want a twist on the frosting, try using cream cheese frosting. It adds a tangy flavor that pairs well with the sweetness. For a lighter option, consider whipped coconut cream. This will give a fluffy texture and a hint of coconut flavor. You can also add colors to your frosting for a fun look. Each variation can give your Easter chicks cupcakes a unique taste and style. For the full recipe, check the earlier sections. To keep your Easter Chicks Cupcakes fresh, place them in an airtight container. Make sure the cupcakes are fully cooled before you store them. If they are not cooled, condensation can form and make them soggy. You can keep them at room temperature for up to three days. If you want to save them longer, consider freezing. Freezing cupcakes is easy and effective. First, wrap each cupcake tightly in plastic wrap to prevent freezer burn. Then, place them in a freezer-safe bag or container. You can freeze these cupcakes for up to three months. When you are ready to enjoy them, let them thaw in the fridge overnight. For the best taste, only frost what you will eat right away. Frosting can lose its texture over time. If you have leftover frosting, store it in a separate airtight container. You can keep it in the fridge for up to one week. To refresh the frosting, just give it a quick stir before using it again. Yes, you can make the batter ahead. Store it in the fridge for up to 24 hours. Just cover it well in a bowl or a bag. When you're ready, bring it to room temp before baking. This helps the cupcakes rise nicely. If you don't have buttermilk, no problem! You can use plain yogurt or sour cream mixed with water. Mix one cup of yogurt with a little water until it's smooth. You can also mix milk with vinegar or lemon juice. Use one cup of milk and add one tablespoon of vinegar, then let it sit for five minutes. These cupcakes stay fresh for about three days at room temperature. Keep them in a covered container to help them last. If you want them to last longer, put them in the fridge for up to a week. Just remember, the frosting may not be as fresh after that. Absolutely! You can use any colors you like for decorating. Just switch up the food coloring to create fun and bright chicks. Use pastel colors for a softer look, or go bold with bright shades. Let your creativity shine during this festive time! You now have all you need to bake delicious Easter Chick Cupcakes. We covered key ingredients, step-by-step instructions, and helpful tips. Remember, perfect texture and fun decorations will impress everyone. Explore tasty variations like gluten-free and vegan options. Store your treats right to keep them fresh. Don’t hesitate to try new flavors and colors. Baking should be fun, so enjoy every moment of it! Happy baking, and may your cupcakes bring joy to all!

Easter Chicks Cupcakes Delightful Spring Treat

Are you ready to bake a fun spring treat that will wow everyone? Easter Chicks Cupcakes are not just sweet;

- Shrimp: 1 lb, peeled and deveined - Avocado: 2 ripe avocados, halved and pitted - Mango: 1 cup, diced - Red onion: 1 small, finely chopped - Jalapeño: 1, finely diced (seeds removed) - Lime: 1, juiced - Fresh cilantro: 2 tablespoons, chopped - Olive oil: 2 tablespoons - Salt and pepper: to taste - Optional ingredients: 1 cup cherry tomatoes, halved To start, gather fresh shrimp and ripe avocados. The shrimp should be peeled and deveined for the best taste and texture. The avocados add creaminess and balance to the dish. Next, for the mango salsa, choose a sweet, ripe mango. The red onion adds a mild bite, while jalapeño brings a hint of heat. Remember to remove the seeds if you want less spice. Fresh lime juice brightens the salsa, and cilantro gives it that fresh, vibrant taste. For cooking, you will need olive oil, salt, and pepper. These simple ingredients help enhance the flavors. If you like, you can add cherry tomatoes for extra color and freshness. This recipe is easy to follow and uses whole foods. The blend of flavors makes for a tasty meal. Check out the Full Recipe for detailed instructions! To cook the shrimp, start with a skillet. Heat 1 tablespoon of olive oil over medium heat. Once hot, add the shrimp to the skillet. Season them with salt and pepper. Cook the shrimp for about 2-3 minutes on each side. They should turn pink and opaque. Remove the shrimp from the heat and set them aside. Next, let’s make the mango salsa. In a bowl, combine the diced mango, chopped red onion, jalapeño, lime juice, and cilantro. Mix gently to combine all the flavors. Season with salt and pepper to taste. This salsa will add a fresh and zesty touch to your bowls. Let it sit for a few minutes to let the flavors meld. Now, it’s time to assemble the bowls. Begin with a base of cooked quinoa or rice in your serving bowl. Halve the avocados and scoop the flesh into the bowl next to the quinoa. Add the cooked shrimp on top of the quinoa and avocado. Finally, spoon the mango salsa generously over the shrimp and avocado. This adds color and flavor to your dish. You can also scatter cherry tomatoes around the bowl for extra freshness. For the full recipe, check the details above. To make tasty shrimp, avoid overcooking. Cook shrimp for only 2-3 minutes on each side. They should turn pink and opaque. Overcooked shrimp can be tough and chewy. Choose fresh shrimp for the best flavor. Look for shrimp with a mild smell and a firm texture. The shells should be shiny and moist. Fresh shrimp will make your dish shine. Selecting ripe mango is key to great salsa. A ripe mango feels slightly soft and has a sweet aroma. If it’s too hard, let it sit on the counter for a few days. For extra zing, add finely diced red bell pepper or a sprinkle of cumin. You can also use fresh mint instead of cilantro for a fresh twist. Use colorful serving bowls to make your meal pop. White bowls contrast nicely with the bright colors of the shrimp and salsa. Arrange the ingredients clearly for a beautiful plate. Garnish with lime wedges and fresh cilantro. This adds color and a hint of extra flavor. For a fancy touch, serve individual bowls for each guest. Try the Full Recipe to put these tips into action! {{image_2}} You can switch out shrimp for chicken or tofu. Chicken thighs or breasts work great. Just cook them until they are done, like the shrimp. For tofu, press it to remove water and sauté it until golden. If you don't have quinoa, try brown rice or cauliflower rice. They offer a nice base, too. Cauliflower rice keeps things light and fresh. To give your dish a different taste, add spices or herbs. Fresh basil, dill, or parsley can change the flavor. You can also try adding cumin or smoked paprika for warmth. If you like some heat, play with different peppers. A serrano pepper adds more spice than a jalapeño. You can also use red pepper flakes for heat without changing the texture. For the full recipe, check out the [Full Recipe]. After enjoying your shrimp avocado bowls, store any leftovers right away. Use airtight containers to keep them fresh. Place the bowls in the fridge. Your dish will last about 1 to 2 days. It’s best to keep the shrimp, avocado, and mango salsa separate. This helps prevent sogginess and keeps flavors bright. To reheat your shrimp avocado bowls, use the microwave. Heat on medium power for about 30 seconds. Stir the ingredients to heat evenly. If you want the shrimp warm but not tough, avoid overheating. For fresh avocado, add it back on top after reheating. This keeps it creamy and prevents browning. Enjoy your meal as if it was freshly made! Yes, you can make shrimp avocado bowls ahead of time. Here are some tips for preparation and storage: - Cook the shrimp: You can cook the shrimp a day before. Store them in an airtight container in the fridge. - Make the mango salsa: Prepare the salsa early too. Keep it in a separate container to keep it fresh. - Store avocado: Avocado can brown quickly. Slice right before serving or use lemon juice to slow browning. - Assemble before serving: Combine all parts just before eating for the best taste and texture. If you prefer something other than quinoa, here are some great alternatives: - Brown rice: A hearty option that cooks similarly. - Cauliflower rice: A low-carb choice for a lighter meal. - Couscous: Quick to cook and offers a fluffy texture. - Farro: A nutty grain that adds a nice chew. Perfectly cooked shrimp has specific signs you can look for: - Color change: Raw shrimp is gray; cooked shrimp turns pink and opaque. - Shape: Cooked shrimp curl into a C shape. - Texture: It should feel firm, not mushy. Yes, this recipe is gluten-free as it uses: - Shrimp: Naturally gluten-free. - Avocado: A safe choice for gluten-free diets. - Quinoa or rice: Both are gluten-free grains. Enjoy the fresh flavors while knowing your meal is safe for gluten-free diets! For the full recipe, check out the ingredients and steps above. This article covered the key ingredients and steps for making delicious shrimp avocado bowls. You learned how to prepare fresh shrimp, make flavorful mango salsa, and assemble everything perfectly. Remember to pick ripe ingredients and avoid overcooking the shrimp for best taste. Try adding your favorite spices or proteins for a twist. This dish is not only tasty, but it’s also easy to store and reheat. Enjoy creating your own shrimp avocado bowls!

Savory Shrimp Avocado Bowls with Mango Salsa Recipe

Looking for a fresh and tasty meal? My Savory Shrimp Avocado Bowls with Mango Salsa will delight your taste buds.

To make perfect S’mores cupcakes, gather these simple ingredients: - 1 cup all-purpose flour - 1 cup graham cracker crumbs - 1 teaspoon baking powder - 1/2 teaspoon baking soda - 1/4 teaspoon salt - 1/2 cup unsweetened cocoa powder - 1/2 cup unsalted butter, softened - 1 cup granulated sugar - 2 large eggs - 1 teaspoon vanilla extract - 1 cup buttermilk - 1 cup mini marshmallows - 1/2 cup chocolate chips - 1/2 cup chopped milk chocolate (for topping) - 1/2 cup additional mini marshmallows (for topping) - 1/4 cup Hershey’s chocolate syrup (optional, for drizzle) You can easily swap some ingredients if needed. Here are a few ideas: - All-purpose flour: Use gluten-free flour for a gluten-free option. - Butter: You can use coconut oil or vegetable oil instead. - Buttermilk: Mix 1 cup of milk with 1 tablespoon of vinegar or lemon juice. Let it sit for five minutes to create a buttermilk-like effect. - Granulated sugar: Use brown sugar for a richer flavor. Using the best ingredients makes a big difference. Here are some tips: - Flour: Always use fresh flour for the best texture. - Cocoa powder: Choose a high-quality cocoa powder for rich chocolate flavor. - Butter: Use unsalted butter to control the salt content in your cupcakes. - Chocolate: Go for high-quality chocolate for the best taste. - Marshmallows: Use mini marshmallows for even melting and a fun texture. These tips help ensure your cupcakes turn out delicious and flavorful. For the full recipe, check the provided details! Start by preheating your oven to 350°F (175°C). This step is key for even baking. While the oven warms, take a muffin tin and line it with cupcake liners. This will help your cupcakes come out easily later. In a medium bowl, whisk together the dry ingredients. Combine 1 cup of all-purpose flour, 1 cup of graham cracker crumbs, 1 teaspoon of baking powder, 1/2 teaspoon of baking soda, 1/4 teaspoon of salt, and 1/2 cup of cocoa powder. Mixing these well gives your cupcakes a rich flavor. In a large bowl, beat together 1/2 cup of softened butter and 1 cup of granulated sugar. Use an electric mixer for 3-4 minutes until it’s light and fluffy. Add 2 large eggs, one at a time. Mix well after each one. Stir in 1 teaspoon of vanilla extract. Now, alternate adding the dry mixture and 1 cup of buttermilk into the creamed mixture. Start and end with the dry ingredients. Mix until just combined. Be careful not to overmix; this keeps your cupcakes soft. Finally, gently fold in 1 cup of mini marshmallows and 1/2 cup of chocolate chips. Now, evenly fill each cupcake liner with the batter. Aim to fill them about three-quarters full. Bake your cupcakes in the preheated oven for 18-20 minutes. To check if they are done, insert a toothpick into the center. If it comes out clean, they are ready! After baking, take them out and while they are still warm, press a piece of chopped milk chocolate and a few mini marshmallows into each cupcake top. For a special touch, broil them for 1-2 minutes. Watch closely to avoid burning. Once done, allow them to cool completely before serving. This step is hard, but trust me, it's worth it! For an extra treat, drizzle with Hershey’s chocolate syrup once they have cooled. Enjoy your Perfect S’mores Cupcakes! To get that classic s’mores flavor, use real graham cracker crumbs. They add a rich taste and texture. Incorporate cocoa powder for a chocolatey base. This gives your cupcakes a wonderful depth. Don’t forget the toasted marshmallows! Their sweetness boosts the overall flavor. Adding Hershey’s chocolate syrup on top enhances the chocolate experience. This step is optional but highly recommended for extra sweetness. Moisture is key for perfect cupcakes. Use buttermilk in your batter; it makes cupcakes soft and light. Be careful not to overmix your batter. Overmixing can lead to dense cupcakes. Fill the liners only three-quarters full to allow room for rising. When baking, check for doneness with a toothpick. It should come out clean for a perfect texture. Presentation makes a big difference. Dust cupcakes with extra graham cracker crumbs for a rustic touch. Top each cupcake with a piece of chocolate and mini marshmallows while they are warm. This helps them melt slightly and look inviting. For a fun twist, serve on a wooden board for a campfire vibe. Drizzling with chocolate syrup adds flair and taste. You can find the full recipe for all these steps included above. {{image_2}} You can switch up the flavor of your s'mores cupcakes. Try using peanut butter in the batter for a nutty twist. Add a layer of raspberry or strawberry jam for a fruity touch. Or, use white chocolate instead of milk chocolate for a different taste. These changes keep the cupcakes fun and exciting! If you need gluten-free cupcakes, swap the all-purpose flour for a gluten-free blend. Make sure it has a good binding agent. For a vegan version, replace the eggs with flax eggs. Use a plant-based butter and non-dairy milk. These swaps keep the taste great while meeting dietary needs. Mini cupcakes are cute and perfect for parties. They bake faster, so watch them closely. Regular-sized cupcakes are more filling and great for a treat at home. You can even mix both sizes for variety. This way, everyone can enjoy their favorite size. To keep your Perfect S’mores Cupcakes fresh, store them in an airtight container. This helps to trap moisture and keep them soft. Place a piece of parchment paper between layers to avoid sticking. Keep the container at room temperature for up to three days. If they last longer, move them to the fridge. Just remember to bring them back to room temp before serving. You can freeze these cupcakes for up to three months. First, let them cool completely. Wrap each cupcake in plastic wrap tightly. Then, place wrapped cupcakes in a freezer-safe bag or container. When you're ready to eat, thaw them in the fridge overnight. For best taste, do not freeze the toppings. Add them after thawing. To warm up the cupcakes, preheat your oven to 350°F (175°C). Place the cupcakes on a baking sheet. Heat them for about 5 to 10 minutes. You can also use a microwave. Heat for about 10 to 15 seconds per cupcake. Enjoy them warm for that fresh-baked taste! To keep your S’mores Cupcakes moist, use fresh ingredients. Always measure buttermilk correctly. When mixing, stop as soon as it blends. Overmixing can make the cupcakes dry. Also, press mini marshmallows into the tops right after baking. This adds moisture and flavor. Yes, you can make these cupcakes ahead. Bake them and let them cool completely. Store them in an airtight container at room temperature for up to three days. If you want to keep them longer, freeze them for up to three months. Just remember to frost them after thawing. If you don’t have buttermilk, you can use milk with vinegar or lemon juice. Add one tablespoon of vinegar or lemon juice to a measuring cup. Fill it with milk until you reach one cup. Let it sit for five minutes before using. This will mimic buttermilk’s tangy flavor. You can make S’mores Cupcakes in a slow cooker. Prepare the batter as you normally would. Pour it into a greased slow cooker. Cover and cook on low for about two hours. Check for doneness with a toothpick. This method gives a moist texture. You can find the full recipe for Perfect S’mores Cupcakes in the provided recipe section. It includes all the ingredients and steps you need to create these tasty treats. Enjoy the fun of baking! In this blog post, we explored the essential ingredients, step-by-step instructions, and clever tips for making perfect S’mores cupcakes. I shared ways to enhance flavors and offer variations, like gluten-free options. Storing and reheating suggestions ensure your cupcakes stay fresh. With these insights, crafting delicious cupcakes is simple and fun. Enjoy experimenting with flavors and techniques, and make these tasty treats part of your baking routine!

Perfect S’mores Cupcakes Irresistible and Flavorful Treat

If you love the campfire classic, then you’ll adore my Perfect S’mores Cupcakes. These treats combine fluffy cake and rich

- 4 bone-in, skin-on chicken thighs - 1 cup jasmine rice - 2 cups chicken broth - 1/2 cup honey BBQ sauce - 1 small onion, diced - 3 cloves garlic, minced - 1 red bell pepper, chopped - 1 cup frozen corn - 1 teaspoon smoked paprika - 1 teaspoon garlic powder - Salt and pepper to taste - 2 tablespoons olive oil - Fresh parsley or green onions for garnish The chicken thighs are key for flavor and moisture. Bone-in, skin-on pieces stay juicy while cooking. Jasmine rice cooks well in this dish and adds a nice aroma. Use chicken broth for depth. It gives the rice extra flavor. Honey BBQ sauce adds sweetness and tang. Adjust the amount to your taste. Fresh veggies, like onion and bell pepper, enhance the dish's overall texture and taste. You can swap chicken thighs for chicken breasts if you prefer leaner meat. Brown rice works well too, but it needs more cooking time. For a vegetarian option, use firm tofu instead of chicken. You can also add black beans for protein. If you want more spice, try adding diced jalapeños or a dash of cayenne pepper. For a twist, mix in some pineapple chunks for sweetness. For the full recipe, check out the One-Pan Honey BBQ Chicken Rice. 1. Prepare the Chicken: Start by seasoning the chicken thighs. Use smoked paprika, garlic powder, salt, and pepper. Make sure to coat both sides well. 2. Sauté Aromatics: Heat olive oil in a large skillet over medium heat. Add the diced onion and cook for 3-4 minutes. The onion should turn translucent. Then, mix in minced garlic and chopped bell pepper. Cook for an extra 2 minutes until it smells great. 3. Brown the Chicken: Move the veggies to the side of the skillet. Place the chicken thighs skin-side down in the skillet. Sear them for 5-7 minutes until the skin is golden. Flip the chicken and cook for another 5 minutes. 4. Add Rice and Sauce: Pour in jasmine rice, chicken broth, and honey BBQ sauce. Stir everything well to combine all the flavors. 5. Incorporate Corn: Toss in the frozen corn and gently mix it into the rice and chicken. 6. Simmer: Bring the mix to a gentle boil. Then, lower the heat to a soft simmer. Cover the skillet and let it cook for 25-30 minutes. The rice should be fluffy, and the chicken needs to reach 165°F or 75°C. 7. Let it Rest: Once cooked, remove the skillet from heat. Let it sit, covered, for 5 minutes. This helps the flavors blend nicely. 8. Serve: Fluff the rice with a fork. Garnish with freshly chopped parsley or green onions. - Seasoning: Season well for maximum flavor. Don't skip the salt and pepper. - Sautéing: Keep the heat at medium. This helps the onion and garlic cook evenly. - Browning: Ensure the chicken has enough space in the skillet to brown properly. Avoid overcrowding. - Simmering: Always cover the skillet. This keeps the moisture in, making the rice fluffy. - Resting: Letting it rest after cooking is crucial. It helps the dish settle and taste better. - Prep Time: 10 minutes - Cook Time: 40 minutes (including browning and simmering) - Internal Temperature: Chicken must reach 165°F or 75°C for safe eating. For the full recipe, check out the One-Pan Honey BBQ Chicken Rice . To make your One-Pan Honey BBQ Chicken Rice shine, focus on timing. Start by browning the chicken well. This step adds flavor. The crispy skin will taste amazing. Use a large skillet to avoid crowding. This helps cook everything evenly. Stir often to prevent sticking. Check the rice for doneness. Fluff it gently with a fork when ready. A few mistakes can ruin this dish. First, don’t skip seasoning the chicken. It needs flavor. Second, avoid using too much liquid. The rice should absorb it, not swim in it. Lastly, don’t rush the resting time. Letting it sit helps flavors blend. These small steps lead to a great meal. For this recipe, you need some key tools. A large skillet works best for cooking. You’ll also need a wooden spoon for stirring. A sharp knife helps you chop the veggies easily. Measuring cups ensure you get the rice and broth right. Lastly, have a meat thermometer handy. This tool checks that your chicken is safe to eat. {{image_2}} You can easily change this dish with different ingredients. For the chicken, use boneless thighs or breasts if you prefer. If you want a lighter version, swap the jasmine rice for quinoa or brown rice. You can also add vegetables like zucchini or spinach for more nutrition. Try mixing in black beans or chickpeas to boost protein and fiber. To make this dish gluten-free, check the BBQ sauce label. Some sauces contain gluten, so look for a certified gluten-free brand. For a low-carb option, use cauliflower rice instead of jasmine rice. This keeps the dish light while still being delicious. Want to elevate the flavor? Add a splash of lime juice for brightness. If you enjoy spice, toss in some chili flakes or diced jalapeños. Fresh herbs like cilantro or basil can also add a burst of freshness. Consider trying different BBQ sauce flavors, such as apple or chipotle, to mix things up. For the full experience, check out the [Full Recipe]. After you enjoy your One-Pan Honey BBQ Chicken Rice, cool it down first. Use an airtight container. Store it in the fridge for up to 3 days. If you want to keep it longer, freezing is a good option. To reheat, take the chicken rice out of the fridge. Place it in a skillet with a splash of water or broth. Heat on low until warm. You can also use a microwave. Cover the bowl and heat in short bursts. Stir between each burst to ensure even heating. If you freeze your leftovers, use a freezer-safe container. Make sure to label it with the date. It will stay good for up to 3 months. Thaw overnight in the fridge before reheating. This way, the flavors will remain tasty and fresh. For the full recipe, refer to the One-Pan Honey BBQ Chicken Rice . I recommend using jasmine rice for this dish. It has a soft texture and a nice aroma. Jasmine rice pairs well with the honey BBQ sauce. You can also try basmati rice if you want a different flavor. Just ensure to adjust the cooking time based on the type of rice you use. Yes, you can use boneless chicken thighs or breasts in this recipe. Boneless chicken cooks faster than bone-in chicken. If you use boneless cuts, reduce the cooking time slightly. Make sure the internal temperature reaches 165°F or 75°C for safety. To add heat, you can include red pepper flakes or cayenne pepper. Stir in some hot sauce with the BBQ sauce to spice things up. You can also add diced jalapeños for a fresh kick. Adjust the amount based on your spice preference. This dish goes well with a simple green salad or roasted vegetables. You can also serve it with coleslaw for a crunchy side. If you want something heartier, cornbread or garlic bread makes a nice addition. Feel free to get creative with your sides! For the complete cooking process, check out the Full Recipe. This blog post detailed how to create a tasty one-pan dish. We covered the right ingredients, cooking steps, and tips for success. You learned about substitutions for dietary needs and storage tips for leftovers. Remember, avoiding common mistakes will boost your cooking. Keep experimenting with flavors to make it your own. I hope you now feel ready to try your hand at this simple, delicious recipe. Enjoy every bite of your creation!

One-Pan Honey BBQ Chicken Rice Easy Dinner Recipe

Looking for a quick and tasty dinner? You’re in the right place! My One-Pan Honey BBQ Chicken Rice dish blends

- 1 cup orzo pasta - 1 pound large shrimp, peeled and deveined - 3 tablespoons olive oil - 4 cloves garlic, minced - Zest and juice of 1 lemon - 1 teaspoon red pepper flakes (optional) - Salt and pepper to taste - 2 cups baby spinach - 1/4 cup parmesan cheese, grated - Fresh parsley, chopped for garnish When I cook Lemon Garlic Shrimp Orzo, I focus on fresh ingredients. The orzo pasta is the star, as it soaks up all the tasty flavors. I love using large shrimp, peeled and deveined, because they cook quickly and add a nice bite. Garlic brings depth and aroma to the dish. I always use fresh garlic, minced just before cooking. The zest and juice of a lemon give it a bright flavor. Red pepper flakes can add a kick if you like spice. Adjust the salt and pepper to your taste. The baby spinach adds color and nutrition. I finish the dish with grated parmesan cheese for creaminess. Finally, I sprinkle fresh parsley for a pop of freshness and color. - Large pot for boiling - Skillet - Measuring cups and spoons - Cooking utensils (spatula, tongs) - Colander Gather these tools before you start. A large pot helps boil the orzo, while a skillet is perfect for sautéing the shrimp. Measuring cups and spoons ensure accuracy. Use a colander for draining the orzo. By preparing everything, you save time and cook smoothly. Now, let’s dive into the full recipe! To start, bring a large pot of salted water to a boil. Add 1 cup of orzo pasta and cook it as the package directs. This usually takes around 8 to 10 minutes for a perfect al dente texture. Once done, drain the orzo and be sure to save 1/2 cup of that pasta water. This water has starch that will help our sauce later. Next, take a large skillet and heat 3 tablespoons of olive oil over medium heat. Once hot, add 1 pound of large shrimp. Lay them out in a single layer and sprinkle with salt, pepper, and red pepper flakes if you want a little kick. Cook each side for about 2 to 3 minutes. You want them to look pink and opaque. Once cooked, remove the shrimp and set them aside. In the same skillet, add the minced garlic. You need about 4 cloves for great flavor. Sauté the garlic for about 30 seconds until you can smell that lovely aroma. Then, stir in the zest and juice of 1 lemon. This adds a bright flavor. Pour in the reserved pasta water and mix it all together. Now it’s time to bring it all together. Add the cooked orzo to the skillet with the sauce. Then, toss in 2 cups of baby spinach. Stir everything well and cook until the spinach wilts down, which takes about 2 to 3 minutes. This step adds color and nutrients to your dish. Remove the skillet from heat. Mix in 1/4 cup of grated parmesan cheese until it melts and blends into the dish. Taste and adjust the seasoning with salt and pepper if needed. Finally, plate your Lemon Garlic Shrimp Orzo and garnish with fresh chopped parsley. Serve it right away for the best flavor experience. For a full recipe, check the details mentioned above. Cooking shrimp just right is key for this dish. You want them to turn pink without overcooking. Overcooked shrimp can become rubbery. Cook them for about 2-3 minutes on each side until they change color and look opaque. When choosing fresh shrimp, look for those with a mild sea scent. They should not smell strong or fishy. The shells should be firm and shiny. If you can, buy shrimp that are wild-caught. They often taste better than farmed shrimp. A creamy sauce makes this dish special. You can use the reserved pasta water to help with the sauce's texture. Just add it slowly until you reach the creaminess you like. It helps bind everything together. If you want to switch cheeses, try feta or goat cheese. They add a unique taste. You can also use nutritional yeast for a vegan option that still packs flavor. To make this dish pop, think about adding fresh herbs. Basil and dill work well here. Just chop them up and stir them in at the end. They add freshness and make the meal more vibrant. If you like spice, red pepper flakes are your friend. Add them to the shrimp while cooking for a nice kick. You can adjust the amount based on your taste. Start with a little, and add more if you want more heat. {{image_2}} You can easily add more veggies to this dish. Bell peppers, zucchini, or cherry tomatoes work well. Chop them into small pieces for even cooking. If you add hard veggies like carrots, cook them longer at the start. For softer ones, add them just before the spinach. This way, they stay bright and fresh. If you want a change, try chicken or tofu instead of shrimp. For chicken, cut it into bite-sized pieces and cook until golden brown. If using tofu, press it to remove water, then sauté until crisp. For other seafood, scallops are a great choice. Cook them for about 2-3 minutes on each side until they turn golden. To make this dish gluten-free, use gluten-free orzo or any gluten-free pasta. Quinoa or rice are good swaps too. Just adjust the cooking time based on the pasta you choose. You may need to add a bit more liquid for flavor, so taste as you go. This keeps your dish tasty and satisfying. For the full recipe, refer to the section above. To keep your Lemon Garlic Shrimp Orzo fresh, place it in a container. Use an airtight container to avoid moisture. You can refrigerate it for up to three days. For longer storage, freeze the dish for up to two months. Just make sure to cool it first. This helps keep the shrimp from getting tough. When you want to enjoy leftovers, use the stovetop. Heat it in a skillet on low. Add a splash of water or broth to keep it moist. Stir often to avoid sticking. You can also refresh the flavors by adding a bit of lemon juice or fresh parsley when reheating. In the fridge, Lemon Garlic Shrimp Orzo lasts about three days. In the freezer, it can stay good for two months. Look for signs of spoilage like an off smell or changed texture. If it looks dry or discolored, it’s best to throw it out. Yes, you can use frozen shrimp. Thaw them in the fridge overnight or under cold water. Cook them right after thawing to keep the best texture. This method keeps them juicy. Just remember to dry them well before cooking to avoid extra water in your dish. Yes, you can make Lemon Garlic Shrimp Orzo ahead of time. Prep the orzo and shrimp, then store them separately in the fridge. Combine them when you’re ready to eat. This keeps everything fresh. If you store it, heat it gently to avoid overcooking the shrimp. If you can’t find orzo, you have options. Try small pasta shapes like ditalini or or any grain like quinoa or couscous. These will work well and add different textures. Just make sure to adjust cooking times as needed. The spice level depends on the red pepper flakes. I recommend starting with a pinch. If you like heat, add more to taste. For milder flavors, skip the flakes. You can also add fresh herbs for extra flavor without heat. Absolutely! If you want a dairy-free dish, skip the cheese. Use nutritional yeast for a cheesy flavor. You can also add more lemon zest or herbs to boost the taste. This keeps the dish flavorful and satisfying without dairy. For the full recipe, check out the section above! This blog post explored a delicious Lemon Garlic Shrimp Orzo recipe. We covered the ingredients, kitchen tools, and step-by-step instructions needed to create this dish. You'll find tips for cooking shrimp perfectly, enhancing flavors, and even making variations to suit your taste. Incorporating these insights will help you prepare a tasty meal. Enjoy the cooking process, experiment with flavors, and make this dish your own!

Lemon Garlic Shrimp Orzo Flavorful and Easy Recipe

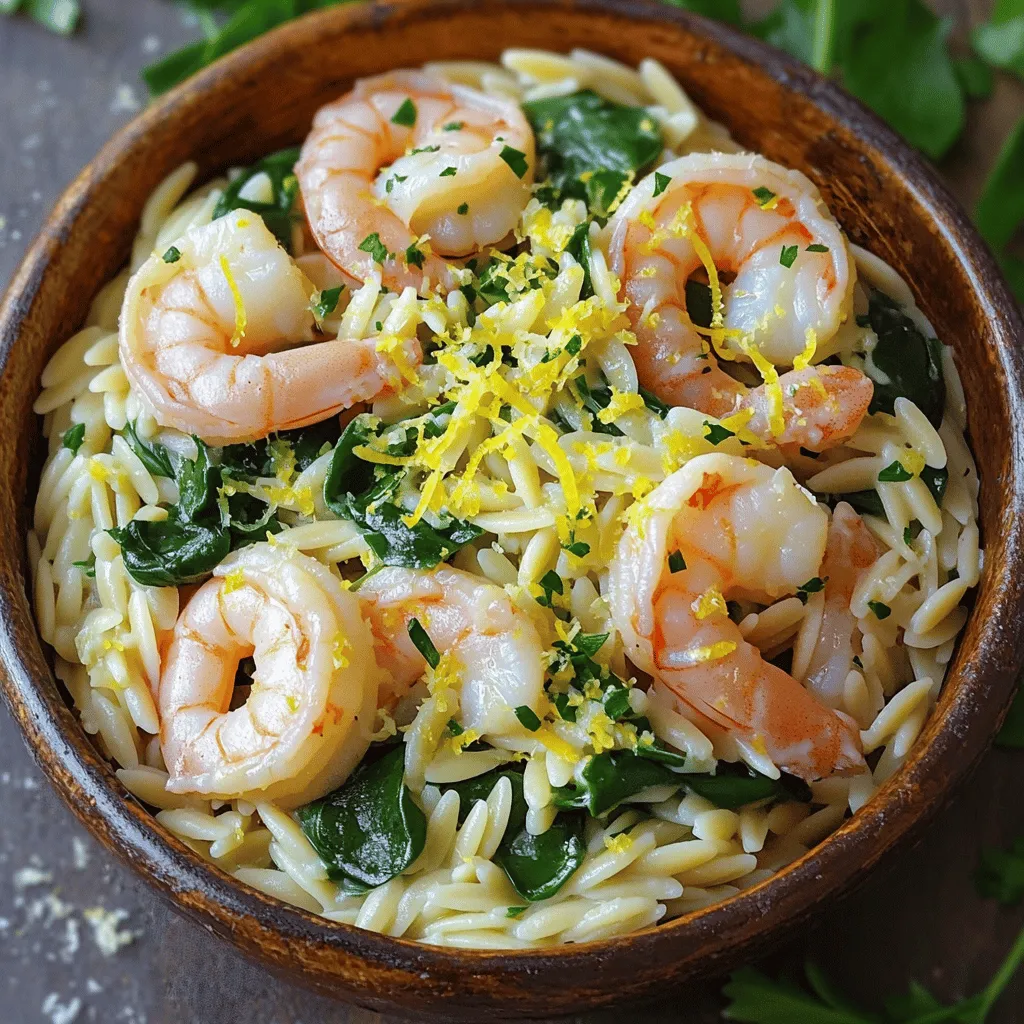
Craving a dish that’s simple yet bursting with flavor? Look no further! This Lemon Garlic Shrimp Orzo combines tender shrimp,

To make a tasty Vegan Buddha Bowl, gather these key ingredients: - 1 cup quinoa, rinsed - 2 cups water or vegetable broth - 1 cup chickpeas, cooked or canned (drained and rinsed) - 1 medium sweet potato, peeled and cubed - 1 cup broccoli florets - 1 cup spinach - 1 avocado, sliced - 1/4 cup red cabbage, shredded - 2 tablespoons sesame seeds - 2 tablespoons olive oil - 1 tablespoon maple syrup - 1 tablespoon tahini - 1 tablespoon lemon juice - Salt and pepper to taste These ingredients create a balanced bowl that is both filling and vibrant. Want to spice things up? Here are some fun add-ins: - Fresh herbs (like cilantro or parsley) for garnish - Roasted nuts or seeds for crunch - Sliced radishes for a peppery bite - Diced bell peppers for sweetness - A splash of hot sauce for heat Feel free to mix and match these extras. They add layers of flavor and texture. This Vegan Buddha Bowl is not just pretty; it's nutritious too! Here are some highlights: - Quinoa is a complete protein and full of fiber. - Chickpeas add protein and help keep you full. - Sweet potatoes are rich in vitamins A and C. - Broccoli is a powerhouse of vitamins and minerals. - Spinach offers iron and antioxidants. - Avocado provides healthy fats for heart health. Each ingredient works together to nourish your body. Enjoy every bite of your Vegan Buddha Bowl with pride! For the complete recipe, check out the Full Recipe. Start by rinsing 1 cup of quinoa in a fine mesh strainer. This step helps remove any bitter taste. Next, combine the rinsed quinoa with 2 cups of water or vegetable broth in a medium saucepan. Bring this mixture to a boil over high heat. Once boiling, reduce the heat to low, cover the pot, and let it simmer for about 15 minutes. The quinoa will absorb the liquid and become fluffy. After cooking, remove it from heat and let it sit for 5 minutes. Fluff the quinoa with a fork before serving. While the quinoa cooks, you can prepare the vegetables. Steam 1 cup of broccoli florets for 4-5 minutes until they turn bright green and tender-crisp. This keeps the nutrients intact and adds a nice crunch. Preheat your oven to 400°F (200°C). Peel and cube 1 medium sweet potato. Place the cubes on a baking tray. Drizzle with 1 tablespoon of olive oil, and sprinkle with salt and pepper. Toss to coat the sweet potatoes evenly. Roast them in the oven for 25-30 minutes. Flip the sweet potatoes halfway through to ensure even cooking. They should be tender and slightly caramelized when done. In a small bowl, combine 1 tablespoon of tahini, 1 tablespoon of lemon juice, 2 tablespoons of olive oil, and 1 tablespoon of maple syrup. Add salt and pepper to taste. Whisk these ingredients together until smooth and creamy. This dressing will add a rich flavor to your Vegan Buddha Bowl. Once everything is ready, you can assemble your bowl. Start with a base of quinoa, add the roasted sweet potato, steamed broccoli, spinach, chickpeas, avocado, and red cabbage. Drizzle the tahini dressing on top and finish with sesame seeds. Enjoy your vibrant Vegan Buddha Bowl! For the full recipe, check the details above. To cook quinoa perfectly, start by rinsing it well. This removes bitter saponins. Use a ratio of 1 part quinoa to 2 parts water or broth. Bring the liquid to a boil, then reduce the heat. Cover and let it simmer for about 15 minutes. When done, let it sit for 5 minutes off the heat. Fluff it gently with a fork. This method gives you light and fluffy quinoa for your Vegan Buddha Bowl. Roasting vegetables enhances their natural sweetness. Start by cutting your veggies into even pieces. Toss them in olive oil, salt, and pepper. Spread them out on a baking tray to avoid steaming. Roast at 400°F (200°C) for 25-30 minutes. Check halfway through and flip them for even cooking. The result? Tender, caramelized veggies that add flavor and color to your bowl. Presentation makes your Buddha Bowl even more appealing. Use a large, shallow bowl to showcase your ingredients. Start with a base of quinoa, then layer your veggies on top. Arrange the chickpeas and avocado slices neatly. Sprinkle sesame seeds over the top for crunch. Add fresh herbs for a touch of color. This makes each bowl a feast for the eyes and taste buds. For the full recipe, refer to the earlier section. {{image_2}} You can switch up the grains in your Buddha bowl for fun. Quinoa is great, but try brown rice for a chewy texture. Farro adds a nutty taste and is very filling. You might also like barley, which has a nice bite. Millet is another option; it's light and fluffy. Each grain brings its own flavor, making your meal unique. Adding protein makes your bowl more filling. Chickpeas are a classic choice, but you can use black beans for a rich flavor. Tofu is another great option; it soaks up all the tasty sauces. If you want a nutty crunch, try adding edamame or roasted pumpkin seeds. These proteins not only add taste but also boost nutrition. Don't be afraid to change your veggies based on the season. In spring, swap in fresh peas or asparagus for a crisp bite. Summer calls for ripe tomatoes and cucumbers, which add a juicy element. In fall, roasted Brussels sprouts or carrots are perfect. And in winter, try hearty root vegetables like turnips or parsnips. Using seasonal veggies keeps your bowl fresh and exciting. For a full recipe, check out the vibrant vegan Buddha bowl. To keep your Vegan Buddha Bowl fresh, store it in an airtight container. Place the bowl in the fridge. It will stay good for about three days. If you want to keep it longer, you can freeze the components. Just remember to keep the dressing separate. This way, your bowl tastes fresh when you eat it. When it's time to eat your leftovers, reheat them gently. Use the microwave for quick warmth. Place the bowl in for 1-2 minutes. Stir halfway for even heating. If you prefer the oven, heat it at 350°F (175°C) for about 10 minutes. Add a splash of water to keep it moist. This helps the quinoa and veggies stay tasty. Meal prep is a great way to save time. Cook a big batch of quinoa at the start of the week. Roast several sweet potatoes and steam broccoli to store. Portion them into containers with chickpeas and spinach. You can mix and match as you go. Add fresh avocado and dressing just before eating. This keeps everything fresh and flavorful. For the full recipe, check out the Vibrant Vegan Buddha Bowl🥗. A Vegan Buddha Bowl is a healthy meal in a bowl. It has grains, veggies, and protein. The dish is colorful and full of flavor. You can use many ingredients, making it fun to create. The base is often quinoa, but you can choose other grains. This bowl is also packed with nutrients, which keeps you feeling full. Yes, you can make a Buddha Bowl without quinoa. You can substitute quinoa with rice, farro, or even cauliflower rice. Each grain brings its unique taste and texture. Just make sure to cook your chosen grain well. The key is to keep the bowl balanced with grains, vegetables, and protein. You can customize your Vegan Buddha Bowl in many ways. Start with a base of grains, then add your favorite veggies. Here are some ideas for customization: - Protein: Add chickpeas, tofu, or lentils for a protein boost. - Veggies: Mix in roasted, raw, or pickled vegetables for variety. - Dressings: Use different dressings like tahini, peanut sauce, or vinaigrette. - Toppings: Sprinkle nuts, seeds, or fresh herbs for extra crunch and flavor. Get creative and make it your own! You can find the full recipe for a vibrant Vegan Buddha Bowl to inspire your next meal. A Vegan Buddha Bowl is simple and fun to make. We covered key ingredients, like grains, proteins, and tasty toppings. I shared step-by-step instructions to prepare quinoa, roast sweet potatoes, and whip up tahini dressing. You now have tips to cook perfectly and present your dish well. Remember, you can change grains and veggies based on the season. Finally, storing and reheating leftovers can help you save time. Enjoy your delicious bowl packed with nutrients and flavor!

Vegan Buddha Bowl Flavorful and Healthy Delight

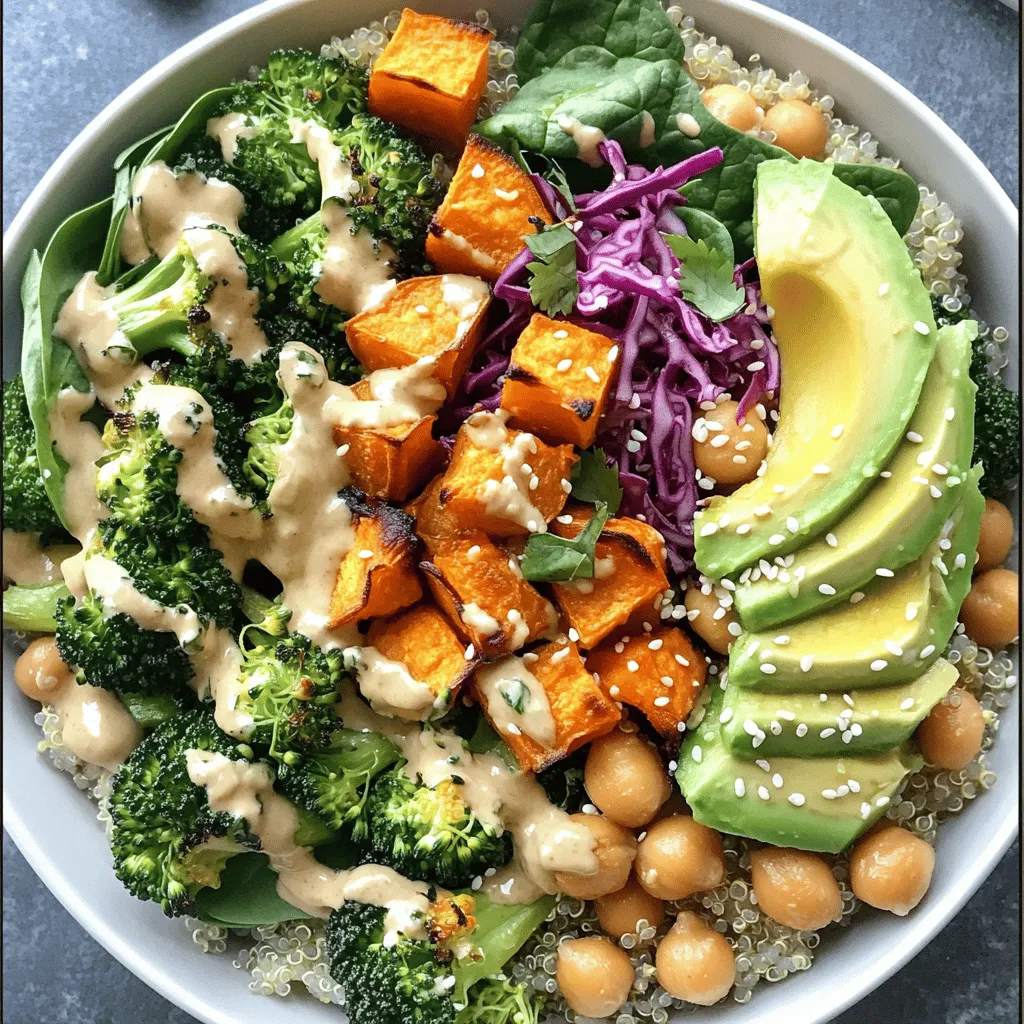
Are you searching for a healthy, tasty meal that’s easy to make? Look no further! A Vegan Buddha Bowl offers

To make Avocado Toast with Poached Egg, gather these fresh ingredients: - 2 ripe avocados - 4 slices of whole grain bread - 4 large eggs - 1 tablespoon white vinegar - 1 tablespoon olive oil - 1 garlic clove, minced - Juice of 1 lemon - Salt and pepper to taste - Red pepper flakes (optional, for garnish) - Fresh herbs (such as cilantro or parsley, for garnish) When you choose avocados, look for ones that yield slightly when pressed. This shows they are ripe and ready to use. Whole grain bread gives a hearty base. The eggs should be large and fresh for the best poaching results. You can use white vinegar to help the egg whites set faster. Fresh garlic and lemon juice add great flavor to the avocado. Seasoning with salt and pepper enhances the taste, while red pepper flakes add the perfect kick. Fresh herbs bring color and additional flavor to your dish. For the full recipe, check out the details above! 1. Filling the saucepan with water Start by filling a medium saucepan with water. Use enough water to cover the eggs. Aim for about 3 inches deep. 2. Adding vinegar and creating a whirlpool Add 1 tablespoon of white vinegar to the water. This helps the egg whites stay together. Stir the water gently to create a whirlpool. This motion helps the eggs form a nice shape. 3. Timing for the perfect runny yolk Crack each egg into a small bowl. This way, you can add each egg without breaking the yolk. Once the water simmers, slide the eggs into the center of the whirlpool. Poach for 3-4 minutes for a runny yolk. If you like it firmer, cook a bit longer. 1. Slicing and mashing the avocados Take 2 ripe avocados and slice them in half. Remove the pit and scoop the flesh into a bowl. Use a fork to mash the avocado until smooth, or keep it chunky if you prefer. 2. Incorporating flavor with garlic and lemon Add 1 minced garlic clove and juice from 1 lemon to the mashed avocado. Mix well and season with salt and pepper. This adds a fresh taste to your avocado spread. 1. Options for toasting: toaster or skillet You can toast 4 slices of whole grain bread in a toaster or on a skillet. If using a skillet, heat a little olive oil for extra flavor. 2. Achieving the perfect crispy texture Toast until golden brown and crispy. This step is key for the perfect avocado toast. A good crunch adds great texture. For the full recipe, see the section above. To poach an egg just right, start with fresh eggs. Fresh eggs hold their shape better. Use a pot with simmering water, not boiling. Add a tablespoon of white vinegar to help the egg whites stay together. Stir the water to create a whirlpool. This helps the egg form a nice shape. Common pitfalls: - Egg breaks: Crack the egg into a small bowl first. This keeps the yolk intact. - Overcooked egg: Aim for 3-4 minutes for a runny yolk. Try a timer to help you. For creamy avocado, choose ripe ones. A ripe avocado feels slightly soft but not mushy. To mash, use a fork for a chunky texture. Add garlic and lemon juice to enhance the flavor. Mix until it reaches your desired consistency. Freshness indicators: - Color: A dark green color inside means it's ripe. - Skin: Check for small dark spots; this might mean it’s overripe. When choosing bread, whole grain is best for flavor and texture. Look for bread with seeds for extra crunch. You can also use sourdough for a tangy taste. Alternatives for gluten-free diets: - Gluten-free bread: Many shops sell tasty gluten-free options. - Rice cakes: A low-carb choice that still holds the toppings well. For the full recipe, check out the details above. {{image_2}} You can add fun toppings to your avocado toast. Try smoked salmon for a rich taste. Bacon adds a nice crunch and salty flavor. For veggies, slice fresh tomatoes or radishes. Both add color and freshness. You can also sprinkle some feta cheese for a creamy bite. To boost flavor, consider adding spices. A pinch of garlic powder or paprika works wonders. You can also try fresh herbs like basil or dill. For oil, flavored olive oil adds extra zest. Avocado oil is another great choice for health and taste. If you want a vegan option, swap eggs for chickpeas or tofu. Both are great for protein. For low-carb diets, skip the bread and use cucumber slices. You can also use cloud bread for a keto-friendly choice. This way, you can enjoy the same great taste while sticking to your diet. For the complete recipe, check out the Full Recipe section. To keep avocados fresh, store them in the fridge. Wrap them tightly in plastic wrap. This slows down browning. If you have cut avocados, sprinkle some lemon juice on them. This helps keep their green color. For toasted bread, keep it in an airtight container. This keeps it from getting stale. To reheat your toast, use a toaster or an oven. This way, it stays crispy. Avoid using the microwave as it can make it soggy. If you have leftover poached eggs, place them in warm water. This warms them up gently without cooking them more. You can prepare ingredients ahead of time to save time. Mash avocados the night before, but store them in an airtight container. Add lemon juice to prevent browning. You can also toast your bread in advance. Just keep it in a cool, dry place until you're ready to eat. For the full recipe, check the earlier section. To poach an egg perfectly, use fresh eggs. Fill a medium saucepan with water and bring it to a gentle simmer. Add a tablespoon of white vinegar to help the egg whites hold together. Create a gentle whirlpool by stirring the water. This helps the egg white wrap around the yolk. Crack the egg into a small bowl first, then slide it into the whirlpool. Cook for about 3-4 minutes for a runny yolk. Use a slotted spoon to remove it. You can prepare avocado toast in advance, but the avocado may brown. To slow browning, add lemon juice to the mashed avocado. Store it in an airtight container. Assemble the toast shortly before serving for the best taste. Toast the bread and add the avocado just before eating. This keeps the flavors fresh and bright. If you don’t have whole grain bread, many options exist. You can use sourdough, rye, or multigrain bread. Gluten-free bread also works well. For a low-carb option, try using lettuce wraps or zucchini slices. Each option gives a different taste and texture to your avocado toast. Avocados are very healthy. They are full of good fats that help your heart. They also have fiber, which aids digestion. Plus, avocados contain vitamins like E, K, and B. Eating avocados can help keep your skin healthy and your energy levels up. Yes, you can use frozen avocados. Just thaw them before using. Frozen avocados are great for smoothies too. However, they may be a bit mushy, so they work best for mashing. Use them in your avocado toast with confidence! Check out the Full Recipe for more details on how to make this dish delicious. To wrap up, we've explored how to make a tasty avocado toast with poached eggs. We covered the key ingredients, the steps to poach eggs, prepare avocados, and toast bread for the perfect crunch. You learned tips to avoid common mistakes and ways to customize the dish for your tastes. Enjoy experimenting with different toppings and flavors. This simple meal can be a great breakfast or snack. Remember, avocado toast is not just food; it’s a versatile canvas for your creativity!

Avocado Toast with Poached Egg Healthy Breakfast Bliss

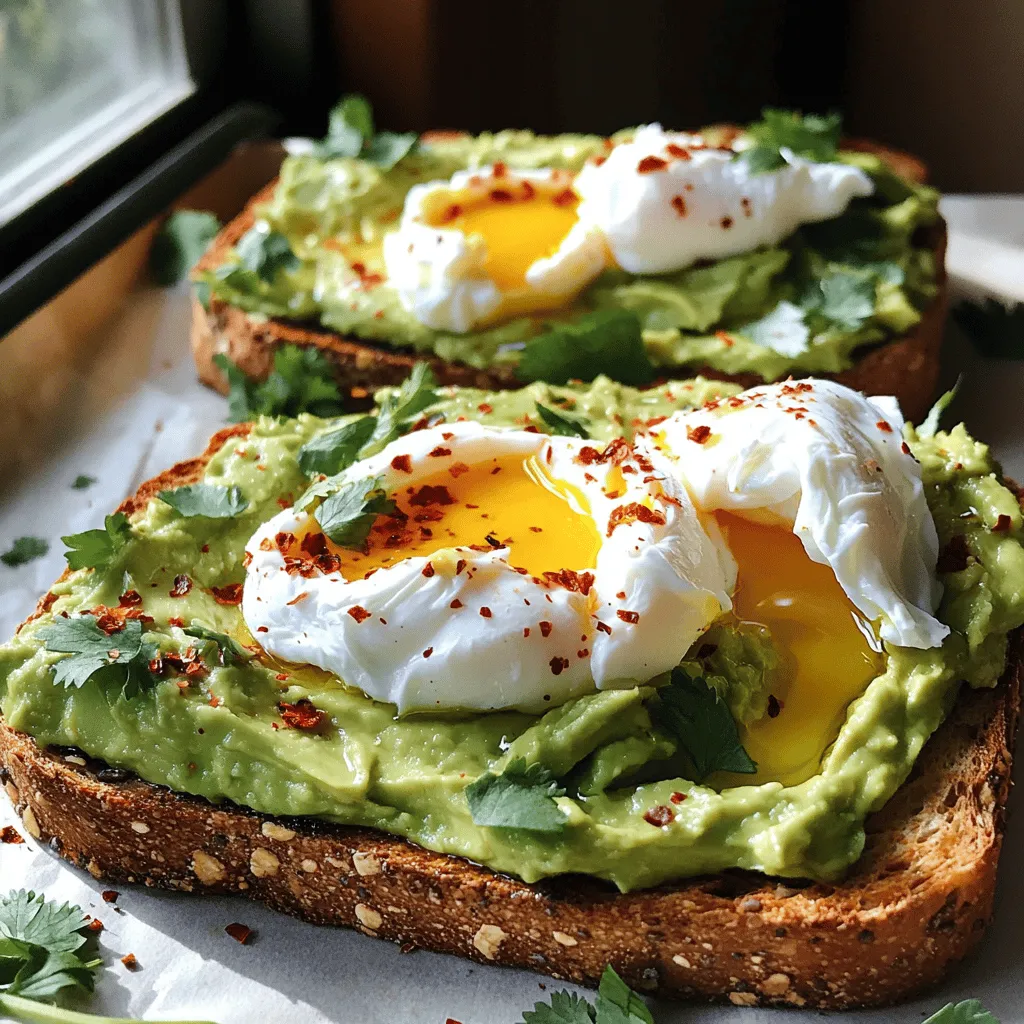
If you’re searching for a quick, nutritious breakfast, look no further! Avocado toast with a poached egg is a perfect

Older posts
Newer posts
← Previous Page1 … Page90 Page91 Page92 … Page105 Next →
© 2025 My Cooking Cast • Built with GeneratePress

Our Policies

  • Privacy Policy
  • GDPR Policy
  • Terms Of Use
  • Copyright Policy
  • Cookie Policy
  • Disclaimer

More Information​

  • Home
  • Contact
  • About
  • Dinner
  • Appetizers
  • Dessert
©2025, My Cooking Cast About Privacy Policy Back To Top