Skip to content
DisclaimerTerms Of UseGDPR PolicyCookie Policy

My Cooking Cast

  • Home
  • Drinks
  • Appetizers
  • Dinner
  • Dessert
  • About
  • Contact
  • Privacy Policy
DisclaimerTerms Of UseGDPR PolicyCookie Policy

Emma

The main flavors in One-Pan Creamy Tuscan Chicken come from a few key ingredients. Here’s what you need: - 4 boneless, skinless chicken breasts - 2 tablespoons olive oil - 4 cloves garlic, minced - 1 cup cherry tomatoes, halved - 2 cups fresh spinach - 1 cup heavy cream - 1 cup grated Parmesan cheese - 1 teaspoon Italian seasoning These ingredients create the perfect balance of taste and texture. The chicken stays juicy, while the sauce is creamy and rich. To enhance the dish, you’ll also need some seasonings: - Salt and pepper - Fresh basil for garnish These simple seasonings uplift the flavors. The basil adds a fresh note that really ties everything together. For the full recipe, check out the [Full Recipe]. First, grab a large skillet and heat the olive oil over medium-high heat. While the oil warms, season the chicken breasts with salt and pepper. This simple step enhances the flavor. Once the oil is hot, add the chicken breasts to the skillet. Brown the chicken on each side for about 5 to 7 minutes. You want them golden brown and fully cooked. After browning, carefully remove the chicken from the skillet and set it aside. This keeps it juicy while you make the sauce. Next, in the same skillet, add the minced garlic. Sauté it for about 30 seconds. You want it to smell great but not burn. After that, toss in the halved cherry tomatoes. Cook them for about 3 to 4 minutes until they soften. Now, pour in the heavy cream. This adds richness. Stir in the grated Parmesan cheese and Italian seasoning. Keep stirring until the cheese melts and the sauce becomes smooth. This creamy sauce is what makes the dish shine. Now it's time to finish your dish. Add the fresh spinach to the skillet. Cook it until it wilts, which should take about 2 minutes. Then, return the chicken to the skillet, spooning the creamy sauce over the top. Let it simmer for another 3 to 5 minutes. This heats everything through and blends the flavors. Before serving, taste the sauce. Adjust the seasoning with more salt and pepper if needed. For a lovely touch, garnish with fresh basil. This One-Pan Creamy Tuscan Chicken is now ready to serve. For the full recipe, check out the earlier section! To make sure your chicken cooks well, start with a hot skillet. Heat your olive oil until it shimmers. Season the chicken breasts with salt and pepper. Cook them for 5-7 minutes on each side. This browning adds flavor and keeps the chicken juicy. Use a meat thermometer. Aim for an internal temperature of 165°F. For a creamy sauce, add the heavy cream slowly. Stir it well with the melted Parmesan cheese. This helps create a smooth texture. If the sauce seems too thick, add a splash of chicken broth or water to loosen it up. Keep stirring until everything blends well. To make your dish look fancy, serve the chicken on a plate with the creamy sauce drizzled around it. Sprinkle fresh basil on top for color. You can also add a few halved cherry tomatoes for contrast. Pair your One-Pan Creamy Tuscan Chicken with crusty bread. This adds a nice touch and helps soak up the sauce. You can also serve it with a side salad for a fresh crunch. Roasted vegetables go well too. They add flavor and complement the dish nicely. {{image_2}} You can change the proteins in this dish. Shrimp or tofu make great swaps. Shrimp cooks fast and adds a nice texture. Tofu is perfect for a plant-based option. Just ensure you season them well to match the dish's flavor. If you want a dairy-free version, you can use coconut cream or cashew cream. Both provide a rich texture without the dairy. They blend well and keep the sauce creamy. Just adjust the seasoning to balance the flavors. To add more flavor, consider mushrooms or artichokes. Mushrooms bring an earthy taste. Sauté them with garlic before adding cream for depth. Artichokes add a unique twist. They pair well with the creamy sauce and offer a pleasant bite. For spice variations, try red pepper flakes for heat or smoked paprika for a smoky touch. A pinch of nutmeg can add warmth. Just sprinkle in a little at a time, so it does not overpower the dish. These variations keep the dish exciting and tailor it to your taste. For the full details, check out the Full Recipe. To store leftovers from One-Pan Creamy Tuscan Chicken, let the meal cool first. Place it in an airtight container. This helps keep the chicken moist and the sauce fresh. Use glass or BPA-free plastic containers. They are the best options for storing food. Label the container with the date. This way, you can track how long it has been in the fridge. When it’s time to enjoy your leftovers, reheat the chicken safely. You can use the microwave or the stovetop. If using the microwave, place the chicken on a plate. Cover it with a damp paper towel. This keeps the chicken from drying out. Heat in short bursts, stirring in between. If you prefer the stovetop, place the chicken in a skillet over low heat. Add a splash of water or extra cream to maintain moisture. Stir gently to warm it up. To keep the cream sauce from separating, avoid high heat. A gentle heat keeps the sauce smooth and creamy. Enjoy your tasty dinner delight! Making this dish is quick and easy. It takes about 30 minutes from start to finish. You’ll spend around 10 minutes prepping the ingredients. The cooking time is about 20 minutes. This makes it a great choice for busy weeknights when you want a tasty meal fast. Yes, you can use frozen chicken breasts for this recipe. Just be sure to thaw them first. You can defrost them overnight in the fridge or use the quick method of placing them in cold water. Once thawed, you can follow the recipe as usual. Cooking times may vary slightly, so ensure the chicken is cooked through. This creamy chicken pairs well with many sides. Here are a few great options: - Steamed rice or quinoa - Garlic bread for dipping in the sauce - A fresh green salad to balance the meal - Roasted vegetables for a colorful plate You might also enjoy a light white wine, like Pinot Grigio, with it. Yes, this dish works well for meal prep. You can make it in advance and store it in the fridge. Just divide it into meal containers. It keeps well for about 3 days. When you’re ready to eat, simply reheat it in the microwave. Make sure the chicken is hot throughout. This way, you can enjoy a tasty meal any day of the week. For the full recipe, check above! In this blog post, we explored how to make One-Pan Creamy Tuscan Chicken. We covered the key ingredients like juicy chicken, fresh spinach, and creamy sauce. I included step-by-step instructions to guide you through prepping, cooking, and finishing the dish perfectly. For those looking to add variety, we discussed ingredient swaps and flavor boosts. Remember to follow my tips for the best texture and taste. With these simple steps, you'll create a delicious meal that everyone will love. Enjoy your cooking!

One-Pan Creamy Tuscan Chicken Tasty Dinner Delight

Looking for a quick and tasty dinner? Try my One-Pan Creamy Tuscan Chicken! With juicy chicken, vibrant spinach, and sun-kissed

- 1 pound large shrimp, peeled and deveined - 4 cloves garlic, minced - 1/4 cup fresh lemon juice - Zest of 1 lemon - 1/4 cup olive oil - 1 teaspoon red pepper flakes (adjust to taste) - 1 tablespoon fresh parsley, chopped - Salt and pepper, to taste - Lemon wedges, for serving For this dish, I always choose fresh shrimp. They bring bright flavors and a juicy bite. You can find them at your local market. Look for shrimp that feels firm and has a clean smell. If you use frozen shrimp, make sure to thaw them well before cooking. The marinade is key to great taste. Fresh garlic gives a strong flavor. Lemon juice and zest add a nice zing. Olive oil makes everything rich and smooth. Red pepper flakes give a little heat, but you can use less if you want it milder. Garnish with parsley for color and freshness. Serve with lemon wedges for a zesty kick. You can find the full recipe for Zesty Lemon Garlic Shrimp in the earlier sections. To start, grab a medium bowl. In this bowl, mix together the olive oil, minced garlic, and fresh lemon juice. Add the lemon zest and red pepper flakes. Season with salt and pepper. Whisk it all together until it looks smooth and mixed well. This marinade gives the shrimp a bright and zesty flavor. Now, take your peeled and deveined shrimp and place them in the bowl with the marinade. Toss the shrimp gently to coat them evenly. This step is key to ensuring every bite is full of flavor. Let the shrimp marinate for at least 15 minutes. If you have time, let them sit for up to 30 minutes. This longer time allows the flavors to soak in even more. Once your shrimp have marinated, heat a large skillet over medium-high heat. When the skillet is hot, add the shrimp in a single layer. Cook them for about 2-3 minutes on one side. You want them to turn pink and opaque. After that, flip the shrimp over and cook for another 2 minutes. Once done, remove the skillet from heat. Garnish your shrimp with chopped parsley for a fresh touch. Serve them right away with lemon wedges for an extra zesty kick. For the full recipe, check the earlier section. When picking shrimp, look for large, fresh shrimp. They should smell like the sea, not fishy. You can choose either wild-caught or farmed shrimp. Wild shrimp often have better flavor. If using frozen shrimp, thaw them in the fridge overnight for best results. To make your dish even tastier, try adding some extras. Fresh basil or cilantro adds a nice twist. For a smoky flavor, add smoked paprika. A splash of white wine can also elevate the dish. Experiment with different spices to find your favorite mix. Cooking shrimp takes just a few minutes. They are done when they turn pink and curl into a C shape. Avoid overcooking, as it makes them tough. Pay close attention to the cooking time. Remove them from heat as soon as they're done. Follow the Full Recipe for precise cooking times. {{image_2}} You can boost the taste of your Zesty Lemon Garlic Shrimp with fun add-ins. Consider adding diced tomatoes for a fresh burst. Fresh spinach adds color and nutrients. For a kick, toss in sliced jalapeños or crushed red pepper. You can also mix in capers or olives for a salty touch. Each add-in brings a new twist, so feel free to get creative! You don’t have to stick to a skillet for cooking shrimp. You can grill them for a smoky flavor. Just thread the marinated shrimp on skewers and cook on medium heat. Broiling is another great option. Place the shrimp on a baking sheet and broil for about 2-3 minutes on each side. This method gives them a nice char and depth of flavor. Pair your shrimp with various sides for a complete meal. Serve over fluffy rice or creamy risotto for a hearty dish. You can also go with a fresh salad for a lighter option. Roasted vegetables add a nice crunch and color. If you want a crunchy touch, serve with garlic bread. Each side complements the shrimp and makes your meal special. For the full recipe, check below. After you enjoy your zesty lemon garlic shrimp, store any leftovers in an airtight container. This keeps the shrimp fresh. Place the container in the fridge. Your shrimp will stay good for up to two days. If you notice any strange smells or colors, it’s best to toss it out. If you want to keep your shrimp longer, freezing is a great option. First, make sure the shrimp is completely cooled. Place the shrimp in a freezer-safe bag or container. Remove as much air as you can to prevent freezer burn. Your shrimp can last up to three months in the freezer. When you're ready to use them, transfer them to the fridge to thaw overnight. To reheat your shrimp, avoid using the microwave. This can make them rubbery. Instead, use a skillet on low heat. Add a little olive oil and heat the shrimp slowly. This keeps them juicy and flavorful. You can also add a splash of lemon juice for extra zest while reheating. Enjoy your shrimp again just like the first time! For the full recipe, check out the previous section. You can tell shrimp is cooked when it turns pink and opaque. It should curl into a "C" shape. If it curls into an "O," it is overcooked. Cooking shrimp takes about 2 to 3 minutes per side. Keep an eye on it to avoid overcooking. Yes, you can use frozen shrimp for this recipe. Just make sure to thaw them first. Place them in the fridge overnight or run them under cold water for quick thawing. Pat the shrimp dry before marinating. This helps the marinade stick better. Zesty Lemon Garlic Shrimp goes well with many sides. Here are some great options: - Steamed rice or quinoa - Garlic bread or crusty baguette - Roasted vegetables like asparagus or broccoli - A fresh green salad with lemon vinaigrette - Pasta tossed in olive oil and herbs These sides will complement the bright flavors of the shrimp. For the full recipe, check out the main section on Zesty Lemon Garlic Shrimp. This post covered how to prepare zesty lemon garlic shrimp. You learned about the key ingredients, step-by-step cooking, and helpful tips. Remember to choose the right shrimp for the best taste. You can also explore fun variations to fit your meal. Storing leftovers properly keeps your dish tasty for later. Now you can cook shrimp with confidence. Enjoy your time in the kitchen and delight in every bite!

Zesty Lemon Garlic Shrimp Flavorful and Easy Recipe

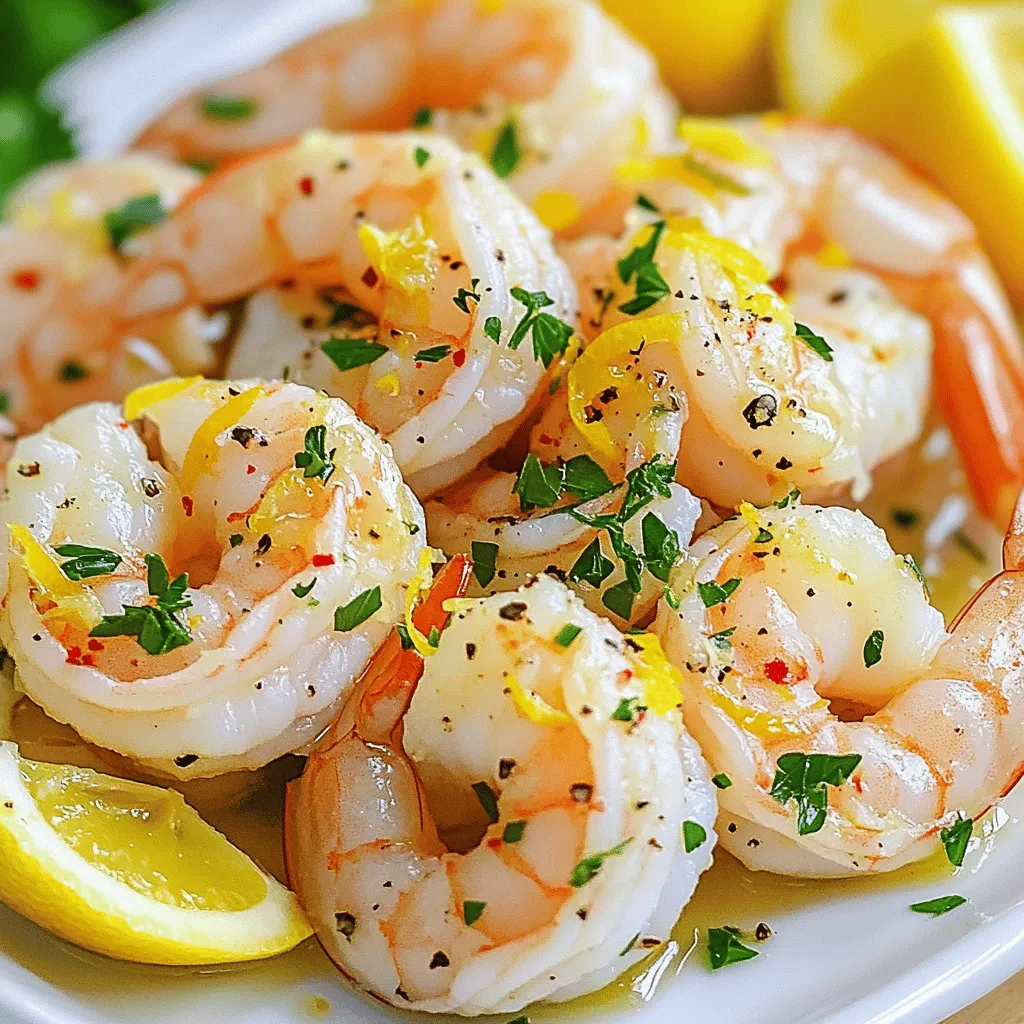
Craving a burst of flavor in your meal? You’ll love this Zesty Lemon Garlic Shrimp recipe. It’s quick, easy, and

To make this Heavenly Banana Walnut Cream Cake, gather these items: - 2 ripe bananas, mashed - 1 cup granulated sugar - 1/2 cup unsalted butter, softened - 2 large eggs - 1 teaspoon vanilla extract - 1 1/2 cups all-purpose flour - 1 teaspoon baking powder - 1/2 teaspoon baking soda - 1/4 teaspoon salt - 1/2 cup buttermilk - 1 cup walnuts, chopped - 1 cup heavy cream - 2 tablespoons powdered sugar - Optional: additional walnuts or banana slices for decoration Each ingredient plays a key role in the cake’s flavor and texture: - Ripe bananas add natural sweetness and moisture. - Granulated sugar gives sweetness and helps with browning. - Unsalted butter provides richness and a soft texture. - Eggs act as a binder and help the cake rise. - Vanilla extract enhances flavor. - Flour is the backbone of the cake, giving it structure. - Baking powder and baking soda create lift for a light cake. - Salt balances sweetness and brings out flavors. - Buttermilk adds moisture and a slight tang. - Walnuts contribute a crunchy texture and nutty flavor. - Heavy cream is whipped for a rich topping. - Powdered sugar sweetens the cream, making it fluffy. Choosing the right bananas and walnuts makes a big difference: - Bananas: Look for bananas that are ripe with brown spots. They should feel soft but not mushy. The more spots, the sweeter they will be. - Walnuts: Choose fresh, unsalted walnuts. Check for any signs of rancidity or an off smell. Toasting them lightly before adding can enhance their flavor. Follow these tips to ensure your cake is both tasty and delightful! For the full recipe, check out the detailed cooking instructions. 1. First, preheat your oven to 350°F (175°C). This is key for baking. 2. Grease and flour a 9-inch round cake pan. This helps the cake to come out easily. 3. In a mixing bowl, cream together the softened butter and granulated sugar until light and fluffy. This should take about 3 minutes. 4. Next, beat in the eggs one at a time. Stir in the mashed bananas and vanilla extract until well mixed. 5. In another bowl, whisk together the flour, baking powder, baking soda, and salt. This helps the cake rise well. 6. Gradually add the dry mix to the banana mixture, alternating with the buttermilk. Mix until just combined. Don’t overmix! 7. Fold in the chopped walnuts gently. This keeps the walnuts whole for a nice crunch. 8. Pour the batter into the prepared pan and spread it evenly. 9. Bake for about 25-30 minutes. Check with a toothpick in the center. It should come out clean. 10. Once done, let the cake cool in the pan for 10 minutes. Then, transfer it to a wire rack to cool completely. 11. While the cake cools, prepare the whipped cream. In a bowl, whip the heavy cream with the powdered sugar. Whip until soft peaks form. 12. Once the cake has cooled, spread the whipped cream evenly over the top. 13. For fun, garnish with additional walnuts or banana slices. This adds a nice touch and makes it look pretty. For the complete recipe, check out the Full Recipe section. Enjoy your baking! Baking can be tricky, and I’ve seen some common mistakes. First, do not skip the buttermilk. It makes the cake moist. Second, avoid overmixing the batter. This can make your cake tough. Lastly, check your oven temperature. An oven that is too hot can burn the cake. To get that perfect texture, use ripe bananas. They add natural sweetness and moisture. Make sure to mash them well. Next, cream the butter and sugar until fluffy. This adds air and lightens the cake. When mixing, add the dry and wet ingredients alternately. This keeps the batter light. For a lovely presentation, top the cake with whipped cream. You can add banana slices on top for color. Chopped walnuts also add a nice crunch. If you like, drizzle some honey or caramel sauce. This makes the cake even more tempting. For the full recipe, check out the detailed instructions above. {{image_2}} You can switch up some ingredients in the Heavenly Banana Walnut Cream Cake to suit your taste. For example, if you prefer a sweeter cake, use brown sugar instead of granulated sugar. This swap adds a nice caramel flavor. You can also use coconut oil in place of unsalted butter for a different twist. If you want a nut-free cake, simply leave out the walnuts or replace them with sunflower seeds. To make this cake even more exciting, you can add extra flavors. Try mixing in a teaspoon of cinnamon for warmth. You could also add a splash of rum or bourbon for a richer taste. Another option is to fold in chocolate chips for a sweet surprise. You can even mix in some shredded coconut for a tropical vibe. These additions will enhance the cake’s flavor and make it your own. If you have gluten or dairy restrictions, you can still enjoy this cake. Use a gluten-free flour blend instead of all-purpose flour. Many blends work well and keep the cake moist. For a dairy-free version, replace buttermilk with almond milk mixed with a teaspoon of vinegar. This will mimic the tanginess of buttermilk. Additionally, choose coconut cream or a dairy-free whipped topping for the cake's creamy layer. These changes will help you enjoy this delightful treat without worry. For the complete recipe, check out the Full Recipe. To keep your Heavenly Banana Walnut Cream Cake fresh, store it properly. First, allow the cake to cool fully. Then, cover it with plastic wrap or foil. You can also use an airtight container. This keeps the cake moist and stops it from drying out. If you want to save it for later, refrigerate it. When stored correctly, your cake can last about 3 to 5 days in the fridge. If you freeze it, it can last up to 3 months. Just make sure to wrap it well before freezing. When you are ready to eat it, thaw it in the fridge overnight. If you want to enjoy a warm slice, you can reheat the cake. Place a slice in the microwave for about 10 to 15 seconds. This warms it up nicely without making it dry. Serve it with a dollop of whipped cream or some fresh banana slices for extra flavor. For a fun twist, try adding a sprinkle of cinnamon on top! For the full recipe, visit the Full Recipe section. Yes, you can use frozen bananas. Just thaw them first. Drain any excess liquid. Mash them well before mixing. Frozen bananas work great in baked goods. They are often sweeter and softer. This can enhance the flavor and texture of your cake. You can bake the cake a day before serving. Let it cool completely. Wrap it tightly in plastic wrap. You can also store it in an airtight container. This keeps it fresh and moist. You can whip the cream topping on the day you serve. This way, it stays fluffy and light. If you don't have buttermilk, don't worry. You can make your own. Mix one cup of milk with one tablespoon of vinegar or lemon juice. Let it sit for about five minutes. This will mimic buttermilk's tangy taste. You can also use yogurt or sour cream mixed with water. This blog post covered everything you need for a delicious cake. We explored the key ingredients and their importance. I provided step-by-step baking instructions and tips to avoid common mistakes. You learned about fun variations and how to store your cake properly. Remember, using fresh bananas and walnuts makes a big difference. Bake smart, and enjoy your creation with a tasty whipped cream topping. Now, you have all the tools to make a perfect cake!

Heavenly Banana Walnut Cream Cake Easy and Delicious Recipe

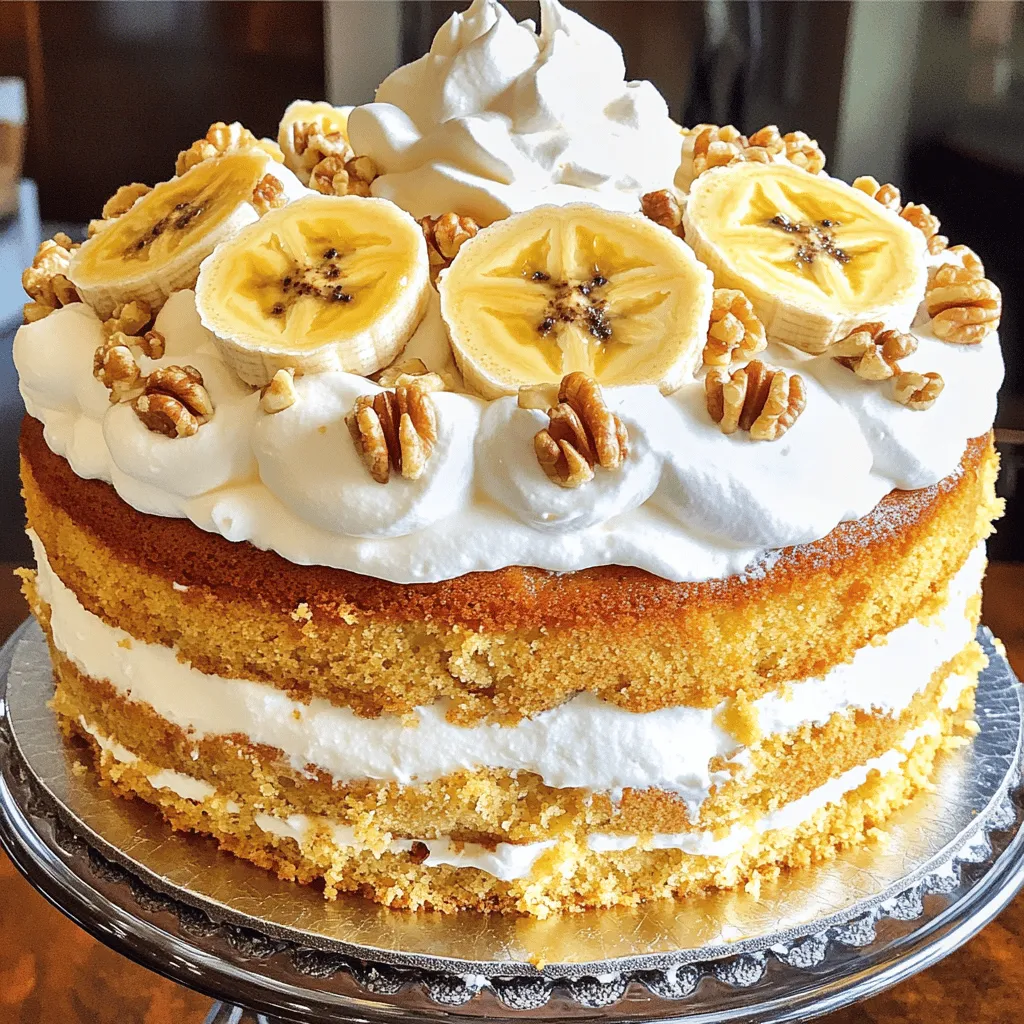
Are you ready for a dessert that tastes as good as it looks? My Heavenly Banana Walnut Cream Cake is

- 8 oz penne pasta - 1 lb chicken breast, diced - 2 cups broccoli florets - 1 cup heavy cream - 1 teaspoon Italian seasoning - 3 cloves garlic, minced - 1 cup grated Parmesan cheese - 2 tablespoons olive oil - Additional vegetables like bell peppers or carrots - Spices for flavor, such as red pepper flakes or paprika When I whip up Creamy Broccoli and Chicken Penne, I love to keep it simple yet flavorful. The main ingredients form the base of this dish. You need penne pasta, chicken breast, broccoli florets, and heavy cream. This combo creates a creamy, rich texture that wraps around the penne beautifully. Next, let's talk about seasoning. I always use Italian seasoning and minced garlic to add depth to the dish. A sprinkle of grated Parmesan cheese brings a nice salty flavor, while olive oil helps cook the chicken just right. Feel free to get creative with optional ingredients. You can toss in extra vegetables like bell peppers or carrots for color and nutrition. If you like heat, add spices like red pepper flakes or paprika. This dish is all about your taste and what you enjoy! For the full recipe, check the instructions to create this delightful meal. To start, fill a large pot with water. Add a pinch of salt and bring it to a boil. Once boiling, add 8 oz of penne pasta. Cook it according to the package instructions until it reaches an al dente texture. In the last 2 minutes of cooking, add the 2 cups of broccoli florets. This step keeps the broccoli bright and crisp. After everything is cooked, drain the pasta and broccoli together. Set them aside for later. Next, heat a large skillet over medium heat. Pour in 2 tablespoons of olive oil. When the oil is hot, add 1 lb of diced chicken breast. Season it with salt, pepper, and 1 teaspoon of Italian seasoning. Cook the chicken for about 6-8 minutes. Look for a golden brown color and ensure it is fully cooked. After that, stir in 3 cloves of minced garlic. Cook for one more minute until you smell that wonderful garlic aroma. Now it’s time to make the sauce. Pour in 1 cup of chicken broth and bring it to a simmer. Let it reduce slightly for about 3-4 minutes. Then, gradually whisk in 1 cup of heavy cream. This will make the mixture smooth and creamy. Next, stir in 1 cup of grated Parmesan cheese until it melts. If your sauce feels too thick, add a splash of chicken broth to loosen it. Finally, add the drained penne and broccoli back into the skillet. Toss everything well to coat it in the creamy sauce. Heat it through for about 2-3 minutes. Make sure to taste and adjust the seasoning if needed. Serve your creamy broccoli and chicken penne hot, garnished with fresh parsley and an extra sprinkle of Parmesan. For the full recipe, check out the previous section. Enjoy your meal! To keep your sauce smooth, avoid boiling it after adding cream. High heat can cause it to separate. Stir gently over low heat for best results. If your sauce gets too thick, add a splash of chicken broth. This will help bring it back to a nice creamy consistency. To keep chicken juicy, start with even-sized pieces. This ensures they cook evenly. Brown the chicken on medium heat. Don’t crowd the pan; this helps achieve a nice golden color. Use a meat thermometer to check for doneness. The chicken should reach 165°F for safe eating. For a pretty presentation, serve in deep bowls. Garnish with fresh parsley and an extra sprinkle of Parmesan. This adds color and taste. Pair your dish with a light salad or garlic bread. A crisp side will balance the creamy pasta nicely. For a complete cooking experience, check out the Full Recipe! {{image_2}} You can switch up the pasta type in this dish. Try whole wheat penne for a healthier option. Gluten-free pasta works well too. It gives the same great texture without gluten. If you want to swap chicken, you have options. You can use shrimp, turkey, or tofu. Each option adds a unique flavor twist. Just adjust cooking times based on your choice. To change the creaminess, consider Greek yogurt or light cream. Both options cut calories while keeping that rich taste. You can mix them in slowly to see how creamy you want it. If you're dairy-free, there are substitutes too. Coconut milk or almond milk can work well. Just make sure to choose unsweetened versions for the best flavor. Boost the flavor with spices or herbs. A pinch of red pepper flakes adds heat. Fresh basil or thyme can bring a lovely aroma. Experiment to find the mix you enjoy. You can also add different vegetables to the mix. Bell peppers, spinach, or peas all work well. They not only add color but also extra nutrition. For the full recipe, check out the detailed instructions above. To store leftover creamy broccoli and chicken penne, let it cool first. Use an airtight container. Keep it in the fridge. This meal stays fresh for about 3-4 days. If you want to keep it longer, consider freezing. When reheating, use a skillet or microwave. If using a skillet, add a splash of broth or cream. This helps keep it moist. Stir often to avoid burning. For the microwave, cover it to trap steam. This keeps the dish from getting soggy. To freeze creamy broccoli and chicken penne, use a freezer-safe container. Leave some space at the top for expansion. Label the container with the date. For best taste, eat it within 3 months. When ready to eat, thaw it in the fridge overnight before reheating. Yes, you can prepare creamy broccoli and chicken penne ahead of time. Cook the pasta and chicken as directed, then combine them with the sauce. Store everything in an airtight container. Keep it in the fridge for up to three days. When ready to eat, reheat gently on the stove. Add a splash of chicken broth to keep it creamy. To spice up your dish, add red pepper flakes while cooking the chicken. You can also mix in some hot sauce or diced jalapeños. If you like a smoky flavor, try adding smoked paprika. Start with a small amount, then taste and adjust to your heat preference. This dish pairs well with a simple green salad. A side of garlic bread also complements it nicely. You could serve it with roasted vegetables or a light soup for a complete meal. If you want to add more greens, consider sautéed spinach or kale. Yes, creamy broccoli and chicken penne is great for meal prep. It holds up well in the fridge and reheats nicely. Divide it into individual containers for easy grab-and-go meals. This makes it a perfect choice for busy weekdays. Absolutely! Frozen broccoli works well in this recipe. Just add it to the boiling pasta for the last two minutes. It cooks quickly and retains its nutrients. Plus, it saves you time and effort, making this dish even easier to prepare. This blog post covered a creamy chicken and broccoli penne recipe. You learned about key ingredients like penne pasta, chicken, and heavy cream. I shared step-by-step instructions, tips for perfect sauce, and variations to suit your taste. Remember, you can store leftovers and reheat them with care. Try this dish in your kitchen for a comforting meal. Cooking is fun, and experimenting can lead to tasty surprises! Enjoy the process as you create delicious meals for yourself or loved ones.

Creamy Broccoli and Chicken Penne Comfort Meal

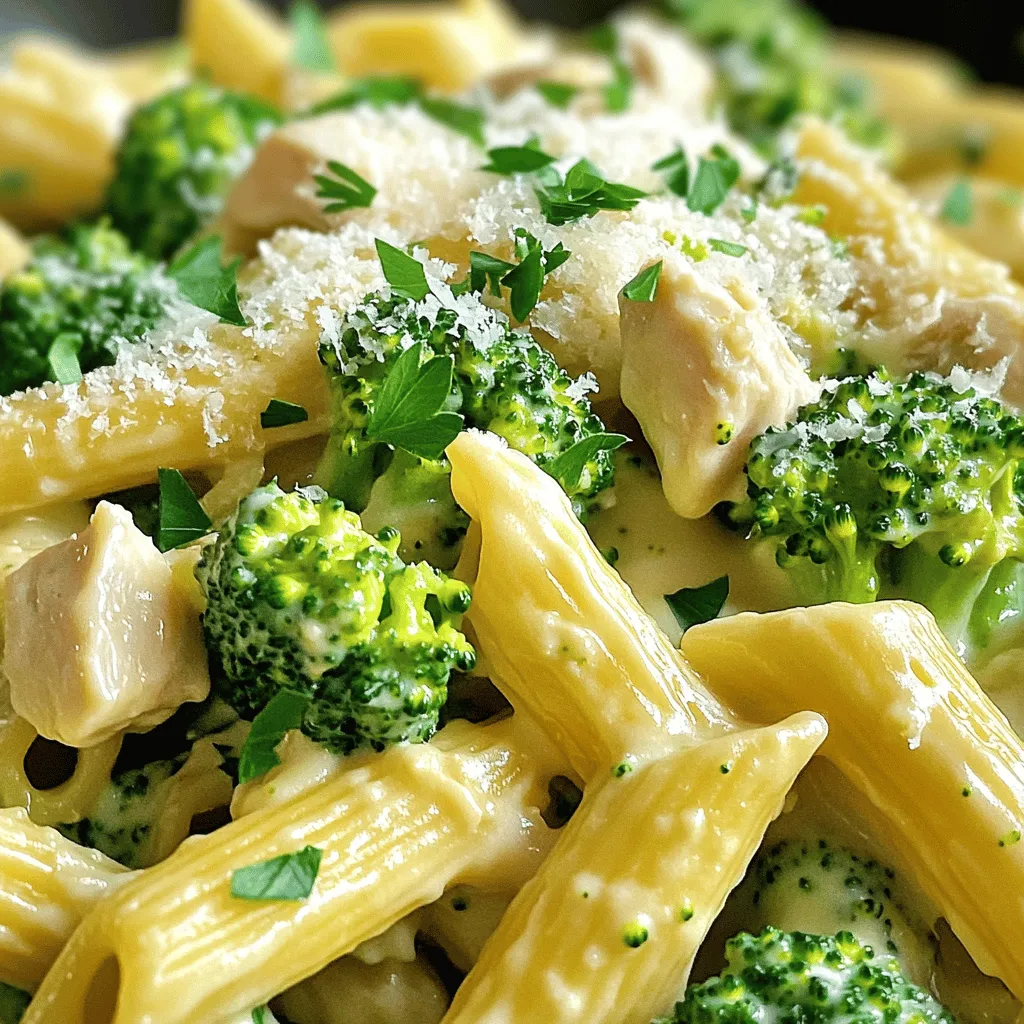
Looking for a warm, comforting meal that’s easy to make? This Creamy Broccoli and Chicken Penne dish is perfect for

To make a delightful Cheesy Broccoli Rice Casserole, gather these simple ingredients: - 2 cups cooked white or brown rice - 2 cups fresh broccoli florets (or frozen, thawed) - 1 cup shredded cheddar cheese - ½ cup cream cheese, softened - 1 cup vegetable or chicken broth - 1 cup milk - 1 teaspoon garlic powder - 1 teaspoon onion powder - ½ teaspoon paprika - ¼ teaspoon black pepper - ¼ teaspoon salt (adjust to taste) - 1 cup breadcrumbs (optional, for topping) - 2 tablespoons olive oil (for the topping) These ingredients work together to create a creamy, cheesy dish. The rice and broccoli form a hearty base. The cheeses add richness and flavor. The spices give it a nice kick. Cream cheese makes the casserole smooth and soft. Broth and milk keep it moist. If you like a crunchy top, add breadcrumbs mixed with olive oil. This will make the dish even more appealing. Trust me, using fresh or frozen broccoli is easy. Each option brings a lovely green color and taste. I recommend using quality cheddar cheese for the best flavor. You can try different cheeses if you’d like. Just keep the cream cheese for that creamy texture. For a complete recipe, check out the Full Recipe. - Preheat your oven to 350°F (175°C). - If you use fresh broccoli, steam it for 3-4 minutes. It should be bright green and slightly tender. If you choose frozen broccoli, make sure it is thawed and drained. - In a large bowl, combine the cooked rice, broccoli, ½ cup of cheddar cheese, cream cheese, broth, milk, garlic powder, onion powder, paprika, black pepper, and salt. - Stir until everything is mixed well. - Pour the mixture into a greased 9x13-inch baking dish. Spread it out evenly. - In a small bowl, mix breadcrumbs with olive oil until well coated. This step adds a nice crunch. - Sprinkle the breadcrumb mix on top, then add the remaining ½ cup of cheddar cheese. - Bake for 30-35 minutes, or until the top is golden brown and bubbly. This Cheesy Broccoli Rice Casserole is so comforting. For the full recipe, check out the earlier section. To get the best cheesiness and creaminess in your casserole, use a mix of cheeses. I love using sharp cheddar for flavor and cream cheese for a smooth texture. Combine them well with the other ingredients for a rich taste. Also, let the casserole cool for about 5-10 minutes before serving. This helps it set and makes serving easier. You’ll enjoy the full flavor when it’s not too hot. Fresh herbs can enhance the flavor of your dish. I suggest using parsley or chives. Just chop them up and sprinkle them on top. This not only adds taste but also gives the dish a beautiful look. You can also drizzle olive oil around the edges of the serving dish. It adds a nice shine and makes it more appealing. If your oven runs hot or cool, adjust your cooking time. Keep an eye on the casserole as it bakes. You want it to be bubbly and golden brown on top. For a crispy topping, try broiling it for the last few minutes. Just watch it closely to prevent burning. These small changes can make your casserole even better. For the full recipe, check out the complete guide above. {{image_2}} You can easily swap out the cheese in this casserole. If you want a vegan option, try using vegan cheese. It melts well and still gives that cheesy flavor. You can also change the rice you use. Brown rice adds a nutty taste and more fiber. Cauliflower rice can make your dish lighter and lower in carbs. Feel free to add more veggies to your casserole. Carrots, peas, or bell peppers work great. They add color and nutrition. If you want to make this dish a full meal, include some protein. Cooked chicken, turkey, or even beans can make it heartier. Just mix them in with the rice and broccoli. For gluten-free options, look for gluten-free breadcrumbs. Many brands offer great choices that taste just as good. If you need a dairy-free option, use almond milk instead of regular milk. For cream cheese, try a dairy-free cream cheese. These swaps will keep the casserole creamy and tasty! For the full recipe, check out the [Full Recipe] section. To keep your leftover Cheesy Broccoli Rice Casserole fresh, place it in an airtight container. Store it in the fridge. It will stay good for about 3 to 5 days. Make sure to let it cool before sealing the container. If you want to save some for later, freezing is a great option. First, let the casserole cool completely. Then, cut it into portions. Wrap each piece tightly in plastic wrap. Place the wrapped portions in a freezer-safe bag or container. This way, it can last for up to 3 months. When you’re ready to eat, take it out and thaw in the fridge overnight. Reheating can be done in a microwave or an oven. For the microwave, place a portion on a microwave-safe plate. Cover it with a damp paper towel. Heat for 2-3 minutes, checking halfway. For the oven, preheat it to 350°F (175°C) and place the casserole in an oven-safe dish. Cover it with foil to keep it moist. Heat for about 20 minutes. Make sure to check that it’s warm all the way through. This helps keep it from drying out. Enjoy your cheesy delight anytime! For the complete cooking method, check the Full Recipe. Yes, you can make this casserole ahead. Simply prepare it up to the baking step. Cover it well and store it in the fridge for up to 24 hours. When you are ready, bake it as directed. This method saves time on busy days. Frozen broccoli works great! It is often picked at peak ripeness and frozen quickly. This keeps the nutrients intact. Just make sure to thaw and drain it before using. This saves time and makes prep easy. To make it vegetarian, use vegetable broth instead of chicken broth. You can also swap the cream cheese for a dairy-free version. Lastly, check your cheese. Use vegetarian cheese if needed. This way, you keep all the cheesy goodness! This dish pairs well with many sides. A fresh green salad adds a nice crunch. You can also serve it with roasted vegetables for extra flavor. For a heartier meal, try it alongside grilled chicken or fish. This blog post shared a simple recipe for Cheesy Broccoli Rice Casserole with easy steps. I went over ingredients, cooking tips, and storage methods. You can customize it with different cheeses or add proteins to fit any meal. Remember to let it cool before serving for the best taste. Whether you make it for family dinner or a gathering, this dish is sure to please. Enjoy cooking and sharing this tasty casserole with your loved ones!

Cheesy Broccoli Rice Casserole Comfort Food Delight

Craving comfort food that’s creamy, cheesy, and packed with nutrients? Look no further than this Cheesy Broccoli Rice Casserole. With

- 1 cup quinoa (rinsed and drained) - 2 cups water or vegetable broth - 1 cup cherry tomatoes, halved - 1 cucumber, diced - 1/2 red onion, finely chopped - 1/2 bell pepper (any color), diced - 1 can (15 oz) chickpeas, rinsed and drained - 1/2 cup kalamata olives, pitted and sliced - 1/4 cup feta cheese, crumbled (optional) - 1/4 cup fresh parsley, chopped - 1/4 cup fresh mint, chopped - 3 tablespoons olive oil - 2 tablespoons lemon juice - 1 teaspoon dried oregano - Salt and pepper to taste When making this Mediterranean quinoa salad, I love to focus on fresh ingredients. Each one adds flavor and texture. Quinoa is the star of this dish. It cooks up fluffy and light. Rinsing it first removes any bitterness. I use water or vegetable broth for cooking quinoa. Vegetable broth adds even more flavor. The cherry tomatoes burst with sweetness. They bring a bright color too. Next, I add a cucumber, red onion, and a bell pepper. The cucumber gives a crisp crunch. The onion adds a mild bite, while the bell pepper brings sweetness. Together, they create a nice balance. For protein, I include chickpeas. They are full of fiber and protein. Kalamata olives add a briny punch, while feta cheese adds a creamy touch. If you want a vegan option, just skip the feta. Herbs like parsley and mint brighten the salad. They add freshness and a pop of green. The dressing is simple. I whisk together olive oil, lemon juice, oregano, salt, and pepper. It ties everything together. This Mediterranean quinoa salad is a perfect dish for lunch or dinner. For the full recipe, check the details above. Enjoy creating this fresh and vibrant meal! - Combine 1 cup of rinsed quinoa and 2 cups of water or broth in a saucepan. - Bring the mixture to a boil, then reduce the heat and simmer for 15 minutes. Cooking quinoa is easy. After 15 minutes, the quinoa should be fluffy. Remove it from heat and let it cool. This step is crucial for the salad's texture. - Mix the cooled quinoa with 1 cup of halved cherry tomatoes, 1 diced cucumber, 1/2 finely chopped red onion, 1/2 diced bell pepper, and 1 can (15 oz) of rinsed chickpeas. - Add 1/2 cup of sliced kalamata olives, 1/4 cup of crumbled feta cheese (if using), 1/4 cup of chopped fresh parsley, and 1/4 cup of chopped fresh mint. This salad bursts with color and flavor. The fresh vegetables add crunch, while chickpeas boost protein. - In a small bowl, whisk together 3 tablespoons of olive oil, 2 tablespoons of lemon juice, 1 teaspoon of dried oregano, and salt and pepper to taste. - Pour the dressing over the salad and toss gently to coat everything evenly. A good dressing makes a big difference. The olive oil and lemon juice bring a bright taste to the dish. - Let the salad sit for 15-30 minutes. This time allows the flavors to meld. - Serve chilled or at room temperature for the best experience. Presentation matters. Serve this salad in a large bowl or on individual plates. Add a sprig of mint or a lemon wedge on top for a fresh look. For the full recipe, check the details above. To make your salad shine, rinse your quinoa. This step removes any bitterness. Then, use fresh lemon juice. It brightens every bite and adds zest. You can customize this salad to your liking. Feel free to add different vegetables. Bell peppers and carrots bring color and crunch. If you want a twist, substitute quinoa. Try farro or couscous for a new texture. To boost flavor, add more herbs. Dill or coriander can change the game. A drizzle of balsamic glaze makes the salad pop. It adds depth and sweetness that balances well with the other flavors. For the full recipe, check below! {{image_2}} You can easily make this salad vegan. Just omit the feta cheese for a plant-based option. It still tastes great without it! For the dressing, use tahini instead of olive oil. This swap adds a creamy texture and a nutty flavor. Want to boost the protein? Add grilled chicken or shrimp to your salad. They pair perfectly with the flavors in this dish. You can also add avocado for extra creaminess. It gives a rich taste and makes the salad even more filling. Feel free to switch up the ingredients based on what's in season. Fresh tomatoes in summer or squash in the fall can add variety. You can also try adding roasted vegetables for a warm salad. This adds depth and changes the texture, making it comforting and hearty. Remember, this Mediterranean quinoa salad is versatile. You can explore many flavors and textures, making it your own! For the full recipe, check out the details above. To keep your Mediterranean quinoa salad fresh, store it in an airtight container in the fridge. This way, you can enjoy it later without losing flavor or texture. It’s best consumed within 3-4 days. After that, the veggies may start to wilt, and the quinoa can dry out. Freezing this salad is not recommended. When you freeze quinoa salad, the texture changes. The vegetables become mushy, and that fresh crunch disappears. For the best taste and texture, enjoy it fresh. If you prefer to serve the salad warm, lightly heat it in a pan. Add a splash of water to help keep it moist. However, I recommend serving it chilled for maximum freshness. The flavors shine when the salad is served cold, making every bite delightful. - Approximately 15 minutes once brought to a boil. Quinoa cooks quickly, which I love. Just bring water or broth to a boil, add the rinsed quinoa, then reduce the heat. Cover and let it simmer until it absorbs all the liquid. You’ll know it’s done when it looks fluffy. - Yes, it can be made up to a day in advance; flavors improve with time. Making this salad ahead is great for meal prep. It allows the flavors to blend and taste even better when you serve it. Just store it in the fridge and enjoy later. - Other grains like couscous, bulgur, or farro work well. If you can't find quinoa, don’t worry! Those grains add a nice texture too. You can try any of them, and they will taste amazing with the salad. - Yes, quinoa is naturally gluten-free. This makes it perfect for gluten-free diets. You can enjoy this dish without any worries about gluten. - While fresh is best, canned vegetables can be used for convenience. If you’re short on time, canned veggies are a quick fix. Just rinse them well before adding to the salad. - Rich in fiber, protein, and healthy fats; detailed nutritional info can be provided. This salad is not just tasty; it’s healthy too. Quinoa packs a protein punch, while the veggies add fiber and nutrients. Enjoying this salad supports a balanced diet. For more details, check the full recipe. This Mediterranean quinoa salad is full of great flavors and healthy ingredients. Combine quinoa, fresh veggies, chickpeas, and herbs to make a filling meal. You can customize it with different toppings or dressings, depending on your taste. Keep leftovers in the fridge for a few days, but enjoy the salad fresh for the best flavor. This dish is easy to make and is perfect for any occasion. You'll love how simple it is to create a delicious and nutritious meal.

Mediterranean Quinoa Salad Fresh and Flavorful Dish

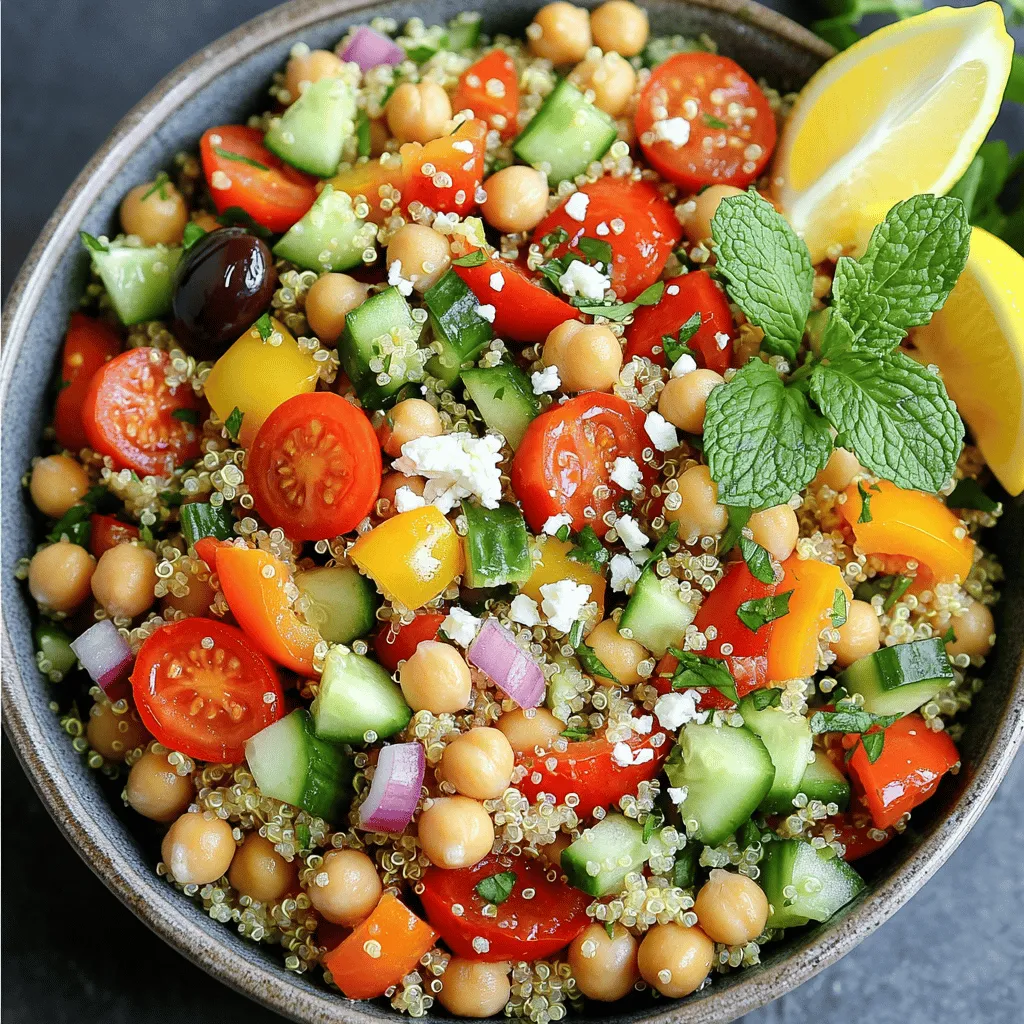
Welcome to a burst of fresh flavors! This Mediterranean Quinoa Salad is not just a dish; it’s a delightful mix

To make this tasty soup, gather the following ingredients: - 1 tablespoon olive oil - 1 medium onion, diced - 2 garlic cloves, minced - 2 medium carrots, sliced - 2 celery stalks, diced - 1 bell pepper, diced (any color) - 1 zucchini, chopped - 1 cup green beans, trimmed and cut into pieces - 1 can (14.5 oz) diced tomatoes and juices - 4 cups vegetable broth - 1 teaspoon dried thyme - 1 teaspoon dried basil - 1 bay leaf - Salt and pepper to taste - 1 cup kale or spinach, chopped - Optional: 1 tablespoon lemon juice for brightness You can use both fresh and frozen vegetables in this soup. Fresh vegetables offer bright flavors and textures. They also have more nutrients. Frozen vegetables are convenient and quick. They are picked at their peak freshness. I often use a mix of both. That way, I get the best of both worlds. If you use frozen vegetables, skip the initial sauté step. Just add them straight to the pot. Want to boost the taste of your soup? Here are some optional ingredients to try: - Fresh herbs like parsley or cilantro for garnish - A splash of balsamic vinegar for depth - A pinch of red pepper flakes for heat - Cooked beans or lentils for added protein These extras can make your soup even better. Feel free to mix and match based on what you enjoy! For the full recipe, check out the detailed instructions provided earlier. Start by washing all your vegetables. This keeps your soup fresh and clean. Dice the onion and garlic first. Slice the carrots and celery into small pieces. Chop the bell pepper and zucchini. Trim the green beans and cut them into bite-sized pieces. Finally, wash and chop the kale or spinach. Having everything ready makes cooking easier and faster. 1. Sauté the Base: Turn on your Instant Pot and select the sauté function. Add one tablespoon of olive oil. Once hot, toss in the diced onion and minced garlic. Cook for about 3-4 minutes until they smell good and soften. 2. Add Vegetables: Next, stir in the sliced carrots, diced celery, bell pepper, and zucchini. Cook for another 3-4 minutes. You want them to start softening but not mushy. 3. Combine Ingredients: Now, add the chopped green beans, canned tomatoes with juices, vegetable broth, thyme, basil, bay leaf, salt, and pepper. Stir well to mix everything together. 4. Pressure Cook: Close the lid and make sure the steam valve is sealed. Select the Pressure Cook function and set the timer for 8 minutes. 5. Release Pressure: After the timer goes off, let the pressure release naturally for about 5 minutes. Then, switch to quick release for any remaining steam. 6. Finish the Soup: Carefully open the lid. Remove the bay leaf and stir in the chopped kale or spinach. If you like, add a tablespoon of lemon juice for extra brightness. Let the soup sit for a few minutes until the greens wilt. 7. Taste and Adjust: Finally, taste your soup. Add more salt, pepper, or herbs if you want. This step ensures your soup is just right. - Always check that the sealing ring is in place. This helps build pressure. - Avoid overfilling the pot. Leave space for steam to circulate. - Quick release is best for vegetables. This keeps them crisp and bright. - If your soup is too thick, add more broth or water after cooking. These tips help you get the best soup every time you use your Instant Pot. Don't forget to check the Full Recipe for all the details! To create the best Instant Pot vegetable soup, start with fresh ingredients. Fresh vegetables give more flavor. Chop them into even pieces for even cooking. Use the sauté function to build flavor. Sauté onions and garlic first. This step adds depth to your soup. Make sure to add enough broth. For a rich taste, use vegetable broth. You can also add herbs like thyme and basil for extra flavor. Don’t forget the bay leaf; it adds a unique touch. Always taste your soup before serving. Adjust the salt and pepper to your liking. If you want a zing, add lemon juice at the end. This brightens the flavors beautifully. One common mistake is not sealing the lid properly. If the lid is not sealed, the pressure won’t build. This means the soup won’t cook right. Another mistake is overcooking the vegetables. If you cook them too long, they turn mushy. Stick to the 8-minute cooking time for perfect veggies. Don’t skip the natural pressure release. This step helps keep your soup from being too watery. Be careful when quick-releasing steam; hot steam can burn you. Cooking at high altitudes requires some changes. Water boils at a lower temperature up there. This means you may need longer cooking times. At altitudes above 3,000 feet, add 1-2 minutes to the cooking time. Always check the soup after the initial cook time. If the veggies are still firm, add more time. Keep an eye on your soup. Adjust as needed for perfect results. Cooking should be fun and tasty! For a full recipe, check the [Full Recipe]. {{image_2}} You can change up the base of this soup. Swap out the zucchini for squash or use sweet potatoes instead of carrots. If you love a bit of crunch, add some corn or peas. For a heartier soup, toss in some lentils or quinoa. These swaps keep things fresh and fun! This soup is super flexible. It’s already vegan, as it uses vegetable broth. For gluten-free eaters, just check the broth label. Most are safe, but it’s good to be sure. If you want to add protein, use chickpeas or beans. They fit well and keep it plant-based. If you like heat, add some red pepper flakes or chopped jalapeños. They bring a nice kick! You can also stir in a spoon of hot sauce right before serving. For a smoky flavor, try adding smoked paprika. This gives your soup a whole new vibe! For the full recipe, check out the detailed steps to create this delightful dish. After you enjoy your meal, let the soup cool down. You can store it in an airtight container. This keeps the soup fresh and tasty. Place it in the fridge if you plan to eat it within a few days. It’s best to eat it within five days. If you want to keep it longer, freezing is a great option. To freeze your soup, first, let it cool completely. Pour the soup into freezer-safe bags or containers. Leave some space at the top for expansion. Seal the bags tightly to avoid air. Label the bags with the date to keep track. The soup can last up to three months in the freezer. When you're ready to eat, take the soup out of the fridge or freezer. If frozen, let it thaw in the fridge overnight. Reheat the soup in a pot on the stove over medium heat. Stir often to avoid sticking. If you used the freezer, add a splash of water or broth. This helps bring back the soup's great texture. You can also reheat in the microwave but watch the time so it doesn't overcook. Enjoy your warm and flavorful Instant Pot Vegetable Soup! Yes, you can make this soup without broth. Just use water instead. It will still taste good. You can add herbs and spices to boost flavor. If you want, add a splash of soy sauce or a bit of vinegar for depth. The soup may be lighter, but you still get all those tasty veggies. There are many great sides for vegetable soup! Here are some ideas: - Crusty bread - Grilled cheese sandwiches - A fresh garden salad - Garlic bread - Cheese quesadillas These sides add flavor and texture. They also make your meal more filling. Your Instant Pot Vegetable Soup will last about 3 to 5 days in the fridge. Store it in an airtight container. Make sure it cools down before sealing. If you want to keep it longer, freeze it. It will last up to 3 months in the freezer. When ready, just reheat and enjoy! You can find the Full Recipe for this soup above. This blog post offers a full guide to making Instant Pot Vegetable Soup. We covered essential ingredients, cooking steps, and useful tips. You learned about ingredient swaps, diet needs, and how to store leftovers. Remember, the best soup starts with fresh or frozen veggies and your favorite spices. Keep experimenting with flavors to make it your own. I hope you enjoy every comforting bowl!

Instant Pot Vegetable Soup Quick and Flavorful Recipe

Looking for a quick and tasty vegetable soup? This Instant Pot Vegetable Soup recipe is just what you need! Packed

- 1 cup quinoa - 1 can (15 oz) black beans, drained and rinsed - 1 red bell pepper, diced - 1 avocado, diced - 1 cup cherry tomatoes, halved - 1/4 cup red onion, finely chopped - 1 cup corn kernels (fresh, frozen, or canned) - 1 tablespoon olive oil - 1 teaspoon ground cumin - 1 teaspoon smoked paprika - Salt and pepper to taste - Juice of 1 lime - 1/2 cup fresh cilantro, chopped You need these main ingredients to make your Vegan Taco Salad Bowls fresh and tasty. Quinoa serves as a great base. It cooks well and adds a nice texture. Black beans bring protein and fiber. The fresh vegetables add color and crunch. Each veggie, from the red bell pepper to the cherry tomatoes, packs flavor. Seasonings like cumin and smoked paprika give the dish warmth and depth. A squeeze of lime juice brightens everything up. - Tortilla chips - Fresh cilantro - Crunchy toppings You can add tortilla chips for a fun crunch. They give a nice contrast to the soft ingredients. Fresh cilantro can enhance the flavor and add a pop of color. Other crunchy toppings like seeds or nuts can also work. Feel free to get creative with what you have on hand! For the full recipe, check out the [Full Recipe]. To start, rinse 1 cup of quinoa under cold water. This helps remove the bitter coating. Next, combine the rinsed quinoa with 2 cups of vegetable broth in a medium saucepan. Bring it to a boil. Once it boils, reduce the heat to low. Cover the saucepan and let it simmer for about 15 minutes. You want the quinoa to absorb all the liquid and become fluffy. After that, remove it from the heat. Let it sit covered for 5 minutes. Finally, fluff the quinoa gently with a fork and set it aside. In a large mixing bowl, add the cooked quinoa, 1 can of drained black beans, 1 cup of corn kernels, 1 diced red bell pepper, 1 diced avocado, 1 cup of halved cherry tomatoes, and 1/4 cup of finely chopped red onion. Mix these ingredients together well. In a small bowl, whisk together 1 tablespoon of olive oil, 1 teaspoon of ground cumin, 1 teaspoon of smoked paprika, the juice of 1 lime, and salt and pepper to taste. This will be your dressing. Pour the dressing over the quinoa mixture. Gently toss everything until it is evenly coated. Stir in 1/2 cup of chopped fresh cilantro. Taste and adjust the seasoning if needed. For serving, use large, colorful bowls. Garnish each bowl with extra fresh cilantro and a few whole tortilla chips. This adds a fun crunch and a vibrant look. Enjoy your Vegan Taco Salad Bowls! For the full recipe, refer to the earlier section. To make your Vegan Taco Salad Bowls pop, adjust the seasoning. Start with salt and pepper. Taste as you go. You can also add more cumin or smoked paprika for a bolder flavor. If you like heat, try adding some chili powder or diced jalapeños. Want more protein? Add lentils or chickpeas to the mix. These ingredients boost nutrition and help keep you full. They also absorb flavors well, making every bite delicious. Dressings can change the whole vibe of your salad. Try a creamy avocado dressing or a zesty lime vinaigrette. You can also add salsa for a fun twist. If you prefer a tangy kick, mix in some nutritional yeast. Need to swap ingredients? Replace black beans with kidney beans or pinto beans. You can use different veggies based on what you have. Spinach or kale can add a lovely crunch. When choosing edible bowls, you can pick tortilla shells or lettuce leaves. Tortilla shells add a nice crunch. Lettuce leaves are low in carbs and light. Both options are tasty! To prepare edible bowls, bake tortilla shells in a muffin tin. This gives them a fun shape. For lettuce, simply wash and dry the leaves. Use large leaves to hold your salad. They are easy to eat and add freshness. For the full recipe, check the details provided earlier. {{image_2}} You can switch up your protein in this salad. Lentils or chickpeas work great. They add heartiness and texture. If you want something different, try tofu or tempeh. Both soak up flavors well and add a nice bite. For a low-carb option, use cauliflower rice instead of quinoa. It gives a nice crunch and keeps it light. Zucchini noodles are another fun choice. They add a fresh twist and make the dish even more colorful. Change your salad with the seasons. In summer, add fresh herbs and citrus for a bright taste. Try basil, mint, or parsley with a splash of lime. For fall, think about using roasted squash or sweet potatoes. These ingredients warm up the dish and bring cozy flavors. You can find the Full Recipe for Vegan Taco Salad Bowls 🥗 to explore all these ideas and more! To keep your Vegan Taco Salad Bowls fresh, store leftovers in airtight containers. This helps keep the flavors intact. Refrigerate the salad for up to three days. It’s best to keep the dressing separate until you are ready to eat. This stops the salad from getting soggy. When you want to enjoy your salad again, pull it from the fridge. If the quinoa has thickened, add a splash of water or lime juice. This helps revive the flavors. You can make this salad ahead of time. Cook the quinoa and let it cool. Store it in a container in the fridge. Chop the veggies and keep them in separate bags. This way, they stay fresh and crisp. If you want to freeze parts of your salad, do this with the quinoa and beans. Place them in freezer bags and label them. They can last for up to three months. When you’re ready to use them, just thaw in the fridge overnight. You can then mix everything together for a quick meal. For the full recipe, check out the instructions above. Yes, you can. I recommend storing the ingredients separately. This keeps everything fresh. You can cook the quinoa and beans in advance. Store them in the fridge. Chop the veggies just before serving. This way, they stay crisp and bright. You can get creative with toppings! Here are some of my favorites: - Sliced jalapeños for heat. - Shredded lettuce for crunch. - Dairy-free cheese for creaminess. - A dollop of guacamole for richness. - Fresh lime wedges for a zesty kick. Add any of these to make your salad pop! Yes, this recipe is gluten-free! Quinoa is a great gluten-free grain. Just make sure that any canned ingredients, like beans or corn, are labeled gluten-free. If you want a crunchy topping, use gluten-free tortilla chips. Enjoy your meal without worry! This blog post guided you through making a delicious Vegan Taco Salad Bowl. You learned about essential ingredients like quinoa, black beans, and fresh veggies. I shared easy steps for cooking and mixing everything together. Tips on flavor, customization, and storage help you make the meal your own. Remember, you can swap ingredients to suit your taste. Enjoy experimenting with new flavors and toppings. You'll create a unique dish every time. Happy cooking!

Vegan Taco Salad Bowls Fresh and Flavorful Meal

Looking for a fresh and flavorful meal that delights your taste buds? I’ve got the perfect solution: Vegan Taco Salad

- 4 medium zucchinis, spiralized - 2 cups fresh basil leaves - 1/2 cup pine nuts, toasted - 1/2 cup Parmesan cheese, grated - 3 cloves garlic - 1/2 cup extra virgin olive oil - Salt and black pepper to taste - Cherry tomatoes, halved (for garnish) - Fresh mozzarella balls (optional, for garnish) When making zucchini noodles with pesto, fresh ingredients make a big difference. I use medium zucchinis for the perfect noodle texture. Spiralizing them is quick and fun. The pesto is key to flavor. I love using fresh basil leaves paired with toasted pine nuts and grated Parmesan. Garlic adds a punch that I can’t resist. Extra virgin olive oil brings it all together, creating a smooth and rich sauce. I always season with salt and black pepper to enhance the taste. For garnish, I like to add halved cherry tomatoes and fresh mozzarella balls. They not only look great but also add fresh flavors. If you want the full recipe, check out the Full Recipe link. This dish is simple, fresh, and full of flavor! To make zucchini noodles, begin by spiralizing the zucchinis. A spiralizer is the best tool for this task. You just twist the zucchini, and it turns into long, curly noodles. If you don’t have a spiralizer, a vegetable peeler works too. With the peeler, slice the zucchini into thin ribbons. These ribbons will look lovely on your plate. For the pesto, gather your ingredients and place them in a food processor. This includes fresh basil leaves, toasted pine nuts, grated Parmesan cheese, and garlic cloves. Pulse the mixture until it becomes finely chopped. This step is key. Next, while the processor runs, slowly add the extra virgin olive oil. This helps your pesto reach a smooth consistency. Don’t forget to scrape down the sides if needed. Finally, taste the pesto. Add salt and black pepper to suit your taste. Next, it’s time to sauté the zucchini noodles. Heat a large skillet over medium heat. Add the zucchini noodles and sauté for about 2-3 minutes. You want them tender but still crunchy. This step is important to keep their texture. After that, remove the skillet from heat. Pour the prepared pesto over the noodles. Gently toss the noodles to coat them evenly with the pesto. Serve your dish warm. You can add halved cherry tomatoes and fresh mozzarella balls on top for extra flavor. Enjoy your colorful and fresh meal! For complete details, check the Full Recipe. To avoid overcooking zucchini noodles, start with a quick sauté. Cook them for just 2-3 minutes. This keeps them crunchy and vibrant. Don't walk away during cooking! Zucchini noodles can turn mushy fast. Serve the noodles warm, not hot. This preserves their fresh taste. A warm dish enhances the pesto flavor. Add more depth to your dish! Consider mixing in cherry tomatoes, olives, or grilled chicken. They add color and texture to the plate. If you have leftover pesto, use it in many ways. Spread it on sandwiches or drizzle over grilled fish. You can even toss it with roasted veggies for a quick side. For more cooking tips, check out the Full Recipe to elevate your meal! {{image_2}} If you want to avoid gluten, you can use other options instead of traditional pasta. Try using spiralized sweet potatoes or carrots for a fun twist. They both offer a sweet flavor that pairs well with pesto. You can also use gluten-free pasta made from rice or quinoa. This way, you keep the dish light and fresh while enjoying the flavors. To make this dish vegan, you can swap out the Parmesan cheese. Nutritional yeast is a great choice. It adds a cheesy flavor without the dairy. If you miss the creaminess, blend in some avocado with the pesto. This will help balance the flavors and give a smooth texture. You can also add a splash of lemon juice for a zesty punch. Feel free to get creative with your pesto! Instead of pine nuts, you can use walnuts or cashews. Each nut brings a unique flavor to the dish. If you want to try another vegetable for noodles, consider using butternut squash or even cucumber. Both will add a refreshing taste. Experimenting with these swaps can lead to new favorite dishes. For the complete recipe, check out the Full Recipe. To keep zucchini noodles fresh, store them in an airtight container. Place a paper towel inside to absorb extra moisture. This helps prevent sogginess. You can store raw zucchini noodles in the fridge for up to three days. If you have cooked noodles, eat them within two days for the best taste. For longer storage, consider freezing your zucchini noodles. Lay them flat in a single layer on a baking sheet, freeze until solid, then put them in freezer bags. This keeps them fresh for about three months. To keep leftover pesto fresh, transfer it to a clean jar. Pour a thin layer of olive oil on top to seal in flavor. This method helps prevent browning and keeps it tasty. Store the jar in the fridge, where it can last for up to a week. If you want to save pesto for later, freezing works well. Place pesto in an ice cube tray, freeze, then transfer the cubes to a freezer bag. This way, you can use small amounts as needed. Frozen pesto stays fresh for up to six months. Enjoy your homemade pesto whenever you want! Yes, you can make zucchini noodles ahead of time. I recommend spiralizing them no more than one day before. Store them in an airtight container with a paper towel. The towel absorbs moisture and keeps them fresh. I love serving zucchini noodles with pesto as a main dish. You can also pair them with grilled chicken or shrimp for protein. Top with cherry tomatoes and mozzarella for extra flavor. Zucchini noodles are done when they are tender but still have a bite. This takes about 2-3 minutes of cooking. Watch for them to turn bright green but not mushy. Yes, you can use store-bought pesto. It saves time and is often tasty. However, homemade pesto has fresher flavors and can be adjusted to your taste. For the complete instructions and ingredient amounts, check out the Full Recipe. Zucchini noodles are a fun, healthy dish you can easily make at home. You learned how to spiralize zucchini, whip up pesto, and sauté everything to perfection. The tips on storage and variations let you tailor the dish to your tastes. Experimenting with flavors keeps meals exciting. Using fresh ingredients creates the best taste. Enjoy your new dish! You now have the tools to make zucchini noodles that impress and satisfy.

Zucchini Noodles with Pesto Flavorful and Fresh Dish

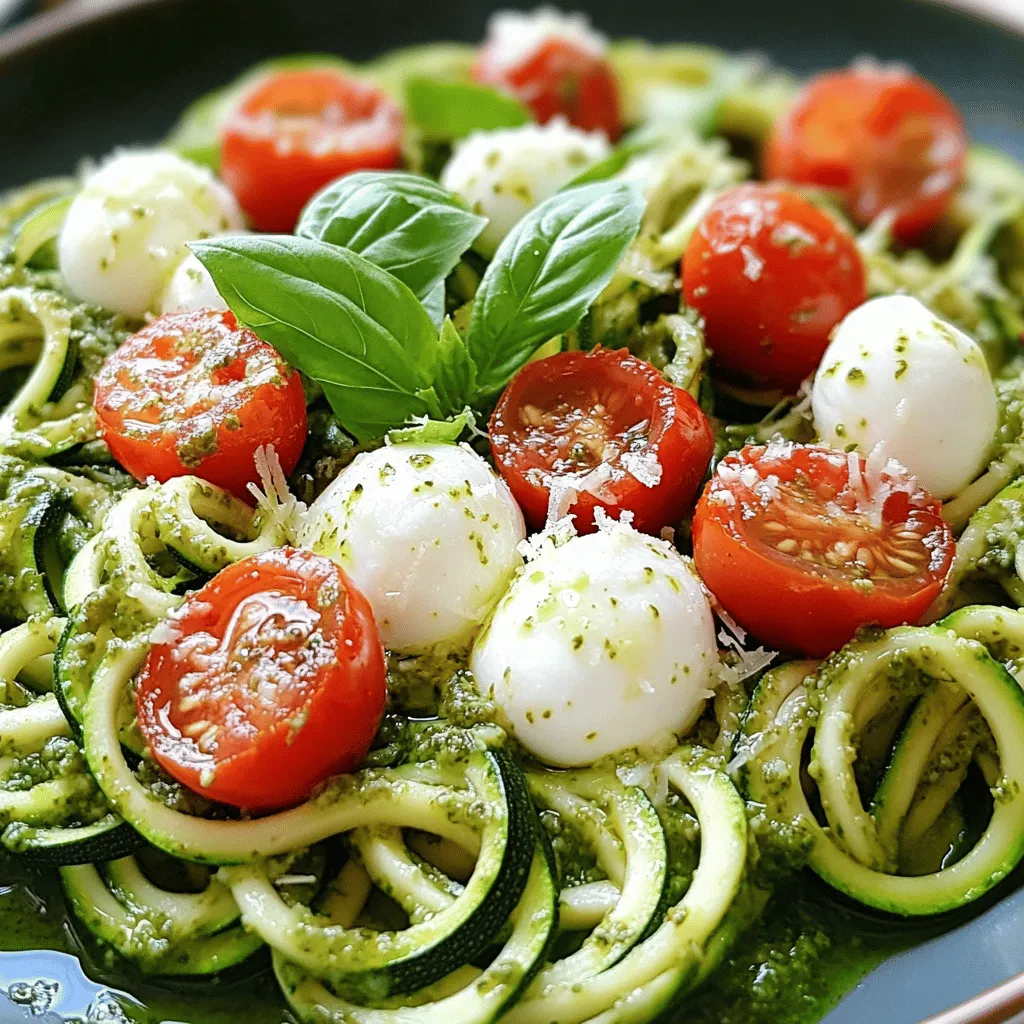
Are you ready to try something fresh and tasty? Zucchini noodles with pesto are a fun way to enjoy a

To make Coconut Macaroons with Dark Chocolate, gather these tasty ingredients: - 2 ½ cups shredded coconut (unsweetened) - 1 cup sweetened condensed milk - 1 teaspoon vanilla extract - 1/4 teaspoon almond extract (optional) - 1/4 teaspoon salt - 2 large egg whites - 1/4 cup granulated sugar - 1 cup dark chocolate chips (or chopped dark chocolate) - Sea salt flakes (for sprinkling, optional) Each ingredient plays a key role in creating a chewy, sweet treat. The shredded coconut gives the macaroon its signature texture. Sweetened condensed milk adds a rich sweetness. The vanilla and optional almond extracts bring a lovely flavor depth. Egg whites help the macaroons hold their shape and add lightness. Using dark chocolate for dipping elevates the dessert with a bold taste. A sprinkle of sea salt on top can enhance the chocolate’s flavor. The balance of sweet and salty makes each bite a delight. For the full recipe, check the instructions to create these delicious bites! - Preheat the Oven Start by preheating your oven to 325°F (160°C). This step is key for even baking. - Mix Coconut Base In a large bowl, combine 2 ½ cups of shredded coconut, 1 cup of sweetened condensed milk, 1 teaspoon of vanilla extract, 1/4 teaspoon of almond extract (if using), and 1/4 teaspoon of salt. Stir well until everything blends perfectly. - Whip Egg Whites In another bowl, beat 2 large egg whites until soft peaks form. Slowly add 1/4 cup of granulated sugar while beating. Continue until you see stiff peaks. This step adds fluffiness to your macaroons. - Combine Mixtures Gently fold the coconut mix into the whipped egg whites. Be careful not to deflate the whites. You want a light and airy mix for your macaroons. - Shape Macaroons Using a small cookie scoop or your hands, form the mixture into small mounds. Place them on a lined baking sheet, leaving about 1 inch between each mound. - Bake Bake the macaroons for 15-18 minutes, or until the edges turn a light golden brown. Keep an eye on them to avoid over-baking. - Cool Down After baking, let the macaroons cool on the sheet for about 10 minutes. Then, move them to a wire rack to cool fully. - Melt Chocolate While cooling, melt 1 cup of dark chocolate chips in a microwave-safe bowl. Heat in 30-second intervals, stirring until smooth. - Dip Macaroons Once cool, dip the bottoms of the macaroons into the melted chocolate. Let any extra chocolate drip off. Place them back on the parchment paper. - Add Finishing Touch If you like, sprinkle a pinch of sea salt flakes on top of the chocolate before it hardens. This adds a nice contrast to the sweet flavors. - Set Allow the chocolate to harden at room temperature or place in the fridge for about 15-20 minutes. Enjoy your delightful coconut macaroons with dark chocolate, following the full recipe for best results! How to achieve the perfect golden brown To get that nice golden color, watch your macaroons closely. Bake them until the edges turn light brown. This usually takes about 15 to 18 minutes. If you see them browning too fast, lower the heat slightly. Preventing over-baking Over-baking can make your macaroons dry. Check them a few minutes before the timer goes off. If they look golden but not brown, take them out. They will continue to cook on the baking sheet after you remove them. Presentation ideas For a lovely look, arrange the macaroons on a nice plate. You can sprinkle some extra coconut on top. A drizzle of melted chocolate also adds a great touch. Pairing with beverages Coconut macaroons pair well with coffee or tea. They also taste great with cold milk or even coconut milk. These drinks enhance the flavors of the macaroons. Tips on egg white handling When whipping egg whites, ensure no yolk gets in. Even a small amount can stop them from whipping well. Use a clean bowl and beaters for best results. Ensuring proper coconut mixture consistency The coconut mixture needs to be thick but not too dry. If it feels crumbly, add a bit more condensed milk. The right mixture holds together well when shaped into mounds. For the full recipe, refer to the instructions above. {{image_2}} You can change the flavor of coconut macaroons by adding extracts. Try coconut extract for a stronger coconut taste. Lemon extract gives a nice zest. You can also mix in some nuts like almonds or walnuts for crunch. Dried fruits, such as cherries or cranberries, can add sweetness and color. The combinations are endless, so feel free to get creative. While dark chocolate is great, you can also use milk chocolate for a sweeter treat. White chocolate offers a rich, creamy taste. If you need a vegan option, choose dairy-free chocolate. Many brands offer tasty vegan chocolate that melts well. No matter what chocolate you pick, it will make your macaroons even more delightful. If you need gluten-free options, rest easy. Coconut macaroons are naturally gluten-free, so you can enjoy them without worry. For those watching sugar intake, consider using low-sugar sweeteners. These swaps let you enjoy a treat that meets your dietary needs. Just remember to keep the balance of flavors right. Enjoy making these adjustments for a perfect bite! To keep your coconut macaroons fresh, store them in an airtight container. Place a piece of parchment paper between layers to prevent sticking. Keep them at room temperature for up to three days. If you want to store them longer, consider moving them to the fridge. The cooler temperature can help maintain their texture while keeping them tasty. If you want to save your macaroons for later, freezing is a great option. To freeze, follow these steps: - Arrange the cooled macaroons on a baking sheet. - Place them in the freezer for about one hour, until they are firm. - Once frozen, transfer them to a freezer-safe bag or container. This way, they can last up to three months in the freezer without losing flavor. When you want to enjoy your macaroons again, thaw them properly. Here are some tips for thawing: - Remove the macaroons from the freezer. - Let them sit at room temperature for about 30 minutes. - For a quick thaw, you can use the microwave on low power for 10-second intervals, checking often. This method helps keep their texture and taste just right. Enjoy your coconut macaroons with dark chocolate delight whenever you wish! How do I know when macaroons are done? You will know macaroons are done when they turn golden brown at the edges. They should feel firm but still soft inside. Keep an eye on them to avoid burning. Can I make these macaroons without egg whites? Yes, you can make macaroons without egg whites. Use aquafaba, the liquid from canned chickpeas. It whips up nicely and works as a great egg white substitute. How to fix a runny coconut mixture? If your coconut mixture is too runny, add more shredded coconut. Start with a few tablespoons and mix well until you achieve the right consistency. Best ways to serve coconut macaroons Serve coconut macaroons on a beautiful plate. You can pair them with coffee or tea. They also make a great treat at parties. For a special touch, drizzle chocolate on top. Can they be made ahead of time? Absolutely! You can make macaroons a day in advance. Store them in an airtight container at room temperature. The flavors will be even better the next day! Can I use sweetened coconut for this recipe? Yes, you can use sweetened coconut. Just keep in mind that it will make your macaroons sweeter. If you like a sweeter treat, go for it! What can I substitute for sweetened condensed milk? You can use coconut cream mixed with sugar as a substitute. Another option is to use regular cream with sugar. Adjust the amount of sugar to taste. You now know how to make delicious coconut macaroons. The ingredients mix together nicely, and you can shape them easily. Remember to bake until they are golden brown. Use tips to avoid common baking mistakes and explore tasty variations. Store your macaroons correctly to keep them fresh. With these steps, you can enjoy this treat anytime. Happy baking!

Coconut Macaroons with Dark Chocolate Delight

Get ready for a treat that blends sweet and savory! My Coconut Macaroons with Dark Chocolate Delight are perfect for

Older posts
Newer posts
← Previous Page1 … Page89 Page90 Page91 … Page105 Next →
© 2025 My Cooking Cast • Built with GeneratePress

Our Policies

  • Privacy Policy
  • GDPR Policy
  • Terms Of Use
  • Copyright Policy
  • Cookie Policy
  • Disclaimer

More Information​

  • Home
  • Contact
  • About
  • Dinner
  • Appetizers
  • Dessert
©2025, My Cooking Cast About Privacy Policy Back To Top