Skip to content
DisclaimerTerms Of UseGDPR PolicyCookie Policy

My Cooking Cast

  • Home
  • Drinks
  • Appetizers
  • Dinner
  • Dessert
  • About
  • Contact
  • Privacy Policy
DisclaimerTerms Of UseGDPR PolicyCookie Policy

Emma

To make Garlic Parmesan Roasted Shrimp, gather these key ingredients: - 1 pound large shrimp, peeled and deveined - 4 tablespoons olive oil - 6 cloves garlic, minced - 1 teaspoon smoked paprika - Salt and pepper to taste - 1 cup grated Parmesan cheese - 2 tablespoons fresh parsley, chopped - 1 lemon, zested and juiced These ingredients work together to create a dish full of flavor. The shrimp becomes juicy, and the garlic adds a great punch. The Parmesan cheese melts and forms a golden crust, making every bite delightful. You can add a few optional ingredients for extra taste: - 1 teaspoon red pepper flakes (for heat) - Lemon slices (for garnish) Red pepper flakes can give your dish a nice kick. Lemon slices on top add a fresh burst when serving. These add-ons can make your dish even more special. If you don’t have some ingredients, here are easy swaps: - Use butter instead of olive oil for a richer taste. - Try other cheeses like Asiago or Pecorino if you lack Parmesan. - Use shrimp alternatives like scallops or fish if needed. These substitutions keep the essence of the dish while allowing you to work with what you have. Don't hesitate to experiment! For the full recipe, check the instructions above. Start with one pound of large shrimp. Make sure they are peeled and deveined. Rinse the shrimp under cold water and pat them dry with paper towels. This step helps the shrimp get a nice texture when cooked. Dry shrimp will soak up the flavors better. In a large bowl, add four tablespoons of olive oil. Next, toss in six cloves of minced garlic. If you like some heat, add one teaspoon of red pepper flakes. For a smoky flavor, include one teaspoon of smoked paprika. Season with salt and pepper to taste. Now, whisk everything together until it blends well. Once the mixture is ready, add the shrimp to the bowl. Toss them gently to coat each shrimp well with the garlic and oil mix. Preheat your oven to 400°F (200°C). Line a baking sheet with parchment paper. This makes for easy cleanup later. Spread the shrimp in a single layer on the baking sheet. Next, sprinkle one cup of grated Parmesan cheese over the shrimp. Don’t hold back; this cheese adds great flavor! Zest one lemon and sprinkle that over the shrimp too. Then, drizzle some lemon juice on top for an extra zing. Roast the shrimp in the oven for 8 to 10 minutes. They should turn pink and opaque, while the cheese gets bubbly and golden. Once done, take them out and sprinkle fresh parsley on top before serving. For the full recipe, check out the details above. When picking shrimp, always look for fresh, firm, and pink ones. The size matters too. Large shrimp work best since they hold up well during roasting. If you buy frozen shrimp, choose ones that are flash-frozen. This keeps them fresh longer. Check for any off smells. If they smell fishy, skip them. One common mistake is not thawing shrimp properly. Thaw them in the fridge overnight or under cold water. Do not use hot water. Another mistake is overcrowding the baking sheet. This leads to uneven cooking. Always spread the shrimp out in one layer. Lastly, don’t skip the lemon juice. It brightens up the flavors. To get that perfect roast, preheat your oven well. A hot oven helps the shrimp cook evenly. Keep an eye on the shrimp. They only need about 8-10 minutes to cook. Overcooking makes them rubbery. When they turn pink and opaque, they are done. For extra flavor, add fresh herbs right before serving. For the full recipe, check out the detailed steps mentioned. {{image_2}} To make your dish spicy, add more red pepper flakes. You can also use a spicy sauce. Hot sauce or chili oil works well. This adds a nice kick that pairs well with the garlic and cheese. Just remember to adjust the amount based on your spice level. Enjoy the heat! For a fresh twist, mix in lemon zest and herbs. Try parsley, basil, or even dill. The herbs brighten the dish and enhance the garlic flavor. You can add lemon juice for more zing. This variation is perfect for a summer meal. It brings a refreshing taste that's hard to resist. To keep this dish low-carb, use less Parmesan cheese. You can also skip the breading if you prefer. Pair it with veggies like zucchini or asparagus instead of pasta. This keeps the meal light and healthy. You can enjoy all the flavors without the extra carbs. Savor the taste while staying on track! For the full recipe, check out the detailed steps provided above. To keep your Garlic Parmesan Roasted Shrimp fresh, store it in an airtight container. Make sure the shrimp cool down before you seal the lid. This helps prevent moisture buildup. Place the container in the fridge. Leftovers stay good for up to three days. Avoid storing them in the same container with other strong-smelling foods. Doing so can change their flavor. When you’re ready to enjoy leftovers, reheating is key. The best way to reheat shrimp is in the oven. Preheat your oven to 350°F (175°C). Place the shrimp on a baking sheet. Heat for about 5-7 minutes or until warm. This keeps the shrimp juicy and the cheese nice and melty. You can also use the microwave but do so with caution. Heat in short bursts of 30 seconds to avoid overcooking. If you want to store the shrimp for longer, freezing works well. First, let the shrimp cool completely. Then, place them in a freezer-safe bag. Remove as much air as possible before sealing. You can freeze them for up to three months. When you’re ready to eat, thaw the shrimp overnight in the fridge. Reheat them in the oven for the best taste. For the full recipe, check out the earlier section. Use large shrimp for this recipe. They have a great texture and cook evenly. Look for shrimp that are fresh, firm, and have a mild ocean scent. You can also use frozen shrimp. Just make sure to thaw them completely before cooking. Yes, you can prepare Garlic Parmesan Roasted Shrimp in advance. Mix the shrimp with the garlic and oil, then cover and chill in the fridge. It’s best to cook them right before serving, but they can last a day in the fridge. Just remember to bring them back to room temperature before cooking. Shrimp are fully cooked when they turn pink and opaque. This usually takes about 8-10 minutes in the oven. You can also check the internal temperature, which should reach 120°F (49°C). Overcooked shrimp can become tough, so watch them closely while roasting. For the full recipe, check out the details above. This recipe for garlic parmesan roasted shrimp offers simple steps and tasty options. You learned about essential ingredients, preparation, and baking tips. Don’t forget the variations to keep it exciting. Remember to store leftovers properly and reheat for best flavor. Enjoy making this dish and share it with friends. With these tips, you can create a meal everyone loves and feels proud to serve. Happy cooking!

Garlic Parmesan Roasted Shrimp Flavorful Dish Made Easy

Are you ready to impress your taste buds? Garlic Parmesan Roasted Shrimp is a flavorful dish anyone can make. In

For the Tuscan shrimp and scallops, gather these fresh ingredients: - 1 lb large shrimp, peeled and deveined - 1 lb sea scallops - 2 tablespoons olive oil - 4 cloves garlic, minced - 1 cup cherry tomatoes, halved - 1 cup baby spinach - 1 teaspoon dried oregano - 1 teaspoon crushed red pepper flakes (adjust for spice preference) - Salt and pepper to taste - Zest of 1 lemon - Juice of 1 lemon - Fresh basil leaves for garnish You can swap ingredients based on what you have. Use: - Medium shrimp instead of large. - Any firm white fish for scallops. - Fresh tomatoes if cherry tomatoes are not available. - Kale or arugula instead of spinach. - Fresh herbs like parsley if you lack basil. These options keep the dish tasty while using what you have on hand. This dish is rich in protein and low in carbs. Each serving has about: - Calories: 350 - Protein: 35g - Fat: 15g - Carbohydrates: 10g - Fiber: 2g These numbers may vary based on what you use and portion sizes. Each bite of this meal not only fills you up but also provides key nutrients. You can find the full recipe for this dish to help you get started! Start by rinsing the shrimp and scallops under cool water. Pat them dry with a paper towel. This step is key for getting a nice sear. You want the seafood fresh and ready to cook. Take a large skillet and heat olive oil over medium-high heat. The oil should shimmer but not smoke. Add minced garlic to the hot oil. Sauté it for about one minute. You want it fragrant, not brown. Add the sea scallops to the skillet. Season them with salt and pepper. Let them sear for 2-3 minutes per side. They should turn a lovely golden brown. Once done, take them out and set aside. Now, add the shrimp to the skillet. Season with oregano, crushed red pepper, salt, and pepper. Cook the shrimp for 2-3 minutes. They should turn pink and opaque. Next, toss in the halved cherry tomatoes and baby spinach. Stir gently and cook until the spinach wilts. It should take about two minutes. Return the scallops to the pan. Squeeze lemon juice over the mixture. Toss everything together gently. Add lemon zest for extra flavor. Adjust the seasoning if needed. For a beautiful presentation, serve the dish in a large, shallow bowl. Garnish with fresh basil leaves. Drizzle a bit of extra olive oil on top for shine. This will make your dish pop! Enjoy your Tuscan shrimp and scallops as a flavorful dinner treat. For the complete recipe, check [Full Recipe]. To cook shrimp and scallops just right, follow these steps: - Heat your skillet well: Start with medium-high heat. This helps sear the seafood quickly. - Do not overcrowd the pan: Cook in batches if needed. This ensures even cooking. - Check for doneness: Shrimp should turn pink and opaque. Scallops need a golden crust. Each takes about 2-3 minutes per side. - Rest your seafood: Let it sit for a minute after cooking. This helps keep it juicy. Adding layers of flavor makes your dish shine. Here are some ideas: - Fresh herbs: Basil and parsley add bright notes. - Citrus zest: Lemon zest brightens the dish and enhances flavor. - Spices: Use crushed red pepper for heat. Adjust it to your taste. - Wine pairing: A crisp white wine like Pinot Grigio works well with seafood. Avoid these common pitfalls for the best results: - Not thawing seafood properly: Always thaw shrimp and scallops in the fridge overnight. - Cooking too long: Overcooked seafood can become rubbery. Keep an eye on the time. - Skipping seasoning: Season your seafood well with salt and pepper. It truly makes a difference. - Neglecting to taste: Always taste your dish before serving. Adjust seasoning as needed. For the full recipe, check out the Tuscan Shrimp and Scallops Delight 🦐🥘. {{image_2}} If you want a meat-free dish, try using mushrooms instead of seafood. Portobello or shiitake mushrooms work well. They have a nice texture and soak up flavors. You can also add zucchini or bell peppers. These will add color and nutrients. For protein, consider chickpeas or tofu. Both can take on the Tuscan flavors nicely. Use the same cooking steps for these veggies. You can mix up the seafood in this dish. Try using only shrimp, or swap in fish like halibut or cod. These fish will cook quickly, just like the shrimp and scallops. You can also add clams or mussels for a more coastal taste. Just be sure to adjust cooking times so everything is cooked well. Each seafood option brings its unique flavor to the dish. Want to change the heat? You can easily adjust the spice level. If you love heat, add more crushed red pepper flakes. For a milder dish, reduce or leave them out. You can also use sweet paprika for a warm flavor without spice. Another option is to add a pinch of cayenne pepper for a different kick. Just remember to taste as you go, so you get it just right. Once you finish your Tuscan shrimp and scallops, let them cool. Place leftovers in an airtight container. Store them in the fridge for up to three days. This dish tastes great the next day, too! To reheat, use a skillet over medium heat. Add a splash of olive oil to keep the shrimp and scallops moist. Heat for about 5 minutes, stirring gently. You can also use a microwave. Heat in 30-second bursts until warm. Just be careful not to overcook. If you want to save some for later, you can freeze it. Cool the dish completely. Transfer it to a freezer-safe container. It can last up to three months in the freezer. To reheat, let it thaw in the fridge overnight before warming it up. For the best taste, enjoy it fresh! For the complete cooking process, refer to the Full Recipe. The best way to season shrimp and scallops is simple. Use salt and black pepper. Add dried oregano for flavor. Crushed red pepper gives a nice kick. You can also squeeze fresh lemon juice. This brightens the dish and enhances the seafood's taste. Always taste as you go. Adjust the seasoning to your liking. Fresh herbs like basil can add a nice finish. To make this recipe healthier, use less olive oil. You can reduce it to one tablespoon. Add more veggies like zucchini or bell peppers for extra fiber. Use whole grain pasta instead of white pasta if you serve it with pasta. Swap out scallops for shrimp only, reducing calories. You can also skip the extra oil drizzle at the end. These small changes keep flavors while lowering fat content. Yes, you can make Tuscan Shrimp and Scallops ahead of time. Cook the seafood and veggies and let them cool. Store in the fridge for up to two days. When you're ready to serve, reheat gently in a skillet. Add a splash of lemon juice to freshen it up. Avoid cooking it too long to keep the seafood tender. This makes it a great dish for meal prep. Several sides pair well with Tuscan Shrimp and Scallops. Here are some ideas: - Garlic bread for a crunchy side. - Steamed asparagus for a light touch. - Quinoa or brown rice for extra fiber. - Mixed greens salad with a lemon vinaigrette for freshness. These sides will balance the dish and offer variety. Enjoy experimenting with different combinations! This blog covered the key steps to making Tuscan shrimp and scallops. We explored ingredients, cooking methods, and helpful tips. You learned how to prepare seafood, enhance flavors, and avoid common mistakes. We also offered variations for different diets and storage advice. In the end, cooking should be fun and tasty. Enjoy experimenting with flavors and techniques as you make this dish your own!

Tuscan Shrimp and Scallops Flavorful Dinner Recipe

Are you ready to dive into a delightful meal? This Tuscan Shrimp and Scallops recipe will transport your taste buds

- 1 medium sweet potato, peeled and diced - 1 cup canned chickpeas, rinsed and drained - 1 cup red lentils, rinsed - 1 medium onion, chopped - 2 garlic cloves, minced - 1 teaspoon fresh ginger, grated - 1 carrot, diced - 1 teaspoon ground cumin - 1 teaspoon ground coriander - ½ teaspoon smoked paprika - 4 cups vegetable broth - 2 cups water - 2 tablespoons olive oil - Salt and pepper to taste - Fresh cilantro for garnish (optional) This soup is packed with nutrients. Sweet potatoes provide vitamins and fiber. Chickpeas add protein and healthy fats. Red lentils boost the dish with even more protein. Each ingredient plays a key role in flavor and health. I love how this recipe is both simple and delicious. - Caloric content per serving: About 250 calories - Macronutrient breakdown: - Protein: 10 grams - Carbohydrates: 45 grams - Fats: 6 grams This soup fits well into a balanced diet. It nourishes your body while delighting your taste buds. You can enjoy this meal with confidence, knowing it supports your health goals. For the complete process of making this soup, refer to the Full Recipe. 1. In a large pot, heat 2 tablespoons of olive oil over medium heat. 2. Add 1 medium chopped onion. Cook until it looks clear, about 5 minutes. 3. Stir in 2 minced garlic cloves and 1 teaspoon of grated ginger. Cook for 1 minute until you smell it. 4. Add 1 medium diced sweet potato and 1 diced carrot. Mix them well with the onion. 5. Sprinkle in 1 teaspoon of ground cumin, 1 teaspoon of ground coriander, and ½ teaspoon of smoked paprika. Cook for 1 more minute to wake up the flavors. 6. Pour in 4 cups of vegetable broth and 2 cups of water. Bring the mix to a boil. 7. Once it boils, add 1 cup of rinsed red lentils and 1 cup of rinsed chickpeas. Lower the heat and let it simmer for 20-25 minutes. The sweet potatoes and lentils should be tender. 8. Use an immersion blender to blend half of the soup. This gives it a creamy feel while keeping some chunks. If you don't have one, carefully transfer half to a regular blender, blend it, and return it to the pot. 9. Season with salt and pepper. Taste and adjust to your liking. - This recipe serves 4-6 people. A good serving size is about 1-1.5 cups. - For garnish, add fresh cilantro on top. It adds a nice touch and flavor! You can find the full recipe [here](#). To make great soup, start with fresh ingredients. Look for sweet potatoes that feel firm and smooth. Choose chickpeas that are plump and shiny. For lentils, make sure they are clean and free from debris. Use the right tools for blending. An immersion blender works well. It lets you blend hot soup right in the pot. If you don’t have one, use a regular blender. Just be careful when transferring hot soup. Add spices to boost flavor. Try a pinch of cayenne for heat or a dash of turmeric for warmth. Fresh herbs like thyme or rosemary can also add depth. To make the soup creamy, add coconut milk. It gives a rich taste and complements the sweet potato. You can mix it in during the last few minutes of cooking for a smooth finish. For the full recipe, check the Sweet Potato Chickpea & Red Lentil Delight . {{image_2}} You can swap beans or veggies in this soup. Try black beans or kidney beans instead of chickpeas. For veggies, add spinach or kale for nutrition. If you need gluten-free options, this recipe is already safe. It is naturally vegan, so feel free to adapt it as you like. Want a spicy kick? Add red pepper flakes or a spoonful of curry powder. These spices will warm up your soup. You can also explore regional flavors. Try adding herbs like parsley for a Mediterranean taste. For a Middle Eastern vibe, use cumin and coriander generously. Both options will make the soup exciting and new. To keep your sweet potato, chickpea, and red lentil soup fresh, follow these steps: - Refrigerating Leftovers: Let the soup cool down first. Store it in an airtight container. It can last for up to five days in the fridge. - Freezing Instructions: For long-term storage, pour the cooled soup into freezer-safe containers. Leave some space at the top for expansion. This soup can last for up to three months in the freezer. When you’re ready to enjoy your soup again, here’s how to reheat it: - Stovetop Method: Pour the soup into a pot. Heat it over medium heat, stirring often. This method warms the soup evenly and helps maintain its flavor. - Microwave Method: Place the soup in a microwave-safe bowl. Cover it with a microwave-safe lid or wrap. Heat on high for 2-3 minutes, stopping to stir halfway. To keep the soup's texture, add a bit of water or broth if it seems too thick while reheating. Enjoy every spoonful! Can I use dried lentils instead of canned? Yes, you can use dried lentils. Just remember to rinse them. Dried lentils need to cook longer, about 30-35 minutes, compared to canned ones. This change will also add more texture to the soup. What is the best way to thicken the soup? You can thicken the soup by blending part of it. Use an immersion blender and blend half of the soup until smooth. This makes the soup creamy while keeping some chunks for texture. You can also add more red lentils, which will thicken as they cook. How long does the soup last in the refrigerator? The soup can last 4-5 days in the fridge. Just store it in an airtight container. Make sure it cools down before sealing to keep it fresh. Can I make this soup nut-free? Absolutely! This recipe is nut-free as is. Just ensure any added ingredients, like broth or garnishes, do not contain nuts. Vegan options for ingredients? All the ingredients in this soup are vegan. It’s naturally plant-based, using sweet potatoes, lentils, and chickpeas. You can feel good knowing it meets vegan needs. What to serve alongside the soup for a complete meal? Pair the soup with crusty bread or a fresh salad. A side of roasted vegetables also works well. These sides add more nutrients and make your meal more filling. Try a simple green salad with a lemon vinaigrette to brighten your plate. This blog post guided you through making a delicious soup. You learned about the key ingredients, cooking steps, and serving tips. I shared how to enhance flavors and adapt the recipe as needed. You also discovered storage and reheating tips for leftovers. With these insights, you can create a rich, nutritious dish. Enjoy experimenting with different flavors and ingredients to make it your own. Happy cooking!

Nourishing Sweet Potato, Chickpea, and Red Lentil Soup

Ready to warm your soul with a cozy bowl of goodness? This nourishing Sweet Potato, Chickpea, and Red Lentil Soup

- 12 oz rigatoni pasta - 1 lb smoked sausage, sliced - 1 medium onion, chopped - 3 cloves garlic, minced - 1 red bell pepper, diced - 1 can (14 oz) diced tomatoes, with juices - 4 cups chicken broth - 1 teaspoon Italian seasoning - 1 teaspoon paprika - 1 cup heavy cream - 1 cup shredded mozzarella cheese - Salt and pepper to taste - Fresh parsley, chopped (for garnish) Choosing the right ingredients makes this meal special. I often use high-quality smoked sausage, as it brings rich flavor. Look for brands that list meat as the first ingredient. Fresh vegetables also add taste and color. When buying canned tomatoes, choose ones without added sugars or preservatives. For smoked sausage, I recommend Eckrich or Hillshire Farm. They offer flavorful options. For pasta, Barilla is a solid choice. For canned tomatoes, Muir Glen provides great quality. When selecting smoked sausage, check for these tips: - Look for natural casings for better texture. - Choose sausage with visible spices for flavor. - Always check the expiration date for freshness. With the right ingredients, your One Pot Smoked Sausage Pasta will shine. For the full recipe, refer back to the top of this section. - Sautéing the sausage: Start by heating your large pot over medium heat. Add the sliced smoked sausage. Cook it for about 5 to 7 minutes until it turns brown. This browning adds great flavor. Remove the sausage and set it aside. - Cooking the vegetables: In the same pot, add the chopped onion and diced red bell pepper. Cook for 3 to 4 minutes until the onion is soft and clear. Then, add the minced garlic. Stir and cook for another minute. This will bring out the garlic's great smell. - Mixing the liquids: Now, pour in the can of diced tomatoes with their juices. Add the chicken broth next. Sprinkle in Italian seasoning, paprika, salt, and pepper. Stir everything well to mix the flavors. - Importance of simmering: Bring the mixture to a boil. Once it bubbles, add the rigatoni pasta. Lower the heat to let it simmer. Simmering helps the pasta absorb the flavors and cook evenly. - Cooking time for al dente: Cover the pot and cook for about 12 to 15 minutes. Stir occasionally. You want the pasta to be al dente, which means it should still have a slight bite to it. - Adding cream and cheese: When the pasta is cooked, reduce the heat to low. Stir in the heavy cream and the browned sausage. Mix well and heat for 2 to 3 minutes. This makes the dish creamy and rich. - Garnishing for serving: Finally, sprinkle the shredded mozzarella cheese on top. Cover the pot for a couple of minutes until the cheese melts. Serve your pasta hot, and don’t forget to garnish with fresh parsley. Enjoy this easy and flavorful meal! For the full recipe, check the instructions above. To avoid overcooked pasta, follow these steps: - Cook rigatoni until just al dente. This means it should be firm yet tender. - Stir often to prevent sticking and ensure even cooking. - Drain pasta quickly to stop the cooking process. For flavor enhancements, consider: - Adding a splash of lemon juice for brightness. - Mixing in fresh herbs like basil or parsley. - Incorporating a pinch of red pepper flakes for heat. One common mistake is not adjusting seasoning. Always taste your dish before serving. - If it tastes bland, add more salt or spices. - Balance flavors by adding a touch of sugar if needed. Another mistake is skipping a proper simmer. - Simmering helps flavors meld together beautifully. - If you rush this step, your dish may lack depth. For sides or salads, I recommend: - A simple green salad with light vinaigrette. - Garlic bread for a crunchy texture. - Steamed veggies for added nutrients and color. You can find the Full Recipe for One Pot Smoked Sausage Pasta within this article. Enjoy your cooking! {{image_2}} You can make this dish meat-free. Start by replacing the sausage with your favorite vegetables. Great choices include zucchini, mushrooms, or spinach. These veggies add flavor and color. You can also use alternative pasta, like whole wheat or chickpea pasta. These options increase fiber and protein. Both choices keep the meal healthy and tasty. If you like heat, try a spicy version. Adding red pepper flakes gives a nice kick. Start with a small amount and adjust to your taste. You can also incorporate jalapeños for extra spice. Slice them up and add them with the onions. This way, they soften and blend well with the other flavors. For cheese fans, you can add different cheeses for more flavor. Try using cheddar or pepper jack cheese. Mix them in with the mozzarella. This creates a melty, gooey texture. For a fun twist, bake the dish after mixing in the cheese. Bake it until the cheese is bubbly and golden. This adds a nice crust and a unique taste. For full recipe details, check the original instructions. To keep your One Pot Smoked Sausage Pasta fresh, use airtight containers. Glass or plastic containers work well. Store it in the fridge. It stays good for 3 to 4 days. Make sure to let it cool before sealing. When you reheat, aim for gentle heat. The stove top is best for even warming. Heat in a pan over low heat. Stir often to keep it moist. If you use a microwave, cover the bowl with a lid or a damp paper towel. This prevents drying out. You can freeze the pasta too! Use freezer-safe containers or bags. Make sure to remove as much air as possible. Label the bags with the date. It stays good for about 2 to 3 months. When ready to eat, thaw it in the fridge overnight. Then reheat on the stove or in the microwave. One Pot Smoked Sausage Pasta takes about 30 minutes to make. This includes prep time and cooking time. You can easily whip it up on a busy weeknight. Yes, you can use a different type of pasta. Penne or fusilli work well too. Just adjust the cooking time based on the pasta you choose. You can serve this dish with a simple salad or garlic bread. A light green salad adds freshness. Garlic bread gives a nice crunch and flavor. Yes, you can make this dish gluten-free. Use gluten-free pasta for the recipe. Check that your sausage and broth are also gluten-free. Yes, you can make this recipe in advance. Cook it, then cool it down before storing. Keep it in the fridge for up to three days. Just reheat it when you're ready to eat. For the full recipe, check the earlier section. This blog post provided a clear guide to making One Pot Smoked Sausage Pasta. You learned about the ingredients, cooking steps, and helpful tips to avoid common mistakes. Remember, cooking pasta should be simple and fun. With variations like vegetarian or spicy options, there’s something for everyone. Store leftovers properly to enjoy later. I hope you feel inspired to try this dish and make it your own. Happy cooking!

One Pot Smoked Sausage Pasta Easy and Flavorful Meal

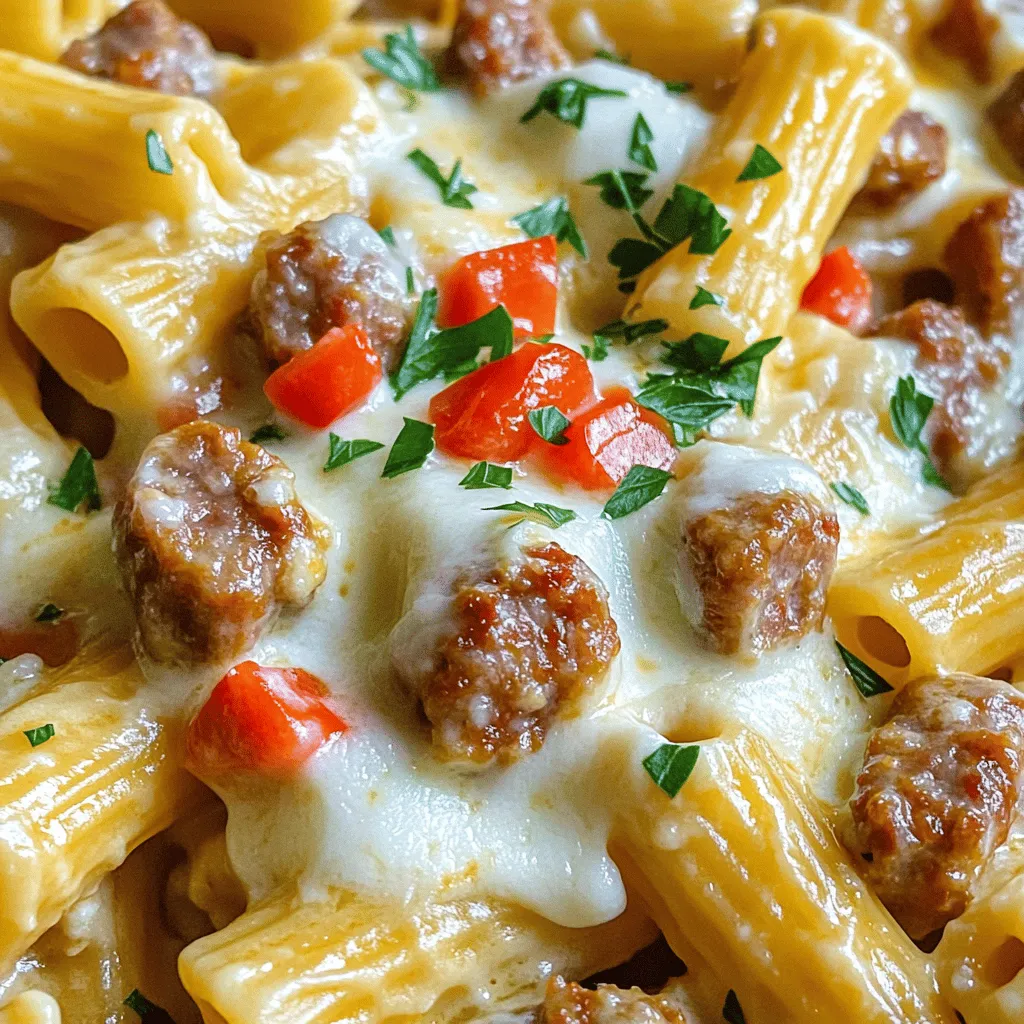
Looking for a quick and tasty meal? One Pot Smoked Sausage Pasta is your answer! With just one pot, you

- 12 oz spaghetti or your preferred pasta - 6 cloves garlic, minced - 1/2 cup unsalted butter - 1 cup heavy cream - 1 cup grated Parmesan cheese - 1/2 teaspoon red pepper flakes (optional) - Salt and black pepper to taste - Fresh parsley, chopped, for garnish To make Garlic Parmesan Pasta, you need simple ingredients. I love using fresh garlic for the best flavor. The butter creates a rich base. Heavy cream makes it creamy and smooth. Parmesan cheese adds a salty, nutty taste. You can adjust the heat with red pepper flakes if you like spice. Salt and black pepper help enhance all the flavors. Finally, fresh parsley gives a nice touch and color. Gathering these ingredients will set you up for success. This dish is quick and easy to prepare. You can find the Full Recipe to guide you through the steps. Enjoy the process and the delicious outcome! Start by boiling a large pot of salted water. The salt helps flavor the pasta as it cooks. Once the water is boiling, add 12 ounces of spaghetti or your preferred pasta. Cook it according to the package instructions until it's al dente, which means it should still be a bit firm when you bite it. This usually takes about 8 to 10 minutes. After cooking, reserve one cup of pasta water. Drain the pasta and set it aside. In a large skillet, melt 1/2 cup of unsalted butter over medium heat. Once the butter is melted, add 6 cloves of minced garlic. Sauté the garlic until it becomes fragrant, which should take about 1 to 2 minutes. Be careful not to let the garlic burn; you want it to smell amazing, not bitter. Now it’s time to make the cream sauce. Pour in 1 cup of heavy cream into the skillet with the garlic butter. Bring the mixture to a gentle simmer, stirring occasionally. Let it cook for about 2 to 3 minutes until the sauce starts to thicken slightly. This is where the magic happens! Next, gradually stir in 1 cup of grated Parmesan cheese. Keep stirring until the cheese melts and the sauce is smooth. If you like a bit of heat, add 1/2 teaspoon of red pepper flakes at this point. Don’t forget to season with salt and black pepper to taste. Now, add the cooked spaghetti to the skillet. Toss the pasta in the garlic Parmesan sauce until it’s well coated. If the sauce feels too thick, add some of the reserved pasta water to reach your desired consistency. Once everything is combined, remove the skillet from heat. Garnish your Garlic Parmesan Pasta with freshly chopped parsley for a pop of color. Serve it hot and enjoy your creamy and flavorful meal. You can pair it with a simple salad or some crusty bread for a complete dinner. Try this full recipe for all the details! - Salt your water properly: Use about 1 tablespoon of salt per gallon of water. This step flavors your pasta from the inside out. - Importance of reserving pasta water: Always save about one cup of pasta water. This starchy water helps to thin the sauce and makes it cling to the pasta better. - Adding herbs: Fresh herbs like basil or thyme bring a burst of flavor. Just chop them finely and stir them in at the end. - Options for extra spice: For some heat, add more red pepper flakes or a dash of cayenne pepper. This can make your dish pop. - Reheating tips: Use a pan over low heat. Add a splash of reserved pasta water to keep it creamy as you warm it up. - Additional serving ideas: Turn leftovers into a baked dish. Just add some cheese on top and broil until golden. You can also toss in veggies or proteins for a heartier meal. For the complete step-by-step guide, check out the Full Recipe. {{image_2}} You can boost the flavor and nutrition of your Garlic Parmesan Pasta by adding proteins. - Grilled chicken: Slice grilled chicken and mix it into the pasta. It adds a savory taste and makes the dish heartier. You can season the chicken with garlic and herbs for extra flavor. - Sautéed shrimp: Shrimp cooks quickly and pairs well with garlic and Parmesan. Sauté shrimp in olive oil with garlic until pink and tender. Stir them into the pasta for a tasty seafood twist. For a vegetarian take, you can include more fresh ingredients. - Including vegetables: Add sautéed vegetables like spinach, bell peppers, or broccoli. They will bring color and nutrition to your dish. Cook the veggies in the garlic butter before mixing in the pasta. - Using plant-based alternatives: If you want a vegan option, use plant-based butter and cheese. These swaps keep the creamy texture while making it suitable for those avoiding animal products. If you need a gluten-free version, there are great options. - Recommended gluten-free pasta types: Look for pasta made from rice, corn, or quinoa. These alternatives have a similar texture and taste. Cook them according to package directions for the best results. - Adjusting the recipe: When using gluten-free pasta, keep the cooking time in mind. Gluten-free pasta can cook faster than regular pasta. Make sure to check for doneness so it doesn’t become mushy. To store your Garlic Parmesan Pasta, let it cool first. Place it in an airtight container. This helps keep it fresh. I recommend using glass or plastic containers with tight lids. These containers prevent air from getting in, which keeps the pasta tasty. You can freeze Garlic Parmesan Pasta if you want to save some for later. First, make sure it is cool. Then, transfer it to a freezer-safe container. Use a freezer bag if you like. Squeeze out the air before sealing. This keeps ice crystals from forming. To thaw, place it in the fridge overnight. For reheating, warm it in a pot over low heat. Add a splash of water or cream to keep it creamy. In the fridge, Garlic Parmesan Pasta lasts about three to four days. Always check for signs of spoilage. If you see mold or notice an off smell, it’s best to throw it out. Trust your senses; they guide you well. Garlic Parmesan Pasta is a rich and creamy dish. It combines garlic, butter, and Parmesan cheese with pasta. You can use any pasta you like, but spaghetti is a great choice. This dish is quick to make and full of flavor. Each bite offers a comforting blend of buttery goodness and savory cheese. Yes, you can prepare some parts ahead. Cook the pasta and store it in the fridge. Make the sauce separately and chill it too. When you are ready to eat, just reheat the sauce and mix it with the pasta. This saves time on busy days. To make it vegan, swap out a few ingredients. Use plant-based butter instead of regular butter. Replace heavy cream with coconut cream or cashew cream. For cheese, try using nutritional yeast for a cheesy flavor. These swaps keep the dish creamy and tasty without animal products. Absolutely! If you want a different flavor, try using Pecorino Romano. It has a similar taste but is saltier. You can also use a mix of mozzarella and cheddar for a creamy texture. Just keep in mind that each cheese adds its own unique flavor! Garlic Parmesan Pasta can be rich in calories due to butter and cream. To make it healthier, use less butter and cream. You can add vegetables like spinach or broccoli for extra nutrients. Whole grain pasta is another good choice. It has more fiber and keeps you full longer. We explored how to make a tasty Garlic Parmesan Pasta from scratch. You learned about the key ingredients and step-by-step cooking instructions. We also covered helpful tips for perfect pasta and variations to suit your taste. Finally, we examined storage techniques and answered common questions. I hope these insights inspire you to try this easy yet delicious recipe. Enjoy crafting your Garlic Parmesan Pasta, and make it your own!

Garlic Parmesan Pasta Creamy and Flavorful Recipe

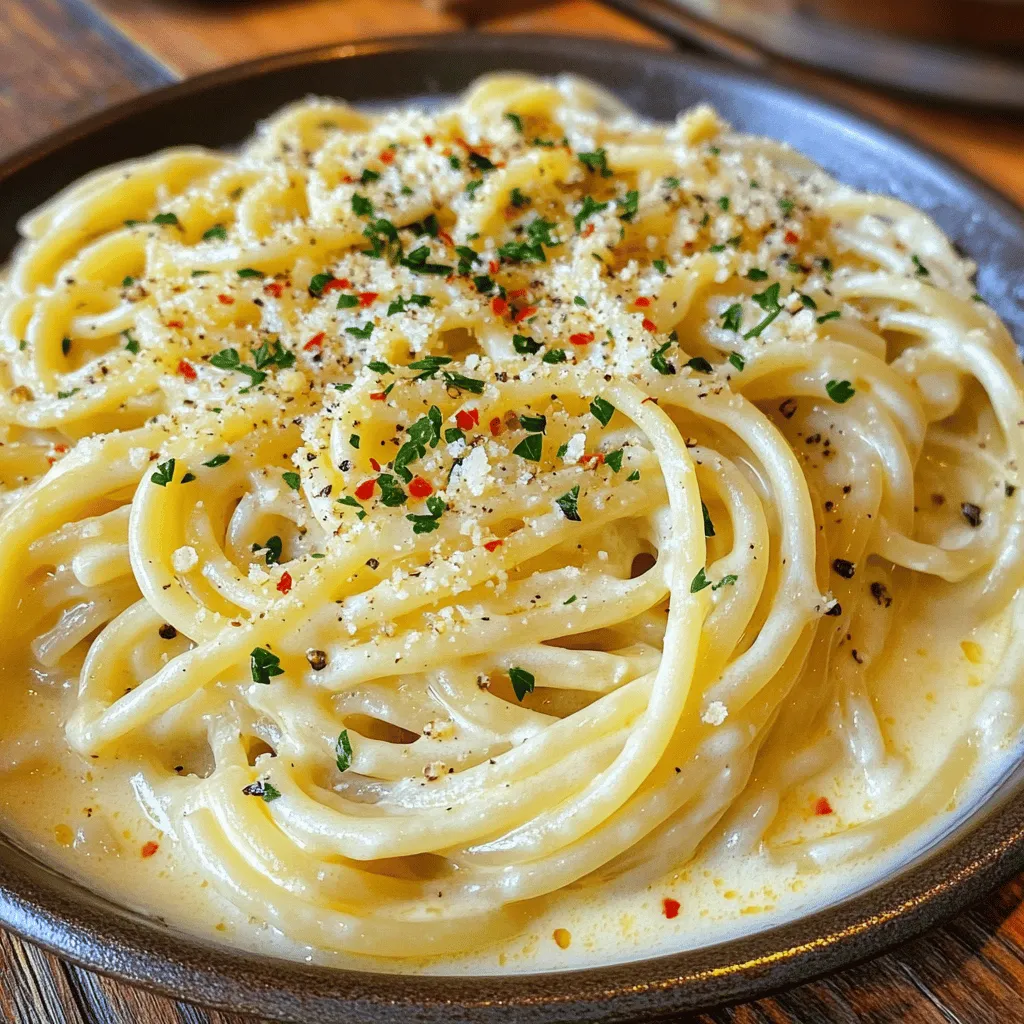
Craving a dish that’s creamy, rich, and packed with flavor? Look no further! My Garlic Parmesan Pasta recipe combines simple

- 4 salmon fillets - 1/4 cup unsalted butter, melted - 1/4 cup honey - 2 tablespoons lime juice - 3 cloves garlic, minced - 1 teaspoon lime zest - Salt and pepper, to taste - Fresh cilantro, for garnish (optional) - Lime wedges, for serving Gather these ingredients before you start cooking. The salmon fillets are the star of the dish. They provide a rich, buttery flavor that pairs well with the sweet honey and zesty lime. The unsalted butter adds a creamy texture that helps the sauce cling to the fish. Using fresh garlic elevates the dish, giving it a nice kick. Lime juice and zest add brightness, balancing the sweetness of the honey. Make sure to season with salt and pepper for the best taste. For a touch of color and flavor, fresh cilantro makes a lovely garnish. Lime wedges serve as a refreshing side. These simple ingredients come together to create a delicious meal that you can enjoy any night of the week. For the full recipe, check out the cooking instructions that follow. 1. Preheating the oven: Start by preheating your oven to 400°F (200°C). This step is key for even cooking. Line a baking sheet with parchment paper. You can also lightly grease it with cooking spray. This helps prevent the salmon from sticking. 2. Mixing the honey-lime garlic butter: In a mixing bowl, combine 1/4 cup of melted butter, 1/4 cup of honey, and 2 tablespoons of lime juice. Add 3 cloves of minced garlic and 1 teaspoon of lime zest. Stir everything until it blends well. This mixture adds a sweet and tangy flavor to the salmon. 1. Placing and seasoning the salmon: Lay the 4 salmon fillets on your prepared baking sheet. Season each fillet with salt and pepper to taste. This simple step boosts the taste of the fish. 2. Baking the salmon: Drizzle the honey-lime garlic butter mixture over the salmon. Make sure every fillet is coated. Bake in the oven for about 12-15 minutes. You want the salmon to be cooked through and flaky. 3. Optional broiling for caramelization: If you want a nice, caramelized finish, you can switch to broil for the last 2-3 minutes. Keep a close eye on it to avoid burning. This step adds depth to the flavors. Once the salmon is done, take it out of the oven. Let it rest for a couple of minutes. Serve it garnished with fresh cilantro if you like. Add lime wedges on the side. The lime adds a fresh burst of flavor that complements the dish perfectly. Enjoy your honey-lime garlic butter baked salmon! For the full recipe, refer to the details above. How to know when salmon is done? Salmon is ready when it flakes easily with a fork. If you insert a fork into the thickest part, it should separate with little effort. The fish should also look opaque and have a light pink color. Use a food thermometer for best results. The internal temperature should reach 145°F (63°C). Importance of resting time after baking Letting the salmon rest for a couple of minutes after baking is key. This helps the juices settle, making the fish moist and flavorful. If you cut into it right away, you lose those tasty juices. Just wait a bit, and your salmon will be so much better. Adding herbs and spices You can boost the flavor of your honey-lime garlic butter baked salmon by adding fresh herbs. Cilantro, parsley, or dill work great. You can also sprinkle in spices like paprika or chili flakes for a kick. These little tweaks can make your dish shine. Adjusting sweetness or acidity If you like a sweeter taste, add more honey to the mix. For more zing, squeeze in extra lime juice. Balancing these flavors is key to a perfect dish. Taste your sauce before pouring it over the salmon. Adjust it to suit your taste buds. Check out the Full Recipe for more tips. {{image_2}} You can change the honey in the recipe. Maple syrup or agave nectar works well. These sweeteners add a unique flavor. You can also use brown sugar for a richer taste. Just mix it with the butter, lime juice, and garlic as you would with honey. When it comes to fish, salmon is great, but it’s not your only choice. You can use tilapia, trout, or even cod. These fish are mild and soak up the flavors well. Adjust the cooking time if you switch fish. Thinner fillets cook faster. Grilling adds a smoky flavor to your salmon. Preheat your grill to medium heat. Brush the salmon fillets with the honey-lime garlic butter. Place them skin-side down on the grill. Cook for about 6-8 minutes on each side. You want the salmon to be flaky and tender. If you prefer pan-searing, heat a skillet over medium-high heat. Add a little oil before placing the salmon in the pan. Sear for about 4-5 minutes on each side. This method gives a nice crispy edge while keeping the inside juicy. Try these variations for a fun twist on the classic baked salmon. For the full recipe, check out the complete instructions above. After enjoying your honey-lime garlic butter baked salmon, you may have some leftovers. To keep them fresh, store the salmon in an airtight container. Place it in the fridge. It will stay good for up to three days. Make sure to cool it down to room temperature before sealing. This method helps keep the flavors intact. When you're ready to eat, just reheat gently. Use a microwave or an oven to warm it up. For long-term storage, you can freeze the cooked salmon. Wrap each fillet tightly in plastic wrap. Then place the wrapped salmon in a freezer bag. Be sure to remove as much air as possible. This helps prevent freezer burn. The salmon can last up to three months in the freezer. When you want to eat it, thaw the salmon overnight in the fridge. To reheat, place it in a preheated oven at 350°F (175°C) for about 10-15 minutes. This way, the salmon stays moist and tasty. You can find the full recipe for honey-lime garlic butter baked salmon above. How do I know when my salmon is fully cooked? You can tell your salmon is done when it flakes easily with a fork. The inside should look opaque and no longer shiny. If you have a food thermometer, the thickest part should reach 145°F (63°C). This ensures it is safe to eat. Can I use frozen salmon for this recipe? Yes, you can use frozen salmon! Just ensure to thaw it fully before cooking. Thaw it in the fridge overnight or place it in a sealed bag and submerge it in cold water for about an hour. This helps maintain the fish's texture and flavor. What side dishes pair well with honey-lime garlic butter baked salmon? This dish goes well with many sides. Consider serving it with: - Steamed asparagus - Garlic mashed potatoes - Quinoa salad - Grilled vegetables - Rice pilaf These options complement the flavors without overpowering them. How long can I keep leftovers in the fridge? You can store leftover salmon in the fridge for up to three days. Make sure to place it in an airtight container to keep it fresh. If you want to enjoy it longer, consider freezing it. This blog post shared a delicious honey-lime garlic butter salmon recipe. We covered ingredients, step-by-step cooking instructions, tips, and storage advice. You can use common variations and substitutions too. Cooking salmon can be easy and fun. With simple steps and tasty flavors, you’ll impress anyone. Try adding your twist to this dish! Your friends and family will love it. Enjoy your cooking adventure!

Honey-Lime Garlic Butter Baked Salmon Flavorful Delight

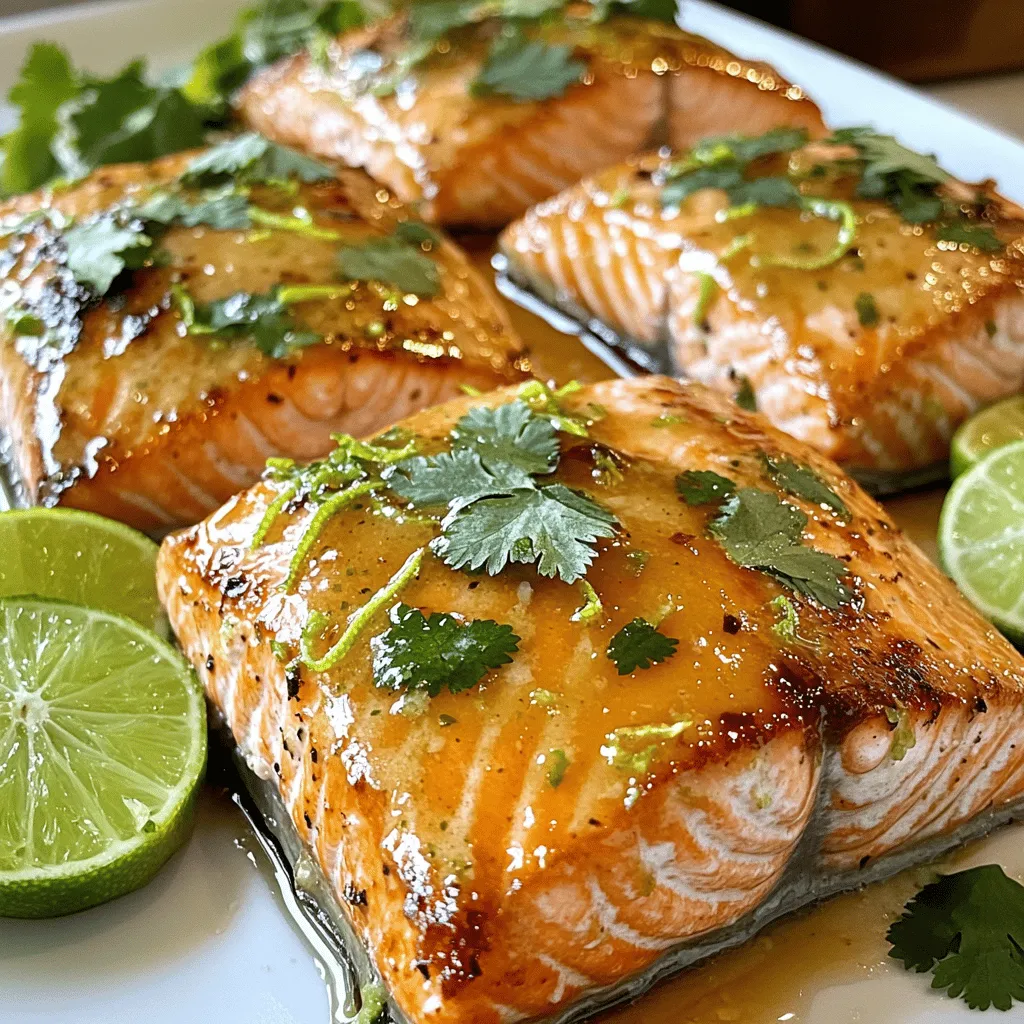
Ready to impress your taste buds? In this post, I’ll share a simple and delicious recipe for Honey-Lime Garlic Butter

To make the perfect Vegan Meatball Mozzarella Hot Pockets, we need a few key ingredients. - 1 cup cooked quinoa - 1 can (15 oz) chickpeas, drained and rinsed - 1/2 cup breadcrumbs (vegan) - 1/4 cup nutritional yeast - 1 tablespoon Italian seasoning - 1 teaspoon garlic powder - 1 teaspoon onion powder - Salt and pepper to taste - 1/2 cup marinara sauce (plus extra for serving) - 1 cup vegan mozzarella cheese, shredded - 1 pack of store-bought vegan puff pastry or pizza dough - Olive oil for brushing The chickpeas and quinoa form the base of our vegan meatballs. They create a hearty texture and add protein. You can find puff pastry in the frozen section of most grocery stores. Pizza dough also works well if you prefer a thicker crust. To bring out the best flavors, we need some seasonings. Italian seasoning adds that classic taste. Garlic powder and onion powder enhance the aroma and depth. You can adjust the salt and pepper to your liking. For the marinara sauce, I recommend using a good quality store-bought brand. Look for one that is rich and flavorful. You can also make your own if you want a fresh touch. Choosing the right vegan mozzarella cheese is vital for melty goodness. There are many brands available. Some melt better than others, so it’s good to do a little taste test. Popular brands include Daiya, Violife, and Follow Your Heart. Each has a unique taste and meltability. I find that Violife tends to melt very well, making it a great choice for these hot pockets. Always check the label for any allergens or additives. For the full recipe, refer to the complete instructions on how to assemble and bake these delicious hot pockets. To make the perfect vegan meatballs, start with chickpeas and quinoa. Use one can of chickpeas, drained and rinsed. This gives you a great base. Add one cup of cooked quinoa for texture. Pulse them in a food processor until they are slightly chunky. This helps keep the meatball feel. Next, mix in breadcrumbs, nutritional yeast, and seasonings. Use 1/2 cup of breadcrumbs and 1/4 cup of nutritional yeast. Add one tablespoon of Italian seasoning, one teaspoon of garlic powder, and one teaspoon of onion powder. Don't forget salt and pepper to taste! Bake the meatballs for about 15 minutes at 375°F. This gives them a nice golden color. Check them halfway through. If they look dry, you can lightly brush them with olive oil. When your meatballs are done, it’s time to assemble the hot pockets. Roll out your vegan puff pastry or pizza dough on a floured surface. Aim for a thickness of about 1/8 inch. Cut the dough into 4x4 inch squares. Take a square and place a tablespoon of marinara sauce in the middle. Add one meatball on top of the sauce. Then, sprinkle a tablespoon of vegan mozzarella cheese over the meatball. Fold the dough over to create a pocket. Press the edges with a fork to seal them well. This step is key to keeping your filling inside while baking. Place the assembled pockets on a baking sheet lined with parchment paper. Brush the tops with olive oil to get that golden finish. Bake them in the oven for 20 to 25 minutes. Look for a puffed, golden brown appearance. Once they are out of the oven, let them cool for a few minutes. Serve them with extra marinara sauce on the side. This adds a nice touch for dipping! For the full recipe, check out the complete instructions and tips. Enjoy making these delicious Vegan Meatball Mozzarella Hot Pockets! To make the best Vegan Meatball Mozzarella Hot Pockets, start with the dough. I prefer store-bought vegan puff pastry or pizza dough because it saves time. Roll the dough on a floured surface. This keeps it from sticking. Aim for about 1/8 inch thick. Cutting into 4x4 inch squares works well. To prevent sogginess, avoid overfilling. Use just enough sauce and filling. Seal your pockets tightly by pressing the edges with a fork. You want them to keep all the goodness inside. Flavor is key in these hot pockets. You can change the seasonings to suit your taste. Try adding smoked paprika for a kick or some fresh herbs. Pre-baking your meatballs is essential. It deepens the flavor and gives them a nice texture. Mixing in some chopped spinach or sun-dried tomatoes can also enhance the taste. Be creative! The more you play with flavors, the more exciting the hot pockets will be. Leftover hot pockets can be just as tasty. The best way to reheat them is in the oven. Set it to 350°F (175°C) and bake for about 10-15 minutes. This keeps the outside crispy. You can also use an air fryer for quick reheating. Just a few minutes at 350°F (175°C) will do the trick. Avoid microwaving them, as this can make the dough soggy. Enjoy your perfectly reheated hot pockets! {{image_2}} You can switch up the filling for fun. Lentils make a great stand-in for chickpeas. They give a nice texture and flavor. Tempeh is another option. It adds a hearty bite to your hot pockets. You can also use black beans or tofu for a protein boost. Mix in vegetables for added nutrition. Try spinach, mushrooms, or bell peppers. These veggies add color and vitamins. You can even sneak in some finely chopped kale or carrots for extra goodness. Herbs and spices can take your hot pockets to the next level. Try adding basil or oregano to the dough. A pinch of red pepper flakes gives a nice kick. You can also mix in garlic or onion powder for extra flavor. If you're not a fan of marinara sauce, no problem! Try pesto or hummus for dipping. You can also use a vegan ranch dressing. These alternatives can change the whole taste of your hot pockets. Making these hot pockets gluten-free is easy. Use gluten-free dough brands like Udi's or Bob's Red Mill. Be sure to check the labels for any hidden gluten. You can also make your own gluten-free dough! Combine almond flour, coconut flour, and a bit of flaxseed. This mix creates a tasty, gluten-free option that works well. Enjoy your hot pockets without the worry of gluten! To keep your Vegan Meatball Mozzarella Hot Pockets fresh, store them properly. Place any leftovers in an airtight container. This helps prevent them from drying out. Refrigerate them if you plan to eat them within three days. If you want to save some for later, freeze the hot pockets. Wrap each one in plastic wrap or foil. Then, place them in a freezer bag. This keeps them safe from freezer burn. They will stay fresh for up to three months. In the fridge, your hot pockets can last about three days. If you freeze them, they can last up to three months. Always check for signs of spoilage. Look for changes in color or texture. If they smell off, it's best to throw them away. When you're ready to eat frozen hot pockets, thaw them safely. You can place them in the fridge overnight. This is the best method to keep them safe. If you're in a hurry, you can use the microwave. Set it to defrost for a few minutes. For re-baking, preheat your oven to 375°F. Bake the thawed hot pockets for about 15 minutes. This will make them crispy and warm again. Enjoy them with some extra marinara sauce! For the full recipe, check the link above. Yes, these hot pockets can be healthy. They are packed with protein from chickpeas and quinoa. The nutritional yeast adds B vitamins, while the vegan cheese offers calcium. Here’s a quick breakdown: - Calories: About 250 per pocket - Protein: 10 grams - Fiber: 5 grams - Fat: 8 grams Using whole ingredients gives you good nutrition. You can adjust the portion size to fit your needs. Keep in mind, though, that the pastry adds some carbs. It’s all about balance! Absolutely, you can prepare these hot pockets ahead. Here’s how: - Storage: Wrap them tightly in plastic wrap or foil. - Refrigerate: They last up to three days in the fridge. - Freeze: For longer storage, freeze them. They can last up to three months. To reheat, bake from frozen at 375°F (190°C) for about 25-30 minutes. This keeps them crispy. You can also use the microwave, but they may not stay as crunchy. You can find pre-made vegan hot pockets at many health food stores. Some popular brands include: - Amy’s Kitchen: Known for its organic options. - Beyond Meat: Offers a tasty meatless choice. These store-bought versions can save time. However, homemade hot pockets often taste better. You can customize them to your liking, and they are fresher! If you can’t find vegan mozzarella, try these options: - Cashew Cheese: Creamy and rich in flavor. - Almond Cheese: A lighter choice with a mild taste. - Coconut-Based Cheese: Melts well and adds a unique flavor. Each option gives a different taste. Experiment to find what you enjoy best! In this blog post, we covered how to make vegan meatball mozzarella hot pockets. You learned about key ingredients, including dough options and flavor enhancers. I shared step-by-step instructions for prepping, assembling, and baking your hot pockets. We also explored tips for variations, storage advice, and answered common questions. Now you can enjoy a tasty, plant-based treat. Get creative with fillings and flavors. Your kitchen will be filled with delicious smells and smiles. Happy cooking!

Vegan Meatball Mozzarella Hot Pockets Delicious Recipe

Craving a hot, gooey, and satisfying snack? Look no further than these Vegan Meatball Mozzarella Hot Pockets! Packed with flavor

To make these delightful crescent cheese danishes, you will need a few simple ingredients. Here’s what you should gather: - 1 can refrigerated crescent roll dough - 8 oz cream cheese, softened - 1/3 cup granulated sugar - 1 teaspoon vanilla extract - Zest of 1 lemon - 1 egg (for egg wash) - Powdered sugar (for dusting, optional) - Fresh berries (for garnish, optional) Each ingredient plays a key role. The crescent roll dough gives a flaky base. Cream cheese adds a rich, creamy filling. Sugar sweetens the mix, while vanilla brings warmth. Lemon zest brightens the flavor, making it fresh and lively. The egg wash gives a golden color when baked. You can dust with powdered sugar for sweetness and use fresh berries as a tasty garnish. These ingredients blend well together, creating a perfect balance of flavors. Enjoy making these easy danishes! For the full recipe, check out the detailed instructions above. 1. Preheat your oven to 375°F (190°C). This step ensures even baking. 2. Line a baking sheet with parchment paper. It helps the danishes not stick. 3. In a medium bowl, mix the softened cream cheese, granulated sugar, vanilla extract, and lemon zest until smooth. This mixture gives a creamy filling. 1. Unroll the crescent roll dough. Separate it into triangles. You’ll see the lines to guide you. 2. Take one triangle of dough and place a tablespoon of the cream cheese mixture in the center. This is the heart of your danish! 3. Fold the dough over the filling to create a pocket. Pinch the edges to seal tightly. For fun, twist the ends or shape them. 4. Repeat with the rest of the dough and filling until all are filled. Each one is a little treasure. 1. In a small bowl, whisk the egg. Brush the tops of the danishes with the egg wash. This gives a golden color. 2. Place the prepared danishes on the lined baking sheet. Bake for 12-15 minutes, or until golden brown and puffed. Watch them rise and turn golden! 3. Once baked, remove them from the oven. Let them cool slightly. Dust with powdered sugar if you want. Garnish with fresh berries for a pop of color. For the full recipe, check the earlier sections. Enjoy these delicious treats! To get the best flakiness in your dough, start with cold ingredients. Keep the crescent roll dough in the fridge until you are ready to use it. When you bake the danishes, the cold dough creates steam, making them puff up nicely. For the cream cheese filling, mix it well. Use a hand mixer or a whisk. This makes it smooth and easy to spread. If it's too lumpy, it can be hard to seal the danishes. To boost flavor, try adding spices. Cinnamon or nutmeg can give a warm taste. A drop of almond extract adds a nice twist too. Lemon zest is key for freshness. It brightens the filling and balances the creaminess. Just a little zest goes a long way. Garnishing is fun! You can use fresh berries like strawberries or blueberries. They add color and flavor. Dusting with powdered sugar makes the danishes look special. It gives them a sweet finish. Just sprinkle lightly on top before serving. For more ideas, check out the Full Recipe for Crescent Cheese Danishes. {{image_2}} You can play with many fillings for your Crescent Cheese Danishes. Here are some ideas: - Fruit fillings: Try using raspberry or strawberry jam. These add a sweet and tart flavor. You can also use blueberry or peach for a change. - Savory variations: For a unique twist, add herbs and spices. Mix cream cheese with fresh basil or chives for a savory treat. You can also add some garlic for extra flavor. If you have dietary needs, there are easy ways to adapt this recipe: - Gluten-free options: Look for gluten-free crescent roll dough in stores. Many brands offer this, so you won’t miss out on the fun. - Vegan alternatives: Substitute the cream cheese with a vegan cream cheese. There are many great brands that taste just as good. Change your danishes with the seasons. Here are some fun ideas: - Holiday-inspired flavors: During the holidays, add spices like nutmeg or cinnamon. These spices bring out warm flavors and make your danishes festive. - Using seasonal fruits: In summer, use fresh berries. In fall, try pumpkin puree with cream cheese. Seasonal fruits keep your danishes fresh and delicious. For a complete recipe, check out the Full Recipe section. Enjoy making these delicious danishes! To keep your crescent cheese danishes fresh, store them in an airtight container. Place parchment paper between layers to avoid sticking. They stay good in the fridge for about 2 to 3 days. After that, the dough may get soggy, and the filling could lose flavor. To freeze danishes before baking, prepare them as usual. Place the unbaked danishes on a baking sheet and freeze them for about 1 hour. Once they are firm, transfer them to a freezer bag. They can stay frozen for up to 2 months. To reheat frozen danishes, bake them straight from the freezer. Preheat your oven to 375°F (190°C). Bake for about 15 to 18 minutes. Check until they are golden brown and puffed. For the best taste, serve danishes warm. The cream cheese filling is creamy and rich when heated. You can dust them with powdered sugar or add fresh berries for extra flavor. Cold danishes are fine, but they lose some texture and taste. The dough may not be as flaky, and the filling will be less creamy. Warm danishes offer a delightful and fresh experience. Enjoy them straight from the oven for the best treat! Can I use homemade dough instead of refrigerated? Yes, you can! Homemade dough works well. Just roll it thin and cut it into triangles. This may take more time, but the taste will be worth it. What can I substitute for cream cheese? You can use ricotta or mascarpone cheese. Both will give a nice texture. If you want a lower-fat option, use Greek yogurt. It adds a tangy taste and is creamy too. How do I know when they are done baking? Look for a golden brown color. If they puff up and turn golden, they are ready. You can also insert a toothpick to check if the filling is warm. Can I prepare them ahead of time? Yes! You can mix the filling a day before. Store it in the fridge. You can also shape the danishes and chill them until you are ready to bake. This makes it easy to serve fresh. What fruits pair best with cream cheese? Berries like strawberries, blueberries, and raspberries work great. Their sweetness balances the cream cheese flavor. You can also try peaches or apricots for a fun twist. How can I make them less sweet? Reduce the sugar in the filling. You can use only two tablespoons instead of one-third cup. Adding a touch of lemon juice can also brighten the flavor without extra sugar. To wrap up, we covered how to make delicious crescent cheese danishes. You learned about the simple ingredients and the easy steps for preparation, assembly, and baking. I shared tips to enhance flavor and presentation while exploring variations for dietary needs. Lastly, we discussed storage methods to keep your danishes fresh. These tips will help you create tasty treats for any occasion. Enjoy experimenting and sharing your creations!

Crescent Cheese Danishes Delightful Easy Recipe

Are you ready to impress your family or guests with a sweet treat? My Crescent Cheese Danishes recipe is a

- 2 cups rolled oats - 1 cup pecans, roughly chopped - 1/2 cup almond butter (or any nut butter) - 1/2 cup pure maple syrup - 1/4 teaspoon salt - 1/2 teaspoon cinnamon - 1/2 cup dried cranberries or raisins - 1/4 cup dark chocolate chips (optional) - 1 teaspoon vanilla extract These ingredients come together to make a tasty treat. You’ll find that the rolled oats form a solid base. I love using pecans for their rich, buttery flavor. Almond butter adds creaminess and binds the mix well. Pure maple syrup gives the bars a natural sweetness. Salt and cinnamon enhance the flavors, making them pop. Dried cranberries or raisins add a chewy texture and a fruity taste. If you want a chocolatey twist, add dark chocolate chips. When you gather these ingredients, make sure they are fresh. Fresh nuts give a better crunch. Quality maple syrup makes a big difference in taste. You can find the full recipe at the end to guide you through the steps. Each serving has about 150 calories. - Calories per serving: 150 - Carbohydrates: 20g - Protein: 4g - Fat: 7g - Fiber: 2g - Sugar: 6g These bars are a balanced snack. They provide good energy, thanks to healthy fats and carbs. Plus, they are packed with nutrients from the oats and nuts. Enjoy them anytime for a boost! 1. Preheat your oven to 350°F (175°C). 2. Line an 8x8 inch baking dish with parchment paper. Leave some overhang. This makes it easy to remove the bars later. 3. In a large bowl, mix the rolled oats, chopped pecans, salt, and cinnamon. Make sure to stir well. 4. In another bowl, whisk together the almond butter, maple syrup, and vanilla extract. Mix until smooth. 1. Pour the wet mixture over the dry mix. Stir until everything is coated well. 2. If you wish, gently fold in the dried cranberries or raisins and dark chocolate chips. 3. Transfer the mixture to the prepared baking dish. Press it down firmly with a spatula or your hands. Make sure it’s even. 4. Bake for 20-25 minutes. Check for golden edges to know it's done. 1. Let the granola cool in the pan for about 10 minutes. 2. Use the parchment overhang to lift it from the dish. 3. Allow it to cool completely on a wire rack before cutting. 4. Cut into bars or squares for easy snacking. Store in an airtight container for up to a week. For the complete recipe, check the [Full Recipe]. Getting the measurements right is key. Use a kitchen scale for precision. Too much of one ingredient can change the texture. To get that perfect chewy bar, pack the mixture tightly. Press it down firmly into the baking dish. You want it to hold together when cut. You can serve these bars in fun ways. Stack them in a pretty jar for a snack display. Wrap them in parchment paper for easy grab-and-go treats. Drizzle some extra maple syrup on top for added flavor. They also taste great with a side of yogurt. Be careful not to overbake your granola bars. If you do, they will turn hard and dry. Keep an eye on the edges; they should be golden, not burnt. Also, be cautious with substitutions. Using a different nut butter may alter the taste and texture. Stick to the recipe for the best results. {{image_2}} You can make these bars more fun and tasty. Try adding different nuts or seeds. Walnuts, almonds, or sunflower seeds work well. Mix and match to find your favorite blend! You can also include dried fruits. Chopped apricots or figs add a sweet twist. You could even toss in some mini chocolate chips for extra joy. If you want a different sweetener, honey is a great choice. It adds a nice flavor too. You can also make nut-free versions of these bars. Use sun butter or pumpkin seed butter instead of almond butter. These options still taste good and keep the bars chewy. For those who avoid gluten, use certified gluten-free oats. This keeps the bars safe for all. If you want a vegan treat, make sure to use maple syrup and a plant-based butter. This way, everyone can enjoy these yummy snacks! Check out the Full Recipe for details on how to make these delicious bars. Store your maple pecan granola bars in airtight containers. This keeps them fresh and tasty. Air can make them go stale quickly. An airtight container helps protect them from moisture and air. Your bars will stay good for up to a week. For the best taste, eat them within five days. You can freeze granola bars for long-term storage. Wrap each bar in plastic wrap. Then, place them in a freezer-safe bag. This keeps them safe from freezer burn. You can freeze them for up to three months. To thaw, simply leave them at room temperature for a few hours. You can also heat them in the microwave for a quick snack. Enjoy your homemade treats anytime! For the [Full Recipe], check it out. Homemade granola bars last about one week when stored in an airtight container. Make sure to keep them in a cool, dry place. If you want to keep them longer, you can freeze them. They last up to three months in the freezer. Yes, you can use different nut butters. Almond butter, peanut butter, or cashew butter all work well. Each nut butter brings its unique flavor, so feel free to experiment! Granola bars can be too crumbly if there isn't enough binding. Make sure you add enough nut butter and maple syrup. Press the mixture down firmly into the baking dish. This helps them stick together better. To cut granola bars, let them cool for about ten minutes. Use a sharp knife to slice them into bars. You can also use a pizza cutter for clean edges. If the bars stick, run the knife under warm water for easier cutting. You can make these bars without maple syrup. Use honey or agave syrup as an alternative. The flavor will change slightly, but they will still be delicious. Just keep the same amount for good binding. For the full recipe, check the details above. You learned how to make tasty and healthy granola bars. We covered the ingredients, step-by-step instructions, and tips for perfect results. I shared variations that let you customize the bars to suit your taste and diet. Remember to store them right for lasting freshness. With this knowledge, you're ready to create your snacks at home. Enjoy making these delicious bars, and make them your own!

Maple Pecan Granola Bars Simple and Tasty Snack

If you’re looking for a simple and tasty snack, you need to try these Maple Pecan Granola Bars! With just

- 1 can (15 oz) chickpeas, rinsed and drained - Spices: chili powder, cumin, smoked paprika, cayenne pepper - Olive oil and seasoning: salt and pepper to taste To make spicy chickpea tacos, you need some key items. The main star is a can of chickpeas. Chickpeas are packed with protein and fiber. They give the tacos a hearty feel. You will also need a mix of spices. Chili powder, cumin, smoked paprika, and cayenne pepper create a warm and zesty flavor. Olive oil helps to cook the chickpeas and adds richness. Lastly, season with salt and pepper to taste. - Sliced avocado - Shredded red cabbage - Halved cherry tomatoes and chopped cilantro Toppings add freshness and crunch. Sliced avocado brings creaminess to the dish. Shredded red cabbage adds a nice crunch and color. Halved cherry tomatoes add sweetness. Don’t forget the chopped cilantro for a burst of flavor. These toppings make each bite exciting. - 8 small corn tortillas - Lime wedges and optional hot sauce For the base, choose small corn tortillas. They hold the filling well and have a great taste. Serve your tacos with lime wedges. A squeeze of lime adds brightness. If you like heat, optional hot sauce can elevate the flavor. This combination makes for a fun and tasty meal. For the full recipe, check out [Full Recipe]. First, take a medium bowl and mash half of the chickpeas. Use a fork or potato masher for this. You want a mix of chunky and smooth chickpeas. This mix gives the tacos great texture. Next, heat 1 tablespoon of olive oil in a skillet over medium heat. The oil should shimmer but not smoke. Add both the mashed and whole chickpeas to the skillet. This will help them crisp up nicely. Now, sprinkle the spices over the chickpeas. Use 1 teaspoon of chili powder, 1/2 teaspoon of cumin, 1/2 teaspoon of smoked paprika, and 1/4 teaspoon of cayenne pepper. Don't forget to add salt and pepper to taste. Stir well to combine everything. Cook this mixture for about 5 to 7 minutes. You want the chickpeas to heat through and get a little crispy. Keep stirring to prevent sticking. The aroma will be amazing! While the chickpeas cook, warm your corn tortillas. Heat them in a separate pan for about 30 seconds on each side. This makes them soft and easy to fold. Now, it’s time to assemble! Place a generous scoop of the spiced chickpeas onto each tortilla. Layer on sliced avocado, shredded cabbage, halved cherry tomatoes, and chopped cilantro. For the finishing touch, serve with lime wedges and a drizzle of hot sauce if you like extra heat. Enjoy your tasty spicy chickpea tacos! For more details on how to make these, check the Full Recipe. To boost flavor in your spicy chickpea tacos, adjust the cayenne pepper. If you like more heat, add a little more. For a milder taste, reduce it. You can also try adding fresh herbs. Cilantro and parsley work well. Other spices, like garlic powder or onion powder, can add depth too. Experiment with these to find your perfect mix. Getting crispy chickpeas is easy. After cooking, let them sit in the skillet for a minute. This helps them crisp up. You can also dry the chickpeas well before cooking. For warming tortillas, heat them on a skillet for about 30 seconds on each side. This makes them soft and easy to fold. Avoid overcooking them, or they may break. Pair your tacos with fresh sides. A simple salad or some rice can complete the meal. You can customize your toppings too. Try adding diced red onion or pickled jalapeños. Hot sauce is great for extra spice. Lime wedges add freshness, so don’t skip them. For a fun twist, swap out the chickpeas for black beans or lentils. For the full recipe, check out the details above. {{image_2}} You can easily make spicy chickpea tacos vegetarian or vegan. Swap in different legumes like black beans or lentils. They add protein and flavor. You can also mix in veggies like bell peppers or zucchini for extra crunch. For toppings, use vegan sour cream or cashew cream instead of dairy. This keeps it creamy while staying plant-based. You can even add pickled onions or radishes for a tangy twist. To change the heat level, you have options. For milder tacos, reduce the cayenne pepper. Alternatively, you can skip the hot sauce. If you want more heat, add extra cayenne or use a spicier hot sauce. Other options include fresh jalapeños or chili flakes. These can add heat without changing the taco's base flavor. You can use flour tortillas instead of corn if you prefer them. They make the tacos softer and are easy to roll. For gluten-free options, try corn or brown rice tortillas. Both types hold the filling well. Choose what suits your taste and diet best. Enjoy your tacos with your favorite tortilla style! To keep your spicy chickpea tacos fresh, seal leftovers in an airtight container. Place the container in your fridge. They stay good for about 3 days. For the best taste, store the chickpeas and toppings separately. This helps keep everything fresh and tasty. When reheating chickpeas, use a skillet over medium heat. Stir them often until they are hot. This method keeps them crispy. For tortillas, heat them in a dry pan for about 15 seconds per side. This way, they won't get soggy when you add the chickpeas. Yes, you can freeze this dish! Store the chickpeas in a freezer-safe bag. They will stay fresh for about 2 months. When you want to eat them, thaw the chickpeas in your fridge overnight. Reheat them in a skillet before serving. Enjoy your spicy chickpea tacos again and again with these easy steps! For the full recipe, check out the cooking guide above. Spicy chickpea tacos can last in the fridge for about three days. Store them in an airtight container. However, the texture of the tortillas may change after a day. To keep them fresh, store the chickpea filling and toppings separately from the tortillas. Reassemble the tacos just before eating for the best taste. Yes, you can use canned chickpeas. They save time and are easy to use. Just rinse and drain them before cooking. Canned chickpeas are already cooked, so you only need to warm them with the spices. This makes your cooking process quick and simple. To make these tacos more filling, consider adding protein. Here are some great options: - Grilled chicken or shrimp - Black beans or lentils - Sautéed mushrooms or tofu - Cheese or a dollop of Greek yogurt These additions boost the protein and help keep you satisfied longer. Enjoy experimenting with different toppings! This blog post showed you how to make spicy chickpea tacos with easy steps. We covered the main ingredients, from chickpeas to tasty toppings. I shared tips to boost flavor and texture, plus diverse topping options. Storing and reheating are simple, so leftovers stay fresh. These tacos are fun to customize and healthy too. Enjoy creative meals that fit your taste. Happy cooking!

Spicy Chickpea Tacos Flavorful and Easy to Make

Are you ready for a delicious twist on taco night? These Spicy Chickpea Tacos are not just flavorful; they’re quick

Older posts
Newer posts
← Previous Page1 … Page85 Page86 Page87 … Page106 Next →
© 2025 My Cooking Cast • Built with GeneratePress

Our Policies

  • Privacy Policy
  • GDPR Policy
  • Terms Of Use
  • Copyright Policy
  • Cookie Policy
  • Disclaimer

More Information​

  • Home
  • Contact
  • About
  • Dinner
  • Appetizers
  • Dessert
©2025, My Cooking Cast About Privacy Policy Back To Top