Skip to content
DisclaimerTerms Of UseGDPR PolicyCookie Policy

My Cooking Cast

  • Home
  • Drinks
  • Appetizers
  • Dinner
  • Dessert
  • About
  • Contact
  • Privacy Policy
DisclaimerTerms Of UseGDPR PolicyCookie Policy

Emma

For the Garlic Parmesan Cheeseburger Bombs, you'll need a few key ingredients. These bring great flavor and texture to each bite. Here’s what you’ll need: - 1 pound ground beef - 1 teaspoon garlic powder - 1 teaspoon onion powder - 1 teaspoon black pepper - 1 teaspoon salt - 1 cup shredded cheddar cheese - 1/2 cup grated Parmesan cheese - 1 package refrigerated crescent roll dough - 1/4 cup unsalted butter, melted - 2 tablespoons fresh parsley, chopped (for garnish) These ingredients work together to create a tasty treat. The ground beef gives a hearty base. Garlic and onion powder add depth. The cheeses melt beautifully inside the dough. For serving, consider adding a side of marinara sauce. This adds a nice touch. You can also use extra parsley for garnish. It looks great and adds freshness to the dish. Make sure to check the Full Recipe for detailed instructions on how to combine these flavors into delicious bombs! First, you need to preheat your oven to 375°F (190°C). This helps the bombs cook evenly. Next, line a baking sheet with parchment paper. This keeps the bombs from sticking. In a mixing bowl, combine the ground beef with garlic powder, onion powder, black pepper, and salt. Mix these well. Then, divide the beef mixture into 12 equal portions. Shape each portion into a small patty. To add a cheesy surprise, place a tablespoon of shredded cheddar cheese in the center of each patty. Fold the edges over to seal the cheese inside. Now, let’s move on to the dough. Roll out the crescent roll dough on a clean surface. Cut it into squares that are about 4 inches by 4 inches. Take a beef patty and place it on each square of dough. Fold the corners of the square up to cover the patty. Pinch the seams tightly to make sure it is sealed well. Arrange the cheeseburger bombs seam-side down on the prepared baking sheet. This helps them keep their shape. Brush the tops of the bombs with melted butter for a nice golden color. Then, sprinkle grated Parmesan cheese on top for added flavor. Bake in your preheated oven for about 15 to 18 minutes. Keep an eye on them. You want the rolls to be golden brown and the meat to be cooked through. Once done, remove them from the oven. Let them cool slightly before serving. You can garnish with freshly chopped parsley for a pop of color. For the complete recipe, check the Full Recipe section. To get that cheese perfectly melted inside, use a good amount of cheddar cheese. Place it right in the center of each beef patty. When baking, the heat will melt the cheese nicely. Check the bombs after 15 minutes. They should be golden and the cheese should ooze out when you bite. Sealing the dough is key to keeping the filling inside. When you fold the dough over the beef, pinch it tightly. Make sure there are no gaps. This way, your cheeseburger bombs stay juicy and flavorful. If the dough tears, don’t worry. Use a small piece of dough to patch it up. For dipping, marinara sauce works great. You can also try ranch or barbecue sauce. These add a nice flavor touch. Serve the bombs warm on a big platter. It makes them look tempting and fun. Garnish with chopped parsley for color. You can also sprinkle some extra Parmesan on top. This makes them look fancy and taste even better. These tips will impress your friends and family at your next gathering. For the full recipe, check out the details above! {{image_2}} You can switch up the cheese in Garlic Parmesan Cheeseburger Bombs. For a creamier taste, try mozzarella. If you want more flavor, go with pepper jack. You can mix cheeses for a fun twist. Just remember, the cheese should melt well. You don’t have to use beef. Ground turkey or chicken works great too. If you prefer a plant-based option, use a veggie ground meat. Each choice adds its own flavor. This makes the bombs suitable for different diets. Want to spice things up? Add some diced jalapeños or bell peppers to the beef mix. You can also toss in some Italian herbs for extra zest. Each added ingredient creates a new taste. This way, you can customize your bombs for every meal. To keep your Garlic Parmesan Cheeseburger Bombs fresh, store them in an airtight container. If you plan to eat them within three days, put them in the fridge. For longer storage, freeze them in a freezer bag. They last up to three months in the freezer. When you are ready to eat them, you can thaw them in the fridge overnight. To reheat the bombs, use your oven for the best results. Preheat your oven to 350°F (175°C). Place the bombs on a baking sheet. Heat for about 10-15 minutes or until warm. This method keeps the outside crispy and the inside gooey. Avoid using the microwave, as it may make the dough soggy. Follow these steps, and you'll enjoy your tasty treats just like when they were fresh! Can I make these ahead of time? Yes, you can prepare these bombs ahead of time. Shape the patties and wrap them in dough. Place them on a baking sheet and cover. Refrigerate them for up to 24 hours before baking. When ready, just bake as directed. This saves time and lets you enjoy them fresh! What can I use instead of crescent roll dough? If you want a different dough, you can use biscuit dough or pizza dough. Each option gives a unique taste. Just make sure to cut it into squares or circles to wrap the patties well. This keeps the cheese inside and ensures a tasty bite. How long do leftovers last? Leftovers are great! Store them in an airtight container in the fridge. They last for about 3 to 4 days. You can also freeze them for up to 2 months. When you want to eat them, just reheat in the oven for the best taste. What to do if the dough tears? If your dough tears, don’t worry! Just pinch it back together. You can also use small pieces of dough to patch it. This will help keep the filling inside. Make sure to seal well to avoid leaks while baking. How to adjust cooking time for different ovens? Oven temperatures can vary. If your oven runs hot, check the bombs a few minutes early. If it runs cool, you may need to add a few extra minutes. Always look for a golden-brown color and ensure the meat is fully cooked. This will give you the best Garlic Parmesan Cheeseburger Bombs! You now know how to make delicious Garlic Parmesan Cheeseburger Bombs. We covered all the ingredients you need, from ground beef to cheeses and dough. I shared step-by-step instructions to help you prepare, bake, and serve these tasty treats. Remember the tips for perfecting them and the fun variations you can try. These bombs are perfect for family gatherings or game days. Enjoy creating your version, and don’t hesitate to get creative with flavors. Happy cooking!

Garlic Parmesan Cheeseburger Bombs Tasty and Easy Treat

Get ready to indulge in a delightfully cheesy and savory treat: Garlic Parmesan Cheeseburger Bombs! These tasty bites combine juicy

For your easy Chicken Teriyaki Bowls, you'll need some key items. Each ingredient adds flavor and texture. - Chicken - 1 lb (450g) boneless, skinless chicken thighs - Sauce Components - 1/4 cup soy sauce (low sodium preferred) - 1/4 cup honey - 2 tablespoons rice vinegar - 1 tablespoon sesame oil - 2 cloves garlic, minced - 1 teaspoon ginger, grated - Vegetables and Garnishes - 2 cups cooked jasmine rice - 1 cup steamed broccoli florets - 1 cup shredded carrots - 2 green onions, sliced - Sesame seeds for garnish These ingredients blend well together. The chicken gives protein, while the sauce brings a sweet, savory kick. The veggies add color and crunch. This dish is not only tasty but also easy to make. You can find the Full Recipe to guide you through the steps. Enjoy cooking! To make the teriyaki sauce, gather your ingredients. You need soy sauce, honey, rice vinegar, sesame oil, garlic, and ginger. In a small saucepan, mix these ingredients. Heat it over medium heat. Stir until the honey dissolves. Once it simmers, let it thicken for about 5-7 minutes. When done, take it off the heat and set it aside. Next, we cook the chicken. Cut the chicken thighs into bite-sized pieces. Season them with salt and pepper. Heat a tablespoon of oil in a large skillet over medium-high heat. Add the chicken in a single layer. Cook it for about 6-8 minutes. It should turn golden brown and be fully cooked. Stir occasionally for even cooking. After it’s cooked, pour the teriyaki sauce over the chicken. Stir well to coat it. Let it simmer for 2-3 minutes. This helps the chicken soak up the sauce. Now it’s time to assemble your bowls. Start with a base of cooked jasmine rice. Spoon the teriyaki chicken on top of the rice. Add steamed broccoli and shredded carrots next. Finally, garnish with sliced green onions and a sprinkle of sesame seeds. Serve hot and enjoy your delicious chicken teriyaki bowls! For the full recipe, check the detailed instructions and ingredients. To make a great teriyaki sauce, use low-sodium soy sauce. It keeps the dish from being too salty. Combine soy sauce, honey, rice vinegar, sesame oil, minced garlic, and grated ginger in a small pot. Heat this mix on medium heat. Stir until the honey melts. Let it simmer for about 5-7 minutes. The sauce should thicken nicely. This is where the magic happens! For the chicken, use boneless, skinless thighs. They remain juicy and tender. Cut the chicken into bite-sized pieces for even cooking. Season with a little salt and pepper. Heat oil in a large skillet on medium-high. Add the chicken pieces and spread them out. Cook for 6-8 minutes, turning them to brown on all sides. This step ensures the chicken cooks through and gains great flavor. When serving, start with a bed of jasmine rice. Spoon the teriyaki chicken on top. Add a generous amount of steamed broccoli and shredded carrots. This not only adds color but also nutrition. Finish by garnishing with sliced green onions and sesame seeds. Each bowl should look vibrant and inviting. For more details, check the Full Recipe. Enjoy every bite of your easy chicken teriyaki bowls! {{image_2}} You can change the chicken in this recipe. Try using turkey or pork instead. Both will soak up the teriyaki sauce well. You can also use firm tofu for a great vegetarian option. Just press the tofu to remove excess water. Cut it into cubes and sauté until golden. Feel free to swap out the vegetables. Bell peppers add a sweet crunch. Snap peas or green beans will give a nice snap. You can even use zucchini or mushrooms for a different texture. Just make sure you cut the veggies into bite-sized pieces for easy eating. While jasmine rice is great, other types work too. Brown rice adds a nutty flavor and is healthier. Quinoa is another choice and packs more protein. For a fun twist, you can use cauliflower rice for a low-carb option. Each rice type brings its own taste and texture to your bowl. For the full recipe, check out the details above. You can store leftover chicken teriyaki bowls in an airtight container. Place them in the fridge right after they cool down. They stay fresh for up to three days. When you’re ready to eat, check for any change in smell or texture before reheating. If you want to keep your chicken teriyaki bowls longer, freezing is a great option. Pack the bowls in freezer-safe containers. Make sure to leave some space at the top for expansion. You can freeze them for up to three months. Label each container with the date so you know how long they’ve been in the freezer. To reheat, you can use the microwave or the stovetop. For the microwave, heat in 30-second bursts until hot. Stir in between to warm evenly. If you prefer the stovetop, place the bowl in a pan over medium heat. Add a little water if needed to keep it moist. Heat it until warm throughout. Enjoy your flavorful chicken teriyaki bowls! For the complete recipe, check the Full Recipe. To make this recipe gluten-free, you can use tamari instead of soy sauce. Tamari is a great gluten-free option that still gives you that delicious umami flavor. Check the label to ensure it fits your needs. You can also use coconut aminos as a soy sauce substitute. This option is both gluten-free and lower in sodium. Yes, you can use chicken breast instead of thighs. Chicken breast is leaner and will still taste great. Just remember to cook it for a shorter time. Chicken breast cooks faster than thighs, so check for doneness at about 5-7 minutes. This way, you avoid dry chicken. You can serve your chicken teriyaki bowls with various sides. They pair well with extra steamed vegetables, like snap peas or bell peppers. You can also add a fresh salad or some edamame for crunch. For a heartier meal, try serving it with miso soup or pickled vegetables. For detailed instructions and ingredients, refer to the Full Recipe. This blog post covered how to make delicious chicken teriyaki bowls. We explored the main ingredients, step-by-step instructions, and helpful tips. You learned about variations, storage info, and FAQs. In summary, you now have everything to create tasty teriyaki bowls. Don’t be afraid to experiment with ingredients and flavors. Enjoy your cooking journey and share your meal with family and friends!

Easy Chicken Teriyaki Bowls Quick and Tasty Meal

Get ready to spice up your dinner routine with my Easy Chicken Teriyaki Bowls! This quick and tasty meal combines

To make the Chocolate Chip Cookie Skillet, gather these simple ingredients: - 1 cup unsalted butter, softened - 1 cup brown sugar, packed - 1/2 cup granulated sugar - 2 large eggs - 2 teaspoons vanilla extract - 2 1/4 cups all-purpose flour - 1 teaspoon baking soda - 1/2 teaspoon salt - 1 cup chocolate chips (semi-sweet or milk chocolate) - 1/2 cup chopped nuts (optional, like walnuts or pecans) - Vanilla ice cream for serving (optional) You can add some optional ingredients to make your cookie skillet even better. Here are a few: - Chopped nuts for crunch - Sea salt for a sweet and salty combo - Peanut butter chips for extra flavor If you need to swap some ingredients, here are a few easy ideas: - Use coconut oil instead of butter for a dairy-free option. - Substitute brown sugar with coconut sugar for a different taste. - For a gluten-free version, try almond flour or gluten-free all-purpose flour. - You can replace eggs with flaxseed meal mixed with water for a vegan choice. These options give you room to make the recipe your own. You can find the Full Recipe linked for easy reference. Each choice still leads to a delicious cookie skillet that everyone will love! First, set your oven to 350°F (175°C). This step ensures your cookie bakes evenly. A hot oven helps create a crispy top and a soft center. In a large bowl, blend the softened butter, brown sugar, and granulated sugar. Use an electric mixer to whip these until they are light and fluffy. This process takes about 2-3 minutes. Next, add the eggs one at a time. Mix well after each egg. Finally, stir in the vanilla extract, which adds great flavor. Take another bowl and whisk together the all-purpose flour, baking soda, and salt. This mix is crucial. It makes sure the cookie rises well. Gradually add this dry mix to the wet ingredients. Stir just until combined. Be careful not to overmix. You want a soft dough. Grab a large cast-iron skillet or any oven-safe skillet. Coat it lightly with butter or cooking spray. This step keeps the cookie from sticking. Pour the cookie dough into the skillet. Use a spatula to spread it evenly across the bottom. Place your skillet in the oven. Bake for 25-30 minutes. Look for a golden brown top and slightly crispy edges. The center should feel soft but not raw. If you see that, it’s perfect! After baking, take it out and let it cool for about 10 minutes. This cooling time helps the cookie set. For a special treat, serve it warm with a scoop of vanilla ice cream. It melts beautifully over the hot cookie. Enjoy this chocolate chip cookie skillet with friends and family! For the full recipe, check out the above section. To get that soft, gooey center, do not overmix the dough. Mix until just combined. This keeps your cookie chewy. Pull it out of the oven when the edges are golden, and the center looks a bit soft. It will continue to cook as it cools. One common mistake is using cold butter. Always use softened butter for the best results. Another mistake is overbaking. Keep an eye on the cookie as it bakes. If you leave it in too long, it will be dry. Lastly, don’t skip the salt. It balances the sweetness. For a delicious treat, serve warm from the skillet. Top it with vanilla ice cream for extra sweetness. Ice cream melts into the cookie, making each bite a dream. You can also add chocolate sauce or caramel for more flavor. Enjoy it straight from the skillet for a fun vibe. To see the full recipe, check out the Chocolate Chip Cookie Skillet section above. {{image_2}} You can change the type of chocolate in your skillet. Use semi-sweet, milk, or dark chocolate chips. Each type gives a unique taste. You can also mix different kinds. Try adding white chocolate for a fun twist. The chocolate melts nicely and creates gooey pockets in your cookie. Adding nuts like walnuts or pecans gives a nice crunch. You can also toss in dried fruits. Chopped cherries or cranberries add a sweet and tart flavor. If you like coconut, sprinkle some shredded coconut on top too. Each add-in makes the cookie more exciting and full of flavor. If you need a gluten-free option, use a gluten-free flour mix. This will still give you great texture. For a vegan version, replace eggs with flaxseed meal or applesauce. Use vegan butter and dairy-free chocolate chips. These changes keep the taste while fitting your dietary needs. Check out the Full Recipe for more details! To keep your chocolate chip cookie skillet fresh, let it cool first. Use plastic wrap or foil to cover the skillet tightly. You can also transfer the cookies to an airtight container. Store it at room temperature for up to three days. If you want to keep it longer, refrigerate it for up to a week. When you’re ready to enjoy your cookie skillet again, preheat your oven to 350°F (175°C). Place the skillet in the oven for about 10 minutes. This will help warm it up and restore its soft texture. If you prefer, you can microwave a slice for about 20-30 seconds. Just make sure to check it to avoid overheating. If you want to save some for later, freezing is a great choice. Wrap the cooled skillet tightly in plastic wrap or foil. Then, place it inside a freezer-safe bag. It can last for up to three months in the freezer. When you want to eat it, let it thaw in the fridge overnight before reheating. Enjoy every bite of this delicious treat! For the full recipe, check above. Yes, you can prepare the cookie dough ahead of time. Store it in the fridge for up to 24 hours. Just remember to let it come to room temperature before baking. You can tell it's done when the top is golden brown. The edges should be crispy, while the center remains soft. A toothpick inserted should come out with a few moist crumbs. Absolutely! You can use any oven-safe skillet. Just make sure it’s large enough to hold the dough. Cast iron gives the best results, but non-stick works too. If the center is undercooked, return the skillet to the oven. Bake for an additional 5 to 10 minutes. Keep an eye on it to avoid overcooking the edges. Yes, you can double the recipe! Just use a larger skillet and increase the baking time by a few minutes. Keep checking for that golden top. I love serving it warm with a scoop of vanilla ice cream. You can also add whipped cream or fresh berries for extra flavor. Enjoy every bite! For the full recipe, visit the recipe section above. This blog post covered all you need for a tasty chocolate chip cookie skillet. We talked about ingredients, how to mix and bake, and even tips for great texture. You learned about fun variations and storage options to keep leftovers fresh. Remember, cooking is all about trying new things. So, enjoy this treat and share it with others. Happy baking!

Chocolate Chip Cookie Skillet Irresistible Treat

If you love warm, gooey cookies, then you’ve hit the jackpot! My Chocolate Chip Cookie Skillet is the ultimate treat,

- 1 can (15 oz) chickpeas, rinsed and drained - 1 tablespoon olive oil - 1 teaspoon cumin - 1 teaspoon smoked paprika - ½ teaspoon garlic powder - ½ teaspoon cayenne pepper (adjust to taste) - Salt and pepper to taste - 8 small corn or flour tortillas For these tacos, chickpeas are the star. They are packed with protein and fiber. You can use canned chickpeas for ease. Just rinse and drain them well. Spices bring life to the dish. Cumin adds warmth, while smoked paprika gives a nice depth. Garlic powder enhances flavor, and cayenne pepper adds the heat. You can adjust the cayenne to fit your taste. Don’t forget to season with salt and pepper for balance. For the tortillas, you can choose between corn or flour. Corn tortillas offer a nice crunch. Flour tortillas are soft and chewy. - 1 cup shredded lettuce - 1 cup diced tomatoes - ¼ cup red onion, finely chopped - ¼ cup fresh cilantro, chopped - 1 avocado, sliced - Lime wedges for serving Fresh toppings make these tacos shine. Crispy lettuce adds crunch and freshness. Diced tomatoes bring juiciness and color. Red onion gives a nice bite, while cilantro adds a fresh herb flavor. Avocado slices are a must. They provide creaminess and richness. Lime wedges are perfect for squeezing over the tacos. This adds brightness and acidity, balancing the flavors. For the full recipe, you can reference the detailed instructions. Enjoy making your spicy chickpea tacos! 1. Heat a large skillet over medium heat. 2. Add one tablespoon of olive oil to the skillet. 3. Once the oil warms, toss in the rinsed chickpeas. 4. Cook them for about 2 minutes. This helps to get them warm. 5. Sprinkle the spices: one teaspoon of cumin, one teaspoon of smoked paprika, half a teaspoon of garlic powder, and half a teaspoon of cayenne pepper. 6. Add salt and pepper to taste. 7. Stir well to coat the chickpeas evenly. 8. Cook for another 5 to 7 minutes. Stir occasionally until the chickpeas are crispy. 1. You can warm the tortillas in a dry skillet. 2. Heat them over medium heat for about 30 seconds on each side. 3. This keeps them soft and easy to fold. 4. You can also wrap them in a damp paper towel and microwave for 20 seconds. 1. Grab a warm tortilla and place a generous portion of the spicy chickpea mixture in the center. 2. Add shredded lettuce on top of the chickpeas. 3. Next, sprinkle diced tomatoes and finely chopped red onion. 4. Add fresh cilantro for that burst of flavor. 5. Finish with slices of avocado. 6. Serve each taco with a lime wedge. Squeeze it over your taco for extra zest! For more details, check out the Full Recipe. To get crispy chickpeas, start by drying them. After rinsing, pat them with a towel. This helps them crisp up in the pan. Use medium heat, so they cook evenly. Stir them often to avoid burning. If you want extra crunch, roast them in the oven. Spread them on a baking sheet and cook at 400°F for 20 minutes. You can change the spice level easily. Start with a little cayenne pepper. Add more if you like more heat. For less spice, skip the cayenne. You can also use mild spices like paprika. Taste as you go to find the right balance for you. Serving matters! Use a colorful plate to make your tacos pop. Stack the tacos neatly, and add lime wedges on the side. A small bowl of extra cilantro adds a nice touch. For a fun look, arrange toppings in little bowls. This lets everyone build their own tacos. Enjoy your meal with friends and family! {{image_2}} If you want to mix things up, try other beans or lentils. Black beans bring a rich flavor. They pair well with spices in this recipe. Kidney beans also add a nice texture and taste. You can even use lentils for a twist. Just be sure to cook them until soft. This way, they blend well in tacos. Each option creates a unique taste while keeping it healthy. For those following a vegan diet, choose dairy-free toppings. You can use cashew cream or a simple avocado mash. Both add creaminess without dairy. If you prefer vegetarian options, try adding cheese. Feta or cotija cheese works well with the spices. Both choices enhance flavor while keeping the meal satisfying. You can even mix and match toppings to fit everyone's needs. Tortillas are key to great tacos. You can use corn or flour tortillas, depending on your taste. Corn tortillas are gluten-free and have a nice texture. Flour tortillas are softer and easier to fold. If you want more options, look for gluten-free tortillas made from rice or cassava. These add a fun twist to your tacos. Everyone can enjoy tasty tacos, no matter their diet. To keep your tacos fresh, store the ingredients separately. Keep the chickpeas in one container. Place the tortillas in a sealed bag. Store the toppings like lettuce, tomatoes, and avocado in separate containers. This method keeps everything fresh and prevents sogginess. When you want to reheat your chickpeas, use a skillet. Heat them over medium heat for about five minutes. This will keep them crispy. If you use a microwave, the texture may change. For tortillas, warm them in a dry skillet for a minute. This helps them stay soft and pliable. In the fridge, leftover chickpea tacos last about three days. If you freeze the chickpeas, they can last for up to three months. Just remember to thaw them in the fridge before reheating. This way, you can enjoy your spicy chickpea tacos later without losing flavor. For full recipe details, refer to the [Full Recipe]. Yes, you can make Spicy Chickpea Tacos ahead of time. Meal prep is easy with this recipe. Cook the chickpeas and store them in an airtight container. Keep the tortillas and toppings separate to prevent sogginess. This way, you can enjoy fresh tacos in no time. Just reheat the chickpeas on the stove or microwave before serving. Chickpeas are packed with nutrients. They are a great source of protein and fiber. This makes them filling and helpful for digestion. They contain vitamins like B6 and minerals like iron and magnesium. Eating chickpeas can help control blood sugar levels and support heart health. They are low in fat and can help you feel satisfied longer. To modify this recipe for meal planning, you can easily scale the ingredients. Double or triple the chickpeas if you need more servings. Store leftovers in the fridge for up to four days. You can also freeze the chickpeas for later use. Just make sure to keep the toppings and tortillas stored separately. Many side dishes pair well with Spicy Chickpea Tacos. You can serve a fresh salad or some guacamole. Rice or quinoa can also be great sides. For a crunch, add tortilla chips with salsa. These options will complement the flavors of the tacos and make your meal more filling. Enjoy experimenting with different sides! This article explored how to make spicy chickpea tacos. We covered essential ingredients, fresh toppings, and step-by-step instructions for perfectly cooked tacos. You learned tips for the best texture and spice levels, plus variations to suit different diets. We also discussed how to store and reheat leftovers. Tacos are fun to make and enjoy. With easy steps and tasty options, you can create your own spicy chickpea tacos at home. Dive into this recipe, experiment, and share your delicious results!

Spicy Chickpea Tacos Flavorful and Easy Recipe

Are you ready to spice up your taco night? My Spicy Chickpea Tacos are not only packed with flavor but

To make creamy pumpkin risotto, you will need these key ingredients: - 1 cup Arborio rice - 2 cups pumpkin puree (fresh or canned) - 4 cups vegetable broth - 1 medium onion, finely chopped - 2 cloves garlic, minced - 1/2 cup grated Parmesan cheese (or nutritional yeast for a vegan option) - 1/2 cup heavy cream (or coconut cream for a vegan option) - 2 tablespoons olive oil - 1 teaspoon dried thyme - Salt and pepper to taste - Fresh parsley or sage leaves for garnish Creamy pumpkin risotto is not just tasty; it’s also healthy. Here’s a quick look at the nutrients in a serving: - Calories: Approximately 350 - Protein: 10 grams - Carbohydrates: 50 grams - Fat: 15 grams - Fiber: 3 grams This dish offers a good balance of carbs and healthy fats, plus vitamins from the pumpkin. You can customize this risotto based on what you have at home. Here are some easy swaps: - Use brown rice instead of Arborio for a nuttier flavor. - Swap vegetable broth with chicken broth for a richer taste. - Try butternut squash puree instead of pumpkin for a different twist. - Replace heavy cream with cashew cream for a vegan option. These substitutions keep the dish delicious while catering to your diet or pantry needs. For the full recipe, check the details above. Start by gathering all your ingredients. Measure out: - 1 cup Arborio rice - 2 cups pumpkin puree - 4 cups vegetable broth - 1 medium onion, finely chopped - 2 cloves garlic, minced - 1/2 cup grated Parmesan cheese - 1/2 cup heavy cream - 2 tablespoons olive oil - 1 teaspoon dried thyme - Salt and pepper to taste - Fresh parsley or sage for garnish Keep your broth warm in a small pot. This helps the rice cook evenly. Chop your onion and garlic finely. This ensures they blend well in the dish. In a large skillet, heat the olive oil over medium heat. Add the chopped onion and cook it for about five minutes. The onion should turn soft and clear. Next, add the garlic and cook for one to two minutes. You want to smell the garlic without burning it. Then, add the Arborio rice. Stir it for two to three minutes. This step toasts the rice and adds flavor. Start adding the warm vegetable broth one ladle at a time. Stir constantly and wait until the rice absorbs most of the broth before adding more. This process takes about 18 to 20 minutes. When the risotto is creamy and the rice is al dente, add the pumpkin puree, heavy cream, and Parmesan cheese. Stir well so the cheese melts and combines with the rice. Mix in dried thyme and season with salt and pepper to taste. Once everything is mixed, remove the skillet from heat. Let the risotto rest for a minute. This helps it thicken slightly. To serve, use shallow bowls. Garnish with chopped parsley or sage for color. Drizzle some olive oil on top for extra richness. This step makes your dish look beautiful. You can find the full recipe for this delicious creamy pumpkin risotto and enjoy every bite! One mistake many make is adding too much broth at once. This can make the risotto too soggy. Always add the broth one ladle at a time. Stir constantly and wait until the rice absorbs most of the liquid before adding more. Another mistake is not stirring enough. Stirring releases starch, which makes the risotto creamy. Lastly, don’t skip the resting time after cooking. Letting it sit helps the flavors meld. To get that perfect creamy texture, use Arborio rice. Its high starch content is key. Always keep your broth warm while cooking. Cold broth can shock the rice and change the texture. Add heavy cream or coconut cream near the end for extra creaminess. Mixing in grated Parmesan cheese also helps create that rich, velvety feel. To boost the flavor, consider adding fresh herbs like thyme or sage. A pinch of nutmeg can add warmth and depth. You might also add a splash of white wine when sautéing the onion and garlic. This adds a nice acidity that balances the richness. For extra umami, try adding a touch of miso paste or nutritional yeast if you prefer a vegan option. For the full recipe, check out our detailed guide. {{image_2}} To make creamy pumpkin risotto vegan or dairy-free, swap a few key ingredients. Use nutritional yeast instead of Parmesan cheese. Choose coconut cream in place of heavy cream. These changes keep the dish rich and tasty without dairy. You still enjoy all the flavors of the original recipe. You can easily add proteins to your risotto. For chicken, cube cooked chicken breasts and stir them in before serving. Shrimp works great too. Just sauté shrimp in olive oil until they turn pink, then mix them in at the end. Both options add texture and make the dish more filling. You can change up the vegetables to suit the season. In spring, try fresh asparagus or peas for a bright touch. In summer, add zucchini or corn for sweetness. Fall brings squash varieties like butternut for more depth. Winter vegetables like kale or Brussels sprouts bring a hearty feel. Each version offers a new twist on this comforting dish. To store your creamy pumpkin risotto, let it cool first. Then, place it in an airtight container. This keeps the risotto fresh for about three days. Make sure to label it with the date. Always store it in the fridge to prevent spoilage. If you want to keep risotto longer, you can freeze it. Portion the risotto into freezer-safe bags. Squeeze out as much air as possible before sealing. It can last up to three months in the freezer. When ready to eat, thaw it in the fridge overnight. To reheat, add a splash of broth or water to the risotto. This helps to restore its creamy texture. Heat it slowly on the stove over low heat. Stir frequently to avoid sticking. You can also use a microwave, but be careful not to overcook it. Enjoy your creamy pumpkin risotto any time! For the full recipe, check out the details above. No, Arborio rice is best for risotto. It has a high starch content. This makes the dish creamy. White rice will not create the same texture. If you're in a pinch, you can use another short-grain rice. But the result won't be as creamy. This creamy pumpkin risotto is already gluten-free if you use gluten-free broth. Always check the labels. The other ingredients, like rice and pumpkin, are naturally gluten-free. So, it’s an easy swap! Creamy pumpkin risotto pairs well with many dishes. Consider serving it with roasted vegetables or a fresh salad. Grilled chicken or shrimp also make excellent companions. Adding some crusty bread can round out the meal too. Risotto stays good in the fridge for about three days. Store it in an airtight container. Make sure it cools down before you seal it. Reheat gently on the stove with a bit of broth to keep it creamy. This blog post covered how to make delicious risotto step by step. We explored key ingredients, nutritional details, and substitutions. You learned how to prepare ingredients and cook risotto for perfect creaminess. I shared tips to avoid common mistakes and enhance flavor. You also discovered variations, including vegan options and protein add-ins. Finally, we discussed storage and reheating tips. Risotto can be a fun dish to make and enjoy. Now, you'll impress friends and family with your new skills.

Creamy Pumpkin Risotto Comforting and Flavorful Dish

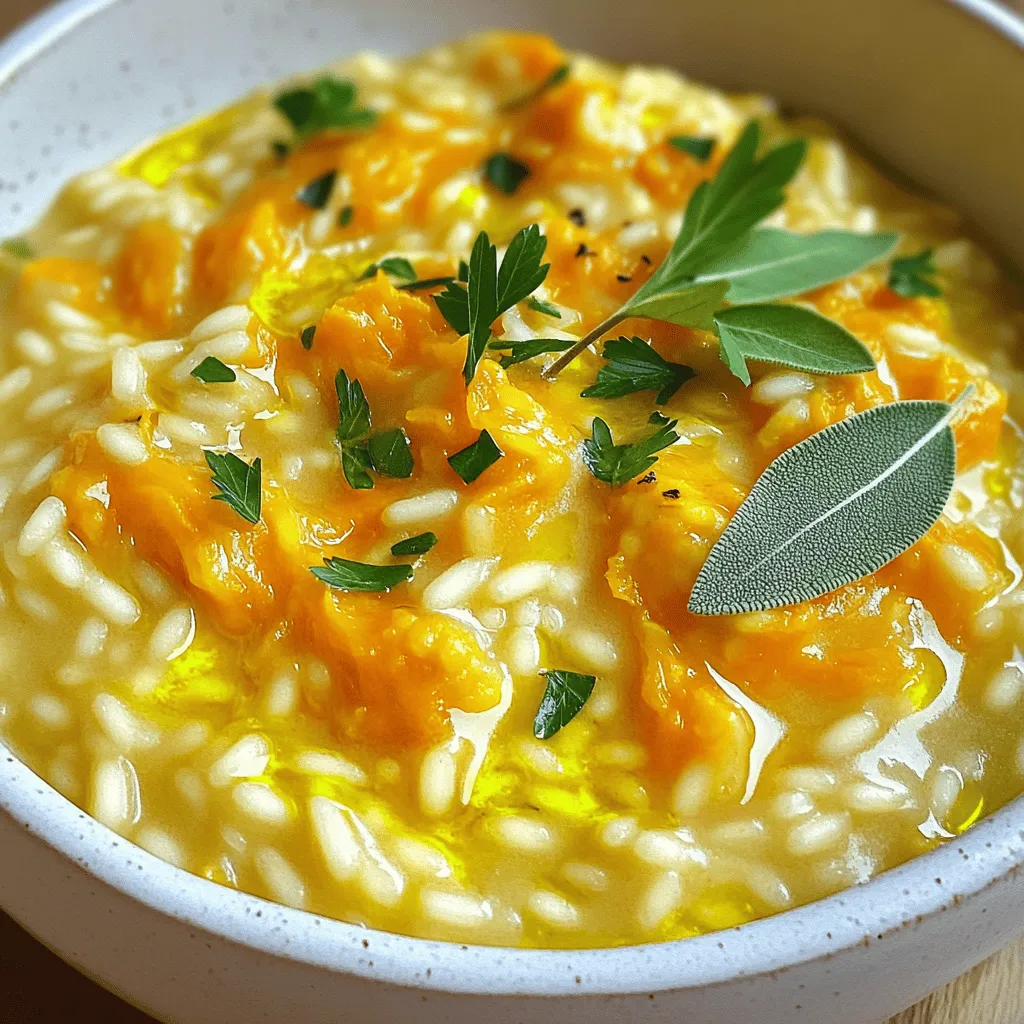
If you crave a dish that warms your soul, look no further than creamy pumpkin risotto. This comforting meal blends

- 1 cup Arborio rice - 4 large onions, thinly sliced - 4 cups vegetable broth - 2 tablespoons olive oil - 2 tablespoons butter - 2 cloves garlic, minced - 1 teaspoon dried thyme - 1 bay leaf - Salt and pepper to taste - 1 cup Gruyère cheese, grated (or a dairy-free alternative) - Fresh parsley, chopped (for garnish) This dish starts strong with Arborio rice. Its creamy texture makes it ideal for this recipe. The onions add sweetness and depth. I love using four large onions; they really shine in this dish. Garlic brings a lovely aroma. You can’t go wrong with fresh thyme and a bay leaf for flavor. The vegetable broth adds richness. Don’t forget to season with salt and pepper. Finally, Gruyère cheese melts beautifully, giving that classic French taste. A sprinkle of fresh parsley on top adds a nice touch. - Alternative cheeses or dairy-free substitutions - Fresh herbs for garnish If you want to mix things up, try different cheeses. Cheddar or mozzarella also work well. For a dairy-free option, use a vegan cheese. Fresh herbs like thyme or chives can enhance the dish’s flavor. They add a fresh note that brightens every bite. - Pot for cooking - Wooden spoon for stirring - Broiler-safe serving dishes You’ll need a good pot to cook the rice and caramelize the onions. A wooden spoon helps you stir without scratching your pot. Broiler-safe serving dishes will help you achieve that bubbly, golden cheese on top. These tools make the process smooth and enjoyable. Happy cooking! To make French onion soup rice, start with the onions. Use a large pot for this. Heat olive oil and butter over medium heat. Add your sliced onions. Cook them low and slow for about 25-30 minutes. Stir them often. You want them to turn a rich golden-brown color. This caramelizing technique brings out their sweet flavor. Low and slow cooking is key. It helps develop a deep taste in the onions. Next, add the Arborio rice to the pot. Toast the rice in the onion mixture for about 2 minutes. Stir constantly to prevent sticking. This step adds flavor and helps with texture. Then, begin adding the vegetable broth. Add it one cup at a time. Wait until the rice absorbs the broth before adding more. This process takes about 20 minutes. The rice should be creamy and al dente, which means it is soft but still has a little bite. Once the rice is cooked, remove the bay leaf. Season the rice with salt and pepper to taste. Now, stir in half of the grated Gruyère cheese. Mix until it melts and blends well. Transfer the rice to individual dishes or keep it in the pot for family style. Top each serving with the remaining cheese. Broil in the oven for 3-5 minutes until the cheese is bubbly and golden. Finally, garnish with fresh parsley. This adds a nice touch and a pop of color. For the full recipe, check out the complete guide. To get sweet, rich onions, timing and heat matter. Start on medium heat. Stir the onions often. If they cook too fast, turn down the heat. This helps avoid burned onions. Burned onions ruin the sweet taste we want. Use a heavy pot. This helps the heat spread evenly. For creamy rice, stirring is key. Stir the rice often as you add broth. This helps it soak up the flavors. If the rice seems dry, add more broth. If the rice is too sticky, it might be overcooked. Try using less broth next time. You want the rice soft, but not mushy. For serving, you can use individual bowls or a big dish. Both look nice! Top each serving with extra cheese. It melts and creates a yummy crust. Fresh parsley adds a nice touch. It brings color and a fresh taste. {{image_2}} You can add proteins to French onion soup rice for extra flavor and nutrition. Consider using: - Shredded chicken - Ground beef or turkey - Cooked lentils - Chickpeas If using meat, cook it separately first. Then, mix it in with the rice towards the end. For plant-based proteins, add them during the last few minutes of cooking. This way, they blend well without losing texture. To take your dish to the next level, consider adding herbs and spices. Some great options include: - Fresh thyme - Bay leaves - Rosemary - Black pepper You can also swap out the cheese. Gruyère is classic, but you might try: - Fontina - Mozzarella - Vegan cheese Each cheese brings a unique taste and texture to the dish. Making this dish fit your diet is easy. For gluten-free versions, use gluten-free broth and ensure no added ingredients contain gluten. For a vegan approach, replace butter with olive oil and use a dairy-free cheese. If you're watching carbs, consider using cauliflower rice instead of Arborio. It cooks faster and still pairs well with the onion and broth flavors. After you finish your meal, let the rice cool first. This helps keep it fresh. Store it in a sealed container. Use a glass or plastic container that fits well in your fridge. This will keep the rice from drying out. Leftovers stay good for about 3 to 4 days in the fridge. To reheat, use the stovetop for the best results. Add a splash of broth or water. This helps keep the rice creamy. Heat on low to medium, stirring often. It should take about 5 to 10 minutes to warm up. You can also use the microwave, but be careful. Heat for 1 to 2 minutes, stirring halfway through. Check to see if it’s warm all the way through. If you want to save some for later, freezing is a great choice. First, let the rice cool completely. Then, scoop it into freezer-safe bags. Remove as much air as you can before sealing. You can freeze it for up to 2 months. When you’re ready to eat, take it out and thaw in the fridge overnight. Reheat as mentioned before to keep it creamy. Making French Onion Soup Rice takes about 1 hour in total. Here’s the breakdown: - Prep Time: 15 minutes. You will slice onions and gather ingredients. - Cook Time: 45 minutes. This includes caramelizing the onions and cooking the rice. You can use brown rice, but it will change the dish. Brown rice takes longer to cook, about 40-50 minutes. It has a chewier texture, while Arborio rice is creamy and tender. If you choose brown rice, add more broth and watch the cooking time closely. This dish pairs well with several side options: - A simple green salad for freshness. - Crusty bread to soak up the flavors. - Roasted vegetables for extra nutrition. - Grilled chicken or fish for protein. Yes, this dish is great for meal prep! Here are some tips: - Make Ahead: Prepare the rice and store it in the fridge for up to 3 days. - Storage: Use airtight containers to keep it fresh. - Reheating: Reheat in a pot with a splash of broth to keep it creamy. For the full recipe, check out the [Full Recipe]. This blog post covered making French Onion Soup Rice, focusing on key ingredients and tools. We explored steps for perfect caramelization, rice cooking, and finishing touches. I offered tips for creamy texture and variations for different diets. Remember, practice makes perfect, so don't hesitate to experiment. Whether you enjoy it fresh or reheated, this dish brings flavor and comfort to your table. Get started and make this meal your own!

French Onion Soup Rice Creamy and Simple Delight

Welcome to a cozy delight that will warm your soul: French Onion Soup Rice! This creamy and simple dish packs

- 1 cup Biscoff spread - 1 cup cream cheese, softened - 1 cup whipped topping (like Cool Whip) - 2 tablespoons powdered sugar - 1 teaspoon vanilla extract - Ground cinnamon, for garnish To make Biscoff Fluff Dip, you need simple ingredients. Biscoff spread is the star here. It gives a rich, sweet flavor. The cream cheese adds creaminess and balances the sweetness. Whipped topping makes it light and fluffy. Powdered sugar adds a touch more sweetness. Lastly, vanilla extract and ground cinnamon give great flavor notes. - Chocolate chips - Chopped nuts - Additional spices You can get creative with optional add-ins. Chocolate chips add richness. Chopped nuts give a nice crunch. Additional spices can enhance the flavor too. Try a pinch of nutmeg or a dash of cardamom for something unique. - Biscoff cookies - Fresh fruits - Pretzels What do you dip in this scrumptious fluff? Biscoff cookies are a classic choice. They match the dip’s flavor perfectly. Fresh fruits like apples or strawberries offer a fresh contrast. Pretzels add a salty crunch that balances the sweetness. You can mix and match for fun and flavor. For the complete recipe, check out the [Full Recipe]. First, grab a large mixing bowl. Combine 1 cup of Biscoff spread and 1 cup of softened cream cheese. Use an electric mixer and beat until the mix is smooth and creamy. This step is key for a great texture. Next, add 2 tablespoons of powdered sugar and 1 teaspoon of vanilla extract. Keep mixing until everything is well-blended. Now, it’s time to add the whipped topping. Gently fold in 1 cup of whipped topping using a spatula. Be careful not to deflate the mixture. You want to keep it light and fluffy. Mix until it’s fully combined. This step really makes the dip airy and fun. After mixing, taste the dip. If you want it sweeter, add more powdered sugar. Just a little will do! Once you’re happy with the taste, transfer the fluff dip to a serving bowl. Smooth the top with a spatula for a nice look. Sprinkle some ground cinnamon over the top for a lovely finishing touch. Finally, garnish the bowl with broken pieces of Biscoff cookies around the dip. This makes it easy to dip and adds visual appeal. For the full recipe, be sure to check out the detailed instructions above. Enjoy making this tasty treat! To make Biscoff Fluff Dip super fluffy, start with room temperature ingredients. This helps them blend well. If cream cheese is cold, it won't mix smoothly. Set it out for about 30 minutes before starting. When you mix the Biscoff spread and cream cheese, beat them until creamy. Use an electric mixer for the best results. Once smooth, add powdered sugar and vanilla extract. Mix until blended. Now, gently fold in the whipped topping with a spatula. Be careful not to stir too hard. This keeps the dip light and airy. I love serving Biscoff Fluff Dip with broken Biscoff cookies around it. This makes dipping easy and fun! For a tasty twist, try fresh fruit like apples or strawberries. Pretzels are also a great choice for a sweet and salty combo. For events, place the dip in a beautiful bowl. You can even sprinkle some ground cinnamon on top for a nice touch. Set out different dippers so guests can try a mix of flavors. If you have leftovers, store them in an airtight container in the fridge. It keeps well for about 3 to 5 days. When you're ready to enjoy it again, just give it a light stir. If it seems a little thick, mix in a bit of cream to regain its fluffiness. This dip is perfect for any occasion, so don’t hesitate to make it ahead of time. Enjoy your delicious Biscoff Fluff Dip! {{image_2}} You can change the flavor of Biscoff Fluff Dip to fit your taste. Adding chocolate or caramel can give it a sweet twist. Just fold in some chocolate chips or drizzle caramel on top. You can also try other cookie spreads. Nut butters or other flavored spreads create new flavor profiles. This way, you keep the dip exciting for every bite. Some folks need to watch their diet. You can make this dip gluten-free by using gluten-free cookies. For a low-sugar version, swap the powdered sugar for a sugar alternative. Always check labels to ensure your choices fit your needs. These adjustments let everyone enjoy this tasty treat without worry. You can customize Biscoff Fluff Dip for holidays or celebrations. For Halloween, add orange food coloring and spooky sprinkles. During Christmas, mix in crushed peppermint for a festive touch. For birthdays, top with colorful candies or sprinkles. These fun twists make your dip suitable for any event and bring joy to your table. Biscoff Fluff Dip can last for about five days in the fridge. Store it in an airtight container to keep it fresh. The dip may lose its fluffiness over time but will still taste great. Yes, you can make this dip a day in advance. Just store it in the fridge. This dip tastes better when chilled. If you want it fluffy again, give it a quick mix before serving. You have many tasty options! Try these: - Biscoff cookies - Fresh fruits like apples or bananas - Pretzels for a salty crunch - Graham crackers for a sweet touch - Marshmallows for a fun treat Feel free to mix and match! Each adds a new layer of flavor. Enjoy pairing this dip with your favorites! For the full recipe, visit the recipe section above. To make Biscoff Fluff Dip, gather the following ingredients: - 1 cup Biscoff spread - 1 cup cream cheese, softened - 1 cup whipped topping (like Cool Whip) - 2 tablespoons powdered sugar - 1 teaspoon vanilla extract - Ground cinnamon, for garnish - Biscoff cookies, broken for dipping 1. Start by mixing the softened cream cheese and Biscoff spread in a large bowl. Use an electric mixer until the mix is smooth and creamy. 2. Next, add the powdered sugar and vanilla extract. Keep mixing until everything blends well. 3. Now, gently fold in the whipped topping with a spatula. Be careful not to deflate the dip. Mix until you see a fluffy texture. 4. Taste the dip. If you'd like it sweeter, add more powdered sugar and mix again. 5. Transfer the fluff dip into a serving bowl. Use the spatula to smooth the top. 6. Sprinkle a little ground cinnamon on top for extra flavor. 7. Finally, add broken pieces of Biscoff cookies around the dip for easy dipping. This recipe serves about 6 to 8 people. Each serving contains around: - Calories: 250 - Total fat: 15g - Saturated fat: 7g - Carbohydrates: 28g - Sugars: 15g - Protein: 3g Enjoy this sweet and creamy treat at your next gathering! This blog post shows how to make Biscoff Fluff Dip step by step. We discussed the main ingredients, like Biscoff spread and cream cheese, and how to mix them. You learned some tips for achieving a fluffy texture and creative ways to serve the dip. Consider adding chocolate chips or nuts for extra flavor. This dip is perfect for any gathering and easy to store. Try making it for your next event. You’ll impress everyone with your tasty creation.

Biscoff Fluff Dip Delicious Treat for Any Occasion

Are you ready to elevate your snacking game? Biscoff Fluff Dip is a sweet, creamy treat perfect for any occasion.

To make your Easy Pad Thai with Shrimp, gather these tasty ingredients: - 200g rice noodles - 200g shrimp, peeled and deveined - 2 tablespoons vegetable oil - 2 cloves garlic, minced - 2 eggs, lightly beaten - 2 tablespoons fish sauce - 1 tablespoon tamarind paste - 1 tablespoon brown sugar - 1 cup bean sprouts - 2 green onions, sliced - 1/4 cup crushed peanuts - Lime wedges for serving - Fresh cilantro for garnish - Salt and pepper to taste If you can’t find something or wish to swap, here are some easy swaps: - Rice noodles: Use any flat noodles or even spaghetti. - Shrimp: Substitute with chicken or tofu for a different taste. - Fish sauce: Soy sauce works well for a vegetarian option. - Tamarind paste: Use lime juice for a bit of tang. - Bean sprouts: Try shredded carrots or cabbage instead. Using fresh ingredients makes your Pad Thai taste better. Here are some tips: - Buy shrimp that smell fresh and have a firm texture. - Choose rice noodles that are soft and not broken. - Look for vibrant green onions with no wilting. - Always select cilantro that is bright green and fragrant. - Store your ingredients in a cool place to keep them fresh longer. For more details, check out the Full Recipe. To make Easy Pad Thai with shrimp, you need to prep your ingredients first. Start by soaking the rice noodles in warm water for about 30 minutes. This softens the noodles and helps them cook faster. While they soak, peel and devein the shrimp if you haven’t done so yet. Mince the garlic and slice the green onions. You want everything ready to go for quick cooking. Heat the vegetable oil in a large skillet or wok over medium heat. Once the oil is hot, add the minced garlic. Stir it for about 30 seconds until it smells great. Next, add the shrimp to the pan. Cook them until they turn pink, which takes about 3-4 minutes. Push the shrimp to one side of the skillet. Pour the beaten eggs into the clear space. Scramble the eggs until they are fully cooked, then mix them with the shrimp. After that, add the soaked rice noodles, fish sauce, tamarind paste, and brown sugar. Toss everything well so the noodles soak up the flavors. Finally, fold in the bean sprouts and green onions. Cook for another minute to warm them through. You’ll know your shrimp are done when they turn a bright pink color. The eggs should look firm and set, not runny. The noodles should be soft and flexible but not mushy. The bean sprouts should still have a little crunch. When everything looks good, it’s time to plate your dish. Serve it hot, topped with crushed peanuts, cilantro, and lime wedges for that extra zing. For the full recipe, check out the details above! When making Pad Thai, avoid overcooking the noodles. They should be soft but firm. If they get too mushy, your dish will lose texture. Also, don’t skip the fish sauce; it adds the umami flavor that makes this dish shine. Another mistake is not prepping your ingredients first. This dish cooks quickly, so having everything ready is key. Want more heat? Add sliced fresh chili peppers or a dash of chili paste. You can mix the chili paste into the sauce for a more even flavor. If you like it fiery, use Thai bird chilies. Start with a small amount and add more to suit your taste. Serve your Pad Thai hot and garnished with lime wedges and fresh cilantro. The lime adds a nice zing that brightens the dish. You can also sprinkle more crushed peanuts on top for extra crunch. Pair it with a light salad or spring rolls for a full meal. Don't forget to check out the Full Recipe for more details! {{image_2}} You can easily make Pad Thai vegetarian. Swap shrimp for firm tofu. Tofu absorbs flavors well. It gives a nice texture. Use the same cooking steps. You can also add more veggies. Try bell peppers, carrots, or broccoli. These add color and crunch. For extra flavor, use soy sauce instead of fish sauce. You can also use a vegan fish sauce if you like. This way, you keep the taste but stay plant-based. If you want to change the protein, chicken works great too. Use boneless, skinless thighs or breasts. Cut them into bite-sized pieces. Cook them the same way as shrimp. They need about 5-7 minutes to cook fully. Tofu is another good option. Just remember to press it first. This helps remove excess moisture. This way, the tofu gets crispy. It adds a nice flavor to the dish. For those who need gluten-free options, rice noodles are perfect. They are naturally gluten-free. Just check the label to be sure. Instead of soy sauce, use tamari. Tamari has a similar taste and is gluten-free. Also, check the fish sauce brand. Most fish sauces are gluten-free, but it’s good to verify. These simple swaps let everyone enjoy this tasty dish without worry. For the full recipe, check out the detailed instructions above. After you enjoy your Easy Pad Thai with Shrimp, store any leftovers in an airtight container. Let the dish cool to room temperature first. This helps keep it fresh. You can keep it in the fridge for up to three days. If you want to enjoy it later, consider freezing it. To reheat, use a skillet over medium heat. Add a splash of water or oil to prevent sticking. Heat until warm, stirring often. This helps the flavors mix again. You can also use a microwave. Place the Pad Thai in a microwave-safe dish. Cover it loosely and heat in short bursts, stirring in between. If you want to freeze Pad Thai, it’s simple! Place your cooled leftovers in a freezer-safe bag or container. Remove as much air as possible to prevent freezer burn. It can last up to three months in the freezer. When you’re ready to eat, thaw it in the fridge overnight. Then, reheat as mentioned above for the best taste. For the full recipe, check out the details above! The best noodles for Pad Thai are rice noodles. They cook quickly and absorb flavors well. Look for flat rice noodles, often labeled as "Pad Thai noodles." You can find them in most grocery stores. Make sure to soak them in warm water before cooking. This helps them get soft and ready for your dish. Yes, you can use pre-cooked shrimp. They save time and make the meal quicker. Just warm them in the skillet until hot. Be careful not to overcook, as they can become rubbery. Toss them in with the garlic first, so they absorb some flavor. Homemade Pad Thai lasts about 2-3 days in the fridge. Store it in an airtight container to keep it fresh. When you are ready to eat, just reheat it in a pan or microwave. Add a splash of water if it seems dry. This will help bring back the original flavors. For more details, check out the Full Recipe. In this post, we explored Pad Thai, from key ingredients to cooking tips. You learned about ingredient swaps and how to choose fresh items. We covered step-by-step instructions and shared tips to avoid common mistakes. We also looked at vegetarian options and how to store leftovers. Remember, great Pad Thai starts with good ingredients and careful cooking. Use this guide to make a tasty dish you'll love!

Easy Pad Thai with Shrimp Flavorful and Quick Meal

If you’re craving a quick, tasty meal, my Easy Pad Thai with Shrimp recipe is perfect for you! This dish

- 1 pound ground chicken - 1 cup breadcrumbs - 1/2 cup grated Parmesan cheese - 2 cloves garlic, minced - 1/4 cup fresh parsley, chopped - 1/4 cup milk - 1 egg - 1 teaspoon onion powder - 1 teaspoon Italian seasoning - Salt and pepper, to taste - 2 tablespoons olive oil - 1/2 cup marinara sauce (for serving) The main ingredient here is ground chicken. It gives us a light and juicy meatloaf. Breadcrumbs help bind everything together and add texture. Parmesan cheese brings a nice salty flavor. Garlic adds depth and a bit of kick. Fresh parsley brightens the dish and adds color. Milk keeps the meatloaves moist. An egg helps to hold the mixture together. Onion powder and Italian seasoning enhance the overall taste. Salt and pepper, of course, are essential for seasoning. Lastly, olive oil adds richness, and marinara sauce is perfect for serving. - Alternative meats: You can swap ground chicken for turkey or lean beef. - Gluten-free breadcrumbs: Use crushed gluten-free crackers or oats if needed. - Vegan cheese options: Try nutritional yeast or a vegan cheese to replace Parmesan. These substitutions let you customize the recipe to fit your needs. If you want more flavor, consider mixing in chopped vegetables. They can add both taste and nutrients. - Mixing bowls: Essential for combining ingredients. - Baking sheet: Needed for roasting the meatloaves. - Measuring cups and spoons: Critical for getting the right amounts. Having the right tools makes cooking easier. I always keep my kitchen well-stocked with these basics. It helps me focus on creating delicious dishes like Garlic Parmesan Chicken Meatloaves. For the complete recipe, check the [Full Recipe]. First, you need to set your oven to 375°F (190°C). This temperature ensures even cooking. Next, line your baking sheet with parchment paper. This helps prevent sticking and makes cleanup easy. In a large mixing bowl, combine the following ingredients: - 1 pound ground chicken - 1 cup breadcrumbs - 1/2 cup grated Parmesan cheese - 2 cloves garlic, minced - 1/4 cup fresh parsley, chopped - 1/4 cup milk - 1 egg - 1 teaspoon onion powder - 1 teaspoon Italian seasoning - Salt and pepper, to taste Mix all the ingredients together until they blend well. Be careful not to overmix. Overmixing can make your meatloaves tough and chewy. You want a nice, soft texture. Now, divide the mixture into six equal parts. Shape each part into a small loaf. Place them on your lined baking sheet. To keep your meatloaves moist, drizzle olive oil over the top. This step also helps them brown nicely. Finally, bake them in your preheated oven for about 25-30 minutes. They should reach an internal temperature of 165°F (74°C). Enjoy the great aroma as they cook! To make your Garlic Parmesan Chicken Meatloaves truly shine, use fresh herbs. Fresh parsley adds bright flavor and color. Dried herbs work, but fresh gives a better taste. You can also try basil or thyme for added depth. Resting your meatloaves is just as important. After baking, let them sit for five minutes. This helps keep them juicy. If you skip this step, your meatloaves may fall apart. To check if your meatloaves are done, use a meat thermometer. Insert it in the center; it should read 165°F (74°C). This ensures they are safe to eat. If you undercook them, they can be unsafe. If you overcook them, they may dry out. Avoid dry meatloaves by not overmixing the meat mixture. This keeps them tender. Also, drizzle olive oil on top before baking. This adds moisture and helps with browning. For a beautiful presentation, garnish with fresh parsley. This adds color and freshness to your dish. You can also sprinkle some extra Parmesan on top for a cheesy touch. Serve your meatloaves on a rustic wooden board. This gives a warm, inviting feel. Pair with steamed green vegetables for a complete meal. You can also offer warm marinara sauce on the side for dipping. {{image_2}} You can easily boost the flavor of your Garlic Parmesan Chicken Meatloaves. Adding spices like paprika or cayenne pepper gives them a nice kick. A few drops of hot sauce can also bring heat. If you love cheese, try folding in shredded mozzarella or cheddar. The melted cheese adds a creamy texture and rich taste. You have options when shaping your meatloaves. You can make mini loaves for fun, bite-sized servings. These cook faster and are great for kids. If you want something different, use a muffin tin. Each cup creates a perfectly shaped meatloaf. Plus, they look cute on the plate! If you're watching carbs, there are ways to adapt this recipe. Use almond flour instead of breadcrumbs for a keto-friendly option. You can also skip the bread entirely and add more veggies. For a low-carb twist, grated zucchini or mushrooms can replace some meat. These changes keep the meat moist and add extra flavor. You can find the full recipe to explore these ideas and more! To keep your Garlic Parmesan Chicken Meatloaves fresh, store them properly. Let them cool first. Place them in an airtight container. They can stay in the fridge for up to three days. If you want to save them longer, freezing is the way to go. Wrap each meatloaf tightly in plastic wrap. Then, place them in a freezer-safe bag. They can last for up to three months in the freezer. When it's time to enjoy your leftovers, reheating is key. The best method is to use the oven. Preheat it to 350°F (175°C). Place the meatloaves on a baking sheet. Cover them with foil to keep them moist. Heat for about 15 to 20 minutes. You can also use the microwave for quick reheating. Place a meatloaf on a microwave-safe plate. Add a splash of water to help keep it juicy. Heat it for one to two minutes. Check to see if it's warm all the way through. Preparing in advance can save you time. You can mix the ingredients and shape the meatloaves a day ahead. Just cover and refrigerate them until you're ready to bake. For quick meals, freeze individual portions. Thaw them overnight in the fridge before cooking. This way, you can enjoy a tasty meal in no time. Check the [Full Recipe] for all the details you need! Bake the meatloaves for 25 to 30 minutes. This time will help them cook through. Check for doneness with a meat thermometer. The center should reach 165°F (74°C). Yes! You can add different herbs or spices. Try adding cheese or chopped veggies for more flavor. These meatloaves pair well with sides like mashed potatoes, green beans, or a fresh salad. To make it gluten-free, use gluten-free breadcrumbs. This swap keeps the meatloaves tasty and safe. For the full recipe, be sure to refer back to the main section! This blog post covered how to make Garlic Parmesan Chicken Meatloaves from start to finish. We explored key ingredients, helpful tools, and tips for great flavor. Remember to customize your recipe to suit your taste and dietary needs. Don’t forget to store any leftovers properly for future meals. With simple steps, you can serve a delicious dish. Enjoy cooking, and here's to many tasty meatloaf dinners ahead!

Garlic Parmesan Chicken Meatloaves Savory and Simple

Welcome to a flavorful delight! Today, I’ll show you how to make Garlic Parmesan Chicken Meatloaves that are both savory

To make this delightful dip, you need a few key ingredients. Here's what you'll need: - 1 cup all-purpose flour, heat-treated - 1/2 cup unsalted butter, softened - 3/4 cup brown sugar, packed - 1/2 cup granulated sugar - 1 teaspoon vanilla extract - 1/4 teaspoon salt - 1 cup mini chocolate chips - 1/2 cup cream cheese, softened - 1/4 cup powdered sugar - 1-2 tablespoons milk (as needed for consistency) These ingredients create a creamy and sweet mix that tastes just like cookie dough. You can make this dip even more fun by adding some of these optional ingredients: - Chopped nuts (like walnuts or pecans) for crunch - A pinch of cinnamon for warmth - Other flavored extracts (like almond or hazelnut) for a twist - More chocolate chips or sprinkles for extra sweetness Feel free to get creative! Your dip can be unique with these simple changes. To prepare this yummy dip, you will need a few basic tools: - Mixing bowl for combining ingredients - Electric mixer to beat the mixture until smooth - Rubber spatula for folding in the chocolate chips - Baking sheet for heat-treating the flour - Measuring cups and spoons for accuracy Gather these tools before you start. They will help make the process quick and easy! For the full recipe, you can refer to the recipe section above. Start with the all-purpose flour. You need to heat-treat it first. This step is key for safety. Spread the flour on a baking sheet. Bake it at 350°F (175°C) for 5-7 minutes. This kills any harmful bacteria. Once done, let it cool before using. This ensures your dip is safe and tasty. Next, grab a mixing bowl and add the softened butter. Mix in the brown sugar and granulated sugar. Beat them together until creamy. Then, add the softened cream cheese. Mix this well until smooth and silky. After that, stir in the vanilla extract and salt. Make sure everything is combined evenly. Slowly add the heat-treated flour and powdered sugar. Stir gently to avoid lumps. If it feels too thick, add milk one tablespoon at a time. This will help you reach the right dip consistency. Finally, fold in the mini chocolate chips. This is where the magic happens! Now it’s time to chill the dip. Cover the bowl and place it in the fridge. Let it chill for at least 30 minutes. This waiting time helps the flavors blend. When ready, take it out and serve in a bowl. For a nice touch, sprinkle a few mini chocolate chips on top. This dip is perfect with graham crackers, pretzels, or fruit. Enjoy your delightful chocolate chip cookie dough dip! For the full recipe, check the details above. To get a creamy dip, start with softened butter and cream cheese. This helps mix everything well. If the dip is too thick, add milk one tablespoon at a time. Mix until smooth. For a fluffier texture, you can beat the mixture longer. You want it to be light and spreadable, not runny. You can swap ingredients based on your taste. Use coconut oil instead of butter for a dairy-free option. You can also replace cream cheese with a vegan cream cheese. If you want less sugar, use a sugar substitute. Just keep in mind that some swaps may change the taste and texture. Serve the dip in a fun bowl to catch the eye. You can sprinkle extra mini chocolate chips on top for a treat. Use fresh fruit, pretzels, or graham crackers as dippers. Arrange them nicely around the bowl for a beautiful display. This makes the dip look tasty and inviting. For the full recipe, you can check the detailed instructions above. {{image_2}} You can make this dip even more fun by adding different flavors. Try mixing in peanut butter for a nutty twist. Almond extract works well too, giving a nice, sweet touch. For a chocolate lover's dream, use cocoa powder to deepen the flavor. You can also add crushed cookies or a sprinkle of sea salt to enhance the taste. While I love classic dippers, feel free to get creative! Use graham crackers, pretzels, or fruit like apples and bananas. Mini pancakes or waffles make great dippers too. You can even serve it with mini cones or marshmallows for a fun treat. This dip is all about what you enjoy! For gluten-free options, swap the all-purpose flour for a gluten-free blend. Just remember to heat-treat it as mentioned in the recipe. To make this dip vegan, use dairy-free butter and cream cheese. You can also replace the milk with almond or oat milk for a tasty twist. Now everyone can enjoy this delightful dip! You can store leftover chocolate chip cookie dough dip in an airtight container. Make sure the lid is tight to keep it fresh. Place the container in the fridge. This way, the flavors will stay strong. If you have leftovers, enjoy them within a few days. If you want to freeze the dip, use a freezer-safe container. Leave some space at the top, as it may expand when frozen. You can also use ice cube trays for small portions. When you want some, just pop out a cube. Thaw it in the fridge overnight before you serve it again. The dip lasts about 3 to 5 days in the fridge. If frozen, it can last for up to 3 months. Always check for any off smells or changes in texture before eating. Enjoy your dip at its best by eating it fresh or properly stored. Yes, you can eat this dip raw. It tastes just like cookie dough! The flavors mix well, making each bite sweet and fun. Just remember, we use heat-treated flour to keep it safe. This means you can enjoy it without worry. Chill the dip for at least 30 minutes. This time helps the flavors come together. If you can wait longer, that’s even better! Chilling makes the dip colder and yummier. No, you should not use regular flour. Regular flour can contain bacteria that may make you sick. Heat-treating the flour makes it safe for eating raw. It’s simple, just bake it for a few minutes. You can dip many things! Try graham crackers, pretzels, or even apple slices. Each choice adds a new flavor and crunch. You can also use cookies for a cookie-on-cookie experience! You can keep the dip in the fridge for about 3 days. Just make sure it’s in a sealed container. The dip stays tasty, but it may get a bit thicker. If it does, stir in some milk to fix that. Yes, you can make a vegan version! Use vegan butter and cream cheese. Also, swap the milk for a plant-based option. This way, everyone can enjoy the dip! Absolutely! Chopped nuts like walnuts or pecans add great flavor and crunch. Add them in when you mix in the chocolate chips for a tasty twist. Yes, it’s perfect for parties! The dip is easy to make and fun to share. Set it out with a variety of dippers. Guests will love it and want the recipe! Yes, you can freeze it! Just store it in an airtight container. When you want to eat it, let it thaw in the fridge. You may need to stir it again before serving. You can find the full recipe in the section above. It has all the details you need to make this tasty dip! In this post, we explored how to make a tasty chocolate chip cookie dough dip. We covered key ingredients and tools, plus step-by-step prep instructions. I shared tips for the best texture and ideas for serving. You can customize flavors and make dietary changes. Finally, we discussed storage tips to keep your dip fresh. Now you’re ready to whip up this fun treat and impress everyone! Enjoy creating your own perfect cookie dough dip!

Chocolate Chip Cookie Dough Dip Delightful and Easy

If you love the taste of cookie dough, this Chocolate Chip Cookie Dough Dip is for you! It’s simple to

Older posts
Newer posts
← Previous Page1 … Page84 Page85 Page86 … Page106 Next →
© 2025 My Cooking Cast • Built with GeneratePress

Our Policies

  • Privacy Policy
  • GDPR Policy
  • Terms Of Use
  • Copyright Policy
  • Cookie Policy
  • Disclaimer

More Information​

  • Home
  • Contact
  • About
  • Dinner
  • Appetizers
  • Dessert
©2025, My Cooking Cast About Privacy Policy Back To Top