Skip to content
DisclaimerTerms Of UseGDPR PolicyCookie Policy

My Cooking Cast

  • Home
  • Drinks
  • Appetizers
  • Dinner
  • Dessert
  • About
  • Contact
  • Privacy Policy
DisclaimerTerms Of UseGDPR PolicyCookie Policy

Emma

- 10 cups popped popcorn (1/2 cup unpopped kernels) - 1 cup unsalted butter - 2 cups packed brown sugar - 1/2 cup corn syrup - 1 teaspoon vanilla extract - 1/2 teaspoon baking soda - 1 cup mixed nuts - 1 cup chocolate chips You can add different nuts like walnuts or peanuts. If you want more sweetness, try adding M&M's or gummy candies. You can also use flavored popcorn. Kettle corn can add a nice twist. Pair this snack with cold milk or hot cocoa for a treat. It's great for movie nights or parties. A serving size of about 1/2 cup works well for sharing. Enjoy it on a cozy evening with family or friends. For the full recipe, check out the steps to make this delightful treat! Preheating the oven and preparing baking sheets First, preheat your oven to 250°F (120°C). This low heat helps create that perfect crunch. Next, take two large baking sheets and line them with parchment paper. This keeps the popcorn from sticking and makes cleanup easy. Popping popcorn safely You can pop your popcorn in two ways. Use an air popper for a healthier option, or pop it on the stovetop. If using the stovetop, heat a bit of oil in a large pot, add your kernels, and cover. Shake the pot as the kernels pop to avoid burning. Make sure to transfer the popped popcorn to a big bowl. Check for any unpopped kernels and remove them to prevent surprises later. Detailed steps for melting butter and mixing ingredients In a medium saucepan, place your unsalted butter and melt it over medium heat. Once the butter is melted, add the brown sugar and corn syrup. Stir this mixture until it is fully combined. You want a smooth blend before you heat it. Importance of boiling time Bring the mixture to a boil without stirring. Let it boil for 4 to 5 minutes. This step is crucial. It allows the caramel to thicken and develop that rich flavor. When time is up, remove the pan from heat. Stir in the vanilla extract and baking soda. Be careful; the mixture will bubble up. This bubbling is normal and indicates you did it right! How to achieve an even coating Pour the warm caramel sauce over your popped popcorn in the bowl. Use a spatula to fold the popcorn gently. This helps make sure every piece gets coated without breaking it. Take your time to do this well. Tips for adding nuts and chocolate staying melted Once your popcorn is coated, add the mixed nuts. Gently mix them in so they are evenly spread. Now, spread the popcorn mixture onto your prepared baking sheets in an even layer. Bake it in the oven for about 1 hour, stirring every 15 minutes. This step helps keep the coating even and crunchy. When you take it out, while it is still warm, sprinkle the chocolate chips on top. They will melt slightly, sticking to the popcorn. Let it cool completely, and then break it into clusters. Enjoy your Moose Munch Caramel Popcorn! For the complete details, check the Full Recipe. To get that perfect crunch, baking time is key. I suggest baking your caramel popcorn for about one hour at 250°F (120°C). Stir the popcorn every 15 minutes. This helps it bake evenly and prevents sogginess. Keep an eye on it, as every oven is slightly different. Want to elevate the flavor? You can add a pinch of salt to your caramel. It balances the sweetness. Try adding spices like cinnamon or nutmeg for a warm twist. You can also mix in some cocoa powder for a chocolatey kick. Experiment and find what you love! Avoid overcooking your caramel. If it cooks too long, it can become hard and hard to chew. Stirring is also important. If you don’t mix the popcorn and caramel well, some pieces may end up dry. Mix gently but thoroughly to ensure every piece gets that sweet coating. {{image_2}} You can change Moose Munch caramel popcorn to fit your taste. Try adding spices or flavors you love. For example, mix in cinnamon for a warm touch. You can also create seasonal treats. Think about a "Pumpkin Spice" version for fall. Just add pumpkin spice to the caramel. For winter, make "Peppermint Bark" popcorn. Toss in crushed peppermint candies for a festive crunch. If you need gluten-free options, pick popcorn brands that use no gluten. Most plain popcorn is safe. You can also swap out mixed nuts for seeds. Pumpkin seeds or sunflower seeds work well. If you need a nut-free treat, just leave the nuts out. You can still enjoy the caramel flavor without them. Chocolate makes this snack even better. Try using white chocolate for a sweet twist. Melt it and drizzle over the popcorn after baking. Dark chocolate adds a rich flavor. You can mix both types for a fun blend. Flavored chocolate, like caramel or mint, also works. Just remember to melt it carefully so it stays smooth. To keep your Moose Munch caramel popcorn fresh, use an airtight container. Glass jars or plastic bins work well. Store it in a cool, dry place. Avoid areas with high heat or humidity. This helps maintain its crunch. If you have a lot, you can layer it with parchment paper to prevent sticking. Moose Munch caramel popcorn lasts about one to two weeks. After that, it may lose its crunch. If stored properly, the flavor stays great. Always check for any signs of spoilage before eating. If it smells off or looks stale, it's best to toss it. If your popcorn loses its crunch, don’t worry! You can refresh it easily. Preheat your oven to 250°F (120°C). Spread the popcorn on a baking sheet. Bake it for about 5 to 10 minutes. This will help restore its crispiness. Make sure to check it often so it doesn’t burn. Enjoy your tasty snack! Moose Munch Caramel Popcorn is a sweet treat made with popcorn, caramel, and nuts. You get a crunchy, buttery flavor with a hint of sweetness. The brand behind it, Harry & David, is known for its gourmet snacks. Moose Munch is a fun twist on traditional caramel popcorn. The mix of popcorn and nuts gives it a great texture and taste. Yes, you can make Moose Munch Caramel Popcorn ahead of time. It stays fresh when stored properly. Let it cool completely before putting it in an airtight container. Keep it in a cool, dry place. This way, it can last for about two weeks. If you want to make it for a party, you can prepare it a few days early. If you need a nut-free option, you can leave out the nuts. You can also use seeds instead, like sunflower or pumpkin seeds. Dried fruits, like cranberries or raisins, can add a nice touch too. Chocolate pieces can also work well for added sweetness. To keep your caramel smooth, make sure to stir well while cooking. Use a heavy pot for even heat. Avoid stirring the caramel too much once it starts to boil. When it’s boiling, let it cook for the full time. Adding a little corn syrup helps keep the caramel smooth too. You can use microwave popcorn, but it may not taste the same. The texture might be less crunchy, and the flavor may be weaker. Air-popped popcorn is best for this recipe. It gives a fresher taste and better crunch. If you use microwave popcorn, choose the plain version, not the flavored ones. Moose Munch Caramel Popcorn is a fun treat with many ways to customize it. You can swap nuts or try different popcorn types for your own flavors. Remember to store it well to keep it fresh. Enjoy it with drinks or share it as a snack. Making it right can impress friends and family. By using this guide, you can create a delicious treat everyone will love. Happy cooking, and have fun experimenting with your Moose Munch!

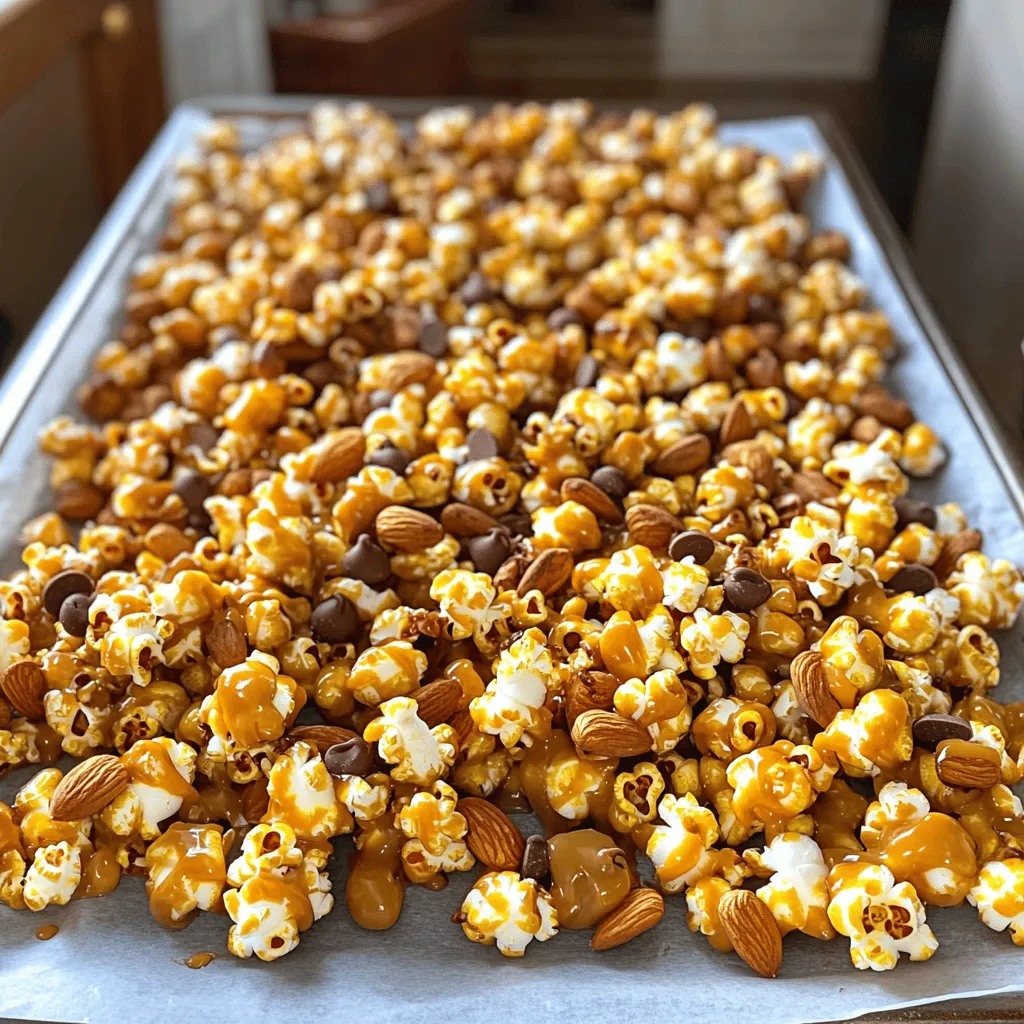
Moose Munch Caramel Popcorn Irresistible Snack Idea

Looking for a delicious snack that satisfies sweet and salty cravings? Moose Munch Caramel Popcorn is your answer! This treat

To make these tasty oats, you need some simple items. Here’s what you will need: - 1 cup rolled oats - 2 tablespoons peanut butter (smooth or crunchy) - 1 ripe banana, sliced - 1 cup almond milk (or any milk of your choice) - 1 tablespoon honey or maple syrup (optional) - 1 teaspoon chia seeds (optional for added texture) - 1/2 teaspoon vanilla extract - A pinch of salt These key ingredients come together to create a creamy, rich breakfast. The oats soak up the milk and flavors overnight. This makes them soft and delicious by morning. Want to make your oats even better? You can try adding: - A tablespoon of cocoa powder for a chocolatey twist. - A sprinkle of cinnamon for a warm spice. - A handful of berries for a fruity touch. - A scoop of protein powder for an extra boost. These add-ins give you more flavor and nutrition. You can mix and match based on what you like. When you are ready to eat, toppings can make your oats shine. Here are some great ideas: - Extra banana slices for sweetness. - Chopped nuts for crunch. - A drizzle of peanut butter for richness. - A spoonful of yogurt for creaminess. These toppings not only look good but also add more taste and texture to your meal. You can explore different combinations to find your favorite! For the complete recipe, check out the Full Recipe. First, gather your ingredients. You need rolled oats, peanut butter, and almond milk. Slice the ripe banana into small pieces. In a mason jar or bowl, combine all the ingredients. Add oats, almond milk, peanut butter, honey, chia seeds, vanilla, and salt. Stir everything well. Make sure the peanut butter mixes in nicely. Then, fold in the banana slices gently. You want the banana to stay chunky, not mushy. Once mixed, cover your jar or bowl. Use a lid or plastic wrap to seal it. Place it in the fridge overnight. If you’re short on time, let it sit for at least four hours. This step is important. The oats absorb the liquid and flavors. They become soft and creamy. You’ll wake up to a tasty breakfast ready to enjoy. In the morning, stir the oats. If they are too thick, add more almond milk. You want your oats creamy but not runny. Next, top them with extra banana slices and chopped nuts. You can also drizzle more peanut butter on top. This adds a nice touch. Serve it right away for a delightful breakfast. Enjoy the mix of flavors and textures! To get the right texture for your oats, start with the right ratio of oats to milk. I suggest using 1 cup of rolled oats to 1 cup of milk. This mix gives you a creamy yet thick result. If you prefer a thinner texture, add more milk in the morning. Stir the oats well before serving. This helps mix the flavors and keeps everything smooth. When choosing peanut butter, think about your taste. Smooth peanut butter gives a creamy feel. Crunchy peanut butter adds nice bits for texture. I often use natural brands that have no added sugar or oils. This way, I enjoy a pure peanut taste. You can also try other nut butters if you want a twist! Store your overnight oats in a sealed jar or bowl in the fridge. This keeps them fresh. I like to use mason jars. They are easy to close and look great. You can make a few jars at once for busy mornings. Just remember, keep them covered to prevent drying out. Enjoy your oats within 3 to 5 days for the best taste. {{image_2}} If you want a nut-free option, swap the peanut butter. Use sunflower seed butter for a similar taste. It's creamy and rich, just like peanut butter. You can also try soy nut butter or tahini. These spreads give you a nice flavor without nuts. This way, you can still enjoy your oats without worrying about allergies. To boost the nutrition, add superfoods to your oats. You can mix in chia seeds or flaxseeds. They add fiber, which helps you feel full. You might also consider adding hemp hearts or spirulina. These ingredients pack a punch of vitamins and minerals. Just a tablespoon goes a long way in making your meal even healthier. Experimenting with flavors can keep your breakfast fun. Try adding cocoa powder for a chocolatey twist. You can also mix in cinnamon for warmth. If you like a hint of spice, a pinch of nutmeg works well. For a fruity touch, toss in berries or diced apples. Each variation can change your breakfast game! For the complete recipe, check out the Full Recipe section. You can store your peanut butter banana overnight oats in a mason jar or bowl. Make sure to cover it with a lid or plastic wrap. This keeps the oats fresh and moist. Place it in the fridge right after you prepare it. These oats last for up to five days in the fridge. After that, the banana may brown and change flavor. If you notice any off smell, it’s best to toss it out. Always check before you eat. You can freeze overnight oats for later use. Just pour the oats into a freezer-safe container. Leave some space at the top, as they may expand. When you want to eat them, thaw in the fridge overnight. It’s a great way to meal prep! Yes, you can use any milk you like. Almond milk, soy milk, or oat milk all work well. Each type adds a different taste. If you prefer, use whole milk or skim milk for creaminess. Just remember, the flavor may change a bit with each choice. You can store your oats in the fridge for up to five days. They stay fresh and tasty if kept in a sealed jar or container. Just make sure to stir them well each morning. If they become too thick, add a splash of milk to loosen them up. Yes, you can make a few jars at once! Preparing for several days saves time. Just make sure to keep them in the fridge. This makes breakfast easy and quick. You can mix flavors too, such as adding berries or nuts to keep things fun. Check out the Full Recipe for more ideas! Peanut Butter Banana Overnight Oats are easy and fun to make. We discussed key ingredients and added flavors. I showed you how to prepare and store your oats, along with tips for perfect consistency. You can even try different flavors or make them nut-free. This dish is great for busy mornings. With simple steps and ideas, you can enjoy tasty, healthy meals in no time. Now you’re ready to create your own delicious version!

Peanut Butter Banana Overnight Oats Easy and Tasty Recipe

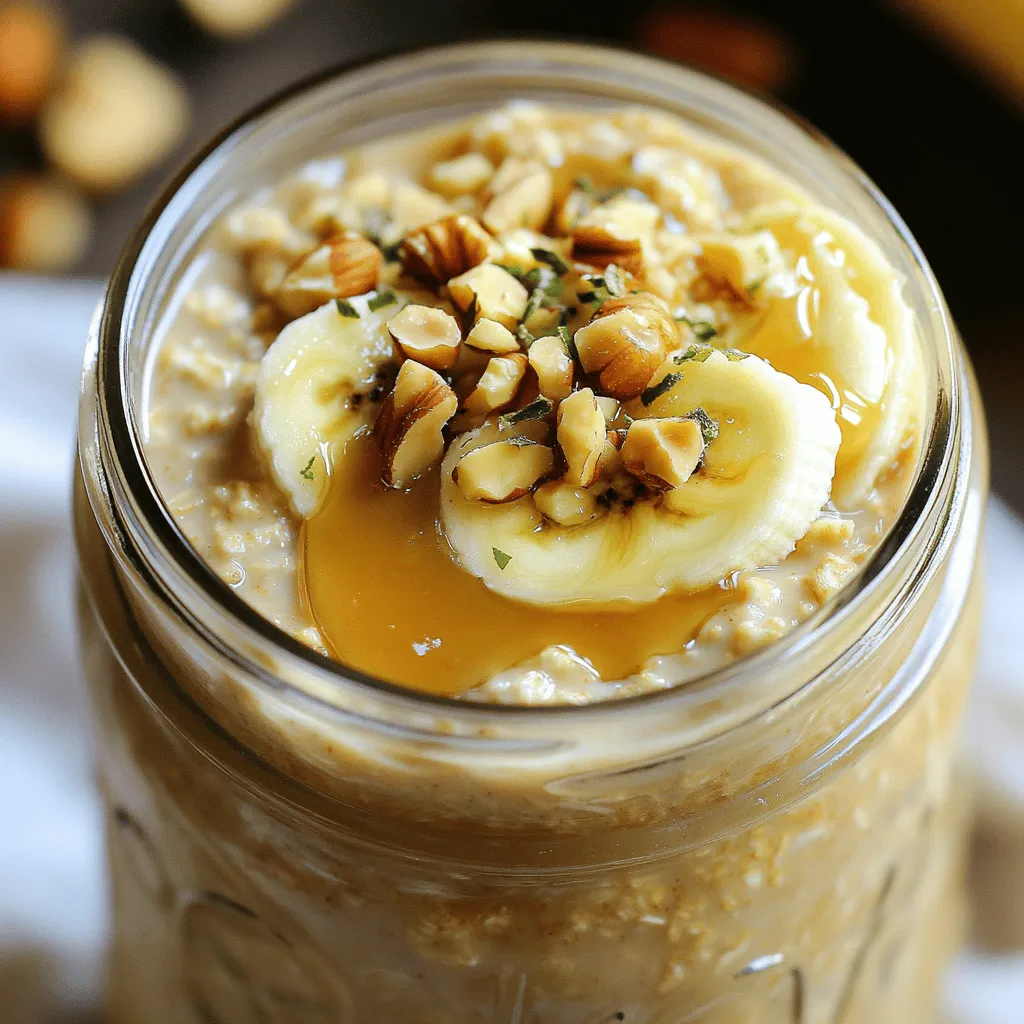
Start your day with the delicious taste of Peanut Butter Banana Overnight Oats! This easy recipe combines creamy peanut butter

To make these delicious coconut cream pie bars, you will need: - 1 ½ cups graham cracker crumbs - ½ cup unsweetened shredded coconut (plus extra for topping) - ½ cup unsalted butter, melted - 1 cup granulated sugar - 1 (8 oz) package cream cheese, softened - 1 cup coconut cream (canned) - 2 teaspoons vanilla extract - 1 (8 oz) container whipped topping, thawed - Fresh mint leaves for garnish (optional) You can easily swap some ingredients if needed. Here are some ideas: - Graham Cracker Crumbs: Use crushed digestive biscuits or vanilla wafers. - Cream Cheese: Softened mascarpone cheese works well too. - Coconut Cream: You can use coconut milk for a lighter version. - Whipped Topping: Whip heavy cream as a fresh alternative. Garnishes enhance the look and taste of your bars. Consider these options: - Sprinkle extra shredded coconut on top for more texture. - Add fresh mint leaves for a bright flavor. - Drizzle with chocolate or caramel sauce for a twist. - Top with sliced bananas for added freshness. These simple ingredients and swaps let you create a delightful treat. Enjoy the process! Check out the Full Recipe for more details on making these bars. Start by preheating your oven to 350°F (175°C). In a medium bowl, mix the graham cracker crumbs, shredded coconut, and melted butter. Stir until the crumbs are coated. This mixture will form a nice base for your bars. Next, press the crumb mixture firmly into the bottom of an 8x8-inch baking dish. Bake for 8 to 10 minutes until golden brown. Once done, take it out and let it cool completely. In a large mixing bowl, beat together the sugar and softened cream cheese. Do this until the mixture is smooth and creamy. Next, gradually add the coconut cream and vanilla extract. Beat until everything blends well and is fluffy. This step gives your filling a rich and creamy texture. Finally, gently fold in the whipped topping until everything is just combined. Be careful not to deflate the mixture. Now, pour the coconut cream mixture over the cooled crust. Spread it evenly across the top. Use a spatula to smooth the surface. Cover the dish with plastic wrap and refrigerate for at least 4 hours. This chilling time helps the bars set properly. Once set, cut them into squares. You can sprinkle extra shredded coconut on top for garnish. Add fresh mint leaves for a nice touch, too. Enjoy your Coconut Cream Pie Bars! For the complete recipe, check the Full Recipe section. To make the best crust, use fresh graham cracker crumbs. You can crush them yourself for a better texture. Mix in melted butter and shredded coconut. This adds flavor and helps the crust hold together. Press the mixture firmly into the bottom of your baking dish. Bake it until golden brown for a crisp base. Let it cool completely before adding the filling. This step is key to avoid a soggy crust. For a light and fluffy filling, start with room temperature cream cheese. This helps it mix smoothly with sugar. Beat them together until creamy. Gradually add coconut cream and vanilla extract. Mix until combined, but don’t overbeat. Finally, fold in the whipped topping gently. This keeps the air in the mixture, making it light and fluffy. Serve these bars chilled for the best taste. Cut them into squares and place them on a colorful plate. Sprinkle extra shredded coconut on top for a nice finish. For a touch of freshness, add mint leaves as a garnish. This not only looks good but also adds a burst of flavor. Enjoy these bars with friends and family for a sweet treat everyone will love. For the complete recipe, check out the Full Recipe. {{image_2}} Want to add some chocolate? You can easily make chocolate coconut cream pie bars! Start by adding ½ cup of cocoa powder to the crust mix. This will give your base a rich chocolate flavor. Then, melt some dark chocolate and mix it into the cream filling. This will create a creamy, dreamy chocolate layer that pairs perfectly with coconut. For a fruity twist, try tropical fruit coconut cream pie bars. You can add diced pineapple, mango, or banana to the cream filling. Mix in about a cup of chopped fruit after combining the coconut cream and cream cheese. This will give each bite a burst of fruity flavor. Top the bars with extra fruit and toasted coconut for a beautiful finish. If you want a vegan option, it is simple to switch things up! Replace the cream cheese with vegan cream cheese. Use coconut whipped cream instead of regular whipped topping. Make sure to check the labels for any hidden dairy. For the crust, use melted coconut oil instead of butter. These swaps keep all the delicious flavors you love while making it plant-based. You can find the full recipe here to help you make the perfect coconut cream pie bars! To keep your coconut cream pie bars fresh, store them in the fridge. Place the bars in an airtight container. If you don’t have one, cover the dish tightly with plastic wrap. This helps to keep them from drying out. Make sure they stay cool until you're ready to enjoy them. These bars last about 4 to 5 days in the fridge. If you want to save some for later, you can freeze them. Cut the bars into pieces, and wrap each piece in plastic wrap. Then, put them in a freezer-safe bag or container. They will stay good for up to 3 months in the freezer. If you want to enjoy the bars at room temperature, simply take them out of the fridge. Let them sit for about 15 minutes before serving. If they are frozen, thaw them in the fridge overnight. You do not need to heat them; they taste great cold! For the best flavor, serve them chilled. To make Coconut Cream Pie Bars, follow these steps: 1. Preheat your oven to 350°F (175°C). 2. In a bowl, mix graham cracker crumbs, shredded coconut, and melted butter. 3. Press this mixture into an 8x8-inch baking dish. 4. Bake for 8-10 minutes until golden brown. 5. In a new bowl, beat granulated sugar and softened cream cheese until smooth. 6. Add coconut cream and vanilla extract, mixing until fluffy. 7. Gently fold in thawed whipped topping. 8. Pour this mixture onto the cooled crust and smooth it out. 9. Cover and chill for at least 4 hours or until set. 10. Cut into bars and top with extra coconut. You can find the full recipe above. Yes, you can use low-fat ingredients. Substitute low-fat cream cheese and whipped topping. Keep in mind, the taste and texture may change slightly. The bars might be less creamy but still delicious. If you want a substitute for whipped topping, use homemade whipped cream. To make it, beat heavy cream with sugar until stiff peaks form. You can also use coconut cream whipped until fluffy for a dairy-free option. Yes, you can use sweetened shredded coconut. Just reduce the sugar in the filling to balance the sweetness. It adds a nice texture and flavor to the bars. The bars need to chill for at least 4 hours. This helps the filling set properly. If you can, chill them overnight for the best results. Yes, these bars are great for making ahead of time. You can prepare them up to two days in advance. Just keep them covered in the fridge until you are ready to serve. Use a sharp knife to cut the bars. Dip the knife in warm water before each cut for clean slices. This helps prevent the filling from sticking to the knife. To make these bars gluten-free, use gluten-free graham cracker crumbs. This way, you can enjoy the same great taste without gluten. Coconut Cream Pie Bars are delicious and fun to make. We covered the key ingredients and their substitutes to suit your taste. You learned how to prepare the crust and make a light cream filling. I shared tips for the best results and fun variations to try. Don’t forget how to store your treats for later! Now, you have all the tools to create these bars. Get ready to enjoy a tasty dessert that everyone will love.

Coconut Cream Pie Bars Tasty Dessert for Everyone

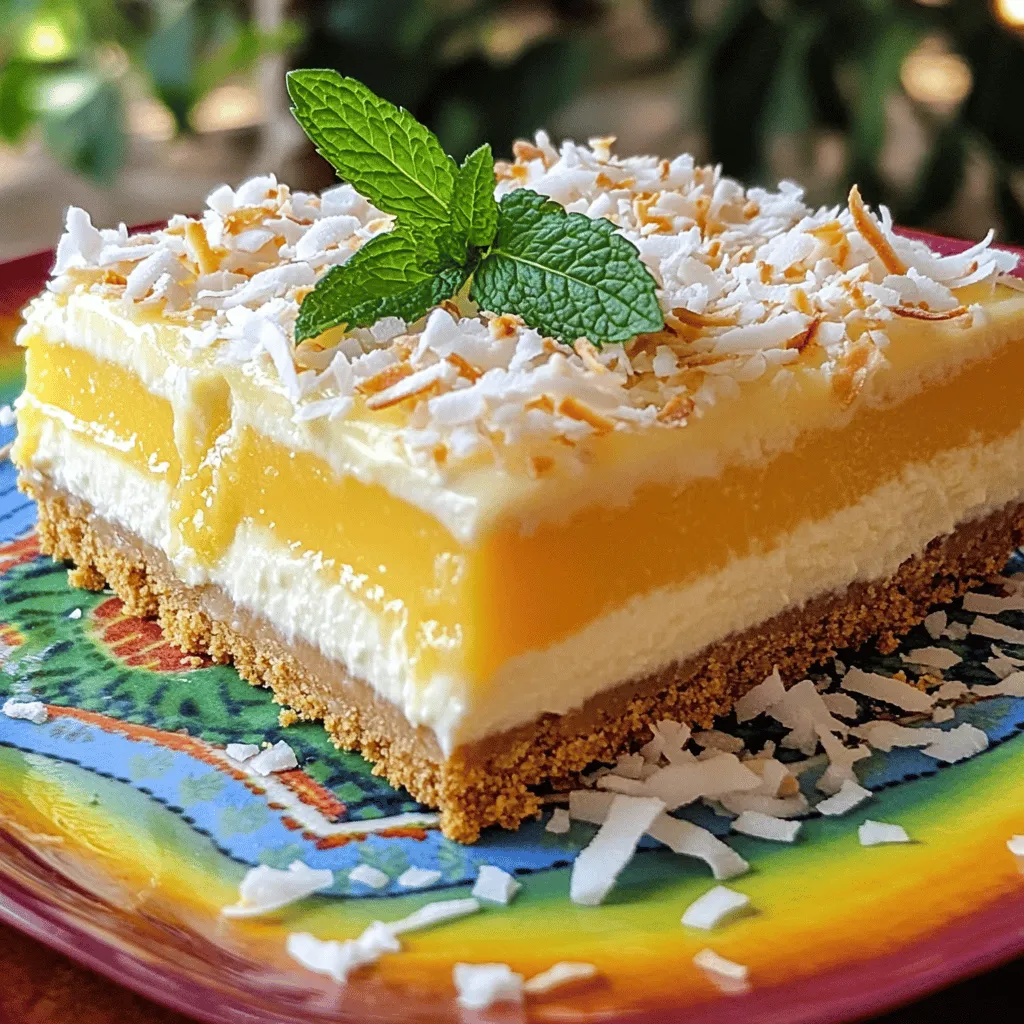
If you love dessert, you need to try these Coconut Cream Pie Bars! They bring all the creamy, tropical flavors

To make this chocolate chip cookie dough dip, gather these simple ingredients: - 1 cup all-purpose flour (heat-treated for safety) - 1/2 cup unsalted butter, softened - 1/2 cup granulated sugar - 1/4 cup packed brown sugar - 1 teaspoon vanilla extract - 1/4 teaspoon salt - 1 cup cream cheese, softened - 1/2 cup mini chocolate chips - 1/4 cup crushed nuts (optional, for texture) - Assorted dippers: graham crackers, apple slices, pretzels, or cookies Why heat the flour? Raw flour can carry germs. Heating it kills any germs. It's easy! Just put flour in a microwave-safe bowl. Heat it in 30-second bursts. Keep checking until it hits 160°F (70°C). Let it cool before using. This step keeps your dip safe and tasty. Want to jazz up your dip? You can add fun mix-ins. Try crushed nuts for crunch. Or, mix in different chocolate types like dark or white. You could also add sprinkles for color. Be creative! Just remember to keep it balanced so the flavors shine. If you want the full recipe, check out the details above. To start, gather all your ingredients. You need flour, butter, sugars, vanilla, salt, cream cheese, chocolate chips, and optional nuts. The prep time is quick—just about 10 minutes. First, heat the flour in the microwave. Use 30-second intervals until it reaches 160°F. This step kills any bacteria and makes it safe to eat. Let it cool down before you mix it in. In a mixing bowl, cream the softened butter, granulated sugar, brown sugar, and salt. Use an electric mixer for about 2-3 minutes. You want it fluffy and light. Next, add the softened cream cheese and vanilla extract. Mix until it is smooth. Now, gradually add the heat-treated flour. Mix on low speed until everything is well combined. Finally, gently fold in the mini chocolate chips and crushed nuts, if you want some crunch. Make sure they are evenly spread throughout. Transfer the dip to a colorful serving bowl. Smooth the top with a spatula. Chill it in the fridge for at least 30 minutes. This time lets the flavors blend nicely. When ready to serve, garnish with a sprinkle of chocolate chips. Arrange assorted dippers, like graham crackers or apple slices, around the bowl. This will make it look fun and inviting. For the full recipe, check out the complete details. To get the best texture for your cookie dough dip, start with softened butter and cream cheese. Mixing these well creates a smooth base. Make sure you gradually add the heat-treated flour. This helps prevent clumps and keeps the dip creamy. If it feels too thick, you can add a splash of milk. For a fluffier dip, mix it a bit longer after adding the flour. Store your dip in an airtight container. This keeps it fresh for longer. Make sure to chill it in the fridge if you’re not serving it right away. It can last about 3 to 5 days. If you want to keep it longer, consider freezing it. Just thaw it in the fridge and mix well before serving. For a fun party treat, serve this dip in a colorful bowl. I love to garnish it with extra chocolate chips on top. Arrange dippers like graham crackers, apple slices, or pretzels around the bowl. This makes a great presentation and adds flavor contrasts. You can even set up a dip bar with different dippers for guests to enjoy. {{image_2}} You can change the flavors of this cookie dough dip to match your taste. For a peanut butter twist, swap half the butter with peanut butter. This swap adds a rich and nutty flavor. You can also try mint extract instead of vanilla for a refreshing touch. Just use a small amount, as mint can be strong. Each of these changes makes the dip unique and exciting. If you have dietary needs, you can still enjoy this dip. For a gluten-free version, use gluten-free flour in place of regular flour. It works well and keeps the dip tasty. For a dairy-free option, replace cream cheese with a dairy-free cream cheese. Use coconut oil instead of butter for a dairy-free treat. These swaps make this dip safe for everyone to enjoy. While graham crackers and apple slices are great, you can get creative with dippers! Try using pretzels for a salty crunch. You can also use fresh strawberries or banana slices for a fruity choice. Even mini cookies work well for a fun twist. The options are endless, and each dipper adds its own flavor to the mix. To keep your chocolate chip cookie dough dip fresh, store it in the fridge. Use an airtight container to prevent air from drying it out. This helps keep the flavors bright. I recommend placing a layer of plastic wrap over the dip before sealing the container. This extra step locks in moisture. Your dip will stay good in the fridge for about 5 days. If you want to store it longer, you can freeze it. Place the dip in a freezer-safe container. It can last for up to 3 months in the freezer. Just remember to thaw it in the fridge before serving. If your dip seems a bit thick after storage, don't worry. You can easily revive it. Just take it out of the fridge and let it sit for a few minutes. Then, mix in a little cream cheese or a splash of milk. This will help bring back its creamy texture. Enjoy your delicious treat again! Yes, this dip is safe to eat raw. I heat-treat the flour to kill any bacteria. To do this, I microwave the flour until it reaches 160°F. This step is key for safety. It lets you enjoy the rich flavor of cookie dough without worry. Absolutely! You can make this dip a day ahead. Just prepare it, then chill it in the fridge. This helps the flavors blend together beautifully. It also saves you time on the day of your event. Just remember to let it chill for at least 30 minutes before serving. I love using a variety of dippers for this treat. Here are my favorites: - Graham crackers - Apple slices - Pretzels - Cookies Each of these brings a fun twist to the dip. The sweet and salty mix adds to the enjoyment. You can also get creative and try other options you love. Enjoy! In this post, we covered how to make a delicious dip from basic ingredients. We looked at the complete ingredient list, heat treatment, and optional mix-ins. The step-by-step instructions guided you through preparation, mixing, chilling, and serving. I shared tips for the right consistency and great storage practices. We also explored unique flavor variations and answered common questions. By following these steps, you can create a tasty dip that impresses at any gathering. Enjoy experimenting with flavors and making it your own!

Chocolate Chip Cookie Dough Dip Deliciously Easy Treat

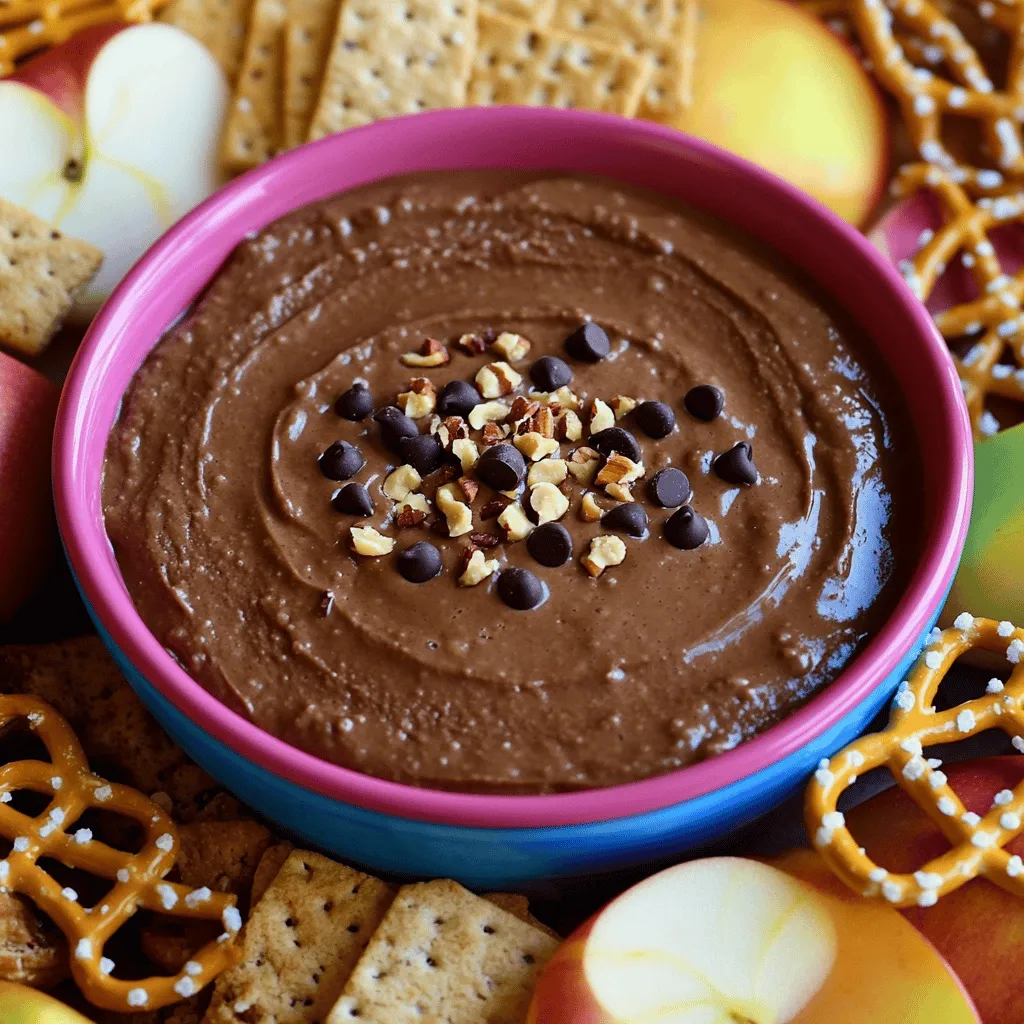
Are you ready to indulge in a sweet, creamy delight? This Chocolate Chip Cookie Dough Dip is all about fun!

To make these delicious lemon blueberry muffins, gather the following ingredients: - 1 ½ cups all-purpose flour - ½ cup granulated sugar - 2 teaspoons baking powder - ½ teaspoon baking soda - ¼ teaspoon salt - 1 large egg - ½ cup plain Greek yogurt - ½ cup milk - ⅓ cup vegetable oil - Zest of 1 lemon - 1 tablespoon lemon juice - 1 ½ cups fresh blueberries (or frozen, if unavailable) - 1 tablespoon powdered sugar (for dusting, optional) If you have dietary needs, you can swap some ingredients. Try these options: - Use almond flour instead of all-purpose flour for a gluten-free version. - Substitute coconut sugar for granulated sugar for a less processed option. - Replace Greek yogurt with a dairy-free yogurt for a vegan choice. - Use almond milk or oat milk instead of regular milk to keep it dairy-free. When buying blueberries, look for these signs of freshness: - Berries should be firm, plump, and free from mold. - Their color should be deep blue, with a slight white bloom. - Avoid any with wrinkles or soft spots. For lemons, check for: - Bright yellow color with smooth skin. - A firm feel, indicating ripeness. - A fragrant scent, which shows they are fresh. These simple tips will help you pick the best ingredients for your lemon blueberry muffins. For the full recipe, refer back to the beginning. To make these lemon blueberry muffins, start by gathering all your ingredients. You need flour, sugar, baking powder, baking soda, salt, an egg, Greek yogurt, milk, vegetable oil, lemon zest, lemon juice, and blueberries. 1. Preheat your oven to 375°F (190°C). Line a muffin pan with paper liners or grease it lightly. 2. In a large bowl, mix together the flour, sugar, baking powder, baking soda, and salt. Whisk until combined. 3. In another bowl, beat the egg. Add Greek yogurt, milk, vegetable oil, lemon zest, and lemon juice. Stir until smooth. 4. Pour the wet mixture into the dry ingredients. Fold gently with a spatula until just combined. Remember, a few lumps are okay! 5. Carefully fold in the blueberries. You can save some for topping the muffins later. Now it's time to bake! 1. Divide the batter evenly among the muffin cups, filling each about three-quarters full. 2. If you reserved some blueberries, sprinkle them on top of the batter now. 3. Bake for 18-20 minutes. Your muffins should turn golden brown. Insert a toothpick in the center. It should come out clean if they are done. Once your muffins are baked, let them cool down. 1. Remove the muffins from the oven and let them sit in the pan for about five minutes. 2. Transfer them to a wire rack to cool completely. 3. If you like, dust the muffins with powdered sugar before serving. Serve these warm for the best taste. Enjoy them with a cup of tea or coffee. For the full recipe, check out the details above! Baking can be tricky, but knowing some common mistakes helps. - Overmixing the batter: This makes muffins tough. Mix just until combined. - Wrong oven temperature: Always preheat your oven. Use an oven thermometer for accuracy. - Using stale ingredients: Check dates on your baking powder and baking soda. Fresh ingredients matter! To keep your muffins moist, focus on key steps: - Use Greek yogurt: It adds creaminess and moisture. This is a must in this recipe. - Don’t overbake: Check for doneness at 18 minutes. A toothpick should come out clean. - Add lemon juice: It gives a bright flavor and helps with moisture. The zest also adds a nice touch. Storing muffins properly keeps them fresh. - Cool completely: Let them cool on a wire rack first. - Use an airtight container: This prevents drying out. Line with paper towels for extra moisture. - Refrigerate for longer storage: They last up to a week in the fridge. For longer, freeze them. These tips will help you create the best lemon blueberry muffins. For the complete process, check the Full Recipe. {{image_2}} You can make lemon blueberry muffins healthier without losing flavor. First, swap all-purpose flour for whole wheat flour. This change adds fiber and nutrients. You can also use honey or maple syrup instead of sugar. These natural sweeteners can enhance the muffins' taste. Use low-fat Greek yogurt for a lighter version. It keeps the muffins moist while cutting calories. Add zest to your muffins with other fruits. Try incorporating raspberries or strawberries for a twist. You can also mix in nuts like almonds or walnuts for crunch. A sprinkle of cinnamon can add warmth and depth to the flavor. If you want a richer taste, add a touch of vanilla extract. Seasonal fruits can change the whole muffin experience. In spring, try adding fresh strawberries or cherries. In fall, consider pumpkin puree or spices like nutmeg. For summer, mix in peaches or blackberries. Each season brings new flavors. Let your taste buds explore these fun options. For a complete recipe to start baking right away, check out the Full Recipe. To keep your lemon blueberry muffins fresh, store them at room temperature. Place the muffins in an airtight container. This keeps moisture in and prevents them from drying out. If you plan to eat them within a few days, this method works great. For longer storage, consider freezing. Freezing is a smart way to save your muffins. First, let them cool completely. Wrap each muffin tightly in plastic wrap. Then, place them in a freezer bag. This prevents freezer burn and keeps them tasty. You can freeze muffins for up to three months. When you’re ready to enjoy one, just take it out and let it thaw. Reheating muffins is easy. For the best taste, use the oven. Preheat your oven to 350°F (175°C). Place the muffins on a baking sheet and warm them for about 10 minutes. This keeps them soft and brings back that fresh-baked flavor. If you’re in a hurry, you can microwave them for 15-20 seconds. However, the oven gives a better texture. Enjoy your muffins warm! Yes, you can use frozen blueberries. They work just as well in the batter. However, they may bleed a bit more color into the muffins. This can create a lovely marbled effect. Just remember to fold them in gently to avoid mushiness. To make these muffins vegan, swap the egg for a flax egg. Mix one tablespoon of ground flaxseed with three tablespoons of water. Let it sit for five minutes to thicken. Replace Greek yogurt with a non-dairy yogurt or applesauce. Use plant-based milk and oil as well. Lemons are high in vitamin C and help boost the immune system. They also aid digestion and add flavor without extra calories. Blueberries are packed with antioxidants, which help fight free radicals in the body. They support heart health and may improve brain function. Together, they make a healthy snack! To check if your muffins are done, use a toothpick. Insert it into the center of a muffin. If it comes out clean or with a few crumbs, they are ready. If it comes out wet, bake for a few more minutes. Watch for a golden color on top as well. Yes, you can substitute Greek yogurt. Use regular yogurt for a similar texture. If you're vegan, try non-dairy yogurt or applesauce. Both options keep the muffins moist and flavorful. Just ensure you use a plain flavor to maintain the lemon-blueberry balance. For the full recipe of these delightful muffins, check out the details above. Enjoy your baking! We covered all you need to know about making lemon blueberry muffins. First, we explored the essential ingredients and what substitutes to use. Next, I shared detailed steps for mixing, baking, cooling, and serving. We also discussed common mistakes and tips for keeping muffins moist. Lastly, I highlighted various versions and storage methods to keep your muffins fresh. Use these insights to bake perfectly delicious muffins every time. Enjoy the process and taste the results!

Lemon Blueberry Muffins Fresh and Flavorful Delight

Lemon Blueberry Muffins are a bright and tasty treat you’ll love. These muffins burst with fresh flavor and aroma, making

To make the creamy garlic chicken pasta, gather these items: - 400g fettuccine pasta - 2 boneless chicken breasts, sliced thin - 4 cloves garlic, minced - 1 cup heavy cream - 1 cup chicken broth - 1 cup grated Parmesan cheese - 2 tablespoons olive oil - 1 tablespoon butter - 1 teaspoon Italian seasoning - Salt and pepper to taste - Fresh parsley, chopped for garnish If you need substitutes, here are some great options: - Use penne or spaghetti instead of fettuccine. - Swap chicken for shrimp or tofu for a different flavor. - Try low-fat milk instead of heavy cream for a lighter sauce. - Use vegetable broth instead of chicken broth for a vegetarian option. - If you’re out of Parmesan, use Pecorino Romano or nutritional yeast. This dish serves four people and offers a tasty balance. Each serving contains: - Calories: 600 - Protein: 35g - Carbohydrates: 60g - Fat: 25g - Fiber: 2g - Sodium: 700mg For more details, check the Full Recipe. Enjoy cooking this creamy garlic chicken pasta! Start by boiling water in a large pot. Add salt to the water. Once it boils, add the fettuccine pasta. Cook it according to the package directions until it is al dente. This usually takes around 10-12 minutes. When done, drain the pasta but save half a cup of the water. Set the pasta aside and let it cool. In a large skillet, heat two tablespoons of olive oil and one tablespoon of butter over medium heat. Add the sliced chicken breasts to the skillet. Sprinkle salt, pepper, and Italian seasoning on the chicken. Cook it for about 5 to 7 minutes until it turns golden brown. Make sure the chicken is cooked through. Once done, take the chicken out and place it on a plate. In the same skillet, add four minced garlic cloves. Sauté the garlic for about 30 seconds. Be careful not to let it burn. Next, pour in one cup of chicken broth. Bring it to a gentle simmer. After that, add one cup of heavy cream. Stir well to mix everything together. Gradually add one cup of grated Parmesan cheese to the sauce. Keep stirring until the cheese melts and makes the sauce smooth. If the sauce gets too thick, use the reserved pasta water to adjust the consistency. Now, return the cooked chicken to the skillet. Add the drained fettuccine. Toss everything together so the pasta is well coated in the creamy sauce. Taste and add more salt and pepper if needed. When ready to serve, plate the pasta. Garnish each dish with fresh chopped parsley. You can also sprinkle some extra Parmesan cheese on top for added flavor. Enjoy your delicious creamy garlic chicken pasta! For the complete recipe, check out the Full Recipe section. To cook perfect pasta, start with a large pot. Use plenty of water and add salt. This step adds flavor to the pasta. Bring the water to a rolling boil before adding your fettuccine. Stir the pasta often to prevent it from sticking. Cook until it's al dente, which means it still has a bite. Drain the pasta when done, but save some water for later. This water can help loosen your sauce. For juicy, tender chicken, slice the breasts thinly. This helps them cook evenly and quickly. Heat olive oil and butter in your skillet over medium heat. Once hot, add the chicken and season it well with salt, pepper, and Italian seasoning. Sauté until the chicken turns golden and is cooked through. This usually takes about 5-7 minutes. Take the chicken out of the pan to keep it juicy while you make the sauce. To make the sauce creamy, use heavy cream and chicken broth. After cooking the garlic, pour in the broth and let it simmer. Add the heavy cream next, stirring to combine. Gradually mix in the grated Parmesan cheese. It melts and thickens the sauce, making it rich and smooth. If the sauce feels too thick, add a splash of reserved pasta water. This small trick helps you achieve the perfect creamy texture. Enjoy this sauce with your pasta for a delicious meal. For the full recipe, check out the complete instructions above. {{image_2}} You can easily make this dish vegetarian. Just swap the chicken for mushrooms or tofu. Both options give a nice texture and flavor. Mushrooms add a deep, earthy taste. Tofu absorbs the creamy sauce well. Use the same cooking method as for chicken. Cook until golden and crispy. Adding vegetables boosts nutrition and flavor. Good choices are spinach, bell peppers, or broccoli. Sauté them in the pan after the garlic. This adds color and crunch. You can also toss in cherry tomatoes for a sweet burst. Adjust cooking times for firmer veggies to keep them vibrant. Fettuccine works well, but feel free to use other pasta. Penne, spaghetti, or even gluten-free pasta can work great. Choose a shape that holds sauce well. For shorter pasta, reduce cooking time slightly. This way, you keep everything balanced and delicious. Check out the Full Recipe for more tips! After you enjoy your Creamy Garlic Chicken Pasta, store any leftovers in an airtight container. Let the pasta cool down first. Place it in the fridge for up to three days. This keeps the flavors fresh and tasty. To reheat, use a skillet over low heat. Add a splash of chicken broth or cream to keep it moist. Stir often until it heats through. You can also use a microwave. Heat in short bursts, stirring in between to avoid hot spots. If you want to save some for later, freezing is an option. Place the cooled pasta in a freezer-safe container. It can last up to three months in the freezer. When ready to eat, thaw it in the fridge overnight. Reheat as mentioned above for the best results. Yes, you can use other cheeses. Mozzarella or cream cheese can work well. Each cheese gives a unique taste and texture. Experiment to find what you love best. Just keep in mind, the creaminess may change based on the cheese you choose. This dish pairs well with many sides. A fresh green salad adds a nice crunch. Garlic bread can soak up that creamy sauce. Steamed vegetables bring color and nutrients. Choose what fits your meal and your mood! To make it healthier, try these tips: - Use whole wheat pasta for more fiber. - Swap heavy cream for Greek yogurt or cashew cream. - Add more veggies like spinach, broccoli, or bell peppers. These changes keep the flavor while boosting nutrition. Yes, this recipe is great for meal prep! You can make it ahead and store it. Divide it into portions and keep it in the fridge. Reheat it when you’re ready to eat. Just add a splash of water to keep it creamy. This recipe stands out for its rich flavor and easy steps. The garlic sauce is creamy and comforting. You can make it in about 30 minutes. The balance of chicken and pasta keeps it filling. Plus, it’s a crowd-pleaser for all ages. You can find the full recipe above to get started! In this blog post, I covered how to make Creamy Garlic Chicken Pasta. We looked at the ingredients, cooking steps, and helpful tips. You learned about variations like vegetarian options and how to store leftovers. For the best results, follow each step carefully. Don't hesitate to experiment with flavors and ingredients. Enjoy your cooking, and remember to share your tasty results!

Creamy Garlic Chicken Pasta Simple and Flavorful Dish

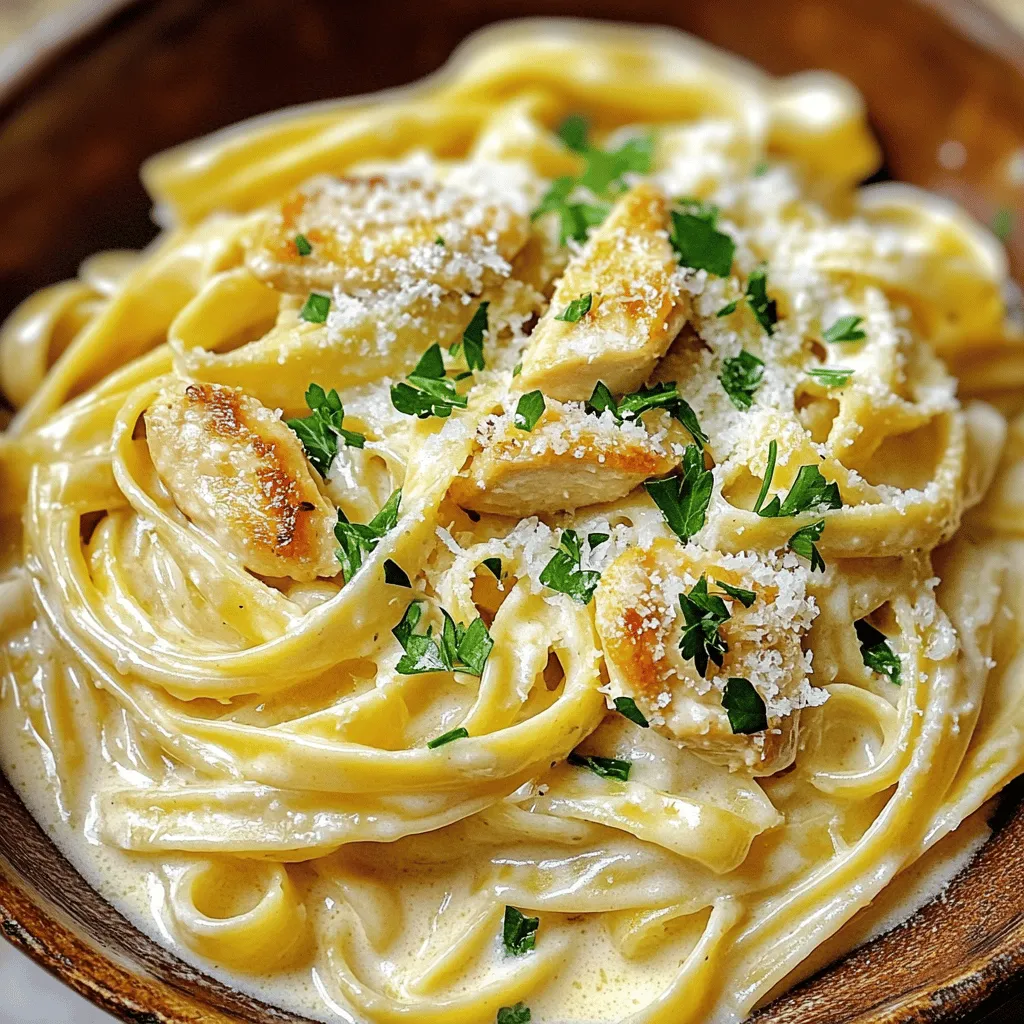
Looking for a dish that’s both simple and packed with flavor? You’re in the right place! My Creamy Garlic Chicken

To make this seafood pasta salad, gather these fresh ingredients: - 8 oz fusilli pasta or any pasta of choice - 1 cup cooked shrimp, deveined and tails removed - 1 cup lump crab meat (fresh or canned, drained) - 1 cup cherry tomatoes, halved - 1/2 cup diced cucumber - 1/4 cup red onion, finely chopped - 1/4 cup black olives, sliced - 3 tablespoons capers, rinsed - 1/4 cup fresh parsley, chopped - 1 lemon, zested and juiced - 3 tablespoons olive oil - Salt and pepper to taste You can make this salad even better with these optional add-ins: - 1 avocado, diced - 1/2 cup corn, fresh or frozen - 1/2 cup bell peppers, diced - A pinch of red pepper flakes for heat - Feta cheese, crumbled These add-ins can enhance flavor and texture. Choose what you like best! For this dish, you can use various kinds of seafood. Here are some popular options: - Scallops, cooked and sliced - Lobster, cooked and chopped - Cooked mussels or clams - Smoked salmon, shredded Feel free to mix and match your seafood. This adds your unique touch to the dish. Enjoy creating your own version of this seafood pasta salad! For the full recipe, check out the details above. Start by boiling a large pot of salted water. Add 8 oz of fusilli pasta. Cook it until al dente, about 8 to 10 minutes. After cooking, drain the pasta and rinse it under cold water. This stops the cooking and keeps the pasta firm. Now, set the pasta aside while you prepare the other ingredients. In a large mixing bowl, add the cooled pasta. Then, mix in 1 cup of cooked shrimp and 1 cup of lump crab meat. Next, toss in 1 cup of halved cherry tomatoes, 1/2 cup of diced cucumber, and 1/4 cup of finely chopped red onion. Add 1/4 cup of sliced black olives and 3 tablespoons of rinsed capers. Finally, sprinkle in 1/4 cup of chopped fresh parsley. Stir everything gently until well combined. In a small bowl, whisk together the juice and zest of 1 lemon with 3 tablespoons of olive oil. Add salt and pepper to taste. Mix until everything is combined. This dressing brings all flavors together. - Mixing and Chilling Pour the dressing over the seafood pasta salad. Gently toss everything again until the pasta and seafood are fully coated. Taste the salad and adjust the seasoning if needed. Cover the bowl and chill it in the fridge for at least 30 minutes. This lets the flavors blend. Serve the salad chilled or at room temperature. For an extra touch, garnish with more parsley. Enjoy this fresh and flavorful dish, inspired by my love for seafood and pasta. For the full recipe, check the details above! To get the best pasta, follow a few simple steps. Start with a large pot of water and add salt. The water should taste like the sea. Boil the water before adding the pasta. Cook the pasta until it is al dente, which means it should have a slight bite. This keeps the pasta from getting mushy when mixed. After cooking, drain and rinse the pasta under cold water. This stops the cooking process and helps keep it firm. To boost the flavor of your seafood pasta salad, use fresh herbs and spices. Fresh parsley adds a bright taste. You can also try adding basil or dill for more depth. A squeeze of lemon juice gives a nice tang. For a spicy kick, add red pepper flakes. If you want a creamier texture, you can mix in some Greek yogurt or sour cream. These small changes can make a big difference. Serve your seafood pasta salad cold or at room temperature. It’s great for picnics or parties. For a fancy touch, serve it on a bed of leafy greens. You can also add slices of lemon or lime on the side for garnish. Pair it with crusty bread or a light white wine for a complete meal. Don't forget to chill the salad for at least 30 minutes before serving. This helps all the flavors blend together beautifully. For the full recipe, check out Ocean Breeze Seafood Pasta Salad. {{image_2}} You can switch up the seafood in your pasta salad. Try adding scallops or mussels for a new twist. You can also use cooked lobster or even canned tuna. These choices add unique flavors and textures. Each seafood option pairs well with the salad's fresh ingredients. If you prefer a vegetarian dish, skip the seafood. Add more veggies instead. Bell peppers, artichokes, or avocados make great substitutes. You can also include chickpeas for protein. This way, you keep the salad filling and tasty. You can play with the dressing to change the flavor. Instead of lemon, try lime or orange juice. A dash of balsamic vinegar can add a sweet kick. For a creamier option, mix in some Greek yogurt. Each dressing choice brings a new taste to your salad. For the full recipe, check out the Ocean Breeze Seafood Pasta Salad. To keep your seafood pasta salad fresh, store it in an airtight container. This helps prevent air from spoiling your dish. Place the salad in the fridge right after serving. It stays tasty for about three days. If you're using fresh seafood, try to eat it sooner. I don't recommend freezing seafood pasta salad. The texture changes when thawed. The pasta may become mushy, and seafood can lose its taste. If you must freeze it, do so without the dressing. Store the salad and dressing in separate containers. This way, you can enjoy the salad fresh after thawing. If you have leftovers, enjoy them cold or at room temperature. If you prefer to heat it, do so gently. Place the salad in a pan on low heat. Stir often until heated through. Avoid overheating, as it can ruin the seafood and pasta's texture. For best flavor, add fresh herbs or a splash of lemon juice right before serving. To keep pasta from getting mushy, cook it until it is al dente. This means it should still have a slight bite. After cooking, drain and rinse the pasta under cold water. This stops the cooking process and helps maintain its texture. You can also toss the pasta with a little olive oil to prevent sticking. Yes, you can make this salad ahead of time. In fact, it tastes even better after chilling for a few hours. Just mix all the ingredients and dress the salad. Cover it well and place it in the fridge. You can add many vegetables! Consider adding bell peppers, radishes, or zucchini. These add color and crunch. You can also try adding corn or asparagus for a fresh twist. Feel free to mix and match based on your taste. - Is this recipe suitable for meal prep? Absolutely! This seafood pasta salad works great for meal prep. It stores well in the fridge for up to three days. Just keep the dressing separate if you want to maintain the best texture. When ready to eat, combine everything and enjoy! For the full recipe, check out the Ocean Breeze Seafood Pasta Salad. This blog post covered every step for making a great pasta salad, from choosing ingredients to storage tips. We looked at seafood options and some tasty add-ins. I shared how to cook perfect pasta and make a flavorful dressing. Remember, you can mix and match ingredients for fun variations. Store your salad well, and it will stay fresh. With these tips, you can enjoy a delicious pasta salad any time. Happy cooking!

Seafood Pasta Salad Fresh and Flavorful Recipe

Are you ready to dive into a bowl of fresh and flavorful Seafood Pasta Salad? This dish is perfect for

To make Southern Bananas Foster, you need simple ingredients. You will blend sweet bananas with rich butter and brown sugar. This dessert cooks quickly and serves four people. It's a warm treat perfect for any occasion. Here’s what you need to gather: - 4 ripe bananas, sliced lengthwise - 1/2 cup brown sugar - 1/4 cup unsalted butter - 1 teaspoon ground cinnamon - 1/2 teaspoon vanilla extract - 1/4 cup chopped pecans (or walnuts) - Vanilla ice cream, for serving These ingredients work together to create a sweet, caramelized sauce. The bananas soak up all that goodness. The brown sugar and cinnamon add depth to the dish. While the dessert is tasty on its own, you can add some fun extras: - Fresh mint leaves, for garnish Mint adds a nice pop of color and freshness. You can also sprinkle more nuts on top if you like. These garnishes make your dessert look great and taste even better. For the full recipe, check our guide! Begin with the right ingredients. Gather these items for your Southern Bananas Foster: - 4 ripe bananas, sliced lengthwise - 1/2 cup brown sugar - 1/4 cup unsalted butter - 1 teaspoon ground cinnamon - 1/2 teaspoon vanilla extract - 1/4 cup chopped pecans or walnuts - Vanilla ice cream, for serving - Fresh mint leaves, for garnish Make sure your bananas are ripe. This ensures they are sweet and soft. The butter should be unsalted for a perfect balance of flavors. Now, let’s cook! Start by melting the butter in a large skillet over medium heat. Wait until it is foamy but not browned. Add the brown sugar and cinnamon. Stir until the sugar dissolves. You want the mixture to bubble gently. Next, gently place the sliced bananas into the skillet. Turn them to coat in the caramel sauce. Cook for about 1-2 minutes until they are warmed through. Stir in the vanilla extract and chopped nuts. Let everything combine and heat for another minute. This creates a lovely blend of flavors. Time to serve! Take a scoop of vanilla ice cream and place it in a bowl. Spoon the warm banana mixture generously over the ice cream. The contrast of warm and cold is magical. For a beautiful finish, garnish with fresh mint leaves. Serve immediately to enjoy the warm sauce. Drizzle any extra sauce over the ice cream for an extra treat. Enjoy your delightful dessert! For Bananas Foster, use ripe bananas. They should be yellow with a few brown spots. These bananas taste sweeter and have a softer texture. Avoid green bananas; they are too firm and not sweet enough. The perfect banana adds flavor and helps the dish shine. You can adjust the sweetness to fit your taste. If you like it sweeter, add more brown sugar. Start with a tablespoon more and taste as you go. If it’s too sweet, add a pinch of salt. Salt balances the sweetness and enhances flavors. Flaming the dish adds a fun touch. To do this safely, add rum after cooking the bananas. Let it warm for a moment, then carefully ignite it. Stand back and let the flames dance. This creates a show and adds deep flavor. Remember to keep a fire extinguisher nearby for safety. Enjoy the experience and thrill of making this dessert! For more details, check the Full Recipe. {{image_2}} To make a nut-free Bananas Foster, simply skip the pecans or walnuts. You can still enjoy the dish without the crunch. Use the same recipe as before. The bananas, butter, and brown sugar bring all the flavor you need. The ice cream also adds great creaminess. This keeps it safe for those with nut allergies. Want to jazz things up? Try adding a splash of rum or whiskey. This gives your dessert a warm kick. You can also add a hint of coconut for a tropical twist. Just mix in some coconut milk or shredded coconut. These flavors blend well with the sweet bananas. Feel free to experiment with spices, too. A pinch of nutmeg can add depth to your dish. If you want a vegan version, swap the butter with coconut oil or vegan butter. Use a dairy-free ice cream to serve. Almond or coconut ice cream works great. For the brown sugar, make sure it’s vegan-friendly. This way, you can enjoy a delicious dessert while staying true to your diet. The flavors remain rich and delightful. You won’t miss the dairy at all. For the full recipe, check out the main article. Enjoy these variations, and make them your own! To store leftover Southern Bananas Foster, let it cool first. Place it in an airtight container. Make sure to seal it tightly. You can keep it in the fridge for up to three days. This helps retain the flavor and texture. If you notice any liquid, that’s normal. It’s the sauce that has separated a bit. When you are ready to enjoy your leftovers, reheat them gently. Use a small pot on low heat. Stir often to avoid burning. You can also use the microwave. Place the mixture in a microwave-safe bowl. Heat it in short bursts, about 30 seconds at a time. Check often to ensure it’s warm but not hot. You can freeze Southern Bananas Foster, but be aware it may change texture. To freeze, place it in a freezer-safe container. Make sure to leave space at the top for expansion. It can last in the freezer for about two months. When ready to eat, thaw it overnight in the fridge. Reheat as mentioned before for the best results. Enjoy this delightful dessert anytime! No, you should not make Bananas Foster ahead of time. This dessert tastes best when served fresh. The bananas can turn mushy and lose flavor when stored. If you want to prep, slice the bananas and keep them in lemon juice. This helps prevent browning. When you're ready, just cook the sauce and add the bananas. If you don’t have rum, you can use other options. Try whiskey or brandy for a similar flavor. You can also skip the alcohol altogether. Just add a splash of orange juice or extra vanilla extract. This will keep the taste bright and delicious. Yes, you can use other fruits for a twist! Pineapples and peaches work great. Slice them like you would the bananas. Just keep an eye on cooking time since different fruits soften at different rates. You can also mix fruits for a fun flavor blend. You learned how to make delicious Southern Bananas Foster, step by step. We covered the key ingredients, cooking methods, and helpful tips to get it just right. There are also variations to suit your taste and storing advice for leftovers. With a little practice, you can make this dessert shine at any gathering. Enjoy impressing friends with your culinary skills while serving a classic dish that warms hearts and satisfies cravings. Happy cooking!

Southern Bananas Foster Delightful Dessert Recipe

Are you ready to elevate your dessert game? Southern Bananas Foster is a classic treat that brings warm flavors and

- 250g paneer, cubed - 2 medium tomatoes, pureed - 1 large onion, finely chopped Butter Paneer, also known as Paneer Makhani, shines with its main ingredients. The star is the paneer. This soft cheese gives the dish its rich texture. Use fresh, high-quality paneer for the best taste. Tomatoes add a lovely sweetness and acidity. Pureeing them brings a smooth, bright flavor. Onions contribute depth and sweetness to the sauce. They caramelize beautifully when cooked right. - 1 teaspoon cumin seeds - 1 teaspoon garam masala - 1 teaspoon red chili powder Spices elevate the dish, making it vibrant and aromatic. Cumin seeds add a warm, earthy tone. They pop in hot oil, releasing their oils and fragrance. Garam masala is a blend of spices that offers warmth and complexity. Red chili powder brings heat and color. Adjust its amount based on your spice preference. - 1/2 cup heavy cream - 2 tablespoons butter - 1 tablespoon oil - Cashew garnish (optional) Heavy cream makes the sauce luscious and creamy. It balances out the spices and adds richness. Butter enhances the flavor and gives a silky finish. A bit of oil helps with cooking the onions and spices. If you want an extra touch, use cashews for garnish. They add a nice crunch and a hint of sweetness. Check the [Full Recipe] for more details on preparation! To start, heat the butter and oil in a large skillet over medium heat. Add the cumin seeds and let them pop. This step adds a nice flavor. Next, add the finely chopped onion. Cook until the onions turn golden brown. Stir in the minced garlic and grated ginger. Cook this mix for about one minute. This will make your kitchen smell amazing. Now, add the pureed tomatoes to the skillet. Stir well and cook for 5-7 minutes. You want the oil to separate from the mixture. This shows your base is ready. Mix in the garam masala, red chili powder, turmeric powder, and salt. Let it cook for another two minutes. This part is key for rich flavors. It's time to add the main star—paneer! Gently fold in the cubed paneer. Make sure each piece gets coated in the sauce. Then, pour in the heavy cream. Stir gently to mix. This cream will give your dish that rich, creamy texture we all love. Next, bring the dish to a gentle simmer. Let it cook for about five minutes. This helps the flavors blend together nicely. Before finishing, add the kasuri methi and stir well. This gives the dish a unique, aromatic touch. Finally, garnish your Butter Paneer with fresh cilantro before serving. Enjoy this flavorful dish with naan or steamed basmati rice. For the full recipe, check out the complete instructions above! To get the right texture of paneer, make sure to use fresh paneer. Fresh paneer holds its shape and has a soft bite. You can also soak the paneer in warm water for 10 minutes before adding it to the dish. This makes it even softer. Balancing spices is key for the best flavor. Start with a small amount of red chili powder. You can always add more if you like it spicy. The garam masala adds warmth, but don't overdo it. A little goes a long way. One common mistake is overcooking the paneer. When paneer cooks for too long, it can become rubbery. Add it to the sauce, and let it heat through for about five minutes. That’s all it needs! Another mistake is skipping the kasuri methi. This dried fenugreek leaf adds a unique flavor. It brings a lovely aroma and depth to your dish. Always include it for the best taste. Butter paneer pairs well with naan or steamed basmati rice. These sides soak up the creamy sauce. You can also serve it with a side salad for freshness. For a beautiful dish, garnish with a drizzle of cream and freshly chopped cilantro. A sprinkle of red chili powder adds a pop of color. Serve hot for the best experience. {{image_2}} You can swap paneer for tofu if you want a vegan dish. Tofu absorbs flavors well, making it a great substitute. You can also use mixed vegetables like bell peppers or zucchini for a fresh twist. For cream, consider using coconut milk or cashew cream. These options keep the dish creamy while reducing calories. Across India, Butter Paneer has many styles. In North India, it often has rich spices and a smooth texture. In the South, cooks might add more heat and different spices. You can also try adding nuts like cashews or almonds for extra crunch. Fruits like raisins can add sweetness and depth too. You can make this dish vegan by using tofu and coconut milk. This way, you keep the creamy texture without dairy. For gluten-free options, Butter Paneer is naturally gluten-free. Just pair it with rice or gluten-free naan to enjoy a complete meal. To keep your Butter Paneer fresh, store leftovers in an airtight container. Let it cool to room temperature first. Place the container in the fridge. It will stay good for 3 to 4 days. When reheating, use low heat on the stove. This helps to keep the sauce creamy. Stir it often to prevent sticking. You can also microwave it, but use a microwave-safe dish and cover it loosely. You can freeze Butter Paneer for longer storage. To freeze, let it cool completely first. Then, place it in a freezer-safe container or bag. Remove as much air as possible to avoid freezer burn. It can last up to 3 months in the freezer. Label the container with the date for easy tracking. When ready to eat, thaw the Butter Paneer in the fridge overnight. If you need it fast, you can use the microwave. Use the defrost setting to avoid cooking it. Once thawed, reheat it gently on the stove. Add a splash of water or cream to restore creaminess. Heat until warm, stirring often to blend the flavors back together. For a great meal, serve it with naan or rice. Enjoy your flavorful Butter Paneer! Butter Paneer, also known as Paneer Makhani, is a rich and creamy dish from India. It features paneer, a fresh cheese made from milk, cooked in a buttery tomato sauce. This dish has roots in North Indian kitchens and is famous for its smooth texture and deep flavors. The sauce combines tomatoes, butter, and spices, creating a delightful blend that makes your taste buds dance. My love for Butter Paneer started when I first tasted it at a local restaurant. The warmth and comfort of this dish are simply unmatched. Yes, you can make Butter Paneer in advance. It stores well in the fridge for up to three days. To prepare it, cook the dish as usual, allow it to cool, and then transfer it to an airtight container. When you’re ready to eat, just reheat it gently on the stove or in the microwave. The flavors will deepen, making it even tastier. Meal prep makes busy weeknights easier, and this dish is perfect to have on hand! Butter Paneer pairs beautifully with many sides. Here are some great options: - Naan or roti for dipping - Steamed basmati rice to soak up the sauce - A fresh salad to balance the creaminess - Lassi or chai for a refreshing drink These sides enhance the meal and create a satisfying dining experience. Yes, you can replace paneer with other ingredients if needed. Here are some great substitutes: - Tofu for a vegan option - Cooked chicken for a meaty twist - Mixed vegetables for a hearty vegetarian dish Feel free to experiment based on your dietary needs or preferences. Each option offers a unique flavor profile while keeping the spirit of Butter Paneer alive. For the full recipe, check out the Butter Paneer Delight section. Butter paneer is a rich and creamy dish made with paneer, tomatoes, and spices. We discussed essential ingredients, cooking steps, and tips for perfecting this dish. Remember to balance your spices and avoid overcooking the paneer. You can adjust the recipe for dietary needs or explore regional variations for different tastes. Storing and reheating are easy with the right methods. Enjoy making this dish and sharing it with loved ones for a delightful meal.

Butter Paneer (Paneer Makhani) Flavorful and Creamy Dish

Welcome to the flavorful world of Butter Paneer, also known as Paneer Makhani! This creamy dish bursts with rich flavors

- 4 slices of sourdough bread - 1 cup shredded mozzarella cheese - 1/2 cup marinara sauce - 1/2 cup sliced pepperoni - 1/4 cup grated Parmesan cheese - 1 teaspoon dried oregano - 1 tablespoon olive oil - 1 tablespoon butter - Fresh basil leaves for garnish (optional) This recipe is a fun twist on two classics. You get the taste of pizza and grilled cheese all in one bite. The sourdough bread gives a nice crunch, while the melted cheese pulls apart in a gooey delight. I love using fresh mozzarella for a creamy texture, but shredded works just fine, too. The marinara sauce adds that perfect pizza flavor. Feel free to mix things up! You can add other toppings like olives or bell peppers. The options are endless. Just get creative with what you have at home. Remember, cooking is all about making it your own. Check out the Full Recipe for more details on how to whip this up. - Heat a skillet over medium heat. Add 1 tablespoon of olive oil and 1 tablespoon of butter. - Spread a thin layer of marinara sauce on one side of each slice of sourdough bread. - On two slices, layer half of the shredded mozzarella cheese. Add sliced pepperoni and sprinkle with 1 teaspoon of dried oregano. - Place the remaining mozzarella cheese on top. Cover with the other two slices of bread, sauce side down. - Place the sandwiches in the hot skillet. Cook for 3-4 minutes until golden brown and cheese melts. - Carefully flip the sandwiches. Cook the other side for another 3-4 minutes until crispy. - Remove the sandwiches from the skillet. Slice them in half. Sprinkle with 1/4 cup of grated Parmesan and add fresh basil leaves for garnish if you like. - Prep Time: 10 minutes - Cook Time: 10 minutes - Total Time: 20 minutes - Servings: 2 For a detailed guide, check out the Full Recipe. To make the best pizza grilled cheese, use fresh ingredients for maximum flavor. Fresh bread, cheese, and toppings make a big difference. I recommend sourdough for its great texture and taste. Monitor cooking heat for even browning. Too high can burn the bread, while too low can leave the cheese unmelted. For a gooey bite, consider double cheese layers. You can mix mozzarella with provolone or cheddar for added depth. Each cheese melts differently, so try what you like best. Other cheese types, like fontina or gouda, also work well. They offer a unique twist to classic flavors. To jazz up your marinara sauce, add spices like red pepper flakes or garlic powder. This simple change adds warmth and depth to your dish. Fresh herbs like basil or oregano can elevate the taste. Sprinkle them on top right before serving for a burst of freshness. These little touches make your pizza grilled cheese truly special. For the full recipe, check out the instructions above. {{image_2}} You can make your pizza grilled cheese even more fun. Try a veggie-loaded option. Add bell peppers and mushrooms for extra crunch. This mix gives you a great taste and more nutrients. You can also create a meat-lover's version. Just layer in some sausage or crispy bacon. The savory flavors will delight your taste buds. If you need gluten-free options, don't worry! You can swap out regular bread for gluten-free varieties. Look for gluten-free sourdough or whole-grain bread. These options work well and taste great. For sauces, check for gluten-free marinara. Many brands offer this, so read the labels. You can enjoy pizza grilled cheese without the gluten! If you want a vegan pizza grilled cheese, you have options too. Use plant-based cheese alternatives. Brands like Daiya or Follow Your Heart melt well and taste amazing. For the sauce, try a dairy-free marinara. You can make it with crushed tomatoes, garlic, and herbs. This way, you still get all the yummy flavors without dairy. For the full recipe and more ideas, check out the complete guide. To keep your pizza grilled cheese fresh, allow it to cool first. This step helps avoid sogginess. Use an airtight container or wrap the sandwich in foil. These options help preserve the flavors and keep the bread from drying out. When you want to enjoy your leftover pizza grilled cheese, reheat it in a skillet. This method warms it through and keeps it crispy. Use low heat to avoid burning. You can also cover the skillet with a lid to help melt the cheese. For extra crispiness, add a little butter to the pan. Enjoy your tasty treat! To make a quick marinara sauce, you need just a few items. Here’s a simple recipe: - 1 can (15 oz) of crushed tomatoes - 2 cloves garlic, minced - 1 tablespoon olive oil - 1 teaspoon dried oregano - Salt and pepper to taste 1. Heat olive oil in a saucepan over medium heat. 2. Add minced garlic and cook for about 1 minute. 3. Stir in crushed tomatoes and dried oregano. 4. Season with salt and pepper. 5. Simmer for 10-15 minutes, stirring occasionally. This sauce is easy to make and adds great flavor to your Pizza Grilled Cheese. Yes, you can use various types of bread to make this dish. Here are some tasty options: - Whole wheat bread for a nutty flavor - Ciabatta for a crusty texture - Rye bread for a unique twist - French bread for a hearty bite Each bread type will change the taste and crunch of your Pizza Grilled Cheese. You can get creative with toppings to make your sandwich fun and unique. Here are a few ideas: - Sliced olives for a briny kick - Fresh spinach for added greens - Sliced mushrooms for earthiness - Jalapeños for a spicy punch - Cooked sausage for extra protein Mix and match these toppings to find your favorite combination! This blog post shared a tasty recipe for Pizza Grilled Cheese. You learned about the key ingredients and the simple steps to make it. We covered helpful tips to enhance flavor and suggested fun variations for every diet. Don't forget storage tips to keep leftovers fresh! Now, you can try this dish and enjoy your own twist. It’s a fun way to mix pizza and grilled cheese. Enjoy your cooking adventure!

Pizza Grilled Cheese Irresistible Comfort Food Delight

Craving comfort food that hits all the right notes? Meet the Pizza Grilled Cheese, where cheesy goodness meets pizza flavor.

Older posts
Newer posts
← Previous Page1 … Page83 Page84 Page85 … Page106 Next →
© 2025 My Cooking Cast • Built with GeneratePress

Our Policies

  • Privacy Policy
  • GDPR Policy
  • Terms Of Use
  • Copyright Policy
  • Cookie Policy
  • Disclaimer

More Information​

  • Home
  • Contact
  • About
  • Dinner
  • Appetizers
  • Dessert
©2025, My Cooking Cast About Privacy Policy Back To Top