Skip to content
DisclaimerTerms Of UseGDPR PolicyCookie Policy

My Cooking Cast

  • Home
  • Drinks
  • Appetizers
  • Dinner
  • Dessert
  • About
  • Contact
  • Privacy Policy
DisclaimerTerms Of UseGDPR PolicyCookie Policy

Emma

To make Easy Lasagna Soup, gather these ingredients: - 1 tablespoon olive oil - 1 onion, finely chopped - 3 cloves garlic, minced - 1 pound ground beef or turkey - 1 can (28 oz) crushed tomatoes - 4 cups beef or vegetable broth - 1 tablespoon Italian seasoning - 1 teaspoon sugar - 8 lasagna noodles, broken into pieces - 1 cup ricotta cheese - 1 cup shredded mozzarella cheese - ½ cup grated Parmesan cheese - Fresh basil or parsley, for garnish - Salt and pepper to taste These amounts provide great flavor and a hearty meal. If you want to switch things up, consider these options: - Use ground chicken or plant-based meat for a lighter soup. - Swap crushed tomatoes for diced tomatoes for a chunkier texture. - For a vegetarian version, add mushrooms or spinach instead of meat. - Use vegetable broth instead of beef broth for a vegan option. These swaps let everyone enjoy this dish, no matter their diet. To cook this soup, you need some basic tools: - A large pot for simmering the soup. - A wooden spoon for stirring. - A sharp knife and cutting board for chopping. - Measuring cups and spoons for accuracy. Using the right tools helps make cooking easy and fun. Start by gathering all your ingredients. This makes cooking smoother and faster. Chop the onion finely to help it cook evenly. Mince the garlic into small pieces. If you prefer, you can use pre-minced garlic for ease. Measure out your crushed tomatoes and broth. Having everything ready saves time and keeps you focused. - Chopped onion: 1 onion - Minced garlic: 3 cloves - Ground meat: 1 pound - Crushed tomatoes: 1 can (28 oz) - Broth: 4 cups - Lasagna noodles: 8 broken into pieces - Cheese mixture: 1 cup ricotta, 1 cup mozzarella, ½ cup Parmesan Heat the olive oil in a large pot over medium heat. Add the chopped onion and cook until it turns clear, about 3-4 minutes. Stir in the minced garlic for 1 minute. Next, add the ground meat. Cook it until brown, breaking it up as you go. This should take about 5-7 minutes. If there is extra fat, drain it. Pour in the crushed tomatoes, broth, Italian seasoning, and sugar. Stir it all and bring it to a simmer. This step builds the soup’s flavor base. Once simmering, add the broken lasagna noodles. Cook according to the package, usually about 10-12 minutes. Stir occasionally to keep the noodles from sticking. While the noodles cook, mix the ricotta, half of the mozzarella, and Parmesan in a bowl. Add salt and pepper to taste. This mixture adds creaminess to the soup. When the noodles are soft, ladle the soup into bowls. Add a dollop of the ricotta mixture to each bowl. Then, sprinkle the remaining mozzarella on top. Let it melt slightly before serving. This adds a gooey, cheesy layer. Finally, garnish with fresh basil or parsley. This step boosts the flavor and makes the soup look inviting. For the full recipe, check out the details above. Enjoy your delicious Easy Lasagna Soup! To boost the taste of your Easy Lasagna Soup, consider adding these ingredients: - A splash of red wine - A teaspoon of balsamic vinegar - Crushed red pepper flakes These can add depth and warmth. For seasoning, remember to taste as you go. Start with salt and pepper, then adjust later. This way, you control the flavor better. A smooth, rich texture makes the soup delightful. To achieve this: - Cook the noodles separately for the best texture. - Stir them in just before serving. This keeps them from getting too mushy. If you like a thicker soup, reduce the broth slightly. You can also mash some noodles while they cook to thicken the broth. To save time, prep your ingredients before you cook. Chop the onion and garlic first. Here are some quick tips: - Use pre-chopped vegetables. - Cook the meat in bulk on a different day. For meal prep, make extra soup and freeze it. It keeps well and tastes great later. Just thaw and heat when you want a warm bowl of comfort. You can find the full recipe to guide you through the steps. {{image_2}} To create a veggie-packed version, start by swapping meat for your favorite vegetables. You can use zucchini, bell peppers, and spinach. These add color and nutrients. Cut them into small pieces for even cooking. You can sauté these veggies with the onion and garlic for added flavor. Recommended vegetables to include: - Zucchini - Bell peppers - Spinach - Mushrooms - Carrots To boost the cheesiness of your soup, mix in more types of cheese. You can add cream cheese for a rich texture. Another great choice is Gouda, which melts well and adds depth. Experiment with cheese to find your favorite combo. Suggested cheese combinations: - Cream cheese - Gouda cheese - Cheddar cheese - Feta cheese If you like heat, there are many ways to spice up your soup. You can add red pepper flakes for a simple kick. Another option is diced jalapeños for a fresh, spicy flavor. Just remember to adjust the amount based on your taste! Suggested spicy ingredients to incorporate: - Red pepper flakes - Diced jalapeños - Hot sauce - Chipotle peppers in adobo sauce Store leftover lasagna soup in an airtight container. This keeps it fresh and tasty. It lasts in the fridge for about 3 to 4 days. Always let the soup cool before sealing it up. This step prevents moisture build-up inside the container. To freeze the soup, pour it into freezer-safe containers. Leave some space at the top. The soup expands when frozen. It’s best to use it within 2 to 3 months for the best flavor. When you want to reheat, place the container in the fridge overnight. This helps it thaw slowly. Reheat the soup on the stove over low heat. Stir often to warm it evenly. If it's too thick, add a splash of broth or water. You can also use the microwave; just cover the bowl to keep moisture in. This method helps maintain the soup's texture and flavor. Enjoy your Easy Lasagna Soup again! Yes, you can prepare this soup ahead of time. Make it up to two days in advance. Store it in the fridge in an airtight container. When ready to eat, heat it on the stove. The flavors will meld and get even better! This soup pairs well with many sides. Here are some great options: - Garlic bread for a crunchy bite - A fresh green salad for a light touch - Parmesan cheese for extra flavor - Crusty rolls to soak up the soup To make this soup gluten-free, swap regular lasagna noodles for gluten-free ones. You can also use zucchini or eggplant slices as a noodle alternative. Just slice them thinly, and they will cook fast in the soup. Yes, this recipe is very kid-friendly! Kids often love cheesy dishes. To make it even more appealing, let them help mix in the cheeses. Serve it with fun toppings like extra cheese or fresh herbs. They will love picking out their favorite toppings! This article shared how to create delicious Easy Lasagna Soup from scratch. We covered key ingredients, kitchen tools, and step-by-step cooking instructions. I also offered tips to enhance flavor and adjust textures, ensuring a satisfying dish. Whether you want to customize the recipe or store leftovers, we have you covered. Enjoy experimenting with variations and make it your own. With this guide, you'll be serving up comfort in a bowl that everyone will love.

Easy Lasagna Soup Simple and Flavorful Recipe

If you’re craving a warm, comforting meal that’s easy to make, Easy Lasagna Soup is your answer! This dish captures

- 1 cup shelled pistachios (unsalted) - 2 ½ cups whole milk - ¾ cup granulated sugar - 1/4 cup cornstarch - 1/4 teaspoon salt - 2 teaspoons vanilla extract - 3 tablespoons unsalted butter - Whipped cream (for serving) - Chopped pistachios (for garnish) When you measure the pistachios, make sure they are unsalted. This keeps the pudding sweet and creamy. For the milk, use whole milk for the best taste. If you want a richer flavor, you can substitute half-and-half. The sugar adds sweetness, but you can adjust it based on your taste. Cornstarch thickens the pudding, so use it carefully. If you want a smoother finish, sift it before using. If you are allergic to nuts, try using sunflower seeds instead of pistachios. For a dairy-free version, use almond milk or coconut milk. You can also swap the butter for a vegan butter alternative. If you don’t have vanilla extract, use almond extract for a different twist. These swaps can change the flavor but still keep the creamy texture you want. To start, you need to grind the pistachios. Place one cup of shelled, unsalted pistachios in a food processor. Pulse them until you get a fine grind. Be careful not to turn them into a paste. Set aside one tablespoon for a tasty garnish later. Next, grab a medium saucepan. In it, whisk together the ground pistachios, sugar, cornstarch, and salt. Mix these well. Slowly pour in 2 ½ cups of whole milk, whisking as you go. This helps prevent lumps. Now, turn on the heat to medium. Stir the mixture constantly. Watch as it thickens over about 8-10 minutes. You want it to reach a pudding-like texture. Once it's thick enough, take it off the heat. Stir in 2 teaspoons of vanilla extract and 3 tablespoons of unsalted butter until they melt and blend in. Pour the pudding into serving dishes or a big bowl. Let it cool to room temperature. Cover it with plastic wrap, pressing it right onto the surface. This stops a skin from forming. Chill it in the fridge for at least 2 hours. When you're ready to serve, add a dollop of whipped cream on top. Finish with a sprinkle of the reserved chopped pistachios for that extra crunch. For the full recipe, check the linked details. Enjoy your delicious pistachio pudding! When making pistachio pudding, avoid a few common errors. First, do not over-process the pistachios. You want them finely ground, but not a paste. This gives your pudding the right texture. Second, be careful with the heat. If it’s too high, your pudding may burn. Stir constantly to keep it smooth. Lastly, don’t skip chilling. This step helps the flavors develop and gives the pudding the right consistency. To get your pudding super creamy, use whole milk. The fat content in whole milk helps create a rich mouthfeel. Another trick is to whisk the mixture well while it cooks. This keeps it smooth and free of lumps. If you want an even creamier pudding, add an extra tablespoon of butter at the end. This simple addition makes a big difference. Serving pistachio pudding can be fun! Top your pudding with a generous dollop of whipped cream. This adds sweetness and lightness. Sprinkle chopped pistachios on top for a nice crunch. You can also serve it in clear cups to show off that beautiful green color. For a special touch, add a drizzle of chocolate sauce. It pairs well with the nuttiness of the pistachios. Remember, this creamy delight is best enjoyed chilled! For the full recipe, check out the [Full Recipe]. {{image_2}} You can easily change the flavor of your pistachio pudding. Adding chocolate gives it a rich taste. Just melt some dark chocolate and mix it in when the pudding thickens. For an almond twist, add almond extract instead of vanilla. This change brings a lovely nutty flavor that pairs well with pistachios. You can even blend in other nuts. Hazelnuts or walnuts can add a fun crunch and new taste. If you want a dairy-free or vegan option, I have you covered. Use almond milk or coconut milk in place of whole milk. This swap keeps the pudding creamy and delicious. For a vegan option, replace butter with coconut oil. You can also use a plant-based sweetener instead of granulated sugar. These changes make the pudding friendly for various diets. How you serve your pistachio pudding can make a big difference. Use clear cups or jars to show off the rich green color. Top each serving with a dollop of whipped cream for a nice contrast. A sprinkle of chopped pistachios adds texture and looks pretty. You can even layer the pudding with crushed cookies for a fun dessert. For a festive touch, add fresh mint leaves or edible flowers on top. This makes your creamy delight not only tasty but also beautiful to look at. After you enjoy your pistachio pudding, store any leftovers in the fridge. Use an airtight container to keep it fresh. It will taste best if eaten within three days. Press plastic wrap directly onto the pudding's surface to avoid a skin forming. You can freeze pistachio pudding if you need to save it longer. Pour the pudding into a freezer-safe container, leaving space at the top for expansion. Seal it tightly and label it with the date. It can last for up to two months in the freezer. To enjoy it later, thaw it in the fridge overnight. If you want to enjoy your pudding warm, heat it gently. Place it in a saucepan over low heat. Stir it often to keep it smooth. If it seems too thick, add a splash of milk to loosen it. Never heat it too fast, or it might clump. Pistachio pudding lasts about 3 to 5 days in the fridge. To keep it fresh, store it in an airtight container. Make sure to cover the surface with plastic wrap to avoid a skin forming. This keeps the creamy texture you love. Yes, you can use other nuts! Almonds or hazelnuts work great. Just grind them finely, like the pistachios. Adjust the sugar based on the nut type, as some are sweeter. This adds a fun twist to your pudding. You can get creative with leftover pudding! Use it as a filling for cakes or pastries. Top it on pancakes or waffles for a sweet breakfast. You could also mix it into smoothies for a nutty flavor. Enjoy every last bite! This article covered the best ingredients and simple steps for making pistachio pudding. We discussed tips to avoid mistakes and how to achieve the best texture. You can even customize flavors or make it dairy-free. Proper storage keeps your pudding fresh longer. I hope you feel ready to make this yummy treat. Enjoy your pistachio pudding!

From-Scratch Pistachio Pudding Creamy Delight Recipe

If you’ve ever craved a creamy dessert that’s as easy as it is delicious, you’re in the right place. I’m

- 6 large buttery croissants - 6 large eggs - 2 cups whole milk The main ingredients create a soft and rich base for the casserole. The croissants bring a flaky texture and buttery flavor. Eggs and milk form a creamy custard that binds everything together. - 1 cup shredded sharp cheddar cheese - 1 cup cooked and crumbled sausage (optional) - 1 bell pepper, diced These extra ingredients add depth to the dish. The cheese melts beautifully on top, giving a savory bite. If you like meat, sausage adds a hearty touch. The bell pepper adds a nice crunch and a pop of color. - 1/2 cup onion, diced - 1 teaspoon Dijon mustard - 1 teaspoon garlic powder - 1/2 teaspoon salt - 1/4 teaspoon black pepper - Fresh parsley for garnish Seasoning is key to great flavor. Onion adds sweetness, while mustard gives a tangy lift. Garlic powder enhances the overall taste, and salt and pepper bring balance. Fresh parsley on top makes your casserole look and taste fresh. For the full recipe, check out the Overnight Croissant Breakfast Casserole section. Start by cutting six large buttery croissants into bite-sized pieces. Place these pieces in a large mixing bowl. If you want meat, add one cup of cooked and crumbled sausage. Next, dice one bell pepper and half a cup of onion. Toss these in with the croissants and sausage. Mix everything well so each bite has flavor. In a separate bowl, crack six large eggs. Add two cups of whole milk, one teaspoon of Dijon mustard, one teaspoon of garlic powder, half a teaspoon of salt, and a quarter teaspoon of black pepper. Whisk these together until the mixture is frothy and smooth. This custard will add richness to your casserole. Pour the egg mixture over the croissant mixture. Stir gently to ensure all the croissant pieces soak up the custard. Next, sprinkle one cup of shredded sharp cheddar cheese on top. Fold it in gently but leave some cheese on top for a melty finish. Cover the casserole with plastic wrap. Place it in the refrigerator overnight. This step is key. It allows the croissants to absorb all the flavors and become soft. In the morning, preheat your oven to 350°F (175°C). Take the casserole out of the fridge. Let it sit at room temperature for about 15 minutes. Remove the plastic wrap and bake the casserole uncovered for 45 to 50 minutes. It’s ready when the center is set and the top is golden brown. After baking, let the casserole cool for a few minutes. Cut it into squares. Garnish with chopped fresh parsley for a pop of color. Serve warm, and enjoy your delicious Overnight Croissant Breakfast Casserole! For the full details, check the Full Recipe. To make this casserole great, you can swap croissants for other bread. You can use brioche or challah for a sweeter taste. These breads soak up the egg mixture well. Aim for a soaking time of at least eight hours. This lets the bread absorb all the flavors. A longer soak will give a creamier texture. Add fresh herbs like thyme or basil to boost the taste. You could also sprinkle in some paprika for a little kick. Need more crunch? Toss in seasonal veggies like spinach or zucchini. These additions not only taste good but also make the dish colorful. For a special brunch, serve this casserole in a cast-iron skillet. It looks rustic and inviting. Cut squares and place them on vibrant plates. A sprinkle of fresh parsley on top adds a nice touch. Pair it with a side of mixed berries for color and freshness. This will impress your guests and make the meal feel festive. For the full recipe, check out the Overnight Croissant Breakfast Casserole! {{image_2}} For a tasty vegetarian twist, leave out the sausage. You can add more veggies instead. Try using spinach, mushrooms, or zucchini. These add color and flavor. Mix them in with the croissants. This will ensure every bite is packed with goodness. Plus, it's a great way to sneak in extra nutrients. If you crave something sweet, turn this dish into a dessert. You can add fruits like berries or bananas. Use a custard mix made with eggs and milk. Pour this over the croissants instead of the savory mixture. You will create a delightful breakfast treat. Serve it with maple syrup or whipped cream for added sweetness. For a gluten-free option, swap out croissants for gluten-free bread. Look for soft, fluffy types to keep the texture right. Some brands offer great choices that hold up well. This way, everyone can enjoy the casserole without worry. Just follow the same steps in the Full Recipe to make your gluten-free version! Store any leftover casserole in an airtight container. This keeps it fresh and safe. You can refrigerate it for up to 3 days. Make sure it cools to room temperature before sealing. This helps prevent excess moisture. To freeze the casserole, first, let it cool completely. Cut it into squares for easy portions. Wrap each piece tightly in plastic wrap. Then, place them in a freezer bag. Try to remove as much air as possible. You can freeze it for up to 2 months. When you're ready to eat, thaw it in the fridge overnight. To reheat, you can use an oven or microwave. For the oven, preheat to 350°F (175°C). Place the casserole in a baking dish, cover with foil, and heat for about 20 minutes. This helps keep the top from burning. If you use a microwave, heat on high for about 1-2 minutes. Check to see if it’s warm throughout. Enjoy your meal without losing any flavor or texture! Yes, you can easily make this casserole without sausage. To do this, simply skip the sausage. Add more veggies instead. You can use spinach, mushrooms, or zucchini for added flavor. This makes it vegetarian-friendly and just as tasty. If you use a convection oven, reduce the cooking time. Convection ovens cook food faster. Start checking for doneness at 35 minutes. For a conventional oven, stick to the 45-50 minutes. Always check that the center is set and the top is golden. To reheat leftovers, the oven works best. Preheat it to 350°F (175°C). Place slices on a baking sheet and cover with foil. Heat for about 15-20 minutes, until warm. You can also use a microwave, but the oven keeps the texture better. Yes, you can scale the recipe up or down. For a larger crowd, double the ingredients. Use a bigger baking dish to fit all the mixture. You can also prepare it the night before. Just add extra baking time in the morning. Check for doneness as you bake. For the full recipe, use the ingredients and steps listed above. Enjoy your cooking! This blog post detailed how to make a delicious Overnight Croissant Breakfast Casserole. We covered the main ingredients, step-by-step instructions, tips, variations, and storage info. Each part helps you create a great dish full of rich flavor. This casserole is not just easy to make; it can be customized to fit your tastes. Whether preparing for a crowd or a cozy breakfast, this recipe shines. Enjoy making it and sharing joy around your table!

Overnight Croissant Breakfast Casserole Easy and Tasty

Start your day with a warm, buttery delight! This Overnight Croissant Breakfast Casserole is both easy to make and delicious.

- Rustic Italian bread - Ripe tomato - Fresh mozzarella cheese - Fresh basil leaves - Balsamic glaze - Olive oil - Salt and black pepper - Optional ingredients - Recommended brands or sources for ingredients To make a great Caprese sandwich, you need fresh ingredients. Here’s a detailed list. - Rustic Italian bread: Look for crusty bread. It should be thick enough to hold the filling. A good brand is Ciabatta or Focaccia. - Ripe tomato: Use a large, juicy tomato. Heirloom or vine-ripened tomatoes work best. They add flavor and color. - Fresh mozzarella cheese: Choose high-quality mozzarella. It should be soft and creamy, not rubbery. Brands like BelGioioso are great options. - Fresh basil leaves: Look for vibrant green leaves. They should smell fresh. This herb adds a sweet aroma and taste. - Balsamic glaze: A drizzle of balsamic glaze adds sweetness. You can find it in stores or make your own. - Olive oil: Use extra virgin olive oil for the best taste. It will enhance the sandwich's flavors. - Salt and black pepper: Basic but essential. They bring all the flavors together. Optional ingredients: You can add sliced avocado for a creamy touch. It adds healthy fats and makes it richer. When sourcing ingredients, visit local farmers' markets for fresh produce. Specialty stores often stock the best cheeses and breads. Always choose organic when possible to enjoy the best flavors. For the full recipe of this delightful sandwich, check the previous section. Enjoy making your Caprese sandwich! Start by choosing rustic Italian bread. It should be thick and sturdy. This bread holds toppings well and adds great flavor. To toast the bread, heat your toaster or oven. Toast until golden brown and crisp. This step adds texture and warmth to your sandwich. Drizzle olive oil on one side of each slice once toasted. This adds flavor and helps keep the sandwich together. Now, let's build your sandwich! Begin with the sliced tomatoes on one slice of bread. Arrange them in a slightly overlapping fashion. Next, sprinkle a pinch of salt and freshly ground black pepper on the tomatoes. This enhances their natural flavor and makes them pop. Place the fresh mozzarella slices evenly over the tomatoes. Cover them completely for a creamy, rich taste. If you want extra creaminess, add avocado slices on top of the mozzarella. This step is optional but delicious! Add fresh basil leaves generously over the mozzarella. The basil gives a fragrant and fresh touch. Finally, drizzle balsamic glaze over the basil. This adds a sweet and tangy layer that blends beautifully. Carefully place the second slice of toasted bread on top. Make sure the olive oil side is down. Press down gently to compact the sandwich. This helps bind all the tasty layers together. To serve, cut the sandwich in half diagonally. This makes it easier to eat and looks nice. For a fun touch, serve on a wooden board or colorful plate. Add extra basil and a drizzle of balsamic glaze to impress! You can also add a side of mixed greens or chips for a complete meal. Enjoy your Fresh Caprese Sandwich! Using fresh herbs is key for a vibrant taste. Fresh basil gives that bright flavor. Dried herbs can work in a pinch but lack the same punch. For a twist, try adding a sprinkle of garlic powder or a pinch of red pepper flakes. These give your sandwich a fun kick. Plating can make your sandwich pop. Serve it on a rustic wooden board for a charming look. You can cut the sandwich in half and stand it up. This way, the layers show off their colors. For garnishing, add extra basil leaves or a small bowl of balsamic glaze. A side of mixed greens or crispy potato chips adds color and crunch. You don’t need fancy tools to make a great sandwich. A good knife is essential for slicing. Use a sturdy cutting board to protect your counters. If you want to toast the bread, a non-stick skillet works well. Choose tools that feel good in your hands. Comfort is key for enjoyable cooking. {{image_2}} You can make your Caprese sandwich even more fun. First, try different cheeses. Instead of fresh mozzarella, use burrata or goat cheese. Each option adds a unique taste and texture. For the bread, switch from rustic Italian to ciabatta or sourdough. Both will hold the ingredients well. They give a nice crust and soft inside. Want to add protein? You can add grilled chicken or turkey slices. These options make the sandwich heartier and more filling. If you're vegan, try adding marinated tofu for extra protein. The Caprese sandwich can change with the seasons. In summer, use sun-ripened tomatoes. They taste sweet and juicy. You can also add arugula for a peppery kick. In winter, switch to roasted tomatoes. They provide warmth and a different flavor. You might even use sautéed spinach for a cozy touch. Regional variations exist, too. In Italy, some add prosciutto for saltiness. In other parts, pesto can replace basil for a twist. Pair your Caprese sandwich with refreshing drinks. A chilled lemonade or iced tea complements the flavors well. For sides, serve with a light salad or crispy potato chips. For a creative touch, stack the sandwich high and use a skewer to hold it together. You can also cut it into small triangles for easy sharing. A side of homemade pesto for dipping can make it fancy. Enjoy exploring these variations! To keep your Caprese sandwich fresh, wrap it tightly in plastic wrap. Place it in the fridge. This helps keep the bread from getting soggy. You can also use a reusable container with a lid. Make sure to eat it within two days for the best taste. If you want to keep the ingredients separate, store them in different containers. This way, you can build a fresh sandwich later. Can you freeze a Caprese sandwich? Yes, but it’s best to freeze the ingredients separately. You can freeze the bread and cheese, but tomatoes and basil do not freeze well. To freeze the bread, wrap it tightly in foil or plastic wrap. For cheese, place it in an airtight bag. When you’re ready to eat, thaw the bread and cheese in the fridge overnight. To reheat your sandwich without losing texture, use a skillet. Heat it on medium-low heat. This helps the bread get crispy again. You can also use a toaster oven to warm it up. If you prefer the microwave, place a damp paper towel over the sandwich to keep it moist. Heat for 15 seconds at a time until warm. This keeps your sandwich tasty and enjoyable! A Fresh Caprese sandwich is a simple yet tasty meal. It features fresh mozzarella, tomatoes, and basil. The sandwich comes from Italy, where it is loved for its bright flavors. The name "Caprese" means "from Capri," a beautiful island in Italy. This dish highlights fresh ingredients, making it a favorite for summer picnics or quick lunches. Yes, you can make a Caprese sandwich ahead of time. Here are some tips: - Prep the ingredients: Slice the tomatoes and mozzarella in advance. - Store separately: Keep the bread, tomatoes, and cheese in different containers. - Assemble later: Put the sandwich together just before you eat. This keeps the bread from getting soggy. - Use fresh basil: Add basil right before serving for the best flavor. To make a vegan Caprese sandwich, swap out the cheese. Try these substitutions: - Use vegan mozzarella: Look for brands that mimic the taste and texture of dairy cheese. - Add avocado: This creamy fruit adds richness and healthy fats. - Try hummus: Spread a layer of hummus for extra flavor and creaminess. These changes keep your sandwich delicious and plant-based. To find a great Caprese sandwich, look for these signs: - Fresh ingredients: The tomatoes should be ripe, and the mozzarella should be soft. - Basil quality: Fresh basil leaves should look vibrant and green. - Artisan bread: Look for rustic Italian bread that is crusty yet soft. - Balsamic glaze: A good sandwich will have a drizzle of high-quality balsamic. When you spot these quality indicators, you are likely to enjoy a delicious Caprese sandwich. For a detailed recipe, check out the Full Recipe. In this blog post, we explored the delicious world of Caprese sandwiches. We covered essential ingredients, step-by-step instructions, storage tips, and tasty variations. Fresh ingredients, like ripe tomatoes and basil, truly make a difference. Remember to enjoy layering flavors to enhance your meal. Whether you stick with classic options or try new twists, each bite is delightful. With the right tips, you can create a fantastic sandwich to share. Now, it's time to dive into making your perfect Caprese sandwich!

Fresh Caprese Sandwich Delightful and Simple Recipe

If you love fresh flavors and simple cooking, you’ll adore the Fresh Caprese Sandwich. This easy recipe combines juicy tomatoes,

To make Lemon Tiramisu, you need these simple and fresh ingredients: - 10 ladyfinger biscuits - 1 cup lemon curd - 1 cup mascarpone cheese - 1 cup heavy cream - 1/2 cup powdered sugar - 1 tablespoon lemon zest - 1/2 teaspoon vanilla extract - 1 cup brewed green tea, cooled - Fresh mint leaves for garnish Each ingredient plays a key role in creating a light and zesty dessert. The ladyfingers soak up the green tea, adding a soft texture. The lemon curd gives a bright and tangy flavor. Mascarpone cheese and heavy cream create a rich, creamy base. Powdered sugar balances the zestiness. Lemon zest adds an aromatic touch, while vanilla extract rounds out the flavors. Finally, fresh mint leaves not only look great but also add a refreshing taste. You can easily find these ingredients at any grocery store. For the best flavor, use fresh lemon juice and high-quality mascarpone cheese. If you want to elevate your dessert, consider making your own lemon curd. It adds a personal touch and tastes amazing. For the full recipe, follow the steps outlined, and enjoy this delightful treat! - In a large bowl, combine: - 1 cup mascarpone cheese - 1 cup heavy cream - 1/2 cup powdered sugar - 1 tablespoon lemon zest - 1/2 teaspoon vanilla extract Whip the mixture until it is smooth and fluffy. You want to see soft peaks form. This step is key to a light texture. - Quickly dip each ladyfinger into 1 cup of cooled green tea. Avoid soaking them too long. - Place half of the dipped ladyfingers in a single layer in a 9x9-inch dish. This layer adds a nice flavor while keeping the dessert light. - Spread 1 cup of lemon curd evenly over the ladyfingers. - Spoon half of the whipped mascarpone mixture over the lemon curd and spread it out evenly. - Add another layer of dipped ladyfingers on top. - Follow with the remaining lemon curd and finish with the rest of the mascarpone mixture. Smooth the top with a spatula. Chill the dessert in the fridge for at least 4 hours. You can also leave it overnight for the best flavor. Enjoy making this lemon tiramisu delight! For the complete recipe, check out the Full Recipe. To make your lemon tiramisu creamy, start with a chilled bowl. Cold bowls help the cream whip better. Use chilled beaters too for the best results. Whip the mixture until it is fluffy and forms soft peaks. Be careful not to overmix. Overmixing can make the cream too stiff and less smooth. For a fresh taste, use homemade lemon curd. It adds a bright flavor that store-bought can't match. You can also adjust the sugar levels to fit your taste. If you like it sweeter, add a bit more sugar. If you prefer a tangy taste, reduce the sugar slightly. This way, you can make the dessert just right for you. {{image_2}} You can play with flavors by using other citrus fruits. Try lime or orange instead of lemon. Both will give a fresh twist. Lime brings a tart taste. Orange adds a sweet note. You can also mix lemon with flavored liqueurs. Consider limoncello or orange liqueurs for a fun kick. These options will create a unique taste. You can impress your guests with these twists! If you need a gluten-free dessert, you can swap the ladyfingers. Look for gluten-free ladyfinger cookies. They work just as well in this recipe. You can also use gluten-free sponge cake. Just cut it into strips. This way, everyone can enjoy your lemon tiramisu. For a vegan version, you can get creative with ingredients. Use coconut cream instead of mascarpone. It gives a rich flavor and creamy texture. You can also make or buy vegan lemon curd. This will keep your dessert plant-based. Both swaps will make a delightful treat without dairy. Your vegan friends will love this version! For a full recipe, check out the complete guide to make the perfect lemon tiramisu. To keep your lemon tiramisu fresh, store it in the fridge. Cover the dish tightly with plastic wrap. This helps prevent it from absorbing other smells. The dessert will stay fresh for 3 to 4 days. After this time, the flavors may fade. If you want to save some for later, you can freeze lemon tiramisu. First, make sure it is in an airtight container. You can also wrap it tightly in plastic wrap and foil. When you are ready to eat it, take it out of the freezer. Place it in the fridge for several hours to defrost. Never defrost it at room temperature. This method keeps the texture and flavor intact. Enjoy your refreshing dessert even after freezing! Lemon tiramisu should chill for at least four hours. I recommend chilling it overnight for the best taste. This time allows the flavors to mingle and the dessert to set. If you’re in a hurry, four hours will still give you a delicious result. Yes! You can make lemon tiramisu a day or two before your event. This dessert holds up well and can even taste better after resting. Just cover it well in the fridge to keep it fresh. This makes it a great choice for parties or gatherings. If you can’t find ladyfingers, you have options. Use sponge cake or pound cake cut into strips. You can also try graham crackers, though they will change the texture. Just remember to dip them in the green tea to keep the layers moist. This recipe for lemon tiramisu combines tasty ingredients and easy steps. You learned how to whip up a creamy mixture and layer ladyfingers with lemon curd. Remember these tips for great flavor and texture. You can even try different citrus fruits or make it gluten-free or vegan. Store your dessert carefully to keep it fresh. Now, you can impress friends and family with this zesty treat anytime! Enjoy making this twist on a classic dessert.

Lemon Tiramisu Delightful and Refreshing Dessert Treat

Craving a dessert that’s both refreshing and indulgent? Look no further than Lemon Tiramisu! This delightful twist on the classic

- 1 lb large shrimp, peeled and deveined - 2 tablespoons olive oil - 2 tablespoons chipotle in adobo sauce, minced - Juice and zest of 2 limes - 1 teaspoon garlic powder - 1 teaspoon ground cumin - Salt and pepper to taste - 1 cup cooked brown rice - 1 cup black beans, rinsed and drained - 1 cup corn (fresh or frozen) - 1 avocado, diced - 1 cup cherry tomatoes, halved - Fresh cilantro, for garnish This dish is full of flavor and color. The shrimp is the star. You want fresh, large shrimp for the best taste. The olive oil helps the spices stick. Chipotle in adobo adds a smoky kick. Lime juice and zest brighten the dish. Garlic powder and cumin give depth to the flavor. For the base, I use brown rice. It adds heartiness and fiber. Black beans and corn offer protein and sweetness. Diced avocado adds creaminess. Cherry tomatoes bring freshness. Finally, fresh cilantro adds a burst of flavor. Each ingredient plays an important role. When you gather these items, you set yourself up for success. For the full recipe, be sure to check the instructions. Enjoy cooking! To start, gather a large bowl. In this bowl, combine the following marinade ingredients: - 2 tablespoons olive oil - 2 tablespoons chipotle in adobo sauce, minced - Juice and zest of 2 limes - 1 teaspoon garlic powder - 1 teaspoon ground cumin - Salt and pepper to taste Mix these ingredients well. Then, add 1 pound of large shrimp, peeled and deveined. Stir until the shrimp are evenly coated. Let them marinate for about 20 minutes. This lets the flavors soak in. While the shrimp marinate, cook 1 cup of brown rice as directed on the package. If you choose frozen corn, prepare it as well. Steam or microwave the corn until it’s heated through. This forms a great base for your bowl. Next, heat a large skillet over medium-high heat. When hot, add the marinated shrimp. Cook for about 2-3 minutes on each side. You want them to turn pink and opaque. Once done, remove the shrimp from heat and set them aside. Now, it’s time to build your bowl. Start with a layer of the cooked brown rice. Next, add a scoop of black beans, followed by the corn and cooked shrimp. Then, top it off with diced avocado and halved cherry tomatoes. For a fresh finish, garnish with cilantro. If you like, drizzle extra lime juice over the top for even more flavor. Follow this method for a delicious Chipotle Lime Shrimp Bowl. For the full recipe, refer back to the main instructions. Enjoy the burst of flavors! The right marinating time boosts flavor. I recommend marinating the shrimp for 20 minutes. This allows the shrimp to soak in all those tasty spices. If you marinate too long, the shrimp can become mushy. To tell when shrimp are properly cooked, look for a few signs. Cooked shrimp turn pink and opaque. They should curl into a C shape. If they curl tightly into an O, they might be overcooked. Always keep an eye on them while cooking. Presenting your bowl well makes it more fun to eat. I like to use deep plates to show off the colors. Start with a layer of brown rice. Then, add black beans, corn, and shrimp. Top with diced avocado and cherry tomatoes. Pairing lime wedges with your bowl adds extra zest. Just squeeze some lime juice on top before eating. It brightens the flavors and gives a fresh taste. For a final touch, sprinkle fresh cilantro on top. This adds color and flavor! {{image_2}} You can change the shrimp for other proteins. Chicken or tofu works great. For chicken, use boneless thighs or breasts. Tofu should be firm and pressed. You can also swap the beans or grains. Try pinto beans or quinoa for a twist. Each swap brings new tastes and textures. Add more flavor with spices or hot sauce. Cayenne pepper or smoked paprika can spice things up. You can also use your favorite hot sauce to kick the heat. Customizing vegetable toppings makes the dish unique. Try bell peppers, radishes, or even jalapeños for a fresh crunch. These small changes keep the meal exciting. For a complete guide, check the Full Recipe. You can store leftovers in the fridge for up to three days. Make sure to place the shrimp bowl in an airtight container. This keeps the shrimp juicy and the veggies fresh. When you're ready to eat, reheat gently. Use the microwave or a skillet over low heat. Freezing is a great way to save the Chipotle Lime Shrimp Bowl. You can freeze the shrimp and rice separately. Store them in freezer-safe bags. This helps keep the flavors intact. To thaw, place the shrimp and rice in the fridge overnight. When it's time to eat, reheat the shrimp in a skillet. Heat the rice in the microwave. Make sure everything is hot before serving. Enjoy that fresh taste! You can use smoked paprika or cayenne pepper instead. These spices give a smoky heat. If you want less heat, try sweet paprika. You can also mix in a bit of hot sauce for a kick. Yes, you can! Use grilled vegetables or tofu instead of shrimp. Marinate the tofu like shrimp for great flavor. You can also add more beans or chickpeas for protein. This recipe is already dairy-free as written. Just skip any cheese toppings. Instead, add more avocado for creaminess. You can also drizzle olive oil for extra flavor. Consider serving tortilla chips or a fresh salad on the side. You can also add a corn salsa for brightness. A simple lime wedge can enhance flavors too. Absolutely! This shrimp bowl stores well. Keep the shrimp, rice, and veggies in separate containers. Assemble just before serving for the best taste. You can check local grocery stores or meal delivery services. Many places offer ready-to-eat versions. Look for them in the frozen or prepared food sections. For the full recipe, visit our detailed guide to create your own at home. This blog post shared a simple, tasty recipe for Chipotle Lime Shrimp Bowls. You learned how to marinate shrimp, cook rice, and layer flavors for a filling meal. Remember, you can swap ingredients and customize your bowl to fit your taste. Feel free to play with spices and toppings to make it your own. With easy storage tips, this dish is perfect for meal prep. Enjoy your cooking and share your creations!

Savory Chipotle Lime Shrimp Bowl Recipe and Tips

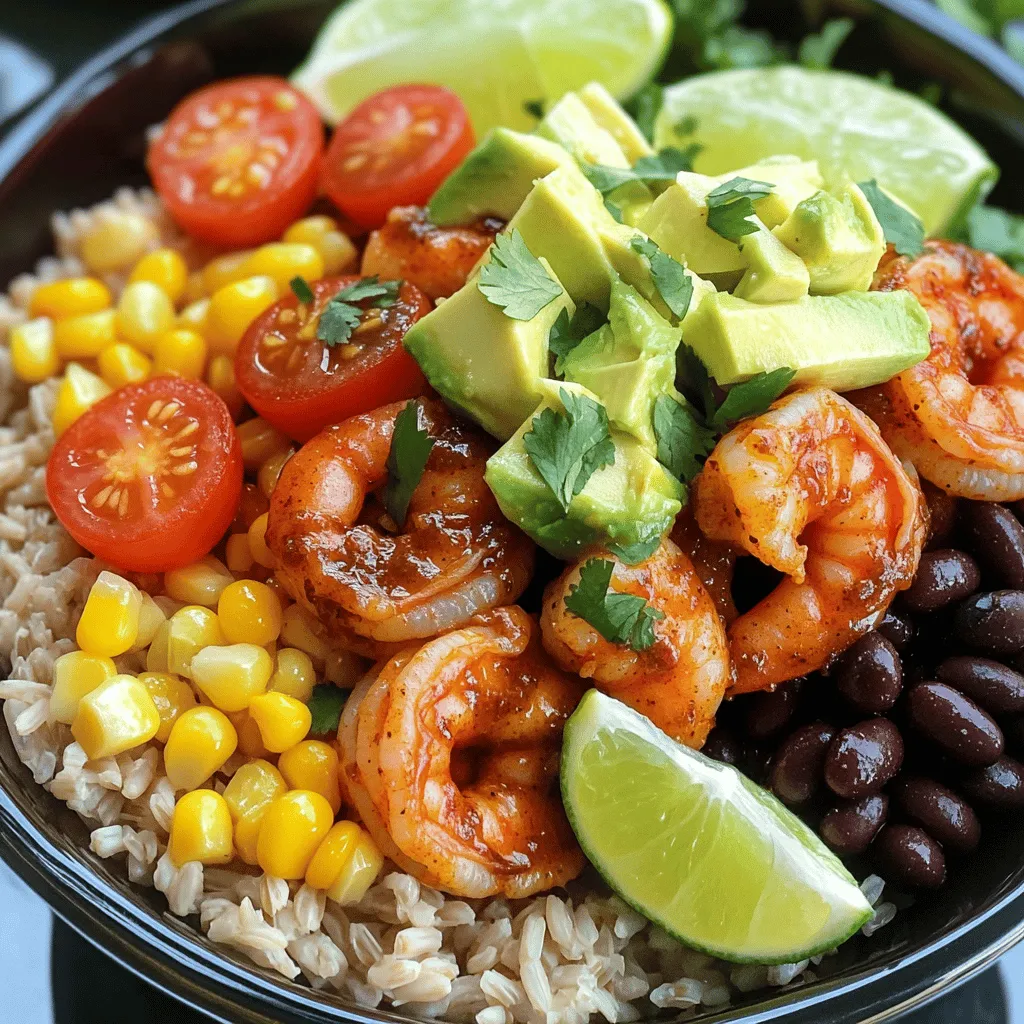
Looking to spice up your dinner? Try my Savory Chipotle Lime Shrimp Bowl! This vibrant dish combines shrimp marinated in

- 1 cup glutinous rice - 1 ½ cups coconut milk - ½ cup sugar - ½ teaspoon salt - 2 ripe mangoes, peeled, pitted, and sliced - 1 tablespoon sesame seeds - Fresh mint leaves for garnish - Steamer - Cheesecloth - Saucepan To make Tropical Mango Sticky Rice, gather these items first. The glutinous rice is key. It gives the dish its unique sticky texture. Coconut milk adds rich creaminess and sweetness. Sugar helps balance flavors, while salt enhances them. Ripe mangoes bring freshness and brightness to the dish. You can add sesame seeds to give a nice crunch. Fresh mint leaves can add a pop of color and flavor. Both are optional but worth trying. For cooking, you need a steamer to cook the rice properly. Cheesecloth helps keep the rice from falling through the steamer. A saucepan is needed for making the coconut sauce. All these ingredients and tools work together to create a delightful dessert. You will love how simple and tasty it is to prepare this dish. For the full recipe, check out the details above. To start, you need to rinse the glutinous rice. Place the rice in a bowl and cover it with cold water. Swirl the rice gently with your hands. Keep rinsing until the water runs clear. This step removes excess starch and helps achieve the right texture. Next, soak the rice for optimal texture. After rinsing, soak the rice in water for 6 to 8 hours or overnight. Soaking allows the rice to absorb water, making it softer and easier to cook. Now, let’s move on to steaming the rice. Drain the soaked rice and prepare your steamer. You can use a bamboo or metal steamer lined with cheesecloth. Steam the rice for about 30 to 40 minutes. The rice should be tender and slightly sticky when done. To check for doneness, take a small scoop of rice and taste it. It should be soft and chewy. If it needs more time, steam it for a few more minutes. While the rice is steaming, prepare the coconut sauce. In a small saucepan, combine 1 ½ cups of coconut milk, ½ cup of sugar, and ½ teaspoon of salt. Heat the mixture over low to medium heat. Stir gently until the sugar dissolves completely. Be careful not to boil the sauce. Boiling can change the texture and flavor. Once the sugar dissolves, remove the saucepan from the heat and set it aside. For the complete recipe, check the [Full Recipe]. Soaking the glutinous rice is very important. It helps the rice absorb water and become soft. I recommend soaking it for about 6-8 hours or overnight. This step makes a big difference in the final dish. When it comes to steaming, use a bamboo or metal steamer lined with cheesecloth. Make sure to check the water levels in the steamer. You want to avoid burning the rice. Steam the rice for about 30-40 minutes. It should be tender but not mushy. For a beautiful presentation, place a scoop of sticky rice on one side of the plate. Arrange sliced mangoes on the other side. Drizzle some coconut sauce over the rice and mango. You can also sprinkle sesame seeds on top for crunch. Fresh mint leaves add a pop of color and flavor. Pair this dessert with a refreshing drink. Coconut water or a light iced tea works well. The flavors will balance nicely. You can add flavors to the coconut sauce. Try mixing in a little vanilla extract or a pinch of cinnamon. These simple additions can elevate the dish. Using different fruits can also bring new life to this recipe. Pineapple, bananas, or even berries can work. Just make sure to slice them thinly for easy pairing with the rice. For more details on making this dish, check out the Full Recipe. {{image_2}} You can switch up the mango for other tropical fruits. Pineapple and jackfruit work great here. Both add a sweet and tangy taste. You can also try banana for a softer texture. Each fruit gives a unique twist to the dish. Seasonal fruits can also shine in this recipe. Use peaches in summer or apples in fall. They add freshness and a new flavor. Experimenting with different fruits makes the dish fun and exciting. If you want a vegan option, this recipe is easy to adapt. The main ingredients are already plant-based. Just make sure the sugar you use is vegan-friendly. Many sugars are processed with bone char. Look for brands that are labeled vegan. For those watching sugar, there are many substitutes. You can use honey or maple syrup instead. These options add sweetness without refined sugar. Stevia or monk fruit are good low-calorie choices too. Just adjust the amount to taste. You can take this recipe global by adding fusion elements. For example, try a Thai twist with a splash of lime juice. It adds a zesty kick. You can also mix in some toasted coconut for texture. Incorporating different cuisines can lead to fun results. Think of adding spices like cardamom or cinnamon. They bring warmth and depth to the flavor. This way, you can create a unique dessert that reflects your style. For the full recipe, check out the details above. Enjoy making this delightful treat! To keep your mango sticky rice fresh, store it properly. Place leftovers in an airtight container. This helps prevent the rice from drying out. You should refrigerate it if you plan to eat it within three days. If you want to keep it longer, freezing is a good option. When reheating sticky rice, use a gentle method. You can steam it again to maintain its soft texture. If you prefer the microwave, add a splash of water. This adds moisture and helps keep it fluffy. Heat it in short bursts, checking often to avoid overcooking. Freezing mango sticky rice is easy. Portion it into small servings before freezing. Use freezer-safe bags or containers. Make sure to remove as much air as possible. When you’re ready to eat, thaw it in the fridge overnight. Reheat it as mentioned earlier for the best taste and texture. For the full recipe, check out the Tropical Mango Sticky Rice Delightful Dessert Recipe. The best type of rice for sticky rice is glutinous rice. This rice is also known as sweet rice or waxy rice. Glutinous rice has a high starch content, which helps it become sticky when cooked. This unique texture makes it perfect for desserts, like mango sticky rice. Be sure to rinse it well before soaking. This step removes excess starch and helps achieve the right consistency. You can make mango sticky rice in advance. Prepare the rice and coconut sauce a few hours before serving. Store the rice in an airtight container. Keep the coconut sauce separate to drizzle on top later. This keeps the rice from becoming too soggy. When ready to serve, warm the rice gently. This simple timing tip helps maintain flavor and texture. You can tell sticky rice is done by its texture. The grains should be tender and slightly sticky. When you press it between your fingers, it should hold together but not be mushy. If you see any white, hard grains, it needs more time. Steam for an additional 5-10 minutes if needed. Keep checking until it reaches that perfect consistency. Yes, mango sticky rice is gluten-free. Both glutinous rice and coconut milk do not contain gluten. This makes it safe for those with gluten sensitivities. Just ensure that any additional toppings or sauces are also gluten-free. Enjoy this sweet treat without worry! In this post, we explored the main ingredients for mango sticky rice, including glutinous rice, coconut milk, and mangoes. I provided clear step-by-step instructions for preparing and serving this delightful dish. You learned tips for achieving the perfect texture and variations to suit different tastes. Finally, remember this dish brings joy to any meal. Enjoy making mango sticky rice, and don't be afraid to experiment. Your kitchen can be a place of creativity and fun!

Tropical Mango Sticky Rice Delightful Dessert Recipe

If you’re craving a delightful dessert that bursts with flavor, Tropical Mango Sticky Rice is your answer! This sweet treat

To make these tasty tacos, gather these key ingredients: - 1 lb ground beef - 1 lb Italian sausage, casing removed - 1 cup pepperoni, sliced - 1 small red onion, diced - 1 cup mushrooms, sliced - 1 cup shredded mozzarella cheese - 1 cup pizza sauce - 8 small flour tortillas - 1 teaspoon Italian seasoning - 1 tablespoon olive oil - Salt and pepper to taste - Fresh basil, for garnish These ingredients give you a mix of rich flavors. The beef and sausage add a hearty base. The pepperoni and cheese bring that classic pizza taste. You can customize your tacos with these fun toppings: - Sliced olives - Diced jalapeños - Sour cream - Extra cheese - Chopped green onions These toppings add texture and flavor. They let you make each taco your own. If you want to mix things up, consider these alternatives: - Ground turkey instead of beef - Cauliflower crust for a low-carb route - Vegan sausage for a plant-based option - Whole wheat tortillas for a healthier choice Using these alternatives can change the taste and fit different diets. Don't be afraid to experiment and find what you love best! Start by heating a large skillet over medium heat. Add 1 tablespoon of olive oil. Once it’s hot, add 1 pound of ground beef and 1 pound of Italian sausage, casing removed. Cook the meat until it’s brown, about 5 to 7 minutes. Use a spoon to break it apart as it cooks. Drain any extra fat from the skillet. Next, add 1 cup of diced red onion and 1 cup of sliced mushrooms. Cook for another 5 minutes. The onions should be clear, and the mushrooms should be soft. Season with salt, pepper, and 1 teaspoon of Italian seasoning. Stir in 1 cup of sliced pepperoni and half of 1 cup of pizza sauce. Let this mixture simmer for 2 to 3 minutes. Now it’s time to build the tacos. Warm 8 small flour tortillas in a separate pan or microwave until they are soft. Spoon the meat mixture into the center of each tortilla. Don’t be shy; fill them up! Top each taco with 1 cup of shredded mozzarella cheese and a drizzle of the remaining pizza sauce. Fold the tortillas over to create a taco shape. Place the tacos seam side down in a hot skillet. Let them cook for about 2 to 3 minutes until the shells turn golden and crispy. Flip each taco and repeat on the other side. Once they are done, remove them from the heat. For a final touch, garnish with fresh basil before serving. Enjoy your Meat Lovers Pizza Tacos! For the full recipe, check out the detailed instructions above. To get crispy taco shells, warm the tortillas first. A hot skillet helps too. After you fill the tacos, place them seam side down. Cook each side until golden brown. This method makes the shells crunchy and tasty. Mixing flavors is key for great tacos. Start with good meat. Ground beef and Italian sausage pair well. Add onions and mushrooms for depth. Use Italian seasoning for that classic pizza taste. Don’t forget the pepperoni! It adds a smoky flavor that everyone loves. Serve your Meat Lovers Pizza Tacos with a side of pizza sauce for dipping. A fresh salad can balance the rich flavors. Pair with a light drink, like lemonade or iced tea. Don’t forget fresh basil on top for a nice touch. These simple tips make your meal even better. For the full recipe, check the link. {{image_2}} You can make these tacos veggie-friendly. Start by swapping the meat for tasty veggies. Use ingredients like mushrooms, bell peppers, and zucchini. Sauté them until soft. You can add plant-based sausage for extra flavor. Use the same spices to keep the taste bold. Top with cheese or vegan cheese. You’ll get a hearty meal that satisfies everyone. If you need a low-carb option, try using lettuce wraps. Instead of flour tortillas, use large lettuce leaves. They are fresh and crunchy. Fill them with the meat mixture as usual. You can also use cauliflower tortillas for a tasty twist. This way, you cut carbs but keep all the fun. Want to kick it up a notch? Add some heat to your tacos. You can mix in jalapeños or crushed red pepper flakes to the meat. If you love spicy, try adding hot sauce on top. This can bring a new level of flavor. You can also use spicy sausage instead of regular sausage. Adjust the heat to your taste for a fun twist. For the full recipe, check out the detailed steps provided! To store leftover taco mixture, place it in an airtight container. Make sure the mixture is cool before sealing the lid. Keep it in the fridge for up to three days. You can also separate it into smaller portions for easy meals later. If you wish to freeze the taco mixture, use freezer-safe bags. Squeeze out the air and seal tightly. Label the bags with the date. This mixture can last up to three months in the freezer. When ready to use, thaw in the fridge overnight. To reheat the taco mixture, place it in a skillet over medium heat. Stir often until heated through. You can also microwave it in a bowl, covered, for about two minutes. Just make sure to stir halfway to heat evenly. Enjoy your Meat Lovers Pizza Tacos again with ease! Yes, you can prepare the meat mixture ahead of time. Cook the meat and let it cool. Store it in an airtight container in the fridge for up to two days. When ready to eat, just reheat the mixture. Warm the tortillas fresh for the best taste. This makes meal prep easy and quick. If you want to swap pizza sauce, use marinara sauce or tomato sauce. Both add great flavor. You could also try barbecue sauce for a smoky twist. Experiment with different sauces to find what you like best. Yes, you can make this recipe gluten-free. Use corn tortillas instead of flour tortillas. They taste great and hold the filling well. Also, check that your meat and sauces are gluten-free. This way, everyone can enjoy these tasty tacos! You now know how to make Meat Lovers Pizza Tacos, from the ingredients to cooking. You learned about tasty options and clever tips for that perfect crunch. Remember to get creative with toppings and flavors to suit your taste. You can also store leftovers easily or even freeze them for later. I hope you feel ready to try this fun twist on pizza. Enjoy your cooking and share these tacos with friends or family!

Meat Lovers Pizza Tacos Simple and Delicious Recipe

Are you ready to spice up your taco night? I’m excited to share my Meat Lovers Pizza Tacos recipe. This

To make the perfect salted caramel bars, you'll need these main ingredients: - 1 cup unsalted butter, softened - 1 cup granulated sugar - 1 cup brown sugar, packed - 3 large eggs - 2 teaspoons vanilla extract - 2 cups all-purpose flour - 1 teaspoon baking powder - ½ teaspoon salt - 1 cup caramel sauce (store-bought or homemade) - ½ teaspoon sea salt flakes (for topping) These ingredients create a rich and sweet base. The caramel sauce adds a gooey layer, and the sea salt gives it that perfect touch. Here's the equipment you need for this recipe: - 9x13-inch baking pan - Mixing bowls - Electric mixer or whisk - Measuring cups and spoons - Rubber spatula - Parchment paper (optional for easy removal) Using the right tools helps make the process easier and more fun. Feel free to customize your bars with these optional ingredients: - Chopped nuts (like pecans or walnuts) - Chocolate chips for added richness - Flavored extracts (like almond or hazelnut) - Sea salt caramel drizzle for garnish These additions can make your salted caramel bars unique and even more delicious. First, gather all your ingredients. You will need butter, sugar, eggs, and more. Start by preheating your oven to 350°F (175°C). Grease a 9x13-inch baking pan or use parchment paper. This helps with easy removal later. In a large bowl, cream together the softened butter, granulated sugar, and brown sugar. Mix until it looks light and fluffy. Next, beat in the eggs one at a time. Add the vanilla extract and stir it well. In another bowl, whisk the flour, baking powder, and salt together. Slowly mix the dry ingredients into the wet mixture. Stop mixing when everything is just combined. Now it’s time to assemble the bars. Take half of the cookie dough and spread it into the baking pan. Make sure to smooth it out evenly. Next, pour the caramel sauce on top. Leave a small margin around the edges to avoid overflow. Crumble the rest of the cookie dough over the caramel layer. Press it down gently to seal it. This layer helps keep the caramel in place. Finally, sprinkle the sea salt flakes on top. This adds a nice touch and enhances the flavor of the caramel. Bake your bars in the preheated oven for 25-30 minutes. They should turn golden brown on the edges and firm in the center. When done, take them out and let them cool in the pan. This step is important; cooling allows the bars to set properly. Once cool, cut them into squares or bars. Enjoy this decadent treat, and don't forget to check the Full Recipe for more details! To get the best caramel, heat it slowly. This lets the sugar melt evenly. Stir gently to avoid burning. The caramel should be smooth and glossy when done. You can use store-bought caramel or make your own. If you make your own, use a heavy pot. Watch it closely, as sugar can go from perfect to burnt quickly. To cut the bars neatly, let them cool completely. Use a sharp knife for clean cuts. You can warm the knife slightly for easier slicing. If you want perfect squares, score the bars lightly before cutting. This helps guide your knife. Always cut in straight lines for a nice look. One common mistake is not cooling the bars long enough. If you cut them too soon, they may fall apart. Another mistake is using too much heat when making caramel. This can cause it to harden. Avoid these pitfalls for the best salted caramel bars. For your full recipe, follow the steps carefully to ensure success. {{image_2}} You can make your salted caramel bars even better by adding chocolate chips. Just mix in one cup of semi-sweet or dark chocolate chips into the dough. This will add a rich flavor and a nice texture. The warm chocolate will blend with the caramel, making each bite a delight. You can even sprinkle some chips on top before baking for extra chocolate goodness. Want to add some crunch? Try making nutty salted caramel bars. Add one cup of chopped nuts like pecans or walnuts to the dough. The nuts will give a lovely texture and flavor. If you like, you can toast the nuts lightly before mixing them in. This will bring out their natural oils and make them even tastier. You can enjoy these bars while sticking to a vegan diet. Swap the butter for plant-based butter. For the eggs, use flax eggs made by mixing one tablespoon of ground flaxseed with three tablespoons of water. Let it sit for a few minutes until it thickens. Use a vegan caramel sauce to make it fully plant-based. These bars will be just as tasty and satisfy your sweet tooth. Try these variations to find your favorite twist on salted caramel bars. Each version brings a unique taste and style to the classic treat! For the original recipe, check out the Full Recipe. To keep your salted caramel bars fresh, place them in an airtight container. Layer the bars with parchment paper to avoid sticking. Store them at room temperature for up to five days. If you want to keep them longer, try refrigerating them. They can last up to two weeks in the fridge. Just remember, the colder they get, the firmer they become. Freezing salted caramel bars is easy. Cut them into squares or bars first. Wrap each piece tightly in plastic wrap. Then, place the wrapped bars in a freezer-safe bag. They will stay good in the freezer for up to three months. When you're ready to enjoy, just thaw them in the fridge overnight. To reheat salted caramel bars, preheat your oven to 350°F (175°C). Place the bars on a baking sheet. Heat for about 10 minutes. They will become warm and soft, just like fresh out of the oven. You can also heat them in the microwave for about 15 seconds per bar. Top with extra caramel sauce for a delightful treat! For the complete method, refer to the Full Recipe. Yes, you can use store-bought caramel sauce. It saves time and still tastes good. Just pour it over the dough as directed in the recipe. If you want a richer taste, try making your own caramel. Homemade sauce gives a fresh touch. Salted caramel bars can last about a week. Store them in an airtight container at room temperature. If you keep them in the fridge, they can last up to two weeks. Just make sure they are covered well to prevent drying out. Salted caramel bars pair well with vanilla ice cream or whipped cream. You can also serve them with fresh fruit like apples or pears. A drizzle of chocolate sauce adds extra flavor. These options make the treat even more special. No, salted caramel bars are not gluten-free. They contain all-purpose flour, which has gluten. If you need a gluten-free option, use a gluten-free flour blend. This way, you can still enjoy the bars without worry. To make salted caramel sauce at home, you need sugar, butter, and cream. Here’s a simple method: - Cook 1 cup of sugar in a pan over medium heat. - Stir until it melts and turns amber. - Add 6 tablespoons of butter and mix well. - Slowly pour in ½ cup of heavy cream. Stir until smooth. - Add a pinch of salt, and you’re done! The Full Recipe for Salted Caramel Delight Bars includes simple steps. You start by creaming butter and sugars, then mix in eggs and vanilla. After that, combine the dry ingredients. Layer half the dough, add caramel, and top with the rest of the dough. Sprinkle sea salt on top and bake! Enjoy the rich flavor and gooey texture. Making salted caramel bars is a fun and rewarding experience. We covered the main ingredients, equipment, and many ways to customize your bars. I shared step-by-step instructions to help you bake them perfectly every time. Tips for achieving the right caramel texture and cutting your bars will save you time. You can also explore tasty variations and learn the best storage methods. Enjoy these bars fresh, or share with friends. Remember, the right ingredients and methods make all the difference. Happy baking!

Salted Caramel Bars Decadent and Irresistible Treat

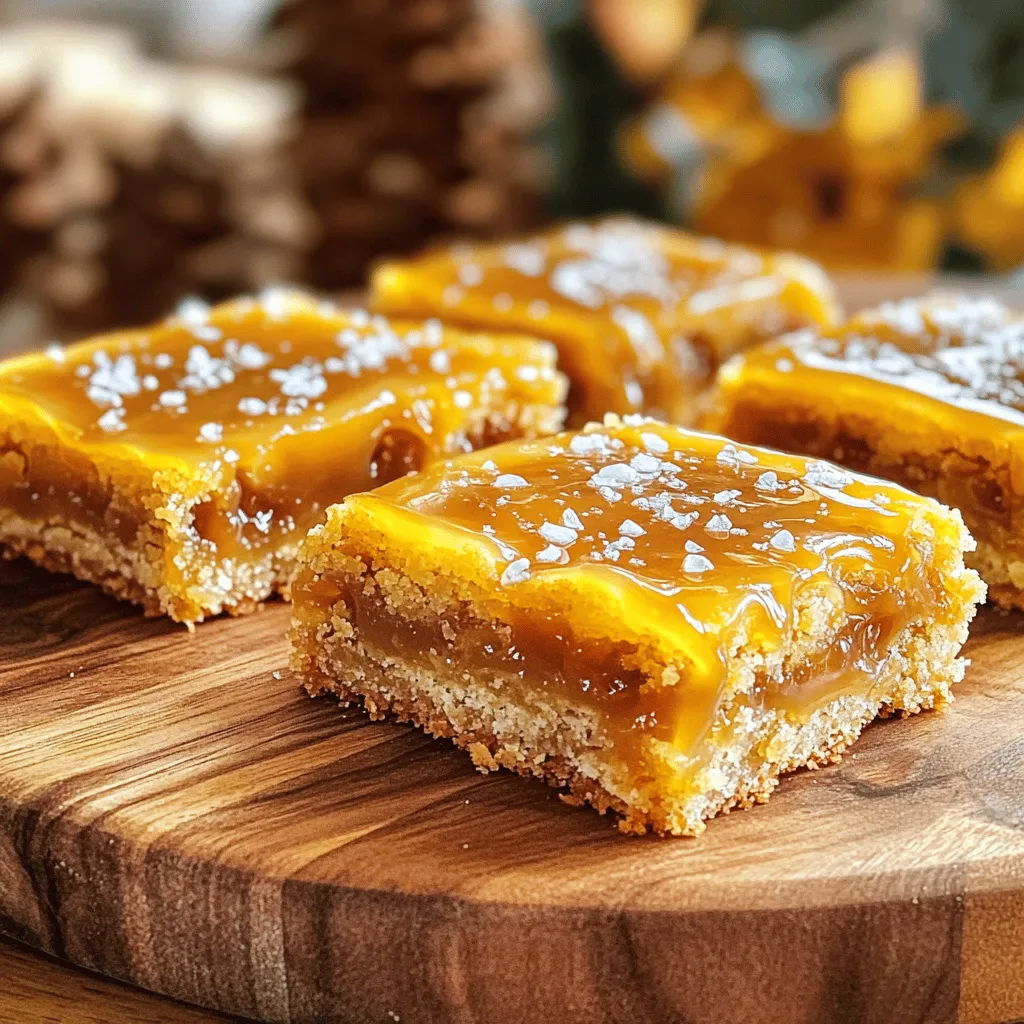
If you love sweet treats, you’re in for a real delight! These Salted Caramel Bars are rich, chewy, and topped

To create a delightful Pineapple Cream Cake, you need some key ingredients: - 2 cups all-purpose flour - 1 ½ teaspoons baking powder - ½ teaspoon baking soda - ½ teaspoon salt - ½ cup unsalted butter, softened - 1 cup granulated sugar - 3 large eggs - 1 teaspoon vanilla extract These ingredients form the base of your cake batter. The all-purpose flour gives the cake structure. Baking powder and baking soda help it rise. Salt enhances the sweetness. Butter and sugar make the cake rich and sweet. The toppings and fillings add flavor and fun. Here’s what you need: - 1 cup crushed pineapple, drained - 1 cup heavy cream - 2 tablespoons powdered sugar - ½ teaspoon coconut extract - Toasted coconut flakes for garnish Crushed pineapple gives a burst of tropical taste. Heavy cream, whipped with powdered sugar, creates a fluffy frosting. Coconut extract adds a hint of coconut flavor. Finally, toasted coconut flakes make the cake look and taste amazing! You can find the Full Recipe for this delightful cake to start your baking adventure! First, preheat your oven to 350°F (175°C). Grease and flour two 9-inch round cake pans. This helps the cake come out easily. In a medium bowl, mix 2 cups of all-purpose flour, 1 ½ teaspoons of baking powder, ½ teaspoon of baking soda, and ½ teaspoon of salt. Set this bowl aside for later. In a large bowl, cream together ½ cup of softened unsalted butter and 1 cup of granulated sugar. Mix until it becomes light and fluffy, which takes about 3-4 minutes. Then, add 3 large eggs one at a time. Mix well after each egg. Next, stir in 1 teaspoon of vanilla extract. Now, gradually add the flour mixture to the butter mixture. Alternate with 1 cup of crushed pineapple that you have drained. Mix until just combined. This blend gives your cake a wonderful flavor. Once your batter is ready, divide it evenly between the two prepared cake pans. Smooth the tops with a spatula to create an even surface. Now, bake in the preheated oven for 25-30 minutes. To check for doneness, insert a toothpick into the center of the cake. If it comes out clean, your cake is ready. Let the cakes cool in the pans for about 10 minutes. After that, transfer them to a wire rack to cool completely. For the whipped cream topping, start by whipping 1 cup of heavy cream in a mixing bowl. Whip until soft peaks form. This means the cream should hold its shape but still be smooth. Then, gradually add 2 tablespoons of powdered sugar. Also, mix in ½ teaspoon of coconut extract. Continue to whip until you see stiff peaks. Stiff peaks mean the cream will hold its shape well. Once your cakes are cool, place one layer on a serving plate. Spread a generous layer of whipped cream on top. Then, place the second layer on top. Frost the top and sides with the remaining whipped cream. Finally, sprinkle toasted coconut flakes on top and sides for a tropical touch. For the full recipe, don't forget to check the complete list of ingredients and instructions. To avoid a dry cake, mix the batter well. Start by creaming the butter and sugar until fluffy. This adds air, making your cake light. When adding eggs, mix one at a time. This helps blend the flavors better. For even baking, make sure to divide the batter equally. Use an ice cream scoop or measuring cup for uniformity. Rotate the pans halfway through baking. This ensures that both cakes get the same heat. Garnishing with toasted coconut adds flavor and fun. You can toast coconut flakes in a pan until golden. Then, sprinkle them on top of your cake. When serving, slice the cake carefully. Use a sharp knife dipped in warm water for clean cuts. This keeps the layers intact and looks nice on plates. Overbaking can lead to a dry cake. Check for doneness at 25 minutes. If a toothpick comes out clean, it’s ready. If not, check every few minutes after that. Using undrained pineapple is another common mistake. Always drain the pineapple before adding it. This prevents excess moisture, which can affect the cake's texture. {{image_2}} You can mix things up with different flavors in your Pineapple Cream Cake. Try adding fresh mango or strawberries for a fruity twist. These fruits add sweetness and color. You can also incorporate lime zest. It gives a bright, tangy flavor that pairs well with pineapple. If you need a gluten-free cake, swap out the all-purpose flour for a gluten-free blend. Many blends work well in cakes. For a vegan version, replace eggs with flaxseed meal or applesauce. Use coconut cream instead of heavy cream for the topping. Both options keep the cake moist and tasty. For a new topping, consider cream cheese frosting. It adds a rich, tangy flavor that complements the cake. To make a lighter topping, use yogurt instead of whipped cream. Greek yogurt gives you a creamy texture with fewer calories. Each option will change the cake's taste and make it unique. You can find the [Full Recipe] for more details on making this delicious cake. To keep your pineapple cream cake fresh, store it in the fridge. Place the cake in an airtight container. If you don’t have one, cover it tightly with plastic wrap. This keeps the cake moist and tasty. Avoid leaving it out at room temperature for too long. If you want to save some cake for later, freezing is a great option. Cut the cake into slices. Wrap each slice in plastic wrap tightly. Then, place the slices in a freezer-safe bag. When you are ready to eat, take a slice out. Let it thaw in the fridge overnight for the best texture. Your pineapple cream cake stays fresh for about 4 to 5 days in the fridge. If you freeze it, it can last up to 3 months. However, check for signs of spoilage. Look for any mold or a sour smell. If you see or smell anything off, it’s best to throw it out. Enjoy your cake while it’s still fresh! Yes, you can use fresh pineapple. Fresh pineapple adds a bright flavor. Chop it into small pieces. Make sure to drain it well. Too much juice can make the cake soggy. Canned crushed pineapple is easier and sweeter. Both options work well, but choose based on your taste. If you need a substitute for heavy cream, try coconut cream. It gives a nice flavor. You can also use whipped coconut milk for a lighter option. Both choices make the cake rich and creamy. Other options include Greek yogurt or silken tofu. These will change the texture, but they still work. You can bake the cake a day in advance. Allow it to cool completely first. Wrap each layer in plastic wrap to keep it fresh. Store it in the fridge. When ready, whip the cream and frost the cake. This keeps the cream nice and fluffy. Enjoy the cake within a few days for the best taste. This article shared key ingredients, tips, and steps for a delicious pineapple cream cake. You learned how to prepare the batter, bake, and create the perfect topping. Remember the importance of not overbaking and draining the pineapple well. Feel free to explore new flavors, try different frostings, or adjust for dietary needs. With the right practice, your cake can wow friends and family. Enjoy making this treat, and don’t forget to store any leftovers properly. Happy baking!

Pineapple Cream Cake Delightful and Simple Recipe

If you crave a dessert that’s both delightful and easy to make, you’ll love this Pineapple Cream Cake recipe! I’ll

Older posts
Newer posts
← Previous Page1 … Page82 Page83 Page84 … Page106 Next →
© 2025 My Cooking Cast • Built with GeneratePress

Our Policies

  • Privacy Policy
  • GDPR Policy
  • Terms Of Use
  • Copyright Policy
  • Cookie Policy
  • Disclaimer

More Information​

  • Home
  • Contact
  • About
  • Dinner
  • Appetizers
  • Dessert
©2025, My Cooking Cast About Privacy Policy Back To Top