Skip to content
DisclaimerTerms Of UseGDPR PolicyCookie Policy

My Cooking Cast

  • Home
  • Drinks
  • Appetizers
  • Dinner
  • Dessert
  • About
  • Contact
  • Privacy Policy
DisclaimerTerms Of UseGDPR PolicyCookie Policy

Emma

To make Cuban Sandwich Potato Skins, gather the following ingredients: - 4 large russet potatoes - 1 cup cooked and shredded chicken (or turkey) - 1 cup sliced deli ham - 1 cup Swiss cheese, grated - ½ cup dill pickles, sliced - 2 tablespoons yellow mustard - 2 tablespoons olive oil - Salt and pepper to taste - Fresh cilantro, for garnish These ingredients work together to create a tasty twist on the classic Cuban sandwich. The russet potatoes serve as the perfect base, offering a crispy outside and a fluffy inside. The combination of chicken, ham, and Swiss cheese provides a rich flavor. Dill pickles add a tangy crunch, while mustard ties the flavors together. Don't forget to check the Full Recipe for step-by-step instructions on how to prepare this delicious meal! - Preheat your oven to 400°F (200°C). - Wash the russet potatoes well and dry them. - Poke a few holes in each potato with a fork. This helps steam escape. - Rub the potatoes with olive oil and sprinkle with salt. - Place the potatoes directly on the oven rack. - Bake for 45 minutes to 1 hour. They should be soft when poked with a fork. - After baking, let the potatoes cool a bit. - Cut each potato in half lengthwise and scoop out some flesh. - In a bowl, mix the scooped potato flesh with shredded chicken, sliced ham, yellow mustard, and season with salt and pepper. - Fill each potato skin with this tasty mixture. Pack it in well. - Top each filled potato skin with grated Swiss cheese and add pickles as you like. - Place the filled potato skins back into the oven. - Bake them for another 10-15 minutes. Wait until the cheese is melted and bubbly. This recipe for Cuban sandwich potato skins is fun and easy to make. You can find the full recipe in the earlier section. To make Cuban sandwich potato skins great, the potatoes must be tender. I recommend using large russet potatoes. They have a sturdy skin and hold up well. Bake them until you can easily pierce them with a fork. This usually takes about 45 minutes to 1 hour. Balancing the flavors is key. You want the saltiness of the ham and cheese to shine. The tang from the mustard and pickles adds zest. Mix these ingredients well before filling the potato skins. Taste as you go to ensure a perfect blend. Presentation matters! Serve the potato skins on a colorful platter. You can use vibrant greens, reds, or yellows for a fun look. Drizzle with extra mustard for added flavor. A spicy dipping sauce is also a great choice. It gives a nice kick and pairs well with the potato skins. You will need a few simple tools to make this dish: - Oven - Knife - Baking sheet - Mixing bowl Having these items ready will help you move through the recipe smoothly. With the right tools, your cooking experience will be easier and more enjoyable. Don't forget to check the [Full Recipe](#) for detailed instructions! {{image_2}} You can change up the meats in this dish. Pulled pork works great in place of chicken or ham. It adds a rich flavor. You can also try turkey for a lighter option. For cheese, Swiss is classic, but feel free to use cheddar or pepper jack. Each choice adds its own twist. To make a meatless version, swap the chicken and ham for black beans or sautéed mushrooms. Both options pack a lot of flavor. For cheese, look for vegan cheese or use avocado slices. This keeps the dish creamy and tasty without meat. Want to spice things up? Add jalapeños for heat. They give a nice kick to the skins. You can also serve them with salsa on the side. This adds freshness and complements the rich flavors. Other fun toppings include sour cream or diced tomatoes. These options let you customize your meal. For the full recipe, check out the instructions above! To store leftover Cuban sandwich potato skins, first let them cool. Place them in an airtight container. You can keep them in the fridge for up to three days. To keep them fresh, separate layers with parchment paper. This prevents them from sticking together. To reheat, the oven is best. Preheat it to 350°F (175°C). Place the potato skins on a baking sheet. Heat for 10 to 15 minutes. This method keeps the skins crispy. You can also use a microwave. Just heat for 1-2 minutes, but the texture may not be as good. Yes, you can freeze these potato skins. First, let them cool completely. Wrap each skin in plastic wrap. Then place them in a freezer bag. They can stay frozen for up to three months. To reheat, thaw overnight in the fridge. Then, bake at 350°F (175°C) until hot. Bake the russet potatoes for 45 minutes to 1 hour at 400°F (200°C). This time ensures they become soft and tender. Test them with a fork; if it goes in easily, they are ready. A good bake gives the skins a nice crisp that holds up to the filling. Yes, you can prepare the potato skins in advance. Bake the potatoes and scoop out the flesh. Store the skins in an airtight container in the fridge. You can also mix the filling ahead of time. Just keep it in the fridge until you are ready to bake. This makes meal prep easier and faster. These potato skins pair well with many sides. You can serve them with a fresh salad or some crunchy coleslaw. Dipping sauces like spicy mustard or garlic aioli enhance the meal. For a fun twist, try serving them with plantain chips for added crunch. Yes, sweet potatoes make a tasty alternative. They add a sweet flavor that contrasts nicely with the savory filling. Just adjust the baking time. Sweet potatoes may cook faster, so check them after about 30 minutes. You will enjoy a unique twist on this classic dish. For the complete recipe, check out the Full Recipe. This blog post detailed how to make delicious Cuban sandwich potato skins. We covered ingredients, preparation, baking, and serving tips. You can customize the recipe with different meats or make it vegetarian. Remember to pay attention to baking times for the best results. With these skills, you can serve a tasty dish your friends and family will love. Enjoy this fun twist on a classic appetizer.

Cuban Sandwich Potato Skins Flavorful Meal Idea

If you crave a bold and tasty twist on a classic, you’ll love Cuban Sandwich Potato Skins! This fun dish

To make Sweet & Spicy Gochujang Shrimp, you need simple, fresh ingredients. Here’s the list: - 1 pound large shrimp, peeled and deveined - 2 tablespoons gochujang (Korean chili paste) - 1 tablespoon honey - 1 tablespoon soy sauce - 1 tablespoon sesame oil - 3 cloves garlic, minced - 1 tablespoon fresh ginger, grated - 1 tablespoon rice vinegar - 1 teaspoon lime juice - 2 green onions, chopped (for garnish) - Sesame seeds (for garnish) - Cooked jasmine rice (for serving) Each ingredient plays a key role in creating the dish's unique flavor profile. Gochujang is the star of this dish. It brings heat and depth. The honey adds sweetness, balancing the spice. Soy sauce provides umami, enhancing the shrimp's taste. Sesame oil adds a warm, nutty flavor. Garlic and ginger bring freshness and zing. Rice vinegar adds a touch of acidity, brightening the dish. Finally, lime juice gives a burst of citrus, elevating the overall flavor. Using fresh shrimp is ideal for the best taste and texture. Fresh shrimp offers a sweet, clean flavor. They cook quickly and stay tender. However, frozen shrimp can be a good choice too. They are often flash-frozen, preserving their quality. Just make sure to thaw them properly. Always check for quality, regardless of fresh or frozen. They should smell like the ocean, not fishy. To make the marinade, start by getting a medium bowl. Add these ingredients: - 2 tablespoons gochujang - 1 tablespoon honey - 1 tablespoon soy sauce - 1 tablespoon sesame oil - 3 cloves garlic, minced - 1 tablespoon fresh ginger, grated - 1 tablespoon rice vinegar - 1 teaspoon lime juice Whisk these together until smooth. This mix gives a sweet and spicy kick to the shrimp. Now, add your shrimp to the bowl. Use 1 pound of large, peeled, and deveined shrimp. Toss the shrimp well, so they coat evenly in the marinade. Cover the bowl with plastic wrap. Let the shrimp sit in the fridge for at least 15 minutes. This time helps the flavors soak in. Get a large skillet or wok and heat it over medium-high heat. When the pan is hot, add the marinated shrimp. Arrange them in a single layer. Cook for about 2-3 minutes on each side. You want them to turn pink and opaque. Avoid overcrowding the pan; cook in batches if needed. Once done, remove them from the skillet. If you like, drizzle any extra sauce over the shrimp. Serve the shrimp on a bed of cooked jasmine rice. Top with chopped green onions and sesame seeds for a delicious finish. Enjoy your Sweet & Spicy Gochujang Shrimp! To make the sauce just right, balance is key. You want a mix of sweet and spicy. Start with gochujang; it brings heat and depth. Adding honey gives it sweetness, which balances the spice. Taste as you mix, and adjust if needed. If you want more heat, add a pinch of chili flakes. If it's too spicy, a bit more honey can help. Cook shrimp quickly over high heat. Use a large skillet or wok for even cooking. Make sure the pan is hot before adding shrimp. This helps them cook fast and stay juicy. Don't overcrowd the pan; it leads to steaming, not searing. Cook them for 2-3 minutes on each side until they turn pink. This way, they stay tender and flavorful. Serve your shrimp over fluffy jasmine rice. This rice soaks up the sauce well. For a pop of color, garnish with chopped green onions and sesame seeds. Arrange the shrimp in a circle on the rice for a pretty look. You can also add steamed veggies like broccoli or snap peas to boost nutrition. This makes your dish colorful and healthy. For the full recipe, check the earlier section. {{image_2}} You can easily change the heat in this dish. If you like it mild, use less gochujang. Start with one tablespoon instead of two. For more heat, add extra gochujang or some chili flakes. You can also mix in a dash of hot sauce for a kick. Always taste as you go. This lets you control the spice to fit your taste. Not a fan of shrimp? No problem! You can swap shrimp for chicken, tofu, or even fish. If you use chicken, cut it into small pieces. Cook it the same way as shrimp. Tofu can soak up the sauce well. Just make sure to press it first to remove extra water. This makes it crispier when you cook it. Want to make your dish more colorful and healthy? Try adding veggies! Bell peppers, snap peas, or broccoli are great choices. You can stir-fry them with the shrimp for a complete meal. Another idea is to add nuts, like peanuts or cashews. They add crunch and healthy fats. For a nutritional boost, sprinkle some sesame seeds on top. This dish is not only tasty but can also be very good for you! To keep your Sweet & Spicy Gochujang Shrimp fresh, store it in the fridge. Place the shrimp in an airtight container. You can keep it for up to three days. Make sure the shrimp is cooled before sealing. Always check for any off smells before eating. If you want to freeze the shrimp, it’s best to do it before cooking. Place the marinated shrimp in a freezer-safe bag. Squeeze out excess air and seal it tightly. The shrimp can last for up to three months in the freezer. When ready to use, thaw in the fridge overnight. To reheat, use a skillet over medium heat. Add a splash of water or oil to prevent sticking. Cook for about 2-3 minutes until heated through. You can also use the microwave. Heat in short bursts, stirring in between, to avoid overcooking. Enjoy the flavors with jasmine rice again! To make Sweet & Spicy Gochujang Shrimp, start with fresh ingredients. You need shrimp, gochujang, honey, soy sauce, sesame oil, garlic, ginger, rice vinegar, and lime juice. Mix these ingredients in a bowl to create the marinade. Let the shrimp sit in the marinade for at least 15 minutes. Then, cook them in a hot skillet for 2-3 minutes on each side. Serve over jasmine rice and garnish with green onions and sesame seeds. This dish is easy and full of flavor! Yes, you can substitute gochujang if needed. Use sriracha or red pepper flakes for heat. However, these options lack the same depth of flavor. You can also mix miso paste with chili sauce for a different taste. Keep in mind that the flavor will change. Gochujang brings a unique sweet and spicy kick. Sweet & Spicy Gochujang Shrimp pairs well with many sides. Here are a few ideas: - Steamed broccoli - Cucumber salad - Kimchi - Fried rice - Sesame noodles These sides add freshness and balance to the rich shrimp dish. You can find the full recipe for Sweet & Spicy Gochujang Shrimp online. This dish is popular and easy to make. It shows how simple ingredients can create amazing flavors! This article covered the key parts of making Sweet & Spicy Gochujang Shrimp. We looked at the best ingredients. Fresh shrimp truly boost the flavor. The steps to prepare and cook shrimp were clear and simple. I shared tips to make your dish shine. You can alter the spice and try new proteins. Lastly, I gave storage tips to keep your meal fresh. Now you're ready to create a tasty dish. Enjoy this shrimp recipe and make it your own!

Sweet & Spicy Gochujang Shrimp Flavorful Dinner Dish

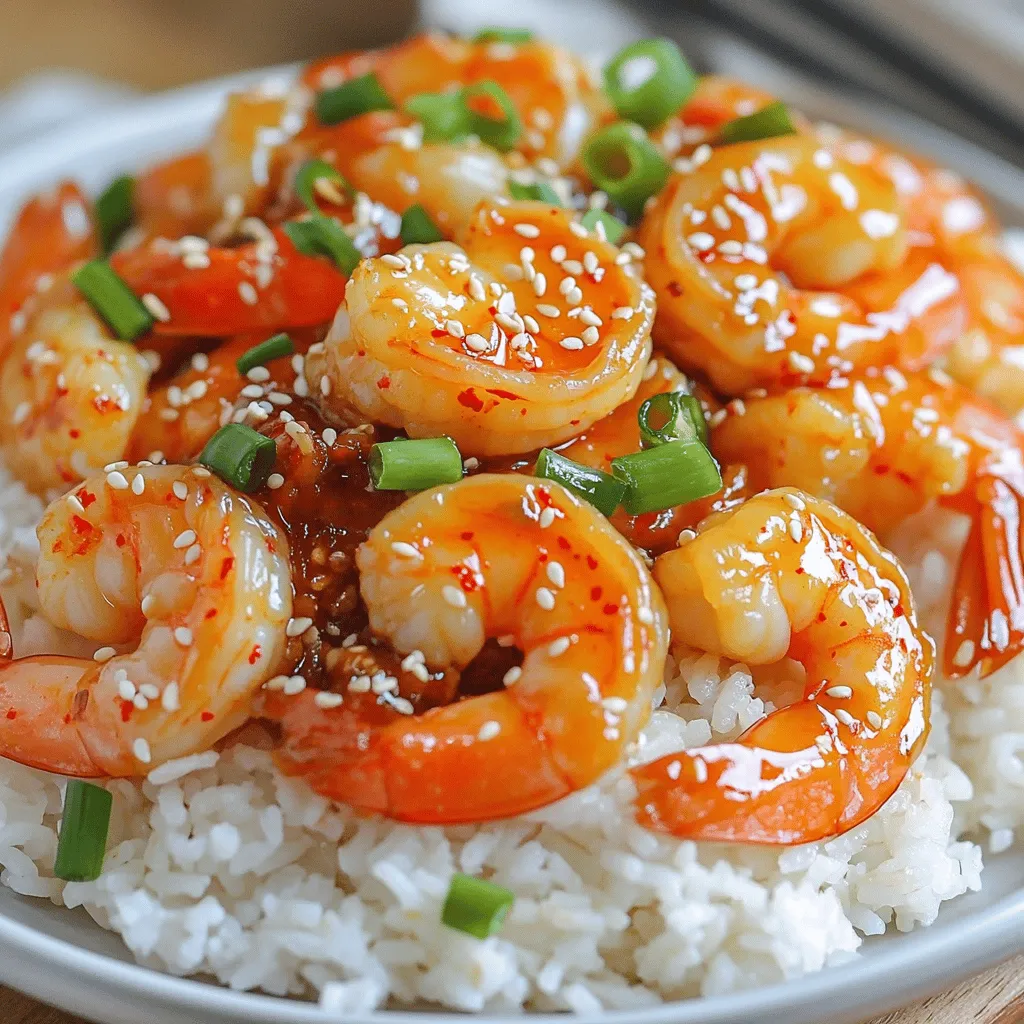
Looking for a dinner that packs a punch? Sweet & Spicy Gochujang Shrimp is your answer! This dish mixes rich

- 1 cup creamy peanut butter - 1 cup powdered sugar - 8 oz cream cheese, softened - 1 cup whipped topping (like Cool Whip) - 1/2 cup semi-sweet chocolate chips - 1 tablespoon coconut oil (or vegetable oil) - A pinch of salt If you want to switch up the peanut butter, try almond or sun butter. They add a nice twist. For cream cheese, look for dairy-free options like cashew cream or tofu cream. These work well in the recipe. If you need a sweetener, use coconut sugar or maple syrup in place of powdered sugar. Just adjust the amount based on your taste. When selecting brands, look for natural peanut butter without added sugar. For cream cheese, use well-known brands for the best flavor. Always use cream cheese that is at room temperature. This step helps it mix smoothly with the other ingredients. It makes your dip creamy and delightful. First, grab a large mixing bowl. Add 1 cup of creamy peanut butter, 1 cup of powdered sugar, 8 oz of softened cream cheese, and a pinch of salt. Mix these ingredients well. You want a smooth and creamy texture. An electric mixer works best. Beat the mixture on medium speed until no lumps remain. This will be the base of your dip. Next, take your 1 cup of whipped topping. Gently fold it into the peanut butter mix. Use a spatula for this step. Be careful not to stir too hard. You want to keep the air in the whipped topping. This helps your dip stay light and fluffy. Now, let’s melt the chocolate. In a microwave-safe bowl, combine 1/2 cup of semi-sweet chocolate chips and 1 tablespoon of coconut oil. Heat this in the microwave. Start with 30-second intervals. Stir after each interval until the chocolate is fully melted. It should be smooth and shiny. If it looks clumpy, heat a bit more. Finally, drizzle or swirl the melted chocolate over the peanut butter mixture. You can choose how much chocolate you want. It adds a nice touch. Now, transfer your dip to a serving bowl. Refrigerate it for at least 30 minutes. This helps it firm up. Then, it’s ready to enjoy with your favorite dippers! For the full recipe, check out the details above. To make Buckeye Dip smooth and creamy, use room-temperature cream cheese. It blends better with peanut butter and sugar. Beat the mixture until it’s free of lumps. This step is key for a great texture. If the dip feels too thick, add whipped topping. This lightens the dip and gives it a fluffy feel. For the best dippers, try graham crackers, apple slices, or pretzel sticks. These pair well with the dip's sweet and salty flavor. You can also set out a platter with a mix of dippers. This way, everyone can find something they like. For a fun touch at gatherings, serve the dip in a hollowed-out apple. It looks festive and adds a burst of flavor. You can add a splash of vanilla to deepen the taste. A pinch of sea salt can also boost the peanut flavor. For a visual appeal, top the dip with extra chocolate drizzle. This adds a nice touch and makes the dip look gourmet. You can also sprinkle crushed nuts or mini chocolate chips on top for added texture. {{image_2}} Customizing Buckeye Dip is easy and fun. You can change it up to fit your taste or event. Adding crushed pretzels or nuts gives the dip a nice crunch. Use salty pretzels or chopped peanuts for texture. You can also try adding different types of chocolate. For a twist, use milk chocolate or white chocolate chips. These changes keep the dip exciting and unique. If you want a lighter dip, consider using Greek yogurt instead of cream cheese. This swap adds protein and reduces fat. You can also use natural sweeteners like honey or maple syrup instead of powdered sugar. These options make the dip healthier but still tasty. You can create holiday-themed flavors for special occasions. Try adding peppermint extract for winter. For children's birthday parties, consider mixing in colorful sprinkles. These seasonal variations make the dip fun and festive for any gathering. Explore the [Full Recipe] to make your own delicious Buckeye Dip! To keep your Buckeye Dip fresh, use an airtight container. This prevents air from getting in and ruining the dip. I suggest glass containers since they seal well. Make sure to refrigerate the dip right after serving. This keeps it cold and safe to eat. Buckeye Dip stays fresh in the fridge for about five days. If you see any mold or smell something off, it's best to throw it away. Always trust your senses; they guide you well in the kitchen. You can freeze Buckeye Dip for later use. Just place it in an airtight container, leaving some space at the top. The dip can last up to three months in the freezer. When you're ready to eat it, move it to the fridge overnight to thaw. Once thawed, give it a good mix to refresh the texture before serving. Buckeye Dip is a sweet, creamy treat inspired by the famous Buckeye candy. This candy comes from Ohio and combines chocolate and peanut butter. The dip captures that same flavor but in a fun, shareable form. It’s a crowd-pleaser at parties and gatherings. You can serve it with dippers like pretzels or fruit. Everyone loves its rich taste and smooth texture. Yes, you can make Buckeye Dip ahead of time! I often prepare it a day before my event. Just mix all the ingredients and store it in the fridge. This dip tastes even better after chilling. The flavors blend nicely, making it perfect for serving later. Just remember to give it some time to firm up. When serving Buckeye Dip, choose dippers that complement its sweet flavor. Here are some great options: - Graham crackers - Apple slices - Pretzel sticks - Vanilla wafers These choices add nice crunch and sweetness. You can also add some chocolate drizzle on top for extra flair. Yes! Buckeye Dip can be gluten-free. Use gluten-free dippers like rice cakes or fresh fruit. Always check labels to ensure your ingredients are safe. You can swap out any gluten-filled items for gluten-free ones. This way, everyone can enjoy the dip without worry. This blog post covered how to make Buckeye Dip, from ingredients to serving. We explored ingredient choices and helpful tips for fresh products. You learned how to prepare the dip and perfect its texture. In my view, Buckeye Dip is a fun treat for all occasions. With a few easy tricks, you can customize it to fit your taste. Enjoy making this dip your own and impress your friends!

Buckeye Dip Crafted for Delicious Gatherings

Are you ready to impress your friends at your next gathering? Buckeye Dip is the perfect blend of creamy peanut

For this Cheese Tortellini Caesar Salad, you need a few key items. First, grab 10 oz of cheese tortellini. You can use fresh or frozen. Both work well. Next, get 4 cups of chopped romaine lettuce. This adds nice crunch. You will also need 1 cup of halved cherry tomatoes. Their sweetness balances the salad. Lastly, pick up 1/2 cup of croutons. You can buy them or make your own. These give a tasty crunch. The dressing is important for flavor. Choose 1/4 cup of Caesar dressing. You can use store-bought or make it at home. Add 1 tbsp of lemon juice for brightness. You can also mix in 1/2 tsp of garlic powder. This adds a nice kick. Finish with freshly ground black pepper to taste. This will enhance all the flavors. For extra flavor, consider some add-ins. 1/4 cup of grated Parmesan cheese adds richness. You can also add some chopped fresh basil. This adds a fresh taste and a pop of color. These optional ingredients can take your salad to the next level. For the full recipe, check the details above. To start, fill a large pot with water and add a pinch of salt. Bring the water to a boil. Once boiling, add your cheese tortellini. Cook according to the package instructions, usually about 3-5 minutes. You want the tortellini to be al dente, which means firm to the bite. After cooking, drain the tortellini and rinse it under cold water. This stops the cooking process and keeps them from sticking together. Set them aside to cool. Now, let’s make the dressing. In a small bowl, combine 1/4 cup of Caesar dressing, 1 tablespoon of lemon juice, 1/2 teaspoon of garlic powder, and freshly ground black pepper. Use a whisk to blend everything well. This dressing will add a creamy, tangy flavor to your salad. Next, it’s time to assemble the salad. In a large bowl, combine 4 cups of chopped romaine lettuce, 1 cup of halved cherry tomatoes, and the cooled tortellini. Drizzle the prepared dressing over the salad ingredients. Toss gently to make sure everything is well coated. Finally, add 1/2 cup of croutons and 1/4 cup of grated Parmesan cheese on top. If you like, you can also sprinkle some chopped fresh basil for a pop of color and flavor. Serve it up right away or in a big bowl for family-style dining. Enjoy your fresh and tasty Cheese Tortellini Caesar Salad! For the full recipe, check out the section above. To get the best texture for your tortellini, follow these steps. First, bring a large pot of salted water to a rolling boil. Add your cheese tortellini and cook it for about 3 to 5 minutes. You want it to be al dente, meaning it should have a slight bite to it. After cooking, drain the tortellini in a colander. Rinse it under cold water right away. This helps stop the cooking and keeps the pasta from getting soggy. Let it cool while you prep the salad. You can choose between homemade and store-bought Caesar dressing. Homemade dressing is simple and fresh. Just mix olive oil, lemon juice, garlic, and anchovies. It adds a rich flavor and makes your salad stand out. If you're short on time, store-bought dressing works well too. Look for brands that use real ingredients and no preservatives. Both options can make your Cheese Tortellini Caesar Salad tasty. To make your salad visually appealing, add layers when you serve. Start with a bed of romaine lettuce and then add your tortellini and tomatoes on top. Sprinkle croutons and Parmesan cheese to finish. For an extra touch, consider adding chopped fresh basil. It adds color and a burst of flavor. You can serve the salad in a large bowl or divide it onto individual plates for a nice presentation. Enjoy your delicious creation! For the complete recipe, check out the Full Recipe. {{image_2}} You can add protein to make your Cheese Tortellini Caesar Salad heartier. Grilled chicken is a great option. It pairs well with the creamy dressing. Shrimp also works nicely. Simply grill or sauté them before adding to the salad. These proteins boost flavor and make the dish more filling. If you prefer a vegetarian take, there are many options. You can use chickpeas for protein and texture. They add a nice crunch and earthy flavor. Another option is to replace the cheese tortellini with a spinach variety. This keeps the taste fresh while adding a twist. You can also add extra veggies like bell peppers or cucumbers for more crunch. Incorporating seasonal ingredients can elevate your salad. In spring, fresh peas or asparagus add color and taste. In summer, try adding sliced radishes or zucchini. These veggies keep the salad light and refreshing. Fresh herbs like basil or dill can also enhance the flavor. Just chop them finely and sprinkle on top. This keeps your salad exciting all year round. For the complete recipe, check the Full Recipe section. To keep your Cheese Tortellini Caesar Salad fresh, store it in an airtight container. This method helps prevent the salad from wilting. If you have leftover dressing, store it separately. This keeps the greens crisp. Use the salad within two days for the best taste. If you have leftover tortellini, reheat it gently. Place the tortellini in a pot with a splash of water. Heat on low until warm, stirring often. Avoid boiling it, as that can make the pasta mushy. You can also use the microwave. Heat it in short bursts, stirring in between. To keep your dressing fresh, store it in a sealed jar in the fridge. It lasts about a week. If you made homemade dressing, give it a good shake before using it again. Always check for any signs of spoilage before using leftover dressing. To make Cheese Tortellini Caesar Salad, start by cooking the tortellini in boiling water. Follow the package instructions, usually about 3-5 minutes. Drain and rinse under cold water. In a bowl, mix romaine lettuce, halved cherry tomatoes, and cooled tortellini. Prepare the dressing with Caesar dressing, lemon juice, garlic powder, and black pepper. Drizzle over the salad and toss gently. Top with croutons and Parmesan cheese. You can find the full recipe above. Yes, you can! If you want to switch things up, consider using mozzarella for a creamy touch. Feta cheese brings a salty flavor that pairs well too. Goat cheese adds a nice tang. You can even try cheddar for a sharper taste. Each cheese will change the salad's flavor, so pick your favorite! You can find Cheese Tortellini Caesar Salad at many restaurants and cafes. Some grocery stores offer pre-made salads in the deli section. You might also find it in salad bars or make-your-own salad shops. If you want a quick meal, check delivery apps for local places that serve it. You now know how to make a tasty Cheese Tortellini Caesar Salad. We explored key ingredients, step-by-step instructions, and tips to enhance your dish. Remember, you can customize it to suit your taste with proteins or seasonal veggies. Proper storage will keep your leftovers fresh, too. Enjoy making this salad at home and impress your friends or family. It's simple, delicious, and fun to create. Happy cooking!

Cheese Tortellini Caesar Salad Fresh and Flavorful Dish

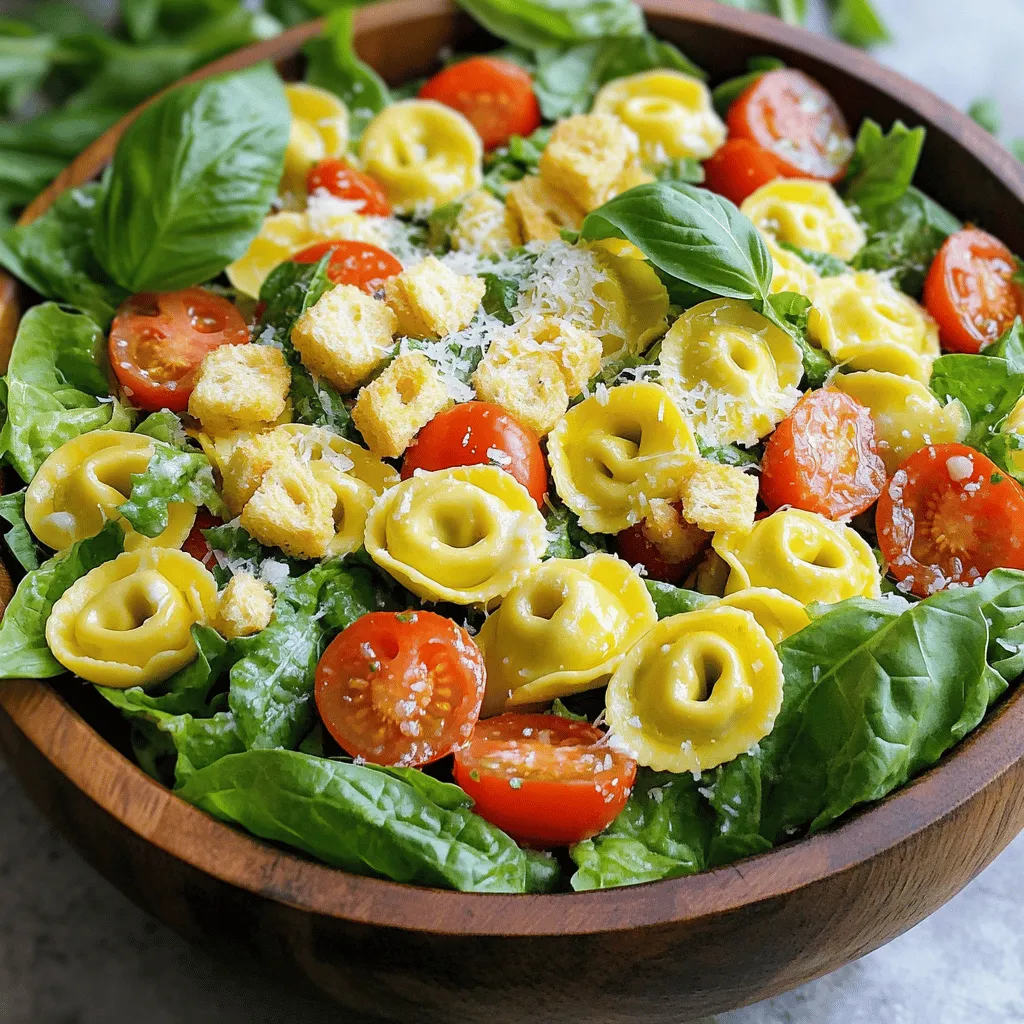
Are you ready to elevate your salad game? The Cheese Tortellini Caesar Salad is a fresh and flavorful dish that

- 4 boneless, skinless chicken breasts - 1 cup grated Parmesan cheese - 1/2 cup breadcrumbs (preferably whole wheat) - 1/4 cup fresh basil pesto - 2 cloves garlic, minced - 1 teaspoon dried oregano - Salt and pepper to taste - 2 tablespoons olive oil - 1/4 cup chopped fresh parsley for garnish (optional) When choosing chicken breasts, look for ones that are firm and pink. They should not have any dark spots. For cheese, grated Parmesan gives a sharp taste. You can also use Pecorino Romano for a stronger flavor. If you want a lighter option, try using nutritional yeast. Breadcrumbs are key for that crunchy crust. Whole wheat breadcrumbs add a nutty flavor and extra fiber. You can also use panko for extra crispiness. Fresh herbs like basil and parsley really boost the flavor. Garlic adds depth and aroma. You can also use thyme or rosemary for a different taste. For a kick, consider adding red pepper flakes. Optional ingredients like lemon zest can enhance the dish. You could try different pestos, like sun-dried tomato or spinach. These add unique flavors and color. Fresh parsley makes a great garnish. It adds color and freshness. You can also use basil leaves for an herbal touch. For sauces, a simple lemon butter sauce pairs well. You can also serve it with marinara for a classic twist. This adds moisture and flavor to your meal. For the full recipe, check out Parmesan-Pesto Crusted Chicken . First, preheat your oven to 400°F (200°C). This step is key for even cooking. Next, line a baking sheet with parchment paper. This prevents sticking and makes cleanup easy. Now, let’s mix the breadcrumb coating. In a shallow bowl, combine: - 1 cup grated Parmesan cheese - 1/2 cup breadcrumbs (preferably whole wheat) - 2 cloves garlic, minced - 1 teaspoon dried oregano - Salt and pepper to taste Mix these ingredients well to ensure a tasty crust. Before coating the chicken, season each breast with salt and pepper on both sides. This adds flavor inside the meat. Now, spread a generous layer of basil pesto over the top of each chicken breast. Make sure it covers well. Next, press each chicken breast into the Parmesan breadcrumb mixture. Coat the pesto side thoroughly. This creates a nice crust when cooked. In a large oven-safe skillet, heat 2 tablespoons of olive oil over medium heat. Once hot, add the coated chicken breasts, crust side down. Cook them for about 3-4 minutes until they turn golden brown. This step adds flavor and texture. After pan-searing, carefully flip the chicken breasts over. Now, transfer the skillet to your preheated oven. Bake for an additional 15-20 minutes. Check for doneness, ensuring the internal temperature reaches 165°F (74°C). This step is vital for safety. Once done, remove the skillet from the oven. Let the chicken rest for a few minutes before serving. Garnish with fresh parsley for a nice touch. For the full recipe, refer to the complete guide. To get a great crust on your chicken, focus on coating techniques. First, press the chicken into the breadcrumb mixture firmly. This helps the crumbs stick better. You want that crunch! For chicken breasts, cook them for about 3-4 minutes on the stove. Then, finish baking for 15-20 minutes in the oven. This method keeps the crust crisp while the chicken cooks through. To keep your chicken juicy, avoid overcooking it. Use a meat thermometer to check the internal temperature. Aim for 165°F (74°C). This ensures it’s safe and moist. Let the chicken rest for a few minutes after cooking. This helps retain juices, making each bite tender and flavorful. Pair your Parmesan crusted chicken with fresh sides. Steamed broccoli or a light salad works well. You can also serve it with roasted potatoes for heartiness. For plating, place the chicken on a colorful plate and add a sprinkle of parsley. This adds a nice touch and looks great! Want to explore more? Check out the Full Recipe for more tips on perfecting this dish. {{image_2}} You can change the flavor of Parmesan crusted chicken easily. Try using different pestos. Sun-dried tomato pesto gives a sweet twist. Spinach pesto adds a fresh taste. Mixing herbs also works well. Try rosemary or thyme for a new flavor. Grilling is a great choice if you want a smoky flavor. Simply season the chicken and grill it for about six to eight minutes per side. Baking is simple and hands-off. Just follow the full recipe for perfect results. You can also use an air fryer. Set it to 375°F (190°C) and cook for about 12 to 15 minutes. This method gives a crispy texture with less oil. If you need gluten-free options, use gluten-free breadcrumbs. They work just as well for the crust. For dairy-free needs, look for cheese made from nuts or soy. These choices can still give you a tasty dish without dairy. After you enjoy your Parmesan Crusted Chicken, store the leftovers well. First, let the chicken cool down to room temperature. This helps keep it fresh. Next, place the chicken in an airtight container. Glass or plastic containers work great. Make sure to seal them tightly to lock in moisture and flavor. When it’s time to eat your leftovers, reheating is key. I recommend using an oven for the best results. Preheat it to 350°F (175°C). Place the chicken on a baking sheet. Heat for about 15-20 minutes until warm. If you want a crispy crust, cover the chicken with foil for the first half. Then, remove the foil for the last few minutes to crisp it up. Yes, you can freeze Parmesan Crusted Chicken! Wrap each piece in plastic wrap, then place it in a freezer bag. This keeps the chicken fresh for about three months. When you’re ready to eat it, thaw it in the fridge overnight. For cooking from frozen, bake it at 375°F (190°C) for 30-35 minutes. Always check that the internal temperature reaches 165°F (74°C) for safe eating. Parmesan crusted chicken takes about 40 minutes from start to finish. You spend 15 minutes prepping the chicken. Cooking takes an additional 25 minutes. You bake it for 15 to 20 minutes in the oven. Make sure the chicken reaches 165°F (74°C) inside. Yes, you can prep this dish ahead of time. Coat the chicken with pesto and breadcrumbs. Cover it tightly and store it in the fridge. This way, you can save time later. It tastes great even after a night in the fridge. Just bake it when you are ready to eat! You can serve this chicken with many tasty sides. Here are some ideas: - Roasted vegetables like carrots and broccoli - Creamy mashed potatoes or garlic mashed cauliflower - A fresh green salad with lemon vinaigrette - Quinoa or rice for a filling option - Steamed asparagus or green beans for a crunch Pairing these sides will make your meal even better. Enjoy your delicious creation! This blog covered all you need for making Parmesan Crusted Chicken. We discussed the right ingredients, seasoning, and garnishing to make your dish shine. I provided step-by-step cooking tips for a perfect crust and offered variations to suit different tastes. If you store and reheat properly, you can enjoy this meal later too. Keep these tips in mind, and you’ll impress family and friends. Cooking can be fun and easy with the right tools and knowledge. Enjoy your delicious creation!

Parmesan Crusted Chicken Juicy and Flavorful Delight

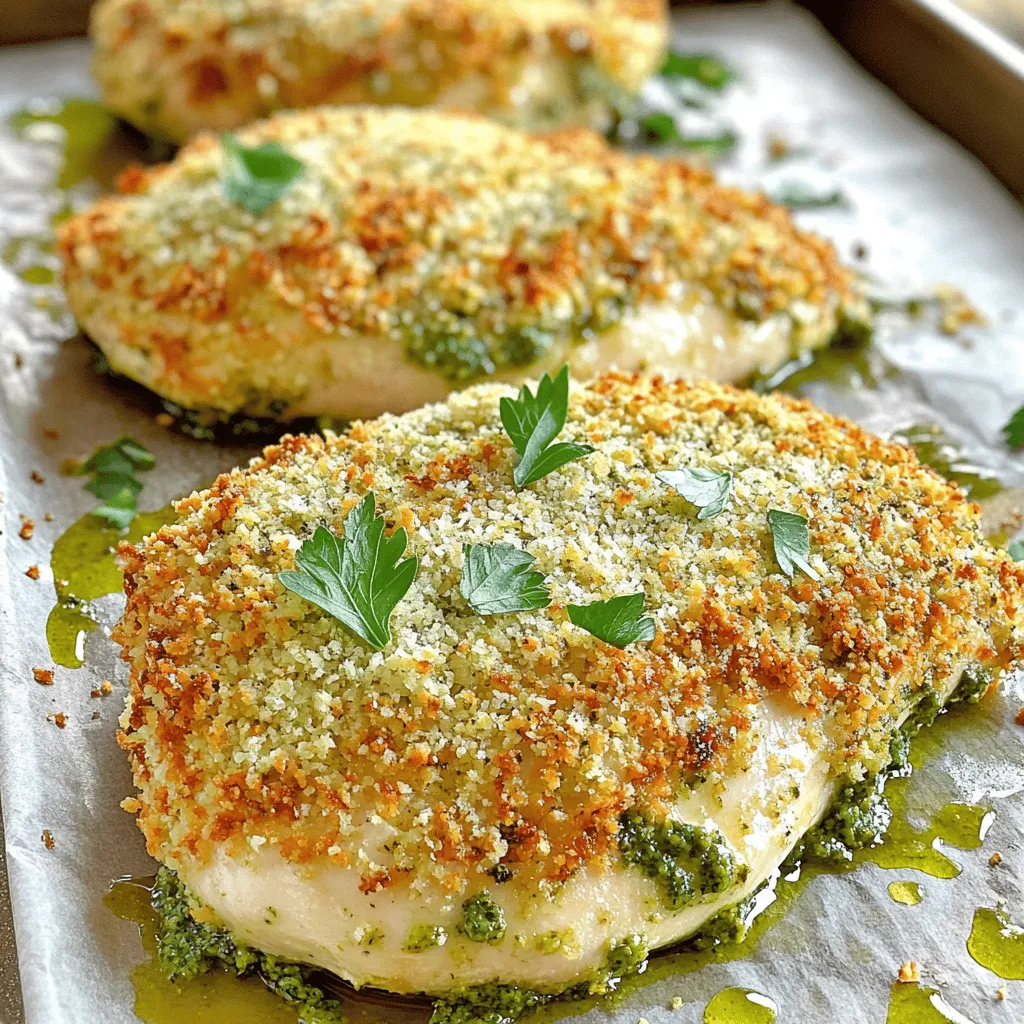
Welcome to a culinary adventure where we transform ordinary chicken into a juicy, flavorful delight! Parmesan Crusted Chicken brings crispy

- 2 large flour tortillas - 1 cup chocolate chips - 1 cup mini marshmallows - ½ cup graham cracker crumbs - 1 tablespoon unsalted butter - Pinch of sea salt - Optional: Fresh strawberries or bananas for layering - Non-stick grill pan or skillet - Spatula - Measuring cups and spoons When you make Grilled S'mores Quesadillas, you want to ensure you gather all the right ingredients first. You need large flour tortillas to hold everything together. Chocolate chips add rich sweetness, while mini marshmallows bring that gooey goodness. Graham cracker crumbs give a nice crunch. You’ll also want unsalted butter to crisp up the tortillas as they grill. A pinch of sea salt adds a nice contrast to the sweet flavors. If you want to add a fruity twist, fresh strawberries or bananas work beautifully. For tools, a non-stick grill pan or skillet is key. It helps achieve that perfect golden crust. A spatula makes flipping easy and keeps everything intact. Measuring cups and spoons ensure you get the right amounts for each ingredient, leading to a successful treat every time. With all your ingredients and tools ready, you're set to create a fun and tasty dessert that everyone will love! For the full recipe, check out the detailed instructions. - Preheat your non-stick grill pan or skillet over medium heat. - Spread unsalted butter on one side of each tortilla. - Place the first tortilla on the skillet, buttered side down. - Evenly sprinkle chocolate chips, followed by mini marshmallows and graham cracker crumbs. - Add strawberries or bananas if desired. - Place the second tortilla on top, buttered side facing up, and press gently. - Grill for 2-3 minutes on each side until golden and crispy. These steps are simple and quick. Each layer adds flavor and texture. The grilling gives a nice crunch. This recipe makes a fun treat for any time. For the full experience, check the Full Recipe. Enjoy your cooking! To make the best grilled s'mores quesadillas, start with a non-stick pan. This helps them cook evenly and prevents sticking. Keep your heat at medium. This way, you avoid burning the tortillas while ensuring they get crispy. Serve your quesadillas warm. Add extra chocolate chips and graham cracker crumbs on the side for dipping. You can also drizzle them with chocolate sauce or whipped cream. These toppings make the treat even more special. Try different types of chocolate in your quesadillas. Dark, milk, or white chocolate each bring a unique taste. For a fun twist, add a pinch of cinnamon to the filling. This small change can elevate the flavors. For the full recipe, visit the main article. Enjoy making these delicious treats! {{image_2}} You can make your grilled s'mores quesadillas even more fun. Swap out chocolate chips for Nutella or any spread you enjoy. This change adds a creamy texture and a rich taste. You can also try flavored tortillas, like cinnamon or whole wheat. These options add a twist that enhances the flavor. Adding extra fillings can take your quesadillas to the next level. Peanut butter or almond butter gives a nutty taste that mixes well with chocolate. You can layer in fruits like berries or sliced apples for a burst of sweetness. These additions make the dish more colorful and tasty. Remember, the full recipe is easy to follow and lets you create your delightful treat at home. Store leftover quesadillas in an airtight container in the fridge for up to 2 days. This keeps them fresh and tasty for your next snack. Just make sure the lid is tight. You want to keep out air and moisture. To reheat, use a skillet over medium heat for best results. This method helps maintain the crispness of the quesadilla. Just place it in the skillet and heat for a few minutes on each side. You’ll enjoy that crunchy texture again. Avoid using the microwave, as it may make the quesadilla soggy. Enjoy your treat warm and delicious! For the full recipe, check the earlier section. Yes, you can prepare the filling and layer the quesadillas ahead of time, then grill just before serving. This method makes it easy for parties or quick snacks. Just keep them in the fridge until you’re ready to cook. It's not recommended to freeze once grilled, but you can freeze the prepared layers before grilling. This way, you can enjoy them fresh later. Just thaw them in the fridge overnight when you want to grill them. Corn tortillas or even crepes can be substituted for a gluten-free option. Crepes offer a fun twist, while corn tortillas add a nice crunch. Both options work well with the sweet filling. Use whole wheat tortillas and reduce the amount of chocolate chips or opt for dark chocolate. Whole wheat adds fiber, making it a better choice. You can also add fruits for extra nutrition and natural sweetness. Check out the Full Recipe for more ideas! Grilled s'mores quesadillas are fun, easy, and tasty. We covered the ingredients, tools, and step-by-step cooking. I shared tips for perfecting your quesadillas and ways to serve them. You can even try fun variations with different flavors and fillings. In the end, these quesadillas are a great treat for any occasion. Enjoy making them and let your creativity shine!

Grilled S’mores Quesadillas Delightfully Simple Treat

Craving a sweet twist on a classic treat? Grilled S’mores Quesadillas offer a fun way to enjoy your favorite campfire

- 2 ribeye steaks (about 1 inch thick) - 8 ounces shrimp, peeled and deveined - 2 tablespoons olive oil - Salt and pepper to taste - 1 teaspoon garlic powder - 1 cup heavy cream - 1 teaspoon Dijon mustard - 1 tablespoon fresh lemon juice - 1 tablespoon fresh parsley, chopped - 1 tablespoon chives, chopped When you prepare surf and turf steak with creamy sauce, using the right ingredients is key. Start with ribeye steaks. They have great marbling and flavor. The shrimp adds a nice touch. Next, don’t forget the seasoning. Salt and pepper bring out the meat's taste. Garlic powder adds a lovely depth. Heavy cream makes the sauce rich and smooth. Fresh ingredients also boost flavor. Dijon mustard adds a bit of tang. Lemon juice brightens the dish. Chopped parsley and chives give it a fresh look and taste. For the full recipe, check the detailed steps above. Enjoy crafting this delicious meal! - Seasoning: Start by seasoning the ribeye steaks. Use salt, pepper, and garlic powder. Make sure to coat both sides well. This adds flavor and helps create a nice crust when cooking. - Letting the steaks rest: Let the seasoned steaks sit at room temperature for about 20-30 minutes. This step helps the steaks cook evenly. It also makes them more tender and flavorful. - Heating the skillet: Heat a large skillet over medium-high heat. Add 1 tablespoon of olive oil. Wait until the oil is hot and shimmering before adding the steaks. - Cooking to desired doneness: Place the steaks in the skillet. Cook for about 4-5 minutes on each side for medium-rare. Adjust the time if you want them more or less done. Once cooked, remove them from the skillet. Cover loosely with aluminum foil and let them rest for a few minutes. - Sautéing techniques: In the same skillet, add 1 tablespoon of olive oil and 1 tablespoon of butter. Once melted, add the peeled and deveined shrimp. Cook for about 2-3 minutes on each side until they turn pink and opaque. - Removing shrimp from the skillet: After cooking, season the shrimp with a pinch of salt and pepper. Remove them from the skillet and set aside. - Ingredients in the skillet: Lower the heat. In the same skillet, add 1 cup of heavy cream, 1 teaspoon of Dijon mustard, and 1 tablespoon of fresh lemon juice. Stir well to combine. - Simmering duration: Let the sauce simmer for about 5 minutes. Stir continuously and scrape any bits from the bottom of the pan. This adds extra flavor to the sauce as it thickens. - Mixing shrimp with the sauce: Stir the cooked shrimp into the creamy sauce. Make sure to coat the shrimp well. - Adjusting seasoning: Taste the sauce and adjust the seasoning if needed. You can add more salt, pepper, or lemon juice for balance. - Plating suggestions: Slice the rested steaks and place them on plates. Spoon the creamy shrimp sauce generously over the steaks. - Presentation tips: Garnish with chopped fresh parsley and chives. This adds color and freshness. Serve with a garden salad or roasted vegetables for a complete meal. For the full recipe, check [Full Recipe]. How do I achieve the perfect steak doneness? To get the perfect steak, know the cooking times. For medium-rare, cook each side for about 4-5 minutes. Use a meat thermometer to check. Aim for 130°F for medium-rare. Let your steak rest after cooking. This helps keep it juicy. What are tips for juicy shrimp? Cook shrimp quickly. Sauté them for 2-3 minutes on each side. They should turn pink and opaque. Don’t overcook, or they become rubbery. Season with salt and pepper for taste. Keep the heat high for a good sear. What are variations for creaminess? You can make the sauce creamier. Add more heavy cream or use cream cheese. For a lighter option, try half-and-half. You can also mix in sour cream for tanginess. How can I add spices for flavor? Boost flavor with spices. Try paprika for a smoky taste. Cayenne pepper adds heat. Fresh herbs like thyme or basil can brighten the sauce. Experiment with your favorite spices to personalize the flavor. What are creative garnishing techniques? Garnish your dish with fresh herbs like parsley and chives. They add color and freshness. You can also use lemon wedges for a bright touch. Arrange the shrimp on top of the steak for a beautiful look. What are serving suggestions with side dishes? Serve with a fresh garden salad or roasted vegetables. They complement the rich flavors. Mashed potatoes or rice work well too. You can even add crusty bread to soak up the sauce. {{image_2}} You can switch the ribeye steaks for other cuts. Cuts like sirloin or filet mignon work well too. These alternatives can change the taste and texture. Each cut brings its own charm to the dish. If you want to try seafood, use scallops or lobster instead of shrimp. Both options add a sweet, rich flavor. They also make the dish elegant and fancy. You can grill or sauté them just like the shrimp. Sauces can change the whole dish. A garlic butter sauce is a delicious option. For this, melt butter in a pan, then add minced garlic. Cook the garlic until fragrant and pour it over your steak and shrimp. This will elevate your dish with a lovely aroma. For those who like heat, try a spicy sauce. You can mix in crushed red pepper flakes or hot sauce. This adds a kick that pairs well with the creamy sauce. Experiment with different spices to find your favorite blend. You can easily adapt this dish for special diets. For a gluten-free version, just check all your ingredients. Many common sauces and seasonings are gluten-free. Always read labels to ensure they meet your needs. If you want a dairy-free option, use coconut milk or cashew cream. These alternatives will keep your sauce creamy without dairy. Just swap them for heavy cream in the recipe. This way, everyone can enjoy your surf and turf. For more details, check the Full Recipe. To store leftovers, let the dish cool down first. Place the steak and sauce in separate airtight containers. This keeps the steak juicy and the sauce creamy. Store them in the fridge for up to three days for the best taste. When you store the shrimp, keep it with the sauce to maintain its flavor. To reheat steak, use an oven set to 250°F. Place the steak on a baking sheet and cover it with foil. This method warms the steak evenly without drying it out. Check it after about 20 minutes. For the creamy sauce, pour it into a small pot over low heat. Stir often until it warms up. Add a splash of cream if it seems too thick. You can freeze the cooked components. Wrap the steak tightly in plastic wrap, then in aluminum foil. For the sauce, pour it into a freezer-safe container. It can last up to three months in the freezer. When you’re ready to eat, thaw the steak in the fridge overnight. For the sauce, place it in the fridge to thaw. Reheat it gently on the stove when you’re ready to enjoy your meal again. Surf and turf is a dish that combines meat and seafood. You can enjoy steak and shrimp or lobster together. Many variations exist. Some people use filet mignon or crab. Each combo brings new flavors. To make your steak tender, follow these tips: - Choose high-quality meat, like ribeye. - Let the steak sit at room temperature. - Season it well before cooking. - Don't overcook; aim for medium-rare. - Let it rest after cooking to keep juices inside. Yes, you can prep Surf and Turf ahead. Here’s how: - Season the steaks and let them rest. - Cook the shrimp and sauce but store separately. - Keep them in the fridge, covered. - Reheat gently before serving. Great sides for Surf and Turf include: - Garlic mashed potatoes - Grilled asparagus - Fresh garden salad - Roasted vegetables - Creamy risotto To boost the sauce's flavor, try these ideas: - Add fresh herbs like thyme or basil. - Mix in a splash of white wine. - Stir in some grated Parmesan. - Use spicy mustard instead of Dijon. - Incorporate sautéed onions or mushrooms. For the complete guide, see the Full Recipe. This blog post covered a delicious surf and turf recipe. You learned about the key ingredients, like ribeye steaks and shrimp, along with how to make a creamy sauce. We went through step-by-step instructions on cooking and combining the dish, plus tips for the best results. In the end, enjoy exploring variations and enhancing flavors. With practice, you'll make the perfect meal every time. Happy cooking!

Surf and Turf Steak with Creamy Sauce Delight

Welcome to the ultimate guide on how to make Surf and Turf Steak with Creamy Sauce Delight! This dish combines

To make cheesy chicken wraps, you need some key ingredients. Here’s what you will need: - 2 boneless, skinless chicken breasts, cooked and shredded - 1 cup shredded cheddar cheese - 1 cup cream cheese, softened - 1/2 cup diced bell peppers (any color) - 1/2 cup corn (canned or frozen) - 1 tablespoon taco seasoning - 4 large flour tortillas - 1/4 cup fresh cilantro, chopped (for garnish) - Salt and pepper to taste - Olive oil, for frying These ingredients create a rich and tasty filling. The chicken provides protein, while the cheese adds creaminess. You can add some fun extras to make your wraps even better. Here are some ideas: - Sliced jalapeños for heat - Avocado or guacamole for creaminess - Black beans for more texture - Chopped green onions for a fresh kick These options let you tailor the wraps to your taste. Feel free to mix and match based on what you have at home. You can switch out some ingredients if needed. Here are some good swaps: - Use turkey or tofu instead of chicken for a different protein. - Try different cheeses like Monterey Jack or pepper jack. - Use whole wheat or spinach tortillas for a healthier wrap. These substitutions can help you use what you have on hand. They also add variety to your meals. For the full recipe, check out the instructions above. To start, you need cooked chicken. I like to use boneless, skinless chicken breasts. You can shred them easily with two forks. In a large bowl, mix the shredded chicken with one cup of shredded cheddar cheese. Add one cup of softened cream cheese for creamy goodness. Toss in half a cup of diced bell peppers—any color works! Then, add half a cup of corn, canned or frozen. Sprinkle in one tablespoon of taco seasoning. Don’t forget to add salt and pepper to taste. Mix everything well until it's all combined. Now, grab your large flour tortillas. Lay one flat on a clean surface. Spoon a good amount of the chicken mixture right in the center. Fold the sides of the tortilla in first. Then, roll it tightly from the bottom to the top. This keeps all that tasty filling inside. Repeat this process for the rest of the tortillas and filling. Next, heat a skillet over medium heat. Drizzle a bit of olive oil into the pan. Place the wrapped tortillas seam-side down in the skillet. Cook them for about 3 to 4 minutes on each side. You want them golden brown and crispy. Once they are done, take them out of the skillet. Let them rest for a minute before slicing each wrap in half. For a nice touch, sprinkle fresh chopped cilantro on top before serving. You can find the full recipe to get more details. To get your wraps crispy, start with a hot skillet. Heat the skillet over medium heat before adding olive oil. Once the oil shimmers, place the wraps seam-side down. Cook them for 3-4 minutes on each side. This will give you that golden color and crunch you want. If you want extra crispiness, use a little more oil. Taco seasoning adds a nice kick. You can also try adding garlic powder or onion powder for more depth. A squeeze of lime juice over the filling gives a fresh taste. Experiment with spices like paprika or cumin to find your perfect blend. Don’t skip on salt and pepper; they make a big difference! These cheesy chicken wraps pair well with salsa and guacamole. Serve them on a platter for parties or family meals. You can also add a side salad for a fresh touch. If you want to impress, sprinkle extra cheese on top before serving. It adds flavor and looks great! For a twist, try serving with a creamy ranch dip. {{image_2}} You can mix up the cheese in your wraps. Use mozzarella for a stretchy melty bite. Try pepper jack for a spicy kick. Cream cheese adds a rich, smooth texture. You could even blend different cheeses for a unique taste. Each choice brings a new flavor to your wrap. If you want to switch the chicken, try ground turkey or beef. Shredded pork works well too. You can use canned tuna for a quick meal. For a smoky taste, add some bacon bits. Each protein option adds a different twist to your wraps. You can easily make these wraps vegetarian. Replace chicken with black beans or chickpeas. Use a mix of your favorite veggies, like zucchini or spinach. For vegan wraps, swap out cream cheese for cashew cream. Nutritional yeast can add a cheesy flavor without dairy. This way, you keep all the tasty goodness while catering to different diets. To store leftover wraps, first let them cool. Place them in an airtight container. You can also wrap them in plastic wrap. This keeps them fresh for up to three days in the fridge. If you want to keep them longer, freezing is a great option. When you are ready to eat, take the wraps out of the fridge. You can reheat them in a skillet over low heat. This helps to keep the wrap crispy. Heat each side for about three minutes. You can also use a microwave, but the wrap may get soft. Heat for about one minute, checking often. To freeze the wraps, wrap each one tightly in plastic wrap. Then place them in a freezer bag. Remove all the air to prevent freezer burn. You can freeze them for up to three months. When you are ready to eat, thaw them in the fridge overnight before reheating. For best results, use the Full Recipe to get the most out of your delicious wraps! Yes, you can prepare Cheesy Chicken Wraps ahead of time. Just make the filling and store it in the fridge. You can keep it for up to two days. When ready to eat, assemble the wraps and cook them. This way, you save time on busy days. You can add many vegetables to your wraps. Some great options are: - Spinach - Zucchini - Mushrooms - Onions - Tomatoes These add extra flavor and nutrients. Feel free to mix and match your favorites! To make the wraps healthier, try these tips: - Use whole wheat tortillas for more fiber. - Add more veggies like spinach or bell peppers. - Use low-fat cheese and cream cheese options. - Substitute grilled chicken for shredded chicken. These changes can enhance the taste and nutrition of your meal. For a complete guide on making these wraps, check the Full Recipe. Cheesy chicken wraps are simple but delicious. You learned about key ingredients, how to prepare them, and cooking tips for the best results. I shared ways to store leftovers and delicious variations. You can experiment with different cheeses and proteins to suit your taste. Remember, wraps are easy to customize. Use these ideas to make your own tasty creations. Enjoy your time in the kitchen!

Cheesy Chicken Wraps Flavorful and Easy Meal Idea

Looking for a quick and tasty meal? Cheesy Chicken Wraps are your answer! With gooey cheese and seasoned chicken, these

To make delicious spicy honey chicken, you need some key ingredients. Here’s what you will need: - 4 boneless chicken breasts - 1/4 cup honey - 2 tablespoons soy sauce - 2 tablespoons Sriracha (adjust for heat preference) - 1 tablespoon apple cider vinegar These ingredients create a sweet and spicy flavor that makes this dish special. The honey gives it a nice sweetness. The Sriracha adds the heat, and the soy sauce brings depth. Apple cider vinegar adds a hint of tang, balancing the flavors. Now let’s talk about seasonings and garnishes. They enhance the dish even more: - 3 cloves garlic, minced - 1 teaspoon fresh ginger, grated - 1 teaspoon sesame oil - 1 tablespoon vegetable oil - Salt and pepper, to taste - 1 tablespoon sesame seeds (for garnish) - 2 green onions, chopped (for garnish) Garlic and ginger bring a fresh taste. The oils add richness. Salt and pepper are basic but vital for flavor. Finally, sesame seeds and green onions give a nice crunch and color. For the full recipe, check out Delicious Spicy Honey Chicken. Enjoy making this tasty dish! Start by mixing the honey, soy sauce, and Sriracha in a bowl. You can adjust the Sriracha based on your heat preference. Next, add minced garlic, grated ginger, and sesame oil to the mix. Stir well until everything is combined. This marinade gives the chicken its sweet and spicy flavor. Now, season the chicken breasts with salt and pepper. Place them in a resealable bag or shallow dish. Pour the marinade over the chicken, ensuring it coats every piece. Seal the bag or cover the dish, then place it in the fridge. Marinate for at least 30 minutes. For even more flavor, try marinating for up to 2 hours. Preheat your oven to 400°F (200°C). Line a baking dish with parchment paper to make cleanup easy. Remove the chicken from the marinade and keep the marinade for later. Place the chicken breasts in the prepared baking dish. Ensure they are spaced out for even cooking. While the chicken bakes, pour the reserved marinade into a saucepan. Bring it to a boil over medium-high heat. Reduce the heat and let it simmer for about 5 minutes, so it thickens. Once the chicken is done baking, brush it with the thickened marinade. Return it to the oven for an extra 5 minutes to caramelize the sauce. After baking, let the chicken rest for 5 minutes. Slice it, drizzle with any remaining sauce, and garnish with sesame seeds and chopped green onions. For the full recipe, check the earlier section. To make your chicken extra spicy, use Sriracha to taste. If you like heat, add more. If you prefer mild, use less. Marination time is key for flavor. I suggest at least 30 minutes, but two hours gives the best taste. To keep the chicken moist, don’t overcook it. Use a meat thermometer to check for 165°F (74°C). You can grill or pan-sear the chicken too. Both methods add a nice char and flavor. For serving, slice the chicken into strips for a nice look. Drizzle some sauce on top for color. Pair it with rice or a fresh salad. Steamed veggies also go well with this dish. {{image_2}} You can switch up the protein to suit your taste. Try tofu or pork instead of chicken. Tofu absorbs the marinade well, giving it great flavor. For pork, choose tender cuts like pork chops. You can also use different sweeteners. Agave syrup works well for a lighter flavor. Maple syrup brings a lovely depth. Both will add sweetness without changing the dish much. Want to brighten up the dish? Add some citrus! Lime or orange zest adds a fresh twist. Just a little zest can make your meal pop. You can also fold in some veggies. Bell peppers or broccoli add color and crunch. Just toss them with the chicken in the oven. They will soak up the spicy honey goodness too. Explore global flavors to change the dish. For an Asian twist, add sesame seeds and green onions. For BBQ vibes, mix in some smoked paprika or chipotle. You can also use herbs like cilantro or basil from other cuisines. These can add unique tastes. Just sprinkle them on before serving for a fresh kick. For the full recipe, check out the Delicious Spicy Honey Chicken section. Enjoy experimenting with these variations! To keep your delicious spicy honey chicken fresh, follow these tips: - Refrigerate: Place leftovers in an airtight container. Store in the fridge for up to 3 days. - Freeze: For longer storage, use freezer-safe bags or containers. It lasts about 3 months in the freezer. - Label: Always label containers with the date. This helps you know when to use them. When reheating, you want the chicken juicy and warm. Here’s how: - Oven Method: Preheat your oven to 350°F (175°C). Place chicken on a baking sheet. Heat for about 15-20 minutes. - Microwave Method: Use a microwave-safe plate. Cover with a damp paper towel. Heat in short bursts to avoid dryness. - Avoid Overcooking: Check the temperature. It should be just warm, not hot, to keep it moist. For a full recipe, refer to the previous sections and follow the steps for perfect chicken every time! How long should I marinate the chicken? You should marinate the chicken for at least 30 minutes. For more flavor, try marinating it for up to 2 hours. This lets the spices soak in well. Can I use frozen chicken breasts for this recipe? Yes, you can use frozen chicken breasts. Just make sure to thaw them completely first. This ensures even cooking and better flavor absorption. What if I don’t have Sriracha? If you don’t have Sriracha, you can use other hot sauces. Try a bit of chili paste or even red pepper flakes. Adjust the amount to fit your heat level. Can I use bone-in chicken for this recipe? Yes, you can use bone-in chicken. Just adjust the cooking time. Bone-in pieces may take longer to cook, so check for an internal temperature of 165°F (74°C). Is this recipe gluten-free or low-carb? This recipe can be gluten-free if you use gluten-free soy sauce. It is also low-carb, depending on the honey amount you use. For a lower carb count, consider a sugar substitute. Vegan alternatives for this recipe? For a vegan version, swap chicken for tofu or tempeh. Use maple syrup instead of honey. This will still give you a sweet and spicy flavor. This article covers how to make delicious spicy honey chicken. We discussed key ingredients, like chicken breasts and marinade components. You learned how to prepare, marinate, and bake the chicken step by step. I also shared tips for flavor and cooking techniques, plus some fun variations. Finally, we touched on storage and common questions. Enjoy experimenting with this recipe. With these steps, you’ll make a great meal perfect for any occasion.

Delicious Spicy Honey Chicken Flavorful and Easy Recipe

Are you ready to spice up your dinner routine? This Delicious Spicy Honey Chicken recipe is packed with flavor, easy

- 2 cups penne pasta - 1 lb boneless, skinless chicken breasts, cubed - 2 tablespoons olive oil - 3 cloves garlic, minced - 1 small onion, diced - 1 cup heavy cream - 1 cup chicken broth - 1 cup spinach, chopped - 1 cup sun-dried tomatoes, chopped - 1 cup grated Parmesan cheese - Salt and pepper to taste - 1 teaspoon Italian seasoning - Fresh basil leaves for garnish To make a great Creamy Chicken Penne, gather all your ingredients. Fresh ingredients make a big difference. You need penne pasta, which gives a nice bite. The chicken adds protein and flavor, while garlic and onion boost the taste. Heavy cream makes the dish rich and smooth. Chicken broth adds depth to the sauce. Spinach and sun-dried tomatoes give color and nutrition. Finally, Parmesan cheese adds that savory touch. Don't forget salt, pepper, and Italian seasoning to round out the flavors. Check the Full Recipe for a detailed guide. Having all these ingredients ready makes cooking easy and fun! First, you need to cook the penne pasta. Fill a large pot with water and add a pinch of salt. Bring the water to a boil. Once it’s boiling, add 2 cups of penne pasta. Cook it according to the package instructions. I like mine al dente, which means it should be firm but not hard. This usually takes about 10-12 minutes. After cooking, drain the pasta and set it aside. Next, focus on the chicken and vegetables. In a large skillet, heat 2 tablespoons of olive oil over medium heat. Add 1 pound of cubed, boneless, skinless chicken breasts to the skillet. Season it with salt, pepper, and 1 teaspoon of Italian seasoning. Cook the chicken until it turns golden brown, which should take about 6-8 minutes. Once the chicken is done, add 1 small diced onion and 3 cloves of minced garlic. Sauté these together until the onion is soft and see-through, about 3-4 minutes. Now it's time to make the creamy sauce. Pour in 1 cup of chicken broth and bring it to a gentle simmer. Stir in 1 cup of heavy cream and let it bubble for about 2-3 minutes. Add 1 cup of chopped spinach and 1 cup of chopped sun-dried tomatoes. Cook until the spinach wilts. Lower the heat and add the cooked penne pasta. Mix well so each piece of pasta gets coated in that rich sauce. Finally, stir in 1 cup of grated Parmesan cheese. This makes the sauce creamy and delicious. Taste it and add more salt or pepper if needed. For the full recipe, don’t forget to check the complete list of steps! To make your sauce rich and smooth, start with quality heavy cream. The cream adds a velvety texture. Stir it in slowly, allowing it to combine well with the chicken broth. This helps create a thick and creamy sauce. Always taste as you go. If it needs more flavor, a pinch of salt or pepper can make a big difference. For juicy chicken, cut it into small cubes. This helps it cook evenly. Use medium heat to avoid burning. Cook the chicken until golden brown, about 6-8 minutes. Let it rest for a few minutes after cooking. This keeps it tender and moist. Don't rush this step; it makes your dish shine. Plan your steps to save time. Start by boiling the penne pasta. While that cooks, chop your garlic, onion, and other ingredients. After draining the pasta, focus on the chicken. Cook it, then add the onion and garlic. This method keeps everything fresh. You will have a hot, ready meal in just 30 minutes. Enjoy your cooking adventure with this creamy chicken penne! For the full recipe, check out the recipe card above. {{image_2}} You can easily boost the nutrition of Creamy Chicken Penne by adding more veggies. Some great options include: - Bell peppers - Mushrooms - Zucchini - Broccoli Chop them up and sauté them with the chicken. This adds color and flavor. More vegetables make the dish healthy and tasty. If you want to change the protein, try these options: - Shrimp - Tofu - Turkey - Sausage Each protein brings a unique taste. Shrimp works well with the creamy sauce. Tofu is a great choice for a vegetarian option. You may want more or less creaminess in your dish. To increase creaminess, add more heavy cream or cheese. If you want it lighter, use less cream or swap for low-fat milk. This way, you can enjoy Creamy Chicken Penne just how you like it. To store your creamy chicken penne, let it cool down first. Then, place it in an airtight container. This keeps the dish fresh for up to three days. You can keep it in the fridge. Make sure to label the container with the date. When you are ready to eat, reheat the creamy chicken penne gently. Use the microwave or a skillet on low heat. If the sauce seems thick, add a splash of chicken broth or cream. Stir well as you heat. This keeps the dish creamy and tasty. You can freeze creamy chicken penne, but it’s best to do this before adding the cheese. Store it in a freezer-safe container. It lasts for about three months. When ready to eat, thaw it overnight in the fridge. Reheat on the stove and add cheese just before serving. This keeps the flavors fresh. For the full recipe, refer to the earlier section. Yes, you can make Creamy Chicken Penne in advance. Cook the pasta and sauce separately. Store each in airtight containers. When ready to serve, heat the sauce on low. Add the cooked pasta and mix well. This keeps the pasta from getting too soft. If you need a substitute for heavy cream, try whole milk mixed with butter. Use three parts milk to one part melted butter. You can also use half-and-half for a lighter option. Another choice is coconut cream for a dairy-free version. Each option gives a slightly different taste. To add spice to your Creamy Chicken Penne, use crushed red pepper flakes. Start with a pinch and add more for heat. You can also mix in diced jalapeños or a splash of hot sauce. For a different flavor, try smoked paprika. Adjust the spice level to fit your taste. For the full recipe, check out the [Full Recipe]. This creamy chicken penne is easy and delicious. We covered the key ingredients, from pasta to chicken. You learned how to cook everything step by step. I shared tips to make the sauce perfect and ideas for variations. Plus, I included storage tips for leftovers. Now, you can enjoy this dish your way. Make it for friends or family. Follow these steps for a tasty meal that everyone will love. Happy cooking!

Creamy Chicken Penne Rich and Flavorful Dinner Dish

Looking for a simple yet delicious dinner option? Let me introduce you to my Creamy Chicken Penne. This dish combines

Older posts
Newer posts
← Previous Page1 … Page79 Page80 Page81 … Page106 Next →
© 2025 My Cooking Cast • Built with GeneratePress

Our Policies

  • Privacy Policy
  • GDPR Policy
  • Terms Of Use
  • Copyright Policy
  • Cookie Policy
  • Disclaimer

More Information​

  • Home
  • Contact
  • About
  • Dinner
  • Appetizers
  • Dessert
©2025, My Cooking Cast About Privacy Policy Back To Top