Skip to content
DisclaimerTerms Of UseGDPR PolicyCookie Policy

My Cooking Cast

  • Home
  • Drinks
  • Appetizers
  • Dinner
  • Dessert
  • About
  • Contact
  • Privacy Policy
DisclaimerTerms Of UseGDPR PolicyCookie Policy

Emma

- 2 cups of pretzel sticks, crushed - 1 cup creamy peanut butter - 1/2 cup honey or maple syrup - 1/2 cup powdered sugar - 1 teaspoon vanilla extract - 1 cup semi-sweet chocolate chips - 1 tablespoon coconut oil (optional) These ingredients come together to create a sweet and salty treat. The pretzel sticks give a nice crunch. Creamy peanut butter adds rich flavor. Honey or maple syrup provides sweetness. Powdered sugar helps bind everything. Vanilla extract brings out the flavors. Semi-sweet chocolate chips add a tasty layer on top. Coconut oil can make the chocolate smoother. - Best peanut butter types: Use creamy peanut butter for a smooth mix. Brands like Jif or Skippy work well. Choose natural peanut butter for a healthier option, but check for added sugar. - Choosing high-quality chocolate: Look for semi-sweet chocolate chips with good cocoa content. Ghirardelli or Nestle are great choices. Higher quality chocolate melts better and tastes richer. Start by mixing the dry and wet ingredients. In a large bowl, combine the crushed pretzel sticks, creamy peanut butter, honey or maple syrup, powdered sugar, and vanilla extract. Make sure to mix well. You want everything to blend together nicely. This step creates a sticky mixture that holds the bars together. Next, line an 8x8 inch baking dish with parchment paper. Leave some paper hanging over the edges. This helps with removing the bars later. Now, transfer your sticky mixture into the dish. Press it down firmly and evenly. Use the back of a spatula or your hands to make a flat surface. Make sure to press down hard so the bars stay together. Now it’s time to melt the chocolate. In a microwave-safe bowl, add the semi-sweet chocolate chips and coconut oil if you want a smoother layer. Heat the bowl in 30-second intervals. Stir after each time to make sure it melts evenly. Once it’s smooth, pour the melted chocolate over the pressed pretzel mixture. Use a spatula to spread it evenly. Place the baking dish in the refrigerator. Let the bars set for at least 2 hours. This helps them firm up. For the best results, do not skip this step. Once the bars are firm, lift them out using the parchment paper. Cut them into squares or rectangles. Enjoy your Peanut Butter Pretzel Bars! To get the best texture for your Peanut Butter Pretzel Bars, press down firmly. This step is key for a solid base. Use your hands or a spatula to ensure it’s even. If you want a different binding agent, try almond butter or sunflower seed butter. These can add unique flavors and textures. For a great presentation, stack the bars neatly on a wooden board. You can drizzle extra melted chocolate on top for flair. Add some crushed pretzels for a nice crunch. These bars pair well with a cool glass of milk. The creaminess of milk balances the salty-sweet flavors perfectly. One common mistake is overheating the chocolate. Heat it in short bursts to prevent burning. Stir often until it’s smooth. Another mistake is not letting the bars set long enough. They need at least two hours in the fridge. If you skip this step, they may fall apart when cut. {{image_2}} You might want a nut-free option. You can swap peanut butter with sunflower seed butter. Sunflower seed butter gives a creamy texture. It also adds a slight nutty taste. This choice works well for kids with nut allergies. Want to boost the flavor? You can add spices like cinnamon for warmth. A sprinkle of cinnamon makes each bite more exciting. You can also add sea salt on top for a sweet and salty mix. This extra touch enhances the bars’ flavor profile. Looking for a healthier treat? You can cut down the sugar content. Use less honey or maple syrup, or try natural sweeteners. Options like agave syrup or stevia can work well. These substitutions help make your bars a bit lighter, while still tasting great. To keep your Peanut Butter Pretzel Bars fresh, choose the right containers. Use an airtight container. This will help keep moisture out. If you don’t have one, a non-airtight container works, but it’s not as effective. Wrap the bars in plastic wrap before placing them in the container. This adds an extra layer of protection. At room temperature, these bars last about one week. Keep them in a cool, dry place. For longer freshness, refrigerate them. In the fridge, they can last up to two weeks. The cold helps maintain their texture and flavor. To freeze your bars, cut them into squares first. Wrap each piece in plastic wrap. Place them in a freezer-safe bag or container. They can stay frozen for up to three months. When you’re ready to enjoy them, take out a bar. Let it thaw in the fridge for a few hours. You can also leave it at room temperature for about 30 minutes. Enjoy the same great taste! Yes, you can make these bars gluten-free. Look for gluten-free pretzel sticks. Many brands offer tasty options made from rice or corn. Always check the label to be sure. To cut down on sweetness, reduce the honey or maple syrup. You can also use less powdered sugar. Adding a pinch of salt can help balance the flavors too. If you don’t have coconut oil, use butter instead. It makes the chocolate smooth and tasty. You can also skip it and just melt the chocolate. The bars will still be great! Absolutely! You can add chopped nuts like almonds or walnuts for crunch. Try adding mini chocolate chips or dried fruit for extra flavor. Mix them in before pressing the base into the dish for a fun twist! You learned how to make tasty sweet bars with simple ingredients. We covered everything from the main ingredients to smart storage tips. Remember to choose high-quality items for the best results. Also, pressing down firmly is key for the right texture. If you try different flavors or healthier options, enjoy the process! With these tips, you can make bars that taste great and impress everyone. Happy making!

Peanut Butter Pretzel Bars No Bake Delicious Treat

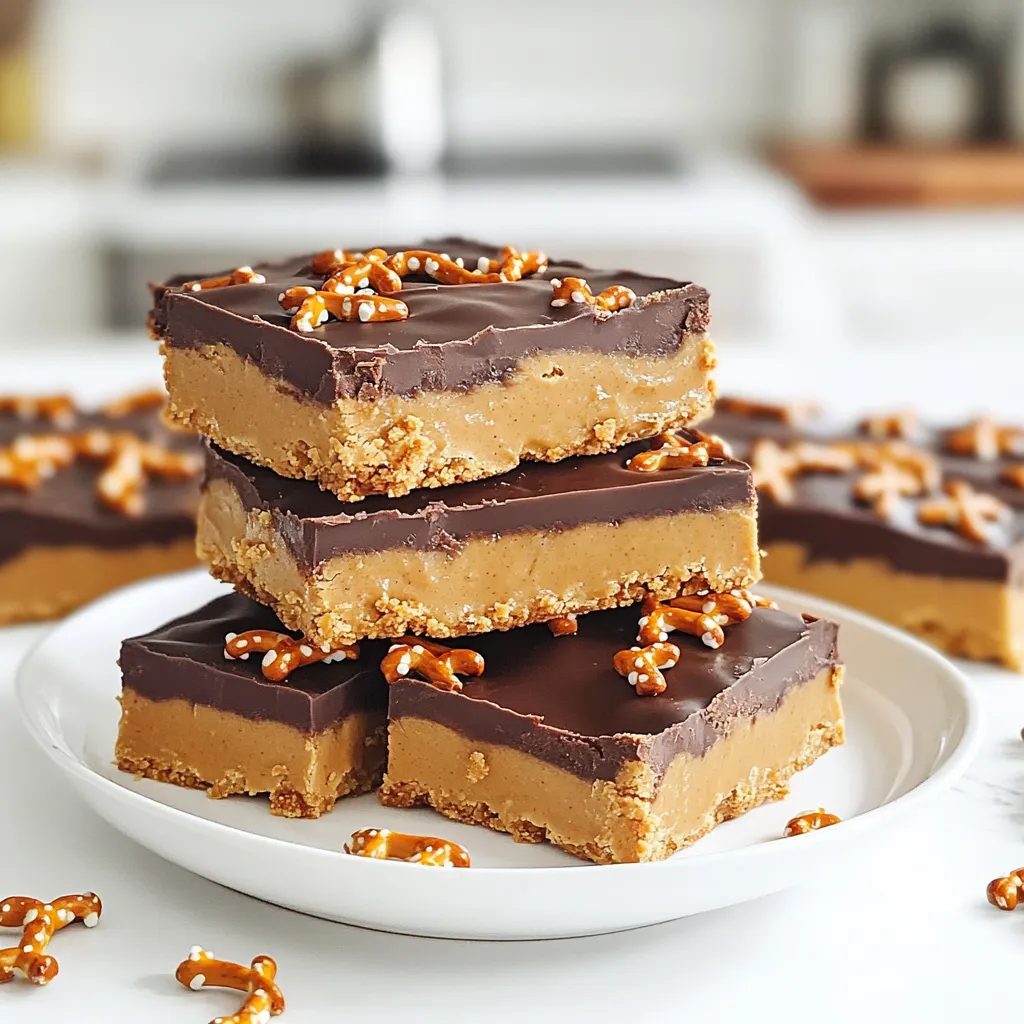
Looking for a quick and tasty treat? These no-bake peanut butter pretzel bars are the answer! With just a handful

To make your pumpkin pecan muffins, gather these simple ingredients: - 1 cup all-purpose flour - 1 cup whole wheat flour - 1 cup canned pumpkin puree - 1/2 cup brown sugar - 1/2 cup granulated sugar - 1/2 cup vegetable oil - 2 large eggs - 1/2 cup chopped pecans - 1 teaspoon baking soda - 1 teaspoon baking powder - 1 teaspoon ground cinnamon - 1/2 teaspoon ground nutmeg - 1/4 teaspoon ground ginger - 1/4 teaspoon salt - 1/4 cup milk (or plant-based alternative) - Optional: extra pecans for topping Accurate measurements make all the difference in baking. Here are some tips: - Use a dry measuring cup for flour. Fill it, then level it off with a knife. - For brown sugar, pack it into the cup firmly. This ensures the right sweetness. - When measuring liquids, use a liquid measuring cup. Check the measurement at eye level. - Always sift your dry ingredients if the recipe calls for it. This helps avoid lumps. You can easily swap some ingredients based on your needs or preferences: - Use coconut oil instead of vegetable oil for a different flavor. - Substitute honey or maple syrup for granulated sugar for a natural sweetener. - For a gluten-free option, replace all-purpose and whole wheat flour with a gluten-free blend. - Use applesauce instead of eggs for a vegan version. Just use 1/4 cup per egg. - If you don’t have pecans, walnuts or almonds work well, too. First, set your oven to 350°F (175°C). This temperature ensures the muffins bake evenly. While the oven warms up, grab your muffin tin. You can use paper liners for easy cleanup, or lightly grease the tin with oil. This step helps the muffins release easily after baking. In a large bowl, mix the all-purpose flour, whole wheat flour, baking soda, baking powder, cinnamon, nutmeg, ginger, and salt. Use a whisk to combine everything well. This step is crucial for even flavor and texture. Set this bowl aside for now, as we will return to it soon. In a separate bowl, combine the canned pumpkin puree, brown sugar, granulated sugar, vegetable oil, and eggs. Mix these ingredients until smooth. You want a consistent mixture with no lumps. This mix will add moisture and flavor to your muffins. Now, slowly add the dry ingredients to the wet mixture. Stir gently until combined. Be careful not to overmix, as this can make the muffins dense. Next, fold in the chopped pecans and milk. If the batter feels thick, add a little more milk to achieve your desired consistency. Spoon the batter into the prepared muffin cups, filling them about 2/3 full. If you like, sprinkle extra pecans on top for added crunch. Place the muffin tin in the preheated oven and bake for 18-20 minutes. Check for doneness by inserting a toothpick in the center. If it comes out clean, the muffins are ready! Let them cool in the tin for about 5 minutes. Then, move them to a wire rack to cool completely. Enjoy the delightful smell as they cool! To make the best pumpkin pecan muffins, you need to avoid overmixing. Mix the dry and wet ingredients until just combined. This keeps the muffins light and fluffy. Also, be sure to measure your flour correctly. Scoop it into the measuring cup and level it off with a knife. Too much flour can make your muffins dense. You can boost the flavor of your muffins by adding spices. Try a pinch of ground cloves or allspice for a richer taste. You might also add chocolate chips for a sweet twist. If you love nuts, consider using walnuts instead of pecans. Each nut brings its own flavor and crunch, making your muffins unique. Warm muffins look great on a plate. You can dust them with powdered sugar for a fancy touch. A drizzle of maple syrup adds sweetness and a beautiful shine. Serve them with a cup of coffee or tea for a cozy treat. For a fun idea, place them in a cute basket lined with a cloth. This will make your muffins look even more inviting! {{image_2}} You can change the flavors in pumpkin pecan muffins by adding different mix-ins. Try chocolate chips for a sweet touch. Dried cranberries or raisins work well for a fruity twist. If you like a bit of spice, add chopped candied ginger. You can also swap pecans for walnuts or almonds to give a nutty change. These mix-ins can take your muffins to a new level of yum. To make gluten-free pumpkin pecan muffins, use a gluten-free flour blend instead of all-purpose and whole wheat flour. You may also need to add a binder like xanthan gum to help with texture. For a vegan version, substitute eggs with flax eggs or applesauce. Replace the milk with almond or oat milk. These changes ensure everyone can enjoy these tasty muffins. In fall, you might want to add a pinch of clove or allspice to enhance the seasonal flavors. You can also mix in some fresh apple chunks for extra sweetness. As winter approaches, consider adding a dash of cocoa powder for a cozy, warm twist. These seasonal additions can keep your muffins fresh and exciting all year long. To keep your pumpkin pecan muffins fresh, store them in an airtight container. Place parchment paper between layers to avoid sticking. These muffins stay delicious for up to three days at room temperature. If you live in a humid area, refrigerate them to prevent spoilage. When you want to enjoy a warm muffin, preheat your oven to 350°F (175°C). Wrap the muffin in aluminum foil to keep it moist. Heat it for about 10 minutes. You can also use a microwave. Heat the muffin for 15-20 seconds. This method is quick and easy. Freezing these muffins is a great way to save them. First, let the muffins cool completely. Then, wrap each muffin tightly in plastic wrap. Place them in a freezer bag or container. They can stay in the freezer for about three months. When you want to eat one, thaw it in the fridge overnight or at room temperature for a few hours. Reheat as needed. You can tell when the muffins are done by using a toothpick. Insert it into the center of a muffin. If it comes out clean, they are ready. The muffins should be golden brown on top. They should spring back when you gently press them. Yes, you can use fresh pumpkin. Just cook and puree it first. Make sure it’s not too watery, as this can change the batter. Fresh pumpkin adds a lovely, rich taste. You can use walnuts, hazelnuts, or even almonds. Each nut gives a different flavor and crunch. Choose what you like best or what you have on hand. Store leftover muffins in an airtight container. They stay fresh at room temperature for about three days. For longer storage, place them in the fridge for up to a week. Yes! You can make these muffins a day or two ahead. Just cool them and store them properly. They taste great even after a day. You can also freeze them for up to three months. This guide covered essential muffin-making steps, from choosing ingredients to storage tips. You learned to measure with care and explore fun mix-ins. Fluffy muffins come from combining wet and dry ingredients just right. With simple swaps, you can adapt recipes to fit your needs. Storing muffins properly will keep them fresh longer. Use these tips to bake tasty muffins that impress everyone. Now, enjoy your baking journey and share your delicious creations!

Pumpkin Pecan Muffins Bakery Style Easy and Delicious

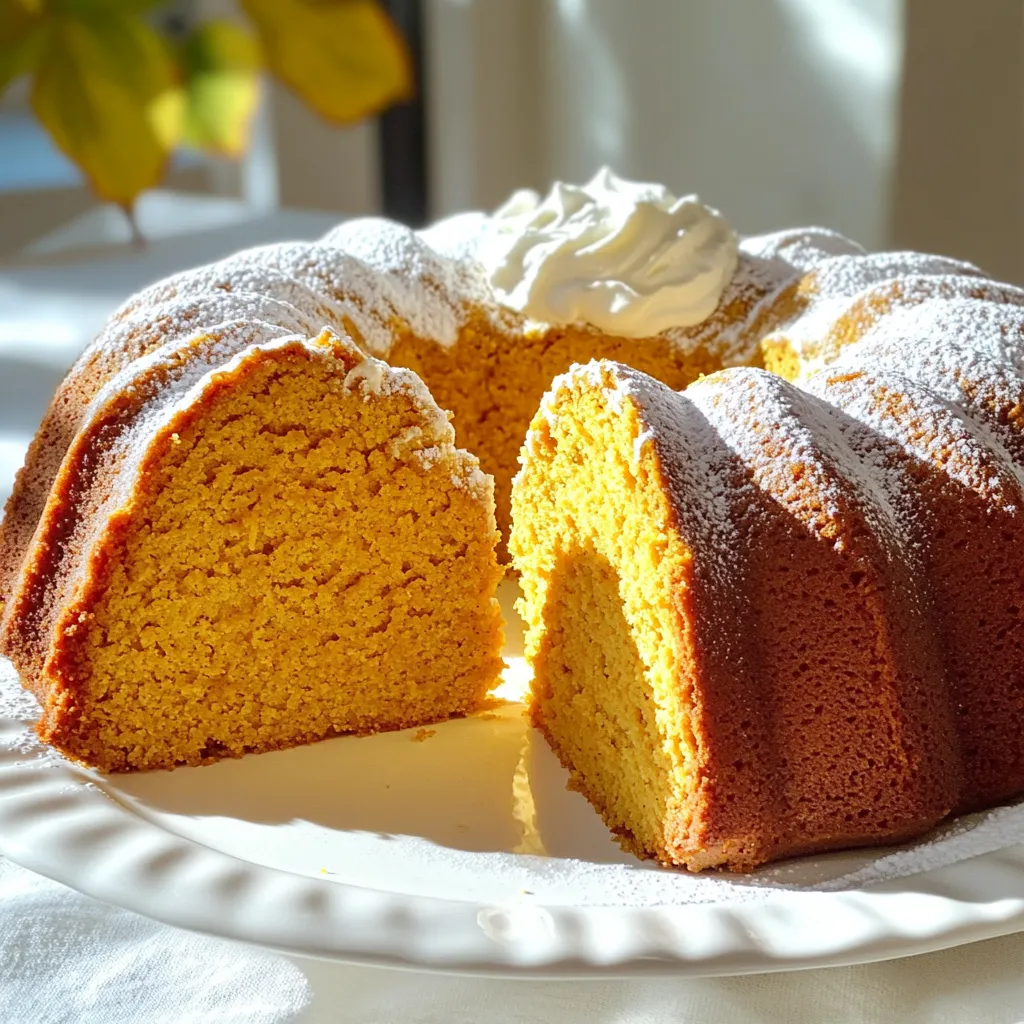
Get ready to bring the cozy flavors of fall to your kitchen with my Pumpkin Pecan Muffins! These bakery-style muffins

- 12 oz fettuccine pasta - 1 lb large shrimp, peeled and deveined - 2 tablespoons Cajun seasoning - 2 tablespoons olive oil - 2 cups heavy cream - 1 cup grated Parmesan cheese - 1 cup chicken broth - 4 cloves garlic, minced - 1 cup cherry tomatoes, halved - 1 teaspoon dried oregano - Fresh parsley, chopped - Salt and pepper to taste When I think about making creamy Cajun shrimp Alfredo, I focus on these key ingredients. First, I choose fettuccine pasta. The wide noodles hold the sauce well. For the shrimp, I always opt for large, peeled, and deveined shrimp. They cook quickly and add a nice bite. The Cajun seasoning gives this dish its bold flavor. I love using a good quality blend for the best taste. Olive oil is also essential for cooking the shrimp. Next, for that creamy texture, I use heavy cream. It blends perfectly with the other flavors. Grated Parmesan cheese adds a rich, savory taste. Chicken broth enhances the sauce and keeps it moist, while minced garlic brings in a lovely aroma. For garnishes, I often use halved cherry tomatoes. They add a pop of color and freshness. A sprinkle of dried oregano gives a nice herbal note. Finally, I finish with fresh parsley and a dash of salt and pepper to taste. These ingredients come together to create a delightful one-pot meal. 1. Start by heating 2 tablespoons of olive oil in a large pot over medium heat. 2. Once hot, add 1 pound of large shrimp, peeled and deveined. 3. Sprinkle 2 tablespoons of Cajun seasoning over the shrimp. 4. Cook for about 3-4 minutes. The shrimp should turn pink and opaque. 5. Remove the shrimp from the pot and set them aside. 1. In the same pot, add 4 cloves of minced garlic. 2. Sauté the garlic for about 1 minute. You want it fragrant but not burnt. 3. Next, pour in 1 cup of chicken broth and 2 cups of heavy cream. 4. Add 1 teaspoon of dried oregano and stir well to combine. 1. Bring the mixture to a simmer. 2. Add 12 ounces of fettuccine pasta to the simmering sauce. 3. Cook according to package instructions until the pasta is al dente. Stir occasionally to prevent sticking. 1. Once the pasta is cooked, lower the heat. 2. Stir in 1 cup of grated Parmesan cheese. Let it melt to create a creamy sauce. 3. Add the cooked shrimp and 1 cup of halved cherry tomatoes to the pot. 4. Gently toss everything together until well mixed and heated through. 5. Season with salt and pepper to taste. If the sauce is too thick, add a splash of chicken broth. - How to prevent sticking pasta To stop the pasta from sticking, stir it often while it cooks. Make sure to add enough water to cover the pasta completely. A pinch of salt in the water helps too. This keeps the pasta loose and tasty. - Ensuring shrimp are perfectly cooked Cook the shrimp just until they turn pink. This usually takes about 3-4 minutes. Overcooking makes them tough. Once they look opaque, take them out of the pot. Set them aside and add them back in later. - Different types of pasta While fettuccine works great, feel free to try penne or linguine. Each type gives a different texture. You can even use whole wheat pasta for a healthier twist. - Alternative proteins You can swap shrimp for chicken or tofu. Chicken should be cooked until no pink remains. Tofu should be firm and diced. Both options create a delicious meal with great flavors. - Substituting cream alternatives If you want a lighter dish, try using half-and-half or coconut cream. They will still create a creamy sauce but with fewer calories. Adjust the seasoning as needed for taste. - Using vegetable broth For a vegetarian version, replace the chicken broth with vegetable broth. This keeps the dish rich and tasty without meat. It’s a simple swap that works well in this recipe. {{image_2}} To plate the dish, use shallow bowls. Serve the creamy Cajun shrimp Alfredo in the center. Sprinkle chopped parsley on top for color. Add a little extra Parmesan for a rich touch. This makes each bowl look tempting and fresh. For side dishes, consider garlic bread or a green salad. These complement the creamy flavors well. A simple Caesar salad works great too. It adds crunch and freshness. The best wine to pair with this dish is a crisp white wine. A Sauvignon Blanc or Chardonnay enhances the flavors. Its acidity cuts through the creaminess of the sauce. For appetizers, try crispy fried calamari or stuffed mushrooms. These options keep the theme fun and flavorful. They set the stage for your creamy meal. If you have leftovers, don’t worry! You can use them to make a creamy shrimp quesadilla. Just add cheese and grill until golden. That’s a tasty twist on the original dish. Another idea is to mix leftovers into a frittata. Whisk eggs and pour over the shrimp Alfredo. Bake until set for a delightful breakfast. This way, you turn a single dish into new meals. To keep your creamy Cajun shrimp Alfredo fresh, use airtight containers. Glass or plastic containers work well. Avoid leaving it out at room temperature for long. If you plan to eat it soon, store it in the fridge. If you want to save it for later, freezing is a good option. Just make sure to leave some space in the container for expansion. When you are ready to enjoy your leftovers, use the stovetop or microwave. For the stovetop, heat it gently in a pan over low heat. Stir often to keep it smooth. If you use the microwave, heat it in short bursts. Check every 30 seconds to avoid overheating. To keep the creaminess, add a splash of chicken broth or cream while reheating. This will help restore the sauce's texture. Leftovers last 3 to 4 days in the fridge. Keep an eye out for signs of spoilage. If it smells off or has a strange color, it’s best to throw it out. Always trust your nose and eyes. When in doubt, throw it out! The best shrimp for this dish is large shrimp. They hold up well during cooking. Look for shrimp that are fresh and firm. You can also use frozen shrimp. Just make sure to thaw them before cooking. Yes, you can make this dish ahead of time. Cook the pasta and shrimp, then store them separately. When you’re ready to eat, combine them. Heat gently on the stove, adding a splash of cream if needed. Absolutely! To make this dish gluten-free, use gluten-free pasta. Many brands offer great options that taste good. The rest of the recipe remains the same. If you lack Cajun seasoning, make your own! Combine paprika, garlic powder, onion powder, and cayenne pepper. This mix gives you a similar flavor. You can adjust the spice level to your liking. To spice up this dish, add more cayenne pepper or hot sauce. You can also toss in diced jalapeños. This will add extra heat and flavor to your meal. Enjoy the kick! This blog post covered how to make a delicious Cajun shrimp fettuccine. We discussed key ingredients like fettuccine, shrimp, and more. I provided step-by-step instructions, cooking tips, and serving ideas. Remember, cooking should be fun and creative. Experiment with flavors and share your version. Enjoy making this tasty dish, and let it impress your family or friends!

Creamy Cajun Shrimp Alfredo One Pot Delight

Get ready to spice up your dinner routine with my Creamy Cajun Shrimp Alfredo One Pot Delight! This dish combines

- 2 medium zucchinis, sliced thinly - 1 cup breadcrumbs (panko for extra crunch) - ½ cup grated Parmesan cheese - 1 teaspoon garlic powder - 1 teaspoon onion powder - ½ teaspoon paprika - Salt and pepper to taste - 1 large egg - 1 tablespoon olive oil To make crispy zucchini chips, you need fresh ingredients. Start with two medium zucchinis. Thin slices make them crunchy. I love using panko breadcrumbs for that extra crunch factor. You’ll also need some grated Parmesan cheese. It adds a nice salty bite. For flavor, garlic powder, onion powder, and paprika are key. They make the chips taste great. Don't forget salt and pepper to bring it all together. You will also need one egg and a tablespoon of olive oil. The egg helps the coating stick. The olive oil adds richness and helps the chips crisp up. These ingredients come together to create a simple, tasty snack. You can easily find them at any grocery store. Feel free to tweak the spices to fit your taste. Enjoy your cooking! - Preheat the air fryer to 375°F (190°C). - In a small bowl, whisk the egg and olive oil together until smooth. - In another bowl, mix the breadcrumbs, grated Parmesan, garlic powder, onion powder, paprika, salt, and pepper. - Take each zucchini slice and dip it into the egg mixture. Let the extra drip off before moving to the next step. - Coat the zucchini slice in the breadcrumb mixture. Press lightly to ensure it sticks well. - Place the coated zucchini chips in a single layer in the air fryer basket. Make sure not to overcrowd them for the best outcome. - Air fry for about 10-12 minutes. Flip the chips halfway through to get them crispy on both sides. - When they turn golden brown and crispy, remove them from the air fryer. Let them cool slightly for maximum crunch. These steps make it easy to enjoy a tasty snack. You can dip them in your favorite sauce or eat them plain. To get the crispiest zucchini chips, start by letting the slices dry after you cut them. This helps remove excess moisture. Think of it like drying off your hands before you hold something. Also, avoid overcrowding the air fryer basket. When you pile too many chips in, they steam instead of fry. Keep them in a single layer for the best crunch. You can get creative with your seasonings. Try adding Italian herbs like oregano or even a bit of cayenne for heat. For a milder taste, stick with just salt and pepper. It’s all about what you like! Adjusting the seasoning is easy. Taste the breadcrumb mix before coating the zucchini. This way, you can add more salt or spices to match your palate. When serving your crispy zucchini chips, make them look great! Arrange them on a plate in a fun way. You can sprinkle fresh parsley or basil on top. Serve them warm with a bowl of marinara sauce or your favorite dip. Dips like ranch or tzatziki also work well. These not only add flavor but make your snack more enjoyable! {{image_2}} You can change the coating for your zucchini chips. Instead of regular breadcrumbs, use gluten-free breadcrumbs. This works well for those with gluten issues. You can also try different types of cheese. For a richer flavor, use sharp cheddar or a blend of Italian cheeses. Boost the taste by adding herbs. Oregano and thyme add a fresh kick. You can also spice things up with cayenne or chili powder. These spices give a nice heat and depth to your chips. Mix and match to find your favorite flavor. Don’t stop at zucchini! You can air fry other veggies too. Try sweet potatoes, carrots, or beets. Each veggie adds its own unique taste. For fun, combine different veggies for a mixed chip basket. This way, you get a variety of flavors and textures in one snack! To store leftover crispy zucchini chips, use an airtight container. Place a paper towel at the bottom to soak up any moisture. This helps keep the chips crispy. Refrigerate them for up to three days. Avoid stacking the chips. This lets air circulate and keeps them from getting soggy. For reheating, use your air fryer or oven. Preheat your air fryer to 375°F (190°C). Place the chips in a single layer and heat for about 3-5 minutes. If using the oven, heat to 350°F (175°C) and bake for about 5-7 minutes. Check them often to avoid burning. This method helps restore their crunch. You can freeze both uncooked and cooked zucchini chips. For uncooked chips, arrange them on a baking sheet and flash freeze for an hour. Then, transfer them to a freezer bag. For cooked chips, let them cool completely before freezing. Thaw uncooked chips overnight in the fridge before cooking. Reheat cooked chips straight from the freezer. This keeps them crispy and tasty. Yes, you can! Try using eggplant, sweet potatoes, or carrots. These veggies have a similar texture and will crisp up nicely in the air fryer. - For eggplant, slice it thinly and remove excess moisture. Cook for about 12-15 minutes. - Sweet potatoes need a longer cook time of 15-18 minutes. Thin slices work best. - Carrots also do well; slice them into thin rounds and fry for about 10-12 minutes. You can skip the breadcrumbs by using cornmeal or crushed nuts instead. Both options add great texture. - For a gluten-free version, use almond flour or ground flaxseed. Both will keep your chips crispy. - Just coat the zucchini slices in your chosen mix and air fry as usual. Zucchini chips taste great with many dips! Marinara sauce and ranch dressing are popular choices. - To make a simple homemade dip, mix Greek yogurt with garlic powder and lemon juice. - Another easy mix is sour cream with a dash of hot sauce for a spicy kick. Experiment with different dips to find your favorite! Now you have a clear guide to make crispy air-fried zucchini chips. You learned about the key ingredients, simple steps, and useful tips to enhance flavor. Remember, you can also experiment with different vegetables and coatings to suit your taste. With these insights, I hope you feel ready to tackle this fun recipe. Enjoy your cooking and savor the delicious results!

Crispy Zucchini Chips Air Fryer Simple and Tasty Snack

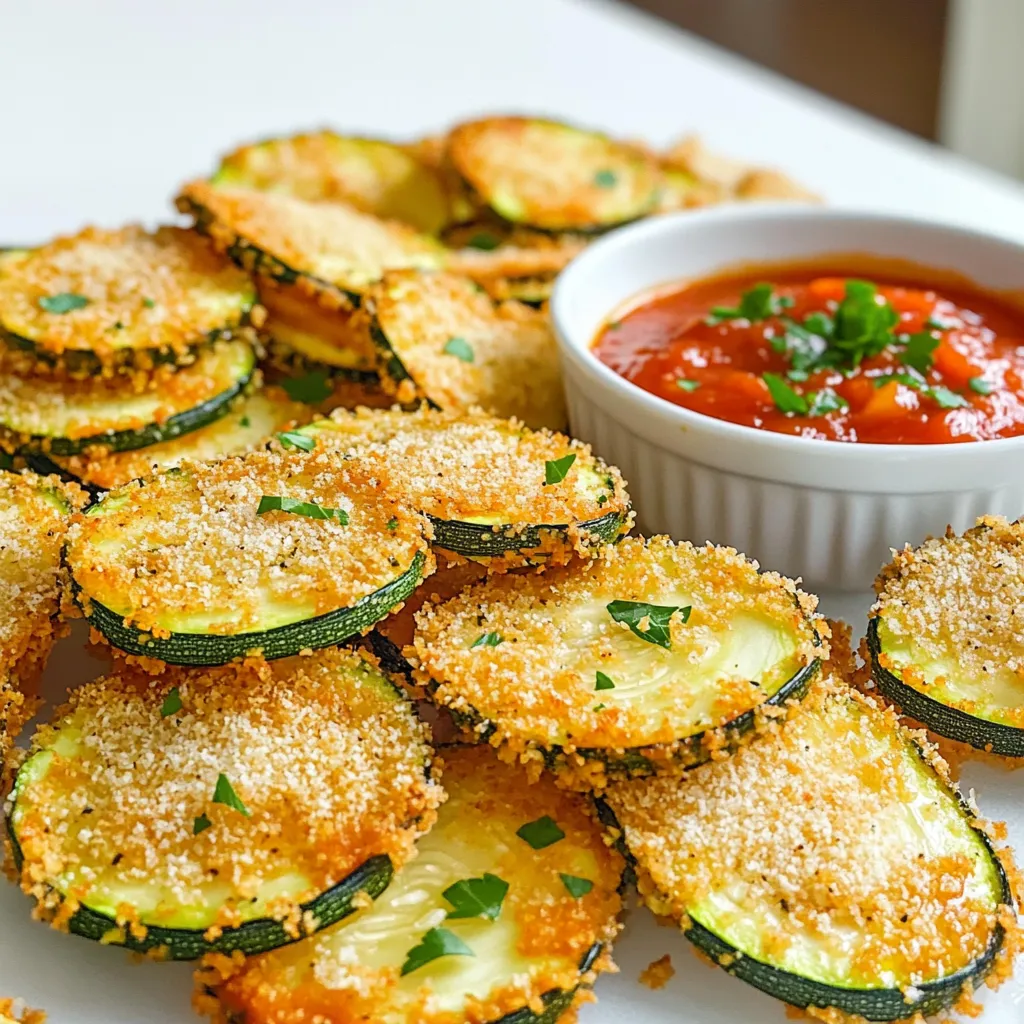
Looking for a snack that satisfies your crunch craving without the guilt? Air fryer crispy zucchini chips are the answer!

- 8 oz lo mein noodles - 1 pound boneless, skinless chicken breast, sliced thin - 1 cup mixed bell peppers, julienned - 1 cup julienned carrots - 1 cup sugar snap peas - 3 cloves garlic, minced - 1-inch piece of ginger, grated - 1/4 cup soy sauce - 2 tablespoons oyster sauce - 1 tablespoon sesame oil - 1 teaspoon ground black pepper - Sesame seeds - Extra green onions Gathering the right ingredients is key to making Chicken Lo Mein better than takeout. Start with fresh lo mein noodles. They give the dish a nice texture. Choose a pound of chicken breast, as it cooks quickly and stays juicy. Next, pick colorful bell peppers. They add a pop of color and flavor. Don’t forget about carrots and sugar snap peas; these add crunch and sweetness. Use fresh garlic and ginger to build a strong base for your sauce. For the sauces, soy sauce and oyster sauce give depth. Sesame oil adds a lovely nuttiness. Black pepper adds just the right kick. If you want to make your dish look great, sprinkle some sesame seeds and sliced green onions on top. These garnishes not only look nice but also add flavor. Using fresh, quality ingredients will elevate your Chicken Lo Mein from ordinary to extraordinary. First, bring a large pot of salted water to a boil. Add 8 ounces of lo mein noodles. Cook them according to the package instructions. This usually takes about 4 to 6 minutes. You want the noodles to be al dente, which means they should still have a bit of bite. Once cooked, drain the noodles and rinse them under cold water. This stops the cooking process and keeps them from getting sticky. Set them aside for later. Next, heat 1 tablespoon of vegetable oil in a large skillet or wok over medium-high heat. Add 1 pound of sliced chicken breast. Stir-fry it for about 4 to 5 minutes. You want the chicken to be fully cooked and no longer pink. This quick cooking gives the chicken a nice texture. Once done, remove the chicken from the pan and set it aside. In the same skillet, add another tablespoon of vegetable oil. Throw in 3 cloves of minced garlic and 1-inch grated ginger. Stir them for about 30 seconds to release their aroma. Then add 1 cup of julienned bell peppers, 1 cup of julienned carrots, and 1 cup of sugar snap peas. Stir-fry these veggies for about 3 to 4 minutes. You want them tender but still crisp. This keeps the colors bright and the flavors fresh. Now it’s time to mix everything together. Return the cooked chicken to the skillet with the vegetables. Add the drained lo mein noodles. Toss everything together so the noodles, chicken, and veggies blend well. Make sure the noodles get evenly distributed throughout. This helps every bite be flavorful. Pour in 1/4 cup of soy sauce, 2 tablespoons of oyster sauce, and 1 tablespoon of sesame oil. Sprinkle in 1 teaspoon of ground black pepper. Toss everything thoroughly for about 2 to 3 minutes. This ensures the noodles are well-coated with the sauce and heated through. Finally, stir in 3 sliced green onions just before serving. This adds a fresh crunch. Serve the Chicken Lo Mein hot. You can garnish it with sesame seeds for a nice touch. Place it in a bowl or on a plate, and enjoy your homemade dish that tastes even better than takeout! To make your Chicken Lo Mein truly shine, focus on key ingredients. Use fresh, high-quality vegetables. Crisp bell peppers and sweet snap peas bring color and flavor. Fresh garlic and ginger enhance the dish. They add a warm, spicy note that transforms the meal. Freshness matters. Use vegetables that are bright and firm. They should not be wilting or brown. Fresh vegetables will keep their crunch and taste vibrant. This simple step boosts your dish beyond any takeout. Many people overcook their noodles. This leads to mushy lo mein that lacks the perfect bite. Cook your lo mein noodles just until al dente. This keeps them firm and helps them hold the sauce. Another big mistake is not heating sauces properly. If your sauces aren't warm, they won't coat the noodles well. Heat them before adding to the pan. This ensures every bite is full of flavor. Using the right tools can make a big difference. A large skillet or wok is best for stir-frying. These tools allow for even cooking and help avoid steaming. You will also need a good stirring tool. A wooden spoon or spatula works well. This will help you toss the ingredients without breaking them. Having these tools ready will make your cooking smooth and fun. {{image_2}} You can easily swap chicken for tofu in this dish. Tofu takes on flavors well. Use firm tofu for the best texture. Press it to remove excess water and cut it into cubes. Cook it until golden brown for a nice crunch. Adjust the sauces for flavor. Use hoisin sauce instead of oyster sauce. This change keeps the dish vegetarian while adding a sweet and savory note. If you prefer shrimp or beef, they work great too. Shrimp cooks quickly, so add it last. Cook shrimp for about 3-4 minutes until pink. If using beef, slice it thinly for quick cooking. Stir-fry beef for about 4-5 minutes until browned. Adjust cooking times to ensure all proteins are cooked through. Spice things up by adding chili flakes or sriracha. This adds heat and depth to your dish. You can also mix in different vegetables. Try broccoli, bok choy, or mushrooms for added texture and flavor. These simple changes make your Chicken Lo Mein a fun and tasty meal. Enjoy experimenting with flavors! To keep your Chicken Lo Mein fresh, store it in the fridge. Use an airtight container. This method keeps flavors locked in. Your dish stays tasty for about 3 to 4 days. If you want to keep it longer, freeze it. In the freezer, it lasts up to 2 months. Just remember, freezing may change the texture of your noodles. When it's time to enjoy your leftovers, you have two great options: microwave or stovetop. - Microwave: Place your Chicken Lo Mein in a microwave-safe bowl. Cover it loosely to avoid splatter. Heat it in 30-second bursts. Stir between each burst. This keeps it evenly heated. - Stovetop: The stovetop is my favorite! Heat a little oil in a pan over medium heat. Add your lo mein and stir gently. This helps keep the noodles from getting mushy. Tips for avoiding mushy noodles: Always add a splash of water or broth when reheating. This steam helps rehydrate the noodles without making them soggy. Enjoy your meal just like it was freshly made! Yes, you can use other noodles. Some good options are: - Spaghetti: Easy to find and cook. - Rice noodles: Great for a gluten-free meal. - Egg noodles: Adds a nice texture. These alternatives may change the taste slightly. But they still yield a tasty dish. If you need a substitute for oyster sauce, try these: - Hoisin sauce: It has a sweet and savory profile. - Soy sauce with sugar: Mix one tablespoon of soy sauce with a teaspoon of sugar. - Vegetarian stir-fry sauce: Use any sauce that gives umami flavor. These options still provide depth to your Chicken Lo Mein. Making Chicken Lo Mein is quick! Here’s a simple time breakdown: - Prep time: 15 minutes to gather and chop ingredients. - Cook time: 15 minutes to stir-fry and combine everything. - Total time: 30 minutes from start to finish. This means you can enjoy a fresh meal in no time! Yes, you can prepare Chicken Lo Mein ahead of time. Here’s how: - Cook the noodles: You can cook them and store them in the fridge. - Prep the chicken and veggies: Cut them and keep them in separate containers. - Reheat: When ready to eat, stir-fry everything and add sauces. This way, you have a quick meal ready whenever you want! You learned how to make Chicken Lo Mein with simple steps. We covered key ingredients, cooking techniques, and useful tips to enhance your dish. Avoid common mistakes to ensure perfect texture and flavor. Remember, fresh veggies make a big difference. Experiment with variations like tofu or shrimp to suit your taste. Store leftovers properly and reheating them wisely keeps them tasty. Enjoy your meal, and share your delicious results!

Chicken Lo Mein Better Than Takeout Savory Delight

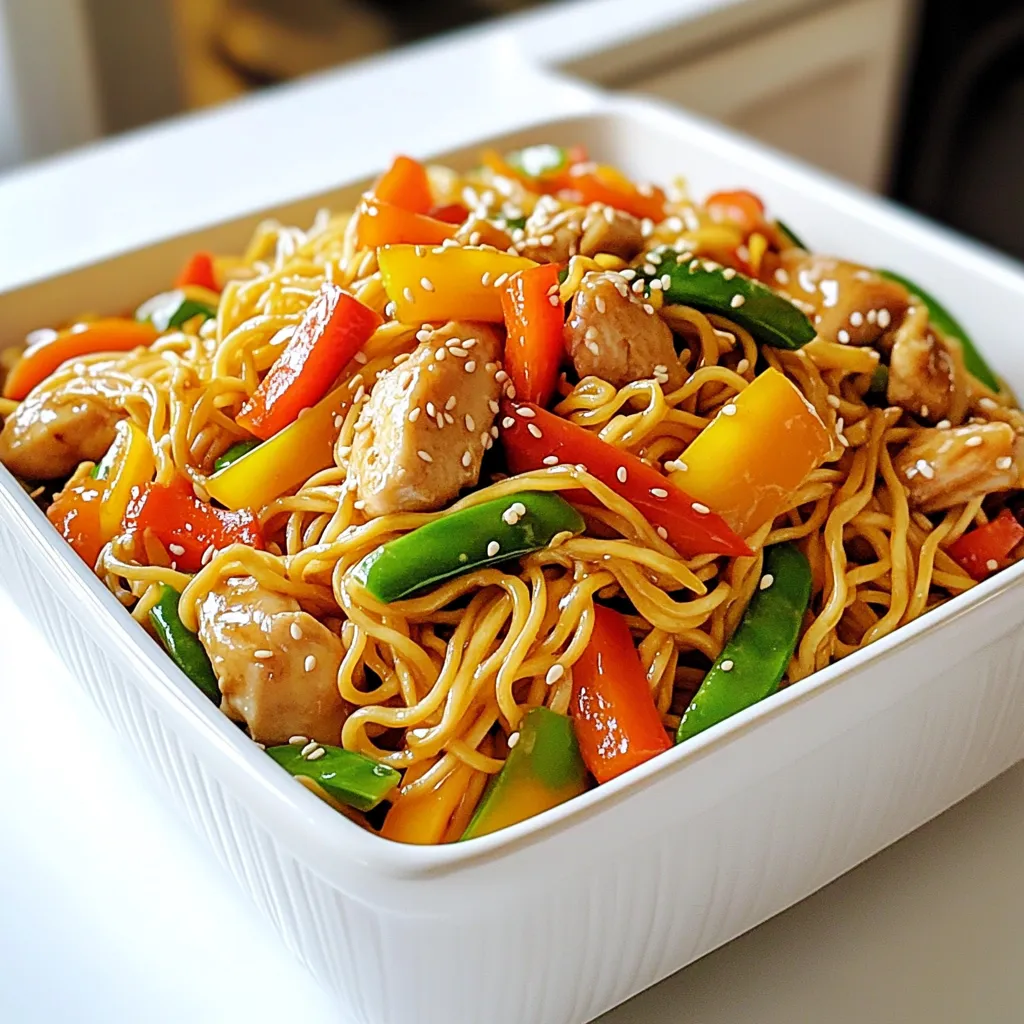
Do you crave the delicious taste of Chicken Lo Mein but want something even better than takeout? You’re in the

- 2 salmon fillets (6 oz each) - 1 bunch asparagus, trimmed - 3 cloves garlic, minced Salmon is the star of this dish. It provides healthy fats and protein. Choose fresh salmon for the best flavor. Asparagus adds a nice crunch and vibrant color. Garlic gives a lovely aroma and taste. - 1 lemon, zested and juiced - 2 tablespoons olive oil - 1 teaspoon dried thyme - 1 teaspoon paprika - Salt and pepper to taste The marinade is key to this recipe. It brightens up the salmon and asparagus. Lemon zest and juice bring a fresh tang. Olive oil adds richness. Thyme and paprika give depth. Adjust salt and pepper to your liking. - Fresh parsley, chopped (for garnish) Garnishing with parsley makes the dish pop. It adds color and a fresh taste. You can also use other herbs if you like. Enjoy your meal looking as good as it tastes! - Preheat the oven: Set your oven to 400°F (200°C). This high heat helps the salmon and asparagus cook well. - Prepare the marinade: In a small bowl, mix together the minced garlic, lemon zest, lemon juice, olive oil, dried thyme, paprika, salt, and pepper. This mix adds flavor and moisture to the salmon. - How to marinate the salmon: Place the salmon fillets in a shallow dish. Pour half of the marinade over the salmon. Make sure the fillets are well coated. Let them sit for about 15-20 minutes. This time allows the flavors to soak into the fish. - Arranging asparagus and salmon: On a large baking sheet, lay out the trimmed asparagus in a single layer. Drizzle the remaining marinade over the asparagus and toss gently. Season it lightly with salt and pepper. After that, make space by pushing the asparagus to one side and place the marinated salmon fillets skin side down on the sheet. - Baking temperature and time guidelines: Place the baking sheet in the oven and bake for about 15-20 minutes. The salmon should be cooked through and flake easily with a fork. The asparagus will be tender and vibrant. To adjust flavors in the marinade, you can play with the lemon juice. Want it zestier? Add more lemon juice or zest. If you like it a bit sweet, try adding honey. You can also swap the thyme for rosemary or dill. Each herb brings a new taste to the dish. To ensure perfect salmon texture, watch the cooking time closely. Salmon cooks fast, so check it at 15 minutes. The fish should flake easily with a fork when done. Overcooking can lead to dry fish, so pull it from the oven when it's almost done. It will keep cooking a bit after you take it out. For the best accompaniments, consider serving with rice or quinoa. These grains soak up the flavors well. You can also add a fresh salad on the side. A simple green salad with a light vinaigrette adds a nice crunch. If you want a richer side, try garlic mashed potatoes. They complement the salmon and asparagus perfectly. {{image_2}} You can switch up the veggies in this dish. Broccoli, green beans, or bell peppers work well. You can even add cherry tomatoes for a burst of flavor. Each veggie brings a unique taste and texture. Just remember to adjust the cooking time. Thicker veggies may need more time to cook. Want to try something different? You can use other fish like trout or cod. Chicken breasts also work great with this marinade. If you prefer meat, try thin pork chops. Just ensure they have even cooking times. This way, you keep the meal simple and tasty. Feel free to mix up the spices! A pinch of crushed red pepper gives a nice kick. Fresh herbs like dill or basil add a lovely note. You can also try a splash of soy sauce for a twist. These changes can really elevate your dish. Experimenting with flavors makes cooking fun! To store leftovers safely, let the dish cool first. Place the salmon and asparagus in an airtight container. You can keep it in the fridge for up to three days. Make sure to separate the salmon from the asparagus if you want to keep them fresh longer. This way, they won’t get mushy. For reheating, the oven works best. Preheat it to 350°F (175°C). Place the salmon and asparagus on a baking sheet. Heat for about 10-15 minutes. Check that the salmon is warm all the way through. You can also use a microwave. If you do, cover the food with a damp paper towel. This keeps it from drying out. Use glass or BPA-free plastic containers. These types keep food fresh and safe. Look for containers with tight lids to avoid spills. You can also use silicone bags for easy storage. They are great for keeping food fresh and are eco-friendly. You should marinate salmon for 15 to 20 minutes. This time is just right to let the flavors soak in. If you marinate it too long, the fish can become mushy. The acid from the lemon juice can change the texture. So, keep it simple and don’t rush. Yes, you can use frozen salmon. Just make sure to thaw it first. Frozen salmon can taste just as good as fresh. To thaw, place it in the fridge overnight. If you need it fast, seal it in a bag and run cold water over it. Once thawed, follow the same steps for marinating and cooking. You can serve many sides with this dish. Here are a few great options: - Rice: Plain white or brown rice works well. - Quinoa: For a nutty flavor and extra protein. - Mashed Potatoes: Creamy and comforting. - Salad: A fresh green salad adds crunch. - Bread: A slice of crusty bread is always nice. Choose any of these sides to make a complete meal. Enjoy your cooking! This blog post highlighted how to make lemon garlic salmon with asparagus. We discussed the main ingredients, including salmon and asparagus, along with key marinade components. You learned about preparation, marination, and baking steps. Tips on perfecting the flavors and cooking techniques followed. We also covered variations in vegetables and proteins and provided storage information. Cooking this dish can be easy and enjoyable. I encourage you to try it and make adjustments as needed!

Lemon Garlic Salmon and Asparagus Sheet Pan Delight

Looking for a quick and tasty dinner? Try my Lemon Garlic Salmon and Asparagus Sheet Pan Delight! This dish combines

- 1 cup unsalted butter, softened - 1 cup cream cheese, softened - 2 cups granulated sugar - 4 large eggs - 2 cups all-purpose flour - 1 teaspoon baking powder - 1 teaspoon baking soda - 1 teaspoon ground cinnamon - ½ teaspoon ground nutmeg - ½ teaspoon ground ginger - 1 cup canned pumpkin puree - 1 teaspoon vanilla extract - ½ teaspoon salt For the best results, use high-quality ingredients. Fresh butter and cream cheese make a big difference. Make sure your eggs are at room temperature. This helps them blend better into the batter. - Powdered sugar for dusting - Vanilla ice cream or whipped cream for serving You can add powdered sugar on top for a sweet touch. If you want to make it even better, serve it with vanilla ice cream or whipped cream. This adds a nice contrast to the pumpkin flavor. With these ingredients, you're set for a delightful baking experience. Each one plays a key role in making your Pumpkin Cream Cheese Pound Cake irresistible. - Preheat your oven to 350°F (175°C). - Grease and flour a 10-inch bundt pan. - In a large bowl, mix 1 cup of softened butter and 1 cup of softened cream cheese. Use an electric mixer on medium speed. Blend until the mix is creamy and smooth. - Gradually add in 2 cups of granulated sugar. Beat until light and fluffy, about 3 to 5 minutes. - Add 4 large eggs, one at a time. Mix well after each egg. Scrape down the bowl as needed. - In another bowl, whisk together 2 cups of all-purpose flour, 1 teaspoon of baking powder, 1 teaspoon of baking soda, 1 teaspoon of ground cinnamon, ½ teaspoon of ground nutmeg, ½ teaspoon of ground ginger, and ½ teaspoon of salt. - Gradually add the dry mix to the butter mixture, alternating with 1 cup of canned pumpkin puree. Start and end with the dry mix. Stir until just combined. - Stir in 1 teaspoon of vanilla extract. - Pour the batter into the prepared bundt pan. Smooth the top with a spatula. - Bake in the oven for 60 to 70 minutes. Check for doneness by inserting a toothpick into the center. It should come out clean. - Let the cake cool in the pan for about 15 minutes. Then remove it and cool completely on a wire rack. - Use softened butter and cream cheese for a smooth batter. - Mix well to avoid lumps. - For best results, keep eggs and cream cheese at room temperature. - Room temperature ingredients blend easily, making a lighter cake. - Dust the cooled cake with powdered sugar for a sweet touch. - Drizzle a glaze made from powdered sugar and milk for shine. - Serve each slice with whipped cream or vanilla ice cream. - This adds flavor and makes it look special. - To prevent a sunken cake, do not overmix the batter. - Bake until a toothpick comes out clean. - For a dry texture, avoid overbaking. - Check the cake before the time is up to ensure moisture. {{image_2}} You can add a twist to your cake by mixing in chocolate chips or nuts. I love using walnuts or pecans for a crunchy bite. They add both taste and texture. You can also swap spices for new flavors. Try adding cardamom or cloves for a warm, spicy kick. Each spice brings a different taste, making each cake special. If you need a gluten-free option, almond flour works great. It gives the cake a moist texture and rich flavor. You can also make a low-sugar version. Use stevia or monk fruit sweetener instead of sugar. This way, you enjoy the cake without the extra sugar. Fall is the best time to use fresh pumpkin puree. It has a bright flavor and makes the cake even better. You can also mix in seasonal flavors like apple or maple. These flavors bring warmth to the cake. They make it perfect for fall gatherings or cozy nights. To keep your Pumpkin Cream Cheese Pound Cake fresh, store it at room temperature. Wrap it in plastic wrap or place it in an airtight container. This method keeps the cake moist and tasty for about three days. If you have leftovers, refrigerate them. Use a tight-lid container for the fridge. This way, you can enjoy the cake for up to a week without losing flavor. For longer storage, freezing is your best option. Wrap the cooled cake tightly in plastic wrap. Then, place it in a freezer-safe bag or container. This will keep it fresh for up to three months. When you’re ready to enjoy it, thaw the cake in the fridge overnight. For the best taste, enjoy the cake within a month or two after freezing. How long does Pumpkin Cream Cheese Pound Cake last? This cake lasts up to five days at room temperature. Store it in an airtight container. It stays fresh and tasty, making it a great treat for guests or family. Can I make this recipe in advance? Yes, you can make this cake a day or two ahead. It tastes even better after the flavors meld together. Just cover it well and store it at room temperature. What should I do if my cake is too dense? If your cake is too dense, check your mixing method. Make sure you beat the butter and cream cheese until fluffy. Also, check that you measured the flour correctly. Too much flour can cause density. Can I use a different pan size? You can use a different pan size, but baking times will change. A smaller pan may need less time, while a larger one may need more. Check for doneness with a toothpick. Is it necessary to use cream cheese? Yes, cream cheese adds moisture and richness. If you skip it, the cake may turn out dry. You could try sour cream as a substitute for a similar effect. Can I substitute pumpkin puree with fresh pumpkin? Yes, you can use fresh pumpkin. Cook and puree the pumpkin until smooth. Make sure it's not too watery, or it will change the cake's texture. What can I use instead of eggs for a vegan version? You can use applesauce or mashed bananas as an egg substitute. Use 1/4 cup for each egg. Flax eggs are another option; mix one tablespoon of flaxseed meal with two and a half tablespoons of water for one egg. This blog post covered how to make a delicious Pumpkin Cream Cheese Pound Cake. We discussed key ingredients and provided simple steps for baking. I shared tips to avoid common issues and variations to explore new flavors. You can also store the cake easily for later enjoyment. Remember, baking is about fun and creativity. Enjoy the process, and don’t hesitate to try your own twists! Your cake can be a hit whether for a holiday or any day of the year.

Pumpkin Cream Cheese Pound Cake Irresistible Dessert

Are you ready to indulge in a dessert that combines the rich flavors of fall with creamy goodness? This Pumpkin

- 1 cup graham cracker crumbs - 1/4 cup melted unsalted butter - 2 teaspoons sugar - 8 oz cream cheese, softened - 1/2 cup powdered sugar - 1/2 cup canned pumpkin puree - 1 teaspoon pumpkin pie spice - 1 teaspoon vanilla extract - 1/2 teaspoon cinnamon - Whipped cream for topping - Extra pumpkin pie spice for garnish The first step to making pumpkin spice cheesecake cups is gathering your ingredients. You need simple items that blend well together. Start with graham cracker crumbs. They will form the base of your cheesecake. Mix them with melted butter and sugar. This gives your crust a rich flavor. For the cheesecake filling, use softened cream cheese. It should be soft to mix easily. Add powdered sugar to sweeten the cream cheese. Then, mix in canned pumpkin puree for that classic fall taste. Next, include pumpkin pie spice. This spice mix adds warmth and depth. Don't forget vanilla extract and a touch of cinnamon. These flavors create a lovely blend in each cup. Finally, you’ll need whipped cream for topping. It adds a light and fluffy finish. You can also sprinkle extra pumpkin pie spice on top. This gives a nice touch and makes it look pretty. With these ingredients, you are ready to create a delightful treat that is sure to impress! - In a medium bowl, mix 1 cup graham cracker crumbs, 1/4 cup melted unsalted butter, and 2 teaspoons sugar. Stir until the crumbs are coated. - Take small cups or jars. Divide the crumb mix evenly among them. Press down slightly to form a crust layer. - In a large bowl, beat 8 oz cream cheese and 1/2 cup powdered sugar until smooth and creamy. - Add 1/2 cup canned pumpkin puree, 1 teaspoon pumpkin pie spice, 1 teaspoon vanilla extract, and 1/2 teaspoon cinnamon. Beat until everything is well combined and smooth. - Spoon or pipe the pumpkin cheesecake mixture over the graham cracker crust in each cup. - Place the cups in the fridge for at least 2 hours to set. Before serving, top each cup with whipped cream and a sprinkle of extra pumpkin pie spice. To get the best texture for your cheesecake, start with the cream cheese. - Softening cream cheese: Take your cream cheese out of the fridge. Let it sit at room temperature for about 30 minutes. This helps it mix smoothly. If you're in a hurry, you can cut it into small cubes. Microwave it for about 10 seconds. This will soften it quickly. - Avoiding lumps in the mixture: Once the cream cheese is soft, beat it well. Use an electric mixer on low speed at first. Gradually increase the speed until it is smooth. Make sure to scrape the bowl's sides. This helps to mix everything evenly and avoids lumps. To make your pumpkin spice cheesecake even better, you can adjust the flavors. - Adjusting spice levels: If you love spices, add a little extra pumpkin pie spice. You can also increase the cinnamon for a warm flavor. Start with small amounts. Taste as you go to find your perfect balance. - Adding additional flavorings if desired: Want to get creative? You can mix in a bit of maple syrup for a sweet touch. A splash of bourbon or rum can also add depth to the flavor. Just remember, a little goes a long way! {{image_2}} You can change the crust for fun. Instead of graham crackers, try using cookie crumbs. Chocolate cookies add a rich flavor. Nut crusts work well too. Ground almonds or walnuts make a tasty base. For a gluten-free treat, use gluten-free cookie crumbs. You can even try oats mixed with butter for a different feel. Want to switch things up? Try a chocolate pumpkin spice cheesecake. Just add melted chocolate to the filling. This twist gives a rich taste that pairs well with pumpkin. You can also swap the spices. Instead of pumpkin pie spice, use ginger or nutmeg. This gives your cups a unique flair and new taste. Store your pumpkin spice cheesecake cups in the fridge. Make sure they are covered. They stay fresh for up to five days. If you want to enjoy them later, save some for the week. You can freeze these cups before or after assembly. If you freeze them before, just add the whipped cream later. If you freeze after, let them thaw in the fridge overnight. For best texture, enjoy them within three months. You can make these cheesecake cups a day in advance. Prepare the crust and filling as directed. Then, assemble the cups and refrigerate them. They will stay fresh overnight. This makes it easy to serve at parties or gatherings. Just add the whipped cream and spices right before serving. Yes, you can use fresh pumpkin. Start by roasting a small pumpkin. Cut it in half and remove the seeds. Bake it cut side down until soft. Once cool, scoop the flesh into a bowl and mash it. Use this fresh pumpkin in place of canned pumpkin puree. It gives a nice, fresh flavor. Garnishes add a fun touch to your cheesecake cups. Here are some ideas: - Crushed graham crackers for crunch - Chopped nuts, like pecans or walnuts - A drizzle of caramel sauce - Fresh mint leaves for color - Cinnamon sticks for a rustic look These garnishes will enhance the visual appeal and flavor of your cups. In this blog post, I shared how to make delicious pumpkin cheesecake cups. We covered the key ingredients, from grahams and cream cheese to pumpkin and spices. I gave step-by-step instructions for creating the crust and filling, plus tips for perfect texture and flavor variations. Lastly, we discussed storage options to keep your treats fresh. These cups are easy to make and fun to enjoy. Try them out! You’ll impress everyone with your baking skills.

Pumpkin Spice Cheesecake Cups Delightful and Easy Treat

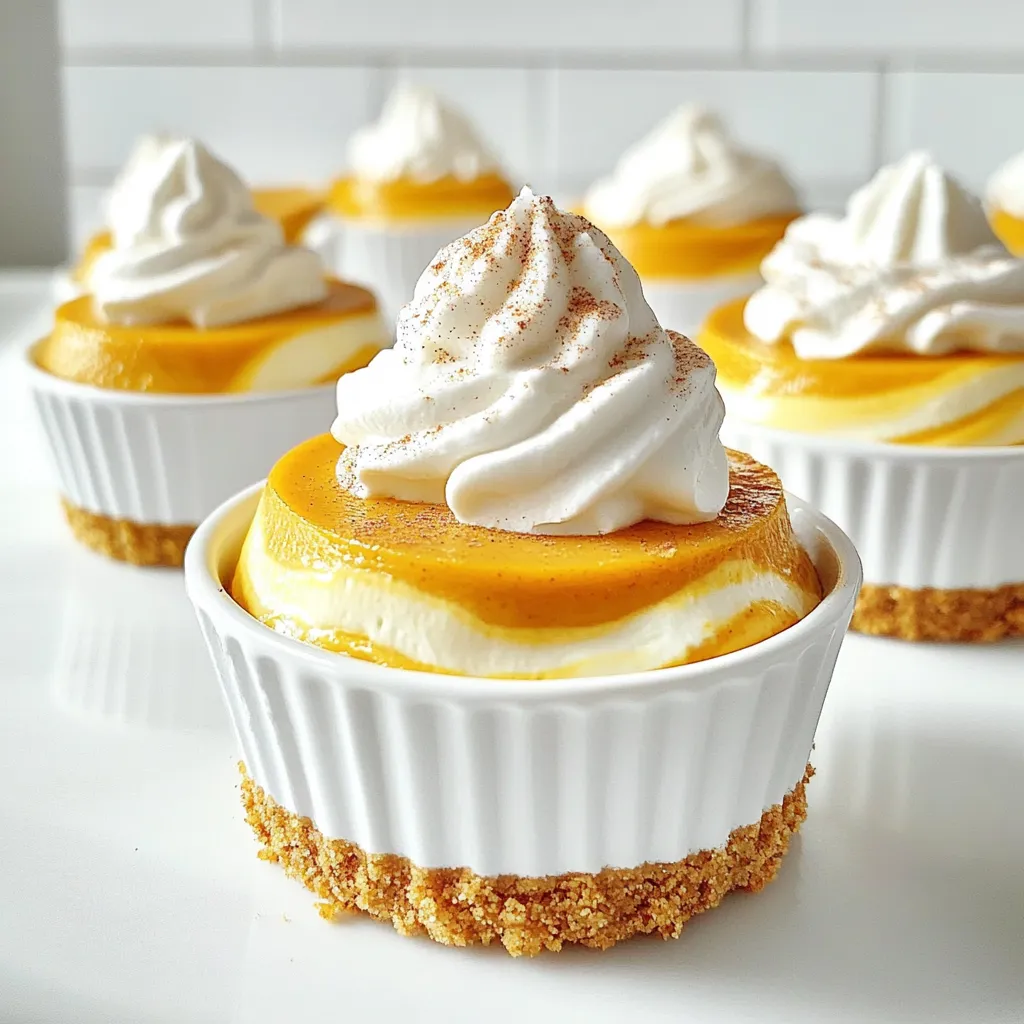
If you love the cozy flavors of fall, you’re in for a treat! These Pumpkin Spice Cheesecake Cups are the

To make Cozy Caramel Apple Bread Pudding, you need a few key ingredients. Here’s what you'll need: - 6 cups day-old bread (French or brioche), cubed - 3 cups milk - 1 cup heavy cream - 3 large eggs - 1 cup brown sugar - 1 teaspoon vanilla extract - 1 teaspoon ground cinnamon - 1/2 teaspoon nutmeg - 2 cups peeled and diced apples (Granny Smith or Honeycrisp) - 1 cup caramel sauce (store-bought or homemade) - 1/2 cup chopped walnuts (optional) - Pinch of salt Each ingredient plays a key role. The day-old bread gives structure and absorbs the custard beautifully. Milk and cream add richness that makes the pudding creamy. Eggs bind everything together. The brown sugar brings sweetness and depth. Vanilla, cinnamon, and nutmeg infuse warm, cozy flavors. Choosing the right apples is crucial. Granny Smith offers tartness, while Honeycrisp adds sweetness. The caramel sauce gives that extra touch of indulgence. If you want a crunch, add walnuts. When you gather these ingredients, you set the stage for a delicious dessert. Each bite will be warm and comforting, perfect for a chilly day. - Preheat the oven to 350°F (175°C). - Grease a 9x13 inch deep baking dish with butter or non-stick spray. - In a large bowl, combine 6 cups of cubed day-old bread and 2 cups of diced apples. - If you like nuts, add in 1/2 cup of chopped walnuts now. - In another bowl, whisk together 3 cups of milk, 1 cup of heavy cream, and 3 large eggs. - Mix in 1 cup of brown sugar, 1 teaspoon of vanilla extract, 1 teaspoon of ground cinnamon, 1/2 teaspoon of nutmeg, and a pinch of salt. - Pour the custard over the bread and apple mixture. - Make sure every piece of bread gets soaked. Let it sit for 10-15 minutes so it absorbs the liquid. - Drizzle 1 cup of caramel sauce over the mixture. - Gently fold it in to create swirls. - Bake for 40-50 minutes until the top is golden brown and the center is set. - Allow it to cool for 10 minutes before serving. - Cut into squares and serve warm, adding extra caramel sauce on top. For the best texture, use day-old French bread or brioche. This bread soaks up the custard well and bakes to a lovely texture. If you want a twist, try challah or even whole grain bread. Each choice brings its own unique flavor to this dish. The best apples for this recipe are Granny Smith or Honeycrisp. They provide a nice balance of sweet and tart flavors. If you want your pudding sweeter, choose a softer apple like Fuji or Gala. To balance sweetness, mix tart apples with sweet ones. This creates a rich flavor profile. Garnish your bread pudding with a sprinkle of cinnamon or a dollop of whipped cream. Chopped walnuts add a lovely crunch. For an extra treat, serve it with vanilla ice cream or drizzle warm cream sauces over the top. This adds warmth and richness to every bite. {{image_2}} You can make your bread pudding even more fun. Try mixing in chocolate chips or dried fruits. They add great taste and texture. Chocolate pairs well with caramel. Dried fruits bring sweetness and chewiness. You can also play with spices. Adding a pinch of ginger or a dash of cloves can change the whole dish. Experiment and find what you love! If you need gluten-free options, use gluten-free bread. It works just as well. Look for a bread that has a good texture. You can also make it dairy-free. Use almond milk instead of regular milk. For cream, try coconut cream. These swaps keep the dish tasty while meeting your dietary needs. As seasons change, so can your bread pudding. In fall, add pumpkin spice for a cozy twist. It brings warmth and flavor that everyone loves. You can also switch the apples for other fruits. Try pears or berries for a fresh taste. Each fruit gives a different flavor, making this dish exciting all year round! To store your cozy caramel apple bread pudding, let it cool first. Once cool, cover it tightly with plastic wrap or foil. You can also use an airtight container. This keeps it fresh and moist. Store it in the fridge for up to four days. If you plan to eat it later, refrigerate it right after it cools. To freeze your bread pudding, cut it into servings. Wrap each piece in plastic wrap and then place them in a freezer bag. This helps keep the flavor and texture. You can freeze it for up to three months. When you're ready to enjoy, thaw it in the fridge overnight. Reheat it in the oven at 350°F (175°C) for about 20 minutes. This warms it through and keeps it tasty. In the fridge, your bread pudding stays fresh for about four days. In the freezer, it lasts up to three months. Check for any signs of spoilage before eating. If you notice a sour smell, discoloration, or mold, it's best to throw it away. Always use your senses to ensure your dessert is safe to eat! Yes, you can prepare this dish ahead of time. - Mix the bread and apples, and place them in a baking dish. - Prepare the custard base and pour it over the bread mixture. - Cover it tightly with plastic wrap. - Store it in the fridge for up to 24 hours. - When ready, bake as directed, adding a few extra minutes if needed. To boost the caramel flavor, try these tips: - Use a richer caramel sauce. - Add an extra 1/4 cup of caramel sauce into the custard mixture. - Drizzle more caramel on top before serving. - You can even mix in caramel bits for extra sweetness. Bread pudding is best served warm. - Warm pudding has a soft and gooey texture. - The flavors blend together better when warm. - A scoop of ice cream on top adds a nice contrast to the warmth. Yes, you can double this recipe easily. - Use a larger baking dish, like a 12x18 inch pan. - Just double all the ingredients as listed. - Keep the same baking time, but check for doneness a bit earlier. The best bread for this dish is day-old French bread or brioche. - Both types soak up the custard well. - They create a soft texture and rich flavor. - You can also use challah for a sweeter taste. This bread pudding recipe is easy and fun to make. You learned about key ingredients, simple steps, and helpful tips. Remember to pick the right bread and apples for the best taste. Feel free to explore variations that suit your needs. Store leftovers properly to keep them fresh for days. I hope you try this recipe soon. Enjoy it warm or cold, and share it with friends and family!

Cozy Caramel Apple Bread Pudding Delightful Treat

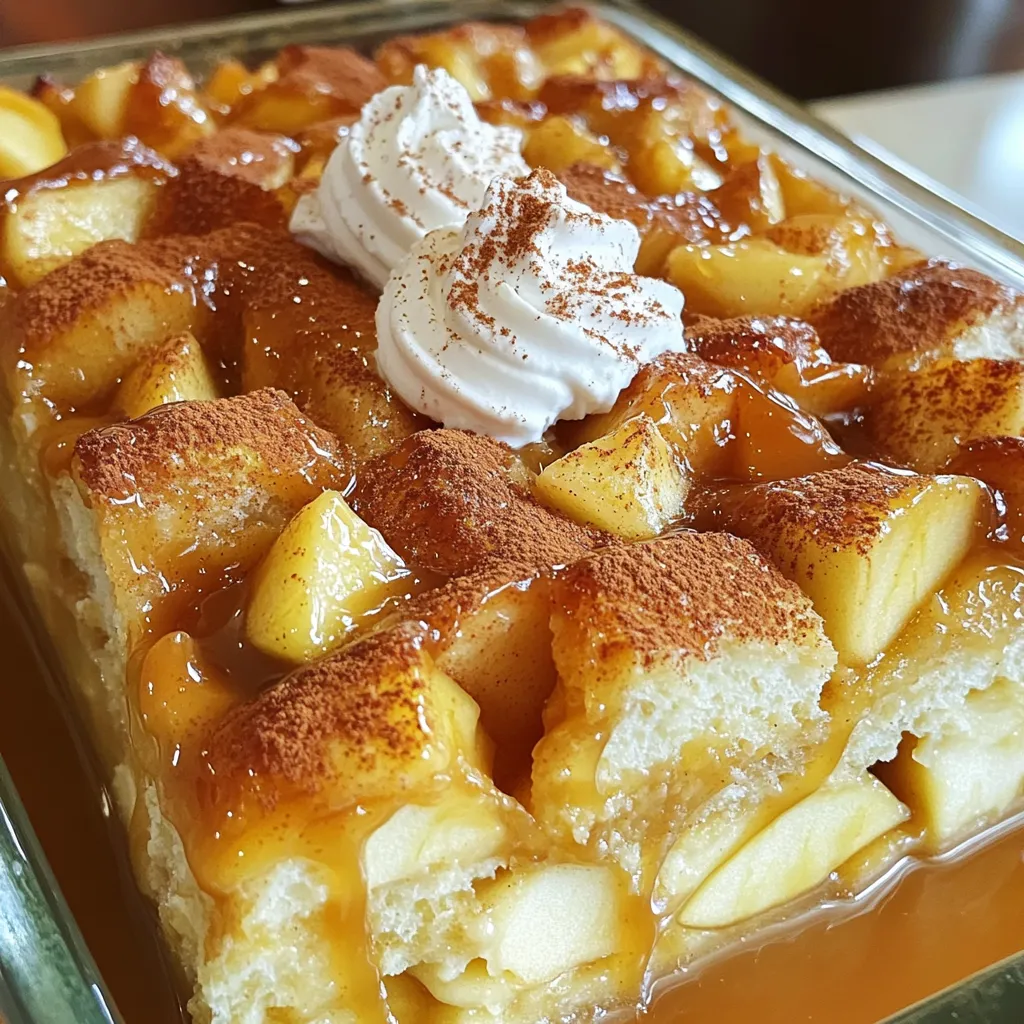
Craving a sweet, warm treat that brings comfort on chilly days? Look no further! My Cozy Caramel Apple Bread Pudding

When making Sheet-Pan Fajita Salmon with Lime Crema, you need fresh ingredients. Here’s what you will need: - 4 salmon fillets - 1 red bell pepper, sliced - 1 yellow bell pepper, sliced - 1 red onion, sliced - 2 tablespoons olive oil - 2 teaspoons chili powder - 1 teaspoon cumin - 1 teaspoon garlic powder - Salt and pepper to taste - 1 lime, juiced (1 tablespoon reserved for crema) - ½ cup sour cream - 2 tablespoons mayonnaise - Fresh cilantro, chopped (for garnish) These ingredients create a tasty dish full of flavor. The salmon gives protein, while the bell peppers and onions add color and crunch. The spices make everything pop! Lime juice adds brightness, and the crema brings creaminess to each bite. This mix makes a great meal that is easy to make and fun to eat. You can feel good knowing you are using fresh, simple items to create a gourmet dish at home. 1. First, preheat your oven to 400°F (200°C). This step is key for even cooking. 2. Next, take a large baking sheet and line it with parchment paper. This helps with easy cleanup later. 1. In a large mixing bowl, combine the sliced red and yellow bell peppers with the sliced red onion. 2. Drizzle the olive oil over the veggies. Add the chili powder, cumin, garlic powder, salt, and pepper. Toss well to coat every piece evenly. 3. Spread the seasoned vegetables in an even layer on the prepared baking sheet. 4. Now, place the salmon fillets on top of the veggies. Squeeze fresh lime juice over the salmon. Add a pinch of salt and pepper on top. 1. Bake everything in the preheated oven for 15-20 minutes. 2. Check for doneness by seeing if the salmon flakes easily with a fork. The veggies should be tender too. 3. While it bakes, you can prepare the lime crema. Mix sour cream, mayonnaise, and reserved lime juice in a small bowl. Season with salt and pepper to taste. 4. Once done, take the sheet pan out of the oven and let it cool for a few minutes. This method ensures a flavorful meal with minimal fuss. Enjoy your cooking! - Ideal cooking time: Bake the salmon for 15 to 20 minutes. This time ensures the salmon cooks through but remains moist. - How to check for doneness: Use a fork to flake the salmon gently. If it flakes easily, it's done. The flesh should be opaque and not translucent. - Additional seasoning options: Try adding smoked paprika or cayenne for a smoky kick. Fresh lime zest can brighten the dish further. - Tips for high-quality lime crema: Use full-fat sour cream for creaminess. Mix in fresh lime juice and zest for a burst of flavor. Taste as you go to find your perfect balance. - Best side dishes to complement the meal: Serve with warm tortillas or a simple green salad. Rice or quinoa can also be a nice addition. - Plating the dish nicely: Arrange the salmon and veggies on a large platter. Drizzle the lime crema over the top and garnish with fresh cilantro. Add lime wedges on the side for color and taste. {{image_2}} You can swap salmon for chicken or tofu. Both options work well here. For chicken, use boneless thighs or breasts. Season them the same way as the salmon. Bake until cooked through, about 25-30 minutes. Tofu is a great choice for a plant-based meal. Use firm tofu, press out the water, and cut it into cubes. Toss the tofu with the same seasonings and bake as directed. If you prefer seafood, shrimp or white fish are excellent choices. Shrimp cooks quickly, so add it in the last 5 minutes of baking. For white fish, like cod, follow the same steps as salmon. Just ensure it’s flaky and tender when done. Get creative with spices to change the taste. Add smoked paprika for a smoky flavor or cayenne pepper for heat. You can also try adding dried herbs like oregano or thyme. Fresh herbs like basil or dill can give it a fresh twist. Mix in different veggies for added color and nutrients. Zucchini, corn, or cherry tomatoes work well. Just cut them into similar sizes to ensure they cook evenly. Feel free to toss in some fresh cilantro or parsley right before serving to add freshness. Change the lime crema by using yogurt or avocado. Greek yogurt gives a tangy twist, while avocado adds creaminess. Simply blend your choice with lime juice and season to taste. Adjust the zestiness by adding more or less lime juice. You can also mix in some hot sauce or diced jalapeños for extra flavor. The crema should complement your dish, so make it to your liking! To keep your sheet-pan fajita salmon fresh, store it in the fridge. Use an airtight container to prevent moisture loss. This dish lasts about three days when stored properly. If you don't think you'll eat it in that time, consider freezing it. Salmon can last up to three months in the freezer, but for best taste, aim to eat it sooner. When you reheat your salmon, you want to keep it tender. The best way to do this is in the oven. Preheat your oven to 350°F (175°C) and place the salmon on a baking sheet for about 10 minutes. This helps keep the texture nice. If you're short on time, you can use the microwave. Heat it in short bursts of 30 seconds, checking often to avoid overcooking. Remember, the goal is to warm it, not cook it again. The best way to cook salmon on a sheet pan is to preheat your oven to 400°F (200°C). This high heat helps cook the salmon evenly and gives it a nice texture. Use parchment paper to line your baking sheet. This makes cleanup easy. Place your seasoned salmon on top of veggies for extra flavor. Bake for 15 to 20 minutes. Check that the salmon flakes easily with a fork. This means it is done. Yes, you can use frozen salmon for this recipe. If you use frozen salmon, make sure to thaw it first. Thaw it in the fridge overnight or under cold water. Once thawed, pat it dry with a paper towel. This helps the seasoning stick better. You might need to increase the baking time by a few minutes. Always check for doneness to ensure it's cooked through. To make this recipe spicier, add more chili powder to the veggies. You can also include sliced jalapeños or fresh hot peppers. For a different heat, try adding cayenne pepper or a dash of hot sauce to the lime crema. This will give your dish a nice kick. Be careful not to overdo it, so it remains tasty. This blog post covers how to create a tasty sheet pan salmon dish. You learned about the main ingredients, like salmon, bell peppers, and seasonings. We went through step-by-step instructions to prepare, marinate, and bake the dish. Tips helped you perfect cooking, enhance flavors, and choose side dishes. Variations let you explore different proteins and flavor profiles. Finally, we discussed storing leftovers and reheating methods. Now, it's time to try this easy recipe and enjoy your delicious meal!

Sheet-Pan Fajita Salmon with Lime Crema Delight

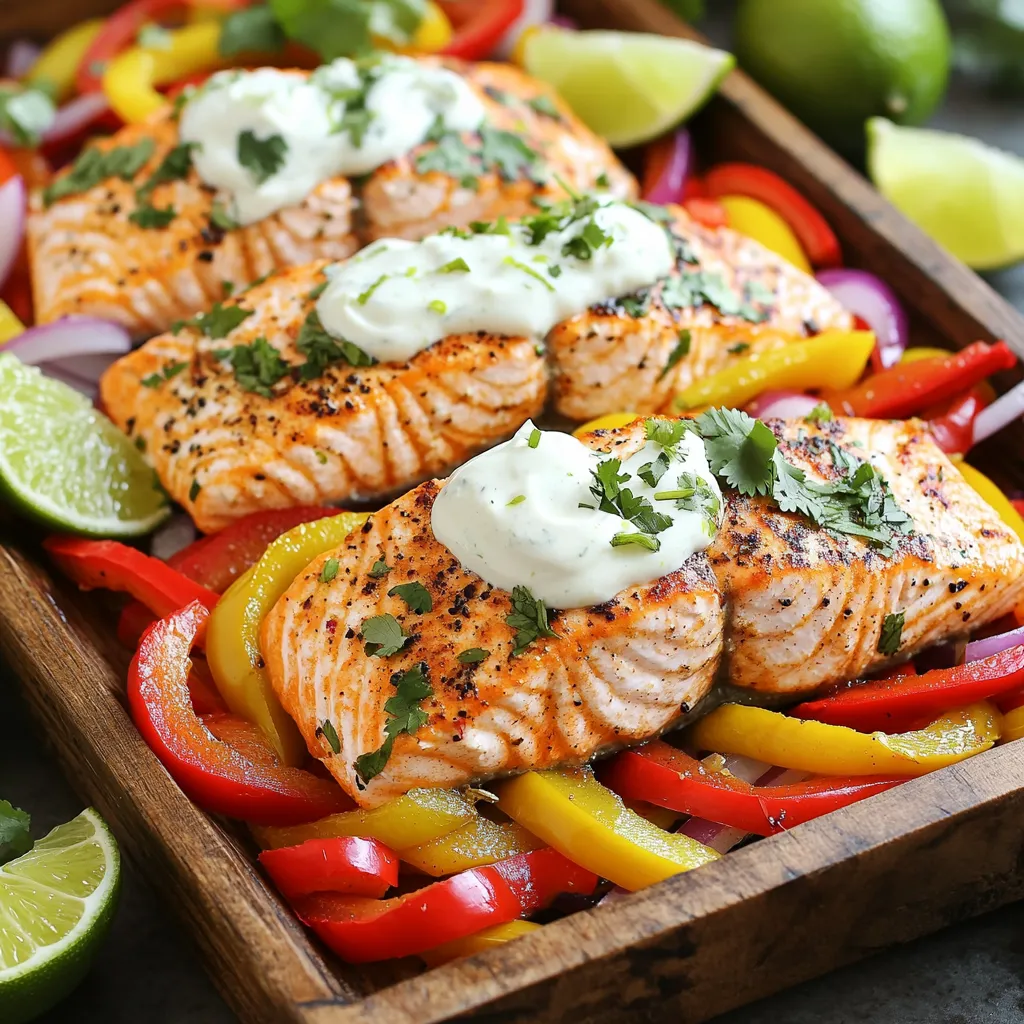
Are you ready to elevate your dinner game? This Sheet-Pan Fajita Salmon with Lime Crema is a game-changer. With vibrant

Older posts
Newer posts
← Previous Page1 … Page7 Page8 Page9 … Page130 Next →
© 2025 My Cooking Cast • Built with GeneratePress

Our Policies

  • Privacy Policy
  • GDPR Policy
  • Terms Of Use
  • Copyright Policy
  • Cookie Policy
  • Disclaimer

More Information​

  • Home
  • Contact
  • About
  • Dinner
  • Appetizers
  • Dessert
©2025, My Cooking Cast About Privacy Policy Back To Top