Skip to content
DisclaimerTerms Of UseGDPR PolicyCookie Policy

My Cooking Cast

  • Home
  • Drinks
  • Appetizers
  • Dinner
  • Dessert
  • About
  • Contact
  • Privacy Policy
DisclaimerTerms Of UseGDPR PolicyCookie Policy

Emma

To make Quick Crispy Parmesan Fried Tortellini, you need some simple ingredients. Here’s what you will need: - 12 oz refrigerated tortellini (cheese or spinach-filled) - 1 cup panko breadcrumbs - ½ cup grated Parmesan cheese - 1 tsp garlic powder - 1 tsp onion powder - ½ tsp dried oregano - Salt and pepper, to taste - 1 large egg, beaten - Vegetable oil, for frying - Fresh parsley, chopped (for garnish) This list is easy to gather. The tortellini is the star of the dish. I prefer cheese-filled tortellini for a rich taste. You can also use spinach-filled tortellini for a fresh twist. Panko breadcrumbs give a great crunch. Mixing them with Parmesan cheese, garlic powder, onion powder, and oregano adds depth. Don’t forget salt and pepper to boost flavors. You’ll use one large egg as a binder. This helps the breadcrumbs stick well. Vegetable oil is best for frying. It heats evenly and gives a nice golden color. Finally, fresh parsley adds a pop of color and freshness when serving. If you want the full recipe, check out the detailed instructions for cooking and frying. Enjoy making this delicious dish! First, cook the tortellini. Follow the package instructions. Aim for al dente. This means the pasta should be firm but not hard. It usually takes about 3-5 minutes. Once done, drain the tortellini in a colander. Let it cool for a few minutes. This helps in handling them later without burning your fingers. Now, let’s set up for breading. In a shallow bowl, mix panko breadcrumbs, Parmesan cheese, garlic powder, onion powder, oregano, salt, and pepper. Stir well so all the seasonings blend nicely. In another shallow bowl, beat the egg. This will help the breadcrumbs stick better. Take each tortellini. First, dip it into the egg. Let any extra egg drip off. Next, roll it in the breadcrumb mixture. Make sure it is fully coated. If you want a thicker crust, dip it back in the egg and then into the breadcrumbs again. This double coating adds extra crunch. Heat about 1 inch of vegetable oil in a deep skillet over medium heat. Test the oil by dropping in a breadcrumb. If it sizzles, you are ready to fry. Carefully add the coated tortellini in batches. Avoid overcrowding to keep them crispy. Fry for about 2-3 minutes on each side. Look for a golden brown color. Once done, use a slotted spoon to take them out. Place them on a paper towel-lined plate to drain excess oil. Enjoy your Quick Crispy Parmesan Fried Tortellini! For the complete instructions, check the Full Recipe. To get your tortellini crispy, start with dry pasta. Use refrigerated tortellini for the best taste. When frying, heat your oil to the right temperature. It's hot enough when a breadcrumb sizzles. For extra crunch, try a double coating. Dip your tortellini in egg, then breadcrumbs. Repeat the process for a thicker layer of crispiness. Serve your crispy tortellini with marinara sauce for dipping. Pesto also makes a great pair. Garnish them with fresh parsley for a pop of color. You can add a sprinkle of more Parmesan for extra flavor. Serve them on a fun plate to make them look fancy. Fry your tortellini in small batches. Overcrowding the pan can make them soggy. It also slows down cooking time. Each piece needs room to fry evenly. If they touch, they may stick together and lose their crunch. Keep this in mind for a perfect fry every time. {{image_2}} You can make Quick Crispy Parmesan Fried Tortellini even more exciting. Try adding herbs like basil or thyme to the breadcrumb mix. These herbs add a fresh taste that brightens up the dish. You can also use spices like paprika or cayenne for a kick. For a cheesy twist, mix in mozzarella or gouda with the Parmesan. These cheeses melt beautifully and enhance flavor. If you want a lighter option, consider baking instead of frying. Preheat your oven to 400°F and bake the tortellini for about 20 minutes. This method gives you a crispy finish without all the oil. You can also opt for whole wheat tortellini for extra fiber. If you need a gluten-free option, look for gluten-free tortellini at your local store. These tortellini make a great appetizer for parties. Serve them in a cute bowl with marinara or pesto for dipping. You can also place them on a platter with toothpicks for easy snacking. For maximum appeal, sprinkle some fresh parsley on top. This adds color and makes the dish look even more inviting. If you want to impress your guests, arrange them in a circle with a small bowl of sauce in the center. To keep your fried tortellini fresh, store them in an airtight container. This helps prevent them from getting soggy. A glass or plastic container with a tight lid works best. Make sure the tortellini cool down before sealing. This step keeps moisture from building up inside the container. Reheating fried tortellini can be tricky. For ideal texture, use the oven. Preheat your oven to 350°F (175°C). Place the tortellini on a baking sheet. Heat for about 10-15 minutes until they are warm and crispy again. Avoid using the microwave, as it can make them soggy. You can freeze fried tortellini before or after frying. If freezing before frying, simply place them on a baking sheet. Freeze until firm, then transfer to a zip-top bag. If freezing after frying, let them cool completely first. Then, store in an airtight container or a freezer-safe bag. For thawing, move the tortellini to the fridge overnight before reheating. This helps maintain their texture. Yes, you can use frozen tortellini. Just cook it for about 2-3 minutes longer than the package says. This ensures they are heated through. After cooking, let them cool before breading. It helps the coating stick better. The best oils for frying are those with high smoke points. Here are a few good options: - Vegetable oil: Smoke point around 400°F - Canola oil: Smoke point around 400°F - Peanut oil: Smoke point around 450°F These oils work well for frying tortellini and won’t burn easily. Look for a golden brown color on the tortellini. It should take about 2-3 minutes on each side. You can also test one piece by cutting it open. It should be hot and crispy inside. You can prep the tortellini early. Cook and coat them, then store in the fridge for up to 2 hours. Fry them just before serving for the best taste. If you want to reheat, use an oven to keep them crispy. In this post, we covered how to make crispy fried tortellini. We discussed the ingredients you'll need and outlined each step from cooking to frying. I shared tips to ensure maximum crispiness and variations to try. Storing and reheating tips helped you plan for leftovers. This dish is perfect for snacks or parties, offering a simple way to impress guests. Try your own twist on this recipe, and enjoy every delicious bite!

Quick Crispy Parmesan Fried Tortellini Delight

Looking for a fun and quick snack? You’ll love my Quick Crispy Parmesan Fried Tortellini Delight! This tasty treat uses

- 1¼ cups all-purpose flour - ½ cup granulated sugar - ½ cup unsalted butter, softened - 2 large eggs - 1 teaspoon baking powder - ½ teaspoon baking soda - ¼ teaspoon salt - ½ cup whole milk - 1 teaspoon vanilla extract - 1 cup pastry cream (store-bought or homemade) - ½ cup chocolate ganache (store-bought or homemade) I love how simple and fun this recipe is! Each ingredient plays a big role in making Boston Cream Bars so tasty. The flour gives the bars structure. Sugar adds sweetness. Butter keeps everything moist and rich. Eggs help bind it all together. Baking powder and baking soda work together to make the bars fluffy. Salt balances the sweetness and enhances the flavors. Milk adds creaminess, while vanilla brings a warm touch. Pastry cream adds that classic Boston cream flavor, and chocolate ganache tops it off beautifully. - Powdered sugar - Chocolate shavings - Fresh berries These garnishes give the bars a lovely finish. Dusting with powdered sugar makes them look fancy. Chocolate shavings add a touch of elegance. Fresh berries bring color and freshness. You can mix and match these garnishes to make your dessert special! - Preheat oven to 350°F (175°C). - Grease a 9x9 inch baking pan well. - Cream together ½ cup of softened butter and ½ cup of sugar. - Mix until light and fluffy. - Add 2 large eggs, one at a time. - Pour in 1 teaspoon of vanilla extract and mix well. - In another bowl, whisk together 1¼ cups of flour, 1 teaspoon of baking powder, ½ teaspoon of baking soda, and ¼ teaspoon of salt. - Gradually add dry ingredients to the butter mixture. - Alternate with ½ cup of whole milk. Mix until just combined. - Pour the batter into the greased pan. Spread it evenly. - Bake for 25-30 minutes. A toothpick should come out clean. - Let the cake cool completely in the pan. - Slice the cake in half horizontally to create two layers. - Spread 1 cup of pastry cream on the bottom layer. - Carefully place the top layer back on. - Pour ½ cup of chocolate ganache over the top layer. - Let it drip slightly down the sides. - Chill in the refrigerator for at least one hour to set the ganache before slicing into squares. For the full recipe, refer to the section above. To make the best Boston cream bars, follow these tips. First, prevent overmixing. Mix just until the dry and wet ingredients combine. Overmixing can make the cake dense. Next, ensure even baking. Rotate the pan halfway through baking. This helps the cake bake evenly. Serve your Boston cream bars chilled. They taste best when cool. For presentation, dust the top with powdered sugar. You can also add chocolate shavings or fresh berries. This makes your bars look fancy! Sometimes, the cake can be too dense. If this happens, check if you overmixed the batter. Also, make sure you measured the flour correctly. Another problem is the ganache not setting. If it won’t set, try chilling it longer in the fridge. This helps it firm up nicely. For the complete recipe, you can refer to the Full Recipe section. {{image_2}} You can make Boston Cream Bars even more fun with flavor changes. Adding almond extract gives a nice twist. Just a few drops can add a sweet, nutty taste. You can also try different chocolate types for the ganache. Dark chocolate adds richness, while white chocolate gives a sweet touch. Each choice can change the whole vibe of the dessert. If you need a gluten-free option, use a gluten-free flour blend. It works well in this recipe. You can also create a vegan version. Replace eggs with flaxseed meal mixed with water. Use plant-based butter and milk instead of dairy. These swaps keep the dessert tasty for everyone. Get creative with how you serve these bars. Try making individual servings in small cups. This way, each guest gets their own treat. You can also switch up the toppings. Whipped cream adds a light touch, while fresh fruit brings a burst of color. You can even drizzle extra chocolate on top for more flavor. For the full recipe, check out the details above. Enjoy experimenting with your Boston Cream Bars! To keep your Boston Cream Bars fresh, store them in the fridge. Place the bars in an airtight container. This helps keep them from drying out. If you have leftovers, they can stay good in the fridge for up to four days. If you want to save them longer, freeze the bars. Wrap each bar in plastic wrap, then put them in a freezer bag. They can last for up to three months this way. When stored properly, Boston Cream Bars last about four days in the fridge. Look for signs that they have gone bad. If the bars smell sour or have mold, it’s time to throw them away. If the ganache looks dull or the cake feels very dry, they may not taste good anymore. If you want to warm your Boston Cream Bars, do it gently. Use a microwave on low power for about 10-15 seconds. This will keep the cake moist and the ganache smooth. Avoid overheating, as it can change the texture. Enjoy the bars warm, or eat them cold for a nice treat! Yes, you can make Boston Cream Bars ahead of time. I recommend making them one day before you serve them. This allows the flavors to blend and the ganache to set perfectly. After chilling in the fridge, your bars will be ready to impress your guests. Just keep them covered to stay fresh. If you need a substitute for pastry cream, try using whipped cream or pudding. Whipped cream gives a light texture, while pudding adds creaminess and flavor. You can use vanilla or chocolate pudding based on your taste. Both options work well and still taste great in the bars. Making chocolate ganache is easy! Start with equal parts chocolate and heavy cream. Heat the cream until it’s just about to boil, then pour it over chopped chocolate. Let it sit for a few minutes, then stir until smooth. This simple ganache recipe is rich and perfect for topping your bars. You can find Boston Cream Bars at bakeries and dessert shops. Many grocery stores also carry them in their bakery section. If you prefer online shopping, check websites like Amazon or local delivery services. You’ll find a variety of options to satisfy your sweet tooth. For the best homemade experience, try my full recipe. Boston Cream Bars are a tasty dessert you can make at home. This post outlined the key ingredients and easy steps to bake them. I shared baking tips to ensure your bars come out just right. You can also try different flavors or make dietary adjustments to suit your needs. Store leftovers properly to keep them fresh, and enjoy them for days. With these tips, you can impress friends and family with a delicious treat. Happy baking!

Boston Cream Bars Delightful Dessert Recipe Guide

Welcome to the ultimate guide for making delicious Boston Cream Bars! If you’re looking for a simple yet tasty dessert,

- Ripe tomatoes - Fresh mozzarella cheese - Fresh basil leaves The heart of a Caprese salad is fresh produce. Ripe tomatoes are vital. They should be juicy and sweet. Look for bright colors and a slight give when you squeeze them. Fresh mozzarella cheese adds a creamy texture. It should be soft and slightly springy. Fresh basil leaves bring a fragrant touch. Their smell alone can make your kitchen feel like an Italian bistro. - Extra virgin olive oil - Balsamic glaze - Salt and pepper Extra virgin olive oil enhances the flavors. It adds richness and smoothness. Balsamic glaze offers sweetness and depth. Just a drizzle can elevate your salad. Salt and pepper are essential, too. They bring out the natural tastes of the tomatoes and cheese. Don't be shy—season well for the best results! - Sharp knife - Cutting board - Serving platter A sharp knife is key for slicing tomatoes and mozzarella. It helps you make clean cuts without squishing the cheese. A sturdy cutting board provides a safe workspace. Finally, a serving platter makes your salad shine. Choose one that showcases the vibrant colors of your ingredients. You can find the full recipe for this delightful dish [here](#). 1. Start by laying out the sliced tomatoes on a large serving platter. 2. Overlap the tomato slices slightly. This helps create a pretty look. 3. Next, layer the fresh mozzarella slices on top of the tomatoes. 4. Alternate mozzarella with tomatoes for balance. 5. Tuck fresh basil leaves between the layers. This adds great flavor. 1. Drizzle generous amounts of extra virgin olive oil over the salad. 2. This oil brings out the best in the fresh ingredients. 3. Next, add a touch of balsamic glaze. This adds sweetness and depth. 4. Season the salad with salt and freshly cracked black pepper. 5. These seasonings enhance all the vibrant flavors in the dish. 1. Let the salad sit for about 10 minutes before serving. 2. This resting time allows the flavors to blend well. 3. Consider how the salad looks. Use a rustic wooden board or white platter. 4. Garnish with extra basil leaves for added freshness. 5. A beautiful presentation makes the dish even more appealing. This recipe makes a stunning Caprese salad that showcases bold flavors and fresh ingredients. Check out the Full Recipe for complete details. When making Caprese salad, the right ingredients are key. Start with ripe tomatoes. Look for tomatoes that feel heavy and have a sweet scent. A firm, shiny skin is also a good sign. You want them to be sweet and juicy. Next, opt for high-quality mozzarella. Fresh mozzarella should be soft and creamy. It should feel slightly springy when you press it. If it smells fresh and milky, you’ve found a winner. Your Caprese salad should look as good as it tastes. Serve it on a rustic wooden board or a bright white platter. This contrast makes the colors pop. Layer the slices neatly for a beautiful display. For quick garnishing ideas, add a few extra basil leaves on top. You can also drizzle a bit of olive oil around the edges. This adds a polished look without much effort. To boost the flavor, think about adding spices or herbs. A sprinkle of crushed red pepper can add a nice kick. Fresh cracked black pepper also enhances the taste. Experimenting with balsamic alternatives can be fun too. You can try citrus vinaigrette for a zesty twist. Adding a touch of honey to your balsamic glaze can also sweeten the salad perfectly. For the full recipe, check out the Caprese Salad Extravaganza. It brings all these tips together for a delicious meal! {{image_2}} You can change your Caprese salad with the seasons. In summer, ripe heirloom tomatoes shine. In autumn, try adding roasted butternut squash. Fresh corn also adds sweetness. Winter brings a chance to use citrus. Oranges and grapefruits brighten up your dish. When you think about different cuisines, you can mix in flavors. For a Mediterranean twist, add olives or artichokes. If you like Asian flavors, try using sesame oil and fresh cilantro. Each change brings new life to your salad. For a vegan twist, swap fresh mozzarella with cashew cheese or tofu. These options still offer great taste. You can even make a creamy avocado dressing for extra richness. If you need gluten-free options, you’re in luck! The classic Caprese is already gluten-free. Just make sure all your ingredients are pure and safe. Want to add some protein? Grilled chicken works great. It makes your salad a full meal. You can also try adding shrimp for a seafood flair. Infusing your salad with a citrus dressing gives it a fresh kick. Mix lemon juice with olive oil for brightness. This twist complements the mozzarella and tomatoes well. For the complete experience, check out the Full Recipe. Each variation can make your Caprese salad a new delight! To keep your Caprese salad fresh, refrigerate leftovers right away. Place the salad in an airtight container. This helps to keep the flavors intact. Use glass or plastic containers that seal tightly. Avoid using metal containers, as they can alter the taste. Freezing Caprese salad is not recommended. The tomatoes and mozzarella lose texture when thawed. However, you can freeze some individual ingredients. For example, you can freeze basil leaves in oil for later use. To revive leftover salad, let it sit at room temperature for about 15 minutes before serving. This brings back some of the fresh flavors. Fresh tomatoes can last about one week in the fridge. Mozzarella cheese should be eaten within five days of opening. Basil leaves are best used within three days for optimal flavor. Check for signs of spoilage. Look for mold on cheese, mushy tomatoes, or wilting leaves. These indicate that it’s time to toss your ingredients. If you can't find fresh mozzarella, try these options: - Burrata: This creamy cheese adds a rich texture. - Feta: Crumbled feta gives a salty kick. - Goat cheese: This tangy cheese offers a different flavor. - Ricotta: Use this for a lighter, fluffy touch. Each option brings a unique taste, but they all pair well with tomatoes and basil. Yes, you can make Caprese salad ahead of time. Here are some tips: - Slice tomatoes and mozzarella a few hours before serving. - Keep them in separate containers to avoid sogginess. - Add fresh basil just before serving for best taste. - Drizzle olive oil and balsamic glaze right before eating. This way, your salad stays fresh and vibrant. Caprese salad comes from the island of Capri in Italy. It dates back to the 1920s. The salad represents the colors of the Italian flag: red tomatoes, white mozzarella, and green basil. This dish celebrates simplicity and fresh ingredients. Now, it’s enjoyed around the world in many variations. For the complete preparation process, check out the [Full Recipe]. In this post, I covered the key ingredients for a delicious Caprese salad. You learned about ripe tomatoes, fresh mozzarella, and fragrant basil. I shared step-by-step instructions for preparation and tips for perfecting your presentation. Variations and storage options help you customize and keep your salad fresh. Caprese salad is simple yet full of flavor. It’s perfect for any occasion. Enjoy making this dish your own!

Caprese Salad with Fresh Mozzarella Bold Flavor Boost

Are you ready to elevate your summer meals? My Caprese Salad with Fresh Mozzarella brings bold flavors to your table.

- 250g paneer, cubed - 1 can (400ml) coconut milk - Fresh cilantro, for garnish Paneer is a fresh cheese. It adds a soft texture and protein to the dish. Coconut milk gives a creamy base and rich flavor. Fresh cilantro adds a bright, herbal note on top. - 1 tablespoon lemongrass, finely chopped - 2 cloves garlic, minced - 1-inch piece ginger, grated - 1 teaspoon mustard seeds Lemongrass brings a citrusy aroma. Garlic and ginger add warmth and depth. Mustard seeds provide a pop of flavor and a nice crunch when cooked. - 2 green chilies, slit - 1 tablespoon soy sauce - Salt to taste Green chilies bring heat and spice. Soy sauce adds a savory umami kick. Adjust salt to fit your taste. This recipe is easy to follow and the flavors blend perfectly. Check the Full Recipe for a complete guide. - Chop the Paneer: Cut 250g of paneer into small cubes. Aim for bite-sized pieces for even cooking. - Slice Onions and Green Chilies: Finely slice one medium onion. Slit two green chilies lengthwise, so they release heat. - Heating Oil and Tempering Spices: In a large pan, heat one tablespoon of vegetable oil over medium heat. Add one teaspoon of mustard seeds. Wait for them to splutter; this brings out their flavor. - Sautéing Aromatics: Add the sliced onion and cook for about five minutes until it turns translucent. Then, stir in two minced garlic cloves and one inch of grated ginger. Add the chopped lemongrass and sauté for another two minutes until fragrant. - Adding Liquid Ingredients: Pour in one can of coconut milk and one tablespoon of soy sauce. Stir well and bring this mixture to a gentle simmer. - Simmering the Curry: Add the cubed paneer to the pan. Season with salt to taste. Let the curry simmer for 10-15 minutes. This allows the flavors to meld together nicely. For more details, check the [Full Recipe]. To get the right texture, let the curry simmer gently. This allows the coconut milk to thicken. Stir occasionally to avoid sticking. If it seems too thick, add a splash of water. This keeps the sauce smooth and creamy. For a richer taste, add a bit more lemongrass and ginger. You can also use fresh herbs like basil or mint. They add a nice twist. A squeeze of lime juice at the end brightens the flavors, making it pop. This curry pairs well with jasmine rice or warm naan. The rice absorbs the sauce perfectly. Naan serves as a great tool for scooping up the curry. Both options make for a filling meal. Garnish your curry with fresh cilantro before serving. This adds color and flavor. You can also sprinkle some chili flakes for a hint of heat. A beautiful presentation makes the meal more enjoyable. Be careful not to overcook the paneer. It can become rubbery and tough. Add it in the last few minutes of cooking. This keeps it soft and tender. Taste as you cook. If it’s too salty, add a bit of sugar. If it’s bland, a dash of soy sauce works wonders. Finding the right balance makes all the difference in your dish. {{image_2}} You can easily switch paneer with tofu. Tofu offers a similar texture and absorbs flavors well. Choose firm tofu for best results. Simply cube it and follow the same steps as with paneer. Using different vegetables also works great. Try bell peppers, carrots, or eggplant. Chop them into bite-sized pieces. Add them with the onions so they cook evenly. This adds color and nutrition to your dish. You may want to adjust the heat levels. If you prefer less spice, use fewer green chilies. You can also remove the seeds to cut down on heat. For more warmth, add extra green chilies or even a pinch of cayenne pepper. To explore additional flavor profiles, consider adding spices like turmeric or cumin. These spices deepen the flavor and add warmth. Just a pinch goes a long way in enhancing the taste of your curry. For a richer taste, substitute coconut milk with coconut cream. This change thickens the curry and makes it creamier. You still get that yummy coconut flavor everyone loves. If you want to make this curry vegan, omit the fish sauce. Instead, add more soy sauce or tamari for depth. This keeps the dish flavorful while sticking to a plant-based diet. These variations let you customize your Paneer Lemongrass Coconut Curry to fit your taste. Enjoy the process of making this dish your own! For the full recipe, check the earlier section. How do you store leftovers? First, let the curry cool down. Then, put it in a container. Use an airtight container to keep it fresh. You can store it in the fridge for about 3-4 days. What are the proper containers? Glass or plastic containers work well. Make sure they seal tightly to prevent air from getting in. Label your container with the date. This way, you know when you made it. Can you freeze the curry? Yes, you can! To freeze the curry, let it cool completely. Then, pour it into a freezer-safe bag. Remove as much air as you can before sealing. What are the defrosting methods? When you want to eat it, take it out of the freezer. Let it thaw in the fridge overnight. You can also use the microwave for quick defrosting. Just be careful not to cook it further. What are the best practices for freshness? Keep the curry in the fridge if you plan to eat it soon. For longer storage, use the freezer. Always check for signs of spoilage before eating. What are the signs of spoilage? If you see mold or the curry smells bad, it’s time to throw it away. A change in color or texture can also mean it’s not good anymore. For the full recipe of this delightful dish, be sure to check out the detailed instructions above. Paneer Lemongrass Coconut Curry blends Indian and Southeast Asian flavors. It showcases how diverse cooking can be. The use of paneer, a staple in Indian cuisine, adds a creamy texture. Lemongrass brings a fresh, citrusy note, common in Thai dishes. This curry speaks to the fusion of cultures in cooking. The creamy coconut milk rounds out the dish, making it rich and satisfying. Yes, you can use dried lemongrass, but fresh offers better flavor. Fresh lemongrass has a bright, vibrant taste that enhances the curry. Dried lemongrass can lack the same intensity and aroma. If you use dried, use less, as it is more potent. Soak dried lemongrass in warm water before using for the best results. To add heat, you can include more green chilies. Slicing them more finely releases more spice. You can also add red chili flakes for an extra kick. Another option is to include a dash of hot sauce. Adjust the spice level to suit your taste. Remember to balance heat with the sweetness of the coconut. Enjoy experimenting to find your perfect spice level! This blog post shared a simple and tasty recipe for Paneer Lemongrass Coconut Curry. You learned about key ingredients like paneer, coconut milk, and fresh herbs. I walked you through easy steps for prepping and cooking. Tips for flavor boosting and serving were also included, plus variations to try. In the end, this curry is delicious and adaptable. Whether you stick with the main recipe or make it your own, you'll enjoy every bite. With some practice, you'll impress family and friends with this comforting dish.

Paneer Lemongrass Coconut Curry Flavorful Delight

Welcome to your next favorite dish! This Paneer Lemongrass Coconut Curry is a true flavorful delight. Imagine creamy coconut milk

- 1 lb sirloin steak, cut into bite-sized pieces - 4 tablespoons unsalted butter, divided - 4 cloves garlic, minced - 1 teaspoon fresh thyme, chopped (or 1/2 teaspoon dried thyme) - Salt and pepper to taste - 8 oz rigatoni pasta - 1 cup heavy cream - 1 cup shredded mozzarella cheese - 1/2 cup grated Parmesan cheese - 1/2 teaspoon smoked paprika - Fresh parsley, chopped (for garnish) Gather these ingredients before you start cooking. Fresh sirloin steak is key for great flavor. Use high-quality unsalted butter to enhance the richness of the dish. Garlic adds a savory depth that pairs perfectly with the steak. Fresh thyme will give a lovely aroma, while salt and pepper will bring out the natural flavors of each ingredient. For the rigatoni, choose a good brand for the best texture. Heavy cream makes the sauce creamy and rich, while mozzarella and Parmesan add that cheesy goodness. Smoked paprika adds a subtle warmth and depth, making the dish even more delicious. Finally, fresh parsley is not just for looks; it adds a burst of freshness. You can find the full recipe at the end of this section. It has all the steps you need to create this delightful meal. - Start by boiling a large pot of water. - Add a generous amount of salt to the water. - Once the water boils, add the rigatoni. - Cook the pasta until it is al dente, about 10-12 minutes. - Drain the pasta but save 1/2 cup of the water. Set the pasta aside. - Grab your sirloin steak and cut it into bite-sized pieces. - Season the steak with salt and pepper on all sides. - In a large skillet, melt 2 tablespoons of butter over medium-high heat. - When the butter is hot, add the steak pieces. - Sear the steak for about 3-4 minutes until browned. - Remove the steak from the pan and set it aside. - In the same skillet, lower the heat to medium. - Add the remaining 2 tablespoons of butter to the pan. - Once melted, add the minced garlic and sauté for about 1 minute. - Stir in the fresh thyme and smoked paprika for flavor. - Reduce heat to low and then add heavy cream to the garlic butter mix. - Gradually stir in the mozzarella and Parmesan cheese until melted. - If the sauce is too thick, add some reserved pasta water until smooth. - Toss the drained rigatoni into the cheese sauce, mixing to coat the pasta. - Gently fold in the seared steak tips until everything is combined. For a full recipe, check out the complete instructions above. Choosing the best cut of steak: I recommend using sirloin for this dish. Sirloin has great flavor and cooks well. It is tender and easy to cut into bite-sized pieces. You can also try ribeye or filet mignon for a more tender bite. Always choose fresh meat from a trusted source. This ensures quality and taste. Achieving the desired doneness: For steak tips, medium-rare is best. Cook them for about 3-4 minutes. You want them browned on the outside but pink inside. Use a meat thermometer to check doneness. Aim for 130°F for medium-rare. If you like it more done, cook longer. Just watch to avoid drying out the meat. Using pasta water to adjust thickness: Save some pasta water when you drain your rigatoni. This starchy water helps the sauce stick to the pasta. If your sauce is too thick, add a little water. Stir it in slowly until you reach your desired creaminess. This tip gives you the best texture. Tips for preventing cheese clumping: To keep your cheese smooth, add it slowly to the sauce. Stir continuously while adding. This helps the cheese melt evenly. You can also use freshly grated cheese instead of pre-shredded. Pre-shredded cheese often has anti-caking agents that can cause clumps. Best sides to accompany the dish: Garlic bread is a perfect side for this meal. It complements the garlic butter flavor well. A simple green salad with vinaigrette also works nicely. The freshness cuts through the richness of the dish. Using herbs and garnishes effectively: Fresh parsley adds color and flavor. Sprinkle it on just before serving. You can also use fresh thyme or basil for a different touch. Herbs brighten the dish and enhance the taste, making it more appealing. {{image_2}} You can add colorful veggies to your dish for more flavor and nutrition. Consider using bell peppers, spinach, or cherry tomatoes. These vegetables not only brighten the plate but also add texture. To incorporate seasonal ingredients, try using asparagus in spring or zucchini in summer. Just sauté the veggies in the same skillet after the steak and before adding the garlic butter sauce. This method keeps the flavors vibrant and fresh. Cheese is a key part of this recipe. While mozzarella and Parmesan are great, you can switch it up for other flavors. Try using gouda for a smoky touch or cheddar for a sharper taste. If you prefer a creamier sauce, add a bit of cream cheese. Tailor the cheese to your taste. Just remember to adjust the amount to keep the sauce balanced. If you enjoy a kick, spice up the recipe with chili flakes or hot sauce. Just sprinkle in your desired heat level while making the garlic butter sauce. You can also use fresh herbs like basil or oregano for a different flavor profile. Adding these herbs can elevate the dish and make it even more delicious. Experiment to find the right balance that suits your palate! To keep your Garlic Butter Steak Tips with Cheesy Rigatoni fresh, store leftovers in an airtight container. This helps prevent drying out. It’s best to eat leftovers within three days for the best taste. Always let the dish cool down before sealing it in the fridge. This keeps moisture from building up inside the container. You can freeze this dish if you want to save some for later. First, let it cool completely. Then, place it in a freezer-safe container. It can last up to three months in the freezer. When you’re ready to eat, thaw it overnight in the fridge. Reheat in a skillet over low heat, adding a splash of cream or pasta water. This keeps the dish creamy and tasty. This dish is great for meal prep! You can make it ahead for busy weeknights. Cook a big batch on the weekend, and portion it out for lunches. Use small containers to make it easy to grab and go. Pair it with a side salad or some fresh fruit for a complete meal. Yes, you can make Garlic Butter Steak Tips in advance. Cook the steak tips and the cheesy rigatoni separately. Store each in an airtight container. When you are ready to eat, reheat them in a skillet over medium heat. Add a splash of cream or water to the rigatoni to keep it creamy. Heat until warm, stirring often. This way, you enjoy a fresh meal even after a busy day. Sirloin steak works best for this recipe. It is tender and flavorful. Other good cuts include ribeye and flank steak. Ribeye has more fat, which adds flavor. Flank steak is leaner but still tasty. Choose cuts that are easy to bite and cook well. Yes, you can use a different type of pasta. Penne, fusilli, or farfalle are great alternatives. Cooking times may change, so check the package. The goal is always to cook until al dente. Keep in mind that the shape can affect how the sauce sticks. Choose a pasta that you enjoy. To make this recipe gluten-free, use gluten-free rigatoni. Many brands offer great options made from rice or corn. For the sauce, ensure the cream and cheese are gluten-free. Check labels for any hidden gluten. This way, you can enjoy the same rich flavors without worry. This blog post guides you through making a delicious Garlic Butter Steak and Rigatoni dish. We covered key ingredients, step-by-step cooking instructions, and helpful tips. You can explore fun variations like adding veggies or different cheeses to suit your taste. Remember, proper storage will keep your leftovers fresh and tasty. This dish is perfect for special occasions or a simple weeknight meal. Enjoy your cooking and impress others with this easy yet flavorful recipe!

Garlic Butter Steak Tips with Cheesy Rigatoni Delight

Get ready for a tasty treat! In this blog post, I’ll share my easy recipe for Garlic Butter Steak Tips

To make a delightful pistachio cake, you need some key ingredients. Here’s what you will need: - 1 cup shelled pistachios (finely ground) - 1 ½ cups all-purpose flour - 1 teaspoon baking powder - ½ teaspoon baking soda - ¼ teaspoon salt - ½ cup unsalted butter (softened) - 1 cup granulated sugar - 3 large eggs - 1 teaspoon vanilla extract - ½ cup buttermilk - Zest of 1 lemon Each ingredient plays an important role. The finely ground pistachios give the cake its unique flavor and texture. The flour provides structure, while the sugar adds sweetness. Eggs help bind everything together. You can add a few optional ingredients to make your cake even better. Consider using: - Powdered sugar for dusting - Extra crushed pistachios for garnish - Fresh mint leaves for decoration These additions not only enhance the taste but also improve the look of the cake. A light dusting of powdered sugar gives a nice finish. Choosing the right ingredients makes a big difference in your cake's taste. Here are some tips: - Pistachios: Look for fresh, unsalted pistachios. Check for bright green color and a good aroma. - Butter: Use high-quality unsalted butter for the best flavor. - Buttermilk: If you can, use fresh buttermilk. It adds a nice tang to the cake. - Lemon Zest: Fresh zest gives a burst of citrus flavor. Avoid bottled lemon juice. By picking quality ingredients, your pistachio cake will taste amazing. For the full recipe, check out the entire guide. To start, gather all your ingredients. This makes the process smooth. You need: - 1 cup shelled pistachios (finely ground) - 1 ½ cups all-purpose flour - 1 teaspoon baking powder - ½ teaspoon baking soda - ¼ teaspoon salt - ½ cup unsalted butter (softened) - 1 cup granulated sugar - 3 large eggs - 1 teaspoon vanilla extract - ½ cup buttermilk - Zest of 1 lemon - Optional: Powdered sugar for dusting Make sure your butter is soft. This helps it mix well. Also, preheat your oven to 350°F (175°C). Grease and flour a 9-inch round cake pan. This will help the cake come out easily. Now, it’s time to mix! In a medium bowl, whisk together the ground pistachios, flour, baking powder, baking soda, and salt. Set this bowl aside for later. In a large mixing bowl, beat the softened butter and sugar. Mix until it’s light and fluffy. This takes about 3-4 minutes. Next, add the eggs one by one. Make sure each egg mixes well before adding the next. Now, stir in the vanilla extract and lemon zest. Gradually add the dry mixture to the wet mixture. Alternate this with the buttermilk. Start and finish with the dry mix. Stir just until combined. Pour the batter into your prepared pan. Smooth the top with a spatula. Bake in the preheated oven for 25-30 minutes. Check with a toothpick to see if it’s done. If it comes out clean, your cake is ready! Let the cake cool in the pan for 10 minutes. Then, turn it out onto a wire rack to cool completely. Once cooled, you can dust it with powdered sugar for a nice touch. For an even prettier look, serve slices with extra crushed pistachios and fresh mint leaves. This makes for a colorful and tasty dessert. For the complete recipe, refer to the Full Recipe section. To get a fluffy cake, always use room temperature ingredients. Softened butter blends better with sugar. This creates air pockets, making your cake rise. Also, do not overmix the batter. Stop mixing once just combined. This keeps the cake light. A common mistake is using cold eggs. Cold eggs can create a dense texture. Always let them warm up before using. Another mistake is not measuring flour correctly. Use a spoon to fill your measuring cup, then level it off. This method prevents dry cake. I recommend using a kitchen scale for precision. It gives you better results. Also, check your oven's temperature with an oven thermometer. Sometimes, ovens can be off by a few degrees. Lastly, let your cake cool completely before serving. This allows flavors to settle, making it even tastier. If you want more details, check the Full Recipe. {{image_2}} You can play with the basic pistachio flavor. Adding a hint of almond extract gives a lovely twist. You might also try mixing in chocolate chips for a rich contrast. Dried fruit, like cranberries or apricots, can add a sweet touch. You can even fold in some shredded coconut for extra texture. These add-ins can lift your cake to new heights! Frosting can change the whole cake vibe. A cream cheese frosting pairs well with pistachio. It adds a tangy flavor that balances the sweetness. You can also try a simple whipped cream topping. For a fun twist, consider a honey glaze. It brings out the nutty flavor of the cake beautifully. Each option can make your cake feel fresh and exciting. If you need a gluten-free cake, swap all-purpose flour for almond flour. This will keep the nutty flavor strong. For a vegan version, replace eggs with flaxseed meal or applesauce. Use dairy-free butter and plant-based milk instead of buttermilk. This way, everyone can enjoy the delightful pistachio cake. There are many ways to make it fit your diet! For the full recipe, check out the [Full Recipe]. To keep your Delightful Pistachio Cake fresh, store it in an airtight container. This helps prevent drying out. Make sure to let the cake cool completely before sealing it. If you plan to eat it within a few days, keep it at room temperature. A cool, dry place works best. If you need to store it for longer, refrigerate it. Just remember to wrap it well to avoid absorbing odors from the fridge. When you want to enjoy your cake again, reheating it is easy. Preheat your oven to 300°F (150°C). Place a slice of cake on a baking sheet. Heat it for about 10-15 minutes. This warms it up without drying it out. If you prefer the microwave, heat a slice for about 10-15 seconds. Check to make sure it’s warm enough for your taste. If you want to save your Delightful Pistachio Cake for later, freezing is a great option. First, wrap the cake tightly in plastic wrap. Then, place it in a freezer-safe bag or container. This helps keep it fresh for up to three months. When you’re ready to eat, remove it from the freezer. Let it thaw in the fridge overnight. You can also thaw it at room temperature for a few hours. Avoid reheating it directly from frozen to keep the texture nice. For more details, check the Full Recipe. To make your pistachio cake more moist, use buttermilk. It adds creaminess and keeps the cake tender. You can also add a little more butter. This helps keep the cake soft and rich. Another tip is to avoid overbaking. Check the cake a few minutes early to ensure it stays moist. Yes, you can use roasted pistachios. They add a deeper flavor and a nice crunch. Just make sure they are unsalted. Salt may change the taste of your cake. If you want a more intense pistachio flavor, roasted is a great choice. You can find pistachio cake ingredients at local grocery stores. Look for shelled pistachios in the baking aisle or nut section. All-purpose flour and baking supplies are usually easy to find. If you want something special, check online stores. They often carry unique items, especially for baking. To decorate your pistachio cake, dust it with powdered sugar for a simple look. Crushed pistachios on top add color and texture. You can also use fresh mint leaves for a pop of green. For a fancier touch, try a light frosting made with cream cheese or whipped cream. Check the full recipe for more ideas! In this article, we covered how to make a delightful pistachio cake. We discussed essential and optional ingredients, plus tips for picking quality items. You learned step-by-step instructions for mixing, baking, and serving. We highlighted texture tips and common baking mistakes to avoid, along with fun variations. Don't forget safe storage practices and reheating tips. I hope this guide inspires you to bake and enjoy your own pistachio cake!

Delightful Pistachio Cake Simple and Tasty Recipe

If you’re craving a cake that’s both simple and delicious, you’re in the right place! My Delightful Pistachio Cake recipe

For a delightful Vegan Christmas Pie, gather these simple yet flavorful ingredients: - 1 pre-made vegan pie crust - 2 cups butternut squash, cubed - 1 cup kale, chopped - 1 cup cooked lentils (green or brown) - 1 small onion, finely chopped - 3 cloves garlic, minced - 1 teaspoon dried thyme - 1 teaspoon dried sage - 1/2 teaspoon nutmeg - 1/2 cup coconut milk - 2 tablespoons olive oil - Salt and pepper to taste - 1/4 cup walnuts, chopped (optional) - Pomegranate seeds for garnish (optional) Each ingredient plays a key role. The butternut squash adds sweetness and creaminess. Kale brings color and nutrients. Lentils add protein and heartiness. The herbs and spices bring warmth and earthiness to the pie. Coconut milk gives it a rich texture, while the olive oil enhances flavor. If you want a bit of crunch, add walnuts. Pomegranate seeds give a festive touch and a burst of flavor. You can find the full recipe [here](#). - Preheat your oven to 375°F (190°C). - In a large pot, boil water. Add 2 cups of cubed butternut squash and cook for about 10 minutes. The squash should be tender. Drain it and set aside. - In the same pot, heat 2 tablespoons of olive oil over medium heat. Add 1 finely chopped onion and sauté it until it turns translucent, about 5 minutes. Now, add 3 minced garlic cloves and sauté for one more minute. - Toss in 1 cup of chopped kale and cook until it wilts, taking about 3 minutes. - Next, stir in 1 cup of cooked lentils, the boiled butternut squash, 1 teaspoon of dried thyme, 1 teaspoon of dried sage, 1/2 teaspoon of nutmeg, salt, and pepper to taste. Mix everything well and cook for another 2-3 minutes. - Remove the pot from heat. Stir in 1/2 cup of coconut milk for extra creaminess. If you like, fold in 1/4 cup of chopped walnuts. - Pour the filling into the pre-made vegan pie crust. Spread it evenly. - Bake the pie in the preheated oven for 30-35 minutes. You want the crust to turn golden brown. - After baking, let the pie cool for about 10 minutes before slicing. This step-by-step guide ensures that your Vegan Christmas Pie turns out delicious and festive. For the full recipe, check the details above. To make a great Vegan Christmas Pie, focus on texture and flavor. Lentils are key here. They add protein and a nice bite. Use cooked green or brown lentils. They should be firm, not mushy, for the best results. Balancing flavors is vital. Dried herbs like thyme and sage give depth. Nutmeg adds warmth and a hint of sweetness. Don't skip the salt and pepper. They enhance all the flavors. The crust should be golden and flaky. Use a pre-made vegan pie crust for ease. Brush it lightly with olive oil before baking. This helps it stay crisp. Pre-baking the crust is a simple step that helps. It makes the crust firm and prevents sogginess. Bake it for about 10 minutes at 375°F (190°C) before adding your filling. Using a thermometer is a smart choice. Check for doneness at 30 minutes. The pie should reach 165°F (74°C) to ensure safety and flavor. Let the pie rest for about 10 minutes before slicing. This helps the filling set up. Plus, it makes serving much easier. Enjoy this delightful Vegan Christmas Pie with your loved ones! For the full recipe, visit the main article. {{image_2}} Want to make your Vegan Christmas Pie stand out? You can add different vegetables or legumes to mix things up. Try using sweet potatoes or carrots for a hint of sweetness. You could also add chickpeas or black beans for extra protein and texture. Experimenting with spices can also enhance the flavor. Cumin adds warmth, while paprika gives a nice smoky touch. You can even play with herbs like rosemary or basil. Consider sweet versus savory options for your pie. For a sweet twist, you might try adding apples and cinnamon. This change gives a festive vibe and pairs well with coconut milk. If you need a gluten-free crust, you can use almond flour or gluten-free flour blends. These options work well and create a nice texture. Just make sure to check that your pie crust is labeled gluten-free. For those with nut allergies, you can skip the walnuts. Instead, try sunflower seeds or pumpkin seeds for a crunchy topping without the nuts. This way, everyone can enjoy this delicious dish safely! To keep your Vegan Christmas Pie fresh, refrigerate it within two hours of serving. Place slices in an airtight container. This keeps the pie moist and tasty for up to four days. If you want to save it longer, freezing is a great option. Wrap the pie tightly in plastic wrap and then in aluminum foil. This helps avoid freezer burn. You can freeze it for up to three months. When you’re ready to enjoy it again, just take it out and let it thaw in the fridge overnight. To reheat your pie, use the oven for best results. Preheat your oven to 350°F (175°C). Place the pie on a baking sheet and cover it lightly with foil. Heat it for about 20 minutes or until warm. This method helps keep the flavor intact. If you want to keep the crust crispy, avoid the microwave. Microwaving can make the crust soggy. If you must use the microwave, heat it in short bursts on a low setting, checking often. This way, you keep the pie tasty and the crust nice. Can I make Vegan Christmas Pie ahead of time? Yes, you can prepare this pie in advance. You can make the filling and freeze it. Store it in an airtight container. You can also bake it a day ahead and refrigerate. Just let it cool completely before storing. When ready to serve, reheat it in the oven. What’s the best way to serve this pie? Serve the pie warm for the best taste. Garnish with pomegranate seeds for a festive look. Pair it with a light salad or some roasted veggies. It makes a great centerpiece for your holiday meal. How do I know when the pie is done baking? Check the crust for a golden brown color. You can insert a toothpick into the filling. If it comes out clean, the pie is done. Baking usually takes about 30 to 35 minutes. Keep an eye on it during the last few minutes for the perfect finish. For the full recipe, check above for all the details. Enjoy! In this guide, we explored making a vegan Christmas pie. We covered essential ingredients like butternut squash, lentils, and herbs. I shared step-by-step instructions for preparation and baking. You learned tips for perfecting texture and flavor, along with fun variations. Lastly, we discussed storage and reheating methods. With a little effort, you can make a delicious and festive vegan pie that everyone will love. Enjoy this tasty treat at your holiday table!

Vegan Christmas Pie Delightful Holiday Treat Recipe

Looking for a festive treat that shines on your holiday table? This Vegan Christmas Pie is a game-changer! Packed with

To make Rosemary Pumpkin Bread Rolls, you need simple and fresh ingredients. Each one plays a key role in the flavor and texture of the rolls. Here’s the list of ingredients you’ll need: - 1 cup pumpkin puree (canned or homemade) - 2 tablespoons fresh rosemary, finely chopped - 1/4 cup honey or maple syrup - 1/4 cup olive oil - 1 cup warm water (about 110°F) - 1 packet (2 1/4 teaspoons) active dry yeast - 4 cups all-purpose flour (plus extra for dusting) - 1 teaspoon salt - 1/2 teaspoon ground nutmeg - 1/4 teaspoon ground cinnamon - 1 egg (for egg wash, optional) Using high-quality ingredients makes a big difference. The pumpkin puree adds moisture and a lovely color. Fresh rosemary brings a burst of flavor that pairs well with the pumpkin. Honey or maple syrup sweetens the rolls, while olive oil keeps them soft. The yeast is crucial for making the rolls rise. Flour adds structure, while salt enhances all flavors. Nutmeg and cinnamon lend warmth and spice. An egg wash gives the rolls a shiny finish if you choose to use it. For the full recipe, you’ll mix these ingredients in a fun and easy way to create delicious rolls. Enjoy the process as much as the end result! - Combine 1 cup of warm water and 1 packet of active dry yeast. - Let the yeast sit for about 5-10 minutes until it becomes frothy. This shows that the yeast is active and ready to work. - In a large bowl, combine 1 cup of pumpkin puree, 1/4 cup of honey, 1/4 cup of olive oil, and 2 tablespoons of finely chopped rosemary. - Stir the mixture until it is well combined. The pumpkin will give your rolls a lovely color and taste. - In a separate bowl, mix together 4 cups of all-purpose flour, 1 teaspoon of salt, 1/2 teaspoon of ground nutmeg, and 1/4 teaspoon of ground cinnamon. - Gradually add this dry mix to the pumpkin mixture. Stir until a sticky dough forms. This dough will be soft and a bit tacky. - Turn the dough out onto a floured surface. Knead it for about 8-10 minutes. Add small amounts of flour if necessary until the dough is smooth and elastic. - Place the kneaded dough in a greased bowl. Cover it with a clean kitchen towel. Let it rise in a warm spot for 1 to 1.5 hours, or until it doubles in size. - After the dough has risen, punch it down. Divide it into 12 equal pieces and shape each piece into a ball. - Place the rolls on a greased baking sheet, leaving space between them. If you want a shiny finish, beat an egg and brush it on top of each roll. - Cover the rolls again and let them rise for about 30 minutes. Preheat your oven to 375°F (190°C). - Bake the rolls for 20-25 minutes or until they turn golden brown. Enjoy the aroma filling your kitchen! Kneading is key for great bread rolls. Aim for 8-10 minutes of kneading. Use your palms to press and fold the dough. Turn the dough a quarter turn every few folds. This helps develop gluten, which makes the rolls soft and fluffy. You know the dough is ready when it feels smooth and elastic. It should spring back when you poke it. If it sticks too much, add a little flour. If it feels too dry, wet your hands slightly. To boost the rosemary flavor, use fresh rosemary. Chop it finely to release more oils. You can also mix in a bit of garlic powder for extra depth. If you want a sweeter roll, swap honey for maple syrup. This adds a nice touch of flavor and keeps the rolls moist. Using an egg wash gives your rolls a shiny finish. Brush the tops with a beaten egg before baking. This makes them look golden and appetizing. If you want a vegan option, try using almond milk or soy milk instead. It won't be as shiny, but it still works well. For the full recipe, follow the steps above to enjoy these delightful rolls! {{image_2}} You can make these rolls even better with herbs and spices. Adding garlic gives a nice kick. Use fresh minced garlic for the best flavor. You can also try adding herbs like thyme or sage. These will blend well with the rosemary. Another idea is to mix in spices like allspice or black pepper. These spices add warmth and depth to the dough. Switching to whole wheat flour can make these rolls healthier. Whole wheat adds fiber, which is good for digestion. It also gives a nuttier flavor. However, you must adjust the liquid in the recipe. Whole wheat flour absorbs more water. You might need to add a bit more warm water to keep the dough moist. This will help you achieve a soft texture. You can play with the flavors by making sweet or savory rolls. For sweet rolls, add chocolate chips or dried fruits. These will give a fun twist to the rolls. You can also top them with a sweet glaze after baking. If you prefer savory, try mixing in cheese or olives. These will add a rich flavor that pairs well with the pumpkin. Both variations offer a tasty way to enjoy these rolls. For the full recipe, check out the details provided above. To keep your rosemary pumpkin bread rolls fresh, store them in an airtight container. This helps seal in moisture and flavor. You can also wrap them tightly in plastic wrap or aluminum foil. Store at room temperature for up to three days. If you want to keep them longer, freezing is a great option. To freeze your rolls, let them cool completely. Place them in a freezer-safe bag or container. Remove as much air as possible before sealing. They can stay fresh in the freezer for about three months. When you're ready to enjoy them, just take out as many as you need. To reheat your rolls without drying them out, use the oven. Preheat it to 350°F (175°C). Wrap the rolls in aluminum foil to keep them soft. Heat for about 10-15 minutes. This method helps keep the outside golden and the inside warm. If you refrigerated your rolls, serve them within three days. The texture and taste are best when fresh. If you need to store them longer, consider freezing them instead. Enjoy your warm rosemary pumpkin bread rolls at any meal! For the full recipe, refer back to the beginning. Yes, you can use fresh pumpkin. First, choose a small pumpkin. Cut it in half and scoop out the seeds. Roast the pumpkin halves until soft, about 35-40 minutes at 400°F. Let it cool, then mash or blend until smooth. This fresh pumpkin puree adds a great taste to the rolls. Use it in the same amount as canned pumpkin. To check if your rolls are done, look for a golden brown color. Tap the bottom of a roll; it should sound hollow. You can also use a thermometer. The center should reach 190°F. If they don't pass these tests, give them a few more minutes. Yes, you can make this recipe gluten-free. Use a gluten-free flour blend. Look for one that can replace all-purpose flour in equal amounts. Add a bit of xanthan gum, about 1 teaspoon, to help with texture. Make sure to check the package for specific instructions. These rolls pair well with soups and salads. Try them with a warm pumpkin soup or a hearty vegetable stew. They also work great with roasted meats. Serve them warm with butter for a tasty treat. The flavors of rosemary and pumpkin will shine in any meal. You now have all the steps to make tasty rosemary pumpkin bread rolls. From mixing the ingredients to baking, these rolls are sure to impress. Remember, you can adjust flavors and add different herbs for your taste. Storing them right helps keep them fresh, and reheating is simple. Don’t hesitate to explore variations and pair them with your favorite meals. Baking becomes fun and rewarding with unique recipes like this. Enjoy your homemade rolls and share them with others!

Rosemary Pumpkin Bread Rolls Flavorful and Soft Treat

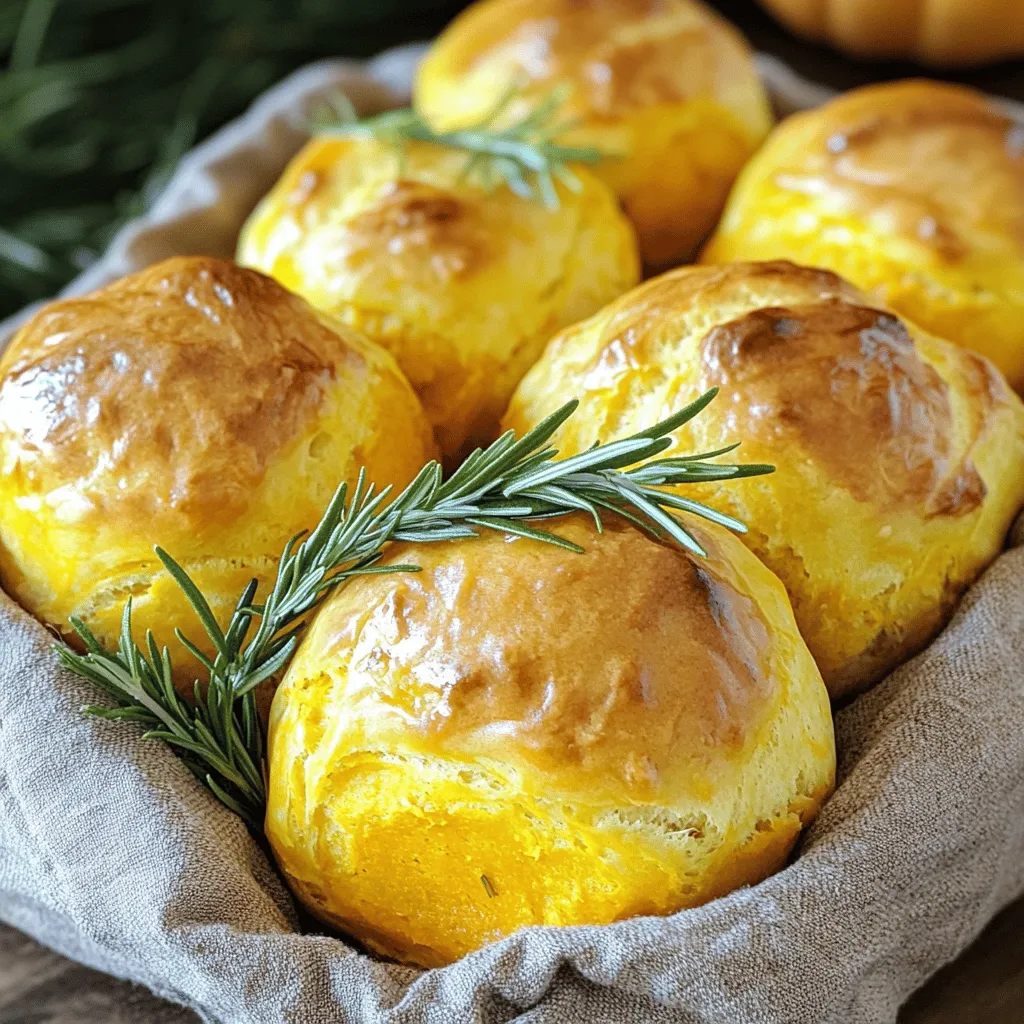
Looking to impress your friends and family with a warm, fragrant treat? Rosemary pumpkin bread rolls are the perfect choice!

- 1 cup graham cracker crumbs - 2 cups cream cheese, softened - 1 cup heavy whipping cream These three ingredients create a rich and creamy base for your mini lemon cheesecakes. The graham cracker crumbs add a nice crunch, while the cream cheese gives it a smooth texture. Heavy whipping cream makes it light and fluffy. - 1/4 cup fresh lemon juice - Zest of 1 lemon - 1 teaspoon vanilla extract Fresh lemon juice and zest bring that bright, zesty flavor. The vanilla extract adds warmth and depth, balancing the tartness of the lemon. This combination makes every bite refreshing. - Fresh berries - Lemon slices Adding fresh berries and lemon slices on top makes your cheesecakes look beautiful. They also add a pop of color and extra flavor. You can choose your favorite berries, like strawberries or blueberries, to make it your own. For the complete list of ingredients and detailed instructions, check out the Full Recipe! - In a bowl, combine 1 cup of graham cracker crumbs, 1/4 cup of sugar, and 1/4 cup of melted butter. - Stir until it feels like wet sand. - Spoon the mixture into mini cheesecake cups or muffin tins. - Press it down firmly to make a solid base. - Place the cups in the fridge while you make the filling. - In a large bowl, beat 2 cups of softened cream cheese until smooth. - Gradually mix in 1 cup of powdered sugar, blending well. - Add 1/4 cup of fresh lemon juice, the zest of 1 lemon, and 1 teaspoon of vanilla extract. - Mix everything until it is fully combined and creamy. - In a separate bowl, whip 1 cup of heavy cream until it forms stiff peaks. - Gently fold the whipped cream into the cream cheese mixture. - Keep folding until no streaks remain. - Spoon the lemon filling into the chilled crusts. - Smooth the tops as you go, tapping the cups gently on the counter to remove air bubbles. - Cover the mini cheesecakes and refrigerate for at least 4 hours or overnight for the best set. For a complete guide, check out the Full Recipe. To get a creamy filling, start with softened cream cheese. Use an electric mixer to beat it until smooth. This helps to prevent lumps. Add sugar slowly while mixing. This step helps blend everything well. To prevent cracks in the cheesecake, avoid overmixing. Once you add the whipped cream, fold it gently. Stirring too much can add air. Air causes cracks when the cheesecake sets. If you want to reduce sugar, try using less powdered sugar. You can also use honey or maple syrup as alternatives. These options add sweetness without processed sugar. For a healthier version, consider using Greek yogurt. It adds creaminess and lowers fat. You can also try using stevia or monk fruit sweetener. These are good options for lower-calorie treats. The minimum refrigeration time is four hours. However, for the best flavor and texture, chill overnight. The longer the cheesecake sits, the better it sets. To tell when your cheesecakes are set, gently shake the cups. If the filling jiggles slightly in the center, it’s ready. If it wobbles too much, it needs more time. For the full recipe, check the earlier section. {{image_2}} You can switch up the flavors in your mini cheesecakes. Try adding different citrus fruits. Lime or orange can give a fresh twist. You can also use flavored extracts. Almond or coconut extract adds a unique touch. Just a little can change the taste. If you want a new base, consider crushed cookies. Oreos or vanilla wafers work great. They add a different flavor profile. For those avoiding gluten, use gluten-free cookies. Almond flour is another good option for a simple crust. Think about how to serve these treats. They pair well with sauces. A berry sauce or a lemon curd can elevate your dish. You can also use fruit compotes for a colorful touch. For plating, stack mini cheesecakes with berries on top. Use a mint leaf for a nice pop of color. For the complete recipe, check the [Full Recipe]. To keep your no-bake mini lemon cheesecakes fresh, store any leftovers in the refrigerator. Use an airtight container to prevent them from drying out. If you don’t have a container, cover them tightly with plastic wrap. This helps maintain their creamy texture and vibrant flavor. You can freeze these mini cheesecakes for later enjoyment. First, let them chill completely in the fridge. Then, place the cheesecakes in a single layer on a baking sheet. Freeze until solid, then transfer them to a freezer-safe container. Be sure to separate layers with parchment paper. To enjoy later, thaw the cheesecakes in the fridge overnight for the best texture. These mini cheesecakes last up to five days in the fridge. Check for any changes in smell or texture before eating. If you notice any signs of spoilage, like a sour smell or mold, it’s best to discard them. Enjoy these sweet treats while they are fresh for the best taste! Yes, you can make these cheesecakes ahead of time. They taste even better after sitting in the fridge. I recommend making them a day or two before you plan to serve them. Just be sure to cover them well. Use plastic wrap or a lid to keep them fresh. This way, you save time and impress your guests with a delicious dessert. If you need a dairy-free option, you can use vegan cream cheese. This works well in the recipe. You can also try cashew cream. Soak cashews in water, then blend them until smooth. Add a bit of lemon juice for flavor. Both options give you a nice creamy texture without dairy. To prevent sticking, use mini cheesecake cups or muffin tins with paper liners. This makes removal easy. If you don’t have liners, grease the cups lightly with cooking spray. After chilling, run a small knife around the edge to help release the cheesecakes. This simple step saves you from frustration when serving. This post covered how to make mini cheesecakes, from crust to filling. You learned about key ingredients like cream cheese and graham crackers. I shared tips for the best texture and sweetness. We explored fun variations and storage methods to keep them fresh. Mini cheesecakes are easy to make and fun to enjoy. With practice, you’ll impress everyone with your tasty treats. Now, get in the kitchen and create a delicious dessert!

No-Bake Mini Lemon Cheesecakes Simple Sweet Treat

Are you ready to treat yourself to a delightful dessert? These No-Bake Mini Lemon Cheesecakes are easy to make and

For a tasty Italian seafood salad, you need fresh seafood that brings flavor. Here’s what I use: - 1 cup cooked shrimp, peeled and deveined - 1 cup calamari, cleaned and sliced into rings - 1 cup mussels, cleaned and steamed (optional) These seafood choices give you great texture and taste. Shrimp is sweet, calamari is tender, and mussels add a briny kick. The crunch of fresh veggies makes the salad exciting. Here’s what I include: - 1 cup cherry tomatoes, halved - 1 cucumber, diced - 1/4 red onion, finely chopped - 1/4 cup black olives, pitted and sliced - 1/4 cup fresh parsley, chopped These ingredients brighten the dish. Tomatoes offer juiciness, cucumbers add freshness, and parsley gives a pop of color. A good dressing ties everything together. I like to keep it simple with: - 2 tablespoons lemon juice - 3 tablespoons extra-virgin olive oil - Salt and pepper to taste - 1 teaspoon dried oregano - A pinch of red pepper flakes (optional) The dressing is zesty and light. Lemon juice adds acidity, olive oil provides richness, and oregano gives it an Italian flair. You can find the full recipe to guide you through the steps! First, gather your seafood. Use fresh shrimp, calamari, and mussels if you like. I often start by cooking the shrimp until they turn pink. This takes about 3-4 minutes. Next, clean the calamari and slice it into rings. If you choose mussels, steam them until they open. This adds a rich flavor to the salad. Once cooked, let the seafood cool before mixing. Now, it’s time to build the salad. In a large bowl, combine the seafood. Add the halved cherry tomatoes, diced cucumber, chopped red onion, and sliced black olives. Each ingredient brings its own taste. Mix everything gently with a spoon. This helps keep the seafood from breaking apart. You want a nice blend of colors and textures. For the dressing, grab a small bowl. Whisk together lemon juice, olive oil, salt, pepper, dried oregano, and red pepper flakes. This step is key to adding flavor. Once mixed, pour the dressing over the seafood and veggies. Toss everything gently to coat well. Finally, fold in the chopped parsley. Cover the bowl and refrigerate for at least 30 minutes. This helps all the flavors blend beautifully. Serve chilled or at room temperature for a refreshing dish. For the complete recipe, check out the Full Recipe. When making Italian seafood salad, fresh seafood is key. Look for shrimp that smell like the ocean, not fishy. The flesh should be firm and slightly translucent. For calamari, choose rings that are white and glossy. If you use mussels, they should be closed tightly. If one is open, discard it. Fresh seafood makes your salad taste bright and clean. Marinating seafood is simple and effective. After mixing your seafood with veggies, add the dressing. Let it sit in the fridge for at least 30 minutes. This helps the flavors blend. If you can, marinate for up to two hours. The seafood absorbs the tangy lemon and olive oil. You’ll enjoy a much richer taste in every bite. Presentation matters! Serve your seafood salad in a large glass bowl to show off the colors. You can also use individual cups for a fun twist. Garnish each serving with a lemon wedge and a sprinkle of parsley. This adds a pop of color and a hint of freshness. For extra flair, consider placing some edible flowers around the dish. This makes your salad not just tasty, but beautiful too. For the full recipe, check out the Italian Seafood Salad section. {{image_2}} You can change the seafood in this salad to suit your taste. If you love crab, try adding lump crab meat. Scallops work well too, but cook them briefly. For a bolder flavor, use smoked salmon instead of fresh seafood. You can also mix in different shellfish, like clams or prawns. Just make sure everything is fresh and cooked properly. This way, you will get a tasty twist on the classic dish. Feel free to swap out the vegetables to match what you have. Bell peppers add crunch and color. You might try adding diced avocado for creaminess. Radishes can give a nice kick. If you like greens, toss in some arugula or spinach. Just remember to keep the balance of flavors in mind. Fresh herbs like basil or dill can also brighten up the salad. The dressing can change the whole vibe of your seafood salad. For a zesty kick, add a bit of Dijon mustard to the lemon juice and oil. You can use balsamic vinegar instead of lemon juice for a sweeter flavor. Try adding minced garlic for a bold taste. If you want a creamier dressing, mix in some yogurt or sour cream. This gives a rich texture that pairs well with the seafood. For the full recipe, check out the complete details. After enjoying your Italian seafood salad, store leftovers in an airtight container. Make sure to seal it tightly. This keeps the salad fresh and prevents any odors from other foods. Always refrigerate the salad right away to maintain quality. If you have leftovers with dressing, consider storing the dressing separately to keep the salad crisp. Freezing seafood salad is not ideal. The seafood can become rubbery when thawed. However, if you need to freeze it, only freeze the seafood without the veggies or dressing. Place the seafood in a freezer-safe bag and remove as much air as possible. To use later, thaw it in the fridge overnight. Then, prepare fresh veggies and dressing when you are ready to eat. In the fridge, your seafood salad can last for about 2 to 3 days. Always check for any signs of spoilage before eating. If it smells off or the texture seems strange, it’s best to throw it out. For the best flavor and texture, enjoy it within the first couple of days. For an Italian seafood salad, I love using a mix of seafood. Some great options are: - Cooked shrimp - Calamari rings - Mussels (if you enjoy them) These seafood types bring different flavors and textures. Shrimp adds sweetness. Calamari gives a nice chew, while mussels add a briny taste. You can mix and match based on what you like or can find fresh. Yes, you can make this salad ahead of time. It tastes even better after sitting. I recommend making it about 30 minutes before serving. This gives the flavors time to blend. Just cover the bowl with plastic wrap and chill it in the fridge. If you plan to store it longer, keep the dressing separate until you're ready to serve. Absolutely! This Italian seafood salad is gluten-free. The ingredients do not contain gluten. Just make sure to check your dressing for any hidden gluten. You can enjoy this salad without worry if you follow these tips. In this article, we explored how to create a delicious Italian seafood salad. We covered the key ingredients, from fresh seafood to vibrant vegetables. You learned the step-by-step process for preparing your salad and making a zesty dressing. I shared tips on selecting the best seafood and presented ideas for personal touches. Finally, we discussed storage guidelines and answered common questions. Creating this salad is fun and rewarding. Enjoy trying it with your family and friends.

Italian Seafood Salad Fresh and Flavorful Recipe

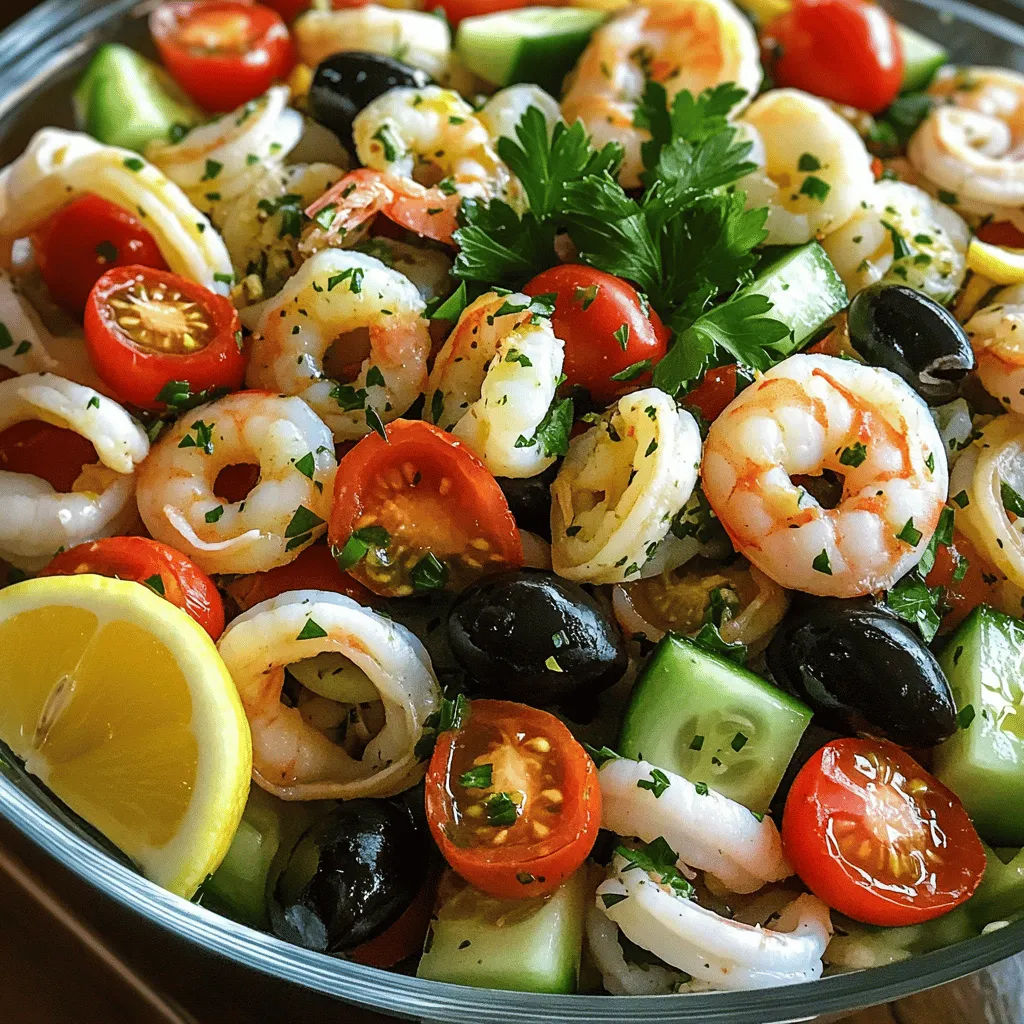
Are you ready to dive into a plate of fresh and vibrant flavors? This Italian Seafood Salad is a perfect

Older posts
Newer posts
← Previous Page1 … Page76 Page77 Page78 … Page106 Next →
© 2025 My Cooking Cast • Built with GeneratePress

Our Policies

  • Privacy Policy
  • GDPR Policy
  • Terms Of Use
  • Copyright Policy
  • Cookie Policy
  • Disclaimer

More Information​

  • Home
  • Contact
  • About
  • Dinner
  • Appetizers
  • Dessert
©2025, My Cooking Cast About Privacy Policy Back To Top