Skip to content
DisclaimerTerms Of UseGDPR PolicyCookie Policy

My Cooking Cast

  • Home
  • Drinks
  • Appetizers
  • Dinner
  • Dessert
  • About
  • Contact
  • Privacy Policy
DisclaimerTerms Of UseGDPR PolicyCookie Policy

Emma

To make Asian Beef with Mushrooms, gather these key ingredients: - 1 lb (450g) flank steak, thinly sliced - 1 cup shiitake mushrooms, sliced - 1 red bell pepper, sliced - 1 cup broccoli florets - 3 cloves garlic, minced - 1 inch fresh ginger, grated - 2 tablespoons soy sauce - 1 tablespoon hoisin sauce - 1 tablespoon sesame oil - 1 teaspoon sugar - Salt and pepper, to taste - 2 tablespoons vegetable oil - 2 teaspoons sesame seeds, for garnish - 2 green onions, chopped, for garnish This dish shines due to its rich flavors. The flank steak offers a tender bite. Shiitake mushrooms add earthy depth. Red bell pepper gives sweetness, while broccoli brings a fresh crunch. Garlic and ginger boost the dish with aromatic warmth. Soy sauce and hoisin sauce provide that essential umami taste. Sesame oil adds a nutty finish, while sugar balances the flavors. Salt and pepper round out the seasoning, ensuring every bite is full of taste. For the best flavor, always choose fresh ingredients. Look for flank steak that is bright red with minimal fat. Your shiitake mushrooms should be firm and smooth. Avoid slimy or dark spots. Select bell peppers that are shiny and firm to the touch. Fresh broccoli should be vibrant green with tight florets. Always check the expiry dates on sauces. Using high-quality ingredients makes a big difference in your meal’s taste. Start by preparing the marinade. In a bowl, mix the soy sauce, hoisin sauce, sesame oil, sugar, and a pinch of salt and pepper. This blend gives the beef a rich flavor. Next, add the thinly sliced flank steak to the bowl. Make sure each piece is well-coated. Let it marinate for 15 to 20 minutes. This step helps the beef soak up all the tasty flavors. After marinating, heat a large skillet or wok over medium-high heat. Add vegetable oil and let it heat up. Once hot, add the marinated beef to the skillet. Cook for about 3 to 4 minutes. You want the beef to turn a nice brown color. When it’s done, remove the beef from the pan and set it aside. This keeps it juicy and prevents overcooking. In the same skillet, add minced garlic and grated ginger. Stir them for about 30 seconds until they smell great. Then, add the sliced shiitake mushrooms. Cook them for 3 minutes until they start to soften. After that, toss in the broccoli florets and sliced red bell pepper. Stir-fry these for 4 to 5 minutes. You want the veggies to be tender but still crisp. Now it’s time to bring everything together. Return the cooked beef to the skillet. Toss all the ingredients together for about 2 minutes. This allows the flavors to meld. Make sure to check the seasoning and adjust if needed. Serve hot and garnish with sesame seeds and chopped green onions. For a complete meal, serve over steamed rice or noodles. For the full recipe, check the recipe section above. To get the best stir-fry, heat is key. Use a large skillet or wok. Preheat it over medium-high heat. This helps cook the beef quickly. When the pan is hot, add oil right before the meat. This prevents sticking and burning. Cook the beef in small batches. Crowding the pan will steam the meat instead of browning it. You can easily change the flavors to fit your taste. Want it spicier? Add some red pepper flakes or sriracha. If you like it sweeter, increase the sugar a bit. Always taste as you cook. This helps you find the perfect balance. If it’s too salty, add a splash of water. If it needs more umami, add more soy sauce. Garnishes make your dish look fancy and tasty. Here are some ideas: - Sprinkle sesame seeds on top for crunch. - Chop green onions and scatter them for freshness. - Add a few slices of lime or lemon for a zesty kick. - Fresh cilantro or basil will add a bright flavor. These simple touches will elevate your Asian Beef with Mushrooms. For detailed cooking steps, check out the Full Recipe. {{image_2}} You can swap beef for chicken or tofu. Chicken gives a lighter taste. Use boneless chicken thighs or breasts for best results. Tofu is great for a plant-based meal. Choose firm tofu, and press it to remove excess water. Marinate it just like the beef, then cook it until golden. Feel free to mix different veggies in your dish. Snap peas, carrots, or baby corn add crunch. You can also use bok choy for a unique flavor. Try zucchini for a fresh twist. Just make sure to cut the vegetables into uniform pieces for even cooking. For a spicy kick, add red pepper flakes or sriracha. This will wake up your taste buds! If you prefer a sweeter taste, drizzle more hoisin sauce over your dish. You can also toss in some pineapple chunks for a fruity twist. Adjust these flavors to fit your mood and taste. Feel free to explore these variations to make your Asian Beef with Mushrooms even more delightful. For the full recipe, check out the details above. After enjoying Asian Beef with Mushrooms, you may have leftovers. To store them well, let the dish cool to room temperature. Transfer it to an airtight container. Make sure to seal it tight to keep moisture out. Store it in the fridge. It should stay fresh for up to three days. When you want to eat your leftovers, reheating them properly is key. Use a skillet over low heat. Add a splash of water or broth to keep it moist. Stir often to heat evenly. You can also use a microwave. Place the food in a microwave-safe dish. Cover it with a damp paper towel to trap steam. Heat in short bursts, stirring in between, until warm. If you want to save the dish for later, freezing is a great option. Let the beef and veggies cool completely first. Place them in a freezer-safe container. Label it with the date for easy tracking. This dish can last for up to three months in the freezer. To enjoy later, thaw it in the fridge overnight before reheating. For the full recipe and more tips, check out the Full Recipe section. To make a gluten-free Asian Beef with Mushrooms, swap out soy sauce for gluten-free tamari. This sauce gives the same salty flavor without gluten. Check your hoisin sauce too; some brands are not gluten-free. You can also make hoisin sauce at home using gluten-free ingredients. You can serve Asian Beef with Mushrooms over steamed rice or noodles. Fried rice is another great choice. For a fresh touch, add a side salad with a soy-ginger dressing. You can also pair it with spring rolls for a fun meal. Asian Beef with Mushrooms can last in the fridge for up to three days. Make sure to store it in an airtight container. If you want to eat it later, reheat it in a pan over low heat. This keeps the flavors fresh and the beef tender. Yes, you can use dried mushrooms instead of fresh. However, you must rehydrate them first. Soak dried shiitake mushrooms in warm water for about 30 minutes. Once they are soft, slice them and use them just like fresh ones in the recipe. This blog post covered everything you need for Asian Beef with Mushrooms. We explored must-have ingredients, marinating tips, and how to perfect your stir-fry. You learned variations for different proteins and veggies, plus how to store leftovers. In closing, trying this dish is worth it. Ready your kitchen, gather your ingredients, and enjoy a delicious meal tonight!

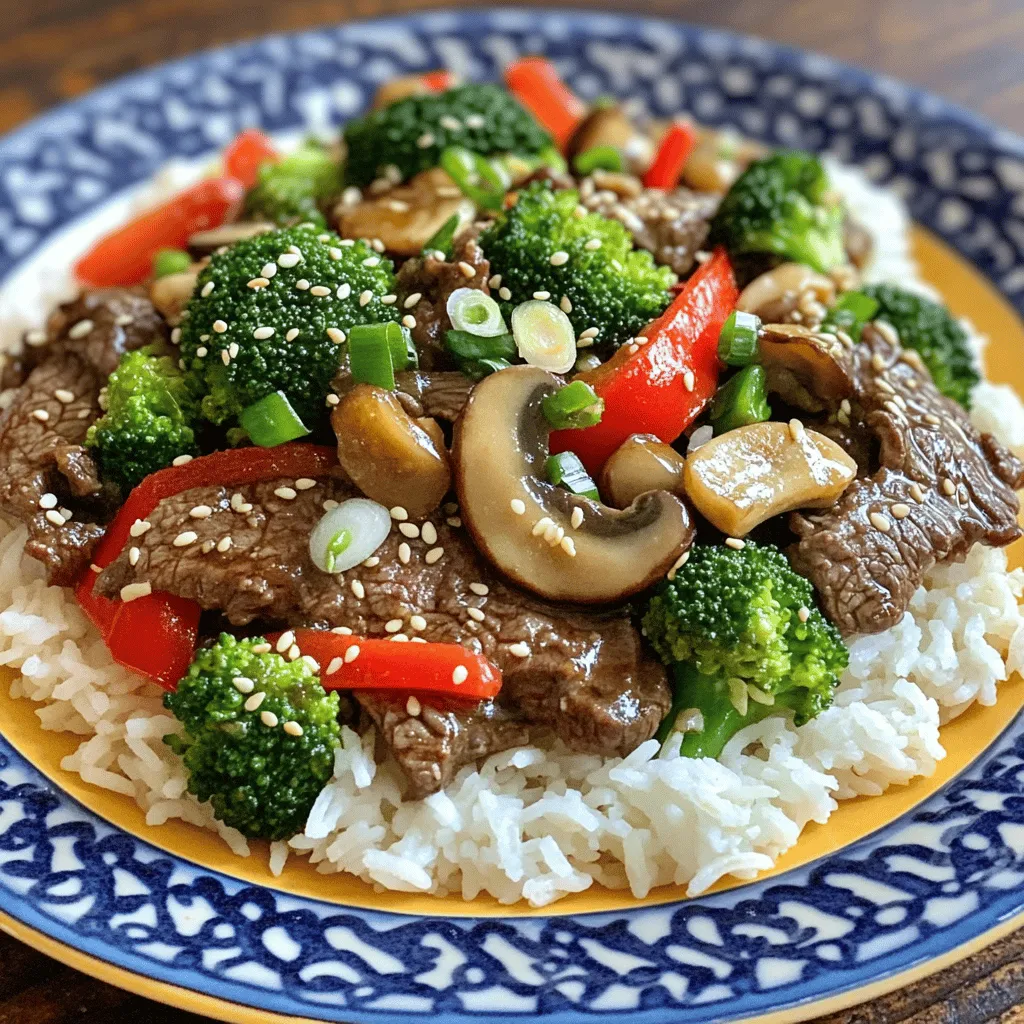
Asian Beef with Mushrooms Flavorful Dinner Delight

If you’re craving a flavorful dinner that’s simple to make, Asian Beef with Mushrooms is the answer! With tender beef

For a delicious Snickerdoodle Cream Cheese Apple Pie, gather these key ingredients: - 1 ½ cups all-purpose flour - ½ cup unsalted butter, softened - ¼ cup granulated sugar - 1 egg yolk - 1 teaspoon vanilla extract - ½ teaspoon salt - 1 cup cream cheese, softened - 1/3 cup granulated sugar - 1 teaspoon cinnamon - 1 teaspoon vanilla extract - 1 egg - 3 cups Granny Smith apples, peeled and sliced - 1 tablespoon lemon juice - ½ cup brown sugar - 1 teaspoon cinnamon - 1 tablespoon cornstarch - 1 tablespoon unsalted butter, melted - 2 tablespoons granulated sugar - 1 teaspoon cinnamon - 2 tablespoons unsalted butter, melted With these ingredients, you can create a pie that balances creamy and spiced flavors. The tart apples blend perfectly with rich cream cheese and snickerdoodle spices. For the full recipe, check out the detailed instructions provided earlier. Each bite of this pie offers a delightful experience that’s hard to resist! Mixing the Ingredients To start, grab a mixing bowl. Combine 1 ½ cups of flour, ½ cup of softened butter, and ¼ cup of sugar. Add 1 egg yolk, 1 teaspoon of vanilla extract, and ½ teaspoon of salt. Use a fork or pastry cutter to mix until you see a dough form. Chilling the Dough Next, press the dough into a 9-inch pie plate. Make sure to cover the bottom and sides evenly. Prick the bottom with a fork to prevent bubbling. Now, chill the crust in the refrigerator for 30 minutes. Shaping the Crust After chilling, remove the crust from the fridge. If needed, gently reshape the edges. This helps to make the crust look nice and neat. Blending Cream Cheese Mixture In a separate bowl, add 1 cup of softened cream cheese. Then, combine it with ⅓ cup of sugar, 1 teaspoon of cinnamon, 1 teaspoon of vanilla extract, and 1 egg. Mix until the cream cheese is smooth and creamy. Achieving Smooth Consistency Make sure there are no lumps in the cream cheese mixture. A smooth layer will blend well with the apples. Tossing Apples with Spices Grab 3 cups of peeled and sliced Granny Smith apples. In a large bowl, toss these apples with ½ cup of brown sugar, 1 tablespoon of cornstarch, and 1 teaspoon of cinnamon. This gives the apples a sweet and spicy flavor. Combining with Lemon Juice Add 1 tablespoon of lemon juice to the apples. This will keep them fresh and add a nice zing. Layering Techniques Preheat your oven to 350°F (175°C). Once the crust has chilled, spread the cream cheese mixture evenly over the crust. Then, layer the spiced apple mixture on top. Adding the Topping In a small bowl, mix 2 tablespoons of sugar with 1 teaspoon of cinnamon. Drizzle 2 tablespoons of melted butter over the apple filling. Sprinkle the cinnamon sugar mixture on top. Oven Temperature and Time Bake the pie in the preheated oven for 45-50 minutes. The apples should become tender, and the crust should turn golden brown. Checking for Doneness Keep an eye on the pie. If the crust starts to brown too much, cover the edges with foil. Recommended Cooling Time After baking, let the pie cool for at least 30 minutes. This cooling time helps the filling set up nicely. Presentation Suggestions Serve the pie warm or at room temperature. You can top each slice with whipped cream or vanilla ice cream. A sprinkle of cinnamon adds a lovely touch. For the complete recipe, check out the Full Recipe section. - Blind Baking Techniques: Blind baking helps set the crust. After chilling the dough, line it with parchment paper. Fill with pie weights. Bake at 350°F (175°C) for 10-15 minutes. This prevents sogginess when adding filling. - Cooling Tips: Let the pie cool for 30 minutes after baking. This allows the filling to set. If you cut it too early, the bottom can become wet. - Spice Options: You can add more warmth with nutmeg or ginger. A dash of allspice can also enhance the flavor. Experiment to find your favorite mix! - Extract Variations: Vanilla is classic, but almond extract adds a unique twist. Try maple extract for a sweet depth. Just a little goes a long way. - Cream Cheese Consistency Tips: Always soften the cream cheese before mixing. Cold cream cheese will not blend well. Aim for a smooth, creamy texture to make the layer rich. - Whisking Techniques: Use a hand mixer for smooth results. Start slow to avoid splatter. Increase speed once mixed well. This ensures no lumps remain for a perfect snickerdoodle layer. For full details on creating this mouthwatering pie, check out the Full Recipe. {{image_2}} For a different taste, try using a gluten-free crust. You can mix gluten-free flour with cold butter. This gives you a nice base for your pie. Another fun option is to use biscuit or graham cracker crusts. Crush the crackers and mix them with melted butter. Press this into your pie dish. This adds a sweet crunch that pairs well with the filling. While Granny Smith apples are great, you can experiment with other apple types. Try Honeycrisp or Fuji apples for a sweeter taste. Each apple brings its unique flavor to the pie. You can also add pears or berries for a twist. Pears add a soft texture, while berries give a burst of flavor. Mix these fruits with the apples for a colorful filling. If you're dairy-free, you can use dairy-free cream cheese. This works well and still keeps the creamy texture. Look for brands that mimic regular cream cheese for the best result. You can also swap out regular sugar for alternatives like coconut sugar or honey. These options can add a new depth of flavor to your pie. Just adjust the amount to taste. For the full recipe, check the detailed steps and ingredient usage to create your own Snickerdoodle Cream Cheese Apple Pie. When you have leftover Snickerdoodle Cream Cheese Apple Pie, store it in the fridge. Place it in an airtight container for best results. If you don’t have a container, cover it tightly with plastic wrap. This keeps the pie fresh and prevents it from drying out. You can freeze this pie, but decide when to do it. If you freeze before baking, wrap it well in plastic wrap and foil. Make sure it is sealed tight. If you want to freeze after baking, let it cool first. Then, wrap it in plastic wrap and foil. When you are ready to eat it, follow these thawing guidelines. For a pie frozen before baking, thaw it in the fridge overnight. For a baked pie, let it sit at room temperature for a few hours. To reheat your pie, use an oven for the best taste. Preheat your oven to 350°F (175°C). Place the pie on a baking sheet and heat for about 15-20 minutes. This helps keep the crust crisp. If you’re short on time, use the microwave. Heat a slice for 30-45 seconds. Check to see if it is warm enough. If not, heat it in small increments. However, this method may soften the crust. Enjoy your Snickerdoodle Cream Cheese Apple Pie fresh and warm! Yes, you can use store-bought pie crust for this recipe. It saves time and effort. Just make sure it fits your pie plate. Follow the package instructions for baking times. The pie is done when the apples are tender and the crust is golden. You can check the apples with a fork. If they are soft, the pie is ready. Absolutely! You can prepare the pie a day in advance. Just store it in the fridge after cooling. Reheat it before serving for the best taste. Serve it warm or at room temperature. Add whipped cream or vanilla ice cream on top. A sprinkle of cinnamon adds a nice touch. Yes, you can skip the cream cheese. Use a mix of sour cream and sugar instead. This will change the flavor but still keep it tasty. To create a Snickerdoodle Cream Cheese Apple Pie, you need to follow some easy steps. Each layer adds a unique flavor and texture, making this pie a delightful treat. Detailed Steps and Ingredient Usage: 1. Prepare the Pie Crust: - Combine these ingredients in a bowl: - 1 ½ cups all-purpose flour - ½ cup unsalted butter, softened - ¼ cup granulated sugar - 1 egg yolk - 1 teaspoon vanilla extract - ½ teaspoon salt - Mix until a dough forms. Press this dough into a 9-inch pie plate. Prick the bottom and chill it for 30 minutes. 2. Make the Snickerdoodle Layer: - In another bowl, beat together: - 1 cup cream cheese, softened - 1/3 cup granulated sugar - 1 teaspoon cinnamon - 1 teaspoon vanilla extract - 1 egg - Mix until it's smooth and creamy. 3. Prepare the Apple Filling: - Toss 3 cups of peeled and sliced Granny Smith apples with: - 1 tablespoon lemon juice - ½ cup brown sugar - 1 teaspoon cinnamon - 1 tablespoon cornstarch - Ensure all apples are coated well. 4. Assemble the Pie: - Preheat the oven to 350°F (175°C). - Spread the snickerdoodle cream cheese mixture over the chilled crust. - Layer the apple mixture on top of the cream cheese. 5. Add the Topping: - Mix 2 tablespoons of granulated sugar with 1 teaspoon of cinnamon in a small bowl. - Drizzle 2 tablespoons of melted butter over the apple filling and sprinkle the cinnamon-sugar mix on top. 6. Bake the Pie: - Bake for 45-50 minutes. The pie is done when the apples are tender and the crust is golden. 7. Cool and Serve: - Let the pie cool for at least 30 minutes before slicing. This helps the filling set. Summary of Preparation Techniques: This pie blends the rich taste of cream cheese and the warm spices of cinnamon. Chilling the crust helps prevent sogginess. Layering the cream cheese and apples creates a delightful texture. Baking brings all the flavors together, making every bite a flavorful delight. Enjoy your slice with whipped cream or ice cream for extra joy! This blog post covered the tasty Snickerdoodle Cream Cheese Apple Pie. We explored each step, from making the perfect crust to creating a delicious apple filling. I shared tips to avoid a soggy bottom and suggested fun variations. Remember, this pie is all about balance—sweet cream cheese, spiced apples, and a crisp crust. Use this guidance to impress your family and friends. Enjoy the baking journey!

Snickerdoodle Cream Cheese Apple Pie Flavorful Delight

Are you ready to bake a pie that combines creamy delight with spiced goodness? My Snickerdoodle Cream Cheese Apple Pie

Here’s what you need to make these tasty breakfast burritos. Gather all your ingredients before you start cooking. This makes the process smooth and fun. - 4 large flour tortillas - 6 large eggs - 1 cup black beans, drained and rinsed - 1 cup cherry tomatoes, halved - 1 cup cheddar cheese, shredded - 1 avocado, diced - 1/2 cup bell pepper, finely chopped (red or green) - 1/4 cup red onion, finely chopped - 1 teaspoon ground cumin - 1 teaspoon paprika - Salt and pepper to taste - 2 tablespoons olive oil - Fresh cilantro, chopped (for garnish) - Salsa (for serving) This list ensures you have bright flavors and good textures in each bite. Each ingredient plays a role in making your burrito delicious. For the full recipe, check the other sections. Start by cracking six large eggs into a bowl. Whisk them well until they blend into a smooth mix. Add one teaspoon of ground cumin and one teaspoon of paprika. Sprinkle in salt and pepper to taste. This mix will give your eggs a rich flavor. Next, heat two tablespoons of olive oil in a large skillet over medium heat. Once hot, add half a cup of finely chopped bell pepper and a quarter cup of finely chopped red onion. Sauté these for about three to four minutes until they soften. The smell will make you hungry! Now, pour the egg mixture into the skillet with the vegetables. Stir gently as the eggs begin to cook. This should take about three to five minutes. You want to form soft curds, not dry eggs. Keep an eye on them. When the eggs are nearly done but still fluffy, fold in one cup of drained black beans and one cup of halved cherry tomatoes. Mix gently and let them heat for two to three more minutes. This adds more flavor and texture to your filling. Grab four large flour tortillas. Place some of the egg and vegetable mixture in the center of each tortilla. Be generous! Top it with one cup of shredded cheddar cheese and some diced avocado. This makes each bite creamy and delicious. To wrap, fold the sides of the tortilla in first, then roll it from the bottom up. Make sure the filling stays inside. Now, return the skillet to medium heat. Place the wrapped burritos seam-side down in the skillet. Toast for about two to three minutes on each side until they turn golden brown and crispy. Now you have a tasty breakfast burrito ready to enjoy! For the full recipe, check out the details above. Achieving the Right Egg Consistency For the best texture, whisk the eggs well. This adds air and makes them fluffy. Cook the eggs on medium heat. Stir gently to form soft curds. Remove them from heat when they are still slightly runny. They will continue to cook after you take them off the stove. Getting a Golden Brown Exterior To achieve a perfect golden brown crust, use enough olive oil when toasting. Heat the skillet well before adding the burritos. Place them seam-side down first. Cook for 2-3 minutes on each side until crispy. This gives your burrito a nice crunch. Recommended Spices and Seasonings Spices boost the flavor of your burrito. I suggest using ground cumin and paprika for warmth. You can also try chili powder for extra heat. A pinch of salt and pepper enhances all the flavors. Additional Toppings to Consider Toppings can take your burrito to the next level. Fresh ingredients like diced avocado and cherry tomatoes add creaminess and brightness. You can also add sour cream or Greek yogurt for a tangy touch. Don't forget chopped cilantro for a fresh finish. Pairing Ideas with Salsa Salsa is a perfect side. It adds spice and freshness. I love to use a fresh pico de gallo or a smooth salsa verde. Either choice adds a burst of flavor that complements the burrito well. Presentation Tips To make your dish look great, cut the burrito in half diagonally. This shows off the colorful filling. Serve it on a plate with a scoop of salsa on the side. Garnish with a sprinkle of cilantro for a pop of color. If you want to try making these delightful burritos, check out the Full Recipe for all the details! {{image_2}} For a tasty vegetarian burrito, you can use a mix of fresh vegetables. Try adding spinach, zucchini, or mushrooms. These veggies add great flavor and color to the filling. You could even toss in some sweet corn for a touch of sweetness. When it comes to protein, beans are a great choice. You can use black beans, pinto beans, or chickpeas. They provide a hearty texture and boost the protein level. Tofu is another option. It absorbs flavors well and can be cooked until golden. If you enjoy meat, bacon or sausage brings great flavor to your burrito. Cook the bacon until crisp and crumble it into the egg mixture. For sausage, cook it in the skillet first. Then add the eggs and veggies. This makes the filling rich and savory. For chicken or beef burritos, use cooked shredded chicken or ground beef. Season them with spices that match the burrito flavor. You can even use leftover grilled meats for a quick and tasty meal. If you need a gluten-free option, look for gluten-free tortillas. Many brands offer tasty alternatives made from rice or corn. These work well for wraps and taste great. For low-carb options, try using lettuce leaves instead of tortillas. This gives you a fresh crunch and cuts down on carbs. You can wrap the filling in large leaves, like romaine or butter lettuce. This is a fun and light way to enjoy your burrito! These variations let you create a breakfast burrito that suits your taste and diet. You can explore different flavors and make it your own! Check out the Full Recipe for more ideas on making these delicious burritos. To keep your burritos fresh, store them right away. Wrap each burrito in plastic wrap or foil. Place them in an airtight container. - Refrigeration Guidelines: You can store burritos in the fridge for up to three days. Make sure they cool to room temperature before storing. This helps prevent sogginess. - Freezing Burritos for Later: For longer storage, freeze the burritos. Wrap them tightly in plastic wrap and then foil. Label them with the date. They can last up to three months in the freezer. To enjoy your leftovers, you’ll need to reheat them well. - Best Methods for Softness: The microwave is quick and easy. Unwrap the burrito and place it on a plate. Heat for 1-2 minutes, flipping halfway. For a crispier option, use an oven or skillet. Preheat the oven to 350°F (175°C) and bake for 15-20 minutes. - Avoiding Sogginess: If using a microwave, cover the burrito with a damp paper towel. This keeps moisture in but avoids sogginess. If you use a skillet, keep the heat moderate. This helps the outside stay crispy while heating the inside. For the full recipe, check out the Savory Breakfast Burritos. You can use corn tortillas if you want a gluten-free option. They are smaller, but they hold up well. You can also try whole wheat tortillas for a healthier choice. Lettuce wraps are great for low-carb diets. Yes, you can make burritos ahead of time. Just prepare the filling and wrap them in tortillas. Then, store them in the fridge for up to three days. You can also freeze them for up to three months. Just let them cool completely before wrapping. To make burritos spicy, add jalapeños or diced green chilies to the filling. You can also use spicy salsa or hot sauce when serving. For an extra kick, sprinkle in some cayenne pepper or crushed red pepper flakes during cooking. Many fillings work well in burritos. You can use cooked chicken, beef, or pork for protein. Try sautéed mushrooms, zucchini, or spinach for added veggies. Cheese types like pepper jack or feta can also add great flavor. Yes, you can bake burritos instead of toasting them. Preheat your oven to 375°F (190°C). Place the wrapped burritos seam-side down on a baking sheet. Bake for about 20 minutes until they are golden brown and hot. This method is great for making multiple burritos at once. For the full recipe, check out the Savory Breakfast Burritos section. You’ve learned how to make delicious burritos packed with tasty ingredients. We covered everything from the filling to wrapping techniques. Don’t forget to explore variations to fit your taste and dietary needs. With the tips provided, you can enjoy perfect burritos every time. Have fun with different flavors! Try new ingredients and impress your friends and family. Happy cooking, and enjoy your culinary creations!

Savory Breakfast Burritos Easy and Flavorful Recipe

Breakfast should be exciting, and savory breakfast burritos are the perfect way to start your day! In just a few

- 2 slices of sourdough bread - 1 ripe avocado - 2 large eggs - 1 tablespoon lemon juice - 1 teaspoon chili flakes - 1 tablespoon olive oil - Salt and pepper to taste - Fresh microgreens or herbs (like cilantro or basil) Creating this dish is simple yet rewarding. First, I choose fresh sourdough bread. It gives a perfect crunch and a nice base. The avocado should be ripe but not too soft. This ensures a creamy texture without being mushy. For flavor, I always add a splash of lemon juice. It brightens up the dish and keeps the avocado green. A sprinkle of chili flakes adds a gentle heat that contrasts with the smooth avocado. I finish it with olive oil, salt, and pepper for a balanced taste. Don't forget the garnishes! Fresh microgreens or herbs can elevate the dish. They add a pop of color and freshness. This recipe is not just about taste; it's about presentation too. You can find the full recipe linked above to guide you through each step. Enjoy making this delightful meal! - Toast the sourdough bread: Start by toasting two slices of sourdough. Toast them until they are golden brown and crispy. This gives a crunchy base for your dish. - Mash the avocado with seasoning: While the bread toasts, cut a ripe avocado in half. Take out the pit and scoop the green flesh into a bowl. Add one tablespoon of lemon juice, salt, and pepper to taste. Use a fork to mash the avocado lightly. You want it creamy but still chunky. - Instructions for creating a whirlpool: Fill a saucepan with about three inches of water. Bring it to a gentle simmer on the stove. Crack one egg into a small bowl. Stir the simmering water to create a gentle whirlpool. This will help the egg white wrap around the yolk. - Timing for achieving the perfect runny yolk: Gently slide the egg into the center of the whirlpool. Poach it for about three to four minutes. This time gives you a nice runny yolk. Use a slotted spoon to remove it from the water and set it on a plate. Repeat for the second egg. - Spreading avocado on toast: Once the bread is toasted, take each slice and spread a generous amount of mashed avocado on top. Make sure to cover the bread well. - Drizzling olive oil and adding chili flakes: Take one tablespoon of olive oil and drizzle it over the avocado. Sprinkle one teaspoon of chili flakes on top for a bit of heat. - Adding the poached egg and garnishing: Carefully place one poached egg on each slice of avocado toast. If you like, add more salt and pepper to taste. Finish with a sprinkle of fresh microgreens or herbs. This adds color and freshness to your dish. For the full recipe, check the details above! To make a perfect poached egg, start with fresh eggs. Fresh eggs hold their shape better. Here are some best practices: - Use a small pot with about three inches of water. - Heat the water until it's just simmering, not boiling. - Crack the egg into a bowl before adding it to the water. - Create a gentle whirlpool with a spoon before sliding in the egg. Common mistakes include using boiling water or not using fresh eggs. Boiling water can make the egg break apart. If the egg spreads too much, it won't look nice on your toast. To boost the flavor of your avocado toast, try these seasonings: - A pinch of salt and freshly cracked pepper - A squeeze of lemon juice for brightness - Chili flakes for a bit of heat You can also add creative toppings like: - Feta cheese for a salty bite - Sliced radishes for crunch - A drizzle of balsamic glaze for sweetness To make your dish look stunning, focus on plating: - Use a vibrant plate to make the colors pop. - Place the avocado toast slightly off-center for a casual look. - Top the poached egg with fresh microgreens or herbs. For complementary sides, consider serving: - A small fruit salad for freshness - A light green salad to balance the meal For more details, check the Full Recipe. {{image_2}} For a lighter take on avocado toast, consider using whole grain or gluten-free bread. These options pack more fiber and nutrients. You can also add toppings like sliced tomatoes or radishes for extra crunch. If you're watching your fat intake, try a low-fat Greek yogurt instead of an egg. It adds creaminess without the extra calories. To switch things up, try a Mediterranean twist. Add crumbled feta and sliced olives on top of your avocado spread. This mix gives a salty burst of flavor. If you love heat, drizzle sriracha or add sliced jalapeños. These will spice up your toast and take it to another level. Fresh herbs can brighten your dish. Try adding basil or cilantro for a pop of flavor. You can also toss in seasonal veggies like arugula or spinach. For a sweet touch, consider thinly sliced strawberries or peaches when they’re in season. These fruits add a delightful contrast to the creamy avocado. For the full recipe, check the details above. To keep your avocado fresh, store it in an airtight container. Always add a splash of lemon juice. This helps slow down browning. You can keep mashed avocado in the fridge for up to two days. For reheating toast, use a toaster or oven. This keeps it crispy. Avoid microwaving, as it can make the bread soggy. For the poached eggs, gently warm them in hot water. Serve the leftovers with fresh herbs for added flavor. When it comes to food safety, always check the eggs. Ensure they are fresh and stored in the fridge. Avocado should also be ripe but not overripe. Discard any avocado that looks brown or mushy. Follow these steps to enjoy safe and tasty meals! You can poach eggs without vinegar by using a few different methods. One option is to use a non-stick pan and plenty of water. Heat the water to a gentle simmer. Create a whirlpool, then add the egg. This helps keep the egg white together. Another method is to use silicone molds. Place the molds in simmering water and crack the eggs inside. This helps the eggs hold their shape. Yes, you can make avocado toast ahead of time, but it’s best to prep wisely. Toast your bread and prepare the avocado mixture separately. Store the avocado in an airtight container. Add lemon juice to slow browning. Assemble the toast just before serving to keep it fresh and tasty. Sourdough bread is a top choice for avocado toast. Its crusty outside and soft inside make a great base. Whole grain bread adds fiber and flavor. You can also try rye or gluten-free bread if you prefer. Choose a bread that you enjoy for the best taste. To keep your avocado fresh, add lemon or lime juice right after cutting. The acid slows down browning. Store the avocado in an airtight container. You can also place the pit in the container with the avocado. This can help keep it green longer. If you cover it with plastic wrap, press it tightly against the surface. Avocado toast with a poached egg is simple but delicious. We explored ingredients, from ripe avocados to sourdough bread. You learned steps for perfect poached eggs and creative ways to enhance flavor. Remember, mastering techniques and presentation makes your dish shine. Try different toppings and seasonal ingredients to keep it fresh. Enjoy your tasty creation, and don’t forget to share your twists with others!

Savory Avocado Toast with Poached Egg Delight

Looking for a hearty yet simple meal? This Savory Avocado Toast with Poached Egg Delight is just what you need!

- 1 can (15 oz) chickpeas, drained and rinsed - 2 tablespoons olive oil - 1 teaspoon garlic powder - 1 teaspoon smoked paprika - 1/2 teaspoon cayenne pepper (adjust to taste) - 1 teaspoon sea salt - 1/2 teaspoon black pepper - 1 teaspoon lemon zest To make spicy garlic roasted chickpeas, you need a few key items. First, get a can of chickpeas. They are the main star of this snack. You will also need olive oil to help the spices stick and add flavor. Next, gather the spices and seasonings. Garlic powder gives a great taste. Smoked paprika adds a nice depth. Adjust the cayenne pepper for heat based on your preference. Sea salt and black pepper will enhance the overall flavor. Finally, lemon zest brings a fresh kick that ties it all together. - Fresh parsley - Lemon wedges For garnishes, I recommend using fresh parsley. It adds color and brightness to the dish. Lemon wedges also make a great addition. They can add a zesty squeeze right before eating. These small touches can elevate your snack and make it look even more appealing. You can find the full recipe in the earlier part of this article. Rinsing and drying the chickpeas is very important. This step removes the canning liquid and makes them less soggy. Proper drying helps them get that great crunch. After rinsing, pat them dry using a paper towel. You want to absorb as much moisture as possible. Next, it's time to season. In a large bowl, mix the dried chickpeas with olive oil, garlic powder, smoked paprika, cayenne pepper, sea salt, and black pepper. Make sure every chickpea gets coated well. This mix gives your snack a burst of flavor. Preheat your oven to 400°F (200°C). This is key for cooking them evenly. A hot oven helps create a crunchy texture that you will love. While the oven heats, spread the seasoned chickpeas on a baking sheet. Use parchment paper to help with easy cleanup. Make sure the chickpeas are in a single layer. If they are piled on top of each other, they won’t roast well. Even spreading allows for proper air circulation and crispiness. Roast the chickpeas in the preheated oven for 25-30 minutes. This time frame is perfect for getting them golden and crunchy. Halfway through roasting, give the pan a shake. This helps them cook evenly and prevents sticking. When they look golden brown, take them out. Right after roasting, sprinkle lemon zest on top. This adds a fresh zing that wakes up the flavors. Let them cool for a few minutes before serving. Enjoy your spicy garlic roasted chickpeas as a tasty snack or a crunchy salad topping. To make your spicy garlic roasted chickpeas crunchy, start by drying them well. After rinsing the chickpeas, spread them on a clean kitchen towel. Pat them gently with another towel. Make sure they are as dry as possible. This step is key for crispiness. Common mistakes include not drying the chickpeas enough. If they are wet, they won't crisp up. Another mistake is overcrowding the baking sheet. Spread them out in a single layer. This ensures even roasting and helps them become golden and crunchy. Enhancing flavor is easy. You can try adding different spices. For example, cumin adds warmth. Curry powder gives a unique twist. If you want more heat, add more cayenne pepper or some chili powder. Adjusting heat levels can change the dish. If you like it mild, cut back on spicy ingredients. For those who love heat, double the cayenne. Taste as you go to find the perfect balance for your palate. Serving your spicy garlic roasted chickpeas can be fun. Use a bright bowl or a stylish platter. Garnish with fresh parsley to add color. Lemon wedges on the side also brighten up the dish. For a fun twist, consider serving them as a topping. They make a great crunchy addition to salads. Just sprinkle them on top for extra flavor and texture. Enjoy these tasty bites while sharing with friends or family! {{image_2}} You can change the flavor of roasted chickpeas easily. Try different spice blends for fun. For a sweet twist, add cinnamon and a bit of sugar. If you like a kick, mix in chili powder or curry powder. Want a cheesy touch? Sprinkle in some grated Parmesan cheese after roasting. Nuts, like almonds or walnuts, add crunch and flavor too. Roasted chickpeas fit many diets. They are vegan, so you can enjoy them without worry. If you want a gluten-free snack, these fit the bill perfectly. Just check your spices to make sure they are gluten-free. You can replace olive oil with coconut oil for a different taste if you prefer. When it comes to drinks, pair your spicy garlic roasted chickpeas with a light beer or sparkling water. Both help balance the spice. For a tasty meal, serve them with a fresh salad or your favorite dip, like hummus or yogurt sauce. They make a great crunchy topping too! For the full recipe, check out Spicy Garlic Roasted Chickpeas. After making spicy garlic roasted chickpeas, let them cool down. Use an airtight container to keep them fresh. Glass or plastic containers work well. Store them in a cool, dry place. Keep them away from heat and moisture. This helps maintain their crunchy texture. To reheat, use the oven or an air fryer. Preheat your oven to 350°F (175°C). Spread them out on a baking sheet. Heat for about 10 minutes. This keeps them crispy. If using an air fryer, heat at 325°F (160°C) for 5-7 minutes. Yes, you can freeze roasted chickpeas. Place them in a freezer-safe bag. Remove as much air as possible. They can last up to three months in the freezer. To thaw, leave them in the fridge overnight. For quick thawing, use the microwave. Once thawed, reheat them using the methods above to regain their crunch. Enjoy your flavorful snack anytime! Roasted chickpeas can last up to one week. Store them in an airtight container. Keep them in a cool, dry place. They may lose crispiness over time. For the best taste, enjoy them fresh! Yes, you can use dried chickpeas. However, you need to soak and cook them first. Soak them overnight in water. Then, boil them until soft. After that, you can follow the same steps for roasting. If your chickpeas are too soft, they may not crisp well. Ensure you dry them completely after rinsing. You can also roast them longer. Check them every few minutes to avoid burning. Yes, roasted chickpeas are a healthy snack. They are high in protein and fiber. They also provide essential vitamins and minerals. This makes them a great alternative to chips or crackers. Enjoy them guilt-free! Roasted chickpeas are a tasty and healthy snack. We covered everything from essential ingredients to easy cooking steps. Remember to rinse and dry the chickpeas for a crisp finish. Try different spices for fun flavor twists, and don't forget to serve with garnishes like parsley or lemon wedges. You can even freeze them for later! Enjoy exploring the many ways to make roasted chickpeas your go-to snack.

Spicy Garlic Roasted Chickpeas Crunchy Snack Idea

Looking for a snack that’s both crunchy and packed with flavor? Try my Spicy Garlic Roasted Chickpeas! These little bites

To make a tasty Instant Pot Beef Stroganoff, you need these simple ingredients: - 1 lb (450g) beef sirloin or flank steak, sliced into thin strips - 1 medium onion, diced - 2 cloves garlic, minced - 8 oz (225g) mushrooms, sliced - 1 cup beef broth - 1 tablespoon Worcestershire sauce - 1 teaspoon dried thyme - 1 teaspoon paprika - Salt and pepper to taste - 1 cup sour cream - 2 tablespoons olive oil - 12 oz (340g) egg noodles - Fresh parsley for garnish You can easily swap some ingredients for what you have on hand. For example, if you don’t have beef broth, chicken broth works too. If you want a lighter dish, use chicken or turkey instead of beef. You can also use different types of mushrooms, like cremini or button mushrooms. If you want to make it dairy-free, try using a vegan sour cream. Using fresh and high-quality ingredients makes a big difference in flavor. Fresh beef gives a rich taste that frozen meat can lack. Fresh mushrooms add a nice texture and umami flavor. Also, fresh herbs like parsley brighten up the dish. When you use great ingredients, you elevate the taste of your meal. It shows in every bite! To start, gather your ingredients. This will help you stay organized. First, set your Instant Pot to 'Sauté' mode. Add 2 tablespoons of olive oil. Once hot, add 1 pound of sliced beef sirloin. Season it with salt and pepper. Brown the beef for about 3-4 minutes. Then, remove the beef and set it aside. Next, add 1 medium diced onion to the pot. Sauté it until it turns translucent, about 3 minutes. Then, add 2 minced garlic cloves and 8 ounces of sliced mushrooms. Cook them for another 3-4 minutes until the mushrooms soften. Now, it’s time to deglaze the pot. Pour in 1 cup of beef broth and 1 tablespoon of Worcestershire sauce. Use a wooden spoon to scrape the bottom of the pot. This helps lift all the tasty bits stuck there. Return the browned beef to the pot. Stir in 1 teaspoon of dried thyme, 1 teaspoon of paprika, and more salt and pepper if you wish. Place 12 ounces of egg noodles on top of the beef mixture. Do not stir. Secure the lid on your Instant Pot and set the valve to 'Sealing.' Select 'Manual' or 'Pressure Cook' and set it for 7 minutes. Using the Instant Pot can be easy. To ensure great results, always follow these tips: - Prep Ahead: Measure and cut your ingredients before you start cooking. - Avoid Overfilling: Do not exceed the max fill line. This helps prevent spills. - Use Natural Release for Delicate Foods: For dishes with dairy, let pressure release naturally to avoid curdling. - Clean the Seal: Regularly check the sealing ring for food particles. This keeps your pot working well. For this beef stroganoff, timing is key. After you set the pot for 7 minutes, pay attention to the pressure release. A quick release works best here. Once you open the lid, stir in 1 cup of sour cream. If the sauce is thick, add a little more broth or water. Watch for the noodles; they should be tender but not mushy. Your stroganoff is ready when it is creamy and flavorful. Adjust the seasoning to your taste, and enjoy this comforting meal! For the full recipe, check the details above. To make a great beef stroganoff, start with good meat. I like using beef sirloin or flank steak. Slice it thin for quick cooking. Here are my tips: - Searing the Beef: Sear the beef in the Instant Pot on 'Sauté' mode. This builds flavor. - Cook Onions First: Cook the onions until they are soft. This adds sweetness to your dish. - Layer the Ingredients: Add the egg noodles on top of the beef. Do not stir. This helps them cook evenly. Here are some common errors that can ruin your beef stroganoff: - Overcooking the Meat: Don't cook the beef too long in the pot. It can get tough. - Skipping the Deglazing: Always deglaze the pot. This removes burnt bits and keeps the sauce tasty. - Too Thick of a Sauce: If your sauce is too thick, add more broth or water. Stir until smooth. Want to add more flavor? Try these tips: - Use Fresh Herbs: Fresh parsley on top makes a big difference. It adds color and taste. - Add a Splash of Wine: A little white wine can boost the flavor. Add it during deglazing. - Try Different Mushrooms: Use cremini or shiitake mushrooms for a richer taste. For the full recipe and detailed instructions, check out the [Full Recipe]. {{image_2}} You can give your beef stroganoff a twist by adding more mushrooms. This creamy mushroom version is rich and full of flavor. Just add an extra cup of sliced mushrooms to the recipe. Cook them with the onions and garlic for a deeper taste. The mushrooms soak up the broth, making every bite delicious. Want to make it heartier? Toss in some vegetables like peas, carrots, or spinach. Simply add them in with the beef before pressure cooking. You can also swap the beef for chicken or turkey for a lighter meal. Just adjust the cooking time if you change the protein. If you're avoiding gluten, use gluten-free noodles or skip them altogether. You can serve the beef and sauce over zucchini noodles or cauliflower rice. For a low-carb version, just stick to the beef and sauce. This way, you keep all the flavors without the extra carbs. For all these variations, you can still follow the full recipe to keep your dish tasty and fun! After enjoying your Instant Pot Beef Stroganoff, store leftovers in an airtight container. Let the dish cool to room temperature before sealing. This prevents moisture buildup and keeps flavors intact. Leftovers can stay fresh in the fridge for up to three days. Make sure to label the container with the date, so you know when to use them. To reheat, place your Beef Stroganoff in a pot over low heat on the stove. Stir gently to avoid sticking. Add a splash of broth or water if the sauce seems thick. Heat until warm throughout. You can also use the microwave. Place in a microwave-safe dish, cover loosely, and heat in 30-second intervals, stirring in between. This ensures even heating without drying it out. Freezing Beef Stroganoff is an option if you want to save some for later. First, let it cool completely. Then, transfer the stroganoff to a freezer-safe container. You can also use freezer bags. Remove as much air as possible before sealing. Label with the date and store in the freezer for up to three months. For best results, thaw overnight in the fridge before reheating. Making Instant Pot Beef Stroganoff takes about 45 minutes total. You need 15 minutes for prep. The cooking time under pressure is only 7 minutes. This quick method makes it easy to enjoy a hearty meal without spending all day in the kitchen. Yes, you can use other cuts of beef. Flank steak and chuck roast work well too. Just remember that cooking times might vary slightly. Leaner cuts may cook faster, while tougher cuts might need a bit longer to become tender. Always cut the beef into thin strips for best results. Beef Stroganoff pairs well with many sides. Here are some great options: - Egg noodles (the classic choice) - Rice for a hearty base - Mashed potatoes for creamy comfort - Steamed vegetables for a fresh touch - Crusty bread to soak up the sauce These sides will balance the rich flavors of the stroganoff. For the full recipe, check out the [Full Recipe]. You now know how to make Instant Pot Beef Stroganoff. Start with good ingredients for better taste. Follow the step-by-step guide for easy cooking. Use my tips to avoid mistakes and enhance flavors. Try the fun variations to mix things up. Store leftovers properly to enjoy later. When you keep these points in mind, you will make delicious meals. Enjoy your cooking adventure!

Instant Pot Beef Stroganoff Quick and Flavorful Recipe

Looking for a quick and tasty dinner? You’ll love my Instant Pot Beef Stroganoff recipe! It’s packed with flavor and

For a great chocolate chip cookie skillet, you need some key ingredients. Here’s what to gather: - 1 cup unsalted butter, softened - 1 cup brown sugar, packed - 1/2 cup granulated sugar - 2 large eggs - 2 teaspoons vanilla extract - 3 cups all-purpose flour - 1 teaspoon baking soda - 1/2 teaspoon salt - 2 cups semi-sweet chocolate chips These ingredients create a rich, gooey cookie that melts in your mouth. The butter and sugars give it a soft texture, while the chocolate chips add that famous sweet touch. You can enhance your cookie skillet with some optional ingredients. They add a twist to the classic flavor: - 1/2 cup chopped walnuts (optional) Adding walnuts gives a nice crunch and a hint of nuttiness. If you don’t like nuts, feel free to skip them. To make this delicious dessert, you will need the right tools. Here’s what you'll need: - A large mixing bowl - A whisk or electric mixer - A 10-inch cast-iron skillet or any oven-safe skillet - Measuring cups and spoons - A spatula for mixing Having the right equipment helps you mix well and bake evenly. You’ll be ready to create this delightful treat in no time! For the full recipe, check the details above. Start by gathering your ingredients. You need: - 1 cup unsalted butter, softened - 1 cup brown sugar, packed - 1/2 cup granulated sugar - 2 large eggs - 2 teaspoons vanilla extract - 3 cups all-purpose flour - 1 teaspoon baking soda - 1/2 teaspoon salt - 2 cups semi-sweet chocolate chips - 1/2 cup chopped walnuts (optional) Make sure your butter is soft. This helps it mix better. Measure your sugars and eggs. It’s best to have everything ready before you start. 1. Preheat your oven to 350°F (175°C). This step is key. 2. In a large bowl, cream the butter, brown sugar, and granulated sugar. Mix until it’s light and fluffy. This takes about 2-3 minutes. 3. Add the eggs, one at a time. Mix well after each egg. Stir in the vanilla extract. 4. In another bowl, whisk the flour, baking soda, and salt together. 5. Gradually add the dry mix to the wet mix. Stir until just combined. Be careful not to overmix. 6. Fold in the chocolate chips and walnuts if you are using them. Now pour the cookie dough into a 10-inch cast-iron skillet. Spread it evenly across the bottom. Bake your cookie skillet in the preheated oven for 25-30 minutes. Keep an eye on it. The edges should be golden brown. The center should be set but still soft. Once baked, remove it from the oven. Let it cool for 10-15 minutes before serving. Enjoy this treat warm! For the full recipe, check out the section above. To get the best texture, you need to cream the butter and sugars well. Aim for a light and fluffy mix. This step adds air, making your cookie soft. Once you add the eggs, mix just enough to blend. Overmixing can make your cookie tough. When adding flour, do it slowly. This helps keep your cookie soft and chewy. Serve your skillet warm. It tastes best fresh from the oven. I love adding a scoop of vanilla ice cream on top. The hot cookie and cold ice cream create a great mix. You can also drizzle some chocolate sauce over it. For a twist, sprinkle a bit of sea salt on top. This gives a sweet and salty flavor that is amazing. One big mistake is overbaking the cookie. Keep an eye on it while it bakes. The edges should be golden, but the center must remain soft. Another common error is not using enough butter. Butter adds richness and flavor to your cookie. Lastly, don't skip the resting time after baking. Let it cool for about 10-15 minutes. This helps the cookie set and makes it easier to cut. For the full recipe, check out the details above! {{image_2}} You can make a gluten-free version of this dish. Use a gluten-free flour blend instead of all-purpose flour. Look for blends that have xanthan gum. This will help the cookies hold together. Follow the same steps as the original recipe. You will still get a soft and chewy cookie skillet. To make a vegan version, swap out the eggs for flaxseed meal. Mix one tablespoon of flaxseed meal with three tablespoons of water. Let it sit for five minutes to thicken. Use coconut oil instead of butter and dairy-free chocolate chips. This will keep the cookie rich and tasty without animal products. You can add fun flavors to your cookie skillet. Try mixing in some chopped nuts like pecans or almonds. You can also add dried fruit like cranberries or raisins for a chewy twist. For a spicy kick, add a pinch of cinnamon or a dash of espresso powder. These small changes can make your dessert even more fun! For the full recipe, check the section above. Enjoy making these variations! Store leftover chocolate chip cookie skillet in an airtight container. Let it cool first. Keep it at room temperature for up to two days. If you want to keep it longer, place it in the fridge. It can last up to a week this way. To reheat, preheat your oven to 350°F (175°C). Place the skillet in the oven for about 10 minutes. This warms it through and keeps it soft. You can also use the microwave. Heat for 20-30 seconds, but it might not be as good. If you want to freeze it, cut the cookie into squares. Wrap each piece in plastic wrap. Then, place them in a freezer-safe bag. It can last up to three months in the freezer. When ready to eat, thaw in the fridge overnight before reheating. Enjoy the sweet flavors again! You can tell the cookie skillet is done when the edges turn golden brown. The center should still look soft but not gooey. Insert a toothpick in the middle; it should come out clean or with just a few crumbs. Keep an eye on it during the last few minutes. You want a nice balance between a chewy center and crisp edges. Yes, you can prepare the cookie dough ahead of time. Simply mix all the ingredients and place the dough in the skillet. Cover it with plastic wrap and store it in the fridge for up to 24 hours. When you're ready to bake, let it sit for about 10 minutes at room temperature before placing it in the oven. This helps with even baking. Serving options are endless! A scoop of vanilla ice cream on top is a must. You can also drizzle some chocolate sauce or caramel over it for extra flavor. Fresh berries or a sprinkle of sea salt can add a nice touch too. For a fun twist, serve with whipped cream or chopped nuts. Enjoy it warm right from the skillet! In this post, I shared a fun way to make a chocolate chip cookie skillet. We covered key ingredients, step-by-step instructions, and helpful tips. Variations like gluten-free and vegan options were included to suit different needs. Remember to store your leftovers right and reheat them for the best taste. Baking this skillet is easy and enjoyable. With these tips, you can create a treat that everyone will love. Give it a try, and enjoy your delicious creation!

Chocolate Chip Cookie Skillet Delightful Dessert Recipe

Craving something sweet? You’re in the right place! My Chocolate Chip Cookie Skillet recipe offers the warm, gooey goodness you

- 1 pound chicken breast, sliced into thin strips - 3 types of bell peppers (red, yellow, green) - 1 red onion, sliced For this dish, you will need fresh chicken and colorful veggies. I love using three bell peppers for their sweet taste and bright colors. The red onion adds a nice bite. When you mix these ingredients, you get a feast for your eyes and stomach! - Chili powder - Cumin - Smoked paprika - Garlic powder - Onion powder - Salt and black pepper to taste Spices make this meal pop! Chili powder adds heat, while cumin and smoked paprika offer deep flavor. Garlic and onion powder give it a savory touch. Don’t forget to season with salt and pepper to make it all come together. - Sour cream - Guacamole - Salsa - Fresh cilantro - Lime wedges Toppings can make your fajitas even better! A dollop of sour cream cools the heat. Guacamole adds creaminess, and salsa brings freshness. A sprinkle of cilantro brightens the dish, and a squeeze of lime gives it a zing. You can find the full recipe above to guide you through this delicious meal. - Preheat your oven to 425°F (220°C). - In a large bowl, combine the sliced chicken, red, yellow, and green bell peppers, along with the red onion. - Drizzle olive oil over the chicken and vegetables. - Add chili powder, cumin, smoked paprika, garlic powder, onion powder, salt, and black pepper. - Toss everything together until well coated. - Spread the mixture evenly on a parchment-lined sheet pan. - Bake for 20-25 minutes. Stir halfway through for even cooking. This simple process gives you a vibrant dish full of flavor. For the full recipe, check out the details above! To get the best texture in your sheet pan fajitas, set your oven to 425°F (220°C). This temperature cooks the chicken and veggies just right. Stir the mix halfway through cooking. This step helps everything cook evenly and prevents burning. You can switch up the protein in your fajitas. Try beef, shrimp, or tofu. Each choice brings a unique taste. You can also add more veggies like zucchini, mushrooms, or corn. These additions can give your dish more color and flavor. There are many fun ways to serve your fajitas. You can let everyone build their own with tortillas and toppings. Some great toppings to try are sour cream, guacamole, and salsa. For sides, consider rice, beans, or a fresh salad. To drink, pair your fajitas with a cold beer or a fruity mocktail. {{image_2}} You can make delicious vegetarian fajitas! Just swap the chicken for plant-based proteins like tofu or tempeh. These options absorb flavors well and add great texture. I like to use extra vegetables like zucchini, mushrooms, or corn. They make the dish colorful and tasty! Do you want more heat? Add sliced jalapeños or your favorite hot sauce to the mix. Start with a small amount, then taste. You can always add more spice if needed. Adjust the heat to your liking, so everyone enjoys their meal. Want to try different flavors? Marinate the chicken ahead of time for extra taste. Use lime juice, soy sauce, or even teriyaki for a fun twist. Mix in fresh herbs like cilantro or basil to change the flavor profile. Each marinade gives your fajitas a unique flair. For the full recipe, check out the Sizzlin' Sheet Pan Fajitas section! To store your fajitas, use an airtight container. Place the chicken and veggies in the container and seal it well. This method keeps your meal fresh. You can refrigerate leftovers for up to three days. Make sure to let them cool down first before sealing. You can freeze the fajita mixture for later use. First, let the cooked fajitas cool completely. Then, place them in a freezer-safe bag. Squeeze out excess air to prevent freezer burn. You can freeze them for up to three months. When you are ready to eat, thaw the mixture in the fridge overnight. To reheat, the oven works best for texture. Preheat it to 350°F (175°C). Spread the fajitas on a baking sheet and warm for about 10-15 minutes. You can also use a microwave for quick reheating. Just place the mixture in a microwave-safe bowl and heat it for one minute. Stir and check if it’s hot enough. If not, heat for 30 more seconds. Use whichever method you prefer, but the oven gives better results. To boost the flavor of your fajitas, you can add a few simple tweaks. First, try marinating the chicken for a few hours. A mix of lime juice, olive oil, and spices works great. You can also add fresh herbs like cilantro or parsley. For more heat, toss in sliced jalapeños. Using fresh vegetables boosts taste too. Don't forget to season with salt and pepper well. This enhances all the flavors. Yes, you can prep the fajitas ahead of time! Slice the chicken and veggies a day before. Store them in an airtight container in the fridge. You can mix the spices in a separate bowl. Just combine everything when you’re ready to cook. If you have leftovers, keep them in the fridge for up to three days. Sheet pan fajitas pair well with many sides. Some great options include: - Mexican rice - Refried beans - Corn on the cob - A fresh green salad - Chips and salsa These sides add variety and make for a fun meal! This blog post shared a simple sheet pan fajitas recipe. You learned about the key ingredients, steps, and tips for cooking. I covered fun variations and smart storage ideas. You can easily make this dish your own, whether you prefer chicken, veggies, or spicy heat. Fajitas are great for meal prep, fun dinners, or a tasty snack. With its vibrant flavors and fresh options, fajitas can please anyone. Dive in and enjoy making this dish again and again!

Sheet Pan Fajitas Simple and Flavorful Meal Recipe

Looking for a quick, tasty meal that everyone will love? My Sheet Pan Fajitas recipe is your answer! With just

For a tasty quick veggie stir-fry, you need fresh vegetables. Here are my favorites: - 1 cup broccoli florets - 1 bell pepper (any color), sliced - 1 medium carrot, julienned - 1 cup snap peas - 1 small zucchini, sliced into half-moons - 1 cup baby corn, halved These veggies add color, crunch, and a lot of nutrients. You can mix and match based on what you enjoy or have on hand! To create flavor, you need the right oils and sauces. Here’s what you'll want: - 3 tablespoons vegetable oil - 2 tablespoons soy sauce (or tamari for gluten-free) - 1 tablespoon sesame oil - 1 teaspoon grated fresh ginger - 2 cloves garlic, minced These ingredients bring life to your stir-fry. The oils help with cooking, while the sauces add that savory kick. Garnishes can make your dish even better. Here are some ideas: - 1 tablespoon sesame seeds (optional) - Fresh herbs like cilantro or green onions Adding these at the end gives your dish a nice touch. You can also use what you have for more fun! Check the Full Recipe to see how everything comes together in this quick and easy meal. To start, gather your fresh veggies. You will need: - 1 cup broccoli florets - 1 bell pepper (any color), sliced - 1 medium carrot, julienned - 1 cup snap peas - 1 small zucchini, sliced into half-moons - 1 cup baby corn, halved Wash and chop all the vegetables. Cut them into bite-sized pieces. This helps them cook evenly. Now heat a large skillet or wok over medium-high heat. Add 3 tablespoons of vegetable oil. Once it’s hot, add 2 cloves of minced garlic and 1 teaspoon of grated fresh ginger. Sauté for about 30 seconds. You want to smell that lovely aroma. Next, toss in the broccoli and julienned carrot. Stir them for about 2 minutes. This step helps them soften. After that, add the bell pepper, snap peas, zucchini, and baby corn. Stir-fry for 3 to 4 minutes. You want the veggies to stay bright and crisp-tender. Pour in 2 tablespoons of soy sauce and 1 tablespoon of sesame oil. Toss everything together well. Cook for another minute. You want the sauce to coat all the veggies. Season with salt and pepper to taste. When everything looks good, remove the pan from heat. If you like, sprinkle 1 tablespoon of sesame seeds on top. Serve your quick veggie stir-fry hot over cooked rice or noodles. Enjoy your colorful and healthy meal! For the complete recipe, check out the [Full Recipe]. To get that great crunch in your stir-fry, choose fresh veggies. I love using broccoli, bell peppers, and snap peas. Cut them evenly. This helps them cook at the same pace. Always heat your oil before adding the veggies. This step locks in texture. Stir-fry over high heat. It should cook fast, keeping the veggies crisp. To boost flavor, add ginger and garlic early. They give a warm taste. Use soy sauce and sesame oil for a savory kick. You can try adding a splash of rice vinegar for tang. If you want spice, add red pepper flakes. This gives your dish some heat. You can also sprinkle sesame seeds on top for a nutty crunch. Prep your veggies before you cook. Wash and chop them all at once. Store them in clear bowls. This makes cooking fast and easy. You can also use pre-cut veggies from the store. They save time and still taste great. And remember, keep your cooking area clean. A tidy space helps you focus and enjoy your cooking. For the full recipe, check out the details above. {{image_2}} You can easily add proteins to your stir-fry. Chicken, beef, or shrimp work well. If you prefer plant-based options, tofu or tempeh are great choices. Just cut your protein into bite-sized pieces. Cook them in the pan first. Remove them before adding vegetables. This way, they stay juicy and tender. After cooking the veggies, mix everything back in. This makes your meal filling and tasty. Explore different sauces to change the flavor. You can use teriyaki sauce for a sweet touch. Hoisin sauce adds a unique twist. For spice lovers, try sriracha or chili paste. If you like a tangy taste, add a splash of rice vinegar. Each sauce brings its own flavor, so feel free to experiment. This keeps your stir-fry fresh and exciting every time. Use seasonal vegetables for the best taste. In spring, add asparagus or peas. Summer is perfect for bell peppers and eggplant. Fall brings squash and Brussels sprouts. In winter, you can use hearty greens like kale or Swiss chard. Each season gives you new colors and flavors. Mixing seasonal veggies keeps your dish vibrant and nutritious. Check local markets for fresh options every time you cook this quick veggie stir-fry. To keep your quick veggie stir-fry fresh, store it in an airtight container. Make sure it cools down first. This helps prevent steam from building up inside and making the veggies soggy. If you want to keep each type of vegetable crisp, you can separate them in the container. When you’re ready to eat, reheat your stir-fry in a skillet on medium heat. Add a splash of water or a bit of oil to help bring back moisture. Stir it often to heat evenly. You can also use the microwave if you're short on time. Just cover it loosely and heat in short bursts, stirring in between. Your veggie stir-fry lasts about 3 to 4 days in the fridge. After that, the veggies may lose their crunch and flavor. Always check for any signs of spoilage before eating. If you notice any off smells or textures, it's best to toss it out. Enjoy the flavors while they are fresh! I love using fresh, colorful veggies in a stir-fry. Here are my favorites: - Broccoli florets - Bell peppers (any color) - Carrots (julienned) - Snap peas - Zucchini (sliced) - Baby corn These veggies cook quickly and keep their crunch. You can mix and match as you like. Just remember to cut them into similar sizes. This helps them cook evenly and look pretty on your plate. Yes, you can! To make it gluten-free, use tamari instead of soy sauce. Tamari is a great option that tastes just as good. Always check labels on sauces for hidden gluten. Most fresh veggies are gluten-free, so you're good to go! To keep your veggies crisp, follow these tips: - Start with a hot pan. Heat your oil well before adding veggies. - Add harder vegetables first. Broccoli and carrots need more time to cook. - Stir-fry quickly. Do not let them sit too long. - Avoid overcrowding the pan. Cook in batches if needed. These steps will help keep your stir-fry vibrant and crunchy. For the full recipe, check the earlier section. Enjoy your cooking! This blog post explored how to make a delicious stir-fry using fresh vegetables, oils, and sauces. You learned about preparation, cooking techniques, and tips for perfect crispness. We also covered ways to vary your dish with proteins and seasonal veggies. Storage tips help you keep leftovers fresh, while FAQs answered common questions. In the end, stir-frying gives you a quick, tasty meal that you can customize to your liking. Enjoy your cooking journey!

Quick Veggie Stir-Fry Flavorful and Easy Recipe

Are you looking for a quick and tasty dish? My Quick Veggie Stir-Fry is packed with fresh flavors and easy

- 1 pound large shrimp, peeled and deveined - 3 tablespoons olive oil - 4 cloves garlic, minced - 1 lemon, zested and juiced - 1 teaspoon red pepper flakes - Salt and pepper, to taste - 1 cup cherry tomatoes, halved - 2 cups baby spinach - ½ cup fresh parsley, chopped - Cooked rice or quinoa, for serving For this One-Pan Lemon Garlic Shrimp, you need fresh ingredients. Start with large shrimp. They should be peeled and deveined. This makes cooking quick and easy. Use good quality olive oil for flavor. Garlic adds a strong aroma and taste. Mince it finely for even cooking. The lemon zest and juice provide a bright flavor that makes this dish pop. Next, prepare the extra ingredients. Red pepper flakes add a bit of heat. Adjust the amount to your liking. Don’t forget salt and pepper for basic seasoning. Cherry tomatoes give sweetness and color. Halve them for even cooking. Baby spinach adds nutrients and a nice green touch. Use fresh parsley for garnish. It brightens the dish. Serve your shrimp over cooked rice or quinoa. This soaks up all the lovely juices. For the full recipe, check the cooking instructions provided. - Heat the olive oil over medium heat. - Sauté garlic and red pepper flakes. Start by pouring the olive oil into a large skillet. Heat it on medium. Watch the oil shimmer. Next, add minced garlic and red pepper flakes. Sauté these for about one minute. This will make your kitchen smell amazing. Make sure to stir so the garlic does not brown. - Add shrimp and cook until pink. - Incorporate lemon zest and juice. Once the garlic is fragrant, raise the heat to medium-high. Now, add the shrimp to the skillet. Cook them for about two to three minutes. You want them to turn pink and opaque. Then, add lemon zest and juice. Sprinkle in salt and pepper to taste. Toss the shrimp well to coat them in the zesty sauce. - Add cherry tomatoes and spinach. - Toss everything together before serving. Next, throw in the halved cherry tomatoes. Cook for another two to three minutes. You want the tomatoes to soften a bit. After that, add the baby spinach. Stir and cook until the spinach wilts, which takes about one to two minutes. Remove the skillet from the heat. Toss everything together again for one last mix. Serve the shrimp mixture over cooked rice or quinoa for a complete meal. For the full recipe, check out the details above. To know when shrimp are done, watch for their color. They should turn pink and opaque. This usually takes 2-3 minutes on medium-high heat. If they curl into a tight shape, they are likely overcooked. Overcooked shrimp can become rubbery and tough. To avoid this, keep an eye on the time and check them frequently. You can substitute garlic with shallots for a milder taste. Adding fresh herbs like thyme or basil can also boost flavor. Always choose fresh lemons for the best taste. Look for firm lemons with smooth skin. The zest adds a bright touch, while the juice brings a refreshing tang. Remember, fresh ingredients make a big difference in your dish. For the full recipe, you can refer to the previous section. {{image_2}} You can switch the shrimp for chicken or scallops. Chicken breast works well in this dish. Simply cut it into bite-sized pieces. Cook it until golden brown and fully cooked. Scallops are another tasty option. They cook quickly and soak up the flavors nicely. For a vegan-friendly version, try using tofu or chickpeas. When using tofu, press it first to remove water. This helps it absorb the sauce better. You can add different vegetables to the dish for more color and taste. Bell peppers, zucchini, or broccoli are great choices. Just chop them into small pieces and add them to the skillet with the shrimp. You can also incorporate fresh herbs like basil or cilantro for added freshness. Toss them in right before serving to keep their bright flavor. Enjoy experimenting with these options to make the dish your own! For the full recipe, check out the detailed instructions. To keep your One-Pan Lemon Garlic Shrimp fresh, store it in an airtight container. Place the container in your fridge right after it cools. Make sure to eat it within three days for the best taste. If you want to save it longer, consider freezing it. Use freezer-safe bags or containers to avoid freezer burn. When you're ready to enjoy your leftovers, there are a few ways to reheat the shrimp. You can use a microwave, which is quick and easy. Place the shrimp in a bowl, cover it with a damp paper towel, and heat for one to two minutes. Stir halfway to ensure even heating. For a stovetop method, heat a skillet over low heat. Add a splash of water or broth to keep moisture. Add the shrimp and warm them gently. This will help keep your dish moist and flavorful. Always check to avoid overcooking. Enjoy your meal! For the full recipe, refer to the earlier section. You can serve One-Pan Lemon Garlic Shrimp with various sides. Here are some tasty options: - Cooked rice or quinoa for a filling base - Garlic bread to soak up the sauce - A fresh green salad for crunch - Steamed veggies like broccoli or asparagus - Lemon wedges for a citrusy kick These sides will complement the shrimp and enhance your meal. Yes, you can prep One-Pan Lemon Garlic Shrimp ahead of time. Here’s how: - Cook the shrimp and veggies, then store them in the fridge. - You can keep it in an airtight container for up to two days. - When ready to eat, reheat in a skillet over medium heat. - Add a splash of olive oil or lemon juice to keep it moist. This makes it easy for busy days or meal prep! Yes, One-Pan Lemon Garlic Shrimp is gluten-free! To keep it gluten-free, use: - Rice or quinoa, as both are naturally gluten-free. - Check any additional sauces or spices to ensure they are gluten-free. This dish is a great choice for those with gluten sensitivities. Enjoy your meal! This blog post covered a simple and tasty recipe for lemon garlic shrimp. You learned about the key ingredients, easy cooking steps, and tips for perfecting the dish. You can change proteins or add veggies for more variety. Storing leftovers and reheating is also easy. In short, this recipe is quick, healthy, and great for any meal. Enjoy the cooking process and have fun with your own flavors!

One-Pan Lemon Garlic Shrimp Easy and Tasty Meal

If you want a quick, tasty meal that impresses, you’ve found it! My One-Pan Lemon Garlic Shrimp is flavorful, easy

Older posts
Newer posts
← Previous Page1 … Page70 Page71 Page72 … Page75 Next →
© 2025 My Cooking Cast • Built with GeneratePress

Our Policies

  • Privacy Policy
  • GDPR Policy
  • Terms Of Use
  • Copyright Policy
  • Cookie Policy
  • Disclaimer

More Information​

  • Home
  • Contact
  • About
  • Dinner
  • Appetizers
  • Dessert
©2025, My Cooking Cast About Privacy Policy Back To Top