Skip to content
DisclaimerTerms Of UseGDPR PolicyCookie Policy

My Cooking Cast

  • Home
  • Drinks
  • Appetizers
  • Dinner
  • Dessert
  • About
  • Contact
  • Privacy Policy
DisclaimerTerms Of UseGDPR PolicyCookie Policy

Emma

To make Mango Coconut Chia Pudding, you will need: - 1 cup coconut milk (canned or carton) - 2 tablespoons chia seeds - 2 ripe mangoes (1 diced, 1 pureed) - 2 tablespoons honey or maple syrup (optional) - 1 teaspoon vanilla extract - A pinch of salt - Toasted coconut flakes for garnish - Fresh mint leaves for garnish You can swap coconut milk with almond milk or soy milk. If you want a nut-free option, try oat milk. For chia seeds, you can use flax seeds, but the texture will differ. Instead of honey, you may use agave syrup for a vegan version. You can skip the sweetener if your mangoes are sweet enough. - Coconut Milk: Rich in healthy fats, it boosts energy and supports heart health. - Chia Seeds: Packed with fiber, protein, and omega-3s, they aid digestion and keep you full. - Mangoes: High in vitamins A and C, they support eye health and boost immunity. - Honey/Maple Syrup: They provide natural sweetness and antioxidants, promoting overall health. - Vanilla Extract: Adds flavor and may help reduce stress. - Salt: Enhances flavor and balances sweetness. - Toasted Coconut Flakes: Add crunch and healthy fats, making the dish more enjoyable. - Fresh Mint Leaves: They add freshness and may aid digestion. For the full recipe, check out the complete instructions provided earlier. First, gather all your ingredients. You need coconut milk, chia seeds, mangoes, honey or maple syrup, vanilla extract, and salt. If you want to add a fun touch, grab some toasted coconut flakes and mint leaves for garnish. 1. Start by mixing the coconut milk and chia seeds in a bowl. 2. If you like sweetness, add honey or maple syrup, along with vanilla and salt. 3. Stir well to mix everything. This helps prevent the chia seeds from clumping together. 4. Let this mixture sit for about 5-10 minutes. Give it another stir to spread the seeds evenly. 5. Cover the bowl and place it in the fridge. Leave it there for at least 4 hours, or overnight. This time allows the chia seeds to swell and thicken the mix. 6. While waiting, prepare your mangoes. Peel and dice one mango into small cubes. Blend the second mango into a smooth puree. 7. When the chia pudding is ready, take it out of the fridge. Stir it again to ensure it is smooth. 8. In serving bowls or glasses, layer the chia pudding with the mango puree. Top it with the diced mango. 9. For a nice finish, sprinkle some toasted coconut flakes and add mint leaves on top. To get the right pudding texture, make sure to stir the chia mix well after it sits. This step ensures the seeds don’t clump and helps create a creamy texture. If you want a little more thickness, let it sit longer in the fridge. You can adjust the amount of chia seeds if needed. If you want it creamier, use less coconut milk. Enjoy your Mango Coconut Chia Pudding! For the full recipe, check the details above. One common mistake is not letting the chia seeds soak long enough. Chia seeds need time to absorb liquid and expand. If you skip this step, your pudding may be runny. Stirring the mixture again after a few minutes helps. This keeps the seeds from clumping together. Another mistake is using unripe mangoes. Choose ripe, sweet mangoes for the best flavor. They add natural sweetness to your pudding. Layering is key for a beautiful presentation. Start with a layer of chia pudding. Then, add a layer of pureed mango. This creates a nice contrast in color. Use clear glasses to show off the layers. After the pureed mango, add some diced mango. Finish with toasted coconut flakes on top. This adds crunch and visual appeal. Make sure to use a spoon to scoop from the bottom for every bite. You can enhance the flavor of your pudding with a few extras. Try adding a pinch of cinnamon for warmth. You might also use a splash of lime juice for brightness. If you like nuts, sprinkle some on top for added texture. A dollop of yogurt can add creaminess. Feel free to get creative with flavors that you love. Remember, the goal is to make it your own! For the full recipe, check out the instructions above. {{image_2}} You can switch up the mango for other fruits. Berries, like strawberries or blueberries, add a nice touch. Bananas bring a creamy texture. Pineapple gives a tropical twist. You can mix and match fruits to find your favorite combo. To make this pudding vegan, swap honey for maple syrup or agave nectar. You can also skip the sweetener altogether. The natural fruit flavors shine without added sugar. This keeps the pudding healthy and light. Try adding spices for a flavor boost. A pinch of cinnamon or nutmeg can add warmth. For a zesty kick, mix in some lime or lemon juice. You can also blend in a bit of cocoa powder for a chocolate twist. Each variation opens a new taste adventure! You can store leftovers in a sealed container. Make sure to keep it in the fridge. This helps maintain its fresh taste and texture. If you have any toppings, store them separately. This way, your chia pudding stays creamy. Mango Coconut Chia Pudding lasts about 3 to 5 days in the fridge. Keep an eye on it for any changes in smell or texture. If it starts to look or smell off, it's best to toss it. Enjoy it while it's fresh for the best flavor! You can freeze chia pudding for longer storage. Pour it into freezer-safe containers. Leave some space at the top for expansion. To thaw, move it to the fridge overnight. Stir well before serving. The texture may change slightly, but it will still taste great! For more details, check the Full Recipe. Yes, you can use different types of milk. Almond milk, oat milk, or soy milk work well. Each type adds its own flavor. Coconut milk gives a rich taste, but feel free to explore. Just make sure the milk is unsweetened for a healthier option. You can store this pudding in the fridge for up to five days. Keep it in an airtight container. This helps maintain its freshness. If you notice any separation, just stir it before eating. The flavor will still be great! Yes, this recipe is perfect for meal prep. You can make it ahead for busy mornings. Prepare several servings at once and store them in jars. Just grab one when you need a quick breakfast or snack. It’s easy to enjoy on the go! Absolutely! You can skip the sugar altogether. The ripe mangoes add natural sweetness. If you want a little extra, try using mashed banana or dates. These options keep it healthy while still tasting yummy. This article covered the key ingredients and their benefits for Mango Coconut Chia Pudding. We detailed the steps to prepare it with perfect consistency. I shared tips to avoid common mistakes and ways to enhance its flavor. You learned about variations and how to store leftovers effectively. In summary, this recipe is easy and fun. It offers many options to fit your taste and needs. Enjoy exploring new flavors and making it your own!

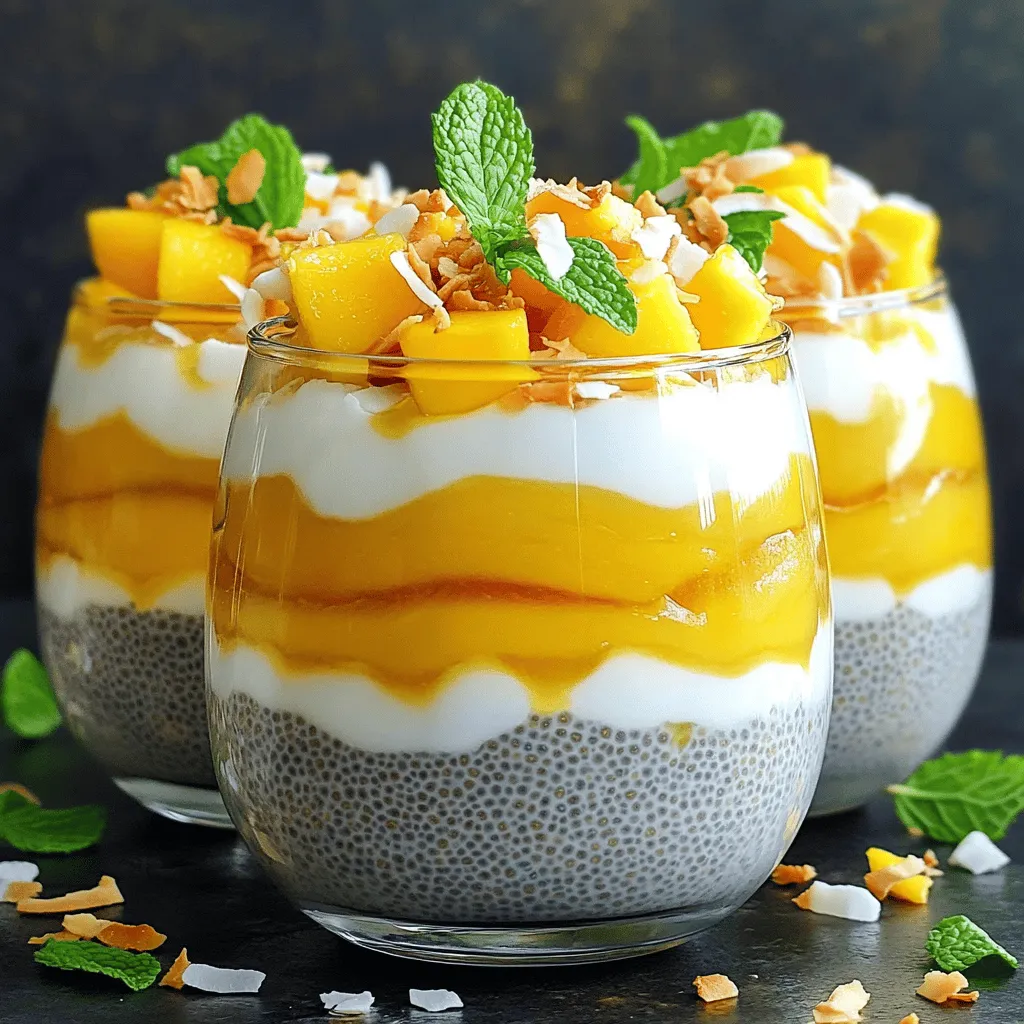
Mango Coconut Chia Pudding Simple Healthy Delight

Looking for a tasty yet healthy treat? Mango Coconut Chia Pudding is your answer! This simple recipe packs a punch

To make Lemon Garlic Butter Shrimp, you need some key ingredients. Here’s what you will need: - 1 pound large shrimp, peeled and deveined - 4 tablespoons unsalted butter - 4 cloves garlic, minced - 1 lemon, zested and juiced - 1 tablespoon fresh parsley, chopped - 1 teaspoon red pepper flakes (optional) - Salt and pepper to taste - Lemon wedges, for serving These ingredients create a bright and zesty flavor that makes this dish shine. Fresh shrimp is the star of the show, so choose large, plump shrimp for the best taste and texture. Having the right tools makes cooking a breeze. For this recipe, you will need: - A large skillet - A spatula or wooden spoon - A zester or grater for the lemon - A cutting board and knife for prep These tools help you cook efficiently and keep everything organized. A good skillet ensures even cooking and helps the shrimp get that nice sear. Sometimes, you may not have all the ingredients on hand. Here are some easy swaps: - Use olive oil instead of butter for a lighter option. - If you don’t have fresh parsley, try fresh cilantro or basil. - For a different flavor, swap lemon juice with lime juice. These substitutes can give you a new twist while keeping the essence of the dish. For full guidance on the recipe, check the Full Recipe section. To start, rinse the shrimp under cold water. I like to use cold water to keep them fresh. Next, pat the shrimp dry with paper towels. This step is key! It helps the shrimp get a nice sear. Now, season the shrimp with salt and pepper. Use just enough to enhance the flavor. Now, grab a large skillet. Melt four tablespoons of unsalted butter over medium heat. Watch closely as it starts to foam. You want it melted but not browned. Add four cloves of minced garlic to the skillet. Stir it for about one to two minutes. The garlic should smell amazing, but don’t let it burn. Next, add the shrimp to the skillet. Cook one side for two to three minutes. You’ll see the shrimp turn pink and opaque. Then, flip them over to the other side. Cook for another two to three minutes. The shrimp should be fully cooked and tender. After that, pour in the lemon juice and add the lemon zest. For some heat, sprinkle in red pepper flakes. Stir well to mix all the flavors. Finally, take the skillet off the heat. Toss in the fresh parsley and mix. Your Lemon Garlic Butter Shrimp is ready to serve! For the complete guidance, check the Full Recipe. When buying shrimp, look for a few key signs. The shrimp should smell like the ocean, not fishy. Choose shrimp that feel firm to the touch. Their shells should be shiny and clear. If you see black spots, skip those shrimp. Buy shrimp from a trusted source for the best quality. Always check the sell-by date to ensure freshness. To boost the taste of your lemon garlic butter shrimp, consider these tips. Add fresh herbs like basil or dill for a unique twist. A splash of white wine can deepen the flavor. For a spicy kick, increase the red pepper flakes. You can also squeeze more lemon juice for extra zest. Experimenting with flavors helps you find your favorite mix. Many people make simple mistakes when cooking shrimp. Overcooking shrimp makes them tough and rubbery. Always cook them just until they turn pink. Another mistake is not seasoning enough. Salt and pepper enhance the shrimp's natural flavor. Lastly, don’t rush the garlic. Burnt garlic can ruin your dish. Follow these tips for the best results. For the full scoop, check the Full Recipe. {{image_2}} If you love heat, add red pepper flakes. This spice lifts the dish. It gives the shrimp a nice kick. Start with one teaspoon; you can add more if you want. Mix the flakes in when you add the lemon juice. This spicy twist makes the shrimp even more tasty. You can add veggies to the shrimp. Bell peppers, zucchini, and spinach work well. Just chop them and add them after you sauté the garlic. Cook them for a few minutes until they are tender. This adds color and nutrition to the dish. Plus, it makes a great one-pan meal. To make this dish gluten-free, check your butter. Most butter is gluten-free, but some brands may add gluten. You can use olive oil instead of butter for a dairy-free option. The taste will still be great! Just follow the same steps in the Full Recipe to cook the shrimp. After enjoying your Lemon Garlic Butter Shrimp, let the leftovers cool. Place them in an airtight container. Store in the fridge for up to two days. Make sure to keep the shrimp dry to avoid sogginess. If you have extra sauce, store it separately to maintain flavor and texture. To reheat, use a skillet over medium heat. Add a splash of water or broth to help steam the shrimp. Heat for about 3-4 minutes until warmed through. Avoid high heat; it can make the shrimp tough. Stir gently to keep the shrimp intact. You can freeze Lemon Garlic Butter Shrimp for future meals. Place cooled shrimp in a freezer-safe bag. Remove as much air as possible before sealing. They will stay fresh for about three months. When ready to eat, thaw them overnight in the fridge. Reheat in the skillet as mentioned above for the best taste. For complete guidance, refer to the Full Recipe. Yes, you can use frozen shrimp. Just thaw them first. Place them in cold water for about 15 minutes. This method works well and keeps the shrimp fresh. After thawing, dry them well with paper towels. Season as you would with fresh shrimp. To make this dish ahead, cook the shrimp and sauce. Let it cool and store in the fridge. You can keep it for up to two days. Reheat gently on low heat before serving. This way, you save time for your meal. This shrimp pairs well with many sides. You can serve it with crusty bread. It’s great for soaking up the sauce. Fluffy rice is also a good choice. You can even add a fresh salad for crunch. For complete guidance, check the Full Recipe. In this blog, we explored essential ingredients, helpful tools, and substitutes for your shrimp dish. You learned easy steps to prepare and cook shrimp perfectly. We shared tips to pick fresh shrimp, enhance flavor, and avoid common mistakes. You can try fun variations like spicy or veggie-packed options. Plus, we covered storage and reheating tips to keep leftovers tasty. For complete guidance, don't miss the full recipe. Enjoy cooking this simple and delicious dish!

Lemon Garlic Butter Shrimp Flavorsome Easy Recipe

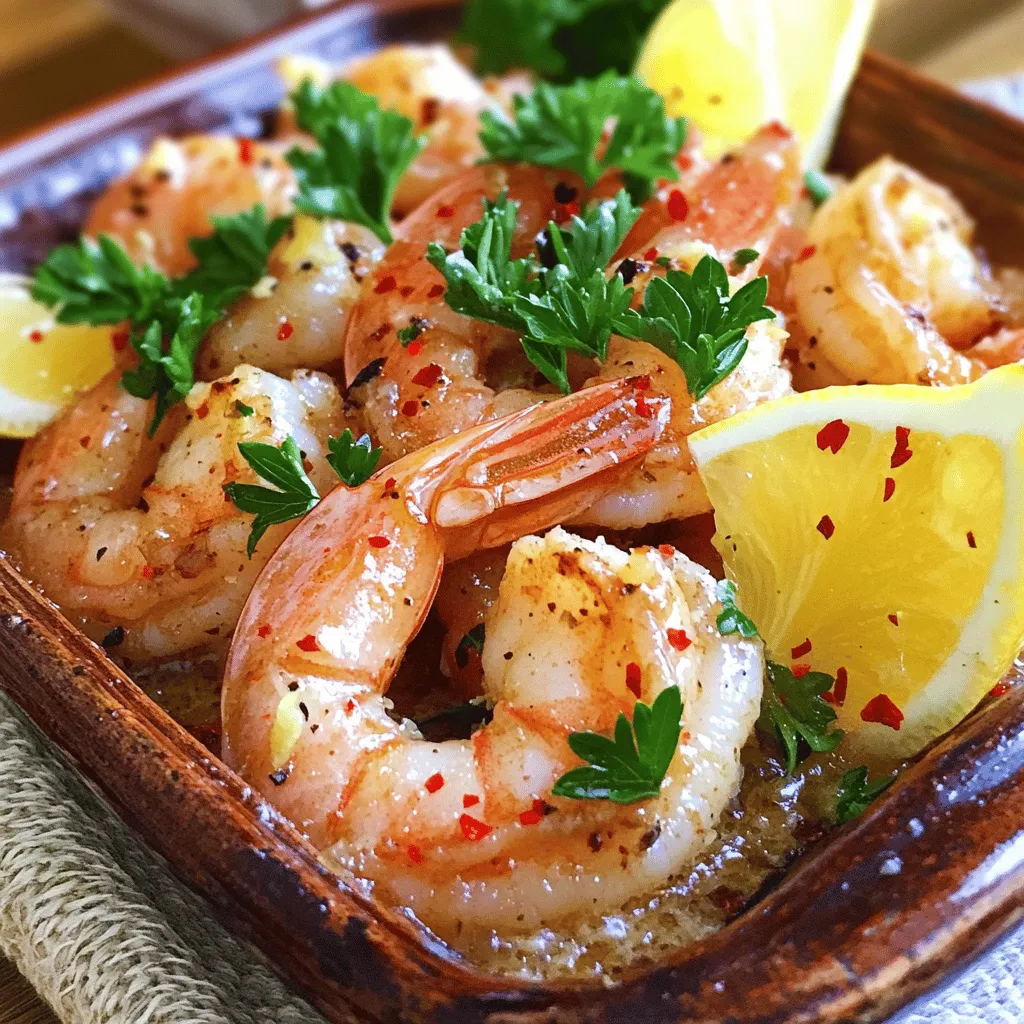
If you crave a quick and tasty meal, this Lemon Garlic Butter Shrimp recipe is for you! It’s packed with

To make this vegan sweet potato chili, gather the following ingredients: - 2 medium sweet potatoes, peeled and diced - 1 tablespoon olive oil - 1 large onion, chopped - 3 cloves garlic, minced - 1 red bell pepper, diced - 1 green bell pepper, diced - 2 cans (15 oz each) black beans, rinsed and drained - 1 can (15 oz) diced tomatoes with green chilies - 1 cup corn kernels (fresh or frozen) - 2 cups vegetable broth - 2 tablespoons chili powder - 1 teaspoon cumin - 1 teaspoon smoked paprika - Salt and pepper to taste - Fresh cilantro, chopped (for garnish) This chili packs a nutritious punch! Each serving has around: - Calories: 250 - Protein: 10g - Carbohydrates: 45g - Dietary Fiber: 12g - Sugars: 6g - Fat: 5g - Vitamin A: 180% DV - Vitamin C: 70% DV - Iron: 20% DV These numbers make it clear this meal is hearty and healthy. If you need alternatives, here are some great options: - Sweet Potatoes: Butternut squash or regular potatoes work well. - Black Beans: Kidney beans or pinto beans can replace black beans. - Olive Oil: Avocado oil or coconut oil will also do the job. - Vegetable Broth: Water or homemade broth can be used instead. - Chili Powder: Use taco seasoning for a different flavor. These swaps can help you customize the chili to your taste or pantry. You can find the full recipe in the previous section. Start by gathering all your ingredients. This makes cooking smooth and easy. Peel and dice the sweet potatoes into small cubes. Chop the onion and bell peppers. Mince the garlic. Rinse and drain the black beans. 1. In a large pot, heat the olive oil over medium heat. 2. Add the chopped onion and sauté for about 5 minutes, until it turns translucent. 3. Stir in the minced garlic and cook for one more minute. This brings out the flavor. 4. Add the diced sweet potatoes, red bell pepper, and green bell pepper to the pot. Cook for about 10 minutes. Stir often to keep the veggies from sticking. 5. Next, stir in the black beans, diced tomatoes (with juice), corn, and vegetable broth. 6. Season with chili powder, cumin, smoked paprika, salt, and pepper. Bring it to a gentle simmer. 7. Reduce the heat to low, cover the pot, and let it simmer for 30-35 minutes. Stir occasionally. The sweet potatoes should be tender when done. 8. Taste and adjust the seasoning before serving. To get the best texture, cut the sweet potatoes into uniform pieces. This helps them cook evenly. Stir often as it simmers to prevent sticking. If you want a thicker chili, let it cook longer without the lid. For a smoother texture, you can mash some of the sweet potatoes while cooking. This adds creaminess without dairy. Enjoy this hearty dish with crusty bread or cornbread for a complete meal! If you want the full recipe, you can find it in the recipe section above. To make your vegan sweet potato chili pop with flavor, try a few easy tricks. First, add a splash of lime juice before serving. This brightens the taste. You can also use smoked salt instead of regular salt. It adds a nice, rich depth. Fresh herbs like cilantro or parsley will make it even better. Consider adding a dash of hot sauce for heat. If you want a sweeter taste, a pinch of brown sugar can balance the chili's spices. Want to save time in the kitchen? Start by prepping your ingredients ahead of time. Chop the vegetables and store them in the fridge. You can also cook the sweet potatoes in the microwave for a quicker start. If you have leftover chili, it is great for lunch. Make a big batch, and you have meals ready to go! Using canned beans and tomatoes helps cut down on prep time too. When serving your vegan sweet potato chili, presentation matters. Ladle it into bowls and sprinkle fresh cilantro on top. This adds color and flavor. Pair it with crusty bread or cornbread for a filling meal. You can also serve it over rice for a heartier dish. If you like toppings, consider avocado slices, dairy-free sour cream, or vegan cheese. These add creaminess and extra flavor to your chili. For the full recipe, check out the complete guide. {{image_2}} This vegan sweet potato chili is already gluten-free! You can enjoy it without worry. Just check any canned goods, like beans and tomatoes, to ensure they are gluten-free. Most brands are safe, but it is good to read labels. You can make this chili even better by adding more veggies. Try these options: - Zucchini, diced - Carrots, chopped - Spinach or kale, stirred in at the end These add color and nutrients to your meal. You could also throw in some quinoa or lentils for extra protein and texture. For those who love heat, add more chili powder or some diced jalapeños. If you prefer it mild, just use less chili powder. You can also add a touch of maple syrup to balance the heat. This sweet touch can make the chili more complex without losing flavor. Feel free to adjust based on your taste. Remember, you can find the full recipe above to guide you through these variations! After you make this vegan sweet potato chili, you might have some left. First, let it cool down to room temperature. Then, pour it into an airtight container. Make sure to seal it well to keep it fresh. You can store it in the fridge for up to five days. If you want it to last longer, consider freezing it. When you're ready to enjoy your chili again, you can reheat it easily. For the best taste, heat it on the stove. Pour the chili into a pot and warm it over medium heat. Stir often to avoid sticking. If you need to, add a splash of vegetable broth for moisture. You can also microwave it. Just put it in a microwave-safe bowl and cover it. Heat in short bursts, stirring in between. Freezing is a great way to save your chili for later. Use freezer-safe containers or bags. Portion the chili into smaller servings for easy meals. Leave some space at the top of the container. This allows the chili to expand as it freezes. You can freeze it for up to three months. When you want to eat it, thaw it overnight in the fridge. Then, reheat it as described above. Enjoy your flavorful and hearty meal anytime! Vegan sweet potato chili is a warm and filling dish. It blends sweet potatoes, beans, and spices. You might wonder if it's hard to make. The answer is no! This recipe is easy and quick. You can whip it up in about 50 minutes. Many ask about the taste. It’s rich, hearty, and full of flavor. The chili powder and smoked paprika add depth. Plus, the sweet potatoes give it a nice sweetness. If you have allergies, you can adjust the recipe. For example, if you are allergic to beans, use lentils instead. You can swap corn with diced zucchini or carrots. If you can't have nightshades, skip the bell peppers and use celery. You can also use vegetable broth made from scratch if you want to avoid store-bought options. Always check labels to ensure safety. You don’t need much to make this chili. A large pot works best for cooking. A good wooden spoon helps to stir the ingredients well. If you have a sharp knife, it will make chopping easier. A cutting board is also essential. For serving, use bowls and a ladle. If you want to make it even easier, consider a slow cooker or an Instant Pot. These tools can help you make great chili with less fuss. You can find the full recipe linked above! In this blog post, we covered the key ingredients and steps to make vegan sweet potato chili. You learned about nutritional details, possible substitutes, and step-by-step cooking instructions. Tips on enhancing flavor and storing leftovers help ensure great taste and freshness. Remember, you can make this chili your own with variations and serving ideas. Enjoy your cooking journey, and don’t forget to share your results!

Vegan Sweet Potato Chili Flavorful and Hearty Meal

Get ready to warm your heart and satisfy your cravings with my Vegan Sweet Potato Chili! This dish is not

To make this dip, you need fresh and simple ingredients. Here’s what you will need: - 1 cup frozen spinach, thawed and drained - 1 can (14 oz) artichoke hearts, drained and chopped - 1 cup cream cheese, softened - ½ cup sour cream - ½ cup mayonnaise - 1 cup shredded mozzarella cheese - ½ cup grated Parmesan cheese - 2 cloves garlic, minced - ½ teaspoon onion powder - ½ teaspoon red pepper flakes (optional for heat) - Salt and pepper to taste These ingredients blend to create a rich and creamy flavor. The spinach gives it a nice green color, while the artichokes add a unique taste. You can add your own twist to this dip. Here are some optional ingredients: - Chopped green onions for extra flavor - A squeeze of lemon juice for brightness - Cooked and crumbled bacon for a smoky touch - Different cheese types, like cheddar or gouda, for varied flavor Feel free to mix and match based on what you love. This dip can be as unique as you want. To make this dip, you’ll need a few basic tools: - A large mixing bowl for combining ingredients - A baking dish to hold the dip while it bakes - A spatula or spoon for mixing - An oven to bake the dip These tools make the process easy and fun. With just a few items, you can create a delicious dish. For the full recipe, check out the detailed steps and cooking times. To make your creamy spinach artichoke dip, start with some simple prep. First, gather your ingredients. You will need frozen spinach, artichoke hearts, cream cheese, sour cream, mayonnaise, mozzarella cheese, Parmesan cheese, garlic, onion powder, red pepper flakes, and salt and pepper. Then, preheat your oven to 350°F (175°C). This step is key. It helps your dip cook evenly. Next, take a large mixing bowl. Add the softened cream cheese, sour cream, and mayonnaise. Mix them well until smooth. Now, add the minced garlic, onion powder, and red pepper flakes to the bowl. Stir everything together until it is fully combined. Next, it's time to add the spinach and artichokes. Make sure to drain and chop the artichokes first. Fold both the spinach and artichokes into the creamy mixture gently. Be careful not to break them apart too much. Finally, mix in the shredded mozzarella and grated Parmesan cheese. This will make your dip rich and cheesy. Season with salt and pepper to taste. Adjust this based on what you like. Now that your dip is ready, transfer it to a medium-sized baking dish. Spread the mixture evenly in the dish. Place it in the preheated oven. Bake for 25 to 30 minutes. You will know it is done when the edges are hot and bubbly, and the top is lightly golden. After baking, remove the dip from the oven. Let it cool for a few minutes before serving. This helps prevent any burns when you dig in. For the best creamy spinach artichoke dip, here are some tips. Use fresh ingredients whenever possible. Fresh spinach tastes better than frozen. If you want a thicker dip, add more cream cheese or cheese. Try different cheeses for unique flavors. A mix of cheddar and mozzarella can add a nice twist. If you like it spicy, add more red pepper flakes. Serve the dip warm with toasted baguette slices or tortilla chips. Garnish with extra Parmesan and fresh spinach leaves for a nice touch. This will impress your guests and make your dip look extra special. For the full recipe, check the earlier section. To get the smoothest dip, use softened cream cheese. Let it sit out for about 30 minutes. Mix it well with sour cream and mayonnaise. This helps create a nice base. Fold in the spinach and artichokes gently. Overmixing can make it grainy. Serve the dip warm with toasted baguette slices or tortilla chips. Fresh veggie sticks work great too. Think about cucumbers, bell peppers, or carrots. They add a crunchy touch. For a fun twist, try adding some crackers. They add a nice bite and flavor. If you want heat, include red pepper flakes. Start with half a teaspoon. Taste before adding more. You can also add hot sauce for extra kick. For a milder dip, skip the spices. Adjust salt and pepper to make it just right for you. For the complete recipe, visit the [Full Recipe]. {{image_2}} You can make a vegan version of this dip. Use cashew cream instead of cream cheese. Blend soaked cashews with lemon juice and garlic for a creamy base. Use coconut yogurt instead of sour cream. Replace the mayonnaise with silken tofu for extra creaminess. For cheese, try nutritional yeast. It adds a cheesy flavor without dairy. Mix in other ingredients for extra flavor. Try adding sun-dried tomatoes or roasted red peppers. These add a sweet, tangy taste. You can also include chopped olives for a briny touch. A squeeze of lemon juice brightens the dip. Fresh herbs like basil or parsley make it fresh and lively. You can easily adjust the serving size. If you need a dip for more people, double the recipe. Use a larger baking dish to hold it all. For smaller gatherings, half the recipe works well. Just bake it in a smaller dish. The dip is still great, no matter the size. For the full recipe, check the previous sections. Enjoy your creamy spinach artichoke dip! After you finish your dip, let it cool. Then, scoop it into an airtight container. This keeps it fresh. Store it in the fridge for up to four days. If you see any mold, toss it out. To enjoy the dip later, remember to check the smell. It should smell fresh, not sour. You can freeze the dip too! Place the cooled dip in a freezer-safe container. Leave some space at the top. The dip will expand when frozen. It can last for up to three months. Remember to label your container with the date. This helps you keep track of how long it has been frozen. To reheat, take the dip out of the fridge or freezer. If frozen, let it thaw overnight in the fridge. Preheat your oven to 350°F (175°C). Place the dip in a baking dish. Cover it with foil to keep it from drying out. Heat for about 20 minutes. If it's cold from the fridge, it may need a bit longer. Stir it once or twice to help it heat evenly. Enjoy your creamy spinach artichoke dip warm! For the full recipe, check out the main section. I love serving Creamy Spinach Artichoke Dip warm. It pairs well with toasted baguette slices, tortilla chips, or fresh veggie sticks. You can even add a sprinkle of extra Parmesan on top for a nice touch. This dip is great for parties or game days. Everyone loves dipping into this creamy goodness! Yes, you can make this dip ahead of time. Just prepare it up to the baking step. Cover it and store it in the fridge. When you're ready to serve, simply bake it as directed. This saves time and lets the flavors blend well. It’s a perfect make-ahead dish! Creamy Spinach Artichoke Dip lasts about 3 to 4 days in the fridge. Store it in an airtight container to keep it fresh. If you want it to last longer, consider freezing it. Just remember to reheat it thoroughly before serving. Enjoy this tasty treat even days later! This blog post showed how to make a tasty Creamy Spinach Artichoke Dip. We covered main ingredients, handy tools, and step-by-step cooking instructions. I shared tips for the creamiest dip and some fun variations, from vegan swaps to flavor boosts. Plus, we discussed the best ways to store leftovers. Now, you can enjoy this dip at any gathering or cozy night in. Dive into your own version and impress your friends!

Creamy Spinach Artichoke Dip Savory and Tasty Treat

If you crave a savory snack that’s simple yet delicious, you’re in for a treat! This Creamy Spinach Artichoke Dip

To make a great pumpkin pie dump cake, you need the following: - 1 (15 oz) can of pure pumpkin puree - 1 (12 oz) can of evaporated milk - 1 cup granulated sugar - 3 large eggs - 1 teaspoon vanilla extract - 2 teaspoons pumpkin pie spice - 1/2 teaspoon salt - 1 box of yellow cake mix (15.25 oz) - 1/2 cup unsalted butter, melted - 1 cup chopped pecans (or walnuts) - Whipped cream (for serving, optional) These ingredients come together to create a rich and creamy dessert. The pumpkin puree gives it a smooth texture. The spices add warmth, while the cake mix creates a nice topping. You can change the flavor and texture of your dump cake. Here are some options: - Add chocolate chips for a sweet twist. - Use a spice cake mix for a different flavor. - Swap pecans for walnuts or almonds. - Mix in dried cranberries for a fruity touch. Each of these options brings its own unique taste to the dish. Feel free to experiment and discover what you love most! When picking your ingredients, quality matters. Here are my tips: - Select 100% pure pumpkin puree, not pumpkin pie filling. - Use fresh eggs for better flavor. - Choose high-quality vanilla extract for a deeper taste. - Opt for unsalted butter to control the salt in your dish. By choosing the right ingredients, you enhance the overall flavor and texture of your pumpkin pie dump cake. This recipe is easy and fun, so don't hesitate to explore! For the full recipe, check out the details above. To make the pumpkin filling, grab a large mixing bowl. Add the pumpkin puree, evaporated milk, sugar, eggs, vanilla extract, pumpkin pie spice, and salt. Whisk these ingredients together until the mixture is smooth. This step is key for a tasty filling. Make sure no lumps remain. You want it creamy and rich. This is the heart of your dump cake. Next, take a greased 9x13 inch baking dish. Pour the pumpkin mixture evenly into the dish. Spread it out well. Now, open your box of yellow cake mix. Sprinkle the cake mix over the pumpkin filling. Try to cover the whole surface evenly. Don’t mix it in; this keeps the layers separate. Then, drizzle the melted butter over the cake mix. This adds moisture and flavor. Finally, sprinkle chopped pecans or walnuts on top. This gives a nice crunch. Now, it’s time to bake. Preheat your oven to 350°F (175°C). Place your baking dish in the oven and bake for 45-50 minutes. Check for a golden brown color on top. The pumpkin filling should be set in the center. When it’s done, let the dump cake cool for a few minutes. This allows the flavors to meld. Enjoy your delicious creation warm or at room temperature. For a treat, add whipped cream on top. You can find the complete recipe and details in the Full Recipe section. To bake a great dump cake, always use fresh ingredients. Fresh pumpkin puree gives the best flavor. Also, ensure your eggs are at room temperature. This helps them mix well and makes a smooth filling. When measuring sugar, use a dry measuring cup and level it off for accuracy. For the best texture, mix the pumpkin filling well until it is smooth. This ensures even baking. When you sprinkle the cake mix, do not mix it in. Let it sit on top. This creates a nice crust. The melted butter should cover as much of the mix as possible. This helps it brown nicely. If your dump cake is too dry, it may need more butter. Try adding a bit more next time. If it’s too wet, you may have added too much pumpkin or liquid. Also, bake it longer if the center wobbles. It should be set and firm. For a full recipe, check out the [Full Recipe]. {{image_2}} You can make a gluten-free version of this cake. Swap regular cake mix for a gluten-free mix. Check the label to ensure it has no gluten. The taste stays rich and delicious. You won’t miss the gluten at all! For a vegan dump cake, use plant-based milk instead of evaporated milk. Replace eggs with flax eggs or applesauce. Use vegan butter to drizzle on top of the cake mix. This keeps the flavors intact while making it plant-based. You can add fun flavors to your cake. Mix in chocolate chips or caramel bits for sweetness. Try adding chopped apples or cranberries for a fruity twist. A dash of maple syrup can also enhance the taste. Feel free to get creative with your favorite flavors! To keep leftover pumpkin pie dump cake fresh, let it cool first. Then, cover it tightly with plastic wrap or aluminum foil. Store it in the fridge for up to five days. This helps keep the flavors and texture intact. If you want to save some for later, freezing is a great option. You can freeze pumpkin pie dump cake for up to three months. Cut the cake into squares or keep it whole. Wrap each piece in plastic wrap, then place them in a freezer-safe bag. Label the bag with the date. When you're ready to eat it, just pull it out of the freezer. To reheat your dump cake, preheat your oven to 350°F (175°C). Place the cake in an oven-safe dish. Cover it with foil to keep it moist. Heat it for about 15-20 minutes. You can also microwave it for 30-60 seconds if you want a quicker option. Enjoy the warm flavors just like fresh! Yes, you can make Pumpkin Pie Dump Cake ahead of time. You can prepare the cake and store it in the fridge. Just cover it with plastic wrap or foil. It will stay fresh for a few days. If you want to serve it later, reheat it in the oven. Warm it at 350°F for about 15 minutes. This keeps the flavors rich and the texture great. Pumpkin Pie Dump Cake is great on its own. You can also serve it with whipped cream. Ice cream is another tasty choice. A scoop of vanilla or cinnamon ice cream adds a nice touch. Some people love to add a sprinkle of nuts on top. You could also offer a drizzle of caramel sauce for extra sweetness. No, it is not necessary to use pecans or walnuts. They add a nice crunch and flavor. However, if you prefer, you can skip them. You can also use other nuts, like almonds. If you want a nut-free option, just leave them out. The dump cake will still taste amazing. Yes, you can use fresh pumpkin. First, cook the pumpkin until soft. Then, blend it until smooth. This will give a fresh taste. Make sure to measure out 15 oz of puree for the recipe. Fresh pumpkin might take more time but adds a special touch. When stored correctly, Pumpkin Pie Dump Cake lasts about 3 to 4 days in the fridge. Make sure to keep it in an airtight container. If you want to enjoy it longer, you can freeze it. It can last up to 2 months in the freezer. Just thaw it in the fridge before serving. Yes, you can add chocolate chips! They add a sweet twist to the dump cake. Just sprinkle them on top of the cake mix before baking. Semi-sweet or dark chocolate chips work best. This gives a nice contrast to the pumpkin flavor. If your dump cake turns out too dry, it could be overbaked. Keep an eye on the baking time next time. You can also add more butter on top before baking. This helps to keep it moist. If it’s too dry after baking, serve it with whipped cream or ice cream to add moisture. Yes, you can make a gluten-free version. Just use a gluten-free cake mix. Make sure to check the other ingredients for gluten. The rest of the recipe stays the same. This way, everyone can enjoy a slice! Yes, greasing the baking dish is important. It helps the dump cake come out easily after baking. You can use butter or cooking spray. Make sure to cover the bottom and sides well for best results. You can use a different type of cake mix if you like. Spice cake mix works great for more flavor. Yellow cake mix is the classic choice, but feel free to experiment. Each type gives a unique twist to the dump cake. Enjoy trying out different flavors! This blog covered how to make a delicious Pumpkin Pie Dump Cake. We explored essential and optional ingredients, tips for choosing the best options, and step-by-step baking instructions. You learned how to store leftovers and variations for gluten-free and vegan diets. Remember, small changes can elevate your dessert game. Enjoy experimenting with flavors and textures!

Pumpkin Pie Dump Cake Delicious and Easy Recipe

There’s nothing quite like the warm, sweet taste of pumpkin pie, especially in cake form! In this blog post, I’m

To make Cowboy Butter Chicken Pasta, gather these ingredients: - 8 oz fettuccine or penne pasta - 2 chicken breasts, cubed - 4 tablespoons unsalted butter - 1 tablespoon olive oil - 3 cloves garlic, minced - 1 teaspoon smoked paprika - 1 teaspoon onion powder - 1 teaspoon garlic powder - ½ teaspoon cayenne pepper (adjust for spice preference) - 1 cup heavy cream - 1 cup chicken broth - 1 cup cherry tomatoes, halved - 1 cup spinach, roughly chopped - Salt and pepper to taste - Fresh parsley, chopped (for garnish) - Grated Parmesan cheese (for serving) If you have dietary needs, try these swaps: - Pasta: Use gluten-free pasta for a gluten-free option. - Chicken: Swap chicken with shrimp or tofu for a different protein. - Butter: Use olive oil or vegan butter for a dairy-free version. - Cream: Replace heavy cream with coconut cream for a dairy-free choice. - Spinach: Kale or arugula works great in place of spinach. For the best flavor, pick fresh ingredients: - Chicken: Choose organic or free-range chicken for better taste. - Pasta: Look for high-quality pasta brands that use durum wheat. - Vegetables: Buy local, seasonal produce for freshness. - Spices: Fresh spices enhance flavor. Check expiration dates. - Dairy: Use fresh butter and cheese for richer taste. These tips help ensure your Cowboy Butter Chicken Pasta shines on the plate. For the full recipe, check the detailed instructions. 1. Cook the Pasta: Start by filling a large pot with salted water. Bring it to a boil. Add 8 oz of fettuccine or penne pasta. Cook until al dente, as per the package instructions. Drain the pasta and keep ½ cup of the pasta water for later. 2. Sauté the Chicken: In a large skillet over medium-high heat, heat 1 tablespoon of olive oil and 2 tablespoons of unsalted butter. Add 2 cubed chicken breasts. Season with salt, pepper, smoked paprika, onion powder, garlic powder, and cayenne pepper. Cook for about 6-8 minutes until browned and cooked through. Take the chicken out and set aside. 3. Make the Cowboy Butter Sauce: In the same skillet, lower the heat to medium. Add the remaining 2 tablespoons of butter. Once melted, add 3 minced garlic cloves. Sauté for about 30 seconds until fragrant. Pour in 1 cup of chicken broth and let it simmer for 2-3 minutes. 4. Add Cream and Vegetables: Stir in 1 cup of heavy cream. Let the sauce simmer for another 2-3 minutes until it thickens. Toss in 1 cup of halved cherry tomatoes and 1 cup of chopped spinach. Cook until the tomatoes soften and the spinach wilts, about 2-3 minutes. 5. Combine Everything: Add the cooked chicken back to the skillet. Mix well. Stir in the cooked pasta and reserved pasta water. Toss everything together until well coated. Cook for another minute or two to heat through. Adjust seasoning with salt and pepper to taste. 6. Serve: Plate the pasta. Sprinkle fresh chopped parsley on top. Grate Parmesan cheese over each serving. - Prep Time: 10 minutes - Cook Time: 20 minutes - Total Time: 30 minutes - Use fresh ingredients for the best flavor. - Don't overcook the pasta; it should be al dente for a nice bite. - Reserve pasta water helps to adjust the sauce thickness. - Add spinach last; it wilts quickly and keeps its bright color. - Use high-quality butter for rich taste. To make the Cowboy Butter sauce shine, follow these tips: - Use fresh garlic. Fresh garlic gives the best flavor. Mince it just before cooking. - Control the heat. Keep the heat at medium to avoid burning the butter and garlic. - Simmer gently. Let the sauce simmer slowly. This helps the flavors blend well. - Adjust creaminess. If you want a richer sauce, add a bit more heavy cream. Avoid these common mistakes to ensure a tasty meal: - Overcooking the pasta. Cook it just until al dente. This keeps it firm and prevents mushiness. - Not seasoning enough. Make sure to season the chicken and sauce well with salt and pepper. - Skipping the pasta water. The reserved pasta water helps the sauce cling to the noodles. - Rushing the sauce. Let it simmer long enough to thicken and develop flavors. Pair your Cowboy Butter Chicken Pasta for a delightful meal: - Serve with garlic bread. It complements the butter sauce and adds crunch. - Add a side salad. A fresh salad balances the richness of the pasta. - Try a white wine. A crisp Sauvignon Blanc enhances the flavors of the dish. - Garnish with herbs. Fresh parsley not only adds color but also freshens the taste. For the complete Cowboy Butter Chicken Pasta recipe, check the Full Recipe. Enjoy making this flavorful dinner delight! {{image_2}} You can easily switch proteins in this dish. Shrimp adds a nice twist. Cook it in the same way as chicken. Just be careful not to overcook shrimp; it cooks fast! Tofu is another great option. Use firm tofu, and pan-fry it to get a crispy edge. Both options keep the dish flavorful and fun. While fettuccine or penne works best, you can try other pastas too. Bowtie pasta, or farfalle, looks pretty on the plate. Rotini holds sauce well, making each bite tasty. Spaghetti is classic and always a hit. Feel free to experiment and find your favorite! To make this dish vegan, swap chicken for chickpeas or lentils. Use a plant-based cream for the sauce. For gluten-free, choose gluten-free pasta. Both changes keep the flavors intact. You won't miss the meat or gluten at all! Enjoy these twists on a classic dish. To keep your Cowboy Butter Chicken Pasta fresh, store it in an airtight container. Make sure it cools down to room temperature first. This helps prevent condensation inside the container. You can keep it in the fridge for up to three days. If you want to enjoy it later, freezing is also an option. When reheating, I recommend using the stove instead of the microwave. Place the pasta in a skillet over medium heat. Add a splash of chicken broth or water to help restore moisture. Stir gently until heated through. This method keeps the sauce creamy and tasty. Avoid high heat, as it can dry out the dish. If you plan to freeze your Cowboy Butter Chicken Pasta, do so within two days of cooking. Use a freezer-safe container and leave some space for expansion. It can last for up to three months in the freezer. When ready to eat, thaw it overnight in the fridge before reheating. This helps maintain the best flavor and texture. For the full recipe, check out the complete cooking instructions above. Cowboy Butter is a rich, flavorful sauce that combines butter with spices. It adds a creamy, savory taste to the pasta. The blend of garlic, smoked paprika, and cayenne pepper gives the sauce a kick. This sauce coats the chicken and pasta, making every bite delicious. Using this sauce in the Cowboy Butter Chicken Pasta brings warmth and depth to the dish. It makes the meal feel cozy and satisfying. Yes, you can prepare Cowboy Butter Chicken Pasta ahead of time. Cook the pasta and chicken, then mix them with the sauce. Store everything in an airtight container. Keep it in the fridge for up to three days. When ready to eat, reheat it slowly on the stove or in the microwave. You may need to add a splash of chicken broth or cream to keep it creamy. Making it ahead saves time and makes dinner quick and easy. Great sides for Cowboy Butter Chicken Pasta include: - Garlic bread - Steamed broccoli - Caesar salad - Grilled corn on the cob - Roasted asparagus These sides add color and crunch to your meal. They also balance the rich flavors of the pasta. You can mix and match these sides to suit your taste. Enjoy your meal! For the Full Recipe, check the details above. In this post, we explored how to make Cowboy Butter Chicken Pasta. We covered every detail, from ingredients to cooking steps. I shared tips to avoid common mistakes and offered ways to adapt the dish for different diets. Cooking can be fun and rewarding. With the right ingredients and techniques, you can create a delicious meal. Enjoy your cooking journey, and know that your efforts will pay off with great taste! Keep experimenting and sharing this dish with others.

Cowboy Butter Chicken Pasta Flavorful Dinner Delight

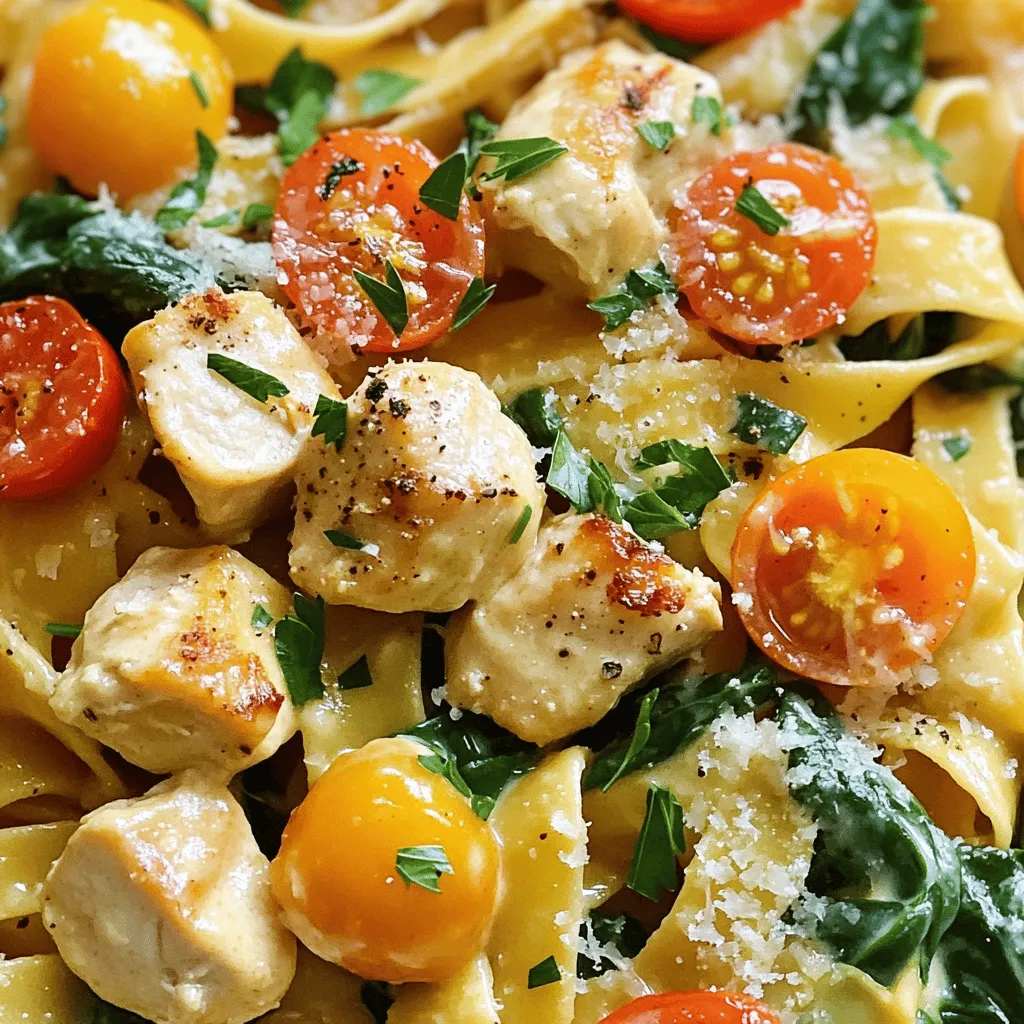
Looking for a tasty dinner idea? You’ll love Cowboy Butter Chicken Pasta! This dish combines rich, flavorful sauce with tender
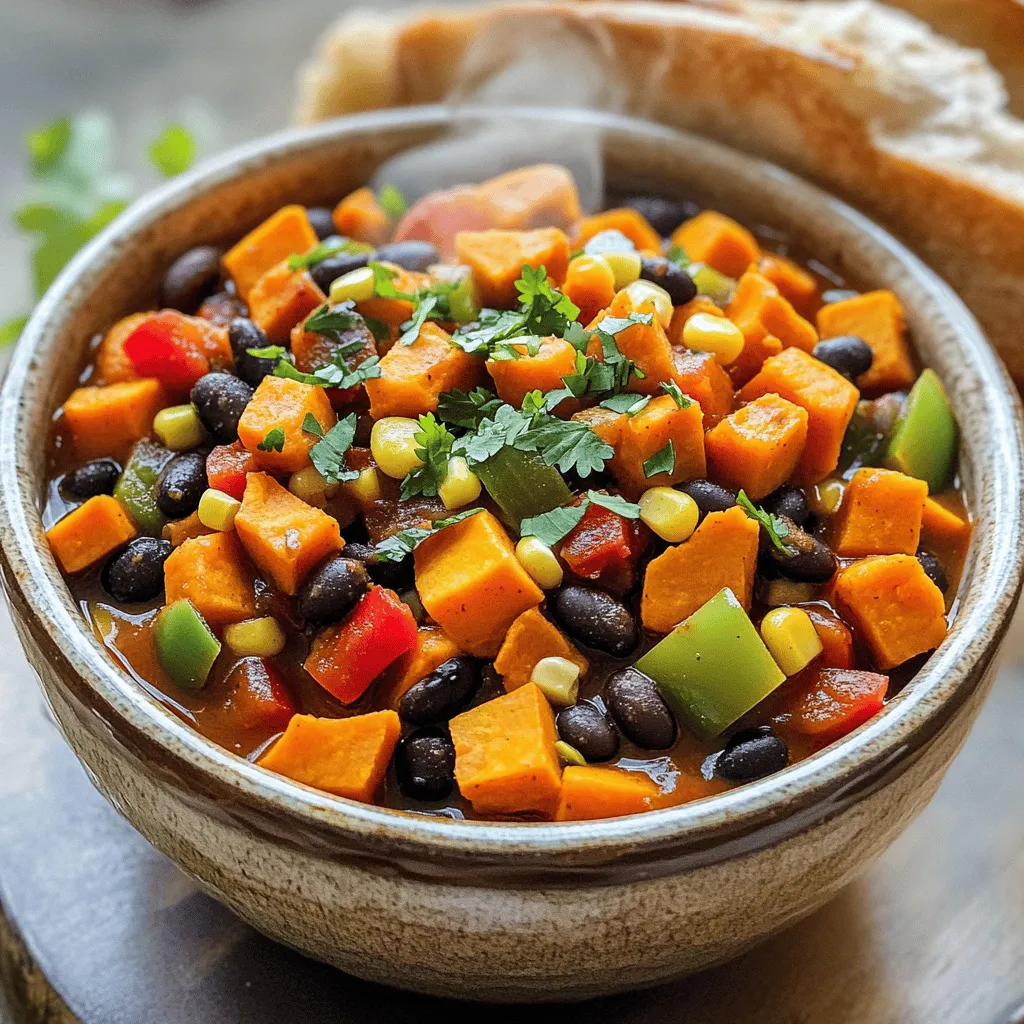
For a great pot of Sweet Potato and Black Bean Chili, gather these items: - 2 medium sweet potatoes, peeled and diced - 1 can (15 oz) black beans, rinsed and drained - 1 can (14 oz) diced tomatoes (with juice) - 1 large onion, chopped - 3 cloves garlic, minced - 1 red bell pepper, chopped - 1 green bell pepper, chopped - 2 cups vegetable broth - 2 tablespoons olive oil - 1 tablespoon chili powder - 1 teaspoon cumin - 1 teaspoon smoked paprika - 1/2 teaspoon cinnamon - Salt and pepper to taste - Fresh cilantro, for garnish - Avocado and lime wedges, for serving This chili is not only tasty but also packed with nutrients. Each serving provides: - Calories: 220 - Protein: 9g - Carbohydrates: 37g - Dietary Fiber: 10g - Fat: 5g - Sugars: 6g Sweet potatoes and black beans are full of health perks. Here are a few: - Sweet Potatoes: They are high in beta-carotene, which is good for your eyes. They also help with digestion due to their fiber. - Black Beans: These beans are great for your heart. They have protein and iron, which can help keep you strong. - Vegetables: Onions and peppers add vitamins and antioxidants, boosting your overall health. - Spices: Chili powder and cumin can help with digestion and may reduce inflammation. This chili is a tasty way to eat well and feel good. For the full recipe, check out the [Full Recipe]. Start by peeling and dicing the sweet potatoes. Aim for uniform pieces for even cooking. Next, chop the onion and bell peppers. Mince the garlic cloves. You want all vegetables to be ready before cooking. This helps the process flow smoothly. In a large pot or Dutch oven, heat the olive oil over medium heat. Add the chopped onion and garlic first. Sauté for about 3-4 minutes until they smell great and turn soft. Then, stir in the red and green bell peppers. Cook them for about 5 minutes until they soften slightly. Next, sprinkle in the chili powder, cumin, smoked paprika, and cinnamon. Stir well to coat the vegetables with spices. Cook for another 2 minutes to boost the flavor. Now, mix in the diced sweet potatoes and the can of diced tomatoes with juice. Stir everything together, ensuring the sweet potatoes are well combined. Pour in the vegetable broth and add the black beans. Don’t forget to season with salt and pepper to taste. Stir everything together once more. Bring the mix to a boil, then reduce the heat to low. Cover the pot and let the chili simmer for about 20-25 minutes. Stir occasionally until the sweet potatoes are tender. After simmering, taste your chili. Adjust the seasoning if needed. If it seems too thick, you can add more vegetable broth to reach your desired consistency. When it’s ready, ladle the chili into bowls. Garnish with fresh cilantro. You can serve it with avocado slices and lime wedges on the side for extra flavor. Enjoy your delicious Sweet Potato and Black Bean Chili! For the full recipe, check the section above. To boost the flavor of your chili, use fresh herbs. Fresh cilantro adds a nice touch. You can also add a splash of lime juice just before serving. This lifts the flavors and gives it a fresh taste. Consider using smoked salt for a unique twist. It adds depth to the dish. When cooking sweet potatoes, cut them into uniform pieces. This helps them cook evenly. Peel them before dicing for a smoother texture. If you want a sweeter flavor, roast them first. Roasting caramelizes their natural sugars. It makes them taste even better in the chili. Serve your chili hot in a bowl. Top it with fresh cilantro for color and flavor. Add slices of avocado for creaminess. Lime wedges bring brightness and balance to the dish. You can also serve it with warm bread or rice for a hearty meal. For extra fun, try it with tortilla chips on the side. Enjoy this tasty dish with family and friends! {{image_2}} You can easily make this chili vegetarian or vegan. The recipe already uses black beans and sweet potatoes, which are great sources of protein. Feel free to skip the meat entirely. You can also use vegetable broth instead of chicken broth for a fully vegan dish. If you want extra protein, add lentils or quinoa. These will blend well and add texture. If you love heat, try adding jalapeños or chili flakes. You can chop fresh jalapeños and sauté them with the onions and garlic. For extra spice, consider using cayenne pepper in the spice mix. Adjust the amount to fit your taste. Remember, you can always add more heat, but it’s hard to take it away once it’s in. You don’t have to stick to black beans. You can swap them for kidney beans or pinto beans. Each type offers a different flavor and texture. For vegetables, try adding corn, zucchini, or carrots. They will enhance the dish's color and taste. Feel free to mix and match your favorite ingredients. This chili is very flexible, so make it your own. For more details, check out the Full Recipe. After you enjoy your chili, let it cool down. Transfer any leftovers into an airtight container. Store it in the fridge for up to five days. This keeps the flavors fresh. If you want to keep it longer, freezing is a great option. To reheat, you can use the microwave or the stove. If using the microwave, place your portion in a bowl. Cover it loosely and heat for about two minutes. Stir halfway through to ensure even heating. For the stove, pour the chili into a pot and heat over medium heat. Stir occasionally until hot. To freeze, place the cooled chili in a freezer-safe container. Leave some space at the top, as the chili will expand. It can stay frozen for up to three months. When ready to eat, thaw it in the fridge overnight. Then, reheat it on the stove or in the microwave. Enjoy the flavors like fresh! For the full recipe, check out Sweet Potato & Black Bean Chili. Yes, you can make this chili in a slow cooker. Start by sautéing the onions and garlic in a pan. Then, add all ingredients, including the sweet potatoes and spices, to the slow cooker. Cook on low for 6 to 8 hours or on high for 3 to 4 hours. This method lets the flavors blend beautifully. You will enjoy a warm and hearty meal. If your chili is too watery, there are a few easy ways to thicken it. First, let it simmer longer with the lid off. This lets steam escape and reduces the liquid. You can also mash some sweet potatoes in the chili for a thicker texture. Another option is to mix in a cornstarch slurry. Just combine 1 tablespoon of cornstarch with 2 tablespoons of water, stir it in, and heat until thick. Each method works well, so choose what suits you best. You can serve this chili with many tasty sides. Here are some ideas: - Cornbread: Its sweetness pairs well with the chili's spice. - Rice: White or brown rice makes a filling base. - Tortilla chips: Perfect for dipping and adds crunch. - Avocado: Sliced avocado adds creaminess and flavor. - Fresh cilantro: Use it as a garnish for a fresh touch. These sides enhance your meal and make it even more enjoyable. For the full recipe, check out the detailed instructions above. This blog post covered key ingredients, cooking steps, and tips for Sweet Potato and Black Bean Chili. I shared nutritional info and health benefits to help you choose wisely. You learned how to make it tasty, store it well, and explore fun variations. Remember, cooking is about enjoyment and creativity. Feel free to tweak recipes. Your version of this chili can be unique and full of flavor. Happy cooking!

Savory Sweet Potato and Black Bean Chili Recipe

Are you ready to warm your heart and belly? My Savory Sweet Potato and Black Bean Chili recipe is the

For these pancakes, you need simple items. Here's what you will need: - 1 cup rolled oats - 1 ripe banana (mashed) - 1 cup milk (dairy or non-dairy) - 1 large egg - 1 tablespoon honey (or maple syrup) - 1 teaspoon baking powder - 1/2 teaspoon cinnamon - 1/4 teaspoon salt - 1 teaspoon vanilla extract - Cooking oil or butter for frying These ingredients work well together. The oats give the pancakes heartiness. The banana adds natural sweetness and moisture. Milk makes the batter smooth. The egg helps bind the mixture. Honey or maple syrup boosts the flavor. You can add fun extras to your pancakes. Here are some ideas: - Chopped nuts (like walnuts or pecans) - Chocolate chips - Fresh berries (like blueberries or strawberries) - Shredded coconut - A spoonful of nut butter Adding any of these gives the pancakes a unique twist. You can mix them into the batter or sprinkle them on top. If you have specific dietary needs, you can adjust the recipe. Here are some easy swaps: - Use gluten-free oats for a gluten-free version. - Replace the egg with a flaxseed meal or chia seed mixture for a vegan option. - Choose almond milk or oat milk for a dairy-free choice. - Swap honey for agave syrup if you want a vegan sweetener. These substitutions let everyone enjoy the pancakes. You can make them fit your diet while keeping them tasty. For the full recipe, check out the details above. To start, grab 1 cup of rolled oats. Place them in a blender or food processor. Pulse them until they look like flour. This step makes a great base for our pancakes. Once done, transfer the oat flour to a mixing bowl. Next, it's time to mix! Add the following ingredients to the bowl: - 1 ripe banana (mashed) - 1 cup milk (dairy or non-dairy) - 1 large egg - 1 tablespoon honey (or maple syrup) - 1 teaspoon baking powder - 1/2 teaspoon cinnamon - 1/4 teaspoon salt - 1 teaspoon vanilla extract Mix everything until just combined. The batter should feel slightly thick. Don't overmix; a few lumps are okay. Now, preheat a non-stick skillet or griddle over medium heat. Lightly grease it with cooking oil or butter. Pour 1/4 cup of batter onto the skillet for each pancake. Cook until bubbles form on the surface and the edges look set, about 2-3 minutes. Flip the pancakes carefully. Cook for another 2-3 minutes on the other side until they turn golden brown. Remove the pancakes and keep them warm. Repeat this until you cook all the batter. For the full recipe, check out the full section above. Enjoy your delicious banana oatmeal pancakes! To get the best texture, blend your oats well. Aim for a fine flour. This helps the pancakes rise and stay fluffy. Mix the wet and dry ingredients gently. Over-mixing can make pancakes tough. Let the batter rest for a few minutes. This allows the oats to absorb the liquid. Your pancakes will turn out soft and tender. One common mistake is using too much liquid. If your batter is thin, the pancakes will spread too much. Another mistake is cooking on high heat. This can burn the outside while leaving the inside raw. Always cook on medium heat. Lastly, don't forget to grease your pan. This prevents sticking and helps the pancakes cook evenly. Serve your pancakes warm for the best taste. Stack them high on a plate. Drizzle with honey or maple syrup for sweetness. Fresh fruit like banana slices or berries adds color and flavor. Sprinkle some cinnamon on top for an extra touch. Enjoy your pancakes with a side of yogurt for creaminess. For the full recipe, check the section above. {{image_2}} You can make gluten-free banana oatmeal pancakes easily. Just use certified gluten-free oats. This ensures no gluten mixes in, making them safe for those with gluten sensitivities. The oats provide a great texture. They will still taste delicious and fluffy. To make a vegan version, swap the egg with a flax egg. Mix one tablespoon of ground flaxseed with three tablespoons of water. Let it sit for five minutes to thicken. You can also use plant-based milk, like almond or oat milk. This way, everyone can enjoy these tasty pancakes. You can add fun flavors to your pancakes. Try mixing in chocolate chips for a sweet treat. Blueberries also work great; they burst with juice when you cook them. You can even experiment with spices, like nutmeg or cardamom. These simple changes can bring new excitement to your breakfast. For the full recipe, check out the previous section. To keep your leftover pancakes fresh, let them cool first. Place them in a stack on a plate. Cover the stack with plastic wrap or foil. You can also keep them in an airtight container. Store them in the fridge for up to three days. This way, they stay soft and tasty. When you want to eat your leftover pancakes, you have a few good options. The microwave is quick. Just place pancakes on a plate and heat for about 30 seconds. You can also use a toaster or toaster oven. This method makes them crispy! For the best taste, reheat them on a skillet over low heat for about two minutes on each side. To freeze pancakes, make sure they are fully cooled. Place a piece of parchment paper between each pancake. This prevents them from sticking together. Then, put them in a freezer bag or container. Be sure to remove as much air as possible. You can freeze them for up to two months. When you're ready to eat, just reheat them straight from the freezer. Enjoy these delicious banana oatmeal pancakes anytime! For the full recipe, check out the earlier section. Yes, you can make these pancakes without eggs. To replace one egg, use 1/4 cup of unsweetened applesauce or mashed banana. Both options keep the pancakes moist and add natural sweetness. If you use applesauce, the flavor stays mild. If you use banana, the flavor gets a bit stronger. Each option works well and gives you a tasty pancake. To make these pancakes healthier, consider these tips: - Use whole-grain oats instead of regular oats for more fiber. - Swap honey for a natural sweetener like stevia or use less sweetener. - Add in some chia seeds or flaxseeds for extra nutrients. - Use almond milk or oat milk instead of regular milk for fewer calories. These changes help you enjoy a delicious meal that fits a healthier diet. The best toppings for Banana Oatmeal Pancakes include: - Fresh sliced bananas - A drizzle of honey or maple syrup - A sprinkle of cinnamon or nutmeg - Chopped nuts like walnuts or pecans - A dollop of yogurt - Fresh berries like strawberries or blueberries These toppings add flavor and color, making your pancakes even more enjoyable. You can mix and match for a fun experience! For the complete recipe, refer to the Full Recipe section. Banana oatmeal pancakes are easy, tasty, and healthy. We covered key ingredients and add-ins, plus tips for the best texture. I shared step-by-step instructions to help you cook perfect pancakes every time. You can also try variations to fit your needs. Lastly, storing pancakes is simple for later use. Whether you enjoy them warm from the skillet or as a meal prep option, these pancakes will satisfy. Enjoy your delicious creations today!

Banana Oatmeal Pancakes Simple and Delicious Recipe

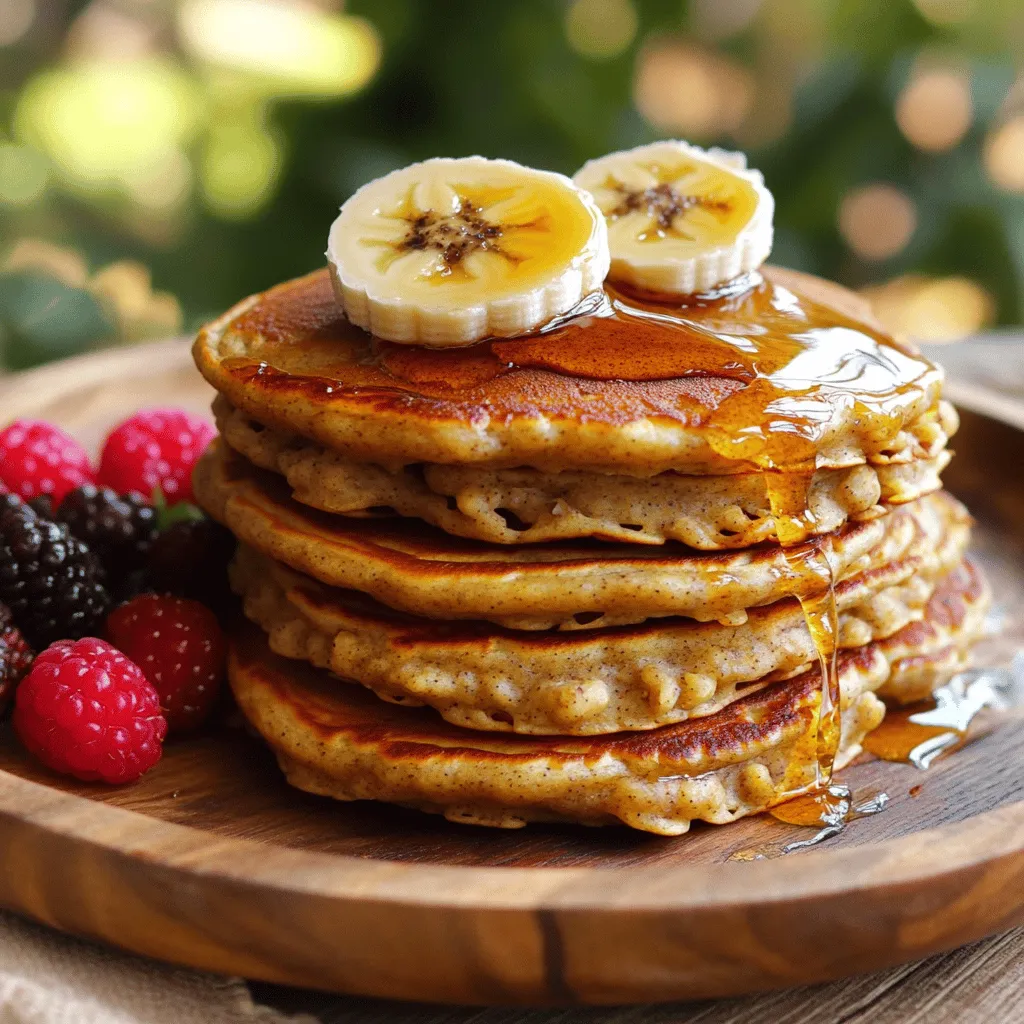
Start your day on a healthy note with my simple and delicious Banana Oatmeal Pancakes! Packed with flavor and nutrients,

To make a tasty Chocolate Chip Cookie Dough Dip, you need these simple ingredients: - 1 cup all-purpose flour - 1/2 cup brown sugar, packed - 1/4 cup granulated sugar - 1/2 cup unsalted butter, softened - 1 teaspoon vanilla extract - 1/2 teaspoon salt - 1/4 cup almond milk (or regular milk) - 1/2 cup mini chocolate chips - 1/4 cup chopped nuts (optional) - Serving suggestions: Graham crackers, fruit, or pretzel sticks These ingredients create a creamy dip that tastes just like cookie dough. Make sure to use softened butter for the best texture. You can easily find all these items at your local grocery store. For a fun twist, try adding chopped nuts or different chocolate types. This dip is perfect for parties, movie nights, or just a sweet treat at home. You can enjoy it with graham crackers, fresh fruit, or pretzel sticks for dipping. Check out the Full Recipe for step-by-step instructions to create this delightful dessert. To make sure our cookie dough dip is safe, we must bake the flour. Start by spreading 1 cup of all-purpose flour on a baking sheet. Preheat your oven to 350°F (175°C). Bake the flour for 5 minutes. This step kills any harmful bacteria. After baking, let the flour cool completely before using it in your dip. In a large mixing bowl, we will combine the base ingredients. Add 1/2 cup of softened unsalted butter, 1/2 cup of brown sugar, and 1/4 cup of granulated sugar to the bowl. Using an electric mixer or a whisk, cream them together until the mixture looks smooth and fluffy. This step is key to getting a light texture in our dip. Now, let's add more flavor. Mix in 1 teaspoon of vanilla extract and 1/2 teaspoon of salt. This will enhance the taste. Next, we will add the cooled flour. Do this gradually, mixing well. Alternate adding 1/4 cup of almond milk (or regular milk) with the flour. Keep mixing until everything is smooth. After that, it’s time to add the fun stuff! Gently fold in 1/2 cup of mini chocolate chips. If you like nuts, add 1/4 cup of chopped nuts at this point. Mix them until they are evenly spread throughout the dip. Finally, if you want a cooler dip, place it in the fridge for about 30 minutes. Now, you can enjoy this delicious cookie dough dip with graham crackers, fruit, or pretzel sticks for dipping. For the full recipe, check out the earlier section! To get a smooth and creamy dip, start with softened butter. This helps the sugars blend well. Cream the butter with brown sugar and granulated sugar until fluffy. The key is to mix thoroughly. Once you add the flour, do it slowly. This keeps the dip from becoming lumpy. If you want a creamier dip, add a bit more almond milk. It will make the dip even more delightful! Want to change things up? You can add spices like cinnamon or nutmeg for warmth. These spices make the dip special. You can also mix in different types of chocolate chips. Try dark chocolate or white chocolate for a twist. If you like nuts, add chopped walnuts or pecans. These add crunch and flavor. You can also fold in a bit of peanut butter for a richer taste. Chilling the dip is a smart move. It helps the flavors meld together. Plus, it makes the dip firmer. I recommend chilling it for about 30 minutes before serving. This makes a big difference in taste and texture. If you are in a hurry, you can skip this step. But trust me, chilling is worth it for that perfect bite. Check out the Full Recipe for more details! {{image_2}} When making chocolate chip cookie dough dip, you can get creative with variations. This lets you enjoy new flavors and meet different dietary needs. You can change up the sweetness in this dip. Using maple syrup or coconut sugar provides a unique taste. Both options are great for a natural sweetness. If you want a sugar-free dip, consider using erythritol or stevia. These sweeteners work well, keeping the dip tasty without added sugar. Adding different extracts can change the flavor. Almond or hazelnut extracts offer a nice twist. You can also mix in cocoa powder for a rich chocolate flavor. Peanut butter adds creaminess and depth. Try these for a fun spin on the classic recipe. For those with special diets, I have great options. Use gluten-free flours like almond or coconut flour to make the dip gluten-free. For a dairy-free version, replace butter with coconut oil or a dairy-free spread. This keeps the dip creamy without any dairy. These swaps allow everyone to enjoy this tasty treat. For the full recipe, check out the guide above. Enjoy making your own versions! To keep your cookie dough dip fresh, store it in an airtight container. Place it in the fridge as soon as you finish serving. This helps maintain its creamy texture and flavor. Always use a clean spoon to scoop out the dip. This prevents germs and keeps your dip tasting great. If you want to save some for later, you can freeze the dip. First, put it in a freezer-safe container. Make sure the lid is tight. Freeze it for up to three months. To thaw, simply move it to the fridge overnight. Stir it well before serving again. This way, it will taste just as good! In the fridge, your cookie dough dip can last about five days. If you freeze it, it can last for up to three months. However, for the best taste, try to eat it within a month. Always check for any signs of spoilage before enjoying. Keeping track of these time frames helps you enjoy this treat at its best! No, raw flour can contain harmful bacteria. To make it safe, always bake the flour first. Spread it on a baking sheet and bake at 350°F for 5 minutes. This kills any bad germs. Let it cool before mixing it into your dip. Following this step keeps your cookie dough dip safe to enjoy. If you need a dairy-free option, you can use coconut oil. It gives a nice texture and flavor. You can also try using vegan butter. This works well as a 1:1 substitute for regular butter. Applesauce is another option, but it may change the taste more. Choose your substitute based on what you like best! You can serve this dip with graham crackers for a sweet crunch. Fresh fruit like apple slices or strawberries works great too. Pretzel sticks add a salty touch that pairs nicely with the sweet dip. You can also use cookies. Try different dippers to find your favorite! Some stores sell pre-made cookie dough dip. Look at local grocery stores or specialty shops. Brands like Betty Crocker or Pillsbury often have options. These can save time when you want a quick treat. Always read labels to find one that suits your taste and needs. We've covered easy steps to make a tasty Chocolate Chip Cookie Dough Dip. You learned about essential ingredients, safe baking practices, and tips for the best texture. We discussed fun alternatives and how to store your dip properly. Lastly, answers to common questions shared more ways to enjoy this treat. This dip is fun, versatile, and perfect for any gathering. Enjoy making it, sharing it, and most importantly, savoring every bite!

Chocolate Chip Cookie Dough Dip Irresistible Treat

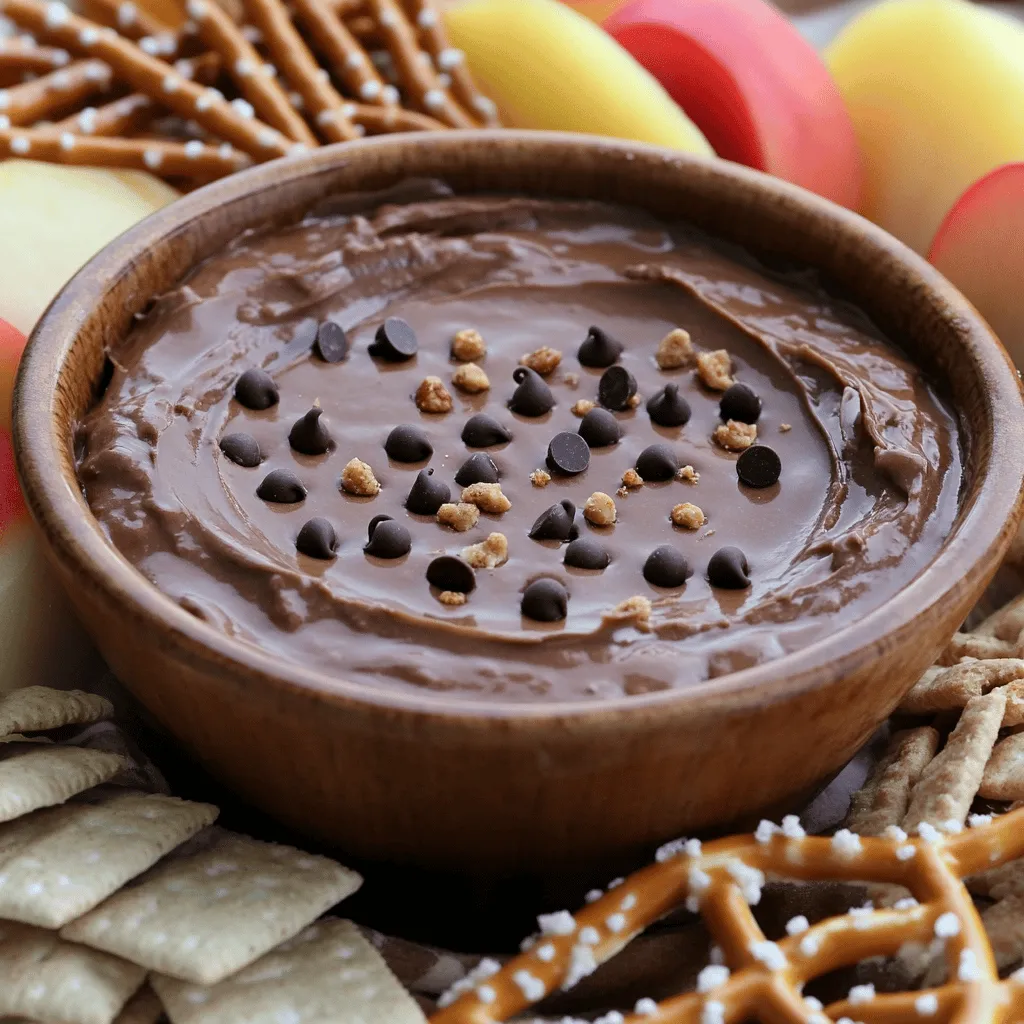
Are you a cookie dough lover? If so, you’re in for a treat! This Chocolate Chip Cookie Dough Dip is

To make cheesy garlic breadsticks, you'll need a few simple ingredients. These items will help create a tasty treat. Here’s what you need: - 2 cups all-purpose flour - 1 teaspoon instant yeast - 1 teaspoon sugar - 3/4 teaspoon salt - 3/4 cup warm water (around 110°F) - 2 tablespoons olive oil - 2 tablespoons unsalted butter (melted) - 2 cloves garlic (minced) - 1 cup shredded mozzarella cheese - 1/2 cup grated Parmesan cheese - 1 tablespoon dried oregano - Fresh parsley (for garnish) Every ingredient plays a role. The flour gives structure. The yeast helps the dough rise. Sugar adds a hint of sweetness. Salt enhances all flavors. Warm water activates the yeast. Olive oil adds moisture and flavor. Butter gives richness. Garlic brings that bold taste. Mozzarella and Parmesan offer a cheesy delight. Oregano adds a lovely herb note. Finally, parsley brightens the dish. You can find the full recipe online if you want to dive deeper. Each step will guide you to cheesy perfection. 1. Start by mixing the dry ingredients. In a large bowl, combine 2 cups of all-purpose flour, 1 teaspoon of instant yeast, 1 teaspoon of sugar, and 3/4 teaspoon of salt. Make sure to mix well. 2. Next, add warm water and olive oil. Pour in 3/4 cup of warm water and 2 tablespoons of olive oil. Stir until a dough starts to form. 3. Now, knead the dough. Transfer the dough to a lightly floured surface. Knead it for about 5 to 7 minutes until it feels smooth and elastic. 1. Grease the bowl. Lightly coat the mixing bowl with oil to prevent sticking. 2. Cover and let it rest. Place the dough in the greased bowl and cover it with a clean towel. Let it rise in a warm place for about 30 to 45 minutes, or until it doubles in size. 1. Preheat the oven. Set your oven to 425°F (220°C) so it’s hot and ready for baking. 2. Apply the garlic butter mixture. In a small bowl, mix 2 tablespoons of melted butter and 2 cloves of minced garlic. Brush this mixture over the rolled-out dough. 3. Add cheese and oregano. Sprinkle 1 cup of shredded mozzarella cheese, 1/2 cup of grated Parmesan cheese, and 1 tablespoon of dried oregano evenly over the garlic-buttered dough. 4. Slice and bake. Use a sharp knife or pizza cutter to cut the dough into strips about 1 inch wide. Place the strips on a parchment-lined baking sheet. Bake for 12 to 15 minutes or until golden and bubbly. Enjoy making these cheesy garlic breadsticks with the full recipe! To make great breadsticks, kneading is key. Here’s how to do it right: - Knead the dough for about 5-7 minutes. This helps develop gluten. - Use a lightly floured surface. This keeps the dough from sticking. - Feel the dough. It should be smooth and elastic when done. For rising the dough, follow these tips: - Grease your bowl lightly. This helps the dough rise without sticking. - Cover the bowl with a clean towel. It keeps the warmth inside. - Find a warm spot for rising. A sunny window or a warm oven works well. To add more flavor, try these suggestions: - Mix in some red pepper flakes for heat. - Use fresh herbs like basil or thyme for a fresh taste. - You can also add a touch of garlic powder to the dough. For cheese, don't limit yourself to mozzarella. Consider these options: - Cheddar adds a sharp flavor. - Gouda gives a creamy texture. - Blending different cheeses creates a rich taste. Making your breadsticks look good is easy. Here are some ideas: - Serve them warm in a small basket lined with a colorful cloth. - Garnish with fresh parsley for a pop of color. - For dipping, offer marinara sauce or a garlic herb dip. These simple steps can make your cheesy garlic breadsticks shine! For the full recipe, check out the recipe section above. {{image_2}} You can switch up the cheese for a new taste. Cheddar adds a sharp flavor, while gouda offers a creamy twist. Mixing cheeses brings depth. Try blending mozzarella with cheddar for a great combo. This mix creates a rich, gooey texture. For a kick, add red pepper flakes. This spice gives your breadsticks a mild heat. You can also try fresh herbs like basil or thyme. These herbs add a delightful aroma and fresh taste. Experiment with your favorite spices to make them unique. Want gluten-free breadsticks? You can use gluten-free flour instead of regular flour. Make sure to check the flour’s rising ability. You may need to adjust the yeast quantity for best results. This way, everyone can enjoy these cheesy treats! To store uneaten breadsticks, let them cool first. Place them in an airtight container. You can also wrap them in plastic wrap. This keeps them fresh for a few days. Make sure to seal tightly to avoid drying out. You can freeze baked breadsticks. First, let them cool completely. Then, place them in a freezer-safe bag. Remove as much air as possible before sealing. To thaw, leave them in the fridge overnight. For reheating, pop them in the oven at 350°F for about 10 minutes. This will bring back their crispiness. In the fridge, cheesy garlic breadsticks last about 3 to 5 days. If you freeze them, they can last up to 3 months. Look for signs of spoilage, like an off smell or mold. If you see either, it’s best to toss them out. To make cheesy garlic breadsticks from scratch, start by mixing flour, yeast, sugar, and salt in a bowl. Then add warm water and olive oil. Knead the dough until smooth. Let it rise until it doubles in size. Roll out the dough, brush it with garlic butter, and top with cheese and oregano. Slice it up and bake until golden. Yes, you can substitute several ingredients. Use whole wheat flour instead of all-purpose flour. You can swap out mozzarella for cheddar or gouda. If you don’t have fresh garlic, garlic powder works well too. Be creative and adjust to your taste! Cheesy garlic breadsticks pair well with marinara sauce or garlic herb dip. You can also serve them with a fresh salad or soup. They make a great side for pasta dishes too. Enjoy them with your favorite meal! Cheesy garlic breadsticks last about 2-3 days in the fridge. Wrap them in plastic wrap or foil to keep them fresh. If you want to store them longer, freeze them for up to a month. Just reheat before serving. Yes, you can make the dough ahead of time. After kneading, let it rise. Then, cover it and place it in the fridge. It can stay there for up to 24 hours. Just remember to let it come to room temperature before rolling it out. Find the complete Cheesy Garlic Breadsticks recipe [here](#). You now have everything to make perfect cheesy garlic breadsticks. We covered all the key steps, from mixing the ingredients to baking the breadsticks. Remember to knead well and let the dough rise. Feel free to get creative with flavors and cheese options. Storage tips help keep your breadsticks fresh. Enjoy this tasty treat with your favorite dips or share with friends. Happy baking!

Cheesy Garlic Breadsticks Simple and Tasty Recipe

Craving an easy, delicious snack? My Cheesy Garlic Breadsticks recipe is exactly what you need! Imagine warm, cheesy breadsticks fresh

Older posts
Newer posts
← Previous Page1 … Page68 Page69 Page70 … Page76 Next →
© 2025 My Cooking Cast • Built with GeneratePress

Our Policies

  • Privacy Policy
  • GDPR Policy
  • Terms Of Use
  • Copyright Policy
  • Cookie Policy
  • Disclaimer

More Information​

  • Home
  • Contact
  • About
  • Dinner
  • Appetizers
  • Dessert
©2025, My Cooking Cast About Privacy Policy Back To Top