Skip to content
DisclaimerTerms Of UseGDPR PolicyCookie Policy

My Cooking Cast

  • Home
  • Drinks
  • Appetizers
  • Dinner
  • Dessert
  • About
  • Contact
  • Privacy Policy
DisclaimerTerms Of UseGDPR PolicyCookie Policy

Emma

- 8 oz. egg noodles or rice noodles - 1 lb. flank steak, thinly sliced - 4 tablespoons unsalted butter - 5 cloves garlic, minced - 2 tablespoons soy sauce - 1 tablespoon oyster sauce - 1 tablespoon sesame oil - 1 teaspoon black pepper - 2 green onions, sliced (for garnish) - Fresh cilantro leaves (for garnish) - Optional: Red pepper flakes for heat The main ingredients for Garlic Butter Steak Noodles are simple yet impactful. The choice of noodles is key. I love using egg noodles for their texture, but rice noodles work too. The flank steak is a great cut for this dish. It cooks quickly and remains tender. Next, we have the aromatic components. Garlic is a must. It adds a strong and tasty punch. Soy sauce and oyster sauce bring depth and umami to the dish. They balance the rich butter flavor. Finally, we finish with the seasoning and garnish. Sesame oil enhances the nutty taste. Black pepper adds a little heat. Green onions and cilantro make the dish look fresh. If you enjoy spice, sprinkle on red pepper flakes. For the full recipe, check out the instructions to create this tasty meal. To cook egg noodles or rice noodles, start by boiling water in a large pot. Add the noodles and cook them according to the package instructions. This usually takes about 4 to 6 minutes. Stir the noodles occasionally to keep them from sticking together. Once done, drain the noodles in a colander and set them aside. To avoid stickiness, drizzle a bit of sesame oil on the drained noodles. Toss them gently to coat. This step helps keep your noodles nice and separate for the final dish. Next, we get to the steak. In a large skillet or wok, melt 2 tablespoons of butter over medium-high heat. Then, add the minced garlic. Sauté it for about one minute until you smell that great garlic aroma. This brings out its flavor and makes your dish shine. Now, crank up the heat to high and add your thinly sliced flank steak. Season it with black pepper. Cook the steak for about 3 to 4 minutes, stirring frequently. You want it browned and cooked through, but not overdone. Once your steak is ready, it’s time to bring it all together. Add the cooked noodles to the skillet. Pour in the soy sauce and oyster sauce, and toss everything together. This step ensures that the noodles and steak are well coated. Next, add the remaining 2 tablespoons of butter. Stir until it melts and mixes well with the noodles and steak. This creates a rich, flavorful dish. Taste it and see if it needs more seasoning. If you like heat, sprinkle in some red pepper flakes. Finally, remove your pan from the heat. Garnish your dish with sliced green onions and fresh cilantro before serving. For the full recipe, check out the complete instructions. Enjoy your delicious Garlic Butter Steak Noodles! To make Garlic Butter Steak Noodles shine, pick the right cut of steak. Flank steak is a great choice. It cooks quickly and has a nice flavor. Slice it thin for tender bites. Next, focus on the noodles. For the best texture, cook them until just tender. You want them soft but firm enough to hold their shape. Toss them with sesame oil right after cooking. This will keep them from sticking together. Want to spice things up? Add red pepper flakes to the skillet when you cook the steak. This gives the dish a nice kick. If you prefer a milder taste, skip the heat. Fresh herbs can brighten your meal. I love using cilantro or green onions. Sprinkle them on top just before serving for added freshness. Garlic Butter Steak Noodles taste great with simple side dishes. Try a fresh salad or steamed veggies. They balance the richness of the steak and butter. Want to impress your guests? Serve the noodles in a big bowl with the steak on top. Add a sprinkle of fresh herbs for color. This makes a beautiful presentation that looks as good as it tastes. For the full recipe, check out the detailed instructions on how to create this delightful dish. {{image_2}} You can switch up the protein in this dish easily. Want to use chicken? Just slice it thin and cook it the same way as the steak. Shrimp works great too. Cook it until it turns pink, which only takes a few minutes. For a vegetarian option, try tofu or tempeh. Press the tofu to remove water, then cut it into cubes. Sauté it until golden. Tempeh can be sliced thin and cooked like the steak. Both options absorb flavors well, making them tasty choices. The type of noodle you use can change the dish. Egg noodles give a rich taste, but rice noodles are light and chewy. Try soba noodles for a different twist. They add a nutty flavor that pairs well with garlic butter. If you need gluten-free options, choose rice noodles or gluten-free pasta. These will still deliver a delicious meal without any gluten. To enhance flavors, think about adding more sauces. Teriyaki sauce can give a sweet touch. Hoisin sauce adds depth and richness. You can also play with homemade sauces. Mixing soy sauce with lime juice or sesame oil can create a fresh twist. Try adding fresh herbs, like basil or mint, for a bright flavor. A splash of hot sauce can bring heat. Feel free to experiment; the sauce is key to making this dish your own. For the complete recipe, check the [Full Recipe]. To keep your Garlic Butter Steak Noodles fresh, let them cool to room temperature. This step helps prevent moisture build-up. Once cooled, place them in an airtight container. I recommend using glass containers as they seal well and do not absorb odors. Store your leftovers in the fridge for up to three days. When it’s time to enjoy your leftovers, you want to reheat them just right. The best way is to use a skillet over medium heat. Add a splash of water or broth to keep the noodles moist. Stir often until everything is heated through. This method keeps the texture nice and prevents the noodles from becoming mushy. Yes, you can freeze Garlic Butter Steak Noodles! To prepare for freezing, let the dish cool completely first. Portion it into freezer-safe bags or containers. Remove as much air as possible to avoid freezer burn. You can store them for up to three months. When you’re ready to eat, thaw overnight in the fridge and reheat as mentioned above. It takes about 10 minutes to prep and 15 minutes to cook. You can enjoy this dish in just 25 minutes! This quick timing makes it perfect for busy weeknights. Yes, you can prep many parts ahead of time. Slice the steak and mince the garlic the day before. Store them in the fridge. You can also cook the noodles in advance. Just toss them with sesame oil to keep them from sticking. You can pair these noodles with a fresh salad or steamed vegetables. A side of garlic bread also goes well with this dish. For a complete meal, add some crispy spring rolls for extra crunch. Absolutely! You can portion the noodles and steak into containers. Store them in the fridge for up to four days. This makes it easy to grab a meal on busy days. Just reheat and enjoy! Yes, you can use chicken, shrimp, or pork instead of steak. Thinly sliced chicken breast or shrimp cook quickly and taste great. For a vegetarian option, try tofu or tempeh. They absorb flavors well and add protein. For the full recipe, check the detailed instructions above. Garlic Butter Steak Noodles are a tasty choice for any meal. We covered the key ingredients, with steak and noodles at the heart. You learned how to cook these well and add great flavor. Remember, you can switch proteins or noodles to fit your taste. Proper storage helps keep your dish fresh for later. Use these tips to impress at your next dinner. Enjoy your cooking journey with Garlic Butter Steak Noodles!

Garlic Butter Steak Noodles Tasty and Quick Meal

Ready for a meal that’s both quick and loaded with flavor? These Garlic Butter Steak Noodles combine tender steak and

- 1 lb ground beef (or chicken/turkey) - 4 tablespoons unsalted butter - 4 cloves garlic, minced - 1/4 cup honey - 1/3 cup BBQ sauce - 1 teaspoon smoked paprika - 1 teaspoon chili powder - Salt and pepper to taste - 8 small corn or flour tortillas - 1 cup shredded lettuce - 1/2 cup diced tomatoes - 1/2 cup shredded cheese (cheddar or Mexican blend) - Fresh cilantro for garnish - Lime wedges for serving For my Garlic Butter Honey BBQ Tacos, I love using simple ingredients. First, I take 1 pound of ground beef, but chicken or turkey works well too. The meat adds a hearty base for the dish. Next, I melt 4 tablespoons of unsalted butter in a skillet. This butter gives the tacos a rich flavor. I also add 4 cloves of minced garlic. Garlic is key for that savory kick. Then, I stir in 1/4 cup of honey. Honey brings a sweet touch that balances the BBQ flavor. Next, I mix in my sauces and seasonings. I use 1/3 cup of BBQ sauce for depth. A teaspoon of smoked paprika adds a slight smokiness. I also add a teaspoon of chili powder for warmth. Finally, I season with salt and pepper to taste. When it comes to toppings, I warm 8 small corn or flour tortillas. I love to fill them with 1 cup of shredded lettuce and 1/2 cup of diced tomatoes for freshness. For some creaminess, I sprinkle on 1/2 cup of shredded cheese, either cheddar or a Mexican blend. I always add fresh cilantro for a bright finish and serve with lime wedges on the side. You can find the full recipe [here](Full Recipe). - First, melt the butter in a large skillet over medium heat. - Next, add the minced garlic. Sauté it for about one minute until it smells great. - Now, add the ground beef or chicken/turkey to the skillet. - Stir it well to break it up. Cook until it turns brown, about 5-7 minutes. - After the meat is cooked, stir in the honey and BBQ sauce. - Add the smoked paprika, chili powder, salt, and pepper. Mix it all well. Cook for another 2-3 minutes. - While the meat cooks, warm the tortillas. - You can do this in a separate skillet or microwave for about 30 seconds. They should be soft and easy to fold. - To assemble, take a tortilla and add a scoop of the meat mixture. - Top it with shredded lettuce, diced tomatoes, and cheese. - Don’t forget to garnish with fresh cilantro. Serve with lime wedges for a zesty touch. For the full recipe, refer to the earlier section. To make your taco filling shine, season the meat well. Start by adding salt and pepper while cooking. This helps build flavor early on. Use smoked paprika and chili powder to give it a nice kick. For extra depth, taste the filling as you cook. Adjust the spices as needed. Remember, a well-seasoned filling makes all the difference in your tacos. Soft tortillas are key to a great taco. To warm them, use a skillet over medium heat. Place each tortilla for about 30 seconds on each side. This method keeps them soft and pliable. If you prefer, you can microwave them for about 30 seconds, wrapped in a damp paper towel. Just make sure they don’t dry out. Warm tortillas make the perfect base for your delicious filling. Pair your tacos with tasty side dishes. A fresh corn salad adds sweetness and crunch. You can also serve black beans for a hearty side. Guacamole or salsa brings extra flavor and zest. Don't forget lime wedges! The citrus adds a refreshing touch to each bite. These sides will round out your meal and make it truly special. {{image_2}} You can switch up the meat in these tacos. Ground chicken or turkey works great. If you want a plant-based option, try using lentils or black beans. These alternatives still soak up the garlic butter honey BBQ flavor. Just make sure to adjust your cooking time. Cook chicken and turkey until fully done. For lentils or beans, just heat them through. BBQ sauce is key in this recipe. You can use your favorite brand or make your own. Try different flavors like spicy, smoky, or even sweet. Each sauce gives the tacos a unique taste. Mix and match sauces for fun flavor combos. Add a splash of hot sauce for extra kick, if you like heat. Toppings make tacos fun and personal. Some good choices are avocado, jalapeños, or sour cream. You can also add corn or diced onions for more crunch. Fresh herbs like cilantro or parsley make a nice touch. Don’t forget lime wedges for a zesty finish. Customize each taco to fit your mood or the crowd. For the full details on making these delicious tacos, check the Full Recipe. To keep your leftover tacos fresh, store them in the fridge. Place the tacos in an airtight container. This helps to keep them from drying out. Enjoy them within three days for the best taste. If you have extra meat filling, store it separately. This way, your tortillas stay soft. You can freeze the taco filling for later use. First, let the meat cool completely. Then, place it in a freezer-safe bag. Remove as much air as possible before sealing. Label the bag with the date. You can freeze it for up to three months. When ready to eat, just thaw it in the fridge overnight. To reheat your tacos, use the oven or a skillet. If you're using the oven, set it to 350°F. Wrap the tacos in foil to keep them moist. Heat for about 10-15 minutes. If you choose a skillet, warm it over medium heat. Add a splash of water to prevent drying. Cook for a few minutes until heated through. Enjoy your tasty Garlic Butter Honey BBQ Tacos! For the full recipe, check the recipe section. To keep your tortillas crisp, heat them just before serving. You can warm them in a skillet or microwave. Use low heat and don’t overcook. This method keeps them soft without making them soggy. You can also use a cast-iron skillet. A quick toast adds nice flavor and crunch. Another tip is to serve the filling hot but not wet. This way, the tortillas stay firm and tasty. Yes! You can easily make these tacos gluten-free. Use corn tortillas instead of flour tortillas. They provide great flavor and texture. Check the labels if you buy pre-made tortillas. Some brands offer gluten-free options. You can also use lettuce leaves as a wrap. This gives a fresh twist and cuts carbs. If you need a substitute for honey, try maple syrup. It adds sweetness and flavor. Agave nectar is another great choice. It has a mild taste and works well in BBQ. You could even use brown sugar mixed with a little water. This gives you a similar sweetness and consistency. Each option will change the flavor just a bit, so choose what you like best. This blog post gave you a clear view of how to make tasty tacos. You learned about the key ingredients, sauces, and the right toppings. I shared simple steps to prepare and cook, making the process easy. We also explored tips for soft tortillas and how to customize flavors. Lastly, I provided storage and reheating advice to enjoy leftovers. Now, it’s time to gather your ingredients and create delicious tacos at home. Enjoy your cooking adventure!

Garlic Butter Honey BBQ Tacos Easy and Flavorful Dish

Do you want to spice up your taco night? These Garlic Butter Honey BBQ Tacos are both easy and packed

To make this Peach Cobbler Bread Pudding, you will need the following ingredients: - 1 loaf of challah or brioche bread, cubed - 3 cups fresh peaches, peeled and diced (or canned peaches, drained) - 4 large eggs - 2 cups whole milk - 1 cup heavy cream - 1 cup granulated sugar - 1 teaspoon vanilla extract - 1 teaspoon ground cinnamon - ½ teaspoon nutmeg - ½ cup brown sugar - 2 tablespoons butter, melted - Pinch of salt - Optional toppings: Whipped cream or vanilla ice cream Each ingredient plays a key role in making this dessert delicious. The bread adds texture. The peaches bring sweetness and juiciness. Eggs and cream create a rich custard. Sugar balances flavors, while spices add warmth. Using fresh peaches gives the best taste. Canned peaches can work if fresh ones aren't available. You can adjust the amount of sugar based on how sweet your peaches are. This recipe is easy to follow. You can find the full recipe later. Enjoy gathering these ingredients and get ready for a delightful baking experience! - Preheat your oven to 350°F (175°C). - Grease a 9x13 inch baking dish with butter or cooking spray. - In a large bowl, mix cubed bread with diced peaches. Toss them gently so the peaches blend well with the bread. - Whisk together the eggs, milk, heavy cream, sugar, and spices until smooth. The mixture should look creamy and well-combined. - Pour the custard mixture over the bread and peach mix. Let it sit for about 10-15 minutes. This helps the bread soak up the flavors. - Sprinkle brown sugar on top of the mixture. Bake for 45-50 minutes. The top should turn golden brown and a toothpick should come out clean. - Once baked, let it cool for 10 minutes before serving. This makes it easier to cut and serve. For this recipe, challah and brioche are my top picks. Both breads have a rich texture. They soak up the custard well. Challah has a slightly sweet flavor, while brioche is buttermilk-based. You can also use other breads like Texas toast or croissants. Just ensure they are a bit stale. Fresh bread may get too mushy. Using fresh peaches gives the best taste. They are juicy and sweet, perfect for summer. If fresh peaches are out of season, canned peaches work too. Just make sure to drain them well. This keeps the pudding from becoming too watery. You can also mix in some cinnamon or nutmeg for extra flavor. Serve your peach cobbler bread pudding warm for the best taste. Top it with whipped cream or a scoop of vanilla ice cream. This adds a nice touch of creaminess. You can also sprinkle some cinnamon or add peach slices on top. This makes the dish look fancy and inviting. Enjoy this delightful dessert! {{image_2}} You can use many fruits instead of peaches. Try ripe pears for a sweet twist. Apples add a nice crunch and flavor. For a berry boost, mix in strawberries or blueberries. They bring a fresh taste that pairs well with the bread pudding. Each fruit gives the dish its own unique flair. To make this dish gluten-free, use gluten-free bread. Look for bread that feels soft and has a good texture. For dairy-free options, swap whole milk and cream with almond or coconut milk. You can also replace eggs with flaxseed meal for a vegan version. Just mix one tablespoon of flaxseed with three tablespoons of water for each egg. These changes help everyone enjoy this dessert. Enhance the flavor of your pudding with spices. Consider adding a pinch of ginger or cloves for warmth. You can also use almond extract for a nutty touch. For a fun twist, mix in some chocolate chips or nuts. These extras add a delightful surprise to every bite. To keep your peach cobbler bread pudding fresh, store it in the fridge. Use an airtight container to prevent it from drying out. If you place it in a bowl, cover it tightly with plastic wrap. It will stay good for about 3 to 4 days. For best taste, eat it within this time frame. To reheat your bread pudding, the oven is your best friend. Preheat the oven to 350°F (175°C). Place the pudding in a baking dish. Cover it with foil to keep it moist. Heat for about 15 to 20 minutes. You can also use the microwave. Just warm it in short intervals, about 30 seconds at a time. Stir in between to heat it evenly. If you want to freeze your bread pudding, follow these steps: 1. Allow it to cool completely after baking. 2. Cut it into portions for easy serving. 3. Wrap each piece tightly in plastic wrap. 4. Place the wrapped pieces in a freezer-safe bag or container. 5. Label it with the date and freeze. To thaw, move it to the fridge overnight. You can reheat it as mentioned above. Enjoy your peach cobbler bread pudding even after freezing! For the full recipe, check out the earlier section. Yes, you can prepare this dish in advance. To do this, follow these steps: - Make the bread pudding mix and assemble it in the baking dish. - Cover it tightly with plastic wrap or foil. - Store it in the fridge for up to 24 hours. - When ready to bake, remove it from the fridge and let it sit for about 30 minutes. - Bake as instructed in the recipe. This method keeps the flavors rich and allows for easy serving. If you need a substitute for heavy cream, try these options: - Full-fat coconut milk provides a creamy texture. - Whole milk mixed with melted butter works too. - A combination of milk and Greek yogurt can add creaminess. These alternatives may slightly change the flavor but will still create a delicious dessert. To check if your bread pudding is ready: - Look for a golden brown top. - Insert a toothpick in the center; it should come out clean. - The pudding should be set but slightly jiggly in the middle. These signs indicate a perfectly baked bread pudding. Yes, frozen peaches are a great option! - Thaw and drain them before use to avoid excess moisture. - Cut them into smaller pieces for better distribution. - They may not taste as fresh, but they'll still add great flavor. Absolutely! This dessert fits perfectly for gatherings and celebrations. - Serve it warm with whipped cream or vanilla ice cream. - You can also add fresh peach slices or a sprinkle of cinnamon on top. This dish is sure to impress your guests and make any occasion special. This blog post outlined a tasty peach cobbler bread pudding recipe. You learned about the key ingredients, from bread and fresh peaches to rich custard mix. I shared step-by-step instructions to help you bake it perfectly. Tips revealed the best bread choices and serving ideas. Variations showed how to adjust the recipe to fit your needs. Finally, storage info ensured your leftovers stay fresh. Now, it’s time to enjoy your delicious creation. This dessert is not just food; it’s a warm memory waiting to be made.

Peach Cobbler Bread Pudding Delightful Dessert Recipe

Craving a dessert that’s both comforting and scrumptious? Look no further! This Peach Cobbler Bread Pudding combines rich, buttery bread

- Canned chickpeas - Cherry tomatoes - Cucumber - Red onion - Kalamata olives - Feta cheese - Fresh parsley - Olive oil - Lemon juice - Dried oregano - Salt and black pepper - Chickpeas provide high protein content. - Cherry tomatoes are rich in antioxidants. - Olive oil offers healthy fats. Chickpeas are the star of this salad. They add a hearty feel and protein. I love using canned chickpeas because they save time. Just rinse and drain, and you’re ready to go! Cherry tomatoes bring a burst of sweetness and color. I cut them in half for easy bites. Cucumber adds crunch and freshness to the dish. I dice it into small pieces for texture. Red onion gives a mild zing, but you can use less if you prefer. Kalamata olives add a briny flavor. Their deep taste brightens the salad. Feta cheese gives a creamy touch. I crumble it right over the top. Fresh parsley adds a bright green pop and earthy flavor. It’s the perfect herb to finish this dish. For the dressing, I use simple ingredients. Olive oil is the base and adds richness. Lemon juice brings a bright, zesty kick. Dried oregano gives an herbal note that ties it all together. I season with salt and black pepper to taste. This salad is not just tasty; it’s packed with nutrition. The protein from chickpeas keeps you full. Cherry tomatoes help fight free radicals due to their antioxidants. The healthy fats from olive oil support heart health. You can find the full recipe at the end of the article. Enjoy making this delightful Mediterranean chickpea salad! - In a large mixing bowl, combine the chickpeas, cherry tomatoes, cucumber, red onion, olives, feta cheese, and parsley. Make sure to rinse and drain the chickpeas first. This step is key to avoid excess salt and liquid in your salad. - In a small bowl, whisk together the olive oil, lemon juice, dried oregano, salt, and black pepper. Whisking well helps blend the flavors. This dressing adds a zesty kick to your salad. - Pour the dressing over the salad mix. This will elevate the taste of the veggies and chickpeas. - Gently toss to combine everything. Be careful not to smash the chickpeas or feta. You want each bite to be delicious and fresh. - Let the salad sit for at least 15 minutes before serving. This allows the flavors to meld beautifully. - For serving suggestions, present the salad in a large bowl. Drizzle a bit more olive oil on top and garnish with fresh parsley and lemon wedges. This makes the dish vibrant and inviting. To make your Mediterranean chickpea salad shine, let it sit before serving. This resting time lets the flavors mix well, making each bite taste better. Fresh herbs add a bright note. Use parsley, basil, or mint for a fresh twist. Add chopped nuts for a fun crunch. Almonds or walnuts work great. For a creamy touch, include avocado. It makes the salad rich and satisfying, balancing the textures nicely. Prepare your ingredients ahead of time. Chop veggies and store them in separate containers. This way, you save time when making the salad. Use an airtight container to keep it fresh. Your salad will taste great even after a few days. For the full recipe, check the earlier section. {{image_2}} You can easily make this salad even more colorful and tasty. Adding bell peppers brings a sweet crunch. Choose any color you like! Carrots also add vibrant color and a nice bite. For a more filling dish, try incorporating quinoa. Quinoa is high in protein and makes the salad heartier. If you want extra protein, grilled chicken or shrimp works great. Just cook them first and slice them up. Canned tuna or salmon are also easy options. They add flavor and more nutrients without much effort. To change the flavor, try different cheeses. Goat cheese or mozzarella can give a fresh twist. Instead of lemon dressing, you might like using balsamic vinaigrette. It adds a rich, sweet taste that pairs well with the salad. Explore these variations to find your favorite mix! For the full recipe, check the details above. To store leftovers of your Mediterranean chickpea salad, place it in an airtight container. This keeps the salad fresh and tasty. Make sure to seal it tightly to avoid air exposure. If you have extra dressing, store it separately. This helps prevent the salad from getting soggy. You can enjoy your salad for up to three days in the fridge. Can you freeze Mediterranean chickpea salad? Freezing is not the best option for this salad. It can change the texture of the veggies and chickpeas. If you need to freeze it, prepare the salad without the dressing. Store the salad in a freezer-safe container. When ready to eat, thaw it in the fridge overnight and then add the dressing. How long does the salad last in the fridge? If stored properly, your salad can last about three days. Always check for signs of spoilage before eating. Signs that the salad has spoiled include a strange smell or slimy texture. If you see any of these signs, it’s best to toss it out. Yes, you can make this salad ahead of time. For the best taste, eat it within three days. The flavors blend nicely when it sits. Store it in an airtight container in the fridge. Make sure to keep the dressing separate if you want it to stay fresh longer. Just add the dressing right before serving. Yes, Mediterranean Chickpea Salad can be vegan! Just skip the feta cheese. You can use avocado or a vegan cheese instead. Both options add creaminess and flavor. This way, anyone can enjoy the salad! This salad pairs well with many dishes. Here are some ideas: - Grilled chicken or fish for a protein boost - Pita bread for a crunchy side - Hummus for a creamy dip - Quinoa for a filling addition These options make a lovely meal together. You can find the Full Recipe for the salad above! This blog post showed you how to make a tasty Mediterranean Chickpea Salad. You learned about the key ingredients, including chickpeas, veggies, and feta cheese. We discussed how to make the dressing, toss the salad, and let flavors blend. You can enhance this salad with nuts, herbs, or extra protein. Remember, store leftovers properly for the best taste. This salad is versatile and easy to customize. Enjoy your healthy dish!

Mediterranean Chickpea Salad Tasty and Fresh Dish

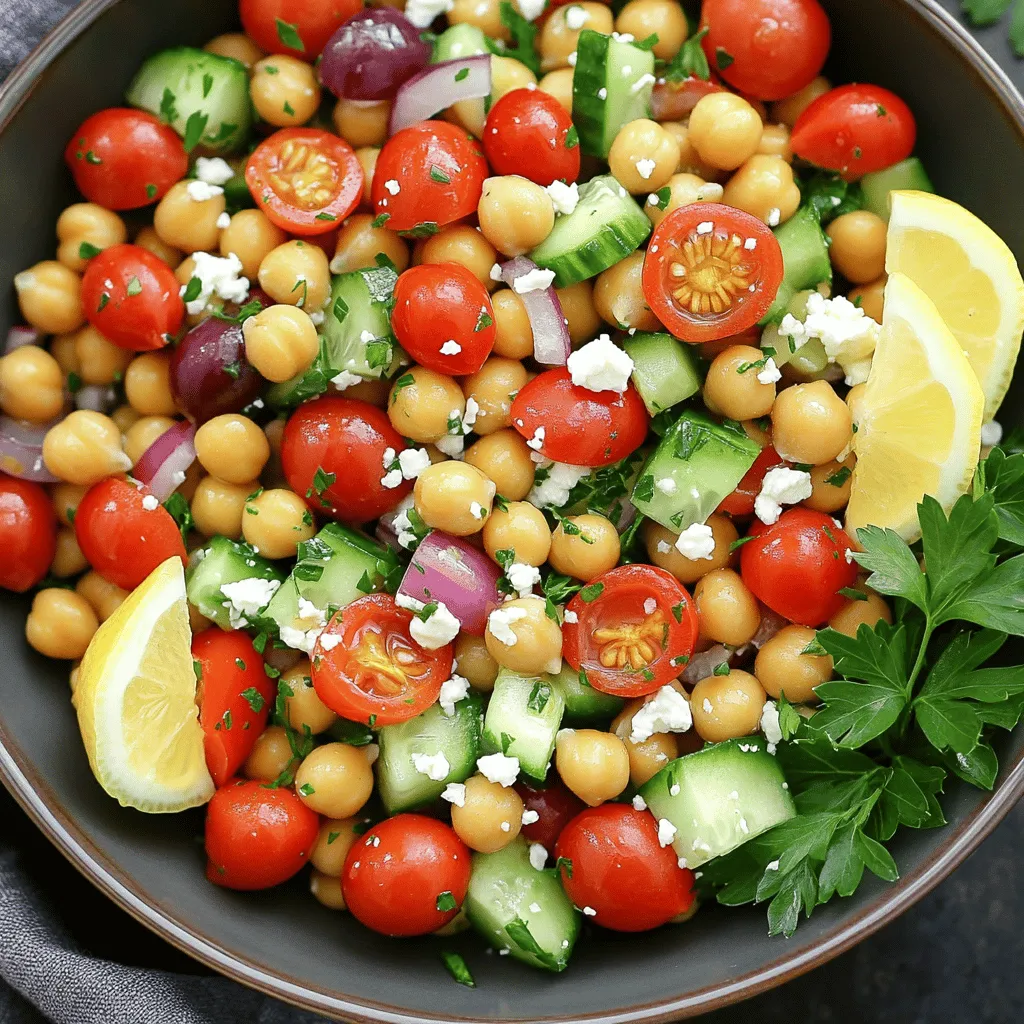
Ready to make a dish that’s fresh, tasty, and packed with goodness? My Mediterranean Chickpea Salad is just what you

To make a Healthy Strawberry Banana Smoothie, you need fresh and simple ingredients. Here’s what you will gather: - 1 cup fresh strawberries, hulled and sliced - 1 ripe banana, peeled and sliced - 1/2 cup unsweetened almond milk - 1/2 cup Greek yogurt - 1 tablespoon honey or maple syrup - 1 tablespoon chia seeds - 1/2 teaspoon vanilla extract - Ice cubes (optional) Each ingredient plays a key role. Fresh strawberries add a sweet, juicy flavor. Bananas make the smoothie creamy and add natural sweetness. Almond milk keeps it light and dairy-free. Greek yogurt adds protein and richness. Honey or maple syrup can sweeten it further, but adjust to your taste. Chia seeds provide fiber and healthy fats. A hint of vanilla enhances the overall flavor. If you like your smoothie cold and thick, toss in some ice cubes. For the full recipe, check out Berry Bliss Banana Smoothie. To make the Healthy Strawberry Banana Smoothie, follow these easy steps. 1. Prepare the Fruit: Start by washing the strawberries. Remove the green tops and slice them. Next, peel the banana and slice it into rounds. This makes blending easier. 2. Combine Ingredients: In your blender, add the sliced strawberries and banana. Pour in the almond milk and add the Greek yogurt. If you want extra sweetness, add honey or maple syrup. Don't forget the chia seeds and vanilla extract for flavor. 3. Blend Until Smooth: Blend the mixture on high speed. Keep blending until it looks smooth and creamy. If you like it thicker, add a few ice cubes and blend again. Taste the smoothie. If it needs more sweetness, add a bit more honey or syrup and blend again. Pour the smoothie into glasses and enjoy right away for the best taste. This process is quick, taking only about five minutes. For the full recipe, check out the details above. To make your smoothie taste great, you can adjust the sweetness. If you want a sweeter drink, add honey or maple syrup. Start with one tablespoon and taste it. You can always add more if needed. If you prefer natural sweetness, use ripe bananas. They add flavor without extra sugar. For the perfect smoothie consistency, blend until smooth. If your smoothie is too thin, add more yogurt or a few ice cubes. Ice makes it thicker and colder. If it’s too thick, add a splash of almond milk. Blend again until you reach your desired texture. Before blending, prepare your fruits. Slice the strawberries and bananas into smaller pieces. This helps them blend evenly. If you have time, freeze some of the banana slices. Frozen fruit gives a nice chill and creaminess. For a healthy boost, try adding chia seeds. They blend well and add fiber. You can find the full recipe to create this delightful drink. Enjoy your smoothie! {{image_2}} This Healthy Strawberry Banana Smoothie packs a nutritious punch. Each serving has about 200 calories. This makes it a great snack or light meal. Vitamins and minerals in this smoothie are impressive. Strawberries are rich in vitamin C and potassium. Bananas provide vitamin B6 and vitamin C. Together, they offer a nice mix of nutrients. Health benefits of strawberries and bananas are many. Strawberries can help boost your immune system. They also support heart health. Bananas give energy and aid digestion. Together, they create a tasty treat that fuels your body well. For the full recipe, check out the berry bliss banana smoothie. You can easily make this smoothie your own. Dairy-free alternatives and substitutes If you want a dairy-free option, use almond milk or oat milk instead of regular milk. For yogurt, try coconut yogurt. Both options keep the creamy taste. Adding greens for nutritional boosts Want to add some greens? Spinach or kale blends well without changing the flavor. Just a small handful adds vitamins and minerals. You won’t even taste it! Flavor variations Feel free to mix in other fruits. Blueberries or mango add a fun twist. You can also throw in some peaches or a handful of pineapple. Each fruit adds its unique taste and nutrition. Experiment with these tips to find your perfect blend! For the full recipe, check out the Berry Bliss Banana Smoothie. To make this smoothie vegan, simply swap the Greek yogurt for dairy-free yogurt. You can use coconut, almond, or soy yogurt. Also, choose maple syrup instead of honey for sweetness. These small changes keep your smoothie plant-based without losing flavor. If you don’t have chia seeds, flaxseeds work well too. Ground flaxseeds give similar fiber and omega-3 benefits. You can also skip them entirely. The smoothie will still taste great and be healthy without them. You can store the smoothie in the fridge for up to 24 hours. Use an airtight container to keep it fresh. Stir or shake well before drinking, as it may separate. For longer storage, freeze it in ice cube trays. Blend the frozen cubes later for a quick treat. For the full recipe, check out the Berry Bliss Banana Smoothie! This blog post covered how to make a tasty smoothie with strawberries and bananas. You learned the ingredients, steps, and tips to make it great. We also looked at the health benefits and ways to customize your smoothie. Use the tips to mix flavors and boost its nutrition. Enjoy your delicious drink, knowing you made it just right!

Healthy Strawberry Banana Smoothie Delightful Refreshment

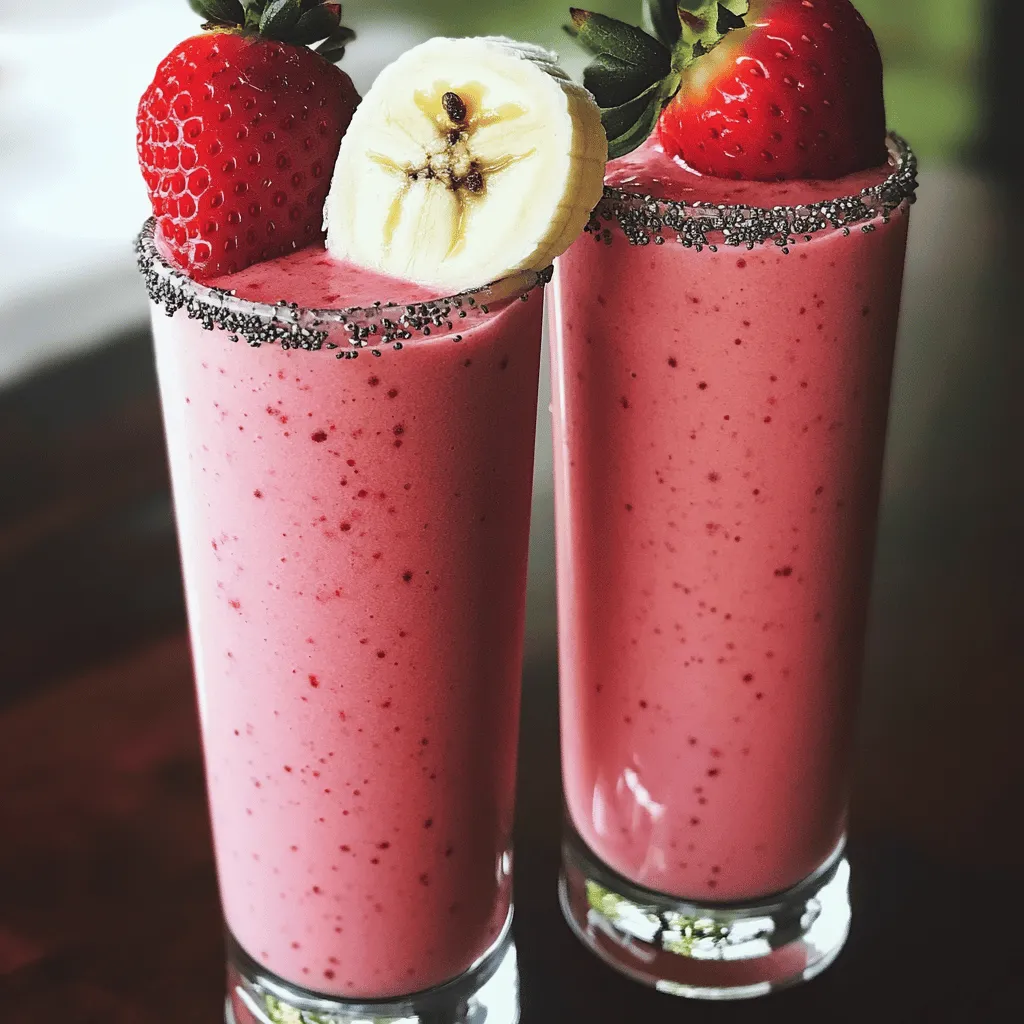
Looking for a simple, delicious way to kick-start your day? This Healthy Strawberry Banana Smoothie is the perfect blend of

- 4 medium zucchini - 1 cup fresh basil leaves - 1/4 cup walnuts (or pine nuts) - 1/4 cup grated Parmesan cheese (or nutritional yeast for vegan) - 2 cloves garlic, minced - 1/3 cup extra virgin olive oil - Salt and pepper to taste - Cherry tomatoes, halved - Red pepper flakes for added heat Zucchini noodles make a great base for this dish. You’ll need four medium zucchini. They spiralize well and hold their shape. Next, let’s talk about the pesto sauce. For a fresh and vibrant flavor, use one cup of basil leaves. You can choose walnuts or pine nuts, both work great. You’ll need a quarter cup. If you want a vegan option, use nutritional yeast instead of Parmesan cheese. That’s also a quarter cup. Two cloves of minced garlic add zest. Extra virgin olive oil brings it all together, about a third of a cup. Finally, season with salt and pepper to taste. For garnishes, halved cherry tomatoes look and taste great. If you like a kick, add red pepper flakes. This full recipe makes a simple and fresh meal that shines with flavor! To start, grab your zucchini. Use a spiralizer to create long, thin noodles. If you don’t have one, a vegetable peeler works too. Simply peel the zucchini into strips. Once you have your noodles, place them in a colander. Let them drain for about 10 minutes. This step helps remove excess water, so your dish stays crunchy. Next, let’s make the pesto. In a food processor, combine fresh basil leaves, walnuts, Parmesan cheese, and minced garlic. Pulse the mix until it’s finely chopped. Then, while the processor runs, slowly drizzle in the olive oil. Keep blending until you reach a smooth paste. Scrape down the sides if needed. Finally, season with salt and pepper to taste. You can adjust the texture with more olive oil or a bit of water. Now, heat a non-stick skillet over medium heat. Add your drained zucchini noodles to the pan. Sauté them for about 2-3 minutes. You want them tender but still firm, which is called al dente. Make sure not to cook them too long, or they will become mushy. Once the noodles are ready, remove the skillet from heat. Stir in the pesto sauce until the noodles are well coated. Taste your dish and adjust the seasoning if needed. For a fun touch, serve it with halved cherry tomatoes on top. If you like a bit of spice, add red pepper flakes for extra heat. Enjoy your fresh and vibrant zucchini noodles with pesto! For the full recipe, you can refer to the section above. To avoid sogginess, drain zucchini noodles well. After spiralizing, place them in a colander. Let them sit for about 10 minutes. This helps remove extra water. You want them tender, but not mushy. Sauté for 2-3 minutes over medium heat. This keeps them firm and tasty. To make your pesto richer, try adding nuts or cheese. Pine nuts and Parmesan cheese work great. You can also try adding lemon juice for zest. Adjust the texture by adding more olive oil. If it's too thick, add a splash of water. This makes the pesto smooth and easy to mix. Zucchini noodles pair well with grilled chicken or shrimp. For a vegetarian meal, add roasted veggies like bell peppers or mushrooms. Arrange the noodles in a bowl and top with cherry tomatoes. You can also sprinkle nuts on top for crunch. This gives a nice look and taste. For a fun twist, serve in a hollowed-out zucchini. You can find the full recipe [here](#). {{image_2}} If you want a vegan option, you can easily swap out the cheese. Instead of Parmesan, try using nutritional yeast. It adds a cheesy flavor without any dairy. You can also use blended cashews for a creamy texture. Both options work well in the pesto and keep it fresh and tasty. Do you need a nut-free recipe? No problem! You can use seeds instead of nuts. Sunflower seeds or pumpkin seeds make great substitutes. Just blend them in the food processor as you would with nuts. They add a nice crunch and flavor without any nuts, making it safe for those with allergies. Want to make your dish even better? Add more veggies or proteins! You can toss in sliced bell peppers, spinach, or cherry tomatoes. For protein, think of grilled chicken, shrimp, or chickpeas. These add-ins boost flavor and nutrition. Get creative and mix what you love. Remember, this dish is all about fresh and simple ingredients, so feel free to experiment! Store your zucchini noodles and pesto in separate, airtight containers. This keeps each fresh. Place the noodles in the fridge for up to two days. The pesto can last up to a week. To keep your pesto green, press plastic wrap on the surface before sealing. You can freeze zucchini noodles, but they can lose some crunch. To freeze, place them in a single layer on a baking sheet. After a few hours, transfer them to a freezer bag. For pesto, pour it into ice cube trays. Once frozen, pop them out and store in a bag. Both will last about three months in the freezer. To reheat zucchini noodles, use a non-stick skillet. Heat them on low for about two minutes. This helps keep them from getting mushy. For pesto, add it to the skillet with a bit of olive oil. Stir until warm, but don’t cook it too long. This keeps the flavors fresh and bright. For a complete recipe, check out the Full Recipe. Yes, you can make zucchini noodles ahead of time. Here are some tips for meal prep: - Spiralize or peel the zucchini a few hours before serving. - Place the noodles in a colander and sprinkle with salt. - Let them sit for 10 minutes to draw out moisture. - Store them in an airtight container in the fridge. These steps help keep your noodles fresh and ready for a quick meal. Zucchini noodles can become soggy if not prepared correctly. Here are common mistakes to avoid: - Don’t skip salting the noodles; it removes extra water. - Avoid cooking them for too long; 2-3 minutes is ideal. - Use a non-stick skillet to prevent sticking and overcooking. Following these tips keeps your noodles firm and tasty. Zucchini noodles are very versatile! Here are some alternative sauce ideas: - Marinara sauce for a classic flavor. - Alfredo sauce for a creamy twist. - A simple olive oil and garlic mix for a light option. - Spicy arrabbiata if you like heat. Feel free to experiment with different flavors! Leftovers can last in the fridge for about 3 days. Here are some storage tips: - Place them in an airtight container. - Keep the pesto and zucchini noodles separate if possible. - Reheat gently on the stove or in the microwave. This way, you maintain the best taste and texture for your meal. For the full recipe, check out the details above! This blog post covered how to make delicious zucchini noodles with pesto sauce. We started with the basic ingredients, from zucchini to fresh basil. Then, I guided you through step-by-step instructions, ensuring your noodles shine. We discussed tips to enhance flavor and ways to store your meal. In closing, experimenting with variations can make this dish even better. Enjoy healthy meals that are simple and fun to make!

Zucchini Noodles with Pesto Simple and Fresh Meal

Looking for a fresh and simple meal? Zucchini Noodles with Pesto is your answer! This dish is healthy, quick to

- Cauliflower florets - All-purpose flour or gluten-free flour - Water Cauliflower is the star of this dish. You want it cut into bite-sized florets for the best texture. Choose a large head of cauliflower for more wings. The flour creates the perfect batter, while water helps it blend smoothly. - Garlic powder - Onion powder - Smoked paprika - Cayenne pepper - Salt and black pepper Seasoning is key to flavor. Garlic powder adds depth. Onion powder gives it a sweet note. Smoked paprika brings a nice warmth. Adjust cayenne pepper to your heat level. Salt and black pepper round out the taste. - Buffalo sauce (store-bought or homemade) - Unsalted butter or vegan alternative Buffalo sauce gives the wings their signature kick. You can use store-bought or make your own. Mixing it with melted butter makes the sauce rich and smooth. For a vegan option, use a plant-based butter. These ingredients come together to create a tasty and crunchy snack. You can find the complete recipe in the Full Recipe section. - First, preheat your oven to 450°F (230°C). - Next, line a baking sheet with parchment paper. - In a large bowl, mix 1 cup of flour, 1 cup of water, garlic powder, onion powder, smoked paprika, cayenne pepper, salt, and black pepper. Whisk until smooth. - Take each cauliflower floret and dip it into the batter. - Let the excess batter drip off before placing them on the baking sheet. - Make sure to arrange them in a single layer for even baking. - Bake the cauliflower for 20 minutes. Flip them halfway through for even crispiness. - While they bake, mix buffalo sauce and melted butter in a bowl. - After 20 minutes, toss the cauliflower in the buffalo sauce until coated. - Return them to the baking sheet and bake for another 10-15 minutes. Look for a crispy, caramelized finish. - Finally, let them cool slightly before serving. Enjoy your tasty snack! For the full recipe, check out the detailed instructions above! To make your cauliflower buffalo wings super crunchy, bake them at a high temp. I recommend 450°F (230°C). This heat locks in moisture and gives you that desired crunch. Use parchment paper on your baking sheet to prevent sticking. Flipping the wings halfway through baking is key. This step ensures even cooking and browning. If you skip this, one side might end up soggy. So, set a timer for halfway, and give them a quick turn. Want to kick up the flavor? Add more spices to your batter! A sprinkle of cumin, or a dash of chili powder can add depth. You can also try smoked paprika for a deeper taste. If you like it hot, adjust the cayenne pepper. Start with a little, then add more to your taste. Remember, you can always add heat, but you can’t take it away! These wings pair great with crunchy celery sticks. They help cool down the spice and add a fresh crunch. For dipping, ranch dressing is a classic choice. You can also try blue cheese dressing for a bold twist. Serve everything on a platter for a fun, shareable snack. Check out the Full Recipe for more ideas! {{image_2}} You can change the flavor of your cauliflower buffalo wings with different sauces. Try using a blend of your favorite hot sauces. This can give your wings a new twist. Some popular options include sriracha or chipotle sauce for extra heat. You can also make your own sauce at home. Combine butter, vinegar, and spices for a personal touch. Want to make your wings even better? Add cheese! You can sprinkle some shredded cheese on top before the last baking step. This adds a tasty, gooey layer. You can also mix in vegetables like bell peppers or carrots. They add color and crunch to your dish. If you need gluten-free options, switch the all-purpose flour for gluten-free flour. This keeps the wings crispy without wheat. For a vegan version, use a plant-based butter instead of regular butter. It’s easy to adapt this recipe to fit your needs. Just follow the tips I shared, and you’ll have a delicious snack for everyone. For the full recipe, check out the [Full Recipe]. After cooking, let your cauliflower buffalo wings cool. Store leftovers in an airtight container. Place them in the fridge for up to three days. For longer storage, freeze them. Lay the wings on a baking sheet and freeze until solid. Once frozen, transfer them to a zip-top bag. This method helps to keep them from sticking together. For reheating, the oven is best. Preheat to 350°F (175°C). Spread the wings on a baking sheet. Heat for about 10-15 minutes. This keeps them crispy and tasty. If you're in a hurry, you can use the microwave. However, the wings may be softer. To keep some crunch, heat in short bursts. Check them frequently. Leftovers last about three days in the fridge. After that, they can spoil. Look for signs like an off smell or visible mold. If they look or smell strange, toss them out. When frozen, they can last for up to three months. Always check for freshness before eating. Keep these tips in mind for your delicious cauliflower buffalo wings! Yes, you can prep these wings in advance. First, make the batter and coat the cauliflower florets. Then, you can store them in the fridge for up to 24 hours. Just keep them covered in an airtight container. When ready to bake, let them sit at room temperature for about 20 minutes. This helps them cook evenly. If you want to freeze them, freeze the coated florets before baking. Place them on a baking sheet in a single layer. Once frozen, transfer them to a freezer bag. They can last for about a month. Bake them straight from the freezer when you’re ready to enjoy! There are plenty of great sides to pair with these tasty wings. Here are some popular options: - Celery sticks - Carrot sticks - Cucumber slices - Ranch dressing - Blue cheese dressing - Hummus These sides add crunch and freshness. You can also serve these wings with your favorite dipping sauces for extra flavor. To kick up the heat in your Cauliflower Buffalo Wings, you can adjust the cayenne pepper. Start by adding more cayenne to the batter. You can also mix in hot sauce directly into the batter. If you want more heat, try using a hotter buffalo sauce. Another option is to sprinkle some chili flakes on top after baking. This adds a nice touch. Just remember, start small and taste as you go! Making Cauliflower Buffalo Wings is both fun and tasty. You learned how to prepare the florets and make a great batter. I shared tips on achieving that perfect crispiness and suggested flavor tweaks. You also discovered how to store leftovers and different serving ideas. In the end, these wings adapt well to any taste. Whether you enjoy them spicy or mild, they’re a hit. Try them with your favorite dips, and don’t forget to share your creations!

Cauliflower Buffalo Wings Tasty and Crunchy Snack

If you’re looking for a tasty and crunchy snack, try my Cauliflower Buffalo Wings! These bites are perfect for game

- 4 boneless, skinless chicken thighs - 1 lemon (juiced and zested) - 3 cloves garlic, minced - 2 teaspoons dried oregano - 1 teaspoon dried thyme - 1 teaspoon smoked paprika - 1 teaspoon salt - ½ teaspoon black pepper - 2 tablespoons olive oil - 2 cups baby potatoes, halved - 1 cup cherry tomatoes - 1 bell pepper (any color), sliced - 1 red onion, cut into wedges - Fresh parsley for garnish This recipe is simple yet full of flavor. You’ll love how the chicken thighs soak up the bright lemon and herb mix. The garlic adds warmth, bringing everything together. For seasoning, the dried oregano and thyme add depth. Smoked paprika gives a nice touch of warmth. You control the salt and pepper to suit your taste. The veggies shine too! Baby potatoes become tender and creamy. Cherry tomatoes burst with sweetness. Bell peppers add crunch, while red onion caramelizes nicely in the oven. Fresh parsley makes a lovely finish. It not only adds color but also freshness to the dish. You can find the full recipe for this tasty meal and dive into the details of cooking it to perfection. Enjoy this easy, one-pan delight! 1. Preheat your oven to 425°F (220°C). This makes sure the chicken cooks well. 2. Line a large baking sheet with parchment paper. This helps with easy cleanup. 3. In a small bowl, mix the lemon juice, lemon zest, minced garlic, oregano, thyme, smoked paprika, salt, black pepper, and olive oil. Whisk until smooth. 1. Take the chicken thighs and place them on the lined baking sheet. 2. Pour half of the lemon herb mixture over the chicken. Make sure each piece is well coated. Save the other half for the veggies. 1. In a large bowl, toss the baby potatoes, cherry tomatoes, bell pepper slices, and red onion wedges with the remaining lemon herb mixture. Make sure all the veggies get coated. 2. Arrange the seasoned veggies around the chicken on the baking sheet. 1. Bake everything in the preheated oven for 25 to 30 minutes. Check that the chicken reaches 165°F (75°C) inside. The veggies should be tender and slightly caramelized. 2. When done, take the baking sheet out of the oven. Let it rest for a few minutes before serving. Enjoy your meal bursting with flavor and color. For more details, you can check the Full Recipe. To ensure a juicy result, choose chicken thighs over breasts. Thighs have more fat, which keeps them moist. Marinate the chicken for at least 30 minutes. This allows the flavors to soak in well. You can even marinate overnight for deeper flavor. Using a meat thermometer is key. Insert it into the thickest part of the thigh. It should read 165°F (75°C) to be safe to eat. This method helps avoid undercooked or overcooked chicken. For marinating, a good rule is to let it sit at least 30 minutes. If you have time, let it sit for 2 hours. This helps the chicken absorb more flavor. Want to switch things up? You can use lime juice instead of lemon. Fresh herbs like basil or cilantro add a nice twist, too. For a bit of heat, add red pepper flakes to the marinade. Using a sheet pan has many advantages. It allows for easy cleanup and quick cooking. Everything cooks together, letting the flavors blend. To achieve even cooking, cut veggies into similar sizes. Place denser vegetables, like potatoes, on one side. Less dense ones, like tomatoes, go on the other. This way, all ingredients cook perfectly without burning. For more detailed steps, check the Full Recipe. {{image_2}} You can change the protein in this dish. Instead of chicken thighs, use chicken breasts for a leaner option. They cook fast, too. If you're looking for other proteins, try turkey or tofu. Turkey gives you a similar taste with a bit less fat. Tofu is a great choice for a plant-based meal. Just make sure to press it first to remove excess water. Seasonal veggies can add a fun twist. In spring, use asparagus or peas. In fall, try butternut squash or Brussels sprouts. You can mix colors and textures. Carrots and zucchini work great, too. Toss in some green beans for a crunchy bite. Each veggie brings its own flavor, making your dish unique. Feel free to play with herbs and spices. For a bolder taste, add rosemary or basil. A pinch of red pepper flakes can give it heat. You can also swap out the lemon for lime or orange juice. This small change can refresh the dish. Each citrus fruit adds a different twist to the marinade. For the best results, use fresh herbs when possible. This will enhance the flavor and make your meal pop. For the full recipe, check out the [Full Recipe]. To store leftovers, let the chicken and veggies cool. Place them in an airtight container. They will stay fresh in the fridge for up to four days. Make sure to keep the chicken and veggies together for best flavor. If you want to freeze this meal, first cool it completely. Then, transfer the chicken and veggies to a freezer-safe bag or container. This dish can last in the freezer for about three months. To defrost, move it to the fridge overnight. For reheating, the oven works best to keep the texture. Preheat your oven to 350°F (175°C). Place the chicken and veggies on a baking sheet and cover them with foil. Heat for about 15-20 minutes until warmed through. This method keeps the flavors bright and the chicken juicy. You can also use the microwave, but it may not keep the same texture. Yes, you can prepare this sheet pan recipe ahead of time. You can marinate the chicken and veggies in the lemon herb mixture a few hours before cooking. This helps the flavors soak in. Store them in the fridge until you are ready to bake. This makes it easy to enjoy a fresh meal after a busy day. To check if the chicken is fully cooked, use a meat thermometer. Insert it into the thickest part of the thigh. The chicken should reach an internal temperature of 165°F (75°C). If you don’t have a thermometer, cut into the chicken. The juices should run clear, and the meat should look white, not pink. You can serve this dish with many things. A simple green salad pairs well. You could also add rice or quinoa for a hearty side. Garlic bread is another tasty option. For a fresh twist, try a light yogurt sauce or tzatziki on the side. Yes, you can use other spices for this recipe. Feel free to experiment with flavors. For a kick, add cayenne pepper or red pepper flakes. If you like a sweeter touch, try adding a bit of brown sugar. Fresh herbs like basil or cilantro can also add a nice twist. Just be sure to adjust the amounts to match your taste. This blog post showed you how to make Lemon Herb Chicken and Veggies. We explored the ingredients, preparation steps, and cooking tips. You can make this dish with ease and adjust it to fit your taste. Try different proteins or veggies to keep things fresh. Remember, meal prep can save time and reduce waste. Enjoy the delicious results, and feel free to experiment! The joy of cooking lies in your creativity. Now, get started and treat yourself to a tasty meal!

Sheet Pan Lemon Herb Chicken and Veggies Delight

Looking for a simple, tasty dinner? “Sheet Pan Lemon Herb Chicken and Veggies Delight” is your answer! This dish packs

- 1 cup quinoa, rinsed - 2 cups water - 1 cup parsley, finely chopped - 1/2 cup mint leaves, finely chopped - 1 medium cucumber, diced - 2 medium tomatoes, diced - 1/4 red onion, finely chopped - 1/4 cup olive oil - 3 tablespoons lemon juice - Salt and pepper to taste Quinoa offers protein and fiber. It helps keep you full. Parsley is rich in vitamins A and C. It also adds a fresh taste. Mint brings a cooling effect and aids digestion. Cucumbers provide hydration and crunch. Tomatoes are full of antioxidants and vitamins. Red onion adds flavor and has heart benefits. Olive oil is a healthy fat. It supports good heart health. Lemon juice gives a tangy flavor. It is also high in vitamin C. You can swap quinoa for bulgur if you like. For a gluten-free option, use cauliflower rice. If you don't have parsley, try fresh cilantro. You can replace mint with basil for a different taste. Any fresh veggies can work too. Try bell peppers or radishes for crunch. Use apple cider vinegar instead of lemon juice if needed. First, rinse 1 cup of quinoa under cold water. This helps remove any bitter taste. Next, bring 2 cups of water to a boil in a medium saucepan. Once boiling, add the rinsed quinoa. Lower the heat and cover the pot. Let it simmer for about 15 minutes. You will know it’s done when all the water is gone. Remove the pot from heat and let it cool for a bit. In a large bowl, combine the cooled quinoa with the fresh ingredients. Add 1 cup of finely chopped parsley, 1/2 cup of finely chopped mint leaves, 1 diced cucumber, 2 diced tomatoes, and 1/4 of a finely chopped red onion. Mix these ingredients well with a fork. This step makes sure every bite is full of flavor and freshness. In a small bowl, whisk together the dressing. Start with 1/4 cup of olive oil and 3 tablespoons of lemon juice. Add salt and pepper to taste. Once mixed, pour the dressing over the quinoa mixture. Toss everything gently to coat the ingredients well. Taste the salad and adjust the seasoning if needed. For the best flavor, refrigerate for at least 30 minutes. This allows the flavors to blend perfectly. You can find the Full Recipe for more details on this delicious dish. To make quinoa fluffy, start with rinsing it well. Rinsing removes the bitter coating called saponin. Next, use double the water for every cup of quinoa. Bring the water to a boil, then add the quinoa. Lower the heat and cover the pot. Let it simmer for about 15 minutes. After that, let it sit off the heat for 5 minutes. Finally, fluff it with a fork. This gives it a light and airy texture. Chopping herbs is easy with the right method. Start by stacking the leaves. Roll them tightly like a cigar. Then, use a sharp knife to slice across the roll. This creates thin strips. For parsley and mint, make sure to chop them finely. This helps release their flavors and makes them mix well in your tabbouleh. Always use a clean, dry cutting board to avoid any slips. You can easily adjust the flavors in your quinoa tabbouleh. Taste the dish after mixing the ingredients. If it needs more zing, add more lemon juice. For a richer taste, drizzle in extra olive oil. If you like spice, try adding a pinch of red pepper flakes. Remember, each ingredient adds its own flavor. So, start with small amounts and add more as needed. This way, you can create a tabbouleh that suits your taste perfectly. For the full recipe, check out the Healthy Quinoa Tabbouleh section. {{image_2}} You can make this quinoa tabbouleh even better by adding protein. Chickpeas are a great choice. They add a nice crunch and are full of fiber. Simply rinse and drain a can of chickpeas, then mix them in with the quinoa. If you want meat, grilled chicken works well too. Cook the chicken, chop it into small pieces, and add it to the mix. You get flavor and a hearty meal this way. Quinoa is naturally gluten-free, making it perfect for many diets. If you need a gluten-free option, ensure all your ingredients are certified gluten-free. For a twist, you can replace quinoa with cooked rice or millet. These grains also provide a light and tasty base. Using seasonal ingredients can make your quinoa tabbouleh fresh and exciting. In the summer, try adding ripe peaches or watermelon for a sweet touch. In fall, you can toss in roasted butternut squash for warmth. Think about using different herbs too! Basil or cilantro can change the taste. Experiment with what’s fresh and available to keep your dish lively and tasty. For the full recipe, check out the Healthy Quinoa Tabbouleh! 🥗 To keep your quinoa tabbouleh fresh, store it in the fridge. Use an airtight container to prevent odors from mixing. Make sure the salad is cool before sealing it. This way, it stays crisp and tasty. Glass containers are great for storing quinoa tabbouleh. They let you see the food inside. Plastic containers work well too, but choose ones without BPA. Avoid metal containers, as they can alter the taste of your dish. Quinoa tabbouleh lasts about 3 to 5 days in the fridge. If you want to freeze it, consider the ingredients. Fresh herbs and veggies may lose their crunch when thawed. I recommend freezing only the quinoa base. When you're ready to eat, mix in fresh herbs and veggies. For the best flavor, make it fresh. Check out the Full Recipe for more tips! You can serve Healthy Quinoa Tabbouleh with many dishes. It pairs well with grilled chicken or fish. You can also add it to a wrap or pita. For a vegetarian option, try it with falafel. This salad complements hummus and roasted veggies too. It’s fresh and bright, enhancing any meal. Yes, you can make Healthy Quinoa Tabbouleh ahead of time. It tastes even better after the flavors mix. Prepare it a day before your event, and keep it in the fridge. This helps the ingredients blend well. Just remember to stir it before serving. If it seems dry, add a splash of lemon juice. Quinoa is very healthy and offers many benefits. It is high in protein, which helps build muscles. Quinoa also has fiber, aiding digestion and keeping you full. It contains vitamins and minerals, like magnesium and iron. Plus, it is gluten-free, making it great for those with allergies. Eating quinoa may help support heart health too. Healthy quinoa tabbouleh offers fresh flavors and great nutrition. We covered the main ingredients that boost your health and provided easy steps to prepare it. I shared tips to make your quinoa fluffy and how to adjust flavors. We also explored tasty variations and smart storage methods. This dish is not only simple but fun to make. You can enjoy it any time with different sides or ingredients. Keep experimenting, and you’ll always have a great meal ready!

Healthy Quinoa Tabbouleh Quick and Flavorful Recipe

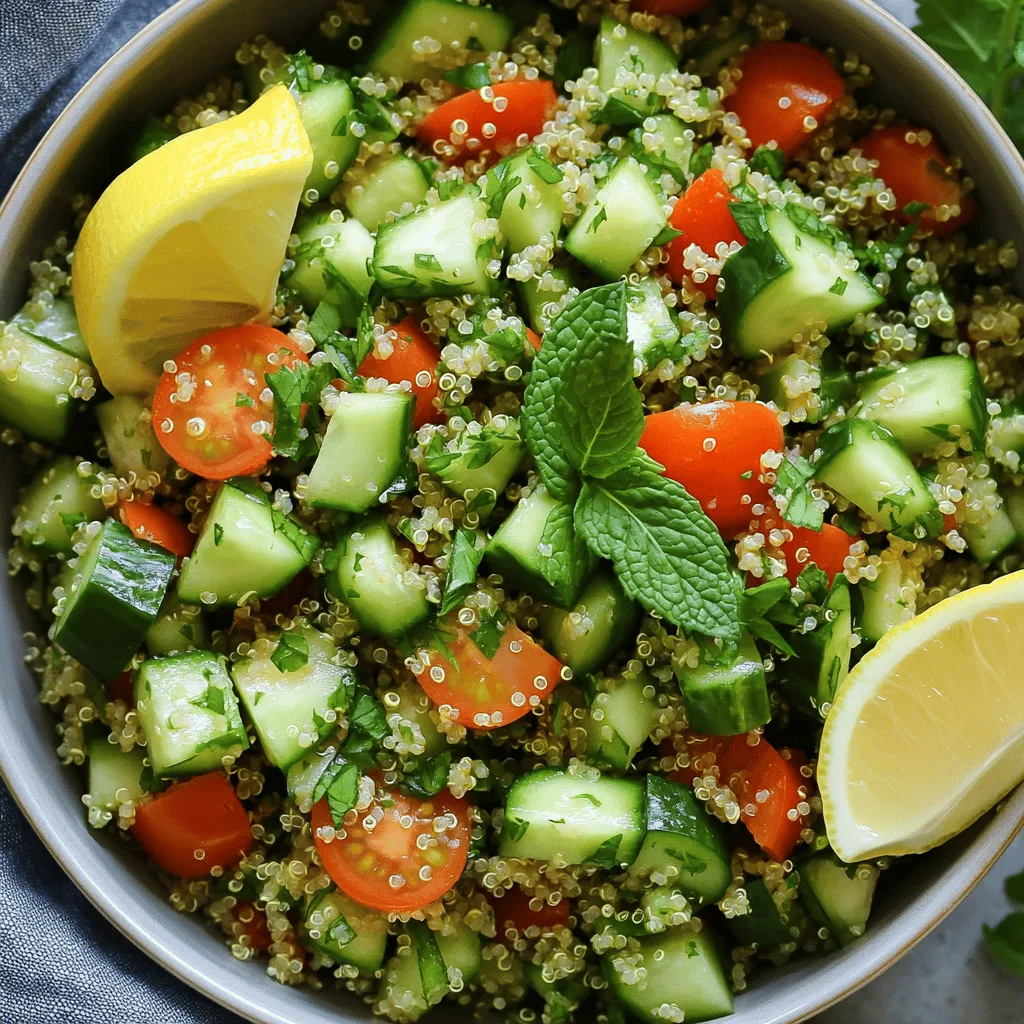
Looking for a quick and tasty dish that’s also healthy? You’ll love this Healthy Quinoa Tabbouleh recipe! Packed with fresh

- 1 lb ground chicken - 1 tablespoon vegetable oil - 3 cloves garlic, minced - 1 tablespoon fresh ginger, grated The base of this dish is ground chicken. It gives you a tasty and tender filling. I use vegetable oil to sauté the garlic and ginger. These two add a lovely aroma and flavor. Don't skip the garlic and ginger; they make a big difference. - 1 red bell pepper, diced - 1 carrot, grated - 1/4 cup green onions, chopped - Fresh cilantro leaves for garnish Adding veggies brightens the dish. Red bell pepper gives sweetness and color. Grated carrot adds crunch and fun. Green onions add a fresh bite. Finally, cilantro gives a fresh taste. You can use these garnishes to make the wraps look pretty, too. - 1 tablespoon soy sauce - 1 tablespoon fish sauce - 1 tablespoon sriracha (or to taste) - 1 tablespoon lime juice The sauces bring everything together. Soy sauce adds saltiness, while fish sauce adds umami. Sriracha gives heat, so you can adjust it for your taste. Lime juice adds a zesty finish. These flavors mix well with the chicken and veggies. For the full recipe, check out the details above. First, gather all your ingredients. For the vegetable mixture, you will need the red bell pepper, carrot, and green onions. Dice the bell pepper, grate the carrot, and chop the green onions. You want these cuts small, so they mix well with the chicken. Now, let's cook the ground chicken. Heat the vegetable oil in a large skillet over medium heat. Add minced garlic and grated ginger. Sauté for 1-2 minutes until it smells good. Then, add the ground chicken. Break it up with a wooden spoon. Cook it until it turns brown, about 5-7 minutes. Once the chicken is cooked, stir in the prepared vegetables. Cook for another 3-4 minutes until they soften. This adds color and flavor to the dish. Next, it's time to mix in the sauces and seasonings. Add soy sauce, fish sauce, sriracha, and lime juice to the skillet. Stir well to blend all the flavors together. This step is crucial for that delicious Thai taste. Let the mixture cook for an extra 2 minutes. This allows all the flavors to meld perfectly. After cooking, taste the mixture. If you like it spicier, add more sriracha. Now, it's time to assemble the lettuce wraps. Take a lettuce leaf and spoon a generous amount of the chicken mixture into it. Top with fresh cilantro leaves for a burst of flavor. Then, wrap the lettuce around the filling like a taco. For presentation, arrange the lettuce wraps on a platter. Garnish with extra chopped peanuts and cilantro for a beautiful look. Serve with lime wedges on the side for extra zest. You can find the Full Recipe for additional details! - Adjusting spice levels: Spice is key in this dish. Start with one tablespoon of sriracha. Taste the mixture. If you want more heat, add more sriracha. Remember, you can always add, but you can’t take away. - Enhancing flavor with herbs: Fresh herbs boost flavor. Try adding mint or basil along with cilantro. These herbs add a fresh taste and make your wraps even better. - Using the right skillet: A non-stick skillet works best. It keeps the chicken from sticking and helps it cook evenly. Make sure to heat it before adding the oil. - Cooking chicken evenly: Break the chicken apart as it cooks. This helps it brown well. Stir often to ensure all pieces cook at the same time. - Adding more veggies: You can boost nutrition by adding more veggies. Try adding mushrooms, zucchini, or even shredded cabbage. These add crunch and color. - Substituting proteins: If you want a different protein, try turkey or tofu. Both options work well and keep the dish tasty and healthy. You can mix and match proteins to find your favorite option. For the complete dish, check the Full Recipe. Enjoy making this fun and tasty meal! {{image_2}} You can change the ground chicken to fit your taste. Try ground turkey or tofu for a lighter option. Both work well in this dish. If you need gluten-free options, look for gluten-free soy sauce. It keeps the flavor without the gluten. To mix things up, use different sauces. Teriyaki sauce adds a sweet touch. Hoisin sauce can bring a nice depth of flavor too. For a fruity twist, consider adding pineapple or mango. These fruits pair well with spicy chicken and add a nice sweetness. You can switch up the type of lettuce for a fun look. Romaine or butter lettuce is great, but you can also try cabbage leaves. They add a nice crunch. For garnishing, sprinkle more chopped peanuts or fresh herbs on top. It makes the dish more colorful and inviting. Store your leftover spicy Thai chicken mixture in an airtight container. This keeps it fresh and safe. Place it in the fridge right after it cools. You can store it for up to three days. After that, the flavors may fade, and it won't taste as good. For reheating, use a skillet over medium heat. This method warms the filling evenly. Stir it often to avoid sticking. You can also use the microwave. If using a microwave, heat it in short bursts. This helps keep the wraps fresh and tasty. To freeze the chicken mixture, let it cool completely. Then, place it in a freezer-safe bag. Squeeze out the air before sealing. You can freeze it for up to three months. When you're ready to eat, thaw it in the fridge overnight. For reheating, use a skillet or microwave, just like before. This way, you enjoy a quick meal anytime! If you want the full recipe, check out the earlier section. To make these wraps even spicier, add more sriracha. You can also mix in some chopped fresh chili peppers. Thai bird chilies work well for a real kick. Another option is to use chili oil instead of regular oil. This adds heat and flavor. Remember to taste as you go. This way, you can control how spicy you want it. Yes, you can prepare the filling in advance. Cook the chicken mixture and let it cool. Then, store it in an airtight container. It keeps well in the fridge for up to three days. When you're ready to eat, just reheat it in a skillet. This will save you time when you want to serve these wraps. Some great sides for lettuce wraps are rice or quinoa. They add heartiness to the meal. You can also serve a simple cucumber salad. This cool crunch pairs well with the spicy chicken. Another idea is to offer a dipping sauce, like peanut sauce or sweet chili sauce. These add extra flavor and fun to your meal. For the full recipe, check out the recipe section above! This article covered making Spicy Thai Chicken Lettuce Wraps. We discussed key ingredients like ground chicken, garlic, and red bell pepper. Preparation steps included cooking techniques and mixing flavors. Tips helped you enhance taste while variations offered fun options. Storing leftovers properly keeps your meal fresh longer. You can easily adapt the recipe to your needs. Enjoy your cooking journey with these wraps, and don’t forget to share your results!

Spicy Thai Chicken Lettuce Wraps Simple and Tasty Meal

Looking for a flavorful meal that’s quick and fun to make? Spicy Thai Chicken Lettuce Wraps fit the bill! With

Older posts
Newer posts
← Previous Page1 … Page67 Page68 Page69 … Page76 Next →
© 2025 My Cooking Cast • Built with GeneratePress

Our Policies

  • Privacy Policy
  • GDPR Policy
  • Terms Of Use
  • Copyright Policy
  • Cookie Policy
  • Disclaimer

More Information​

  • Home
  • Contact
  • About
  • Dinner
  • Appetizers
  • Dessert
©2025, My Cooking Cast About Privacy Policy Back To Top