Skip to content
DisclaimerTerms Of UseGDPR PolicyCookie Policy

My Cooking Cast

  • Home
  • Drinks
  • Appetizers
  • Dinner
  • Dessert
  • About
  • Contact
  • Privacy Policy
DisclaimerTerms Of UseGDPR PolicyCookie Policy

Emma

- Large shrimp: 1 lb, peeled and deveined - Unsalted butter: 4 tablespoons - Garlic: 5 cloves, minced - Fresh lemon juice: 1 tablespoon - Smoked paprika: 1 teaspoon - Dried oregano: 1 teaspoon - Salt and pepper: to taste - Fresh parsley: 1 tablespoon, chopped (for garnish) - Skewers: Wooden or metal (soak wooden skewers in water for 30 minutes before use) This dish shines with simple yet bold ingredients. You want fresh large shrimp for the best taste. It helps to peel and devein them before cooking. Butter adds richness. I recommend unsalted butter so you can control the salt. Garlic brings a strong flavor, so use fresh minced garlic. The lemon juice adds brightness. Smoked paprika gives a subtle smokiness. Dried oregano adds an earthy note. Don’t forget to season with salt and pepper. Finally, fresh parsley makes a lovely garnish. For best results, soak wooden skewers in water. This step prevents them from burning on the grill. Use metal skewers if you prefer. This recipe offers an easy way to enjoy great seafood. You can find the full recipe for Garlic Butter Shrimp Skewers in the article. To start, melt the butter in a small saucepan over medium heat. You want it to melt, not brown. Next, add the minced garlic. Sauté it for about 1-2 minutes until it smells amazing. Be careful; you don’t want it to burn. After that, stir in the fresh lemon juice, smoked paprika, dried oregano, salt, and pepper. Mix it well. This garlic butter mixture adds great flavor. Once done, remove it from heat and let it cool slightly. Now, take your peeled and deveined shrimp and place them in a bowl. Pour the garlic butter mixture over the shrimp. Make sure every piece is well-coated. This step is key for flavor. Let the shrimp marinate for 15-20 minutes. This allows them to soak up all those tasty flavors. While the shrimp is marinating, preheat your grill to medium-high heat. It should be hot enough to cook the shrimp quickly. Now, thread the marinated shrimp onto skewers. Aim for about 4-5 shrimp per skewer. Once done, place the skewers on the grill. Grill them for about 2-3 minutes on each side. The shrimp should turn pink and opaque. This means they are cooked perfectly. After grilling, remove the skewers from the heat. For a finishing touch, sprinkle some fresh parsley on top. For the full recipe, check out the earlier section. How to avoid overcooking shrimp To keep shrimp tender, cook them just right. Shrimp cook fast. Watch for color change. They turn pink and opaque when done. Aim for about 2-3 minutes per side on the grill. If you see them curling tightly, they may be overcooked. Best grilling techniques for skewers For perfect skewers, preheat your grill to medium-high heat. This helps create a nice char. If using wooden skewers, soak them in water for 30 minutes. This prevents burning. Place the skewers on the grill without crowding. Leave space between each skewer for even cooking. Presentation ideas for garlic butter shrimp skewers Serve your skewers on a bright platter. Drizzle any leftover garlic butter on top. This adds flavor and looks great. Add lemon wedges around the skewers for color and zest. Fresh parsley on top brings a pop of green. Recommended side dishes Garlic butter shrimp skewers pair well with simple sides. Consider serving them with rice or a fresh salad. Grilled veggies also work nicely. These options balance the rich flavors of the shrimp. For a touch of carbs, garlic bread could be a hit too. For more details on making these delicious skewers, check out the Full Recipe. {{image_2}} You can change the flavor by swapping out seasonings. Try adding chili powder for heat or lemon zest for a fresh twist. Fresh herbs like thyme or basil can also enhance the dish. If you want to explore different seafood, scallops or fish fillets work great. Just be sure to adjust cooking times. You can also bake garlic butter shrimp skewers in the oven. Preheat your oven to 400°F (200°C). Place the skewers on a baking tray and cook for about 10-12 minutes. Check them often to avoid overcooking. If you prefer cooking on the stove, a skillet works well. Heat some oil in a large skillet over medium heat. Add the marinated shrimp and cook for 2-3 minutes on each side, just like on the grill. For more details, you can refer to the Full Recipe. To store leftover skewers, place them in an airtight container. This keeps the shrimp fresh. You can store them in the fridge for up to 2 days. When you're ready to eat, reheat the skewers. The best way is to use a skillet over medium heat. Heat for 2-3 minutes, turning gently. This warms them without drying them out. To freeze shrimp skewers, first let them cool completely. Lay them flat in a single layer on a baking sheet. Cover with plastic wrap and freeze for about 1 hour. This helps them freeze without sticking. After that, transfer them to a freezer bag. Remove as much air as possible before sealing. You can freeze them for up to 2 months. When you're ready to eat, thaw the skewers in the fridge overnight. If you need them faster, submerge the bag in cold water for about 30 minutes. Once thawed, you can reheat them in a skillet or on the grill. Enjoy the same delicious flavor from the Full Recipe! What can I serve with garlic butter shrimp skewers? You can serve these shrimp skewers with many tasty sides. Some great options are: - Fresh salad - Rice or quinoa - Grilled vegetables - Garlic bread Each side brings a unique flavor. I enjoy pairing them with a light salad. The crunch and freshness balance the rich garlic butter. Can I use frozen shrimp for this recipe? Yes, you can use frozen shrimp. Just make sure to thaw them first. Place the shrimp in the fridge overnight or run them under cold water. This keeps the shrimp juicy and tasty. How long can I marinate shrimp? You can marinate shrimp for about 15 to 30 minutes. This time allows the shrimp to soak up all the flavors. If you wait too long, the shrimp may become mushy. What should I do if my shrimp are overcooked? If your shrimp are overcooked, there isn’t much you can do. They may become tough and chewy. To avoid this, keep an eye on them while they cook. Shrimp cook quickly, so check them often. Can I grill shrimp on a stovetop? Yes, grilling shrimp on a stovetop works well. Use a grill pan to get those nice grill marks. Heat the pan, add the shrimp, and cook as you would on an outdoor grill. What other seafood works well for skewers? Many types of seafood are great for skewers. You can try: - Scallops - Salmon - Swordfish - Veggie options like mushrooms or bell peppers These pair well with the garlic butter. Feel free to mix and match! For a complete guide, refer to the Full Recipe. This blog post covers how to make garlic butter shrimp skewers. We discussed key ingredients, steps for prep, and cooking. I shared tips to avoid overcooking and ideas for serving. You can also try variations with spices or different seafood. Proper storage can keep your leftovers fresh. Whether grilling or baking, these skewers are delicious. Remember to enjoy the process. Get creative and make it your own!

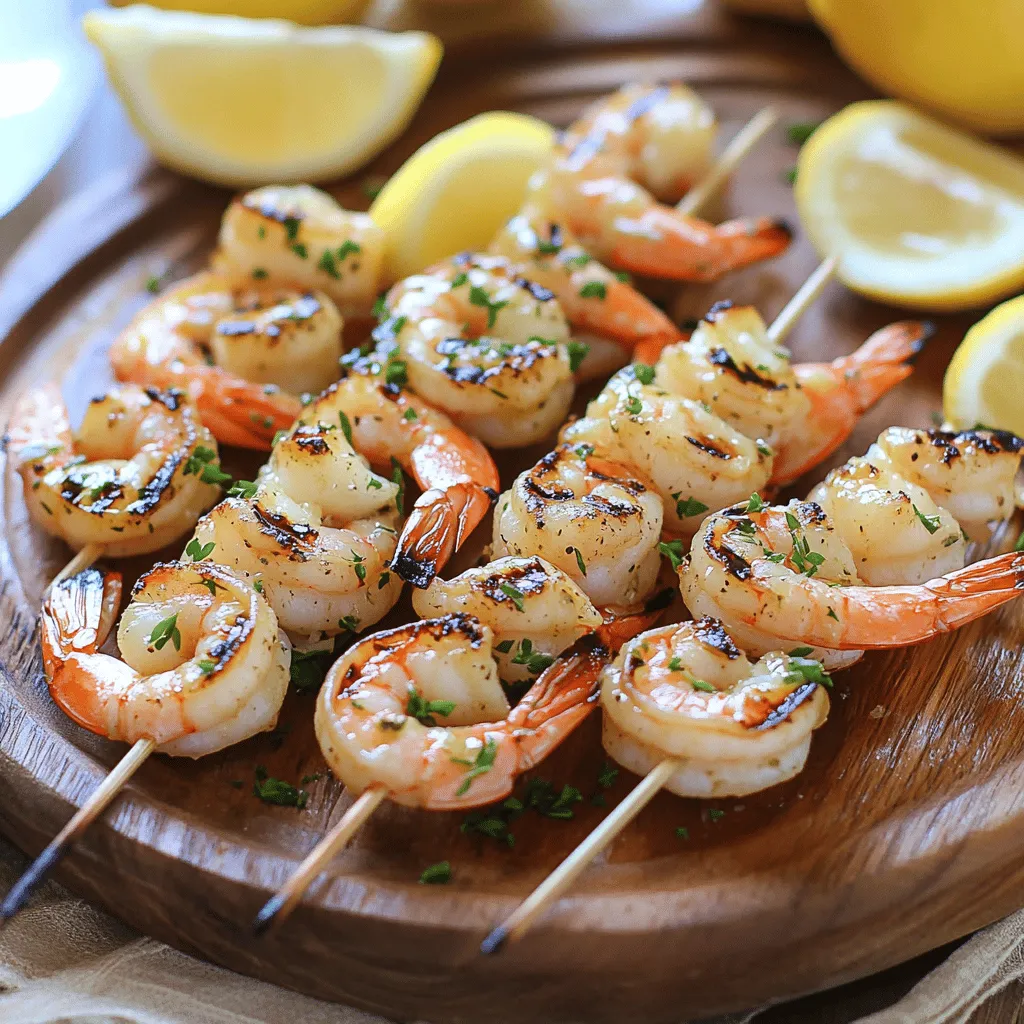
Garlic Butter Shrimp Skewers Irresistible Grilled Flavor

Are you ready to elevate your grilling game? Garlic Butter Shrimp Skewers are the perfect blend of juicy shrimp and

- 2 ripe avocados - 4 slices of whole grain bread - 4 large eggs - 1 tablespoon lemon juice - 1 tablespoon olive oil - 1/2 cup cherry tomatoes, halved - 1/4 teaspoon red pepper flakes - Fresh herbs for garnish (like cilantro or parsley) - Salt and pepper to taste When it comes to making hearty avocado toast with poached egg, the right ingredients matter. Start with ripe avocados. They should feel slightly soft when you press them gently. Next, use whole grain bread for a nutty flavor. Toast it until it’s crisp. For the eggs, choose large eggs to get a nice runny yolk. Lemon juice adds brightness. It keeps the avocado from browning too. Olive oil brings richness. Cherry tomatoes add a fresh burst of flavor. You can use red pepper flakes if you like a bit of heat. Fresh herbs like cilantro or parsley give a lovely touch. Don’t forget salt and pepper to enhance all the flavors. This combination makes a delicious meal. The creamy avocado pairs well with the runny egg. You can find the full recipe at the end of this article. Enjoy crafting this delightful dish! To start, you need to choose the right bread. Whole grain bread gives great flavor and nutrition. Look for bread that is thick enough to hold the toppings without getting soggy. Toasting your bread is key. Set your toaster to a medium setting. You want it to be golden brown and crisp. If you want extra crunch, you can toast it in a pan with a bit of olive oil. This adds flavor and helps the bread stay crispy longer. Next, let’s make the avocado smash. First, cut the avocados in half and remove the pit. Scoop the flesh into a bowl. Use a fork to mash the avocados. You want a mix of creamy and chunky. This gives texture to your smash. For some zing, add a tablespoon of lemon juice. This helps the avocados stay bright green. Add salt and pepper to taste. If you like heat, mix in a bit of red pepper flakes. Fresh herbs like cilantro or parsley are great for extra flavor too. Now it’s time for the eggs. Fill a medium saucepan with water and bring it to a gentle simmer. Add a splash of vinegar. This helps the eggs hold their shape. Crack each egg into a small bowl first. Then, gently slide them into the simmering water. Poach the eggs for 3-4 minutes for runny yolks. If you prefer firmer yolks, let them cook a bit longer. Use a slotted spoon to take the eggs out. Place them on a paper towel to drain excess water. Follow this [Full Recipe](#) for a complete guide to creating your avocado toast masterpiece. For a great poached egg, add vinegar to your water. This helps the egg whites hold together better. A common mistake is using water that’s boiling too hard. You want a gentle simmer, not a rolling boil. This way, the eggs cook evenly and look beautiful. To make your avocado toast eye-catching, use a colorful plate. Arrange halved cherry tomatoes around the toast for a bright touch. You can also sprinkle fresh herbs on top for a pop of green. This adds flavor and makes the dish look fancy. For brunch, serve with fresh juice or coffee to elevate the meal. To save unused avocados, put them in a bowl with a little lemon juice. This helps prevent browning. Store leftover toast in a sealed container, but it’s best fresh. Reheat toast in a toaster for crispiness. Avoid the microwave, as it can make the bread soggy. {{image_2}} You can make your avocado toast even tastier with fun add-ins. Try adding spices like garlic powder or smoked paprika for a kick. A sprinkle of feta or goat cheese can add creaminess. For protein, think about using smoked salmon or crispy bacon. Both pair well with the creamy avocado. If you want a plant-based option, try marinated tofu or chickpeas. They add great flavor and texture. If you need gluten-free options, swap whole grain bread for gluten-free bread. There are many tasty brands available now. You can also use rice cakes or lettuce wraps for a lighter choice. For those who prefer a vegan option, replace the poached egg with avocado slices or a tofu scramble. You can also use nutritional yeast to add a cheesy flavor without dairy. You can explore flavors from around the world with your avocado toast. Try a Mexican twist by adding jalapeños, cilantro, and lime juice. It brings a fresh, zesty taste. For an Italian flair, top with fresh tomatoes, basil, and a drizzle of balsamic glaze. You can also go Asian with sesame seeds, sliced radishes, and a splash of soy sauce. Each of these ideas lets you create a unique dish that excites the palate. Check out the Full Recipe for the basic version, then let your creativity shine! To keep leftover toast fresh, wrap it in foil or place it in an airtight container. Avoid stacking the slices, as this can make them soggy. For reheating, you can use a toaster or an oven. Toast for a few minutes until it's hot and crispy. This keeps the texture just right. Avocados can ripen on your counter. Once ripe, store them in the fridge to slow down the process. To prevent browning in your avocado smash, add lemon juice right after mashing. You can also cover it tightly with plastic wrap, pressing it against the surface. This reduces air contact. To store poached eggs, place them in a container with cold water. Cover and refrigerate them for up to two days. When ready to eat, reheat in warm water for a few minutes. This keeps them soft and tasty. For meal prepping eggs safely, cook them and store them in a fridge container. Use within four days for the best taste. To pick ripe avocados, look for a few key signs. First, gently squeeze the avocado in your hand. It should feel slightly soft but not mushy. Next, check the color. A ripe avocado usually has a dark green or black skin. If the skin is bright green, it is not ready. Finally, remove the small stem at the top. If it comes off easily and you see green underneath, the avocado is ripe. If it is brown, the avocado may be overripe. Yes, you can prepare avocado toast ahead of time, but with some care. Toast the bread just before serving to keep it crisp. For the avocado, mash it right before you eat. If you need to store it, add lemon juice to slow browning. Place it in an airtight container and use it within a day. If you want to make poached eggs in advance, store them in water in the fridge. Reheat them gently in hot water for a few minutes before serving. Toppings can really enhance your avocado toast. Here are some tasty ideas: - Crumbled feta or goat cheese for a creamy texture. - Sliced radishes for crunch and spice. - Smoked salmon or turkey for added protein. - Fresh herbs like basil or dill for a fresh taste. - A drizzle of balsamic glaze for sweetness. - Cherry tomatoes for a burst of flavor. - Red pepper flakes for a spicy kick. Try mixing and matching these toppings to create your perfect avocado toast. For the full recipe, check out the Avocado Bliss Toast with Poached Egg. In this article, we explored how to make the best avocado toast. We covered key ingredients, from ripe avocados to whole grain bread and eggs. Then, we discussed step-by-step instructions for preparing the toast and perfecting poached eggs. Additional tips offered insights on presentation and ingredient storage. Remember, avocado toast can be fun and flexible. Try different toppings or adaptations. Each bite can delight your taste buds while keeping it nutritious. Embrace your creativity in the kitchen!

Hearty Avocado Toast with Poached Egg Delight

Craving a tasty breakfast that’s both filling and healthy? Let’s dive into making hearty avocado toast with a perfect poached

- 1 cup quinoa - 2 cups vegetable broth or water - 1 can (15 oz) chickpeas - 1 medium sweet potato, diced - 2 cups spinach or kale, chopped - 1 avocado, sliced - 1 cup cherry tomatoes, halved - 1 tablespoon olive oil - 1 teaspoon smoked paprika - 1 teaspoon garlic powder - Salt and pepper to taste - 2 tablespoons tahini - 2 tablespoons lemon juice - 1 tablespoon maple syrup - 1 tablespoon sesame seeds The first step is to gather these ingredients. Quinoa serves as the base, providing protein and fiber. You can mix it with vegetable broth to enhance its flavor. The chickpeas add more protein and a nice texture. Sweet potatoes give a sweet touch and are rich in vitamins. Spinach or kale adds greens, making your bowl colorful and nutritious. Avocado brings creaminess, while cherry tomatoes add freshness. For flavor, you need olive oil, smoked paprika, garlic powder, salt, and pepper. These seasonings create depth in taste. Tahini, lemon juice, and maple syrup combine to make a tasty dressing. This drizzle ties all the flavors together. When you prepare your Vegan Buddha Bowl, remember that each ingredient adds its unique taste and nutrition. You can find the full recipe to guide you through the steps. - Preheat the oven to 400°F (200°C). - Rinse the quinoa under cold water. Cook quinoa in a pot with vegetable broth or water. Bring to a boil, then reduce heat. Cover and simmer for about 15 minutes until fluffy. - Toss diced sweet potatoes with olive oil, smoked paprika, garlic powder, salt, and pepper. - Spread sweet potatoes on a baking sheet. Roast in the oven for 20-25 minutes until tender and slightly caramelized. - Heat a skillet over medium heat. Add drained and rinsed chickpeas. - Sauté chickpeas for about 5 minutes. They should be warm and slightly crispy outside. - In a small bowl, whisk together tahini, lemon juice, maple syrup, and a pinch of salt. - If the dressing is too thick, add a splash of water until it reaches your desired consistency. - Start with a base of quinoa in a large bowl. - Layer in roasted sweet potatoes, sautéed chickpeas, chopped greens, avocado slices, and halved cherry tomatoes. - Drizzle the tahini dressing over the top. Sprinkle sesame seeds for added crunch. You can find the full recipe above to guide you through these steps! - To achieve fluffy quinoa, rinse it well before cooking. This removes the bitter outer layer called saponin. Use a pot with a lid. Add quinoa and vegetable broth. Bring it to a boil, then reduce heat. Let it simmer for about 15 minutes. Fluff with a fork when done. - For perfectly roasting sweet potatoes, preheat your oven to 400°F (200°C). Cut sweet potatoes into even pieces. Toss them with olive oil, smoked paprika, garlic powder, salt, and pepper. Spread them on a baking sheet. Roast for 20-25 minutes until they are tender and golden. - Arrange ingredients for visual appeal by layering them neatly. Start with quinoa as the base. Add greens, followed by sweet potatoes, chickpeas, and avocado. Place cherry tomatoes on top for color. - Incorporate fresh herbs for garnish. Parsley or cilantro adds a pop of green and freshness. Sprinkle them on top just before serving. - You can customize the tahini dressing thickness. If it is too thick, add a splash of water or more lemon juice. Adjust until you reach your desired consistency. - Add spices for a flavor boost. Try a pinch of cayenne, cumin, or black pepper to give your dressing an extra kick. This enhances the overall taste of your Buddha bowl. For the full recipe, check out the [Full Recipe]. {{image_2}} You can swap chickpeas for lentils or tofu. Lentils cook fast and add fiber. Tofu gives a hearty texture. You can also add tempeh or edamame for extra protein. Both options boost your bowl's protein content and flavor. Instead of quinoa, try brown rice, farro, or barley. These grains bring unique tastes and textures. If you're looking for a low-carb option, cauliflower rice works great. It’s light and soaks up flavors well. Experiment with different dressings or sauces. A spicy peanut sauce or ginger dressing adds a kick. You can also add nuts or seeds for crunch. Almonds or sunflower seeds give a nice texture and extra nutrients. Feel free to get creative with these ideas to make your Vegan Buddha Bowl even more delicious. Check the Full Recipe to see how these variations fit in! To store leftovers, place your Buddha bowl in an airtight container. Keep it in the fridge. This will keep the flavors fresh. The shelf life of the components is about 3 to 5 days. Quinoa can last up to a week. Sweet potatoes and chickpeas stay good for the same time. Greens like spinach or kale should be used within 3 days for best taste. You can freeze components of your Buddha bowl. Quinoa and chickpeas freeze well. Spread them on a baking sheet first. Once frozen, transfer them to freezer bags. Sweet potatoes can also be frozen, but they may lose some texture. For meal prep, thaw overnight in the fridge. This keeps everything safe and tasty. To reheat quinoa, add a splash of water. Microwave it for 1 to 2 minutes. For vegetables, use a skillet over medium heat. This keeps the flavors intact. Stir often until warm. Avoid reheating multiple times to maintain taste and texture. Enjoy your vibrant Vegan Buddha Bowl fresh and delicious! A Vegan Buddha Bowl is a colorful meal. It includes grains, veggies, and proteins. You can make it in many ways. The base is often quinoa, rice, or farro. You add roasted veggies like sweet potatoes. Chickpeas or beans add protein. Fresh greens like spinach or kale give crunch. Avocado adds creaminess. Top it with a tasty dressing for flavor. This dish is not only healthy but also fun to make! Yes, you can easily make this recipe gluten-free. Swap quinoa with brown rice or millet. You can also use gluten-free oats if you want. Make sure to check all labels when buying ingredients. This ensures they are gluten-free. Enjoy the same great taste without gluten! You can make this bowl your own! Start by changing the base grain. Use farro, rice, or even cauliflower rice. Next, add your favorite veggies. Try roasted carrots, zucchini, or bell peppers. For protein, swap chickpeas for lentils or tofu. You can mix and match as you like. Get creative with toppings, too! Nuts and seeds add a nice crunch. A Vegan Buddha Bowl is packed with nutrients. Quinoa provides protein and fiber. Sweet potatoes offer vitamins A and C. Chickpeas add more protein and iron. Greens like spinach are full of vitamins and minerals. Healthy fats come from avocado. This dish gives you energy and supports your health. Yes, this recipe is great for meal prep! Cook all components in advance. Store them in airtight containers. Keep grains, veggies, and dressing separate to stay fresh. You can combine them when ready to eat. This makes for quick and easy meals all week long. Enjoy the flavors whenever you want! This blog post covered how to create a tasty Vegan Buddha Bowl. We explored the main ingredients, like quinoa, sweet potatoes, and chickpeas. I shared steps for cooking, assembling, and enhancing your bowl's flavor. Remember, you can customize this dish to fit your taste and nutritional needs. Use the tips for perfecting each component and store leftovers wisely. Enjoy making this healthy meal that’s both delicious and fun to create!

Vegan Buddha Bowl Flavorful and Nutritious Recipe

If you’re looking for a meal that’s both tasty and good for you, try a Vegan Buddha Bowl. Packed with

To make a chocolate chip cookie skillet, you need key ingredients. Here’s what you’ll need: - 1 cup unsalted butter, softened - 3/4 cup brown sugar, packed - 1/4 cup granulated sugar - 1 large egg + 1 egg yolk - 2 teaspoons vanilla extract Unsalted butter adds rich flavor. The sugars create a sweet, chewy texture. Mixing both sugars helps the cookie stay soft inside. The egg and yolk add structure and moisture, while vanilla brings warmth and depth. Next, you need to mix in your dry ingredients. Here's what to gather: - 2 cups all-purpose flour - 1 teaspoon baking soda - 1/2 teaspoon salt - 1 cup semisweet chocolate chips - 1/2 cup chopped walnuts (optional) All-purpose flour gives the cookie body. Baking soda helps it rise, while salt enhances all the flavors. Chocolate chips are the star of the show, melting into gooey pockets of joy. If you like, add walnuts for a nice crunch. With these ingredients ready, you can start creating your delicious skillet cookie. For the full recipe, check [Full Recipe]. First, we need to cream the butter and sugars. In a large bowl, add 1 cup of softened unsalted butter. Then, add 3/4 cup of brown sugar and 1/4 cup of granulated sugar. Use an electric mixer to beat them together. Mix until the mixture is light and fluffy. This step is key for a soft cookie. Next, we’ll add the eggs and vanilla. Crack one large egg and add one egg yolk into the bowl. Then, pour in 2 teaspoons of vanilla extract. Beat everything together until it is well combined. This will add flavor and moisture. Now, let's mix the dry and wet ingredients. In a separate bowl, whisk together 2 cups of all-purpose flour, 1 teaspoon of baking soda, and 1/2 teaspoon of salt. Slowly add this dry mixture to the butter mixture. Stir until just combined. Do not overmix; a few lumps are fine. After that, fold in the chocolate chips and walnuts. Add 1 cup of semisweet chocolate chips and 1/2 cup of chopped walnuts, if you like. Gently mix them into the dough until they are evenly spread. Time to prepare the skillet. Grease a 10-inch cast-iron skillet with butter or cooking spray. This will help the cookie come out easily. Spread the cookie dough evenly in the skillet. Use a spatula to smooth the top. Now, we’ll bake the cookie. Preheat your oven to 350°F (175°C). Place the skillet in the oven and bake for 25-30 minutes. Look for golden edges and a soft center. When it’s done, take it out and let it cool for about 10 minutes. This cooling time helps it set before slicing. For the full recipe, check out the [Full Recipe]. Enjoy your warm, gooey treat! To get the best texture in your cookie skillet, adjust the baking time. If you want a chewy cookie, take it out a bit early. Aim for golden edges and a soft center. This timing helps create that perfect balance. Using room temperature ingredients is key. When butter is soft, it blends well with sugars. This helps trap air and gives you a light, fluffy cookie. Eggs should also be at room temperature. This helps them mix better into your dough. Choosing the right skillet matters. A 10-inch cast-iron skillet works best. It heats evenly and gives great results. If you don’t have cast iron, any oven-safe skillet will do. Before adding the dough, grease your skillet well. Use butter or cooking spray to coat it. This helps the cookie slide out easily once baked. Spread the dough evenly to ensure it cooks well. This cookie skillet shines when paired with ice cream. Vanilla ice cream melts perfectly on warm cookie. You can also top it with whipped cream or chocolate sauce. For a fun presentation, serve it straight from the skillet. Add spoons for a casual feel. You can even sprinkle some extra chocolate chips on top for style. For the full recipe, check the details above and get baking! {{image_2}} You can change up your chocolate chip cookie skillet with different chocolate chips. Use milk chocolate, dark chocolate, or even white chocolate for a twist. Each type of chip brings its own taste. You can also mix in some fun extras. Try adding nuts like pecans or almonds, or even candy pieces. These mix-ins add texture and flavor. If you need gluten-free options, use almond flour or coconut flour. Both work well in this recipe and still taste great. For a vegan version, swap the butter for coconut oil. You can replace the eggs with a flaxseed mixture. Mix one tablespoon of flaxseed meal with three tablespoons of water. Let it sit for a few minutes until it thickens. Seasonal flavors can make this dish special. Add warm spices like cinnamon or nutmeg during fall or winter. You can also use fresh fruits like berries or sliced apples. They bring a fresh taste that brightens the dish. For festive occasions, try adding peppermint or orange zest for a fun twist. For more details, you can check the Full Recipe. To keep your cookie skillet fresh, let it cool first. Once it’s cool, cover it tightly with plastic wrap or aluminum foil. You can also use an airtight container. This helps keep it moist. Store it in the fridge for up to five days. If you want to enjoy it later, slice it before storing. This makes it easy to grab a piece when you want a sweet treat. To reheat your chocolate chip cookie skillet, use your oven or microwave. For the oven, preheat to 350°F (175°C). Place the skillet inside for about 10 minutes. This warms it through while keeping the edges nice. If you use a microwave, heat a slice for about 20 seconds. Be careful, as it can get hot quickly. Pairing it with a scoop of ice cream is a great idea to keep the flavor fresh. You can freeze cookie dough for later. Scoop the dough into balls and place them on a baking sheet. Freeze them for about an hour, then transfer them to a freezer bag. This method helps keep them from sticking together. You can store the dough for up to three months. When you’re ready to bake, just take out as many as you need. Let them thaw for about 30 minutes before baking. This lets you enjoy fresh cookies anytime! For the full recipe, check back to make your own delicious skillet treat. Look for a few signs. The edges should be a nice golden brown. The center will be soft but not gooey. You can also poke it with a toothpick. If it comes out mostly clean, it’s done. Remember, the cookie will continue to cook a little after you take it out of the oven. Yes, you can prepare the dough in advance. Just cover it and store it in the fridge for up to 24 hours. When ready, spread it in the skillet and bake. If you have leftovers, let them cool and store in an airtight container. They will stay fresh for about three days. If you don’t have a cast-iron skillet, use any oven-safe skillet. A regular metal skillet works well too. A glass or ceramic dish can also be a good choice. Just make sure to adjust the baking time, as different materials can cook differently. In this post, we covered how to make a delicious chocolate chip cookie skillet. We explored key ingredients, detailed step-by-step instructions, and shared essential tips for perfect results. I also highlighted fun variations and storage suggestions to keep your cookies fresh. As you dive into baking, remember to enjoy the process. Try different flavors and share with others. Your tasty creation can bring joy to any gathering!

Chocolate Chip Cookie Skillet Delightful and Warm Treat

Imagine a warm, gooey chocolate chip cookie fresh from the oven, right in your skillet. It’s the perfect treat for

To make a great coconut cream pie, you need these key items: - 1 pre-baked 9-inch pie crust (store-bought or homemade) - 1 cup shredded unsweetened coconut (toasted if desired) - 1 cup whole milk - 1 cup heavy cream - 1/2 cup granulated sugar - 1/4 cup cornstarch - 1/4 teaspoon salt - 4 large egg yolks - 1 teaspoon vanilla extract - 1 teaspoon coconut extract - Whipped cream (for topping) - Additional toasted coconut flakes (for garnish) These ingredients create a rich, creamy filling with a lovely coconut flavor. The pie crust holds everything together and adds a nice crunch. You can change the pie up with these fun additions: - Dark chocolate shavings for a twist - Lime zest for a citrus kick - Fresh fruit like pineapple for added sweetness These choices can give your pie a unique flair. Feel free to mix and match to find your perfect flavor! To make your coconut cream pie, gather these tools: - Medium saucepan - Whisk - Mixing bowls - Spatula - Measuring cups and spoons - Pie dish Using the right equipment makes the process smooth and enjoyable. With these items, you’ll be ready to whip up a delightful dessert. Don't forget to check the [Full Recipe](#) for detailed steps! To start, gather your ingredients. In a medium saucepan, mix the sugar, cornstarch, and salt. Whisk in the whole milk and heavy cream until smooth. This step helps to blend everything well. It is key for a creamy filling. Place your saucepan over medium heat. Stir the mixture constantly. Watch closely as it heats. In about 5 to 7 minutes, it should start to thicken and bubble. This is when the magic happens! Next, you need to temper the egg yolks. In a bowl, lightly beat the egg yolks. Once your milk mix is bubbling, take a cup of it and whisk it into the yolks. This keeps the eggs from cooking too fast. Pour the yolk mix back into the saucepan. Cook for 2-3 more minutes until thickened. Remove it from heat. Stir in the vanilla, coconut extract, and shredded coconut. Pour this wonderful filling into your pie crust. Smooth it out with a spatula. Let it cool for 30 minutes at room temperature. Then, refrigerate it for at least 4 hours until set. Before serving, top it with whipped cream. Sprinkle toasted coconut flakes on top for a nice finish. Enjoy your tropical dream of a Coconut Cream Pie! For the complete process, check out the Full Recipe. To get the right pie texture, focus on the cooking time. When cooking the filling, stir constantly. This helps it cook evenly. You want it to thicken and bubble, which shows it is ready. If it’s too runny, it may not set well in the fridge. Aim for a thick, custard-like feel. This will give your pie a smooth finish. For a great whipped cream topping, start with cold cream. Use heavy cream for the best results. Whip it in a bowl until it forms soft peaks. Be careful not to over-whip, as it can turn grainy. You can add a little sugar and vanilla for sweetness. Spread the whipped cream over your cooled pie just before serving. This keeps it fresh and fluffy. One big mistake is not letting the filling cool enough. If you pour it into the crust while hot, the crust can get soggy. Always let it cool at room temperature first. Another mistake is skipping the tempering step with the egg yolks. This step is key to avoid scrambling the eggs. Lastly, don’t forget to refrigerate the pie for at least four hours. This helps it set properly. Follow these tips for a perfect Coconut Cream Pie. For the complete recipe, check out the Full Recipe section. {{image_2}} You can make a vegan coconut cream pie using simple swaps. Replace the eggs with cornstarch for thickening. Use coconut milk instead of whole milk and heavy cream. This gives a rich, creamy texture. For flavor, add a splash of vanilla and coconut extracts. The crust can be made with crushed graham crackers and coconut oil. This recipe keeps the delicious coconut flavor while being dairy-free. To make a gluten-free version, choose a gluten-free pie crust. You can find pre-made options at stores. If you prefer homemade, blend gluten-free cookies with melted butter. The filling remains the same, using cornstarch for thickening. This way, you enjoy the same creamy texture without the gluten. You can play with flavors in your coconut cream pie. Try adding chocolate by mixing cocoa powder into the filling. This gives a rich twist. For a citrus kick, add lime zest and juice. A key lime coconut cream pie is refreshing and bright. You can also mix in different extracts, like almond or pineapple, to create your unique pie. Each variation brings a new taste adventure! For more details on making the perfect coconut cream pie, check out the Full Recipe. To store leftover coconut cream pie, cover it tightly. Use plastic wrap or foil to keep air out. Place the pie in the fridge. It will stay fresh for about 3 days. If you notice any change in smell or texture, it’s best to toss it. You can freeze coconut cream pie, but it’s tricky. Wrap the pie well in plastic wrap, then foil. This helps prevent freezer burn. It can last for about 2 months in the freezer. When you’re ready to eat it, move it to the fridge overnight to thaw slowly. Reheating coconut cream pie is easy, but do it gently. Use the oven at a low temperature, around 300°F. Cover the pie with foil to avoid browning the topping. Heat it for about 10-15 minutes. Check it often to make sure it warms up without cooking the filling again. Enjoy your pie warm or chilled! You can tell the filling is thick enough when it coats the back of a spoon. When you run your finger through it, the line should stay clear. The mixture usually takes about 5-7 minutes to thicken on medium heat. If it bubbles and holds its shape, you’re good to go! Yes, you can use canned coconut milk. It adds a richer coconut flavor. If you want the pie to be creamier, mix it with heavy cream. Just keep in mind that using only coconut milk may change the texture slightly. Common toppings include whipped cream and toasted coconut flakes. You can also add chocolate shavings or fresh fruit for a twist. A dusting of cocoa powder or a drizzle of caramel can make it even more special. Enjoy making it your own! In this post, we explored the key ingredients and steps for making a great coconut cream pie. We discussed essential and optional ingredients, the right equipment, and detailed the cooking process with tips to avoid mistakes. You can also try variations like vegan or gluten-free options. Always store leftovers properly, and reheating is simple. Remember, a well-made coconut cream pie can bring joy to any gathering. Enjoy your baking and impress others with your skills!

Coconut Cream Pie Simple and Delicious Dessert Guide

If you crave a sweet treat that’s both simple and delicious, you’re in the right spot! This Coconut Cream Pie

To make a tasty zucchini noodle stir fry, you'll need these key items: - 3 medium zucchinis, spiralized into noodles - 1 bell pepper (any color), sliced - 1 carrot, julienned - 1 cup snap peas, trimmed - 3 green onions, chopped - 2 cloves garlic, minced - 2 tablespoons soy sauce (or tamari for gluten-free) - 1 tablespoon sesame oil - 1 tablespoon olive oil - 1 teaspoon freshly grated ginger - Salt and pepper to taste These ingredients form the base of a healthy and colorful meal. Each one adds texture and flavor, making every bite fresh and satisfying. You can enhance your stir fry with some optional add-ins: - 1 cup sliced mushrooms - 1 cup broccoli florets - 1 small zucchini, spiralized - 1 tablespoon chili paste for heat - 1 tablespoon peanut butter for richness These extras allow you to customize your dish. Feel free to mix and match to suit your taste. Garnishing your dish makes it look appealing and adds flavor: - 1 tablespoon sesame seeds - Fresh cilantro or parsley, chopped - Lime wedges for a zesty kick These garnishes not only add color but also make your dish more flavorful. They can elevate your zucchini noodle stir fry from simple to stunning. For the full recipe, you can refer to the details listed above. First, gather your ingredients. You need three zucchinis, one bell pepper, and one carrot. Also, have one cup of snap peas, three green onions, and two cloves of garlic ready. Don't forget the ginger! Spiralize the zucchinis to make noodles. Cut the bell pepper and carrot into thin strips. Julienne the carrot for a nice crunch. Trim the snap peas and chop the green onions. Mince the garlic and grate the ginger finely. This prep makes cooking fast and easy. Heat two tablespoons of oil in a large skillet or wok over medium-high heat. I like to use olive oil for a rich flavor. Add the minced garlic and grated ginger. Sauté them for about 30 seconds until they smell great. Next, toss in the sliced bell pepper and julienned carrot. Stir-fry these for 2-3 minutes until they soften a bit. Then, add the snap peas and cook for another 2 minutes. They should look bright green and still have a nice crunch. Now, gently fold in the zucchini noodles. Stir well to mix all the veggies. Cook for another 2-3 minutes. The noodles should be tender but still firm. Pour the soy sauce and sesame oil over the veggies. Toss everything together to coat them well. Season with salt and pepper to taste. This brings out all the awesome flavors. Remove the skillet from heat. Garnish your dish with chopped green onions and sesame seeds. This adds a lovely touch! Serve your Zesty Zucchini Noodle Stir Fry immediately for the best taste. For full details, check out the Full Recipe. To spiralize zucchini, you need a good spiralizer. First, wash and trim the ends of the zucchini. Secure it in the spiralizer and turn the handle. Keep turning until you have long, thin noodles. If you don't have a spiralizer, a vegetable peeler or julienne tool can work too. Make sure your noodles are even in size for even cooking. Get your skillet or wok hot before adding oil. Use medium-high heat to keep the veggies crisp. Start with garlic and ginger for great flavor. Stir-fry the harder vegetables first, like bell pepper and carrot. Add softer veggies, like snap peas, later. This way, they stay bright and crunchy. Don't overcook the zucchini noodles; they need just a few minutes. You can easily change the flavors in this stir fry. If you like it spicy, add red pepper flakes or sriracha. For a sweet touch, try a little honey or maple syrup. Use coconut aminos instead of soy sauce for a different taste. You can also mix in lime juice or rice vinegar for a tangy kick. Experiment with these options to find your favorite flavor! {{image_2}} You can easily make this dish vegetarian or vegan. Just skip any meat. The fresh veggies give great flavor. Use more mushrooms for a meaty feel. You can also add extra tofu for protein. It absorbs the sauce well and adds texture. If you want to add protein, chicken, tofu, or shrimp work great. For chicken, use thin slices. Cook them first until golden. Then add the veggies. For shrimp, cook until they turn pink. Tofu is a nice choice too. Use firm tofu and cube it. Sauté it until crispy for the best texture. To make this dish gluten-free, choose tamari instead of soy sauce. Tamari has a rich flavor, just like soy sauce. Always check the label for gluten-free options. You can also use coconut aminos. They are sweet and salty, perfect for this stir fry. To keep your zucchini noodle stir fry fresh, place it in an airtight container. Store it in the fridge. Use leftovers within three to four days for the best taste. Make sure it cools down to room temperature before sealing. This helps prevent moisture build-up. When it's time to reheat, use a skillet over medium heat. Add a splash of water or broth to help keep it moist. Stir often to heat evenly. This method keeps the veggies crisp. Avoid the microwave if you want to keep the noodles from getting mushy. If you want to freeze the stir fry, pack it in freezer-safe bags. Remove as much air as possible before sealing. It’s best to freeze it without the sauce. This way, the veggies stay fresh. To use, thaw it overnight in the fridge. Then, reheat it in a skillet with some sauce for flavor. You can find the full recipe to start your cooking adventure! You can swap soy sauce for coconut aminos or lemon juice. These options add a nice flavor without soy. You can also try using vegetable broth for a savory touch. This keeps the dish tasty and soy-free. Yes, you can prep some parts ahead. Spiralize the zucchini and chop your veggies the night before. Store them in the fridge in airtight bags. However, cook your dish right before serving. This way, your zucchini noodles stay crisp and fresh. Zucchini noodle stir fry pairs well with grilled chicken or shrimp. You can also serve it with rice or quinoa for a full meal. Adding a side salad can provide extra crunch and flavor. For a light meal, serve it on its own or with a simple dipping sauce. Check the Full Recipe for more serving ideas! To make Zesty Zucchini Noodle Stir Fry, we need fresh ingredients. First, gather these items: - 3 medium zucchinis, spiralized into noodles - 1 bell pepper (any color), sliced - 1 carrot, julienned - 1 cup snap peas, trimmed - 3 green onions, chopped - 2 cloves garlic, minced - 2 tablespoons soy sauce (or tamari for gluten-free) - 1 tablespoon sesame oil - 1 tablespoon olive oil - 1 teaspoon freshly grated ginger - 1 tablespoon sesame seeds (for garnish) - Salt and pepper to taste This dish comes together quickly. Start by heating olive oil in a large skillet or wok. Add garlic and ginger, cooking for about 30 seconds until you smell them. Next, toss in your bell pepper and carrot. Stir-fry these for 2-3 minutes until they soften a bit. Add the snap peas and stir-fry for another 2 minutes. They should look bright and stay crisp. Now, gently fold in the spiralized zucchini noodles. Cook them for about 2-3 minutes. You want them tender but still a bit firm. Pour in the soy sauce and sesame oil. Toss everything so it mixes well. Season it with salt and pepper to your liking. Remove from heat and top with green onions and sesame seeds. Enjoy your colorful, tasty meal! This stir fry is not just tasty; it's healthy too. Here’s a quick look at the nutrition: - Calories: About 150 per serving - Protein: Around 4 grams - Carbohydrates: Roughly 10 grams - Fiber: Approximately 3 grams - Fat: About 10 grams These numbers can vary based on exact ingredients and portion sizes. This dish offers a good balance of nutrients. It's low in calories, yet filling and satisfying. Plus, it’s packed with vitamins from the fresh veggies. Zucchini Noodle Stir Fry is versatile. You can enjoy it on its own, or pair it with many options. Here are some ideas: - Serve it alongside grilled chicken or tofu for protein. - Add a side of brown rice or quinoa for extra carbs. - For spice lovers, a sprinkle of red pepper flakes enhances the flavor. Feel free to experiment! Each option can make this dish even more delightful. For the step-by-step process, check the Full Recipe. Happy cooking! In summary, we explored the key ingredients for a tasty zucchini noodle stir fry. We discussed preparation steps, cooking techniques, storage tips, and flavorful variations. Don't forget to try different proteins and seasonings to find your favorite mix. With these tips, you can whip up a meal that's healthy and fun. Enjoy your cooking journey and share your zesty stir fry with friends and family!

Zucchini Noodle Stir Fry Flavorful and Easy Delight

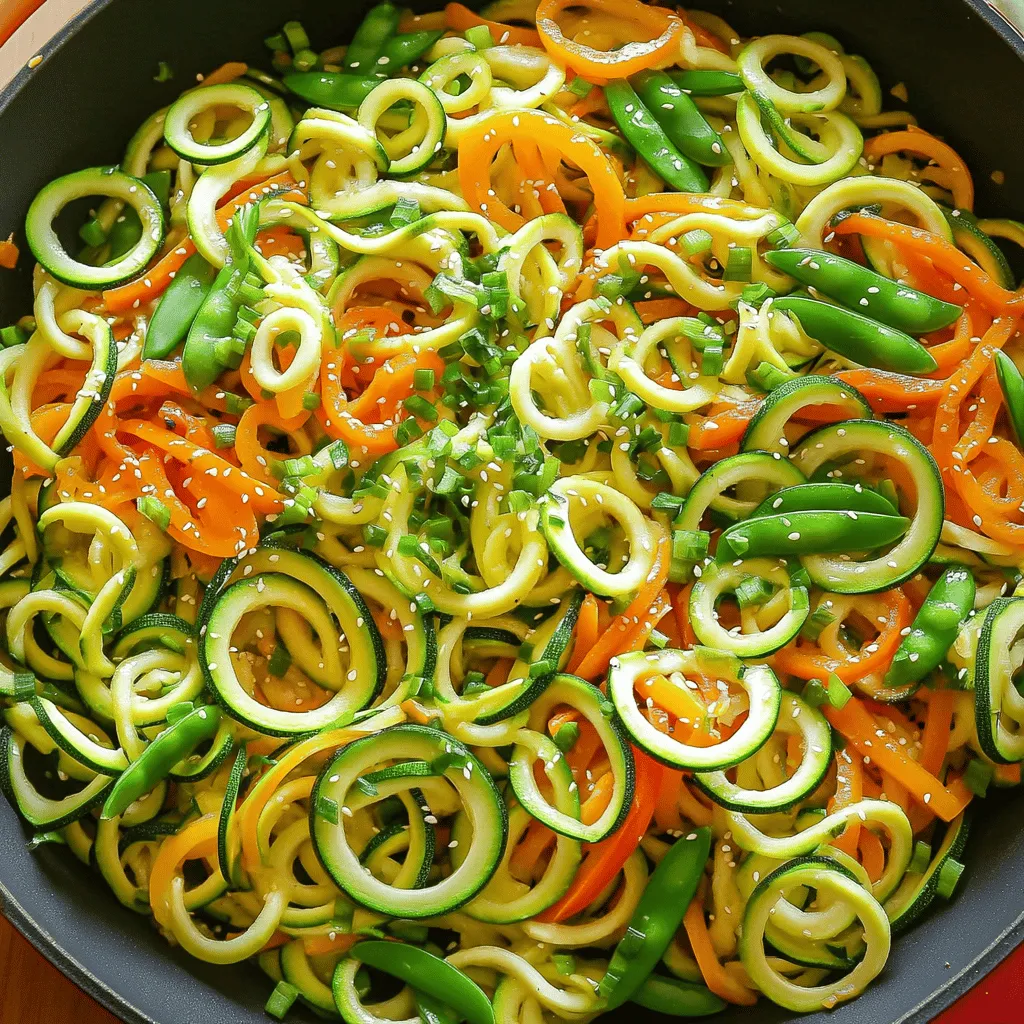
Are you ready to make a tasty and healthy meal? Zucchini noodle stir fry is here to impress! It’s quick,

To make a tasty Peach Cobbler Dump Cake, you need some key ingredients. Here’s what you will need: - 4 cups canned peaches in syrup, drained - 1 cup brown sugar - 1 teaspoon cinnamon - 1 lemon, juice and zest - 1 box yellow cake mix - 1 cup unsalted butter, melted - 1 cup chopped pecans (optional) - 1 teaspoon vanilla extract - Ice cream (for serving, optional) These items come together to create a warm, fruity delight that pleases everyone. The canned peaches give a sweet base, while the spices add warmth. You can play with this recipe to match your taste. Here are some fun ideas: - Fresh peaches for a brighter flavor - Almond extract instead of vanilla for a nutty twist - Other nuts like walnuts or almonds for crunch - Different cake mixes like chocolate or spice for a unique touch Adding these optional ingredients gives your cake a personal flair. Feel free to explore what makes your taste buds happy! If you have allergies or dietary needs, you can still enjoy this dessert. Here are some easy swaps: - Use gluten-free cake mix for a gluten-free version - Swap the butter for a dairy-free alternative like coconut oil - Replace the sugar with a sugar substitute if needed - Omit nuts or use seeds if you have nut allergies These substitutions keep the flavors intact while meeting your needs. Cooking should be fun and safe for everyone! Don't forget to check out the Full Recipe for detailed steps on how to put it all together. Start by opening two cans of peaches. Drain the syrup and save it for later. In a large bowl, mix the peaches with one cup of brown sugar. Add in one teaspoon of cinnamon, the juice, and zest of one lemon. Stir gently until everything is well mixed. This step brings out the sweet and tart flavors of the peaches. Grab a greased 9x13 inch baking dish. Pour the peach mixture evenly into the bottom of the dish. Next, sprinkle one box of dry yellow cake mix over the peaches. Make sure it covers all the fruit. Now, take one cup of melted unsalted butter and drizzle it over the cake mix. Do not stir this part. If you like nuts, sprinkle one cup of chopped pecans on top. Preheat your oven to 350°F (175°C). Bake the cake for 45 to 50 minutes. Look for a golden brown top that is bubbly. Once it’s done, remove the cake from the oven. Let it cool for about 10 minutes before serving. For a tasty treat, serve warm with a scoop of ice cream on top. Enjoy this sweet delight! You can find the full recipe above. To get the best texture, you need to watch the baking time. Bake until the top is golden brown and bubbly. This will give you a nice crispy layer. If you bake it too long, it can dry out. If you take it out too soon, it may be gooey. Keep an eye on it in the last few minutes. You can boost the flavor with spices. I love adding a bit of nutmeg along with the cinnamon. Just a pinch can make a big difference. You might also try a splash of vanilla extract to deepen the taste. Don’t be afraid to mix in other spices like ginger or cardamom for a twist! One common mistake is stirring the butter into the cake mix. Just drizzle it on top instead. This way, the butter creates a nice crust. Another mistake is using too much peach syrup. Make sure to drain the peaches well to avoid a soggy dessert. Following these steps will help you create a perfect Peach Cobbler Dump Cake. For the full recipe, check out the details above. {{image_2}} You can swap peaches for many fruits. Try fresh or canned cherries for a tart twist. Apples work well too, adding a cozy flavor. Blueberries or blackberries can give a bright punch. Mix fruits together for a fun blend. Just remember to adjust sugar based on the fruit's sweetness. To make this dessert gluten-free, choose a gluten-free cake mix. Most brands offer great options. You can also use almond flour or oat flour as a base. Just mix it with your fruit and other ingredients. Always check labels to ensure all your items are gluten-free. For a vegan version, replace butter with coconut oil or vegan butter. Use a plant-based milk, like almond or oat milk, instead of regular milk. Make sure to pick a vegan cake mix. You can enjoy the same tasty dessert without any animal products. It’s simple to make it fit your diet. For the full recipe, see the section above. To store leftover Peach Cobbler Dump Cake, let it cool completely. Place it in an airtight container. You can keep it in the fridge for up to four days. If you want to keep it longer, consider freezing. For freezing, slice the cake into portions. Wrap each piece tightly in plastic wrap. Then, place the wrapped slices in a freezer-safe bag. This way, they stay fresh for up to three months. When you are ready to enjoy, just thaw in the fridge overnight. To reheat, preheat your oven to 350°F (175°C). Place a slice on a baking sheet. Heat for about 10-15 minutes, until warm. You can also microwave a slice for 30-40 seconds. Just add a scoop of ice cream on top for a tasty treat! A dump cake is a simple dessert. You just dump the ingredients into a pan. No mixing is needed. It usually has fruit and cake mix. This makes it easy and fun to make. The layers blend while baking. The result is a warm, sweet treat. Yes, you can use fresh peaches! Just slice about 4 cups of ripe peaches. You may need to add a bit of sugar. This helps bring out the sweetness. Fresh peaches give a great flavor. They will make your cake taste even better. Peach Cobbler Dump Cake lasts about 3 to 4 days. Store it in an airtight container. Keep it in the fridge. You can also freeze it for longer storage. Just make sure to wrap it well. It will stay good for up to 3 months in the freezer. Absolutely! You can cut the recipe in half. Use a smaller baking dish, like an 8x8 inch one. Just adjust the baking time. Check it a bit earlier to avoid overbaking. A smaller batch is perfect for a small gathering. You can serve it with ice cream for a tasty treat. Vanilla ice cream pairs well with the warm cake. You can also add whipped cream or a drizzle of caramel. Fresh mint leaves can add a nice touch, too! Check for a golden brown top. The edges should look bubbly and crisp. You can insert a toothpick in the center. If it comes out clean, your cake is ready. Let it cool for a bit before serving. To make this cake gluten-free, use a gluten-free cake mix. Most brands offer great options. Just follow the same steps. Your cake will still taste amazing! Yes, feel free to mix in other fruits! Berries, apples, or cherries work well. Just keep the total amount of fruit the same. This can add new flavors and make your cake unique. This dessert is quick and easy to make. It brings great flavor with minimal effort. The warm peaches mixed with cake mix is a classic combo. You can customize it to fit your tastes! Try the Full Recipe for a delicious treat. In this post, we explored the simple steps for making a Peach Cobbler Dump Cake. You learned about key and optional ingredients, common substitutions, and various methods to craft this dessert. I shared tips for perfect texture and flavor, plus easy variations to suit dietary needs. Storing leftovers and reheating them is a breeze. Remember, this dessert is adaptable and fun to make. Enjoy your delicious creation and share it with loved ones!

Peach Cobbler Dump Cake Simple and Tasty Dessert

Are you craving a dessert that’s easy to make and bursting with flavor? Look no further! This Peach Cobbler Dump

To make the Taco Meatball Ring, you need a few key ingredients: - 1 lb ground beef - 1/2 cup breadcrumbs - 1/4 cup grated Parmesan cheese - 1/4 cup taco seasoning - 1 egg, beaten - 1/4 cup fresh cilantro, chopped - 1 cup shredded cheddar cheese - 1 can refrigerated crescent roll dough - 1/2 cup diced tomatoes (fresh or canned) - 1/4 cup sliced black olives (optional) These ingredients come together to create rich flavors that everyone loves. The ground beef forms the base, while breadcrumbs help bind everything. Parmesan cheese adds a nice cheesy touch, and taco seasoning gives that classic flavor. While the Taco Meatball Ring is tasty on its own, you can enhance it with some fun toppings: - Sour cream - Salsa - Extra cilantro for garnish - Sliced jalapeños for heat Feel free to mix and match! These toppings make the dish even more enjoyable. They add freshness and a bit of zing. To prepare your Taco Meatball Ring, you’ll need some simple tools: - Large mixing bowl - Skillet for cooking meatballs - Baking sheet - Parchment paper (optional for easy cleanup) - Measuring cups and spoons Having the right tools makes the cooking process smooth and fun. You can focus on enjoying your time in the kitchen. For the full recipe, check the complete guide! First, gather all your ingredients. You will need ground beef, breadcrumbs, Parmesan cheese, and taco seasoning. Add an egg and chopped cilantro to the bowl. Mix these ingredients until they are just combined. You want to keep the mixture light and fluffy. Form small meatballs, about 1 inch in size. Aim for around 24 meatballs. This makes a good amount for sharing. Heat a large skillet over medium heat. Place the meatballs in the skillet and cook them for about 8 to 10 minutes. You want them brown on all sides. They do not need to cook fully at this stage. They will finish cooking in the oven. Once browned, remove them from the skillet and set them aside. This step adds flavor and a nice texture. Preheat your oven to 375°F (190°C). On a large baking sheet, arrange the crescent roll triangles in a circle. Make sure the wide ends overlap in the center. This forms a ring with the points facing outward. Next, add a layer of diced tomatoes in the center of the ring. Sprinkle half of the cheddar cheese on top of the tomatoes. Now, carefully place the cooked meatballs around the ring. Tuck them slightly under the crescent roll dough. Top with the remaining cheddar cheese. Fold the points of the crescent roll dough over the meatballs. This secures the meatballs inside. Bake in the oven for 25 to 30 minutes. Look for the dough to be golden brown. Once done, let it cool for a few minutes before slicing. Enjoy the fun and tasty Taco Meatball Ring with sour cream and salsa on the side. Check out the Full Recipe for more details! To keep your meatballs juicy, use a mix of ingredients. The breadcrumbs add texture and hold moisture. The egg helps bind the meatballs together while adding moisture. Avoid over-mixing the meat; mix just until combined. This keeps them tender. You can also add a splash of beef broth if you want extra moisture. When using crescent roll dough, keep it cold until you are ready to use it. Cold dough is easier to shape and will rise better. Lay the triangles out in a circle, with the wide ends in the center. Make sure the points face outward. This way, you can fold them over the meatballs easily. Press down gently to seal the dough. For a fun touch, garnish your Taco Meatball Ring with fresh cilantro. Serve it with sour cream and salsa on the side. This adds color and flavor. You can also place extra diced tomatoes and olives around the ring for a vibrant look. For a festive feel, use colorful plates or a fun serving platter. Enjoy your meal! {{image_2}} You can swap ingredients to create new flavors in your Taco Meatball Ring. Here are some ideas: - Meat Choices: Use ground turkey or chicken for a leaner option. - Cheese Substitutes: Try pepper jack for a spicy kick or mozzarella for a milder taste. - Breadcrumbs: Replace with crushed tortilla chips for extra crunch. - Herbs: Add fresh parsley or green onions for a different flavor profile. These simple swaps let you explore new tastes while keeping the dish fun and exciting. If you love heat, this version is for you. Start by adding: - Spicy Taco Seasoning: Use a hot blend instead of regular taco seasoning. - Chopped Jalapeños: Mix into the meatball mixture for extra spice. - Hot Sauce: Drizzle some on top before baking for a zesty finish. This spicy version will add a new layer of flavor to your dinner. You can easily make a vegetarian Taco Meatball Ring. Here’s how: - Meat Replacement: Use lentils or black beans instead of ground beef. - Binders: Add mashed avocado or cooked quinoa for texture. - Cheese: Opt for vegan cheese to keep it plant-based. These alternatives keep the taste and feel of the dish while making it vegetarian-friendly. For the full recipe, check the link above. To keep your Taco Meatball Ring fresh, place leftovers in an airtight container. This helps lock in moisture and flavor. Store it in the fridge for up to three days. If you want to keep it longer, freezing is a great option. Reheat your Taco Meatball Ring in the oven for the best results. Preheat your oven to 350°F (175°C). Cover the ring with foil to prevent it from drying out. Heat for about 15-20 minutes or until warmed through. You can also use a microwave, but the oven keeps the crust crispy. To freeze, let the Taco Meatball Ring cool completely. Wrap it tightly in plastic wrap, then in foil. This prevents freezer burn. You can freeze it for up to three months. When you want to enjoy it again, thaw it overnight in the fridge before reheating. For the full recipe, check the details above. Yes, you can make Taco Meatball Ring ahead of time. Prepare the meatballs and assemble the ring but do not bake it. Wrap the uncooked ring in plastic wrap and store it in the fridge. You can keep it for up to 24 hours. When you are ready to eat, just bake it straight from the fridge. This helps save time on busy days. Customizing seasoning is easy! Start with taco seasoning as your base. You can add more spice by using chili powder or cayenne pepper. For a smoky flavor, try adding smoked paprika. Fresh herbs like cilantro or parsley can brighten the taste. Taste your mixture before cooking to find your perfect flavor mix. There are many great sides to serve with Taco Meatball Ring. Here are some ideas: - Mexican rice - Refried beans - Corn salad - Guacamole - Fresh salsa These sides add more color and flavor to your meal. Enjoy dipping your slices in sour cream and salsa, too! For the full recipe, check out the complete preparation steps. In this article, we explored the Taco Meatball Ring, from key ingredients to step-by-step instructions. We learned how to make juicy meatballs and assemble them with crescent dough. Remember to mix in your favorite toppings and dips for extra fun. Don't forget storage tips for leftovers, or try the variations for new flavors. This dish is sure to impress at any gathering. Easy to make and tasty, the Taco Meatball Ring may become a family favorite! Enjoy crafting your version of this dish.

Taco Meatball Ring Quick and Flavorful Dinner Dish

Looking for a quick and tasty dinner idea? The Taco Meatball Ring is your answer! It combines savory meatballs and

To make Air Fryer Lasagna Fritta, you need a few key ingredients. Each one plays a big role in creating that crispy and flavorful delight. Here’s what you’ll need: - 8 lasagna noodles - 1 cup ricotta cheese - 1 ½ cups shredded mozzarella cheese - 1 cup marinara sauce - 1 egg - 1 teaspoon dried oregano - 1 teaspoon garlic powder - 1 teaspoon onion powder - ½ cup all-purpose flour - 1 cup breadcrumbs (Italian seasoned preferred) - Olive oil spray - Fresh basil for garnish (optional) Gathering these ingredients makes the cooking process more fun and easy. Each ingredient adds its own flavor and texture. For instance, the ricotta gives the filling a creamy base, while the mozzarella melts beautifully. The herbs bring out the taste in every bite. You can find the full recipe for Air Fryer Lasagna Fritta in the recipe section. This recipe is perfect for a cozy dinner or a fun gathering. To start, boil a large pot of salted water. Add the lasagna noodles and cook them until they are al dente. This usually takes about 8 to 10 minutes. Drain the noodles and spread them out on a towel or a baking sheet to cool. Cooling helps to prevent them from sticking together. In a mixing bowl, combine the ricotta cheese, 1 cup of shredded mozzarella, the egg, dried oregano, garlic powder, and onion powder. Mix these ingredients well until they are smooth and creamy. The texture is important; it should be thick enough to stay on the noodles but soft enough to spread easily. Lay each noodle flat on a clean surface. Take about 2 tablespoons of the filling and spread it evenly across the noodle. Start rolling tightly from one end to the other. Repeat this for each noodle. Make sure to leave some space between the filling and the edges. This helps keep the filling inside as they cook. Set up a dredging station with three shallow bowls. Fill the first bowl with all-purpose flour, the second with a beaten egg, and the third with breadcrumbs. This step is key for getting that crispy coating. Each lasagna roll needs to be coated in flour, egg, and breadcrumbs for the best crunch. First, preheat your air fryer to 375°F (190°C) for about 5 minutes. Once it's hot, place the coated lasagna rolls in a single layer in the basket. Lightly spray them with olive oil to help them brown. Air fry the rolls for 12 to 15 minutes, flipping them halfway through. They should be golden brown and crispy when done. Serve them hot with marinara sauce on the side for dipping. You can find the full recipe above. To get that perfect crispy coating, use olive oil spray. This small step makes a big difference. A light spray ensures even browning and keeps the coating crunchy. Sogginess is the enemy of crispiness. To avoid it, don’t overfill the rolls. Just enough filling will keep them light and airy. For dipping, marinara sauce is a classic choice. It adds moisture and flavor. You can also try a creamy ranch or garlic aioli for a twist. Pair the fritta with a fresh side salad or garlic bread. These sides balance the meal and add more flavor. One common mistake is overfilling the rolls. This can lead to a messy outcome. Keep the filling to about two tablespoons per noodle. Another mistake is not preheating the air fryer. Always preheat for about five minutes. This step ensures the rolls cook evenly and become crispy. {{image_2}} For a tasty vegetarian option, swap the ricotta with a mix of cottage cheese and spinach. This gives you a great texture and flavor. You can also add diced mushrooms or zucchini to the filling. Use lentils or plant-based meat for a hearty bite. These substitutes keep the dish rich while sticking to veggie goodness. If you need a gluten-free choice, try using gluten-free lasagna noodles. There are many brands that offer great options. For the coating, replace all-purpose flour with almond flour or a gluten-free baking mix. This keeps your Air Fryer Lasagna Fritta just as crispy and delicious. To boost flavor, add fresh herbs like basil or parsley to the ricotta mix. A pinch of red pepper flakes can give it a nice kick. You can also experiment with different cheeses, like fontina or Gouda, for a rich taste. Mixing in some Italian seasoning will enhance the overall profile, making each bite a burst of flavor. To store your Air Fryer Lasagna Fritta, first let them cool. Place them in an airtight container. They can stay fresh in the fridge for about three days. Be sure to keep them covered. This helps prevent them from drying out. You can freeze these rolls for later. If you freeze cooked rolls, let them cool first. Wrap each roll in plastic wrap, then place them in a freezer-safe bag. For uncooked rolls, you can freeze them before air frying. Just follow the same wrapping steps. They will last up to three months in the freezer. To reheat the lasagna fritta, use your air fryer again. This keeps them crispy. Preheat the air fryer to 350°F (175°C). Place the rolls in a single layer. Heat them for about 5-7 minutes. Check if they are hot all the way through. You can also use a regular oven, but this might make them less crispy. Enjoy your delicious treat again! For Air Fryer Lasagna Fritta, choose an air fryer that has a basket style. Look for one with a capacity of at least 3.5 quarts. This size fits the lasagna rolls well. A model with adjustable temperature settings lets you fine-tune cooking. Yes, you can prep this dish ahead. Make the lasagna rolls and store them in the fridge for up to 24 hours. Use an airtight container to keep them fresh. When ready to cook, just take them out and air fry. No need to thaw; just add a minute or two to the cooking time. To add heat, sprinkle red pepper flakes into the ricotta mix. You can also use spicy marinara sauce for dipping. Another option is to include chopped jalapeños in the filling. Adjust the amount to your heat preference. Pair these delicious rolls with a simple side salad. A Caesar or mixed green salad works great. For drinks, serve with a light Italian white wine or sparkling water. A side of garlic bread adds a nice touch too. Making Air Fryer Lasagna Fritta is simple and fun. You learned about the key ingredients, like ricotta and marinara sauce. I walked you through cooking the noodles and preparing the filling. You now know how to assemble the rolls and air fry them for that crispy finish. This dish is perfect for quick meals or gatherings. With tips on storage and variations, you can make it your own. Now, it’s time to try this recipe and enjoy every bite!

Air Fryer Lasagna Fritta Crispy and Flavorful Delight

Are you ready to enjoy a crispy and flavorful twist on classic lasagna? Air Fryer Lasagna Fritta combines your favorite

- 4 boneless, skinless chicken breasts - 2 cups finely chopped mushrooms - 1 small onion, finely chopped - 2 cloves garlic, minced - 1 cup chopped spinach - 1/2 cup low-fat cream cheese - 1/4 cup grated Parmesan cheese - 1 teaspoon dried thyme - 1 teaspoon salt - 1/2 teaspoon black pepper - 2 tablespoons olive oil - Fresh parsley for garnish The ingredients in this recipe come together to create a tasty dish. Each item plays its part in flavor and nutrition. Chicken breasts provide lean protein. Mushrooms add a rich, savory taste. Spinach boosts vitamins and minerals. Cream cheese keeps the stuffing creamy. Parmesan adds a nice, cheesy flavor. This dish is healthy and satisfying. Here’s a breakdown of the nutrients: - Calories: About 350 per serving - Protein: 30g - Fat: 15g - Carbs: 10g - Fiber: 2g The health benefits of the ingredients include: - Chicken breasts: High in protein, helps build muscle. - Mushrooms: Full of antioxidants, good for your immune system. - Spinach: Rich in iron and vitamins A and C. - Olive oil: Contains healthy fats that support heart health. This Healthy Mushroom Stuffed Chicken recipe combines taste and nutrition. You get a meal that fills you up and keeps you healthy. For the full recipe, check out the steps later in the article! First, you need to preheat your oven to 375°F (190°C). This is key for proper cooking. While the oven warms up, clear a large space on your counter. Gather your tools and ingredients so everything is ready when you start cooking. Now, let’s sauté the onions, garlic, and mushrooms. In a large skillet, heat 1 tablespoon of olive oil over medium heat. Add the finely chopped onion and cook for about 3-4 minutes until it turns translucent. Next, add the minced garlic and the chopped mushrooms. Stir and cook for 5-7 minutes until the mushrooms are soft and release their moisture. After that, stir in the chopped spinach and cook for 2 more minutes until it wilts. Once done, remove the skillet from heat and let the mixture cool slightly. In a large bowl, mix the cooled mushroom blend with cream cheese, Parmesan cheese, thyme, salt, and black pepper. Make sure it’s well combined. Now, it’s time to prepare the chicken breasts. Use a sharp knife to cut a pocket into each chicken breast. Slice horizontally but do not cut all the way through. This allows for stuffing. Let’s sear and bake the chicken. Take the stuffing and fill each chicken breast. Use toothpicks if needed to keep them closed. In the same skillet, heat the other tablespoon of olive oil. Sear the stuffed chicken for 2-3 minutes on each side until golden brown. Then, move the chicken to a baking dish. Now, bake the chicken in the preheated oven for 25-30 minutes. The chicken is done when the internal temperature reaches 165°F (75°C). Once cooked, remove it from the oven and let it rest for 5 minutes. Garnish with fresh parsley before serving. Enjoy this Healthy Mushroom Stuffed Chicken Delightful Recipe for a tasty meal. For the complete recipe, check out the Full Recipe. To make your Healthy Mushroom Stuffed Chicken shine, focus on seasoning. I like to use a mix of salt, black pepper, and thyme. You can adjust the salt to suit your taste. If you want more flavor, add a squeeze of lemon juice. This fresh touch brightens the dish. Using fresh herbs makes a big difference. Fresh thyme adds a lovely taste. Dried herbs are fine, too, but fresh makes the dish pop. Always use what you enjoy most. Keeping chicken breasts juicy is key. Start with brining. Soak the chicken in salty water for about 30 minutes. This helps the meat stay moist while cooking. When cooking, don’t overheat the skillet. A medium heat allows for even cooking. Sear both sides until golden brown, then bake. This two-step method locks in juices. Check the internal temperature; it should reach 165°F (75°C). For a beautiful plate, consider garnishing. Fresh parsley adds a pop of green. You can also use thin lemon slices for color. When plating, place the stuffed chicken in the center. Surround it with a colorful veggie side, like roasted carrots or green beans. A well-arranged plate makes your meal look gourmet. For more details, you can find the Full Recipe. {{image_2}} You can switch up the mushrooms and cheese in this recipe. If you want to try different mushrooms, use shiitake or portobello for a richer flavor. For cheese, consider goat cheese or feta for a tangy twist. You can also add other veggies like bell peppers, zucchini, or carrots to the stuffing. These will give your dish more color and nutrients. If you want added protein, consider including cooked quinoa or shredded chicken in the mix. This stuffed chicken pairs well with many sides. Consider serving it with a fresh salad or steamed vegetables for a light meal. You can also serve it over a bed of rice or quinoa for something heartier. For sauces, a light lemon butter sauce works wonders. A simple balsamic glaze can also add nice flavor and a touch of sweetness. Dipping sauces like a yogurt-based sauce or a tangy vinaigrette can enhance the meal. You can easily make this recipe gluten-free or dairy-free. For a gluten-free option, ensure your cream cheese is gluten-free and pair it with gluten-free sides. To make it dairy-free, swap the cream cheese and Parmesan with cashew cheese or a dairy-free cream cheese alternative. This way, you can enjoy the flavors without the dairy. Enjoy making this dish fit your dietary needs while still keeping it delicious! To store your Healthy Mushroom Stuffed Chicken, let it cool first. Place leftovers in an airtight container. You can refrigerate it for up to three days. If you want to keep it longer, freeze it. Wrap each chicken piece tightly in plastic wrap, then place it in a freezer-safe bag. This method helps keep the chicken fresh and tasty. When reheating, the goal is to keep the chicken moist. You can use an oven or a microwave. For the oven, preheat it to 350°F (175°C). Place the chicken in a baking dish and cover it with foil. Heat for about 20 minutes. If using a microwave, place the chicken on a microwave-safe plate. Cover with a damp paper towel and heat for 2-3 minutes. Check that it is hot throughout. Leftovers can stay fresh in the fridge for up to three days. If frozen, they can last for about three months. Always check for any signs of spoilage before eating. If it looks or smells off, it's best to discard it. Enjoy your Healthy Mushroom Stuffed Chicken safely! For the full recipe, feel free to check the earlier section. I recommend using cremini or button mushrooms for this recipe. Cremini mushrooms have a robust, earthy flavor. They add depth to the dish. Button mushrooms taste mild and sweet, making them a great choice too. You can mix both types for a tasty balance. If you want a richer flavor, try shiitake mushrooms. They work well but have a stronger taste. Yes, you can prep this dish in advance. Stuff the chicken breasts and store them in the fridge. Make sure to cover them tightly with plastic wrap or a lid. You can also make the stuffing a day ahead. Just keep it in the fridge until you are ready to use it. This way, you save time during a busy weeknight. To check if the chicken is done, use a meat thermometer. The internal temperature should reach 165°F (75°C). Insert the thermometer into the thickest part of the chicken, avoiding the stuffing. If you don’t have a thermometer, cut into the chicken. The meat should be white, with no pink. Juices should run clear, not pink. Absolutely! This recipe is great for meal prep. You can make a large batch and divide it into portions. Store each portion in airtight containers. These can last in the fridge for up to four days. You can also freeze them for up to three months. Just reheat them in the oven or microwave. Enjoy a healthy meal anytime! For the full recipe, check out the complete instructions above. This blog post covered a delicious stuffed chicken recipe. We detailed each ingredient, from chicken breasts to spinach. Next, I shared a step-by-step cooking guide and helpful tips for juicy chicken. You learned about variations, storage, and reheating too. Remember, you can change ingredients to fit your taste. Enjoy exploring this recipe and making it your own! Happy cooking!

Healthy Mushroom Stuffed Chicken Delightful Recipe

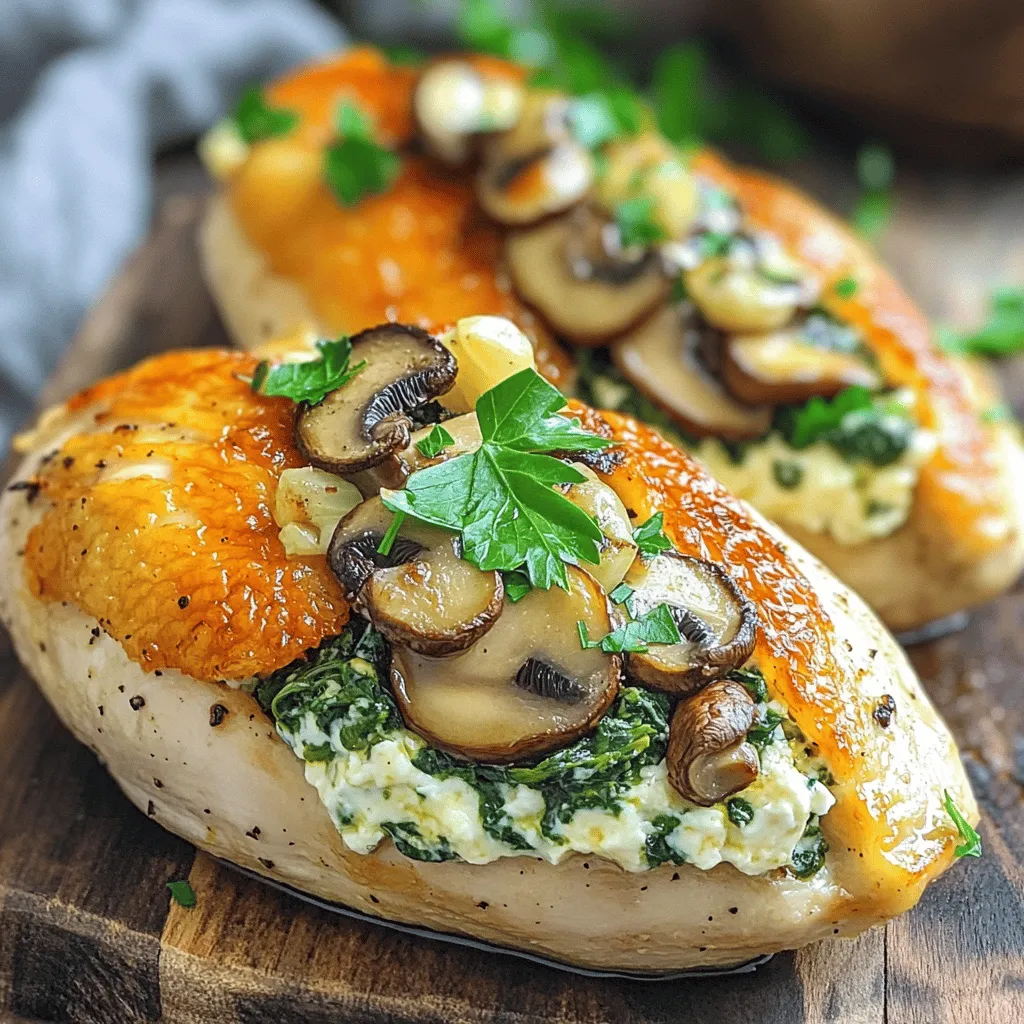
Looking for a tasty and healthy meal? Try my Healthy Mushroom Stuffed Chicken recipe! This dish combines juicy chicken breasts

Older posts
Newer posts
← Previous Page1 … Page65 Page66 Page67 … Page76 Next →
© 2025 My Cooking Cast • Built with GeneratePress

Our Policies

  • Privacy Policy
  • GDPR Policy
  • Terms Of Use
  • Copyright Policy
  • Cookie Policy
  • Disclaimer

More Information​

  • Home
  • Contact
  • About
  • Dinner
  • Appetizers
  • Dessert
©2025, My Cooking Cast About Privacy Policy Back To Top