![To create this delightful dish, gather these key ingredients: - 1 pound boneless chicken thighs, cut into bite-sized pieces - 1 cup long-grain rice, rinsed - 2 cups chicken broth (low sodium) - 1 medium onion, diced - 3 cloves garlic, minced - 1 lemon (zest and juice) - 1 teaspoon dried oregano - 1 teaspoon paprika - 1 tablespoon olive oil - Salt and pepper to taste - Fresh parsley, chopped (for garnish) These ingredients work together to create rich flavors and a hearty meal. The chicken thighs stay juicy, while the rice absorbs all the lemony goodness. You can add a few optional ingredients to boost the flavor: - Lemon slices for garnish - A pinch of red pepper flakes for heat - Fresh thyme or rosemary for herbal notes Using these extras can elevate your dish and make it even more inviting. This dish is not only tasty but also balanced. Here’s a quick look at what you get per serving: - Calories: Approximately 450 - Protein: 30g - Carbohydrates: 45g - Fat: 15g - Fiber: 1g These values can change based on your choices in ingredients. This recipe is a great option for a filling weeknight meal. For the full recipe, make sure to check the provided link! Start by cutting the chicken thighs into bite-sized pieces. Season the chicken with salt, pepper, paprika, and dried oregano. Mix well to coat all the pieces evenly. This step is key to building flavor in your dish. In a large pot, pour in the olive oil and heat it over medium heat. Add the diced onion and cook for about 3-4 minutes until it turns soft and clear. Next, add the minced garlic and cook for 1 more minute. The smell will be amazing! Now, raise the heat to medium-high. Toss in the seasoned chicken pieces and cook until they are lightly browned, about 5-7 minutes. This step locks in great flavor. Now it’s time to add the rice. Stir in the rinsed rice along with the lemon zest and lemon juice. Make sure everything is mixed well. Pour in the chicken broth and bring the mixture to a boil. Once boiling, lower the heat to a simmer. Cover the pot and let it cook for 20 minutes. The rice will absorb the broth and all the flavors. After 20 minutes, remove the pot from heat but keep it covered for another 5 minutes. Fluff the rice with a fork, mixing the chicken and rice together. This dish is now ready to serve! For an extra touch, garnish with fresh parsley and optional lemon slices. For the complete recipe, check out the [Full Recipe]. Cooking rice can seem tricky, but I have a few tips. First, rinse your rice under cold water. This helps remove extra starch and keeps it from being sticky. Use the right water ratio. For long-grain rice, one part rice needs two parts broth. This keeps your rice fluffy and tasty. Lemon adds great zest to this dish. You can add more lemon juice if you love the taste. Fresh herbs, like parsley, also brighten the flavors. Taste the dish while it cooks. This way, you can add salt or pepper as needed. Spices like oregano and paprika give it warmth. Don’t be afraid to adjust these to your liking. One mistake is not searing the chicken enough. This step adds deep flavor. Another mistake is cooking rice too long. Overcooking makes it mushy. Keep an eye on the pot, and check the rice at the 20-minute mark. Avoid lifting the lid too often while it simmers. This keeps all the steam locked in, helping the rice cook evenly. For the full recipe, check the details above. {{image_2}} You can add veggies to the dish for more color and nutrients. Carrots, peas, or bell peppers work well. Just chop them into small pieces. Add them when you sauté the onion. This way, they cook evenly and add a nice crunch. The bright colors will make your meal more fun and appealing. If you love heat, try adding jalapeños. Chop them finely and mix them in with the onion. You can adjust the amount based on your spice level. The jalapeños will give the dish a kick and a fresh flavor. It’s a great way to change up the classic taste of One Pot Lemon Chicken Rice. Changing herbs can bring new flavors to your meal. Try fresh thyme or dill. Just add them in when you mix the rice and chicken broth. You can also use fresh basil for a more Italian feel. Each herb can change the dish's flavor while keeping it bright and tasty. For the full recipe, check out the detailed steps above! To store your One Pot Lemon Chicken Rice, let it cool down first. Then, put it in an airtight container. This keeps it fresh for up to three days in the fridge. If you want to keep it longer, consider freezing it. When you're ready to eat the leftovers, reheating is easy. You can use the microwave or stovetop. For the microwave, place the rice in a bowl and cover it. Heat for about 1-2 minutes, stirring halfway through. If using the stovetop, add a splash of broth or water. Heat it over low heat, stirring often. This helps keep the rice moist. If you have extra servings, freezing is a great option. Portion the rice into freezer-safe bags or containers. Squeeze out the air and seal them tightly. You can freeze it for up to three months. When you want to enjoy it again, thaw it in the fridge overnight. Then, reheat it as mentioned above. Enjoy this tasty meal anytime! Yes, you can use brown rice. It will change the cooking time. Brown rice takes longer to cook than white rice. You will need to add more liquid and extend the simmer time by about 15-20 minutes. Check the rice for doneness. It should be tender but not mushy. To make this dish gluten-free, choose gluten-free chicken broth. Many brands offer low-sodium options. Also, check any spices you use. Some spice blends may contain gluten, so read labels carefully. With these swaps, you can enjoy this meal without worry. This dish works well with simple side salads. A fresh green salad with lemon vinaigrette is perfect. You can also serve it with steamed vegetables. Broccoli, green beans, or asparagus are great choices. For a heartier option, consider serving with garlic bread or pita. For the complete recipe, check out the [Full Recipe]. In this post, we explored making One Pot Lemon Chicken Rice from scratch. We discussed essential and optional ingredients, plus key tips for cooking. You learned how to sauté chicken and incorporate rice smoothly. I shared variations to suit your taste and tips for storing leftovers. As you try this dish, have fun with flavors and ingredients. Enjoy cooking and share your results!](https://mycookingcast.com/wp-content/uploads/2025/06/83506c1d-6fc1-403d-b8c3-0350e47e127c.webp)
One Pot Lemon Chicken Rice Easy Weeknight Meal
Looking for a quick and tasty dinner? One Pot Lemon Chicken Rice is your answer! This simple dish combines juicy
Looking for a quick and tasty dinner? One Pot Lemon Chicken Rice is your answer! This simple dish combines juicy

Craving something sweet without turning on the oven? You’re in the right place! This No Bake Oreo Cheesecake is super

Looking for a simple and tasty dish? This Easy Greek Pasta Salad is perfect for you! With bright veggies and
![- 2 pounds baby Yukon gold potatoes - 4 tablespoons olive oil - 4 cloves garlic, minced - 1 tablespoon fresh rosemary, finely chopped - 1 tablespoon fresh thyme, finely chopped - 1 teaspoon paprika - Salt and pepper to taste - Fresh parsley, for garnish (optional) To make Garlic Herb Roasted Potatoes, you need simple, fresh ingredients. Start with baby Yukon gold potatoes. They are creamy and flavorful. You will use two pounds, and halving them helps them cook evenly. Next, grab four tablespoons of olive oil. This oil adds richness and helps the herbs stick. For flavor, use four cloves of garlic. Minced garlic gives a strong, aromatic taste. Fresh herbs like rosemary and thyme shine in this dish. You’ll need one tablespoon of each, finely chopped. Add one teaspoon of paprika for a hint of warmth. Lastly, season with salt and pepper to your taste. If you want a nice touch, you can garnish with fresh parsley. It adds color and freshness. Now, you have all the ingredients ready. Check the full recipe for precise measurements and instructions. 1. Preheat your oven to 400°F (200°C). This helps the potatoes cook evenly. 2. Prepare a large baking sheet. Line it with parchment paper to make cleanup easy. 3. In a large bowl, combine the ingredients. Add 2 pounds of halved baby Yukon gold potatoes, 4 tablespoons of olive oil, 4 minced garlic cloves, 1 tablespoon of finely chopped rosemary, 1 tablespoon of finely chopped thyme, and 1 teaspoon of paprika. 4. Season with salt and pepper. Use a good amount to bring out the flavors. 5. Toss the potatoes. Make sure every piece is coated evenly in the oil and herbs. 1. Arrange the potatoes on the baking sheet. Spread them in a single layer for even cooking. 2. Roast the potatoes in the preheated oven for 30-35 minutes. Flip them halfway through. This ensures they brown nicely on all sides. 1. Check for doneness. The potatoes should be golden brown and fork-tender. 2. Remove from the oven and let cool for a few minutes. This helps them firm up a bit. 3. Garnish with fresh parsley if you like. It adds a nice color and flavor before serving. For the full recipe, be sure to check that section. Enjoy your tasty garlic herb roasted potatoes! Preheating the oven is a must. A hot oven cooks the potatoes evenly and helps them crisp up. Set the oven to 400°F (200°C) before you start. While it heats, you can prep your ingredients. Using parchment paper makes cleanup easy. Simply line your baking sheet with it. This prevents the potatoes from sticking and keeps the sheet clean. You will thank yourself later for this simple step. To add more flavor, think about using other herbs. Oregano, basil, or dill can work well. Each herb will give your dish a new twist. You can mix and match to find your favorite blend. Different types of potatoes can change the taste and texture. Try red potatoes or fingerling potatoes for a unique experience. Each type has its own flavor, so explore and find what you like best. Adjust the cook time based on potato size. Smaller pieces cook faster, while larger ones take longer. If your potatoes are cut smaller, check them at 25 minutes for doneness. For the crispiest results, use the bake setting. Avoid using the broil setting until the end, as it can burn the potatoes. Roasting at 400°F gives a golden brown outside while keeping the inside tender. Remember to flip them halfway through for even cooking. {{image_2}} You can change the oil in this recipe. Try using avocado oil instead of olive oil. It adds a nice flavor. You can also use other oils like canola or sunflower. Each one gives a unique twist to the dish. If you want to switch the seasonings, feel free to experiment. Herbs like oregano or basil can work well. You can also use garlic powder if you don’t have fresh garlic. Just remember, fresh herbs often taste better. Adding other veggies can make this dish even better. Carrots, bell peppers, or onions blend nicely with the potatoes. Chop them into similar sizes so they cook evenly. You could also mix in sweet potatoes. They add a bit of sweetness and color. Just make sure to cut them into small pieces for faster cooking. All the ingredients in this recipe are vegan and gluten-free. You can enjoy it without worry. To add more flavor, try using vegan sauces. A bit of balsamic glaze or a tahini dressing can create a new taste profile. You can also make this dish with any herb or sauce you love. Cooking is all about your taste! Check the [Full Recipe] for easy steps to follow. To keep your Garlic Herb Roasted Potatoes fresh, let them cool down first. This step helps prevent moisture build-up. Once they are cool, place them in an airtight container. Use a glass or plastic container with a tight seal to keep them fresh. You can also use a resealable bag, but squeeze out the air before sealing. When you want to enjoy your leftovers, reheating them properly is important. The best way to reheat is in the oven. Preheat your oven to 350°F (175°C). Spread the potatoes on a baking sheet for even heating. Bake for about 10-15 minutes until heated through. If you are in a hurry, you can use the microwave. Place the potatoes in a microwave-safe dish. Heat them on medium power for 1-2 minutes. Check and stir halfway for better results. However, using the oven gives you a better texture. You can freeze your Garlic Herb Roasted Potatoes if you have extra. First, let them cool completely. Then, place them in a freezer-safe container or bag. They can last up to 3 months in the freezer. When you are ready to eat them, remove them from the freezer. Thaw them in the fridge overnight for best results. After thawing, reheat in the oven for crispy potatoes again. To make your Garlic Herb Roasted Potatoes crispy, start with dry potatoes. After washing them, pat them dry with a towel. This helps remove extra moisture. Another tip is to cut the potatoes into even sizes. This ensures they all cook at the same rate. Use enough olive oil to coat each potato piece well. This creates a nice crispy layer. Lastly, spread them out on the baking sheet. Leaving space between potatoes allows hot air to circulate. Flip them halfway through cooking for even crispiness. Yes, you can use many different herbs! Try using fresh oregano or basil for a new twist. Dill or parsley also adds a fresh flavor. If you love heat, add some chili flakes with your herbs. Each herb brings a unique taste, so feel free to mix and match. Just remember to adjust the amount based on your taste. Garlic Herb Roasted Potatoes pair well with many dishes. They make a great side for roasted chicken or grilled steak. You can serve them alongside a fresh salad for a lighter meal. Try them with a creamy dip or sauce to enhance the flavor. They also work nicely with roasted vegetables, adding color and taste to your plate. This recipe takes about 45 minutes to make. You will spend about 10 minutes prepping the ingredients. The roasting time is around 30-35 minutes. It’s a quick and easy dish that fits well into any meal plan. Yes, this recipe is great for meal prep! You can make a big batch and store leftovers. After cooking, let the potatoes cool completely. Store them in an airtight container in the fridge. They last about 3-5 days. You can also freeze them for longer storage. Just remember to reheat them well to keep that crispy texture. Garlic Herb Roasted Potatoes are simple to make and full of flavor. We covered ingredients, step-by-step cooking, and storage tips. You can adjust herbs, use different oils, and easily reheat leftovers. This dish is perfect for meal prep and pairs well with many foods. Remember to follow the tips for crispiness and variations to keep things exciting. Enjoy these tasty potatoes as a side or a star. Happy cooking!](https://mycookingcast.com/wp-content/uploads/2025/06/ecc3322d-c379-4f60-a513-14af97ee26fb.webp)
Are you ready to elevate your dinner routine? In this guide, I’ll show you how to whip up Garlic Herb
![Cooking classic chocolate brownies starts with gathering the right ingredients. Each one plays a big role in the taste and texture. Here’s what you need: - 1 cup (225g) unsalted butter, melted - 2 cups (400g) granulated sugar - 4 large eggs - 1 teaspoon vanilla extract - 1 cup (130g) all-purpose flour - 1 cup (90g) unsweetened cocoa powder - 1/2 teaspoon salt - 1/2 teaspoon baking powder - 1 cup (175g) chocolate chips (dark or semi-sweet) - 1/2 cup (75g) chopped walnuts or pecans (optional) Each ingredient serves a purpose. The unsalted butter adds richness. Granulated sugar sweetens and helps create that chewy texture. Eggs bind the mix and add moisture. Vanilla extract gives a warm flavor that enhances chocolate. All-purpose flour provides structure, while cocoa powder offers a deep chocolate taste. Salt balances the sweetness. Baking powder helps the brownies rise slightly. Chocolate chips give bursts of chocolate in every bite. If you're feeling adventurous, nuts add crunch and flavor. This list is your guide to making the perfect brownies. Follow the Full Recipe for detailed steps, and you'll enjoy a delicious treat! 1. Preheating the oven: Start by preheating your oven to 350°F (175°C). This step is vital for even baking. 2. Combining wet ingredients: In a big bowl, mix together 1 cup of melted unsalted butter and 2 cups of granulated sugar. Stir until the mixture looks smooth and shiny. Next, add 4 large eggs one by one. Make sure each egg is mixed in well before adding the next. Finally, pour in 1 teaspoon of vanilla extract for flavor. 3. Mixing dry ingredients: In another bowl, sift together 1 cup of all-purpose flour, 1 cup of unsweetened cocoa powder, 1/2 teaspoon of salt, and 1/2 teaspoon of baking powder. This makes sure there are no lumps and helps the brownies rise well. 4. Incorporating chocolate chips and nuts: Now, slowly fold the dry mix into the wet mix. Do this gently until just combined—don’t overmix! If you like, add 1 cup of chocolate chips and 1/2 cup of chopped nuts for extra crunch. 1. Pouring batter into the pan: Grab a 9x13 inch baking pan that you have greased or lined with parchment paper. Pour the brownie batter in and spread it out evenly. 2. Baking duration and temperature: Place the pan in your preheated oven. Bake the brownies for about 25 to 30 minutes. 3. Testing for doneness: To check if they are done, insert a toothpick into the center. If it comes out with a few moist crumbs, they are ready. If it has wet batter, bake a few more minutes. 1. Cooling tips: Once baked, let the brownies cool in the pan for about 15 minutes. If you used parchment paper, lift them out carefully. If not, you can cool them right in the pan. 2. Proper cutting techniques: For clean cuts, use a sharp knife. Wipe the knife between cuts to keep the edges neat. Cut into squares and enjoy your brownies. For a full recipe, check out [Full Recipe]. - Avoiding overmixing: Mix just until the ingredients blend. Overmixing makes brownies tough. You want a smooth batter, but lumps are okay. This keeps the brownies soft and chewy. - Ensuring proper oven temperature: Use an oven thermometer to check the heat. An accurate temperature helps brownies bake evenly. If the oven is too hot, they may burn. If it’s too cool, they won’t set properly. - Presentation ideas: Dust your brownies with powdered sugar right before serving. This adds a nice touch. You can also cut them into fun shapes. Think hearts or stars for special occasions. - Pairing with ice cream or whipped cream: Serve warm brownies with a scoop of vanilla ice cream. The cold cream melts slightly, creating a tasty contrast. Whipped cream also adds a light, fluffy feel. Both options make your dessert feel extra special. For the full recipe, check the earlier section! {{image_2}} You can easily change the flavor of your brownies. A great option is adding mint extract. Just a teaspoon will give a fresh taste. Another option is to add coffee. This adds depth to the chocolate flavor. Use 1-2 tablespoons of strong coffee for a unique twist. You can also swap the type of chocolate. Dark chocolate gives a rich taste, while semi-sweet chocolate is sweeter. Choose what you love! Mixing both is also a fun idea. This way, you can enjoy a blend of flavors. If you need gluten-free options, use almond flour or gluten-free flour. Make sure to check your cocoa powder too. It should also be gluten-free. This way, everyone can enjoy your brownies. For vegan brownie alternatives, swap eggs with applesauce or flaxseed meal. Use plant-based butter instead of regular butter. You can find many vegan chocolate chips too. These changes make your brownies suitable for vegan diets. For the complete details on how to make these delicious brownies, check the Full Recipe. To keep your brownies fresh, use an airtight container. Line it with parchment paper for easy cleanup. Place the brownies in a single layer if possible. This method keeps them moist and tasty. If you have cut brownies, place wax paper between layers to avoid sticking. Store them at room temperature for up to four days. They can also last in the fridge for about a week. Just remember, cold brownies may lose some of their rich flavor. Freezing brownies is simple and keeps them fresh for a longer time. Here’s how to do it: 1. Cool the Brownies: Let your brownies cool completely before freezing. This helps prevent ice crystals from forming. 2. Slice: Cut them into squares for easy serving later. 3. Wrap: Wrap each piece in plastic wrap. This helps keep them moist. 4. Bag It: Place the wrapped brownies in a freezer bag or container. Remove as much air as possible. 5. Label: Write the date on the bag. Brownies can last up to three months in the freezer. When you're ready to eat them, take out the brownies. Let them thaw at room temperature for about an hour. For a warm treat, heat them in the microwave for a few seconds. Enjoy your tasty homemade brownies! For the full recipe, refer to the instructions above. How do I know when brownies are done? You can tell when brownies are done by checking the center. Insert a toothpick into the middle. If it comes out with a few moist crumbs, they are ready. If it has wet batter, bake them a little longer. The edges should look firm, while the center may be soft. Can I substitute ingredients in the recipe? Yes, you can substitute some ingredients in the recipe. For example, you can use coconut oil instead of butter. You can also swap granulated sugar for brown sugar for a richer taste. If you need to avoid eggs, use applesauce or a flaxseed mixture as replacements. Each change may alter the flavor or texture a bit. What can I add to brownies for extra flavor? You can add many things to boost flavor! Try mixing in nuts for crunch, or swirl in peanut butter for creaminess. You can also add mint extract or coffee to enhance the chocolate taste. Don't forget to sprinkle sea salt on top for a sweet and salty mix. For a fun twist, try adding a layer of caramel or marshmallows! For the full recipe, check out the Decadent Dreamy Chocolate Brownies. You now have all you need to bake classic brownies. We covered ingredients, step-by-step instructions, and helpful tips. Remember to avoid overmixing and keep an eye on the oven temperature. Feel free to explore flavor variations or dietary swaps for your needs. You’ll impress friends and family with your skills. Enjoy every bite of your rich, chewy brownies and share them with those you love. Happy baking!](https://mycookingcast.com/wp-content/uploads/2025/06/d681dc40-b3a3-4d67-97eb-5b21c544090f.webp)
Brownies are the ultimate comfort food, and my classic chocolate brownies recipe is a must-try! With rich chocolate, a chewy
![You need a few key items to make this dish. Gather these main ingredients: - 4 boneless, skinless chicken thighs - 2 tablespoons olive oil - Zest of 1 lemon - Juice of 1 lemon - 1 tablespoon honey - 2 cloves garlic, minced These ingredients give your chicken a bright flavor and juicy texture. The chicken thighs stay moist while roasting, making them a great choice. Next, you will need some seasonings to enhance the taste. Here’s what to add: - 1 teaspoon smoked paprika - 1 teaspoon dried oregano - Salt and pepper to taste Mix these seasonings with the marinade. This blend adds a warm and savory depth to the chicken. The smoked paprika gives a nice touch of smokiness. For this recipe, I prefer fresh, colorful vegetables. Here are some great options: - 1 red bell pepper, sliced - 1 yellow bell pepper, sliced - 1 red onion, cut into wedges - 1 cup broccoli florets Feel free to mix in other veggies too, like zucchini or carrots. The more colors, the better! They add nutrition and a lovely presentation to your meal. For the full recipe, check out the link provided. First, preheat your oven to 425°F (220°C). This step is key for even cooking. Next, take a small bowl. Whisk together the olive oil, lemon zest, lemon juice, honey, minced garlic, smoked paprika, oregano, salt, and pepper. This mixture is a flavorful marinade. Now, put the chicken thighs in a large bowl or a resealable bag. Pour the marinade over the chicken. Make sure each piece is covered well. Let it rest for at least 20 minutes. This allows the flavors to soak in. While the chicken marinates, prepare your veggies. In a separate bowl, mix the sliced bell peppers, onion wedges, and broccoli florets. Drizzle them with olive oil, salt, and pepper. Toss until the veggies are well coated. Once the chicken has marinated, grab a large sheet pan. Place the marinated chicken thighs in the center. Surround them with the seasoned veggies. This setup helps everything cook evenly. Now, put the pan in the oven. Roast for 25-30 minutes. Check the internal temperature of the chicken. It should reach 165°F (75°C). The veggies should be tender and slightly caramelized. When they are done, take the pan out and let it rest for 5 minutes. To serve, garnish your dish with fresh parsley. This adds a nice touch of color. You can serve this meal as is or with a side of rice or quinoa. It is a complete meal full of flavor and nutrients. You can find the full recipe linked above to guide your cooking. Enjoy your healthy and tasty dish! Marinating adds great flavor to chicken. For best results, use a mix of acid and oil. I like to use lemon juice and olive oil. This combo keeps the chicken moist. Let the chicken soak for at least 20 minutes. For stronger taste, marinate overnight in the fridge. Just remember to cover the bowl or bag well. To get those veggies just right, cut them into similar sizes. This helps them roast evenly. I usually use bell peppers, onions, and broccoli. Toss them in olive oil, salt, and pepper. Spread them out on the pan so they don’t steam. Give them space! The more air, the better the roasting. Cooking time can change based on your oven. I suggest checking the chicken at 25 minutes. It should reach 165°F (75°C) to be safe to eat. If you use different veggies, check them too. Some might cook faster. If the chicken is done but veggies need more time, take the chicken out and let it rest. Keep cooking the veggies until they’re perfect. Check the Full Recipe for more details. {{image_2}} You can switch the chicken for other proteins. Try using salmon or shrimp. Both cook fast and taste great with the marinade. If you prefer plant-based options, tofu works well too. Just press it first to remove extra moisture. This way, it absorbs the flavors better. Each protein brings its own unique taste to the dish. You can also change the veggies in this recipe. Carrots, zucchini, or asparagus are good choices. Each vegetable has a different texture and flavor. For a colorful mix, use a variety of bell peppers. If you want more greens, add spinach or kale. Just be sure to cut the veggies into similar sizes. This helps them cook evenly, making your meal look and taste great. To make the dish even more exciting, try adding herbs or spices. Fresh rosemary or thyme adds a nice touch. You can also sprinkle some red pepper flakes for heat. A splash of balsamic vinegar can add a sweet and tangy kick. Feel free to experiment! The more you play with flavors, the more fun your cooking will be. Check the Full Recipe for more ideas on how to make this dish your own. After enjoying your sheet pan chicken and veggies, store any leftovers in an airtight container. This keeps the food fresh for up to three days. Make sure the chicken and veggies cool down before sealing them. If you want to keep the taste and texture, avoid stacking the food too tightly. When you’re ready to enjoy leftovers, you can reheat them easily. Preheat your oven to 350°F (175°C). Place the chicken and veggies on a baking sheet. Warm them for about 10-15 minutes, or until heated through. You can also use a microwave. Heat in short bursts, stirring in between, to avoid hot spots. If you want to save leftovers for later, freezing is a great option. Place the cooled chicken and veggies in a freezer-safe bag. Squeeze out as much air as you can before sealing. You can freeze for up to three months. When you’re ready to eat, thaw in the fridge overnight, then reheat as mentioned above. This helps keep the flavors vibrant and the texture nice. It takes about 25 to 30 minutes to cook sheet pan chicken at 425°F (220°C). The chicken should reach an internal temperature of 165°F (75°C). This cooking time allows the chicken to become juicy and tender. Plus, the veggies will get soft and caramelized during this time. Yes, you can use frozen vegetables for this recipe. Just remember to thaw them first. Thawed veggies will cook more evenly with the chicken. If you add them straight from the freezer, they may release too much water. This can make the dish soggy instead of crisp. Sheet pan chicken goes well with many sides. Here are a few ideas: - Rice: White or brown rice adds a nice base. - Quinoa: This is a healthy, protein-rich option. - Salad: A fresh green salad can lighten the meal. - Bread: Crusty bread is great for soaking up the juices. These sides can round out your meal nicely. For the full recipe, check out the [Full Recipe]. In this blog post, we explored the key ingredients for sheet pan chicken, including main ingredients, seasonings, and veggies. I shared step-by-step instructions for prep, cooking, and serving. You learned tips for marinating, roasting veggies, and timing adjustments. We also looked at variations, storage info, and answered common questions. Now you have everything needed to make this dish your own. Enjoy the cooking journey!](https://mycookingcast.com/wp-content/uploads/2025/06/597ff66d-1b51-4f53-936c-443e3db81c1c.webp)
Looking for a simple, tasty meal? You’re in the right place! Sheet pan chicken and veggies is an easy dish
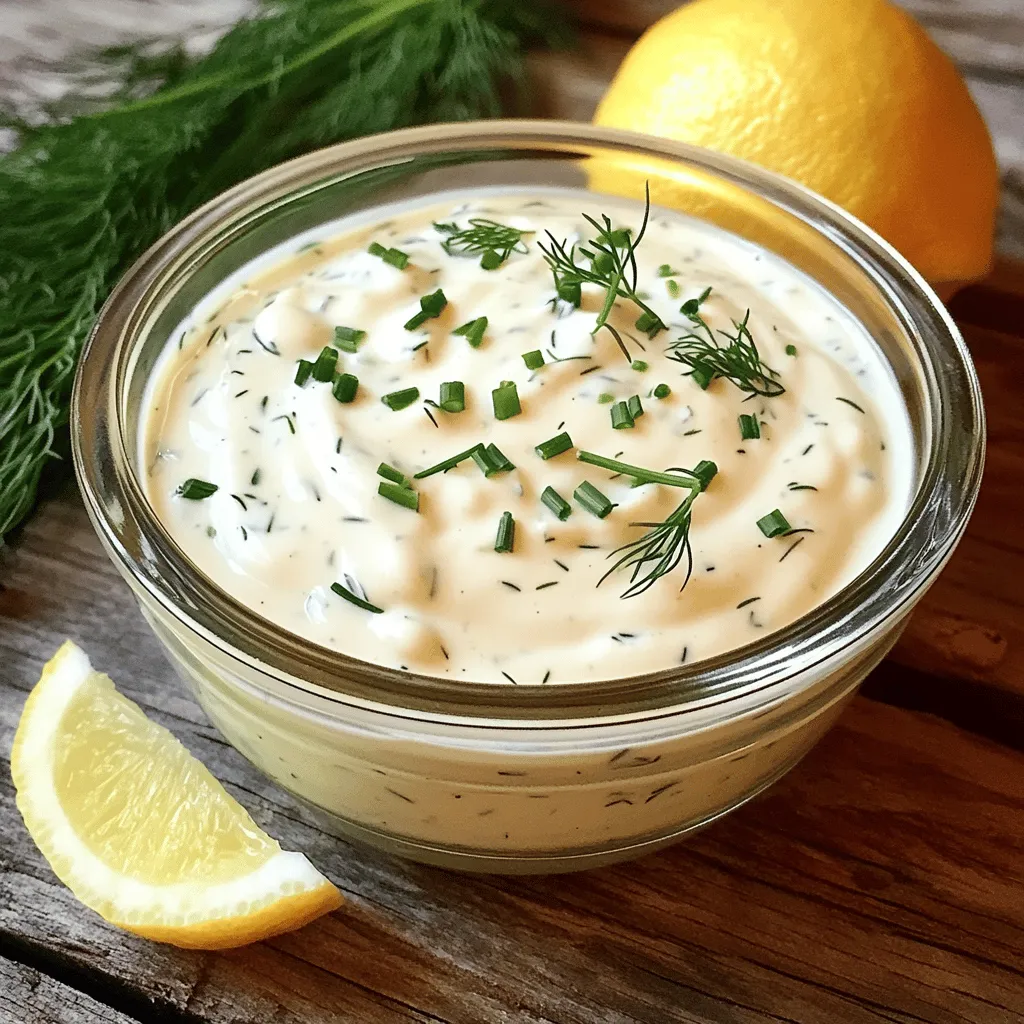
Are you ready to elevate your salads and snacks? Homemade ranch dressing is both easy to make and packed with
![To make the French Onion Chicken Skillet, you need a few simple ingredients. Here’s what you’ll need: - 4 boneless, skinless chicken thighs - 2 large onions, thinly sliced - 2 cloves garlic, minced - 1 teaspoon dried thyme - 1 teaspoon balsamic vinegar - 1 cup low-sodium chicken broth - 1 cup shredded Gruyère cheese - 2 tablespoons olive oil - Salt and pepper to taste - Fresh parsley, chopped for garnish These ingredients combine to create a dish full of rich flavors. The chicken thighs are juicy and tender. The onions add sweetness, while the garlic brings a nice depth. You’ll love how the thyme and balsamic vinegar work together to elevate the taste. The Gruyère cheese melts beautifully, adding creaminess to the whole dish. When I develop recipes, I always choose fresh ingredients. Using fresh herbs and high-quality cheese makes a big difference. This recipe is perfect for a cozy dinner at home. You can find the full recipe [here]. 1. Seasoning the chicken thighs: Start by seasoning your chicken thighs with salt and pepper. This step builds flavor. Make sure to coat both sides well. 2. Searing the chicken in the skillet: Heat olive oil in a large skillet over medium heat. Add the seasoned chicken thighs once the oil is hot. Sear each side for 5-7 minutes until golden brown. This locks in moisture and creates a nice crust. 3. Caramelizing the onions: Remove the chicken and set it aside. In the same skillet, add your sliced onions. Cook them for about 10 minutes, stirring often. You're looking for that rich, golden color. This caramelization adds a deep sweetness to your dish. 4. Adding garlic and thyme: After the onions turn golden brown, stir in minced garlic and dried thyme. Cook for one more minute. This adds a fragrant touch to your mix. 5. Deglazing the skillet with broth and vinegar: Pour in the chicken broth and balsamic vinegar. Use a spatula to scrape the bottom of the skillet. This step captures all those tasty bits stuck to the pan. 6. Simmering with chicken included: Return the chicken thighs to the skillet. Nestle them into the onion mixture. Let everything simmer for about 5 minutes. This allows all the flavors to blend beautifully. 7. Melting the cheese on top: Sprinkle shredded Gruyère cheese over the chicken and onions. Cover the skillet with a lid and let it cook for another 3-5 minutes. You want the cheese to melt and get bubbly. Now you have a hearty meal that’s ready to enjoy! For the full recipe, check out the complete instructions above. To get juicy chicken, cook it for about 5-7 minutes on each side. The chicken should be golden brown when done. Always check that the internal temperature reaches 165°F (75°C). For extra flavor, use spices like garlic powder, paprika, or Italian seasoning. They add depth and make each bite exciting. Caramelizing onions takes patience. Keep the heat medium-low to avoid burning. Stir them often to cook evenly. This process usually takes about 10 minutes. You want them soft and golden brown. To balance sweetness, add a pinch of salt. It helps draw out moisture and enhances the flavor. Pair this dish with mashed potatoes or crusty bread. They soak up the rich sauce well. For a fresh touch, serve a green salad on the side. To make your plate look great, sprinkle fresh parsley on top. This adds color and a hint of freshness. For more ideas on side dishes, check out the Full Recipe. {{image_2}} You can switch out Gruyère cheese if you want. Try Swiss cheese or mozzarella. They melt well and add great flavor too. When it comes to chicken, you can use breasts instead of thighs. Breasts cook faster, but they may dry out. Thighs are juicier, making them a better choice. Want to mix things up? Add mushrooms or bell peppers for extra depth. Sauté them with the onions to enhance their flavors. You can also try different herbs and spices. Rosemary or oregano can add a nice twist. Consider using smoked paprika for a smoky note. If you prefer oven-baking, go for it! Cook the chicken in an oven-safe skillet. Bake it at 375°F for about 25-30 minutes. This method lets the chicken stay moist and tender. For a slow cooker version, brown the chicken first. Then, add the onions and broth to the slow cooker. Cook on low for 6-8 hours. This makes dinner super easy! For the full recipe, check out the details above. To keep your French Onion Chicken Skillet fresh, store leftovers in the fridge. Place the chicken and onions in an airtight container. This helps to seal in moisture and flavor. Make sure to cool the dish to room temperature before sealing it up. It stays good in the fridge for about 3 to 4 days. When it's time to enjoy leftovers, reheat them gently. Use a skillet over low heat. This method warms the dish evenly without drying it out. Stir occasionally to prevent sticking. You can also use the microwave. Heat on medium power for 1 to 2 minutes. Check if it’s warm enough before serving. If you want to save some portions for later, freezing is a great option. Place cooled leftovers in freezer-safe bags or containers. Squeeze out as much air as possible to avoid freezer burn. The meal can last up to 3 months in the freezer. When you're ready to eat, take it out and thaw in the fridge overnight. Reheat in a skillet or microwave until hot. This keeps the dish tasty and enjoyable. For the best flavor, eat your frozen portions within a month. For the complete cooking process, check the Full Recipe. Yes, you can prepare this dish ahead of time. Cook the chicken and onions as directed. Once cooked, let it cool, then store it in an airtight container. Keep it in the fridge for up to three days. When ready to eat, reheat it gently on the stove or in the oven. This keeps all the flavors fresh. If you don't have chicken thighs, chicken breasts work well too. They are leaner but still tasty. You can also use chicken drumsticks or wings. Just adjust the cooking time, as different cuts may cook at different speeds. Absolutely! Using pre-cooked chicken makes this recipe even quicker. Add the cooked chicken to the skillet after you caramelize the onions. Pour in the broth and vinegar, then simmer for a few minutes. This allows the flavors to blend without drying out the chicken. This dish goes well with many sides. A simple green salad adds freshness. You can also serve it with mashed potatoes or rice to soak up the delicious sauce. Crusty bread is another great choice for dipping. To keep the chicken juicy, avoid overcooking it. Sear the chicken until golden brown but not dry. Let the chicken rest for a few minutes after cooking. This helps retain moisture. Also, simmering it in the broth keeps it flavorful and tender. This blog post covered how to make a delicious French Onion Chicken Skillet. We discussed required ingredients, step-by-step instructions, and tips for success. You learned how to cook juicy chicken and caramelize onions for rich flavor. We also shared storage tips and answered common questions. With the right techniques, this dish can impress anyone. Enjoy making this meal and share it with those you love!](https://mycookingcast.com/wp-content/uploads/2025/06/e59c4247-2fc4-43f4-81c9-ce4f54254667.webp)
Looking for a delicious and easy dinner? Try my French Onion Chicken Skillet! This recipe combines tender chicken thighs, sweet

Rich, smooth, and totally dairy-free, this Vegan Chocolate Mousse is a delight! You don’t need fancy skills or rare ingredients

Are you ready to bake a treat that’s both delightful and good for you? These Healthy Zucchini Muffins are a
