![To make a hearty vegan chili, gather these simple ingredients: - 1 tablespoon olive oil - 1 large onion, diced - 2 cloves garlic, minced - 1 green bell pepper, diced - 1 red bell pepper, diced - 2 medium carrots, diced - 1 zucchini, diced - 1 can (15 oz) black beans, drained and rinsed - 1 can (15 oz) kidney beans, drained and rinsed - 1 can (15 oz) diced tomatoes - 2 tablespoons tomato paste - 2 cups vegetable broth - 1 tablespoon chili powder - 1 teaspoon ground cumin - 1 teaspoon smoked paprika - 1/2 teaspoon cayenne pepper (adjust to taste) - Salt and pepper to taste - Fresh cilantro, for garnish - Avocado slices, for serving These ingredients create a rich flavor and a filling meal. The beans offer protein, while the veggies add nutrients. Each spice brings its own warmth and depth. You can adjust the heat by adding more cayenne pepper or chili powder. Enjoy the fresh taste of cilantro and avocado on top. This chili is not only tasty but also healthy. For the full recipe, check out the cooking steps that follow. 1. In a large pot, heat the olive oil over medium heat. 2. Add the diced onion. Sauté it for about 5 minutes. It should turn translucent. 3. Next, stir in the minced garlic. Cook this for an extra minute. 1. Now, add the diced green and red bell peppers, carrots, and zucchini into the pot. 2. Sauté the vegetables for about 5-7 minutes. You want them to soften. 1. Incorporate the black beans, kidney beans, diced tomatoes, and tomato paste into the pot. 2. Mix in the vegetable broth and spices. Stir everything well to combine. 1. Bring the chili to a simmer. 2. Reduce the heat to low and cover the pot. Cook it for 30-40 minutes. Stir occasionally. This helps the flavors blend well. For the full recipe, check the instructions above. To boost the taste of your vegan chili, focus on spices. My favorites are: - Chili powder - Ground cumin - Smoked paprika - Cayenne pepper Each spice adds depth and warmth. Adjust the cayenne to match your heat level. Always taste your chili as it cooks. This helps you find the right balance. Seasoning makes all the difference. I often add salt and pepper in stages. This way, I can control the flavors better. You can choose between slow cooking and stovetop methods. Slow cooking is great for deep flavors. It allows time for ingredients to meld. Use a slow cooker for 6-8 hours on low heat. The stovetop method is quicker. It takes about 30-40 minutes. Temperature control is key. For stovetop, keep it on medium heat. Stir often to avoid sticking. If using a slow cooker, set it on low for a gentle cook. Serving your chili can be fun! Use warm bowls to keep it cozy. I love to garnish with fresh cilantro. Add slices of avocado for creaminess. Pair your chili with crusty bread or rice. Both add heartiness to the meal. You can also serve it with tortilla chips for crunch. Check out the Full Recipe for more ideas! {{image_2}} To make your vegan chili spicy, adjust the cayenne pepper. Start with 1/4 teaspoon and taste. You can always add more! If you want extra heat, add fresh jalapeños or a splash of hot sauce. These ingredients will give your chili a nice kick. Just remember, spice can change the flavor balance. So, add it slowly and taste as you go. Using a slow cooker can make your chili even better. To do this, first, sauté the onion and garlic on the stove. Then, add all your other ingredients to the slow cooker. Cook on low for 6 to 8 hours or high for 3 to 4 hours. The longer cooking time allows the flavors to blend well. Just like with the stovetop method, remember to stir occasionally if you can. Beans are the heart of any chili. You can switch things up by using different types of beans. Try pinto beans or navy beans for a new taste. You can even add lentils or chickpeas for added protein. These options not only change the flavor but also add unique textures. Mixing different beans brings more fun to your bowl. For the full recipe, check out the Hearty Vegan Chili section. To store leftover vegan chili, use airtight containers. Glass or BPA-free plastic containers work best. Make sure to cool the chili to room temperature before sealing. This helps keep it fresh. Store the chili in the fridge for up to five days. You can freeze vegan chili for later use. First, let it cool completely. Then, pour it into freezer-safe bags or containers. Squeeze out as much air as possible to prevent freezer burn. When you want to eat it, take it out and thaw it overnight in the fridge. Reheat it on the stove or in the microwave until it's hot. Vegan chili lasts about five days in the fridge. If you freeze it, it can last up to three months. Always check for signs of spoilage before eating. If it smells bad or looks off, it's best to toss it. Enjoy your tasty vegan chili from the [Full Recipe]! Vegan chili is packed with nutrients. It has beans, veggies, and spices. Beans are high in protein and fiber. They help with digestion and keep you full. Vegan chili is low in fat and cholesterol-free. It supports heart health and helps manage weight. Plant-based diets may lower the risk of some diseases. Eating a variety of plants boosts your vitamins and minerals. Absolutely! You can change the beans or add your favorite veggies. If you have allergies, swap out the ingredients. For instance, use quinoa instead of beans or leave out the peppers. You can also adjust the spices to your taste. If you like it spicy, add more cayenne. If you prefer milder flavors, reduce the chili powder. The options are endless! To thicken your chili, try a few methods. You can mash some beans or add more tomato paste. Another option is to let it simmer longer. This helps the liquid reduce. You can also add cornmeal or ground oats. Both will help absorb extra liquid. These ingredients give your chili a hearty texture. Yes, you can make vegan chili ahead of time. It actually tastes better the next day. The flavors mix and deepen overnight. Store it in the fridge for up to five days. To enhance flavor, let it cool before sealing. Use airtight containers to keep it fresh. Reheat your chili on the stove or in the microwave. On the stove, use low heat and stir often. This keeps it from sticking to the pan. In the microwave, heat in short bursts. Stir between heating to ensure even warmth. Adding a splash of broth can help keep the texture nice. Enjoy it with fresh toppings for added flavor! This vegan chili recipe is simple and packed with flavor. You learned about key ingredients and step-by-step cooking instructions to create a delicious dish. I shared useful tips for enhancing flavor and discussed variations to fit your taste. Storing leftovers safely ensures you enjoy this meal later. Remember, customizing ingredients lets you make this chili your own. Each bite is not only tasty but also good for your health. Enjoy experimenting with this recipe and savoring the delicious outcomes!](https://mycookingcast.com/wp-content/uploads/2025/06/942c680b-6c57-4f95-8b71-e974361ca2ba.webp)
Vegan Chili Flavorful and Healthy Comfort Dish
Looking for a warm, tasty dish that’s good for you? Vegan chili is your answer! Packed with fresh veggies, hearty
Looking for a warm, tasty dish that’s good for you? Vegan chili is your answer! Packed with fresh veggies, hearty

Are you ready to dive into a bowl of cozy comfort? This Greek Lemon Chicken Soup is both easy to
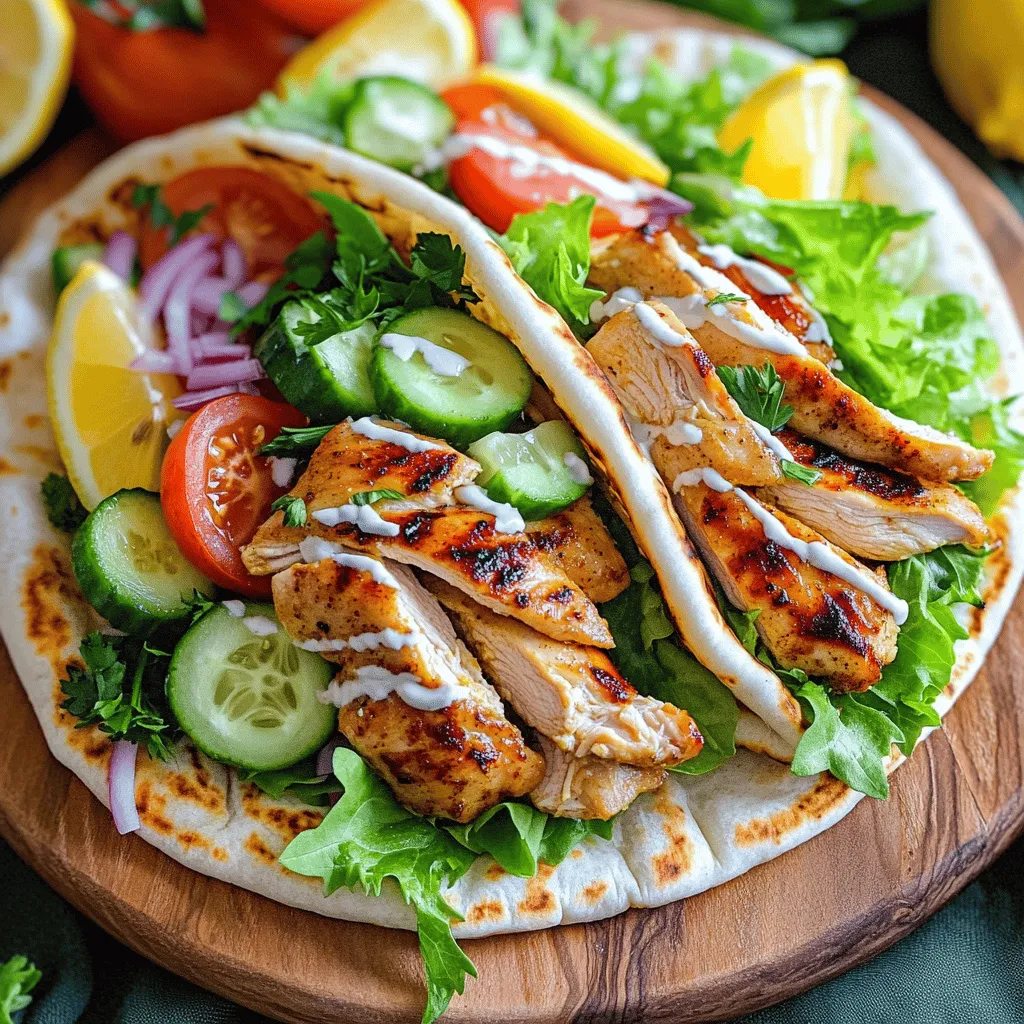
Looking to spice up your dinner routine? My Easy Chicken Shawarma recipe is quick, tasty, and packed with flavor. In
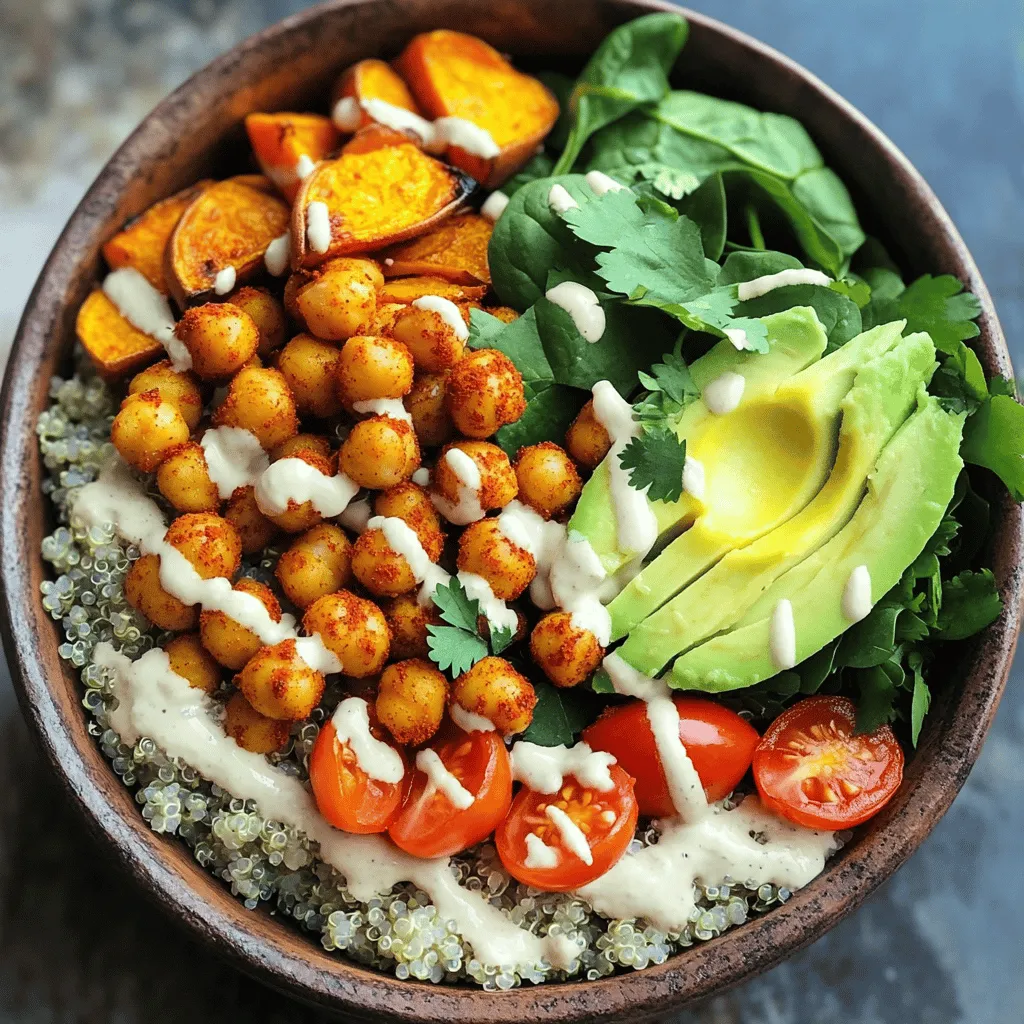
Looking for a meal that’s both delicious and good for you? The Spicy Chickpea Buddha Bowl is what you need!

Craving something cheesy and comforting? This Cheesy Cauliflower Bake is your answer! I’ll show you how to make a tasty

Have you ever wanted to make fresh, chewy bagels at home? You’re in luck! In this guide, I will show
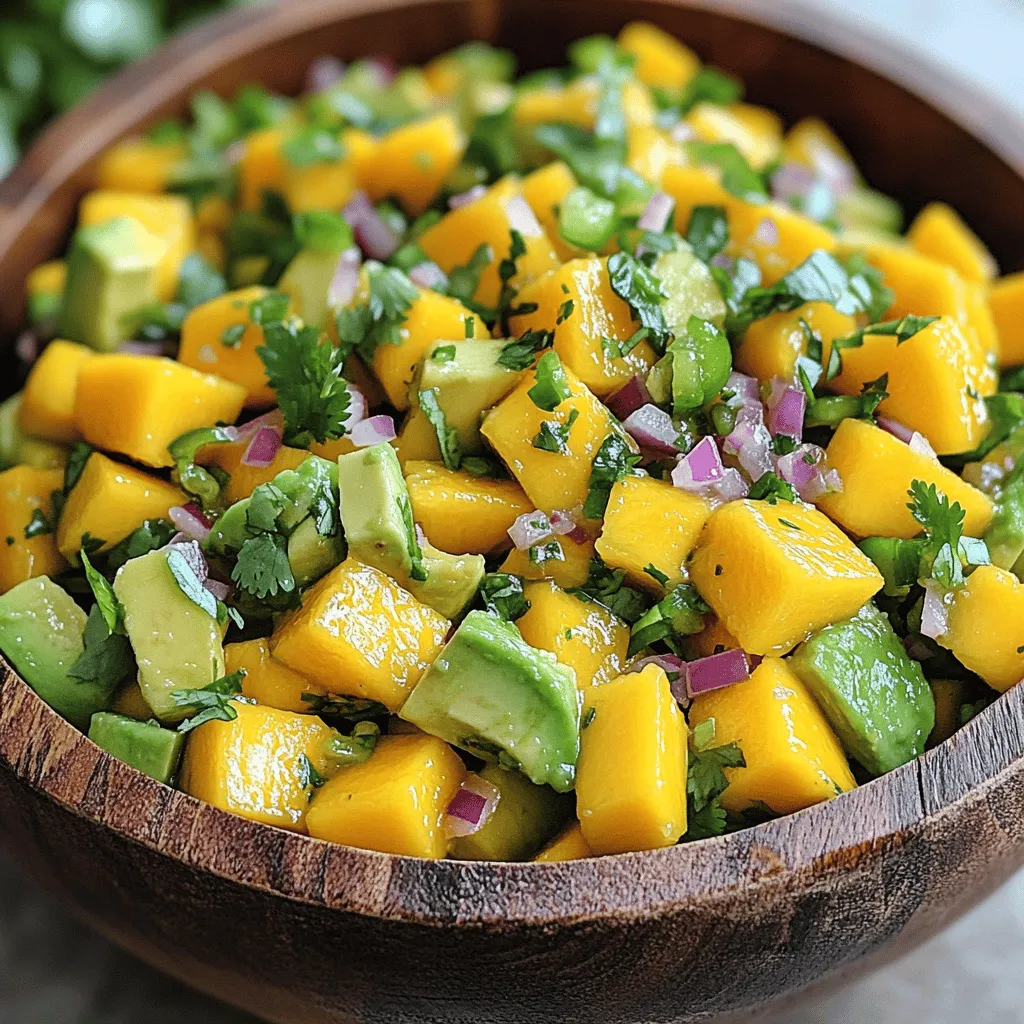
If you crave a bright, refreshing dish that bursts with flavor, Mango Avocado Salsa is your answer! This vibrant salsa
![- 2 boneless, skinless chicken breasts, cut into bite-sized pieces - 2 tablespoons olive oil - 3 cups chicken broth - 8 ounces fettuccine pasta - 1 cup heavy cream - 1 cup grated Parmesan cheese One Pot Chicken Alfredo starts with chicken, pasta, cream, and cheese. I love using boneless, skinless chicken breasts for this dish. They cook fast and stay juicy. For pasta, fettuccine is a classic choice, but you can use any type you like. Heavy cream gives this dish its rich texture, while Parmesan cheese adds a savory kick. - 2 cloves garlic, minced - 1 teaspoon Italian seasoning - Salt and pepper to taste Seasonings are key in this recipe. Garlic brings a nice flavor and aroma. Italian seasoning adds herbs like basil and oregano, which make the dish taste fresh. Use salt and pepper to enhance all the flavors. Adjust them based on your taste. - Large pot or deep skillet - Measuring cups and spoons - Wooden spoon or spatula You need a few simple tools for this recipe. A large pot or deep skillet helps cook everything in one go. Measuring cups and spoons ensure you add the right amounts. Use a wooden spoon or spatula to stir the ingredients. These tools make cooking easy and fun. For the full recipe, check out the [Full Recipe]. Preparing the chicken Start with two boneless, skinless chicken breasts. Cut them into bite-sized pieces. Heat two tablespoons of olive oil in a large pot over medium heat. Add the chicken pieces to the pot. Season with salt and pepper. Cook for about 5-7 minutes until the chicken turns golden and is fully cooked. Remove the chicken from the pot and set it aside. Sautéing garlic In the same pot, add two cloves of minced garlic. Sauté for about 30 seconds until it smells great. This step adds a rich flavor to your dish. Boiling chicken broth Next, pour in three cups of chicken broth and bring it to a boil. The broth adds depth and richness to the pasta. Adding fettuccine Once the broth is boiling, add 8 ounces of fettuccine pasta. Cook it according to the package instructions. Stir occasionally. You want the pasta to be al dente, which means it should be firm but not hard. Mixing cream and cheese After the pasta is cooked, lower the heat. Stir in one cup of heavy cream and one teaspoon of Italian seasoning. Mix until combined. Gradually add one cup of grated Parmesan cheese. Keep stirring until the cheese melts and the sauce becomes creamy. Returning the chicken to the pot Finally, return the cooked chicken to the pot. Mix everything together until well combined. Taste the dish and adjust the seasoning with more salt and pepper if you like. Serve hot, garnished with freshly chopped parsley. Enjoy your creamy One Pot Chicken Alfredo! For the full recipe, check the previous section. - Avoid overcooking the chicken: Cook your chicken just until it's no longer pink. This keeps it juicy and tender. Overcooked chicken can become dry and tough. Aim for about 5-7 minutes on medium heat. - Choosing the right pasta: Fettuccine works best for this dish. Its flat shape holds the creamy sauce well. You can also try penne or rigatoni if you prefer. - Optional spices and herbs: Add a pinch of red pepper flakes for heat. You can also sprinkle in fresh basil or oregano for added flavor. These herbs brighten up the dish and make it more aromatic. - Serving suggestions: Serve your One Pot Chicken Alfredo with a side salad or garlic bread. A crisp salad balances the rich flavors of the pasta. - Managing heat levels: Keep your heat on medium to avoid burning the garlic. Garlic cooks quickly and can turn bitter if overcooked. If the pot gets too hot, lower the heat to maintain control. - Stirring for optimal creaminess: Stirring often while adding the cream and cheese helps create a smooth sauce. Make sure to scrape the bottom of the pot. This prevents sticking and ensures every bite is creamy. These tips will help you make a delicious One Pot Chicken Alfredo. For the detailed recipe, check out the Full Recipe. Enjoy your cooking! {{image_2}} You can switch up the proteins in this dish. Try shrimp, turkey, or even tofu. Each will give a new flavor. If you want a lighter option, chicken thighs work well too. For pasta, you can use different types. Penne, rigatoni, or even gluten-free pasta all work great. Choose what you like best! If you need gluten-free options, use gluten-free pasta. There are many great brands available. They cook well and taste good too. For a dairy-free version, swap the heavy cream with coconut milk or almond milk. Use a dairy-free cheese to keep the flavor. Add vegetables for extra nutrition and flavor. Spinach, peas, or broccoli can mix in easily. They add color and taste to your dish. Try adding spices for a flavor twist. A pinch of red pepper flakes gives heat. Fresh basil or thyme can add a fresh touch. For the Full Recipe, follow the steps and enjoy your cooking! To keep your One Pot Chicken Alfredo fresh, store it in an airtight container. This helps prevent moisture loss and keeps flavors intact. Let the dish cool before sealing it. You can store it in the fridge for up to three days. When you're ready to eat, you can reheat the leftovers quickly. Use the microwave or a stovetop. If using the microwave, heat in short bursts, stirring in between. For the stovetop, add a splash of chicken broth or cream to keep it creamy. Stir often to prevent sticking. Yes, you can freeze One Pot Chicken Alfredo! Divide it into portions in freezer-safe containers. It can last up to three months. To thaw, place it in the fridge overnight. For quick reheating, use the microwave or stovetop, just like with the leftovers. It takes about 30 minutes to make One Pot Chicken Alfredo. You need 10 minutes to prep. The cooking time is around 20 minutes. This fast recipe is perfect for busy nights when you want a tasty meal. Yes, you can make it ahead of time. Cook the dish as usual, then cool it. Store it in an airtight container in the fridge for up to three days. When ready to eat, just reheat on the stove. Add a splash of broth to keep it creamy. You can use several alternatives for heavy cream. Options include whole milk, half-and-half, or coconut milk. Each gives a different flavor and creaminess. If you want a low-fat choice, try plain yogurt or sour cream. Just mix it in slowly to avoid curdling. To make a lighter version, use less cream. You can swap heavy cream for low-fat milk or a dairy-free alternative. Use whole wheat pasta for added fiber. Add more veggies like broccoli or spinach for nutrition. This way, you keep the taste without the extra calories. One Pot Chicken Alfredo is easy and fun to make. You learned about key ingredients, seasonings, and tools. I shared step-by-step instructions and tips for perfecting the dish. You can also explore delicious variations and storage methods. Whether you choose classic or healthier options, this recipe is a win. Enjoy cooking, sharing, and savoring your homemade meal. Your taste buds will thank you!](https://mycookingcast.com/wp-content/uploads/2025/06/ebe623ce-6818-4f4b-a4e9-ff3e56e42640.webp)
Craving a rich, creamy dish that’s also easy to make? Look no further than One Pot Chicken Alfredo! This simple
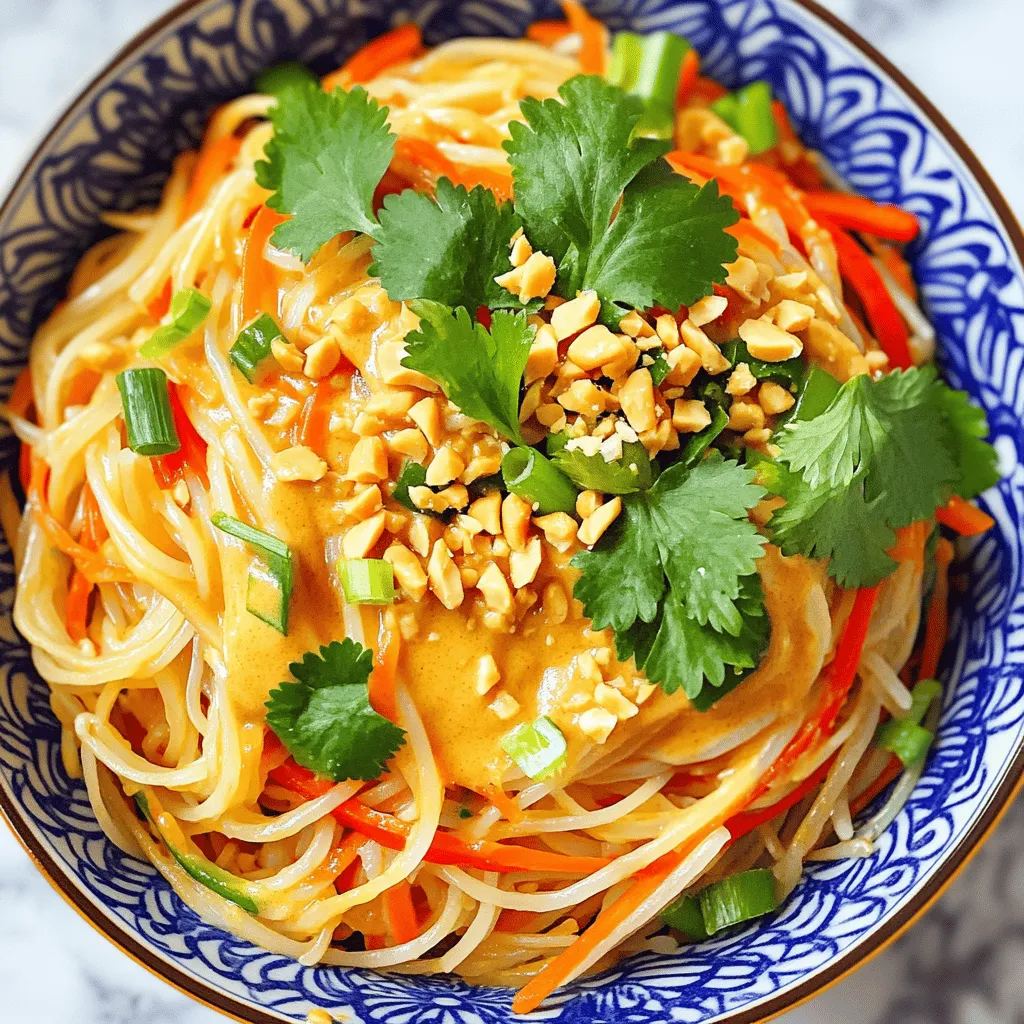
Ready for a quick and tasty dinner? Easy Thai Peanut Noodles offer bold flavors and simple steps that anyone can
![- 1 cup grated zucchini - 1 cup whole wheat flour - 1/2 cup unsweetened cocoa powder The core ingredients are key to making healthy chocolate zucchini bread. Grated zucchini adds moisture and nutrition without a strong taste. Whole wheat flour gives your bread a nutty flavor and extra fiber. Unsweetened cocoa powder brings rich chocolate flavor without added sugar. - 1/2 cup maple syrup or honey - 1/4 cup unsweetened applesauce - 1/4 cup Greek yogurt You can choose natural sweeteners like maple syrup or honey to enhance sweetness. Unsweetened applesauce adds moisture and reduces the need for oil. Greek yogurt boosts protein and keeps the bread soft. - 1/2 teaspoon baking soda - 1/2 teaspoon baking powder - 1/4 teaspoon salt - 1/2 cup dark chocolate chips Baking soda and baking powder help the bread rise. Salt balances flavors and enhances sweetness. Dark chocolate chips, especially those with 70% cacao, add a decadent touch. For the full recipe and more details, check the [Full Recipe]. 1. Preheating the oven: Start by preheating your oven to 350°F (175°C). This ensures that your bread bakes evenly. 2. Preparing the loaf pan: Grease a 9x5 inch loaf pan. You can also line it with parchment paper for easy removal later. 1. Combining flour, cocoa powder, and leavening agents: In a medium bowl, mix together the whole wheat flour, unsweetened cocoa powder, baking soda, baking powder, and salt. This step is important for even flavor and texture. Set this bowl aside. 1. Whisking wet ingredients until smooth: In a large bowl, whisk together maple syrup (or honey), applesauce, Greek yogurt, eggs, and vanilla extract. Whisk until the mixture is smooth and well combined. 2. Folding in zucchini: Gently fold in the grated zucchini. This adds moisture and nutrition to your bread. 1. Adding dry ingredients to wet mixture: Gradually add the dry ingredients to the wet mixture. Stir until just combined. Be careful not to overmix, as this can make the bread tough. 2. Folding in chocolate chips and baking process: Fold in the dark chocolate chips for a rich flavor. Pour the batter into the prepared loaf pan. Smooth the top with a spatula. Bake in the preheated oven for about 50-60 minutes. A toothpick inserted into the center should come out clean. After baking, let the bread cool in the pan for 10 minutes. Then, transfer it to a wire rack to cool completely. For the full recipe, check the details provided earlier. To make your healthy chocolate zucchini bread moist, avoid overmixing. When you mix too much, the bread can become tough. Combine your wet and dry ingredients gently. I recommend mixing until just combined. This keeps the bread fluffy and tender. Also, use the right baking temperature. Preheat your oven to 350°F (175°C). This ensures even cooking. An oven that is too hot may burn the outside while leaving the inside raw. So, check your oven with a thermometer if unsure. If you want healthier options, consider replacing some ingredients. You can use almond flour instead of whole wheat flour for a nutty taste. For sweetness, try using mashed bananas instead of maple syrup or honey. This gives a nice flavor and cuts down on added sugars. Adjusting sweetness levels is easy. If you prefer less sweet bread, reduce the amount of maple syrup or honey by 1/4 cup. Taste the batter before baking. This way, you can find the perfect balance for your family. For a beautiful display, slice the bread and serve it on a wooden board. A dusting of powdered sugar on top adds a nice touch. You can also garnish with fresh mint leaves for color. To enhance the flavor, drizzle a bit of melted dark chocolate over the slices. This makes it look fancy and adds a rich taste. Your friends and family will love this special touch! {{image_2}} You can easily turn this bread into muffins. Simply follow the same recipe. Pour the batter into a muffin tin lined with paper cups. Bake at 350°F for about 20-25 minutes. Check doneness with a toothpick. This way, you get tasty muffins that are easy to grab on the go. To make the bread even better, consider adding spices like cinnamon or nutmeg. These spices add warmth and depth to the flavor. You can also throw in nuts or seeds for a nice crunch. Walnuts or sunflower seeds work great here. This gives your chocolate zucchini bread an extra layer of texture and taste. If you want a vegan version, you can substitute the eggs and dairy. Instead of eggs, use flaxseed meal mixed with water. For each egg, mix 1 tablespoon of flaxseed meal with 2.5 tablespoons of water. Let it sit until it thickens. For dairy, swap Greek yogurt with plant-based yogurt. This keeps the bread moist and delicious without any animal products. To keep your healthy chocolate zucchini bread fresh, let it cool completely first. This step is key. Once cooled, wrap the bread tightly in plastic wrap or aluminum foil. This helps to lock in moisture. For best results, store it in an airtight container. A glass or plastic container works well. If you have extra bread, freezing is a great option. Slice the bread before freezing. Wrap each slice in plastic wrap and then place them in a zip-top bag. Remove as much air as possible. This helps prevent freezer burn. To thaw, just take out a slice and let it sit at room temperature. You can also use the microwave for quick thawing. Your healthy chocolate zucchini bread can last up to five days at room temperature. If you store it in the fridge, it can last about a week. For frozen bread, it stays good for up to three months. Just remember, the sooner you eat it, the better it will taste! You can use regular flour, but it may change the texture and taste. Whole wheat flour gives a nuttier flavor and denser texture. If you use all-purpose flour, the bread may be lighter and fluffier. However, it may lose some of the health benefits. Whole wheat flour adds fiber and nutrients that help keep you full. Yes, this recipe is great for kids! It has healthy ingredients that offer many benefits. Zucchini is packed with vitamins. Greek yogurt adds protein, and whole wheat flour provides fiber. Dark chocolate chips bring a tasty treat, making it a hit for kids. They will enjoy eating this healthy dessert without knowing it's good for them! To check if the zucchini bread is done, use a toothpick. Insert it into the center of the bread. If it comes out clean, the bread is ready. If there is batter on the toothpick, bake for a few more minutes. Keep an eye on it to avoid overbaking, which can make it dry. If you don’t have zucchini, you can use other veggies or fruits. Grated carrots work well and add sweetness. You can also try mashed bananas for a fruity twist. Applesauce is another good choice. Each will change the taste slightly but will still make a moist and tasty bread. This blog covered how to make delicious zucchini bread. We talked about core and optional ingredients, including natural sweeteners and dark chocolate chips. You learned step-by-step instructions, tips for moist bread, and creative variations like muffins. We also shared storage techniques to keep your bread fresh. Zucchini bread is simple and fun to make. You can easily adjust the recipe to suit your taste. Enjoy experimenting with flavors and enjoying this healthy treat!](https://mycookingcast.com/wp-content/uploads/2025/06/60a84e7f-e2ba-4c5c-8110-1c963106f00a.webp)
Are you ready to indulge in a guilt-free treat? This Healthy Chocolate Zucchini Bread is not only delicious but also
