Skip to content
DisclaimerTerms Of UseGDPR PolicyCookie Policy

My Cooking Cast

  • Home
  • Drinks
  • Appetizers
  • Dinner
  • Dessert
  • About
  • Contact
  • Privacy Policy
DisclaimerTerms Of UseGDPR PolicyCookie Policy

Emma

- 2 ripe peaches, halved and pitted - 1 tablespoon olive oil - Salt and pepper to taste - 4 cups arugula or mixed greens - 8 oz burrata cheese - ¼ cup toasted almonds, roughly chopped - ¼ cup balsamic glaze - Fresh basil leaves for garnish The ingredients for the Grilled Peach Burrata Salad are simple yet full of flavor. Peaches bring sweetness, while burrata adds creaminess. Arugula adds a peppery bite. Each serving has about 300 calories. This salad is rich in vitamins A and C. Peaches offer fiber and antioxidants. The almonds provide healthy fats and protein. Burrata gives calcium for strong bones. If you cannot find burrata, use mozzarella. For greens, spinach or kale works well. These swaps keep the dish delicious and fresh. Feel free to mix and match based on your taste. For the full recipe, see the earlier section. 1. Preheat the grill or grill pan Start by preheating your grill or grill pan over medium-high heat. This step is key for getting those lovely grill marks. 2. Brush and season peach halves Take two ripe peaches and cut them in half. Remove the pits. Brush the cut sides with one tablespoon of olive oil. Next, sprinkle a pinch of salt and pepper on them for taste. 1. Placing peaches on the grill Place the peach halves cut side down on the grill. This will give them a nice caramelized flavor. 2. Cooking time and checking for doneness Grill the peaches for about 4-5 minutes. Check for grill marks and tenderness. They should still hold their shape but feel soft. 1. Arranging greens and adding burrata In a large bowl, arrange 4 cups of arugula or mixed greens as a base. Tear 8 oz of burrata cheese into pieces and place it on top of the greens. 2. Adding grilled peaches and toppings Slice the grilled peaches into wedges. Arrange these around the burrata. Sprinkle ¼ cup of toasted almonds for a nice crunch. Finally, drizzle with ¼ cup of balsamic glaze for a sweet finish. Garnish with fresh basil leaves for a burst of aroma. For the full recipe, refer to the earlier section. Enjoy this vibrant and flavorful dish! To get those perfect grill marks, start with a hot grill. Make sure the grill grates are clean. Brush the peach halves with olive oil. This helps them not stick and gives a nice sear. Place the peaches cut side down on the grill. Press gently to ensure good contact. You’ll know the peaches are ready when they have nice grill marks and feel soft. This usually takes 4 to 5 minutes. They should still hold their shape. If they are mushy, they are overcooked. To make your salad more flavorful, think about adding fresh herbs. Basil and mint work well. You can also sprinkle in some fresh oregano or thyme for a twist. When it comes to dressings, balancing flavors is key. A drizzle of balsamic glaze adds sweetness. You can mix it with a bit of olive oil and lemon juice for extra zing. This helps to brighten the dish and brings all the flavors together. For serving, choose a large platter to make a statement. This allows all the colors to shine. You can also use individual bowls for a more personal touch. Garnishing can elevate your salad. Use fresh basil leaves for color and aroma. A sprinkle of toasted almonds adds crunch. Drizzle some extra balsamic glaze around the plate for a refined finish. This makes the dish look as good as it tastes. You can find the full recipe for more detailed steps. {{image_2}} You can spice up your grilled peach burrata salad in fun ways. Adding diced jalapeños or chili flakes gives it a nice heat. The sweetness of the peaches pairs well with spicy notes. You might also try swapping burrata for goat cheese or feta. Each cheese brings a unique taste that complements the peaches. Seasonal fruits can change your salad's flavor. In summer, stick with peaches. In fall, try grilled apples or pears. Each fruit adds a different twist. Also, you can change the greens based on what's fresh. In winter, use kale or spinach. In spring, fresh baby greens are perfect. For a vegan or dairy-free option, replace burrata with avocado or a nut-based cheese. This keeps the creaminess while being dairy-free. You can also keep the salad gluten-free. All the main ingredients are gluten-free, so there’s no need to change anything. Just enjoy the natural flavors! For the full recipe, check out the details above. To keep your Grilled Peach Burrata Salad fresh, store it in an airtight container. Make sure to separate the salad from the dressing. This way, the greens stay crisp. You can layer the salad in a container with parchment paper between layers. This helps absorb moisture. Use a glass or plastic container for best results. You should not reheat this salad. The burrata will lose its creamy texture, and the peaches might become mushy. Instead, enjoy the salad cold or at room temperature. If you have leftover greens, use them in a wrap or sandwich for a quick meal. The salad will stay fresh for about 1-2 days in the fridge. After that, the greens may wilt, and the peaches could spoil. Signs of spoilage include a sour smell, slimy greens, or mushy peaches. If you notice any of these, it’s best to discard the salad. Enjoy this vibrant dish while it's at its best! For the full recipe, check out the earlier section. For grilling, I recommend using ripe peaches. Ripe peaches are sweet and juicy. They will caramelize nicely on the grill. Firm peaches can work too, but they may not taste as sweet. When choosing peaches, look for ones with a slight give when you press them gently. This means they are ripe and ready to grill. Yes, you can make parts of this salad in advance. You can grill the peaches a few hours ahead. Just store them in the fridge until you're ready to serve. Prepare the dressing and chop the greens before serving. Keep the burrata cheese separate until serving time. This keeps everything fresh and tasty. Yes! If you want a vegetarian version, try using a different cheese. You can use mozzarella or feta instead of burrata. Both cheeses will add a nice flavor. You can also try vegan cheese for a non-dairy option. It’s all about finding what you enjoy most. For the full recipe, check out the details above. This salad uses fresh peaches and burrata, blending sweet and creamy flavors. We discussed how to prepare, grill, and serve it, plus clever ways to customize it. Remember to store leftovers carefully to keep them fresh. This dish stands out in taste and nutrition, making it perfect for any occasion. You can easily adapt it for different diets or seasons. Experiment with your favorite ingredients to make it your own. Enjoy creating a vibrant dish that impresses and satisfies!

Grilled Peach Burrata Salad Vibrant and Flavorful Dish

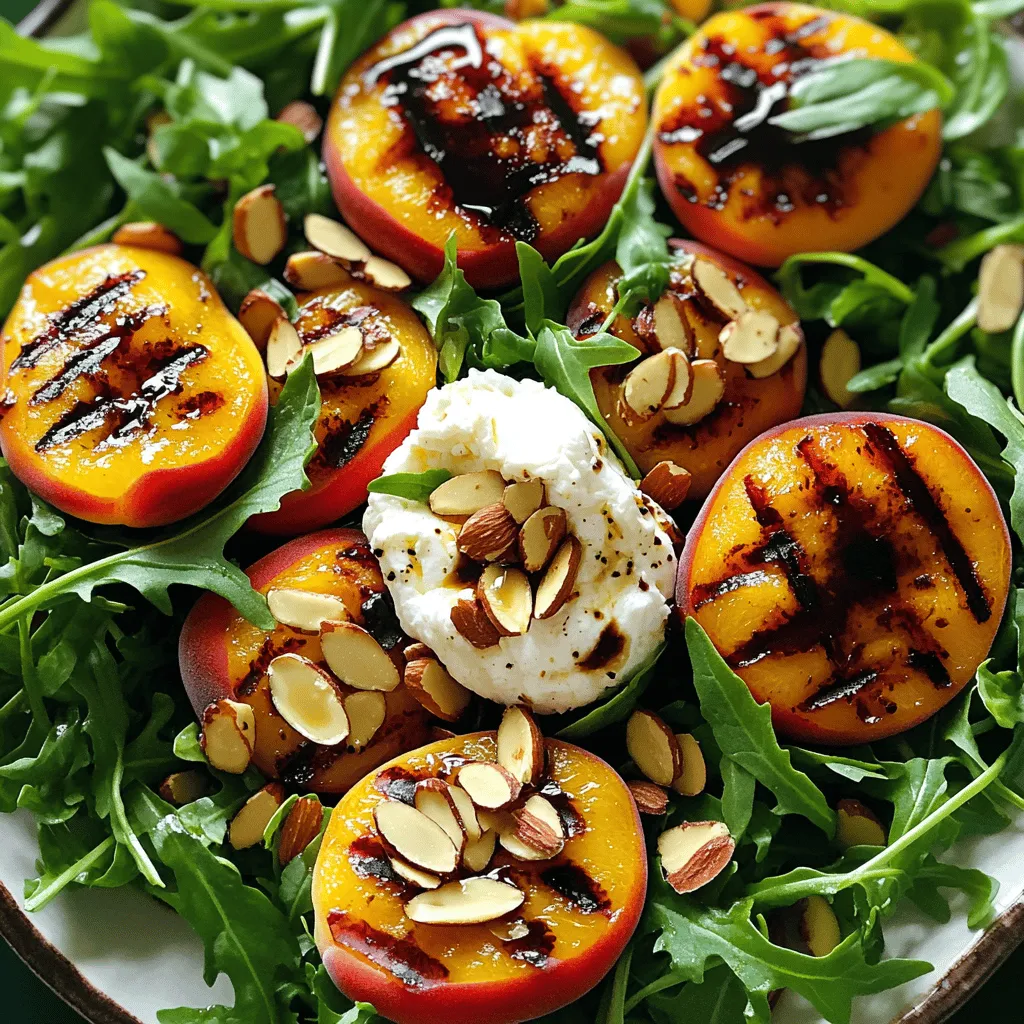
If you’re looking to impress at your next meal, try my Grilled Peach Burrata Salad. With sweet, smoky peaches and

- 1 cup cauliflower florets - 1 cup chickpeas, drained and rinsed - 1 cup breadcrumbs (panko recommended for extra crunch) - 1/2 cup all-purpose flour (or chickpea flour for gluten-free) - 1 cup almond milk (or any plant-based milk) For the main ingredients, you want a good mix of textures. Cauliflower gives a nice bite, while chickpeas add protein. Breadcrumbs help achieve that crispy exterior. If you're avoiding gluten, chickpea flour works great instead. I love using almond milk, but any plant-based milk can work just as well. - 1 tsp garlic powder - 1 tsp onion powder - 1/2 tsp smoked paprika - Salt and pepper to taste Spices bring flavor to your tacos. Garlic powder and onion powder add rich taste. Smoked paprika gives a nice depth. Don't forget salt and pepper; they enhance all the flavors. Adjust these to your liking for a perfect blend. - Corn or flour tortillas - Fresh cilantro or parsley - Avocado slices (optional) - Shredded lettuce or cabbage for crunch Tortillas hold everything together. You can choose corn or flour based on what you love. Fresh herbs like cilantro or parsley brighten up the dish. Adding avocado slices makes it creamy and rich. Finally, top with shredded lettuce or cabbage for that crunch. The mix of flavors and textures makes each bite exciting. For the full recipe, check out the detailed instructions and enjoy making these tacos! 1. First, preheat your oven to 400°F (200°C). This step is key for crispy tacos. 2. Next, line your baking sheet with parchment paper. This helps prevent sticking and makes cleanup easy. 1. In a mixing bowl, add 1 cup of cauliflower florets and 1 cup of chickpeas. 2. Sprinkle in 1 tsp of garlic powder, 1 tsp of onion powder, 1/2 tsp of smoked paprika, salt, and pepper. 3. Toss everything well until the chickpeas and cauliflower are coated in spices. 4. In another bowl, whisk together 1/2 cup of all-purpose flour (or chickpea flour) and 1 cup of almond milk. This creates your batter. 1. Dip each cauliflower floret and chickpea into the batter. 2. Then roll each piece in 1 cup of breadcrumbs to coat completely. 3. Place them on the lined baking sheet in a single layer. 4. Bake for 20-25 minutes, flipping halfway through for even cooking. 5. Once they are crispy and golden, toss the baked pieces with 1/2 cup of buffalo sauce in a bowl. 6. Warm your tortillas briefly in a pan for easier folding. 7. Now, add a generous amount of the buffalo-coated mixture to each tortilla. 8. Top with shredded lettuce or cabbage, avocado slices, and fresh herbs, if desired. Follow these steps carefully for a tasty and fun taco night! For the full recipe, check out the details above. To make your tacos crispy, choose the right breadcrumbs. I recommend using panko breadcrumbs. They create a light and crunchy coating. If you want a gluten-free option, chickpea flour works well. For baking techniques, preheat your oven to 400°F (200°C). Line your baking sheet with parchment paper. This helps the tacos crisp up nicely. Bake for 20-25 minutes, and flip them halfway through for even cooking. Watch for a golden-brown color, which means they are ready. You can customize the heat of the buffalo sauce. Start with a milder sauce if you prefer less heat. Add more hot sauce to increase spiciness. Mix in some fresh herbs like cilantro or parsley to add extra flavor. These herbs brighten the dish and balance the heat. When assembling the tacos, lay the tortillas flat. Add the crispy mixture in the center. Top with shredded lettuce or cabbage for crunch. Avocado slices make a creamy addition. For a pop of color, sprinkle fresh herbs on top. This not only enhances flavor but also makes the tacos look appealing. For a full recipe, check out the Vegan Crispy Buffalo Tacos guide. {{image_2}} You can switch up the main proteins in these tacos. Tempeh is a great option. It has a nutty taste and a meaty texture. You can also use lentils for a softer bite. They soak up flavors well. If you want to mix up the veggies, try using sweet potatoes or zucchini. Both add a nice sweetness. You can roast them for extra flavor. To make these tacos gluten-free, choose gluten-free flour. Almond flour works well, or you can use chickpea flour. These flours hold up nicely in the batter. For taco shells, look for corn tortillas. They are naturally gluten-free. You can also find gluten-free flour tortillas at many stores. For a fun twist, add different sauces or dressings to the tacos. Try ranch or barbecue sauce for a unique flavor. These sauces can change the whole dish. Incorporating seasonal vegetables also adds freshness. Think about adding bell peppers in summer or squash in fall. Each season brings new tastes to explore. To keep your vegan crispy buffalo tacos fresh, use an airtight container. Glass or BPA-free plastic containers work well. Store the tacos in the fridge for up to three days. This time frame ensures the best flavor and texture. If you want to keep them longer, freeze the filling separately. It can last up to a month in the freezer. When reheating, the oven is your best bet. Preheat the oven to 350°F (175°C). Place the tacos on a baking sheet. Heat for about 10-15 minutes, or until they’re warm and crispy again. The microwave is quicker but may make the tacos soggy. If you use the microwave, heat them in short bursts to avoid losing crispiness. Yes, you can prepare the filling in advance. Cook the cauliflower and chickpeas as the recipe states. Then, store them in an airtight container. When you are ready to eat, just reheat them in the oven. For best results, keep them warm at 350°F (175°C) for about 10 minutes. You can also warm the tortillas in a pan. This way, you’ll have crispy tacos ready to enjoy. If you want a different taste, use broccoli florets or diced sweet potatoes. Both options work well. You can also try tempeh or lentils for a protein boost. Each substitute will give your tacos a unique flavor. Feel free to experiment with your favorite veggies! To add more heat, try using a hotter buffalo sauce. You can also mix in some cayenne pepper or crushed red pepper flakes. Another fun idea is to add jalapeños or serrano peppers to the filling. Layering in fresh chilies will give your tacos an extra kick. Enjoy the heat! You've learned how to make vegan crispy buffalo tacos with great flavor and texture. We covered key ingredients like cauliflower, chickpeas, and spices. The step-by-step guide helped you prepare and bake these tasty tacos. Remember to experiment with toppings and variations for a custom dish. Lastly, proper storage ensures your leftovers stay fresh. Enjoy creating a meal that’s fun and healthy!

Vegan Crispy Buffalo Tacos Flavorful and Easy Recipe

Are you ready for a tasty twist on taco night? My Vegan Crispy Buffalo Tacos pack a punch with bold

- 4 boneless, skinless chicken breasts - 2 cups fresh spinach, chopped - 1 cup cream cheese, softened - ½ cup grated Parmesan cheese - 1 teaspoon garlic powder - 1 teaspoon onion powder - ½ teaspoon salt - ½ teaspoon black pepper - 1 tablespoon olive oil - ½ cup breadcrumbs (optional for topping) - Fresh parsley for garnish For the creamy spinach stuffed chicken, you need simple ingredients. Each one adds a unique flavor. You can find most of these ingredients at your local grocery store. - Cream cheese alternatives: You can use Greek yogurt for a lighter option. Ricotta cheese also works well for a creamier texture. - Spinach alternatives: If fresh spinach is not available, you can use frozen spinach. Just make sure to drain it well to avoid excess water. - Best side dishes to pair: Serve with roasted vegetables or a simple salad. Mashed potatoes complement the dish nicely too. - Recommended sauces or dips: A light garlic aioli or marinara sauce adds a nice touch. Consider a squeeze of lemon for freshness. This combination of ingredients and suggestions helps create a tasty meal. You’ll enjoy making this dish and sharing it with others. For the full recipe, check out the link above. 1. Preheating the oven and skillet Start by preheating your oven to 375°F (190°C). This step is key for even cooking. While the oven heats, place a large oven-safe skillet on the stove over medium-high heat. You want it hot for the next step. 2. Preparing the spinach filling In a medium bowl, mix two cups of chopped spinach with one cup of softened cream cheese. Add half a cup of grated Parmesan cheese, one teaspoon of garlic powder, one teaspoon of onion powder, half a teaspoon of salt, and half a teaspoon of black pepper. Blend all these together until smooth. This filling is creamy and packed with flavor! 1. Creating pockets in chicken breasts Take each boneless, skinless chicken breast and slice it horizontally. Be careful to cut only partway, so you create a pocket. This pocket will hold all that delicious filling. 2. How to stuff properly for best results Take the spinach mixture and stuff it gently into each pocket. Press down lightly to ensure it fills well. You want to avoid overstuffing, as this can cause the filling to spill out while cooking. 1. Searing process explained Once your chicken breasts are stuffed, pour one tablespoon of olive oil into the hot skillet. Add the chicken breasts and sear them for about 4-5 minutes on each side. Look for a nice golden-brown color. This step adds a great flavor and texture. 2. Baking time and temperature After searing, transfer the skillet to the preheated oven. Bake the chicken for 20-25 minutes or until the internal temperature reaches 165°F (75°C). This ensures the chicken is cooked through and juicy. Let the chicken rest for five minutes before serving. For the full recipe, check out the detailed steps above! To make your spinach filling shine, think about adding more flavors. You could try adding a squeeze of lemon juice for brightness. A pinch of nutmeg gives a nice warmth, too. Always mix the filling well. This helps to ensure every bite is tasty. For a creamy consistency, make sure your cream cheese is soft. If it’s too cold, it won't mix well. You can microwave it for a few seconds to soften it. This way, the filling will be smooth and easy to stuff into the chicken. To keep your chicken juicy, don’t skip searing. Sear each side for about 4-5 minutes until golden brown. This locks in moisture and adds flavor. After searing, bake it in the oven. This helps cook it evenly without drying it out. To prevent overcooking, use a meat thermometer. Chicken should reach 165°F (75°C). If you don’t have one, look for clear juices when you cut into it. This shows that it's done and not dry. Garnishing adds a pop of color. Use fresh parsley to brighten the dish. Simply chop it and sprinkle on top before serving. You can also add lemon zest for a fresh touch. When plating, place the chicken on a bed of rice or quinoa. This creates a nice base. Arrange some sautéed veggies on the side for color and nutrition. A well-presented dish makes it more enjoyable to eat. For the full recipe, check out the complete guide to Creamy Spinach Stuffed Chicken. {{image_2}} You can make Creamy Spinach Stuffed Chicken even more fun by changing a few things. Try adding different cheeses like feta or mozzarella. These cheeses melt well and add unique flavors. You can also mix in fresh herbs like basil or dill. They bring a fresh taste and make the dish even better. For the filling, think about using other veggies. You can try mushrooms, sun-dried tomatoes, or artichokes. Each option adds a new twist to the dish and keeps it exciting. Just chop the veggies small so they mix well with the spinach and cheese. If you want a lighter dish, low-fat cream cheese works great. It gives you the creaminess without the extra calories. You can also use Greek yogurt as an option. It’s thick and creamy, plus it adds protein. For a gluten-free option, swap out regular breadcrumbs for almond flour or gluten-free breadcrumbs. They work well as a topping and add a nice crunch. You can even skip the breadcrumbs altogether for a lower-carb meal. To spice things up, you can add different seasonings to the filling. For an Italian twist, mix in some Italian herbs like oregano and thyme. For a Mexican flair, add chili powder and cumin. This will change the flavor and transport your taste buds. You can also try different cooking styles. For example, you could grill the chicken instead of baking it. This adds a smoky flavor and keeps the chicken juicy. Each of these ideas helps you create a dish that feels brand new every time you make it. For the full recipe, check out the recipe section. After cooking, let the chicken cool. Place leftovers in an airtight container. Store it in the fridge for up to three days. If you want to save it longer, freeze the chicken. Wrap each piece tightly in plastic wrap. Then, place it in a freezer bag. This helps prevent freezer burn. To reheat without drying it out, use the oven. Preheat it to 350°F (175°C). Place the chicken in a baking dish and cover it with foil. Heat for about 20 minutes. If you're in a hurry, you can use the microwave. Set it to medium power and heat for 2-3 minutes. Check if it's warm throughout before serving. In the fridge, the chicken lasts for about three days. If you freeze it, it can stay good for up to three months. Look for signs of spoilage, like a bad smell or discoloration. If it seems off, throw it away to be safe. What can I use instead of chicken breasts? You can use chicken thighs or pork chops. Both options stay juicy and flavorful. If you prefer a vegetarian option, try stuffed bell peppers or zucchini. Can I make this dish ahead of time? Yes, you can prepare the stuffed chicken a day in advance. Just keep it covered in the fridge. When you’re ready, simply bake it as directed. What is the best way to tell if chicken is cooked through? Use a meat thermometer. Chicken should reach 165°F (75°C). If you don’t have one, cut into the thickest part. The juices should run clear, and there should be no pink meat. Can I use frozen spinach instead of fresh? Yes, frozen spinach works well. Just thaw it first and squeeze out excess water. This prevents your filling from being too watery. Is this recipe gluten-free? The recipe isn’t gluten-free due to breadcrumbs. However, you can leave them out or use gluten-free breadcrumbs instead. Suggestions for low-carb variations To make this dish low-carb, skip the breadcrumbs. You can also serve it with a side of steamed vegetables or a fresh salad instead of grains. This blog post covers a creamy spinach stuffed chicken recipe, complete with tips and variations. We explored key ingredients, cooking steps, and ways to elevate flavors. Remember, you can swap out ingredients or try new flavors to make it your own. Enjoy this dish fresh or as leftovers, and don't forget to consider your serving options. With these easy guidelines, you can make a delicious meal that pleases everyone. I hope you feel inspired to cook and enjoy this dish soon.

Creamy Spinach Stuffed Chicken Easy and Flavorful Recipe

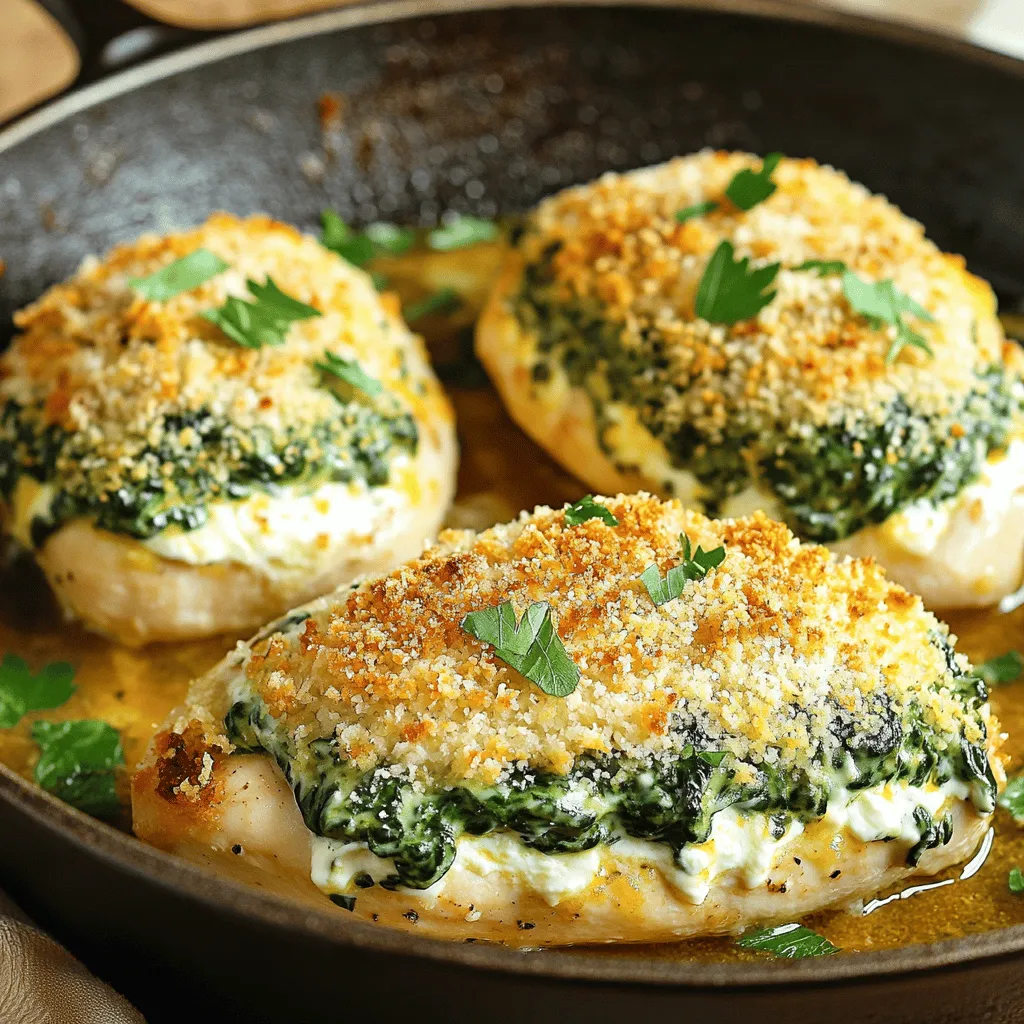
Are you ready to impress your family or friends with a delicious meal? This Creamy Spinach Stuffed Chicken recipe is

- 500g mixed mushrooms (button, cremini, portobello) - 4 tablespoons unsalted butter - 4 cloves garlic, minced - 1 tablespoon fresh thyme leaves - 1 tablespoon fresh parsley, chopped - 1 teaspoon salt - ½ teaspoon black pepper - Zest of 1 lemon - Optional: ¼ teaspoon red pepper flakes Choosing the right mushrooms is key. Mixed mushrooms add great flavor and texture. You can use button, cremini, and portobello. Each type brings its unique taste. If you want to switch it up, use shiitake or oyster mushrooms too. If you don't have fresh garlic, garlic powder works. Just use less, about 1/8 teaspoon per clove. For herbs, dried thyme can replace fresh thyme. Use one teaspoon of dried thyme instead of one tablespoon. Fresh herbs give the best taste, but dried ones work in a pinch. You will need a few simple tools to make this dish. - Baking sheet - Medium saucepan - Large mixing bowl First, set your oven to 200°C (400°F). This temperature helps the mushrooms roast well. Using parchment paper on your baking sheet is key. It keeps the mushrooms from sticking and makes cleanup easy. To clean the mushrooms, gently wipe them with a damp cloth. This removes dirt without soaking them. If you use large mushrooms, cut them in half or quarters. This step ensures even cooking and a nice texture. In a medium saucepan, melt 4 tablespoons of unsalted butter over low heat. Once it's melted, add 4 cloves of minced garlic, 1 tablespoon of fresh thyme, salt, and black pepper. If you want some heat, you can include red pepper flakes. Stir this mix for 1-2 minutes until it smells great. In a big bowl, toss your cleaned mushrooms with the garlic butter mixture. Make sure each mushroom is well-coated. Then, spread them on the baking sheet in a single layer. Roast them for 15-20 minutes. Stir halfway to cook evenly. You want them tender and golden brown. After roasting, sprinkle lemon zest and fresh parsley over the mushrooms. This adds brightness and color. Serve them warm as a side dish, or mix them into salads or pasta. For the complete recipe, check out [Full Recipe]. To make garlic butter roasted mushrooms truly shine, infuse your butter with fresh herbs. Melt butter in a saucepan over low heat, then add minced garlic and thyme. The heat brings out the flavors. Cook this mix for about two minutes until it smells amazing. For perfect garlic roasting, make sure your garlic doesn't burn. If it turns dark, it can taste bitter. Keep an eye on it while it cooks. Use fresh garlic for the best taste, as it gives a strong flavor that dried garlic cannot match. One common mistake is overcrowding the baking sheet. If the mushrooms are too close, they will steam instead of roast. This affects their texture and flavor. Spread them out evenly on the sheet. Another mistake is skipping the preheating step. Always preheat your oven to 200°C (400°F) before roasting. This helps cook the mushrooms evenly and gives them that beautiful golden color. These garlic butter roasted mushrooms are great with many dishes. They pair well with grilled chicken, steak, or fish. Their rich flavor enhances the taste of proteins, making meals more exciting. You can also incorporate them into salads or pasta dishes. Toss them into a fresh salad for added depth. For pasta, mix them with your favorite sauce for a hearty meal. For the full recipe, check out the complete steps! {{image_2}} You can easily change the flavor of garlic butter roasted mushrooms by adding cheese. Parmesan cheese melts well and adds a rich, salty taste. Feta cheese offers a tangy touch and pairs nicely with herbs. You can also play with herbs and spices. Try rosemary or oregano for a fresh twist. If you want heat, add chili flakes or smoked paprika. These changes let you create your own unique dish. You can cook mushrooms in several ways. Stovetop sautéing gives you a quick and easy method to get tender mushrooms. Just heat some butter or oil in a pan and cook the mushrooms until soft. Roasting in the oven brings out more flavor. The high heat makes the mushrooms crispy and caramelized. If you want a smoky flavor, try grilling them. Place the mushrooms on a grill and cook them until they have nice grill marks. If you follow a vegan diet, you can make a few simple swaps. Replace the butter with olive oil or vegan butter. This keeps the dish tasty without any animal products. For gluten-free options, this recipe is already gluten-free! Just ensure any added ingredients, like cheese, are also gluten-free. You can enjoy garlic butter roasted mushrooms without worry. For the full recipe, check out the details above! To keep your garlic butter roasted mushrooms fresh, store them in the fridge. Place the leftovers in an airtight container. This helps to lock in moisture and flavor. Make sure to use them within three days for the best taste. When you are ready to enjoy your mushrooms again, don’t just microwave them! This can make them soggy. Instead, heat them in a skillet over medium heat. Stir them for about five minutes until they are warm. You can also use an oven. Preheat it to 180°C (350°F) and heat the mushrooms for about 10 minutes. If you want to save some for later, you can freeze them. First, cool the mushrooms to room temperature. Next, spread them out on a baking sheet and freeze them for about an hour. This keeps them from clumping. After that, transfer them to a freezer-safe bag. When you want to use them, thaw them in the fridge overnight. Avoid thawing in water, as this can make them mushy. For the full recipe, check back on the main article. Yes, you can! For garlic butter roasted mushrooms, I recommend using a mix of button, cremini, and portobello mushrooms. Each type adds a unique flavor and texture. Button mushrooms are mild and tender, cremini have a deeper flavor, and portobello are meaty and hearty. Mixing these varieties gives your dish depth and interest. While fresh herbs are great, dried herbs work too. Fresh thyme and parsley add bright flavors and a nice look. They enhance the taste of garlic butter. Dried herbs, like thyme, are convenient and save time. Just remember, dried herbs are stronger, so use less. These mushrooms pair well with many dishes. Serve them with grilled meats, like chicken or steak. They also complement pasta or risotto, adding a savory touch. For a lighter meal, try them in a salad. Pair with a crisp white wine or a light beer to highlight the flavors. Yes, you can prepare garlic butter roasted mushrooms ahead of time. Cook them as directed, then cool completely. Store them in an airtight container in the fridge for up to three days. To reheat, place them in a warm oven or sauté in a pan until heated through. This keeps them tasty and avoids sogginess. For the full recipe, check the section above. This blog post covered how to make garlic butter roasted mushrooms. You learned about key ingredients, like fresh mushrooms and herbs. I shared tips for maximum flavor, common mistakes to avoid, and ways to store leftovers. Whether you roast, grill, or modify the recipe, enjoy creating this dish. It’s a great addition to many meals. Now, get cooking and savor your tasty mushrooms!

Garlic Butter Roasted Mushrooms Flavorful Side Dish

Looking for a side dish that wows without fuss? Garlic Butter Roasted Mushrooms are just the ticket! Bursting with flavor,

To make a Tropical Acai Smoothie Bowl, you need fresh and tasty ingredients. These ingredients create a vibrant mix of flavors. Here’s what you need: - 2 packs of frozen acai puree - 1 banana, sliced - 1 cup coconut water - 1/2 cup pineapple chunks - 1/2 cup mango chunks - 1 tablespoon honey or agave syrup (optional) - Suggested toppings: sliced banana, granola, shredded coconut, chia seeds, fresh berries, mint leaves Each of these ingredients brings something special. The acai puree adds a rich flavor and deep color. The banana makes it creamy and smooth. Coconut water gives a light sweetness and hydration. Pineapple and mango chunks add a tropical twist that brightens your bowl. You can change the toppings to fit your taste. Granola gives crunch, while chia seeds add texture and nutrients. Fresh berries not only look pretty, but they also boost flavor. Mint leaves bring a fresh note that ties it all together. With the right mix of these ingredients, you create a smoothie bowl that is both energizing and refreshing. For the full recipe, check the detailed instructions. Start by gathering all your ingredients. You will need frozen acai puree, a banana, coconut water, pineapple chunks, and mango chunks. If you want a sweeter taste, grab honey or agave syrup. Prepare your toppings, like sliced banana, granola, shredded coconut, chia seeds, fresh berries, and mint leaves. This will make your bowl look great and taste amazing. In a blender, add the frozen acai puree, banana slices, coconut water, pineapple chunks, and mango chunks. Blend on high speed until everything is smooth and creamy. If your mix is too thick, pour in a bit more coconut water. Taste it! If you want it sweeter, add honey or agave syrup and blend again. Pour the mix into a bowl, and get ready to add your toppings. Now comes the fun part! Arrange your toppings on the smoothie. You can place sliced banana, granola, shredded coconut, chia seeds, and fresh berries on top. For a final touch, add fresh mint leaves to make it look pretty. Grab a spoon and dig in right away. Enjoy your tropical acai smoothie bowl! For the complete recipe, check out the [Full Recipe]. To get the best texture for your Tropical Acai Smoothie Bowl, aim for a creamy blend. Start with frozen acai puree. The frozen fruit gives a thick texture. When blending, mix in coconut water slowly. If it’s too thick, add more coconut water. Blend until smooth, but don’t overdo it. You want it thick enough to hold toppings but smooth enough to eat with a spoon. You can swap ingredients easily based on your taste or what you have. If you don’t like coconut water, use almond milk or regular water. For the fruits, feel free to mix and match. You can use strawberries instead of mango or kiwi instead of pineapple. If you want a sweeter bowl, add more honey or agave syrup. Just keep the balance of flavors in mind. When picking acai puree, look for unsweetened options. This keeps the bowl healthy. Check the labels. Organic options often taste better. If you can find it, use pure acai from the freezer section. Avoid powders; they may lack flavor and nutrients. Frozen puree gives you that rich, berry taste you want in your smoothie bowl. For the full recipe, refer to the Tropical Acai Smoothie Bowl guide. {{image_2}} You can make your Tropical Acai Smoothie Bowl even better with fun add-ins. Try adding protein powder for a boost. This helps keep you full and supports muscle health. You can also mix in a handful of spinach. It adds nutrients without changing the flavor much. Other great add-ins include: - Chia seeds for extra fiber - Flax seeds for healthy fats - Nut butters for added creaminess Toppings can change your smoothie bowl game. You can use nuts for crunch, like almonds or walnuts. Seeds like pumpkin or sunflower seeds add a nice touch too. Fresh fruits also make great toppings. Consider adding: - Sliced strawberries or kiwi - Blueberries or raspberries - Coconut flakes for some tropical flair These toppings not only taste great but also make your bowl look stunning. Using seasonal fruits can keep your smoothie bowl fresh and exciting. In summer, add juicy peaches or fresh berries. During fall, try slices of apple or pear. Winter brings the chance to use citrus fruits like oranges or mandarins. Each season offers unique flavors, so get creative with what you have! For the full recipe, check out the Tropical Acai Smoothie Bowl section. If you have leftover smoothie, store it in the fridge. Use a clean glass jar or an airtight container. The smoothie stays fresh for up to 24 hours. Just remember, it may separate a bit. When you're ready to enjoy, give it a good shake or stir. You can freeze smoothie ingredients for later use. Portion your frozen acai puree, banana slices, and other fruits into bags. This way, you can make your smoothie quickly. When you want to blend, just take out the portions you need. This keeps your fruits fresh and tasty. For storing your smoothie, use glass jars or BPA-free plastic containers. Glass jars are great because they don’t hold odors like plastic. Make sure your containers have tight-fitting lids. This keeps your smoothie fresh and prevents spills. If you want to freeze, use freezer-safe bags or containers. Acai berries are full of antioxidants. They help fight free radicals in your body. These berries also boost heart health and improve cholesterol levels. They contain fiber, which aids digestion. Plus, they offer healthy fats that can help with weight management. Eating acai may also increase energy levels. Yes, you can easily make this smoothie bowl vegan. Simply skip the honey and use agave syrup instead. All other ingredients are already plant-based. This way, you keep the delicious taste without using animal products. If you want to make more servings, just double or triple the ingredients. Keep the same ratio for each item. For example, if you need four servings, use four packs of acai and two bananas. Blend in batches if your blender cannot hold all at once. Fresh acai is hard to find in many places. If you have access to fresh acai, you can use it. Just make sure to add ice to get that thick, creamy texture. This will help mimic the frozen version. Toppings can change the taste and texture of your smoothie bowl. I love using sliced banana, granola, and shredded coconut. Fresh berries add a burst of flavor. Chia seeds are great for crunch, and mint leaves give a nice touch. Mix and match your favorites! If you have leftovers, store them in an airtight container. They can last in the fridge for up to 24 hours. However, for the best taste and texture, enjoy them right away. Smoothies may separate as they sit, so a quick stir is a must before eating. You can add protein powder to your smoothie. A scoop of plant-based protein works well. Greek yogurt is another option if you're not vegan. This adds creaminess, too! Nut butter like almond or peanut also boosts protein and flavor. For the full recipe, check out the Tropical Acai Smoothie Bowl section above. This article covers making a delicious acai smoothie bowl. We explored ingredient choices, preparation steps, and tips for the best consistency. You learned about fun variations to keep your bowl exciting, plus storage options for leftovers. In summary, acai smoothie bowls are easy to make and perfect for any meal. Enjoy experimenting with different fruits and toppings to make it your own! Get creative and enjoy the health benefits.

Tropical Acai Smoothie Bowl Refreshing and Energizing

Are you ready to boost your mornings? The Tropical Acai Smoothie Bowl is a vibrant, energizing treat that combines delicious

- 1 ripe avocado, peeled and pitted - 1/2 cup unsweetened cocoa powder - 1/2 cup maple syrup or honey - 1/4 cup almond butter or peanut butter - 1/2 cup whole wheat flour - 1/2 teaspoon baking soda - 1/4 teaspoon salt - 1 teaspoon vanilla extract - 1/2 cup dark chocolate chips (dairy-free if desired) Each brownie has about 100 calories. They offer a good balance of nutrients: - Fat: 5g - Carbohydrates: 12g - Protein: 2g - Mixing bowls - Fork or food processor - Baking pan (8x8 inches) - Parchment paper These ingredients mix well to create moist and rich brownies. The avocado replaces oil and adds healthy fats. Cocoa powder gives a deep chocolate flavor, while maple syrup sweetens naturally. Whole wheat flour adds fiber. You can use almond or peanut butter for creaminess. Dark chocolate chips boost the chocolate taste. This recipe is simple and quick. You’ll need basic kitchen tools to make it. The mixing bowls help combine the ingredients. A fork or food processor makes mashing the avocado easy. The baking pan ensures even cooking. Parchment paper helps with easy brownie removal. You can check the [Full Recipe](#) for detailed steps. First, preheat your oven to 350°F (175°C). This step is key for even baking. Next, take an 8x8 inch baking pan and line it with parchment paper. Let some paper hang over the edges. This makes it easy to lift the brownies out later. Grab a medium bowl and mash the ripe avocado until it is smooth. You can use a fork or a food processor. Once smooth, add the maple syrup (or honey), almond butter, and vanilla extract. Mix everything together until well combined. This blend adds moisture and flavor to the brownies. In another bowl, whisk together the cocoa powder, whole wheat flour, baking soda, and salt. This helps distribute the ingredients evenly. Make sure there are no lumps. Each dry ingredient plays a role in the brownie’s texture and taste. Now, combine the wet and dry ingredients in one bowl. Mix until just combined; it’s okay if there are a few lumps. Next, fold in the dark chocolate chips. This adds bursts of chocolate to every bite. Pour the batter into your prepared pan. Spread it evenly with a spatula. Bake in the preheated oven for 20-25 minutes. Check for doneness by inserting a toothpick. It should come out with a few moist crumbs, not wet batter. Once baked, cool the brownies in the pan for about 15 minutes. Use the parchment paper to lift them out for further cooling. After that, cut them into squares. For the full recipe, refer to the instructions above. To get the best texture in your brownies, avoid overmixing the batter. Overmixing can make the brownies tough. Mix just until the wet and dry ingredients combine. A few lumps are okay! This helps keep them fudgy. For extra fudginess, use ripe avocados and fold in dark chocolate chips gently. If you want to change the sweetness, try using less maple syrup or honey. You can also add more cocoa powder for a richer taste. If you need a substitute for maple syrup or honey, try agave nectar or date syrup. These options work well and keep your brownies sweet! Garnishing your brownies can make them look even better. Dust them with cocoa powder or powdered sugar before serving. You can also add fresh berries or a dollop of yogurt on the side. This adds color and makes for a tasty treat! For the full recipe, check the recipe section above. {{image_2}} You can enjoy these brownies without gluten. Just swap regular flour for almond flour or a gluten-free flour blend. Both options keep the brownies rich and tasty. Make sure to check the labels for any hidden gluten. Want to add some crunch? Toss in some chopped nuts or seeds. Walnuts or pecans work great. You can also spice things up. Add a pinch of cinnamon for warmth, or a little espresso powder for a coffee kick. These little tweaks boost the flavor and make each bite exciting. If you're vegan, you can easily adjust this recipe. Use a flax egg or applesauce instead of eggs. For dairy-free options, choose dairy-free chocolate chips. This way, everyone can enjoy these brownies without worry. To keep your healthy chocolate avocado brownies fresh, store them in an airtight container. You can keep them at room temperature for a short time. If you want them to last longer, put them in the refrigerator. This helps maintain their moist texture and rich flavor. These brownies stay fresh for about three to five days when stored properly. If you keep them in the fridge, they may last a bit longer. However, for the best taste, try to eat them within a few days. If you want to save some for later, freezing is a great option. First, let the brownies cool completely. Then, wrap them tightly in plastic wrap or foil. Place the wrapped brownies in a freezer-safe bag or container. They can last up to three months in the freezer. When you're ready to enjoy, thaw them in the fridge overnight or at room temperature for a few hours. Yes, you can use ripe bananas. They will add natural sweetness and moisture. However, the flavor will change a bit. The brownies may taste more like banana bread. If you want a rich chocolate flavor, stick with avocado. To make these brownies healthier, consider these tips: - Use almond flour instead of whole wheat flour. - Reduce the maple syrup or honey. - Add nuts or seeds for extra nutrients. - Swap dark chocolate chips for cacao nibs to cut sugar. To reheat brownies, simply place them in the microwave for 10-15 seconds. This warms them up without drying them out. You can also place them in a warm oven for a few minutes. Just don’t forget to keep an eye on them. You can tell if the brownies are done by using a toothpick. Insert it into the center. If it comes out with a few moist crumbs, they are ready. If you see wet batter, bake them a bit longer. Absolutely! These brownies are a great treat for kids. They are made with healthy ingredients and are lower in sugar. Plus, the chocolate flavor is always a hit. Kids won’t even notice the avocado! For the full recipe, check out the Healthy Chocolate Avocado Brownies section. These avocado brownies mix healthy ingredients for a delicious treat. We covered every step, from mixing to baking. You learned how to adjust sweetness and explore fun variations. Storing tips help keep your brownies fresh longer. Feel free to experiment with flavors and ingredients. In the end, you create a tasty treat that’s good for you, too. Enjoy making these brownies and share them with friends!

Healthy Chocolate Avocado Brownies Quick and Easy Recipe

Looking for a sweet treat that won’t derail your diet? Try these Healthy Chocolate Avocado Brownies! This quick and easy

For tasty veggie skewers, you need fresh, vibrant vegetables. Here are the key ingredients: - 1 bell pepper (red, yellow, or green), cut into 1-inch pieces - 1 zucchini, sliced into thick rounds - 1 yellow squash, sliced into thick rounds - 1 red onion, cut into wedges - 8 cherry tomatoes - 1 cup mushrooms (whole or halved if large) These vegetables add color and crunch to your dish. You can mix and match different types to find your favorite combo. A good marinade makes the flavors pop. Here’s what you need: - 2 tablespoons olive oil - 2 teaspoons garlic powder - 1 teaspoon smoked paprika - Salt and pepper to taste This mix gives the veggies a nice coat of flavor. Olive oil helps the spices stick and enhances the grill marks. To make your skewers even better, add some fresh herbs. You might like: - Fresh basil leaves or other herbs These herbs add a fresh taste and a nice look to your finished dish. You can sprinkle them on top just before serving for extra flair. Make sure to check out the Full Recipe for complete instructions on how to bring these ingredients together. Enjoy grilling! First, you need to preheat your grill to medium-high heat. This step is key for getting those tasty grill marks on your veggies. Wait until the grill is hot before you start cooking. Next, cut and season your vegetables as outlined in the Full Recipe. Use a sharp knife to cut the bell pepper, zucchini, yellow squash, red onion, and mushrooms. Make sure to slice them into even pieces. This helps them cook evenly. Place the cut veggies in a large bowl. Drizzle them with olive oil. Add garlic powder, smoked paprika, salt, and pepper. Toss everything gently, coating each piece well. Now, it’s time to thread your veggies onto skewers. Start by taking a skewer and inserting one piece of vegetable at a time. Alternate between different types for a colorful look. Leave a little space between the pieces. This allows the heat to circulate and cooks them evenly. Once your skewers are ready, place them on the hot grill. Cook them for about 10-12 minutes. Make sure to turn them every few minutes for even cooking. You want them to be tender and have nice grill marks. When done, take them off the grill and let them sit for a couple of minutes. This helps the flavors settle. Enjoy your delicious grilled veggie skewers! To get those tasty grill marks, start with a hot grill. Preheat it to medium-high heat. This step is key. Place the skewers on the grill and don’t move them too much. Let them sit for about three minutes before flipping. This wait time helps create nice marks. After that, turn them every few minutes. Aim for about 10 to 12 minutes of grilling. Marinating your veggies boosts their flavor. Combine olive oil, garlic powder, paprika, salt, and pepper in a bowl. Toss the veggies in this mix before grilling. Let them sit for at least 15 minutes. This tip allows the veggies to soak up the great flavors. Also, cut your vegetables evenly. This way, they cook at the same rate. Grilled veggie skewers are great on their own. You can also pair them with rice or quinoa for a full meal. Serve them with a tangy dipping sauce like tzatziki or ranch. Fresh herbs, like basil, make a lovely garnish. They add color and flavor. Enjoy these skewers at a picnic or barbecue for a fun touch! {{image_2}} You can easily boost your grilled veggie skewers with protein. Tofu makes a great choice for a vegetarian option. It absorbs flavors well. Cut firm tofu into cubes and marinate it like the veggies. Tempeh also works nicely. It has a nutty taste and adds a nice texture. For seafood lovers, shrimp is a fantastic option. Just peel and devein them, then marinate. Thread them onto skewers alongside your veggies. Each protein adds its unique flavor and texture. Changing up the flavors can make your skewers exciting. Try herb-infused oils for a fresh twist. Rosemary or thyme oils add a nice touch. You can also mix in your favorite spices. For a kick, use chili powder or cumin. If you want something sweet, add a bit of honey or maple syrup to your marinade. This will balance the savory flavors. Experiment with different herbs and spices to find your favorite mix. Using seasonal veggies can enhance the taste of your skewers. In spring, asparagus and radishes are great choices. Summer brings zucchini and bell peppers, which are juicy and sweet. In fall, add mushrooms and butternut squash for a hearty feel. Winter can feature Brussels sprouts and root veggies, like carrots and parsnips. Always choose the freshest vegetables for the best flavor. This makes your dish not just tasty but also colorful and fun. To store your grilled veggie skewers, let them cool first. Place them in an airtight container. This keeps moisture in, so they stay fresh. When properly stored, they last in the fridge for up to three days. If you want to enjoy them later, remember to use a few paper towels inside the container. This helps absorb any extra moisture. Reheating grilled veggie skewers can be easy. You can use the microwave, but I suggest using the oven or grill for the best flavor. Preheat your oven to 350°F (175°C). Place the skewers on a baking sheet and cover them with foil. This keeps them moist. Heat for about 10-15 minutes. If using the grill, put them back on for about 5 minutes. This way, they will regain some of that delicious grilled flavor. Freezing your grilled veggie skewers is simple. First, let them cool completely. Then, wrap each skewer tightly in plastic wrap. After that, place them in a freezer-safe bag. They can last in the freezer for up to two months. When you want to eat them, take them out and let them thaw in the fridge overnight. Reheat them as I mentioned before for a tasty meal. I recommend grilling veggie skewers for about 10-12 minutes. This gives the vegetables enough time to soften and develop lovely grill marks. Here are some specific times for different veggies: - Bell Peppers: 10-12 minutes - Zucchini and Yellow Squash: 8-10 minutes - Red Onion: 10-12 minutes - Cherry Tomatoes: 6-8 minutes - Mushrooms: 8-10 minutes Turn the skewers every few minutes to ensure even cooking. Yes, you can prep these skewers ahead of time! Just cut your veggies and store them in the fridge. Keep them in an airtight container for up to 24 hours. - Before grilling: Toss the veggies in olive oil and seasonings. - Storage: Avoid adding oil until you're ready to grill. This keeps them fresh. When ready to cook, thread them onto skewers and grill as usual. Many vegetables work great on skewers! Here are my top picks: - Bell Peppers: They add color and sweetness. - Zucchini and Yellow Squash: These get nice and tender. - Red Onion: It caramelizes beautifully on the grill. - Cherry Tomatoes: They burst with flavor! - Mushrooms: They soak up the marinade well. Feel free to mix and match your favorites for a colorful and tasty dish! For the full recipe, check out the Grilled Veggie Skewers. Grilled veggie skewers bring joy to any meal. We explored fresh vegetables, simple marinades, and easy grilling techniques. You learned how to achieve great grill marks and tender veggies. Plus, we shared clever variations and storage tips for leftovers. Now, get creative with your skewers! Mix flavors and experiment with seasonal veggies. Enjoy grilling and sharing delicious meals with friends and family.

Grilled Veggie Skewers Tasty and Healthy Delight

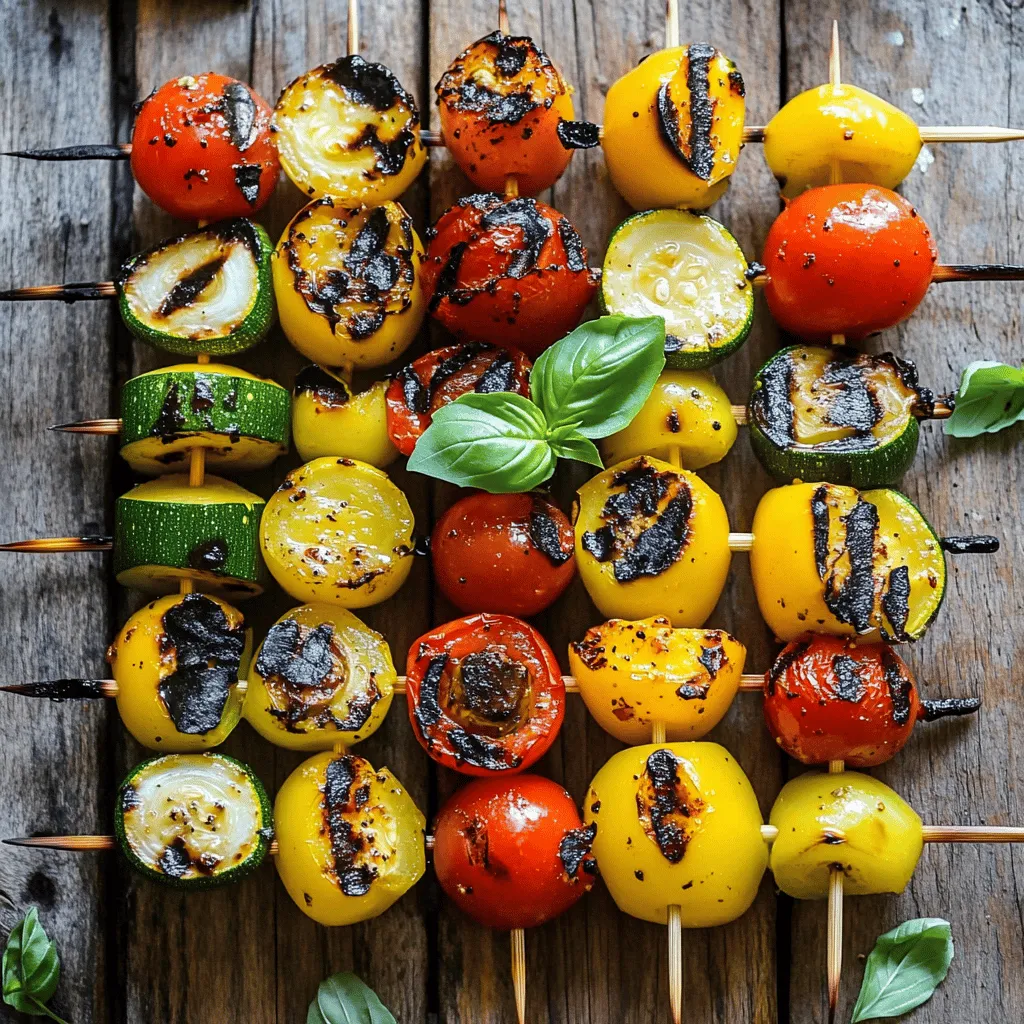
Fire up your grill and get ready for a tasty and healthy delight! Grilled veggie skewers are an easy way

To make Loaded Sweet Potato Nachos, gather these ingredients: - 2 large sweet potatoes, sliced into thin rounds - 2 tablespoons olive oil - 1 teaspoon smoked paprika - 1 teaspoon garlic powder - Salt and pepper to taste - 1 cup black beans, drained and rinsed - 1 cup corn kernels (fresh, frozen, or canned) - 1 avocado, diced - 1 cup cherry tomatoes, halved - 1 cup shredded cheese (cheddar or a dairy-free alternative) - ¼ cup Greek yogurt or sour cream (for serving) - Fresh cilantro, chopped (for garnish) - Jalapeños, sliced (optional for spice) Sweet Potatoes: Rich in vitamins A and C, sweet potatoes offer fiber and antioxidants. They provide a natural sweetness that pairs well with savory toppings. Olive Oil: A healthy fat source, olive oil adds flavor and helps with cooking. It's high in monounsaturated fats, which are good for heart health. Smoked Paprika: This spice brings a rich, smoky flavor. It adds depth to the dish without extra calories. Garlic Powder: Garlic adds flavor and has health benefits, like boosting immunity. Black Beans: Packed with protein and fiber, black beans help keep you full and satisfied. They add a creamy texture to the nachos. Corn Kernels: Sweet and crunchy, corn provides vitamins and adds nice color to the dish. Avocado: High in healthy fats, avocado adds creaminess and a fresh taste. Cherry Tomatoes: These small bursts of flavor are low in calories and high in vitamins. Shredded Cheese: Cheese adds richness and flavor. Choose your favorite type for the best taste. Greek Yogurt/Sour Cream: These add creaminess and tang. Greek yogurt is a healthier choice, packed with protein. Fresh Cilantro: This herb adds freshness and brightness to each bite. Jalapeños: If you like heat, jalapeños can spice things up. They add flavor and a kick. If you need to swap ingredients, try these ideas: - Sweet Potatoes: Use regular potatoes or zucchini slices for a different base. - Olive Oil: Coconut oil or avocado oil work well in place of olive oil. - Black Beans: Try kidney beans or pinto beans for a change. - Corn Kernels: You can use peas or diced bell peppers instead. - Cheese: Nutritional yeast is a great dairy-free option for flavor. - Greek Yogurt: Cashew cream can replace Greek yogurt for a vegan choice. - Fresh Cilantro: Parsley or green onions can add a fresh touch as well. These tips can help you customize your Loaded Sweet Potato Nachos to fit your taste and needs while keeping them delicious and fun! For the full recipe, refer to the earlier section. To start, you need two large sweet potatoes. Slice them into thin rounds. Aim for even slices for even cooking. Place the slices in a large bowl. Drizzle with two tablespoons of olive oil. Add one teaspoon of smoked paprika and one teaspoon of garlic powder. Season with salt and pepper. Toss everything together until the sweet potato slices are well coated. Preheat your oven to 425°F (220°C). Spread the sweet potato rounds out on a large baking sheet. Make sure they are in a single layer. This helps them roast evenly. Roast them in the oven for about 20-25 minutes. Flip them halfway through. You want them tender and crispy around the edges. Once the sweet potatoes are done, take them out of the oven. Sprinkle one cup of black beans and one cup of corn over the sweet potatoes. Then, add one cup of shredded cheese. Return the pan to the oven and bake for 5-7 minutes. Watch for the cheese to melt and bubble. When it’s ready, remove the nachos from the oven. Let them cool for a few minutes. Top with diced avocado, halved cherry tomatoes, and jalapeños if you like spice. Add a dollop of Greek yogurt or sour cream. Finish with a sprinkle of fresh cilantro. Enjoy your loaded sweet potato nachos! For the full recipe, check out the detailed instructions above. To get crispy sweet potatoes, use a few key steps. First, cut the sweet potatoes into thin rounds. Thinner slices cook faster and turn crispier. Next, toss the slices in olive oil, smoked paprika, and garlic powder. Make sure to coat them well. Spread the rounds out on a baking sheet. Avoid crowding them, as this can lead to steaming rather than roasting. Bake at 425°F (220°C) for 20-25 minutes. Flip the slices halfway through. You'll know they are ready when they are tender and golden on the edges. You can make these nachos your own! Start with the basic ingredients, like black beans and corn. Then, add your favorite toppings. Try diced bell peppers or onions for a crunch. For a kick, add jalapeños or hot sauce. If you love cheese, experiment with different types. Pepper jack or a vegan cheese can add unique flavors. You can even swap the black beans for pinto beans or lentils. The choice is yours, so feel free to mix and match! When serving Loaded Sweet Potato Nachos, think about balance. Pair them with a refreshing drink, like iced tea or lemonade. A light salad on the side can also work well. For dipping, offer Greek yogurt or sour cream. It adds creaminess and cools down the spice. You can also top the nachos with fresh cilantro or green onions for a pop of color. Everyone will enjoy this colorful and tasty dish! For more details, check out the Full Recipe. {{image_2}} You can easily make these nachos fit a vegetarian or vegan diet. Start by using dairy-free cheese. Brands like Daiya or Violife melt well and taste great. Replace Greek yogurt with a vegan sour cream or a cashew cream. Fresh herbs like cilantro or parsley add flavor without dairy. This way, everyone can enjoy the dish! Adjust the heat to match your taste. If you love spice, add sliced jalapeños on top before baking. You can also sprinkle some chili powder or cayenne on the sweet potatoes. For a milder version, skip the jalapeños and focus on flavors like smoked paprika and garlic. This keeps it tasty without too much heat. Want to make these nachos heartier? Add a protein source! Black beans are already in the recipe, but you can mix in cooked quinoa or lentils. For meat lovers, shredded chicken or turkey works well too. If you want a fun twist, try crumbled tofu or tempeh for a plant-based option. Protein boosts the meal's nutrition and keeps you full longer. For the full recipe, check out the details above. To store leftover loaded sweet potato nachos, first let them cool down. Placing them in an airtight container keeps them fresh. You can store them in the fridge for up to three days. If you have extra toppings, like avocado or sour cream, store those separately to prevent sogginess. When you’re ready to enjoy your leftovers, you can reheat them in the oven. Preheat the oven to 350°F (175°C). Place the nachos on a baking sheet. Heat for about 10-15 minutes or until warmed through. This method keeps the sweet potatoes crispy. If you use a microwave, heat them in short bursts to avoid making them chewy. Freezing loaded sweet potato nachos is possible but not ideal. The texture may change when thawed. If you want to freeze them, first separate the toppings. Store the sweet potatoes and beans together in a freezer-safe bag. They can last up to three months. When you’re ready, thaw in the fridge overnight and then reheat as mentioned above. For the best taste, make fresh toppings when you serve them. For the full recipe, refer back to the beginning of this article. Yes, you can prep the sweet potatoes ahead. Slice them and store in water to keep fresh. You can roast them right before serving. This keeps them crispy and tasty. The best toppings are black beans, corn, and cheese. Avocado and cherry tomatoes add freshness. For some heat, try jalapeños. Fresh cilantro makes it bright and flavorful. This recipe is already gluten-free. Sweet potatoes, beans, and fresh toppings do not contain gluten. Just check the cheese and yogurt labels to ensure they are gluten-free. Yes, they are a healthy choice! Sweet potatoes are high in vitamins. Beans add protein and fiber. When you use fresh toppings, they add nutrients and flavor without extra calories. To add spice, use jalapeños on top. You can also sprinkle some cayenne pepper on the sweet potatoes. For a different flavor, add hot sauce before serving. Enjoy the heat! Check out the Full Recipe for a step-by-step guide on making these delicious nachos. Loaded sweet potato nachos offer a fun twist on a classic dish. We explored ingredients, cooking techniques, and customization options. You learned how to achieve perfect sweetness and crispiness with simple tips. Whether you want a healthy snack or a hearty meal, these nachos fit the bill. With variations for different diets and easy storage, you can enjoy these nachos anytime. Now, get creative, and enjoy your tasty and satisfying treat!

Loaded Sweet Potato Nachos Flavorful Crowd Pleaser

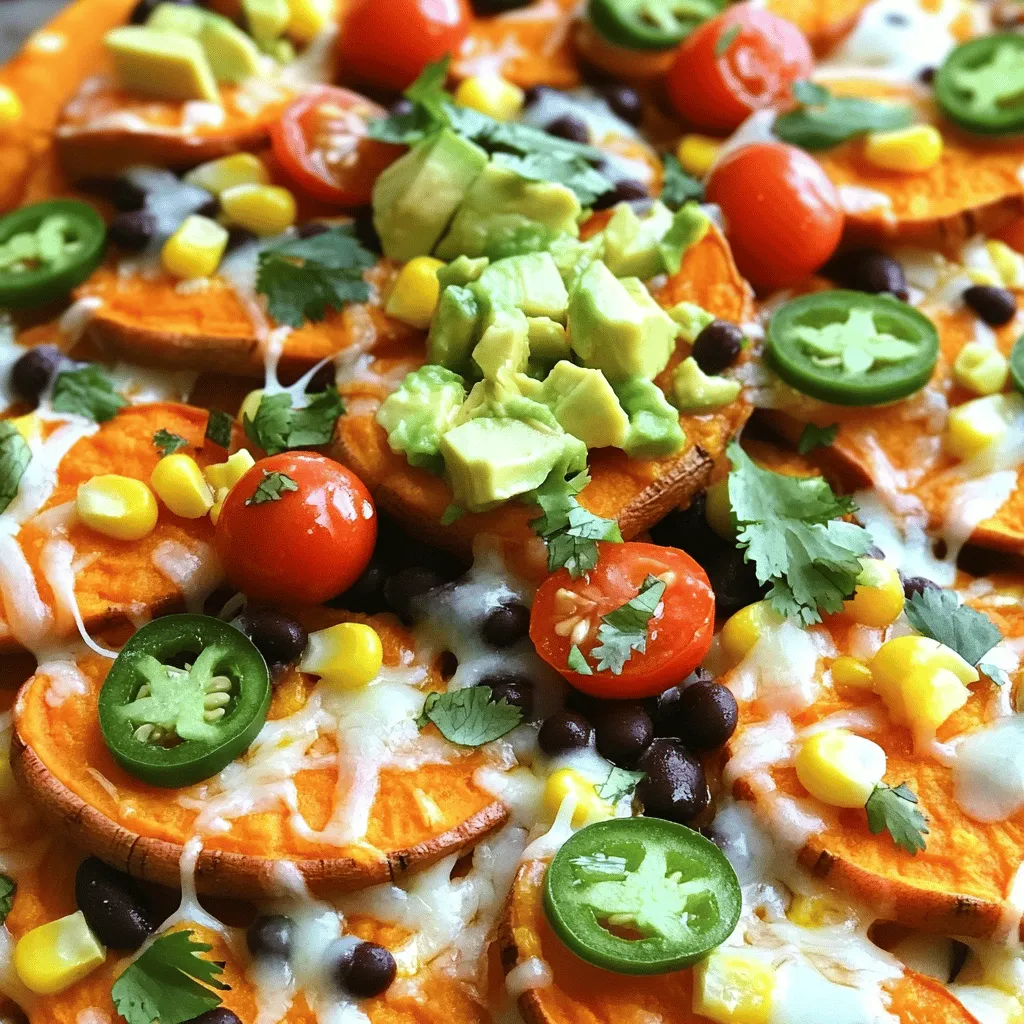
If you’re looking for a tasty snack that pleases any crowd, you’ve found it! My Loaded Sweet Potato Nachos are

- 1 large eggplant - 2 tablespoons olive oil - 1 teaspoon garlic powder - 1 teaspoon onion powder - 1 teaspoon smoked paprika - 1 teaspoon salt - ½ teaspoon black pepper - 2 tablespoons grated Parmesan cheese - Nutritional yeast for vegan option Gathering the right ingredients is key to making crispy baked eggplant chips. First, choose a large eggplant. Look for one that feels heavy and has smooth, shiny skin. This means it is fresh and full of flavor. Next, olive oil plays a big role in making these chips crispy. It helps the spices stick and adds a nice richness. Garlic powder and onion powder give the chips a savory kick. Smoked paprika adds a warm, smoky taste that enhances the eggplant. Don't forget the salt and black pepper! They balance the flavors and make each bite pop. If you want to take it up a notch, sprinkle some grated Parmesan cheese on top before baking. For a vegan option, nutritional yeast works great too. It gives a cheesy flavor without using dairy. With these ingredients ready, you're set for a tasty snack. For the full recipe, check the detailed instructions. Enjoy crafting your delicious eggplant chips! 1. First, preheat your oven to 400°F (200°C). This helps to make the chips crispy. 2. Next, line two baking sheets with parchment paper. This keeps the chips from sticking. 3. Now, slice the eggplant into thin rounds. Aim for about 1/8 inch thick. A mandoline slicer works best here. This ensures even cooking. 4. Sprinkle salt on both sides of the eggplant slices. This draws out extra moisture. 5. Place the salted slices on a clean kitchen towel. Let them sit for about 30 minutes. After 30 minutes, pat the slices dry with another towel. This step is key for crispiness. 6. In a large bowl, mix the olive oil, garlic powder, onion powder, smoked paprika, salt, and black pepper. This is your seasoning blend. 7. Toss the dried eggplant slices in the bowl. Coat them evenly with the mix for great flavor. 8. Arrange the coated eggplant slices in a single layer on the baking sheets. If you like, sprinkle grated Parmesan or nutritional yeast on top. 9. Bake the slices in the preheated oven for 25-30 minutes. Flip the slices halfway through for even cooking. 10. Keep an eye on them during the last few minutes. You want them golden and crispy but not burnt. 11. Once they are done, remove the chips from the oven and let them cool on a wire rack for a few minutes. This helps them stay crisp. Follow these steps, and you'll have a tasty snack that everyone will love. For the complete list of ingredients and instructions, check the Full Recipe. To make your eggplant chips super crispy, thickness matters. Slice the eggplant into 1/8-inch rounds. Thin slices cook more evenly and get crispier. Use a mandoline slicer for perfect cuts. This tool helps you maintain uniform thickness. A wire rack is key while baking. Placing the eggplant on a rack allows heat to circulate. This prevents steam from making the chips soggy. If you don’t have a wire rack, try using parchment paper. Just flip the chips halfway through baking. This way, both sides get crispy. For the best flavor, use high-quality oils like olive oil or avocado oil. These oils add taste and help with browning. You can also try coconut oil for a unique twist. Get creative with your seasonings! Besides garlic powder and smoked paprika, explore spice blends. Try cayenne pepper for heat or Italian herbs for a savory kick. Nutritional yeast gives a cheesy flavor for vegan options. Mix and match until you find your favorite combo. {{image_2}} You can make crispy baked eggplant chips even more tasty. Try adding spices like cayenne for a kick. Italian herbs, such as oregano or basil, also add nice flavor. For cheese lovers, sprinkle different cheese options on top. You can use Parmesan for a rich taste or nutritional yeast for a vegan twist. Each choice brings something special, letting you create your perfect snack. If you want to switch things up, you can use other veggies. Zucchini makes a great option, too. Slice it thin like eggplant, and follow the same steps. Sweet potatoes can also work well. They add sweetness and a unique flavor. You can mix different veggies for a colorful, crunchy snack. This way, you can enjoy a variety of flavors while keeping it healthy. To keep your crispy baked eggplant chips fresh, use an airtight container. Glass or plastic works well. Store them at room temperature for up to three days. If you live in a humid area, consider keeping them in the fridge. This may help them last longer, but it can make them soggy. For best taste, eat them within two days. When you want to enjoy your leftovers, reheating is key. The best way to keep them crispy is to use the oven. Preheat your oven to 350°F (175°C). Spread the chips out on a baking sheet. Heat them for about 5-10 minutes, checking often. This method keeps them crunchy. Avoid using a microwave, as it can make them soft and soggy. To make eggplant chips crispy, avoid thick slices. Thin slices cook evenly and get crunchy. Another mistake is skipping the salting step. Salting draws out moisture, which helps achieve that crispy texture. After salting, always pat the slices dry using a towel. To enhance the texture, use a wire rack when baking. This allows air to circulate around the chips. Also, use a high oven temperature like 400°F (200°C). This helps them crisp up quickly. Yes, you can use a different oven temperature. If you lower the temperature, extend the cooking time. For instance, at 350°F (175°C), bake for about 35-40 minutes. Always check for doneness as ovens can vary. Eggplant chips taste great with many dips. For homemade options, try tzatziki or hummus. These dips add a creamy texture and fresh taste. For store-bought ideas, salsa or guacamole work well too. You can also go for spicy dips like sriracha mayo for a kick. Try mixing different flavors to complement the chips. Each dip offers a fun twist to your snacking experience. This post covered how to make delicious eggplant chips. We explored the key ingredients, preparation steps, and tips for that perfect crunch. We also discussed storage and reheating so you enjoy them later. Finally, we provided ideas for variations and dips to elevate your snack. Enjoy experimenting with flavors and textures as you create your own version of this tasty treat. Your eggplant chips will impress friends and family alike!

Crispy Baked Eggplant Chips Irresistible Snack Recipe

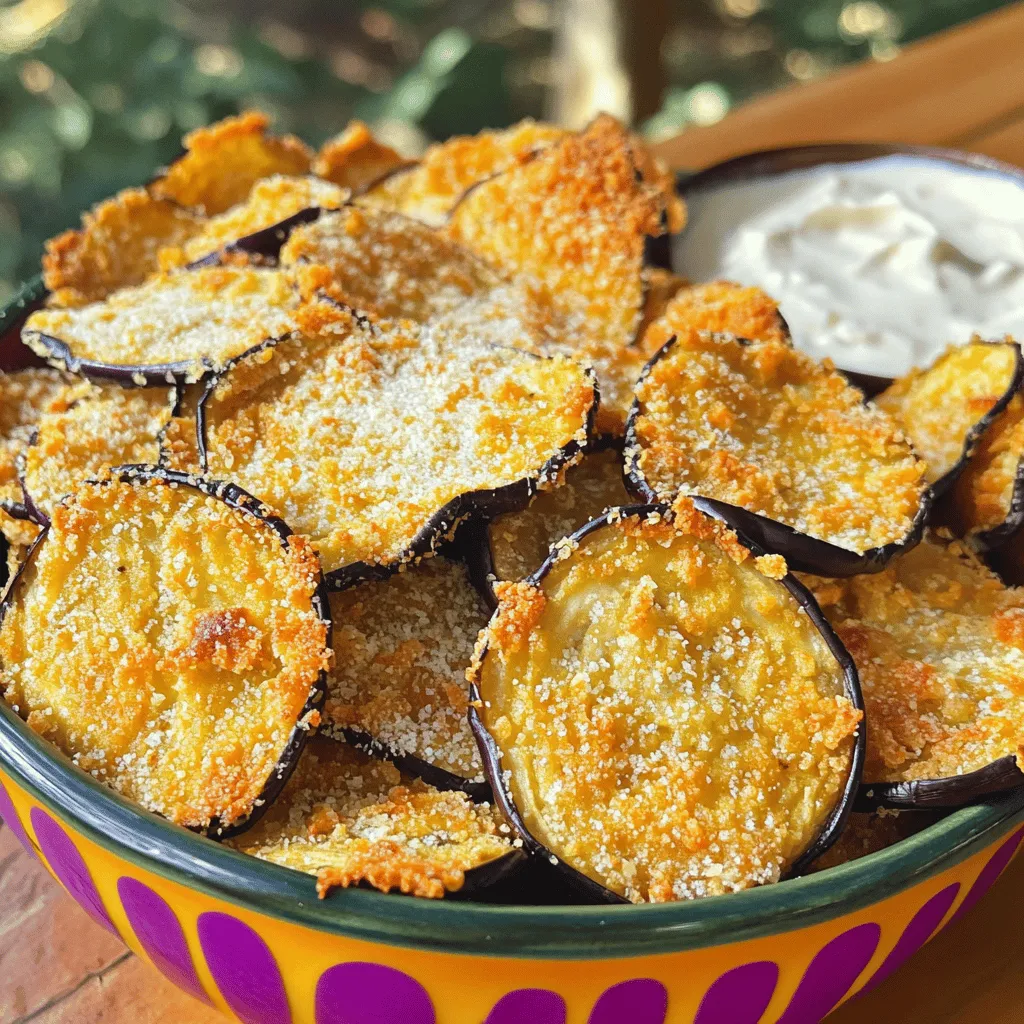
Are you ready to crunch into a tasty, healthy snack? Crispy Baked Eggplant Chips check all the boxes: they’re simple

- 3 medium ripe tomatoes, diced - 1 large cucumber, peeled and diced - 1/2 red onion, finely chopped - 1/4 cup fresh basil leaves, torn - 1/4 cup feta cheese, crumbled - 2 tablespoons olive oil - 1 tablespoon balsamic vinegar - Salt and pepper to taste - 1 teaspoon honey (optional, for sweetness) Fresh ingredients make this salad shine. I love using ripe tomatoes. They bring a sweet and juicy burst to each bite. Cucumbers add a cool crunch that balances the flavors well. Choose a large cucumber for the best texture. Red onion gives a hint of sharpness. It brightens the dish and adds color. Fresh basil leaves bring an aromatic note. The torn leaves release their oils, making the salad fragrant. Feta cheese adds creaminess and a salty kick. It pairs well with the other ingredients. For the dressing, I mix olive oil and balsamic vinegar. This simple blend enhances the fresh produce. Salt and pepper bring out the flavors. A touch of honey can add sweetness if you like. You can find the full recipe below to make this vibrant dish! - Combine diced tomatoes and cucumbers in a bowl. - Add finely chopped red onions and torn basil leaves. Start by selecting ripe tomatoes. Their bright color and firm texture ensure great flavor. Dice them into small pieces. Next, peel and dice your cucumber. A large cucumber gives a nice crunch. Finely chop half a red onion. This will add a mild sweetness. Finally, take fresh basil leaves and tear them into smaller pieces for easy mixing. - Whisk together olive oil, balsamic vinegar, salt, and pepper. - Incorporate honey for added sweetness (optional). In a small bowl, whisk together two tablespoons of olive oil and one tablespoon of balsamic vinegar. Add a pinch of salt and a dash of pepper to taste. If you want a touch of sweetness, add one teaspoon of honey. This step elevates the flavor and balances the acidity. - Pour the dressing over the salad mix and toss gently. - Sprinkle feta cheese on top and lightly toss again. Pour the dressing over the salad mix. Use a spatula to toss gently. This keeps the veggies intact. Next, sprinkle a quarter cup of crumbled feta cheese on top. Toss lightly once more to combine everything. Let the salad sit for about ten minutes. This allows the flavors to meld together beautifully. For the full recipe, check the details above. - Choose firm, ripe tomatoes for maximum flavor. - Opt for a crisp cucumber for texture. When you select your tomatoes, look for ones that feel heavy for their size. The skin should be smooth and shiny. This choice ensures you get the juiciest flavor. For cucumbers, pick ones that are firm and have a bright color. Soft spots mean they may not be fresh. These tips help your salad shine. - Allow the salad to sit for 10 minutes to meld flavors. - Customize dressing with herbs like oregano or dill. After mixing your salad, let it rest for ten minutes. This waiting time helps all the tastes blend nicely. If you want to kick it up a notch, add fresh herbs like oregano or dill to your dressing. These herbs bring a new layer of flavor that makes your salad even more delicious. - Serve chilled for a refreshing appetizer. - Pair with grilled meats or as a side dish. I love serving this salad cold. It makes a perfect appetizer on a hot day. You can also pair it with grilled chicken or fish. The fresh taste balances well with smoky flavors. If you want to impress your guests, this vibrant salad is a great choice for any meal. For the full recipe, check out the link. {{image_2}} You can make your salad more filling by adding protein. Grilled chicken gives a nice smoky flavor. Chickpeas are a great choice for a vegetarian option. Just toss them in with your fresh veggies. Want a twist? Swap feta cheese for mozzarella. Mozzarella adds a creamy texture. You can also add sliced olives or diced avocados. These additions bring richness and a new taste. Make this salad more exciting by using seasonal fruits. In summer, try adding ripe avocados or sweet peaches. They give a fresh, juicy kick. Roasted vegetables can also change the game. They add warmth and depth to your salad. To keep your fresh tomato cucumber salad at its best, place it in an airtight container. Store it in your refrigerator. This will help maintain its crispness and flavor. Try to eat it within 1-2 days for the best taste. Freezing this salad is not a good idea. The texture of tomatoes and cucumbers changes once frozen. They can become mushy when thawed. Enjoy the salad fresh for the best experience. If you have leftover salad mix, don’t waste it! You can use it in wraps or grain bowls. It adds a refreshing touch to your meals. Mix it with some grains or proteins for a quick lunch. This way, you enjoy the flavors again while reducing food waste. To make a fresh tomato cucumber salad, start by gathering your ingredients. Dice three medium ripe tomatoes and one large cucumber. Finely chop half a red onion and tear a quarter cup of fresh basil leaves. In a large mixing bowl, combine the diced tomatoes and cucumber. Add the chopped red onion and basil. In a small bowl, whisk together two tablespoons of olive oil, one tablespoon of balsamic vinegar, salt, and pepper. For sweetness, add one teaspoon of honey. Pour this dressing over the salad and toss gently. Finally, sprinkle a quarter cup of crumbled feta cheese on top. Let it sit for about 10 minutes to blend the flavors. You can find the full recipe above. If you want to change the cheese, try goat cheese instead. It has a creamy texture and tangy flavor. You can also skip cheese altogether for a vegan salad. This way, you keep the salad fresh and light. To add spice, consider diced jalapeños. They give a nice kick. You can also sprinkle a pinch of red pepper flakes on top. Adjust the amount to fit your taste. This adds heat and excitement to your fresh salad mix. This refreshing tomato cucumber salad is easy to make and packed with flavor. You learned how to prepare fresh veggies, make a simple dressing, and customize your dish. Remember to use ripe ingredients for the best taste. Try serving it chilled or pairing it with grilled meats. This salad is versatile, so feel free to add proteins or experiment with flavors. Store leftovers in the fridge for a few days or repurpose them in wraps. Enjoy this healthy dish that brightens any meal!

Fresh Tomato Cucumber Salad Vibrant and Refreshing Mix

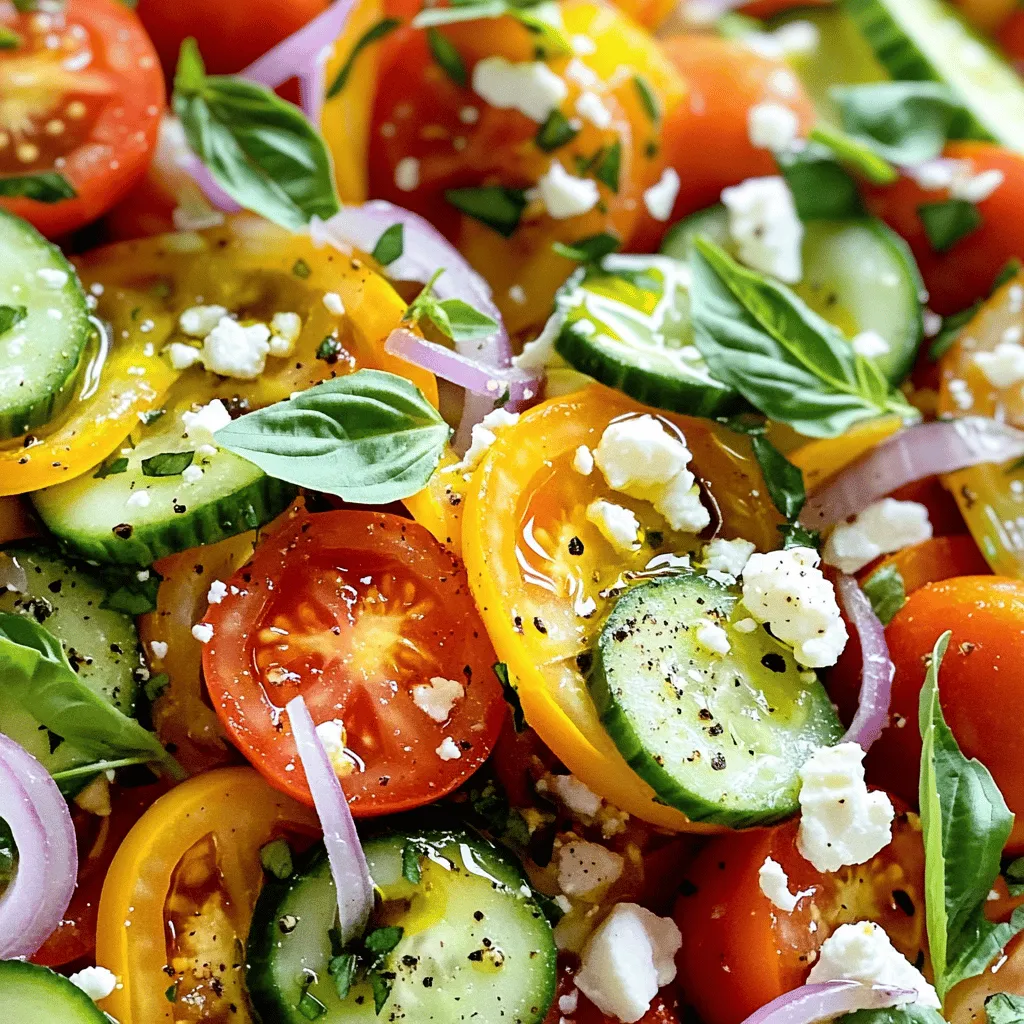
Looking for a dish that bursts with flavor and is super easy to make? My Fresh Tomato Cucumber Salad mixes

Older posts
Newer posts
← Previous Page1 … Page53 Page54 Page55 … Page107 Next →
© 2025 My Cooking Cast • Built with GeneratePress

Our Policies

  • Privacy Policy
  • GDPR Policy
  • Terms Of Use
  • Copyright Policy
  • Cookie Policy
  • Disclaimer

More Information​

  • Home
  • Contact
  • About
  • Dinner
  • Appetizers
  • Dessert
©2025, My Cooking Cast About Privacy Policy Back To Top