Easy Veggie Omelette Quick and Simple Breakfast Dish
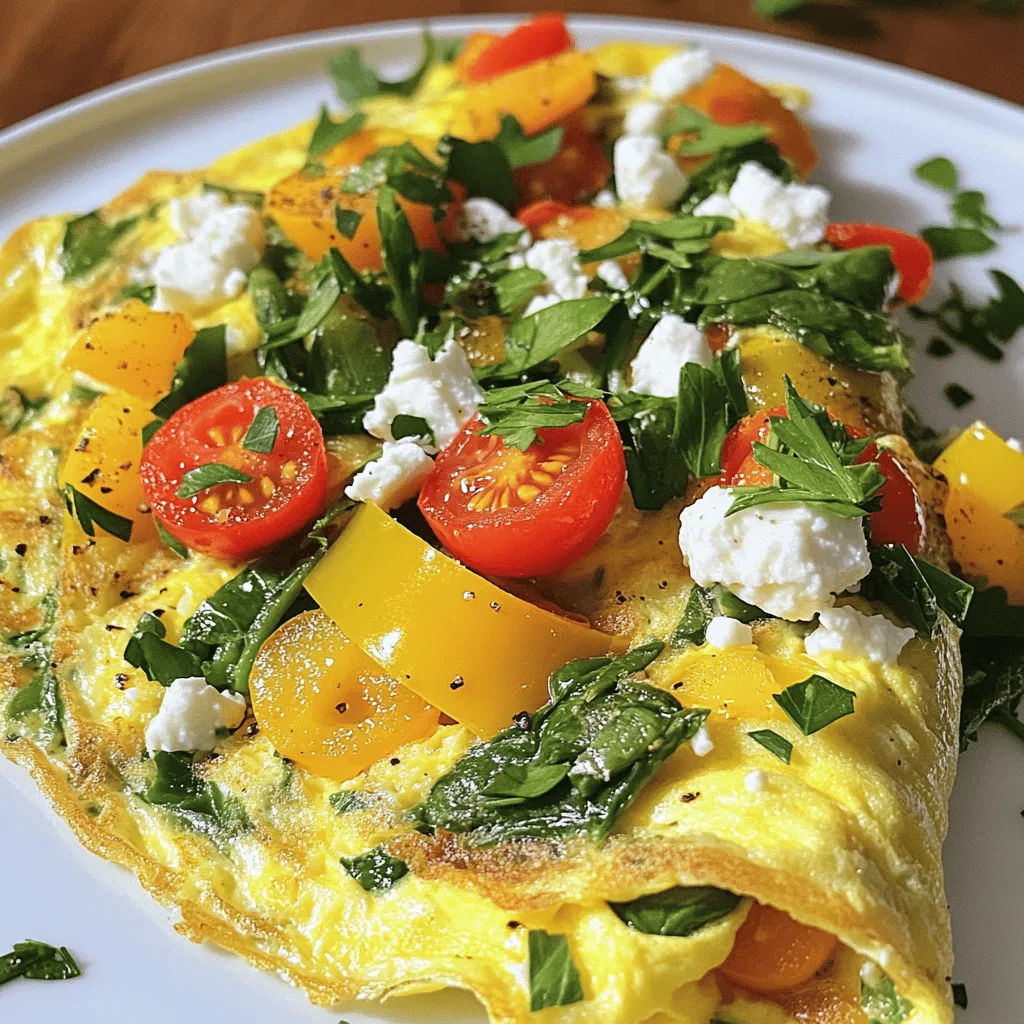
Are you looking for a quick and easy breakfast? Let me introduce you to the Easy Veggie Omelette! This colorful
Are you looking for a quick and easy breakfast? Let me introduce you to the Easy Veggie Omelette! This colorful
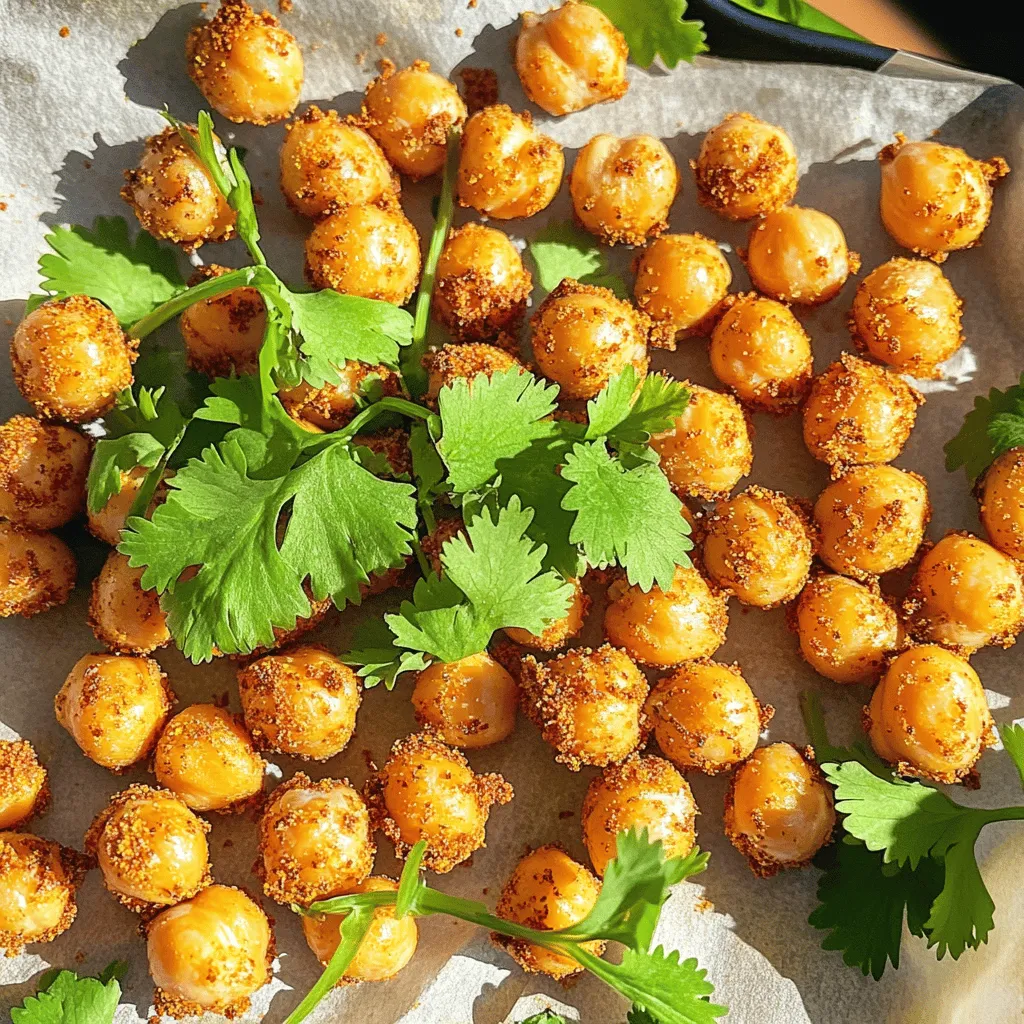
If you’re hunting for a snack that packs a punch, spicy roasted chickpeas are your answer! Crunchy, flavorful, and easy

Looking for a bright and tasty dessert? You’re in for a treat! Lemon Blueberry Cheesecake Bars are your new go-to
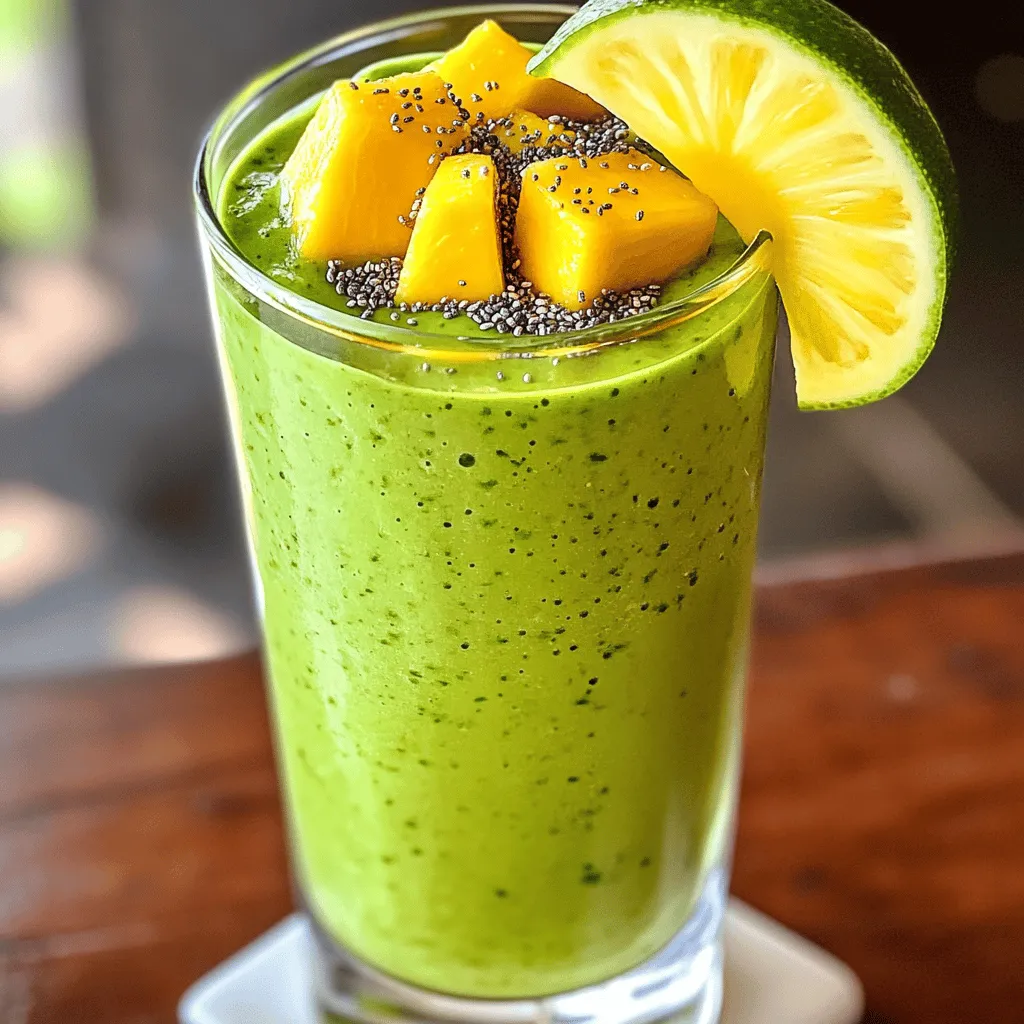
Looking for a delicious way to boost your energy? This Tropical Green Smoothie is not only tasty, but it’s also
![- Chicken: 1 pound boneless, skinless chicken breasts, diced - Rice: 2 cups cooked rice (white or brown) - Vegetables: 2 cups broccoli florets (fresh or frozen) - Cream Soup: 1 can (10.5 oz) cream of mushroom soup - Dairy: 1/2 cup milk, 1 cup shredded cheddar cheese - Seasonings: garlic powder, onion powder, dried thyme, salt, and pepper - Topping: 1/2 cup breadcrumbs (optional, for topping) - Oil: 2 tablespoons olive oil When I make Chicken Broccoli Rice Casserole, I love the blend of flavors. This dish is simple yet satisfying. Each ingredient plays a role in the final result. The chicken provides protein, while the broccoli adds a nice crunch. The rice acts as a hearty base. Using cooked rice makes this dish quick. You can use any rice you like, but I prefer brown rice for its nutty taste and texture. Broccoli is the star here. It can be fresh or frozen, and both work well. The cream of mushroom soup gives the casserole a creamy texture. If you want, you can swap it out for another creamy soup. I find that the cheddar cheese really brings everything together. It melts beautifully and adds a rich flavor. Don’t forget the spices! Garlic powder, onion powder, thyme, salt, and pepper enhance the taste. They create a warm, cozy flavor that makes this dish comforting. If you want a crunchy top, add breadcrumbs. Just a little olive oil helps them brown nicely. This dish is all about balance and comfort. You can find the full recipe [Full Recipe] to try this at home! - Preheat oven to 350°F (175°C). - Cook the chicken: sauté in olive oil with spices. Start by heating olive oil in a large skillet over medium heat. Add diced chicken pieces to the skillet. Season them with garlic powder, onion powder, thyme, salt, and pepper. Cook the chicken until it turns golden and is fully cooked, about 5 to 7 minutes. - Combine rice, broccoli, soup, milk, and cheese. - Add cooked chicken to the mixture. In a big bowl, mix together cooked rice, broccoli florets, cream of mushroom soup, milk, and half of the shredded cheddar cheese. Stir this mixture until it blends well. Then, add the cooked chicken to the rice and broccoli mixture. Make sure everything is evenly combined. - Transfer mixture to a baking dish. - Bake covered and then uncovered for final browning. Next, pour the mixture into a greased 9x13-inch baking dish. Spread the mixture evenly. Sprinkle the remaining cheddar cheese on top. If you like a crunchy topping, add breadcrumbs too. Cover the dish with aluminum foil and bake for 25 minutes. After that, remove the foil and bake for another 10 to 15 minutes until it’s golden and bubbly. Check the casserole to ensure all the cheese melts nicely. For the full cooking instructions, refer to the Full Recipe. Enjoy making this simple and tasty dish! To make your Chicken Broccoli Rice Casserole shine, ensure the chicken is cooked through before mixing. This keeps your dish safe and delicious. For the best texture, use fresh broccoli. It adds a nice crunch and bright color to the casserole. Garnish your casserole with fresh herbs like parsley or chives. This adds a burst of flavor and makes the dish look appealing. Serve it as a main dish with a crisp side salad. The coolness of the salad balances the warm casserole nicely. Choose a 9x13-inch baking dish for this recipe. This size holds all the tasty ingredients well. Make sure to grease the pan before adding the mixture. A greased pan helps you serve the casserole easily without sticking. {{image_2}} You can easily change the main ingredient in this dish. Substitute chicken with turkey for a lighter option. If you want a vegetarian meal, tofu works great too. Both will give a nice flavor. You can also switch the rice. Using jasmine rice or basmati rice adds a unique touch. These rice types have different flavors and aromas that enhance your casserole. Get creative with your spices! Adding paprika brings a mild heat. Oregano adds a lovely herb flavor. You can also mix in other veggies. Carrots add sweetness and color. Bell peppers bring crunch and a burst of flavor. Feel free to experiment and find what you love best. If you need a gluten-free option, you can use gluten-free cream soup. Gluten-free breadcrumbs are also a great choice for topping. For a lower calorie dish, try using less cheese. Skim milk can replace regular milk to cut calories without losing creaminess. These small changes can make a big difference while keeping the dish tasty and satisfying. For the full recipe, check out the Cozy Chicken Broccoli Rice Bake! Cool the casserole completely before storing it. This step helps keep the food fresh. Use airtight containers to store it. This keeps moisture out and flavor in. Place the casserole in the fridge for up to three days. You can freeze the casserole for longer storage. First, let it cool down completely. Then, wrap it tightly in plastic wrap. You can also use a freezer-safe container. It will last for about two months in the freezer. For best texture, thaw it overnight in the fridge before reheating. Reheat the casserole in the oven or microwave. If using the oven, set it to 350°F (175°C). It takes about 20 minutes to heat through. In the microwave, heat in short bursts. Stir often to ensure even heating. Add a splash of milk or broth when reheating. This moisture keeps it creamy and delicious. Enjoy your cozy Chicken Broccoli Rice Casserole! For the full recipe, check out the other sections. Chicken Broccoli Rice Casserole can last for about three to four days in the fridge. To keep it fresh, store it in an airtight container. This helps prevent it from drying out or picking up other odors from the fridge. If you want to enjoy it later, you can freeze it for longer storage. Yes, you can prepare Chicken Broccoli Rice Casserole ahead of time. You can cook the chicken and mix the ingredients earlier in the day. Just store the mixture in the fridge until you’re ready to bake it. You can also prepare the whole casserole and cover it tightly with foil. Bake it when you are ready for a warm meal. This casserole pairs well with many side dishes. You can serve it with a crisp green salad to add freshness. Garlic bread also complements the meal nicely. For a healthy option, steamed carrots or green beans work great. If you want a hearty meal, consider adding a fruit salad for a sweet contrast. I recommend using sharp cheddar cheese for its strong flavor. You can mix in Monterey Jack or mozzarella for a creamier texture. If you want a twist, try using pepper jack for some heat. Feel free to experiment with different cheese blends to find your favorite combo. This Chicken Broccoli Rice Casserole is easy and delicious. We covered key ingredients like chicken, rice, and broccoli. Mixing in cream soup and cheese gives it creaminess. Don’t forget the optional toppings, which add texture. You can adapt this recipe to suit your taste. Try different proteins or vegetables. Store any leftovers properly and enjoy them later. With these tips, you can make a meal that everyone loves. Enjoy cooking and share this recipe with friends!](https://mycookingcast.com/wp-content/uploads/2025/07/8f73cfa4-d8c9-44a2-908a-c2367089e61b.webp)
Looking for a simple and tasty dish? This Chicken Broccoli Rice Casserole is the answer! Packed with protein, veggies, and

Are you ready to spice up your dinner routine? Mango Salsa Chicken is the perfect mix of sweet and savory,
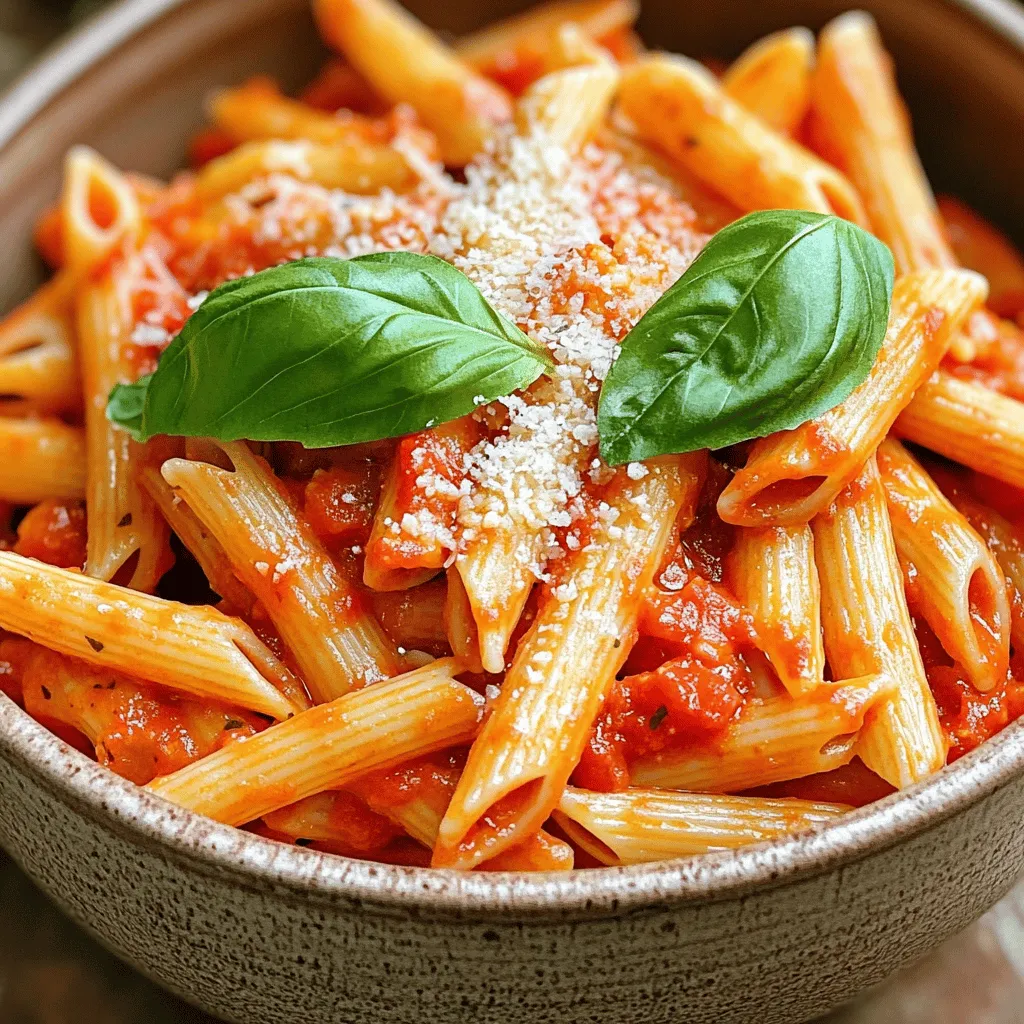
Looking for a delicious dinner that packs a punch? Try my Spicy Roasted Red Pepper Pasta! This dish brings vibrant

Ready to spice up your taco night? Avocado Lime Crema Tacos are the perfect blend of flavor and freshness. You’ll
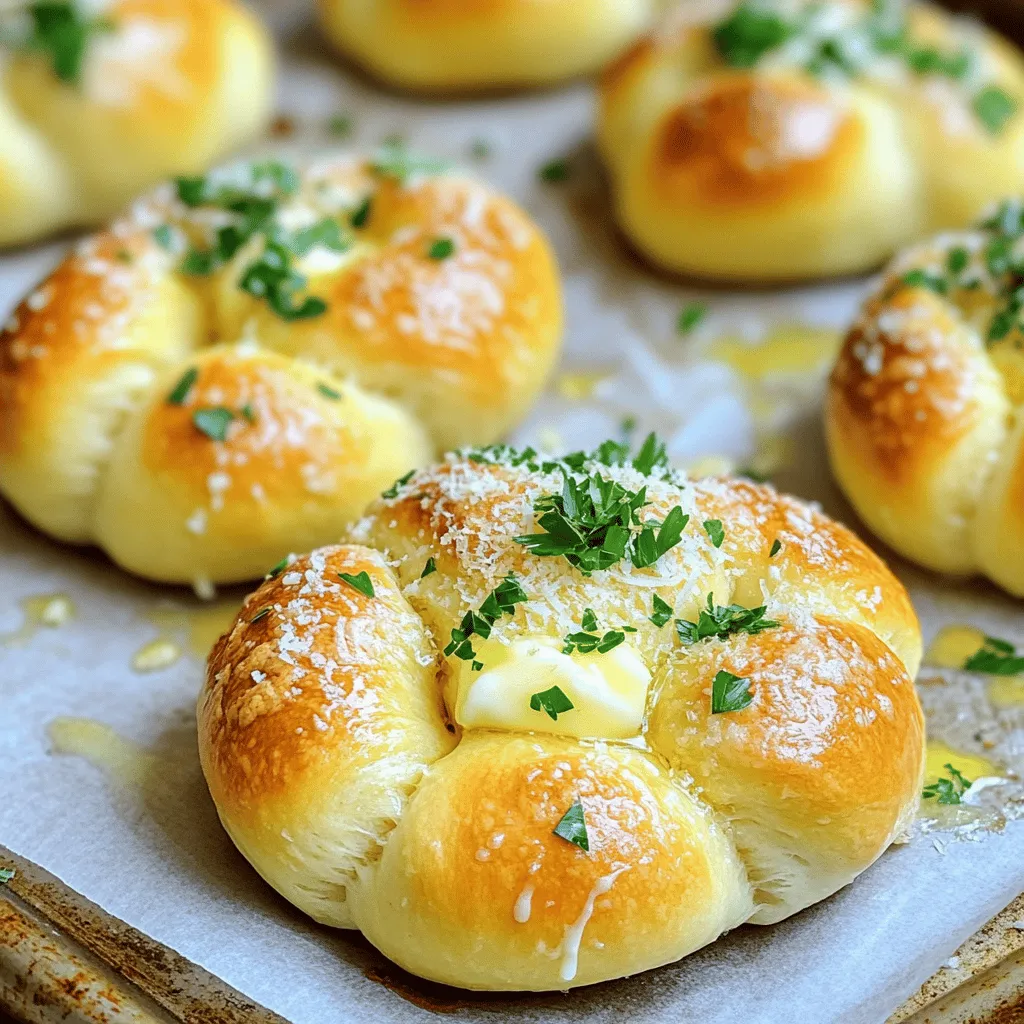
Are you ready to impress your family with a delicious, easy treat? These Easy Garlic Parmesan Knots are perfect for
![To make crispy air fryer potato wedges, you need a few simple items. Here’s the full list of ingredients: - 4 large russet potatoes - 3 tablespoons olive oil - 1 teaspoon garlic powder - 1 teaspoon onion powder - 1 teaspoon smoked paprika - 1 teaspoon dried oregano - Salt and black pepper to taste - Fresh parsley for garnish (optional) Using russet potatoes works best for this recipe. Their starchy texture makes them crispy on the outside and fluffy on the inside. Olive oil adds flavor while helping the spices stick. Garlic powder and onion powder bring depth to the taste, while smoked paprika gives a nice kick. You can adjust the salt and pepper to your liking. If you want to add a pop of color, fresh parsley makes a great garnish. This simple list keeps cooking fun and easy, so you can enjoy your crispy potato wedges without stress. Start by scrubbing and washing the russet potatoes. This step helps remove dirt and any unwanted bits. Next, cut each potato into wedges. Aim for about eight wedges per potato. Keeping the skin on adds flavor and texture. In a large bowl, combine the olive oil with your spices. Use garlic powder, onion powder, smoked paprika, dried oregano, salt, and black pepper. Mix well for an even coating. This mixture will give your wedges a tasty kick. Preheat the air fryer to 400°F (200°C) for about five minutes. This step ensures even cooking. Carefully place the seasoned potato wedges in the air fryer basket. Make sure they are in a single layer. You may need to cook in batches if your air fryer is small. Air fry the wedges for 15 to 20 minutes. Shake the basket halfway through. This action helps them cook evenly. When they turn golden brown and crispy, they are ready to enjoy. To get the best crunch, space the potato wedges well in the air fryer. If they crowd together, they won't cook evenly. I recommend leaving a little room between each wedge. This allows hot air to circulate and crisp them up. Shaking the basket during cooking is key. Halfway through, pull out the basket and give it a good shake. This helps the wedges cook on all sides, making them golden and crispy. Always taste your potato wedges after cooking. If they need a little more flavor, sprinkle on some salt or herbs. You can also add extra spices like chili powder or cumin for a kick. Experiment until you find the taste you love. For air frying, russet potatoes are the best choice. They have a high starch content, which gives you that fluffy inside and crispy outside. Other potatoes, like red or yellow, can work but may not be as crispy. Stick with russets for the best results. You can follow the [Full Recipe] to make your crispy air fryer potato wedges today! {{image_2}} You can change up the flavor of your crispy air fryer potato wedges in fun ways. If you want to add cheese, sprinkle some grated cheddar or Parmesan on top right before they finish cooking. The cheese will melt, making the wedges extra tasty and rich. You can also add fresh herbs like rosemary or thyme for a nice touch. For a spicy kick, try mixing in chili powder. Start with a small amount, then taste as you go. You can even use cayenne pepper for more heat. These options make each batch unique and exciting. If you're looking for vegetarian or vegan options, swap out olive oil for other oils. Avocado oil or coconut oil can work well. They add their own unique flavors and keep the wedges crisp. You might also try different vegetables. Sweet potatoes offer a sweet taste and bright color. Zucchini or carrots cut into wedges can add variety too. Mix and match to find your favorite combination. These potato wedges pair well with many dips. Classic choices include ketchup, ranch, or garlic aioli. For a more gourmet touch, serve them with a homemade herb dip or chimichurri. You can also use the wedges as a side dish. They go great with grilled chicken, burgers, or even a hearty salad. Think about how these crispy wedges can complement your meal. For the full recipe, check the earlier section on ingredients and step-by-step instructions to make these delicious crispy air fryer potato wedges! After cooking, let the potato wedges cool to room temperature. Store them in an airtight container. This keeps them fresh for up to three days in the fridge. When you want to reheat the wedges, the air fryer works best. Set your air fryer to 350°F (175°C) and cook for about 5-7 minutes. This helps them regain their crispiness. You can also use the oven. Just spread them on a baking sheet and heat at 375°F (190°C) for about 10 minutes. You can freeze potato wedges either before or after cooking. If you freeze them before cooking, place the seasoned wedges on a baking sheet. Freeze them for about an hour until firm, then transfer them to a freezer bag. They can stay fresh for up to three months. If you want to freeze cooked wedges, let them cool completely first. Then, place them in an airtight container or freezer bag. They will also keep for up to three months. To use frozen wedges, simply air fry them straight from the freezer. Cook for 15-20 minutes at 400°F (200°C). This way, you can enjoy crispy potato wedges any time! You can find the full recipe above. Yes, you can make potato wedges in the oven. The air fryer gives a crispier result. When you bake, you need a higher heat and longer time. For the oven method, preheat to 425°F (220°C). Spread the wedges on a baking sheet in a single layer. Bake for about 30-35 minutes, flipping halfway. Check for a golden-brown color. The edges should be crispy. You can also use a fork to test. If it slides in easily, they are done. Always rely on your eyes and taste. Yes, you can use other potatoes. Sweet potatoes work well too. They will change the flavor and texture. Yukon Gold potatoes give a creamier inside but may not be as crispy. Stick with russets for the best crunch. These wedges pair well with many dishes. Try them with burgers or grilled chicken. They also go great with dips like ketchup or ranch. You can serve them as a side for salads or even by themselves as a snack. We explored how to make crispy air fryer potato wedges using simple ingredients. Starting from scrubbing russet potatoes to seasoning and cooking them, each step ensures great flavor and texture. With tips on achieving maximum crispiness and variations for more excitement, you can customize these wedges. Remember, storing leftovers properly will keep them tasty. Now you have all the tools to enjoy this easy dish, impress friends, and savor delicious flavors. Enjoy your cooking adventure with crispy potato wedges; they are sure to be a hit!](https://mycookingcast.com/wp-content/uploads/2025/07/111e6c43-7ea4-4c20-aa65-606d3a35a62b.webp)
Are you ready to make the crispiest potato wedges? With just a few simple ingredients and an air fryer, you
