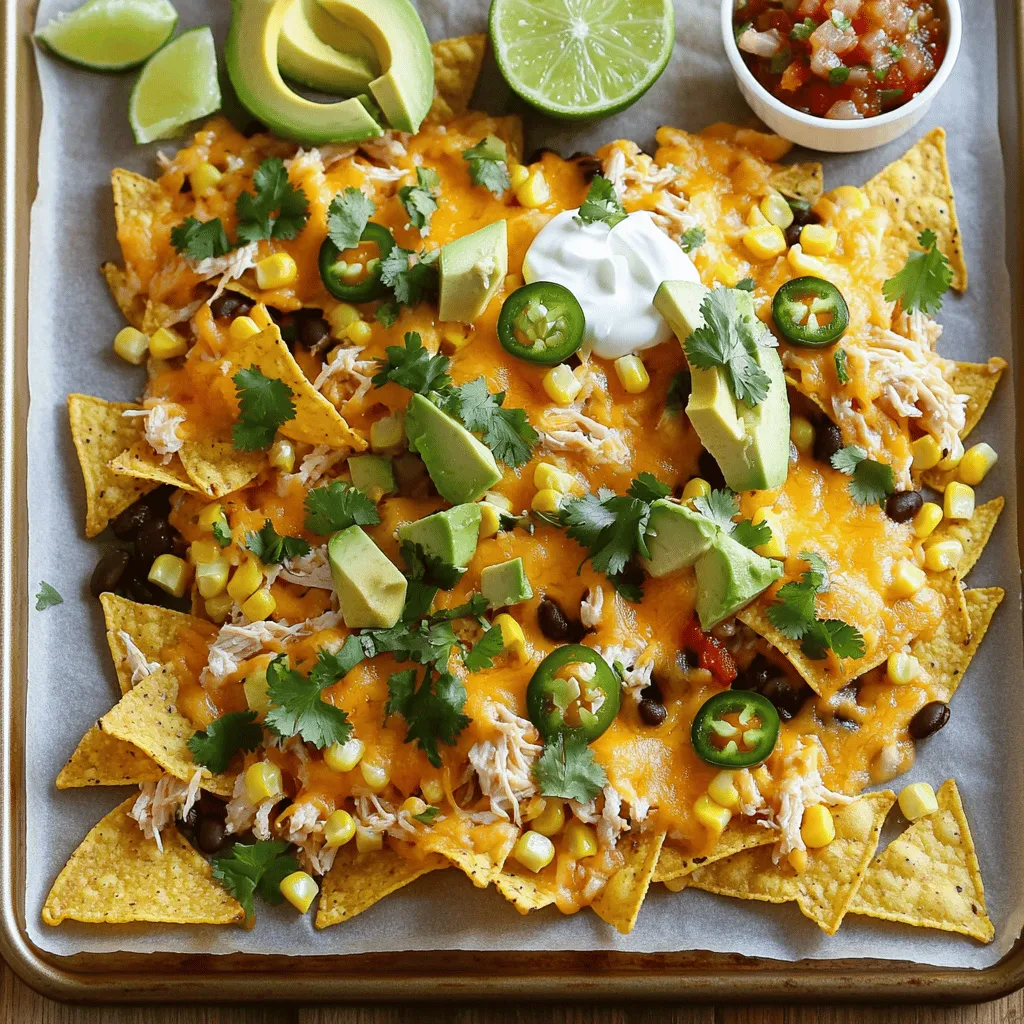
Easy Sheet Pan Nachos Tasty and Fun for Everyone
Get ready to elevate your snack game with Easy Sheet Pan Nachos! Perfect for parties or cozy nights in, these
Get ready to elevate your snack game with Easy Sheet Pan Nachos! Perfect for parties or cozy nights in, these
![- 1 cup coconut milk - 1/2 cup ripe mango, pureed - 1/4 cup chia seeds - 2 tablespoons honey or maple syrup (adjust for sweetness) - 1/2 teaspoon vanilla extract - Pinch of salt The main ingredients for this Coconut Mango Chia Pudding create a creamy, tropical delight. Coconut milk gives it a rich flavor and smooth texture. The ripe mango adds sweetness and color. Chia seeds are the magic that thickens the pudding. You can sweeten it with honey or maple syrup. A dash of vanilla and a pinch of salt enhance all the flavors. - Fresh mango cubes - Shredded coconut Optional toppings make this dish even better. Fresh mango cubes add a juicy burst with each bite. Shredded coconut brings extra texture and a hint of crunch. These toppings not only taste great but also look lovely on the pudding. You can mix and match your favorites to create your own twist. For the complete recipe, you can refer to the [Full Recipe]. To start, you will need to make the base of the pudding. First, take a medium bowl and combine coconut milk and mango puree. Mix them well until you see a smooth blend. The creamy coconut milk pairs perfectly with the sweet mango. Next, incorporate chia seeds and whisk the mixture again. This step is key. The chia seeds will help thicken your pudding. Now, it's time to let the magic happen. Cover and refrigerate the bowl. This keeps your pudding fresh. You should wait at least 4 hours or overnight for the best texture. During this time, the chia seeds will soak up the liquid. They will swell and create that lovely pudding consistency. After your pudding has set, it's time to enjoy! First, stir before serving to mix any settled seeds. Then, portion into bowls or glasses. You can really make it look nice! Finally, add toppings like fresh mango cubes and shredded coconut. These add flavor and texture, making your pudding even more delightful. For a bit of extra sweetness, drizzle honey or maple syrup on top. You can find the full recipe for more detailed steps. For a smooth chia pudding, you need the right mix. Start by whisking your coconut milk and mango puree well. This mix should be creamy and free of lumps. When you add chia seeds, do it slowly. Keep whisking as you add them. This step helps you avoid clumps. If you see lumps, don't worry! Just stir it well after resting in the fridge. Sweetness is key in this recipe. You can adjust it to fit your taste. Start with two tablespoons of honey or maple syrup. Taste the mix and add more if you like it sweeter. If you want natural options, try using agave syrup or mashed bananas instead. Both add great flavor and natural sweetness. Make your pudding look as good as it tastes! Use clear glasses to show off the bright colors. Layer the pudding with fresh mango cubes and shredded coconut on top. You can also drizzle some honey or syrup for a shiny finish. Adding mint leaves gives a nice touch too. It adds color and a fresh flavor. For a fun twist, use different glasses like mason jars or small bowls. {{image_2}} You can change the flavor of your chia pudding easily. Try other fruits like strawberry or pineapple. Both fruits add a fresh taste. To make it spicier, add a sprinkle of cinnamon or nutmeg. These spices bring warmth and depth. Just mix them in when you make the pudding base. This recipe works for many diets. It is vegan and gluten-free as is. You can use maple syrup instead of honey for a vegan option. If you want a low-calorie treat, reduce the sweetener. You can also use unsweetened coconut milk. This keeps the pudding light and healthy. Choose what fits your needs best. To store leftovers of your coconut mango chia pudding, place it in an airtight container. This helps keep it fresh. You can also cover the bowl tightly with plastic wrap. The pudding lasts up to five days in the fridge. Make sure to stir it before serving again. This helps mix the chia seeds that may settle at the bottom. Yes, you can freeze coconut mango chia pudding! Just scoop it into a freezer-safe container. Leave some space at the top, as it will expand when frozen. The pudding can last up to three months in the freezer. To thaw, move it to the fridge overnight. You can also place it in a bowl of cold water for a quicker thaw. Stir well before serving to regain its creamy texture. Coconut mango chia pudding lasts about 3 to 5 days in the fridge. To keep it fresh, store it in an airtight container. Check for any signs of spoilage, like off smells or changes in color. If it looks good, it’s still safe to eat. Yes, you can use different milks. Almond milk, soy milk, or oat milk work well. Each milk will change the taste a bit. If you want a creamier texture, try coconut milk for a rich flavor. Chia pudding is very healthy! Chia seeds are packed with fiber, protein, and omega-3 fatty acids. They help you feel full and support digestion. Coconut milk adds healthy fats, while mango provides vitamins and antioxidants. Together, they make a nutritious treat. You can easily make this recipe ahead of time. Chia pudding needs time to set, so prepare it the night before. This way, you have a quick breakfast or snack ready to go. Just store it in the fridge until you’re ready to enjoy. For the full recipe, check out the instructions above. This blog post explored how to make coconut mango chia pudding. We discussed main ingredients like coconut milk, ripe mango, and chia seeds. I provided easy steps for preparation, setting, and serving the pudding. You learned tips for texture, sweetness, and presentation. We also covered flavor variations and storage info. In conclusion, this chilled treat is easy to make, delicious, and healthy. Enjoy experimenting with flavors and toppings to find what you like best. Now, go ahead and make your own pudding!](https://mycookingcast.com/wp-content/uploads/2025/07/18be33e0-dcdf-41a6-bb29-653e643c74b6.webp)
Looking for a delicious and easy treat? You’ve stumbled upon the perfect recipe! My Coconut Mango Chia Pudding blends creamy

Have you ever craved a warm, creamy, and savory bowl of soup? Roasted Butternut Squash Soup is the answer. This
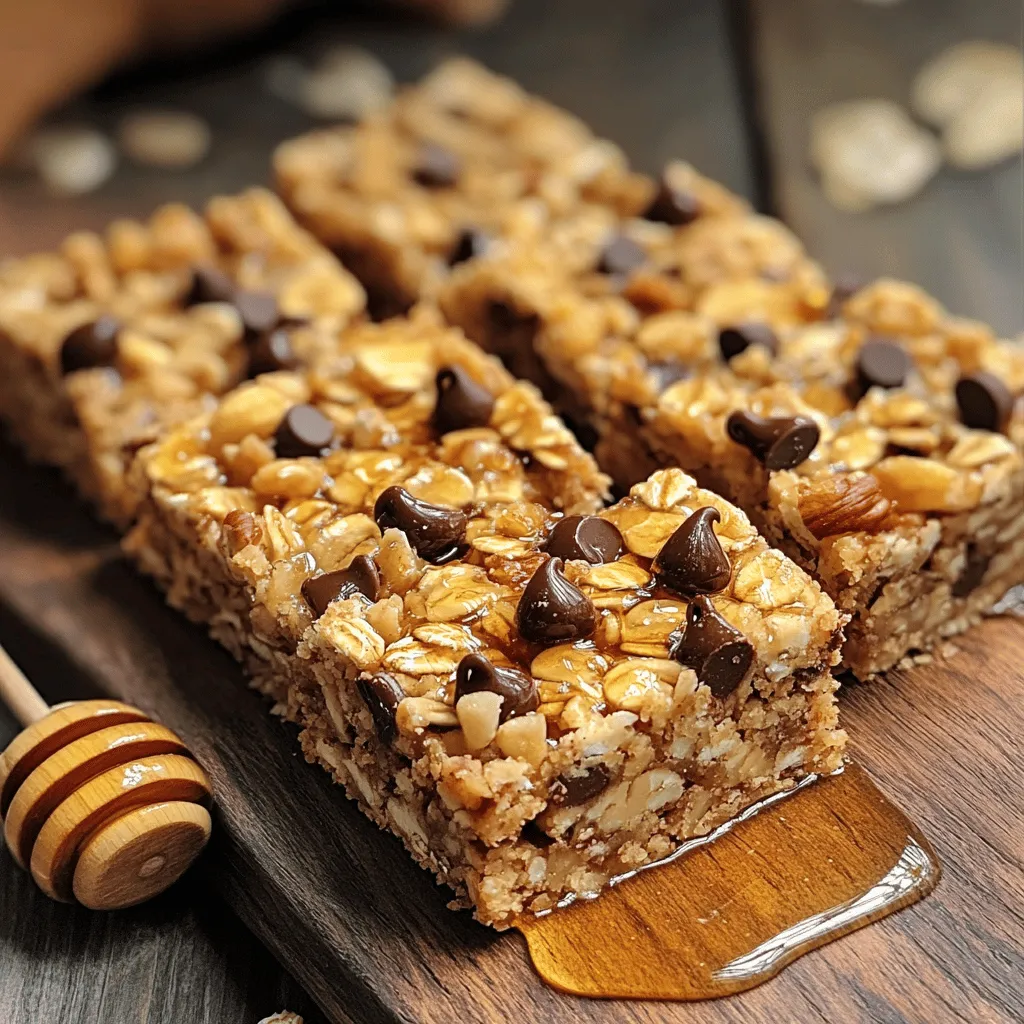
If you’re looking for a tasty and healthy snack, these Peanut Butter Oat Bars are perfect! Packed with wholesome ingredients,
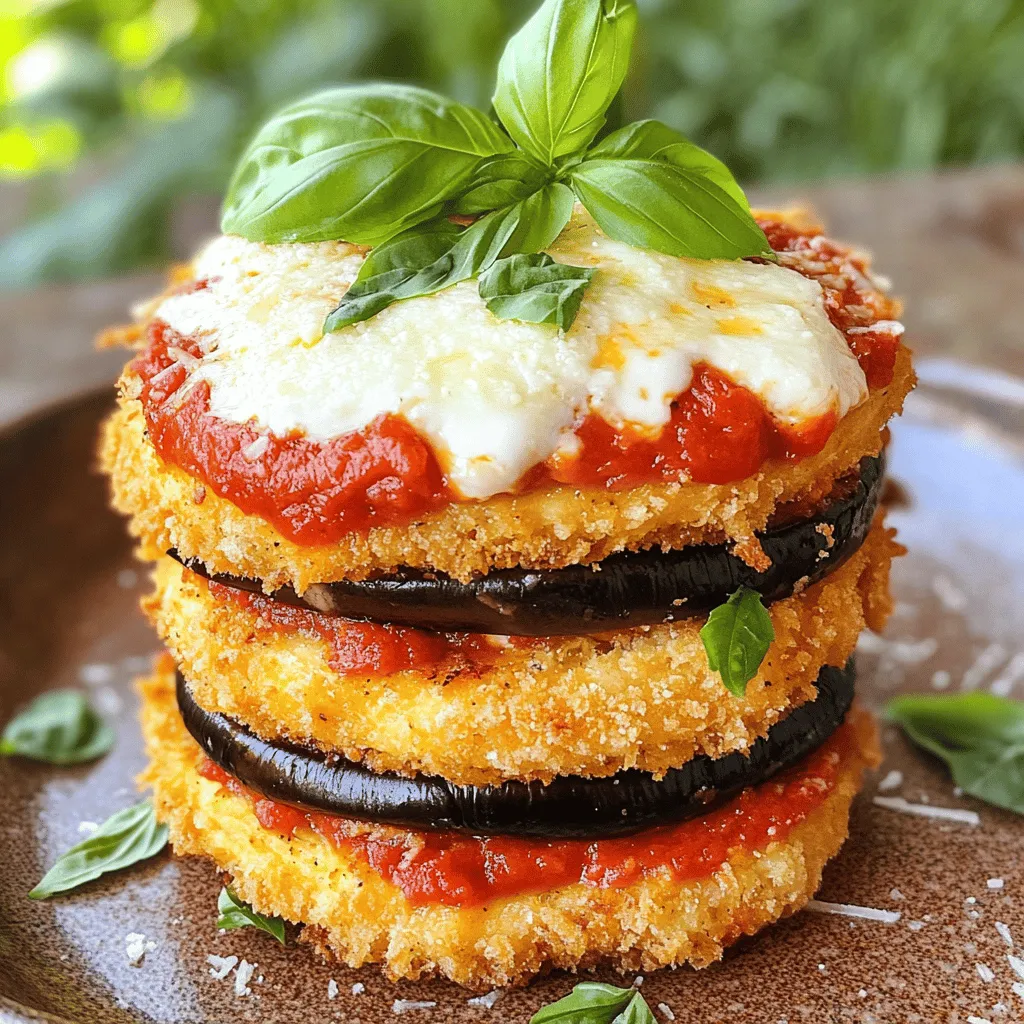
Looking for a tasty dinner idea that the whole family will love? Eggplant Parmesan Stacks are your answer! This dish
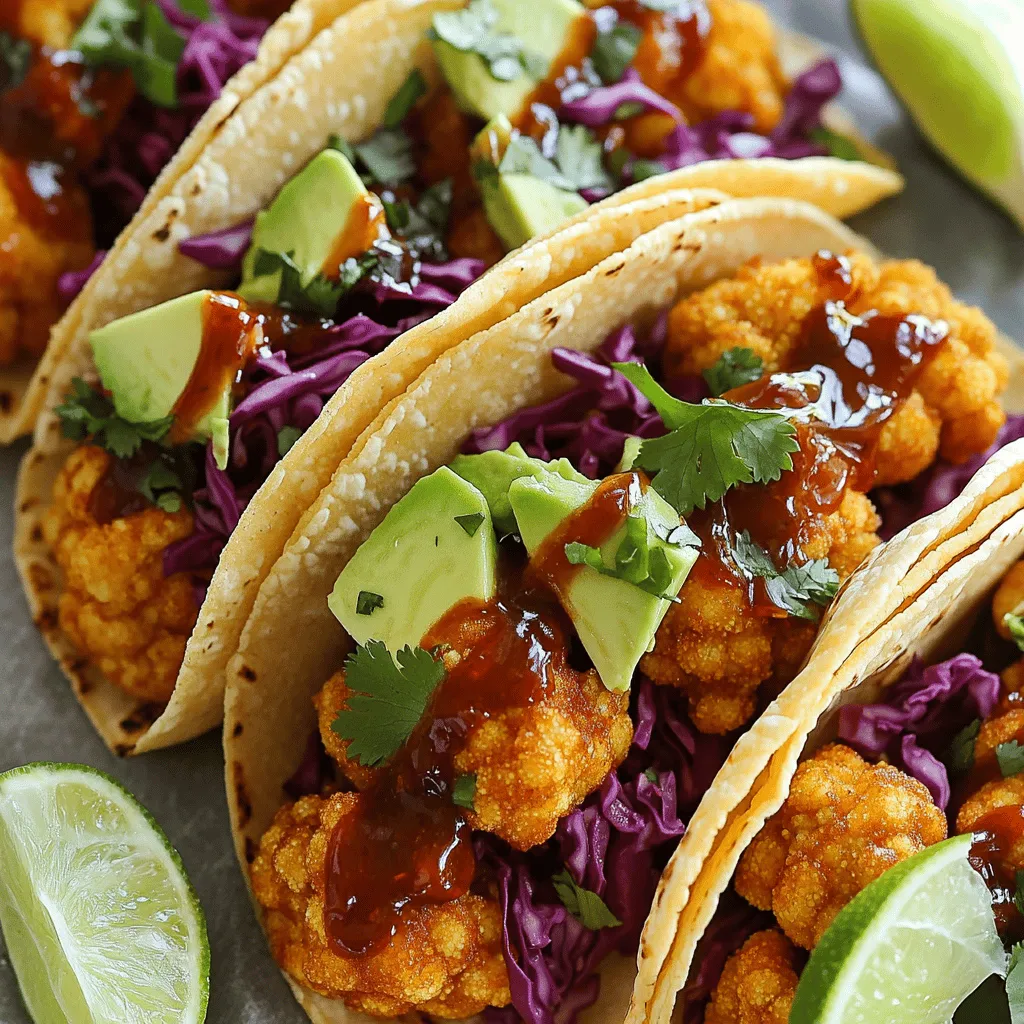
Looking for a tasty meal that packs a punch? Try my Sweet Chili Cauliflower Tacos! These crispy delights combine roasted
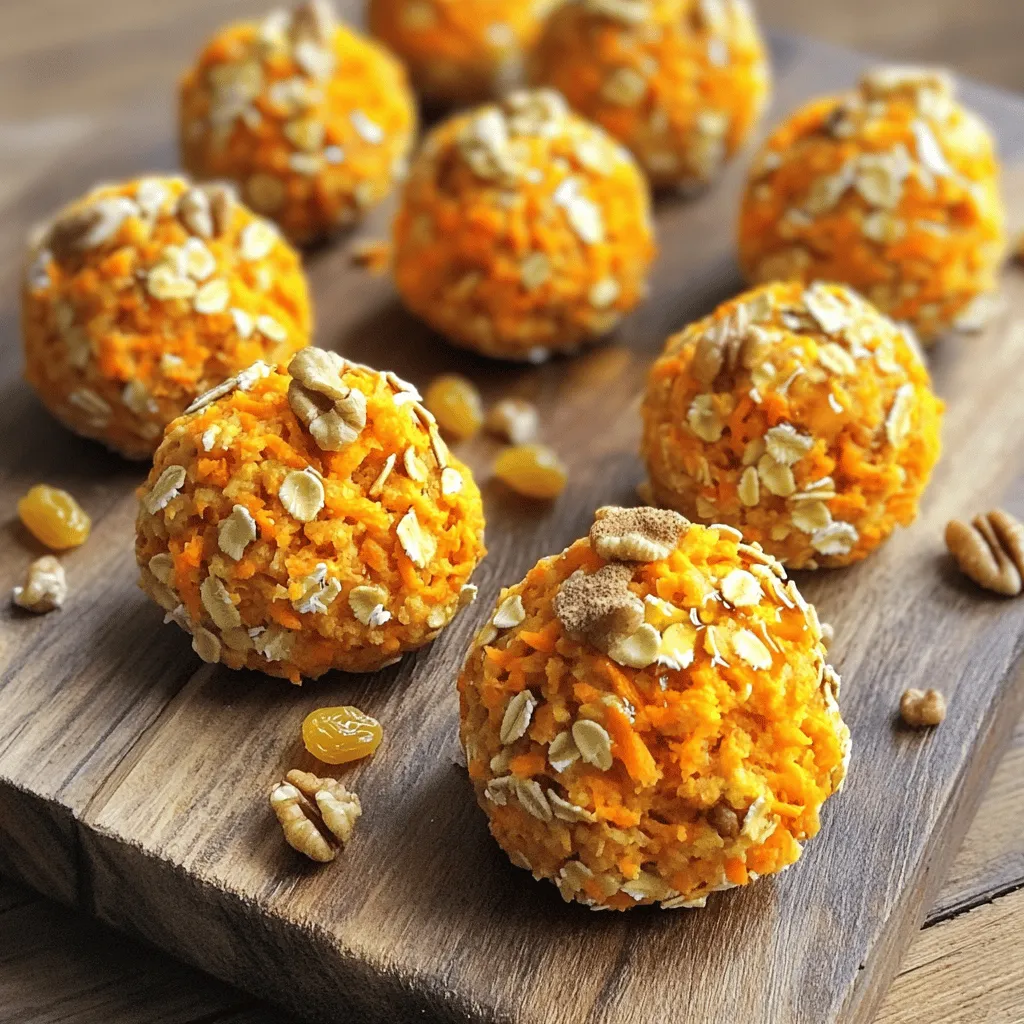
Craving a sweet treat that’s both delicious and easy to make? Look no further! My Vegan Carrot Cake Bites are
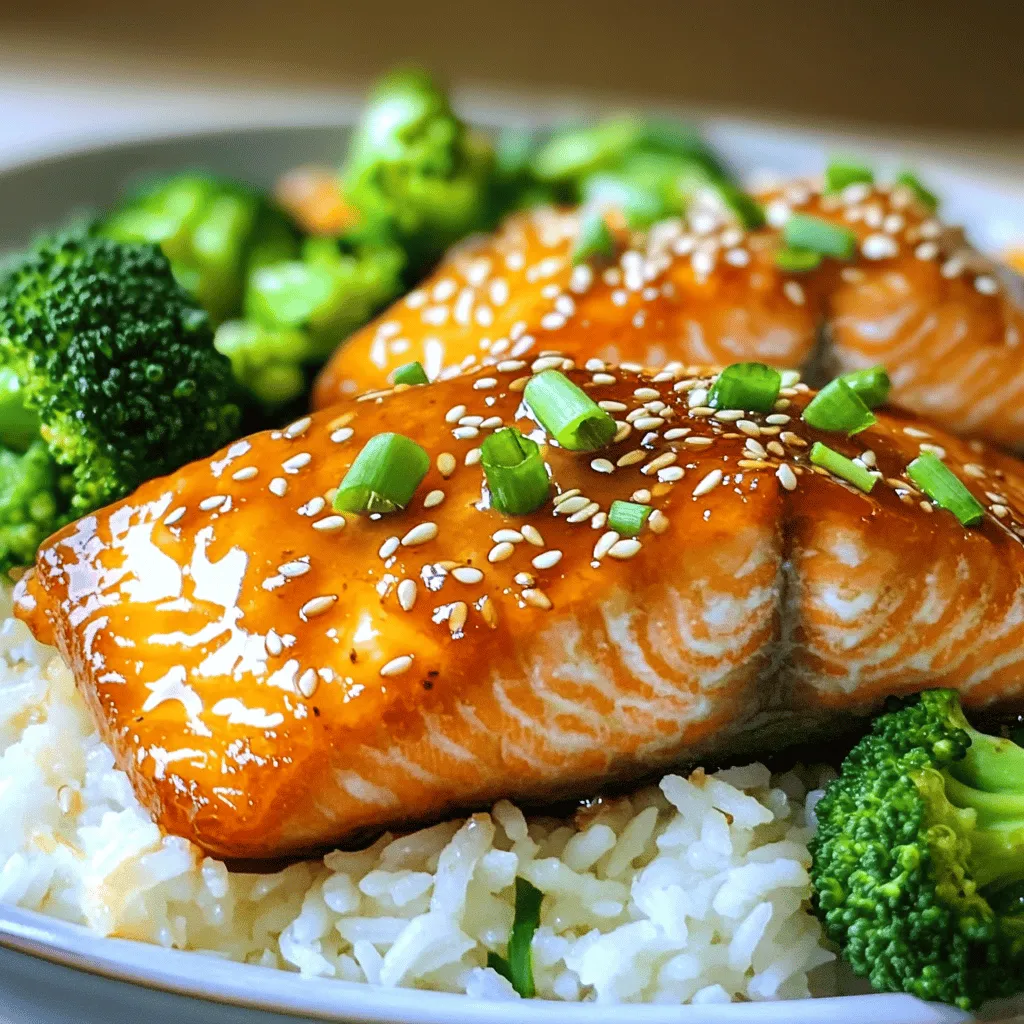
Are you ready to spice up your dinner table? My Sriracha Honey Glazed Salmon is a game-changer. This dish combines
. To get the best texture for your Chickpea Avocado Toast, mash the chickpeas lightly. I like to use a fork or a potato masher. Leave some chunks for a nice bite. This adds a fun twist to the creamy avocado. For a zesty kick, try using lime juice instead of lemon. Lime gives a fresh taste that pairs well with the chickpeas. You can also explore other citrus options, like orange or grapefruit juice, for a unique flavor. Pair your toast with a simple salad. A mix of greens, cucumber, and a light vinaigrette works great. You can also add a side of fresh fruit for a sweet touch. For gatherings, serve the toast on a large platter. Cut the slices into small pieces for easy sharing. Add colorful toppings like radish slices, or sprigs of fresh herbs to make it visually appealing. One mistake to avoid is using overripe avocados. They can make your mixture too mushy. Choose avocados that are ripe but still firm to the touch. Also, watch the toast closely while it cooks. Burnt toast can ruin the dish's flavor. If your chickpea mixture is too dry, add a bit more lemon or lime juice. This will help balance the flavors and add moisture. For the full details on making this delicious dish, check out the Full Recipe. {{image_2}} You can easily change up your chickpea avocado toast with new spices and ingredients. Try adding a pinch of smoked paprika for a warm, smoky flavor. A sprinkle of chili flakes brings a nice kick. You can also mix in some feta cheese for a salty bite. For something sweet, add a drizzle of honey or a few slices of peach. Switch up the bread too! While whole grain is great, consider sourdough or rye for a bolder taste. Gluten-free bread works just as well. You can even use pita or tortillas for a fun twist. Each type of bread will give your toast a new texture and flavor. For gluten-free options, choose gluten-free bread. Many brands offer tasty choices that fit well with this recipe. If you are vegan, you’re in luck! This dish is already vegan-friendly. Just ensure your bread is also free from animal products. If you have allergies, consider swaps like using sunflower seeds or pumpkin seeds instead of chickpeas. You can also replace avocado with hummus for a creamy base. These changes will still give you a delicious toast. Using seasonal veggies can enhance your toast. In spring, add fresh radishes for crunch. Summer is perfect for ripe heirloom tomatoes. In fall, roasted butternut squash adds sweetness. Winter greens like arugula can bring a peppery flavor. Fresh herbs are key for brightness. In spring, use mint for a refreshing twist. Summer basil adds a sweet note. In fall, thyme pairs well with roasted veggies. This way, you can adapt the recipe to whatever you find at the market each season. For the full recipe, check out the detailed instructions above. To keep your chickpea avocado toast fresh, store any leftover mix in an airtight container. Place it in the fridge right away. The mixture stays good for about 2-3 days. If you notice browning, stir in some lemon juice to brighten it up. To reheat the toast without losing its crunch, place it in a toaster or toaster oven. This helps the bread stay crispy. For the chickpea mix, warm it in a small pot over low heat. Stir often and make sure it doesn’t dry out. You can freeze the chickpea avocado mix. To do this, place it in a freezer-safe container. Leave some space at the top for expansion. When you are ready to use it, thaw it in the fridge overnight. Stir well before serving to bring back the creaminess. To make Chickpea Avocado Toast vegan, focus on plant-based ingredients. Use ripe avocados, canned chickpeas, and whole grain bread. All these items are plant-based. Toss in fresh veggies like cherry tomatoes and red onion for added taste. Be sure to check labels for any hidden animal products in bread or toppings. Yes, you can prepare the chickpea and avocado mix ahead of time. Store it in an airtight container in the fridge. To keep it fresh, press a piece of plastic wrap directly onto the surface of the mix. This helps prevent air from browning the avocados. You can make the mix up to a day in advance. Just give it a quick stir before serving. If you're out of avocados, try using hummus or nut butters. Silken tofu can also work for a creamy base. These options provide a smooth texture and add flavor. Mashed bananas or pureed beans could also substitute in a pinch. Each option gives a different taste, so feel free to experiment. Chickpea Avocado Toast is a healthy choice. Chickpeas are high in protein and fiber. They help keep you full longer. Avocados are rich in healthy fats and vitamins. They support heart health and provide energy. Whole grain bread adds more fiber and nutrients. This dish is both tasty and nutritious. To keep avocados from browning, use lemon or lime juice. The acid slows down oxidation. You can also store the avocado halves with onion slices. The sulfur compounds help keep the flesh bright. If you make the mixture ahead, cover it tightly. This keeps air out and keeps it fresh longer. Chickpea avocado toast is a simple, tasty dish packed with nutrition. We covered the key ingredients, steps, and tips for perfection. You learned how to create different flavor combinations and avoid common mistakes. Remember, this dish is versatile and can fit many diets. Enjoying it fresh will give you the best taste and texture. Try experimenting with seasonal ingredients for added flair. With these tips, you'll master this delicious toast. Keep it handy for quick meals or gatherings!](https://mycookingcast.com/wp-content/uploads/2025/07/d91d2ffa-6d2b-4892-832e-374b5d5b44d0.webp)
Ready to elevate your breakfast game? Chickpea Avocado Toast is a fresh and flavorful delight that packs a nutritious punch!
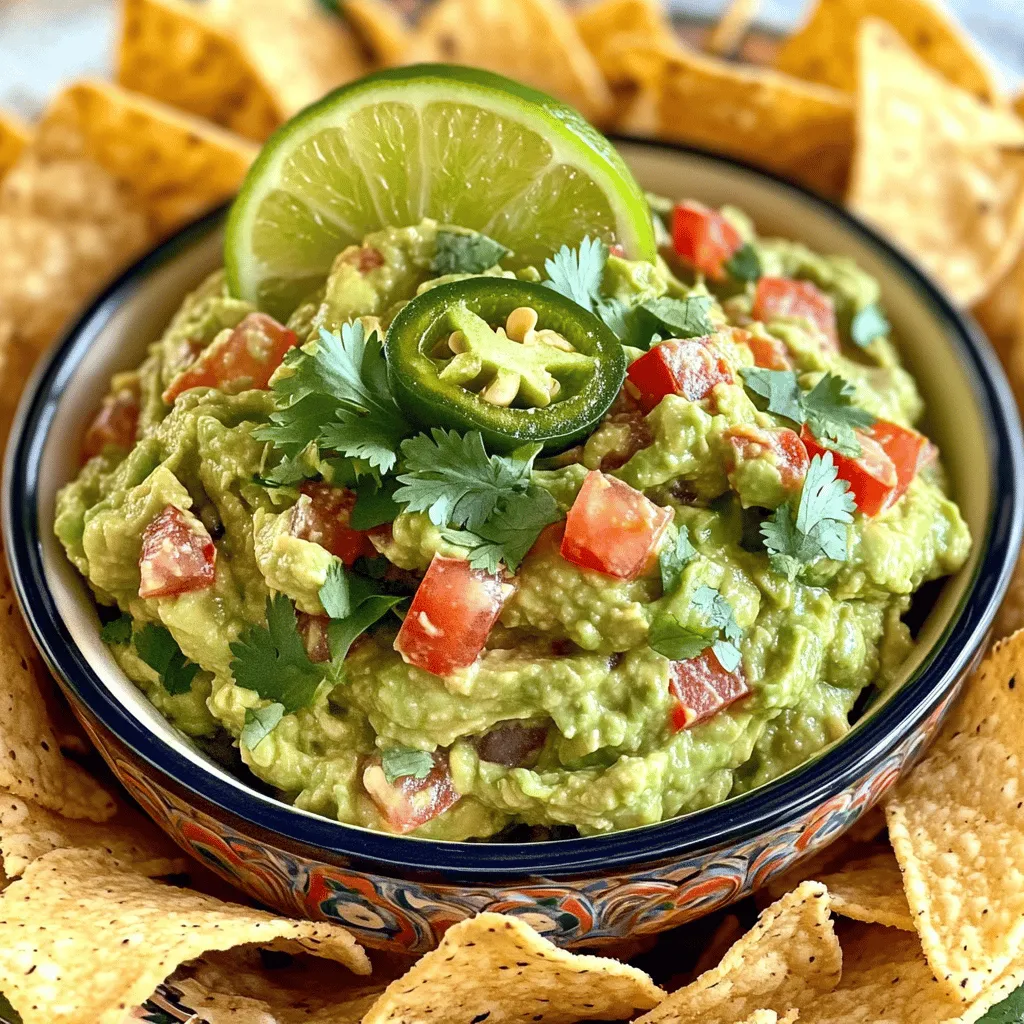
Guacamole is a must-have dip that brings flavor to any meal. This easy recipe uses ripe avocados and fresh ingredients
