Skip to content
DisclaimerTerms Of UseGDPR PolicyCookie Policy

My Cooking Cast

  • Home
  • Drinks
  • Appetizers
  • Dinner
  • Dessert
  • About
  • Contact
  • Privacy Policy
DisclaimerTerms Of UseGDPR PolicyCookie Policy

Emma

For this Honey Lime Fruit Salad, you will need these fresh fruits: - 1 cup strawberries, hulled and sliced - 1 cup blueberries - 1 ripe mango, peeled and diced - 1 cup pineapple, diced - 1 banana, sliced These fruits bring vibrant colors and natural sweetness to the dish. You can mix and match based on what you like or what’s available. Fresh fruits are the stars of this salad, so choose the ripest ones for the best taste. To make the honey-lime dressing, gather these ingredients: - 1/4 cup honey - 2 tablespoons lime juice - Zest of 1 lime The honey adds sweetness, while the lime juice and zest provide a bright, tangy flavor. This dressing is simple yet makes a big impact. It ties all the fruits together and enhances their natural taste. For a lovely finishing touch, consider adding: - Fresh mint leaves for garnish Mint adds a fresh aroma and a pop of green color. It makes the salad look appealing and adds a subtle flavor that complements the fruits. You can sprinkle some on top just before serving for that extra flair. This salad is not just refreshing but also easy to make. You can find the full recipe in the earlier section. Enjoy making this delightful dish! Start by washing all your fruit well. For strawberries, remove the green tops, then slice them. Use a sharp knife to cut each berry into even pieces. Blueberries can go in whole; they are ready to eat! For the mango, peel it and cut the flesh off the pit. Dice the mango into small cubes. Next, take your ripe pineapple and chop it into bite-sized pieces. Lastly, slice the banana into thin rounds. Once you finish cutting the fruit, grab a large mixing bowl. Add all the sliced strawberries, blueberries, diced mango, pineapple, and banana into the bowl. Mix the fruits gently with your hands or a spatula. This keeps them from getting mushy. In a small bowl, combine your honey, lime juice, and lime zest. Use a whisk to mix them together. Stir until all the honey dissolves into the juice. This should only take a minute. You want a smooth and slightly thick dressing. If it's too thick, add a splash of water to thin it out slightly. Now it's time to bring everything together. Drizzle the honey-lime dressing over the mixed fruit. Toss the salad gently with a spoon or spatula. Make sure every piece of fruit gets some dressing. Let the fruit salad sit for about 10 minutes. This allows the flavors to meld together. When ready to serve, garnish with fresh mint leaves for a pop of color and flavor. This adds a nice touch to your dish. Enjoy your refreshing Honey Lime Fruit Salad! You can find the [Full Recipe] for more details. To make a great honey lime fruit salad, choose ripe fruits. Look for strawberries that are bright red. The blueberries should be firm and plump. A mango should feel soft but not mushy. Pineapples should smell sweet and fresh. Bananas need to be yellow with no brown spots. Seasonal fruits add extra flavor. In summer, use peaches and nectarines. In fall, try apples and pears. Fresh fruit tastes better, so shop at local markets when you can. Honey adds sweetness to the salad. If you want it sweeter, add more honey. Lime juice brings a nice zing. For an extra kick, add more lime zest. This makes the salad pop with flavor. You can also try using flavored honey. Lavender or orange blossom honey can add unique taste notes. Experiment to find your favorite blend! How you serve the salad matters. Use clear bowls to show off the colors. You can layer the fruit for a beautiful look. Add fresh mint on top for a nice touch. You can also use fun dishes, like mason jars or hollowed pineapples. These ideas make your honey lime fruit salad even more inviting. For the complete recipe, check the [Full Recipe]. {{image_2}} You can give your Honey Lime Fruit Salad a tropical twist. Try adding kiwi or papaya. These fruits add a bright taste and fun texture. Kiwi brings a tangy flavor, while papaya adds sweetness. Mix these with your base fruits for a refreshing change. Another great idea is to create a berry medley. You can use strawberries, blueberries, raspberries, or blackberries. Each berry adds its own unique flavor. To enhance this mix, you can add nuts like almonds or walnuts. Nuts give a nice crunch and extra nutrition. If you want a creamy version of this salad, add yogurt or cottage cheese. This makes the salad richer and more filling. Greek yogurt works well because it has a thick texture. Start with a small amount and adjust to your taste. Always mix it gently to keep the fruit intact. For more details, check the Full Recipe for Honey Lime Fruit Salad. To keep your honey lime fruit salad fresh, store it in the fridge. Use a tight-sealing container to avoid air. This keeps the fruits crisp and tasty. Glass or BPA-free plastic containers work well. Avoid metal containers, as they can react with the lime juice. Your fruit salad can last about 2 to 3 days in the fridge. After that, the fruits may start to spoil. Look for signs like brown spots or mushy textures. If the fruit smells sour, it’s time to toss it. Always trust your senses when checking for freshness. You can prep the fruit and dressing in advance. Cut the fruit a day before and store it separately. Mix the honey-lime dressing and keep it in the fridge. When you’re ready to serve, combine everything for a quick assembly. This way, you save time and enjoy a fresh taste. For the full recipe, check out the Honey Lime Fruit Salad section. Yes, you can use frozen fruit. Frozen fruit works well in this recipe. It saves time and is easy to find. However, fresh fruit has a better taste and texture. When you use frozen fruit, thaw it first. Drain any extra juice before mixing. This helps keep your salad from getting soggy. If you want a quick meal, frozen fruit is a great option. You can try different dressings for your fruit salad. Here are some tasty ideas: - Yogurt dressing: Mix yogurt with honey and a splash of lime juice. - Citrus dressing: Use orange juice and zest for a bright flavor. - Mint dressing: Blend fresh mint with honey and lime for a fresh twist. These options can make your salad unique and fun. Feel free to experiment with flavors you love! Yes, Honey Lime Fruit Salad is healthy! It has many nutritious ingredients. - Fruits are packed with vitamins and minerals. They help keep your body strong. - Honey adds natural sweetness and has antioxidants. - Lime juice provides vitamin C, which boosts your immune system. This salad is a great way to enjoy sweets without added sugar. Plus, it is colorful and full of flavor. You can feel good about serving it to family and friends. This blog post guides you on making a delicious Honey Lime Fruit Salad. We covered fresh fruit choices, a simple honey-lime dressing, and creative serving ideas. You can boost flavors and try fun variations, like adding tropical fruits or creamy elements. Remember to store your salad well to keep it fresh. Try out these tips, and you’ll enjoy a tasty and colorful dish. Making this fruit salad is easy, fun, and perfect for any occasion! Enjoy your creation and share it with your friends.

Honey Lime Fruit Salad Refreshing and Simple Recipe

Looking for a fresh and easy way to brighten your day? This Honey Lime Fruit Salad checks all the boxes.

- 1 medium head of cauliflower, chopped into florets - 2 tablespoons olive oil - 1 tablespoon chili powder - 1 teaspoon smoked paprika - 1 teaspoon cumin - ½ teaspoon cayenne pepper (adjust for spice level) - Salt and pepper to taste - 8 small corn or flour tortillas - 1 cup shredded red cabbage - ½ cup diced tomatoes - ½ avocado, sliced - ¼ cup fresh cilantro, chopped - 1 lime, cut into wedges - Optional: Hot sauce for drizzling To create spicy roasted cauliflower tacos, you need fresh and vibrant ingredients. Cauliflower florets serve as the base of the tacos. They soak up the olive oil and spices well, giving you that lively flavor. The spices, like chili powder and cumin, add depth. Smoked paprika brings a nice smoky note. Adjust the cayenne pepper based on your heat preference. Salt and pepper balance everything, making it all pop. The tortillas wrap around the filling. Small corn or flour tortillas work best. They are soft yet sturdy. The toppings add crunch and freshness. Shredded cabbage, diced tomatoes, and creamy avocado make the dish exciting. Fresh cilantro brightens the flavors. Lime wedges are essential for a zesty kick. - Additional veggies and proteins - Alternative sauces You can enhance the flavor even more! Try adding extra veggies like bell peppers or onions. These can roast alongside the cauliflower for added taste and texture. If you want more protein, consider black beans or grilled chicken. Sauces also play a big role. You might like a creamy chipotle sauce or a tangy salsa verde. These sauces can elevate your tacos, adding layers of flavor. Experiment with what you love! For the full recipe and detailed instructions, check the Full Recipe link. To start, cut the cauliflower into small florets. You want them bite-sized. This helps them roast well and fit nicely in the tacos. In a big bowl, mix the florets with olive oil and spices. Use chili powder, smoked paprika, cumin, cayenne pepper, salt, and pepper. This mixture will coat the cauliflower and give it great flavor. Mixing oil and spices is key. The oil helps the spices stick to the cauliflower. It also makes the veggies crispy when roasted. If you skip the oil, your cauliflower may be dry, and flavors won’t shine through. Now, let’s roast that cauliflower! Preheat your oven to 425°F (220°C). Line a baking sheet with parchment paper. This makes cleanup easy. Spread the seasoned florets in a single layer on the sheet. Make sure they have space. If they are too close, they won’t roast evenly. Roast them for 25-30 minutes. Flip them halfway through to ensure even browning. You want them golden and tender. The right temperature is crucial for getting that nice crunch we love. When the cauliflower is ready, it’s time to build your tacos. Warm the tortillas in a skillet or oven. Then, add a scoop of roasted cauliflower to each tortilla. Layer on shredded red cabbage, diced tomatoes, and avocado slices. This adds more flavor and crunch. Don’t forget the fresh cilantro! It brightens everything up. Squeeze lime juice over the tacos for a zesty kick. If you like heat, drizzle with hot sauce. These steps create a tasty taco that’s full of flavor. For the full recipe, please check the detailed instructions. To make your cauliflower crispy, avoid overcrowding the pan. Spread the florets out evenly. Too many in one spot can trap steam and make them soggy. Use enough olive oil to coat each piece. This helps with crispiness. For flavor, try different spices. You can mix in garlic powder or onion powder for more depth. Adding a touch of lemon zest can brighten the flavor. If you like heat, increase the cayenne. Adjust the spices to match your taste. To heat tortillas, you have a few options. You can warm them in a dry skillet over medium heat for about 30 seconds on each side. You can also wrap them in foil and pop them in the oven for a few minutes. If you need gluten-free options, use corn tortillas. They work great with these tacos. Look for brands that are certified gluten-free to avoid cross-contamination. When serving your tacos, arrange them on a bright platter. This makes them look more inviting. Place lime wedges on the side for a pop of color. For a vibrant finish, sprinkle extra cilantro on top. This adds both color and flavor. You can also add sliced radishes or edible flowers for a stunning look. The goal is to make each taco a feast for the eyes. {{image_2}} For vegetarians, add black beans or chickpeas for extra protein. You can mix in cooked lentils, too. These options keep your meal hearty and satisfying. If you want to keep it vegan, consider using tahini sauce or avocado crema instead of sour cream. Both add creaminess without dairy. You can make a simple vegan dressing using lime juice, olive oil, and a pinch of salt. You have many choices for tortillas. Corn tortillas give a nice, authentic touch. Flour tortillas are softer and easier to fold. For a fun twist, try using lettuce leaves as wraps. Fusion-style tacos are a great way to mix flavors. Consider adding kimchi for a Korean twist or pickled jalapeños for a spicy kick. You can even use curry spices for an Indian flair. Adjust your ingredients based on the season. In the summer, add fresh corn or mango for sweetness. In the fall, roasted pumpkin or butternut squash can bring warmth and flavor. Creative toppings also make a difference. Try adding pomegranate seeds in winter for a pop of color and tartness. In spring, fresh herbs like dill or mint can brighten your tacos. For the full recipe, check out how to make these delightful tacos. To store your leftover tacos, wrap them tightly in foil or place them in an airtight container. This helps keep the tacos fresh. Store them in the fridge for up to three days. Use a container that fits the tacos well. This prevents them from getting squished. When reheating, avoid a microwave if you can. Instead, use a skillet over medium heat. This method helps keep the tacos crispy. Heat for about three to five minutes on each side. If you must use a microwave, cover the tacos with a damp paper towel. This keeps them from drying out. Store any leftover roasted cauliflower in the fridge for up to four days. Yes, you can freeze roasted cauliflower! To freeze, let the cauliflower cool completely. Then, place it in a freezer bag, squeezing out excess air. It stays fresh for up to three months. To freeze the tacos, wrap them well in foil or plastic wrap. Thaw in the fridge overnight before reheating. Enjoy the Full Recipe for more delicious details! The spice level can vary. I love a good kick! You can adjust the heat based on your taste. If you want it milder, use less cayenne pepper. If you crave more heat, add more cayenne or even hot sauce. The key is to taste as you go. This way, you make the tacos just right for you. Yes, you can! Meal prep makes life easier. You can roast the cauliflower a day before. Store it in the fridge. Just warm it before you assemble the tacos. The toppings can also be prepped ahead. Chop your cabbage, tomatoes, and avocados earlier in the day. This way, you save time when hunger strikes. These tacos pair well with many sides. I suggest a fresh salad or rice. A zesty corn salad complements the flavors too. For drinks, try a cold drink like limeade or a light beer. These options balance the spice and add freshness to your meal. You can find the Full Recipe [here](#). It has all the details you need to make these tasty tacos. Follow the steps, and you will impress everyone! Spicy Roasted Cauliflower Tacos combine flavor, fun, and easy prep. We covered main ingredients and optional flavors to boost your dish. You learned how to prep and roast cauliflower for peak crispness. I shared tips for perfect tortilla handling and eye-catching presentations. Remember, you can vary the recipe based on seasons or diets. Whether you store leftovers or reheat tacos, these tips will help you enjoy every bite. Explore your creative side with these tacos for a tasty meal!

Spicy Roasted Cauliflower Tacos Flavorful Street Treat

Looking for a delicious twist on taco night? These Spicy Roasted Cauliflower Tacos are bursting with flavor and fun! You’ll

To make tasty stuffed bell pepper boats, gather these ingredients: - 4 large bell peppers (any color) - 1 cup quinoa (rinsed and drained) - 2 cups vegetable broth - 1 can (15 oz) black beans, rinsed and drained - 1 cup corn (fresh, frozen, or canned) - 1 cup cherry tomatoes, halved - 1 teaspoon cumin - 1 teaspoon smoked paprika - 1 teaspoon garlic powder - Salt and pepper to taste - 1 tablespoon olive oil - ½ cup shredded cheddar cheese (optional) - Fresh cilantro or parsley for garnish These ingredients come together to create a colorful and nutritious dish. The bell peppers serve as bowls and add a sweet crunch. Quinoa gives a healthy base, while black beans and corn add fiber and protein. The spices give the dish great flavor. You can also adjust the spices to fit your taste. To prepare your stuffed bell pepper boats, you will need: - Baking dish - Medium saucepan - Large mixing bowl - Spoon or spatula - Knife and cutting board This equipment helps you cook and assemble your dish easily. A baking dish keeps the peppers in place while they bake. A saucepan cooks the quinoa, and a mixing bowl combines all the filling ingredients. Using a knife and cutting board, you can chop the veggies quickly. This recipe can fit many diets: - Vegan: Omit the cheese or use a vegan cheese. - Gluten-free: Quinoa is naturally gluten-free. - Nut-free: No nuts are used, making it safe for nut allergies. Feel free to swap any ingredients based on your dietary needs. For example, if you don’t like quinoa, rice works well too. These stuffed bell pepper boats are great for sharing. They are colorful and packed with flavors that everyone can enjoy. If you want the complete cooking instructions, check out the Full Recipe. First, grab your bell peppers. You can use any color you like. Cut off the tops and remove the seeds and membranes. This step is key. It makes room for the tasty filling. Place the peppers cut-side up in a baking dish. This helps them stand firm while they bake. Next, let's cook the quinoa. In a medium saucepan, mix 1 cup of rinsed quinoa with 2 cups of vegetable broth. Bring it to a boil. Once boiling, reduce the heat to low. Cover the pot and let it simmer for about 15 minutes. The quinoa will become fluffy, and the broth will absorb. While the quinoa cooks, you can prep the filling. In a large bowl, combine the cooked quinoa, black beans, corn, and cherry tomatoes. Add 1 teaspoon each of cumin, smoked paprika, and garlic powder for flavor. Season with salt and pepper to taste. Drizzle in 1 tablespoon of olive oil and mix everything well. This filling is packed with nutrients and flavor! Now it's time to assemble. Spoon the filling into each bell pepper. Press down lightly to pack it in. If you want, sprinkle shredded cheddar cheese on top of each pepper for extra flavor. To keep the peppers moist, pour a little water into the bottom of the baking dish. Then, cover it with aluminum foil. Bake in your preheated oven at 375°F (190°C) for 25 to 30 minutes. The peppers are done when they are tender. After baking, let them cool for a few minutes. Garnish with fresh cilantro or parsley before serving. Enjoy your delicious stuffed bell pepper boats! For the full recipe, check the recipe section above. To make sure your quinoa is just right, rinse it first. This step removes bitterness. Use two cups of vegetable broth for one cup of quinoa. Bring it to a boil, then lower the heat. Cover it and let it simmer for about 15 minutes. Check for fluffiness before you mix it with other ingredients. Perfect quinoa should be light and fluffy. If it’s too wet, let it sit off the heat for a few more minutes. If you want more or less spice, adjust the cumin and smoked paprika. Start with a little, then taste the filling. You can always add more spice later. For heat, add a pinch of cayenne or some diced jalapeños. If you prefer milder flavors, skip the spicy additions. Remember, you can always serve hot sauce on the side. This way, everyone can spice their meal to their liking. One common mistake is overcooking the bell peppers. Keep an eye on them in the oven. You want them tender but not mushy. Another mistake is underseasoning the filling. Always taste before you stuff the peppers. If it lacks flavor, add salt or pepper. Lastly, don't forget to add water to the baking dish. This step keeps the peppers from drying out. Follow these tips for a tasty and well-cooked dish from the full recipe. {{image_2}} You can change the filling to fit your taste. Try ground meat like beef or turkey. You can also use shredded chicken or pork. For a vegetarian option, add lentils or chickpeas. If you want whole grains, use brown rice or farro. You can mix in diced veggies like zucchini, mushrooms, or spinach. All these options make the dish more fun. Toppings can change the flavor of your stuffed bell pepper boats. Instead of cheddar, try feta or mozzarella. You can also use pepper jack for a spicy kick. For a healthier twist, skip the cheese and top with avocado or Greek yogurt. Fresh herbs like basil or cilantro can add a nice touch, too. These stuffed bell peppers pair well with many sides. A simple green salad adds freshness. You can serve them with rice or quinoa for more filling. If you like, add a side of guacamole or salsa for extra flavor. These choices make your meal more colorful and tasty. Check the Full Recipe for more ideas! After you enjoy your stuffed bell pepper boats, it is easy to store leftovers. Allow the peppers to cool to room temperature first. Then, place them in an airtight container. You can keep them in the fridge for up to four days. If you want them to last longer, consider freezing them. To reheat your stuffed bell pepper boats, you have a few options. The best way is to use the oven. Preheat it to 350°F (175°C). Place the peppers in a baking dish and cover with foil. Bake for about 20 minutes or until heated through. You can also use a microwave, but the oven keeps the peppers firmer. Freezing stuffed bell pepper boats is simple. First, let the cooked peppers cool completely. Wrap each pepper in plastic wrap or foil. Then, place them in a freezer-safe bag. They can stay in the freezer for up to three months. When you are ready to eat them, thaw in the fridge overnight before reheating. For more details, check the Full Recipe. Stuffed bell peppers can last about 3 to 5 days in the fridge. Make sure to keep them in a sealed container. This helps keep them fresh and safe to eat. If you want to enjoy them later, check for any signs of spoilage before eating. Yes, you can make stuffed bell peppers ahead of time. You can prepare the filling and stuff the peppers a day before cooking. Store them in the fridge in a sealed container. When ready to eat, just bake them as directed in the Full Recipe. They will taste great! If you want to substitute quinoa, you have some good options. You can use cooked rice, couscous, or even lentils. Each option will bring a different taste and texture. Just make sure to adjust the cooking time if needed. Enjoy experimenting to find your favorite filling! In this blog post, we explored how to make stuffed bell peppers. We covered essential ingredients, preparation steps, and helpful tips. You learned about filling options and how to store leftovers safely. These peppers are tasty, healthy, and easy to customize. Try out your favorite variations to make the dish your own. Cooking should be fun and creative. Enjoy making these stuffed bell peppers, and don’t hesitate to experiment!

Stuffed Bell Pepper Boats Flavorful and Easy Recipe

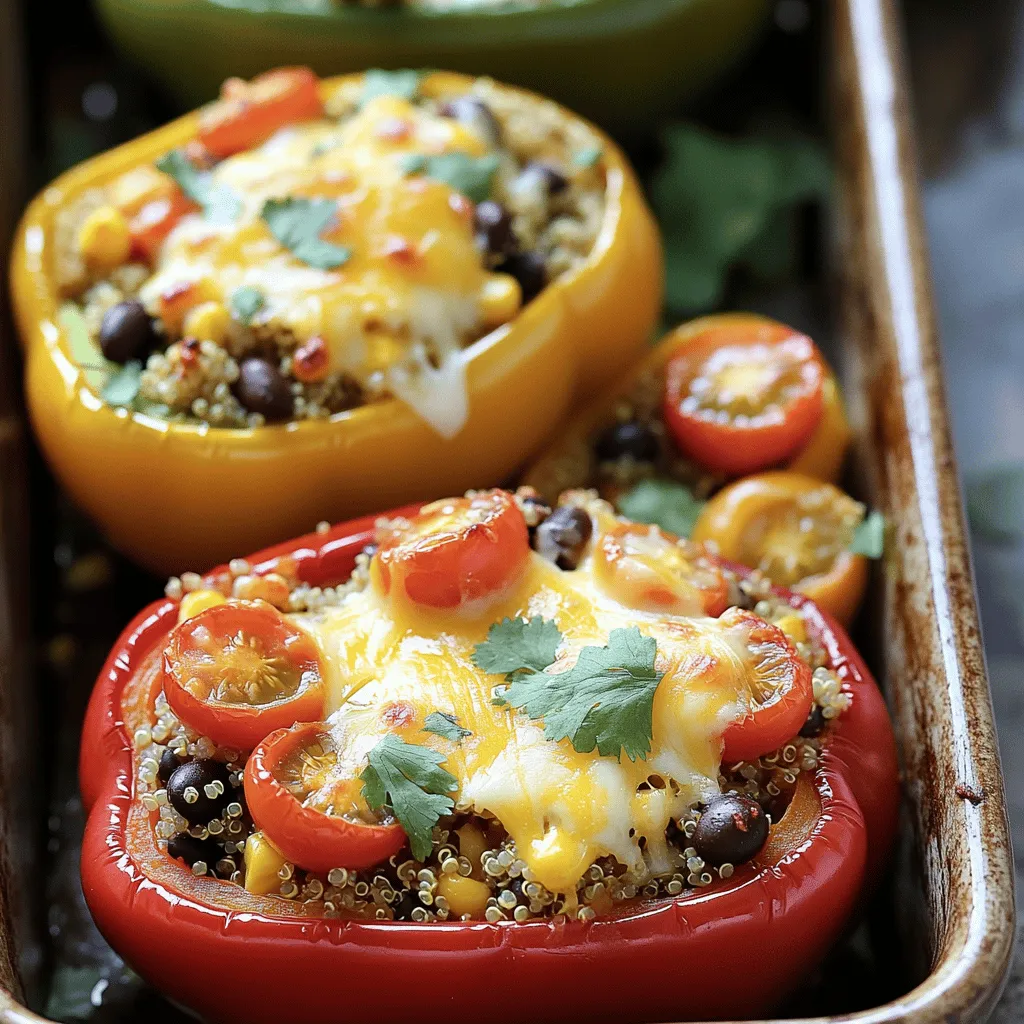
If you’re looking for a fun and easy meal, stuffed bell pepper boats are a winner! These colorful peppers are

For a great apple crisp, gather these main ingredients: - 6 medium apples (Granny Smith or Honeycrisp), peeled, cored, and sliced - 1 tablespoon lemon juice - 1 teaspoon ground cinnamon - 1/2 teaspoon nutmeg - 1 cup brown sugar, packed - 1 cup old-fashioned oats - 1/2 cup all-purpose flour - 1/2 cup unsalted butter, melted - 1/4 teaspoon salt - Ice cream or whipped cream (for serving, optional) When measuring your ingredients, be precise. Use a dry measuring cup for the oats and flour. Pack the brown sugar tightly for the best sweetness. I suggest using a kitchen scale for the butter. One stick of butter is usually 1/2 cup. This helps keep all flavors balanced. I love serving apple crisp warm. Top it with a scoop of ice cream or a dollop of whipped cream. A sprinkle of cinnamon on top adds a nice touch. For a twist, try adding caramel sauce. This makes a delightful contrast to the tart apples. Enjoy your sweet treat! Start by gathering your ingredients. You will need six medium apples. I like to use Granny Smith or Honeycrisp for their crispness. Peel, core, and slice the apples. This takes about 10 minutes. Next, toss the apple slices in a bowl with one tablespoon of lemon juice. The lemon juice keeps the apples fresh. Add one teaspoon of ground cinnamon and half a teaspoon of nutmeg. Mix well until the apples are coated. Then, take a greased 9x13 inch baking dish. Spread the apple mixture evenly in the dish. This helps with even cooking. In another bowl, mix one cup of brown sugar, one cup of old-fashioned oats, half a cup of all-purpose flour, and half a cup of melted butter. Add a pinch of salt (one-fourth teaspoon) to balance the sweetness. Stir until the mixture is crumbly. Preheat your oven to 350°F (175°C). Once it's ready, pour the oat mixture over the apples. Spread it evenly to cover all the fruit. This will create a nice layer on top. Bake the dish in the preheated oven for 40 to 45 minutes. You want the apples to be tender and the topping to be golden brown. After baking, remove the dish from the oven. Let it cool for 10 to 15 minutes. This cooling time helps the crisp set. You can serve it warm in individual bowls. For a special touch, add a scoop of ice cream or a dollop of whipped cream on top. Sprinkle extra cinnamon for a nice look. Enjoy your Classic Apple Crisp Delightful and Easy Dessert! For the complete recipe, refer to the [Full Recipe]. To make the best apple crisp, choose the right apples. I like to use Granny Smith or Honeycrisp apples. Granny Smith adds tartness, while Honeycrisp gives a sweet crunch. Mix different types for great flavor. Aim for six medium apples, peeled, cored, and sliced for your crisp. The topping is key to a great apple crisp. For the best texture, use old-fashioned oats and brown sugar. Combine them with flour and melted butter. This mix should feel crumbly. Spread it evenly over the apples. Bake until golden brown. A perfect topping is crunchy and sweet. Sometimes, your apple crisp might not turn out right. If your topping is too soggy, try using less butter. You can also bake it longer to dry it out. If your apples are too firm, slice them thinner next time. Remember to let it cool for a bit before serving. This helps set the topping and makes it easier to scoop. For the full recipe, check out the detailed steps and measurements. Enjoy making your classic apple crisp! {{image_2}} You can make a gluten-free apple crisp with a few easy swaps. Use gluten-free oats instead of regular oats. Replace all-purpose flour with almond flour or a gluten-free flour blend. The taste remains great, and everyone can enjoy it. To make a vegan apple crisp, use coconut oil or vegan butter in place of regular butter. For the topping, swap brown sugar with coconut sugar or maple syrup. This keeps the taste rich and sweet while being kind to our furry friends. Feel free to play with flavors in your apple crisp. Add chopped nuts like walnuts or pecans for crunch. You can mix in dried fruit such as raisins or cranberries for extra sweetness. Spices like ginger or cardamom can also bring a new twist. Personalize your dish to match your taste! For the complete recipe, check out the [Full Recipe]. To keep your apple crisp fresh, store it in an airtight container. Let it cool fully before sealing. Place the container in the fridge. It will stay good for about 3 to 5 days. If you want to store it longer, freezing is a great option. When you're ready to enjoy your apple crisp again, preheat your oven to 350°F (175°C). Place the crisp in a baking dish, cover it with foil, and heat it for about 15 to 20 minutes. This helps keep the topping crispy. You can also microwave individual servings for about 30 seconds or until warm. To freeze apple crisp, let it cool completely. Cut it into portions and wrap each piece in plastic wrap. Then, place the wrapped portions in a freezer bag or container. It can stay in the freezer for up to 3 months. When ready to eat, thaw it in the fridge overnight, then reheat as mentioned earlier. Enjoy your Classic Apple Crisp even after a long time! To make Classic Apple Crisp without oats, use crushed nuts or flour. You can mix 1 cup of finely chopped nuts with the same amount of flour. Combine this with melted butter and sugar. This mixture will provide a nice crunch. Spread it over the apples just like the oat topping. Bake it as usual for a delicious result. This option is great for those who prefer a nutty flavor. Yes! You can use many fruits in a crisp. Pears, peaches, or berries work well. Each fruit brings a unique flavor. For a berry crisp, mix blueberries and strawberries. For a stone fruit crisp, use ripe peaches or plums. Just remember to adjust the sugar based on the fruit's sweetness. This keeps your dessert balanced and tasty. Classic Apple Crisp can be stored for up to five days. Place it in an airtight container in the fridge. If you want to keep it longer, freeze it for up to three months. Let it cool completely before freezing. To reheat, bake it in the oven until warm. Enjoy it warm for the best taste! You can find the Full Recipe for more guidance. This guide covers everything you need for a delicious apple crisp. We explored the key ingredients and provided easy steps for preparation and baking. You learned tips for choosing the best apples and perfecting the topping. Variations and storage tips help you enjoy it longer. Remember, making apple crisp can be simple and fun. Experiment with flavors and enjoy your sweet treat with friends and family.

Classic Apple Crisp Delightful and Easy Dessert Recipe

Are you ready to whip up a warm and comforting dish that will impress everyone? Classic Apple Crisp is a

- 4 salmon fillets - 4 tablespoons olive oil - 3 cloves garlic, minced - 2 lemons (1 sliced, 1 for juice) - 1 teaspoon dried thyme - 1 teaspoon dried rosemary - Salt and pepper to taste - Fresh parsley, chopped (for garnish) Gather these ingredients before you start cooking. Fresh salmon fillets are key to a great dish. I love using wild-caught salmon when possible. It tastes better and is better for the environment. Olive oil adds rich flavor and helps the garlic stick. Fresh garlic gives the best taste. Always use fresh lemons for juice and slices. Dried herbs like thyme and rosemary add depth to the dish. Don’t forget salt and pepper to enhance all the flavors. Finally, fresh parsley is a bright touch that makes the dish pop. This recipe is simple but packed with flavor. You can find the full recipe above. Enjoy cooking! 1. First, preheat your oven to 400°F (200°C). This heat will cook the salmon perfectly. 2. Next, in a small bowl, whisk together the marinade ingredients. You will mix olive oil, minced garlic, lemon juice, thyme, rosemary, salt, and pepper. This mix adds tons of flavor. 3. Now, place your salmon fillets skin-side down on a parchment-lined baking sheet. Pour the garlic-lemon mixture evenly over the fillets. Make sure each piece is well coated. 1. Position the salmon on the baking sheet. It should have room to cook evenly. 2. Add lemon slices on top of each fillet. This step enhances the taste and looks great. 3. Bake in the preheated oven for 12-15 minutes. The salmon is done when it flakes easily with a fork and hits 145°F (63°C) inside. 1. After baking, let the salmon rest for a few minutes. This helps the juices stay in the fish. 2. Garnish with fresh chopped parsley before serving. This adds a fresh touch to your dish. For the complete process, refer to the Full Recipe. Enjoy your delicious meal! Choosing the right salmon When selecting salmon, look for fresh, bright fillets. The flesh should be moist and firm. I prefer wild-caught salmon for its rich flavor. Farmed salmon works too, but it can be milder. Always check for a clean smell. If it smells fishy, skip it. Ensuring even cooking To cook salmon evenly, let it sit at room temperature for 15 minutes before baking. This helps it cook more evenly. Place the fillets on a lined baking sheet with the skin-side down. This keeps the fish from sticking and makes cleanup easier. Alternative herbs and spices While the recipe uses thyme and rosemary, don’t hesitate to mix it up! Dill, oregano, or basil can add a nice twist. You can also try using a pinch of red pepper flakes for heat. Each herb brings its unique taste. Marinade options for additional flavors Experiment with different marinades. For a sweet twist, add honey or maple syrup. A splash of soy sauce can give a savory touch. You can even use mustard for a tangy flavor. Just remember, balance is key. Pairing with side dishes Baked lemon garlic salmon pairs well with many sides. Try serving it with roasted veggies or a fresh salad. Quinoa or brown rice also works nicely, adding a wholesome grain. You can even serve it over a bed of creamy mashed potatoes. Best accompaniments for presentation To impress your guests, garnish the salmon with fresh parsley. Lemon wedges on the side add a pop of color. A sprinkle of capers or cherry tomatoes can brighten the dish further. Presentation matters, so take a moment to plate it well. For the full recipe, check out the Baked Lemon Garlic Salmon section. {{image_2}} For those wanting healthier options, there are some great choices. - Low-fat alternatives: You can use a mix of Greek yogurt and lemon juice instead of olive oil. This gives a creamy texture with less fat. You can also try using skinless salmon fillets to cut down on fat. - Vegetarian substitutes: If you prefer a plant-based dish, replace salmon with tofu or tempeh. Marinate them just like the salmon for a similar flavor. Want to change things up? Consider these fun twists. - Lemon garlic salmon with Asian flavors: Use soy sauce, sesame oil, and ginger for a tasty Asian vibe. This gives the dish a nice salty and umami flavor. - Mediterranean-inspired variations: Add olives, capers, and feta cheese for a Mediterranean flair. You can also mix in herbs like oregano and dill, which pair well with lemon. You can try different cooking methods for baked lemon garlic salmon. - Broiling instead of baking: Broiling gives a nice char on top. Place the salmon closer to the heat source and cook for 8-10 minutes. This adds a crispy layer while keeping the inside moist. - Grilling options for outdoor preparation: Grilling brings a lovely smoky flavor. Cook the salmon on a grill for 6-8 minutes per side. Use a grill mat to avoid sticking and to keep the salmon intact. Explore these variations to make your baked lemon garlic salmon even more exciting! For the full recipe, check out the details above. To store leftover baked salmon, first let it cool. Place it in an airtight container. This keeps the salmon fresh and safe. You can store it in the fridge for up to three days. After that, the quality may drop. When reheating salmon, the best methods are the oven or microwave. If using the oven, set it to 275°F (135°C). Place the salmon on a baking dish and cover with foil. This keeps it moist. Heat for about 15 minutes. If using a microwave, set it to medium power. Heat in short bursts of 30 seconds. Check to avoid overcooking. To keep the flavor and moisture, add a squeeze of lemon before reheating. This brightens up the dish and adds freshness. To freeze baked salmon, let it cool completely. Wrap each piece tightly in plastic wrap. Then place them in a freezer-safe bag or container. This helps prevent freezer burn. You can freeze it for up to three months. For thawing, place the salmon in the fridge overnight. This method keeps it safe and maintains the flavor. If you're in a hurry, you can thaw it in cold water. Just make sure to seal it well. This method takes about one hour. You can find the full recipe for Baked Lemon Garlic Salmon [here](#). What temperature should salmon be cooked to? Salmon should reach an internal temperature of 145°F (63°C). Use a meat thermometer to check. This ensures the fish is safe to eat and still moist. Cooking it too long can dry it out. How long does baked salmon last in the fridge? Baked salmon lasts for about 3 days in the fridge. Store it in an airtight container. This keeps the fish fresh and safe to eat. If you want it to last longer, consider freezing it. What to do if the salmon is overcooked? If your salmon is overcooked, you can try adding a sauce. A lemon-dill sauce or a creamy dressing can help add moisture. Serve it with a side of rice or salad to balance the dryness. How can I tell if my salmon is done? Salmon is done when it flakes easily with a fork. You can also check the color. It should be opaque and no longer translucent. A meat thermometer can give you an accurate reading, too. Can I use fresh herbs instead of dried? Yes, you can use fresh herbs instead of dried. Use about three times more fresh herbs for the same flavor. Fresh thyme and rosemary add a bright taste to your dish. What can I use instead of olive oil? You can use melted butter or avocado oil instead of olive oil. These options provide a rich flavor. Coconut oil also works well if you want a hint of sweetness. Baked salmon is simple and tasty. We covered key ingredients and clear steps to make it. Each tip helps you perfect your dish, while variations keep it exciting. Whether you want healthy options or new flavors, there’s something for everyone. Storing leftovers and reheating correctly ensures you enjoy it again. Dive into this easy recipe and savor the delight of baked salmon.

Baked Lemon Garlic Salmon Flavorful and Simple Recipe

If you’re looking for an easy and tasty dinner, Baked Lemon Garlic Salmon is perfect for you. This simple dish

- 4 large russet potatoes - 2 cups fresh broccoli florets, steamed - 1 cup shredded cheddar cheese - 1/2 cup cream cheese, softened - 1/4 cup sour cream - 2 tablespoons butter The main ingredients of Cheesy Broccoli Stuffed Potatoes come together to create a creamy and savory dish. I love russet potatoes because they have a fluffy texture when baked. Fresh broccoli adds a nice crunch and bright color. The cheddar cheese brings that melty goodness we all crave. Cream cheese and sour cream create a rich filling, while butter adds depth. - 1 teaspoon garlic powder - Salt and pepper to taste - Chopped chives for garnish Seasonings are essential for flavor. Garlic powder gives a subtle kick. Salt and pepper enhance the taste of all the ingredients. Chopped chives not only look great but also add a fresh taste to the dish. - Alternatives for cheese: You can use mozzarella or gouda if you prefer. - Options for non-dairy ingredients: Try vegan cheese or plant-based cream cheese. - Using different vegetables: Spinach or cauliflower can work well in place of broccoli. If you have dietary needs or preferences, substitutions are easy. For a different flavor, swap the cheese. Non-dairy options are available for those who avoid dairy. You can also mix in other veggies to keep things exciting. For the full recipe, click [here](#). First, preheat your oven to 400°F (200°C). This helps cook the potatoes evenly. Next, wash and scrub the russet potatoes until they are clean. Use a fork to prick them several times. This allows steam to escape while they bake. Place the potatoes on a baking sheet and bake for about 45-60 minutes. They should feel soft when done. While the potatoes bake, it’s time to prepare the cheesy filling. Start by steaming the broccoli florets. Steam them until they turn bright green and tender, which takes about 5-7 minutes. After steaming, set them aside to cool slightly. In a mixing bowl, combine the steamed broccoli with shredded cheddar cheese, cream cheese, sour cream, butter, garlic powder, salt, and pepper. Mix all the ingredients until they are well combined and creamy. Once the potatoes cool for a few minutes, cut each one in half lengthwise. Use a spoon to scoop out some of the potato flesh. Leave a small border to keep the shape. Now, fold the scooped potato into the cheesy broccoli mixture. Spoon this mixture back into the potato skins. Place the stuffed potatoes back on the baking sheet and return them to the oven. Bake for an additional 15-20 minutes, or until the tops are golden and bubbly. Enjoy the warm, cheesy goodness right away. For the complete recipe, check out the Full Recipe. To get the best texture for your potatoes, start with russet potatoes. They are fluffy inside. Bake them until they are soft. You can check by poking them with a fork. The filling should be creamy. Mix softened cream cheese and sour cream together. This makes it rich and smooth. Add shredded cheddar for a cheesy flavor. Don't forget the garlic powder for taste! Pair your stuffed potatoes with a fresh salad. A simple green salad works well. You can also serve them with steamed veggies. These potatoes taste best warm. Serve them right after baking. This keeps the cheese nice and melty. Make your dish look special! Use a wooden board to serve the potatoes. This adds a rustic touch. You can sprinkle chopped chives on top. It adds color and flavor. For a fun twist, serve them in small bowls. This makes them easy to grab and enjoy. {{image_2}} You can switch up the cheese in your cheesy broccoli stuffed potatoes for fun. Try using mozzarella for a mild taste. Gouda adds a creamy texture and a hint of smokiness. If you want bold flavor, add blue cheese. It gives a sharp kick that blends well with the broccoli. Want to make your stuffed potatoes heartier? Add cooked bacon or chicken. Both give a savory touch. You can also use different veggies. Spinach or peppers work great. They add color and nutrition, making your meal even better. For a vegan version, swap out dairy cheese and creams for vegan alternatives. There are many tasty options available today. To make it gluten-free, choose potatoes like sweet potatoes. They add natural sweetness and keep your meal safe for gluten-free diets. To keep your cheesy broccoli stuffed potatoes fresh, refrigerate them right after eating. Place them in an airtight container. This helps lock in moisture and flavor. You can store them in the fridge for up to four days. If you want to save them longer, freezing is the way to go. Wrap each stuffed potato tightly in foil or plastic wrap. Then, place them in a freezer bag. They can last up to three months in the freezer. When you’re ready to enjoy your leftovers, reheating in the oven works best. Preheat your oven to 350°F (175°C). Place the stuffed potatoes on a baking sheet, and bake them for about 20 minutes. This method keeps them crispy and warm. If you want to avoid sogginess, do not cover them with foil. This will help maintain that delicious texture. In the fridge, your stuffed potatoes last about four days. After that, they may spoil. Look for signs like a bad smell or mold. If you see any, it’s best to toss them. Always trust your senses. When in doubt, don’t eat it. For the best taste, enjoy your cheesy broccoli stuffed potatoes fresh or within a few days. To make Cheesy Broccoli Stuffed Potatoes, start with fresh ingredients. First, bake russet potatoes until tender. While they bake, steam the broccoli. Next, mix the broccoli with cheese, sour cream, and seasonings in a bowl. Once the potatoes cool, cut them and scoop out some flesh. Combine the scooped potato with the cheesy mix, then fill the potato skins. Bake again until golden. This process gives you a creamy and delicious dish. For a complete guide, check the Full Recipe. Yes, you can prepare Cheesy Broccoli Stuffed Potatoes in advance. Bake the potatoes and steam the broccoli ahead of time. Store the baked potatoes in the fridge. You can also mix the cheesy filling and keep it in a separate container. When you're ready to eat, fill the potatoes and bake them. This way, you save time and still enjoy a warm meal. You can make some easy swaps for a healthier dish. Use sweet potatoes instead of russet for more vitamins. Choose low-fat cheese or Greek yogurt to cut calories. Instead of sour cream, consider using plain yogurt. You can also add more veggies like spinach or bell peppers for extra nutrition. These changes help you enjoy a tasty meal while staying healthy. Cheesy broccoli stuffed potatoes are a tasty, filling dish that anyone can enjoy. We covered key ingredients, step-by-step preparation, and creative variations. Remember, these potatoes are not just delicious but also flexible. You can swap cheeses or add veggies to fit your taste or diet. Store leftovers properly for the best flavor later. With these tips, make your meal a hit! Enjoy your cooking adventure and share with loved ones for a warm meal together.

Cheesy Broccoli Stuffed Potatoes Creamy Kitchen Delight

Looking for a cozy, cheesy meal that’s both tasty and fun to make? Look no further! My Cheesy Broccoli Stuffed

To make the Easy Strawberry Banana Smoothie, gather these simple items: - 1 cup fresh strawberries, hulled and halved - 1 ripe banana, peeled and sliced - 1 cup unsweetened almond milk (or your choice of milk) - 1/2 cup plain Greek yogurt - 1 tablespoon honey (or vegan alternative) - 1/2 teaspoon vanilla extract - 1/2 cup ice cubes These ingredients create a tasty and healthy drink. Fresh strawberries bring flavor and vitamins. Ripe bananas add sweetness and creaminess. Almond milk keeps it light. Greek yogurt gives protein and richness. Honey adds a touch of natural sweetness. Vanilla extract enhances the taste. Ice cubes make it cool and refreshing. You can find the Full Recipe to guide you through the steps. Enjoy this smoothie for breakfast or a snack! First, you need to prep your fruits. Start by hulling and halving the strawberries. This means you remove the green tops and cut them in half. Next, peel and slice the banana into small pieces. This will help it blend easily. Now, let’s blend! In a blender, add the strawberries, banana, almond milk, Greek yogurt, honey, and vanilla extract. These ingredients create a creamy and tasty mix. Then, toss in the ice cubes. They will chill and thicken your smoothie. Blend on high until smooth. Make sure there are no lumps. After blending, it’s time to taste your smoothie. If you want it sweeter, add more honey. If it’s too thick, add a splash of almond milk. Pour the smoothie into two glasses. For a fun touch, garnish with a slice of banana or a whole strawberry on the rim. You can also sprinkle chia seeds on top for a little crunch. Enjoy your delicious drink! For the full recipe, check back to the beginning. - Use ripe bananas for sweetness. Ripe bananas make your smoothie taste sweeter. - Chill ingredients beforehand for a cooler drink. This makes the smoothie refreshing. - Use banana slices or strawberries on the rim. This adds a fun look to your drink. - Add chia seeds for extra nutrition. Chia seeds boost the smoothie's health benefits. When you follow these tips, you create a great experience with your smoothie. You can find the full recipe above to enjoy a tasty drink anytime. {{image_2}} For a vegan twist, swap Greek yogurt for a plant-based yogurt. This keeps it creamy and adds flavor. Instead of honey, use agave syrup. It’s a great sweetener that fits well in this smoothie. If you follow a keto diet, use unsweetened coconut milk. It has healthy fats and keeps the carbs low. Skip the honey and choose a low-carb sweetener. This way, you can enjoy the smoothie without worrying about sugar. Feel free to get creative by adding more fruits. You can toss in spinach or kale for a green smoothie. This boosts nutrients and adds a fun color. You can also mix in other berries. Blueberries or raspberries will give a nice berry blend. This recipe is flexible, so have fun with it! Check out the Full Recipe for more details. You can keep your smoothie in the fridge. Use an airtight container to seal it well. This way, it stays fresh longer. However, the smoothie tastes best within 24 hours. After that, it may lose some flavor and texture. If you want to save some for later, freezing is a great option. Pour the smoothie into small portions and freeze them. This method makes it easy to grab one later. When you're ready to drink it, just thaw it in the fridge. This keeps the flavor intact while making it a quick treat. To make your smoothie thicker, you can add ice cubes or yogurt. Ice gives a nice chill and adds texture. I recommend adding about half a cup of ice. Greek yogurt also adds creaminess and makes it more filling. Just a half cup will do the trick. Blend until everything is smooth and creamy. Yes, you can use frozen fruits! Frozen strawberries and bananas are great for smoothies. They keep the drink cold and thick. Plus, they are often picked at peak ripeness, so they taste sweet. Just remember, if you use frozen fruit, you may need less ice. This smoothie packs a punch of nutrition. Strawberries are high in vitamin C and fiber. They help boost your immune system. Bananas provide potassium and energy for your day. Greek yogurt adds protein and probiotics for gut health. Almond milk is low in calories and great for hydration. Absolutely! This smoothie is family-friendly and kids love it. It is sweet, creamy, and very tasty. You can adjust the sweetness to fit their taste by adding more or less honey. It’s a fun way for kids to enjoy fruits. Plus, it’s a healthy snack or breakfast option. This blog post shared a simple, tasty smoothie recipe. We covered key ingredients, step-by-step instructions, and helpful tips. You learned different options for vegan, keto, and fruit add-ins. Remember to store leftovers properly for the best taste. Enjoy making this smoothie for a nutritious treat or snack. Feel free to mix things up and create your blend. The possibilities are endless! Keep experimenting and enjoy every sip.

Easy Strawberry Banana Smoothie Healthy and Simple Drink

Looking for a quick and tasty drink? This Easy Strawberry Banana Smoothie is your answer! Packed with fresh flavors, it’s

To make this crunchy slaw, gather these fresh ingredients: - 2 large cucumbers, thinly sliced - 1 medium carrot, julienned - 1 red bell pepper, finely sliced - 3 green onions, chopped - 1/4 cup fresh cilantro, chopped - 1/4 cup rice vinegar - 1 tablespoon honey or maple syrup - 1 tablespoon sesame oil - 1 teaspoon soy sauce - Salt and pepper to taste - Sesame seeds, for garnish These ingredients create a bright and refreshing dish. The cucumbers and carrots give a crisp texture, while the bell pepper adds color. The dressing blends sweet and savory flavors together. If you're missing some ingredients, here are easy swaps: - Use apple cider vinegar instead of rice vinegar for a tangy kick. - Swap honey for agave syrup if you need a vegan option. - Instead of sesame oil, try olive oil for a lighter taste. - If you don’t have fresh cilantro, parsley works well too. These substitutions can change the flavor but still keep the slaw tasty. Add these garnishes to elevate your slaw: - Chopped peanuts for crunch - A squeeze of lime juice for zest - Red pepper flakes for some heat - Extra cilantro or green onions for freshness These optional garnishes make the slaw more exciting. Feel free to mix and match to find what you love best. Want to dive deeper? Check the Full Recipe for more tips! Start by gathering your vegetables. You will need 2 large cucumbers, 1 medium carrot, 1 red bell pepper, and 3 green onions. Thinly slice the cucumbers. Julienne the carrot into thin strips. Finely slice the red bell pepper. Chop the green onions. Place all these vegetables in a large mixing bowl. This mix gives the slaw a colorful and crunchy base. Next, let’s make the dressing. In a small bowl, combine 1/4 cup of rice vinegar, 1 tablespoon of honey or maple syrup, 1 tablespoon of sesame oil, and 1 teaspoon of soy sauce. Whisk these ingredients together until they blend well. This dressing adds tang and sweetness to the slaw. Pour the dressing over the vegetable mixture. Make sure all the veggies get coated evenly. Add 1/4 cup of fresh cilantro, chopped. Season with salt and pepper to taste. Gently toss everything together until mixed well. Let the slaw sit for at least 10 minutes. This wait allows the flavors to meld. Just before serving, sprinkle sesame seeds on top. This adds a nice crunch. You can find the full recipe for more details. Cutting vegetables well makes your slaw look nice. Use a sharp knife for clean cuts. For cucumbers, slice them thinly. This helps them stay crunchy. When cutting carrots, julienne them into thin strips. A mandoline can help with even slices. Always keep your fingers tucked in. This keeps you safe while cutting. To boost the flavor of your slaw, let it sit. After mixing, rest it for 10 minutes. This helps the veggies absorb the dressing. Add lime juice for a zesty kick. If you like spice, try a pinch of chili flakes. Fresh herbs like cilantro or mint also add great taste. Cucumber slaw is a great side dish. It pairs well with grilled meats or fish. Try serving it with tacos for a fresh crunch. You can also use it in sandwiches. For a fun twist, top your burgers with the slaw. This adds flavor and brightness to every bite. {{image_2}} You can use many veggies for cucumber slaw. Try adding radishes for a spicy kick. Shredded cabbage offers a crunchy texture. You can also use zucchini or jicama for a fresh twist. Mix and match to find your favorite blend. Just remember, keep the cuts thin for the best crunch. The dressing can change the whole dish. Swap rice vinegar for lime juice for a zesty taste. Try adding a splash of chili oil for heat. Honey can be replaced with agave for a vegan option. Each change brings new flair to the slaw. Experiment until you find your perfect mix. Want a more filling dish? Add proteins like grilled chicken or shrimp. Tofu works great for a plant-based option. Chopped nuts can add crunch and protein too. These additions make the slaw a full meal. You can enjoy it as a light lunch or dinner side. For the full recipe, check out the details above. To keep your cucumber slaw fresh, store it in an airtight container. This helps keep moisture in and air out. I like to use glass containers since they don’t stain. Make sure to keep it in the fridge. When stored properly, cucumber slaw can last for about 3 to 4 days in the fridge. After that, it may start to lose its crunch. If you notice any browning or mushy veggies, it’s time to toss it. Freezing cucumber slaw is not a good idea. Cucumbers have high water content. When frozen, they become mushy when thawed. This will ruin the texture of your slaw. It’s best to enjoy it fresh. For the full recipe, check out the earlier sections. Yes, you can make Easy Cucumber Slaw ahead of time. It stays fresh for a few hours. If you want to prepare it even earlier, store the vegetables and dressing separately. Combine them just before serving. This keeps the slaw crunchy and tasty. Cucumbers are low in calories and high in water. They help keep you hydrated. They are also rich in vitamins K and C. Cucumbers can aid digestion and support heart health. Plus, they are great for skin health. Eating cucumbers can help you feel full too. To adjust the spice level, add more or less of the soy sauce. For extra heat, try adding a pinch of red pepper flakes. You can also mix in a dash of hot sauce to the dressing. Taste as you go to find your perfect balance. Cucumber slaw pairs well with grilled meats, tacos, and fish. It adds a nice crunch to sandwiches and wraps too. You can serve it alongside rice dishes or as a fresh topping for burgers. Its crispness complements rich flavors nicely. Easy cucumber slaw is fresh, tasty, and simple to make. We covered the right ingredients and creative swaps. You now know how to prepare veggies, make a delicious dressing, and mix flavors well. I shared helpful tips and fun ways to serve slaw with different veggies and proteins. Remember to store it right for maximum freshness. With all this knowledge, you can make cucumber slaw a hit at any meal. Enjoy your cooking!

Easy Cucumber Slaw Fresh and Crunchy Delight

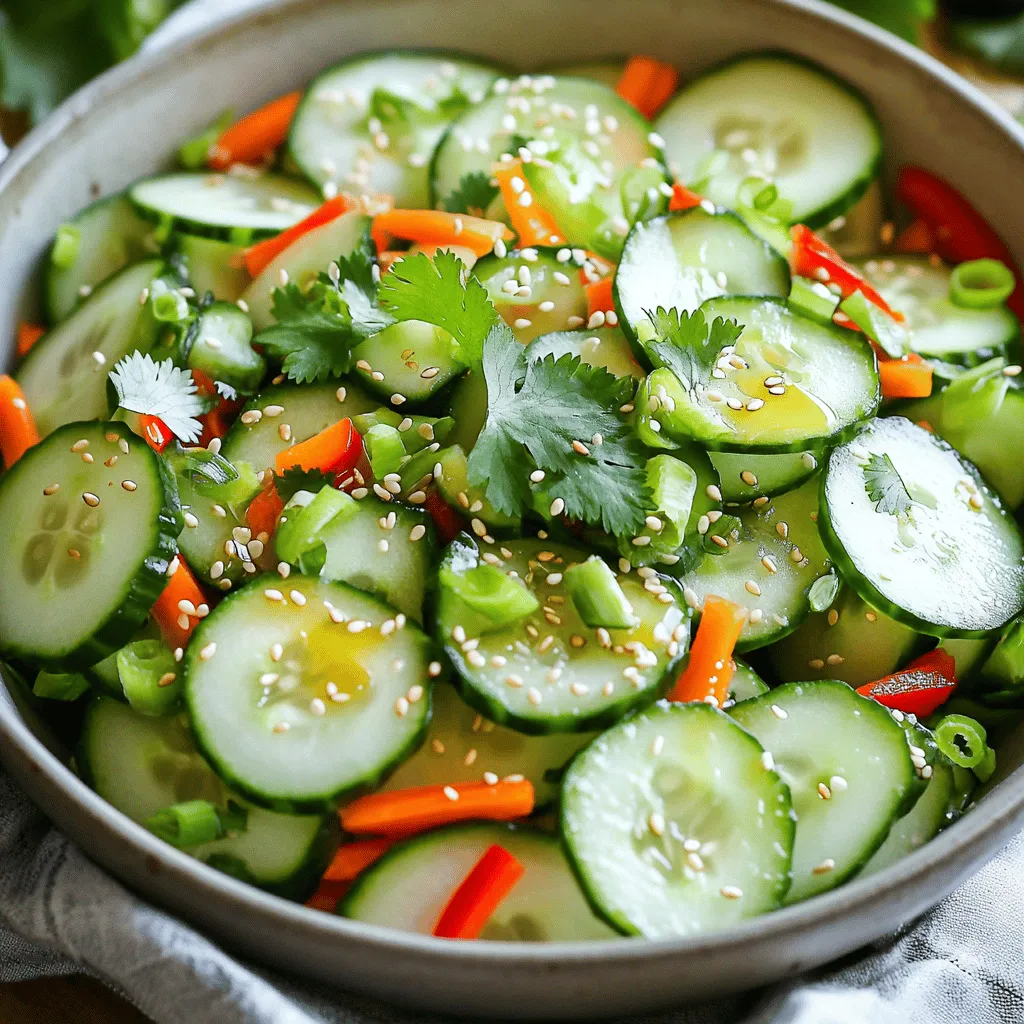
Are you ready to brighten up your meals with a fresh, crunchy delight? This Easy Cucumber Slaw is not just

To make this tasty treat, you need a few key ingredients. Here’s what you’ll need: - 1 cup coconut milk (canned) - 1/2 cup almond milk (or any plant-based milk) - 1/4 cup chia seeds - 2 tablespoons maple syrup (adjust based on sweetness preference) - 1 teaspoon vanilla extract - 1 large ripe peach, diced - 2 tablespoons toasted coconut flakes (for topping) - Fresh mint leaves (for garnish) These simple ingredients come together to create a creamy and flavorful pudding. You can add even more flavor and fun with toppings. Here are a few ideas to try: - Sliced almonds for crunch - Fresh berries for a burst of color - A drizzle of honey for extra sweetness - A sprinkle of cinnamon for warmth Feel free to mix and match these toppings based on what you like. If you don’t have some ingredients, don’t worry! You can make easy swaps: - Use coconut cream instead of coconut milk for a richer taste. - Swap almond milk with oat or soy milk if you prefer. - Try honey or agave syrup instead of maple syrup for sweetness. - Use any stone fruit if peaches are not in season. These substitutions maintain the dish's flavor while catering to your pantry. Check out the Full Recipe for all the details! To start, gather your ingredients. You will need coconut milk, almond milk, chia seeds, maple syrup, and vanilla extract. In a bowl, mix the coconut milk and almond milk first. Then, stir in the chia seeds. Add the maple syrup and vanilla extract next. Mix until smooth. This step is key for a great base. Let the mixture sit for 5 to 10 minutes. Then, stir again to stop clumping. After mixing, cover the bowl and place it in the fridge. Chilling is important! Let it sit for at least 4 hours. For the best results, leave it overnight. This allows the chia seeds to expand. When ready, check the consistency. If it seems too thick, add a splash of almond milk. Stir well to blend. Now comes the fun part—serving! Take your pudding out of the fridge. Stir it one last time before serving. Divide the pudding into bowls or glasses. Top each one with diced peach. Then, sprinkle toasted coconut flakes on top. For a pop of color and flavor, add fresh mint leaves. Enjoy this tasty treat! For the full recipe, check out the details above. To get the right texture for your chia pudding, use the right ratio of liquid to chia seeds. I recommend mixing 1/4 cup of chia seeds with 1.5 cups of liquid. Stir the mixture well. Let it sit for 5-10 minutes, then stir again. This step helps prevent clumping. Refrigerate it for at least 4 hours to allow the seeds to swell. If it feels too thick after chilling, add more almond milk. Sweetness can vary based on personal taste. I use 2 tablespoons of maple syrup. You can start with this and taste it. If you like it sweeter, add more syrup little by little. Honey or agave can work too. Always remember, you can adjust until it feels just right for you. Chia pudding is great for meal prep. You can make it the night before. Just follow the instructions from the Full Recipe. It keeps well in the fridge for up to 5 days. Divide it into jars for easy grab-and-go options. Top them with fresh fruit right before serving to keep them fresh and tasty. {{image_2}} You can change the fruit in this pudding to match the season. In summer, use fresh strawberries or blueberries for a bright twist. In fall, try diced apples or pears. Each fruit adds its own flavor and sweetness. This keeps the recipe fun and fresh all year. This recipe is already dairy-free and vegan, which makes it great for everyone. Use coconut milk and almond milk to keep it rich and creamy. You can try oat milk or soy milk if you want a different taste. This way, you can enjoy a tasty treat that fits your diet. You can add more flavors to make this pudding special. Try mixing in a pinch of cinnamon or nutmeg for warmth. You can also add a splash of fresh orange or lemon juice for a zesty kick. For a more tropical vibe, toss in some pineapple or mango chunks. These small changes can lead to big flavor surprises! For the full recipe, check the section above. Store your peach and coconut chia pudding in airtight containers. This keeps it fresh and prevents odors from other foods. Always use clean utensils to scoop out portions. This avoids any bacteria from spoiling the pudding. Keep it in the fridge for best results. You can also layer it in jars for a pretty look. Peach and coconut chia pudding lasts about 5 days in the fridge. The chia seeds will keep it thick and creamy. However, the fruit may lose its fresh look after a couple of days. To keep it tasty, eat it within the first few days. If the pudding smells off or changes color, it's best to toss it. You don’t need to reheat chia pudding. It tastes great cold. If it's too thick, just add a splash of almond milk. Stir well to combine. Serve it in your favorite bowl or glass. Top it with more peaches or coconut flakes for a fresh touch. Enjoy it as a quick snack or a light dessert. For the full recipe, check out the Peach Paradise Coconut Chia Pudding section. Chia pudding is a simple dish made with chia seeds, milk, and sweeteners. Chia seeds are tiny but mighty. They are packed with fiber, protein, and omega-3 fatty acids. Eating chia pudding can help you feel full longer. It also aids digestion and may boost heart health. This creamy treat is also low in calories. You can enjoy it guilt-free! Chia pudding is ready when it thickens and forms a gel-like texture. After mixing your ingredients, let it sit for at least 4 hours. For best results, chill it overnight. If you stir it and it holds its shape, it’s good to go! If it seems too thick, just add a splash of almond milk to loosen it. Yes, you can use many fruits in chia pudding! Berries, bananas, and mangoes all work well. Try using seasonal fruits for the best flavor. Just dice them small and add them on top or mix them in. Get creative with your favorite fruits and make this pudding your own! Peach and coconut chia pudding is easy and fun to make. I shared key ingredients, preparation steps, and tips for the best texture. You can also customize it with different fruits or toppings. Storing it correctly helps keep it fresh for longer. Try this recipe to enjoy a tasty, healthy snack or dessert. It’s simple and quick! Embrace your creativity as you prepare it. You’ll love the flavors and health benefits. Enjoy every bite of this delightful treat.

Peach and Coconut Chia Pudding Tasty and Simple Treat

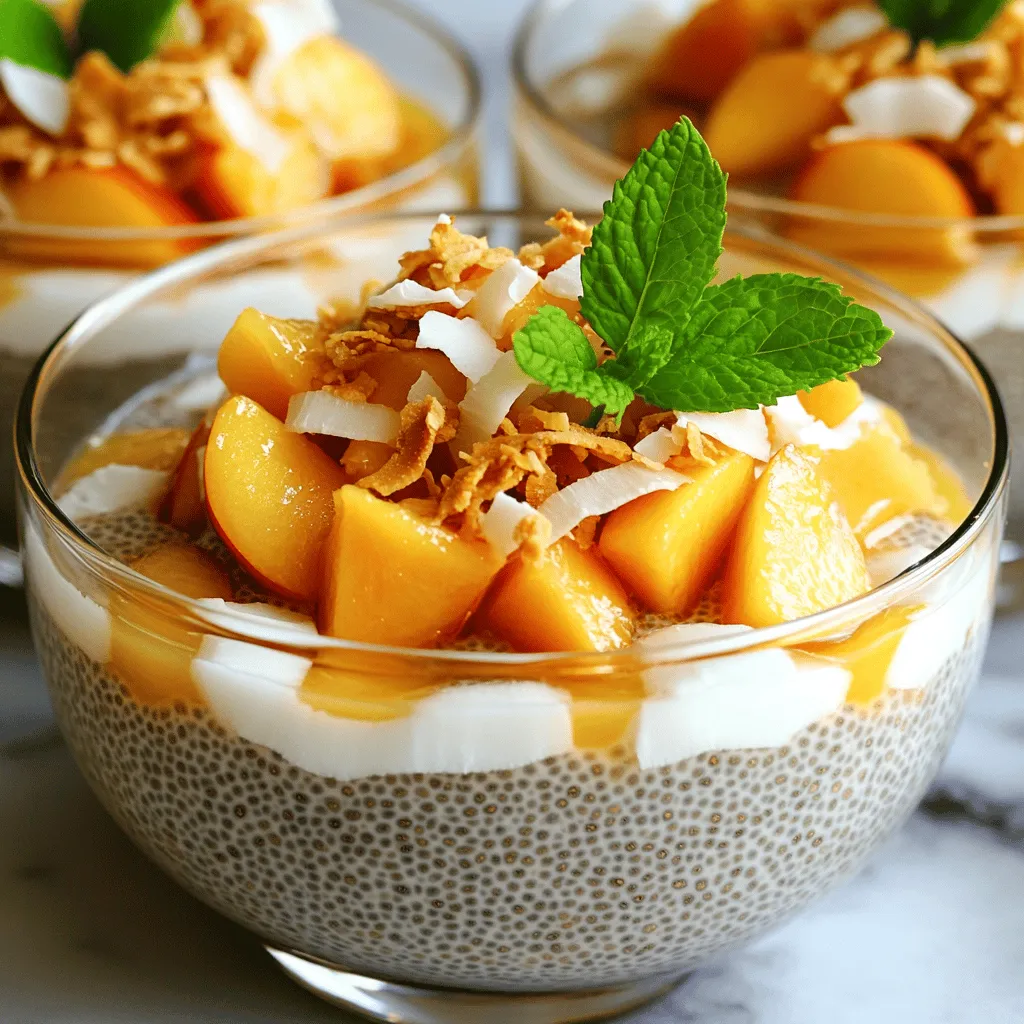
Are you ready to dive into a delightful treat that’s both tasty and simple? Peach and Coconut Chia Pudding is

- 1 cup orzo pasta - 2 medium zucchinis, diced - 1 cup vegetable broth - 1 tablespoon olive oil - 3 cloves garlic, minced - Zest and juice of 1 lemon - 1/4 cup fresh basil, chopped - 1/4 teaspoon red pepper flakes (optional) - Salt and pepper to taste - Grated Parmesan cheese (optional for garnish) When I make Lemon Basil Zucchini Orzo, I love using fresh, vibrant ingredients. The orzo is the perfect base, soaking up all the flavors. Zucchini adds a nice crunch and a light taste. Using vegetable broth instead of water gives the dish more depth. The garlic is a must. It brings warmth and a rich aroma to the dish. Adding lemon zest and juice brightens everything up. Fresh basil gives a fresh flavor that pairs well with the lemon. If you want a little kick, the red pepper flakes work well too. Seasoning with salt and pepper is key. It helps balance the flavors. If you like, sprinkle some grated Parmesan on top for a creamy finish. Each bite is a burst of taste that you will surely enjoy. You can find the Full Recipe online for more details. To start, bring 4 cups of water to a boil in a medium pot. This step is crucial for cooking the orzo just right. Once the water is boiling, add 1 cup of orzo pasta. Cook the orzo according to the package instructions until it is al dente, which usually takes about 9-11 minutes. After cooking, drain the orzo and set it aside. This will ensure it stays firm and doesn’t get mushy. Next, grab a large skillet and heat 1 tablespoon of olive oil over medium heat. Add 3 cloves of minced garlic to the oil. Sauté the garlic for about 1 minute until it becomes fragrant, but be careful not to burn it. Burning garlic can make your dish taste bitter. After that, add 2 diced zucchinis to the skillet. Cook the zucchini for about 4-5 minutes until it starts to soften. If you like a bit of spice, you can sprinkle in 1/4 teaspoon of red pepper flakes at this stage. This is optional, but it adds a nice kick to the dish. Now, it’s time to bring everything together. Pour in 1 cup of vegetable broth and the juice of 1 lemon into the skillet. This gives the dish a bright, fresh flavor. Allow the mixture to come to a gentle simmer. Let it cook for about 3-4 minutes so the flavors can meld together and the zucchini gets tender. After that, stir in the cooked orzo, the zest of the lemon, and 1/4 cup of chopped fresh basil. Mix everything well. Season with salt and pepper to taste, then cook for another 2-3 minutes. This step helps the orzo absorb some of the broth and makes the dish creamy. Now you have a vibrant Lemon Basil Zucchini Orzo that is ready to serve! For the full recipe, check out the section above. To get a creamy texture, cook the orzo just right. When you drain it, leave a little broth. This keeps it moist as you mix in the veggies. Add the broth slowly while stirring to blend the flavors well. Taste as you go. Adjust the salt and pepper based on your liking. A squeeze of extra lemon juice can brighten the dish too. If you want to serve a big group, double the recipe easily. Just make sure to use a larger pot. For gatherings, serve the orzo in a big bowl. This invites everyone to help themselves. Pair it with a fresh salad or crusty bread for an easy meal. You can boost this dish by adding protein. Grilled chicken, shrimp, or chickpeas work well. They add fullness and make it a complete meal. Try adding other vegetables too. Spinach, bell peppers, or peas can add color and crunch. Feel free to experiment with herbs like thyme or dill for new tastes. For the full recipe, check out the details above! {{image_2}} You can easily make this dish gluten-free. Look for gluten-free orzo options made from rice or corn. They cook quite similarly to regular orzo. If you need broth, use gluten-free vegetable broth or make your own from fresh vegetables. Just simmer water with your favorite veggies for flavor. To make this dish vegan, simply skip the cheese. You can choose to add more veggies for texture and flavor. Chickpeas or lentils work well to boost protein. They also add a nice bite to the dish. Get creative with your herbs! You can try fresh parsley or dill instead of basil. These herbs bring a unique taste to the meal. If you want a different zing, swap lemon juice for lime or orange juice. Each option gives a fun twist to the dish. To keep Lemon Basil Zucchini Orzo fresh, store it in an airtight container. Place it in the fridge within two hours after serving. This helps keep flavors intact. Use it within three days for the best taste. For longer storage, you can freeze it. Just portion it into freezer-safe bags. Remove as much air as possible before sealing. This will prevent freezer burn. You can store it for up to three months in the freezer. When reheating orzo, use a skillet or microwave. If using a skillet, add a splash of vegetable broth to help it heat through. Stir gently to keep it creamy. In the microwave, cover the dish with a damp paper towel. This keeps moisture in while it heats. Heat in short intervals, checking often to avoid overcooking. Stir well before serving to distribute heat evenly. Key ingredients like pasta can last for years if stored dry and cool. Zucchini stays fresh in the fridge for about a week. Keep it in a plastic bag to maintain freshness. Fresh basil is best used within a few days but can last up to a week in water. To prevent spoilage, always check for signs of decay before using. Storing herbs in the fridge with stems in water can also extend their life. Cooking orzo takes about 9-11 minutes. You want it al dente, which means firm but not hard. To get this texture, boil water first. Add the orzo and stir. Check it at the lower time of 9 minutes. If it is still too firm, let it cook a bit longer. Drain it once done, and remember to rinse it with cold water. This stops the cooking and keeps it from getting mushy. Yes, you can make Lemon Basil Zucchini Orzo ahead. It will stay good in the fridge for 3-4 days. To prep, cook the orzo and veggies as usual. Let them cool before storing them in an airtight container. When you are ready to eat, reheat in a skillet or microwave. You can add a splash of broth to keep it moist. This dish pairs well with many sides. Try a simple green salad to add freshness. Grilled chicken or shrimp works nicely for protein. You could also serve crusty bread on the side for dipping. If you want more veggies, roasted asparagus or steamed broccoli can be great choices. For a light meal, Lemon Basil Zucchini Orzo stands alone as a tasty option. You can find the full recipe in the article. In this blog post, we explored the vibrant world of Lemon Basil Zucchini Orzo. We discussed the main ingredients, such as orzo pasta and fresh zucchinis, and how to enhance flavors with garlic and lemon. I shared easy steps to cook and combine the ingredients, along with tips to scale the recipe for any gathering. In summary, making this dish is simple and fun. You can experiment with different flavors and adjust it to fit your needs. Enjoy your cooking journey and delight in every bite!

Lemon Basil Zucchini Orzo Flavorful Easy Meal

If you’re searching for a quick, vibrant meal, look no further than Lemon Basil Zucchini Orzo! This simple dish combines

Older posts
Newer posts
← Previous Page1 … Page42 Page43 Page44 … Page106 Next →
© 2025 My Cooking Cast • Built with GeneratePress

Our Policies

  • Privacy Policy
  • GDPR Policy
  • Terms Of Use
  • Copyright Policy
  • Cookie Policy
  • Disclaimer

More Information​

  • Home
  • Contact
  • About
  • Dinner
  • Appetizers
  • Dessert
©2025, My Cooking Cast About Privacy Policy Back To Top