Skip to content
DisclaimerTerms Of UseGDPR PolicyCookie Policy

My Cooking Cast

  • Home
  • Drinks
  • Appetizers
  • Dinner
  • Dessert
  • About
  • Contact
  • Privacy Policy
DisclaimerTerms Of UseGDPR PolicyCookie Policy

Emma

- 1 medium sweet potato, peeled and diced - 1 cup broccoli florets - 1 red bell pepper, chopped - 1 zucchini, sliced - 1 cup quinoa, rinsed - 2 cups vegetable broth or water - 2 tablespoons olive oil - 1 teaspoon smoked paprika - 1 teaspoon garlic powder - Salt and pepper to taste - 1 avocado, sliced - 1 cup chickpeas, drained and rinsed - Fresh lemon juice (from 1 lemon) - Fresh parsley for garnish This meal is packed with nutrients. It includes healthy carbs from sweet potatoes and quinoa. The veggies add fiber and vitamins. Each serving offers protein from chickpeas. This bowl is well-balanced for energy and health. It's perfect for a filling lunch or dinner. - Sweet Potato: You can swap it with butternut squash for a different flavor. - Quinoa: If you want, use brown rice or couscous instead. - Chickpeas: Black beans or lentils work great if you prefer. - Veggies: Feel free to mix in any seasonal veggies you love. - Olive Oil: Avocado oil or coconut oil can replace olive oil. - Herbs: You can use cilantro or basil instead of parsley for garnish. This recipe is flexible, so try different ingredients based on what you have. Enjoy making it your own! For more details, check the Full Recipe. Start by preheating your oven to 425°F (220°C). This high heat helps the veggies get nice and crispy. While the oven heats, chop your vegetables. I use sweet potato, broccoli, red bell pepper, and zucchini. You can use any veggies you love. Place them on a large baking sheet. Drizzle with olive oil and sprinkle smoked paprika, garlic powder, salt, and pepper. Toss them well to coat. Spread the veggies out in a single layer. This helps them roast evenly. As the veggies roast, it’s time to cook the quinoa. Bring two cups of vegetable broth or water to a boil in a medium saucepan. Rinse one cup of quinoa under cold water. Add the rinsed quinoa to the boiling liquid. Reduce the heat to low, cover, and let it simmer for 15 minutes. When done, the quinoa should be fluffy, and all the liquid should be gone. Turn off the heat and let it sit covered for five minutes. Now for the fun part: assembling your Buddha bowls! Take a serving bowl and add a scoop of quinoa at the bottom. Next, layer on your roasted vegetables. I like to add sliced avocado and chickpeas on top for protein. To make it pop, squeeze some fresh lemon juice over everything. Finally, garnish with fresh parsley for a touch of color. Serve warm and enjoy! For the full recipe, check out the details above. Roasting brings out the natural sweetness of veggies. To get the best results, cut all vegetables into even sizes. This helps them cook at the same rate. Always preheat your oven to 425°F for a nice, crispy finish. Use enough olive oil to coat the veggies well, but don’t drown them. A light drizzle works best. Don’t forget to stir the veggies halfway through roasting. This helps them cook evenly and get that lovely caramelization. Cooking quinoa is simple, but it can go wrong if you aren’t careful. Start by rinsing quinoa in cold water. This removes a bitter coating. Then, use a 2:1 ratio of liquid to quinoa. If you want more flavor, use vegetable broth instead of water. Bring the broth to a boil, then reduce the heat and cover the pot. Let it simmer for about 15 minutes. Once it’s done, remove it from heat and let it sit for 5 minutes. Fluff with a fork to get a light texture. Buddha bowls are all about personal taste. Feel free to swap in your favorite veggies. Carrots, Brussels sprouts, or cauliflower work great too. You can also change the protein. Try beans, tofu, or even grilled chicken. For extra flavor, add a drizzle of tahini or your favorite dressing. Fresh herbs like cilantro or basil can also add a nice touch. The Full Recipe gives you a solid base, but don’t hesitate to mix things up! {{image_2}} You can mix and match many veggies in your Buddha bowl. Try using root veggies like carrots and beets for sweetness. Leafy greens like spinach or kale add a fresh touch. Brussels sprouts give a nice crunch and flavor. You may also add seasonal veggies like asparagus in spring or squash in fall. The key is to use what you love! Chickpeas are a great choice, but you can switch it up. Try black beans for a hearty bite or lentils for a protein boost. Tofu works well, too, especially when marinated and roasted. For a meat option, grilled chicken or shrimp can be tasty. These proteins make your bowl filling and balanced. Dress up your Buddha bowl with fun sauces. A simple lemon-tahini dressing adds creaminess. You can also try a spicy sriracha drizzle for a kick. Fresh herbs like cilantro or basil brighten the flavors. Nuts and seeds like pine nuts or pumpkin seeds add crunch and healthy fats. With these options, you can create a bowl that’s uniquely yours. For a detailed recipe, check out the Full Recipe. After you enjoy your roasted veggie Buddha bowls, let them cool. Place any leftovers in an airtight container. Store them in the fridge for up to four days. Make sure the veggies and quinoa are separate if possible. This keeps them fresh and tasty. To reheat, use the microwave or oven. If using the microwave, warm the bowl for 1-2 minutes. Stir halfway through to heat evenly. If you prefer the oven, set it to 350°F (175°C). Place the bowl in for about 10 minutes. This method keeps the veggies crisp and the quinoa fluffy. You can freeze leftovers, but only the quinoa and roasted veggies. Avoid freezing fresh avocado and chickpeas. Pack the cooled quinoa and veggies in a freezer-safe bag. Remove as much air as you can. They will stay fresh for up to three months. When you're ready to eat, thaw them overnight in the fridge before reheating. For the complete recipe, check out the Full Recipe section. Buddha bowls are colorful bowls filled with grains, veggies, and protein. They offer a full meal in one dish. You can mix different textures and flavors. The idea is to create balance and nourishment. Yes, you can make Buddha bowls ahead of time. Prepare the grains and roasted veggies in advance. Store them in separate containers in the fridge. When ready to eat, just assemble and add fresh toppings. To make the best roasted veggie Buddha bowls, focus on flavor and texture. Use fresh, seasonal veggies for the best taste. Roast them until they are golden and tender. Layer your bowls with fluffy quinoa and chickpeas for protein. Healthy toppings for Buddha bowls include: - Sliced avocado - Fresh greens like spinach or arugula - Nuts or seeds for crunch - A drizzle of tahini or yogurt - Fresh herbs like parsley or cilantro These toppings add flavor, nutrition, and a beautiful look to your dish. For a full recipe, check the details above. In this blog post, we explored Buddha bowls. We covered their ingredients, cooking steps, and tips. You learned how to roast veggies, cook quinoa, and assemble bowls. We also discussed fun variations and storage tips. Buddha bowls are flexible and fun. You can mix flavors and make them your own. Remember, the key is to enjoy your meal! Try different veggies, proteins, and dressings. Happy cooking!

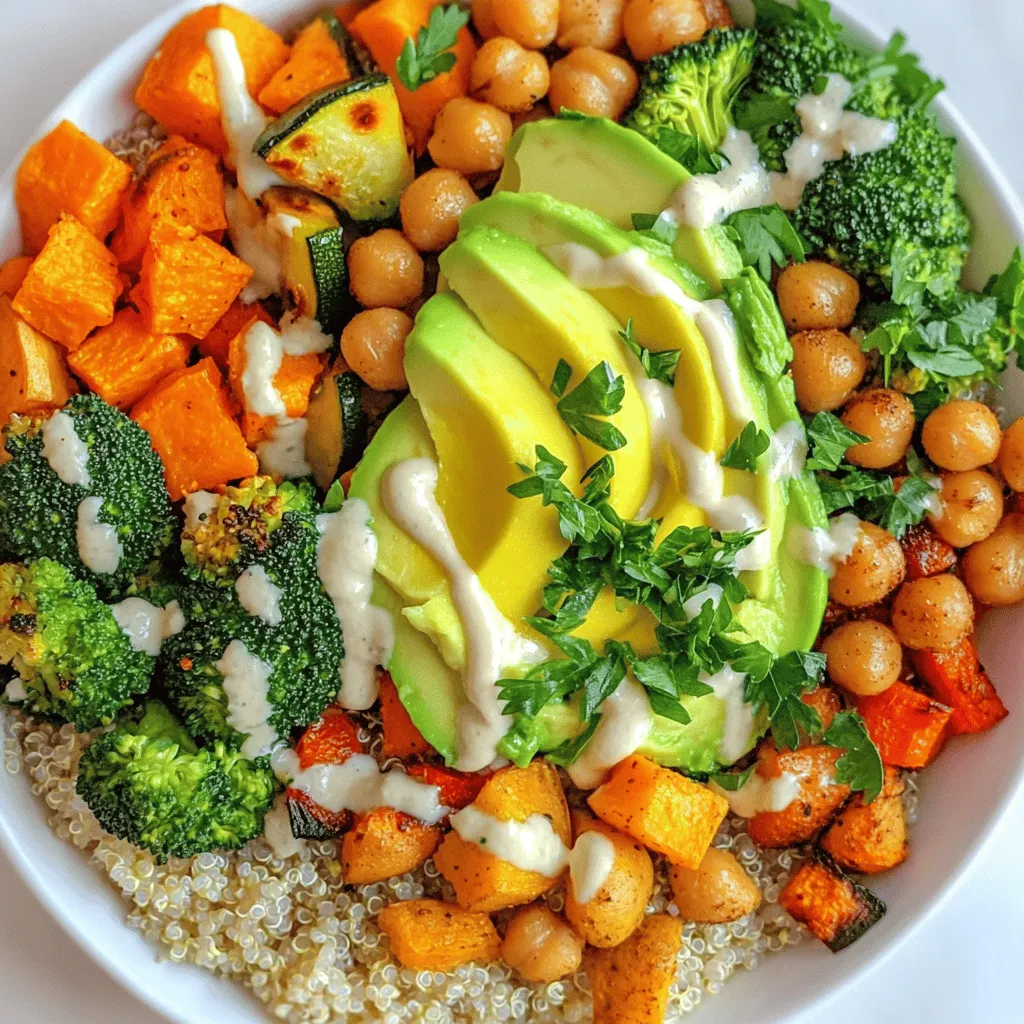
Roasted Veggie Buddha Bowls Simple and Tasty Meal

Looking for a quick and healthy meal? Roasted Veggie Buddha Bowls are the answer! These bowls are colorful, tasty, and

- 4 large eggs, hard-boiled and peeled - 1 ripe avocado - 1 tablespoon Greek yogurt (or sour cream) - 1 tablespoon Dijon mustard - 1 tablespoon fresh lemon juice - 1 green onion, finely chopped - 1/4 teaspoon garlic powder - Salt and pepper to taste - 8 large romaine or butter lettuce leaves - Cherry tomatoes - Fresh parsley Each serving has: - Calories: 180 - Fat: 12g - Protein: 10g - Carbohydrates: 8g This avocado egg salad is a fresh and healthy snack. The main ingredients work together to create a creamy and flavorful dish. Hard-boiled eggs provide protein, while ripe avocado adds healthy fats. Greek yogurt or sour cream gives it a smooth texture. You can add mustard for a little zing and lemon juice for brightness. Chopped green onions add a nice crunch, and garlic powder gives depth. You can adjust the salt and pepper to your taste. For the wraps, large romaine or butter lettuce leaves are perfect. They hold the filling well and add a crisp bite. Feel free to add optional garnishes like cherry tomatoes and fresh parsley. They not only look good but also enhance the flavor. If you want the full recipe, check it out here: [Full Recipe]. This dish is easy to prepare and makes for a delightful light lunch or snack. Enjoy making this tasty meal! First, chop the hard-boiled eggs into small pieces. Use a sharp knife for even cuts. Place them in a mixing bowl. Next, cut the avocado in half and remove the pit. Use a spoon to scoop the creamy flesh into the bowl with the eggs. Now, add the Greek yogurt, Dijon mustard, fresh lemon juice, green onion, garlic powder, salt, and pepper to the bowl. This mix adds flavor and creaminess. Use a fork to mash the avocado and combine all the ingredients. Mix until it's well blended but still chunky. Taste and adjust the seasoning if needed. After mixing, wash and dry the lettuce leaves. These will be your wraps. Spoon a generous amount of the avocado egg salad mixture onto each lettuce leaf. Be careful not to overfill them. If you like, garnish with halved cherry tomatoes and fresh parsley for a pop of color. Enjoy these wraps right away for a fresh snack or lunch. You can find the full recipe for more details on preparation. To make the best avocado egg salad, you need to hard-boil your eggs correctly. Start by placing your eggs in a pot and covering them with cold water. Bring the water to a boil, then turn off the heat. Cover the pot and let the eggs sit for about 12 minutes. This method helps ensure that the yolks are bright yellow and not green. After cooking, cool the eggs in ice water to make peeling easy. Choosing the ripest avocado is also key. A ripe avocado feels slightly soft when you gently squeeze it. If it’s too hard, it’s not ready. If it’s too mushy, it’s overripe. The right avocado will blend nicely into your salad, adding creaminess and flavor. These wraps pair well with simple sides like carrot sticks or cucumber slices. You might also enjoy them with a light dip, such as hummus or tzatziki. For a colorful plate, add cherry tomatoes or fresh fruit on the side. Presentation matters too! Use vibrant romaine leaves as your wraps. Arrange them on a platter and fill each leaf with the salad mixture. Garnish with halved cherry tomatoes and chopped parsley for a pop of color. This makes your snack look fresh and inviting. If you're looking for vegetarian options, this recipe is already meat-free. You can also substitute Greek yogurt with vegan mayo to keep it plant-based. For those who need gluten-free options, lettuce wraps are naturally gluten-free. Just ensure any dips you choose are also gluten-free. You can use other greens, like collard greens or kale, as wraps for different textures and flavors. These tips and tricks will help you create delicious avocado egg salad lettuce wraps, making them perfect for any occasion. For a detailed guide, check out the Full Recipe. {{image_2}} You can boost the flavor of your avocado egg salad in simple ways. Adding spices like paprika gives it a nice kick. If you love heat, a dash of hot sauce can really wake it up. Fresh herbs also add depth. Try mixing in some dill or cilantro for a bright finish. If you want to swap ingredients, consider using vegan mayo instead of Greek yogurt. This keeps it creamy for a plant-based option. You can also change up the greens. Instead of romaine or butter lettuce, try spinach or collard greens. Each green brings its own taste and texture. Your avocado egg salad can be more than just a wrap. You can turn it into a salad by serving it on a bed of greens. If you want a classic feel, use whole grain bread for a sandwich. You can even try different types of wraps, like whole wheat or spinach wraps, for a fun twist. For the full recipe, see the section above. To keep your avocado egg salad fresh, store it in an airtight container. This prevents air from spoiling the salad. You can refrigerate it for up to two days. After that, it may lose its flavor and texture. Always check for any off smell or color before eating. You don't need to heat these wraps. They taste best cold. If you want to refresh them, add a squeeze of lemon juice. This brightens the flavors and gives it a fresh taste. Make this salad a day ahead for quick lunches. It saves time on busy days. Pack it in individual containers with clean lettuce leaves. This keeps the wraps fresh until you’re ready to eat. For travel, use a cooler bag to keep everything cold. Check the [Full Recipe] for more details on preparing this tasty snack. To hard-boil eggs, start by placing them in a pot. Cover them with cold water. Bring the water to a boil over high heat. Once boiling, turn off the heat and cover the pot. Let the eggs sit for about 9-12 minutes. After that, move them to an ice bath for easy peeling. This cooling method helps stop cooking and makes shells easier to remove. Remember, fresh eggs are harder to peel than older ones. Yes, you can make Avocado Egg Salad ahead of time. Store it in an airtight container in the fridge. However, to keep it fresh, eat it within one day. The avocado can brown, so add lemon juice to slow this down. It helps keep the color bright and fresh. If you wait too long, the salad may lose its creamy texture. To make this recipe low-carb, use less avocado and skip the yogurt. You can also add more eggs to keep the bulk. Instead of lettuce, try using cucumber slices or bell pepper strips as wraps. These choices are low in carbs but still tasty. You can also add more herbs for flavor without adding carbs. To spice up your avocado egg salad, consider adding diced jalapeños or red pepper flakes. You can also mix in a dash of hot sauce. For a different kick, try adding cayenne pepper or smoked paprika. Fresh herbs like cilantro can also add a nice flavor burst. These little changes can make your salad exciting and flavorful. For the full recipe, check out the Avocado Egg Salad Lettuce Wraps. Enjoy! This blog post detailed a delicious avocado egg salad recipe. You learned about key ingredients, preparation steps, and tips for perfecting the dish. I shared variations to fit different tastes and dietary needs. Remember, this recipe is flexible and easy to adapt. Whether you enjoy it in lettuce wraps or as a salad, you can make it your own. Enjoy experimenting with flavors to find your favorite version!

Avocado Egg Salad Lettuce Wraps Fresh and Healthy Snack

Looking for a fresh and healthy snack? Try these Avocado Egg Salad Lettuce Wraps! They’re simple to make and packed

- 2 medium zucchinis, grated - 1 cup corn kernels (fresh or frozen) - 1/2 cup all-purpose flour - 1/4 cup cornmeal - 2 large eggs, beaten - 1/4 cup green onions, finely chopped - 1/2 teaspoon baking powder - 1 teaspoon chili powder - 1/2 teaspoon garlic powder - Salt and pepper to taste - Olive oil for frying - Optional: Sour cream or yogurt for serving For my zucchini corn fritters, I love to use fresh ingredients. The zucchinis add moisture and a nice taste. Corn gives a sweet crunch that makes each bite special. When you prepare the batter, make sure to dry the zucchini well. This step avoids soggy fritters. You want your fritters to be crispy and golden. I often keep the corn kernels fresh, but frozen works too. They both add great flavor. The flour and cornmeal create a perfect base, while the eggs bind it all together. I like to mix in green onions for an extra kick. They add flavor and a pop of color. The spices, like chili and garlic powder, give the fritters a nice warmth. Lastly, I always use good olive oil for frying. It helps achieve that perfect crispiness. If you're feeling fancy, serve them with sour cream or yogurt on the side. This adds a cool touch to the warm fritters. For the complete cooking steps, check out the Full Recipe. To start, you need to prepare the zucchini. Take the grated zucchinis and place them in a clean kitchen towel. Squeeze out excess moisture until the towel feels damp, but not soaked. This step is key. If you skip it, your fritters can turn out too watery. Moisture can ruin the perfect texture you want. Next, let’s mix the batter. In a large bowl, combine your dry ingredients. This includes flour, cornmeal, baking powder, chili powder, garlic powder, salt, and pepper. Whisk these until they blend well. Once mixed, add the prepared zucchini, corn kernels, and finely chopped green onions. Then, pour in the beaten eggs. Stir everything together until it forms a thick, cohesive mixture. It should hold together, but not be too runny. Now, it’s time to cook the fritters. Heat about 1/4 inch of olive oil in a large skillet over medium heat. To check if the oil is ready, drop a small spoonful of batter in. If it sizzles, you’re good to go. Using a spoon or small ice cream scoop, drop heaping tablespoons of the mixture into the hot oil. Flatten them slightly. Fry them in batches, making sure not to overcrowd the pan. Cook for about 3-4 minutes on each side. Wait until they are golden brown and crispy. Once done, transfer them to a plate lined with paper towels. This helps drain any extra oil. For the full recipe, check out the details. To make the best zucchini corn fritters, you must remove excess moisture from the zucchini. Watery fritters can turn soggy and lose their crunchy texture. I always grate the zucchini and then squeeze it tightly in a clean kitchen towel. This step helps keep your fritters firm and delicious. Think about the texture. You want them to be crispy on the outside and tender inside. If you skip moisture removal, your fritters might fall apart in the pan. Trust me; this step is key for success. To achieve perfect crispy fritters, oil temperature is crucial. I recommend heating olive oil in a large skillet over medium heat. You can test the oil by adding a small spoonful of the batter. If it sizzles, the oil is ready. Fry the fritters in batches. Avoid overcrowding the pan. Give each fritter space to crisp up. Cook for about 3-4 minutes on each side. They should turn golden brown and look irresistible. If you prefer a healthier option, you can bake the fritters instead of frying them. Preheat your oven to 400°F (200°C). Line a baking sheet with parchment paper. Spoon the batter onto the sheet, giving each fritter space. Bake for about 20-25 minutes, flipping halfway through. This method will yield a different texture, but they will still taste great. You can find the full recipe above for more details. {{image_2}} You can easily change the flavors of your zucchini corn fritters. Try different cheeses like feta or cheddar. Feta adds a tangy taste, while cheddar gives a rich flavor. You can also add spices to amp up the taste. Paprika, cumin, or even herbs can make your fritters unique. Experimenting with these options makes cooking fun! These fritters are great for any meal. Serve them for breakfast with eggs, or enjoy them for lunch with a fresh salad. They also work well for dinner, paired with grilled meats. Dips or sauces enhance the flavors even more. Try sour cream, yogurt, or a spicy salsa. Each pairing can change your experience! Making these fritters fit your diet is easy. For gluten-free options, swap the all-purpose flour with almond flour or chickpea flour. If you want a vegan dish, use flax eggs instead of regular eggs. Just mix one tablespoon of flaxseed meal with three tablespoons of water. Let it sit for a few minutes to thicken. These swaps still keep your fritters delicious! For the full recipe, check the [Full Recipe]. After cooking, let the fritters cool on a wire rack. This keeps air flowing around them. If you stack them on a plate, they can get soggy. Once cool, place them in an airtight container. Store in the fridge for up to three days. To reheat, use an oven or a skillet. Preheat the oven to 350°F (175°C). Place fritters on a baking sheet for about 10-15 minutes. This method keeps them crispy. If using a skillet, heat a small amount of oil over medium heat. Cook for about 3 minutes on each side until warmed through. To freeze leftover fritters, let them cool completely. Place them in a single layer on a baking sheet. Freeze them for about an hour. Once solid, transfer the fritters to a freezer bag. They can stay fresh for up to three months. For reheating after freezing, thaw in the fridge overnight. Then, use the oven or skillet method mentioned earlier. This way, you keep them crispy and tasty. For the full recipe, check out the detailed instructions above. To make zucchini corn fritters crispy, start by squeezing out excess moisture from the grated zucchini. This step is key. If the zucchini is too wet, the fritters can become soggy. Use a clean kitchen towel to get rid of extra water. Another tip is to use a mix of flour and cornmeal. This blend gives a nice crunch. Also, make sure your oil is hot enough before frying. When the oil sizzles, it's ready for the batter. Cook the fritters in batches to avoid crowding the pan. This helps them fry evenly and get that golden crust. Yes, you can make zucchini corn fritters ahead of time. After cooking, let them cool completely. Place them in an airtight container and store them in the fridge. They will last for about 3 days. For best results, reheat them in a skillet to keep them crispy. You can also freeze the fritters. Just make sure to separate them with parchment paper before putting them in a freezer bag. When ready to eat, thaw them in the fridge and reheat in the oven or skillet. Zucchini corn fritters can be a healthy option. Zucchini is low in calories and high in fiber. This makes them good for digestion. Corn adds some sweetness and provides vitamins. Each fritter has around 100 calories, depending on the size. They are a great way to sneak in veggies, especially for kids. You can make them healthier by using whole wheat flour or reducing the oil when frying. You can serve zucchini corn fritters with many dishes. They pair well with a fresh salad or some salsa. For a creamy touch, add sour cream or yogurt on the side. You can also try them with avocado slices or a spicy dipping sauce. These fritters work great as a snack or a side dish for lunch or dinner. They are versatile and can fit into any meal. Want to get creative? Check the Full Recipe for more serving ideas! Zucchini corn fritters are a tasty treat you can easily make at home. We covered the ingredients, cooking steps, and tips to ensure perfect fritters. You learned about variations and how to store leftovers. Remember, drying your zucchini is key for crispness. Whether you fry or bake, these fritters are versatile for meals. Keep trying new flavors and serving styles. Enjoy this delightful dish with your favorite dips!

Zucchini Corn Fritters Crispy and Flavorful Treat

Craving a delicious and easy snack? Try my crispy and flavorful zucchini corn fritters. These bites blend fresh zucchini and

- 1 cup natural peanut butter - 1/2 cup honey or maple syrup - 1 cup rolled oats - 1/2 cup chocolate protein powder - 1/4 cup dark chocolate chips - 1/4 cup ground flaxseed - 1 tsp vanilla extract - A pinch of sea salt The ingredients for Peanut Butter Chocolate Protein Bites are simple and easy to find. Each one adds flavor, texture, and nutrition. Natural peanut butter offers healthy fats and protein. Honey or maple syrup gives sweetness. Rolled oats add fiber and bulk. Chocolate protein powder boosts protein content, making these bites a great snack. Dark chocolate chips add a rich chocolate flavor. Ground flaxseed provides omega-3 fatty acids, which are great for heart health. Vanilla extract enhances the flavor, while a pinch of sea salt balances the sweetness. - Protein content per serving: Each bite packs about 5 grams of protein. - Calories and macronutrients: One bite has around 100 calories, with fat, carbs, and protein in balance. - Health benefits of each ingredient: Together, these ingredients support energy, muscle repair, and heart health. The protein helps keep you full longer. The fiber from oats and flaxseed aids digestion. - Nut butter alternatives: Try almond butter or sunflower seed butter if you're nut-free. - Sweetener options: Use agave nectar or coconut sugar instead of honey. - Gluten-free ingredients: Ensure oats are certified gluten-free for those with gluten sensitivities. These substitutions make the recipe flexible. You can customize it to fit your tastes and dietary needs, making these protein bites a snack everyone can enjoy. Check out the Full Recipe for step-by-step instructions! Mixing the wet ingredients Start by grabbing a large mixing bowl. Add 1 cup of natural peanut butter. Then, pour in 1/2 cup of honey or maple syrup. Mix these two until they are smooth and creamy. This step is key for a tasty base. Incorporating dry ingredients Next, add 1 cup of rolled oats, 1/2 cup of chocolate protein powder, and 1/4 cup of ground flaxseed. Don’t forget a pinch of sea salt! Stir everything together until it looks well mixed. This will give your bites a great texture and flavor. Rolling the mixture into bites Now it’s time for the fun part! Take about a tablespoon of the mixture in your hands. Roll it into a ball. Repeat this step until you have used all the mixture. You should end up with about 12 to 15 bites. Recommended mixing tools I suggest using a sturdy spatula or your hands for mixing. This will help combine all the ingredients well. A large bowl is also a must for easy mixing. Avoiding common mistakes Watch out for dry spots in your mixture. Make sure all ingredients are well combined. If it feels too dry, add a little more honey or peanut butter. Adjusting consistency for preferred texture If you want softer bites, use a bit more honey. For firmer bites, add more oats. You can play around with the mix until you find your perfect texture. Refrigeration instructions Once your bites are formed, place them in an airtight container. Put this container in the fridge for at least 30 minutes. This will help them firm up and hold their shape well. Presentation tips for serving When ready to serve, arrange the bites on a nice plate. You can sprinkle some extra dark chocolate chips or crushed nuts on top. This not only looks great but adds a little extra crunch. Enjoy them with a glass of your favorite plant-based milk! Store your protein bites in an airtight container. Glass or plastic containers work well. Keep them in the fridge for the best taste and texture. They stay fresh for about one week. You can freeze them too. Just place the bites in a freezer bag. They last up to three months in the freezer. Add these bites to your daily snacks. They make a great pick-me-up anytime. Pair them with a glass of milk or your favorite smoothie. You can also pack them in lunchboxes for kids and adults. They fit well with fruit or yogurt for a complete meal. Boost the flavor of your bites by adding spices. A dash of cinnamon or a splash of vanilla extract can elevate them. You can also try different kinds of chocolate. Swap dark chocolate chips for white or milk chocolate for variety. Mixing in dried fruits or chopped nuts adds texture and taste. {{image_2}} When you make Peanut Butter Chocolate Protein Bites, you can switch things up for fun. Here are some tasty ideas. If you want to change the flavor, try using white chocolate or caramel chips instead of dark chocolate. These chips give a new twist. You can also use flavored protein powders, like vanilla or chocolate mint. This adds a unique taste and keeps things interesting. To cut down on sugar, you can reduce the honey or maple syrup. Try using mashed banana or unsweetened applesauce instead. These keep the bites sweet but healthier. For a vegan option, swap the honey with maple syrup and use plant-based protein powder. These changes make the protein bites fit different diets. Spice things up by adding cinnamon or a pinch of cayenne. These spices bring warmth and depth to the flavor. You can also add shredded coconut or dried fruits like cranberries or apricots. These add texture and make your bites even more exciting. These variations let you create your perfect Peanut Butter Chocolate Protein Bites. Explore the possibilities and enjoy your tasty treats! For the complete recipe, check the Full Recipe link above. Store your peanut butter chocolate protein bites in an airtight container. Keep them in the fridge at a temperature below 40°F (4°C). This helps them stay fresh and tasty. They can last about one week in the fridge. If you want to keep them longer, freezing is a great option. To freeze your protein bites, place them in a single layer on a baking sheet. Once they are frozen solid, transfer them to a freezer-safe bag. Remove as much air as possible before sealing. They can last up to three months in the freezer. To thaw, just take out the number of bites you want and leave them in the fridge overnight. This keeps their texture nice and chewy. Look for changes in smell or color. If they have an off smell or look dry, it’s time to toss them. Make sure to check for mold, too. To ensure freshness, always use clean utensils when taking bites from the container. This helps prevent contamination and keeps your snacks safe. Peanut Butter Chocolate Protein Bites can last about one week in the fridge. Store them in an airtight container to keep them fresh. If you want to keep them longer, freeze them. They can last up to three months in the freezer. Just remember to wrap them well before freezing. When you want to eat them, let them thaw in the fridge overnight. Yes, you can make these bites without protein powder. If you skip it, you can add more oats or nut butter for texture. You might also want to reduce the sweetener a bit since protein powder adds some sweetness. Another option is to use ground nuts or seeds for added nutrition. Absolutely! These protein bites offer great nutrition for kids. They contain healthy fats, fiber, and protein, which help keep them full. You can control the portion size easily, making them a perfect snack for children. Aim for one or two bites as a snack. This helps them enjoy the treat without too much sugar. Plus, kids love the chocolatey flavor! You can easily make delicious Peanut Butter Chocolate Protein Bites using simple ingredients. We discussed each ingredient's benefits, and I shared clear step-by-step instructions. You learned various tips for storage and meal prep, plus fun variations to try. These bites are not only tasty but also healthy. They give you great fuel for busy days. Enjoy getting creative with flavors and sharing these bites with family and friends!

Peanut Butter Chocolate Protein Bites Easy Snack Recipe

Craving a tasty snack that fuels your body? Look no further! Peanut Butter Chocolate Protein Bites are the perfect mix

To make a delicious sweet potato breakfast hash, gather these ingredients: - 2 medium sweet potatoes, peeled and diced - 1 red bell pepper, diced - 1 small yellow onion, chopped - 2 cloves garlic, minced - 1 cup spinach, chopped - 4 large eggs - 2 tablespoons olive oil - 1 teaspoon smoked paprika - ½ teaspoon cumin - Salt and pepper to taste - Fresh parsley, chopped (for garnish) You will need a few simple tools to make this dish: - A large skillet - A sharp knife for chopping - A cutting board - A spatula for stirring - A lid to cover the skillet Sweet potatoes are rich in vitamins A and C. They boost your immune system and help your skin. The red bell pepper adds vitamin C and fiber. Onions have antioxidants and may help your heart. Garlic can improve your immune health. Spinach is low in calories but high in iron and calcium. Eggs provide protein and healthy fats, keeping you full longer. This dish combines nutrients for a balanced meal. You get energy and important vitamins in one tasty plate. Enjoy this healthy breakfast delight! Start by peeling and dicing the sweet potatoes. Use medium-sized sweet potatoes for even cooking. Dice them into small cubes, about half an inch. This size helps them cook faster and get tender. Next, heat two tablespoons of olive oil in a large skillet over medium heat. Add the sweet potatoes to the skillet. Season them with salt, pepper, smoked paprika, and cumin. Stir well to coat the sweet potatoes. Sauté for about 10-12 minutes. Stir occasionally to avoid sticking. You want them fork-tender and slightly crispy on the outside. Once the sweet potatoes are tender, it’s time to add more flavor. Add the chopped onion and red bell pepper to the skillet. Cook these for about five minutes. You want them soft and fragrant. Then, add minced garlic and chopped spinach. Stir everything together and cook for another 2-3 minutes. The spinach should wilt nicely, and the garlic will give off a great aroma. Make sure all the veggies mix well with the sweet potatoes. This combination creates a colorful and tasty base for your hash. Now comes the best part: the eggs! Create four small wells in the hash mixture. Crack an egg into each well. Cover the skillet with a lid. Cook for 5-8 minutes. This time will depend on how you like your eggs. I prefer them with runny yolks, but you can cook them longer if you want firmer eggs. Once done, remove the skillet from heat and sprinkle with fresh parsley. This extra touch adds color and freshness. Now, your sweet potato breakfast hash is ready to serve! For the full recipe, check the details provided earlier. To get eggs just right, start with fresh ones. Crack each egg gently into the wells. Cover the skillet with a lid. This keeps steam in, cooking the eggs evenly. Check them after 5 minutes. If you like runny yolks, take them out sooner. For firm yolks, let them cook a bit longer. Practice makes perfect, so don’t worry if it’s not right the first time. Seasoning makes this dish pop! I love using smoked paprika and cumin. They add warmth and depth. Don’t forget salt and pepper. You can also try garlic powder or onion powder. Fresh herbs like thyme or basil work great too. Experiment with flavors you enjoy. This will make your sweet potato breakfast hash uniquely yours. Prepping is key for busy mornings. You can peel and dice sweet potatoes the night before. Store them in water in the fridge to keep them fresh. Chop your veggies ahead, too. This saves time in the morning. You can even cook the hash in advance and reheat it. Just warm it up in a pan or microwave. This way, a delicious breakfast is always ready! {{image_2}} You can easily boost the protein in your sweet potato breakfast hash. Adding sausage gives it a hearty flavor. Choose your favorite type, like spicy or mild. Just cook the sausage first, then add the sweet potatoes. If you prefer a meatless option, tofu works great too. Cube firm tofu and sauté it with the veggies. This keeps the dish light and healthy. Making this dish vegetarian or vegan is simple. To keep it vegetarian, just skip the meat and add extra veggies. You can use mushrooms, zucchini, or kale for more texture. For a vegan twist, remove the eggs and replace them with chickpeas. They add a nice protein boost and a unique flavor. You can also use a vegan egg substitute for a similar taste. Feel free to mix in other vegetables for variety. Try adding broccoli, carrots, or even sweet corn. Each vegetable adds its own taste and crunch. You can switch up the bell peppers too; green or yellow ones work well. This way, you can create a new dish every time. The options are endless, making breakfast fun and exciting. For the complete recipe, check out the Full Recipe. To keep your sweet potato breakfast hash fresh, let it cool first. Use an airtight container to store leftovers. This way, the flavors stay strong. Place it in the fridge right away. You can also divide the hash into single servings. This makes it easy to grab for breakfast later. When you want to enjoy the hash again, reheat it on the stove. Add a splash of water or olive oil to prevent sticking. Heat over medium heat for about 5 minutes. You can also use a microwave. Place a portion in a microwave-safe bowl and cover it. Heat for 1-2 minutes, stirring halfway through. Your leftovers can last in the fridge for up to 4 days. If you want to keep it longer, freeze it. In the freezer, it stays good for about 2-3 months. Just make sure to pack it well to avoid freezer burn. For best results, eat it fresh, but these tips help you enjoy it longer! Yes, you can use regular potatoes or even Yukon gold. Each type gives a different taste. Regular potatoes may be less sweet, while Yukon golds add creaminess. Experiment to find your favorite! This recipe is naturally gluten-free. Just ensure any toppings or sides you choose are gluten-free as well. Always read labels on packaged foods carefully. Most ingredients, like sweet potatoes and eggs, are safe and delicious! Top your hash with fresh herbs like cilantro or parsley. Avocado slices add creaminess. Crumbled feta or goat cheese brings a tangy taste. Hot sauce can spice things up. Try different toppings to make it your own! For the full recipe, check out the Sweet Potato Breakfast Hash section. This blog post covered the key ingredients and cooking tools for a delicious sweet potato breakfast hash. I shared step-by-step instructions to make it easy for you. I also offered tips for perfect eggs and suggestions for variations to fit your taste. Plus, I provided smart storage tips to keep leftovers fresh. Enjoy trying out this tasty dish for breakfast. It’s simple, healthy, and very adaptable. Cooking can be fun and fulfilling!

Sweet Potato Breakfast Hash Healthy Morning Delight

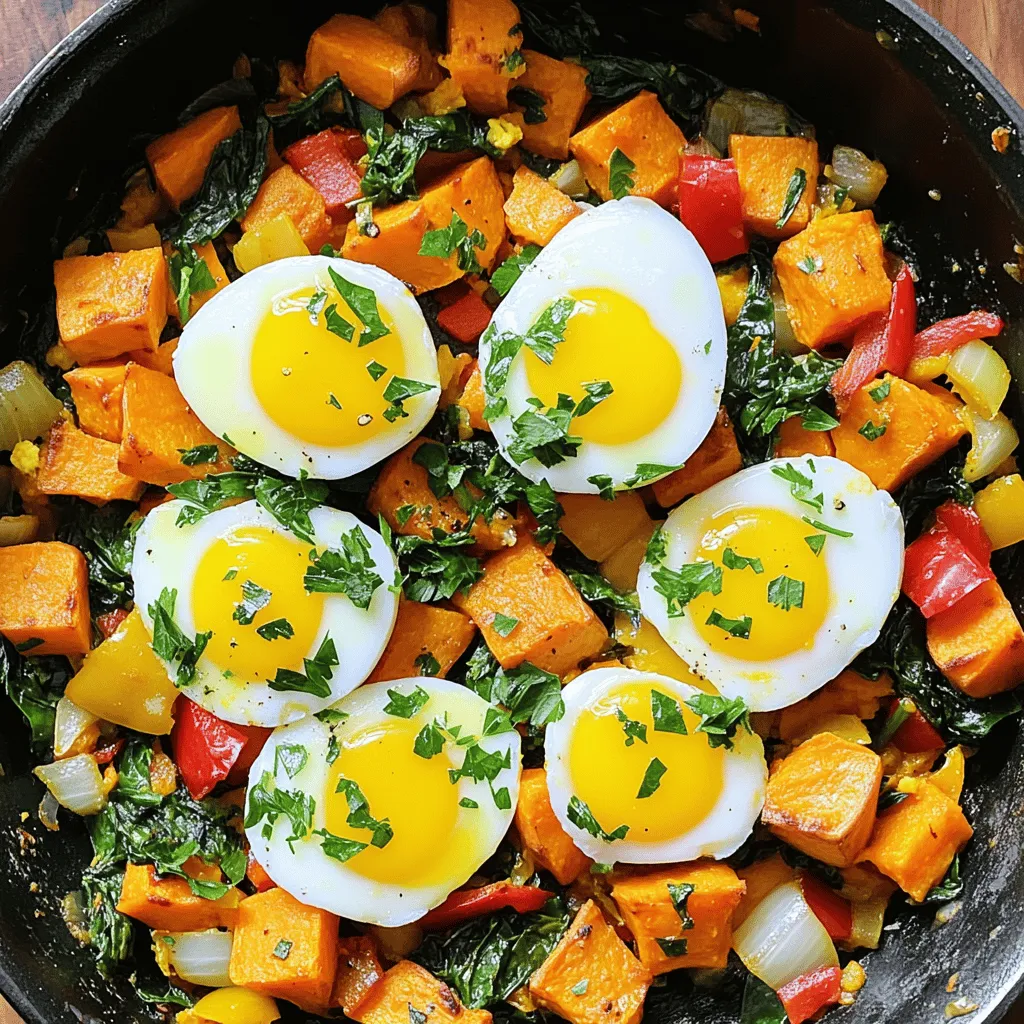
Looking for a tasty and healthy breakfast option? Sweet Potato Breakfast Hash is a perfect choice! This vibrant dish combines

- 1 cup cooked quinoa - 1 cup finely chopped broccoli (steamed) - 1 cup shredded sharp cheddar cheese - 2 large eggs - 1/2 cup breadcrumbs (preferably whole wheat) - 2 tablespoons nutritional yeast (optional) - 1/2 teaspoon garlic powder - 1/4 teaspoon onion powder - Salt and pepper to taste - Olive oil spray for greasing Gathering these ingredients is the first step to making Broccoli Cheddar Quinoa Bites. Each item plays an important role in flavor and texture. You can swap ingredients to fit your needs. For cheese, you can use mozzarella or pepper jack. If you want a gluten-free option, choose gluten-free breadcrumbs. If you need an egg replacement, try using flaxseed meal mixed with water. This way, you can still enjoy these bites while catering to your diet. These bites are packed with nutrients. A serving has about 150 calories, making them a great snack. Each bite gives you protein from the quinoa and eggs. You also get fiber from the broccoli and whole wheat breadcrumbs. The cheese adds calcium, while nutritional yeast boosts the flavor and offers B vitamins. Eating these bites can help you stay full and satisfied. 1. Preheat the oven and prepare the baking sheet: Start by preheating your oven to 375°F (190°C). This step is key for getting a nice crisp on your bites. While the oven heats, line a baking sheet with parchment paper. This makes cleanup easy and helps the bites cook evenly. 2. Steam broccoli to retain nutrients: Next, take your finely chopped broccoli and steam it. Steaming keeps the nutrients intact and gives the broccoli a tender texture. You want the pieces small enough to mix well with the other ingredients. 1. Combine dry and wet ingredients effectively: In a large mixing bowl, combine your cooked quinoa, steamed broccoli, shredded cheddar cheese, eggs, breadcrumbs, nutritional yeast (if you use it), garlic powder, onion powder, salt, and pepper. Mixing these ingredients well ensures that every bite is full of flavor. 2. Achieving the right consistency for bites: Stir everything together until the mixture is thick and holds together. If the mix feels too dry, you can add a little water. If it’s too wet, just sprinkle in more breadcrumbs. You want it to be moldable without being sticky. 1. Forming the bites: ideal size and shape: Now comes the fun part! Use your hands to scoop about 2 tablespoons of the mixture. Shape this into small balls or patties. Place them on the lined baking sheet, making sure to leave some space between each bite for even cooking. 2. Baking time and tips for optimal crispness: Lightly spray the tops of the bites with olive oil. This helps them crisp up nicely in the oven. Bake for 20-25 minutes or until they are golden brown and firm. Keep an eye on them, as oven times can vary. To prevent your broccoli cheddar quinoa bites from falling apart, use the right ratios. Ensure you use enough binding agents like eggs and breadcrumbs. If your mix seems too wet, add more breadcrumbs until it holds together well. Use your hands to compact the mixture firmly when shaping the bites. This will help maintain their shape during baking. To get a crispy texture, lightly spray the tops with olive oil before baking. This small step makes a big difference. Bake at a high temperature, around 375°F, for 20-25 minutes until golden brown. Don't skip letting them cool for a few minutes; this helps them firm up. For the best dipping sauces, I recommend classic options like ranch or honey mustard. You can also try spicy sriracha or a tangy yogurt dip. These sauces add great flavor to your bites. Pair your bites with a fresh salad or steamed veggies for a complete meal. A simple mixed greens salad with lemon vinaigrette works well. For an appealing visual, plate the bites in a circular pattern on a vibrant plate. This draws the eye and makes them look inviting. Use fresh herbs like parsley or cilantro as garnishes. A sprinkle of extra cheese on top right before serving can add a nice touch. You can also drizzle a bit of sauce around the plate for color. For the full recipe, check out the details above! {{image_2}} Want to spice up your bites? You can add jalapeños or a splash of sriracha for heat. These ingredients bring a fun kick and blend well with the cheese and quinoa. If you prefer a milder flavor, fresh herbs like parsley or chives work wonders too. They add freshness and a pop of color, making your bites even more appealing. You can also change how these bites look and taste. Try making them into mini muffins or fritters. This gives you a new texture and can be great for parties or snack time. If you want a crispy outer layer, air frying is a fantastic option. It gives a crunchy finish while keeping the inside soft. Baking is easier and still makes a delightful treat. If you follow a vegan diet, you can still enjoy these bites. Swap the eggs with flaxseed meal or unsweetened applesauce. This keeps the mixture together while being plant-based. For those who need gluten-free options, use gluten-free breadcrumbs instead. This way, everyone can enjoy these tasty broccoli cheddar quinoa bites without worry. You can find the full recipe to get started! To store your broccoli cheddar quinoa bites, place them in an airtight container. This keeps them fresh and tasty. Refrigerate them within two hours of cooking. If you let them cool first, they will not create steam inside the container. Use glass or plastic containers that seal well. Avoid using containers that are too big, as this can let air in. If you want to keep the bites longer, freezing is a great option. Lay the bites on a baking sheet in a single layer. Freeze them for about an hour. Once frozen, move them to a freezer-safe bag or container. This helps to prevent them from sticking together. When you’re ready to eat, reheat them in the oven. Bake at 375°F (190°C) for 15-20 minutes. This keeps a nice texture and warms them through. In the fridge, these bites last for about 3-5 days. Check for any signs of spoilage. If they smell sour or look discolored, it’s best to toss them. Always trust your senses. If you’re unsure, it’s safer to discard them. Enjoy your broccoli cheddar quinoa bites fresh, and don’t hesitate to make more! For the full recipe, check out the details above. Can I make these ahead of time? Yes, you can make these bites ahead of time. You can prepare the mixture and shape the bites. Then, place them on a baking sheet and cover with plastic wrap. Store them in the fridge for up to 24 hours. This saves time on busy days. Just bake them when you are ready to enjoy! How do I know if they are cooked through? To check if they are cooked through, look for a golden-brown color. The bites should feel firm to the touch. You can also cut one open to see if they are hot inside. If they are warm and the cheese is melted, they are ready to eat! Can I use frozen broccoli? Yes, you can use frozen broccoli. Just make sure to thaw it first. Drain any excess water. This helps keep the bites from getting soggy. Chopping it finely will help it mix well with the other ingredients. What type of quinoa works best for this recipe? Any type of quinoa works well, but I prefer using white quinoa. It has a mild flavor and a fluffy texture. Red or black quinoa can add a nice color, but they may have a chewier texture. Just make sure it is cooked before mixing. Are these bites suitable for kids? Yes, these bites are great for kids! They are fun to eat and packed with nutrients. The cheese gives them a tasty flavor that kids love. Plus, they are easy to hold and dip into sauces. Can I omit cheese for a dairy-free version? You can omit the cheese for a dairy-free version. You may want to add extra nutritional yeast. This adds a cheesy flavor without dairy. You can also try using dairy-free cheese options if you want a similar taste. This blog post shared a tasty recipe for broccoli cheddar quinoa bites. You learned about ingredients, substitutes, and nutritional benefits. The step-by-step instructions helped you prepare these bites with ease. We also explored tips for cooking and serving, plus some fun variations. In closing, these bites are both healthy and easy to customize. Enjoy experimenting with flavors and making them your own! Happy cooking!

Broccoli Cheddar Quinoa Bites Tasty and Easy Snack

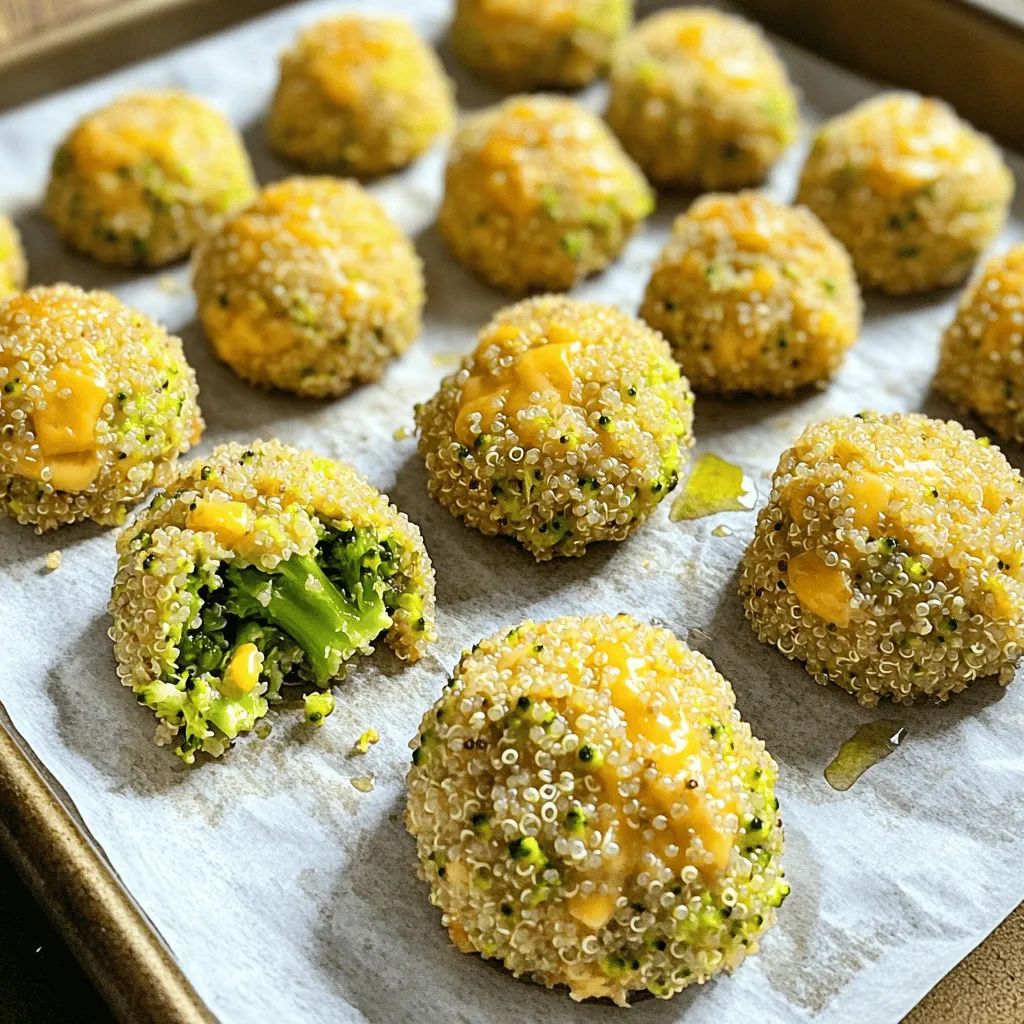
Looking for a tasty, healthy snack? These Broccoli Cheddar Quinoa Bites are delicious and super easy to make! Packed with

- 1 pound chicken breast, cut into 1-inch cubes - 1 cup fresh pineapple, cut into 1-inch cubes - 1 bell pepper (any color), cut into 1-inch pieces - 1/2 red onion, cut into wedges - 2 tablespoons soy sauce - 2 tablespoons honey - 1 tablespoon olive oil - 1 tablespoon fresh ginger, minced - 2 cloves garlic, minced - 1 teaspoon black pepper - Skewers (soaked in water if wooden) To create the best grilled pineapple chicken skewers, you need fresh ingredients. The chicken breast is the star. It should be tender and juicy. Cut it into 1-inch cubes for even cooking. Fresh pineapple adds a sweet and tangy flavor. It balances the savory chicken nicely. You can choose any color bell pepper for a pop of color. Red, yellow, or green all work well. The red onion gives a nice bite and sweetness when grilled. For the marinade, mix soy sauce, honey, olive oil, fresh ginger, garlic, and black pepper. This blend brings all the flavors together. Marinate the chicken for at least 30 minutes. This step makes the chicken more flavorful. Make sure to soak wooden skewers in water first. This helps prevent them from burning on the grill. For the full recipe, check the recipe section. It guides you step-by-step to make these delicious skewers. To make a great marinade, mix the right ingredients. Start by whisking together: - 2 tablespoons soy sauce - 2 tablespoons honey - 1 tablespoon olive oil - 1 tablespoon fresh ginger, minced - 2 cloves garlic, minced - 1 teaspoon black pepper This mix gives your chicken a sweet and savory flavor. Make sure you coat the chicken well. I suggest letting the chicken marinate for at least 30 minutes. If you have more time, marinating for 2 hours or even overnight will deepen the flavors. The longer, the better! Next, it’s time to assemble the skewers. Grab your soaked skewers and start threading. Alternate between chicken, pineapple, bell pepper, and red onion. This not only looks good but also helps with even cooking. To ensure even cooking, cut all your pieces to the same size. Aim for 1-inch cubes for everything. This way, they will cook at the same rate. Preheat your grill to medium-high heat. This is key to getting nice grill marks. Once hot, place the skewers on the grill. Cook for about 10 to 12 minutes. Turn them every few minutes. You want to make sure the chicken is cooked through. Use a meat thermometer if you have one. The chicken should reach 165°F for safety. Take the skewers off the grill and let them rest for a few minutes. This lets the juices settle. For the full recipe, check out the details in the article. For the best flavor, marinate the chicken for at least 30 minutes. If you have time, go for two hours. This helps the chicken soak up all the tasty marinade. The mix of soy sauce and honey gives a great sweet and savory balance. The soy sauce adds salt, while honey brings in sweetness. Together, they make the chicken and pineapple shine. To stop the skewers from sticking, use oil or a non-stick grill spray. Just a light coat on the grill or the skewers will do wonders. This simple step makes flipping them easy. Nobody wants their delicious dinner stuck to the grill! Cut your chicken and veggies into uniform pieces. Aim for 1-inch cubes for the chicken and pineapple. This ensures everything cooks at the same rate. If you have bigger pieces, some may cook longer, leaving others underdone. Consistency is key for perfect skewers. For the full recipe, check out the [Full Recipe]. {{image_2}} You can change the protein in your skewers. Try shrimp for a lighter taste. Tofu works well for a vegetarian option. Both pair nicely with the sweet pineapple. Next, think about different fruits. Mango or peach can add a nice twist. These fruits caramelize beautifully on the grill. You might also try strawberries for a surprising flavor. Don't forget about vegetables! Zucchini and cherry tomatoes add color and crunch. You can mix in mushrooms for a hearty touch. Choose what you love for a personal twist. Feel free to spice up your marinade. Adding chili flakes gives a nice kick. Fresh herbs like basil or cilantro can brighten the flavor. If you like it sweeter, add brown sugar or maple syrup. This enhances the glaze on your chicken. You can even use fruit juice for a unique taste. Check the [Full Recipe] for the base marinade. The key is to experiment and find what you enjoy most! After enjoying your grilled pineapple chicken skewers, store leftovers in the fridge. Use an airtight container to keep them fresh. These skewers will last for up to three days in the fridge. Just make sure they cool down before sealing the container. To reheat the skewers, I recommend using the oven or a grill. This method helps keep the chicken juicy and the pineapple warm. Preheat your oven to 350°F (175°C) and bake for 10 minutes. If you use a grill, heat it to medium and warm the skewers for about 5 minutes, turning occasionally. If you want to save some skewers for later, freezing is a great option. First, let them cool completely. Then, wrap each skewer in plastic wrap, and place them in a freezer-safe bag. They can stay frozen for up to two months. When ready to eat, thaw in the fridge overnight before reheating. For the full recipe, check back to the ingredients section! Yes, you can make these skewers ahead of time. It's easy and saves time. First, prepare the marinade and soak the skewers if they're wooden. Cut the chicken, pineapple, and veggies. Place them in the marinade for at least 30 minutes. You can store everything in the fridge for up to 24 hours. Just remember to assemble the skewers right before grilling. This keeps the chicken fresh and flavorful. Both gas and charcoal grills work well for skewers, but they offer different flavors. Gas grills heat up quickly and give you more control over the heat. This makes it easier to cook the chicken evenly. Charcoal grills, on the other hand, add a nice smoky flavor. They may take longer to heat but can create a great char on your skewers. Choose the one that fits your style and what you enjoy. To keep your chicken juicy, focus on marinating and cooking methods. Marinate the chicken for at least 30 minutes. This helps it soak up flavors and moisture. During grilling, avoid cooking over too high heat. This can dry out the chicken. Instead, grill on medium heat and turn the skewers often. This will help cook the chicken evenly and keep it tender. For the best results, use a meat thermometer to check the chicken’s internal temperature. It should reach 165°F for safe eating. If you follow these tips, your chicken will stay juicy and delicious. For more details, check out the Full Recipe. Grilled pineapple chicken skewers are a fun and tasty dish. We covered key ingredients, marinade tips, and grilling steps. I shared advice on achieving the best flavor and preventing sticking. You can even switch ingredients for variety. Plus, I included storage and reheating advice for leftovers. Enjoy making these skewers for your family and friends. They’re perfect for any gathering. Keep experimenting with flavors and enjoy every bite!

Grilled Pineapple Chicken Skewers Flavorful BBQ Delight

Fire up your grill and get ready for a taste explosion with Grilled Pineapple Chicken Skewers! This BBQ delight combines

To make easy garlic breadsticks, you need a few key items. These are: - 1 can (13.8 oz) refrigerated pizza dough - 4 tablespoons unsalted butter, melted - 4 cloves garlic, minced - 1 teaspoon dried oregano - 1 teaspoon dried parsley - 1/2 teaspoon salt - 1/4 teaspoon black pepper The refrigerated pizza dough is the base of your breadsticks. It saves time and gives great texture. The unsalted butter adds richness and flavor. Garlic brings that classic taste, while herbs like oregano and parsley add freshness. The salt and pepper round out the flavors perfectly. You can also boost the flavor with extra ingredients. Consider these: - Grated Parmesan cheese for topping - Additional seasoning options Parmesan cheese adds a savory touch on top of your breadsticks. You can also try adding red pepper flakes for some heat or Italian seasoning for more flavor. The options are endless, so feel free to get creative! For the full recipe, check out the detailed instructions. First, you need to preheat your oven to 400°F (200°C). This step is key for even baking. While the oven heats, prepare your baking sheets. Line them with parchment paper. This helps keep the breadsticks from sticking. Next, roll out the pizza dough. Place it on a lightly floured surface. Aim for a rectangle that is about 1/2 inch thick. This thickness gives you a nice, fluffy breadstick. Now it's time to make the garlic butter. In a small bowl, combine the melted butter with minced garlic, oregano, parsley, salt, and black pepper. Mix everything until it's well blended. This garlic butter will give your breadsticks a rich flavor. Make sure to taste it! You want to ensure the seasoning is just right. Next, cut the dough into strips. Each strip should be about 1 inch wide. Use a sharp knife or a pizza cutter for clean cuts. After that, take your garlic butter mixture. Brush it generously over each strip. Make sure every piece is well coated. If you want, sprinkle some grated Parmesan cheese on top for extra flavor. Place the breadsticks on your lined baking sheet. Space them about an inch apart. This allows them to bake evenly. Now, bake your breadsticks in the preheated oven for about 12-15 minutes. Keep an eye on them. You want them golden brown and cooked through. Once done, remove them from the oven. Let them cool for a few minutes before serving. Enjoy your delicious garlic breadsticks! For the complete method, check the Full Recipe. To cut the dough, use a sharp knife or pizza cutter. Cut the dough into strips that are about 1-inch wide. This size helps them bake evenly. If you want a more rustic look, you can even tear the dough by hand. For even baking, space the breadsticks about an inch apart on the baking sheet. This allows hot air to circulate around them. Make sure your oven is fully preheated before you bake. This step is key for getting a nice golden color on your breadsticks. Marinara sauce pairs perfectly with these garlic breadsticks. You can serve it warm in a small bowl for dipping. This adds a fun touch and enhances the flavor. For presentation, arrange the warm breadsticks in a tall glass for a stylish look. You can also use a basket lined with a cloth. This gives a cozy feel to your meal. If you want a little extra flair, drizzle olive oil infused with garlic over the breadsticks before serving. For the full details on making these delicious breadsticks, check out the Full Recipe. {{image_2}} You can make your garlic breadsticks even more tasty by adding cheese or herbs. Grated Parmesan cheese elevates the flavor and gives a nice finish. Just sprinkle it on top before baking. You can also try mixing in different herbs. Basil, thyme, or rosemary can bring a new twist. If you love heat, try spicy garlic breadsticks. Just add red pepper flakes to your garlic butter mix. This adds a kick that makes the breadsticks stand out. You can adjust the amount based on how spicy you like it. If you're looking for healthier options, use whole wheat or gluten-free dough. Whole wheat dough packs more fiber and nutrients. It gives a nutty flavor that pairs well with garlic. For gluten-free, choose a dough made from rice or almond flour. This way, everyone can enjoy these breadsticks, regardless of dietary needs. For a full recipe, check the Easy Garlic Breadsticks section. Enjoy experimenting with these variations! To store your leftover garlic breadsticks, let them cool completely. Then, wrap them tightly in plastic wrap or aluminum foil. This keeps them fresh and prevents them from drying out. You can also place them in an airtight container. Store them in the fridge for up to three days. If you want to keep them longer, you can freeze them. Just make sure they are well wrapped. They can last in the freezer for up to three months. For the best taste, reheat your garlic breadsticks in the oven. Preheat your oven to 350°F (175°C). Place the breadsticks on a baking sheet. Cover them loosely with foil to keep them soft. Heat for about 10 minutes, or until they are warm. You can also microwave them for a quick fix. Just place them on a plate and heat for 15-20 seconds. Be careful not to overheat, or they may become tough. Enjoy them warm and fresh! For the full recipe, check out Easy Garlic Breadsticks. To make garlic breadsticks from scratch, start with refrigerated pizza dough. Preheat your oven to 400°F (200°C). Roll out the dough into a rectangle, about 1/2 inch thick. Cut it into strips, about 1 inch wide. Mix melted butter, minced garlic, oregano, parsley, salt, and pepper in a bowl. Brush this mixture over the strips. Place them on a baking sheet. Bake for 12-15 minutes until golden brown. For the full recipe, check the section above. Yes, you can freeze garlic breadsticks. Allow them to cool completely after baking. Wrap each stick in plastic wrap or foil. Place them in a freezer-safe bag or container. They can stay in the freezer for up to three months. When ready to eat, thaw them in the fridge overnight. Reheat them in the oven at 350°F (175°C) for about 10 minutes. Garlic breadsticks pair well with many dipping sauces. Here are a few tasty options: - Marinara sauce - Garlic-infused olive oil - Ranch dressing - Cheese sauce - Pesto Feel free to get creative and try your favorite sauces! In this blog post, we explored how to make tasty garlic breadsticks using easy ingredients. We covered each step, from preparing the dough to baking it perfectly. I shared tips for great flavor and even baking. You can also try variations like cheese or spice to suit your taste. Don't forget how to store and reheat your leftovers for the best experience. Now, you can enjoy warm garlic breadsticks any time. Grab your ingredients and start baking today!

Easy Garlic Breadsticks Delicious and Simple Recipe

Looking for a quick snack or side dish that packs a punch of flavor? You’re in the right place! In

To make Lemon Blueberry Overnight Oats, gather these simple ingredients: - 1 cup rolled oats - 1 ½ cups almond milk (or any milk of choice) - 1 cup fresh blueberries - Zest of 1 lemon - 2 tablespoons honey or maple syrup - 1 teaspoon vanilla extract - ¼ teaspoon salt - 2 tablespoons chia seeds - 1 tablespoon lemon juice - Fresh mint leaves for garnish (optional) These ingredients work together to create a tasty and healthy breakfast. The rolled oats are the base, providing fiber. Almond milk adds creaminess and keeps it dairy-free. Fresh blueberries bring natural sweetness and antioxidants. Lemon zest and juice give a bright, refreshing flavor that wakes up your taste buds. Honey or maple syrup sweetens the mix just right. Chia seeds are small but mighty. They help thicken the oats and add omega-3 fatty acids. A pinch of salt balances the flavors, making each bite delicious. Finally, fresh mint leaves add a pop of color and extra flavor if you choose to garnish. This recipe is not just easy; it’s also a great way to start your day. For the full recipe, check out the [Full Recipe] section. First, gather all your ingredients. Start by mixing the base ingredients. In a large bowl, combine 1 cup of rolled oats, 1 ½ cups of almond milk, and the zest of 1 lemon. Add 2 tablespoons of honey or maple syrup, 1 teaspoon of vanilla extract, ¼ teaspoon of salt, 2 tablespoons of chia seeds, and 1 tablespoon of lemon juice. Stir well to make sure everything blends together. Next, it’s time to incorporate blueberries. Gently fold in 1 cup of fresh blueberries. Make sure they spread evenly throughout the mixture. This gives every bite a burst of flavor. Finally, divide the mixture into jars. Use individual containers with lids for easy storage. This way, you can grab one on busy mornings. Chilling the oats is key to a great texture. It helps the oats soak up the liquid, making them soft and creamy. I recommend refrigerating the jars overnight. If you're in a hurry, at least chill them for 4 hours. When morning comes, take the jars out of the fridge. Give the oats a good stir. If you like a creamier texture, add a splash more milk. This helps loosen the oats and makes them easier to enjoy. For a beautiful finish, garnish before serving. Top with more blueberries, a sprinkle of lemon zest, and fresh mint leaves if you like. These little touches make your breakfast look amazing and taste even better. Enjoy your Lemon Blueberry Overnight Oats! For the full recipe, check the [Full Recipe]. When making lemon blueberry overnight oats, precise measuring is key. Use a measuring cup for the oats and liquid. If you want to swap ingredients, keep the same amounts. For instance, you can use coconut milk instead of almond milk. Adjusting the consistency is easy. If you like thicker oats, add less milk. For creamier oats, add a bit more milk. You can also adjust the sweetness. Add more honey or maple syrup if you like it sweeter. Topping your oats can make them extra special. Here are some ideas: - Fresh blueberries - A sprinkle of lemon zest - Chopped nuts or seeds - Sliced bananas - A dollop of yogurt For portion sizes, a jar usually serves one. You can easily double or triple the recipe for meal prep. These oats are perfect for a quick breakfast. One mistake is over-soaking the oats. They can turn mushy if left too long. Stick to overnight soaking for best results. Another common error is skipping chia seeds. They help thicken the mixture and add fiber. Don’t leave them out if you want a nice texture! For the full recipe, check the detailed instructions. Enjoy your delicious start to the day! {{image_2}} You can change the flavor of your lemon blueberry overnight oats easily. Try adding different fruits like bananas, strawberries, or peaches. These fruits bring new tastes and colors to your dish. You can also mix in nuts or seeds for extra crunch. If you want a sweeter taste, consider using alternative sweeteners. Maple syrup, agave nectar, or stevia work well. Each sweetener adds its own unique flavor. If you follow a vegan diet, simply swap out the honey for maple syrup. This keeps the oats plant-based and just as tasty. For gluten-free needs, use certified gluten-free oats. This way, you can enjoy your oats without worry. To make them nut-free, choose oat milk or coconut milk instead of almond milk. This keeps the dish safe for those with nut allergies. Seasonal fruits can add fun to your overnight oats. In summer, use fresh peaches or cherries. Fall is great for apples and cinnamon. Winter can bring in pomegranate seeds or citrus fruits. Each season offers new flavors. For a holiday twist, try adding pumpkin puree and spices for a fall vibe. You can also mix in cranberries for a festive touch during winter. These small changes can keep your breakfast exciting throughout the year. For the full recipe, check out the Lemon Blueberry Sunrise Oats. To keep your lemon blueberry overnight oats fresh, use airtight containers. These containers help prevent air from getting in, which keeps your oats tasty. You can use glass jars or plastic containers. Make sure they have tight-fitting lids. Store them in the fridge after you prepare them. This helps the oats absorb flavor and stay cool. Your overnight oats can last for up to five days in the fridge. This makes them perfect for meal prep! Look for signs of spoilage, like an off smell or change in color. If the oats look dry or have an odd texture, it's best to discard them. Always trust your senses! Yes, you can freeze the oats! This is a great way to save leftovers. Scoop the mixture into freezer-safe containers or bags. Leave some space for expansion as they freeze. When you're ready to eat them, thaw them in the fridge overnight. You can also heat them in the microwave. Just add a splash of milk to get the right texture. Enjoy your delicious breakfast anytime! You can find the full recipe [here]. To serve more people, you can easily scale up the ingredients. Simply multiply each ingredient by the number of servings you need. For example, if you want to make four servings, double the recipe. This means you will need: - 2 cups rolled oats - 3 cups almond milk - 2 cups fresh blueberries - Zest of 2 lemons - 4 tablespoons honey or maple syrup - 2 teaspoons vanilla extract - ½ teaspoon salt - 4 tablespoons chia seeds - 2 tablespoons lemon juice Mix everything in a larger bowl. Then, divide the mixture into more jars. This will ensure everyone gets a tasty serving. Yes, you can use quick oats. They cook faster, but they change the texture. Quick oats create a softer, creamier mix. If you prefer a chewier bite, stick with rolled oats. Rolled oats absorb the liquid better, giving your overnight oats a heartier feel. If you use quick oats, reduce the soaking time. You might only need to chill them for about 2 to 4 hours instead of overnight. Lemon blueberry overnight oats pack a healthy punch. Here are some key benefits: - Rolled oats: They are rich in fiber, which helps digestion. They also keep you full longer. - Blueberries: These tiny fruits are full of antioxidants. They help fight disease and boost brain health. - Chia seeds: These seeds provide healthy fats and protein. They also add fiber and help keep you full. - Lemon juice and zest: They add vitamin C. This helps your immune system and adds fresh flavor. Together, these ingredients make a nourishing meal that fuels your day. For the full recipe, check out the section above. In this blog post, we explored how to make delicious overnight oats. We covered the key ingredients, preparation steps, and tips for success. I showed you variations to keep it exciting and shared storage methods to keep your oats fresh. Remember, adjusting the recipe is simple, and using seasonal fruits adds fun. Enjoy your oats knowing you can personalize them to fit your taste. Trying new flavors makes every bite a treat. Now, you have all the tools to create your perfect overnight oats!

Lemon Blueberry Overnight Oats Nourishing Breakfast

Start your day right with a zesty twist! Lemon Blueberry Overnight Oats are simple, tasty, and packed with nutrients. I’ll

To make Almond Butter Energy Balls, gather these simple ingredients. Each one plays a vital role in flavor and nutrition. - 1 cup almond butter - 1 cup rolled oats - 1/2 cup honey or maple syrup - 1/2 cup ground flaxseed - 1/2 cup dark chocolate chips - 1 teaspoon vanilla extract - A pinch of sea salt Almond butter serves as the base, giving these bites a creamy texture. The rolled oats add heartiness and fiber, while honey or maple syrup provides natural sweetness. Ground flaxseed boosts the nutrition with omega-3 fatty acids. Dark chocolate chips bring a rich flavor, perfect for satisfying your sweet tooth. You can swap honey for maple syrup, depending on your taste. The vanilla extract enhances the overall flavor, making every bite delightful. Finally, a pinch of sea salt balances the sweetness, making these energy balls truly irresistible. For the full recipe, follow the steps to create these tasty snacks that energize you throughout the day! 1. Mixing the Ingredients Start by grabbing a large mixing bowl. Add 1 cup of almond butter, 1 cup of rolled oats, and 1/2 cup of honey or maple syrup. Then, toss in 1/2 cup of ground flaxseed, 1/2 cup of dark chocolate chips, 1 teaspoon of vanilla extract, and a pinch of sea salt. Mix everything well. You want a sticky dough that holds together. 2. Forming the Balls Next, it’s time to roll your mixture into balls. Take a small amount of dough and shape it into a ball about 1 inch wide. If your hands get too sticky, lightly wet them with water. This makes rolling easier. Place each ball on a baking sheet lined with parchment paper. 3. Refrigeration Process Once you finish rolling all the balls, put the baking sheet in the fridge. Let them chill for about 30 minutes. This helps the energy balls firm up. After they are set, move them to an airtight container. They can stay in the fridge for up to a week or you can freeze them for later. - How to Present For a fun presentation, arrange the energy balls on a bright plate. You can sprinkle some extra ground flaxseed on top for a nice touch. This makes them look even more inviting. - Pairing Ideas Enjoy these energy balls with a side of fresh fruit or yogurt. They also pair well with a cup of tea or coffee. This makes for a balanced snack or quick breakfast. Try them as a post-workout boost too! For the full recipe, check out the detailed instructions above. One common mistake is overmixing. If you mix too much, the dough can become tough. You want a sticky mix that holds together but is still soft. On the other hand, under-mixing can lead to uneven flavors. Make sure all ingredients are blended well but don’t overdo it! Another mistake is incorrect ball sizing. If your energy balls are too big, they won’t set properly. Aim for about 1 inch in diameter. This size is just right for a quick snack. Smaller balls are easier to grab and eat on the go. To enhance flavor, try adding spices or extracts. Cinnamon or nutmeg can add warmth to your energy balls. A splash of almond or coconut extract can also give them a nice twist. Experiment with what you like! Using different mix-ins can change the texture and taste. Chopped nuts, dried fruit, or seeds are great options. You can also swap dark chocolate chips for white chocolate or dried cranberries for a fruity punch. Creativity is key! {{image_2}} You can still enjoy energy balls if you have nut allergies. Sunflower seed butter is a great choice. It has a similar texture and flavor. You can use it in place of almond butter. This swap keeps your energy balls creamy and tasty. You might want to change some other ingredients too. For example, you can use pumpkin seeds instead of flaxseed. They offer a nice crunch and add healthy fats. You can also skip the chocolate chips if you want. Instead, try dried fruit for a sweet twist. If you follow a vegan diet, you can easily make these energy balls vegan. Just use maple syrup instead of honey. This keeps the recipe plant-based and just as yummy. For gluten-free options, choose certified gluten-free oats. This ensures that your energy balls are safe for those with gluten sensitivities. You can also add gluten-free protein powder for an extra boost. It helps keep you full longer and adds more nutrients to your snack. Check out the Full Recipe for more details! To keep your Almond Butter Energy Balls fresh, store them in the fridge. Place them in an airtight container. This helps prevent moisture and keeps them tasty. They will last about a week this way. If you notice they start to dry out, try adding a little more almond butter next time. For longer storage, you can freeze the energy balls. Place them on a baking sheet first. Freeze them for about an hour until they are firm. Then, transfer them to a freezer-safe bag or container. This keeps them fresh for up to three months. When you're ready to eat one, just take it out and let it thaw at room temperature. You can also pop it in the microwave for a few seconds. Enjoy them anytime you want a healthy snack boost! For the full recipe, check out the details above. Almond Butter Energy Balls last about one week in the fridge. They keep well when you store them in an airtight container. At room temperature, they stay fresh for about three days. If you want them to last longer, refrigerate them right after making. For the best taste, enjoy them fresh! Yes, you can make Almond Butter Energy Balls ahead of time. They are great for meal prep. Just follow the full recipe and store them in the fridge. You can make a big batch and keep them ready for snacks throughout the week. This way, you always have a healthy treat on hand! You can get creative with Almond Butter Energy Balls! Some popular swaps include: - Nut-free: Use sunflower seed butter instead of almond butter. - Sweeteners: Try agave syrup or brown rice syrup. - Mix-ins: Add dried fruit, like cranberries or apricots. - Seeds: Substitute chia seeds for flaxseed for a different texture. Feel free to experiment and find your favorite mix! In this blog post, I shared a simple recipe for Almond Butter Energy Balls. You learned about the key ingredients, including almond butter, oats, and dark chocolate chips. I walked you through mixing, forming, and refrigerating the balls, with tips to avoid common mistakes. You can even explore nut-free and vegan options. For storage, I provided ways to keep them fresh short-term and long-term. These energy balls are a tasty and healthy snack. Enjoy making them!

Almond Butter Energy Balls Healthy Snack Boost

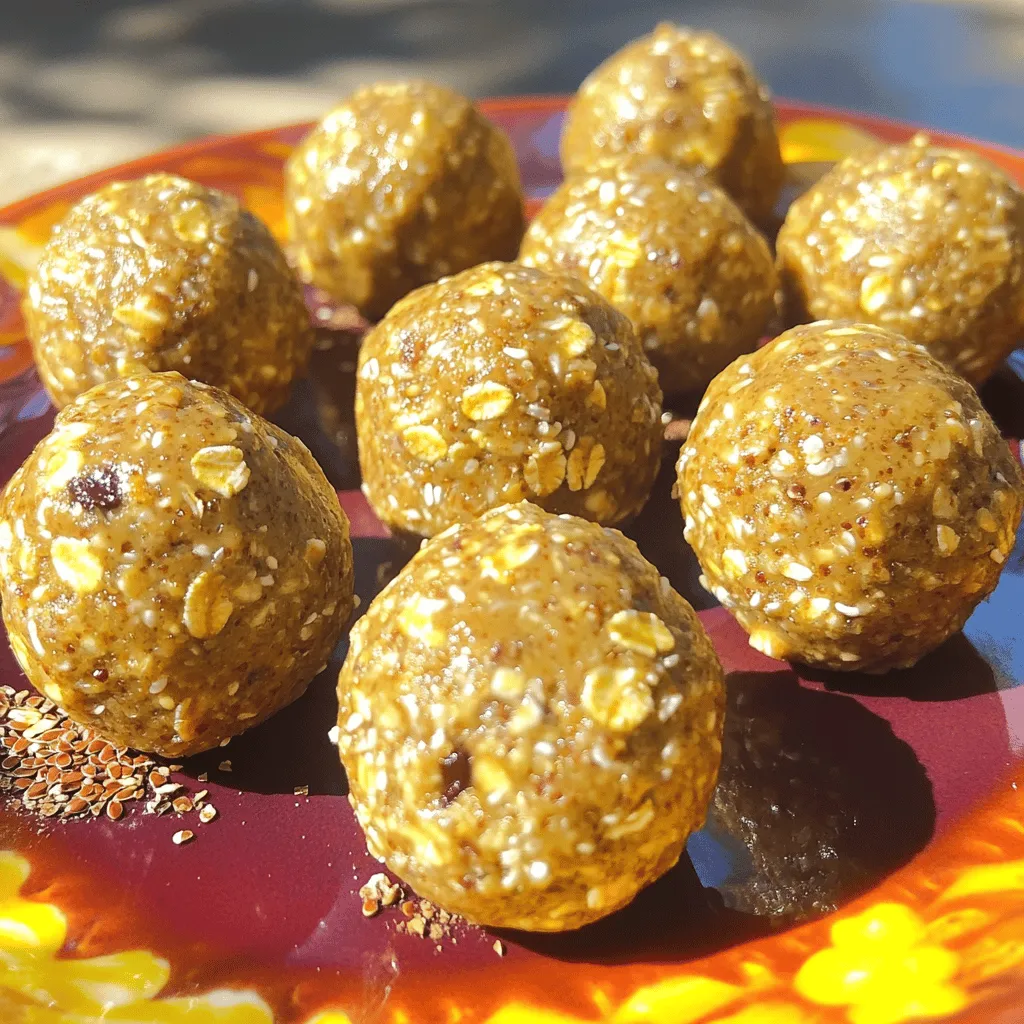
Looking for a quick snack that gives you energy and tastes great? Try my Almond Butter Energy Balls! They are

Older posts
Newer posts
← Previous Page1 … Page40 Page41 Page42 … Page106 Next →
© 2025 My Cooking Cast • Built with GeneratePress

Our Policies

  • Privacy Policy
  • GDPR Policy
  • Terms Of Use
  • Copyright Policy
  • Cookie Policy
  • Disclaimer

More Information​

  • Home
  • Contact
  • About
  • Dinner
  • Appetizers
  • Dessert
©2025, My Cooking Cast About Privacy Policy Back To Top