Skip to content
DisclaimerTerms Of UseGDPR PolicyCookie Policy

My Cooking Cast

  • Home
  • Drinks
  • Appetizers
  • Dinner
  • Dessert
  • About
  • Contact
  • Privacy Policy
DisclaimerTerms Of UseGDPR PolicyCookie Policy

Emma

- 1 lb large shrimp, peeled and deveined - 2 tablespoons Cajun seasoning - 2 tablespoons olive oil - 1 tablespoon lime juice - 8 small corn tortillas - 1 cup red cabbage, thinly sliced - 1 avocado, sliced - ½ cup fresh cilantro, chopped - ½ cup sour cream - 1 tablespoon hot sauce (to taste) - Salt and pepper to taste The ingredients for Spicy Cajun Shrimp Tacos are simple but full of flavor. You start with fresh shrimp, which I find adds the best taste. The Cajun seasoning gives it a nice kick. Use olive oil to help the seasoning stick. A splash of lime juice brightens everything up. For the tacos, I love using small corn tortillas. They hold the shrimp and toppings well. Red cabbage adds a nice crunch, and avocado gives a creamy touch. Fresh cilantro makes it even better. Don’t forget the sauces! A mix of sour cream and hot sauce can change the game. You can add salt and pepper to your taste. These ingredients come together to create a delicious meal. For the complete recipe, check out the [Full Recipe]. Start by taking 1 pound of shrimp. Toss it in a bowl with the Cajun seasoning, olive oil, lime juice, salt, and pepper. Make sure the shrimp gets fully coated. Let it marinate for 15 minutes. This step builds great flavor. Heat a skillet over medium heat. Once hot, add the marinated shrimp. Cook for 2-3 minutes on each side. You want the shrimp to turn pink and opaque. This means they are ready to eat. While the shrimp cooks, warm the corn tortillas. Use a dry skillet and heat them for about 30 seconds on each side. This makes them soft and easy to fold. Now, it’s time to build your tacos! Start with a layer of red cabbage on each tortilla. Add a few pieces of shrimp on top. Then, place slices of avocado and drizzle sour cream mixed with hot sauce. Finish by sprinkling fresh cilantro on top. Enjoy your Spicy Cajun Shrimp Tacos! For the full recipe, check out the earlier section. To make the best shrimp tacos, start by choosing the right shrimp. Look for large shrimp that are fresh and firm. Always check for a nice pink color. If you can, buy shrimp that are wild-caught. They taste better and are healthier. Marinating the shrimp is key to infusing flavor. I recommend letting it sit for at least 15 minutes. This short time allows the spices to soak in. If you have extra time, marinate for up to 30 minutes. Just don’t go too long, or the shrimp can become mushy. Want to kick your tacos up a notch? Add more spices! Consider smoked paprika or garlic powder for added depth. A pinch of cayenne can also boost the heat. Experiment to find your perfect blend. Pair your tacos with the right hot sauce. I suggest a tangy, vinegar-based sauce. It adds a nice zing that complements the shrimp well. Try different brands to discover your favorite. For the best tacos, use small corn tortillas. They hold the filling well and add great flavor. If you prefer flour tortillas, go for it! Just warm them up well before serving. To keep tortillas warm, wrap them in a clean kitchen towel. You can also place them in a covered bowl. This keeps them soft and ready for your shrimp. When you’re ready to serve, your tortillas will be perfect. For the [Full Recipe], check out the complete guide I provided. {{image_2}} To make these tacos gluten-free, use corn tortillas. They are naturally gluten-free and perfect for this dish. For those who need dairy-free options, you can swap sour cream for avocado or a dairy-free yogurt. This keeps the creamy texture without using dairy. You can change the heat level by adding spices like cayenne or smoked paprika. If you want milder tacos, skip the hot sauce or use less Cajun seasoning. For toppings, try adding diced tomatoes, pickled onions, or even sliced jalapeños. You can customize the tacos to suit your taste. These tacos pair well with side dishes like black beans or corn salad. You can also serve them with a light rice dish for a filling meal. For drinks, try a refreshing limeade or a cold beer. These pair nicely with the spice of the tacos. Check the [Full Recipe] for more details on preparation. To keep your tacos fresh, store them in separate containers. Place the shrimp in one container and the toppings in another. This way, the tacos won't get soggy. Use airtight containers to lock in flavor and moisture. I recommend glass containers for easy cleaning and safety. When reheating shrimp, the best method is using a skillet. Heat it over low heat. Add the shrimp and stir until warmed through. This method helps keep the shrimp juicy. For tortillas, use a dry skillet. Heat them for about 30 seconds on each side. This keeps them soft and pliable. Yes, you can freeze cooked shrimp. Place the shrimp in a freezer-safe bag. Try to remove as much air as possible. For assembled tacos, it’s best to freeze the shrimp and toppings separately. When ready to eat, thaw the shrimp overnight in the fridge. Then, reheat and assemble your tacos fresh. This ensures the best taste and texture. How spicy are Cajun shrimp tacos? Cajun shrimp tacos pack a nice heat. The spice level depends on the Cajun seasoning you choose. Many blends have paprika, cayenne, and garlic. If you prefer less heat, use less seasoning or try a milder blend. Can I use frozen shrimp for this recipe? Yes, you can use frozen shrimp! Just thaw them first. Place them in cold water for quick thawing. Pat them dry before marinating. This helps the seasoning stick well. How long does it take to make Spicy Cajun Shrimp Tacos? Making these tacos takes about 30 minutes. You spend 15 minutes marinating the shrimp. Cooking and assembling the tacos takes another 15 minutes. It’s quick and easy! What can I use instead of Cajun seasoning? If you don’t have Cajun seasoning, use taco seasoning or a mix of spices. Combine chili powder, paprika, garlic powder, and black pepper for a good flavor. Adjust to your taste. What sides go well with this recipe? Crispy coleslaw, corn on the cob, or a fresh salad pair nicely. You can also serve with chips and salsa for a fun crunch. Can I make these tacos ahead of time? You can prep the shrimp and toppings ahead. Store them in the fridge for up to a day. Just warm the shrimp and tortillas before serving. Enjoy your flavorful meal! Making Spicy Cajun Shrimp Tacos is straightforward and fun. We covered the main ingredients, cooking methods, and storage tips. These tacos are great for all tastes. You can adapt them for different diets or spice levels. Experiment with flavors and toppings to make them your own. Remember, the best taco comes from fresh ingredients and a little creativity. Enjoy your cooking, and you'll impress everyone with these delicious tacos!

Spicy Cajun Shrimp Tacos Flavorful and Simple Dish

Are you ready to bring the taste of the bayou to your table? Spicy Cajun Shrimp Tacos are quick, fun,

To make your Cherry Almond Breakfast Bars, gather these simple ingredients: - 1 cup rolled oats - ½ cup almond flour - ½ cup pitted chopped cherries (fresh or dried) - ¼ cup honey or maple syrup - ½ cup almond butter - ¼ cup sliced almonds - 1 teaspoon vanilla extract - 1 teaspoon baking powder - ½ teaspoon cinnamon - ¼ teaspoon salt Each Cherry Almond Breakfast Bar offers a balanced mix of nutrients. Here’s what you get per serving (1 bar): - Calories: Approximately 150 - Protein: 4 grams - Carbohydrates: 20 grams - Dietary Fiber: 3 grams - Sugars: 6 grams - Fats: 7 grams - Rolled Oats: These provide energy and help keep you full. They are high in fiber and can lower cholesterol. - Almond Flour: This flour is rich in healthy fats and protein. It also has vitamin E, which supports skin health. - Cherries: Cherries are packed with antioxidants. They can help reduce inflammation and improve sleep quality. - Almond Butter: This adds creaminess and is a good source of healthy fats. It also supports heart health. - Honey or Maple Syrup: These natural sweeteners offer quick energy while adding flavor without refined sugars. - Cinnamon: This spice can add flavor and may help regulate blood sugar levels. These ingredients not only make a tasty snack but also provide many health benefits. For the full recipe, check out the details above. First, gather all your ingredients. You need oats, almond flour, cherries, honey, almond butter, sliced almonds, vanilla, baking powder, cinnamon, and salt. Preheat your oven to 350°F (175°C). Line an 8x8 inch baking dish with parchment paper. Leave some overhang to lift the bars out later. In a large bowl, mix the oats, almond flour, baking powder, cinnamon, and salt. Stir until well combined. In another bowl, whisk the almond butter, honey, and vanilla until smooth. Pour the wet mix into the dry mix. Stir until it’s all combined and thick. Gently fold in the chopped cherries and sliced almonds. Spoon this mixture into the baking dish. Press it down evenly to form a compact layer. Bake for 20-25 minutes. The edges should be golden. A toothpick should come out clean when tested. After baking, let the dish cool for about 10 minutes. Use the parchment paper to lift the bars out of the pan. Place them on a wire rack to cool completely. Once cooled, cut into bars of your choice. You can serve them stacked on a wooden board. Fresh cherries and almonds make a nice touch for a pretty display. Enjoy this tasty snack with family or friends! For the full recipe, check the earlier section. When making Cherry Almond Breakfast Bars, watch out for a few common mistakes. First, don’t skip the baking powder. It helps the bars rise and become fluffy. Second, avoid overmixing the batter. This can make the bars tough. Mix just until combined. Lastly, make sure to press the mixture firmly into the pan. This keeps the bars from crumbling later. For the best texture, use fresh ingredients. Fresh cherries have more moisture, which helps keep the bars soft. If you use dried cherries, soak them in warm water for 10 minutes. This adds moisture back into the fruit. Also, let the bars cool completely before cutting. This helps them set up nicely and stay together. To boost the flavor of your Cherry Almond Breakfast Bars, try adding a pinch of nutmeg. It pairs well with cinnamon. You can also mix in a bit of orange zest. This brightens the taste and adds a fresh twist. If you like a little crunch, toss in some shredded coconut or sunflower seeds. These will add a fun texture and extra flavor. {{image_2}} If you need a change from almond flour, try using coconut flour. Coconut flour adds a sweet taste and pairs well with cherries. You can also use oat flour. It keeps the bars chewy and hearty. When substituting, use less coconut flour. Coconut flour absorbs more liquid than almond flour. Start with just 1/4 cup and adjust as needed. For sweeteners, honey and maple syrup are great choices, but you can switch it up. Try agave syrup for a light flavor. You can also use stevia or monk fruit for a low-calorie option. If you like dates, pureed dates work well too. They add moisture and natural sweetness to the bars. Feel free to get creative with other fruits and nuts! Dried cranberries or blueberries can add a burst of flavor. You could even mix in some chopped apples for a tart kick. For nuts, walnuts or pecans bring a nice crunch. Just make sure to keep the total amount of mix-ins similar to the cherries and almonds to maintain texture. For the full recipe, check out the link! To keep your Cherry Almond Breakfast Bars fresh, store them in an airtight container. This will help maintain their moisture and flavor. You can place parchment paper between the bars to prevent sticking. Make sure to keep the container in a cool, dry place. If you want to save some for later, freezing is a great option. Cut the bars into pieces first. Wrap each bar tightly in plastic wrap. Then, put them in a freezer-safe bag or container. Label the bag with the date. You can freeze them for up to three months. These bars last about five days at room temperature. If you want to enjoy them longer, refrigerating is best. They will stay fresh for about two weeks in the fridge. For the best taste, eat them within the first week. The flavors are at their peak right after baking. For a quick snack, enjoy them straight from the fridge or at room temperature. You can find the Full Recipe for more details on how to make these delicious bars. Yes, you can use frozen cherries. Just thaw and drain them first. This keeps the bars from becoming too wet. Frozen cherries work well and taste great too. You can use peanut butter or sunflower seed butter. Both options give a nice flavor. They also make the bars creamy. To make these bars vegan, use maple syrup instead of honey. You can also swap almond butter for another vegan option. This way, everyone can enjoy them. Yes, these bars are healthy! They have oats, nuts, and fruit. These ingredients provide fiber and protein. Eating them gives you energy for the day. You can find the full recipe for Cherry Almond Breakfast Bars by visiting the recipe section. This includes all the steps and tips you need. We covered all you need for making Cherry Almond Breakfast Bars. You learned the key ingredients and their health benefits. The step-by-step guide helps you bake with ease. Avoid mistakes with tips for perfect texture and flavor. Explore variations to suit your taste and dietary needs. Finally, remember how to store and freeze these bars for later. Enjoy making and sharing these tasty snacks! Your mornings just got better with this healthy treat.

Cherry Almond Breakfast Bars Tasty and Nutritious Snack

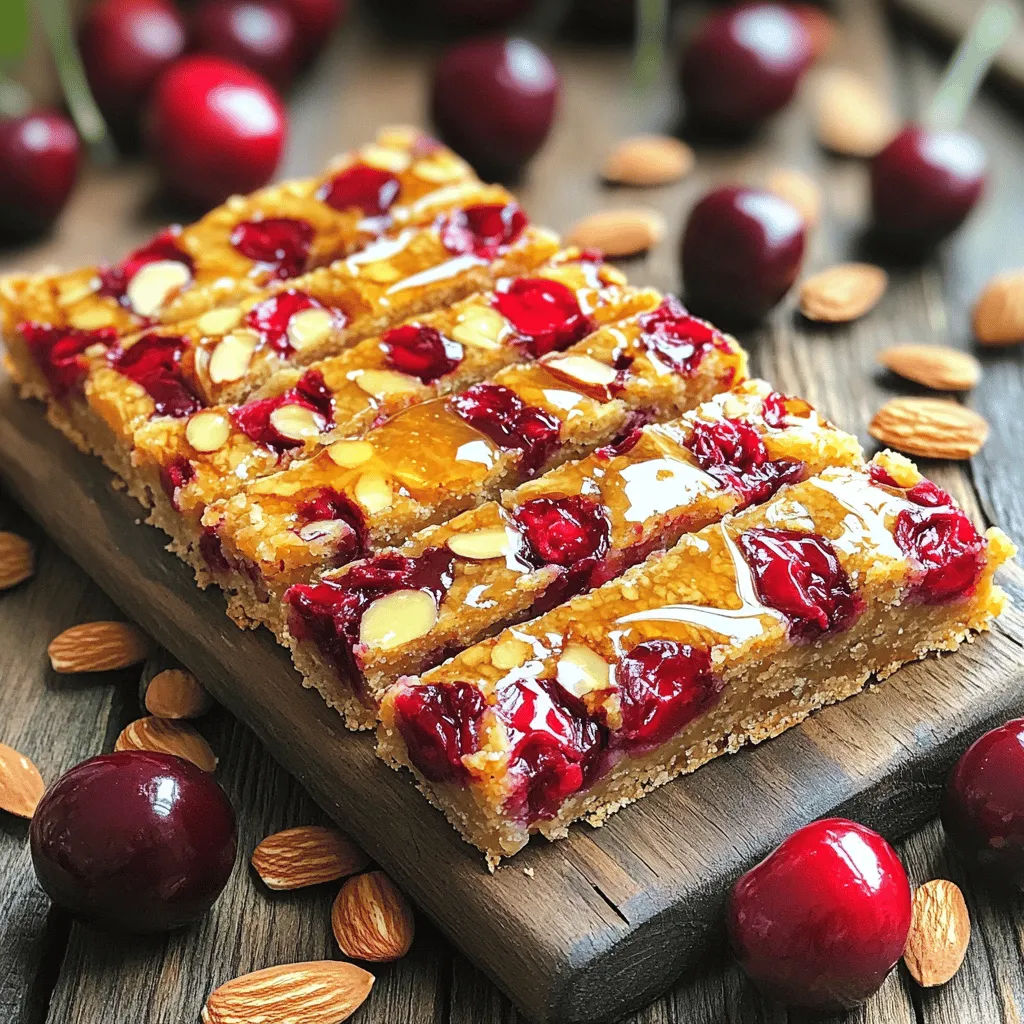
Are you looking for a tasty and nutritious snack to kick-start your day? Cherry Almond Breakfast Bars are the perfect

- 1 pre-made pizza dough - 1 cup cooked chicken, shredded - 1/2 cup ranch dressing - 1 cup shredded mozzarella cheese - 1 cup dill pickles, sliced - 1/2 red onion, thinly sliced For my Pickle Ranch Chicken Pizza, I start with a pre-made pizza dough. This saves time and keeps things simple. You can find it in the store or make your own if you prefer. I use one cup of cooked and shredded chicken. This gives the pizza a great protein boost. My favorite is rotisserie chicken because it’s juicy and full of flavor. Next, I add half a cup of ranch dressing. This dressing brings a creamy and tangy taste that pairs well with chicken. The cheese is important too! I use one cup of shredded mozzarella cheese, which melts beautifully. Now, let's talk pickles. I add one cup of sliced dill pickles. They add a crunchy and zesty flavor that makes this pizza shine. Lastly, I slice half a red onion thinly. The onion adds sweetness and depth to the dish. - 1/4 teaspoon garlic powder - 1/4 teaspoon black pepper - Fresh dill, for garnish (optional) For seasoning, I use just a little garlic powder and black pepper. Each of these adds a nice touch without overpowering the other flavors. If you want, you can sprinkle some fresh dill on top as a garnish. It adds a pop of color and extra flavor. These ingredients combine to create a tasty pizza that your family will love. If you want to see the entire process, check out the Full Recipe. - Preheat your oven to 475°F (245°C) or follow your pizza dough instructions. - Roll out the pre-made pizza dough on a floured surface. You want it thin but not too thin. - In a bowl, mix the shredded chicken with ranch dressing, garlic powder, and black pepper. - Spread this chicken mixture evenly over the pizza dough. - Sprinkle the shredded mozzarella cheese generously on top. - Next, lay out dill pickle slices evenly across the cheese. - Finish by adding thin slices of red onion on top. - Bake the pizza in the preheated oven for 12-15 minutes. Watch for a golden brown crust. - Once it’s done, take it out and let it cool for a few minutes. - Slice the pizza before serving. If you like, add fresh dill on top for extra flavor. You can check the Full Recipe for more details and tips! To get a tasty crust, rolling matters. If you want a chewy crust, roll it thick. For a crispier crust, roll it thin. Press down firmly, but don't overdo it. Bake your pizza at 475°F (245°C). This high heat cooks the crust fast. Check it after 12 minutes. The crust should be golden brown. If not, give it a few more minutes. For the chicken, grilled or rotisserie works best. Both add great taste. Grilled chicken gives a smoky flavor. Rotisserie chicken is easy and tender. Ranch dressing can change the pizza's taste. Try different types. Spicy ranch adds a kick. Buttermilk ranch is creamy and smooth. Choose what you love most. Make your pizza pretty with herbs. Fresh dill looks great and adds flavor. Use other toppings too, like bacon or olives, for more fun. Serve this pizza with a side salad. A crunchy salad pairs well. You can also add some fruit on the side for color. It makes the meal feel complete. For the full recipe, see the section above. {{image_2}} You can easily change up your Pickle Ranch Chicken Pizza with fun swaps. - Try adding crispy bacon for a smoky flavor. - Bell peppers add crunch and color. - If you want a spicy kick, jalapeños work great. - Switch ranch dressing for BBQ sauce if you prefer a sweet taste. - Experiment with blue cheese dressing for a tangy twist. Making this pizza fit your diet is simple. - Use gluten-free pizza dough for a healthier option. - For a lower-fat pizza, choose low-fat cheese. - Plant-based cheese or chicken can be used for a vegan meal. - Cauliflower crusts are a tasty option for gluten-free and low-carb diets. You can also change the taste with a few easy tweaks. - Add garlic powder or crushed red pepper for more heat. - Fresh herbs like basil or oregano can add a fresh taste. - For sweet and savory, consider adding a drizzle of honey after baking. - A sprinkle of lemon zest can brighten up the whole dish. Explore these variations to make your Pickle Ranch Chicken Pizza one-of-a-kind! For the full recipe, check out the details above. Enjoy cooking! To keep leftover Pickle Ranch Chicken Pizza fresh, store it in the fridge. First, let the pizza cool down. Then, slice it into pieces. Use an airtight container or wrap the slices in plastic wrap. This keeps the pizza from drying out. It’s best to eat the leftovers within three days for the best taste. When reheating, I recommend using an oven for the best results. Preheat your oven to 375°F (190°C). Place the pizza slices on a baking sheet. Heat for about 10 minutes or until warm. This method keeps the crust crispy. If you use a microwave, place a paper towel under the pizza. This helps absorb moisture. Heat in short bursts of 30 seconds to avoid sogginess. Yes, you can use homemade pizza dough. Making your own dough is simple and fun. Combine flour, water, yeast, and salt to create a soft dough. Let it rise until it doubles in size. Roll it into your desired shape. This gives you a fresh base for your Pickle Ranch Chicken Pizza. You can also experiment with whole wheat flour for added nutrition. Definitely! This recipe is perfect for kids. If your children are picky eaters, try these tips. You can reduce the amount of pickles or omit the red onion. You might also swap ranch dressing for a milder sauce. Let your kids help make the pizza. They can add their favorite toppings too! Side dishes make this meal even better. Here are some great ideas: - Fresh salad: A simple green salad adds crunch. - Carrot sticks: These are easy to eat and healthy. - Fruit platter: Cut-up fruits like apples or grapes are sweet and fun. - Garlic bread: This is always a hit with pizza lovers. You can easily make this dish healthier. Here are some suggestions: - Use whole wheat dough: This adds fiber and nutrients. - Choose low-fat cheese: This cuts down on calories and fat. - Add more veggies: Bell peppers and spinach boost nutrition. - Limit ranch dressing: Use less or try a yogurt-based dressing. For the full recipe, check out the earlier section! This blog post showed you how to make a delicious Pickle Ranch Chicken Pizza. We covered the main ingredients, from dough to toppings, and detailed easy steps for preparation and baking. You learned tips for a perfect crust and flavor boosts too. Options for variations and storage kept your needs in mind. Enjoy trying this recipe and feel free to experiment with your own toppings! You’ll find that making pizza at home is simple and fun. Happy cooking!

Pickle Ranch Chicken Pizza Flavorful Family Dinner

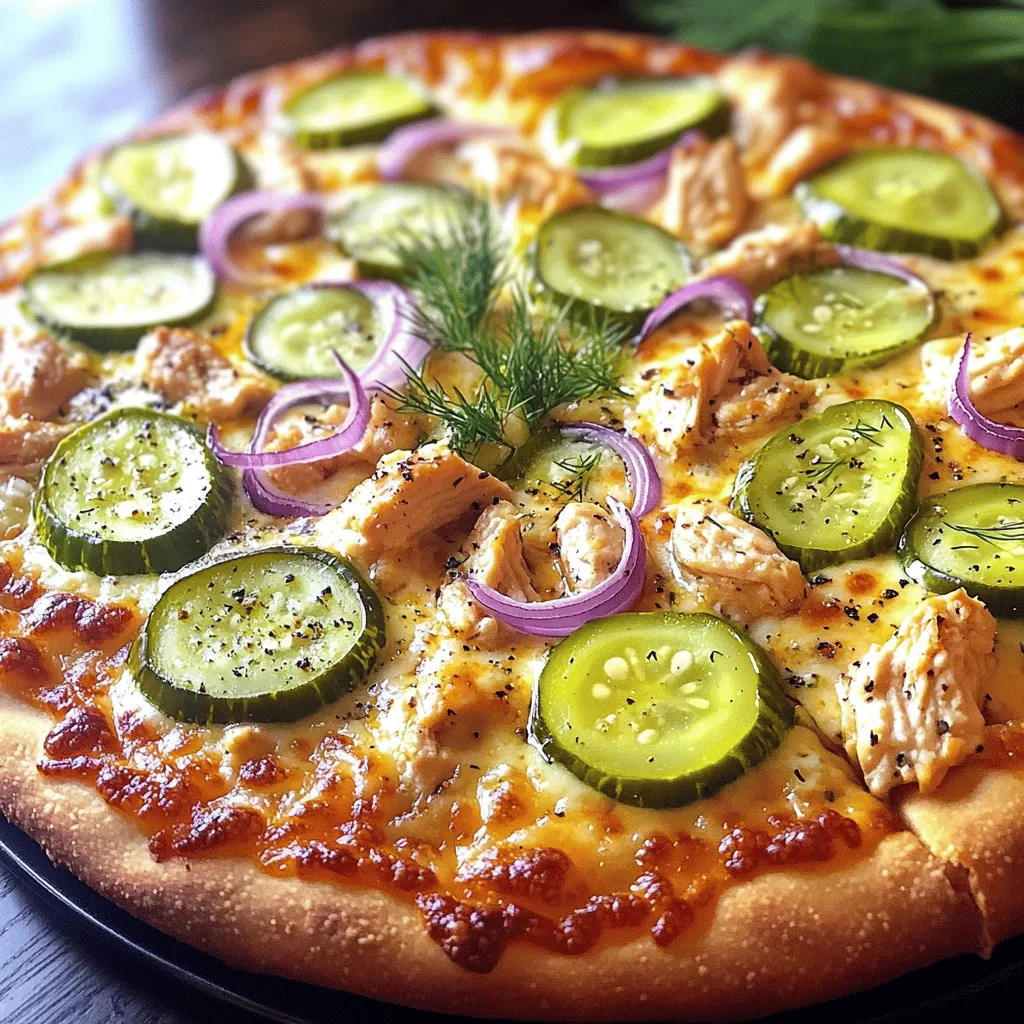
Craving a new family dinner idea? Let’s whip up a delicious Pickle Ranch Chicken Pizza! This fun and tasty dish

To make Cherry Coconut Cake Bites, you will need some simple ingredients. Here’s a complete list: - 1 cup all-purpose flour - 1/2 cup shredded coconut (unsweetened) - 1/2 cup cherry preserves - 1/2 cup granulated sugar - 1/4 cup unsalted butter, softened - 1/2 cup milk - 1 large egg - 1 teaspoon baking powder - 1/2 teaspoon vanilla extract - Pinch of salt - Extra shredded coconut for coating - Dark chocolate (for drizzling, optional) Each ingredient plays a key role in making these bites delightful. The all-purpose flour gives structure, while the shredded coconut adds a chewy texture. Cherry preserves bring sweetness and a burst of fruity flavor. Granulated sugar balances the flavors, and unsalted butter keeps the bites moist. Milk and eggs help bind everything together, creating a smooth batter. Baking powder ensures the bites rise well, giving them a light texture. Vanilla extract adds depth to the flavor, and a pinch of salt enhances all the tastes. For the finishing touch, extra shredded coconut creates a delightful coating, and dark chocolate drizzle adds a rich contrast. You can find the full details in the Full Recipe. Make sure to gather all these ingredients before you start! 1. Preheat your oven to 350°F (175°C). This helps the cake bake evenly. 2. Prepare an 8-inch baking dish with parchment paper. Leave some overhang for easy removal later. 3. In a large bowl, cream together 1/4 cup softened unsalted butter and 1/2 cup granulated sugar. Mix until it becomes light and fluffy. 4. Beat in 1 large egg and 1/2 teaspoon vanilla extract until well combined. This adds flavor and richness to your cake. 1. In another bowl, sift together 1 cup all-purpose flour, 1 teaspoon baking powder, a pinch of salt, and 1/2 cup shredded coconut. Sifting makes the flour light and helps the cake rise. 2. Gradually combine the wet and dry mixtures. Start with the dry ingredients, alternating with 1/2 cup milk. Mix until just combined. Be careful not to overmix. 3. Fold in 1/2 cup cherry preserves. This adds fruity goodness and color to your cake. 1. Pour half of the batter into your prepared baking dish. Spread it evenly to form the base. 2. Spoon dollops of cherry preserves over the batter. Use a knife to gently swirl it in for an even distribution. 3. Pour the remaining batter over the cherry layer and smooth the top. 4. Bake for 25-30 minutes. Check for doneness by inserting a toothpick in the center. It should come out clean. 1. Allow the cake to cool completely in the baking dish on a wire rack. This helps it set well. 2. Once cooled, lift the cake out using the parchment overhang. Cut it into small bite-sized pieces. 3. Roll each piece in extra shredded coconut to coat. You can also drizzle with dark chocolate for a sweet touch. For more details, check the Full Recipe. - How to achieve the perfect texture: For soft cake bites, mix the butter and sugar well. Creaming them together makes the cake light. Be careful not to overmix the batter once you add the dry ingredients. This keeps the cake tender. - Alternative baking times and temperatures: If you want smaller bites, adjust the baking time. For mini cake bites, bake for 15-20 minutes. Always check with a toothpick. If it comes out clean, the cake is done. - Arranging the cake bites on a platter: Use a colorful platter for a fun look. Place the cake bites in rows or circles. This adds a nice touch to your spread. - Garnishing ideas to enhance appearance: Top each bite with a cherry or a sprinkle of coconut. You can also drizzle melted chocolate on top. This adds flavor and makes them pretty. - Suggestions for adding spices or extracts: Want more flavor? Add a pinch of cinnamon or nutmeg. You can also use almond extract instead of vanilla for a unique twist. - Tips for adjusting sweetness and tartness: If you like it sweeter, add more sugar to the batter. To balance the tartness, mix in a bit more cherry preserves. This helps create a rich flavor. For the full recipe, refer to the Cherry Coconut Cake Bites section. {{image_2}} You can easily swap ingredients for the Cherry Coconut Cake Bites. If you need gluten-free options, use almond flour or a gluten-free flour blend. These work well and still taste great. For a vegan version, replace the egg with a flax egg or applesauce. Use plant-based milk and vegan butter for a delicious twist. Want to change up the flavor? Try using different fruit preserves. Raspberry, apricot, or even mango can add a unique taste. You can also mix in chopped nuts like almonds or walnuts for crunch. If you love chocolate, add white or milk chocolate chips for a sweet surprise. Make these bites festive by adjusting the recipe for holidays. For Christmas, add a dash of cinnamon or nutmeg. You can top the bites with crushed peppermint candies for a fun look. For birthdays, decorate with colorful sprinkles or drizzle with colored chocolate. These ideas make the cake bites perfect for any special occasion! To keep your Cherry Coconut Cake Bites fresh, store them in an airtight container. Use a container that is just the right size. This way, the bites do not move around too much. If you have extra bites, layer them with parchment paper to avoid sticking. You can freeze these cake bites for later enjoyment. First, let them cool completely. Then, wrap each bite in plastic wrap. Place the wrapped bites in a freezer bag or container. When you want to eat them, take out only what you need. To thaw, leave the bites in the fridge overnight. This keeps them soft and tasty. These cake bites last up to a week in the fridge. For best taste, eat them within five days. If you freeze them, they can last up to three months. Just remember, the quicker you eat them, the fresher they taste. Check the [Full Recipe] for more tips on making and storing these treats! Can I make this recipe ahead of time? Yes, you can make these cake bites a day in advance. Store them in an airtight container. This helps the flavors meld together nicely. How do I ensure the cake bites stay moist? To keep your cake bites moist, avoid overbaking. Check them a few minutes early. You can also brush them with a little cherry syrup after baking for added moisture. What to do if the cake doesn’t rise properly? If your cake bites don’t rise, check your baking powder. Make sure it is fresh. Also, avoid opening the oven too early, as this can cause them to sink. How to handle the cherry preserves if too runny? If your cherry preserves are too runny, try mixing in a bit of cornstarch. Heat them on low heat until thickened. This will help them set better in the cake. Can I add other fruits or flavors? Absolutely! You can use peach or raspberry preserves instead of cherry. Feel free to mix in nuts or spices for extra flavor. What is the best way to serve these cake bites? Serve these cake bites on a pretty platter with fresh cherries on top. You can also drizzle them with dark chocolate for a fun touch. For a party, these bites are perfect finger foods! For the full recipe, check the details above. Enjoy making your Cherry Coconut Cake Bites! This blog shared a simple and fun cake bite recipe. You learned about the key ingredients, like coconut and cherry preserves. I provided easy steps for mixing and baking. You also found tips to make it look and taste amazing. Lastly, there are ideas for flavor swaps and storing your treats. Enjoy making these cake bites. They are perfect for any occasion!

Cherry Coconut Cake Bites Delightful and Easy Treat

If you crave a simple yet delightful treat, Cherry Coconut Cake Bites are your answer! These easy-to-make bites combine sweet

- 1 ½ cups rolled oats - ½ cup unsweetened almond butter - ⅓ cup honey or maple syrup - ½ cup dried cherries, chopped - ½ cup dark chocolate chips - ¼ cup slivered almonds - ¼ teaspoon salt - 1 teaspoon vanilla extract The ingredients in these cherry chocolate chip granola bars create a perfect balance of flavors. The rolled oats give a hearty base, and the almond butter adds a rich creaminess. Honey or maple syrup provides natural sweetness. Dried cherries bring a tart burst, while dark chocolate chips give a sweet touch. Slivered almonds add a nice crunch, and salt enhances all the flavors. - Mixing bowl - Baking pan (8-inch square) - Parchment paper - Spatula - Small saucepan Having the right tools makes cooking easier. A mixing bowl is essential for combining ingredients. A baking pan lined with parchment paper ensures easy removal later. A spatula helps mix and press the mixture down firmly. Lastly, a small saucepan is needed for melting the almond butter with honey. These tools help you create delicious bars with ease. You can find the full recipe in the earlier section for all the steps. Enjoy! First, preheat your oven to 350°F (175°C). This step is key for even baking. Next, grab an 8-inch square baking pan. Line it with parchment paper, leaving some edges hanging. This makes it easy to remove the bars later. Now, let’s mix the dry ingredients. In a large bowl, combine: - 1 ½ cups rolled oats - ½ cup dried cherries, chopped - ½ cup dark chocolate chips - ¼ cup slivered almonds - ¼ teaspoon salt Stir these ingredients well until they are evenly mixed. Now, melt the almond butter mixture. In a small saucepan, combine: - ½ cup unsweetened almond butter - ⅓ cup honey or maple syrup - 1 teaspoon vanilla extract Heat this over low heat. Stir gently until the mixture is smooth and warm. Once melted, pour it over the dry ingredients in your mixing bowl. Mix everything well until the oats and fruits are fully coated. Next, transfer your mixture to the prepared pan. Press it firmly into the pan using a spatula or your hands. Make sure it is even. Bake in the oven for 15-20 minutes. Look for golden edges; that's your cue it's done. After baking, remove the pan and let it cool for 30 minutes. Use the parchment paper to lift the granola out easily. Finally, cut it into bars or squares. Enjoy these delicious Cherry Chocolate Chip Granola Bars! For the complete recipe, see the [Full Recipe]. To make the best cherry chocolate chip granola bars, even mixing is key. Mix the dry ingredients well to ensure every bite is full of flavor. When adding the wet mixture, press the mixture firmly into the pan. This helps the bars stick together better. A good press leads to a nice, sturdy bar that won’t crumble when you take a bite. For a beautiful presentation, arrange the bars on a nice plate. You can also wrap each bar in parchment paper and tie it with string. This makes a lovely gift for friends or family. Pair these tasty bars with a glass of cold milk or a cup of coffee. The flavors of cherry and chocolate go great with these drinks. If you have allergies, there are easy substitutions. You can use sunflower seed butter instead of almond butter for nut-free bars. To make these bars vegan, replace honey with maple syrup. Each change keeps the bars delicious while meeting your needs. Enjoy making them your own! {{image_2}} You can make your cherry chocolate chip granola bars even better by adding nuts or seeds. Consider using walnuts, pecans, or sunflower seeds. These add both taste and good fats. You can also swap dried cherries for other dried fruits, like cranberries or apricots. Each option gives a new twist to the bars. To make your bars extra crunchy, add crispy rice. This small change creates a fun texture. You can also adjust the sweetness level. If you like it less sweet, use less honey or maple syrup. If you want a sweeter treat, add more chocolate chips. You can create your granola bars with different base ingredients. Try peanut butter instead of almond butter. This small swap changes the flavor nicely. You can also experiment with spices. A pinch of cinnamon or nutmeg can add warmth. Each change can lead to a unique version of your bars. For the full recipe, check the section above. To keep your cherry chocolate chip granola bars fresh, use an airtight container. A glass jar or a plastic container works well. Make sure to seal it tightly to keep air out. You can also wrap each bar in parchment paper for extra protection. If you want to store them longer, freezing is a great option. Place the bars in a freezer-safe bag. Remove as much air as possible before sealing. They can last up to three months in the freezer. When you're ready to eat, let them thaw in the fridge or at room temperature. These granola bars can last about one week in your pantry. If you store them in the fridge, they may last up to two weeks. Always check for freshness before eating. Look for any signs of spoilage. If the bars smell off or feel too hard, it’s best to toss them out. Freshness is key for enjoying their great taste! Cherry chocolate chip granola bars last about one week when stored in an airtight container at room temperature. If you keep them in the fridge, they can stay fresh for up to two weeks. For longer storage, you can freeze them. Wrap each bar in plastic wrap and then place them in a freezer bag. They will last for about three months in the freezer. Yes, you can easily make these granola bars gluten-free! Just use gluten-free rolled oats. Many brands offer gluten-free oats that are safe for those with gluten sensitivities. Always check the label to ensure they are certified gluten-free. This small change keeps the delicious taste while making them suitable for everyone. If you need a substitute for almond butter, try peanut butter or sunflower seed butter. Both options work well in this recipe. They add creaminess and flavor similar to almond butter. If you want a nut-free version, sunflower seed butter is a great choice. You can find cherry chocolate chip granola bars in many grocery stores. Check the snack aisle or the health food section. Some stores may carry them in bulk bins too. If you want fresh bars, try local bakeries or specialty shops that focus on healthy snacks. Using fresh cherries instead of dried is possible, but it will change the texture. Fresh cherries have more moisture. This can make the bars softer and harder to hold together. If you choose fresh cherries, chop them and reduce the amount of other wet ingredients slightly to balance the moisture. This blog post covered how to make cherry chocolate chip granola bars. We looked at required ingredients, helpful tools, and step-by-step instructions. I shared tips for perfecting your bars and fun variations to try. Lastly, I discussed storage methods to keep your snacks fresh. Remember, making these bars lets you customize flavors and textures to fit your taste. Enjoy your homemade treats, and don't forget to share them with friends!

Cherry Chocolate Chip Granola Bars Delicious Treat

Are you ready to enjoy a tasty, healthy snack? These Cherry Chocolate Chip Granola Bars blend sweet cherries with rich

- 2 cups cooked shredded chicken - 1/2 cup cream cheese, softened - 1/4 cup ranch dressing - 1 cup shredded cheddar cheese - 4 large bell peppers (any color) - 1/2 cup dill pickles, chopped - 1/4 teaspoon garlic powder - 1/4 teaspoon onion powder - Salt and pepper to taste - Fresh dill for garnish These ingredients make my Pickle Ranch Chicken Stuffed Peppers a tasty delight. The chicken and cheese create a creamy filling. The dill pickles add a nice crunch. The ranch dressing gives it a zesty kick. You can use any color bell pepper. Red, green, yellow, or orange all work well. The peppers hold the filling and add flavor. Feel free to adjust the seasonings to your taste. If you love garlic, add more garlic powder. If you want more zest, increase the dill pickles. Using quality ingredients matters. I recommend fresh herbs and high-quality cheese. These choices enhance the flavor and texture. For the full recipe, check the details to create this dish at home. Enjoy cooking! Prepping the Peppers Start by preheating your oven to 375°F (190°C). While the oven heats, take your bell peppers and cut off the tops. Remove the seeds and membranes. Place the peppers upright in a baking dish. This way, they stand firm and hold all that tasty filling. Making the Filling In a large mixing bowl, combine 2 cups of cooked shredded chicken, 1/2 cup of chopped dill pickles, and 1/2 cup of softened cream cheese. Add 1/4 cup of ranch dressing for that creamy, zesty flavor. Then, mix in half of the 1 cup of shredded cheddar cheese, along with 1/4 teaspoon of garlic powder and 1/4 teaspoon of onion powder. Finally, add salt and pepper to taste. Mix it all well until it's nice and creamy. Assembling the Stuffed Peppers Now, take that delicious filling and spoon it into each pepper. Pack it tightly so each bite is full of flavor. Once each pepper is filled, sprinkle the remaining cheddar cheese on top. This will create a lovely cheesy crust once baked. Baking the Stuffed Peppers Cover the baking dish with aluminum foil. Bake the peppers for 25 minutes. This step helps cook the peppers and warm the filling. After 25 minutes, remove the foil and let the cheese get bubbly. Bake for an additional 10-15 minutes, watching closely until the cheese is fully melted. Achieving the Perfect Cheese Melt The cheese should be golden and bubbling when ready. Let the stuffed peppers cool for a few minutes before serving. If you like, garnish with fresh dill for an extra pop of flavor. Enjoy your flavorful Pickle Ranch Chicken Stuffed Peppers! For the complete recipe, check out the [Full Recipe]. For great taste, use salt, pepper, garlic powder, and onion powder. These seasonings add depth to the dish. You can also try adding smoked paprika for a hint of warmth. Optional Add-ins: - Chopped green onions for a fresh crunch. - Jalapeños for a spicy kick. - Cooked bacon bits for extra flavor. Proper Pepper Preparation: Start with fresh, firm bell peppers. Cut the tops off and remove seeds. This step makes filling easy and keeps the peppers intact. Stand them upright in a baking dish for even cooking. Baking Techniques for Even Cooking: Cover the dish with foil for the first part of baking. This traps steam and helps cook the peppers. After 25 minutes, remove the foil to brown the cheese. This creates a nice, bubbly topping. For the full recipe, check the [Full Recipe]. {{image_2}} You can switch up the proteins in this dish. Try using turkey instead of chicken. Turkey gives a leaner taste and is just as tasty. If you want a plant-based option, tofu works great too. Just ensure you press the tofu to remove excess water. This way, it absorbs the flavors well. For cream cheese, you can use Greek yogurt. It adds a tangy flavor and makes the dish lighter. If you want a dairy-free option, try cashew cream. Soak cashews in water, then blend them until smooth. This adds a great creamy texture without dairy. If you love spice, add diced jalapeños or red pepper flakes to your mixture. This will heat things up and give it a nice kick. You can also use spicy ranch dressing for more flavor. Adjust the heat to your taste. Herbs can change the whole vibe of your stuffed peppers. Try adding fresh basil or parsley for a fresh touch. You can also use dried herbs like oregano or thyme. These herbs pair well with the chicken and pickles, enhancing the overall taste. For the full recipe, check out the complete details. Enjoy your culinary adventure! To keep your pickle ranch chicken stuffed peppers fresh, store them correctly. For short-term storage, place leftovers in an airtight container. They stay good in the fridge for about 3 to 4 days. If you want to keep them longer, freeze them. Wrap each pepper tightly in plastic wrap, then place them in a freezer-safe bag. This way, they can last for up to 3 months. When you’re ready to enjoy your stuffed peppers again, reheating is key. The best method is in the oven. Preheat your oven to 350°F (175°C). Place the peppers in a baking dish and cover with foil. Heat for about 20 minutes. This keeps the peppers moist and helps the cheese melt perfectly. You can also use the microwave for a quick fix. Just cover the peppers with a damp paper towel and heat for 2 to 3 minutes. Enjoy your flavorful delight again! Can I make this recipe ahead of time? Yes, you can prepare the stuffed peppers a day ahead. Just store them in the fridge. When ready to cook, bake them as the recipe states. This saves time and makes your meal easy. Can I freeze stuffed peppers? Absolutely! After baking, let them cool, then wrap in foil. Store in a freezer bag for up to three months. When you want to eat them, thaw and reheat in the oven. What are the best sides to serve with stuffed peppers? Great sides include a fresh garden salad, some garlic bread, or a light soup. These pair well and balance the flavors of the stuffed peppers. How to make Pickle Ranch Chicken Stuffed Peppers healthier? To make these peppers healthier, use grilled chicken instead of fried. You can also swap out cream cheese for Greek yogurt. This gives you a creamy taste with less fat. What can I substitute for ranch dressing? If you don't have ranch dressing, try using a blend of yogurt, herbs, and a splash of vinegar. This gives a fresh taste and keeps the creamy texture. For more ideas, check out the Full Recipe. In this post, we explored delicious stuffed peppers. I covered the ingredients, prepping steps, and cooking methods. You learned tips to boost flavor and variations for everyone’s taste. Proper storage advice helps you keep your meal fresh. Finally, I answered common questions to make cooking easier. Enjoy making these tasty meals! They are fun to create and great to share with loved ones. Your kitchen can be a place for tasty adventures and simple pleasures.

Pickle Ranch Chicken Stuffed Peppers Flavorful Delight

Are you ready to dive into a flavorful delight? My Pickle Ranch Chicken Stuffed Peppers will impress your taste buds

- 1 cup fresh or frozen cherries, pitted and halved - 1/2 cup pecans, roughly chopped - 1 1/2 cups all-purpose flour - 1 cup granulated sugar - 1/2 cup unsalted butter, melted - 2 large eggs - 1/2 cup buttermilk - 1 teaspoon vanilla extract - 1 teaspoon baking powder - 1/2 teaspoon baking soda - 1/4 teaspoon salt I love using fresh or frozen cherries in my muffins. They add a sweet, juicy burst. Pitting and halving them is easy. Just slice them in half and remove the pit. If you use frozen cherries, let them thaw first. This prevents too much moisture in your batter. Pecans give a nice crunch. I always chop them roughly for the best texture. The all-purpose flour is the base. It helps the muffins rise and stay fluffy. The sugar adds sweetness, balancing the tartness of the cherries. Melted unsalted butter keeps the muffins moist. Eggs add richness and help bind everything together. Buttermilk gives a slight tang and makes the muffins tender. Vanilla extract adds a lovely aroma. Baking powder and baking soda are essential for rising. They create air pockets, making your muffins light. Salt enhances all the flavors, making them pop. - Additional spices (e.g., cinnamon or nutmeg) - Chocolate chips - Coconut flakes You can get creative with optional add-ins. A sprinkle of cinnamon or nutmeg can warm your muffins. Chocolate chips add a sweet twist. Coconut flakes bring a tropical flair and chewiness. These options let you customize your muffins to suit your taste, making them even more irresistible. If you're excited to try this recipe, check out the Full Recipe for Cherry Pecan Muffins! - Preheat your oven to 375°F (190°C). - Prepare your muffin tin with paper liners or grease it with cooking spray. - In a medium bowl, combine 1 1/2 cups of all-purpose flour, 1 teaspoon of baking powder, 1/2 teaspoon of baking soda, and 1/4 teaspoon of salt. This blend sets the base for your muffins. - In a large bowl, whisk together 1/2 cup of melted unsalted butter and 1 cup of granulated sugar until smooth. - Add 2 large eggs, one at a time, whisking well after each one. - Next, mix in 1/2 cup of buttermilk and 1 teaspoon of vanilla extract until everything is fully combined. - Gradually fold the dry ingredients into the wet mixture using a spatula or wooden spoon. Be careful not to overmix. - Gently add in 1/2 cup of roughly chopped pecans and 1 cup of fresh or frozen cherries, ensuring you keep the cherries intact. - Divide the batter evenly among the muffin cups, filling each about 2/3 full. - Bake in your preheated oven for 20-25 minutes. Check with a toothpick to see if it's done. - After baking, let the muffins cool in the pan for 5 minutes. - Transfer them to a wire rack to cool completely. For a great look, arrange the muffins on a platter. A dusting of powdered sugar adds a nice touch. You can also serve them warm with whipped cream or cherry compote for extra flavor. Measuring ingredients correctly is very important. Use dry measuring cups for flour and sugar. Use liquid measuring cups for buttermilk and melted butter. This helps keep the right balance in your muffins. Overmixing can make muffins tough. Mix just until the dry and wet ingredients blend. A few lumps are okay! To make moist muffins, use buttermilk. It adds richness and flavor. Also, don’t bake too long. Check them a few minutes early. For sweetness, use ripe cherries. You can also add a bit of almond extract for depth. This makes each bite special. If your muffins are dense, you may have overmixed the batter. Try to mix less next time. If the tops burn, lower the oven temperature by 25°F. This gives the muffins time to bake through without burning. These tips will help you bake perfect cherry pecan muffins every time! For the Full Recipe, check the earlier section. {{image_2}} You can change the flavor of your cherry pecan muffins easily. Try using almond extract instead of vanilla. This change adds a lovely nutty taste that pairs well with cherries. You can also add lemon zest to the batter. This small twist gives a bright, fresh flavor that lifts your muffins. If you need to make dietary changes, I have some great tips. For gluten-free muffins, use a good gluten-free flour blend. Make sure it has a binding agent, like xanthan gum, to help the texture. If you want to go vegan, you can swap the eggs for flax eggs. Mix one tablespoon of ground flaxseed with three tablespoons of water for each egg. For buttermilk, use almond milk with a splash of vinegar. This will give you a dairy-free option. You can also make seasonal twists on this recipe. Add other fruits like blueberries or diced apples for a different flavor. These fruits bring their own sweetness and texture. If you want to change the nuts, try walnuts or hazelnuts. They add a unique crunch and flavor to your muffins. Each of these variations keeps your muffins exciting and fun to bake. For the full recipe, check out the Cherry Pecan Muffins section above. To keep your cherry pecan muffins fresh for a few days, place them in an airtight container. You can store them at room temperature for up to three days. Make sure the muffins cool completely before sealing them. This step prevents moisture from making them soggy. If you want to save muffins for later, freezing them is a great option. Wrap each muffin in plastic wrap, then place them in a freezer bag. They can stay frozen for up to three months. When you’re ready to enjoy, thaw them in the fridge overnight. For a quick reheat, pop them in the microwave for about 20 seconds. Alternatively, you can warm them in the oven at 350°F (175°C) for 10 minutes. For short-term storage, use a container that seals tightly. Glass or plastic containers work well. Avoid containers that let air in, as this can dry out your muffins. Keeping them away from moisture is key. A dry environment helps keep your muffins soft and tasty. To check if your muffins are ready, use the toothpick test. Insert a toothpick into the center of a muffin. If it comes out clean or with a few crumbs, your muffins are done. If the toothpick has wet batter, bake for a few more minutes. This simple test helps ensure perfect texture every time. Yes, you can use frozen cherries! Just remember to thaw them first. Drain any extra juice to avoid soggy muffins. Frozen cherries may not be as firm as fresh ones, but they still taste great. For best results, gently fold them into the batter to keep their shape. There are many ways to boost flavor! You can add spices like cinnamon or nutmeg for warmth. A splash of almond or lemon extract brightens the taste. Experiment with these additions to find your favorite flavor combo. Each option brings a unique twist to your cherry pecan muffins. Serve your muffins warm for the best experience. Pair them with whipped cream or a spoonful of cherry compote for added delight. You can also arrange them on a pretty platter and dust with powdered sugar. These simple touches make your muffins stand out. You can find the full recipe for Cherry Pecan Muffins in the earlier sections of this article. It guides you through each step, making it easy to bake these delicious treats at home. You’ve learned the key ingredients and steps to bake cherry pecan muffins. Remembering to mix dry and wet ingredients carefully will help you achieve the right texture. Feel free to explore different flavor and dietary adjustments to suit your taste. Proper storage will keep your muffins fresh longer. With these tips and tricks, you can bake muffins that impress. Enjoy your delicious creations!

Cherry Pecan Muffins Irresistible and Easy Recipe

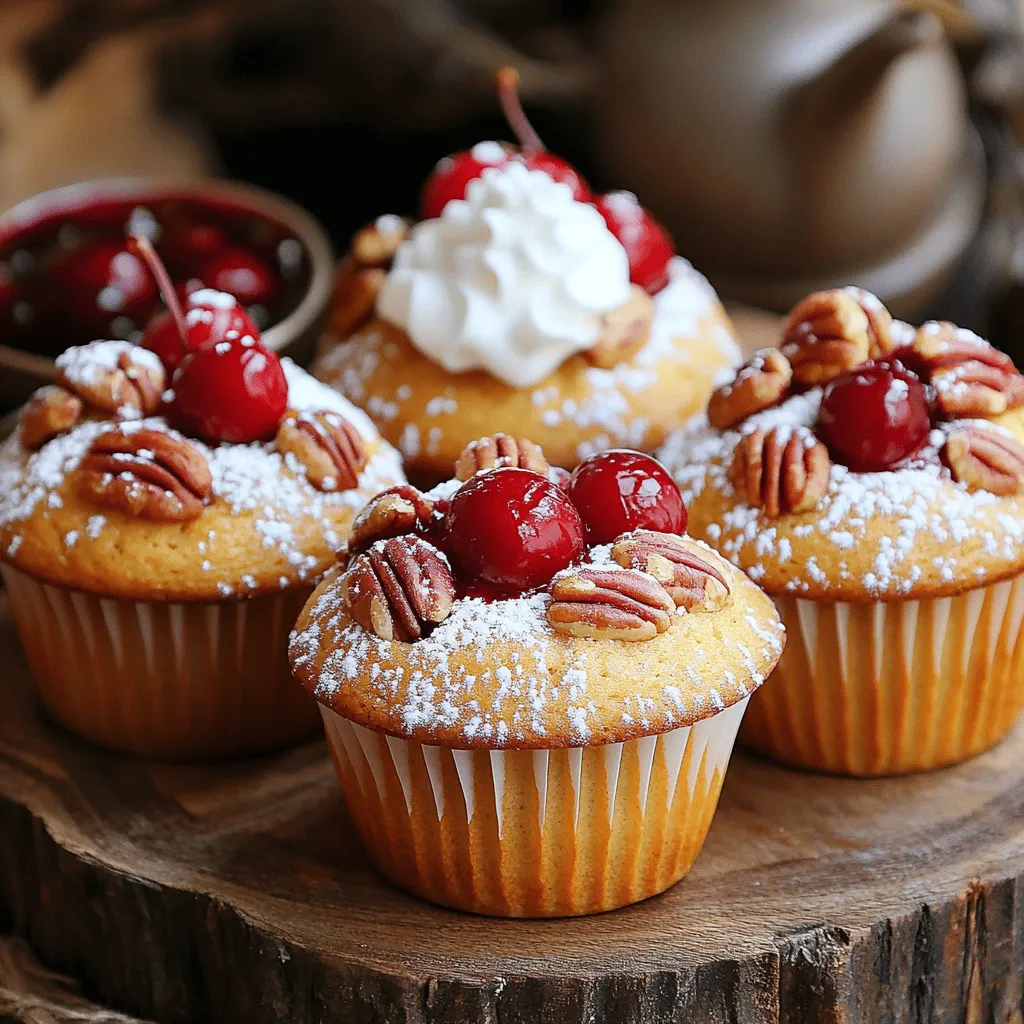
Do you crave a sweet and nutty treat? Look no further than my Cherry Pecan Muffins! This easy recipe combines

- 4 boneless, skinless chicken breasts - 1 cup dill pickle juice - 1 cup ranch dressing - 1 cup breadcrumbs (Italian or panko) - 1 cup grated Parmesan cheese - 1 teaspoon garlic powder - 1 cup marinara sauce - 1 cup shredded mozzarella cheese - Fresh parsley for garnish Pickle Ranch Chicken Parmesan is a fun dish that mixes classic flavors. The main ingredients give this dish its unique twist. The chicken breasts soak in dill pickle juice. This step adds tang and moisture. The ranch dressing gives it a creamy base, making every bite rich. The coating ingredients are just as key. I love using Italian or panko breadcrumbs. They create a crunchy outer layer. Mix these breadcrumbs with grated Parmesan cheese and garlic powder for a burst of flavor. The cheese melts into the chicken, adding a savory kick. For toppings, marinara sauce works wonders. It adds a nice tomato flavor. The shredded mozzarella cheese melts beautifully over the top. If you want a pop of color, sprinkle fresh parsley on your dish. This adds freshness and makes it look great. If you want to try this amazing dish at home, check out the Full Recipe. You will love how simple and tasty it is! - Place chicken in a resealable plastic bag with dill pickle juice. - Refrigerate for at least 1 hour. This step adds a tangy flavor and keeps the chicken juicy. The longer you marinate, the better the taste. One hour is good, but four hours is even better. - Preheat oven to 400°F (200°C). - Mix breadcrumbs, Parmesan, and spices in a shallow dish. Preheating the oven helps cook the chicken evenly. The breadcrumb mix gives a nice crisp. Feel free to add more spices for extra zing! - Coat chicken with ranch dressing, then dredge in breadcrumb mixture. - Sear in skillet before transferring to oven. Ranch dressing gives a creamy base for the breadcrumbs to stick. Searing the chicken adds color and flavor. Cook each side for about 3-4 minutes until golden brown. Make sure to follow the full recipe for all the details! To get that perfect crunch, I always reach for panko breadcrumbs. They add a light, crispy texture that regular breadcrumbs can’t match. Before you coat the chicken, make sure to pat it dry with paper towels. This step helps the coating stick better and keeps it from getting soggy. Want to kick up the flavor? Add more spices to the breadcrumb mix. A little paprika or cayenne pepper can give a nice kick. You can also experiment with different cheeses. Try using sharp cheddar or pepper jack for a unique twist. Each cheese brings its own flavor and can make this dish even better. Use a meat thermometer to check if the chicken is done. The safe internal temperature is 165°F (75°C). After baking, let the chicken rest for a few minutes before slicing. This helps keep the juices inside, making each bite more tender and juicy. {{image_2}} You can switch up the meat in this dish. If you want, use turkey or pork instead of chicken. Both options add a nice twist to the flavor. For a vegetarian choice, consider using eggplant or mushrooms. Slice them thick and coat them just like the chicken. They will soak up the flavor well and taste fantastic. The sauce can also change the dish. Instead of marinara, use Alfredo sauce for a creamy taste. You can also try BBQ sauce for a smoky flavor. If you want something fresh, pesto works great too. Each sauce brings its own unique flair, so feel free to explore. When serving, you have many options. Pair your chicken with pasta or a fresh salad for a complete meal. If you want a fun twist, serve it on a bun. This turns your chicken into a tasty sandwich. You can add extra toppings like lettuce or tomatoes for crunch. Store any leftover Pickle Ranch Chicken Parmesan in an airtight container. This keeps it fresh for up to 3 days. When you're ready to enjoy it again, reheat in the oven. This way, the chicken stays crispy and the cheese melts nicely. You can freeze this dish for longer storage. However, freeze the chicken without the sauce. This helps it last longer and taste better when thawed. Use freezer-safe containers to keep it fresh. Make sure to label them with the date. To thaw, place the frozen chicken in the refrigerator overnight. This slow thaw keeps the texture nice. When ready to eat, reheat in the oven or on the stovetop. This will ensure it's warm all the way through. For the best taste, always check that it reaches 165°F (75°C) before serving. Yes, you can marinate and coat the chicken beforehand. This saves time on busy days. Just place the chicken in a bag with dill pickle juice and let it soak in the fridge. You can do this a few hours or even a day before cooking. When you are ready, just coat it with ranch and breadcrumbs, and bake! This dish pairs well with many sides. I love serving it with mashed potatoes for a classic touch. Rice also complements the chicken nicely. If you prefer something lighter, steamed vegetables are a great choice. They balance the rich flavors of the chicken. Yes, this recipe can be gluten-free! Simply use gluten-free breadcrumbs. Make sure to check the labels on the marinara sauce too, as some may contain gluten. With these simple swaps, you can enjoy the same great taste without gluten. This blog post shows how to make a tasty Pickle Ranch Chicken Parmesan. You learned the key ingredients, from chicken and pickle juice to marinara and cheese. The steps take you through marinating, coating, and baking the chicken. I hope you feel confident trying this dish. Remember, you can mix in different meats or sauces to make it your own. Enjoy your cooking adventure!

Pickle Ranch Chicken Parmesan Flavorful Dinner Treat

Are you ready to try a unique twist on a classic dish? This Pickle Ranch Chicken Parmesan brings bold flavors

- 1 cup cherries, pitted and chopped - 1 cup unsweetened applesauce - 1/2 cup peanut butter or almond butter - 1/2 cup honey or maple syrup - 1 teaspoon vanilla extract - 2 cups rolled oats - 1/2 cup chocolate protein powder - 1 teaspoon baking powder - 1/2 teaspoon baking soda - 1/4 teaspoon salt - 1/3 cup dark chocolate chips Cherries bring a burst of flavor and antioxidants. They help reduce inflammation, making these muffins tasty and good for you. Applesauce adds moisture and natural sweetness, cutting down on added sugar. Peanut butter gives protein and healthy fats. It makes the muffins rich and creamy. Honey or maple syrup adds sweetness while offering vitamins and minerals. Vanilla extract boosts the flavor and smells great. Rolled oats provide fiber, which helps you feel full. Chocolate protein powder adds a protein punch, perfect for a snack or breakfast. Baking powder and baking soda help the muffins rise, making them fluffy. Salt enhances all the flavors, making them pop. Dark chocolate chips add sweetness and indulgence, turning a healthy treat into a dessert. You can swap cherries for blueberries or raspberries if needed. Applesauce works well with mashed bananas or pumpkin puree. Instead of peanut butter, try almond butter or sunflower seed butter for a nut-free version. Choose agave syrup instead of honey for a vegan option. If you don’t have chocolate protein powder, any protein powder will work. You can also use flour if you want a gluten-free option. 1. Preheat the oven to 350°F (175°C). Line a muffin tin with paper liners or grease it lightly. This helps muffins not stick. 2. In a large bowl, mix applesauce, peanut butter, honey, and vanilla extract. Stir until smooth. This will be your wet mix. 3. Add the chopped cherries into the wet mix. Stir gently to combine. The cherries add a nice burst of flavor. 4. In another bowl, whisk together rolled oats, chocolate protein powder, baking powder, baking soda, and salt. This mix adds structure and protein. 5. Slowly fold the dry mix into the wet mix. Stop mixing when you see no dry flour. Overmixing can make muffins tough. 6. Fold in the dark chocolate chips. Make sure they are spread out in the batter. This adds a rich chocolatey taste. 7. Pour the batter into your muffin tin. Fill each cup about 2/3 full. This gives them room to rise. 8. Bake in the oven for 18-20 minutes. Check with a toothpick. If it comes out clean, they are ready. 9. Let the muffins cool in the tin for 5 minutes. Then, move them to a wire rack to cool completely. - Use room temperature ingredients. This helps your muffins rise better. - Avoid overmixing the batter. Mix just until combined for soft muffins. - Keep an eye on the baking time. Ovens can vary. Start checking a few minutes early. - Add extra chocolate chips on top before baking for a nice look. - Muffins are too dense: This may happen if you overmix or use too much flour. Measure carefully. - Muffins don’t rise: Make sure your baking powder and baking soda are fresh. Old leavening agents can lead to flat muffins. - Muffins are dry: Overbaking can cause dryness. Keep an eye on them near the end of the baking time. To keep your muffins fresh, store them in an airtight container. This step helps maintain their moisture. You can also use a zip-top bag. Place a piece of paper towel inside to absorb excess moisture. This way, your muffins stay soft and tasty for days. Add spices like cinnamon or nutmeg to boost flavor. You can mix in chopped nuts for crunch. Consider using different fruits, like blueberries or raspberries. These swaps can change the taste and keep things exciting. For an extra treat, top the muffins with a sprinkle of sea salt before baking. Protein helps build and repair muscles. It keeps you full longer, which can curb snacking. The chocolate protein powder in these muffins offers a tasty way to add protein. Plus, you get the added benefits of cherries. They provide vitamins, antioxidants, and fiber, making these muffins a smart choice. For the full recipe, check out the detailed instructions and ingredient list to start your baking adventure! {{image_2}} You can switch out cherries for other fruits. Blueberries, raspberries, or diced bananas work great. Each fruit gives a new taste and texture. For example, blueberries add a juicy burst. Raspberries provide a nice tartness. Bananas bring natural sweetness and moisture. Feel free to experiment and find your favorite! If you want less sugar, there are many sweetener options. You can use stevia or agave syrup instead of honey. These sweeteners add flavor without the extra calories. Maple syrup is another tasty choice. Each sweetener changes the flavor a bit, so you can find what suits you best. Making these muffins gluten-free is easy. Just use gluten-free rolled oats instead of regular oats. For vegan muffins, swap the honey for agave syrup. You can also replace the peanut butter with almond butter or sunflower seed butter. These changes keep the muffins healthy and delicious while meeting dietary needs. For the full recipe, check out the Cherry Chocolate Protein Muffins section. Store your muffins in an airtight container. This keeps them fresh for up to five days. If you want them to last longer, consider refrigeration. Just remember to let them cool completely before sealing them up. To freeze your muffins, wrap each one in plastic wrap. Then, place them in a freezer bag. This protects them from freezer burn. You can freeze them for up to three months. Just label the bag with the date. To reheat, remove a muffin from the fridge or freezer. If frozen, let it thaw overnight in the fridge. For quick warming, use the microwave for about 20-30 seconds. You can also warm them in the oven at 350°F for 10 minutes. Enjoy them warm for the best taste! You can use ripe bananas or applesauce. These fruits add sweetness naturally. They also keep the muffins moist. For this recipe, unsweetened applesauce works well. It blends perfectly and adds flavor without extra sugar. Yes, frozen cherries are a great choice! Just thaw them first and drain any extra juice. This helps keep the muffin batter from getting too wet. Frozen cherries still taste great and save you time. I recommend using chocolate protein powder. It enhances the chocolate flavor in the muffins. You can also try plant-based protein if you prefer. Just check the brand for taste and mixability. To check if muffins are done, insert a toothpick in the center. If it comes out clean, they are ready. If it has batter on it, bake a few more minutes. Keep an eye on them to avoid overbaking. Each muffin has about 150 calories. This can vary based on the ingredients you use. If you swap ingredients, check the nutrition facts to stay accurate. These muffins are a tasty and healthy snack! For the complete recipe, check out the Cherry Chocolate Protein Muffins recipe. It includes all the steps and tips to make these delicious treats! In this blog post, we explored the key ingredients that make Cherry Chocolate Protein Muffins special. Each ingredient offers unique benefits, and we shared helpful substitutes. The step-by-step instructions ensure you bake them perfectly every time. We also covered storage tips and variations to suit your taste. Remember, muffins can be fun and healthy! Try new flavors and make them your own. Enjoy sharing your muffins with friends and family. Happy baking!

Cherry Chocolate Protein Muffins Healthy and Tasty

If you love a sweet treat that’s both healthy and packed with protein, you are in for a treat! In

For this recipe, you need: - 1 lb ground chicken - 1 cup breadcrumbs These two ingredients form the base of your meatballs. Ground chicken keeps things lean and flavorful. The breadcrumbs help hold everything together, giving the meatballs a nice texture. Now, let's add some zing with flavor enhancers. You will want: - 1/4 cup dill pickle juice - 1/2 cup finely chopped dill pickles - 1/4 cup ranch dressing - 1/4 cup grated Parmesan cheese - 1 teaspoon garlic powder - 1 teaspoon onion powder - 1/2 teaspoon black pepper - 1/2 teaspoon salt Each item brings unique taste. The dill pickle juice gives a tangy kick. Ranch dressing adds creaminess, while Parmesan cheese brings a savory touch. Garlic and onion powders deepen the flavor. To elevate your meatballs, consider these optional additions: - 1 tablespoon chopped fresh dill Adding fresh dill brightens the dish and enhances the pickle flavor. You can skip it if you want a simpler taste, but it’s worth a try! When you gather these ingredients, you’re set to create a dish that bursts with flavor. Check out the Full Recipe for complete cooking steps! Start by preheating your oven to 400°F (200°C). This high heat helps cook the meatballs evenly. Line a baking sheet with parchment paper. The paper keeps the meatballs from sticking. If you don’t have parchment, lightly grease the sheet with cooking spray or olive oil. In a large bowl, add the ground chicken. Next, pour in the breadcrumbs. Then, add the dill pickle juice and chopped dill pickles. The pickle juice gives a nice tang. Follow that with the ranch dressing and Parmesan cheese. Then, sprinkle in the garlic powder, onion powder, black pepper, and salt. If you like dill, toss in the chopped fresh dill too! Mix everything with your hands until it’s well blended. Make sure you spread the flavors evenly. Now, take a tablespoon and scoop out the mixture. Roll it into a ball with your hands. Place each meatball on the baking sheet. Keep them spaced out so they cook well. Once you’ve formed all the meatballs, lightly spray them with cooking spray or drizzle a bit of olive oil on top. Put the baking sheet in the oven and bake for 20-25 minutes. The meatballs should turn golden brown and reach an internal temperature of 165°F (75°C). When they are done, let them cool for a few minutes. Serve them warm with extra ranch dressing for dipping. For extra flair, add pickle slices and fresh dill on a platter. Check out the Full Recipe for more details! To get the best texture for your meatballs, use fresh ingredients. Ground chicken should be moist but not wet. Add breadcrumbs to bind the mixture together. The right amount of dill pickle juice keeps the meatballs juicy. Avoid over-mixing; this can make them tough. Aim for a light touch when rolling them into shape. To enhance flavor, use good quality ranch dressing. Adding grated Parmesan gives a nice, savory kick. Garlic powder and onion powder add depth without overpowering. Fresh dill can brighten the flavor; it’s an optional but tasty choice. For a little extra zest, you could mix in some hot sauce or chopped jalapeños. Serve your meatballs warm on a colorful platter. Garnish with pickle slices and fresh dill for a pop of color. Drizzle extra ranch dressing over the top for a fun touch. Pair them with fresh veggies or crispy chips for a full meal. You could even make sliders using small buns for a party twist. Want to explore more? Check the Full Recipe for additional tips! {{image_2}} You can change the ground chicken for other meats. Ground turkey works well and gives a similar taste. If you prefer beef, use lean ground beef for a richer flavor. For a lighter option, try ground turkey breast. These swaps keep the meatballs juicy and tasty. To make the recipe gluten-free, use gluten-free breadcrumbs. You can find these in most stores. Alternatively, you could crush gluten-free crackers or oats. These options keep the texture smooth and soft while ensuring everyone can enjoy the dish. For a kick, add some heat to the meatballs. Mix in a teaspoon of cayenne pepper or red pepper flakes. You can also add diced jalapeños for a fresh spicy taste. If you love hot sauce, drizzle some into the meat mixture for extra flavor. These spicy options will give your meatballs a fun twist. Try these variations to make the Pickle Ranch Chicken Meatballs your own. You can enjoy a new flavor each time! For the full recipe, check the detailed instructions above. After making your pickle ranch chicken meatballs, let them cool. Place the meatballs in an airtight container. They can last in the fridge for about three to four days. If you want to keep them fresh, store them as soon as they cool down. This keeps the flavors intact and prevents bacteria. To freeze the meatballs, first, let them cool completely. Arrange them on a baking sheet in a single layer. Place the sheet in the freezer until they are firm. Once frozen, transfer them to a freezer-safe bag. You can keep them in the freezer for up to three months. Label the bag with the date for easy tracking. To reheat, take the meatballs from the fridge or freezer. If frozen, thaw them overnight in the fridge. You can heat them in the oven at 350°F (175°C) for about 15 minutes. If using a microwave, heat them in 30-second intervals. Make sure they reach a safe temperature of 165°F (75°C) before serving. Enjoy them warm with extra ranch dressing! For the full recipe, check out the link provided. You can serve these meatballs with many sides. I love pairing them with a fresh salad. A simple green salad with cucumbers and tomatoes works well. You can also serve them with rice or mashed potatoes. For a fun twist, try putting them in slider buns. This makes a great snack or lunch option. Don’t forget to add extra ranch dressing for dipping! Yes, you can use pre-made ranch dressing. It saves time and still gives great flavor. Just make sure to choose a dressing you enjoy. Look for a brand that uses good ingredients. This way, you know you’re getting a tasty result. If you want, you can even mix in some extra pickles for more crunch! To check if your meatballs are done, use a meat thermometer. The internal temperature should reach 165°F (75°C). This ensures they are safe to eat. If you don’t have a thermometer, you can cut one in half. The meat should be no longer pink, and the juices should run clear. When they look golden brown, they are usually ready! In this blog post, I shared how to make tasty Pickle Ranch Chicken Meatballs. We covered the main ingredients, step-by-step cooking instructions, and tips for the best results. I also discussed fun variations, storage guidance, and answered common questions. Remember, you can adjust flavors and textures to fit your taste. Enjoy experimenting and serving these meatballs with your favorite sides. Happy cooking!

Pickle Ranch Chicken Meatballs Flavorful Easy Recipe

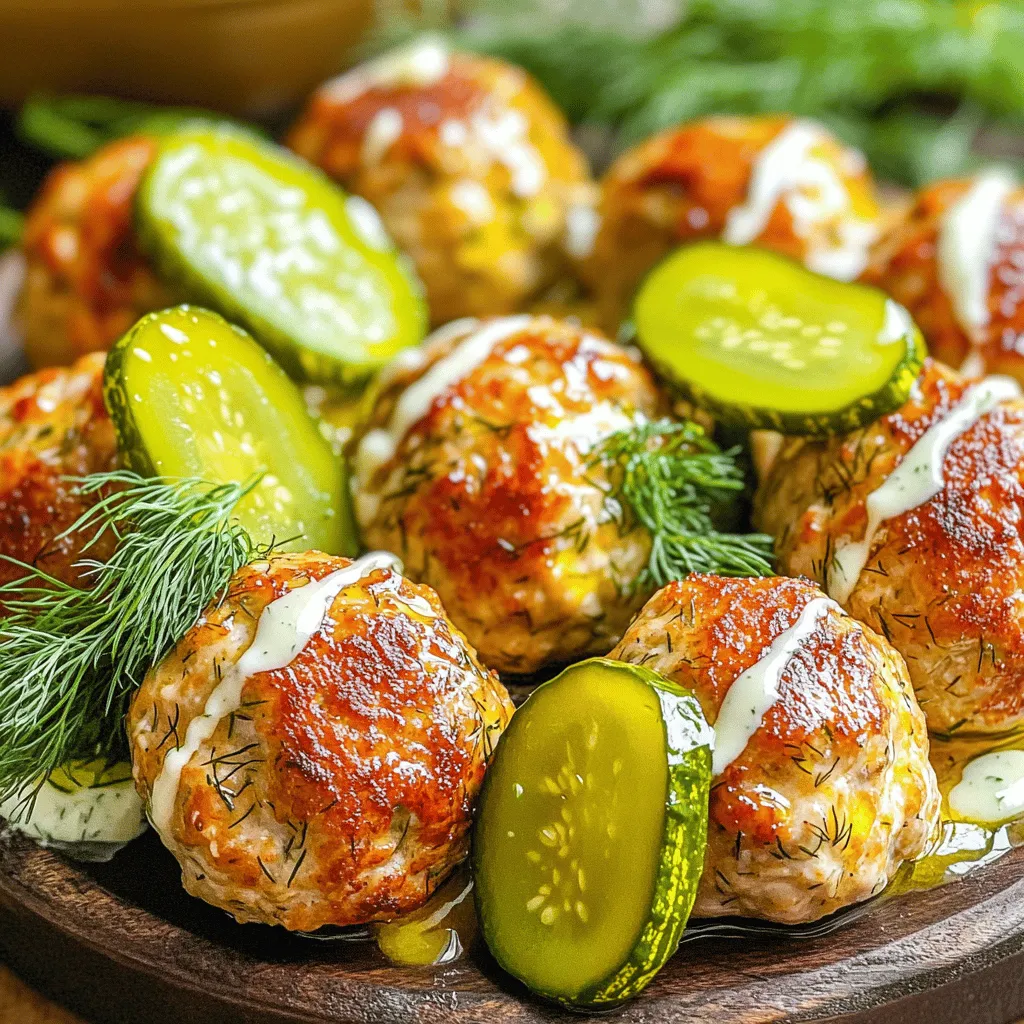
Are you ready to delight your taste buds? This Pickle Ranch Chicken Meatballs recipe is packed with flavor and super

Older posts
Newer posts
← Previous Page1 … Page39 Page40 Page41 … Page106 Next →
© 2025 My Cooking Cast • Built with GeneratePress

Our Policies

  • Privacy Policy
  • GDPR Policy
  • Terms Of Use
  • Copyright Policy
  • Cookie Policy
  • Disclaimer

More Information​

  • Home
  • Contact
  • About
  • Dinner
  • Appetizers
  • Dessert
©2025, My Cooking Cast About Privacy Policy Back To Top