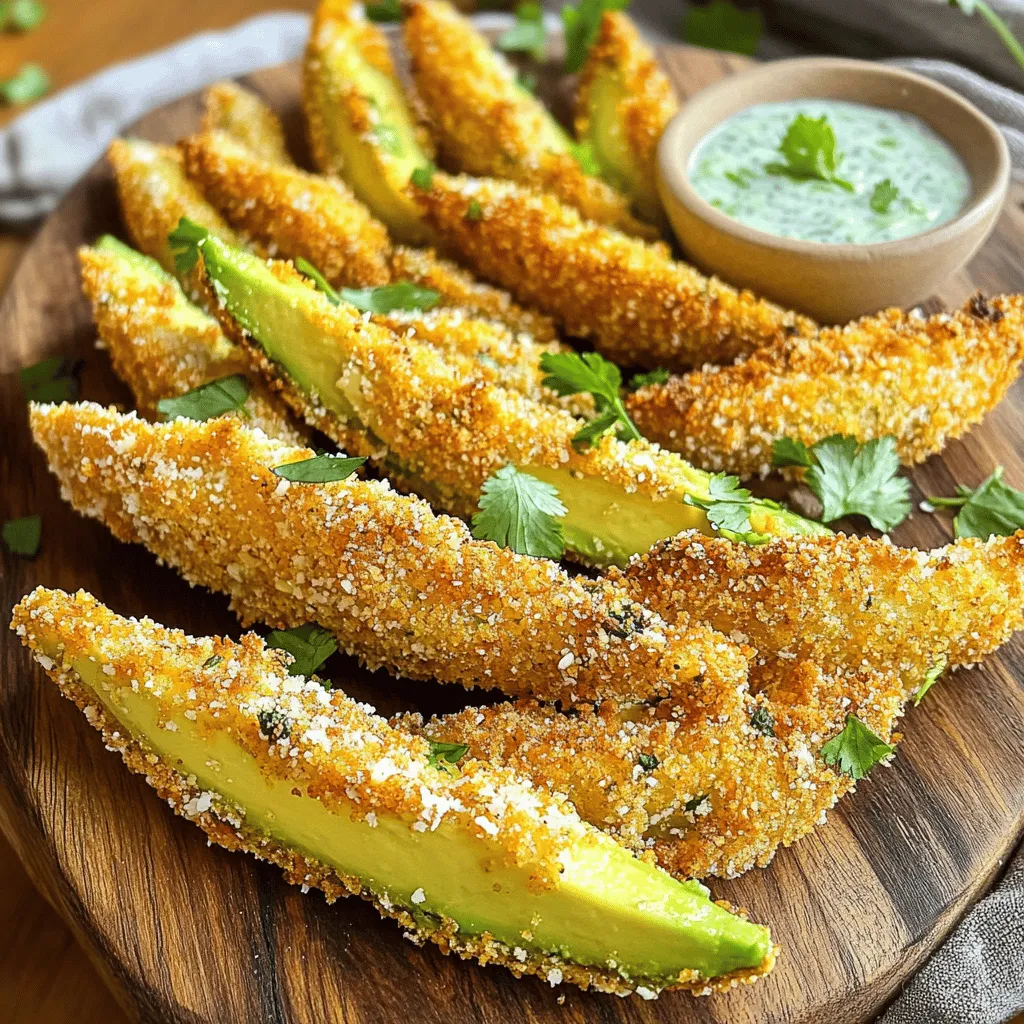
Air Fryer Avocado Fries Crispy and Delicious Snack
Are you ready to enjoy a unique snack that’s crispy and packed with flavor? Air Fryer Avocado Fries are a
Are you ready to enjoy a unique snack that’s crispy and packed with flavor? Air Fryer Avocado Fries are a
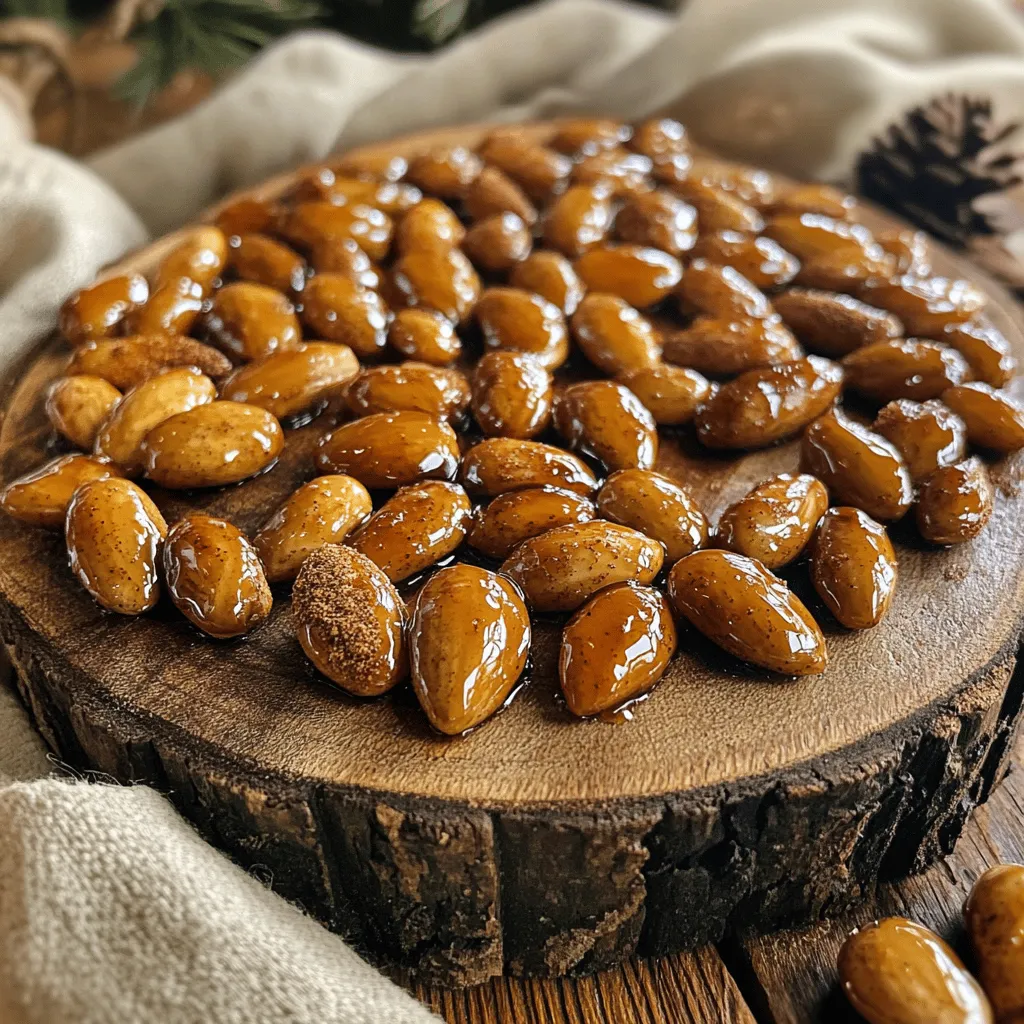
Looking for a tasty snack that’s simple to make? You’ve found it! Maple Cinnamon Roasted Almonds are not just crunchy—they’re
![- 1 cup cornmeal - 1 cup all-purpose flour - 1 tablespoon baking powder - 1/2 teaspoon salt - 1/4 teaspoon baking soda - 1 cup buttermilk - 1/4 cup vegetable oil - 2 large eggs - 1/4 cup honey (optional) - 1 cup shredded sharp cheddar cheese - 1/2 cup jalapeños, finely chopped (fresh or pickled) To make Cheesy Jalapeño Cornbread, gather all these ingredients first. The dry ingredients form the base of your cornbread. The cornmeal gives it a nice texture, while the all-purpose flour helps it rise. Baking powder and baking soda create that fluffy feel, and salt enhances all the flavors. Next, you need the wet ingredients. Buttermilk adds moisture and a slight tang. Vegetable oil keeps the bread tender, while eggs provide structure. If you want a hint of sweetness, add honey. Finally, the flavor elements shine in this recipe. Sharp cheddar cheese adds a bold taste, and jalapeños bring a spicy kick. You can use fresh or pickled jalapeños, depending on your preference. Combining these ingredients creates a mouthwatering cornbread that is both cheesy and spicy. For the full recipe, follow the steps to bring this delightful dish to life. - Preheat oven to 400°F (200°C). - Grease your baking dish or cast-iron skillet well. - In a large bowl, combine: - 1 cup cornmeal - 1 cup all-purpose flour - 1 tablespoon baking powder - 1/2 teaspoon salt - 1/4 teaspoon baking soda - Mix these dry ingredients until they blend well. - In another bowl, whisk together: - 1 cup buttermilk - 1/4 cup vegetable oil - 2 large eggs - If you want more sweetness, add 1/4 cup honey here. - Pour the wet ingredients into the dry mix. - Stir gently until just combined; a few lumps are okay. - Now, fold in: - 1 cup shredded sharp cheddar cheese - 1/2 cup finely chopped jalapeños - Make sure they are evenly mixed in. - Pour the batter into your prepared dish. - Smooth the top with a spatula. - Bake for 20-25 minutes. The top should be golden brown. - Let the cornbread cool a bit before slicing. - Serve warm with butter on top. - It pairs well with chili or is great on its own. You can find the full recipe to ensure you don't miss any steps! - Ensure your oven is fully preheated for even baking. - Use a toothpick to check for doneness. Insert it into the center; it should come out clean. - Avoid overmixing the batter. This keeps your cornbread fluffy and light. - It’s okay to have some lumps in the batter. They will bake out nicely. - You can adjust the jalapeño amount based on your heat preference. If you love spice, add more! - Try using different cheeses for unique flavors. Monterey Jack or Pepper Jack work well too. For the full recipe and more details, check out the [Full Recipe]. {{image_2}} You can make your cornbread sweet. Just add more honey or maple syrup. This gives it a nice, rich taste. Sweet cornbread works well for breakfast or dessert. Try it with butter and jam for a treat! For a fun twist, try adding spices. A little cumin or smoked paprika can change the flavor. These spices add warmth and depth. It’s a great way to surprise your taste buds! Switch up your cheese for new flavors. Monterey Jack or Pepper Jack gives a nice kick. These cheeses melt well and add creaminess to your cornbread. Don't be afraid to experiment with different cheeses for unique results! For the full recipe, check out the main section. Store your Cheesy Jalapeño Cornbread in an airtight container. It keeps well in the fridge for up to 5 days. This way, you can enjoy it fresh for a whole week. Just be sure to let it cool completely before you seal it up. You can freeze this cornbread too! Slice it into individual pieces. Wrap each slice tightly in plastic wrap, then place them in a freezer bag. This makes for quick and easy servings later. When you want a slice, just grab it from the freezer. Reheating is simple! For the best texture, use your oven. Preheat it to 350°F (175°C) and place the slice on a baking sheet. Heat for about 10 minutes. If you’re in a hurry, the microwave works too. Just heat for about 30 seconds, but be careful not to overdo it. Enjoy your tasty cornbread warm! For the full recipe, check out the details above. Yes, but add a tablespoon of vinegar or lemon juice for acidity. This small change helps mimic the tangy taste of buttermilk. It makes the cornbread rise well and stay moist. Substitute all-purpose flour with a gluten-free all-purpose flour blend. Many brands work well in baking. Just check the package for the right measurements. This swap allows gluten-free eaters to enjoy the cornbread too. Yes, prepare the batter in advance and bake it when ready to serve. This makes hosting easier. You can save time and still serve hot, fresh cornbread. Just let it cool a bit before cutting. It pairs perfectly with chili, soups, or as a side dish for BBQ meals. The spicy cheese flavor complements many dishes. You can serve it as a yummy snack or a hearty side. Enjoy it warm with a pat of butter, too! This blog post covers the essential steps to make Cheesy Jalapeño Cornbread. You learned about the ingredients, mixing methods, and baking tips that ensure great results. Remember, mix carefully to keep your cornbread fluffy and adjust jalapeño levels for your taste. Whether you enjoy it with chili or as a standalone snack, this recipe is a crowd-pleaser. Try experimenting with flavors to make it your own. Happy baking!](https://mycookingcast.com/wp-content/uploads/2025/07/5aae95d2-0ef7-4cd4-85ae-eb29c0383eb2.webp)
Craving a tasty twist on classic cornbread? You’re in for a treat with my Cheesy Jalapeño Cornbread! This recipe is

Are you ready to impress your friends with a simple yet stunning dessert? A Strawberry Shortcake Trifle is the perfect
![Garlic Parmesan Roasted Carrots need simple and fresh ingredients. Using high-quality items makes a big difference in flavor. Here is what you will need: - 1 pound baby carrots, peeled - 3 tablespoons olive oil - 4 cloves garlic, minced - 1 teaspoon dried thyme - 1 teaspoon paprika - 1/2 cup grated Parmesan cheese - Salt and pepper to taste - Fresh parsley for garnish (optional) These ingredients come together to create a tasty side dish. The garlic and Parmesan add rich flavors that pair well with many meals. You can use these carrots to impress guests or enjoy a cozy dinner at home. For more details on how to prepare this dish, check out the Full Recipe. - Preheat your oven to 425°F (220°C). - In a large bowl, mix the olive oil, minced garlic, dried thyme, paprika, salt, and pepper. - Add the baby carrots to the bowl and toss until coated. - Spread the carrots on a baking sheet lined with parchment paper. - Roast the carrots for about 20 minutes, turning halfway through. - Sprinkle grated Parmesan cheese over the carrots and roast for an additional 5-7 minutes. - Let them cool for a minute and garnish with fresh parsley if desired. For the full recipe, refer to the instructions provided earlier. Enjoy your tasty Garlic Parmesan Roasted Carrots! To make the best garlic Parmesan roasted carrots, start with fresh baby carrots. Their sweet flavor shines through. You want to coat them evenly with oil and spices. This ensures they roast uniformly and become tender. Feel free to change the seasoning to suit your taste. Add more garlic for extra punch or skip the paprika if you prefer mild flavors. You can also roast the carrots longer for softer bites. For firmer carrots, reduce the roasting time. These roasted carrots pair well with grilled meats. They also complement vegetarian dishes nicely. Serve them at holiday dinners for a festive touch or enjoy them during casual family meals. Their versatility makes them a great addition to any table. {{image_2}} - Incorporate different herbs like rosemary or oregano for a unique taste. These herbs add depth and aroma, enhancing the overall flavor. - Add a splash of balsamic vinegar for an extra flavor layer. This tangy addition brightens the dish and balances the richness of the cheese. - Experiment with different cheese options such as feta or mozzarella. Both add a different texture and flavor, making the dish versatile. - Use nutritional yeast for a vegan-friendly version. It provides a cheesy flavor without dairy, perfect for plant-based diets. - Try using other root vegetables like parsnips or sweet potatoes. They roast well and bring their own sweetness, adding variety to your meals. - A mixed vegetable medley can enhance the dish. Combine carrots with bell peppers or zucchini for added color and nutrition. For the complete Garlic Parmesan Roasted Carrots recipe, check out the [Full Recipe]. Store any leftover Garlic Parmesan Roasted Carrots in an airtight container in the refrigerator. They taste best when eaten within 3-4 days. This helps keep their flavor fresh and delicious. For the best texture, reheat the carrots in the oven. If you need a quick option, you can use a microwave. Just add a splash of water when microwaving to keep them from drying out. This little trick helps maintain their yummy flavor. I do not recommend freezing these carrots. Freezing can change their texture and make them less enjoyable. It's best to eat them fresh or use leftovers within a few days for the best taste. Yes, you can substitute with nutritional yeast for a vegan option. Nutritional yeast offers a cheesy flavor without dairy. This makes your dish suitable for everyone, including vegans. Typically, 20-30 minutes total, depending on desired tenderness. For crunchier carrots, aim for 20 minutes. If you like them softer, extend roasting to 30 minutes. Just keep an eye on them! Great alongside roasted chicken, grilled steak, or as part of a veggie platter. These carrots add color and flavor to any meal. They also make a delightful side for holiday dinners or family gatherings. Look for a tender texture and a slightly caramelized exterior. You can poke them with a fork. If it goes through easily, they are ready. The caramelization adds a lovely sweetness that enhances the dish. Roasting baby carrots with garlic and Parmesan is simple and rewarding. We covered the best ingredients, preparation steps, and tips to elevate your dish. You learned how to adjust flavors and pair with various meals. This easy recipe can shine at any dinner. Remember, experimenting with seasonings can make it even more enjoyable. Enjoy your Garlic Parmesan Roasted Carrots, and share these tips with friends for a delightful culinary experience!](https://mycookingcast.com/wp-content/uploads/2025/07/2b5541b4-7c05-48ff-a2b1-13aee86f691d.webp)
Looking for a tasty and easy side dish? Garlic Parmesan Roasted Carrots are your answer! With just a few simple
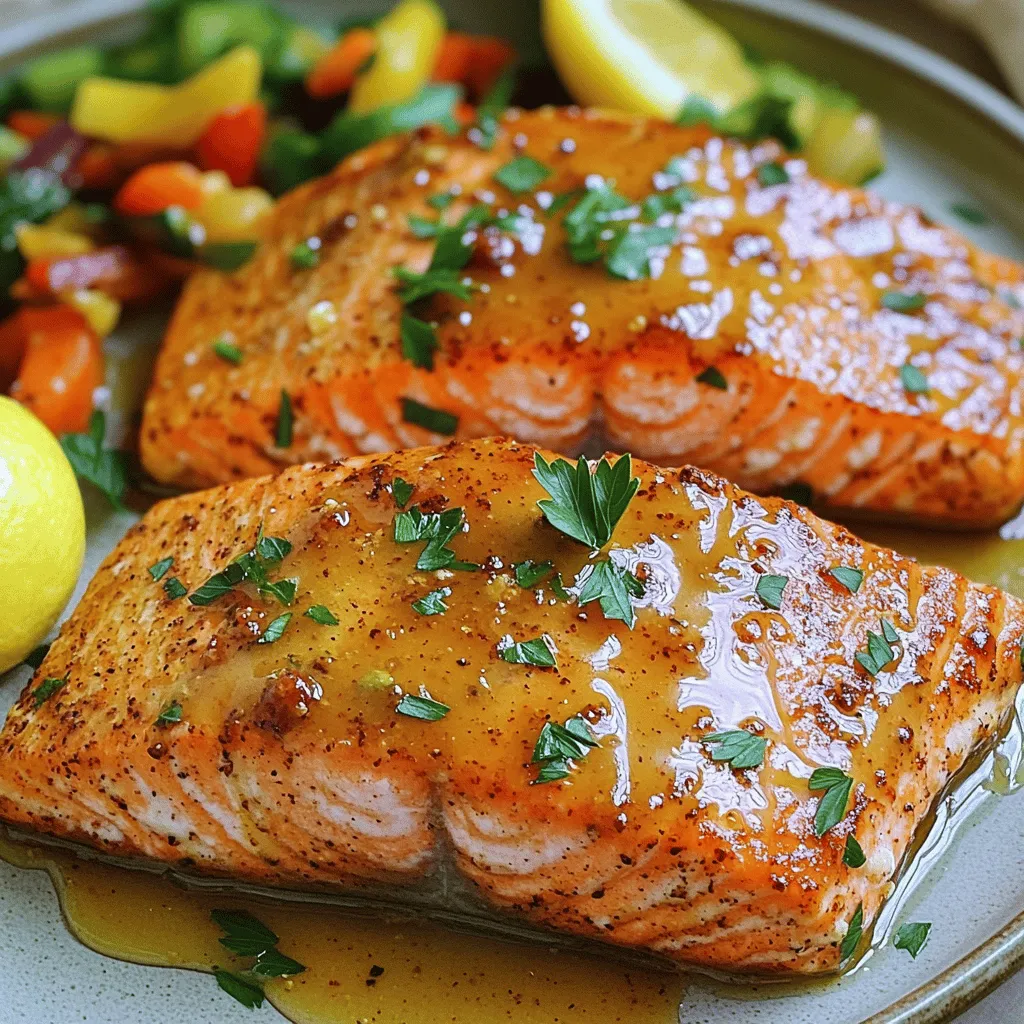
If you want a dish that bursts with flavor, you’ll love this Cajun Honey Butter Salmon recipe! It combines rich
![To make Vegan Pad Thai Lettuce Wraps, you will need the following ingredients: - Butter lettuce or Romaine leaves - Rice noodles - Shredded carrots - Bell pepper selections (preferably red or yellow) - Bean sprouts - Green onions - Peanuts - Sauce ingredients: - 3 tablespoons soy sauce - 2 tablespoons peanut butter - 1 tablespoon lime juice - 1 teaspoon maple syrup - 1/2 teaspoon sriracha These ingredients come together to create a fresh and tasty dish. The crunchy lettuce wraps hold a flavorful filling that’s both satisfying and healthy. Feel free to mix things up with ingredient swaps: - Alternative greens for wrapping: You can use collard greens or cabbage if you want a different wrap. - Gluten-free options: Swap soy sauce for tamari to keep it gluten-free. - Veggie variations: Add in some sliced cucumbers, zucchini, or radishes for extra crunch and nutrition. These swaps keep the dish exciting and cater to various dietary needs. Each serving of these wraps has about 250 calories. Here are some key nutrients you get: - Protein: Rice noodles and peanuts provide a good source of protein. - Vitamins: The veggies offer vitamins A and C, which are great for your skin and immune system. - Fiber: The lettuce and veggies help keep your digestion healthy. This dish is not only tasty but also packed with nutrients to fuel your day. For the full recipe, check out [Full Recipe]. First, cook the rice noodles according to the package. Make sure they are tender but not mushy. Drain them and set aside. Next, chop your vegetables. You will need shredded carrots, thinly sliced bell peppers, and chopped green onions. These add color and crunch to your wraps. Now, let’s make the sauce. In a small bowl, whisk together soy sauce, peanut butter, lime juice, maple syrup, and sriracha. Mix until smooth. This sauce gives your dish that authentic Pad Thai flavor. In a large bowl, mix the cooked rice noodles with the chopped veggies. Gently stir to combine. This step is important, as it ensures even distribution of flavors. Next, pour the sauce over the noodle and veggie mixture. Toss everything together until all the noodles and vegetables are coated in that delicious sauce. Take your time with this step—it really enhances the taste. Now, take a lettuce leaf and spoon a good amount of the Pad Thai mixture into the center. Sprinkle some chopped peanuts and remaining green onions on top for added crunch and flavor. Wrap the lettuce leaf around the filling like a taco. Fold the edges in to keep everything secure inside. Repeat this until you have used all the filling. Serve with lime wedges on the side and garnish with fresh cilantro if you like. Enjoy your fresh and flavorful Vegan Pad Thai Lettuce Wraps! Get the Full Recipe for detailed steps and tips. To get the best texture in your vegan Pad Thai lettuce wraps, use fresh ingredients. Fresh vegetables like bell peppers and carrots add crunch. Cook your rice noodles just right; they should be soft but not mushy. Rinse them in cold water to stop cooking. Adjust spice levels to fit your taste. If you like it hot, add more sriracha. If you prefer mild, use less. For extra flavor, top your wraps with fresh cilantro and lime. These garnishes brighten the dish and add freshness. Pair your wraps with a side of steamed veggies or a light salad. This adds color and nutrients. For presentation, arrange the wraps on a bright plate. Use lime wedges to make it look more inviting. This makes your meal not only tasty but also beautiful. For the full recipe, be sure to check the complete details! {{image_2}} You can boost the protein in your Vegan Pad Thai Lettuce Wraps easily. Tofu is a great option. Use firm tofu for texture. Just cube it, fry it, and mix it in. Tempeh is another choice. It has a nutty taste and is packed with protein. You can sauté or steam it before adding. If you want more legumes, try chickpeas or edamame. They add protein and fiber, making your meal more filling. To make your wraps more exciting, try different sauces. A spicy peanut sauce can add heat. You can also mix in hoisin sauce for sweetness. Want something fruity? Add mango or pineapple chunks. They brighten up the dish and add a sweet note. Fresh herbs like mint or basil can also give a nice twist. Experiment with these to find your favorite! If you need a nut-free version, skip the peanuts. Sunflower seeds are a tasty substitute. They add crunch without the nuts. For those watching carbs, try using zucchini noodles instead of rice noodles. This keeps the wraps light and fresh. You can also wrap everything in cabbage leaves for a low-carb option. These simple swaps make the dish fit various dietary needs. You can prep some parts ahead to save time. First, cook the rice noodles and store them in an airtight container. Chop the veggies like carrots and bell peppers. Keep them separate to stay fresh. Mix the sauce of soy sauce, peanut butter, lime juice, maple syrup, and sriracha in a jar. This way, when you’re ready to eat, it all comes together quickly. When layering, use the lettuce leaves as a base. Place the noodles and veggies in the center. This keeps them from getting soggy. To store leftovers, use a good airtight container. This keeps the wraps fresh. Put the filling in one container and the lettuce leaves in another. This helps keep them crisp. For refrigeration, eat leftovers within two days. Storing them longer may change the taste and texture. To reheat, gently warm the filling in a skillet over low heat. Avoid high heat, as this can make the noodles mushy. You can also serve it cold for a refreshing meal. For safety, always check for signs of spoilage before eating. If it smells bad or looks off, toss it. Enjoy the fresh and flavorful dish that is Vegan Pad Thai Lettuce Wraps! For the full recipe, check the earlier sections. You can easily make these wraps gluten-free by using tamari. Tamari is a great soy sauce alternative. It has a similar taste but does not contain wheat. This small swap keeps your dish tasty while being safe for gluten-free diets. Yes, you can prep some parts ahead. It’s best to mix the filling and sauce in advance. However, wait to assemble the wraps until you are ready to serve. This keeps the lettuce crisp and fresh, avoiding sogginess. If you need a nut-free option, try sunflower seeds or pumpkin seeds. These seeds add crunch without the nuts. You can also skip the nuts entirely and still enjoy the wraps. They will still taste great! You can boost protein by adding tofu or tempeh. Both are excellent sources of plant protein. Cook them until crispy for extra flavor. You can also add chickpeas or edamame for more nutrition. This blog covers how to make tasty Gluten-Free Vegan Pad Thai Lettuce Wraps. You learned about essential ingredients and their substitutes, along with key nutrition facts. I shared step-by-step instructions for preparation and assembly. Tips for flavor and serving enhance your wraps. Remember, you can modify ingredients to suit your taste. Store leftovers properly to enjoy later. Enjoy your delicious wraps, packed with flavor and nutrients! Try these ideas and make them your own. Happy cooking!](https://mycookingcast.com/wp-content/uploads/2025/07/5391e289-05d3-413d-b36e-0576ca86adbf.webp)
Craving a fresh and tangy dish? Try my Vegan Pad Thai Lettuce Wraps! These wraps are packed with flavor and

Looking for a quick, fresh dish that’s bursting with flavor? Look no further than Caprese Pasta Salad! This delightful salad

If you love sweet treats, you’re in for a real joy! Today, I’m sharing my recipe for Chocolate Marshmallow Rocky
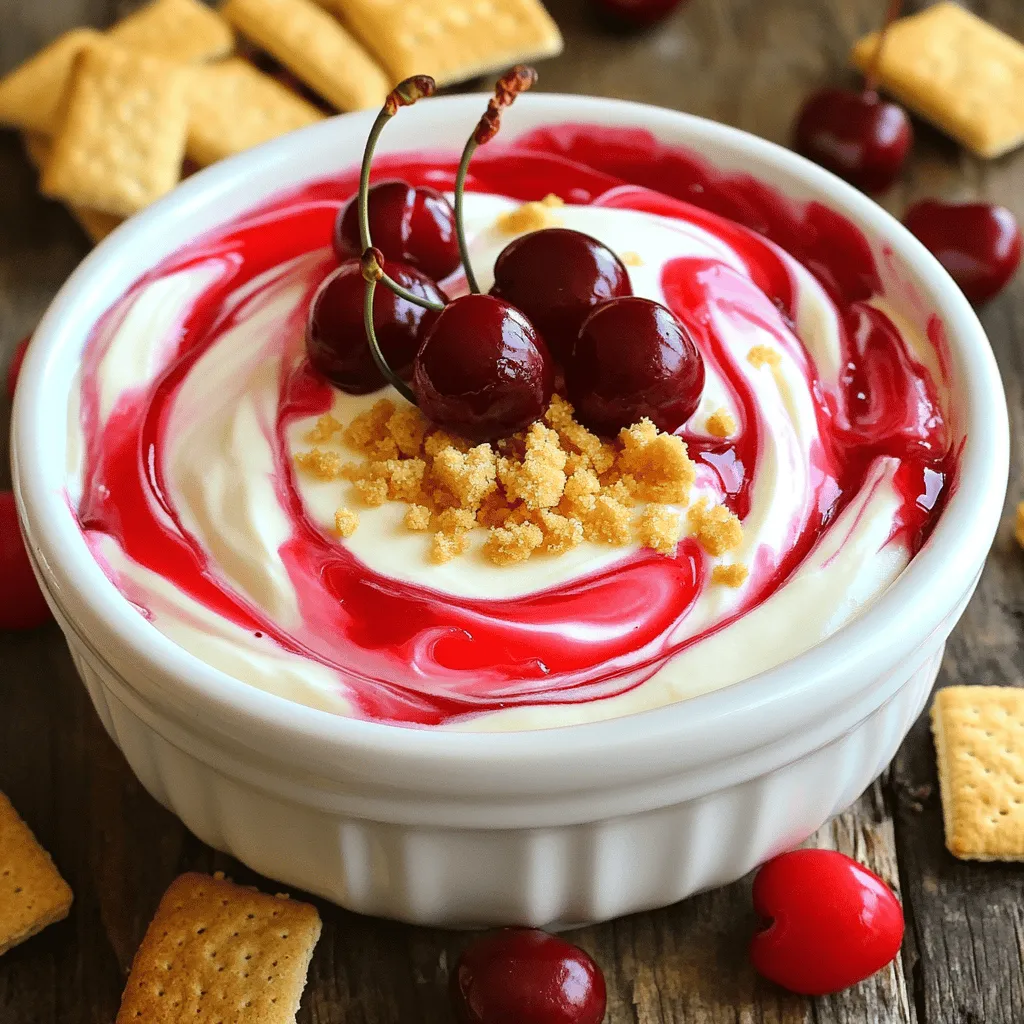
If you’re craving a sweet treat that’s quick and easy to make, look no further than this Cherry Cheesecake Dip!
