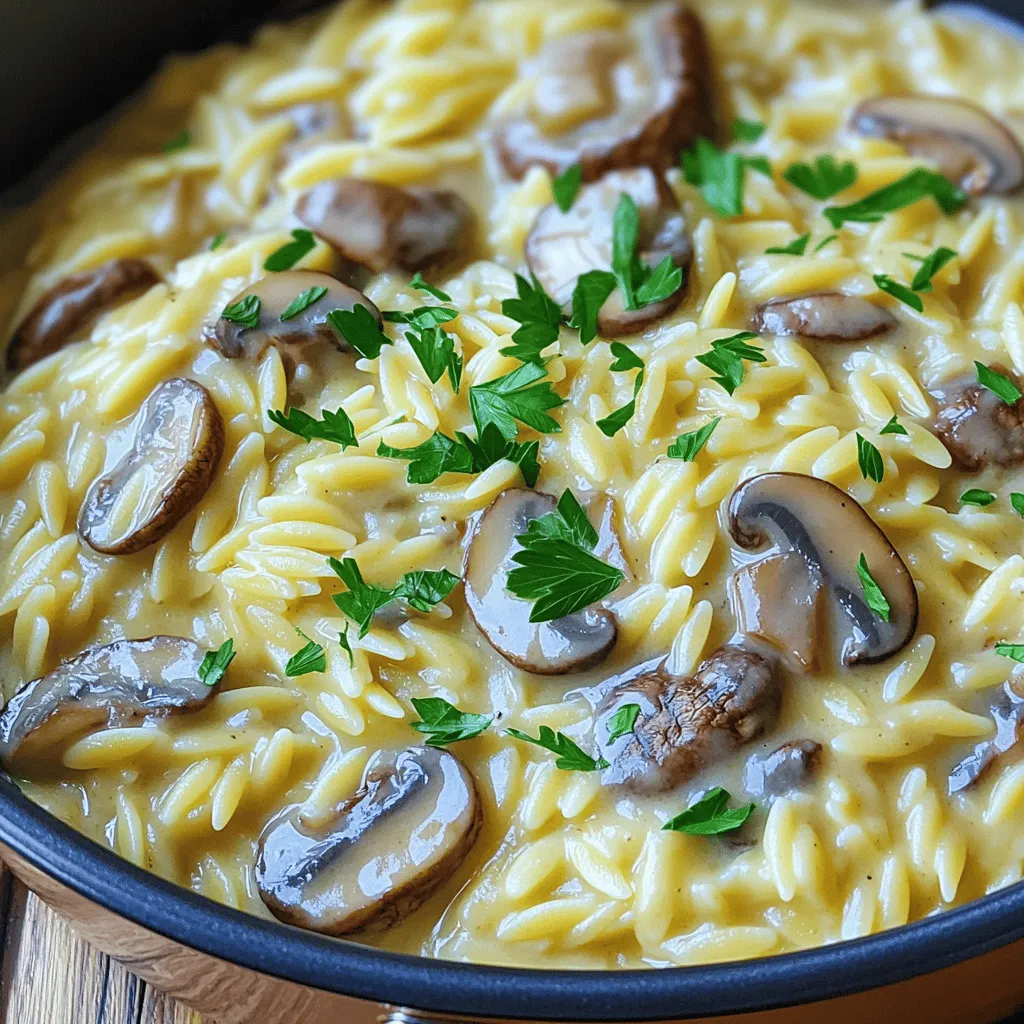
Creamy Mushroom Orzo Simple One Pot Delight
Welcome to my kitchen! Today, I’m excited to share my recipe for Creamy Mushroom Orzo. This simple one-pot delight combines
Welcome to my kitchen! Today, I’m excited to share my recipe for Creamy Mushroom Orzo. This simple one-pot delight combines
![- 12 oz pasta (fettuccine or pappardelle) - 2 cups butternut squash, peeled and cubed - 1 tablespoon olive oil - 1 small onion, diced - 2 cloves garlic, minced - 1 cup vegetable broth - 1 cup coconut milk (or heavy cream) - ½ cup grated Parmesan cheese - Fresh sage leaves for garnish Gathering the right ingredients makes cooking more fun. For the main part, you need 12 ounces of pasta. I love using fettuccine or pappardelle because they hold sauce well. Next, grab two cups of butternut squash, peeled and cubed. This squash adds a sweet, nutty flavor. A tablespoon of olive oil helps with roasting. Now, for additional ingredients, you’ll want a small onion, diced. It brings a nice base flavor. Two cloves of minced garlic add depth. Lastly, one cup of vegetable broth will make it creamy and rich. For optional ingredients, you can use one cup of coconut milk. It gives a nice creaminess. If you want a richer taste, go for heavy cream instead. Adding half a cup of grated Parmesan cheese makes it savory. Lastly, fresh sage leaves are great for garnish. They add a lovely aroma and taste. For the full recipe, check out the section provided in this article. Remember, using fresh ingredients makes a big difference in flavor! - Roast the Butternut Squash: Start by preheating your oven to 400°F (200°C). Toss the cubed butternut squash with olive oil, salt, and pepper. Spread the squash on a baking sheet. Roast for 20-25 minutes, until it’s tender and lightly browned. - Cook the Pasta: While the squash roasts, cook 12 oz of pasta in a large pot of salted boiling water. Follow the package instructions. Reserve 1 cup of pasta water before draining. Set the pasta aside. - Sauté Aromatics: In a large skillet, heat a splash of olive oil over medium heat. Add one diced onion and sauté it until soft, about 5 minutes. Add 2 minced garlic cloves and cook for one more minute. This adds great flavor. - Blend the Sauce: When the squash is done roasting, add it to the skillet with the onions and garlic. Pour in 1 cup of vegetable broth and 1 cup of coconut milk. Add 1 teaspoon of nutmeg for a warm flavor. Use an immersion blender or transfer to a regular blender. Blend until smooth and creamy. - Combine Pasta and Sauce: Return the sauce to the skillet on low heat. Stir in the cooked pasta, adding the reserved pasta water bit by bit to get your desired sauce thickness. Mix it well so the pasta gets coated with the sauce. - Add Cheese and Serve: If you like, add ½ cup of grated Parmesan cheese now. Stir until it melts and mixes in. Adjust seasoning with salt and pepper to taste. Plate your pasta and garnish with fresh sage leaves for a nice touch. For the complete recipe, check out the [Full Recipe]. Seasoning makes a big difference in your dish. Salt and pepper enhance the taste of the butternut squash. Nutmeg adds warmth and depth. Always taste your sauce before serving. Adjust seasoning as needed for the best flavor. Fresh herbs brighten up the dish. I love using sage as a garnish. It brings a lovely smell and taste. You can also try using parsley or basil. These fresh herbs will make your meal look and taste amazing. Roasting the squash is key. Cut it into even pieces for a nice cook. Toss with olive oil, salt, and pepper. Roast at 400°F (200°C) until tender and golden. This brings out the natural sweetness. For a creamy sauce, blend cooked squash with broth and coconut milk. Use an immersion blender for easy cleanup. If you want it extra smooth, use a regular blender. Just remember to let it cool a bit before blending. Prep your ingredients ahead of time. Chop the squash and onion the night before. Store them in the fridge. This way, you save time when cooking. Cook the pasta while the squash roasts. This lets you finish the dish faster. If you're in a hurry, choose a thin pasta. Thin pasta cooks quickly and pairs well with creamy sauces. Check the [Full Recipe] for more helpful tips on timing. {{image_2}} You can change the sauce with a few simple swaps. Heavy cream makes a rich sauce. It adds a nice, creamy taste. If you want a lighter option, try coconut milk. It gives a sweet flavor and is great for vegan meals. You might also look for non-dairy options. Almond milk or cashew cream can work well. Both will keep the sauce creamy without dairy. If you need a gluten-free meal, use gluten-free pasta. There are many options like rice or corn pasta. They work well in this dish. Whole grain pasta is another great choice. It adds more fiber and nutrients. Plus, it has a nutty flavor. You can make this dish even better with add-ins. Spinach and kale are great choices. They add color and nutrition. Just stir them in while mixing the pasta and sauce. For protein, consider chicken, shrimp, or beans. Chicken adds a hearty touch. Shrimp cooks quickly and tastes great. Beans are perfect for a filling, vegetarian meal. Explore these variations to make the creamy butternut squash pasta your own. Check the Full Recipe for all the details! To keep your creamy butternut squash pasta fresh, use airtight containers. Glass or plastic containers work well. Let the pasta cool down before sealing. This helps prevent moisture build-up. Store in the fridge for up to three days. When reheating pasta, you want to keep it creamy. Use a skillet on low heat. Add a splash of water or broth to help with moisture. Stir often to warm evenly. You can also use the microwave, but cover it with a damp paper towel. This keeps the sauce from drying out. You can freeze this pasta, but it's best to do it without the sauce. Freeze the cooked pasta and sauce separately. Use freezer-safe bags or containers. To thaw, move the pasta to the fridge overnight. Reheat gently on the stove or in the microwave. This keeps the taste and texture just right. How long does it take to make creamy butternut squash pasta? Making creamy butternut squash pasta takes about 40 minutes. You will spend 10 minutes prepping and 30 minutes cooking. This includes roasting the squash and making the sauce. It's a quick meal for busy nights. Can you substitute butternut squash with other types of squash? Yes, you can use other squashes like pumpkin or acorn squash. Each squash gives a unique flavor. However, butternut squash is sweeter and creamier, which makes the dish special. Is this dish vegetarian or vegan? This dish can be made vegan if you skip the cheese. Use coconut milk instead of cream. The base is already vegetarian, thanks to the butternut squash and veggie broth. What are the nutritional benefits of butternut squash? Butternut squash is rich in vitamins A and C. It has fiber, which helps digestion. This squash also contains antioxidants that are good for your health. Overall, it’s a tasty and nutritious choice. Can I use canned butternut squash? Yes, you can use canned butternut squash. It saves time and is convenient. Just make sure to drain it well. This helps avoid a watery sauce. How do I know when the pasta is perfectly cooked? To know if the pasta is cooked, taste a piece. It should be al dente, which means firm but not hard. Follow the package instructions for timing, but keep an eye on it. Creamy butternut squash pasta is a tasty, simple dish. We explored key ingredients and how to prepare them. You learned helpful tips to enhance flavor and save time. We also discussed different variations and storage methods. Remember, you can adjust the recipe to suit your taste. Enjoy making this comforting meal for yourself and loved ones!](https://mycookingcast.com/wp-content/uploads/2025/07/000431ad-92db-4f90-88d6-bb841745a08c.webp)
Looking for a quick and flavorful meal? This Creamy Butternut Squash Pasta is just perfect! You’ll love the rich and
![For this creamy vegan pumpkin Alfredo, you will need: - 1 cup pumpkin puree (canned or homemade) - 1 cup cashews (soaked for at least 2 hours) - 1 cup vegetable broth - 2 tablespoons nutritional yeast - 2 cloves garlic, minced - 1 teaspoon onion powder - ½ teaspoon nutmeg - Salt and pepper to taste - 1 tablespoon olive oil - 12 oz fettuccine (or pasta of choice) - Fresh parsley, chopped (for garnish) This dish packs a lot of flavor and nutrients. Here’s a quick overview: - Calories: About 350 per serving - Protein: 10g - Carbohydrates: 50g - Fat: 14g - Fiber: 4g This meal is not only tasty but also gives you energy and vitamins. The cashews add protein, while the pumpkin is rich in vitamins A and C. You can easily swap some ingredients based on what you have. Here are a few ideas: - Cashews: Use sunflower seeds or silken tofu for a nut-free option. - Vegetable broth: Chicken broth can be used if not strictly vegan. - Fettuccine: Any pasta works well, like penne or gluten-free options. - Nutritional yeast: You can skip it, but it adds a cheesy flavor. These swaps keep the dish delicious while making it fit your tastes or needs. For the full recipe, check out the cooking instructions. To start, fill a large pot with water. Add a good pinch of salt and bring it to a boil. Once it’s bubbling, add 12 oz of fettuccine or your pasta of choice. Cook the pasta according to the package instructions until it's al dente. This usually takes about 8 to 10 minutes. When done, drain the pasta in a colander and set it aside. Make sure not to rinse it; you want to keep that nice starch! Next, let’s make the creamy sauce. Grab your blender and add 1 cup of soaked cashews, 1 cup of pumpkin puree, and 1 cup of vegetable broth. Toss in 2 tablespoons of nutritional yeast, 2 minced garlic cloves, 1 teaspoon of onion powder, and ½ teaspoon of nutmeg. Add a pinch of salt and pepper to taste. Blend everything until it’s smooth and creamy. If the sauce seems too thick, just add a bit more vegetable broth to get it to your liking. Now, let’s bring it all together! In a saucepan, heat 1 tablespoon of olive oil over medium heat. Pour in your blended pumpkin Alfredo sauce and let it simmer for about 3 to 5 minutes. Remember to stir occasionally so it doesn’t stick. Once the sauce is warm, add your cooked fettuccine into the pan. Gently toss the pasta in the sauce until it’s well coated. Cook it all together for another 1 to 2 minutes to heat through. Now you’re ready to enjoy a rich and creamy vegan pumpkin Alfredo! Serve it warm and don’t forget to check out the Full Recipe for more tips! To make your sauce creamy, soak the cashews. Soaking for at least two hours works best. This softens them and helps blend smoothly. Blend the cashews with pumpkin puree and broth until very smooth. If your sauce feels too thick, add more vegetable broth. This will help you reach the right texture for your Vegan Pumpkin Alfredo. Want to boost the taste? Try adding more garlic or onion powder. You can also mix in fresh herbs like sage or thyme. These herbs add depth and a fragrant touch. A pinch of cayenne will give your dish a gentle kick. Nutritional yeast adds a cheesy flavor that makes the dish pop. Garnishing is key to making your dish look great. Use fresh parsley as a bright touch on top. You can also sprinkle extra nutritional yeast for a cheesy look. A drizzle of olive oil adds shine and richness. For a fun twist, add roasted pumpkin seeds for crunch. These simple toppings make your Vegan Pumpkin Alfredo even more appealing. For the complete recipe, check out the Full Recipe section. {{image_2}} You can switch up the pasta type in this dish. While I love fettuccine, any pasta works. Try penne, rotini, or even gluten-free options. Each shape holds the creamy sauce differently. You might find a new favorite with just a simple change. Adding veggies boosts the flavor and nutrition. You can mix in spinach, kale, or roasted broccoli. For added protein, toss in chickpeas or tofu. These additions make the dish more filling. Plus, they add color and texture to your plate. Get creative with what you have on hand. You can easily tweak the flavor to suit your taste. For a spicier kick, add red pepper flakes or chili powder. If you like a smoky taste, try a dash of smoked paprika. Fresh herbs like basil or thyme can brighten the dish. Taste your sauce as you go, and make it yours! For the full recipe, click here: [Full Recipe]. To store your Vegan Pumpkin Alfredo, let it cool down first. Place it in an airtight container. Make sure it is sealed tightly to keep it fresh. Store it in the fridge. It can last for up to three days. To reheat, scoop the pasta into a saucepan. Add a splash of vegetable broth or water. Heat it over low to medium heat. Stir it often until warmed through. You can also use a microwave. Heat it in a microwave-safe dish, covered, for about 1-2 minutes. Stir halfway through for even heating. You can freeze Vegan Pumpkin Alfredo for later use. Use a freezer-safe container. Leave some space at the top, as it may expand. It will keep well for up to three months. When ready to eat, thaw it overnight in the fridge. Reheat it gently on the stove or microwave. Just remember to add a splash of broth to help restore its creaminess. You can find the Full Recipe above. Yes, you can use fresh pumpkin. Just roast or steam it first. After cooking, scoop out the flesh and blend it into a smooth puree. Fresh pumpkin can add a sweeter taste and a vibrant color. Yes, this dish can be gluten-free. Use gluten-free pasta to keep the whole dish safe for those who avoid gluten. Most stores offer great gluten-free options. To spice up your sauce, add cayenne pepper or red pepper flakes. Start with a small pinch and taste as you go. You can also add a dash of hot sauce for more heat. This dish pairs well with a fresh salad or garlic bread. Try adding roasted vegetables for extra flavor and nutrients. You can even serve it with a light soup to start your meal. For the full recipe, check out the details above. This blog post covers a delicious Vegan Pumpkin Alfredo. We explored the key ingredients, nutritional facts, and substitutions. You learned step-by-step how to cook pasta, make the cashew sauce, and combine them. Additionally, I shared tips for a creamy texture, flavor boosts, and garnish ideas. We discussed fun variations and how to store leftovers properly. Overall, this dish is flexible and tasty, making dinner fun and easy. Enjoy your cooking!](https://mycookingcast.com/wp-content/uploads/2025/07/baafcca8-e07c-466b-81d6-42e5420e04f6.webp)
Are you ready to dive into a bowl of comfort? Vegan Pumpkin Alfredo is not just a meal; it’s a

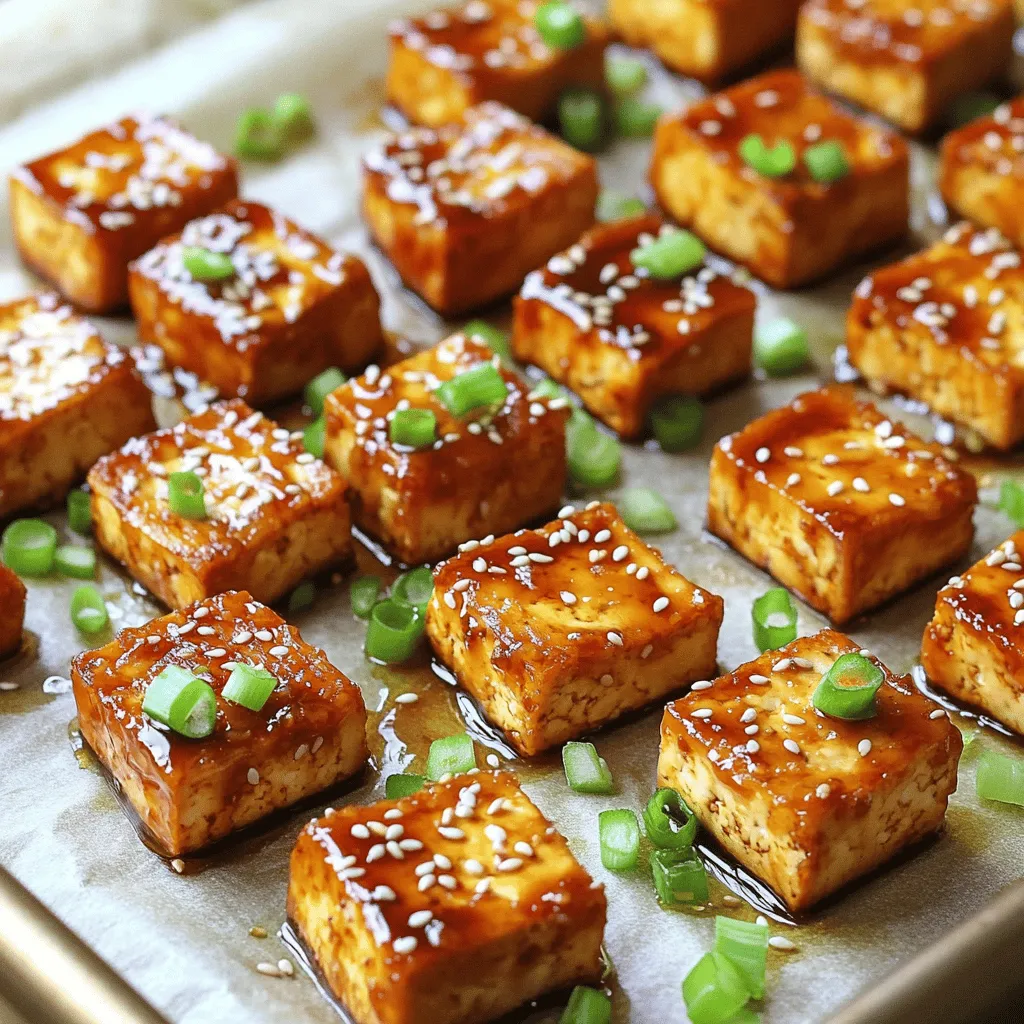
Are you ready to transform tofu into a crispy delight? My Crispy Honey Garlic Tofu Bites are full of flavor
Craving a quick and tasty meal? Baked Teriyaki Tofu delivers bold flavor and easy prep. Whether you’re a tofu pro
![- Fresh asparagus: 1 pound - Olive oil: 3 tablespoons - Garlic: 4 cloves, minced - Lemon zest: from 1 lemon - Fresh lemon juice: 2 tablespoons - Red pepper flakes: 1 teaspoon (optional) - Salt and pepper: to taste - Parmesan cheese: 2 tablespoons, freshly grated (optional) - Lemon wedges: for serving When you gather your ingredients, focus on freshness. Look for bright green asparagus. You want firm stalks with tight tips. The olive oil should be high quality, as it adds great flavor. Fresh garlic packs a punch, enhancing the dish. I love using fresh lemon zest. It brightens the flavors and gives zestiness. The juice adds that tangy kick, making each bite refreshing. If you like a bit of heat, consider the red pepper flakes. They are optional but add a nice touch. Salt and pepper are key to balancing flavors. You may add Parmesan cheese for richness. It melts beautifully over warm asparagus. Finally, serve with lemon wedges. They offer a fresh squeeze when you are ready to eat. For the full recipe, check out the details above. - Step 1: Preheat the oven to 425°F (220°C). This high heat helps the asparagus roast well. - Step 2: Prepare asparagus and combine with olive oil. Trim the woody ends off the asparagus. In a large bowl, add 1 pound of asparagus and 3 tablespoons of olive oil. Toss until each spear is coated. - Step 3: Add remaining ingredients and toss. Next, add 4 cloves of minced garlic, the zest of 1 lemon, 2 tablespoons of fresh lemon juice, and 1 teaspoon of red pepper flakes if you want some heat. Season with salt and pepper. Toss everything together until well mixed. - Step 4: Arrange asparagus on a baking sheet. Spread the seasoned asparagus in a single layer on the baking sheet. This helps them cook evenly. - Step 5: Roast asparagus for 12-15 minutes. Place the baking sheet in the preheated oven. Roast until the asparagus is tender and slightly crispy at the tips. - Step 6: Sprinkle with Parmesan cheese (if using). After removing the asparagus from the oven, add 2 tablespoons of freshly grated Parmesan cheese on top if you like. Serve warm with lemon wedges on the side for extra flavor. For the complete recipe, check out the [Full Recipe]. To make your lemon garlic asparagus shine, use high-quality olive oil. This oil adds depth and richness. It also helps the garlic and lemon flavors pop. You can also experiment with different herbs. Try adding fresh thyme or rosemary for a new twist. These herbs bring a lovely aroma and taste. When roasting, avoid overcrowding the baking sheet. If the asparagus spears touch, they steam instead of roast. This makes them soft, not crisp. Adjust the roasting time based on asparagus thickness. Thicker spears need a bit more time. Keep an eye on them to ensure they turn out just right. Pair your lemon garlic asparagus with grilled meats. It complements chicken, fish, or steak perfectly. You can also serve it alongside a fresh salad. This adds a light and crisp touch to your meal. For the full recipe, check the details above. {{image_2}} To give your Lemon Garlic Asparagus new flavors, try these options. - Lemon Herb Variation: Add thyme or rosemary for a fresh taste. - Spicy Kick: Increase red pepper flakes or add chili powder for heat. These simple changes can elevate your dish and cater to different palates. You can also change how you cook your asparagus. - Sautéing on the stovetop: This method gives a quick cook. Just heat olive oil in a pan and add the seasoned asparagus. Cook for about 5-7 minutes. - Grilling for smoky flavor: Grill asparagus for about 8-10 minutes. The char adds depth and a wonderful taste. Both methods keep the asparagus crisp while adding unique flavors. Make this dish fit the season. - Spring: Add in seasonal vegetables like peas or radishes. They add color and flavor. - Summer: Serve it chilled as a salad. Just let the roasted asparagus cool, then toss with a light dressing. These variations keep your meals fresh and exciting all year round. For the full recipe, check out the recipe section above! Store any leftovers in an airtight container. This keeps the asparagus fresh. It is best eaten within 2-3 days. After that, the flavor and texture may change. To reheat, use the oven or a skillet. This method keeps the texture nice and crisp. Avoid using the microwave because it can make the asparagus soggy. If you want to freeze asparagus, start by blanching it. Blanching means boiling it briefly, then cooling it in ice water. This keeps the bright color and flavor. You can store frozen asparagus for up to 3 months. After that, it may lose its taste and texture. To trim asparagus, hold a spear in each hand. Bend the asparagus until it snaps. This break will remove the tough, woody end. You can also cut off about an inch from the bottom with a knife. This method helps keep the tender part of the asparagus. Yes, you can prepare Lemon Garlic Asparagus ahead of time. Wash and trim the asparagus, then mix with olive oil and spices. Store it in the fridge for up to two days. When you're ready to cook, just roast it in the oven. This saves time on busy days and keeps it fresh. Asparagus is done when it turns bright green and is tender. You can poke it with a fork to check. The tips should be slightly crispy, while the stalks remain firm. If it feels soft and mushy, it may be overcooked. A perfect cook keeps the asparagus bright and vibrant. You now know how to make delicious lemon garlic asparagus. I covered the ingredients, cooking steps, and helpful tips. Remember, you can switch things up with flavors and cooking methods. Keep your leftovers fresh and tasty with proper storage. This dish is easy to enjoy any time. So, gather your ingredients and try it out. You might just find a new favorite!](https://mycookingcast.com/wp-content/uploads/2025/07/a8ee86ac-80ed-47ac-8516-4a4cbb1ac71b.webp)
Looking for a delicious side dish that packs a punch? Look no further than Lemon Garlic Asparagus! This bright and
![- 2 grilled chicken breasts, sliced - 4 cups mixed salad greens (romaine, spinach, arugula) - 1 cup cherry tomatoes, halved - 1 cup corn kernels (fresh or canned) - 1/2 cup black beans, rinsed and drained - 1/2 cup shredded cheddar cheese - 1/4 cup red onion, thinly sliced - 1 avocado, diced - 1/2 cup BBQ sauce - 1/4 cup ranch dressing - Salt and pepper to taste - Fresh cilantro for garnish (optional) To make a BBQ Ranch Chicken Salad, you need fresh and quality ingredients. Each one adds flavor and texture. The grilled chicken gives protein and heartiness. Mixed salad greens bring crunch and color. Cherry tomatoes add sweetness. Corn kernels give a nice pop. Black beans offer fiber and depth. The shredded cheddar cheese melts into the warm chicken. Red onion provides a sharp bite. Diced avocado gives creaminess. BBQ sauce and ranch dressing tie everything together. They add tang and zest. Each serving has about 450 calories. You get around 30 grams of protein, 25 grams of fat, and 35 grams of carbs. This meal is balanced. It fills you up without weighing you down. - Grill or stovetop pan - Large salad bowl - Cutting board and knife You need some tools to whip up this salad. A grill or stovetop pan cooks the chicken. A large salad bowl holds all the ingredients. A cutting board and knife help you prepare the veggies. For the full recipe, check the section above. - Preheat your grill to medium heat. - Grill chicken breasts for about 6-7 minutes on each side. - Make sure the chicken is fully cooked. - Look for nice grill marks and juicy meat. - After grilling, let the chicken rest for a few minutes. - Slice the chicken into strips for easy serving. - In a large salad bowl, combine salad greens, cherry tomatoes, corn, and black beans. - Add shredded cheddar cheese, red onion, and diced avocado. - Top the mixture with the sliced grilled chicken. - Drizzle BBQ sauce and ranch dressing over the salad. - Toss gently until all ingredients are evenly coated. - Season with salt and pepper to taste. The key to a delicious BBQ Ranch Chicken Salad lies in the balance of flavors and the freshness of ingredients. For more detailed instructions, check the Full Recipe, and enjoy making this colorful dish! To make juicy, well-cooked chicken, I always use a simple trick: brine the chicken. A brine of water, salt, and sugar keeps the chicken moist. Soak the chicken for at least 30 minutes. For added flavor, try a marinade with olive oil, garlic, and your favorite herbs. Let it sit for an hour before grilling. This helps the flavors soak in. When grilling, preheat your grill to medium heat. Grill the chicken breasts for about 6-7 minutes on each side. Check that the internal temperature reaches 165°F to ensure that it is safe to eat. Let the chicken rest for a few minutes before slicing. This allows the juices to redistribute, keeping it tender. Preparing ingredients ahead of time makes meal prep easy. You can wash and chop the salad greens, tomatoes, and onions a day prior. Store them in airtight containers in the fridge. For the chicken, grill it the night before. Slice it and keep it in a separate container. Keep the BBQ sauce and ranch dressing in small jars. This keeps them fresh and makes serving simple. When you are ready to eat, just toss everything together. This ensures your salad stays crisp and delicious. BBQ Ranch Chicken Salad pairs well with many sides. Try serving it with corn on the cob or baked sweet potatoes. For drinks, an ice-cold lemonade or iced tea complements the flavors nicely. If you enjoy crunch, add tortilla chips on the side for an added texture. This salad is not just a meal; it’s a feast for the senses! For the complete recipe, check out the [Full Recipe]. {{image_2}} You can change the grilled chicken to fit your taste. Try using tofu for a tasty vegan choice. Shrimp also works great for seafood lovers. If you want to make it vegetarian, switch to chickpeas or black beans. For dressings, many brands offer vegan ranch. You can easily find plant-based BBQ sauces too. Want to give your salad a kick? Add spices like smoked paprika or cayenne pepper. Fresh herbs like cilantro or parsley can also make a big difference. For dressings, making your own BBQ sauce is fun! Mix ketchup, vinegar, brown sugar, and spices for a quick homemade twist. You can blend Greek yogurt with herbs for a healthier ranch option. Salad greens are just the start! You can use quinoa for a hearty base that adds protein. Spinach is another great option and is packed with nutrients. You can even mix in roasted sweet potatoes for a sweet touch. In different regions, people add local ingredients. In the Southwest, corn and black beans shine. In the South, try adding crunchy fried onions for extra flavor. For the full recipe, check out the BBQ Ranch Chicken Salad. To keep your BBQ Ranch Chicken Salad fresh, store it in the fridge right away. Place the salad in an airtight container. This keeps moisture in and prevents it from going bad. If you have extra BBQ sauce, store it in a separate container. This keeps the salad from getting soggy. You can use glass or plastic containers, but glass is best for longer storage. If you want to warm up the grilled chicken, do it gently. Place the chicken in a microwave-safe dish. Cover it with a damp paper towel to keep it moist. Heat it for 30-second bursts until warm. Avoid overheating, as this can dry it out. If you stored the sauces separately, add them after reheating. This keeps their flavor fresh and strong. Your BBQ Ranch Chicken Salad stays fresh in the fridge for about 3 days. After that, it may start to spoil. Look for signs like brown salad greens or a sour smell. If you see or smell anything off, throw it away. It’s always best to enjoy your salad while it's fresh for the best taste and health. For the full recipe, check out our detailed guide. To make BBQ sauce, start with these simple ingredients: - 1 cup ketchup - 1/4 cup apple cider vinegar - 1/4 cup brown sugar - 2 tablespoons Worcestershire sauce - 1 tablespoon smoked paprika - 1 teaspoon garlic powder - 1 teaspoon onion powder - Salt and pepper to taste Combine all ingredients in a bowl. Mix well until smooth. Taste and adjust sweetness or tanginess as needed. This sauce adds great flavor to your BBQ Ranch Chicken Salad. You can prep this salad a day early. Store the salad greens and veggies in separate airtight containers. Keep the dressing in a small jar. When you’re ready to eat, mix everything together. This way, your salad stays fresh and crisp. If you want to switch up the ranch dressing, try these options: - Greek yogurt for a creamy base - Blue cheese dressing for a stronger flavor - Honey mustard for a sweet twist - Avocado dressing for creaminess without dairy These alternatives still pair well with BBQ flavors. Yes, you can use leftover chicken! Rotisserie chicken works great. Just shred or slice it before adding to the salad. This saves time and reduces food waste. To keep this salad gluten-free, watch out for the ingredients: - Use gluten-free BBQ sauce - Ensure ranch dressing is gluten-free Most of the other ingredients are naturally gluten-free. Always check labels to be sure. Enjoy this tasty salad without worries! This BBQ Ranch Chicken Salad recipe combines fresh grilled chicken, vibrant greens, and bold flavors. You learned how to grill chicken, mix the salad, and add dressings for a delicious dish. Remember to use fresh ingredients for the best taste. You can customize it easily with different toppings or dressings. This salad is perfect for any meal or gathering. Enjoy your creation and serve it confidently to family and friends!](https://mycookingcast.com/wp-content/uploads/2025/07/b7a60009-32bd-4641-a1a1-2c9aad547f52.webp)
Looking for a meal that’s both tasty and satisfying? Let me introduce you to BBQ Ranch Chicken Salad! This dish
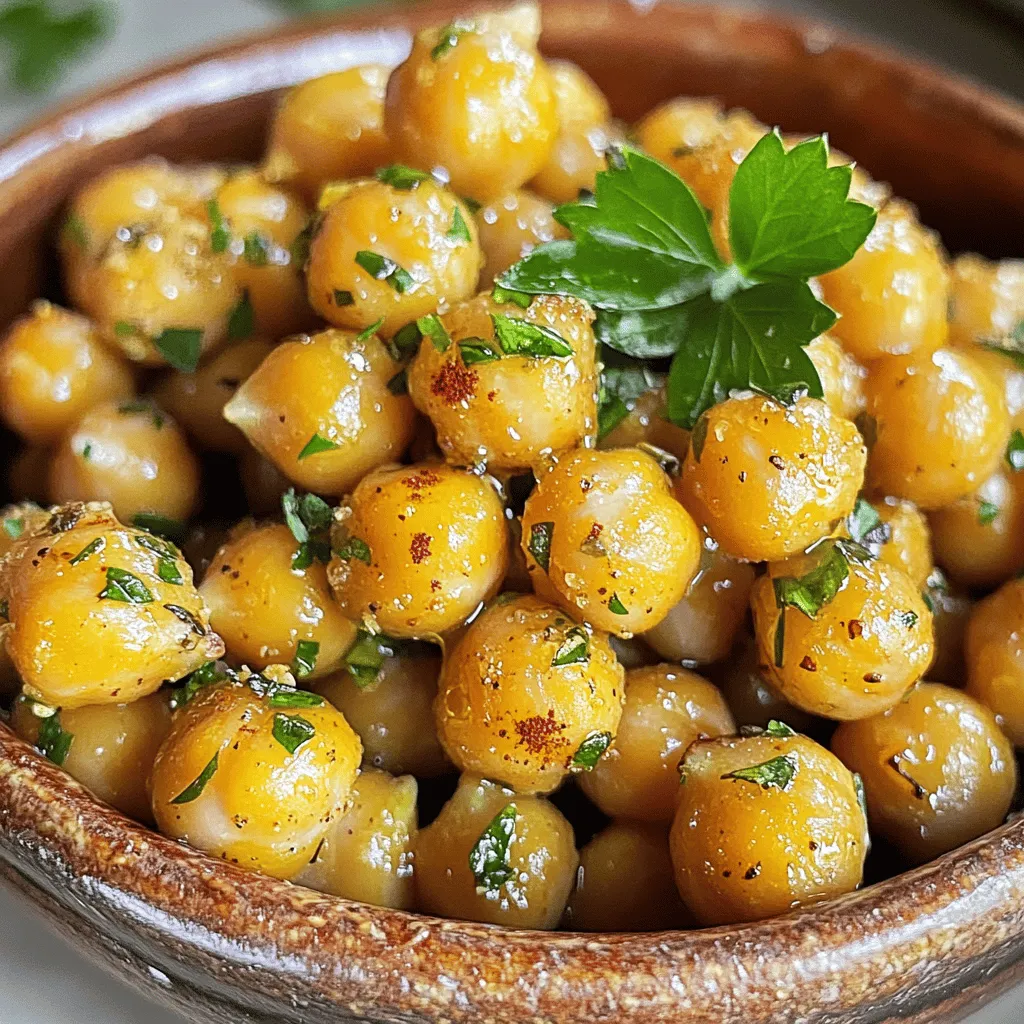
Looking for a delicious and healthy snack? Garlic Herb Roasted Chickpeas are your answer! These crispy morsels pack a punch
![The base of this Caramel Pecan Pumpkin Bread is pumpkin puree. It adds moisture and flavor. Butter gives richness, while sugars bring sweetness. Eggs help bind the bread together. Milk keeps it moist. You’ll need all-purpose flour for structure. Baking soda and baking powder help the bread rise. Spices like cinnamon and nutmeg create that warm fall taste. Salt balances the sweetness. Chopped pecans add crunch. Last, the caramel sauce gives a sweet, gooey finish. Here are the key measurements for the ingredients: - 1 cup pumpkin puree - 1/2 cup unsalted butter, melted - 1 cup brown sugar - 1/2 cup granulated sugar - 2 large eggs - 1/4 cup whole milk - 1 teaspoon vanilla extract - 2 cups all-purpose flour - 1 teaspoon baking soda - 1 teaspoon baking powder - 1 teaspoon ground cinnamon - 1/2 teaspoon ground nutmeg - 1/2 teaspoon salt - 1 cup chopped pecans - 1/2 cup caramel sauce If you need to make substitutions, unsweetened applesauce can replace some butter. For a dairy-free option, use almond milk. You can also swap pecans for walnuts or omit nuts entirely if you prefer. Using quality ingredients makes a big difference. Choose pure pumpkin puree, not pumpkin pie filling. Select unsalted butter for the best control over salt. For sugars, look for organic brown sugar; it adds depth to the flavor. When selecting flour, choose a high-quality all-purpose brand. Fresh spices will give the best aroma and taste. If possible, make your caramel sauce at home for the richest flavor. Trust me, it’s worth the extra effort. 1. Preheat the Oven: Start by preheating your oven to 350°F (175°C). Greasing and flouring a 9x5-inch loaf pan is key. This helps the bread release easily after baking. 2. Mix Wet Ingredients: In a large bowl, combine 1 cup of pumpkin puree, 1/2 cup of melted unsalted butter, 1 cup of brown sugar, and 1/2 cup of granulated sugar. Stir until the mix is smooth. 3. Incorporate Eggs and Milk: Add 2 large eggs, 1/4 cup of whole milk, and 1 teaspoon of vanilla extract. Beat them in until everything is well mixed. 4. Combine Dry Ingredients: In another bowl, whisk together 2 cups of all-purpose flour, 1 teaspoon of baking soda, 1 teaspoon of baking powder, 1 teaspoon of ground cinnamon, 1/2 teaspoon of ground nutmeg, and 1/2 teaspoon of salt. 5. Combine Mixtures: Slowly add the dry mixture into the pumpkin mix. Fold it gently. Do not overmix, as this can make the bread tough. 6. Add Pecans: Fold in 1 cup of chopped pecans. They add a nice crunch to the bread. 7. Drizzle with Caramel: Pour half the batter into the prepared loaf pan. Drizzle 1/4 cup of caramel sauce over it. Pour the rest of the batter on top, then drizzle the remaining caramel sauce. Use a knife to swirl it through the batter. 8. Bake: Place the loaf pan in the oven. Bake for 55-65 minutes. Check if it’s done by inserting a toothpick in the center. If it comes out clean, it’s ready. 9. Cool: After baking, let the bread cool in the pan for 10 minutes. Then, transfer it to a wire rack to cool completely. 10. Serve: Slice the bread and serve it warm. For a treat, add a drizzle of extra caramel sauce on top. You can also enjoy it with vanilla ice cream or whipped cream. It makes a delightful fall dessert! For the full recipe, check out [Full Recipe]. When making caramel pecan pumpkin bread, avoid overmixing the batter. Overmixing can make your bread tough. Mix just until you see the flour disappear. Another mistake is not measuring ingredients correctly. Use measuring cups for dry and wet ingredients. This keeps your bread light and fluffy. Lastly, do not skip the caramel drizzle. It adds a sweet touch that makes the bread special. To get the best flavor, use fresh spices instead of old ones. Fresh ground cinnamon and nutmeg really enhance the taste. Also, consider toasting your pecans before adding them. Toasting brings out their natural oils and gives a deeper flavor. Using high-quality caramel sauce makes a big difference too. A rich caramel balance with the pumpkin is key for a delightful bite. To keep your bread moist, use pumpkin puree, not pumpkin pie filling. Puree has no added sugars or preservatives. Adding an extra egg can also improve texture. If you want a fluffier bread, beat the eggs well before adding them. Lastly, do not skip the milk. Milk adds moisture, leading to a soft, tender crumb. For extra richness, try using buttermilk instead. With these tips, your caramel pecan pumpkin bread will shine! For the full recipe, check out the details above. {{image_2}} You can make this bread gluten-free easily. Use a gluten-free flour blend instead of all-purpose flour. Look for blends that include xanthan gum. This helps the bread hold together and rise well. To make a vegan version, replace the eggs with flax eggs. Mix 1 tablespoon of ground flaxseed with 2.5 tablespoons of water. Let it sit for five minutes until it thickens. Swap the butter for coconut oil or a vegan butter option. Use almond milk or soy milk instead of whole milk. You can get creative with flavors! Try adding chocolate chips for a sweet twist. Dried cranberries or raisins add a nice chew. You can even stir in a bit of orange zest. This will give your bread a fresh taste. For a spiced kick, add a pinch of ground ginger or cloves. Just remember, balance is key. Each added flavor should enhance the bread, not overpower it. For the full recipe, check out the details above. To keep your caramel pecan pumpkin bread fresh, wrap it tightly in plastic wrap. You can also place it in an airtight container. This helps keep moisture in and prevents it from drying out. Store it at room temperature for up to three days. If you want it to last longer, the fridge is a good option. If you want to save some for later, freezing is great! First, let the bread cool completely. Then, wrap it in plastic wrap and place it in a freezer bag. Remove as much air as you can. You can freeze it for up to three months. When you're ready to eat it, just thaw it in the fridge overnight. Caramel pecan pumpkin bread lasts well when stored properly. At room temperature, it stays fresh for about three days. In the fridge, it can last up to a week. When frozen, it stays good for three months. Enjoy your delicious bread at any time! For the full recipe, check the earlier section. You can make this bread without eggs by using substitutes. Use 1/4 cup of unsweetened applesauce per egg. This keeps the bread moist and adds natural sweetness. Another option is to use 1 tablespoon of ground flaxseed mixed with 2.5 tablespoons of water. Let it sit for a few minutes to thicken. Both methods work well and keep the bread delicious. Yes, fresh pumpkin works great! Start with a small pumpkin, usually called a sugar pumpkin. Roast it until soft, then scoop out the flesh. Puree it until smooth. You may need to drain some excess water, as fresh pumpkin can be wetter than canned. Use the same amount as the recipe calls for. This bread is tasty on its own, but you can enhance it further. Serve it warm with a scoop of vanilla ice cream. Whipped cream also pairs well. For a crunch, sprinkle extra chopped pecans on top. You can drizzle more caramel sauce for added sweetness. Each option makes for a delightful treat! In this post, we explored how to make Caramel Pecan Pumpkin Bread, from ingredients to serving tips. We discussed key ingredients, accurate measurements, and quality choices. You learned step-by-step preparation and baking advice for great results. I shared tips to avoid common mistakes and enhance flavor. Finally, we covered variations, storage, and answers to your most common questions. Caramel Pecan Pumpkin Bread is easy and fun to make. Enjoy baking!](https://mycookingcast.com/wp-content/uploads/2025/07/ae25c361-203c-4cee-8193-54e9ea0cc5d0.webp)
Fall is here, and it’s time to treat yourself with a slice of Caramel Pecan Pumpkin Bread! This sweet and
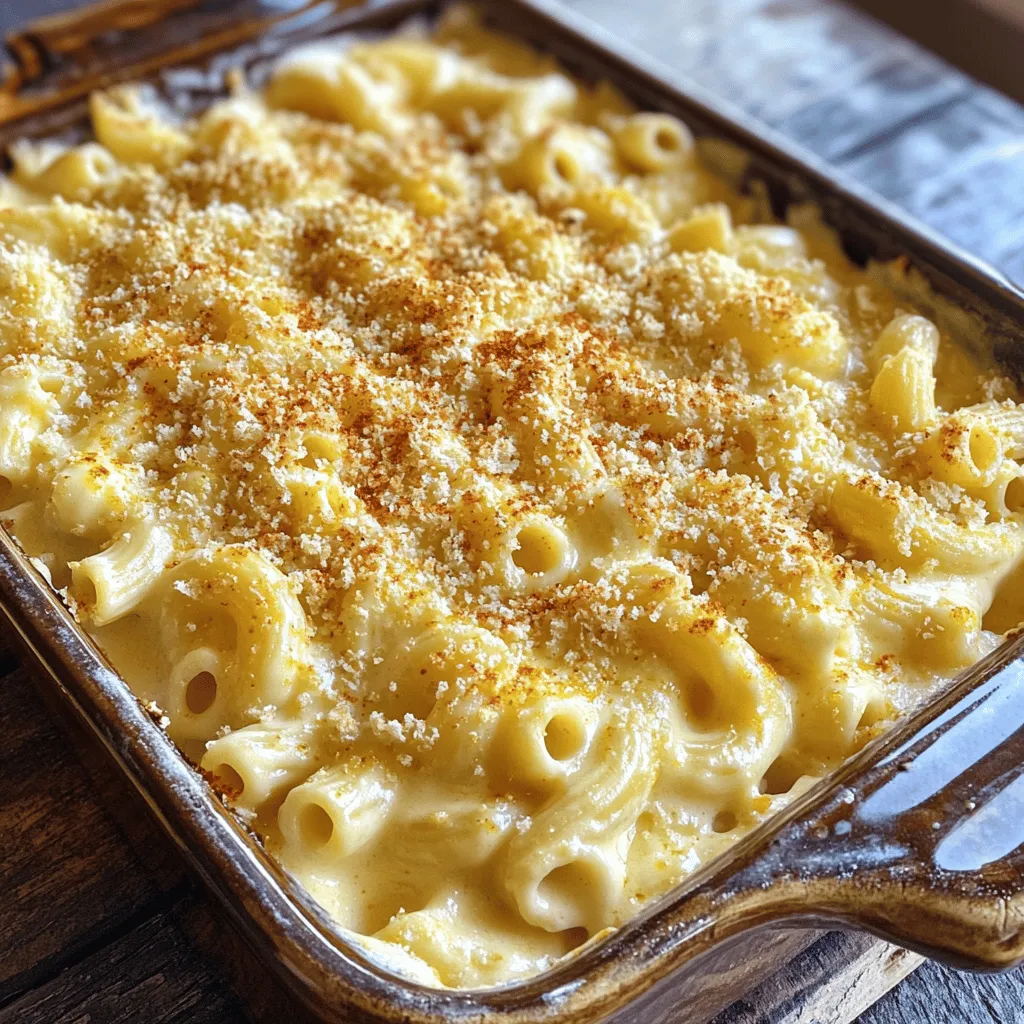
Are you ready to dive into a world of creamy goodness? This White Cheddar Mac and Cheese Creamy Delight Recipe
