
Jalapeño Cheddar Cornbread Bold and Flavorful Recipe
Get ready to spice up your meals with my bold and flavorful Jalapeño Cheddar Cornbread recipe! This dish combines sweet,
Get ready to spice up your meals with my bold and flavorful Jalapeño Cheddar Cornbread recipe! This dish combines sweet,

If you’re looking for a simple, tasty side dish that brings warmth to any meal, you’re in the right place!

If you love cinnamon rolls, you will adore these Cinnamon Roll Scones. Imagine fluffy scones with sweet, spiced swirls of

Are you ready to bake the best chocolate chip scones? With a fresh and flaky texture, this recipe will make
![To make these delightful white chocolate raspberry scones, gather these simple ingredients: - 2 cups all-purpose flour - 1/2 cup granulated sugar - 2 teaspoons baking powder - 1/2 teaspoon salt - 1/4 cup cold unsalted butter, cubed - 1/2 cup heavy cream - 1 large egg - 1 teaspoon vanilla extract - 1 cup fresh raspberries - 1/2 cup white chocolate chips (plus extra for topping) - 1 tablespoon milk (for brushing) These ingredients create a rich and tasty scone. The white chocolate adds sweetness, while the raspberries bring a fresh burst of flavor. You can easily swap some ingredients if needed: - Flour: Use whole wheat flour for a nuttier taste. - Sugar: Coconut sugar works for a lower glycemic index. - Butter: Vegan butter or coconut oil can replace unsalted butter. - Cream: Substitute with buttermilk or a non-dairy milk for a lighter option. - Egg: Use a flax egg (1 tablespoon ground flaxseed mixed with 2.5 tablespoons water) for a vegan version. These swaps keep the scones delicious while fitting your dietary needs. Feel free to make these scones your own by adding extras: - Nuts: Chopped almonds or pecans add crunch. - Zest: Lemon or orange zest brightens the flavor. - Spices: A dash of cinnamon or nutmeg can enhance warmth. - Chocolate: Dark chocolate chips offer a richer taste. These add-ins personalize your scones and make them even more special. For the complete recipe, check out the [Full Recipe]. To make these delightful scones, first gather your ingredients. You will need flour, sugar, baking powder, salt, butter, cream, egg, vanilla, raspberries, and white chocolate chips. Start by preheating your oven to 425°F (220°C). Line a baking sheet with parchment paper. This ensures easy cleanup later. In a large bowl, whisk together the flour, sugar, baking powder, and salt. Then, add the cold butter. Use a pastry cutter or your fingers to mix until it looks like coarse crumbs. In another bowl, mix heavy cream, egg, and vanilla together. Pour this into the flour mixture and stir gently. Be careful not to overmix, or your scones may be tough. Next, fold in the raspberries and white chocolate chips. Turn the dough onto a floured surface. Shape it into a disc about one inch thick. Cut this disc into eight wedges, like cutting a pizza. Place them on the baking sheet, leaving space between each scone. Brush the tops with milk and add extra chocolate chips if you like. Bake for 15 to 20 minutes until golden brown. For fluffy scones, keep your ingredients cold, especially the butter. Don’t overwork the dough. This keeps the scones light. If you want a shiny top, brush with milk or egg wash before baking. Lastly, let them cool on a wire rack, so they firm up nicely. For the full recipe, refer to the complete instructions provided earlier. To make fluffy scones, use cold ingredients. Cold butter is key here. Cut it into small pieces before mixing. This helps create air pockets in the dough. Also, avoid overmixing. Mix until the dough just comes together. This keeps the scones light and airy. Lastly, bake them in a hot oven. A high temperature helps them rise quickly. Many home cooks make a few common mistakes. One mistake is using warm butter. Warm butter can lead to dense scones. Another mistake is overmixing the dough. This makes the scones tough instead of tender. Make sure to fold in the raspberries gently. If you crush them, the dough may turn pink and lose texture. Finally, watch the baking time closely. Check your scones a few minutes early. Serve your scones warm for the best taste. They pair perfectly with tea or coffee. For a special touch, drizzle melted white chocolate on top. Add some fresh raspberries on the side for color. You can also serve them with clotted cream or whipped cream. This adds a rich flavor and creamy texture. Enjoy them as a lovely afternoon treat or a tasty breakfast! For the full recipe, check the details above. {{image_2}} You can change the flavor of your scones easily. If you want a twist, try using blueberries or strawberries instead of raspberries. Both fruits add a sweet burst. You could also try dried fruits like cranberries. They give a nice chew and a different taste. Citrus zest, like lemon or orange, can brighten the scone, too. The options are endless, so have fun with your favorite fruits! Do you need gluten-free scones? It’s simple to adapt this recipe. Just swap the all-purpose flour for a gluten-free blend. Make sure to add a bit of xanthan gum for texture. You can also use almond flour for a nutty flavor. If you want a lighter scone, try using low-fat cream or yogurt instead of heavy cream. These changes keep your scones tasty without gluten. Toppings can make your scones even better. You can drizzle melted white chocolate over the top for extra sweetness. A sprinkle of powdered sugar adds a nice touch and looks great. If you want something fresh, serve your scones with whipped cream or a dollop of yogurt. You might consider a fruit compote for a fruity twist. Each topping brings a new layer of flavor. To keep your scones fresh, place them in an airtight container. This helps maintain their soft texture. Line the container with parchment paper to absorb moisture. Store at room temperature for up to two days. For longer freshness, consider refrigerating them. Just remember to let them come to room temperature before serving. Reheating scones brings back their warm, fresh taste. Preheat your oven to 350°F (175°C). Place the scones on a baking sheet. Heat them for about 5 to 10 minutes. This method keeps them soft and fluffy. You can also use a microwave if you’re in a hurry. Just warm them for 10-15 seconds. They may not be as crisp, but they'll still taste great! If you want to save scones for later, freezing is a great option. Wrap each scone tightly in plastic wrap. Then, place them in a freezer-safe bag. This keeps them fresh for up to three months. When you're ready to eat, thaw them in the fridge overnight. You can then reheat them in the oven for the best results. Enjoy these treats anytime with this simple storage process! You know scones are done when they turn golden brown. A toothpick should come out clean when you poke the center. Bake your scones at 425°F (220°C) for 15-20 minutes. Keep an eye on them as they bake. If they look golden and smell amazing, it’s time to take them out. Yes, you can use frozen raspberries! Just make sure to thaw and drain them first. This step keeps the dough from getting too wet. Frozen raspberries may be softer, so handle them gently when mixing. They add a nice burst of flavor, even if they are not fresh. You can serve these scones with many tasty treats. A cup of tea or coffee pairs nicely. You might also enjoy them with clotted cream or butter. For an extra touch, drizzle some melted white chocolate on top. Fresh raspberries on the side brighten the plate. Check out the Full Recipe for more ideas! In this blog post, I covered the essential ingredients for making scones, including substitutions and optional add-ins. You also learned step-by-step instructions for preparation and baking, along with helpful tips for perfect results. I shared ways to achieve fluffy scones, common mistakes to avoid, and tasty serving suggestions. Lastly, I provided variations for flavors and dietary needs, as well as storage tips. With this guide, you are ready to bake delicious scones. Enjoy experimenting with your favorite ingredients!](https://mycookingcast.com/wp-content/uploads/2025/07/437e04f1-a683-4ca4-9d0f-364a7bf5e892.webp)
If you’re craving a sweet, fruity treat, you’re in the right place! These White Chocolate Raspberry Scones are a perfect

If you’re craving a treat that’s both sweet and nutty, you’ll love this Maple Pecan Scones recipe. With simple ingredients
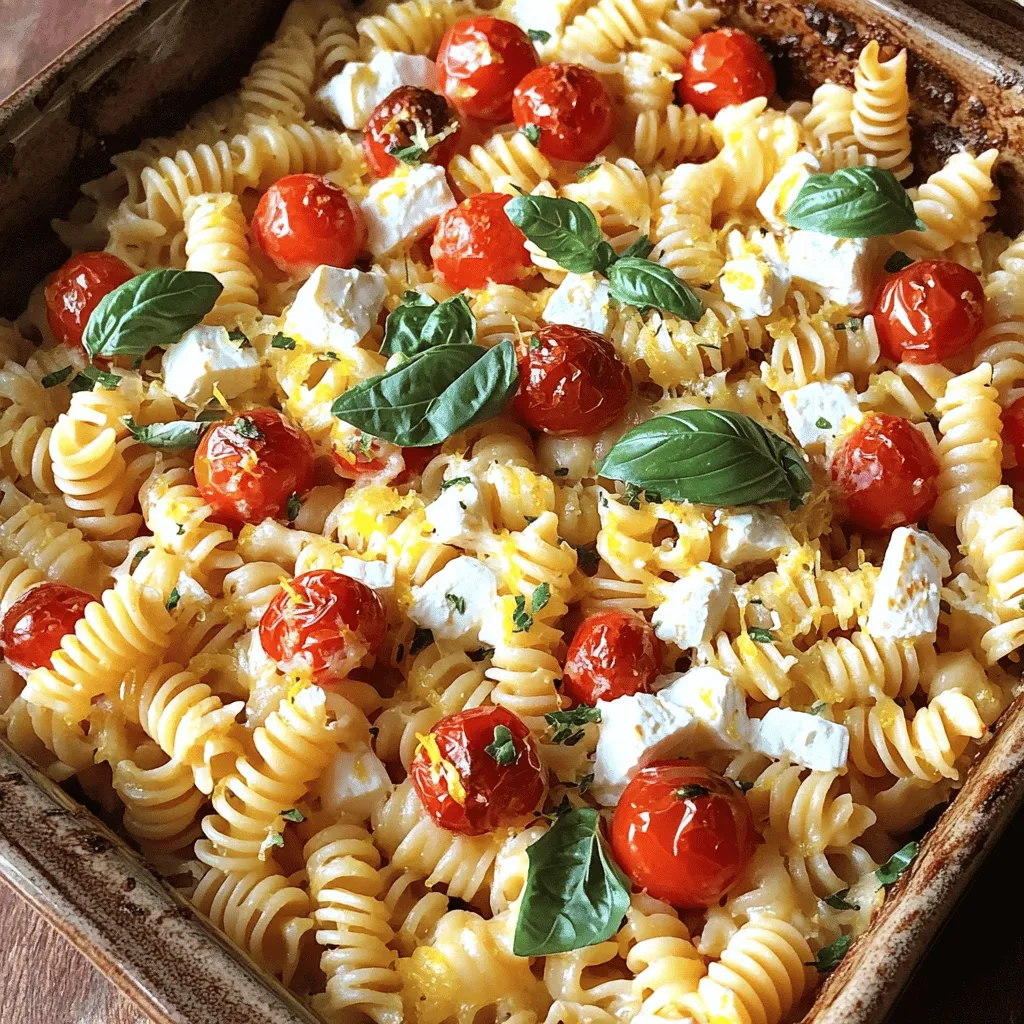
If you’re craving a dish that’s both easy and delicious, you’ve found it! This Baked Feta Pasta with Tomatoes is
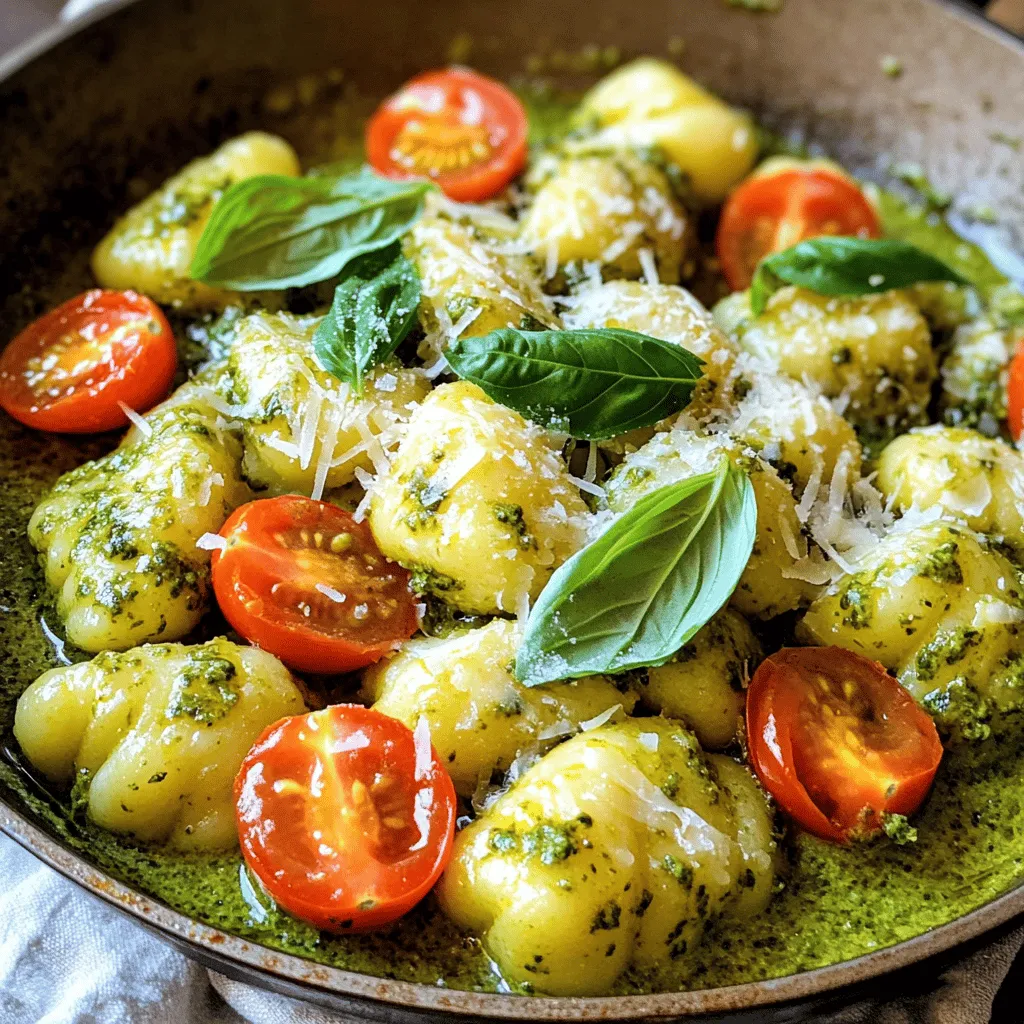
Are you ready to dive into a bowl of pure comfort? My Creamy Pesto Gnocchi recipe is rich, flavorful, and
![To make Cajun Shrimp Alfredo, gather these key ingredients: - 8 oz fettuccine pasta - 1 lb large shrimp, peeled and deveined - 2 tablespoons Cajun seasoning - 2 tablespoons olive oil - 3 cloves garlic, minced - 1 cup heavy cream - 1 cup grated Parmesan cheese - 1/2 cup cream cheese, softened - Salt and pepper to taste - 2 tablespoons chopped parsley (for garnish) You can enhance the dish with these optional ingredients: - Lemon zest for brightness - Additional herbs or garnishes, like basil or chives Using the right tools makes cooking easier. I recommend: - A skillet for sautéing the shrimp and making the sauce - A pot for boiling the pasta These tools help you create a flavorful meal with ease. For the full recipe, check out the details above. To start, bring a large pot of salted water to a rolling boil. This is key for flavor. Once boiling, add the fettuccine pasta. Cook it according to the package instructions, usually around 8 to 10 minutes. You want the pasta to be al dente, which means firm to the bite. Remember to stir it occasionally. When it's done, drain it and save 1/2 cup of the pasta water. This water helps to adjust the sauce later. Next, take your peeled and deveined shrimp. In a bowl, toss the shrimp with Cajun seasoning until they are well-coated. This adds great flavor. Now, heat olive oil in a large skillet over medium-high heat. Add the seasoned shrimp and sauté for about 2 to 3 minutes on each side. You’ll know they’re done when they turn pink and opaque. Remove the shrimp from the skillet and set them aside. In the same skillet, add minced garlic and sauté it for about 30 seconds until it smells great. Lower the heat to medium-low. Now pour in the heavy cream, stirring gently. Allow it to come to a gentle simmer. Next, add the cream cheese and stir until it melts into the cream. Gradually add the grated Parmesan cheese, stirring continuously. This will give you a rich sauce texture. If the sauce is too thick, mix in some reserved pasta water until you reach the right consistency. With these steps, you’re on your way to a delicious Cajun Shrimp Alfredo. Don't forget to check the [Full Recipe] for detailed cooking times and serving suggestions! To adjust the sauce thickness, you have a few options. If your sauce is too thick, add a little reserved pasta water. Start with a tablespoon. Keep stirring until you reach your desired consistency. For a creamier texture, use full-fat cream. It helps create that rich feel we love. To make your dish pop, try adding a pinch of smoked paprika. It adds depth without overpowering the Cajun seasoning. You can also mix in fresh herbs like basil or thyme. They bring a fresh taste that balances the rich sauce. A bit of lemon zest brightens up the dish. Just sprinkle it on before serving for an extra zing. For large shrimp, cook them for about 2-3 minutes on each side. They are done when they turn pink and opaque. If you use smaller shrimp, cut the cooking time in half. Look for a firm texture as a sign they are cooked right. Overcooked shrimp get rubbery, so stay alert! {{image_2}} You can swap shrimp for chicken or scallops easily. For chicken, cut it into small pieces. Season it with the same Cajun spice blend. Cook it until golden, then follow the rest of the recipe. Scallops offer a sweet, tender option. Sear them quickly on high heat for a rich flavor. If you're looking for vegetarian options, mushrooms or tofu work well. Use firm tofu, and cube it for a nice texture. Sauté the mushrooms until golden brown. Both will soak up the creamy sauce just like shrimp. Changing the spice blend can create a new taste. Try adding smoked paprika for a smoky kick. Or, mix in some cayenne for extra heat. You can also explore different herb blends for unique flavor combinations. For creaminess, consider non-dairy options. Coconut milk or cashew cream can replace heavy cream. This keeps the dish creamy while making it dairy-free. You can serve Cajun Shrimp Alfredo as a casserole or bake. Just layer the pasta, sauce, and shrimp in a baking dish. Top with more cheese before baking until bubbly. Pairing it with sides can change the meal. A crisp green salad balances the creamy dish. Garlic bread is another great option for a hearty meal. Explore different sides to find your favorite match! For the full recipe, check out the complete details above. To keep your Cajun Shrimp Alfredo fresh, refrigerate leftovers right away. Place the dish in an airtight container. This helps keep out air and moisture. Always cool the food to room temperature before sealing it up. It’s key to avoid bacteria growth and keep flavors intact. When it's time to eat again, reheating correctly is vital. Use the stovetop for the best results. Heat gently over low to medium heat. Stir often to avoid sticking. If the sauce seems too thick, add a splash of milk or reserved pasta water. This will help maintain the sauce's creamy texture. If you want to freeze Cajun Shrimp Alfredo, start by letting it cool completely. Then, pack it in a freezer-safe container. Leave a bit of space at the top for expansion. For thawing, move it to the fridge overnight. Reheat slowly on the stovetop to keep it creamy. Remember, never refreeze leftovers after thawing. Enjoy your meal fresh whenever you can! For the full recipe, check out the details above. Cajun Shrimp Alfredo pairs well with many sides. Here are some great options: - Garlic bread: A crunchy side to soak up the sauce. - Salad: A fresh green salad with a light vinaigrette adds balance. - Steamed vegetables: Broccoli or asparagus complement the dish without overpowering it. - Rice: A fluffy rice can help catch any leftover sauce. - Corn on the cob: Sweet corn adds a fun contrast to the spice. These sides enhance the meal and make it more enjoyable. To turn up the heat in Cajun Shrimp Alfredo, try these tips: - Use more Cajun seasoning: Add an extra tablespoon or two for more flavor. - Include red pepper flakes: Sprinkle some while cooking the shrimp or in the sauce. - Add hot sauce: A few dashes can bring a kick to the dish. - Experiment with fresh peppers: Dice jalapeños or serranos and sauté with the garlic. These methods help create a spicier, more exciting meal. Yes, you can prepare Cajun Shrimp Alfredo in advance. Here’s how: - Cook the pasta and shrimp separately: This helps keep them fresh. - Store the sauce in an airtight container: It can last up to three days in the fridge. - Combine everything before serving: Reheat gently on the stove and add a splash of cream or pasta water to refresh. This method saves time and lets you enjoy a homemade meal later. Cajun Shrimp Alfredo combines Italian and Creole flavors. It likely began in Louisiana, where Cajun food thrives. Influences from Italian immigrants brought creamy sauces to the region. The dish reflects the rich culture of southern cooking. Cajun Shrimp Alfredo is a delicious mix of traditions that warms the heart and pleases the palate. For the full recipe, check out the details above! Cajun Shrimp Alfredo is a tasty dish you can make easily. We covered ingredients, cooking tips, and even ways to change it up. Whether you love shrimp, chicken, or a veggie option, this dish fits. Remember, the key to a creamy sauce lies in careful cooking. Store any leftovers properly, and reheating is a breeze with the right methods. Dive into this recipe and enjoy a delicious meal that fits your style!](https://mycookingcast.com/wp-content/uploads/2025/07/5d1dc84f-c815-4e1a-a64f-ea492bbf0a6c.webp)
If you’re craving a dinner dish that’s both creamy and full of flavor, look no further than Cajun Shrimp Alfredo.
![To make Cheesy Spinach Artichoke Pasta, gather these key ingredients: - 8 oz (225g) pasta (penne or fusilli) - 1 cup fresh spinach, chopped - 1 cup artichoke hearts (canned or jarred), drained and chopped - 1 cup cream cheese, softened - 1 cup shredded mozzarella cheese - 1/2 cup grated Parmesan cheese - 2 cloves garlic, minced - 1/2 teaspoon red pepper flakes (optional) - 1/2 teaspoon dried oregano - 1/4 teaspoon black pepper - Salt to taste - 1 tablespoon olive oil - Fresh basil leaves for garnish (optional) These ingredients bring together rich flavors and creamy textures. They create a dish that is both filling and comforting. I love using fresh spinach and artichoke hearts as they add great taste and color. The mix of cheeses gives a rich, cheesy flavor. You can choose penne or fusilli pasta based on your preference. Each pasta shape holds the sauce well, making every bite delicious. For a little kick, add red pepper flakes. They are optional but enhance the flavor. The garlic and spices bring out the best in this dish. You can easily find these ingredients at your local grocery store. For the full recipe, check out the cooking instructions to create this delightful meal. First, fill a large pot with water. Add salt to the water. This step makes the pasta flavorful. Bring the water to a boil over high heat. Once boiling, add 8 oz of penne or fusilli pasta. Cook according to the package instructions until it is al dente. When done, drain the pasta but save about 1/2 cup of the pasta water. Set the pasta aside. Now, take the same pot and place it back on medium heat. Add 1 tablespoon of olive oil. Wait for the oil to heat up. Then, add 2 minced garlic cloves. Sauté the garlic for 1-2 minutes. You want it to smell nice, but don’t let it brown. Next, reduce the heat to low. Add 1 cup of softened cream cheese to the pot. Stir it constantly until it melts and becomes creamy. This is the base of your cheese sauce. Then, gradually stir in 1 cup of shredded mozzarella cheese and 1/2 cup of grated Parmesan cheese. Keep stirring until all the cheese is melted. If it gets too thick, add a bit of the reserved pasta water to make it creamy. Now, it’s time to add some color and nutrition. Stir in 1 cup of chopped spinach and 1 cup of chopped artichoke hearts. You can use canned or jarred artichokes. If you like a little heat, add 1/2 teaspoon of red pepper flakes too. Mix everything until the spinach wilts and everything is well combined. Finally, add the cooked pasta to your cheese and veggie mix. Toss gently to coat all the pasta well. Taste your dish and add salt if needed. Let it sit for a minute before serving. This dish is full of flavor and so creamy! Serve it in bowls and enjoy your Cheesy Spinach Artichoke Pasta. For a full recipe, check the [Full Recipe]. To get the best texture, you want your pasta cooked just right. Cooking pasta al dente means it is firm to the bite. This keeps the pasta from getting mushy when mixed with the creamy sauce. Follow the package time for al dente. For softer pasta, cook it an extra minute. Remember to reserve some pasta water before draining! This water helps adjust the sauce's thickness later. Cheese can be tricky. To get that creamy goodness, melt your cream cheese first over low heat. Stir it constantly until it turns smooth. Then, slowly add mozzarella and Parmesan. This gradual addition helps each cheese melt evenly. If it feels too thick, add a splash of reserved pasta water. This will help create a silky sauce. Want to spice things up? Add red pepper flakes for some heat. You can also mix in fresh herbs, like thyme or parsley, for bright flavor. A squeeze of lemon juice at the end adds a fresh twist. For extra depth, consider adding sautéed mushrooms or sun-dried tomatoes. Each of these will make your pasta pop with flavor. {{image_2}} You can boost your Cheesy Spinach Artichoke Pasta with protein. Try adding grilled chicken for a hearty touch. Shrimp is another great choice, giving a seafood twist. If you want a plant-based option, tofu works well too. Simply sauté it until golden and mix it in. If you want to change up the veggies, consider adding bell peppers or mushrooms. Zucchini also adds nice flavor and texture. You can even throw in some sun-dried tomatoes for a burst of sweetness. The key is to choose vegetables that you love, making each bite a delight. For those who need gluten-free options, there are many great pasta substitutes. Look for brown rice pasta or quinoa pasta for a good texture. You can also try chickpea pasta for added protein. Just cook them according to package instructions, and they will blend well with the sauce. For the complete recipe, you can find it in the Full Recipe section. To keep your cheesy spinach artichoke pasta fresh, store it in an airtight container. Place it in the fridge for up to three days. If you want to save it longer, freeze it. Use freezer-safe containers and make sure to label them with the date. This helps you keep track of what you have. Reheating is easy! You can use the microwave or stovetop. For the microwave, put the pasta in a bowl. Add a splash of water to keep it moist. Cover it with a damp paper towel and heat for 1-2 minutes. Stir halfway through to make sure it heats evenly. If using the stovetop, place it in a pan over low heat. Add a little cream or water to help it stay creamy. Stir often until it’s hot. When stored properly, your leftovers last about three days in the fridge. If frozen, they can last up to three months. After that, they may lose flavor and texture. Always check for odd smells or changes in color before eating. Yes, you can prepare this dish ahead of time. Cook the pasta and make the sauce as directed. After mixing, allow it to cool. Store in an airtight container in the fridge for up to 2 days. When ready to eat, just reheat on the stove. Add a splash of reserved pasta water to keep it creamy. If you want a lighter option, consider using Greek yogurt or ricotta cheese. Both provide creaminess without the extra fat. For a dairy-free choice, try cashew cream or coconut cream. These options will give you a nice texture while keeping the flavor delicious. To boost flavor, add more spices like garlic powder or Italian seasoning. You can also include sautéed onions or bell peppers for extra taste. A splash of lemon juice brightens the dish and enhances the flavors. Don’t forget to taste as you go, adjusting the salt and pepper. Yes, frozen spinach works well here. Thaw and drain it before adding to the dish. Squeeze out excess water to avoid a watery sauce. Frozen spinach is just as nutritious and saves prep time. It’s a great option if fresh spinach isn't available. This recipe covers the essentials for a delicious Cheesy Spinach Artichoke Pasta. You learned about the key ingredients, from pasta to cheeses and vegetables. The step-by-step instructions guide you through cooking and mixing everything just right. Remember the tips for perfect texture and flavor. You can also customize your dish with protein or vegetarian options. Storing and reheating it will keep your leftovers tasty. With these insights, you can create a meal everyone will love. Dive in and enjoy your cooking adventure!](https://mycookingcast.com/wp-content/uploads/2025/07/6588d221-62f2-4ee8-bb23-5ccf7ce3489b.webp)
Are you ready to take your pasta game to the next level? This Cheesy Spinach Artichoke Pasta is both delightful
