Cucumber Mint Yogurt Dip Refreshing and Simple Treat
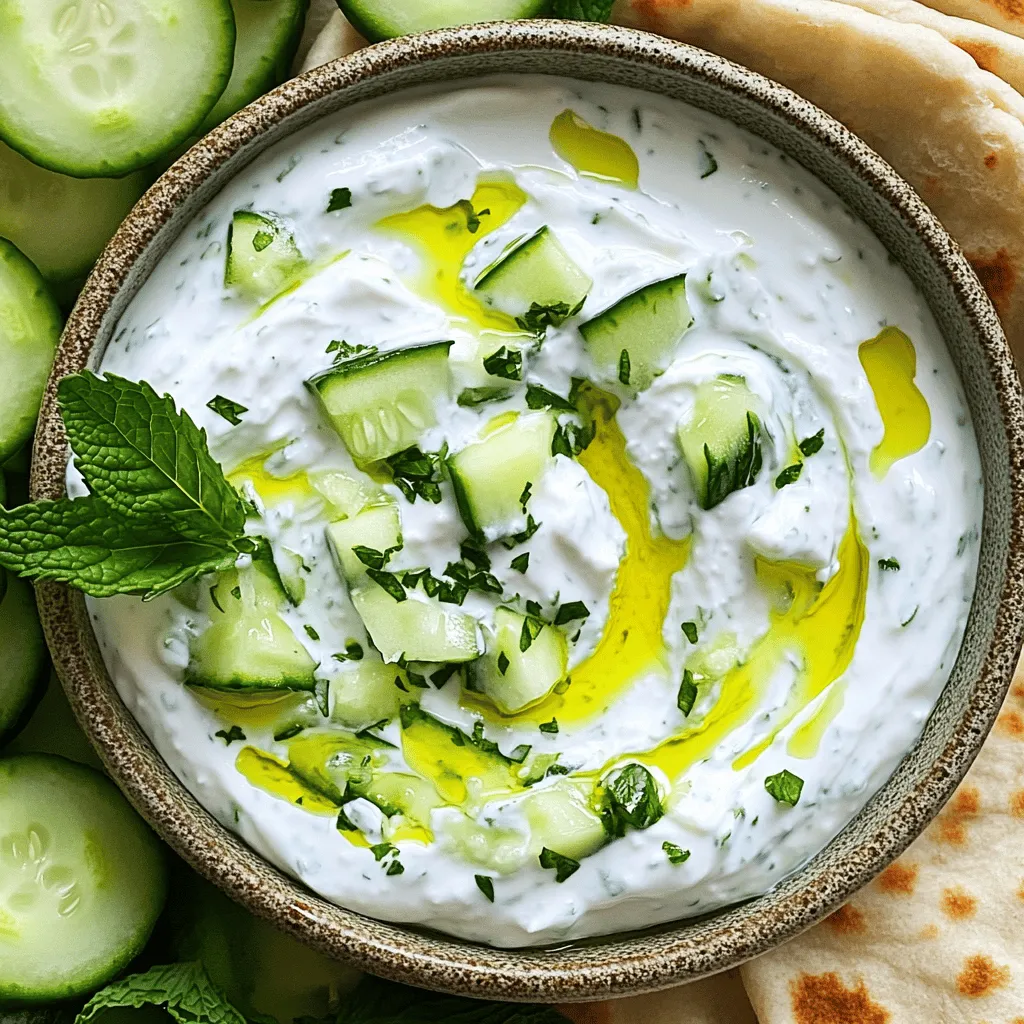
Looking for a refreshing dip that’s easy to make? Our Cucumber Mint Yogurt Dip hits the spot! With creamy Greek
Looking for a refreshing dip that’s easy to make? Our Cucumber Mint Yogurt Dip hits the spot! With creamy Greek

Looking for a quick and tasty meal? You’ve found it with my Sheet Pan Lemon Garlic Shrimp recipe! This dish

Are you ready to enjoy a delicious treat that’s also good for you? My Chocolate Chip Zucchini Muffins are delightfully
![To make the best five-ingredient Alfredo sauce, you need simple yet rich ingredients. Here are the main ones: - Heavy cream: This gives the sauce its creamy base. It adds a smooth texture and rich flavor. - Grated Parmesan cheese: This cheese adds depth and a savory taste. Freshly grated cheese melts better than pre-shredded. - Unsalted butter: Butter is key for a rich flavor. It helps to create a smooth and creamy sauce. - Garlic: Fresh garlic brings a robust taste. It pairs perfectly with cream and cheese. - Seasoning: You'll need salt and black pepper. These simple seasonings enhance the sauce's flavor without overpowering it. Using these ingredients, you can whip up a delicious sauce in no time. If you want the full recipe, check out the [Full Recipe]. 1. Melting the butter Start by taking a medium saucepan. Place it on the stove over medium heat. Add 4 tablespoons of unsalted butter. Watch as it melts and becomes clear. This step sets the base for your sauce. 2. Sautéing garlic Next, take 2 cloves of minced garlic. Add them to the melted butter. Stir for 1-2 minutes. You want the garlic to smell good but not brown. This brings out its flavor. 3. Combining cream and garlic Now, pour in 1 cup of heavy cream. Stir well to mix it with the garlic butter. Bring the mixture to a gentle simmer. Don’t let it boil! Stir occasionally as it warms up. 1. Simmering the cream Keep the cream at a gentle simmer. This helps it thicken. If you see bubbles, lower the heat. You want a smooth and creamy sauce. 2. Adding Parmesan cheese Gradually mix in ½ cup of grated Parmesan cheese. Stir continuously until the cheese melts. This makes the sauce rich and creamy. 3. Adjusting seasoning Finally, taste the sauce. Add salt and black pepper to your liking. If the sauce seems thick, splash in a bit of milk for a thinner texture. Now, your Five-Ingredient Alfredo Sauce is ready! Serve it over your favorite pasta or use it in other dishes. For the full recipe, check above. To make the best five-ingredient Alfredo sauce, avoid common mistakes. First, never let the garlic brown. If it burns, the sauce will taste bitter. Instead, cook it gently until it smells great. Next, focus on the sauce's consistency. If your sauce is too thick, add a splash of milk. For a thinner sauce, stir in more heavy cream. Adjust until it feels just right. You can enhance the flavor with extra ingredients. Try adding fresh herbs like parsley or basil. A pinch of nutmeg can also add warmth. For a kick, toss in some red pepper flakes. These simple tweaks make your sauce shine. This creamy Alfredo sauce pairs well with many types of pasta. Fettuccine is a classic choice. You can also use penne or spaghetti. Each type adds a unique twist to your dish. Beyond pasta, use this sauce in other ways. Pour it over roasted vegetables for a rich flavor. You can also use it as a base for chicken or seafood dishes. Drizzle the sauce over grilled shrimp or chicken for a tasty meal. To explore more ideas, check out the Full Recipe. {{image_2}} You can change the cheese in this Alfredo sauce. Try using Pecorino Romano for a sharper taste. If you want a milder flavor, use mozzarella cheese. If you need a dairy-free option, use coconut cream instead of heavy cream. Nutritional yeast can replace Parmesan cheese for a cheesy flavor without dairy. To add more flavor, mix in herbs or spices. Fresh basil or parsley will brighten up your sauce. For a kick, add red pepper flakes or nutmeg. Making a larger batch is easy. Just double or triple the amounts of each ingredient. This way, you can enjoy more sauce on pasta or share it with friends. If you want smaller servings, cut the ingredients in half. This works great for a quick meal for one or two. Adjust the sauce as needed to fit your plans. For the full recipe, check out the Five-Ingredient Alfredo Sauce guide. After enjoying your creamy five-ingredient Alfredo sauce, you may have some left. You can store it easily. - Refrigeration tips: Place the sauce in an airtight container. It will last for 3 to 4 days in the fridge. Make sure to cool it before sealing the lid. This helps keep the sauce fresh. - Freezing the sauce: If you want to store it longer, freeze the sauce. Pour it into a freezer-safe container. Leave some space at the top, as it will expand when frozen. The sauce can last up to 3 months in the freezer. When you’re ready to use it, thaw it in the fridge overnight. When it’s time to enjoy your sauce again, you’ll want to reheat it right. - Best methods for reheating: The best way to reheat Alfredo sauce is on the stove. Pour it into a saucepan over low heat. Stir often to heat it evenly. You can also use the microwave. Heat it in short bursts of 30 seconds, stirring in between. - Maintaining creaminess: To keep the sauce creamy, add a splash of milk or cream while reheating. This helps restore its texture. If it’s too thick, just add a bit more liquid until it’s just right. How to make a lighter version of Five-Ingredient Alfredo Sauce? You can easily lighten up this sauce. Use half-and-half instead of heavy cream. You can also replace some butter with olive oil. This keeps the flavor while cutting calories. Add a bit of lemon juice for brightness. This will give you a fresh taste without all the fat. Can I use pre-shredded cheese? Yes, you can use pre-shredded cheese. It saves time, but it may not melt as well. Pre-shredded cheese often has anti-caking agents. These agents can make your sauce grainy. If you can, grate your own cheese for the best results. How long does Five-Ingredient Alfredo Sauce last in the fridge? You can store this sauce in the fridge for about three days. Make sure to keep it in an airtight container. If you want to save it longer, freeze it. It can last up to three months in the freezer. Why is my sauce too thick? If your sauce is too thick, it may need more liquid. Try adding a splash of milk or broth. Stir it in slowly until you get your desired consistency. Also, be careful not to cook it too long. Overcooking can make it thicker. How do I fix a grainy sauce? A grainy sauce usually comes from the cheese not melting properly. To fix it, try whisking the sauce over low heat. You can also add a little more cream or milk. This can help smooth it out. If it still doesn’t work, blend the sauce until smooth. For the full recipe, check back for more tips and tricks to perfect your Alfredo sauce! To make a great Alfredo sauce, you need just a few key ingredients. We reviewed the main elements, from heavy cream to garlic. The cooking steps are simple and fun. I shared tips to help you avoid common mistakes and make the sauce just right. You can even explore tasty variations and storage tips to keep your sauce fresh. Remember, practice makes perfect, and soon you'll be serving a delicious dish everyone will love. Enjoy your cooking journey with Alfredo sauce!](https://mycookingcast.com/wp-content/uploads/2025/07/3910e6d3-8039-42b8-8440-4f8a72333afc.webp)
Creamy Alfredo sauce doesn’t have to be complicated. With just five simple ingredients, you can whip up a delicious sauce

Craving a taste of Greece? You’re in the right place! This Greek Chicken Gyros recipe is not only packed with
![To make the best classic banana bread, gather these simple ingredients: - 3 ripe bananas, mashed - 1/3 cup melted butter - 1 teaspoon baking soda - Pinch of salt - 3/4 cup sugar (or 1/2 cup for less sweetness) - 1 large egg, beaten - 1 teaspoon vanilla extract - 1 cup all-purpose flour - 1/2 cup chopped walnuts or pecans (optional) - 1/2 teaspoon cinnamon (optional) Ripe bananas are key to great flavor. They should have brown spots. The brown spots mean they are sweet and soft. You can use them when they are very ripe. The butter adds richness. For a lighter bread, use less sugar. I like to mix in nuts for crunch, but it’s up to you. A dash of cinnamon gives warmth and adds flavor. This list helps you create a moist and tasty banana bread. Grab your ingredients, and let’s move on to the fun part: baking! Check out the [Full Recipe] to see how it all comes together. First, set your oven to 350°F (175°C). This is the perfect temperature for baking banana bread. While the oven heats up, grab a 4x8 inch loaf pan. Grease it well with butter or cooking spray. This step helps the bread slide out easily after baking. In a mixing bowl, combine the melted butter and mashed bananas. Use a fork or a masher to mix them until smooth. This mixture should be creamy and well-blended. The ripe bananas add natural sweetness and moisture to your bread. Now, stir in the baking soda and a pinch of salt. These ingredients will help your bread rise nicely. Next, add the sugar, beaten egg, and vanilla extract. Mix well until everything is fully combined. This step ensures a balanced flavor in your banana bread. Gently fold in the flour. Be careful not to overmix! Overmixing can make your bread tough. If you want, add in chopped nuts and cinnamon at this point. Fold them into the batter gently. They add a lovely crunch and extra flavor. Pour your batter into the prepared loaf pan. Smooth the top with a spatula for a nice finish. Bake in the preheated oven for 60-65 minutes. To check for doneness, insert a toothpick into the center. If it comes out clean, your bread is ready. Let it cool in the pan for about 10 minutes before transferring it to a wire rack. Enjoy the comforting aroma as it bakes! Ripe bananas are key for great banana bread. Look for bananas with brown spots. These spots mean the bananas are sweet and soft. Their natural sugars add flavor and moisture to the bread. If your bananas are green, wait a few days. Or, you can speed up the ripening by placing them in a paper bag. This traps the ethylene gas and helps them ripen faster. Always mash the bananas well. This helps them blend into the batter smoothly. Overmixing can ruin your banana bread. Mix just until the flour disappears. If you mix too much, the bread may turn tough. Also, handle the batter gently when adding nuts or spices. It’s best to store the batter in the fridge if you can’t bake it right away. This keeps it fresh. But try to bake it within a day for the best results. Banana bread is best right out of the oven. Slice it warm and spread a bit of butter on top. For a sweet twist, drizzle some honey over it. You can also add a sprinkle of cinnamon for extra flavor. Serve it with fresh banana slices. This makes a lovely presentation. Enjoy it with a cup of coffee or tea for a perfect snack! {{image_2}} You can make banana bread healthier by changing a few items. Whole wheat flour adds fiber. It gives a nutty taste too. If you want less sugar, cut it back to 1/2 cup. You won't miss the sweetness. You can also use honey or maple syrup for natural sweetness. Want to boost the flavor? Add chocolate chips for a sweet twist. They melt into the warm bread. Dried fruits like raisins or cranberries also work great. They add a chewy texture. Nuts, like walnuts or pecans, give a nice crunch. You can mix and match these extras. If you need a gluten-free version, use gluten-free flour. Almond flour or coconut flour are good choices. They change the flavor and texture a bit. You can also mix gluten-free flour with a bit of cornstarch for a lighter crumb. Always check for gluten-free labels on your ingredients. For the full recipe, check out the Deliciously Classic Banana Bread section above. To keep your banana bread fresh, wrap it well. Use plastic wrap or aluminum foil. This helps it stay moist. You can also place it in an airtight container. Store at room temperature for up to three days. If you want it to last longer, consider refrigeration. Just remember, this might change the texture a bit. Freezing banana bread is easy. First, let it cool completely. Then, slice the bread for easy thawing. Wrap each slice in plastic wrap. After that, place the wrapped slices in a freezer bag. Squeeze out the air before sealing. This helps prevent freezer burn. You can freeze banana bread for up to three months. To thaw frozen banana bread, take it out of the freezer. Leave it in the fridge overnight. If you're in a hurry, you can use the microwave. Unwrap the slice and microwave it for about 15 seconds. Check if it’s warm enough. If not, microwave in 5-second bursts. You can also reheat it in an oven. Preheat to 350°F (175°C) and heat for about 10 minutes. This will bring back its soft texture. For banana bread, bananas should be very ripe. Look for bananas with brown spots. The darker the skin, the sweeter the bananas. Ripe bananas give your bread a rich flavor and soft texture. The natural sugars develop more as they ripen. This is key for making your bread moist and tasty. Yes, you can use frozen bananas! Start by thawing them first. Place them in the fridge overnight or let them sit at room temperature. Once thawed, drain any extra liquid. Then, mash them like you would fresh bananas. They will still work well in your banana bread recipe. Homemade banana bread lasts about 3 to 4 days at room temperature. Store it in an airtight container to keep it fresh. If you want it to last longer, store it in the fridge. It can last up to a week in there. For even longer storage, freeze it. Just make sure to wrap it well to avoid freezer burn. Enjoy your banana bread for longer! In this post, we explored the key ingredients and steps for making banana bread. We covered tips for the right texture and how to avoid common mistakes. You learned about variations and storage options to keep your bread fresh. Banana bread is simple to make and you can customize it to fit your tastes. With the right ingredients, you’ll bake a treat that everyone will love. Enjoy baking and sharing your delicious banana bread!](https://mycookingcast.com/wp-content/uploads/2025/07/757dd1b1-9df8-4ea2-b68d-3517feb68e25.webp)
Banana bread can be soft, moist, and oh-so-delicious! This classic recipe combines simple ingredients you probably already have. In this

Craving a quick and mouthwatering meal? Look no further than this Spicy Ramen Noodle Stir Fry! Packed with crunchy veggies
![- 1 pre-made sugar cookie dough (or homemade sugar cookie dough) - 8 oz cream cheese, softened - ¼ cup powdered sugar - 1 teaspoon vanilla extract - 1 cup Greek yogurt (optional for added tanginess) - 1 kiwi, peeled and sliced - 1 cup strawberries, hulled and sliced - 1 cup blueberries - 1 cup pineapple chunks - 1 banana, sliced - Fresh mint leaves for garnish (optional) Using pre-made sugar cookie dough saves time. But, making your own gives a fresh taste. You can also use gluten-free cookie dough if needed. For the cream cheese, use low-fat or dairy-free options if you prefer. The Greek yogurt adds a nice tang, but you can skip it if you like. Choose ripe fruits for the best flavor. If you can’t find all the fruits listed, swap them with your favorites. For example, mango, raspberries, or oranges can work well too. Fresh fruit gives the best taste, but frozen fruit can work in a pinch if you defrost it first. You might want to add a splash of lemon juice to the cream cheese mix. This brightens the flavor and adds a zesty kick. If you love nuts, try adding some chopped walnuts or pecans on top for crunch. A drizzle of honey can also sweeten the fruit if you like things sweeter. Use these tips to make your rainbow fruit pizza unique! To start, preheat your oven to 350°F (175°C). Take your pre-made sugar cookie dough, which can be homemade or store-bought. Roll it out on a baking sheet lined with parchment paper. Aim for a large circle that is about ½ inch thick. Bake the cookie for about 10 to 12 minutes, or until it turns golden brown. Once baked, let the cookie base cool completely. While your cookie base cools, it's time to make the cream cheese frosting. In a mixing bowl, beat 8 oz of softened cream cheese with ¼ cup of powdered sugar. Add in 1 teaspoon of vanilla extract for flavor. If you want a tangy twist, you can mix in 1 cup of Greek yogurt. Keep mixing until your frosting is smooth and creamy. When the cookie base has cooled, spread the cream cheese mixture evenly across the top. This will be your frosting layer. Now comes the fun part! Arrange your fruits in a rainbow pattern. Start with kiwi slices on one side, followed by strawberries, blueberries, pineapple chunks, and finish with banana slices. For a nice touch, chill the fruit pizza for at least 30 minutes. This helps the flavors blend and sets the cream cheese layer. If you like, sprinkle fresh mint leaves on top before slicing. Your rainbow fruit pizza is now ready to impress! For the complete recipe, check out the [Full Recipe]. When making your rainbow fruit pizza, avoid a few common mistakes. First, don't skip cooling the cookie base. If it's warm, the cream cheese layer will melt. Second, be careful with fruit selection. Use ripe fruit for the best taste and color. Lastly, avoid overloading the pizza with too much fruit. A balanced layer looks better and tastes great. To arrange your fruit nicely, start with a plan. Lay out your fruit in the order of the rainbow. Place the green kiwi first, then red strawberries, blue blueberries, yellow pineapple, and finish with banana. Make sure to slice the fruit evenly. This gives a neat look and helps in serving. If you want a fun twist, try to use different shapes for your fruit slices. For the best look, cut your rainbow fruit pizza into wedges. Use a sharp knife to make clean cuts. Serve the pieces on a colorful platter to enhance the visual appeal. Add fresh mint leaves on top for a pop of green. This adds a fresh touch and makes the pizza look more inviting. You can also drizzle a little honey or a yogurt glaze for extra flair. For more ideas, check out the [Full Recipe]. {{image_2}} You can switch up the fruits on your Rainbow Fruit Pizza. Try using mango, raspberries, or blackberries. For a tropical twist, add papaya or passion fruit. The key is to choose colorful fruits for that vibrant look. Mixing and matching flavors keeps it fun and fresh. Want a gluten-free version? Use gluten-free cookie dough. For a vegan version, swap cream cheese for a plant-based alternative. You can also use maple syrup instead of powdered sugar. Greek yogurt can be replaced with coconut yogurt for a creamy base that fits your diet. In summer, use fresh berries like cherries and peaches. In fall, think about apples and pears. Winter can bring citrus fruits like oranges and grapefruits. Each season offers unique fruits that add flavor and color to your pizza. Pick what’s ripe and in season for the best taste. To store leftover Rainbow Fruit Pizza, cover it tightly with plastic wrap. You can also use a large airtight container. This helps keep the cookie base soft and the fruits fresh. Place it in the fridge. It should stay good for about 2-3 days. Freezing Rainbow Fruit Pizza is a bit tricky. The fruit does not freeze well, so I do not recommend it. However, if you only want to freeze the cookie base, wrap it tightly in plastic wrap. Store it in a freezer bag. It can last up to 3 months. Just thaw it in the fridge before using. If you need to warm up the cookie base, preheat your oven to 350°F (175°C). Place the cookie on a baking sheet. Heat for about 5-8 minutes. This will help it regain some softness. Avoid microwaving, as it can make the cookie tough. For the best taste, top it with fresh cream cheese and fruits after reheating. To make the crust from scratch, use simple sugar cookie dough. You can mix flour, butter, sugar, and eggs to form a dough. Roll it out into a circle on parchment paper. Bake it at 350°F (175°C) until it turns golden. Let it cool before adding any toppings. Yes, you can! Cream cheese is great, but you can try mascarpone or ricotta. Both options give a nice flavor. Just make sure to mix in some powdered sugar and vanilla for sweetness. The best fruits are colorful ones! Use kiwi, strawberries, blueberries, pineapple, and bananas. They create a lovely rainbow look. You may also add raspberries, oranges, or grapes for variety. You can keep the fruit pizza in the fridge for about 2-3 days. Cover it with plastic wrap to keep it fresh. The fruits might get soft after a while, so it’s best enjoyed fresh. Yes, adding a glaze can make your fruit pizza shine! You can mix warm apricot jam with a bit of water. Brush it over the fruit just before serving. This step adds a lovely look and keeps the fruit fresh. We covered how to make a delicious rainbow fruit pizza. You learned about key ingredients and tips for substitutions. I shared step-by-step instructions on preparing the cookie base and frosting. We also discussed common mistakes and how to present your dish beautifully. Don't forget the variations, storage info, and answers to FAQs. This treat is fun to make and even better to eat. Enjoy creating your own unique version of this bright dessert!](https://mycookingcast.com/wp-content/uploads/2025/07/3c398a9d-ca0b-4d10-a08f-f2304302c151.webp)
Are you ready to impress your friends with a fun and tasty treat? Rainbow Fruit Pizza combines a sweet cookie

Looking for a warm hug in a bowl? Thai Coconut Curry Soup delivers just that. This recipe is simple, yet
 for Chocolate Chip Pumpkin Bread. To bake this bread, you will need: - A mixing bowl - A whisk - A loaf pan (9x5 inch) - A spatula Using the right tools helps you bake the best bread! In this article, we covered how to make chocolate chip pumpkin bread, focusing on key ingredients, preparation steps, and baking tips. Using fresh pumpkin puree enhances flavor, while optional spices and nuts add variety. Remember, avoid overmixing to keep your bread light and fluffy. After baking, enjoy it warm with toppings for extra taste. Wrap your bread properly to maintain freshness, and freeze any leftovers for later. This recipe offers many tasty variations to explore, so have fun experimenting in your kitchen!](https://mycookingcast.com/wp-content/uploads/2025/07/b66e048d-a1d5-492e-a136-1085a1d6d282.webp)
If you love the cozy feel of autumn baking, you’re in for a treat! This Chocolate Chip Pumpkin Bread recipe
