
Buffalo Chicken Stuffed Peppers Quick and Tasty Meal
Looking for a quick dinner that’s packed with flavor? Buffalo Chicken Stuffed Peppers deliver just that! With tender bell peppers
Looking for a quick dinner that’s packed with flavor? Buffalo Chicken Stuffed Peppers deliver just that! With tender bell peppers

Get ready to enjoy a bright and tasty treat! My Lemon Raspberry Cheesecake Bars combine creamy cheesecake with a burst
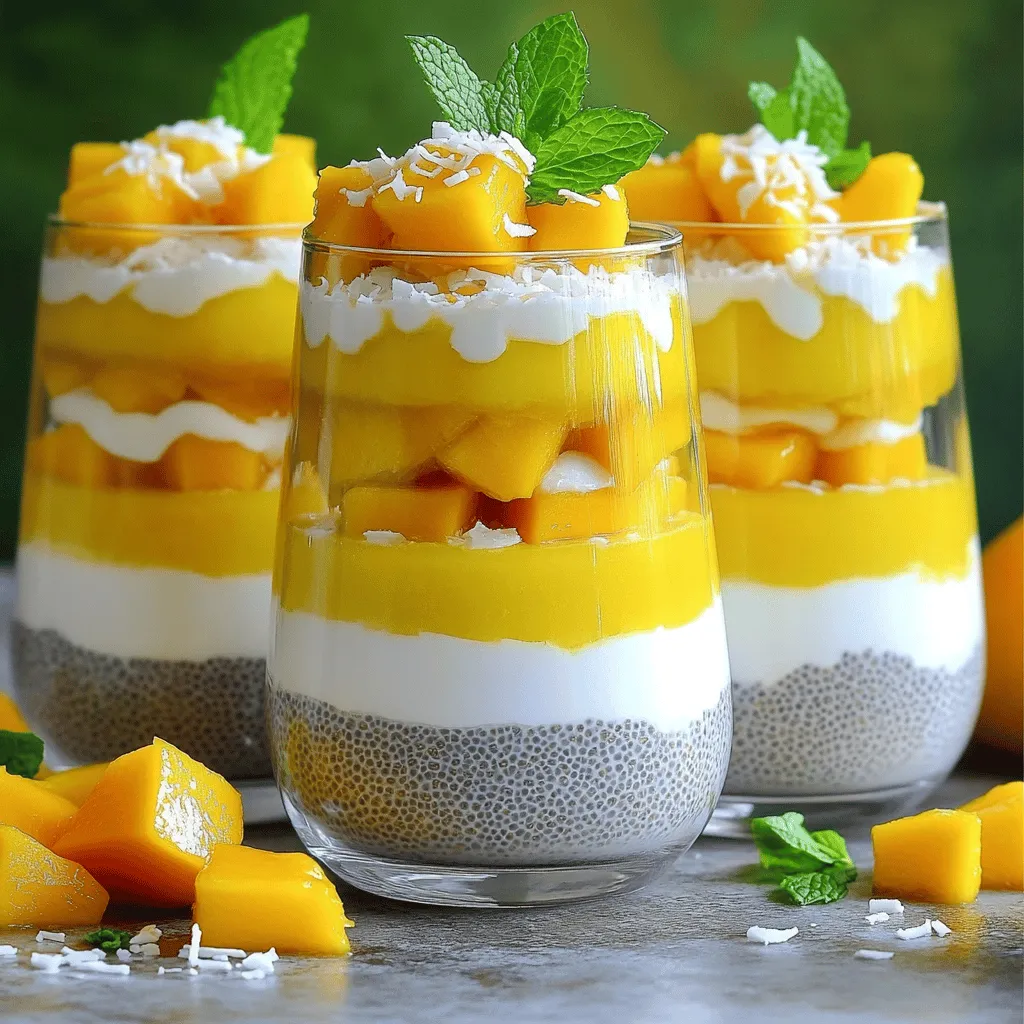
Are you ready for a tasty treat that’s both easy to make and good for you? Mango Coconut Chia Pudding
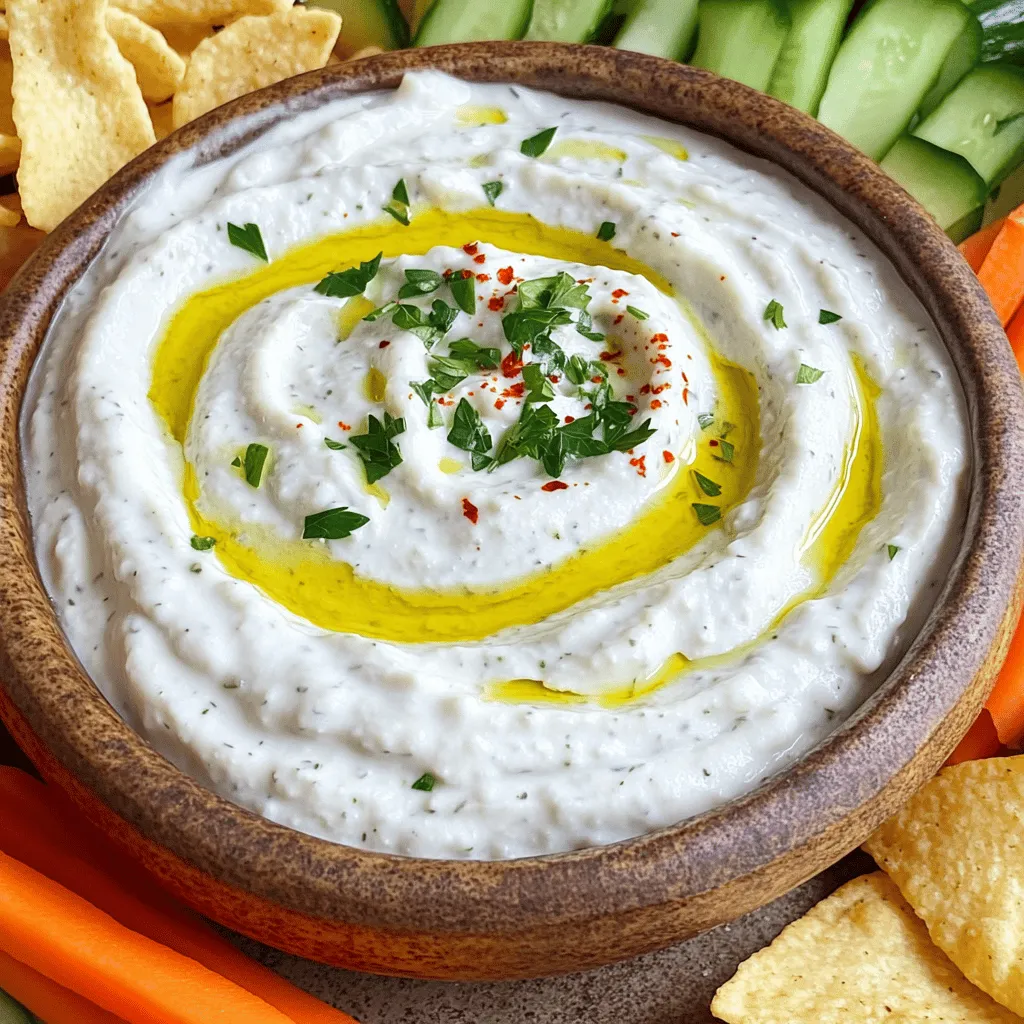
Looking to elevate your snacking game with a delicious and creamy dip? You’re in the right place! In this simple
. Honey roasted carrots are a simple, tasty, and healthy dish. We covered the key ingredients like fresh carrots, honey, and spices that enhance flavor. I shared easy preparation steps and tips for roasting them to perfection. Remember, these carrots pair well with many meals and can be easily stored or frozen. You can also switch up ingredients for new flavors. Enjoy experimenting with this recipe, and make it your own!](https://mycookingcast.com/wp-content/uploads/2025/07/d8a25c24-e1dc-4c2c-9e2c-04c680eb7879.webp)
Looking for a quick, tasty side dish? Honey roasted carrots are your answer! This simple recipe brings out the natural
![To make a great Tropical Acai Bowl, you need fresh and tasty ingredients. Here’s what you will need: - 2 packets of frozen acai puree - 1 ripe banana, sliced - 1 cup fresh pineapple chunks - 1/2 cup coconut milk (or almond milk) - 1 tablespoon honey or agave syrup - 1/4 cup granola - 2 tablespoons shredded coconut - Fresh fruit (kiwi, berries, or any seasonal fruit of your choice) for topping - Chia seeds or hemp seeds (optional, for added nutrition) When choosing fruits, pick ones that are ripe and bright. Ripe fruits taste better and add sweetness. For bananas, look for yellow ones with a few brown spots. For pineapples, choose ones that smell sweet at the base. Not all ingredients may be easy to find. If you can't find acai puree, you can use acai powder. Just mix it with a little bit of water to get a similar texture. If you want a dairy-free option, almond milk works well. Choosing the right fruits is key for a great acai bowl. Look for fresh and colorful fruits. They should feel firm but slightly soft when you press them. This shows they are ripe and full of flavor. Check out the Full Recipe to see how to blend these ingredients into a delicious bowl! To make a Tropical Acai Bowl, start with the right blend. First, gather all your ingredients. You will need: - 2 packets of frozen acai puree - 1 ripe banana, sliced - 1 cup fresh pineapple chunks - 1/2 cup coconut milk (or almond milk) - 1 tablespoon honey or agave syrup Now, add the frozen acai, banana, pineapple, coconut milk, and honey to your blender. The order matters! Start with the liquid first. This helps the blender work better and mix evenly. Blend on high speed until smooth. You want a creamy texture, not too thick or too runny. If it’s too thick, add more coconut milk. Keep blending until you reach the perfect consistency. Next, it’s time to plate your bowl. Pour the acai mixture into a bowl. Use a spoon to smooth the top for a nice finish. For a beautiful look, sprinkle granola over the acai base. Then, add fresh fruit slices on top. You can use kiwi, berries, or any fruit you like. A little shredded coconut adds a nice touch. To make it even better, sprinkle chia seeds or hemp seeds on top. Serve your bowl right away for the best taste and texture. Enjoy the vibrant colors and fresh flavors! To make a great acai bowl, avoid common blending mistakes. Make sure your blender is powerful. This helps blend frozen fruit smoothly. If your mixture is too thick, add more coconut milk. This will make it easier to blend. Adjust the sweetness to fit your taste. You can use honey, agave syrup, or even maple syrup. Start with a little and add more if you want it sweeter. Taste as you go. This way, you get it just right. You can enhance the flavor profile with a splash of vanilla or a pinch of salt. Both add depth to your bowl. Also, consider mixing in some spinach or kale for extra nutrition without changing the taste. For the best results, you need the right blender for acai bowls. Look for a high-speed blender that can handle frozen ingredients. Brands like Vitamix or Ninja work well. They crush ice and blend fruits smoothly. You also need some essential tools for serving and plating. A good bowl is key for a nice presentation. Use a wide, shallow bowl to show off your toppings. A spoon with a long handle helps you serve it easily. When it comes to storage tips for leftovers, use airtight containers. This keeps your acai base fresh. You can store it in the fridge for up to two days. Toppings like granola and fresh fruit should be added right before serving. This keeps them crunchy and bright. You can find the full recipe for the Tropical Acai Bowl to get started right away. {{image_2}} You can change your Tropical Acai Bowl with different fruits. Try mango, papaya, or passion fruit. These fruits offer unique tastes and textures. You can mix and match as you like. Adding superfoods boosts nutrition. Consider chia seeds, flax seeds, or spirulina. These ingredients pack a punch of vitamins and minerals. They blend well and add a nice crunch too. Seasonal fruits make your bowl special. In summer, use fresh berries. In the fall, try sliced apples or pears. Each season brings new flavors, keeping your bowl exciting. Making your bowl vegan is easy. Use coconut or almond milk instead of dairy milk. You can also skip honey and use agave syrup for sweetness. If you want gluten-free options, look for gluten-free granola. Many brands offer tasty blends that fit this need. Always check the label to be sure. For a low-sugar bowl, use ripe fruits for natural sweetness. You can choose fruits like bananas or ripe mangoes. This keeps the taste sweet without added sugar. Don't forget to check the [Full Recipe] for more details! To keep your acai bowl fresh, store the acai base in an airtight container. It can last up to two days in the fridge. When you make the acai base, let it cool first. This helps keep it fresh longer. For toppings, keep them in separate containers. This helps prevent them from getting soggy. Use small glass jars or plastic containers with lids. They work well to keep everything fresh. If you have leftovers, enjoy them chilled. Just take the acai base out of the fridge. You can add fresh fruit and granola right before you eat. To maintain the flavor and texture, don’t heat the acai base. Heating can change its taste and make it watery. Instead, enjoy it cold for the best experience. For the full recipe, check out the Tropical Acai Bowl section above. An acai bowl is a smoothie served in a bowl. It uses acai berries, which are small, dark purple fruits. You blend these berries with other fruits, like bananas and pineapple. After blending, you top it with items like granola and fresh fruit. This creates a tasty and fun dish to eat. A tropical acai bowl is very nutritious. It has healthy fats from coconut milk and fiber from fruits. Acai berries are rich in antioxidants, which help your body fight free radicals. Plus, the banana and pineapple add vitamins and minerals. This bowl gives you energy and keeps you full. Yes, you can make acai bowls in advance. Blend your acai mix and store it in the fridge. It’s best to eat it within one day. For toppings, add them just before serving. This keeps them fresh and crunchy. To find the best tropical acai bowls, check local cafes or smoothie bars. Look for places that use fresh, organic ingredients. You can also read reviews online. Websites like Yelp or Google Maps can help you find top-rated spots near you. You can use many toppings for acai bowls. Here are a few ideas: - Fresh berries (strawberries, blueberries, raspberries) - Sliced kiwi - Nuts (almonds, walnuts) - Seeds (chia seeds, hemp seeds) - Nut butter (peanut butter, almond butter) - Dark chocolate shavings Mix and match to create your perfect bowl! For the full recipe of a tropical acai bowl, check out the Tropical Acai Bowl section above. In this guide, I covered how to make an amazing tropical acai bowl. I shared the best ingredients, preparation tips, and serving ideas. You can now create beautiful and tasty bowls that suit your style. Remember, you can play with flavors and adjust sweetness to fit your taste. With the right tools and a bit of creativity, you'll enjoy delicious acai bowls anytime. Keep your toppings fresh, and don't hesitate to explore new variations. I hope you feel ready to dive into this fruity delight!](https://mycookingcast.com/wp-content/uploads/2025/07/0ea33f0b-c8b0-400e-8d80-4d12ce78759f.webp)
Are you craving a cool, vibrant treat packed with nutrients? Look no further! The Tropical Acai Bowl is the perfect
![To make classic beef enchiladas, gather these key ingredients: - 1 pound ground beef - 1 small onion, diced - 2 cloves garlic, minced - 1 can (15 oz) black beans, drained and rinsed - 1 cup corn kernels - 2 cups enchilada sauce - 8 small flour tortillas - 2 cups shredded cheese - Additional ingredients for garnish Each ingredient plays a role in the final taste. The ground beef gives a savory base. Diced onions and garlic add depth and aroma. Black beans bring protein and a creamy texture. Corn adds sweetness and color, while enchilada sauce ties it all together with a spicy kick. The tortillas wrap everything up, and the cheese melts into a gooey blanket. You can customize your garnishes. Fresh cilantro adds a bright touch, and avocado slices give creaminess. Enjoying this dish is not just about taste; it’s also about sharing warmth and comfort. For the complete recipe, check out the Full Recipe. 1. Preheat the oven. Set it to 375°F (190°C) to warm up while you cook. 2. Sauté onion and garlic. Heat one tablespoon of olive oil in a large skillet over medium heat. Add one small diced onion and two minced garlic cloves. Cook for about 3 to 4 minutes until soft and clear. 3. Brown the ground beef. Add one pound of ground beef to the skillet. Use a spoon to break it apart as it cooks. Stir for about 6 to 7 minutes until it's brown. Drain any fat in the pan. 1. Mix in beans, corn, and seasonings. Add one can of drained black beans and one cup of corn to the beef. Sprinkle in one teaspoon of cumin and one teaspoon of chili powder. Season with salt and pepper to taste. Stir and cook for 2 to 3 minutes until heated. 2. Roll the tortillas. Take one small flour tortilla. Place a spoonful of the beef mixture in the center. Roll it up tightly and place it seam-side down in a greased 9x13 inch baking dish. Repeat this with the rest of the tortillas and filling. 1. Pour enchilada sauce and top with cheese. Once all the tortillas are in the dish, pour two cups of enchilada sauce evenly over them. Sprinkle two cups of shredded cheese on top. 2. Bake and cool before serving. Place the dish in the preheated oven. Bake for about 25 minutes until the cheese is melted and bubbly. After taking it out, let it cool for a few minutes before serving. To make your beef enchiladas shine, focus on spices. I recommend using cumin and chili powder. These add depth and warmth. For a twist, try smoked paprika for a smoky touch. Fresh ingredients also matter. Look for high-quality ground beef and vibrant veggies. This will elevate your dish and make it truly special. Serve your enchiladas on a colorful plate. Drizzle them with extra enchilada sauce for a pop of color. A sprinkle of chopped cilantro adds freshness. For a creamy touch, place avocado slices on the side. These small details enhance the overall look and make it more inviting. One common mistake is overfilling tortillas. This can cause them to break open. Aim for about two tablespoons of filling per tortilla. Another mistake is leaving out essential ingredients like cheese or sauce. These add flavor and help bind the dish together. Following these tips will ensure your enchiladas are a hit. {{image_2}} If you want to make this dish meat-free, try using beans or veggies instead. Black beans work well, adding protein and fiber. You can also use pinto beans or lentils for a different taste. For veggies, consider bell peppers, zucchini, or spinach. Just sauté them until tender before mixing them into your filling. This way, you keep the flavor while making it vegetarian friendly. Some like it hot! If you want spicier enchiladas, add jalapeños or a pinch of cayenne. You can also use a spicier enchilada sauce. If you prefer milder flavors, use less chili powder or go for a sweet sauce. Taste as you cook to find your perfect heat level. Remember, you can always add spice, but it’s hard to take it away! Cheese adds a creamy touch to your enchiladas. While cheddar is popular, try other cheeses for unique flavors. Monterey Jack melts well and brings a mild taste. Queso fresco adds a crumbly texture. Mixing cheeses can create a fun flavor. Don’t be afraid to experiment with your favorites! For the full recipe, check the link above. Enjoy your cooking! To store leftover enchiladas, let them cool first. Place them in an airtight container. You can keep them in the fridge for up to three days. When ready to eat, check that they smell fresh and look good. For freezing, wrap enchiladas in plastic wrap. Then, place them in a freezer-safe bag or container. They can last in the freezer for up to three months. Label the bags with the date so you don’t forget when you made them. Thaw them in the fridge overnight before reheating. To reheat enchiladas, use the oven for the best taste. Preheat it to 350°F (175°C). Place the enchiladas in a baking dish. Cover them with foil to keep them moist. Heat for about 20-25 minutes. If you’re in a hurry, you can use the microwave. Heat them in short bursts, checking often to avoid overcooking. Enjoy your meal with fresh toppings! Yes, you can use corn tortillas. They add a nice flavor. Corn tortillas are gluten-free. They tend to be thinner and can break easier. Flour tortillas are soft and chewy. They hold more filling and are great for wrapping. The choice is yours based on your taste and diet. You can keep enchiladas in the fridge for about three to four days. Store them in an airtight container. This keeps them fresh and tasty. If you want them to last longer, freeze them instead. They can stay good in the freezer for up to three months. Yes, preparing enchiladas ahead of time is a smart idea. You can fill the tortillas and place them in the baking dish. Cover them tightly with foil and store them in the fridge. Bake them the next day when you're ready to eat. This saves time and makes meal prep easier. I recommend using cheddar or a Mexican blend cheese. Cheddar melts nicely and adds great flavor. A Mexican blend combines different cheeses for a rich taste. Both options create a delicious topping for your enchiladas. For the complete Classic Beef Enchiladas recipe, check the [Full Recipe]. In this blog post, we explored how to make delicious Classic Beef Enchiladas. We covered the ingredients, step-by-step instructions, tips for great flavor, and variations for personal touches. Remember, the key is to use quality ingredients and avoid overfilling those tortillas. You can adapt this dish to fit your taste, whether vegetarian or spicy. With proper storage, these enchiladas can stay fresh for days. Enjoy sharing this tasty meal with friends and family!](https://mycookingcast.com/wp-content/uploads/2025/07/75e0f72a-eee3-4d8c-b1db-5320f6a0580e.webp)
If you’re craving a warm, comforting meal, Classic Beef Enchiladas are the perfect dish. Packed with rich flavors and easy

Ready to take your dinner rolls to the next level? My Garlic Parmesan Dinner Rolls are soft, flavorful, and the
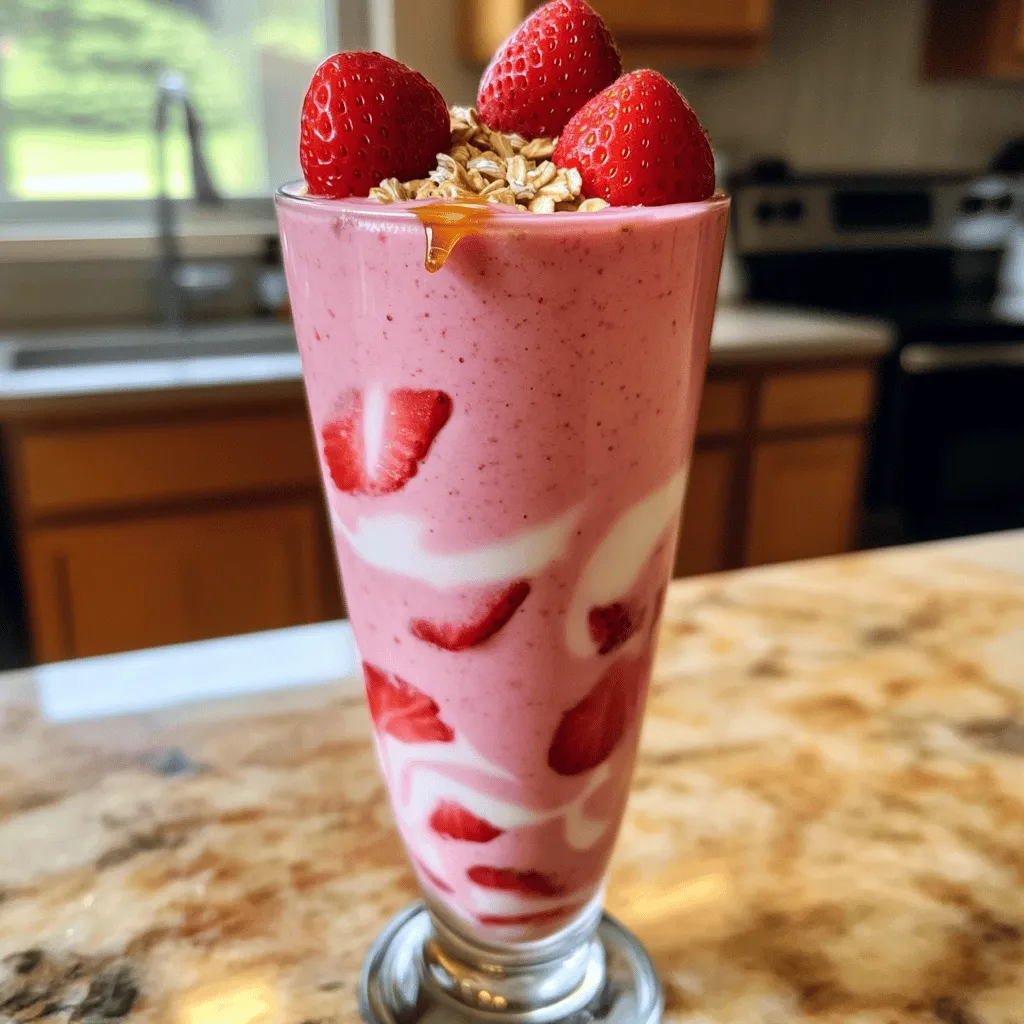
Looking for a quick and tasty drink? The Strawberry Oatmeal Smoothie is perfect for busy mornings or a healthy snack.
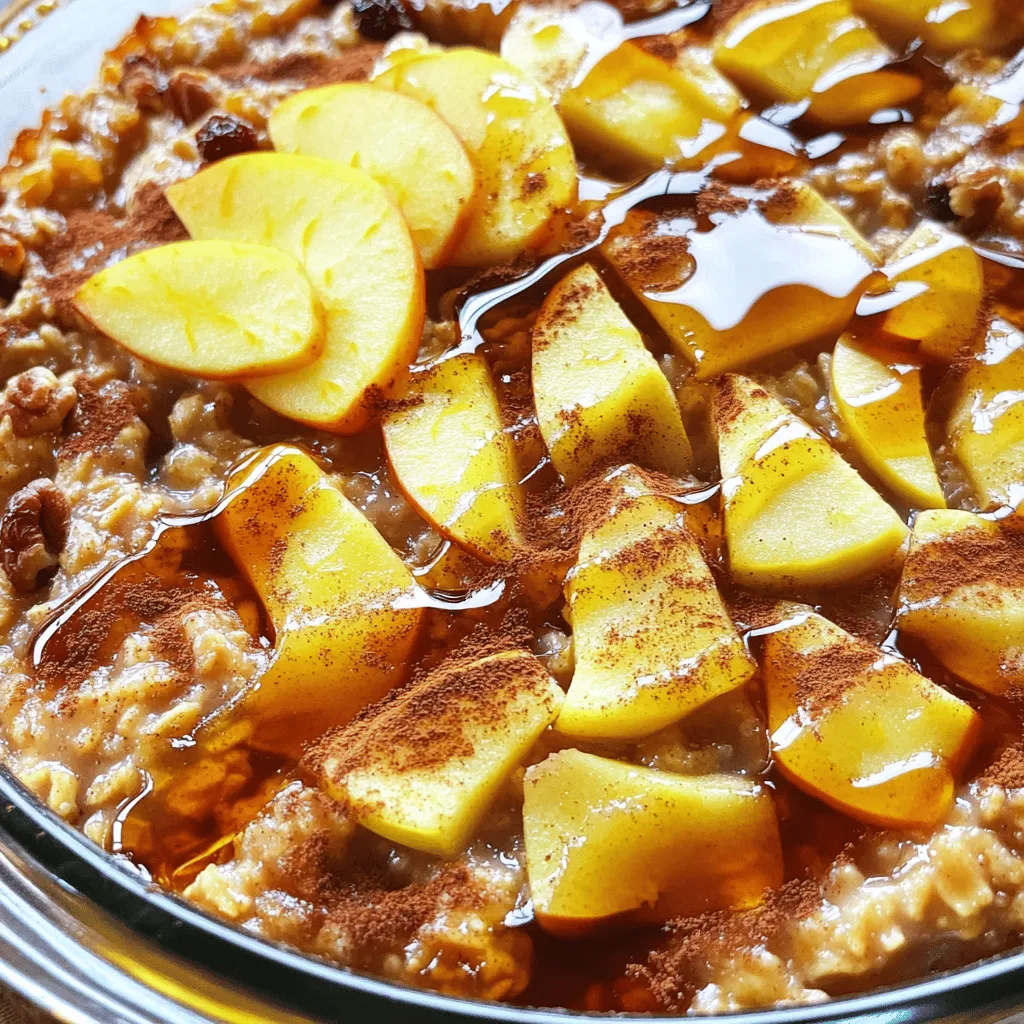
Get ready to awaken your taste buds with my Irresistible Apple Cinnamon Oatmeal Bake! This cozy dish combines the warmth
