Skip to content
DisclaimerTerms Of UseGDPR PolicyCookie Policy

My Cooking Cast

  • Home
  • Drinks
  • Appetizers
  • Dinner
  • Dessert
  • About
  • Contact
  • Privacy Policy
DisclaimerTerms Of UseGDPR PolicyCookie Policy

Emma

When choosing asparagus, look for firm, bright green stalks. They should feel crisp and snap easily when bent. Avoid any that are limp or have dark spots. The thinner stalks tend to be more tender, while thicker ones can be chewier. You want fresh asparagus for the best flavor and texture. To create the lemon butter sauce, you will need: - 1 pound fresh asparagus, trimmed - 3 tablespoons unsalted butter - 2 tablespoons fresh lemon juice - Zest of 1 lemon - 2 cloves garlic, minced - Salt and pepper to taste These ingredients blend well to make a rich, zesty sauce that enhances the asparagus' natural flavor. You can add a few extra touches to elevate your dish. Consider these optional ingredients: - 1 tablespoon freshly chopped parsley (for garnish) - A sprinkle of red pepper flakes for heat - A drizzle of olive oil before serving These garnishes not only add flavor but also make your dish look stunning. For the Full Recipe, refer to the top of the article. Start by washing the asparagus. This step is crucial to remove dirt and grit. After washing, trim the ends. You can snap them off or cut about 1-2 inches from the bottom. This helps the asparagus cook evenly and taste fresh. In a large skillet, melt the butter over medium heat. Wait until it gets foamy. Then, add the minced garlic. Cook it for about 30 seconds. You want it to smell great, but don’t let it brown. This is key to keeping the garlic mild and sweet. Now it’s time to add the asparagus to the skillet. Toss it in the butter and garlic mix. Cook the asparagus for about 4-6 minutes. You want it tender, but still crisp. Once done, drizzle fresh lemon juice over the top. Sprinkle the lemon zest too. Season with salt and pepper to taste. Toss everything together so it’s all well coated. Remove from heat and transfer to a serving dish. Garnish with chopped parsley for a pop of color. Enjoy your quick and tasty side dish! For the complete recipe, check out the Full Recipe section. To get the best texture, start with fresh asparagus. Choose stalks that are bright green and firm. When cooking, aim for tenderness but keep some crunch. This balance makes each bite delightful. Cook for 4-6 minutes. Check for doneness by piercing a stalk with a fork. If it goes in easily, it’s done! You can boost the flavor of this dish with a few simple tweaks. Add a pinch of red pepper flakes for heat. A dash of soy sauce can give it a savory touch. For a nutty flavor, sprinkle some toasted sesame seeds on top. You can also use herbs like thyme or dill for a fresh twist. If you like softer asparagus, cook it a bit longer. Just be careful not to overdo it! For a charred flavor, try grilling the asparagus instead. This adds a smoky taste. You can also roast it in the oven at 400°F for about 15 minutes. This will give you a nice crispiness while keeping it tender. For the complete recipe, check out the Full Recipe section. {{image_2}} You can add a delicious twist to your lemon butter asparagus. Grate some fresh Parmesan cheese over the asparagus just before serving. The cheese melts slightly and adds a rich flavor. This combination of lemon, butter, and cheese creates a mouthwatering dish. It pairs well with many main courses. Need more protein? You can easily add shrimp or chicken to this dish. For shrimp, sauté them in the same skillet after the garlic. Cook them until they turn pink. If you prefer chicken, use cooked, shredded chicken. Toss it in at the end to warm it up. Both options make the dish heartier and great for a full meal. If you’re looking for a vegan option, you can swap the butter for olive oil or vegan butter. Keep the lemon juice and zest to maintain that bright flavor. This change makes the dish plant-based but still tasty. The lemon and garlic will shine through, giving you a fresh side that everyone will enjoy. Explore the Full Recipe for a detailed guide on making this dish. To store leftover lemon butter asparagus, first let it cool down. Place it in an airtight container. This keeps it fresh and tasty. Try to eat it within three days for the best flavor. When reheating, use a skillet for the best taste. Heat the skillet on low heat. Add a tiny bit of butter or oil to keep it moist. Stir gently until warmed through. You can also microwave it. But be sure to cover it to avoid drying out. You can keep lemon butter asparagus in the fridge for up to three days. After that, the texture may change. It might become mushy and lose flavor. For the best taste, try to enjoy it fresh. Find the full recipe for more tips on making this dish. Yes, you can use frozen asparagus. However, fresh asparagus tastes better. Frozen asparagus may lose some crunch. If you choose frozen, cook it a bit longer to ensure it's tender. Lemon Butter Asparagus pairs well with many dishes. Here are some ideas: - Grilled chicken for a light meal - Baked salmon for a healthy option - Quinoa or rice for a filling side - Pasta for a tasty veggie boost These options make your meal feel complete and balanced. To meal prep Lemon Butter Asparagus, follow these steps: 1. Cook the asparagus as in the Full Recipe. 2. Let it cool completely before storing. 3. Place it in an airtight container. 4. Keep it in the fridge for 3-4 days. Reheat it in the microwave or on the stove when ready to eat. This makes healthy eating easy throughout the week! In this post, I shared how to make delicious Lemon Butter Asparagus. We covered choosing fresh asparagus and making a tasty lemon butter sauce. I also provided tips for cooking, enhancing flavors, and various ingredient options. Remember, you can mix in Parmesan or even protein like shrimp. Store leftovers right and enjoy them later. With all these steps and tips, you can create a wonderful dish every time. Enjoy cooking and savoring this delightful recipe!

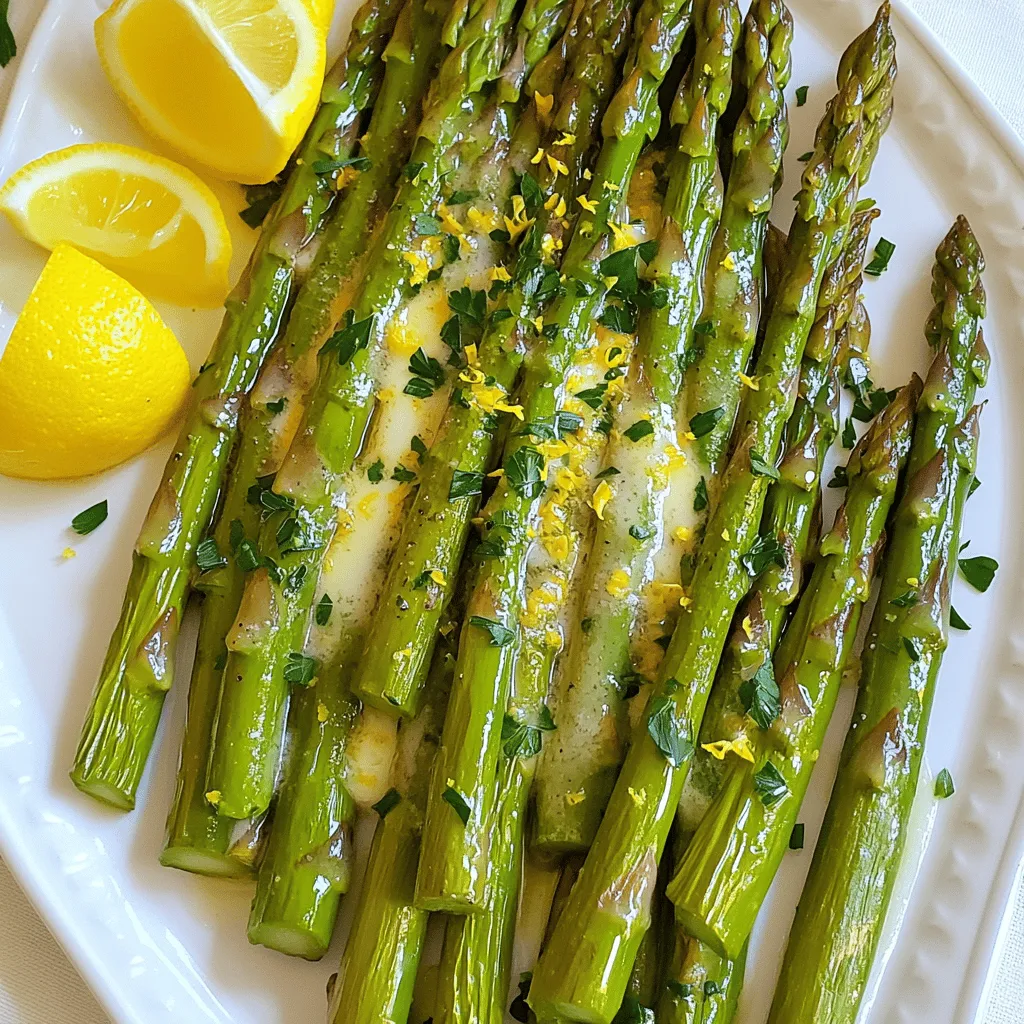
Lemon Butter Asparagus Quick and Tasty Side Dish

Looking for a quick and tasty side dish? Lemon Butter Asparagus is your answer! This dish brightens up any meal

To make Buffalo chicken dip, you need: - 2 cups cooked chicken, shredded - 1 (8 oz) package cream cheese, softened - 1/2 cup buffalo sauce - 1/2 cup ranch dressing - 1 cup shredded cheddar cheese - 1/2 cup crumbled blue cheese (optional) These ingredients blend well to create a rich and creamy dip. Shredded chicken gives the dip its heartiness. Cream cheese adds a smooth texture. Buffalo sauce brings the heat, while ranch dressing balances the flavors. Cheddar and blue cheese add a savory touch. For extra flavor and crunch, add: - 1 green onion, thinly sliced - Tortilla chips or celery sticks for serving The green onion adds freshness and color to the dish. Tortilla chips or celery sticks serve as great vehicles for scooping up the dip. You can modify your dip with these ideas: - Use Greek yogurt instead of cream cheese for a lighter dip. - Try low-calorie ranch dressing to cut calories. - Experiment with different cheese blends, like pepper jack for spice or mozzarella for a milder taste. These substitutions can help you tailor the dip to your taste or dietary needs. You can create a unique twist on this classic recipe. For the full recipe, check the section above. 1. First, preheat your oven to 350°F (175°C). This step warms the oven for baking. 2. Next, grab a large mixing bowl. Combine the shredded chicken, softened cream cheese, buffalo sauce, and ranch dressing. 3. Mix until the mixture is smooth. This helps blend all the flavors together. 4. Gently fold in the shredded cheddar cheese and blue cheese, if you choose to use it. Mix until everything is well combined. 1. Now, transfer the mixture to an oven-safe baking dish. Spread it evenly using a spatula. 2. Place the dish in the preheated oven. Bake for about 20-25 minutes. 3. Look for visual cues: the dip should be bubbly around the edges. It’s important to heat it through for the best taste. 1. Once baked, remove the dish from the oven. Sprinkle sliced green onions on top for a fresh garnish. 2. Let the dip cool slightly before serving. This helps avoid burns and enhances flavor. 3. Serve with crunchy tortilla chips or crisp celery sticks. They pair perfectly with the dip's creamy texture. For the full recipe, check the detailed instructions above. Enjoy! To make your dip creamy and smooth, start with softened cream cheese. Let it sit at room temperature for about 30 minutes. This helps it blend well with the other ingredients. When mixing, use a sturdy fork or a hand mixer. This way, you can break up any lumps. If you want to adjust the spice levels, taste as you go. Start with half the buffalo sauce. Mix it in, then taste. You can always add more if you like it hotter. Remember, everyone's spice tolerance is different! Buffalo chicken dip is best served warm. Pair it with tortilla chips or celery sticks. Both add a crunchy contrast to the creamy dip. For a fun twist, offer sliced bell peppers or pita chips too. For parties, place the dip in a large bowl. Surround it with chips and veggies. This makes it easy for guests to grab what they want. For extra flair, put the dip in a bread bowl! To impress your guests, use a colorful platter. Arrange chips and veggies around the dip. Add a small bowl of extra buffalo sauce for dipping. For garnishing, sprinkle sliced green onions on top. You can also add a few sprigs of parsley for color. If you like, drizzle some ranch dressing on top for a fun touch. This makes your dip look as good as it tastes! For the full recipe, check out the instructions above. {{image_2}} Buffalo chicken dip is fun to make and even more fun to eat! You can change it up in many ways to fit your taste. Let’s explore some great variations. If you love heat, try these spicy ideas: - Adding extra hot sauce: Mix in more buffalo sauce for a fiery kick. Start with one tablespoon and add more to taste. - Incorporating jalapeños: Chop fresh jalapeños and stir them in. They add heat and crunch. You may want a creamier dip without all the fat. Check out these options: - Using Greek yogurt instead of cream cheese: Greek yogurt gives the dip a nice tang and is healthier. Swap it in one-for-one for cream cheese. - Dairy-free options for a healthier version: Use cashew cream or coconut yogurt. Both provide creaminess without dairy. Getting creative can take your dip to new heights: - Adding different cheeses: Try pepper jack for extra spice or gouda for a smoky flavor. Mix and match to find your favorite. - Incorporating other flavor profiles: Stir in BBQ sauce for a sweet twist or ranch seasoning for an herby taste. These variations make Buffalo chicken dip a dish you can enjoy in many ways. Feel free to try the [Full Recipe] and test out these ideas. To keep your Buffalo Chicken Dip fresh, use an airtight container. A glass or plastic container works well. Store it in the fridge for up to three days. Make sure the lid is tight to prevent air from getting in. To reheat the dip, use the oven for the best results. Preheat the oven to 350°F (175°C). Place the dip in an oven-safe dish. Heat for about 15 minutes until warm. The microwave is faster but may dry out the dip. If you use the microwave, heat it in short bursts. Stir after each burst to keep it creamy. You can prepare Buffalo Chicken Dip a day in advance. Just mix all the ingredients and store them in the fridge. When you're ready to serve, just bake it. For long-term storage, freeze the dip before baking. Place it in an airtight container. It can stay in the freezer for up to three months. When ready, thaw it in the fridge overnight and then bake. Enjoy the flavors anytime! For the [Full Recipe], check out the main article. Buffalo chicken dip lasts up to four days in the fridge. Store it in an airtight container. This keeps it fresh and tasty. If you want to enjoy it longer, you can freeze it. Just place it in a freezer-safe dish. It can stay in the freezer for about three months. When you want to eat it, thaw it in the fridge overnight before reheating. Yes, you can make buffalo chicken dip in a slow cooker! Start by mixing the ingredients in the slow cooker. Combine cooked chicken, cream cheese, buffalo sauce, ranch dressing, and cheeses. Stir until well mixed. Set your slow cooker to low and cook for about two hours. Stir occasionally. This method keeps the dip warm and creamy. You can serve buffalo chicken dip with many tasty options. Tortilla chips are a classic choice. They add a nice crunch. You can also use celery sticks for a fresh, crisp bite. Carrot sticks and bell pepper slices work well too. For a fun twist, try serving it with crackers or pita bread. It’s easy to mix and match! Buffalo Chicken Dip is a great choice for gatherings. You learned the key ingredients, like chicken, cream cheese, and buffalo sauce. I shared easy preparation steps and tips to make it perfect. You can also try fun variations and store leftovers properly. Remember to adjust flavors to fit your taste. Enjoy making this dish and impressing your friends with your skills!

Buffalo Chicken Dip Irresistible Party Snack Recipe

If you’re looking for a crowd-pleasing party snack, Buffalo Chicken Dip is your answer! This creamy, spicy dish is packed

- 1 cup water - ½ cup unsalted butter, cubed - 1 cup all-purpose flour - 4 large eggs - 1 tablespoon sugar - ½ teaspoon salt - 1 cup heavy cream - ½ cup hazelnut spread (like Nutella) - 1 teaspoon vanilla extract - 1 tablespoon powdered sugar - 1 cup semi-sweet chocolate chips - ½ cup heavy cream - 1 tablespoon unsalted butter To make these eclairs, you need three sets of ingredients. First, gather the choux pastry items. This includes water, butter, flour, eggs, sugar, and salt. These will create the light and fluffy shells. Next, for the hazelnut cream filling, you will need heavy cream, hazelnut spread, vanilla extract, and powdered sugar. This creamy filling gives the eclairs their rich flavor. Lastly, for the chocolate ganache topping, grab semi-sweet chocolate chips, heavy cream, and unsalted butter. This silky ganache adds a sweet finish. If you want to dive deeper into the recipe, check out the Full Recipe for step-by-step instructions. Enjoy the process of creating these delightful treats! To start, grab a medium saucepan. Combine 1 cup of water, ½ cup of cubed unsalted butter, 1 tablespoon of sugar, and ½ teaspoon of salt. Heat this mixture over medium heat. Stir it until the butter melts and the mixture reaches a boil. Next, add 1 cup of all-purpose flour all at once. Stir vigorously with a wooden spoon. Keep stirring until the dough forms a ball and pulls away from the sides of the pan. Once this happens, remove the saucepan from the heat. Let the dough cool for about 5 minutes. This step is important! Add 4 large eggs one at a time, mixing well after each addition. You want a smooth and glossy dough at the end. Now, it’s time to pipe the eclairs! Preheat your oven to 425°F (220°C). Line a baking sheet with parchment paper to prevent sticking. Transfer your choux pastry to a piping bag that has a large round tip. Pipe the dough into 4-inch long logs on the baking sheet, leaving space between each one. Bake for 15-20 minutes. Watch them puff up and turn golden brown! Avoid opening the oven door during baking to keep the heat in. After baking, let them cool on a wire rack. While the eclairs cool, let’s make the filling. In a mixing bowl, whip 1 cup of heavy cream until soft peaks form. This is the base of your rich filling! Gradually add ½ cup of hazelnut spread, 1 teaspoon of vanilla extract, and 1 tablespoon of powdered sugar. Keep whipping until stiff peaks form. This creamy mixture will make the eclairs irresistible. Once the eclairs are cool, make small incisions on the side of each one. Use a sharp knife or a syringe to fill them with the hazelnut cream. Now, let’s create the chocolate ganache! In a small saucepan, heat ½ cup of heavy cream over low heat until it simmers. Remove it from the heat and add 1 cup of semi-sweet chocolate chips and 1 tablespoon of unsalted butter. Stir until the chocolate melts and the mixture is smooth. To finish, dip the top of each filled éclair into the warm chocolate ganache. Allow any excess to drip off, then place them on a wire rack to set. Enjoy every bite of your chocolate hazelnut eclairs! For the complete recipe, check out the [Full Recipe]. When making choux pastry, avoid common mistakes. Do not rush the cooking. If you do, your pastry will not rise. Make sure the dough pulls away from the pan. This shows it is ready. To achieve the right texture, watch the eggs. Add them one at a time. Mix well after each egg. You want a smooth and shiny dough. If it is too thick, add a bit of water. If too runny, add flour. Whipping cream to the right consistency is key. Start with cold heavy cream. Use a cold bowl, too. This helps the cream whip faster. Whip until soft peaks form. Then, add the hazelnut spread and vanilla. Keep whipping until stiff peaks form. If you want alternatives to hazelnut spread, try chocolate ganache. You can also use almond or peanut butter. These variations add fun flavors to your eclairs. Adjust the thickness of ganache easily. For a thicker ganache, add less cream. If it is too thick, add more cream. Heat the cream gently to avoid burning. To ensure a smooth finish, stir the ganache well. Use a whisk to mix until all is melted. Let it cool slightly before dipping the eclairs. This helps it set better on top. For the full recipe, make sure to check the complete instructions above. {{image_2}} You can change the flavor of the hazelnut cream filling to suit your taste. Here are some fun ideas: - Chocolate filling options: Swap in dark chocolate or white chocolate for a twist. Use melted chocolate mixed with cream for a rich filling. - Adding liqueurs or flavored extracts: Enhance your filling with a splash of liqueur like Frangelico or Amaretto. You can also add a few drops of almond or orange extract for extra flavor. Toppings can make your eclairs even more special. Here are some alternatives: - Alternatives to chocolate ganache: Try a vanilla glaze or a fruit glaze for a fresh touch. You can even go for a caramel drizzle for a sweet surprise. - Creative decorating ideas: Use crushed nuts, colorful sprinkles, or edible flowers for a beautiful display. A light dusting of cocoa powder adds a nice touch too. If you need a gluten-free version of these eclairs, here is how: - Adapting the recipe for gluten-free diets: You can use gluten-free flour blends that work well in baking. Make sure they are designed for pastry. - Recommended flour substitutes: Almond flour or coconut flour can work too, but they may change the texture. Mix them with a binding agent like xanthan gum for the best results. For the full recipe, visit the [Full Recipe]. To keep your filled eclairs fresh, store them in the fridge. Place them in an airtight container. This method prevents them from drying out. Avoid stacking them, as this can cause the tops to stick together. If you want to keep them longer, store the eclairs and filling separately. Fill them just before serving. This keeps them crisp. To prevent sogginess, do not fill eclairs until you are ready to eat them. The cream filling can make the pastry soft. If you need to fill them ahead of time, use a thicker cream. Reheating eclairs can be tricky. To keep their texture, do not use the microwave. Instead, preheat your oven to 350°F (175°C). Place the eclairs on a baking sheet. Warm them for about 5-7 minutes. This method helps regain some crispiness. Serve eclairs fresh for the best taste. If you must serve reheated ones, do so within two days of making them. Fresh eclairs have a light, airy texture. Reheated eclairs can be a bit denser. For the best taste and texture, eat your eclairs within two days. After that, they may lose their crispness. Check for signs of spoilage, such as a sour smell or discoloration. If the cream filling looks or smells off, discard them. Always trust your senses. Fresh eclairs are a treat, but spoiled ones are not worth the risk. To make Chocolate Hazelnut Eclairs from scratch, follow these steps: 1. Make the Choux Pastry: In a saucepan, combine 1 cup of water, ½ cup of unsalted butter, 1 tablespoon of sugar, and ½ teaspoon of salt. Bring this to a boil. Add 1 cup of all-purpose flour all at once. Stir until it forms a ball and pulls away from the pan. Remove from heat and let cool for 5 minutes. Then add 4 large eggs one at a time, mixing well until smooth. 2. Pipe the Eclairs: Preheat your oven to 425°F (220°C). Line a baking sheet with parchment paper. Use a piping bag to pipe 4-inch long logs of the choux pastry on the sheet. Bake for 15-20 minutes until golden brown. Let cool. 3. Prepare the Hazelnut Cream Filling: Whip 1 cup of heavy cream until soft peaks form. Gradually add ½ cup of hazelnut spread, 1 teaspoon of vanilla extract, and 1 tablespoon of powdered sugar. Whip until stiff peaks form. 4. Fill the Eclairs: Once cooled, make a small incision on the side of each éclair. Use a piping bag to fill with the hazelnut cream. 5. Make the Chocolate Ganache: Heat ½ cup of heavy cream in a saucepan until simmering. Remove from heat and stir in 1 cup of semi-sweet chocolate chips and 1 tablespoon of unsalted butter until smooth. 6. Top the Eclairs: Dip the tops of each filled éclair into the ganache. Let any excess drip off and place on a wire rack. Enjoy these creamy delights! You can find the full recipe above. Yes, you can freeze Chocolate Hazelnut Eclairs. Here’s how: - Freezing: First, fill and top the eclairs only before you freeze them. Place them on a tray and freeze until solid. Then transfer them to an airtight container or freezer bag. They can last up to two months in the freezer. - Thawing: To thaw, remove the eclairs from the freezer and place them in the fridge for a few hours. This helps them keep their texture. Avoid thawing at room temperature, as it may make them soggy. If you want to substitute hazelnut spread, consider these options: - Almond butter: This gives a nutty flavor similar to hazelnut but is less sweet. - Peanut butter: Use creamy peanut butter for a different yet tasty filling. - Chocolate spread: A simple swap with chocolate spread adds sweetness and richness. - Sunflower seed butter: This is a great nut-free alternative that still offers a creamy texture. You can find Chocolate Hazelnut Eclairs at: - Local bakeries: Check out nearby bakeries known for pastries. They often have fresh eclairs. - Online delivery services: Websites like Goldbelly or local delivery apps may offer gourmet eclairs. - Grocery stores: Some larger grocery chains may carry them in their bakery section. Chocolate Hazelnut Eclairs last about 2 days in the fridge when stored properly. Keep them in an airtight container to maintain freshness. After this period, they may lose their texture and flavor. If you freeze them, they can last up to two months, but for the best taste, enjoy them fresh! In this post, you learned how to make delicious chocolate hazelnut eclairs from scratch. We covered the essential ingredients, from choux pastry to the creamy filling and rich ganache. I shared tips for perfecting your pastry and even variations you can try. Remember, practice will help you make the best eclairs. You can impress friends and family with these treats. Enjoy the process of creating something special!

Chocolate Hazelnut Eclairs Irresistible Creamy Delights

If you’re craving a sweet treat that combines rich chocolate and smooth hazelnut, you’re in the right place! My recipe

- 2 cups elbow macaroni - 1 cup dill pickles, chopped - 1/2 cup red onion, finely chopped - 1/2 cup celery, diced - 1/2 cup mayonnaise - 1/2 cup sour cream - 2 tablespoons pickle juice - 1 tablespoon Dijon mustard - 1 teaspoon garlic powder - 1 teaspoon onion powder - Salt and pepper to taste - Fresh dill, for garnish When I whip up my creamy dill pickle pasta salad, I start with the basics. First, I grab elbow macaroni. It gives the salad a fun shape and holds the dressing well. Next, I chop some dill pickles. They bring that tangy crunch I love. I finely chop red onion and dice celery for extra flavor and crunch. Then, I measure out my creamy base: mayonnaise and sour cream. They create that rich texture we all crave. I always add pickle juice and Dijon mustard for a zesty kick. To round it off, I use garlic and onion powder. A sprinkle of salt and pepper brings it all together. Fresh dill adds a lovely touch on top. - Cherry tomatoes - Hard-boiled eggs - Cooked bacon Sometimes, I like to mix it up with optional add-ins. Cherry tomatoes add a sweet burst. Hard-boiled eggs boost the protein and creaminess. And cooked bacon gives that savory crunch that’s hard to resist. For the full recipe, check out the complete instructions! First, you need to cook the elbow macaroni. Bring a big pot of salted water to a boil. Add the macaroni and cook it according to the package instructions. This usually takes about 8 to 10 minutes. Check it to ensure it's al dente, or firm to the bite. Once done, drain the pasta in a colander. Next, rinsing is key. Run cold water over the macaroni to stop the cooking. This also cools it down. Spread the pasta out on a clean towel to help dry it. Set it aside while you make the dressing. Now, let's make the creamy dressing. In a large bowl, add the mayonnaise, sour cream, and pickle juice. Then, add Dijon mustard, garlic powder, onion powder, salt, and pepper. Mix these ingredients well until smooth. Seasoning is very important here. It brings life to the pasta salad. Taste the dressing and adjust the salt and pepper as needed. You want it to have a nice balance of flavors. Time to bring it all together! Add the cooled macaroni to the dressing mixture. Use a spatula to gently toss it together. Make sure the pasta is well coated with the creamy dressing. Next, fold in the chopped dill pickles, red onion, and celery. Be gentle to keep the pasta intact. This step adds crunch and brightness to the dish. Taste the salad again and adjust any seasoning if needed. Once mixed, cover the bowl and let it chill in the fridge for at least 30 minutes. This lets all the flavors blend together nicely. Serve it cold, and enjoy your creamy dill pickle pasta salad! You can find the full recipe for more detailed instructions. To spice up the dressing, I love adding a splash of hot sauce. This adds a nice kick. You can also try mixing in some fresh herbs, like parsley or chives, for extra flavor. When using dill, fresh is always best. Fresh dill has a bright taste that dried cannot match. If using dried dill, remember to use less since it is more concentrated. To keep your pasta salad creamy, don’t skip the sour cream and mayonnaise. These two ingredients create a rich base. Make sure to mix them well for a smooth texture. To avoid a soggy salad, rinse the pasta in cold water right after cooking. This stops the cooking process and cools it down quickly. Also, serve the salad soon after making it. If it sits too long, it can become watery. Serve this pasta salad in a big bowl for a fun look. You can garnish with fresh dill on top for color. Pair it with grilled chicken or burgers for a great summer meal. It also goes well with barbecued ribs or fresh seafood. This salad is a true crowd-pleaser! For the full recipe, check out the details above. {{image_2}} You can easily make this creamy dill pickle pasta salad vegetarian. Start by adding more colorful vegetables. Consider mixing in diced bell peppers, carrots, or even peas. These veggies add crunch and boost nutrition. If you want to substitute proteins, try chickpeas or tofu. Both options add protein without meat. Just make sure to drain and rinse chickpeas before mixing them in. This keeps the salad fresh and light. To make a low-calorie version of the creamy dill pickle pasta salad, swap out mayonnaise and sour cream. Use Greek yogurt instead. It gives you creaminess with less fat. You can also mix in a bit of lemon juice for extra flavor. Another way to cut calories is to reduce the pasta quantity. Try using just one cup of elbow macaroni instead of two. This makes the salad lighter while keeping it tasty. Want to give your salad a unique twist? Add spices or herbs for variety. A pinch of cayenne pepper can add a kick, while fresh herbs like parsley or chives can brighten it up. You can also incorporate different cheese varieties. Feta cheese adds a salty bite that pairs well with the pickles. Shredded cheddar offers a rich flavor. Just sprinkle your chosen cheese on top before serving for a delightful touch. Explore the [Full Recipe] to see how these variations can enhance your dish. Store your creamy dill pickle pasta salad in an airtight container. Glass or plastic containers work well. Avoid using metal containers, as they can react with the ingredients. This pasta salad stays fresh in the fridge for up to three days. The flavors will meld more over time, making it even tastier! Can you freeze pasta salad? Yes, but it’s not ideal. Freezing may change the texture of the pasta and veggies. If you must freeze it, store it in a freezer-safe container. Make sure to leave some space for expansion. To thaw, place the pasta salad in the fridge overnight. This method helps keep the flavors intact. When ready to serve, mix gently. You may want to add a bit more dressing to refresh it. Enjoy this creamy dish anytime! For the full recipe, check out the complete guide. Yes, you can make this pasta salad ahead of time. I suggest making it the night before or at least four hours before serving. This allows the flavors to blend well. Just keep it in the fridge until you are ready to serve. If you don't have dill pickles, you can try bread and butter pickles or sweet pickles. Both will add a different taste. You can also use chopped cucumber for a fresh twist. Fresh herbs like parsley or chives can enhance the flavor too. To turn this salad into a main dish, add proteins. Grilled chicken, shrimp, or diced ham work great. You can mix them in with the pasta for a filling meal. Serve it with bread or a side salad for a complete dinner. For more ideas, check the Full Recipe. You now have all the steps to make a tasty pasta salad. Start with the ingredients, cook your pasta, and make the creamy dressing. Then, mix everything together and customize it with add-ins or variations. Remember to store leftovers properly or even try freezing. Enjoy this dish with friends and family, and feel free to put your spin on it. It’s a fun recipe that brings a great taste to any meal. Dive in and have a blast in the kitchen!

Creamy Dill Pickle Pasta Salad Tasty Summer Side

Are you ready to spice up your summer cookouts? This Creamy Dill Pickle Pasta Salad is a perfect side dish

- 4 bone-in, skin-on chicken thighs - 1/4 cup honey - 1/4 cup soy sauce - 2 tablespoons sesame oil - 2 cloves garlic, minced - 1 tablespoon fresh ginger, minced - 1 teaspoon red pepper flakes - 1 tablespoon rice vinegar - Garnishes: Green onions and sesame seeds These ingredients create a sweet and savory flavor. The honey gives the glaze its rich sweetness. Soy sauce adds depth and umami. The sesame oil rounds out the dish with a nutty taste. Garlic and ginger bring fresh, bold flavors. If you want some heat, add red pepper flakes. Rice vinegar can brighten the glaze. Garnishing the chicken with green onions and sesame seeds makes it look fancy. These touches add color and crunch. Using fresh, high-quality ingredients makes a big difference. Each element shines through in this simple dish. For the full recipe, check out the section above. - In a bowl, mix honey, soy sauce, sesame oil, garlic, ginger, and rice vinegar. - If you like heat, add red pepper flakes. - Place chicken thighs in a dish or bag. - Pour marinade over chicken, making sure it coats each piece. - Seal the bag or cover the dish. - Refrigerate for at least 30 minutes. For more flavor, marinate up to 4 hours. - Preheat your oven to 425°F (220°C). - Line a baking sheet with parchment paper for easy cleanup. - Take the chicken out of the marinade. Save the marinade for later. - Lay the chicken thighs skin-side up on the baking sheet. - Bake for 25 to 30 minutes. The skin should be crispy and the chicken cooked through. - Make sure the chicken reaches 165°F (74°C) inside. - While the chicken bakes, pour the reserved marinade into a small pot. - Bring it to a boil over medium heat. - Lower the heat and let it simmer for 5 to 7 minutes to thicken. - When the chicken is done, take it out of the oven. - Brush the thickened marinade over each thigh. - Put the chicken back in the oven for 5 more minutes to caramelize the glaze. - Let the chicken sit for 5 minutes before serving. - Garnish with chopped green onions and sesame seeds for a lovely finish. For the full recipe, refer back to the ingredients section. Enjoy your tasty honey soy glazed chicken thighs! To get the best flavor in your honey soy glazed chicken thighs, marinating is key. Here are some best practices for maximum flavor infusion: - Use a resealable bag: This helps the marinade coat all sides of the chicken. - Make sure to press out air: This ensures the marinade touches every inch of the chicken. I recommend marinating for at least 30 minutes. For deeper flavor, try marinating up to 4 hours. Just don’t go over 24 hours, as the chicken can get mushy. For perfect chicken thighs, follow these tips: - Crispy skin: Bake the chicken skin-side up without covering it. The hot oven air helps crisp the skin. - Check for doneness: Use a meat thermometer. The chicken should reach 165°F (74°C) at the thickest part. This way, you ensure the chicken is both safe to eat and juicy. How you present your dish can make it even more appealing: - Plating: Serve the chicken on a large platter. Drizzle the thickened marinade on top and sprinkle chopped green onions and sesame seeds for color. - Pairing ideas: Serve with steamed rice and fresh veggies, like broccoli or snap peas. They balance the sweet glaze and add freshness. These simple tips will elevate your honey soy glazed chicken thighs and impress your guests. Check out the Full Recipe for more details on making this dish! {{image_2}} You can make this dish spicy by adding hot sauce to the marinade. Start with a teaspoon of your favorite hot sauce. You can always add more if you like it hotter. You can also use different spices for a new twist. Try adding smoked paprika or cayenne pepper for extra flavor. To adapt this recipe for the grill, marinate your chicken just like before. Preheat your grill to medium-high heat. Grill the chicken thighs for 6-8 minutes on each side. Make sure the internal temperature reaches 165°F. Keep an eye on the glaze to avoid burning. For a smoky taste, add wood chips to the grill. You can swap chicken thighs for chicken breasts if you prefer. Just remember that breasts may cook faster, so check them after 20 minutes. If you want to use pork, cook pork chops or tenderloin for about 25-30 minutes. For a meat-free option, tofu works well too. Cook it for about 15-20 minutes, flipping halfway through for even browning. Experiment with these variations to find your favorite twist on this delicious recipe. For the complete process, check the Full Recipe above. To store leftovers, place the chicken in an airtight container. Make sure to let it cool first. The chicken stays tasty in the fridge for up to three days. Use glass or BPA-free plastic containers for the best results. You can freeze the chicken for future meals. Wrap each piece tightly in plastic wrap, then place them in a freezer bag. This keeps them fresh for up to three months. When ready to eat, thaw the chicken overnight in the fridge. Reheat in the oven at 350°F (175°C) until warm. This keeps the skin crispy and the meat juicy. In the fridge, honey soy glazed chicken thighs last about three days. In the freezer, they can last up to three months. Always check for signs of spoilage. Look for off smells or changes in color. If the chicken feels slimy, it’s best to throw it away. Enjoy your delicious dish with peace of mind! To make chicken thighs tender, use a few simple tricks. First, you can pound the thighs lightly to break down tough fibers. Marinating the chicken in the honey soy glaze helps too. The acids in the marinade soften the meat. You can also brine the chicken in saltwater for a few hours. This adds moisture and improves texture. Yes, you can use low-sodium soy sauce. It will change the flavor slightly, making it less salty. To balance this, add a pinch more salt or a bit more honey. This adjustment keeps the sweet and savory balance intact. If you need to avoid honey, there are great alternatives. Agave syrup works well and is similar in sweetness. Maple syrup is another option, offering a unique flavor. Both will keep your dish sweet and tasty, just like the original recipe. Marinating the chicken is not strictly necessary but offers many benefits. It enhances flavor and keeps the meat juicy. A quick marinade of 30 minutes can add a lot of taste. If you're short on time, you can skip it, but marinating is best for rich flavors. For the full recipe, check the cooking instructions above. This recipe combines chicken, honey, and soy sauce for a tasty dish. You learned how to marinate, bake, and finish your chicken with a glaze. Using tips on marinating and cooking gives you a crispy skin and juicy meat. Explore variations to make it spicy or grilled, and don't forget about storage options. This meal stays fresh, making it great for future dinners. Enjoy the cooking process and share your delicious results!

Honey Soy Glazed Chicken Thighs Savory and Simple Dish

Looking for a quick, flavorful dinner? Try my Honey Soy Glazed Chicken Thighs! This dish packs a punch with sweet

To make classic Snickerdoodle cookies, you need just a few key ingredients. Here’s what you'll need: - 1 cup unsalted butter, softened - 1 ½ cups granulated sugar - 2 large eggs - 1 teaspoon vanilla extract - 2 ¾ cups all-purpose flour - 2 teaspoons cream of tartar - 1 teaspoon baking soda - ½ teaspoon salt - 3 tablespoons granulated sugar (for coating) - 1 tablespoon ground cinnamon (for coating) Each ingredient plays a special role in making these cookies great. - Butter adds richness and flavor. It also helps create a soft and tender cookie. - Granulated sugar sweetens the dough. It helps the cookies spread as they bake. - Eggs provide moisture and bind the ingredients together. They give the cookies a nice lift. - Vanilla extract enhances the flavor, giving the cookies a warm, sweet taste. - All-purpose flour gives structure to the cookies. It provides the base for the dough. - Cream of tartar is key for that classic Snickerdoodle texture. It makes the cookies soft and chewy. - Baking soda acts as a leavening agent. It helps the cookies rise and become fluffy. - Salt balances the sweetness and enhances overall flavor. - Cinnamon-sugar coating adds a sweet and spicy finish. It gives the cookies their signature look and taste. If you need alternatives for your Snickerdoodle cookies, here are some options: - Vegan butter works well instead of regular butter. It keeps the cookies tasty while making them dairy-free. - Aquafaba can replace eggs for a vegan option. Use 3 tablespoons for each egg. - Gluten-free flour can be used instead of all-purpose flour. Ensure it's a blend made for baking to get the right texture. - Coconut sugar is a great substitute for granulated sugar. It adds a slight caramel flavor but may change the color of your cookies. These alternatives will allow anyone to enjoy classic Snickerdoodle cookies, no matter their dietary needs. For the complete recipe, check out the Full Recipe section. Start by preheating your oven to 350°F (175°C). This makes sure your cookies bake evenly. Next, take two baking sheets and line them with parchment paper. This helps prevent sticking and makes clean-up easy. In a large bowl, cream together 1 cup of softened unsalted butter and 1 ½ cups of granulated sugar. Mix until it looks light and fluffy. Then, add in 2 large eggs, one at a time. Make sure to mix well after each egg. Finally, stir in 1 teaspoon of vanilla extract for that lovely flavor. In another bowl, whisk together 2 ¾ cups of all-purpose flour, 2 teaspoons of cream of tartar, 1 teaspoon of baking soda, and ½ teaspoon of salt. Make sure these ingredients are well mixed. Gradually add this dry mix to your wet mixture. Mix until just combined, but be careful not to overmix. This keeps your cookies soft. In a small bowl, mix 3 tablespoons of granulated sugar with 1 tablespoon of ground cinnamon. This will be your tasty coating. Roll the dough into balls that are about 1 inch wide. Then, roll each ball in the cinnamon-sugar mix until they are well coated. Place the coated dough balls on your prepared baking sheets, leaving about 2 inches between each one. Bake in your preheated oven for 10-12 minutes. Look for the edges to be set and the tops slightly cracked. They may seem soft, but they will firm up as they cool. After baking, let them sit on the baking sheets for 5 minutes. Then transfer the cookies to a wire rack to cool completely. This step is key for that perfect texture. To get the best texture in your snickerdoodles, you need to control a few things. If you want chewy cookies, use less flour and bake them for a shorter time. This keeps them soft. For crispier cookies, add a bit more flour and bake them a little longer. Watch them closely to prevent burning. Baking snickerdoodles can be simple, but some mistakes can ruin your batch. Here are some key things to avoid: - Overmixing: This makes cookies tough. Mix just until combined. - Wrong oven temp: Always preheat your oven to 350°F. A cooler oven can lead to flat cookies. - Skipping the cream of tartar: This gives snickerdoodles their classic tang. Don't skip it! - Neglecting the cooling time: Let cookies cool on the baking sheet before moving them. This helps them set. To keep your snickerdoodles fresh, store them in an airtight container. They stay soft for up to a week at room temperature. If you want to keep them longer, freeze them. Just make sure to wrap them well in plastic wrap or use a freezer bag. They can last for up to three months in the freezer. When you’re ready to enjoy, just thaw them at room temperature. Try these tips to make your classic snickerdoodle cookies even better! For the full recipe, check out the section above. {{image_2}} You can make snickerdoodles even more fun by adding flavors. Try mixing in chocolate chips or chopped nuts. Walnuts or pecans add a nice crunch. You can also use butterscotch chips for a sweeter twist. These additions create a new layer of taste. I love how they change the cookie while keeping the classic snickerdoodle base. Seasonal flavors can bring a fresh vibe to your snickerdoodles. For fall, add pumpkin spice to the dough. Just mix in a teaspoon of pumpkin pie spice with the dry ingredients. This adds warmth and a cozy feel to the cookies. You can also try peppermint extract around the holidays. It gives a festive touch and a minty freshness that pairs well with cinnamon. The coating on snickerdoodles is classic, but you can switch it up. Instead of just cinnamon and sugar, try adding cocoa powder. Mix it with the sugar for a chocolatey coating. This gives the cookies a rich flavor twist. You can even add a dash of cayenne pepper for a spicy kick. Each variation keeps the cookie exciting and new. Try these ideas to make your next batch special! To keep your snickerdoodle cookies fresh, follow these tips: - Use an airtight container: This helps prevent them from drying out. - Separate layers with parchment paper: This stops them from sticking together. - Store at room temperature: They taste best when kept in a cool place. If you plan to eat them within a week, room temperature storage works well. Freezing snickerdoodles is simple and keeps them tasty. Here’s how to do it: 1. Cool the cookies: Let them cool completely after baking. 2. Place in a freezer-safe bag: Remove as much air as you can. 3. Label the bag: Write the date so you remember when you froze them. You can freeze dough balls too! Just roll them, coat in cinnamon sugar, and freeze before baking. When you want some, bake them right from the freezer. When stored properly, snickerdoodles last: - At room temperature: About 1 week. - In the freezer: Up to 3 months. If you see any signs of spoilage, like mold or an off smell, it’s best to discard them. Enjoy the delightful taste of your snickerdoodles! For the full recipe, check out the section above. Snickerdoodle cookies can be puffy or flat based on a few factors. The main reason is the amount of flour used. If you add too much flour, the cookies will be thicker and puffier. If you use less flour, they will spread out more and be flatter. Also, the temperature of your butter matters. Softened butter helps create air pockets, making cookies puff. Using cold butter leads to flatter cookies. You can use sugar substitutes in this recipe. However, it may change the texture and taste. If you choose a granular substitute, look for one that measures cup-for-cup like sugar. Some substitutes can make cookies less sweet. Always check the package for baking tips. Refrigerating the dough is not necessary, but it can help. Chilling the dough makes it firmer. This helps the cookies hold their shape while baking. If you have time, chill the dough for about 30 minutes. If you're short on time, you can bake right away. Snickerdoodles have a fun history! They likely come from the German word “Schneckennudeln,” meaning snail noodles. The name may refer to the shape of the dough. They became popular in America in the late 19th century. Today, Snickerdoodles are a classic cookie loved by many. You can find many variations and recipes, like the Full Recipe here, but the basic cinnamon-sugar flavor stays the same. In this post, we covered how to make classic Snickerdoodle cookies. We looked at essential ingredients and their roles. You learned step-by-step instructions for making the dough and baking. I shared tips for perfect texture and preventing common mistakes. We also explored fun variations and storage methods. Snickerdoodles are a treat anyone can enjoy, whether you stick to tradition or get creative. Now, you're ready to bake delicious cookies that friends and family will love. Enjoy the process and the sweet rewards!

Classic Snickerdoodle Cookies Delightful and Easy Treat

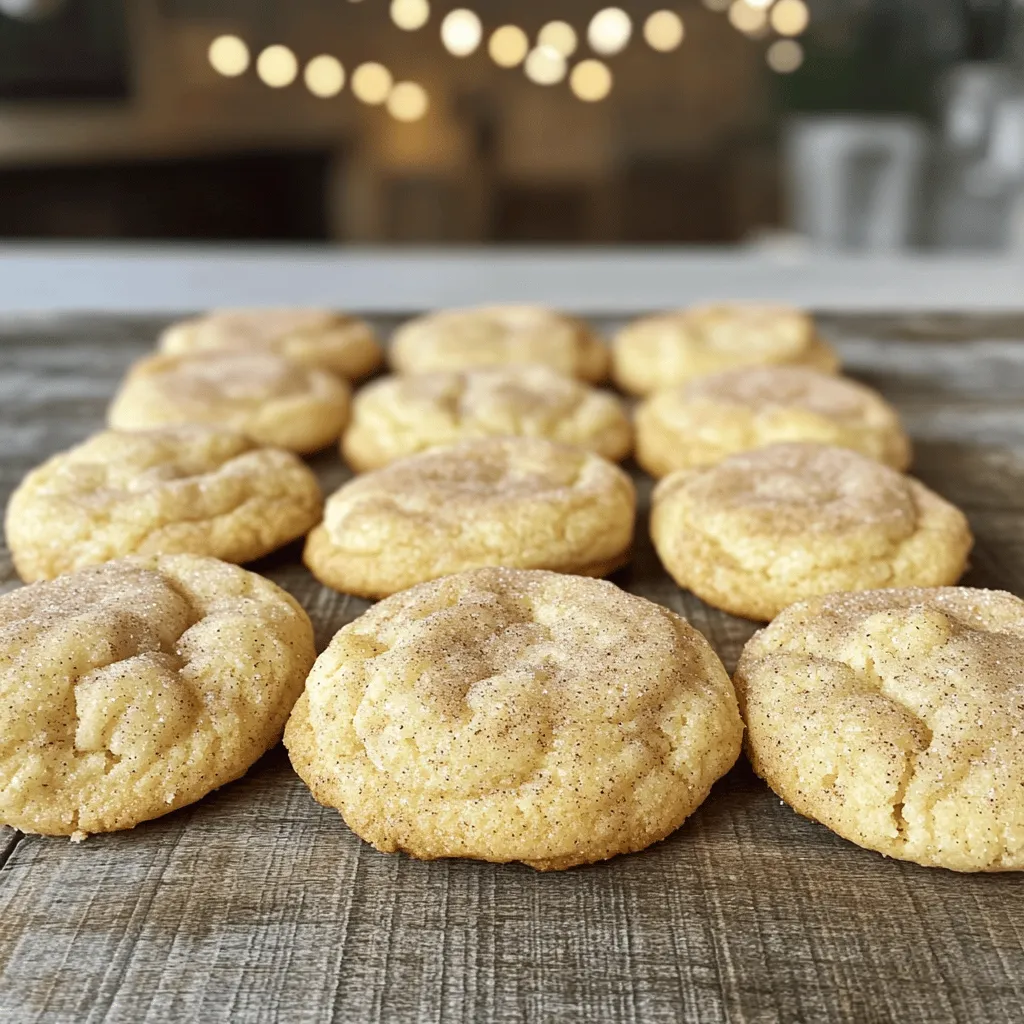
Looking to bake a delicious treat with a hint of nostalgia? You’re in the right place! I’m excited to share

- 4 large bell peppers (any color) - 2 cups cooked chicken, shredded - 1/2 cup buffalo sauce (adjust to taste) - 1 cup cream cheese, softened - 1/2 cup shredded cheddar cheese - 1/4 cup chopped green onions - 1/2 teaspoon garlic powder - Salt and pepper to taste - Optional: Blue cheese crumbles for topping These ingredients create a tasty meal. The bell peppers bring flavor and color. The buffalo sauce adds a nice kick. Cream cheese makes the filling creamy and rich. Shredded chicken keeps it hearty. Green onions give a fresh touch. Each serving has about 350 calories. - Protein: 30 grams - Carbohydrates: 15 grams - Fat: 20 grams This meal is filling and packed with protein. It can fit well in a balanced diet. Enjoy these stuffed peppers as a fun dinner option. For the full recipe, check the section above. 1. Preheating the oven: First, set your oven to 375°F (190°C). This step warms up the oven, ensuring even cooking. 2. Preparing the bell peppers: Take four large bell peppers. You can choose any color you like. Cut off the tops and remove the seeds and membranes. This makes them ready for stuffing. 1. Combining chicken and sauce: In a big bowl, mix two cups of cooked, shredded chicken with half a cup of buffalo sauce. Adjust the sauce amount to match your spice level. 2. Incorporating cheeses and seasoning: Add one cup of softened cream cheese and half a cup of shredded cheddar cheese to the chicken mix. Toss in a quarter cup of chopped green onions, half a teaspoon of garlic powder, and some salt and pepper. Stir until everything blends well. 1. Stuffing the bell peppers: Carefully spoon the buffalo chicken mix into each bell pepper. Pack it lightly but fill them completely. 2. Baking times and techniques: Place the stuffed peppers upright in a baking dish. You might need crumpled foil to hold them steady. Cover the dish with aluminum foil and bake for 25 minutes. After that, remove the foil and bake for another 15 minutes. The peppers should be tender and the tops bubbly. For the full recipe, refer to the detailed instructions above. To get the best texture for your stuffed peppers, choose large, firm bell peppers. They hold the filling well. When you bake them, the peppers get soft, but not mushy. This gives you a nice bite and keeps the filling intact. To adjust spice levels, start with a small amount of buffalo sauce. You can always add more. Mix the sauce into the filling and taste it before stuffing the peppers. This way, you find the right heat for you. For a full meal, pair your stuffed peppers with a side salad. A crisp green salad or coleslaw balances the heat. You can also serve them with rice or quinoa for extra carbs. To plate the dish, place one pepper in the center of the plate. Add a sprinkle of green onions on top for color. If you use blue cheese, add a few crumbles on top right before serving. This adds flavor and a nice touch to the dish. If you want to prepare your meal in advance, stuff the peppers a day before. Cover them well and store them in the fridge. When you’re ready to cook, just pop them in the oven. For leftovers, let the peppers cool and place them in an airtight container. They will last for about three days. To reheat, place them in the oven at 350°F (175°C) for about 15 to 20 minutes. This keeps the peppers tasty and warm. For a quick fix, you can also use the microwave, but the oven gives a better texture. For the full recipe, check out the detailed instructions to get started on these delicious Buffalo Chicken Stuffed Peppers! {{image_2}} You can change the protein in these stuffed peppers. Turkey or tofu work well. Both provide a nice texture and flavor. If you prefer a lighter meal, use ground turkey instead of chicken. Tofu gives a nice plant-based twist. For cheese, try swapping cheddar for pepper jack or mozzarella. Pepper jack adds a fun kick. Mozzarella keeps it creamy and mild. You can mix and match until you find your favorite combo. Want to boost the flavor? Add vegetables to the filling! Diced bell peppers, spinach, or even corn can enhance the dish. They add color and extra nutrients. You can also use different sauce varieties. If you like things spicy, use a hotter buffalo sauce. For a milder taste, try a garlic or ranch sauce. Each sauce will give your peppers a unique spin. If you need gluten-free options, make sure to choose gluten-free sauces. Most buffalo sauces are naturally gluten-free, but always check the label. For dairy-free alternatives, swap cream cheese for a plant-based cream cheese. Nutritional yeast can add a cheesy flavor too. These swaps keep the dish tasty while fitting your diet. To store your Buffalo Chicken Stuffed Peppers, first let them cool. Place them in an airtight container. This keeps them fresh and tasty. You can store them in the fridge for about 3 to 4 days. If you want to enjoy them later, make sure they are sealed well. This helps avoid any fridge odors. Freezing stuffed peppers is a great option for meal prep. To freeze, wrap each pepper in plastic wrap. Then, place them in a freezer-safe bag. Remove as much air as possible. This will help prevent freezer burn. You can freeze them for up to 3 months. When you are ready to eat, take them out of the freezer. Thaw them in the fridge overnight. To reheat, you can bake them at 375°F (190°C) for about 30 minutes. This warms them through and keeps them tasty. For the best flavor and texture, reheating in the oven works best. Place the stuffed peppers on a baking sheet and cover them with foil. This helps keep them moist. Heat them at 375°F (190°C) for about 15 minutes. You can also use a microwave if you are in a rush. Just be careful, as this can make them a bit soggy. Enjoy your delicious meal again! For the full recipe, check out the details above. To reduce the heat, you can adjust the amount of buffalo sauce. Start with a smaller amount, like 1/4 cup, and taste as you mix. You can also add more cream cheese to balance the spice. Cream cheese cools down the flavor. Another option is to mix in some sour cream or yogurt. These will help mellow out the heat, making it more enjoyable for everyone. Using raw chicken is not safe for this dish. You must cook chicken to a safe temperature of 165°F (75°C). If you want to use raw chicken, cook it first. Boil, grill, or bake the chicken before shredding it. This step ensures your stuffed peppers are safe and delicious. Buffalo chicken stuffed peppers pair well with many sides. You could serve a simple green salad for freshness. Coleslaw adds a crunchy texture that complements the peppers. Another good side is rice or quinoa, which soaks up flavors. You can also offer some crunchy tortilla chips for extra fun. Yes, this recipe is great for meal prep. You can make the stuffed peppers ahead of time and store them in the fridge. They last for about three days. To heat, pop them in the oven at 350°F (175°C) until warm. For easy storage, use airtight containers. This way, you can have a tasty meal ready at any time. Check out the Full Recipe for more details. Buffalo Chicken Stuffed Peppers are simple and tasty. You learned about the ideal ingredients, step-by-step instructions, and helpful tips. Variations and storage methods ensure you can enjoy them anytime. Making this dish is a fun way to impress family or friends while keeping meals exciting. With different proteins and flavors, you can adapt it to your taste. Enjoy every bite and get creative with your meals!

Buffalo Chicken Stuffed Peppers Flavorful Dinner Idea

Looking for a tasty dinner that packs a punch? Try Buffalo Chicken Stuffed Peppers! These colorful bell peppers are loaded

- 2 cups watermelon, cubed - 1 cup strawberries, sliced - 1 cup blueberries - 2 ripe kiwis, peeled and sliced - 1 cup cantaloupe, cubed Using fresh fruits makes this salad bright and tasty. Each fruit adds its own flavor and texture. - Watermelon: Sweet and juicy, it keeps the salad refreshing. - Strawberries: Their sweetness brings a nice balance to the mix. - Blueberries: These tiny berries add a burst of flavor. - Kiwis: Their tangy taste pairs well with the sweeter fruits. - Cantaloupe: This fruit adds a soft texture and mild sweetness. - 1 tablespoon honey - 2 tablespoons fresh lime juice - Zest of 1 lime - Fresh mint leaves for garnish (optional) The dressing is what makes this fruit salad pop. - Honey: It adds a natural sweetness that ties all the flavors together. - Fresh lime juice: This brings a bright, zesty kick to the salad. - Lime zest: The zest gives an extra burst of lime flavor. - Fresh mint leaves (optional): These add a refreshing touch and a splash of color. For the full recipe, check out the instructions. Start by washing all your fruits well. Use fresh, ripe fruits for the best taste. For cubing the watermelon and cantaloupe, cut them in half. Then, slice into wedges. Cut those wedges into small cubes. For strawberries, remove the green leaves first. Then, slice them into thin rounds. Kiwis should be peeled and sliced into half-moons. Finally, wash the blueberries and leave them whole. Now, combine all the fruits in a large mixing bowl. You want a colorful mix, so use each fruit. This mix will be the base of your salad. In a small bowl, add one tablespoon of honey. Then, squeeze in two tablespoons of fresh lime juice. Grate the zest of one lime and add that too. Next, take a whisk and mix these ingredients well. You want the honey to blend with the lime juice. This dressing gives your fruit a sweet and tangy flavor. Now, it’s time to drizzle the honey-lime mixture on the fruit. Pour it slowly over the fruit in the large bowl. Using a large spoon, gently toss the fruit. Make sure every piece gets coated in the dressing. Let the fruit salad sit for about ten minutes. This time helps the flavors meld together. When ready to serve, place the fruit in individual bowls or on a nice platter. If you like, add fresh mint leaves on top for a pop of color. Enjoy your fresh and tasty honey lime fruit salad! For more details, check the Full Recipe. When making honey lime fruit salad, choose seasonal fruits for the best flavor. Fresh fruits taste great, and they are often cheaper. Look for fruits that are ripe but not overripe. Here are some ripeness indicators to help you: - Watermelon: It should feel heavy for its size, and the skin should have a dull finish. - Strawberries: Look for bright red color and a fresh green cap. - Blueberries: Choose plump berries with a deep blue hue. - Kiwis: A ripe kiwi gives slightly when you press it gently. - Cantaloupe: It should smell sweet and feel slightly soft at the stem end. Marinating the fruit salad can bring out the flavors even more. Let the salad sit for about 10 minutes after mixing. This allows the honey and lime to soak into the fruit. If you want to try different sweeteners, consider using maple syrup or agave. These can add a unique twist to your salad without losing the fresh taste. Serving your honey lime fruit salad can change the vibe of your meal. You can use small bowls for individual servings or a large platter for a family-style option. A platter looks beautiful and encourages sharing. To make it even more special, garnish with fresh mint leaves. This adds a pop of color and a refreshing touch. For the full recipe, check out the details above. {{image_2}} You can make this salad even better by adding other fruits. Pineapple adds a sweet and tangy touch. It also gives a tropical vibe. Just chop it into bite-sized pieces. Grapes are another great choice. They bring a nice crunch and sweetness. You can use green or red grapes. Both work well in this salad. If you want a vegan version, you can change the dressing. Instead of honey, use agave syrup. It offers a similar sweetness but is plant-based. This keeps the salad light and fresh. You can also try other dressings like a splash of orange juice or a mix of lemon and maple syrup. To turn the salad into a meal, you can pair it with yogurt. A dollop on top adds creaminess and protein. You can also sprinkle nuts for crunch. Almonds or walnuts work best. They add healthy fats and make the dish more filling. Enjoy your honey lime fruit salad as a snack or a light meal! Check out the Full Recipe for more details. To keep your honey lime fruit salad fresh, store it in an airtight container. This helps prevent the fruit from drying out. Place the container in the fridge right after serving. You can enjoy the leftovers for lunch or a snack later. Just remember to eat it within a few days for the best taste. This salad is best when fresh. If stored properly, it can last up to three days in the fridge. After that, the fruit may start to lose its crunch and flavor. The honey-lime dressing helps keep everything juicy and tasty for a while. You can freeze honey lime fruit salad, but it may change in texture. The fruit might become mushy when thawed. If you decide to freeze it, use a freezer-safe container. When ready to eat, thaw it overnight in the fridge. Enjoy it as a quick snack or a sweet treat! For the full recipe, check out the main article. You can use many fruits in a honey lime fruit salad. Some great choices are: - Watermelon - Strawberries - Blueberries - Kiwis - Cantaloupe These fruits blend well together. They add color and flavor. You can also mix in others like pineapple or grapes for a twist. Yes, you can use bottled lime juice. However, fresh lime juice tastes better. It gives a brighter flavor. Fresh lime juice enhances the overall taste of the salad. If you do use bottled juice, make sure it is 100% lime juice without added sugars. Definitely! Honey lime fruit salad is great for kids. It is colorful and sweet. The honey adds a nice touch without being too sugary. Plus, it helps kids eat more fruit. Just keep an eye on any allergy issues with specific fruits. You can store honey lime fruit salad in the fridge for about 1-2 days. The fruit stays fresh, but it may get a bit soggy over time. Keep it in an airtight container to keep it fresh longer. Yes, you can prepare it ahead of time. Just mix the fruits and dressing separately. Combine them right before serving. This keeps the fruit from getting mushy. To make it healthier, use less honey. You can also add nuts for crunch and protein. Chia seeds are another good option. They add fiber and healthy fats. Absolutely! Honey lime fruit salad is perfect for parties. It looks great, tastes fresh, and is easy to make. Serve it in a large bowl or individual cups. Your guests will love it! For the complete recipe, check out the Full Recipe. This blog post explored the joys of making a honey lime fruit salad. We covered fresh fruits like watermelon and strawberries, along with a simple dressing of honey and lime. I shared tips for choosing ripe fruits and enhancing flavors. You learned ways to present your salad and even how to store leftovers. In the end, this salad is fun, fresh, and perfect for any meal. Try it out and enjoy!

Honey Lime Fruit Salad Fresh and Flavorful Delight

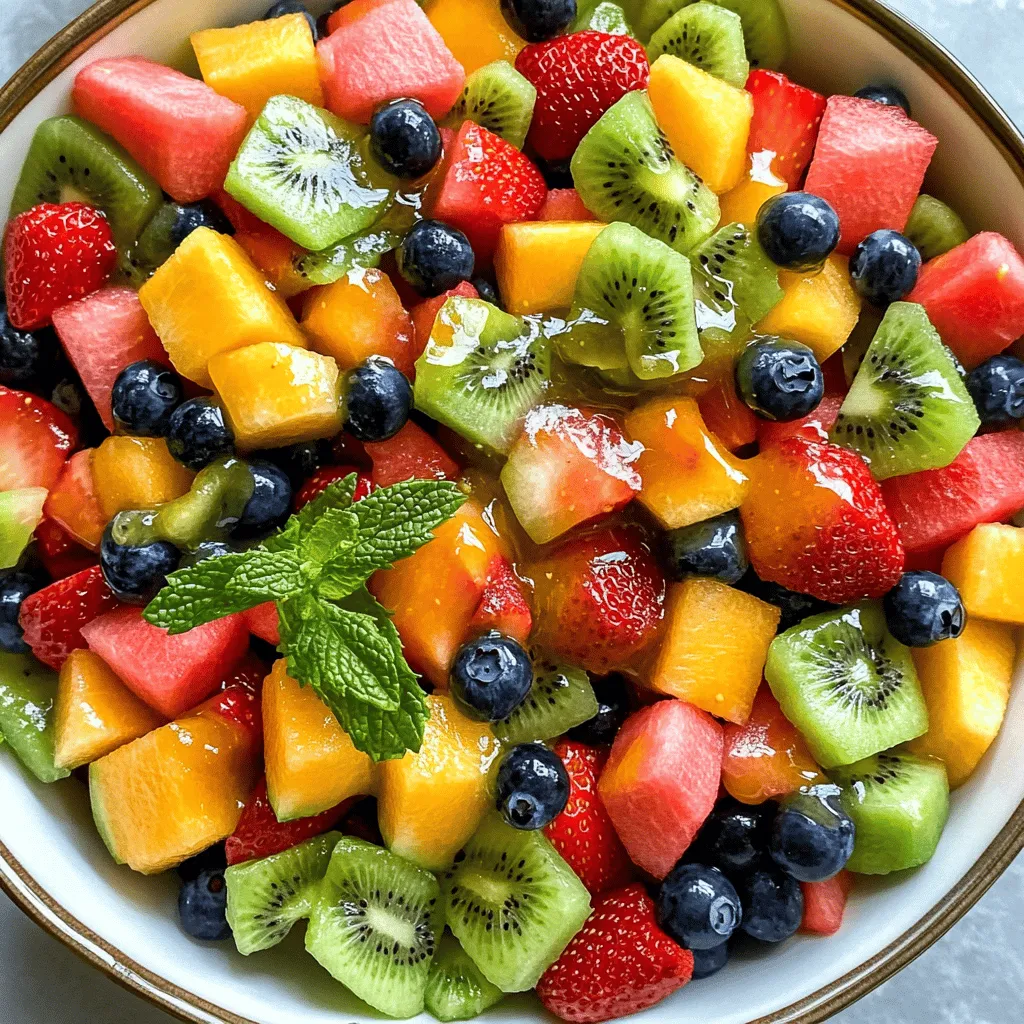
Are you ready for a refreshing treat? My Honey Lime Fruit Salad is packed with vibrant, fresh flavors that burst

To make Spicy Mexican Street Corn Dip, gather these simple ingredients: - 2 cups corn kernels (fresh or canned) - 1 cup cream cheese, softened - ½ cup mayonnaise - 1 cup cotija cheese, crumbled - 1 teaspoon chili powder - 1 teaspoon smoked paprika - ½ teaspoon cayenne pepper (adjust to taste) - 1 lime, juiced - ¼ cup fresh cilantro, chopped - Salt to taste - Tortilla chips, for serving Each ingredient adds its own flavor. The corn brings sweetness, while the spices add warmth. Cream cheese and mayonnaise create a rich base. Cotija cheese adds a salty kick. The lime juice gives a fresh zing, and cilantro adds a burst of color. You can use fresh corn for the best taste, but canned corn works too. This dip is quick and easy. You can whip it up in just 15 minutes. For the full recipe, check the note above. Enjoy making this dip, and get ready for game day! - Step 1: Combine cream cheese and mayonnaise Start by placing 1 cup of softened cream cheese in a large bowl. Add ½ cup of mayonnaise. Use a hand mixer or a fork. Mix until it is smooth and creamy. - Step 2: Incorporate corn kernels Next, take 2 cups of corn kernels. You can use fresh or canned. Gently fold the corn into the cream mixture. Make sure it is well mixed. - Step 3: Add spices and cheese Now, stir in 1 cup of crumbled cotija cheese. Add 1 teaspoon of chili powder, 1 teaspoon of smoked paprika, and ½ teaspoon of cayenne pepper. Adjust the cayenne to your taste. Squeeze in the juice from 1 lime, and add ¼ cup of chopped cilantro. Mix everything until well combined. - Step 4: Season to taste Taste your dip now. If you want more flavor, add salt as needed. If you like it spicy, feel free to add more cayenne pepper. - Step 5: Transfer and garnish Finally, transfer your dip to a serving bowl. Sprinkle some extra cotija cheese and cilantro on top for a nice touch. You're now ready to enjoy this delicious Spicy Mexican Street Corn Dip with tortilla chips. For the full recipe, check the ingredients and steps above! - Use fresh corn for enhanced flavor. Fresh corn gives your dip a sweet crunch. If you can, buy corn on the cob and grill or boil it first. This adds a nice smoky taste. - Adjust spices based on heat preference. Start with less cayenne pepper if you don't like spice. You can always add more later. Taste as you go to find your perfect level of heat. - Make ahead and chill for better flavor. This dip tastes even better after it sits. Prepare it in advance and let it chill in the fridge for at least an hour. The flavors will blend nicely. - Best served with tortilla chips. Use crispy tortilla chips for scooping. They add the perfect crunch and flavor. - Pair with fresh veggies for a lighter option. Carrot sticks, cucumber slices, or bell pepper strips work well. They balance the dip's richness and add freshness. - Great for parties, barbecues, and game days. This dip is a crowd-pleaser. Serve it at your next gathering for a tasty, shareable snack. For the complete recipe, check out the Full Recipe section. {{image_2}} You can easily change this dip to fit your tastes. For a lighter version, swap cream cheese for Greek yogurt. It keeps the creaminess but cuts down on fat. If you want to try different cheeses, use feta cheese or cheddar cheese. Each option adds a unique twist to the dip while still tasting amazing. Want more heat? Add diced jalapeños for that extra kick. They bring a nice crunch and spice that enhances the flavor. For more texture, toss in diced red onion. It adds a tasty crunch and a bit of sweetness. These simple swaps make your Spicy Mexican Street Corn Dip even more exciting! You can find the full recipe [here](#). To keep your Spicy Mexican Street Corn Dip fresh, place it in an airtight container. This helps prevent it from absorbing other smells in your fridge. It tastes best when you eat it within three days. After that, the flavors may fade, and the dip might not be as creamy. If you have extra dip, you can freeze it. It stays good for up to a month. Just make sure to use a freezer-safe container. When you’re ready to enjoy it again, thaw the dip in the fridge overnight. This keeps the texture and flavor intact. How do I make Spicy Mexican Street Corn Dip vegan? To make this dip vegan, swap out the cream cheese and mayonnaise for vegan versions. You can use cashew cream or silken tofu as a base. Crumbled tofu works great as a cotija substitute. Adjust spices to taste. This way, you keep all the flavor without dairy. Can I use frozen corn instead of fresh? Yes, you can use frozen corn! Just thaw it and drain any excess water. Frozen corn is often picked at peak ripeness, so it can taste just as good as fresh. This makes it a convenient option for quick prep. What can I serve with Spicy Mexican Street Corn Dip? Serve this dip with tortilla chips for a classic pairing. Fresh veggies like carrot sticks and bell pepper strips also work well. If you want a twist, try pita chips or even nachos. Each option adds a fun crunch and complements the dip's creamy texture. For more ideas, check out the Full Recipe! This Spicy Mexican Street Corn Dip is simple and tasty. You mix cream cheese, corn, and spices, then serve it with chips or veggies. Fresh ingredients really boost the flavor. Remember to adjust the spices for your taste. Make it ahead to enhance the taste! Store leftovers well in the fridge or freeze for later. Dive into this fun dip at your next gathering. Enjoy every bite!

Spicy Mexican Street Corn Dip Flavorful Game Day Snack

Are you ready to make your game day unforgettable? This Spicy Mexican Street Corn Dip adds a burst of flavor

To make Maple Dijon Glazed Carrots, you need simple and fresh ingredients. Here’s what you’ll need: - 1 lb baby carrots (or regular carrots, peeled and sliced) - 2 tablespoons olive oil - 3 tablespoons pure maple syrup - 2 tablespoons Dijon mustard - 1 tablespoon fresh thyme leaves (or 1 teaspoon dried thyme) - Salt and pepper to taste - Zest of 1 lemon (for garnish) Each ingredient plays an important role. The carrots provide sweetness and crunch. Olive oil helps in roasting and adds flavor. Maple syrup gives a lovely sweetness. Dijon mustard adds a tangy twist. Thyme adds a fresh herb taste. Finally, salt and pepper enhance all the flavors. If you want to make this dish even more special, you can try different herbs or spices. For example, a touch of garlic can add depth. You can find the full recipe to guide you through the cooking process. Enjoy the vibrant colors and flavors of this dish! First, preheat your oven to 425°F (220°C). This high heat helps the carrots roast well. Roasting brings out their sweet flavor. Next, you need to prepare the carrots. If you use regular carrots, peel and slice them into even sticks. Aim for about 1/2 inch thick. This size allows them to cook evenly. Baby carrots can go straight onto the pan. Now, let's make the glaze. In a small bowl, mix together 2 tablespoons of olive oil, 3 tablespoons of pure maple syrup, and 2 tablespoons of Dijon mustard. Add fresh thyme, salt, and pepper. Whisk it all together until smooth. This glaze gives a sweet and tangy flavor to the carrots. In a large bowl, combine the carrots with the glaze. Toss them well to ensure every carrot is coated. This step is key for great flavor in your dish. Spread the coated carrots on a baking sheet. Make sure they are in a single layer. Roast them in the preheated oven for 20 to 25 minutes. Toss them halfway through for even cooking. You want them tender and slightly caramelized. When the carrots are done, take them out of the oven. Sprinkle lemon zest on top for a fresh burst of flavor. Serve these maple Dijon glazed carrots right away. They make a tasty side dish with any meal. For the full recipe, check the earlier section. To achieve a perfect texture, choose carrots of similar size. This helps them cook evenly. If you use regular carrots, cut them into sticks about 1/2 inch thick. This size allows for good caramelization and tenderness. Always preheat your oven to 425°F (220°C) before roasting. This high heat brings out the best flavors in the glaze and gives a nice crunch. You can boost the flavor of your Maple Dijon Glazed Carrots by adding spices. Consider adding a pinch of cinnamon or nutmeg for warmth. You might also try a dash of cayenne for heat. Fresh herbs like parsley or dill can give a bright finish. If you want a tangy twist, add a splash of apple cider vinegar to the glaze. This combination makes the dish more complex and exciting. Maple Dijon Glazed Carrots pair well with many dishes. Serve them alongside roasted chicken or grilled fish for a complete meal. They also work nicely with quinoa or rice. For a special touch, mix them in with a salad of greens and nuts. If you want to impress guests, these carrots look great on a holiday table. They add color and taste, making any meal feel festive. For the full recipe, check out the earlier section on ingredients and instructions. {{image_2}} If you want to switch things up, consider these substitutions: - Maple Syrup: You can use honey or agave syrup. Both add sweetness. - Dijon Mustard: Try yellow mustard for a milder taste. Whole grain mustard adds texture. These swaps keep the dish tasty while changing the flavor profile. Want to make this dish fit your diet? Here’s how: - Vegan: Use agave syrup instead of maple syrup. This keeps it plant-based. - Gluten-Free: Dijon mustard is usually gluten-free. Check labels to be sure. These easy swaps let everyone enjoy this side dish. You can glaze more than just carrots! Here are some fun ideas: - Parsnips: They have a sweet, earthy flavor. Slice them like carrots. - Brussels Sprouts: Halve them and add to the mix for a unique taste. - Cauliflower: Cut it into florets for a fun twist. These vegetables roast well and soak up the glaze like carrots. Try mixing them for added color and flavor! For the full recipe, check out the Maple Dijon Glazed Carrots. Store leftover Maple Dijon glazed carrots in an airtight container. Refrigerate them right away to keep them fresh. They stay good for up to four days. Make sure they cool down first to avoid steam build-up. Label the container with the date you made them. This helps you keep track of freshness. When it’s time to reheat, use the oven or a skillet. Preheat your oven to 350°F (175°C). Spread the carrots on a baking sheet. Heat for about 10-15 minutes until warm. This method keeps the texture and flavor intact. If using a skillet, add a little olive oil and heat over medium heat. Stir often for even warming. You can freeze these carrots if you want to save some for later. First, let them cool completely. Spread them in a single layer on a baking sheet to freeze. Once frozen, transfer them to a freezer bag or container. Keep them in the freezer for up to three months. To thaw, place them in the fridge overnight. Reheat as mentioned above. Enjoy your Maple Dijon glazed carrots later! For the full recipe, check out the detailed steps above. Yes, you can use frozen carrots. However, fresh carrots taste better. Frozen carrots may have a softer texture after cooking. If you use frozen, reduce the roasting time. You can use yellow mustard or honey mustard as a substitute. Both options will add a different flavor. If you want a milder taste, try mayonnaise or a mix of vinegar and olive oil. Look for carrots that are tender and have a slight caramel color. You can pierce them with a fork. If the fork goes in easily, they are ready. Yes, this dish is healthy. Carrots are full of vitamins and fiber. The glaze adds a touch of sweetness without being too heavy. You can enjoy this dish guilt-free. Yes, you can prep the carrots ahead of time. Cut and glaze them, then store in the fridge for up to 24 hours. Just roast them when you are ready to serve. Check the full recipe for more details. In this blog post, we explored a delicious recipe for Maple Dijon Glazed Carrots. We covered the key ingredients, step-by-step instructions for roasting, and helpful tips to get that perfect flavor and texture. I shared variations for dietary needs and creative twists with other vegetables. Remember, these carrots are easy to prepare and can be stored or reheated with care. Enjoy this dish as a tasty side and impress your loved ones. Happy cooking!

Maple Dijon Glazed Carrots Easy and Flavorful Side Dish

Looking for a side dish that wows? You’ll love Maple Dijon Glazed Carrots! This easy recipe combines sweet maple syrup

Older posts
Newer posts
← Previous Page1 … Page29 Page30 Page31 … Page106 Next →
© 2025 My Cooking Cast • Built with GeneratePress

Our Policies

  • Privacy Policy
  • GDPR Policy
  • Terms Of Use
  • Copyright Policy
  • Cookie Policy
  • Disclaimer

More Information​

  • Home
  • Contact
  • About
  • Dinner
  • Appetizers
  • Dessert
©2025, My Cooking Cast About Privacy Policy Back To Top