
Spicy Cajun Chicken Alfredo Bake Easy Family Dish
If you’re craving a dish that bursts with flavor and is super easy to make, look no further! My Spicy
If you’re craving a dish that bursts with flavor and is super easy to make, look no further! My Spicy

Are you ready to elevate your dinner game? Greek Lemon Potatoes are not just a side dish; they are a

Are you ready to spice up your dinner routine? My Parmesan Herb Crusted Tilapia is both tasty and easy to

If you’re craving a dish that’s both easy to make and full of flavor, look no further! My Thai Coconut

If you crave cookies that melt in your mouth, you’re in the right place! My Brown Butter Pecan Cookies Recipe

Dive into the world of fresh flavors with my Savory Southwest Quinoa Salad! This dish is packed with colorful veggies,

If you’re craving a side dish that packs a punch, Greek Lemon Potatoes are a must-try. These tender, zesty delights
![- 1 cup rolled oats - 1/2 cup natural almond butter - 1/4 cup honey or maple syrup - 1/2 cup chocolate chips (dark or semi-sweet) - 1/4 cup chia seeds - 1/4 cup ground flaxseed - 1/2 cup shredded coconut or chopped nuts - Mixing bowl - Baking sheet - Parchment paper When you make chocolate chip energy balls, start with the main ingredients. Rolled oats give them a chewy texture. Almond butter adds creaminess and healthy fats. Honey or maple syrup sweetens the mix and brings everything together. The chocolate chips are the fun part! They add rich flavor and a touch of sweetness. You can also boost flavors with optional ingredients. Chia seeds and ground flaxseed add fiber and omega-3s. Shredded coconut or nuts can add crunch and taste. These extras help make your energy balls not just good, but great! You’ll need some simple tools too. A mixing bowl is key for combining everything. A baking sheet lined with parchment paper makes it easy to place the rolled balls. This setup makes the process smooth. For the full recipe, you can refer to the complete steps on how to create these delicious energy balls. Enjoy making them! Start by gathering your ingredients. In a large bowl, combine: - 1 cup rolled oats - 1/2 cup natural almond butter - 1/4 cup honey or maple syrup Mix these together until they form a consistent base. Next, add in: - 1/2 cup chocolate chips - 1/4 cup chia seeds - 1/4 cup ground flaxseed - 1/4 teaspoon salt - 1 teaspoon vanilla extract Stir all these ingredients together until they blend well. You want every bite to have a bit of everything! Cover the bowl with plastic wrap and place it in the fridge for about 30 minutes. This helps the mixture firm up and makes rolling easier. After chilling, take it out and use your hands to scoop out small portions. Roll these into balls about 1 inch in size. Once you have rolled all the mixture into balls, arrange them on a baking sheet lined with parchment paper. This keeps them from sticking. Now, store the energy balls in an airtight container. You can keep them in the fridge for up to a week. If you want them to last longer, freeze them! Enjoy these tasty snacks whenever you need a boost. For the full recipe, check out the details provided earlier. To get the right texture, you may want to adjust the mixture. If it feels too wet, add more rolled oats. If it feels too dry, add a bit more almond butter. This balance makes a big difference. When shaping the balls, use chilled hands. This simple trick helps prevent the mixture from sticking to your fingers. It makes rolling much easier. You can make your energy balls even better by changing the nut butter. Try peanut butter or cashew butter for a new taste. Each nut butter brings its special flavor to the mix. Adding a dash of cinnamon can also boost the taste. This spice adds warmth and depth. You can even toss in some protein powder for extra health benefits. It helps your body recover after a workout and keeps you fuller longer. These tips will help you create the best chocolate chip energy balls. For the complete recipe, check out the [Full Recipe]. {{image_2}} You can make a nut-free version of chocolate chip energy balls by swapping almond butter. Use sunflower seed butter instead. This change keeps the recipe safe for those with nut allergies. You can also leave out any nuts or coconut. This keeps it simple but still tasty. To mix things up, try using peanut butter with milk chocolate chips. This gives the energy balls a creamy texture and a sweet taste. You can also add dried fruits like cranberries or raisins. These fruits add natural sweetness and a chewy bite to each ball. Feel free to get creative with your flavors. The options are endless! For the full recipe, check the original instructions. To store energy balls in the fridge, use an airtight container. These tasty bites will stay fresh for up to a week. Just make sure to keep them sealed. I love to grab one for a quick snack or a boost before exercise. The cool temperature also helps them stay firm and delicious. If you want to keep your energy balls for longer, freezing is the way to go. Place the balls in a single layer on a baking sheet. Freeze them for about an hour until they are firm. Then, transfer them to a freezer-safe bag. This way, they won't stick together. You can enjoy them for up to three months! To thaw frozen energy balls, simply take out what you need. Let them sit at room temperature for 15 to 20 minutes. This way, they soften but still taste great. If you're in a hurry, you can microwave them for about 10 seconds. They will be just right for a quick snack! Chocolate chip energy balls can last up to one week in the refrigerator. To store them, place the energy balls in an airtight container. If you want to keep them longer, freeze the energy balls. They can last for about three months in the freezer. Just remember to thaw them in the fridge before eating for the best taste. Yes, you can adjust the sweetness of your energy balls. If you want less sweetness, reduce the amount of honey or maple syrup. You can also try using mashed bananas or unsweetened applesauce as a natural sweetener. This change can make your energy balls healthier while keeping them tasty. Chocolate chip energy balls are a great snack option. They offer a good mix of carbs, protein, and healthy fats. The oats provide fiber, which aids digestion. Almond butter adds protein and healthy fats. Chia seeds and ground flaxseed are rich in omega-3 fatty acids. Dark chocolate chips add antioxidants. Overall, they are nutritious and can boost your energy. For the full recipe, check out the Choco-Nut Energy Bites. You learned how to make tasty chocolate chip energy balls. We covered easy steps, key ingredients, and more options to enhance flavor. You can experiment with nut butters, add seeds, or swap ingredients for a nut-free version. These energy balls store well in the fridge or freezer. Remember, making healthy snacks can be fun and simple. Enjoy creating your custom energy balls and share this joy with others!](https://mycookingcast.com/wp-content/uploads/2025/07/4023d167-19ed-4a33-87b4-4970d0902a0a.webp)
Craving a quick, tasty snack that fuels your day? Look no further! Chocolate Chip Energy Balls are easy to make,

Summer is here, and that means it’s time for flavorful meals! Today, I’m excited to share how to make Chili
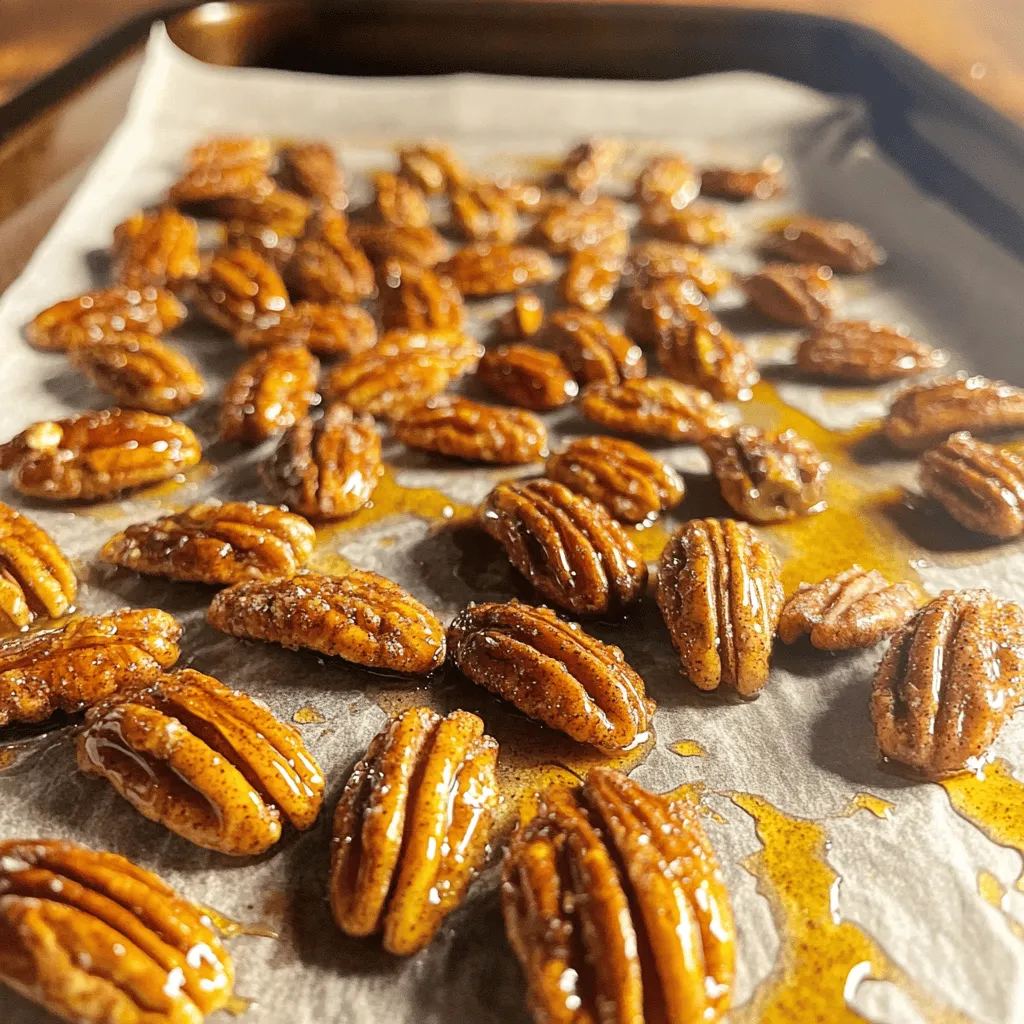
Looking for a quick and tasty snack? You’ll love my Maple Cinnamon Roasted Pecans! This simple recipe brings together sweet
