Skip to content
DisclaimerTerms Of UseGDPR PolicyCookie Policy

My Cooking Cast

  • Home
  • Drinks
  • Appetizers
  • Dinner
  • Dessert
  • About
  • Contact
  • Privacy Policy
DisclaimerTerms Of UseGDPR PolicyCookie Policy

Emma

- 1 large round sourdough bread loaf - 1 cup fresh spinach, chopped - 1 cup canned artichoke hearts, drained and chopped - 1 cup cream cheese, softened - 1 cup shredded mozzarella cheese - 1/2 cup grated Parmesan cheese - 1/4 cup mayonnaise - 2 cloves garlic, minced - 1 teaspoon garlic powder - 1/2 teaspoon crushed red pepper flakes - Salt and pepper to taste - 2 tablespoons fresh parsley, chopped (for garnish) When I make Cheesy Spinach Artichoke Pull-Apart Bread, the ingredients play a vital role. The sourdough loaf serves as the perfect base. Its crusty exterior holds the cheesy goodness inside. Fresh spinach adds color and nutrients, while artichoke hearts bring a unique taste. Cream cheese provides a rich and creamy texture. In the cheese and seasonings section, mozzarella offers that stringy pull we all love. The grated Parmesan adds a sharp flavor that enhances the overall dish. Mayonnaise keeps the filling moist. Garlic, both minced and powdered, gives that bold flavor kick. If you want some heat, crushed red pepper flakes work wonders. You can adjust the salt and pepper to your liking. For a fresh touch, the parsley is a lovely garnish. Using these ingredients will create a delightful dish that everyone will enjoy. - Preheat your oven to 350°F (175°C). - In a large bowl, mix cream cheese, mayonnaise, minced garlic, and garlic powder. Stir until smooth. This creamy base holds all the flavors together. - Take your sourdough loaf and cut it into a checkerboard pattern. Make sure not to cut all the way through. - Now, stuff each cut with the cheesy spinach and artichoke mixture. Fill every gap to ensure each piece is delicious. - Place the stuffed bread on a baking sheet lined with parchment paper. - Wrap the bread in aluminum foil and bake for 15 minutes. Unwrap and bake for another 10 minutes. You want it bubbly and golden brown. This simple process makes the Cheesy Spinach Artichoke Pull-Apart Bread a fun dish to share. You can easily pull apart each piece and enjoy the gooey, cheesy goodness inside. - Use room temperature cream cheese for easy mixing. This makes blending quick and smooth. - Allow the stuffed bread to rest before serving. This helps it hold its shape better. - You can add herbs like basil or oregano for different flavors. These herbs brighten the dish. - Feel free to swap cheeses based on what you like. A blend of cheddar adds a sharp taste. - Serve with marinara or pesto for dipping. The rich flavors pair well with the bread. - Pair it with a fresh salad. The crunch of greens balances the cheesy goodness. {{image_2}} - Substitute low-fat cream cheese and mayonnaise. - Incorporate additional vegetables like bell peppers or mushrooms. Healthier options make this dish lighter without losing taste. Using low-fat cream cheese and mayonnaise reduces calories, while adding bell peppers or mushrooms boosts fiber and nutrients. You can mix in diced zucchini or carrots too for a fun crunch. These swaps keep your pull-apart bread tasty and good for you. - Add crumbled feta or goat cheese for a tangy flavor. - Experiment with different types of bread, such as ciabatta or whole wheat. Gourmet twists can take your bread to the next level. Crumbled feta or goat cheese adds a zesty kick. You can also swap your sourdough for ciabatta or whole wheat bread. Each bread choice gives a new texture and taste. Try adding herbs like dill or thyme for even more flavor. - Use seasonal veggies like zucchini or sun-dried tomatoes. - Try incorporating holiday spices for themed gatherings. Seasonal variations make this dish fresh and exciting. In summer, add zucchini or cherry tomatoes. For fall, sprinkle in pumpkin spice or nutmeg for a warm touch. These seasonal changes keep your cheesy spinach artichoke pull-apart bread fun and relevant all year round. Store any leftovers in an airtight container. This keeps the bread fresh for up to 3 days. When you want to enjoy it again, reheat in the oven. This helps keep the bread crispy and delicious. You can freeze unbaked stuffed bread for up to 1 month. Just make sure to wrap it well. When you are ready to bake, thaw it first. This ensures even cooking and great taste. To keep the bread fresh, avoid storing it with moist items. Moisture can make it soggy. Use parchment paper to line your storage containers. This makes for easy cleaning and keeps everything tidy. Yes, prepare it the night before and bake before serving. This saves time and lets the flavors blend overnight. You can then enjoy fresh, warm bread with minimal effort. It's great as an appetizer, paired with dips or salads. I love serving it with marinara or a fresh green salad. These sides balance the rich cheese and creamy dip. This recipe is already vegetarian. Just ensure all cheese options are rennet-free. Check labels for added peace of mind. You can enjoy this dish without concern for meat products. Yes, just make sure to thaw and drain excess moisture before using. Frozen spinach works well and saves prep time. It still gives you that delicious spinach flavor in each bite. Substitute the sourdough with a gluten-free bread option for a gluten-free version. Many stores offer gluten-free bread that works well. Enjoy this tasty dish without gluten worries! This blog post covered the delicious recipe for Cheesy Spinach Artichoke Pull-Apart Bread. We looked at the key ingredients, step-by-step instructions, and handy tips. Remember, you can customize the flavors and serve it with dips or salads for a tasty meal. Store any leftovers properly to enjoy this dish later. Whether you choose to make it healthier or add gourmet twists, the possibilities are endless. Enjoy this cheesy delight with family and friends!

Cheesy Spinach Artichoke Pull-Apart Bread Delight

Craving a warm, cheesy treat? You’re in for a delight! This Cheesy Spinach Artichoke Pull-Apart Bread is perfect for sharing

- 1 cup quinoa, rinsed - 2 cups water or vegetable broth - 1 ripe mango, diced - 2 ripe avocados, diced - 1 red bell pepper, diced - 1 small red onion, finely chopped - 1/4 cup fresh cilantro, chopped - 1 lime, juiced - 3 tablespoons olive oil - Salt and pepper to taste The main ingredients create a fresh and colorful base for the salad. Quinoa adds protein and fiber. Mango and avocado bring creaminess and sweetness. The red bell pepper and onion add crunch and zest. Fresh cilantro adds a bright note. This mix gives you a salad that is both tasty and healthy. - Jalapeño for extra spice Adding jalapeño gives the salad a nice kick. If you love heat, chop it finely and mix it into the dressing. It enhances the flavor and makes every bite exciting. - Medium saucepan - Large mixing bowl - Whisk You will need a medium saucepan to cook the quinoa. A large mixing bowl is perfect for combining all your ingredients. A whisk helps you blend the dressing well. These tools make the process easy and fun! To start, rinse your quinoa in a fine mesh strainer. This step removes any bitter flavor. Next, in a medium saucepan, combine 1 cup of rinsed quinoa with 2 cups of water or vegetable broth. Bring it to a boil. Once boiling, reduce the heat to low. Cover the pot and let it simmer for about 15 minutes. The quinoa is done when it looks fluffy and the liquid is absorbed. To check for doneness, look for small white tails on the grains. After cooking, take the pot off the heat. Let it sit covered for 5 more minutes. This helps make it even fluffier. Fluff the quinoa with a fork and set it aside to cool. While the quinoa cools, prepare your fruits and vegetables. Dice the ripe mango and avocados into bite-sized pieces. Chop the red bell pepper and finely chop the red onion. Don’t forget to chop the fresh cilantro too! In a large mixing bowl, combine all these chopped ingredients. Once everything is in the bowl, it’s time to add the cooled quinoa. Gently fold the quinoa into the mixture. This keeps the avocados and mangos intact and adds texture. For the dressing, take a small bowl and whisk together the juice of one lime, 3 tablespoons of olive oil, and a pinch of salt and pepper. If you want some heat, finely chop a jalapeño and add it to the mix. Whisk until everything is well combined. Once the dressing is ready, pour it over the salad. Gently toss the salad to coat all the ingredients with the dressing. Taste it and adjust the seasoning if needed. You might want a little more salt or pepper. Enjoy this fresh and colorful salad right away, or let it chill for 30 minutes to let the flavors mix together. To keep your avocados and mangoes intact, handle them gently. When you cut them, aim for clean slices. Avoid mashing or pressing too hard while mixing. This way, you'll enjoy fresh chunks in every bite. Adjusting the seasoning is key for taste. After mixing your salad, take a small bite. If it needs more flavor, add a pinch of salt or a squeeze of lime juice. Taste as you go, and make it your own. For a vibrant dish, serve the salad in a large, shallow bowl. This allows the colors to shine. Garnish with fresh cilantro and lime wedges for that extra pop. Consider adding edible flowers for a stunning look. Pair this salad with grilled chicken or fish for a complete meal. It also goes well with tacos or wraps. The flavors mix well and create a fun dining experience. Quinoa is a great source of protein and fiber. It helps keep you full and energized. Mangoes are rich in vitamins A and C, boosting your immune system. Avocados provide healthy fats, great for your heart. Each serving has around 250 calories, depending on your portion size. This makes it a healthy option for lunch or dinner. Enjoy this bowl of goodness without any guilt! {{image_2}} You can easily change the salad with seasonal veggies. Try adding corn in summer or butternut squash in fall. These add a fresh twist. You can also swap fruits based on what you find. Use peaches in summer or pomegranate seeds in winter. This keeps the salad exciting and fresh all year. This salad is vegan and gluten-free. You can enjoy it without worry. If you need to cut down on salt, skip the added salt in the dressing. Use low-sodium broth when cooking quinoa. These changes still keep the flavors strong and delicious. Want to spice things up? Add spices inspired by other cuisines. Try cumin for a warm, earthy touch or curry powder for a unique flavor. You can also switch the dressing. Instead of lime and olive oil, use balsamic vinegar or sesame dressing for a new taste. These variations can make the salad feel new every time you make it. To store leftovers, place the salad in an airtight container. This helps keep it fresh. Use it within 2 to 3 days for the best taste. After that, the avocados may brown and the salad may lose its crunch. Can you freeze mango avocado quinoa salad? I do not recommend freezing it. The avocado and mango change texture when frozen and thawed. If you want to freeze, keep the quinoa separate from the fresh ingredients. To refresh the salad after storage, add a splash of lime juice. This brightens the flavors. I suggest serving it chilled. This makes it even more refreshing, especially on a warm day. To ripen avocados fast, place them in a brown paper bag. Add an apple or banana to speed up the process. These fruits give off ethylene gas, which helps avocados ripen. Check them daily. When they feel soft, they are ready to eat. Choose avocados that have dark skin and feel slightly soft for the best flavor. Quinoa cooks in about 15 minutes. First, bring water or broth to a boil. Then, add the rinsed quinoa and reduce the heat. Cover the pot and let it simmer. After 15 minutes, the quinoa should look fluffy and have absorbed all the liquid. Let it sit for five minutes to steam. Fluff it with a fork for the best texture. Yes, you can prepare this salad in advance. Make the quinoa and chop all the veggies a day before serving. Store them in the fridge. When you're ready to eat, mix everything together with the dressing. If you let it chill for 30 minutes, the flavors blend well. However, add avocados just before serving to keep them fresh. If you want a substitute for quinoa, try brown rice or farro. Both have great texture and flavor. You can also use couscous, but it cooks faster. For a low-carb option, consider cauliflower rice. Each option brings its own taste and texture, so pick what you like best! This blog post covered key ingredients, detailed steps, and helpful tips for making Mango Avocado Quinoa Salad. You learned about the main ingredients like quinoa, fruits, and vegetables, as well as optional ones for added spice. By following the instructions, you can create a fresh, healthy dish. Remember to store any leftovers properly to keep them tasty. Enjoy exploring variations and personalizing the salad to match your taste. This recipe is not just about making food; it’s about enjoying a fun and nutritious dish!

Mango Avocado Quinoa Salad Fresh and Flavorful Bowl

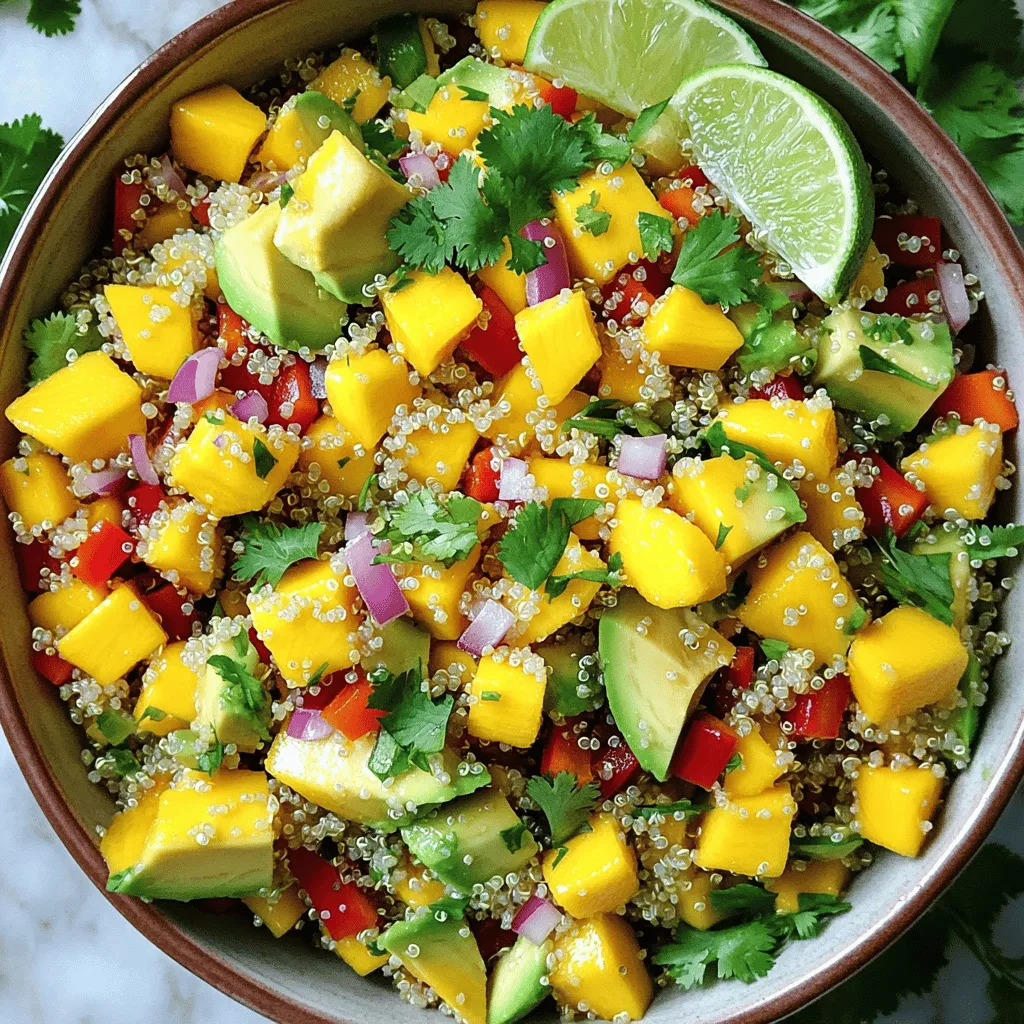
If you’re looking for a fresh and tasty dish that’s both healthy and satisfying, you’re in the right place! My

For a rich and tasty creamy chicken pot pie soup, you need just a few key ingredients. Here’s a quick list to guide you: - Main ingredients for the soup: - 1 lb boneless, skinless chicken breasts, diced - 1 medium onion, diced - 3 medium carrots, diced - 2 celery stalks, diced - 2 cloves garlic, minced - 1 cup frozen peas - 4 cups chicken broth - Additional items for creaminess: - 1 cup heavy cream - 1/4 cup all-purpose flour - Optional accompaniments: - Biscuit or pie crusts, for serving - Fresh parsley for garnish Gathering these ingredients will set you up for a cozy cooking experience. You can find most of these items at your local grocery store. Fresh herbs can elevate the flavor, so don’t skip the thyme and parsley! Start by preparing the chicken and vegetables. Use 1 pound of boneless, skinless chicken breasts. Dice the chicken into small pieces. Heat 2 tablespoons of olive oil in a large pot over medium heat. Add the chicken and cook until it turns brown, around 6-8 minutes. Once cooked, take the chicken out and set it aside. Next, chop the vegetables. You will need 1 medium onion, 2 cloves of garlic, 3 medium carrots, and 2 celery stalks. Dice them all into small pieces for even cooking. In the same pot, add the diced onion, garlic, carrots, and celery. Sauté these for about 5-7 minutes until the veggies soften. Now it’s time to thicken the soup. Sprinkle 1/4 cup of all-purpose flour over the sautéed vegetables. Stir well to coat the veggies in the flour. Cook this mix for 2 minutes while stirring constantly. This helps the flour cook slightly and adds flavor. Slowly pour in 4 cups of chicken broth. Stir continuously to avoid lumps. Then, add the cooked chicken back into the pot. Toss in 1 cup of frozen peas, 1 cup of heavy cream, 1 teaspoon of dried thyme, and 1 teaspoon of dried parsley. Season with 1 teaspoon of salt and 1/2 teaspoon of black pepper. Let the soup come to a gentle simmer. Simmer for about 10-15 minutes. Stir occasionally until the soup thickens to your liking. Just before serving, add 1 tablespoon of lemon juice. This adds a bright flavor that lifts the soup. Taste the soup and adjust the seasoning if needed. For a delightful presentation, serve the soup in large bowls. Top each bowl with freshly chopped parsley. If you like, bake biscuits or pie crusts according to package instructions. Serve them warm on the side for dipping. To make your soup creamy, always use heavy cream. Heavy cream has a high fat content. This gives your soup that rich, velvety texture. Add it right after your soup simmers. Stir gently to combine it well. For thickening, use all-purpose flour wisely. When you cook the flour with the veggies, it helps remove the raw taste. Make sure to stir it for two minutes before adding the broth. This toasts the flour and adds depth to your soup. Herbs and spices can elevate your soup. Use dried thyme and parsley, as they complement the chicken perfectly. You can also add a pinch of garlic powder for extra flavor. A dash of paprika can add warmth. If you want a richer taste, consider adding a splash of white wine. You can also use a bit of cream cheese for extra creaminess. These small changes can really make a big difference. Want to save time? Use rotisserie chicken instead of raw chicken. It cuts down on cooking time. You can also prep your veggies ahead of time. Chop them the night before and store in the fridge. As for tools, a large pot is key for this soup. A good wooden spoon helps in stirring without scratching your pot. A whisk is great for mixing the flour into the broth. These tools will make your cooking smooth and easy. {{image_2}} You can swap chicken for rotisserie chicken. This cuts down your cooking time and adds flavor. Just shred the rotisserie chicken and add it to the soup. For a vegetarian option, use diced mushrooms or chickpeas. Both add heartiness to the soup without meat. Feel free to mix in different vegetables. Try corn, green beans, or even potatoes. Each adds a unique taste and texture. To spice things up, add unique spices like smoked paprika or curry powder. These can give your soup an exciting twist. Get creative with how you serve the soup. You can serve it in bread bowls for a fun touch. Another option is to ladle the soup over baked biscuits or pie crusts. It adds a comforting crunch and makes the dish even better. To store leftovers, let the soup cool first. Then, pour it into a food-safe container. Make sure to seal it tightly. You can keep the soup in the fridge for up to four days. If you think you won't eat it all, freezing is a great option. For freezing, let the soup cool down completely. Pour it into freezer-safe containers or bags. Remove as much air as you can from bags to prevent freezer burn. You can freeze the soup for up to three months. To thaw, move it to the fridge overnight. Reheat it on the stove over low heat, stirring often, to keep it from sticking. Choose containers that fit your soup amount. Glass or BPA-free plastic works best. Label each container with the date. This way, you’ll know how long it has been stored. Keeping track helps ensure your soup stays fresh and tasty. To make Creamy Chicken Pot Pie Soup gluten-free, you can use a few simple swaps. First, replace the all-purpose flour with a gluten-free flour blend. Look for blends that work well in soups. For the broth, check that your chicken broth is labeled gluten-free. Many brands offer gluten-free options. This way, you keep the creamy texture without gluten. Yes, you can use frozen chicken! Just ensure the chicken is fully cooked before adding it to your soup. To do this, first, thaw the chicken in the fridge overnight. If you're short on time, you can cook frozen chicken in the pot. Just add it with the vegetables and cook until fully done, which may take a bit longer, about 10-12 minutes more. This soup pairs well with several tasty sides. Consider serving it with warm biscuits or flaky pie crusts for a fun twist. You can also enjoy a simple salad with mixed greens for a fresh touch. Top your soup with fresh parsley for color. These options make the meal feel complete and cozy. In this post, we covered how to make Creamy Chicken Pot Pie Soup. We started with key ingredients like chicken, veggies, and herbs. Then, I shared preparation and cooking steps for a creamy texture. Tips for flavor and shortcuts helped you save time. We explored variations to keep it fresh and exciting. Finally, I provided storage tips to keep your soup tasty. Remember, this soup is simple to customize and perfect for any meal. Enjoy your cooking, and make it your own!

Creamy Chicken Pot Pie Soup Simple Comfort Dish

Nothing says comfort like a bowl of Creamy Chicken Pot Pie Soup. With tender chicken and fresh veggies, this dish

- 2 cups pretzel sticks - 1 cup semi-sweet chocolate chips - 1 cup white chocolate chips - 1/2 cup crushed nuts (almonds, peanuts, or walnuts) - 1/4 cup sprinkles (optional) - Sea salt to taste The key to making chocolate covered pretzel bark is using simple, tasty ingredients. First, gather your pretzel sticks, as they add crunch. You will need semi-sweet chocolate chips for rich flavor. White chocolate chips add a sweet contrast. Optional add-ins can make your bark special. I love adding crushed nuts for extra texture. Almonds, peanuts, or walnuts work well. If you want some fun, sprinkle colorful sprinkles on top. A dash of sea salt enhances the taste. These ingredients make a great base for your bark. Feel free to mix and match to suit your taste! - Prepare the Baking Sheet: Line a baking sheet with parchment paper. This helps the bark not stick. - Melt the Chocolate: In a microwave-safe bowl, melt the semi-sweet chocolate chips. Heat in 30-second bursts. Stir between each burst until smooth. Repeat this for the white chocolate chips in a separate bowl. - Combine Pretzels and Chocolate: Take a large bowl and pour the melted semi-sweet chocolate over the pretzel sticks. Use a spatula to mix gently. Make sure all the pretzels get coated well. - Spread on the Baking Sheet: Pour the chocolate-covered pretzels onto your prepared baking sheet. Spread them out evenly. This ensures every bite has the right balance. - Drizzle White Chocolate: Use a spoon or piping bag to drizzle melted white chocolate over the pretzel layer. Create a fun zigzag pattern for a pretty look. - Add Toppings: While the chocolate is still warm, sprinkle crushed nuts and optional sprinkles on top. A light touch of sea salt adds a nice contrast. - Chill Until Set: Place the baking sheet in the fridge for about 30 minutes. Wait until the chocolate is hard. - Break into Pieces: Once set, take the bark out of the fridge. Break it into pieces that are the size you like. Enjoy your tasty treat! To melt chocolate well, use a microwave-safe bowl. Microwave the chocolate chips in short bursts. Start with 30 seconds, then stir. Repeat this until smooth. Stirring helps the heat spread evenly. Be careful not to overheat the chocolate. If it gets too hot, it can seize. Seizing happens when chocolate cools too quickly. It will become thick and clumpy. To avoid this, use low heat and stir often. Another way to melt chocolate is a double boiler. Fill a pot with water and heat it. Place a bowl on top, making sure it does not touch the water. Stir the chocolate until it melts smoothly. You can make different flavors of bark. Use dark chocolate or milk chocolate instead of semi-sweet. Each type of chocolate gives a unique taste. Add nuts for crunch. Almonds, peanuts, or walnuts all work well. You can also mix in candies, like M&Ms or Reese's Pieces. Dried fruits, such as cranberries or raisins, add a sweet twist. Feel free to sprinkle in spices, like cinnamon or sea salt, for extra flavor. These little changes can make your bark special and unique. {{image_2}} You can easily change the flavor of your chocolate covered pretzel bark. One fun option is dark chocolate pretzel bark. Just swap the semi-sweet chocolate chips for dark chocolate chips. Dark chocolate gives a richer taste. It pairs perfectly with the saltiness of the pretzels. Another great twist is the peanut butter chocolate variation. Simply mix in some peanut butter with your melted chocolate. This adds a creamy texture and nutty flavor. You can also drizzle some peanut butter on top for extra fun. Make your bark festive with holiday-themed toppings. Use red and green sprinkles for Christmas or pastel colors for Easter. These sprinkles bring a cheerful look to your treats. For festive packaging ideas, consider using small clear bags tied with a ribbon. You can also use decorative boxes. Adding a personal note can make your treats feel even more special. These small touches make great gifts for friends and family. To keep your chocolate covered pretzel bark fresh, store it in an airtight container. I recommend using a glass or plastic container with a tight lid. Layer pieces of bark with parchment paper to prevent sticking. This method also helps keep the bark from breaking. If you have a lot, consider breaking it into smaller portions and storing them separately. This way, you can grab a piece whenever you want a treat! Chocolate covered pretzel bark stays fresh for about two weeks at room temperature. If you store it in the fridge, it can last up to a month. Watch for signs of spoilage. If the chocolate looks dull or white, it may have bloomed. While it’s still safe to eat, the texture and taste may change. If you notice any off smells or odd textures, it’s best to toss it. To make chocolate covered pretzel bark, start with a baking sheet. Line it with parchment paper. This helps the bark not stick. Next, melt your semi-sweet chocolate chips in a bowl. Do this in 30-second bursts, stirring until smooth. Do the same with white chocolate chips in another bowl. In a large bowl, mix the pretzel sticks with the melted semi-sweet chocolate. Spread this mixture on your baking sheet. Drizzle the white chocolate over the top in a zigzag pattern. Add crushed nuts and sprinkles if you like. Finally, sprinkle some sea salt and chill it in the fridge for 30 minutes. Once it sets, break it into pieces. Yes, you can use different types of chocolate! Dark chocolate offers a richer flavor. Milk chocolate will make it sweeter. You can even mix chocolates for a unique taste. Each type of chocolate melts differently, so keep an eye on it. Dark chocolate may need less time to melt, while milk chocolate can be creamier. Choose what you enjoy most! You can find pre-made chocolate covered pretzel bark in stores and online. Look at local candy shops or gourmet grocery stores. These places often have high-quality options. For online shopping, check sites like Amazon or specialty food websites. They usually have a variety of flavors. Don't forget to read reviews to find the best quality! You now know how to make delicious chocolate-covered pretzel bark. We covered key ingredients, step-by-step instructions, and tips for a drool-worthy treat. You can easily customize your bark to fit your taste. Remember to store it well to keep it fresh. Whether it's a snack or gift, your pretzel bark will impress. Enjoy your sweet creation and share it with others!

Chocolate Covered Pretzel Bark Simple and Tasty Treat

If you’re craving a quick and fun treat, look no further than chocolate-covered pretzel bark! This simple recipe combines salty

For these tasty muffins, gather the following items: - 4 cups bread cubes (preferably day-old) - 1 cup fresh cranberries (or dried cranberries) - 1 large apple, peeled and diced (Granny Smith recommended) - 1/2 cup onion, finely chopped - 1/2 cup celery, finely chopped - 1/4 cup fresh parsley, chopped - 1 teaspoon dried thyme - 1/2 teaspoon ground cinnamon - 2 cups vegetable broth - 1/4 cup unsalted butter, melted - Salt and pepper to taste - 2 large eggs, beaten (optional, for binding) You can swap some ingredients if needed. Use any bread you have on hand. Whole grain bread adds a nice touch. If fresh cranberries are not available, dried ones work well. They add sweetness. You can change the apple type too. Honeycrisp or Fuji apples add a different flavor. For a veggie boost, add bell peppers or carrots instead of celery. If you want a vegan version, skip the eggs. You can use flaxseed meal mixed with water to bind the mix. Fresh cranberries give a tart flavor to the muffins. They burst with juice when baked. Dried cranberries are sweeter and chewier. They add a different texture and taste. If you want a balance, mix both types. This way, you’ll enjoy the tart and sweet flavor in each bite. When using dried cranberries, soak them in warm water for 10 minutes. This helps them plump up and stay moist in the muffins. To make these muffins, gather your ingredients and tools. You will need: - 4 cups bread cubes (preferably day-old) - 1 cup fresh cranberries (or dried cranberries) - 1 large apple, peeled and diced (Granny Smith recommended) - 1/2 cup onion, finely chopped - 1/2 cup celery, finely chopped - 1/4 cup fresh parsley, chopped - 1 teaspoon dried thyme - 1/2 teaspoon ground cinnamon - 2 cups vegetable broth - 1/4 cup unsalted butter, melted - Salt and pepper to taste - 2 large eggs, beaten (optional, for binding) You also need a muffin tin, cooking spray or muffin cups, and mixing bowls. Preheat your oven to 350°F (175°C). Grease the muffin tin or line it with cups. Start by mixing the bread cubes, cranberries, diced apple, onion, celery, parsley, thyme, and cinnamon in a large bowl. Stir until the ingredients are well combined. In another bowl, whisk the vegetable broth, melted butter, and eggs if you use them. Season this mixture with salt and pepper. Next, pour the liquid mixture over the bread and other ingredients. Gently fold everything together. Make sure all the bread pieces are moist but do not break them apart too much. Let the mixture sit for about 10 minutes. This step helps all the flavors meld together. Now, spoon the mixture into the muffin tins. Fill each cup about 3/4 full. Bake for 25 to 30 minutes. The muffins should turn golden brown on top. A toothpick inserted into the center should come out clean. Once baked, let them cool for a few minutes in the tin before moving them to a wire rack. To ensure your muffins cook evenly, keep these tips in mind: - Use bread cubes that are the same size. This helps them cook at the same rate. - Mix all ingredients well to avoid dry spots in your muffins. - Allow the mixture to rest for 10 minutes. This step helps with moisture absorption. - Rotate the muffin tin halfway through baking. This promotes even cooking. Following these tips will help you create perfectly baked Cranberry Apple Stuffing Muffins every time! To get the best texture in your muffins, use day-old bread. Fresh bread can be too soft. Cut the bread into cubes, about one inch thick. This helps them hold their shape. Make sure to mix your ingredients well, but don't overdo it. Gently fold everything together. This keeps the muffins light and fluffy. One big mistake is not letting the mixture sit. Allowing it to rest for ten minutes helps the bread soak up liquid. Another mistake is overfilling the muffin tin. Fill each cup about three-quarters full. This gives the muffins room to rise without spilling over. Lastly, don't skip seasoning. Salt and pepper boost the flavors. You can add more depth with spices. Try adding a pinch of nutmeg along with cinnamon. Fresh herbs, like thyme or rosemary, can also add a nice touch. For an extra crunch, mix in chopped nuts or seeds. If you want sweetness, consider a drizzle of honey or maple syrup. These small tweaks can make a big difference in taste. {{image_2}} You can easily change up this recipe with seasonal ingredients. In the fall, add roasted butternut squash or pumpkin. In the spring, try fresh peas or asparagus for a pop of color and taste. Seasonal swaps keep the muffins fresh and exciting all year long. These muffins can be both savory and sweet. Add crumbled sausage or bacon for a hearty twist. If you love sweet flavors, toss in chocolate chips or dried fruit like apricots. Mixing sweet and savory can create a unique taste that everyone will love. You can make these muffins gluten-free by using gluten-free bread. Make sure to check the label for any hidden gluten. For a vegan option, skip the eggs and use flaxseed meal mixed with water as a binder. This keeps the muffins light and fluffy while meeting dietary needs. To keep your cranberry apple stuffing muffins fresh, store them in an airtight container. This helps prevent them from drying out. If you plan to eat them within a few days, keep them at room temperature. Just make sure they are completely cool before sealing them up. If you want to store them longer, the fridge is a good option. When you want to enjoy your muffins again, reheating is easy. You can use the microwave or the oven. For the microwave, heat them for about 15-20 seconds. Check to see if they are warm enough. If you prefer the oven, preheat it to 350°F (175°C). Place the muffins on a baking sheet and heat for about 10 minutes. This will keep them soft and tasty. Freezing these muffins is a great way to save them for later. First, let them cool completely. Then, wrap each muffin tightly in plastic wrap. Place the wrapped muffins in a freezer bag or container. This helps to prevent freezer burn. They can last up to three months. When you're ready to eat, just thaw them in the fridge overnight or at room temperature. Enjoy your muffins whenever you want! You can prepare these muffins a day before you plan to serve them. Just follow the recipe until you fill the muffin tins. Cover the filled muffin tin with plastic wrap and place it in the fridge. When you're ready, bake them directly from the fridge. This saves time and helps the flavors blend nicely. Yes, stale bread works great for this recipe. It holds the moisture better and adds texture. Just cut it into cubes and use it as you would fresh bread. If your bread is very stale, you may want to toast it lightly to ensure it mixes well with the other ingredients. Serve these muffins warm or at room temperature. They make a great side dish for holiday meals or family dinners. You can also enjoy them with a bit of butter or cranberry sauce. For a festive touch, arrange them on a decorative platter with fresh herbs or cranberries. - 4 cups bread cubes (preferably day-old) - 1 cup fresh cranberries (or dried cranberries) - 1 large apple, peeled and diced (Granny Smith recommended) - 1/2 cup onion, finely chopped - 1/2 cup celery, finely chopped - 1/4 cup fresh parsley, chopped - 1 teaspoon dried thyme - 1/2 teaspoon ground cinnamon - 2 cups vegetable broth - 1/4 cup unsalted butter, melted - Salt and pepper to taste - 2 large eggs, beaten (optional, for binding) In this article, we explored the ingredients, preparation, and cooking tips for Cranberry Apple Stuffing Muffins. I shared substitutions to suit your needs, options for fresh and dried cranberries, and methods to get the best flavor. Remember to store muffins properly and consider the variations for different diets. With these tips, you can create tasty muffins every time. Enjoy baking these delicious treats and feel free to adjust them to your taste!

Cranberry Apple Stuffing Muffins Simple and Tasty Recipe

Ready to try a twist on the classic stuffed muffin? My Cranberry Apple Stuffing Muffins are a simple and tasty

To make honey mustard chicken thighs, gather these key ingredients: - 4 chicken thighs, bone-in and skin-on - 3 tablespoons honey - 2 tablespoons Dijon mustard - 1 tablespoon whole grain mustard - 2 cloves garlic, minced - 1 tablespoon olive oil - Salt and pepper to taste - 1 teaspoon dried thyme - Fresh parsley, chopped (for garnish) Each ingredient plays a role in creating a flavorful dish. The chicken thighs are juicy and rich. Honey adds sweetness, while Dijon and whole grain mustard bring a nice tang. Garlic gives a warm, savory touch. Olive oil helps with cooking and flavor. Thyme adds earthy notes, and salt and pepper enhance everything. Finally, parsley brightens the dish when used as a garnish. I love how simple and fresh these ingredients are. You can find most in your kitchen already. This meal is perfect for any night of the week. - Preheat the oven First, set your oven to 400°F (200°C). This step warms up your kitchen and gets the oven ready for cooking. - Make the marinade In a medium bowl, mix together the honey, Dijon mustard, whole grain mustard, minced garlic, olive oil, salt, pepper, and dried thyme. Whisk until smooth. This marinade brings great flavor to the chicken. - Marinate the chicken Place the chicken thighs in a large zip-top bag or a shallow dish. Pour the honey mustard marinade over them. Seal the bag or cover the dish tightly. Let the chicken marinate in the fridge for at least 30 minutes. If you have time, let it sit for up to 2 hours. This helps the chicken absorb the flavors. - Sear the chicken thighs In a hot oven-safe skillet, add a little oil if needed. Place the chicken thighs skin-side down and cook for about 5 minutes. Look for a nice golden-brown color. This step adds a crunchy texture. - Bake in the oven Flip the chicken thighs over, then pour the leftover marinade on top. Move the skillet to the preheated oven. Bake for 25-30 minutes or until the chicken reaches 165°F (75°C). Use a meat thermometer for accuracy. - Rest and garnish After baking, take the skillet out of the oven. Let the chicken rest for 5 minutes. This keeps the juices inside. Before serving, sprinkle fresh parsley on top for a pop of color. Marinating chicken adds great flavor. I recommend at least 30 minutes in the fridge. For deeper taste, marinate for up to 2 hours. Use a zip-top bag for easy coating. It makes sure every part gets the marinade. If you prefer, a shallow dish works too. Just flip the chicken halfway through. For the best sear, heat your skillet to medium-high. This gives the chicken a nice golden crust. Sear the skin side down for about 5 minutes. Then, check for doneness with a meat thermometer. The chicken should reach 165°F (75°C) to ensure it is safe to eat. Pair Honey Mustard Chicken Thighs with roasted vegetables or fluffy rice. They balance well with the sweet and tangy chicken. For presentation, place the chicken on a large platter. Sprinkle fresh parsley on top for a pop of color. This makes your meal look even more delicious. {{image_2}} You can change up the mustards in this recipe. If you want a milder taste, use yellow mustard. For a spicier kick, try spicy brown mustard. Each type gives a unique flavor to the dish. If you don’t have honey, you can use maple syrup or agave nectar. Both will add sweetness. Remember that maple syrup has a stronger taste. Adjust the amount to fit your preference. Grilling is a great option for Honey Mustard Chicken Thighs. Just marinate the chicken as usual. Then, place the thighs on a hot grill. Cook for about 6-8 minutes on each side. This method gives a nice char and smoky flavor. You can also use a slow cooker. Just put the marinated thighs in the cooker. Set it on low for 6-8 hours or high for 3-4 hours. This method makes the chicken very tender and juicy. Adding spices can really boost the taste. Try paprika for warmth or red pepper flakes for heat. These spices blend well with the mustard and honey flavors. You can mix in some soy sauce or Worcestershire sauce to the marinade. This adds depth and umami to the dish. You can also drizzle extra sauce on the chicken before serving. After enjoying your honey mustard chicken thighs, store any leftovers in the fridge. Place the chicken in an airtight container. This keeps the chicken fresh for up to three days. If you used a shallow dish, cover it tightly with plastic wrap. This prevents the chicken from drying out. If you want to keep your chicken longer, freezing is a great option. First, let the chicken cool completely. Then, wrap each piece in plastic wrap. Afterward, place them in a freezer bag. Squeeze out as much air as possible before sealing. This helps avoid freezer burn. You can freeze the chicken for up to three months. To reheat, take the chicken out of the freezer and thaw it in the fridge overnight. Once thawed, you can heat it in the oven or microwave. If using an oven, preheat it to 350°F (175°C). Bake the chicken for about 15-20 minutes. Check that it reaches 165°F (75°C) before serving. Enjoy your tasty meal again! You can enjoy Honey Mustard Chicken Thighs with many tasty sides. Here are some ideas: - Roasted vegetables: Carrots and broccoli pair well. - Mashed potatoes: Creamy potatoes balance the dish. - Rice: Fluffy white or brown rice soaks up the sauce. - Salad: A fresh green salad adds crunch. - Quinoa: This grain is healthy and filling. Yes, you can use chicken breasts. However, cooking times change. Breasts cook faster than thighs. They usually need about 20-25 minutes in the oven. Make sure they reach 165°F (75°C) for safety. Thighs stay juicier, so adjust your time if you switch. You can store leftover chicken in the fridge for up to four days. Keep it in an airtight container. If you want to save it longer, freeze the chicken. It can last up to three months in the freezer. Always reheat to 165°F (75°C) before eating. This blog post covers a delicious recipe for honey mustard chicken thighs. We explored the key ingredients, step-by-step instructions, and helpful tips. You learned how to marinate, cook, and serve the chicken perfectly. Variations can make this meal even more exciting. Proper storage keeps leftovers fresh and tasty. With this guide, you can create a flavorful dish your friends and family will love. Enjoy your cooking adventure and share your results!

Honey Mustard Chicken Thighs Simple Flavorful Meal

If you’re looking for a simple yet tasty meal, Honey Mustard Chicken Thighs will impress you. This dish combines sweet

- 2 ¾ cups all-purpose flour - 1 teaspoon baking soda - 2 teaspoons cream of tartar - ½ teaspoon salt - 1 cup unsalted butter, softened - 1 ½ cups sugar, divided - 2 large eggs - 1 teaspoon vanilla extract - ½ cup chewy caramel candies, chopped into small pieces - ¼ cup cinnamon sugar (2 tablespoons sugar mixed with 1 teaspoon cinnamon) You can swap some ingredients if needed. Use: - Coconut oil instead of unsalted butter for a dairy-free option. - Brown sugar instead of white sugar for a deeper flavor. - A mix of gluten-free flour for a gluten-free version. - Applesauce as an egg substitute. Use ¼ cup for each egg. Fresh ingredients make your cookies taste better. Use fresh eggs for fluffiness and good texture. Fresh butter adds richness. Quality flour helps with structure. Fresh spices, like cinnamon, boost flavor. Always check your ingredients before baking. This ensures your cookies turn out perfect every time. First, gather your ingredients. You will need: - 2 ¾ cups all-purpose flour - 1 teaspoon baking soda - 2 teaspoons cream of tartar - ½ teaspoon salt - 1 cup unsalted butter, softened - 1 ½ cups sugar, divided - 2 large eggs - 1 teaspoon vanilla extract - ½ cup chewy caramel candies, chopped into small pieces - ¼ cup cinnamon sugar (2 tablespoons sugar mixed with 1 teaspoon cinnamon) Next, preheat your oven to 350°F (175°C). This step is key! Line two baking sheets with parchment paper to avoid sticking. In a bowl, whisk together the flour, baking soda, cream of tartar, and salt. Set this mix aside. In another bowl, cream the softened butter with 1 cup of sugar until it’s light and fluffy. This makes the cookies soft. Add in the eggs and vanilla extract. Mix until everything is well combined. Gradually add the dry mix to the wet mix. Stir until the dough forms. Finally, fold in the chopped caramel candies. Make sure they are evenly spread out in the dough. Now it’s time to shape the cookies. Use a tablespoon or cookie scoop to portion out the dough. Make balls about 1 inch wide. Roll each ball in the remaining sugar first, then in the cinnamon sugar mixture. This adds great flavor! Place the dough balls about 2 inches apart on your prepared baking sheets. Bake in the oven for 10-12 minutes. Look for lightly golden edges. The centers should still be soft; this is what makes them chewy! Once you remove the cookies from the oven, let them cool on the sheets for 5 minutes. This helps them set up a bit. After that, transfer them to a wire rack to cool completely. For serving, stack the cookies on a nice plate. Sprinkle a little extra cinnamon sugar on top for a fun touch. Serve them warm for the best gooey texture! Enjoy your chewy caramel snickerdoodles! To make your snickerdoodles chewy, use softened butter. It helps create a rich dough. Do not overbake them. Pull them out when the edges are golden but the center looks soft. The cookies will continue to bake a bit after you remove them from the oven. This keeps them moist and chewy. Adding a pinch of sea salt to the dough boosts the flavor. You can also try different spices. A hint of nutmeg can add warmth. Consider using brown sugar for a richer taste, as it adds moisture and boosts the chewiness. Mixing in a bit of vanilla bean paste will heighten the flavor even more. Do not skip the cream of tartar. It gives snickerdoodles their classic tang. Always measure flour correctly. Too much flour can lead to dry cookies. Avoid chilling the dough unless you want thicker cookies. Lastly, be careful not to overmix the dough. This can toughen the cookies. Follow these tips, and you will bake the perfect chewy caramel snickerdoodles! {{image_2}} You can change up your Chewy Caramel Snickerdoodles in many fun ways. Try adding chocolate chips for a richer taste. Mix in some nuts, like pecans or walnuts, for a crunchy bite. Dried fruits can also work well. Think about using raisins or cranberries for a sweet twist. While cinnamon is a classic choice, you can swap it for other spices. Nutmeg adds warmth and depth. Cardamom brings a unique flavor that surprises the taste buds. You might even try pumpkin spice for a seasonal treat. Each spice adds a new layer to your cookies, making them special. If you need a gluten-free version, substitute the flour with a gluten-free blend. Look for one that has xanthan gum for the best texture. For a vegan option, use plant-based butter and flax eggs. Mix one tablespoon of flaxseed meal with three tablespoons of water. Let it sit for five minutes, and it becomes a great egg substitute. Both options still give you that chewy texture and sweet flavor. To keep your chewy caramel snickerdoodles fresh, store them in an airtight container. This helps to lock in moisture and keeps them soft. You can layer parchment paper between the cookies to prevent sticking. Always store them at room temperature for the best texture. Avoid placing them in the fridge, as cold air can dry them out. If you want to save some cookies for later, freezing is a great option. First, let the cookies cool completely. Then, place them in a single layer on a baking sheet. Freeze until solid, about an hour. After that, transfer them to a freezer-safe bag or container. They can last up to three months in the freezer. When you're ready to enjoy, thaw them at room temperature. Chewy caramel snickerdoodles stay fresh for about a week when stored properly. To reheat, simply pop them in the microwave for 10-15 seconds. This warms them up and makes them gooey again. You can also use an oven. Preheat it to 350°F (175°C) and warm the cookies for about 5 minutes. Enjoy them warm for the best taste! To reduce the sweetness, cut back on sugar. Use 1 cup instead of 1 ½ cups. You can also use less caramel. Try adding a pinch of salt to balance flavors. This small change gives you a less sweet cookie while keeping the caramel taste. Yes, you can use regular caramel. However, it will melt more. This can change the cookie's texture. To avoid this, chop the regular caramel into small pieces. Mix them in gently and keep an eye on the baking time. Your cookies might be a bit different but still tasty. If your dough feels too sticky, add a bit of flour. Start with one tablespoon at a time. Mix well after each addition. You want the dough to be soft but not sticky. You can also chill the dough for 30 minutes. This helps make it easier to handle. This blog post covered the key parts of making delicious Chewy Caramel Snickerdoodles. We explored the ingredients and how to replace them if needed. I shared tips for achieving the perfect texture and flavor. You learned how to store your cookies and keep them fresh. Remember, using fresh ingredients makes all the difference. Don’t be afraid to try new flavors or variations. Enjoy baking and sharing these treats with friends and family!

Chewy Caramel Snickerdoodles Delightful and Simple Snack

If you love warm, chewy cookies, you’re in for a treat! In this simple guide, I’ll show you how to

- 1 cup crushed pretzels - 2 tablespoons sugar - 1/2 cup unsalted butter, melted - 8 oz cream cheese, softened - 1 cup powdered sugar - 1 cup whipped topping (like Cool Whip) - 2 cups fresh strawberries, sliced - 1 cup strawberry gelatin mix - 2 cups boiling water - 2 cups cold water Gather these ingredients before you start. First, you need pretzels for the base. The sweet-salty mix is key. You will also need sugar and butter for binding the crust. Cream cheese gives the creamy layer its rich taste. Powdered sugar adds sweetness. Whipped topping lightens the texture. Fresh strawberries make your dessert shine. They add bright flavor and color. The strawberry gelatin mix brings it all together. Boiling water helps dissolve the gelatin. Cold water cools the mix before you add the strawberries. This list keeps things simple. Each ingredient plays its part. You can find everything at your local store. Get ready to create a delightful treat! - Preheat oven to 350°F (175°C). - In a bowl, mix 1 cup crushed pretzels, 2 tablespoons sugar, and 1/2 cup melted butter until well combined. - Press the pretzel mixture firmly into the bottom of your serving dish. - Bake for 10 minutes and let it cool completely. - In a separate bowl, beat 8 oz softened cream cheese with 1 cup powdered sugar until smooth. - Gently fold in 1 cup whipped topping until fully mixed. - Spread the cream cheese mixture evenly over the cooled pretzel crust. - In another bowl, dissolve 1 cup strawberry gelatin mix in 2 cups boiling water. - Add 2 cups cold water and mix well. - Stir in 2 cups sliced fresh strawberries. - Pour the strawberry mixture over the cream cheese layer, covering it completely. - Refrigerate for at least 3-4 hours until the gelatin sets. - Once chilled and set, scoop the salad into individual cups for serving. Garnish with crushed pretzels on top for a nice crunch. To get the best texture for your pretzel crust, crush the pretzels finely. Larger pieces can make the crust crumbly. Mix the crushed pretzels with sugar and melted butter. This combination helps bind the crust. Press the mixture firmly into your cup or dish to avoid a loose crust. To avoid sogginess, let the crust cool completely before adding the cream cheese layer. If you add the cream cheese layer too soon, it can make the crust wet. Also, make sure your cream cheese mixture is thick enough. This will help keep moisture from seeping into the crust. Refrigerate your assembled cups for at least 3-4 hours. This time allows the gelatin to set properly. If it doesn’t set, the cups will be too runny. Check the gelatin after the minimum time. If it seems soft, chill it longer. Factors that affect gelatin set include temperature and humidity. Warmer kitchens can slow down the setting process. If your kitchen is hot, consider chilling your cups in a cooler area. For garnishing, sprinkle crushed pretzels on top just before serving. This adds a nice crunch. You can also place a fresh strawberry on each cup for a colorful touch. When choosing serving cups, opt for clear ones to show off the pretty layers. Small glass jars or clear plastic cups work great. This will make your Strawberry Pretzel Salad Cups look even more inviting. {{image_2}} You can change the fruit in Strawberry Pretzel Salad Cups. Try using raspberries or blueberries. These berries add their own sweet taste. You can also mix fruits like peaches or blackberries. Seasonal fruits work great too. In summer, use fresh peaches for a juicy twist. In fall, consider adding apples for a crunchy bite. Each fruit choice makes this dessert unique and fun. If you want to cut back on sugar, try natural sweeteners. Options like honey or maple syrup are tasty. You can also use stevia or monk fruit for lower calories. Just remember, some sweeteners are stronger, so adjust the amount. This way, everyone can enjoy the cups, no matter their diet. You can get creative with flavors in your Strawberry Pretzel Salad Cups. Try adding crushed pineapple for a tropical twist. Peaches can also bring a sweet flavor. Mix some lemon juice for a zesty kick. Experimenting with different flavors keeps things exciting. You’ll find new favorites every time you make them! Store your Strawberry Pretzel Salad Cups in the fridge. Use an airtight container to keep them fresh. These cups last about 3 to 5 days in the refrigerator. If you notice any change in texture or smell, it’s best to toss them. Can you freeze Strawberry Pretzel Salad Cups? Yes, but with some care. The cream cheese layer may change texture when frozen. To freeze them, place the cups in a freezer-safe container. Seal it tightly. They can be frozen for up to 2 months. To thaw, move the cups to the fridge overnight. Avoid thawing at room temperature, as this can cause sogginess. Enjoy your delightfully sweet treat even after freezing! Strawberry Pretzel Salad Cups are a fun dessert. They mix sweet and salty flavors. You have a crunchy pretzel base, creamy cheese layer, and fruity strawberry topping. The pretzels give a nice crunch. The cream cheese layer is light and creamy. The strawberries add freshness and brightness. Together, these flavors create a delightful treat. Yes, you can make these cups ahead. Prepare the crust and cream cheese layer the day before. Just make sure to chill them well. You can add the strawberry layer later. This keeps the crust from getting soggy. It’s a great time-saver for parties and gatherings. You can buy ingredients at any grocery store. Look for fresh strawberries in the produce section. Check the baking aisle for pretzels and gelatin. You can also find cream cheese and whipped topping there. For convenience, some stores offer pre-made options if you are short on time. To make these cups without gelatin, you can use whipped cream instead. Mix whipped cream with the strawberries for a lighter topping. You can also use agar-agar, a plant-based thickener. Follow the instructions on the package for the best results. This way, you still get a delicious dessert without gelatin. In this blog post, we explored the delicious recipe for Strawberry Pretzel Salad Cups. We examined each ingredient and shared step-by-step instructions to create the perfect dessert. I also highlighted tips for a crunchy pretzel crust and ways to make this treat your own with various flavor options. Remember, the key to a great Strawberry Pretzel Salad is in the details. Enjoy your creation and impress your friends with this tasty treat!

Strawberry Pretzel Salad Cups Delightful Easy Recipe

Are you ready to enjoy a fun and tasty treat? Strawberry Pretzel Salad Cups are not only easy to make

- 2 cups dark chocolate chips - 1 cup white chocolate chips - 1 teaspoon peppermint extract - ½ cup crushed peppermint candies (or candy canes) - Pinch of sea salt The key to great chocolate peppermint bark lies in the right ingredients. I always use high-quality chocolate chips for the best flavor. Dark chocolate brings rich notes, while white chocolate adds sweetness. Peppermint extract gives that fresh taste we all love. Crushed peppermint candies add a nice crunch and visual appeal. A pinch of sea salt balances the sweetness and enhances the flavors. - Nuts (e.g., walnuts, almonds) - Additional flavorings (e.g., vanilla extract) If you want to mix things up, consider adding nuts. Walnuts or almonds work well and add texture. You can also add a splash of vanilla extract to the white chocolate for extra depth. I love to experiment with different add-ins, but the classic recipe is perfect on its own. To start, we will melt the chocolate. For the dark chocolate, grab a microwave-safe bowl. Add 2 cups of dark chocolate chips. Heat it in the microwave. Use 30-second intervals. Stir the chocolate after each interval. This helps it melt smoothly. For the white chocolate, use a separate microwave-safe bowl. Place 1 cup of white chocolate chips in the bowl. Follow the same 30-second heating method. Stir until it becomes smooth and creamy. Now comes the fun part: assembling the bark! First, pour the melted dark chocolate onto a lined baking sheet. Use a spatula to spread it into an even layer. Next, place the baking sheet in the fridge for about 20 minutes. Let that dark chocolate set well. After the dark chocolate has set, it’s time for the white chocolate. Pour the melted white chocolate over the dark layer. Spread it evenly with your spatula. Then, take ½ cup of crushed peppermint candies. Sprinkle them on top of the white chocolate. Press them down gently. This helps them stick to the bark. Let’s talk about setting and serving the bark! After you finish layering, sprinkle a pinch of sea salt on top. This adds great flavor. Now, return the baking sheet to the fridge. Leave it there for another 30 minutes. This gives the bark time to set fully. Once it is set, take it out of the fridge. Break the bark into pieces. You can choose any size you like. Now you can enjoy your tasty chocolate peppermint bark! Choosing the right chocolate makes a big difference. I recommend using high-quality chocolate chips. Dark chocolate chips give a rich taste while white chocolate adds sweetness. Avoid cheap brands, as they may not melt well. To keep your chocolate smooth, avoid seizing. Seizing happens when chocolate gets too hot or comes into contact with water. Always melt chocolate in a dry bowl. Use short bursts in the microwave. Stir after each interval to check for smoothness. Pick a pure peppermint extract for the best taste. A small amount goes a long way. Start with one teaspoon, and taste as you go. You can always add more if needed. Adding a pinch of sea salt is key. It brings out the flavors and balances the sweetness. Just a little sprinkle on top makes a big impact. For serving, break the bark into uneven pieces for a rustic look. This adds charm and makes it easy to share. Arrange pieces on a festive platter for a beautiful display. If you want to gift the bark, package it in clear bags. Tie them with a colorful ribbon for a nice touch. You can also use decorative boxes. This adds a personal feel to your gift. {{image_2}} You can change the type of chocolate in your bark. Milk chocolate is sweeter and creamier. Dark chocolate has a rich, bold taste. A blend of both gives a nice balance. Try mixing equal parts of dark and milk chocolate for a fun twist. This gives you a unique flavor that pleases everyone. You can switch up flavors for different holidays. For Halloween, add orange food coloring and sprinkle black candies. For Easter, use pastel-colored candies or add fruity flavors. If you want a vegan option, use dairy-free chocolate chips. These options let you enjoy bark all year round. Adding mix-ins can make your bark even more special. Dried fruits like cherries or apricots add a chewy texture. You can also add nuts like walnuts or almonds for a crunchy bite. Spices like cinnamon or nutmeg can warm up the flavor. Just a pinch can change the whole taste. This makes your bark unique and fun to eat. To keep your chocolate peppermint bark fresh, store it in an airtight container. This helps prevent moisture and keeps it crisp. I recommend using a container with a tight seal. Place a piece of parchment paper between layers if you stack them. This prevents sticking and damage. Avoid storing the bark in warm or humid areas. Heat can melt the chocolate, and moisture can create a sticky mess. The best place is a cool, dry cupboard or pantry. If your home is warm, the fridge is a safe option. Just be sure to seal it well to avoid moisture. When stored properly, chocolate peppermint bark lasts about two weeks. You can enjoy it fresh for the best taste. After two weeks, the flavor may fade, and the texture can change. Watch for signs of spoilage. If you see white spots or a dull appearance, this may mean the chocolate has bloomed. It’s still safe to eat but may not taste great. If it smells off or has a strange texture, it’s best to toss it out. Yes, you can use chocolate bars. Just chop them into small pieces. This helps them melt evenly. Using bars may give a richer taste. - Tips for using chocolate bars: - Choose good-quality chocolate. - Use a knife to chop the bars into small, even pieces. - Follow the same melting instructions as with chips. Yes, refrigerating is key for good texture. Cooling helps the chocolate set up firm. If you skip this step, the bark may stay too soft. - Importance of cooling for texture: - It allows the layers to bond well. - Proper cooling keeps the bark from melting easily. - A firm bark is easier to break into pieces. You can make this treat your own! Add flavors or swap ingredients. Try different toppings for a unique twist. - Suggestions for personalizing flavors and ingredients: - Use milk chocolate instead of dark. - Add nuts like almonds or walnuts for crunch. - Mix in dried fruits for a chewy surprise. - Change the extract, like using vanilla. You learned how to make delicious chocolate bark with peppermint. Essential ingredients include dark and white chocolate, peppermint extract, and crushed candies. You can add nuts or other flavors to personalize it. Remember to store your bark properly to keep it fresh. Each small tweak can bring a new taste. By exploring variations and mixing in your favorite treats, you can make this treat your own. Now, get creative in your kitchen and enjoy every bite!

Chocolate Peppermint Bark Festive Holiday Treat

Get ready to indulge in a sweet seasonal treat! Chocolate Peppermint Bark is the perfect blend of rich dark chocolate

To make these tacos, start with fresh chicken. I use 1 lb of boneless, skinless chicken thighs. They stay juicy and tender. You also need 1 cup of diced pineapple for a sweet touch. Add 1/2 of a thinly sliced red onion for crunch. I like 1 small red bell pepper, sliced, to add color. Finally, grab 1 avocado, sliced, for creaminess. For the jerk chicken, you'll want 2 tablespoons of jerk seasoning. This mix packs a spicy punch. I also use 1 tablespoon of olive oil to help the seasoning stick. A dash of salt and pepper to taste rounds out the flavors. Allow the chicken to marinate for at least 30 minutes to soak up these bold tastes. When it comes to toppings, I recommend 8 small corn tortillas. They hold everything together well. You also need 1/4 cup of fresh cilantro, chopped, for a burst of freshness. Squeeze the juice of 1 lime on top for a zesty kick. These toppings blend nicely with the spicy jerk chicken and sweet salsa. Start by taking 1 lb of boneless, skinless chicken thighs. In a mixing bowl, add 2 tablespoons of jerk seasoning and 1 tablespoon of olive oil. Coat the chicken well with the oil and seasoning. Let it marinate for at least 30 minutes. This step adds great flavor! Next, preheat your grill or skillet over medium-high heat. Once it's hot, place the marinated chicken on the grill. Cook each side for 5-7 minutes. Use a meat thermometer to check that it reaches 165°F (75°C). You want the chicken to be charred and juicy. After cooking, remove the chicken from heat. Let it rest for 5 minutes. This helps keep it moist. Then, slice the chicken into thin strips for the tacos. In a separate bowl, mix 1 cup of diced pineapple, 1/2 sliced red onion, and 1 small sliced red bell pepper. Squeeze the juice of 1 lime over the mixture. Add a pinch of salt and pepper for taste. This salsa will bring freshness to your tacos! Now, you are ready to assemble your delicious tacos! To get the best flavor, marinate the chicken for at least 30 minutes. This time allows the jerk seasoning to soak in. You can marinate longer, even overnight, for a deeper taste. Use a bowl that fits the chicken snugly. Cover it with plastic wrap or a lid. Store it in the fridge to keep it fresh. Always remember to coat the chicken well with olive oil and seasoning. Grilling or pan-searing the chicken gives it a nice char. Preheat your grill or skillet over medium-high heat. This helps to lock in flavors. Cook the chicken for about 5-7 minutes on each side. Check the internal temperature; it should reach 165°F. Let the chicken rest after cooking. This step keeps the juices inside. Then slice it thin for easy taco filling. Presentation makes meals more fun! Arrange the tacos on a large platter. You can stand them upright in a taco holder for a nice touch. Top each taco with fresh pineapple salsa and avocado slices. Sprinkle chopped cilantro over everything for color. Add lime wedges for extra zing. Your tacos will look as good as they taste! {{image_2}} You can swap chicken for other proteins. Try using shrimp for a lighter taco. Grilled pork also works well and adds great flavor. For a beef option, use flank steak seasoned with jerk spices. Each protein changes the taste and texture, but keeps that spicy kick. Salsa adds freshness to your tacos. You can use mango instead of pineapple for a sweet twist. Papaya salsa brings a tropical vibe. If you like heat, add diced jalapeños to your salsa. You can even mix and match fruits for a unique flavor. For a veggie option, use grilled tofu or tempeh. These proteins soak up the jerk seasoning well. You can also fill tacos with black beans and corn for a hearty meal. Don’t forget to add your favorite veggies, like roasted bell peppers or zucchini, for extra taste. To keep your leftover jerk chicken tasty, store it in an airtight container. Place the chicken in the fridge. It stays good for up to three days. Be sure to let it cool before sealing it up. This prevents moisture from building up inside the container. When you reheat jerk chicken, aim for even heating. Use the oven or a skillet for best results. Preheat your oven to 350°F (175°C). Warm the chicken for about 10-15 minutes. If using a skillet, heat it over medium. Add a splash of water or chicken broth to prevent drying out. Cook until hot, but not too long to keep it juicy. Freezing jerk chicken is a great way to save it for later. Place the cooled chicken in a freezer-safe bag. Remove as much air as possible before sealing. It can last for up to three months in the freezer. When ready to eat, thaw the chicken in the fridge overnight. Reheat it as mentioned above for the best flavor and texture. Jerk chicken comes from Jamaica. It started with the Maroons, who were escaped slaves. They used spices and smoke to flavor their meats. The key ingredients are allspice and Scotch bonnet peppers. This style of cooking spread throughout the Caribbean. Now, jerk seasoning is popular worldwide, and you can find it in many dishes. Yes, store-bought jerk seasoning works well. It saves time and is easy to use. Just check the label for quality. Some brands are spicier than others, so pick one that fits your taste. If you want, you can also add fresh herbs for extra flavor. Many side dishes go great with these tacos. Here are some tasty options: - Rice and peas: This classic dish complements the spice of jerk chicken. - Coleslaw: A crunchy slaw adds freshness and balances the heat. - Grilled corn: Sweet corn on the cob is a perfect summer side. - Black beans: They add protein and a nice texture. - Plantains: Fried or baked plantains add sweetness. These sides make your meal even more enjoyable! This blog post covered how to make delicious Jerk Chicken Tacos. We talked about fresh ingredients, seasonings, and toppings. I shared step-by-step instructions for the marinade, cooking, and making fresh salsa. You learned tips for marinating and cooking. We also explored different variations like proteins and salsas. Lastly, I gave storage and reheating advice. Now, you can enjoy tasty tacos at home. Try these tips and make your meal special. Happy cooking!

Spicy Caribbean Jerk Chicken Tacos Delightful Meal

Get ready to spice up your dinner with an island favorite: Spicy Caribbean Jerk Chicken Tacos! In this post, I’ll

Older posts
Newer posts
← Previous Page1 … Page26 Page27 Page28 … Page106 Next →
© 2025 My Cooking Cast • Built with GeneratePress

Our Policies

  • Privacy Policy
  • GDPR Policy
  • Terms Of Use
  • Copyright Policy
  • Cookie Policy
  • Disclaimer

More Information​

  • Home
  • Contact
  • About
  • Dinner
  • Appetizers
  • Dessert
©2025, My Cooking Cast About Privacy Policy Back To Top