Skip to content
DisclaimerTerms Of UseGDPR PolicyCookie Policy

My Cooking Cast

  • Home
  • Drinks
  • Appetizers
  • Dinner
  • Dessert
  • About
  • Contact
  • Privacy Policy
DisclaimerTerms Of UseGDPR PolicyCookie Policy

Emma

- Shrimp and Breading Ingredients - 1 pound large shrimp, peeled and deveined - 1 cup shredded coconut (sweetened or unsweetened) - 1 cup panko breadcrumbs - 2 eggs, beaten - 1/2 cup all-purpose flour - 1 teaspoon garlic powder - 1/2 teaspoon salt - 1/4 teaspoon black pepper - Mango Sauce Ingredients - 1 ripe mango, peeled and diced - 1 tablespoon honey - 1 lime, juiced - 1 tablespoon fresh cilantro, chopped (optional) - Cooking Oil Specifications - Cooking oil for frying (enough to cover the pan about 1/4 inch deep) These ingredients bring the coconut shrimp to life. The shrimp should be large and fresh. The coconut gives a sweet crunch, and the panko adds a light crispiness. The mango sauce adds a fruity kick that pairs perfectly with the shrimp. Honey and lime juice in the sauce balance flavors beautifully. You can skip cilantro if you prefer a simpler taste. Always choose high-quality oil for frying. This ensures the shrimp fry evenly and taste great. Seasoning the Shrimp First, grab a mixing bowl. Add garlic powder, salt, and black pepper. Mix these well. Now, take your shrimp and toss them in this seasoning. Make sure every shrimp gets coated evenly. Setting Up the Breading Station Next, set up your breading station. Use three shallow dishes. In the first dish, add the all-purpose flour. In the second, pour in the beaten eggs. In the third, combine shredded coconut and panko breadcrumbs. Flour, Egg, and Coconut-Panko Mixture Method Now it's time to coat the shrimp. Start by dipping each shrimp in the flour. Shake off any extra flour. Then, dip it in the egg, coating it well. Finally, roll the shrimp in the coconut-panko mix. Press gently to make sure it sticks. Heating Oil Techniques In a large skillet, pour enough cooking oil to cover the bottom. Aim for about 1/4 inch deep. Heat the oil over medium-high heat. Wait until it shimmers, which means it’s hot enough. Frying Instructions for Perfect Crispiness When the oil is ready, add the breaded shrimp in batches. Fry them for 2-3 minutes on each side. Look for a golden brown color. This means they are crispy and done. Once cooked, place them on a paper towel-lined plate to drain extra oil. Ingredients and Mixing Instructions For the mango sauce, grab a small bowl. Combine diced mango, honey, lime juice, and chopped cilantro if you choose. Mash lightly with a fork. Mix until it’s combined, but keep some chunks for texture. This adds flavor and freshness. Best Shrimp Types to Use For this dish, I recommend using large shrimp. Look for shrimp labeled as "U10" or "16/20." These sizes work best. They are big and juicy, which makes them perfect for frying. Fresh shrimp is best, but frozen shrimp can work too. Just make sure to thaw them properly. Breading Techniques for Optimal Texture To get the best texture, I suggest a three-step breading process. First, coat the shrimp in flour. This helps the egg stick. Next, dip them in beaten eggs. Finally, roll them in the coconut-panko mix. Press gently to ensure even coverage. This method gives the shrimp a crunchy and golden crust when fried. Flavor Variations for the Sauce You can change up the mango sauce easily. Add a pinch of chili powder for heat. If you like a sweet touch, try adding more honey. You can also mix in lime zest for extra flavor. For a tropical twist, add diced pineapple or passion fruit. Serving Suggestions Serve the coconut shrimp on a platter with the mango sauce on the side. You can also add fresh cilantro on top for a pop of color. For extra crunch, include some lime wedges. If you're feeling fancy, serve it alongside a light salad for a complete meal. {{image_2}} You can make coconut shrimp even better with simple swaps. If you need a gluten-free option, replace all-purpose flour with almond flour. You can also use gluten-free panko breadcrumbs for the breading. This keeps the dish tasty and safe for those with gluten issues. Cooking methods can change the final dish. Frying gives a crispy texture but baking is healthier. To bake, preheat your oven to 400°F. Place shrimp on a baking sheet and spray lightly with oil. Bake for 15-20 minutes until golden and crispy. Mango sauce is versatile. You can switch fruits for different tastes. Try using ripe peaches or pineapple. These fruits add a twist while keeping the sauce fresh and fruity. Want some heat? Add diced jalapeños or a dash of cayenne pepper. This will spice up the sauce and balance the sweet mango. Adjust the heat to your liking for a fun kick. Best Practices for Storing Coconut Shrimp To keep your coconut shrimp fresh, place them in an airtight container. Make sure they cool down before sealing. This prevents sogginess. Store them in the fridge for up to three days. For longer storage, consider freezing them. Place the shrimp in a single layer on a baking sheet. Freeze until solid, then transfer them to a freezer bag. They will last for up to three months. Storing Mango Sauce Properly For the mango sauce, use a small airtight container. Keep it in the fridge. The sauce stays fresh for about three days. If you want to keep it longer, freeze it in an ice cube tray. Once frozen, transfer the cubes to a freezer bag. This way, you can use small amounts as needed. How to Reheat for Optimal Crispiness To reheat coconut shrimp, use the oven. Preheat it to 350°F (175°C). Place the shrimp on a baking sheet in a single layer. Heat them for about 10 minutes. This keeps them crisp. Avoid using the microwave, as it makes them soggy. Safe Reheating of Mango Sauce For mango sauce, you can reheat it gently on the stove. Use low heat to warm it up, stirring often. You can also use the microwave. Heat it in short bursts of 10 to 15 seconds, stirring in between. This keeps the sauce smooth and tasty. Can I make this gluten-free? Yes, you can make this dish gluten-free. Use gluten-free flour and gluten-free panko breadcrumbs. These swaps keep the dish tasty and safe for those with gluten sensitivities. How do I know when the shrimp are fully cooked? Shrimp cook quickly. They turn pink and opaque when done. Cook them for about 2-3 minutes on each side. Ensure they are firm to the touch. Overcooked shrimp can become rubbery, so watch them closely. Can I use frozen mango? Yes! Frozen mango works well in the sauce. Just thaw and chop it before mixing. The flavor is still bright and delicious. How long will the mango sauce last in the refrigerator? The mango sauce can last for about 2-3 days in the fridge. Store it in an airtight container. If you notice any changes in color or smell, it’s best to discard it. We’ve covered how to make delicious coconut shrimp with a zesty mango sauce. You learned the ingredients, step-by-step cooking methods, and useful tips for perfecting your dish. Don't forget the variations and storage tips to keep your meal fresh. Enjoy experimenting with flavors and cooking styles, whether you fry or bake. With easy adjustments, this recipe can fit any diet. Now, you have the tools to serve a tasty dish that impresses. Happy cooking!

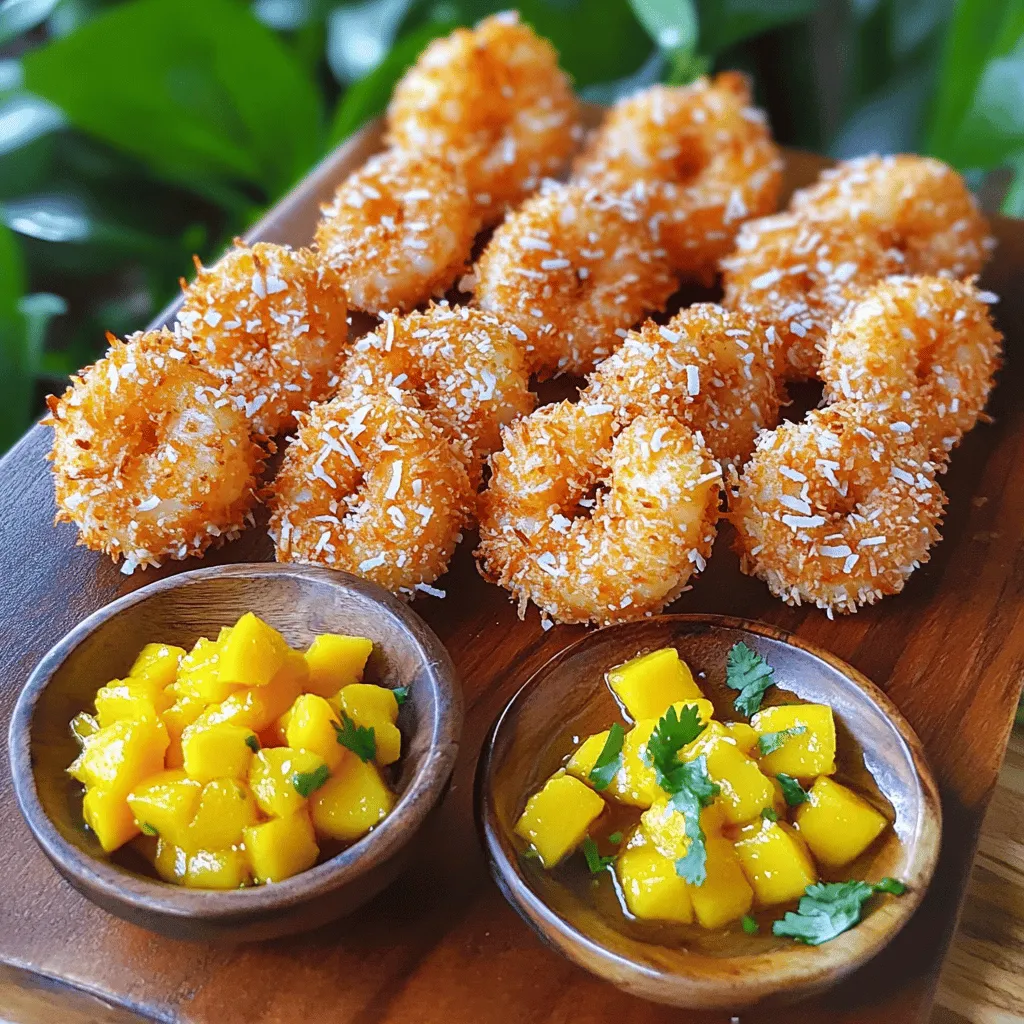
Coconut Shrimp with Mango Sauce Flavorful Delight

If you crave a tasty dish that brings summer vibes to your kitchen, you’ll love this Coconut Shrimp with Mango

- 1 cup all-purpose flour - 1/2 cup water - 1/4 cup unsalted butter - 1 tablespoon granulated sugar - 1/2 teaspoon salt - 1/2 teaspoon vanilla extract - 2 large eggs - 1 cup granulated sugar (for coating) - 2 teaspoons ground cinnamon - Oil for frying (canola or vegetable oil) Cinnamon sugar churro bites are easy and fun to make. You need simple ingredients that you may already have in your kitchen. Start with the basics: one cup of all-purpose flour. This gives the churros their structure. Then, you need half a cup of water. It helps to create a light dough. Next, add a quarter cup of unsalted butter. Butter adds a rich flavor and makes the churros tender. One tablespoon of granulated sugar adds just the right touch of sweetness. For balance, include half a teaspoon of salt. Salt enhances all the flavors in your churros. Don't forget half a teaspoon of vanilla extract for a lovely aroma and taste. You will also need two large eggs. They help bind the dough and give it a nice texture. For the coating, prepare one cup of granulated sugar mixed with two teaspoons of ground cinnamon. This is what makes them extra sweet and delicious. Lastly, have oil ready for frying. Canola or vegetable oil works best. Make sure to have enough to submerge the churro bites for even cooking. These ingredients come together to create delightful treats. You will love how simple it is to whip up this tasty recipe! 1. In a medium saucepan, combine the water, butter, sugar, and salt. 2. Cook over medium heat until the mixture boils and the butter melts. 3. Remove the saucepan from heat and stir in the flour. Mix until a dough ball forms. 1. Allow the dough to cool for about 5 minutes. 2. Add the eggs one at a time. Mix well after each egg until smooth. 3. Stir in the vanilla extract for a sweet flavor boost. 1. Heat oil in a deep skillet or pot over medium-high heat to 350°F (175°C). 2. While the oil heats, mix granulated sugar and ground cinnamon in a bowl. 3. Use a piping bag with a star tip to pipe small pieces of dough into the hot oil. Fry them for 3-4 minutes. Flip them halfway to get that perfect golden brown. 4. Remove the churro bites with a slotted spoon and let them drain on paper towels. 5. Roll the warm churro bites in the cinnamon sugar mixture until fully coated. To get a great texture, oil temperature is key. Heat the oil to about 350°F (175°C). Use a thermometer to check. If the oil is too hot, the churros burn. If it's too cool, they'll soak up oil and become greasy. Cooling the dough is also important. After cooking the mixture, let it cool for about 5 minutes. This helps the eggs mix in better. If the dough is too hot, the eggs can cook and create lumps. Avoid overcrowding your frying pan. Fry only a few churro bites at a time. This keeps the oil at the right temperature and helps them cook evenly. If you add too many, they will stick together and cook poorly. Make sure to turn the churro bites often. This helps them brown on all sides. Use a slotted spoon to flip them carefully. This will ensure they cook evenly and stay nice and fluffy. For dips, chocolate sauce or caramel is a hit. You can also try whipped cream. These add a fun twist to the treats. Pair churro bites with fresh fruit or ice cream. They work great with vanilla or cinnamon flavors. This makes for a complete and delightful dessert experience! {{image_2}} You can make churro bites even more fun! Try adding different extracts to the dough. Almond extract gives a nice nutty flavor. Orange extract adds a bright, citrus note. You can also mix in cocoa powder for chocolate churros. This makes the bites rich and delicious. Kids love these sweet twists! Want a lighter option? You can bake churro bites instead of frying them. Just preheat your oven to 400°F (200°C) and bake until golden. It’s easy! You can also use alternative sweeteners, like honey or agave syrup, instead of sugar. This cuts down on calories but keeps the sweetness. Churro bites can change with the seasons! In fall, try pumpkin spice churro bites. Just add pumpkin puree and your favorite spices. For winter, make gingerbread churro bites. Mix in ginger, cinnamon, and nutmeg for warmth. These seasonal treats add joy to any holiday gathering! To keep your churro bites fresh, store them in an airtight container. This helps prevent them from getting dry. You can keep them at room temperature for one day. If you want to keep them longer, place them in the refrigerator. This way, they can last up to three days. When it's time to enjoy your leftover churro bites, reheating is key. Use an oven to keep them crispy. Preheat your oven to 350°F (175°C). Place the churro bites on a baking sheet and heat for about 5 to 7 minutes. This method brings back their lovely texture and flavor. If you want to save churro bites for later, freezing is a great option. Let them cool completely first. Then, place them in a single layer on a baking sheet and freeze for about an hour. After that, transfer them to a freezer-safe bag. When you’re ready to eat, thaw them in the fridge overnight. Reheat in the oven as mentioned earlier to enjoy! You can tell churro bites are done by their color. They should be a nice golden brown. If they look pale, they need more time. You can also check by piercing one with a fork. If it feels firm and hot inside, they are ready! Yes, you can make the dough ahead of time. After mixing all the ingredients, let the dough cool. Then, wrap it tightly in plastic wrap. Store it in the fridge for up to 24 hours. When you're ready to fry, just let it sit at room temperature for 15 minutes. You can find pre-made churro bites at many grocery stores. Look in the frozen section for brands like Trader Joe's or Costco. You can also check online at places like Amazon. For a fresh option, local Mexican restaurants often have churro bites on their menu. Enjoy exploring these tasty treats! You learned how to make churro bites, starting with simple ingredients. We covered steps for preparation, frying, and achieving that perfect texture. Remember to try different flavors and even bake for a healthier option. Store any leftovers correctly to enjoy later. Churro bites can be a fun treat for any occasion. Experiment with dips and variations to make them even better. Happy cooking! Enjoy your delicious creations!

Cinnamon Sugar Churro Bites Delightful Treat Recipe

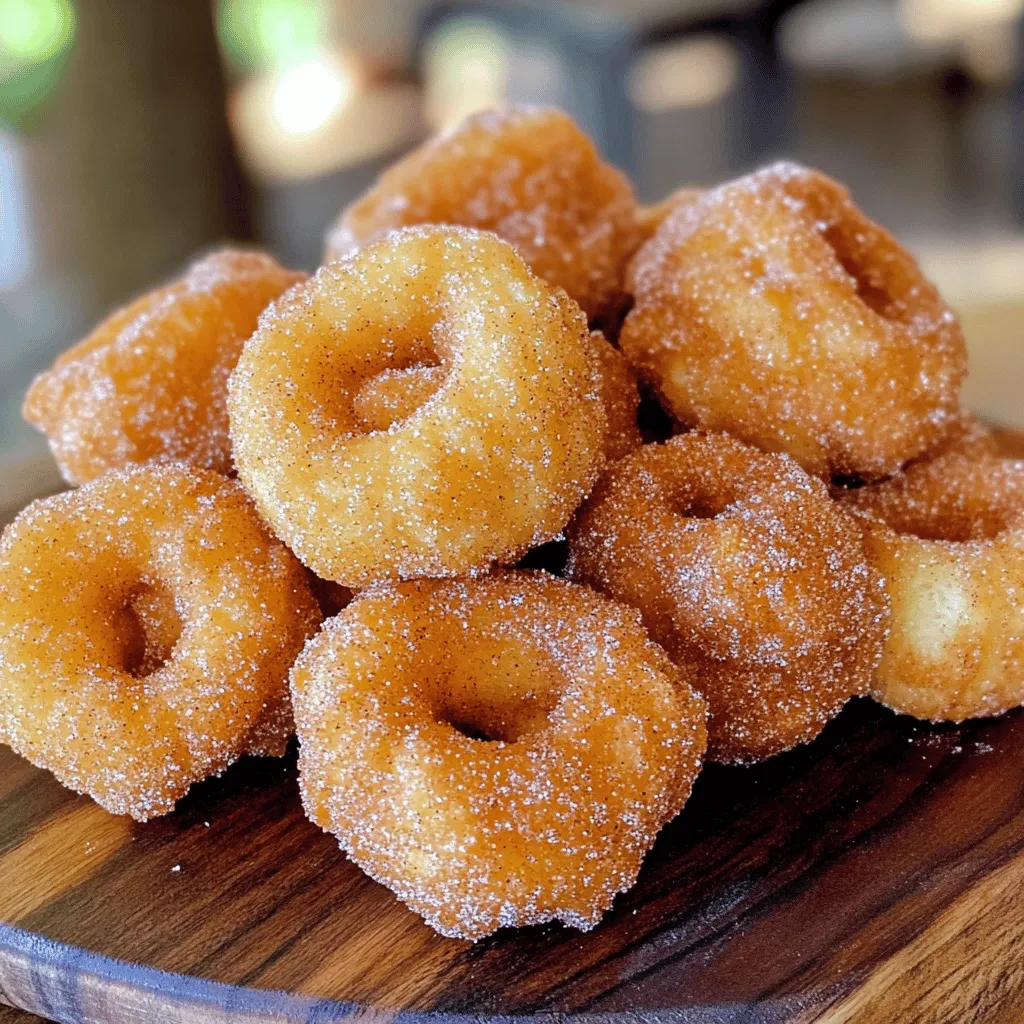
Craving something sweet and crunchy? Let’s dive into making delightful Cinnamon Sugar Churro Bites! This easy recipe transforms simple ingredients

- 500g button mushrooms - 4 tablespoons unsalted butter - 3 cloves garlic - 1 tablespoon fresh thyme leaves - 1 tablespoon fresh parsley - 1 teaspoon oregano - Salt and black pepper - Zest of 1 lemon - 2 tablespoons fresh lemon juice Gather these ingredients to create a dish that shines with rich flavors. The button mushrooms give a great texture. The unsalted butter adds a creamy base. Fresh garlic brings a punch that wakes up the dish. The fresh herbs, like thyme and parsley, provide a bright touch. They make the mushrooms feel fresh and lively. Oregano adds depth, while salt and black pepper enhance all the flavors. Lemon zest and juice elevate the dish even more. They add a zesty brightness that cuts through the richness. This balance makes garlic butter herb mushrooms a must-try side. With these simple ingredients, you can create a dish that impresses. They are easy to find, making this recipe accessible for all cooks. Enjoy exploring these flavors as you prepare them! - Cleaning and trimming the mushrooms Start by rinsing the mushrooms under cold water. Use your hands to gently scrub off dirt. Pat them dry with a clean towel. Cut off the tough stems at the base. Make sure each mushroom is ready for cooking. - Minced garlic preparation Take three fresh garlic cloves. Use a sharp knife to peel them. Chop each clove into tiny pieces. This will help release the garlic's strong flavor when cooked. Set the minced garlic aside for later. - Melting the butter Grab a large skillet and place it on the stove. Add four tablespoons of unsalted butter. Turn the heat to medium. Watch as the butter melts and begins to foam. This means it’s ready for the next step. - Sautéing garlic Add the minced garlic to the melted butter. Stir it gently for one to two minutes. You want the garlic to smell fragrant but not brown. This step adds depth to the dish. - Browning the mushrooms Increase the heat to medium-high. Add the cleaned mushrooms in a single layer. Allow them to cook for five to seven minutes. Turn them occasionally so they brown evenly. They should become tender and slightly crispy. - Adding herbs and seasoning Sprinkle one tablespoon each of fresh thyme and parsley over the mushrooms. Add one teaspoon of oregano, salt, and black pepper to taste. Stir everything well to combine. Cook for another two minutes to let the flavors blend. - Incorporating lemon zest and juice Remove the skillet from the heat. Grate the zest of one lemon over the mushrooms. Then squeeze in two tablespoons of fresh lemon juice. Mix everything gently to combine. This adds a bright note to the dish. - Adjusting seasoning to taste Taste your mushrooms. Adjust the seasoning if needed. You can add more salt, pepper, or lemon juice based on your preference. This final step ensures the dish is just right for you. Avoiding overcooked mushrooms: To keep mushrooms firm, cook them on medium-high heat. Stir them often to brown evenly. Cook for only 5 to 7 minutes. If they are soggy, you cooked them too long. Achieving the right garlic flavor: To get the best garlic taste, sauté it until it's fragrant. This takes about 1 to 2 minutes. If you let it brown, it may taste bitter. You want a sweet, savory flavor. Serving suggestions: Serve mushrooms in a rustic wooden bowl. This adds warmth to your table. Garnish with extra fresh herbs for a pop of color. Pair them with crusty bread for dipping. Enhancing visual appeal: Use a variety of herbs for color. Fresh thyme and parsley look great on top. Drizzle with a bit of lemon juice just before serving for shine. A few lemon slices on the side can also brighten the dish. Pairing with beverages: These mushrooms pair well with white wine, like Chardonnay. The wine's acidity complements the garlic and butter. For a non-alcoholic option, try sparkling water with lemon. Adding sides for a complete meal: Serve these mushrooms with grilled chicken or steak. They also go well with a fresh salad. You can add rice or pasta to make it filling. This creates a balanced meal that everyone will love. {{image_2}} You can switch up the type of mushrooms you use. Cremini mushrooms add a richer taste. They are similar to button mushrooms but have a deeper flavor. Portobello mushrooms give a meaty texture. They work well if you want a hearty side dish. Mixing different types of mushrooms can also enhance the dish. Combining button and shiitake mushrooms creates a fun flavor blend. Each type brings its own unique taste and texture. If you don’t have fresh thyme or parsley, you can use other herbs. Basil and dill can be great alternatives. They each bring a fresh twist to the dish. Dried herbs are also an option. Use one-third of the amount since they are more potent. Dried thyme or oregano can still give you that flavorful punch. Want to add some extra flavor? You can mix in cheese. Grated Parmesan adds a salty, nutty taste that pairs well with mushrooms. You can also experiment with different citrus flavors. Try lime or orange zest for a fresh twist. This adds brightness and makes the dish more exciting. To keep your garlic butter herb mushrooms fresh, use a tight container. Glass or plastic containers work well. Make sure the mushrooms cool down before sealing them. This step helps prevent moisture build-up, which can make them soggy. Store your mushrooms in the fridge for up to three days. If you want to keep them longer, consider freezing. However, frozen mushrooms may lose some texture. The best way to reheat garlic butter herb mushrooms is on the stove. Use medium heat in a skillet. This method helps keep the mushrooms tender. Stir them gently to avoid burning. You can also reheat them in the microwave. Use a microwave-safe dish and cover it loosely. This helps keep moisture in. However, be careful not to overcook them, as this can make them rubbery. To clean mushrooms, use a damp cloth or paper towel. Gently wipe each mushroom to remove dirt. Avoid soaking them in water, as mushrooms can absorb it. This will keep them fresh and maintain their texture. If you rinse them, dry them well before cooking. For best results, clean them just before use. Yes, you can prepare garlic butter herb mushrooms in advance. Cook them as usual, then let them cool. Store them in an airtight container in the fridge. They will stay fresh for up to three days. When ready to serve, reheat them in a skillet over low heat. This keeps the mushrooms tender and full of flavor. Garlic butter herb mushrooms pair well with many dishes. Here are some great options: - Grilled steak - Roasted chicken - Pasta dishes - Crusty bread - Rice or quinoa These sides complement the flavors of the mushrooms and create a balanced meal. Garlic butter herb mushrooms are not vegan due to the butter. To make them vegan, use plant-based butter or olive oil instead. You can also add nutritional yeast for a cheesy flavor. Keep the garlic and herbs the same; they add great taste. These simple swaps keep the dish delicious and suitable for vegans. This blog post covered how to make delicious garlic butter herb mushrooms. We explored the main ingredients like mushrooms, garlic, and butter, along with fresh herbs and seasonings that create rich flavors. I provided step-by-step instructions to prepare and cook them perfectly, plus tips for great presentation and serving ideas. You can even customize the recipe with different mushrooms and herbs. Remember, these mushrooms can enhance any meal. Try them and enjoy the taste. Happy cooking!

Garlic Butter Herb Mushrooms Irresistible Side Dish

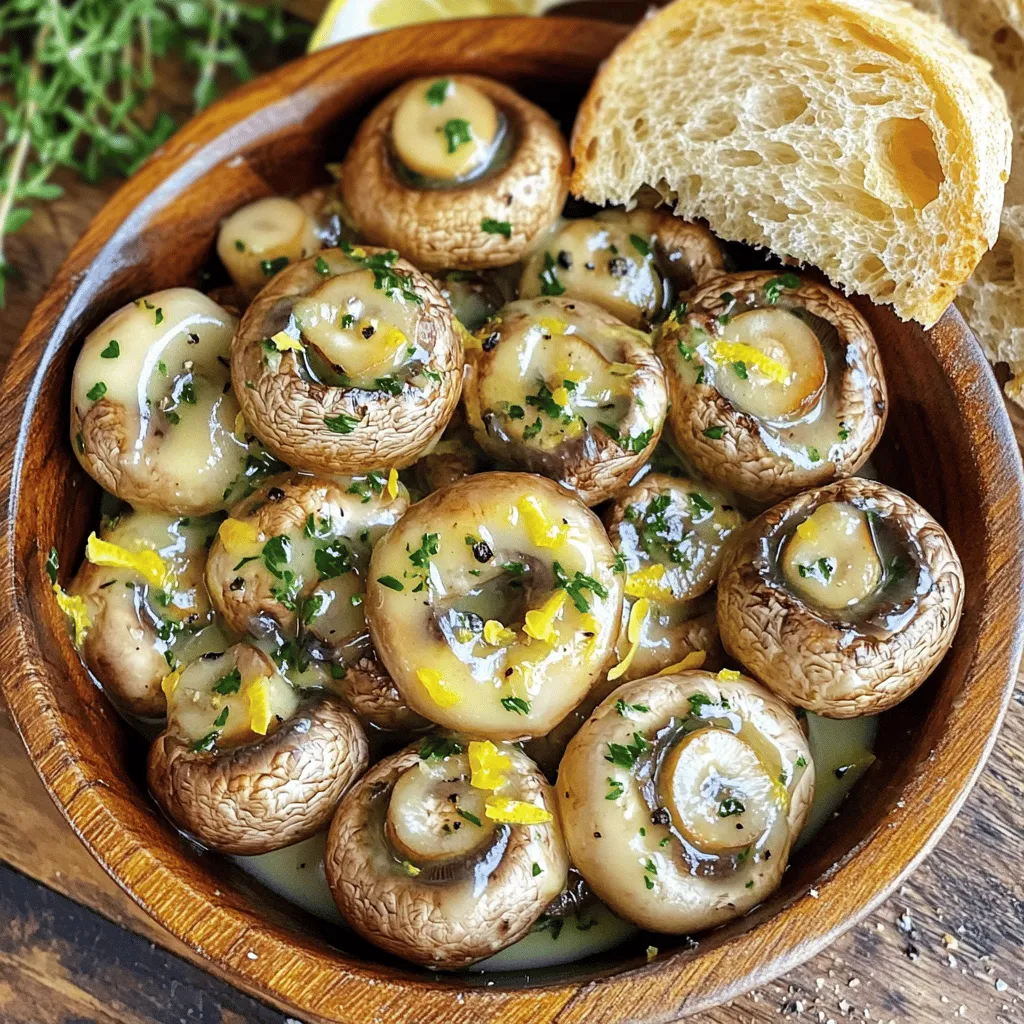
If you’re looking for the perfect side dish, you can’t go wrong with garlic butter herb mushrooms. These tasty bites

- 2 ripe avocados, diced - 1 cup fresh corn kernels (or 1 can of corn, drained) - 1 red bell pepper, diced - 1 jalapeño, deseeded and minced (optional for heat) - 1/4 cup red onion, finely chopped - 1/4 cup fresh cilantro, chopped The heart of this salad is the fresh, vibrant ingredients. Ripe avocados give a creamy texture. Fresh corn adds sweetness and crunch. The red bell pepper brings color and flavor. If you want a kick, add jalapeño. Red onion adds a nice bite, while cilantro adds freshness. - Juice of 2 limes - 2 tablespoons olive oil - Salt and pepper to taste - 1/2 teaspoon smoked paprika (for an extra kick) The dressing is simple yet zesty. Lime juice brightens the salad. Olive oil adds richness. Season with salt, pepper, and smoked paprika for depth. This blend of flavors brings everything together. These ingredients make a tasty and colorful dish. Gather them, and let's make a salad that shines on any table! To make this avocado corn salad, first, gather your fresh ingredients. Start by dicing the 2 ripe avocados. Next, if you are using fresh corn, cut the kernels off the cob. If you prefer canned corn, drain it well. Now, chop the red bell pepper and mince the jalapeño, if you want some heat. Add these to a large mixing bowl along with the corn and diced avocados. Lastly, finely chop 1/4 cup of red onion and add it to the mix. Next, it’s time to make the creamy dressing. In a small bowl, whisk together the juice of 2 limes, 2 tablespoons of olive oil, 1/2 teaspoon of smoked paprika, salt, and pepper. This dressing will give your salad a bright and zesty flavor. Now, pour the dressing over your salad mixture. Make sure to coat all the ingredients evenly. Toss gently to avoid breaking the avocado pieces. We want those beautiful chunks to stay intact. Once mixed, fold in the 1/4 cup of fresh cilantro. Stir lightly to blend the flavors. Taste your salad and adjust the seasoning if needed. Let it sit for about 10 minutes. This allows the flavors to blend well. When you're ready to serve, place the salad in a large bowl. You can garnish it with extra cilantro leaves and lime wedges for a pop of color. Enjoy your fresh and flavorful avocado corn salad! To make your avocado corn salad shine, adjust the acidity and seasoning. You can add more lime juice for a zesty kick. If you like it saltier, sprinkle in a little more salt. Taste your salad as you go. This way, you find your perfect balance. When cutting avocados, use a sharp knife. First, cut the avocado in half and remove the pit. Then, slice the flesh into cubes while it is still in the skin. Scoop out the cubes with a spoon. This method keeps the pieces neat and intact. For serving, choose a large bowl. This makes the salad easy to share. You can also use individual bowls for each guest. Garnish with extra cilantro leaves and lime wedges. This adds a fresh look and bright color. If you want to jazz it up, add feta cheese on top. It gives a nice tangy flavor. Lime wedges on the side let everyone add more zest if they like. Enjoy the fresh and vibrant look of your salad! {{image_2}} You can easily change this salad to fit your taste. If you want a different base, try black beans or chickpeas instead of corn. Both add great flavor and texture. You can also switch up the herbs. Instead of cilantro, use parsley or basil for a fresh twist. These herbs will bring their own unique taste to the dish. If you like heat, add more peppers! Try serrano or poblano for extra spice. You can also use crushed red pepper flakes for a kick. Incorporate spices like cumin or chili powder to add depth. A pinch of garlic powder can enhance the flavor too. Experiment with these options to find your perfect mix. To keep your avocado corn salad fresh, store it in the fridge. Use an airtight container for the best results. This helps prevent air from getting in and changing the salad’s taste. If you have a bowl with a lid, that works well too. Your salad can last about 2 days in the fridge. After that, the avocados may start to brown and the salad will lose its crunch. Look for signs it’s no longer good to eat. If you see brown spots on the avocados or if the salad smells sour, it's time to toss it out. Always trust your senses to determine freshness. Can I make this salad ahead of time? Yes, you can make it ahead. I recommend mixing all the ingredients, except the avocados, and dressing. Keep them separate in the fridge. This way, the salad stays fresh. Just add the avocados and dressing right before serving. How can I keep the avocados from browning? To prevent browning, use fresh lime juice. The acid slows oxidation. You can also cover the salad tightly with plastic wrap. This keeps air out and helps keep the avocados green. If you have leftover salad, eat it within a day for the best taste. Is it possible to make this dish vegan? Yes, this dish is already vegan! All the ingredients, like avocados and corn, are plant-based. You can enjoy this salad without any animal products. If you want to add cheese for flavor, opt for a vegan cheese to keep it vegan-friendly. Avocado corn salad blends fresh, vibrant ingredients into a tasty dish. We covered key ingredients like ripe avocados, fresh corn, and zesty peppers. I shared steps to prepare the salad and tips for best flavor. Plus, you learned variations and storage tips to keep it fresh. Try this salad for your next meal. It’s simple, delicious, and sure to impress! Enjoy every bite with friends or family.

Avocado Corn Salad Fresh and Flavorful Recipe Guide

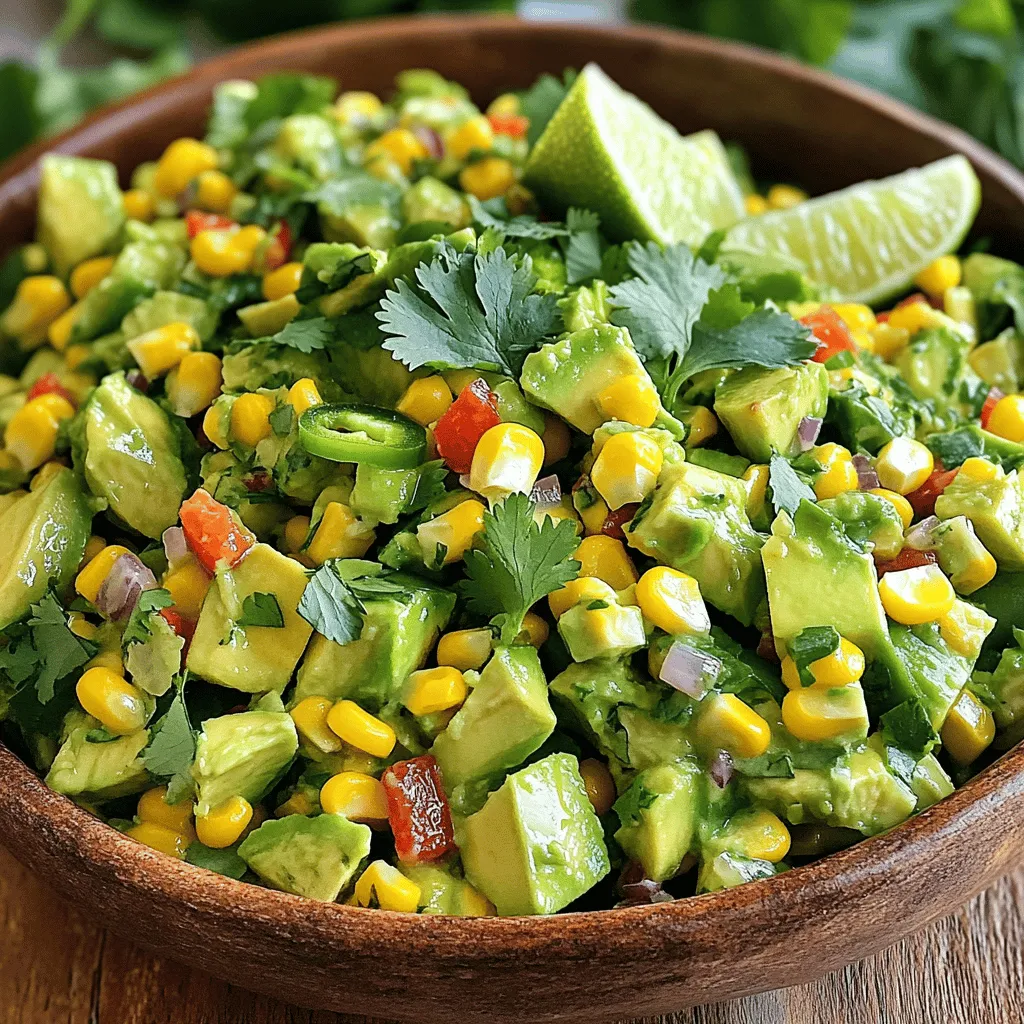
Looking for a fresh, vibrant dish to elevate your meal? This Avocado Corn Salad combines creamy avocados, sweet corn, and

- 2 large apples (Honeycrisp or Fuji) - 2 tablespoons granulated sugar - 1 teaspoon ground cinnamon - A pinch of salt - Cooking spray (or coconut oil for a vegan option) Each serving of these apple chips has about 100 calories. They offer 2 grams of fiber and 10 grams of sugar. This snack is light yet satisfying. Apples are high in fiber, which helps with digestion. They also provide vitamins like Vitamin C. Cinnamon has anti-inflammatory properties. It can help regulate blood sugar levels. Together, they make a healthy and tasty snack. First, preheat your oven to 225°F (110°C). This low heat helps the apples dry out slowly. Next, line two baking sheets with parchment paper. This makes it easy to clean up after baking. Wash your apples well and dry them with a towel. You can use any variety you like, such as Honeycrisp or Fuji. Slice the apples very thinly, about 1/8 inch thick. You do not need to peel them. Thin slices will get crispier. In a small bowl, mix together 2 tablespoons of sugar, 1 teaspoon of cinnamon, and a pinch of salt. This blend gives the chips their sweet and spicy flavor. Now, lay the apple slices in a single layer on your baking sheets. Make sure the slices do not touch each other. Lightly spray the slices with cooking spray. You can also brush them with coconut oil if you prefer. This step helps the cinnamon sugar stick to the apples. Now it’s time to bake! Place the baking sheets in your preheated oven. Bake for 1.5 to 2 hours. Remember to flip the apple slices halfway through to ensure they crisp evenly. Keep a close watch on them to avoid burning. After baking, take them out and let them cool. The chips will become even crisper as they cool down. Enjoy your tasty and crunchy snack! For the best crispness, I recommend using Honeycrisp or Fuji apples. These apples are firm and sweet. Their natural water content helps achieve that perfect crunch. Other great options are Granny Smith and Pink Lady. These apples add a tart flavor and balance the sweetness of the cinnamon sugar. To check for doneness, look for a deep golden color. The apple chips should feel dry and crisp to the touch. If they start to brown too fast, lower the oven temperature slightly. Remember to flip the slices halfway through baking. This helps them cook evenly and prevents burning. Keep a close eye on them during the last 30 minutes. You can serve cinnamon sugar apple chips in fun ways. Try placing them in a cute bowl for a snack. For a twist, drizzle honey or maple syrup on the side for dipping. You can also pair them with yogurt for a tasty treat. They make a great addition to salads or cheese platters. Enjoy your deliciously crunchy apple chips! {{image_2}} You can mix in other spices to change the flavor. Try adding a pinch of nutmeg for warmth. You could also sprinkle a little vanilla extract on the apple slices for a sweet twist. Cinnamon and nutmeg pair well and give a cozy taste to your chips. If you want a bit of zest, add a touch of lemon zest. This will brighten the flavor and make it more refreshing. If you want to swap the sugar, there are good options. Honey is a great natural sweetener that adds a unique flavor. Maple syrup works well too and gives a nice, earthy taste. For those looking to cut sugar, try sugar substitutes like stevia or monk fruit. Just remember to adjust the amount since they can be sweeter than sugar. Using a dehydrator is a simple way to make apple chips. Start by washing and slicing your apples thinly, just like for the oven method. Place the slices in a single layer on the dehydrator trays. Set the temperature to 135°F (57°C) and let them dehydrate for about 6 to 8 hours. Check on them to see if they are crisp. Once done, let them cool and enjoy! To keep your apple chips fresh, store them in an airtight container. Glass jars work great, but plastic bags can also work if sealed well. Keep them in a cool, dry place. Avoid direct sunlight, as it can make them soggy. When stored correctly, these apple chips can last up to two weeks. They stay crispy and tasty during this time. After two weeks, they may lose some crunch but will still be good to eat. If your apple chips lose their crunch, don't worry! You can re-crisp them. Simply place them on a baking sheet in a 200°F (93°C) oven for about 10 minutes. This will help restore their delightful crunch. Bake cinnamon sugar apple chips for 1.5 to 2 hours. This low heat helps them dry out and become crispy. Flip the slices halfway through to ensure even baking. Check on them after an hour to avoid burning. The goal is a perfect crunch that's golden brown. Use a timer, and keep an eye on your chips as they bake. Yes, you can use pears! Pears will give a different taste and texture. They may bake faster, so check them at around 1 hour. If you choose pears, slice them just like apples. You can also mix apples and pears for fun flavors. Adjust the sugar and cinnamon slightly, as pears are sweeter. Cinnamon sugar apple chips can be a healthy snack. Apples are rich in fiber and vitamins. The sugar adds sweetness, but you can reduce it if needed. This snack is better than many store-bought chips. It has no added preservatives. Enjoy these chips in moderation for a tasty treat. Making cinnamon sugar apple chips is fun and easy. We covered the simple ingredients, like apples and cinnamon, and shared a clear step-by-step process. You learned tips for crispiness and creative ways to serve your chips. Plus, we explored flavor variations and storage methods to keep them fresh. In the end, these snacks are tasty and healthy. They offer a great way to enjoy apples. Try them and experiment with your own flavors!

Cinnamon Sugar Apple Chips Perfectly Crispy Snack

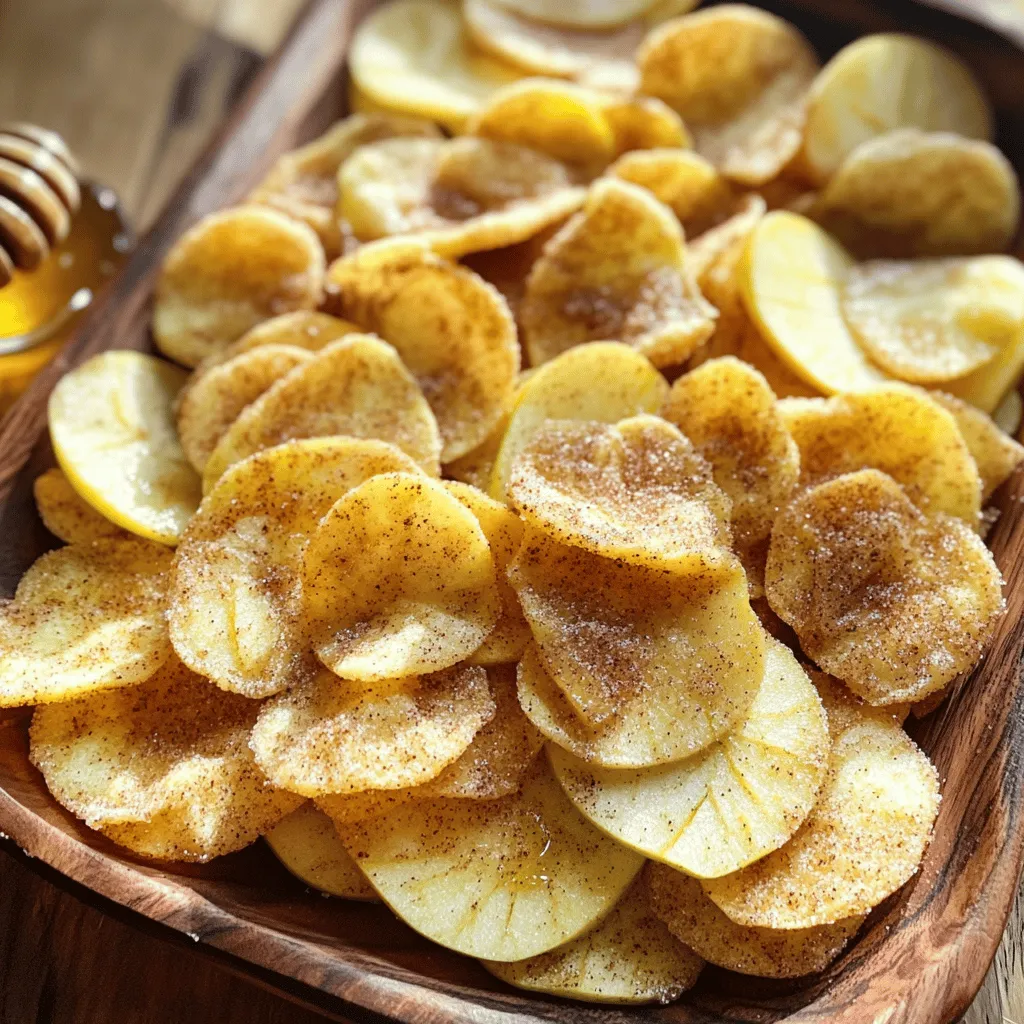
Craving a tasty snack that’s both crispy and sweet? Look no further! These Cinnamon Sugar Apple Chips are your answer.

- 2 cups corn (fresh or frozen) - 1 ripe avocado - 1 lime (juiced and zested) - 1/4 cup fresh cilantro, chopped - 1/2 cup Greek yogurt - 1 small red onion, finely diced - 1 jalapeño, finely minced (optional for heat) - Salt and pepper to taste - 1 tablespoon olive oil - 1/2 teaspoon garlic powder - 1 cup cherry tomatoes, halved Gathering fresh ingredients is the key to a great salad. Start with corn. You can use fresh corn, which has a sweet crunch. If fresh corn isn’t available, frozen corn works well too. Just thaw and sauté it lightly. Next, grab a ripe avocado. It should feel slightly soft when you press it. This will make your crema smooth and creamy. Limes add bright flavor; juice and zest them for the best taste. Fresh cilantro brings a nice herbal note and makes the dish pop with color. You will need Greek yogurt. It gives the crema a tangy taste and creamy texture. A small red onion adds a mild bite. If you like heat, include a jalapeño. Just remember to remove the seeds for less spice. Seasoning is simple. Use salt and pepper to enhance all the flavors. For richness, you’ll need olive oil. Garlic powder adds a hint of depth. Finally, cherry tomatoes add sweetness and color. Halve them to mix in easily. With these ingredients, you create a fresh and flavorful salad that shines at any meal. To start, you need to prepare the corn. If you have fresh corn, grill or boil it until it is tender. This step usually takes about 5 to 7 minutes. Once it cools, cut the kernels off the cob. If you prefer, you can also use frozen corn. Just thaw it and sauté it lightly in a pan until warm. Next, it’s time to make the creamy dressing. In a blender, add the ripe avocado, lime juice, and lime zest. Then, include the Greek yogurt, chopped cilantro, garlic powder, salt, and pepper. Blend everything until it is smooth and creamy. Taste it and adjust the seasoning if needed. This crema adds a bright, zesty flavor to the salad. Now, you can combine the main salad ingredients. In a large mixing bowl, mix the cooked corn, finely diced red onion, minced jalapeño (if you like some heat), and halved cherry tomatoes. This mix gives the salad great texture and taste. Then, pour the avocado lime crema over the mixture. Gently fold everything together until every piece is coated in the crema. For the final touches, drizzle olive oil over the salad to add richness. Mix again and check the seasoning, adding more salt and pepper if you like. After that, let the salad chill in the refrigerator for at least 15 minutes. Chilling enhances the flavors and makes the salad even more refreshing. Enjoy your vibrant and tasty Avocado Lime Crema Corn Salad! To pick a ripe avocado, press gently on its skin. It should feel soft but not mushy. A ripe avocado will have a dark green color. If it’s too hard, give it a few days to ripen at room temperature. Watch for overripeness by looking for dark spots or a squishy feel when pressed. If your avocado is very soft, it may be too far gone. Adjusting seasoning can make a big difference. Taste the crema and add more salt or lime juice if needed. If you like it spicy, sprinkle in more minced jalapeño. For a fresh twist, add herbs like mint or parsley. These can brighten the salad and add new layers of flavor. For meal prep, chop your veggies and store them in airtight containers. This keeps them fresh and ready to mix. You can make the crema ahead of time, too. Just store it in the fridge. To keep the salad fresh, avoid adding the crema until you're ready to serve. This keeps the corn and veggies crisp. Enjoy your salad at its best! {{image_2}} You can swap Greek yogurt for sour cream or plant-based yogurt. Both keep the salad creamy. Fresh herbs are great too. Instead of cilantro, try parsley or basil for a new taste. Want to make this salad heartier? You can add proteins like grilled chicken, shrimp, or beans. Shredded rotisserie chicken is easy and tasty. For a plant-based option, black beans work well too. This salad pairs perfectly with grilled meats or whole grains like quinoa. You can also get creative by serving it in taco shells or on lettuce wraps. It makes for a fun and fresh presentation! Store your Avocado Lime Crema Corn Salad in an airtight container. This helps keep it fresh. If you have leftovers, eat them within three days. The flavors taste best when enjoyed soon after making. You can freeze the salad, but it's not ideal. Avocado does not freeze well. Instead, freeze the corn and crema separately. This way, you can enjoy the salad fresh later. If your corn is cold, warm it gently in a skillet. Use low heat to keep it tender. To refresh the salad, add a splash of lime juice before serving. This brightens the flavors and keeps it delicious. For a vegan version, you can replace the Greek yogurt. Use cashew cream or coconut yogurt as a substitute. Both options add creaminess without dairy. You can also skip the yogurt entirely. Just blend the avocado with lime juice, zest, and spices. This keeps the salad rich and tasty. Yes, you can use canned corn. Just drain and rinse it well before using. Canned corn is convenient. However, fresh or frozen corn has a better texture and flavor. If using fresh corn, grill or boil it first. This adds a nice char and sweetness. This salad pairs well with grilled chicken or fish. It also complements tacos or burritos nicely. For a vegetarian meal, serve it with quinoa or brown rice. You can also enjoy it as a dip with tortilla chips. The options are endless! Yes, you can make this salad ahead. Just keep the avocado crema separate until serving. This prevents the avocado from browning. You can mix the corn and other ingredients in advance. Chill everything in the fridge for great flavor. This blog post showed how to make a tasty Avocado Lime Crema Corn Salad. We covered fresh ingredients, step-by-step instructions, and smart tips for success. You learned how to pick the best avocado and adjust flavors for your taste. We also explored fun variations, meal prep advice, and storage tips. Enjoy making this salad, share it with friends, and get creative with your mix-ins. With simple steps, you can have a fresh dish that's sure to impress.

Avocado Lime Crema Corn Salad Fresh and Flavorful Mix

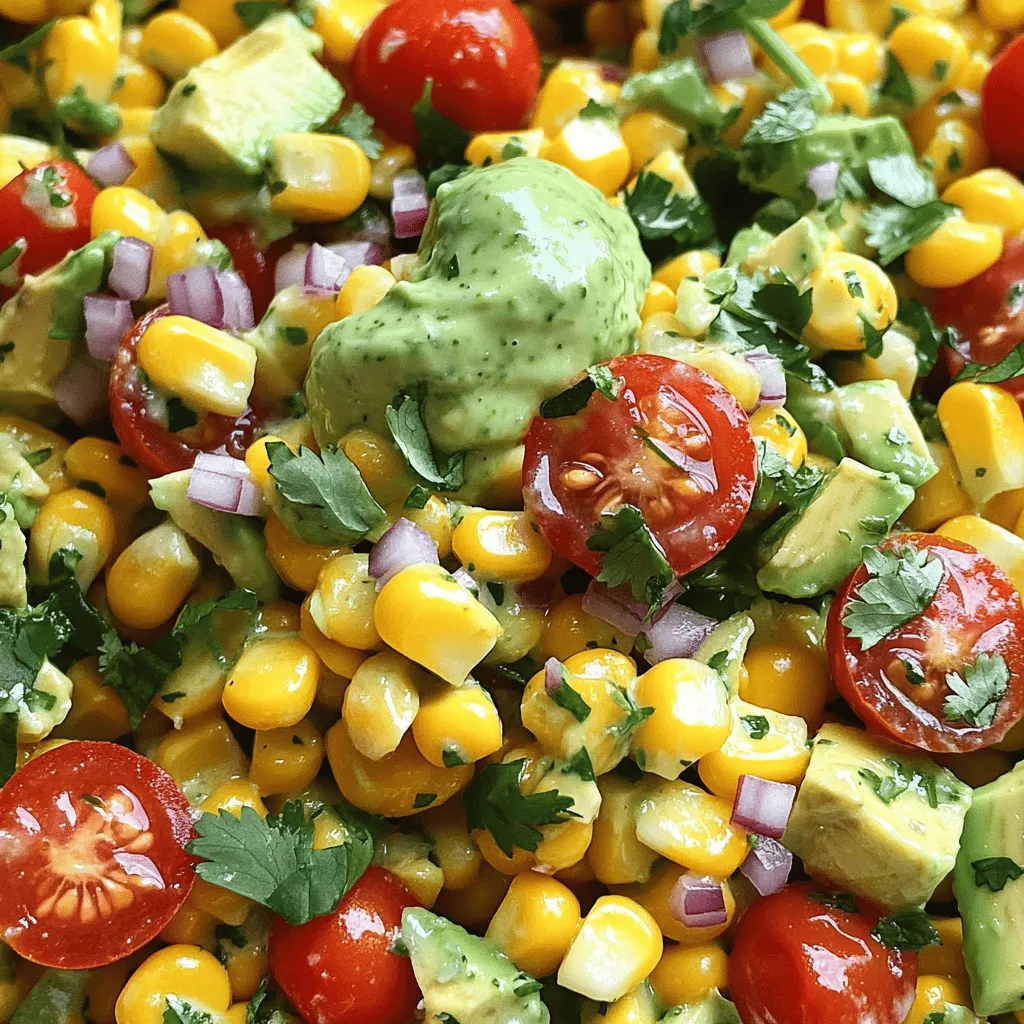
Looking for a fresh and tasty salad? This Avocado Lime Crema Corn Salad is just what you need! It mixes

To make garlic butter shrimp and grits, gather these key ingredients: - 1 pound large shrimp, peeled and deveined - 4 tablespoons unsalted butter - 4 cloves garlic, minced - 1 teaspoon smoked paprika - 1/2 teaspoon red pepper flakes (adjust to taste) - Salt and pepper to taste - 2 cups chicken broth - 1 cup grits (stone-ground preferred) - 1 cup shredded sharp cheddar cheese These ingredients create a rich and creamy dish. The shrimp bring a sweet flavor, while the garlic adds depth. The smoked paprika and red pepper flakes give it a nice kick. You can make your dish even more appealing with these optional garnishes: - 2 green onions, finely sliced - Fresh parsley, chopped These garnishes add color and freshness. They also enhance the dish's flavor profile. To get the best taste, focus on ingredient quality: - Shrimp: Use fresh shrimp when possible. Frozen shrimp works well too, but thaw it properly. - Butter: Unsalted butter gives you control over the salt level. - Garlic: Fresh garlic is key for flavor. Avoid pre-minced garlic. - Grits: Stone-ground grits have a better texture than instant grits. They offer a creamier feel. - Cheese: Use sharp cheddar for a bold flavor. Choosing good ingredients makes a big difference. It elevates your garlic butter shrimp and grits to a gourmet level. To make creamy grits, start with chicken broth. Heat 2 cups of broth in a medium pot until it boils. Slowly add 1 cup of grits while whisking. This helps avoid lumps. Once mixed, lower the heat to low. Let the grits simmer for 20 to 25 minutes. Stir them often, so they do not stick. When they thicken, mix in 1 cup of sharp cheddar cheese. Season with salt and pepper to taste. Keep the grits warm on low heat until you are ready to serve. While the grits simmer, it's time for the shrimp. In a large skillet, melt 2 tablespoons of butter over medium heat. Add 4 cloves of minced garlic, 1 teaspoon of smoked paprika, and 1/2 teaspoon of red pepper flakes. Sauté this mix for 1 to 2 minutes. You want the garlic fragrant but not burnt. Now, add 1 pound of shrimp that is peeled and deveined. Cook the shrimp for 2 to 3 minutes on each side. They should turn pink and opaque. Season with salt and pepper to your liking. Once cooked, remove the shrimp and set them aside. Increase the skillet heat to medium-high. Add the remaining 2 tablespoons of butter. Let it melt and foam. Return the shrimp to the skillet. Stir to coat them with the garlic butter. Cook for another minute to heat through. To serve, place a generous scoop of grits on each plate. Top with the garlic butter shrimp. Garnish with sliced green onions and chopped parsley for a fresh touch. Enjoy this flavorful dish! To make creamy grits, choose stone-ground grits. They have a rich flavor and texture. Use a 2:1 ratio of chicken broth to grits. This helps them cook perfectly. Stir often while cooking to prevent lumps. Cook for 20-25 minutes on low heat. Once thick, add sharp cheddar cheese. This adds creaminess and a nice bite. Seasonings can make your dish shine. Use smoked paprika for a warm, smoky taste. Red pepper flakes add a touch of heat. Adjust the amount to match your taste. Don’t forget salt and pepper. They bring out the natural flavors of the shrimp and grits. Fresh parsley adds a bright touch, too. Avoid cooking grits too quickly. High heat can lead to a gritty texture. Stirring helps to keep them smooth. Also, don’t overcook the shrimp. They cook fast, usually in just 2-3 minutes. Overcooked shrimp can become rubbery. Lastly, taste your dish as you go. Adjust seasonings to make sure it’s just right. {{image_2}} To make a spicy shrimp version, add more red pepper flakes. You can also include diced jalapeños for a fresh kick. Adjust the heat to match your taste. The shrimp will still be tender and flavorful, making every bite exciting. This spicy twist adds a fun layer to the dish. For a vegetarian option, replace shrimp with sautéed mushrooms or zucchini. Use vegetable broth instead of chicken broth. You can add smoked paprika and garlic for depth. The creamy grits will still shine through, giving you a hearty meal. This version is perfect for non-meat eaters, keeping the spirit of the dish alive. Cheddar cheese adds sharpness, but you can try other cheeses too. Gouda gives a nice smoky flavor. Cream cheese makes the grits extra creamy. If you want a tangy taste, use feta cheese. Mixing different cheeses brings a unique twist to the dish. Each cheese choice opens up a new flavor profile. To store leftovers, let the dish cool completely. Place shrimp and grits in separate airtight containers. This keeps them fresh longer. Store in the fridge for up to three days. If you notice any off smells or colors, throw it away. Reheat the grits and shrimp separately for best results. For the grits, add a splash of water or broth in a saucepan. Heat on low and stir until warm. For the shrimp, use a skillet on medium heat. Stir gently until heated through. Avoid overcooking to keep shrimp tender. You can freeze both the grits and shrimp, but they may change texture. For grits, scoop into freezer-safe bags. Try to flatten them for easier thawing. For shrimp, place them in a separate airtight container. Freeze for up to two months. To use, thaw overnight in the fridge before reheating. Yes, you can use frozen shrimp. Just thaw them first. Place the shrimp in cold water for about 15 minutes. Once thawed, pat them dry with a paper towel. This helps the shrimp sear better in the pan. Fresh shrimp is great, but frozen works too. If you need a substitute for chicken broth, use vegetable broth. It adds a nice flavor and keeps the dish tasty. You can also use water mixed with seasonings. This will help keep the grits creamy and rich. To make gluten-free grits, pick stone-ground corn grits. Check the packaging to ensure they are labeled gluten-free. Most grits are naturally gluten-free, but some brands may mix with gluten. Always read labels for safety. This blog post covered how to make garlic butter shrimp and grits. I shared the key ingredients, tips for choosing them, and optional garnishes. You learned step-by-step how to prepare creamy grits and flavorful shrimp. I also shared common mistakes to avoid and tasty variations to try. Finally, I provided tips for storing leftovers and answered common questions. Enjoy cooking this dish, and remember that great meals start with fresh ingredients and careful steps. Happy cooking!

Garlic Butter Shrimp and Grits Flavorful Delight

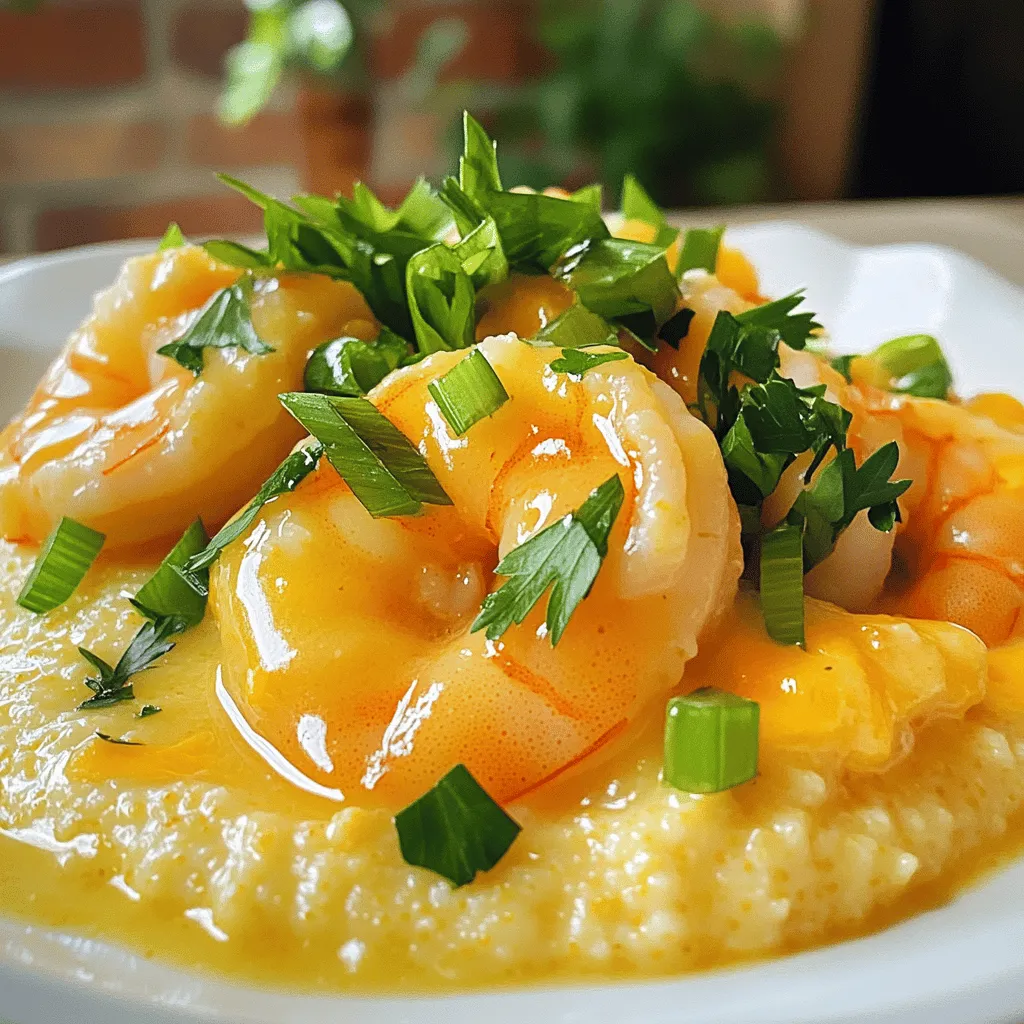
Welcome to your next favorite meal: Garlic Butter Shrimp and Grits! This dish packs bold flavors and creamy textures that

- 1 cup almond butter (smooth or crunchy) - 1/2 cup honey or maple syrup - 1 cup rolled oats - 1/2 cup protein powder (vanilla or unflavored) - 1/4 cup chia seeds - 1/2 teaspoon cinnamon - 1/4 teaspoon salt - Optional add-ins for flavor: dark chocolate chips, shredded coconut The main star here is almond butter. It brings a rich, nutty taste. You can choose smooth or crunchy based on your texture preference. Honey or maple syrup adds natural sweetness. Both options work great, so pick one that you like best. Rolled oats give these bars a hearty base. They add fiber and help keep you full. Protein powder boosts the protein content. Vanilla powder adds a nice flavor, but unflavored works too. Chia seeds are tiny powerhouses. They provide fiber and healthy fats. Plus, they help bind the bars together. A touch of cinnamon adds warmth and depth to the taste. Salt balances the sweetness and enhances the overall flavor. You can get creative with optional add-ins. Dark chocolate chips bring a sweet touch. Shredded coconut adds chewiness and flavor. These extras make the bars feel indulgent, while still being nutritious. Start by grabbing a large mixing bowl. In this bowl, combine 1 cup of almond butter with 1/2 cup of honey or maple syrup. Mix well until it becomes smooth. Next, add 1 cup of rolled oats, 1/2 cup of protein powder, 1/4 cup of chia seeds, 1/2 teaspoon of cinnamon, and 1/4 teaspoon of salt. Stir everything until it blends well. If you like extra flavor, fold in dark chocolate chips or shredded coconut at this stage. Now, take an 8x8 inch baking pan and line it with parchment paper. Make sure to leave some paper hanging over the edges. This helps with easy removal later. Pour the mixture into the prepared pan. Use a spatula or your hands to pack it down firmly. Make sure the layer is even and tightly packed. Place the pan in the refrigerator for about 1 hour. This helps the bars set properly. Once they’re firm, lift the bars out using the parchment overhang. Cut them into squares or rectangles, as you like. You can store them in an airtight container in the fridge for up to two weeks. For convenience, wrap them individually for snacks on-the-go. To get the best texture for your bars, pack the mixture tightly in the pan. Use a spatula or your hands to press it down firmly. This step helps the bars hold together well. If the mixture is loose, the bars may crumble when you cut them. To prevent sticking to the parchment paper, make sure to use enough overhang. Line your pan with parchment paper, leaving extra on the sides. This will help you lift the bars out easily later. If the mixture still sticks, try lightly greasing the parchment with a little oil. You can customize the flavors of your bars by adding spices or extracts. A dash of vanilla extract adds warmth. You can also try nutmeg or ginger for a unique twist. For extra crunch and flavor, consider mix-ins like chopped nuts, dried fruits, or seeds. You can add 1/4 cup of your favorite mix-ins for a fun change. Items like dried cranberries or almonds work well. {{image_2}} Almond butter and protein powder pack a protein punch. Protein helps build muscle and keeps you full. Each bar gives you a good boost for your day. Oats and chia seeds bring fiber to the mix. Fiber is great for digestion and keeps you feeling satisfied. Oats release energy slowly, while chia seeds add extra nutrients. Together, they help balance your blood sugar. This means you won’t have sudden energy drops. Almond butter is rich in healthy fats. These fats are good for your heart and help keep you full. They also provide long-lasting energy. Eating these bars can fuel your workouts. Healthy fats give you energy to power through your exercises. This means you can push a little harder and go a little longer. Plus, the mix of protein, fiber, and healthy fats makes these bars the perfect snack for your busy day. You can switch up flavors in your almond butter protein bars. Try using peanut butter instead of almond butter. This gives a different taste while keeping the same texture. Both nut butters are rich in flavor and nutrients. You can also add fruits for extra sweetness and texture. Bananas work great! Just mash them before mixing them in. Dried cranberries are another option. They add a chewy bite and a touch of tartness. If you need gluten-free options, use gluten-free oats. They work just as well and still taste great. This makes the bars safe for those with gluten issues. For those who follow a vegan diet, swap honey with maple syrup. It keeps the bars sweet without any animal products. This simple change makes the recipe suitable for everyone. By trying these variations, you can enjoy your protein bars in new ways. Feel free to get creative and make them just how you like! Almond butter protein bars can last up to two weeks. Store them in an airtight container in the fridge. This keeps them fresh and tasty. If they sit out at room temperature, they may spoil faster. For the best taste and texture, eat them within this time. Yes, you can freeze these bars for longer storage. Wrap each bar tightly in plastic wrap or foil. Then, place them in a freezer-safe bag. They can stay in the freezer for up to three months. When you’re ready to eat, thaw them in the fridge overnight. This keeps them soft and enjoyable. You can enjoy almond butter protein bars in many ways. They make a great snack before or after workouts. Pair them with fresh fruit or yogurt for extra nutrition. If you like, drizzle a little extra almond butter on top for added flavor. You can also crumble them over your morning oatmeal for a delicious twist. These almond butter protein bars are easy to make and full of nutrition. You mix almond butter, honey, oats, protein powder, and chia seeds, then chill for a tasty treat. By adding chocolate chips or dried fruits, you can make them extra special. Remember, these bars fuel your body with healthy fats and protein. Enjoy them as a snack or post-workout boost. I hope you try these recipes and find your favorites!

Almond Butter Protein Bars Simple and Nutritious Snack

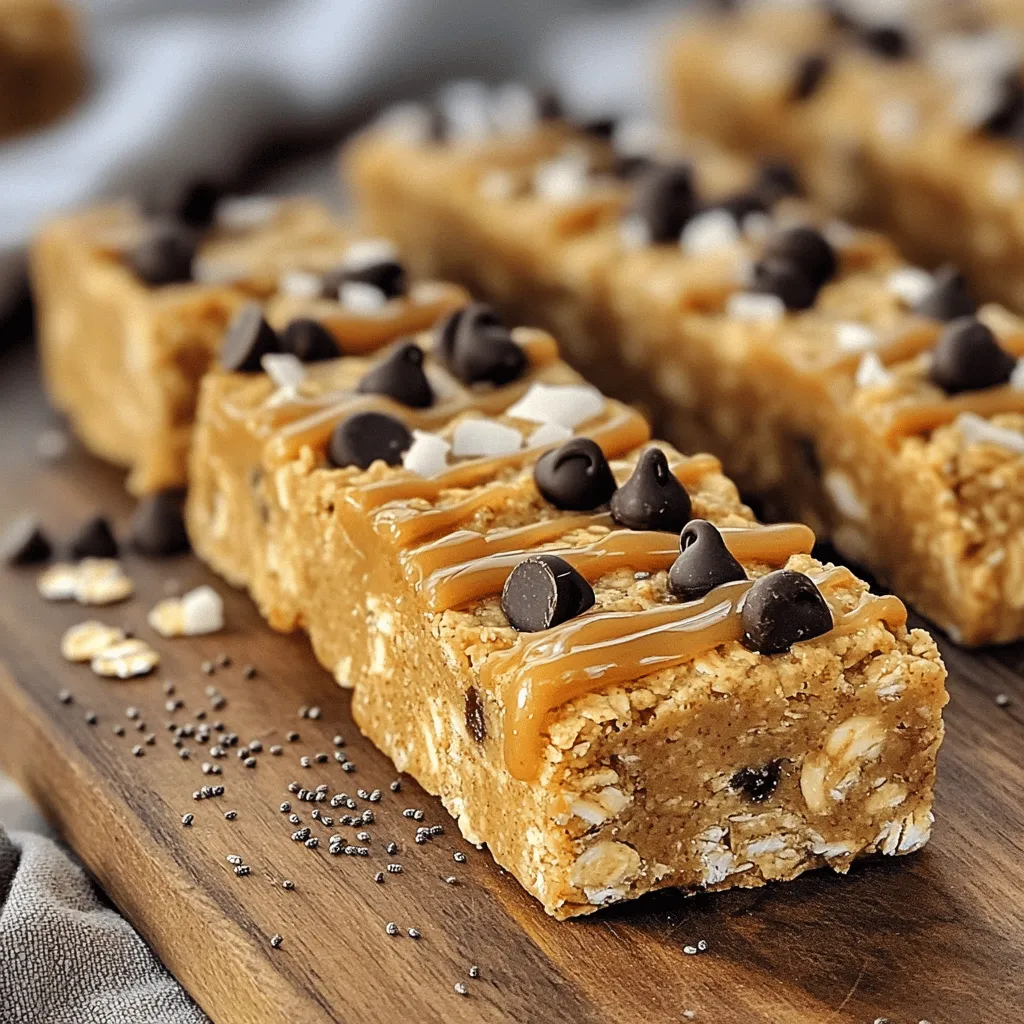
Looking for a healthy snack that fuels your day? Almond Butter Protein Bars are the answer! With just a few

To make a Margherita flatbread pizza, you need a few key items. Here’s what you will need: - 1 pre-made flatbread or pizza dough - 1 cup fresh mozzarella cheese, sliced - 1 large tomato, thinly sliced - 1/4 cup fresh basil leaves - 2 tablespoons olive oil - 1 tablespoon balsamic glaze - Salt and freshly cracked black pepper to taste These ingredients form the heart of your Margherita flatbread pizza. They create a simple but delicious dish. You can add some extra flavors if you want. Consider these optional ingredients: - Crushed red pepper flakes for heat - Garlic, minced for a savory kick - A sprinkle of oregano for a herb boost These options let you customize your pizza to fit your taste. Feel free to mix and match! Sometimes, you may not have all the ingredients. Here are some smart swaps: - Use goat cheese instead of mozzarella for a tangy taste. - Try a different flatbread, like whole wheat or gluten-free. - Use cherry tomatoes if you prefer a sweeter flavor. These substitutions keep your pizza fresh and fun. You can enjoy a classic dish while using what you have on hand. To start, I preheat the oven to 475°F (245°C). This high heat helps to make the flatbread crispy. Next, I line a baking sheet with parchment paper. This keeps the flatbread from sticking. I then place the flatbread on the baking sheet. A quick brush of olive oil on the surface adds flavor and helps it crisp up. Now comes the fun part! I take one cup of fresh mozzarella cheese and slice it. I lay the cheese evenly on the flatbread. Then, I grab one large tomato and slice it thinly. I arrange these beautiful tomato slices on top of the cheese. A sprinkle of salt and freshly cracked black pepper adds a nice touch. Finally, I gather about 1/4 cup of fresh basil leaves. They will add a burst of flavor. It's time to bake! I put the flatbread in the preheated oven. I bake it for about 10 to 12 minutes. I watch for the cheese to melt and bubble. The edges of the flatbread should turn golden brown. When it's done, I take it out and scatter the fresh basil leaves on top. A drizzle of balsamic glaze gives it a sweet finish. I let it cool for a minute, then slice it up and serve! To get a nice bake, preheat your oven to 475°F (245°C). This high heat makes the flatbread crispy. Use parchment paper on your baking sheet. This helps with easy cleanup. Brush your flatbread with olive oil. This gives it a nice golden color. Bake for 10-12 minutes. Keep an eye on it. You want the cheese to melt and bubble. Fresh mozzarella is best for this pizza. It melts well and has a mild taste. You can also try burrata for a creamier texture. If you want a stronger flavor, add some aged mozzarella. Mix cheeses for depth. Just keep the amounts balanced so the flatbread stays light. You can change the toppings to suit your taste. Add a dash of chili flakes for heat. Try different herbs like oregano or thyme for variety. If you like a crunch, add some sautéed onions or bell peppers. For a fresh kick, sprinkle arugula after baking. These small changes can make a big difference. {{image_2}} If you need a gluten-free option, try using gluten-free flatbread or pizza crust. Many stores sell ready-made options that taste great. You can also make your own dough with gluten-free flour. Just mix it with water, oil, and yeast. This way, you can enjoy Margherita flatbread without gluten. For vegetarians, this recipe is already perfect! To make it vegan, switch the mozzarella for a plant-based cheese. There are many tasty options available now. You can also use a mix of cashews and nutritional yeast for a creamy topping. This will keep the flavor rich and satisfying. You can change the toppings with the seasons. In summer, add fresh zucchini or bell peppers. In fall, try butternut squash or kale. You can also add herbs like oregano or thyme for extra flavor. Each season brings new tastes that will keep your flatbread exciting and fresh. To keep your Margherita flatbread pizza fresh, store it in an airtight container. If you can't find one, wrap the pizza tightly in plastic wrap. This will stop air from getting in and drying it out. Make sure to cool the pizza to room temperature before storing it. This way, it won’t steam inside the container and lose its crispiness. When you're ready to enjoy your leftovers, I recommend reheating them in the oven. Preheat your oven to 375°F (190°C). Place the pizza on a baking sheet. Heat it for about 5-8 minutes. This method keeps the flatbread crispy and the cheese melty. You can also use a skillet on medium heat for about 3-4 minutes. Cover the skillet with a lid to help melt the cheese. Properly stored, your Margherita flatbread pizza will last for 3-4 days in the fridge. If you want to keep it longer, consider freezing it. Wrap the pizza tightly in plastic wrap, then place it in a freezer bag. It will last for up to 2 months in the freezer. When you're ready to eat it, let it thaw in the fridge overnight before reheating. Margherita Flatbread Pizza is a simple dish. It uses fresh ingredients. You start with a flatbread or pizza dough. Top it with fresh mozzarella, tomatoes, and basil. A drizzle of olive oil adds flavor. This pizza is light, fresh, and tasty. It is perfect for lunch or dinner. Yes, you can make Margherita Flatbread Pizza ahead of time. Prepare the toppings and store them separately. You can keep them in the fridge. When you are ready to eat, assemble the pizza. Bake it to enjoy fresh flavors. This method saves time on busy days. Margherita Pizza comes from Italy. It was created in the late 1800s. A chef made it for Queen Margherita of Savoy. The colors of the pizza represent the Italian flag: red, white, and green. This pizza has become a classic worldwide. Its simple ingredients shine in every bite. In this post, we covered making delicious Margherita flatbread pizza. We looked at essential and optional ingredients, plus substitutions for your needs. You learned step-by-step how to prep, assemble, and bake your pizza. Tips and tricks helped you choose the right cheese and perfect your bake. We also explored gluten-free, vegetarian, and seasonal options. Finally, we shared storage tips and answered common questions. Enjoy creating your own tasty flatbread pizza!

Margherita Flatbread Pizza Simple and Tasty Recipe

If you’re craving a simple yet delicious meal, look no further than Margherita Flatbread Pizza! This recipe packs fresh flavors

- 8 oz cream cheese, softened - 1 cup powdered sugar - 1/2 cup caramel sauce - 1 teaspoon vanilla extract - 1/2 cup chopped pecans, toasted The main ingredients create a rich and creamy base for the dip. Cream cheese adds a smooth texture and a slight tang. Powdered sugar sweetens the dip, making it dessert-like. Caramel sauce brings a sweet, buttery flavor that pairs well with pecans. Vanilla extract enhances the overall taste. Chopped pecans add a nice crunch and nutty flavor. - 1/2 cup whipped cream - 1 teaspoon cinnamon - Graham crackers or apple slices for dippers Optional ingredients can elevate your dip. Whipped cream makes it even fluffier and lighter. Cinnamon adds warmth and depth to the flavor. Graham crackers or apple slices serve as dippers, giving you a fun way to enjoy the dip. You can mix and match these options to personalize your experience. - Step 1: Mixing cream cheese and powdered sugar Start by taking 8 ounces of softened cream cheese. Place it in a medium mixing bowl. Add 1 cup of powdered sugar to the bowl. Use a hand mixer to beat them together. Mix on medium speed until the mixture is smooth and creamy. - Step 2: Incorporating caramel sauce and vanilla Gradually pour in 1/2 cup of caramel sauce. Add 1 teaspoon of vanilla extract. Keep mixing until everything is well combined. The dip will start to take on a rich, sweet flavor. - Step 3: Folding in pecans and cinnamon Now it’s time to add texture. Take 1/2 cup of chopped pecans that are toasted. Add them to the mix along with 1 teaspoon of cinnamon. Use a spatula to fold these in gently. This step keeps the dip light and fluffy. - Step 4: Adding whipped cream Finally, fold in 1/2 cup of whipped cream. This makes the dip extra fluffy. Mix carefully until it’s all blended. You want a nice, creamy consistency. - Transfer to serving bowl Spoon the finished dip into a decorative serving bowl. This makes it look inviting and fun. - Garnishing with caramel sauce and pecans Drizzle some extra caramel sauce on top. Sprinkle additional toasted pecans for garnish. This adds a nice touch and makes it even more delicious. To achieve a fluffy dip, start with softened cream cheese. This helps create a smooth base. Use a hand mixer to blend the cream cheese and powdered sugar. Mix on medium speed until creamy and well combined. When adding caramel sauce and vanilla, do it slowly. This keeps the dip light and airy. After these ingredients mix well, fold in the chopped, toasted pecans and cinnamon. A spatula is best for this step. It helps maintain the fluffiness of the dip as you mix. For the final touch, gently fold in the whipped cream. This step is key for a light, airy texture. Use slow, careful movements to avoid deflating the whipped cream. For a creative presentation, serve the dip in a decorative bowl. Surround it with graham crackers and fresh apple slices. This creates a colorful and inviting platter. Drizzle extra caramel sauce on top for a sweet finish. A sprinkle of cinnamon adds flavor and a nice look. The best dippers for this dip are graham crackers and apple slices. Both offer a nice contrast to the creamy dip. You can also try pretzels for a salty twist. Enjoy experimenting with different dippers to find your favorite! {{image_2}} You can make your dip even more exciting. Try adding chocolate! Just mix in some cocoa powder or melted chocolate. This creates a rich chocolate caramel pecan dip. It adds a new twist that chocolate lovers will adore. Seasonal flavors can also be fun. For fall, mix in pumpkin spice. Just add a teaspoon of pumpkin spice to the original recipe. It gives your dip a warm, cozy taste perfect for autumn gatherings. If you need gluten-free options, swap out the graham crackers. Use fresh apple slices or gluten-free crackers as dippers. This way, everyone can enjoy the dip. For a low-sugar or sugar-free version, replace powdered sugar with a sugar substitute. Look for products that measure cup-for-cup like sugar. This keeps the dip sweet without the extra sugar. You can still enjoy a tasty treat without worry. To keep your Caramel Pecan Cheesecake Dip fresh, use an airtight container. Glass containers work well, but plastic ones are fine too. Make sure the dip is cool before sealing. Store it in the fridge for up to three days. If you see any change in texture or smell, it's best to toss it. You can freeze this dip if you have extra. To freeze, place it in a freezer-safe container. Leave some space at the top, as the dip may expand. It can last up to two months in the freezer. When ready to enjoy, move it to the fridge for a day to thaw. Once thawed, stir it well before serving. This helps restore its creamy texture. You can keep this dip in the fridge for about three days. Store it in an airtight container. If you notice any change in texture or smell, it's best to toss it. Yes, you can! Almonds or walnuts work well too. Just chop them up like you would with pecans. This dip will still taste great with different nuts. You can use butterscotch sauce or chocolate syrup. Both give a sweet flavor that blends well. If you want a healthier option, try honey or maple syrup. Absolutely! This dip is perfect for parties. It’s easy to make and always a hit. Serve it with graham crackers or apple slices for a fun touch. Your guests will love it! This blog post covered a tasty Caramel Pecan Cheesecake Dip. You learned the key ingredients and steps to make it. I included tips to perfect your dip and ideas for serving. You even found fun variations and storage tips for leftovers. In conclusion, try this dip for your next gathering. It's easy, sweet, and sure to impress. Enjoy your cooking!

Caramel Pecan Cheesecake Dip Decadent and Creamy Delight

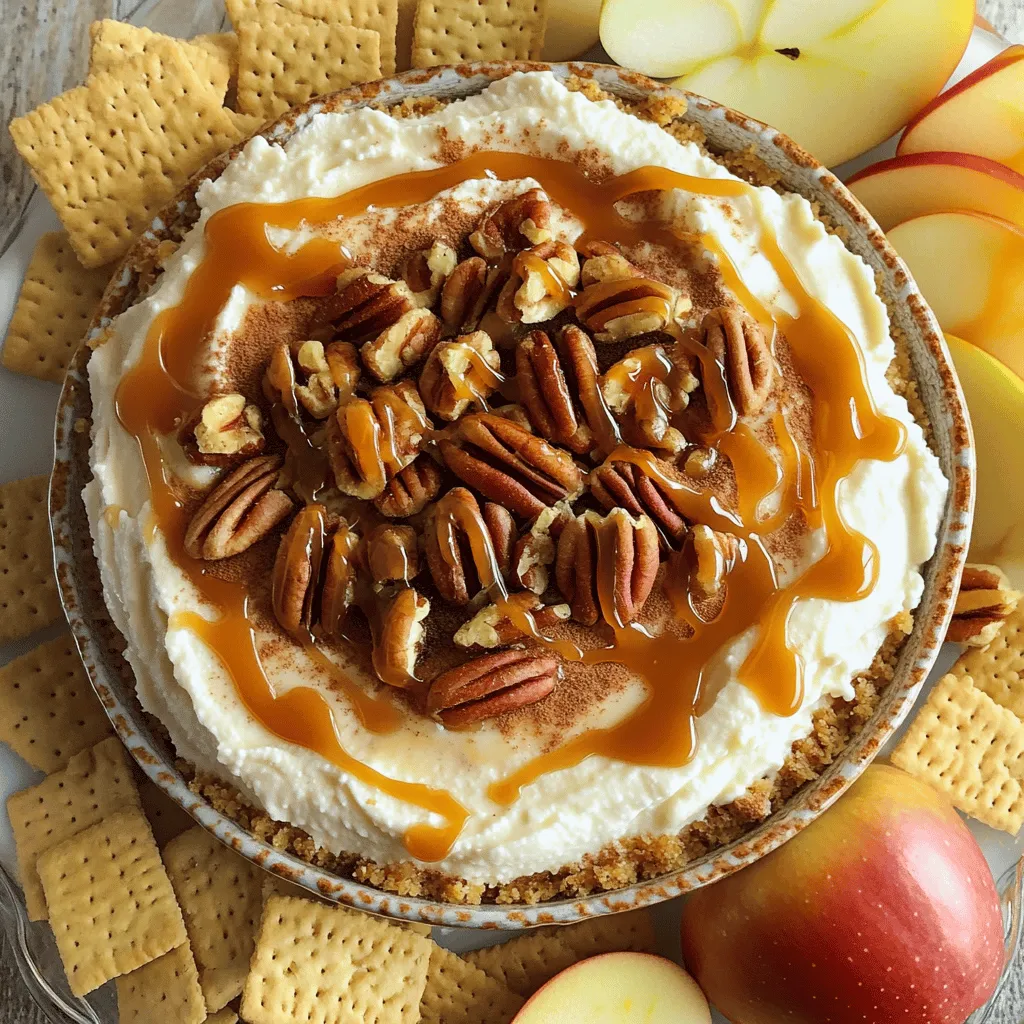
Get ready to indulge in a delightful treat! My Caramel Pecan Cheesecake Dip is creamy, rich, and full of flavor.

Older posts
Newer posts
← Previous Page1 … Page21 Page22 Page23 … Page106 Next →
© 2025 My Cooking Cast • Built with GeneratePress

Our Policies

  • Privacy Policy
  • GDPR Policy
  • Terms Of Use
  • Copyright Policy
  • Cookie Policy
  • Disclaimer

More Information​

  • Home
  • Contact
  • About
  • Dinner
  • Appetizers
  • Dessert
©2025, My Cooking Cast About Privacy Policy Back To Top