Skip to content
DisclaimerTerms Of UseGDPR PolicyCookie Policy

My Cooking Cast

  • Home
  • Drinks
  • Appetizers
  • Dinner
  • Dessert
  • About
  • Contact
  • Privacy Policy
DisclaimerTerms Of UseGDPR PolicyCookie Policy

Emma

To make cranberry pistachio biscotti with white chocolate drizzle, gather these simple ingredients: - 2 cups all-purpose flour - 1 cup granulated sugar - 2 teaspoons baking powder - 1/4 teaspoon salt - 3 large eggs - 1 teaspoon vanilla extract - 1/2 cup dried cranberries - 1/2 cup unsalted pistachios, shelled and roughly chopped - 1/2 cup white chocolate chips for drizzling Each ingredient plays an important role in creating a flavorful and crunchy biscotti. The all-purpose flour gives structure, while the sugar adds sweetness. Baking powder helps the dough rise, and salt balances the flavors. The eggs bind everything together and add moisture. Vanilla extract enhances the overall taste. Dried cranberries offer a tart burst of flavor, and pistachios add a nice crunch. Finally, the white chocolate drizzle adds a sweet finish that ties the whole treat together. When you combine these ingredients, you create a delightful snack perfect for coffee or tea. First, preheat your oven to 350°F (175°C). This step helps your biscotti bake evenly. While the oven heats, line a baking sheet with parchment paper. This keeps your biscotti from sticking and makes cleanup easy. In a mixing bowl, whisk together 2 cups of all-purpose flour, 1 cup of granulated sugar, 2 teaspoons of baking powder, and 1/4 teaspoon of salt. Make sure to mix well. This blend creates a nice base for your biscotti. In another bowl, beat 3 large eggs. Add 1 teaspoon of vanilla extract to the eggs. Mix until everything is well combined. This mixture adds moisture and flavor to your dough. Gradually add the wet ingredients to the dry ingredients. Mix until just combined; don't overdo it. Gently fold in 1/2 cup of dried cranberries and 1/2 cup of chopped pistachios. These add tasty bites in every piece. Transfer your dough to the prepared baking sheet. Shape it into a log about 12 inches long and 3 inches wide. Bake for 25 minutes until it turns a light golden color. Remove it from the oven and let it cool for 10 minutes. After cooling, carefully slice the log diagonally into 1-inch thick slices. Arrange the slices cut-side down on the baking sheet. Bake these slices for an additional 15-20 minutes. You want them crisp and lightly golden. For the white chocolate drizzle, melt 1/2 cup of white chocolate chips. Use a microwave-safe bowl and heat in 20-second intervals. Stir until smooth. This drizzle adds a sweet touch to your biscotti. Once your biscotti is cool, drizzle the melted white chocolate over the top. You can use a fork or a piping bag for this. Let the drizzle set before serving. This finishing touch makes them look and taste amazing! To keep your biscotti fresh, place them in an airtight container. This will help maintain their crunch. If you plan to keep them longer, consider freezing them. Wrap each biscotti in plastic wrap and store in a freezer bag. They can last up to three months. When ready to eat, simply thaw at room temperature. For a great texture, make sure your dough is not too wet. If it feels sticky, add a bit more flour. When shaping the log, aim for a uniform size. This helps them bake evenly. After the second bake, let them cool on a wire rack. This will make them extra crisp. One common mistake is not letting the log cool enough before slicing. If it's too warm, it may crumble. Also, avoid overmixing your dough. This can lead to tough biscotti. Lastly, don't skip the second bake! This step is key for that perfect crunch. {{image_2}} You can switch out pistachios for other nuts. Almonds and walnuts work well. Both add nice texture and flavor. You can even use hazelnuts for a rich taste. Just chop them roughly before adding to the dough. This way, your biscotti keeps its crunch. Consider adding zest from an orange or lemon. It gives a bright flavor that pairs well with cranberries. You can also try spices like cinnamon or cardamom. Just a pinch can add warmth to your biscotti. If you want a unique twist, add almond extract instead of vanilla. It enhances the nutty flavor. For a richer treat, dip your biscotti in melted chocolate. Use dark or milk chocolate for a different taste. Simply melt the chocolate and dip one end of the biscotti. Let it set on parchment paper for easy cleanup. This adds another layer of fun to your baking! To keep your cranberry pistachio biscotti fresh, store them in an airtight container. This keeps moisture out and helps them stay crisp. You can use a cookie jar or a plastic container. Make sure the container is clean and dry before adding the biscotti. Placing parchment paper between layers of biscotti will also help. This prevents them from sticking together. Freezing biscotti is a smart way to save them for later. First, let them cool completely. Then, wrap each piece tightly in plastic wrap. Place the wrapped biscotti in a freezer bag or container. They will stay fresh for up to three months in the freezer. When you're ready to eat, just thaw them at room temperature for a few hours. When stored correctly, biscotti can last up to two weeks at room temperature. If you keep them in the fridge, they may last a little longer. However, I find that the best taste comes when they are fresh. Always check for any signs of spoilage before enjoying your biscotti. If they smell off or look strange, it’s best to toss them. Yes, you can use other dried fruits. Consider raisins, apricots, or cherries. Each fruit adds its own flavor. Dried cherries work well with pistachios. Just chop them to a similar size as cranberries. To make your biscotti softer, bake them for less time. You can also add more eggs. This makes the dough moister. Another tip is to store them in an airtight container. This keeps them fresh and soft. Absolutely! You can replace white chocolate with dark chocolate. Just melt the dark chocolate the same way. The taste will change to a richer flavor. This gives a nice contrast to the sweet dough. The best way to slice biscotti is to use a sharp knife. Angle the knife at about 45 degrees. This gives you nice diagonal slices. Make sure the log is cool for easier cutting. Slicing while it's still warm may cause crumbling. You learned how to make tasty biscotti from scratch. We covered key ingredients, steps, and tips. You can use nuts, fruits, or chocolate to change the recipe. Storing and freezing these treats is easy for long-lasting snacks. Enjoy your biscotti straight from the oven or drizzled with white chocolate. Experiment with flavors to make them your own. Your perfect biscotti awaits, so start baking today!

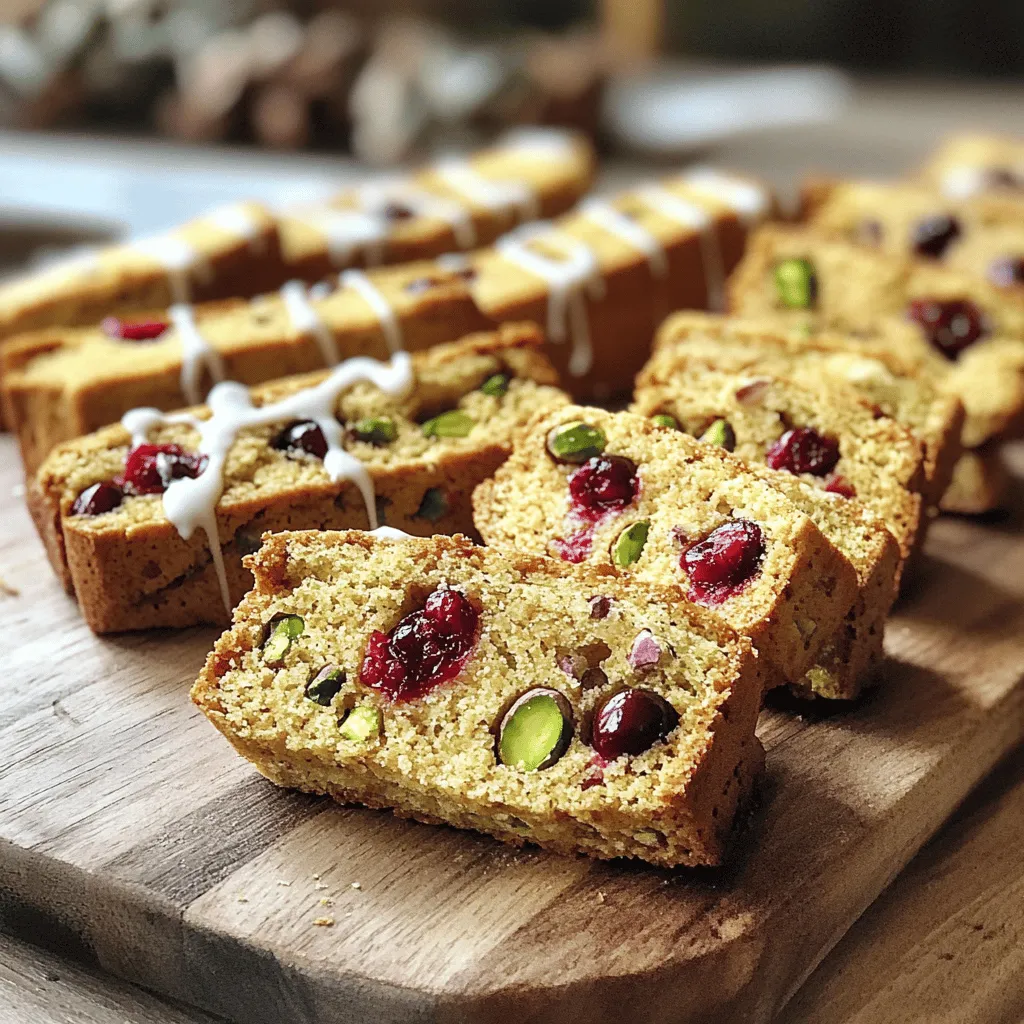
Cranberry Pistachio Biscotti with White Chocolate Drizzle

If you’re looking for a delicious treat, you’ve come to the right place! My Cranberry Pistachio Biscotti with White Chocolate

To make your Pumpkin Spice Latte Ice Cream Floats, you will need these key ingredients: - 2 cups brewed coffee, cooled - 1 cup pumpkin puree - 1/2 cup milk (or dairy-free alternative) - 1/3 cup sugar - 2 teaspoons pumpkin pie spice - 1 teaspoon vanilla extract - 4 scoops vanilla or coffee ice cream - Whipped cream, for topping - Extra pumpkin pie spice or cinnamon, for garnish These ingredients create a rich and creamy blend that brings the fall spirit to your glass. You can personalize your floats with these optional ingredients: - Caramel sauce for extra sweetness - Chocolate chips for a fun crunch - Maple syrup for a unique flavor twist - Nutmeg for additional spice Feel free to mix and match to find your perfect flavor. If you want a dairy-free option, try these substitutes: - Use almond milk or oat milk instead of regular milk. - Choose dairy-free ice cream, like coconut or almond-based options. These swaps keep the flavor while ensuring everyone can enjoy this treat! First, grab a medium bowl. In this bowl, mix 2 cups of cooled brewed coffee with 1 cup of pumpkin puree. Add in 1/2 cup of milk, which can be dairy or a substitute. Stir in 1/3 cup of sugar, 2 teaspoons of pumpkin pie spice, and 1 teaspoon of vanilla extract. Whisk it all together until it looks smooth. Taste your mixture. If you want more sweetness or spice, add more sugar or pumpkin pie spice. Now, take four tall glasses. In each glass, scoop one generous scoop of vanilla or coffee ice cream. Slowly pour the pumpkin spice coffee mixture over the ice cream. Watch as it creates a fun float effect. The ice cream will start to melt a bit but should keep its shape. To get the best float, pour the coffee mixture gently. This way, it won’t sink right to the bottom. Use a spoon to help guide the mixture if needed. After topping with whipped cream, sprinkle some pumpkin pie spice or cinnamon on top. This adds flavor and makes the float look pretty. Enjoy your treat right away with a straw and a spoon! To boost the flavor of your Pumpkin Spice Latte Ice Cream Floats, try these tips: - Use fresh pumpkin puree for a richer taste. - Swap out regular milk for oat or almond milk for extra creaminess. - Add a pinch of nutmeg to deepen the spice flavors. - Mix in a dash of maple syrup for a hint of sweetness. - Experiment with flavored ice creams, like caramel or chocolate, for a twist. Avoid these pitfalls for the best floats: - Don’t use hot coffee; it will melt your ice cream too fast. - Adding too much sugar can overpower the pumpkin flavor. - Skipping the whisking step can leave lumps in your mixture. - Using low-quality ice cream can affect the texture and taste. - Don’t forget to taste your mixture! Adjust the flavors before pouring. Make your floats stand out with these serving ideas: - Use clear glasses to show off the layers. - Garnish with crushed graham crackers for a fun crunch. - Add chocolate shavings for a sweet contrast. - Serve with cute straws or spoons for easy enjoyment. - Drizzle caramel sauce on top for a decadent touch. {{image_2}} You can switch up the ice cream flavor for your float. Instead of vanilla or coffee, try chocolate, caramel, or even pumpkin ice cream. Each will give a new twist to your treat. Chocolate ice cream adds a rich depth. Caramel brings a sweet touch. Pumpkin ice cream enhances the fall vibe. Not a coffee fan? You can still enjoy this float! Use warm milk or chai tea as a base. Just mix in pumpkin puree, sugar, and spices. It will taste just as good. You can also use apple cider for a fruity twist. This option is great for kids or those avoiding caffeine. Change the flavors to match the season. In winter, use peppermint ice cream with hot cocoa. For spring, mix in fresh berries and yogurt. In summer, try tropical flavors like coconut or mango. Each season brings new tastes to explore. Don't hesitate to get creative with your floats! If you have some Pumpkin Spice Latte Ice Cream Floats left, store them in the fridge. Place the floats in airtight containers. This keeps their taste fresh. Avoid leaving them open, as they can absorb other smells. It is best to eat them within two days for the best flavor. For the ice cream, keep it in the freezer. Wrap it well in plastic wrap or foil. This stops ice crystals from forming. If you use a store-bought tub, keep it closed when not in use. Ice cream can last for a few weeks when stored right. If you have leftover coffee mixture, pour it into an ice cube tray. Freeze it until solid. You can use these cubes in future floats. Just blend them with some milk or cream for a quick treat. This way, you can enjoy the flavors later, too! Yes, you can prepare the pumpkin spice coffee mix ahead of time. Just store it in the fridge. It stays fresh for up to three days. When you’re ready, simply pour it over the ice cream. The ice cream will melt a bit, but that is part of the fun! To change the sweetness, taste the coffee mix first. If it's not sweet enough, add more sugar. Start with one tablespoon and mix well. Keep tasting until it’s just right for you. You can also use sweeter types of milk or flavored creamers if you want. There are many fun toppings to try! Here are some ideas: - Crushed graham crackers for crunch - Chopped nuts for texture - Chocolate syrup for a twist - Caramel sauce for added sweetness - Mini marshmallows for extra fluff Yes, you can easily make a vegan version! Use dairy-free milk and ice cream. Almond, coconut, or oat milk works great. For ice cream, look for brands that make vegan options. The flavors will still be rich and delicious! You learned how to make a tasty Pumpkin Spice Latte Ice Cream Float. We covered essential and optional ingredients, plus dairy-free swaps. I shared steps to make the coffee base and assemble your floats. You now know tips to enhance flavor and avoid common mistakes. Remember to store any leftovers properly and freeze your coffee mix. This float is easy to customize, so have fun with it. Enjoy your delicious creation today or share it with friends.

Pumpkin Spice Latte Ice Cream Floats Delightful Treat

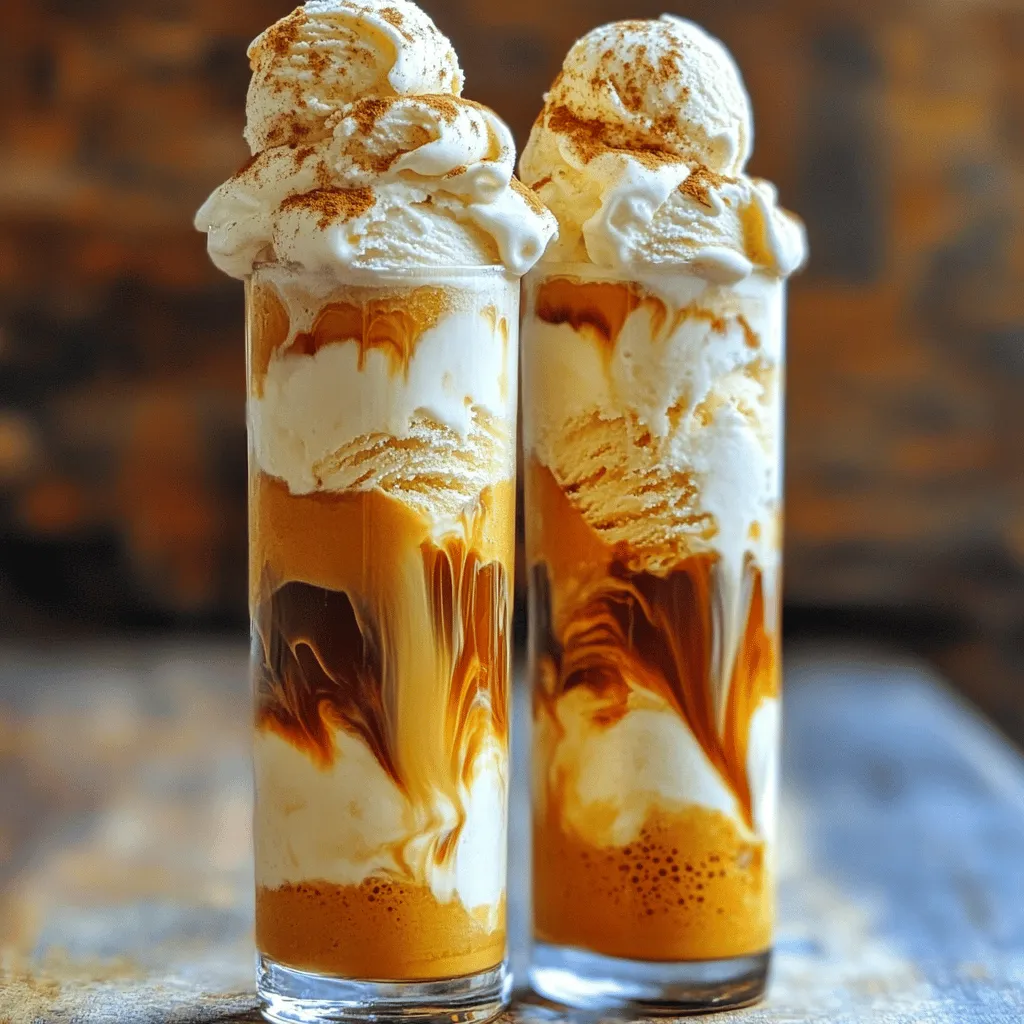
Ready to mix up your fall treats? Pumpkin Spice Latte Ice Cream Floats are here! This delightful blend combines rich

- Apples and their types You need 4 medium apples. I love using Granny Smith or Honeycrisp. They add a nice tartness. You can also mix different types for unique flavors. - Sweeteners: Brown sugar and maple syrup Use 1 cup of packed brown sugar. It gives a deep sweetness. Add 1/2 cup of pure maple syrup for a cozy, rich flavor. - Spices: Ground cinnamon and nutmeg Ground cinnamon is key here. Use 1 teaspoon for warmth. Add 1/4 teaspoon of nutmeg for a hint of spice. This makes your apple crisp fragrant and delicious. - Other key ingredients: Oats, pecans, and butter You’ll need 1 cup of rolled oats for crunch. Chop 1 cup of pecans for extra texture. Finally, use 1/3 cup of melted unsalted butter to tie it all together. This adds richness to the topping. Start by peeling, coring, and slicing your apples. I like to use Granny Smith or Honeycrisp. Next, toss the apple slices in a mixing bowl with lemon juice, brown sugar, ground cinnamon, nutmeg, and half of the maple syrup. This mix makes the apples sweet and tasty. Once coated, spread the apple mixture evenly in a greased 9x13 inch baking dish. In a separate bowl, combine rolled oats, chopped pecans, all-purpose flour, melted butter, and salt. Mix until the texture is crumbly. You want it to feel like wet sand. This topping will give a nice crunch when baked. Preheat your oven to 350°F (175°C). Once ready, sprinkle the oat and pecan mixture over the apples. Drizzle the remaining maple syrup on top for extra sweetness. Bake the dish for about 40-45 minutes. You’ll know it’s ready when the top turns golden brown and the apples are bubbling. After baking, let it cool for a few minutes. Serve warm in bowls. I recommend adding a scoop of vanilla ice cream or a dollop of whipped cream. A sprinkle of cinnamon and a few whole pecans on top adds a nice touch. Enjoy! For this crisp, I love using Granny Smith or Honeycrisp apples. They add a nice tartness. You can also try Fuji or Gala for a sweeter taste. Different apples change the flavor and texture. Tart apples hold their shape well. Sweet apples can become softer and mushy. Aim for a mix for balance. To get the right topping, you want a good mix of sweetness and crunch. Start with one cup of rolled oats and one cup of chopped pecans. You can add more nuts or oats to suit your taste. If you like it sweeter, add a bit more brown sugar or maple syrup. To avoid a soggy bottom, make sure the apples are well-coated with spices. Spread the oat mixture evenly over the apples. Drizzling some maple syrup on top helps keep it crispy. Bake at 350°F for 40-45 minutes until golden. Let it cool briefly before serving. This way, your crisp stays crunchy and delicious! {{image_2}} If you want a change from pecans, try walnuts. They give a rich flavor. Almonds are another great choice for a nice crunch. Cashews can also work but will change the taste a bit. Each nut brings its unique flavor and texture. Feel free to mix different nuts for a fun twist. You can add cranberries for a tart kick. They contrast well with sweet apples. Raisins also add natural sweetness and chewiness. For a seasonal touch, layer in pears or berries. These fruits make the dish even more vibrant and tasty. Mixing fruits keeps every bite exciting and fresh. To make this recipe gluten-free, use gluten-free flour and oats. Check that your oats are certified gluten-free. This ensures no cross-contamination occurs. You can also swap the all-purpose flour for almond flour. It adds a nutty flavor and works well. Enjoy your warm apple crisp without worry! To keep your apple crisp fresh, store leftovers in an airtight container. Place it in the fridge. It will stay good for up to three days. If you want to enjoy it later, freeze it. Let the crisp cool completely. Then wrap it tightly in foil or plastic wrap. You can also use a freezer-safe container. It will last for up to three months in the freezer. To reheat the apple crisp, use an oven for the best results. Preheat your oven to 350°F (175°C). Place the apple crisp in an oven-safe dish. Cover it with foil to keep it from drying out. Heat for about 15-20 minutes, or until warm. You can also microwave it. Place a slice on a plate and heat for about 30 seconds. To keep flavors fresh, add a splash of maple syrup before reheating. Enjoy every bite! Yes, you can make this apple crisp ahead of time. Here are some tips: - Prepare the apple mixture: You can slice and coat the apples with lemon juice, brown sugar, and spices. Store it in the fridge for up to one day. - Make the topping: Combine the oats, pecans, flour, and butter. Keep it in a sealed container. - Bake when ready: Just before serving, spread the apple mix in the baking dish. Add the topping and bake. This apple crisp pairs well with several tasty options: - Ice cream: Vanilla is a classic choice, but try caramel or cinnamon flavors too. - Whipped cream: A dollop on top adds creaminess. - Yogurt: Greek yogurt offers a tangy twist. To keep the topping golden, follow these tips: - Cover with foil: If it browns too fast, cover it lightly with foil. - Check the oven: Every oven is different. Keep an eye on the crisp as it bakes. - Use the right pan: A dark pan absorbs heat more quickly. Adjust the time if needed. In this post, we covered how to make a delicious Warm Maple Pecan Apple Crisp. We explored the best types of apples, sweeteners, and spices. I shared step-by-step instructions for creating a perfect topping and baked apple mixture. Remember to choose apples that fit your taste and tweak your topping for the best crunch. You can also try adding other fruits or nuts for fun twists. Enjoy your apple crisp fresh or stored—it's a treat that brings joy any time!

Warm Maple Pecan Apple Crisp Delicious and Easy Recipe

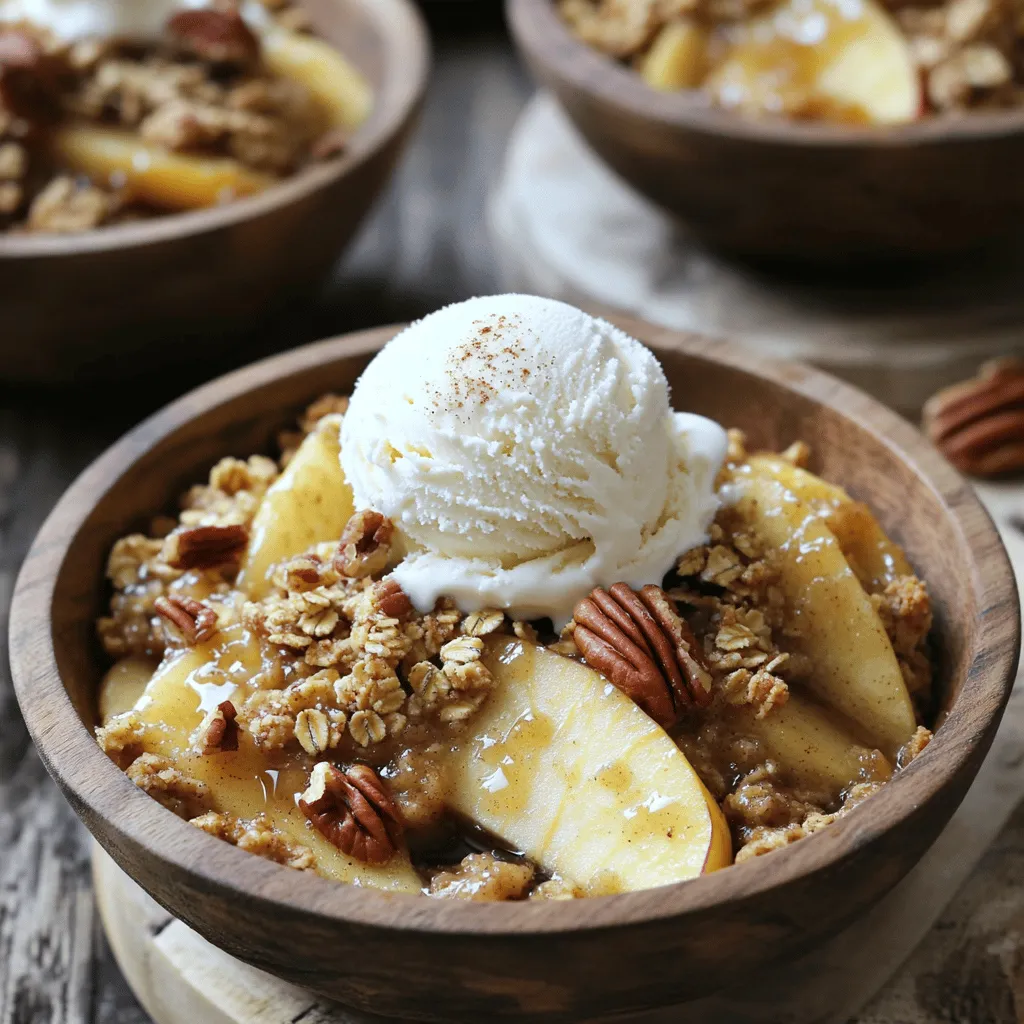
Are you ready to indulge in the warm, sweet flavors of fall? My Warm Maple Pecan Apple Crisp is not

To make No-Bake Chocolate Pumpkin Energy Bites, gather these key ingredients: - 1 cup rolled oats - 1/2 cup canned pumpkin puree - 1/3 cup almond butter (or any nut butter of your choice) - 1/4 cup honey or maple syrup - 1/4 cup unsweetened cocoa powder - 1/2 teaspoon vanilla extract - 1/4 teaspoon pumpkin pie spice - 1/4 cup mini chocolate chips (plus extra for rolling, if desired) - Pinch of salt These ingredients work together to create a delicious and healthy snack. The oats provide a nice texture, while the pumpkin adds moisture and flavor. The nut butter gives healthy fats, and the cocoa powder brings rich chocolate taste. You can enhance these bites with extra flavors. Here are some ideas: - Chopped nuts for crunch - Dried fruits like cranberries or raisins - Coconut flakes for a tropical twist - Flaxseeds or chia seeds for added nutrition Feel free to mix and match these add-ins. This helps you create a version that suits your taste. If you have allergies, you can easily swap some ingredients: - Use sunflower seed butter instead of almond butter for nut-free bites. - Replace honey with agave syrup for a vegan option. - Use gluten-free oats if you need a gluten-free version. By making these swaps, you can enjoy energy bites that fit your dietary needs. Start with a large mixing bowl. Add 1 cup of rolled oats. Next, add 1/2 cup of canned pumpkin puree. Then, scoop in 1/3 cup of almond butter. Mix these ingredients well until they blend together smoothly. Once combined, pour in 1/4 cup of honey or maple syrup. Add 1/4 cup of unsweetened cocoa powder too. Don’t forget 1/2 teaspoon of vanilla extract! Sprinkle in 1/4 teaspoon of pumpkin pie spice and a pinch of salt. Stir thoroughly until everything is mixed well. Finally, fold in 1/4 cup of mini chocolate chips. Make sure they are evenly spread throughout the mixture. Now it’s time to shape the mixture. Scoop out tablespoon-sized portions with your hands. Roll each portion into a ball. This should be easy and fun! If you want, roll the balls in extra mini chocolate chips. This adds a nice touch to the bites. Place them gently on a baking sheet lined with parchment paper. Keep going until you roll all the mixture into bites. Once you’ve rolled all the energy bites, it’s chilling time! Refrigerate them for at least 30 minutes. This helps them firm up nicely. After they chill, transfer the energy bites to an airtight container. Store them in the refrigerator for up to one week. These bites make for a great snack anytime! To get the best texture in your energy bites, use the right oats. Rolled oats work best. They give a nice chewiness without being too soft. If you want a smoother texture, pulse the oats in a blender before mixing. This makes them finer but still holds together well. Make sure to mix all ingredients well. A good mix helps bind everything together. If the mixture feels too dry, add a bit more pumpkin or nut butter. If it's too wet, add a few more oats. Spices can make a big difference in taste. I love adding pumpkin pie spice for a warm flavor. A pinch of cinnamon or nutmeg can also add a nice kick. For a twist, try adding a bit of cocoa powder. This gives a richer chocolate taste. If you want it sweeter, a bit more honey or maple syrup can help. Just remember to taste as you go. Adjust the spices until you find your perfect blend. To make these bites kid-friendly, let your kids help. They can scoop and roll the mixture into balls. You can also switch up the ingredients. Use peanut butter instead of almond butter, if they prefer. For a fun touch, let them roll the bites in extra mini chocolate chips or sprinkles. This makes them more appealing to kids. You can even shape them into fun forms, like hearts or stars, for an extra special treat. {{image_2}} You can switch up the nut butter in this recipe. Almond butter works great, but you can also use peanut butter, cashew butter, or sunflower seed butter. Each nut butter brings its own taste. Peanut butter adds a rich, nutty flavor, while sunflower seed butter is good for those with nut allergies. Experiment to find your favorite! Boost your energy bites with superfoods! Try adding chia seeds, flaxseeds, or hemp seeds. These seeds add healthy fats and fiber. You can also mix in protein powder for an extra protein kick. Spirulina powder is another great option. It gives a vibrant color and loads of nutrients. Just a little goes a long way! You can change the flavor of these bites for different seasons. In spring, add fresh mint or lemon zest. In summer, try using fresh berries. In fall, cinnamon and apple can add warmth. Winter calls for peppermint or gingerbread spice. Each season brings new tastes to explore, keeping your energy bites fun and fresh! To keep your no-bake chocolate pumpkin energy bites fresh, store them in an airtight container. Place them in the fridge right after they chill. This helps maintain their flavor and texture. They stay good for about one week. Always use a clean spoon when taking out bites to avoid contamination. If you want to store these bites for longer, freezing is a great option. Just place them in a freezer-safe bag or container. Make sure to separate layers with parchment paper. This prevents them from sticking together. They can stay in the freezer for about three months. When you're ready to eat, thaw them in the fridge overnight. Check your energy bites for any changes before eating. If you see mold or a change in color, discard them. A sour smell is another sign they may have gone bad. Trust your senses; if something feels off, it’s better to be safe. Keeping an eye on these signs will help you enjoy your treats longer. Yes, you can make these bites vegan. Just swap the honey for maple syrup. Use almond butter or any preferred nut butter. This change keeps the taste while making them vegan. These energy bites last up to one week in the fridge. Store them in an airtight container to keep them fresh. Make sure you don’t leave them out too long. Yes, you can use agave nectar or brown rice syrup. Both options will work well. They add sweetness and keep the texture nice. These energy bites are packed with nutrients. They provide fiber from oats and pumpkin. The nut butter adds protein and healthy fats. Cocoa powder brings in antioxidants. Mini chocolate chips give a tasty touch. We covered key steps to make tasty energy bites. Start with essential ingredients, then mix and roll. Add your favorite flavors to customize them. I shared helpful tips for texture and kid-friendly options. Explore different variations for extra nutrition and seasonal taste. Remember the best storage methods to keep them fresh. These bites are fun to make and easy to enjoy. Dive in and create your own perfect energy snacks!

No-Bake Chocolate Pumpkin Energy Bites Recipe

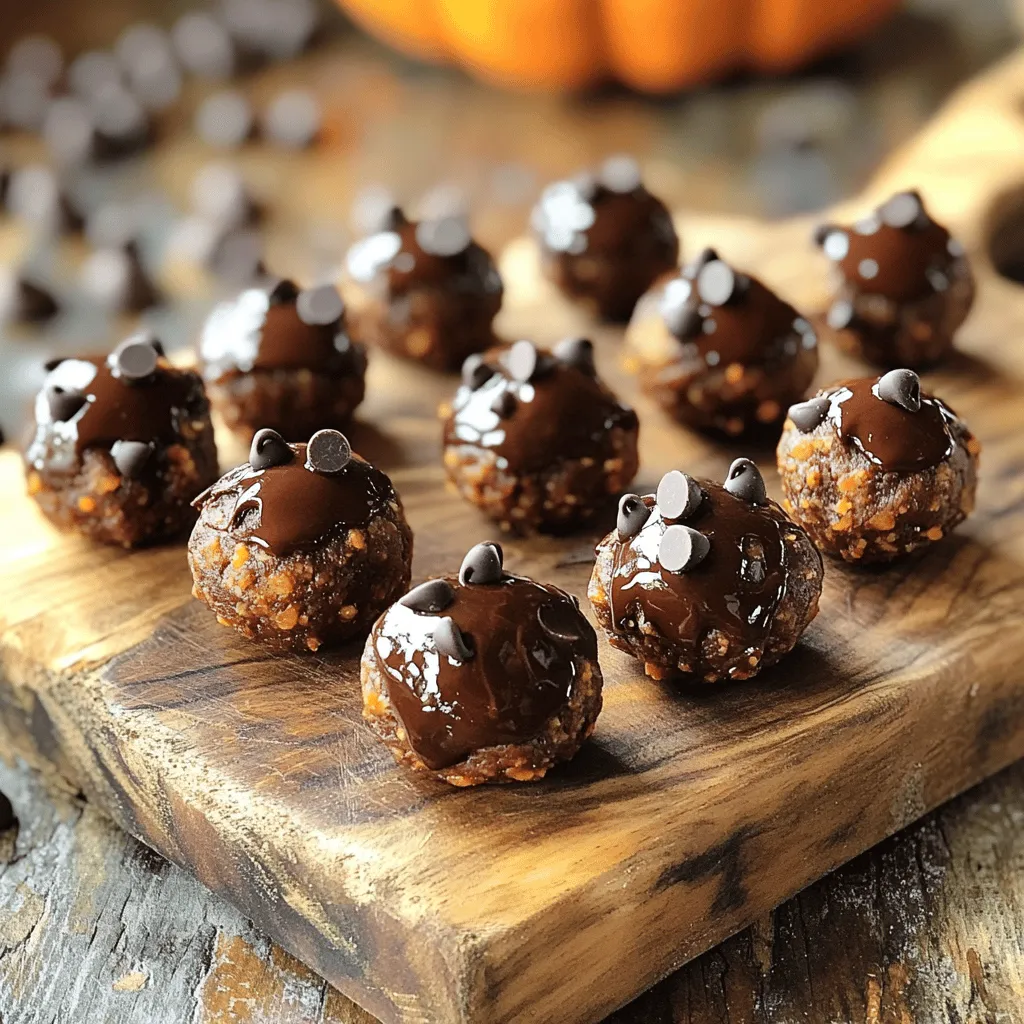
Looking for a quick and tasty snack? You’ll love these No-Bake Chocolate Pumpkin Energy Bites! They mix rich chocolate and

To make One-Pot Creamy Spinach Artichoke Pasta, you need the right ingredients. Here’s what you will need: - 12 oz (340g) pasta of choice (penne or fusilli work well) - 1 can (14 oz) artichoke hearts, drained and chopped - 3 cups fresh spinach, roughly chopped - 1 cup cream cheese, softened - 1 cup vegetable broth - 1 cup grated Parmesan cheese - 2 cloves garlic, minced - 1 teaspoon onion powder - ½ teaspoon red pepper flakes (optional, if you like a bit of heat) - Salt and pepper to taste - 2 tablespoons olive oil - Fresh parsley or basil, for garnish Each ingredient plays a key role. The pasta is the base, holding all those creamy flavors. The artichokes add a unique taste and texture. Fresh spinach brings color and nutrition. Cream cheese and Parmesan create that rich creaminess we crave. Vegetable broth gives the dish depth and flavor. Garlic and onion powder enhance the taste, while red pepper flakes add a nice kick. Finally, the olive oil helps sauté the garlic and keeps everything moist. Feel free to mix and match pasta types based on your preference. You can also adjust the spices to suit your taste. This dish is simple yet satisfying! 1. Heat olive oil in a large pot on medium heat. 2. Add minced garlic and cook for 1 minute until fragrant. 3. Toss in chopped artichoke hearts and spinach. Stir until spinach wilts, about 2-3 minutes. 4. Add pasta, vegetable broth, and onion powder to the pot. Bring to a gentle boil. 5. Cover the pot and reduce heat to simmer. Cook for 10-12 minutes until pasta is al dente. 6. Stir in softened cream cheese and grated Parmesan. Mix until cheese melts into a creamy sauce. 7. If the sauce is thick, add a splash of water or broth. 8. Season with salt, pepper, and red pepper flakes to taste. 9. Let it sit for a few minutes to thicken. - Sauté garlic and artichokes takes around 4 minutes total. - Boiling and simmering the pasta lasts about 10-12 minutes. - The overall cooking time is around 25 minutes. - Serve the pasta in bowls for a nice presentation. - Garnish with chopped parsley or basil for color. - Add a sprinkle of extra Parmesan on top for flavor. To adjust the sauce consistency, add a bit of vegetable broth. If it's too thick, water works well, too. For a richer flavor, stir in more Parmesan cheese. You can also add lemon juice for a zesty kick. One-pot cooking is simple. Start by sautéing garlic first. This step enhances the dish's aroma. When adding pasta, ensure it's fully submerged in the broth. Stir often to prevent sticking. To avoid overcooked pasta, check for doneness a minute early. It should be al dente, firm yet tender. Prep ingredients ahead of time. Chop artichokes and spinach in advance. This saves time when cooking. For quick cleanup, soak your pot right after serving. A little water makes washing easier. You can also use a liner for extra convenience. {{image_2}} - Gluten-free pasta options: You can use gluten-free penne or fusilli for this dish. Brands like Barilla or Banza offer great choices. They taste good and cook well in one pot. - Dairy-free alternatives: For a dairy-free version, try using cashew cream or coconut cream. Nutritional yeast can also add a cheesy flavor without dairy. - Adding proteins: You can make this dish heartier by adding cooked chicken or shrimp. Simply toss in the protein during the last few minutes of cooking. This adds flavor and makes it a full meal. - Incorporating additional vegetables: Consider adding bell peppers, mushrooms, or sun-dried tomatoes. These veggies boost flavor and nutrition. Just chop them and add them with the spinach. - Adjusting ingredients for seasonal produce: In spring, add asparagus or peas for a fresh touch. In fall, try adding roasted butternut squash. It adds sweetness and color. - Holiday-themed variations: For a festive twist, mix in cranberries and pecans during the holidays. This makes the dish special and perfect for gatherings. You can keep One-Pot Creamy Spinach Artichoke Pasta in the fridge for up to three days. Make sure to store it in an airtight container. This helps keep the flavors fresh and tasty. Before serving, check for any signs of spoilage. If it smells good and looks fine, you are good to go! If you want to save this pasta dish for later, freezing is a great option. First, let the pasta cool completely. Then, place it in a freezer-safe container. Make sure to leave some space at the top for expansion. You can freeze it for up to three months. When you want to eat it, thaw it in the fridge overnight. To reheat, put it in a pot over low heat. You may need to add a splash of broth or water to bring back the creaminess. Leftover One-Pot Creamy Spinach Artichoke Pasta can be fun and tasty! You can mix it into a salad for a quick lunch. It adds a nice creamy texture to greens. You could also use it as a filling for wraps. Just add some fresh veggies and roll it up. These simple ideas help you use every last bit of your delicious pasta! Can I make this dish vegan? Yes, you can make this dish vegan! Use vegan cream cheese and nutritional yeast instead of Parmesan cheese. You can also swap the vegetable broth for a homemade vegetable stock to keep it plant-based. What can I substitute for cream cheese? If you don't have cream cheese, you can use Greek yogurt or a dairy-free cream alternative. Silken tofu blended until smooth can also work as a great substitute, giving the dish a creamy texture. Is it possible to use frozen spinach? Yes, you can use frozen spinach! Just make sure to thaw and drain it well before adding it to the pot. This will help avoid excess moisture in your dish. How to adjust serving sizes To adjust serving sizes, simply scale the ingredients up or down. For example, if you want to serve six instead of four, increase all ingredient amounts by 1.5 times. Can I double the recipe? Yes, you can double the recipe. Just use a larger pot to ensure everything cooks evenly. Keep an eye on the cooking time, as it may vary slightly with more ingredients. Recommended pots and utensils I recommend using a large pot or Dutch oven for this recipe. A wooden spoon or silicone spatula works best for stirring. A sharp knife will help with chopping the spinach and artichokes. Best tools for easy cleanup For easy cleanup, consider using a non-stick pot. You can also line your cutting board with parchment paper to catch any veggie scraps. This makes cleaning up a breeze! This dish combines simple ingredients and easy steps to create a tasty meal. You learned how to choose pasta, flavorful broth, and types of cheese. I shared quick cooking tips and variations to fit your needs. Whether you want a creamy texture or a vegan option, you can customize it all. Don’t forget about fun serving ideas and how to store leftovers. Enjoy experimenting with this recipe to make it your own!

One-Pot Creamy Spinach Artichoke Pasta Delight

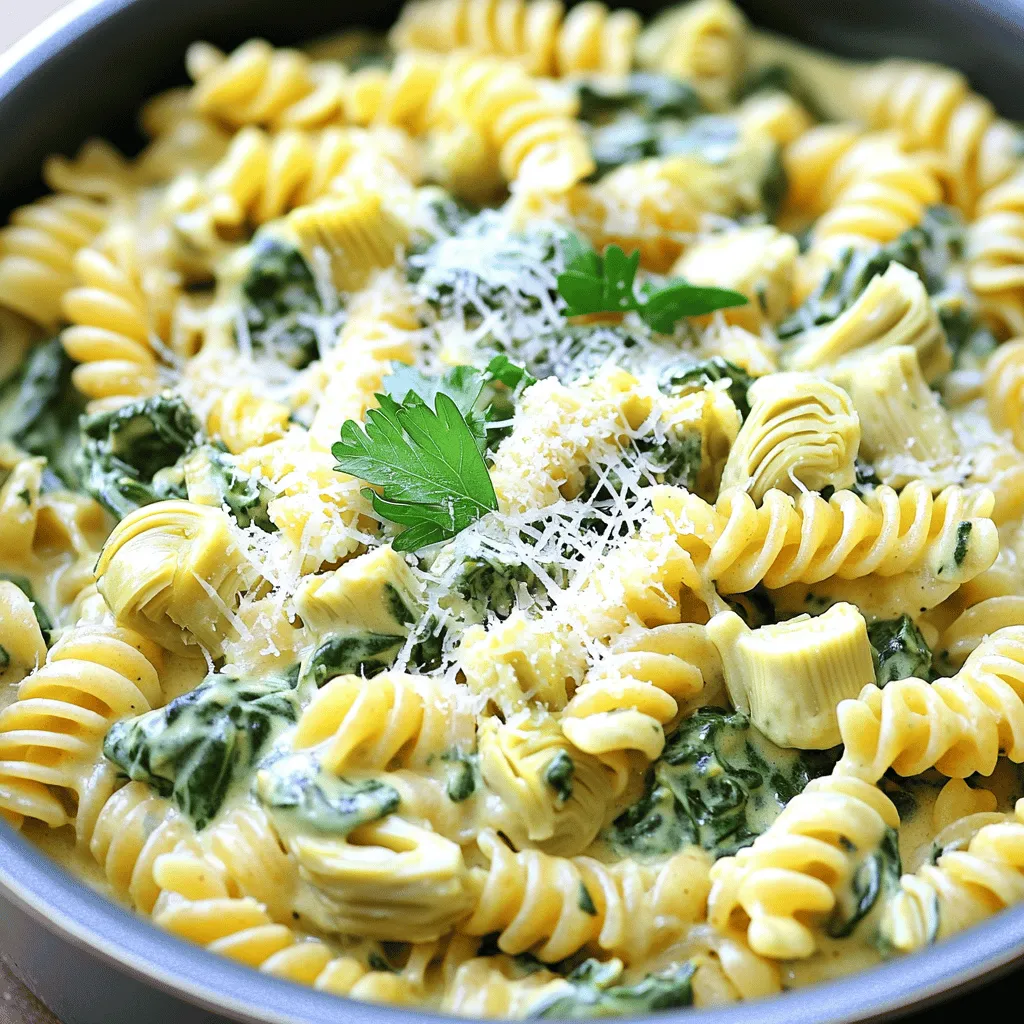
Are you ready for a delicious meal that’s quick to make and easy to clean? My One-Pot Creamy Spinach Artichoke

- 14 oz firm tofu - 1 tablespoon olive oil - 3 tablespoons honey - 2 tablespoons soy sauce - 1 tablespoon rice vinegar - 3 cloves garlic (minced) - 2 tablespoons cornstarch - 1 teaspoon sesame oil - 1/4 teaspoon red pepper flakes (optional) - Fresh cilantro (for garnish) - Sesame seeds (for garnish) To make the best crispy honey garlic tofu bites, you need firm tofu. This type holds its shape well when you cook it. Press the tofu to remove extra moisture. This step makes it crispy when you fry it. You will also need olive oil to help the tofu brown nicely. Honey gives these bites a sweet flavor. Soy sauce adds a salty touch, and rice vinegar brings some tang. For seasoning, minced garlic is a must. It gives a strong flavor. Cornstarch helps make the tofu crispy. Sesame oil adds a nutty taste, and red pepper flakes can give a little kick if you like spice. Lastly, fresh cilantro and sesame seeds are great for garnish. They make the dish look pretty and add flavor. To start, you need to press the tofu. This step is key. Pressing removes extra moisture, helping the tofu get crispy. Place the tofu on a plate. Put another plate on top and add a weight, like a can. Let it press for 20 to 30 minutes. After pressing, cut the tofu into bite-sized cubes. Aim for pieces about 1-inch each. This size helps them cook evenly and fit into your mouth easily. In a large bowl, toss the cubed tofu with 1 tablespoon of olive oil. Make sure every piece gets coated well. Next, sprinkle 2 tablespoons of cornstarch over the tofu. Toss gently again to coat. This will give your tofu a great crunch. Now, preheat your air fryer to 375°F (190°C). When it’s ready, place the coated tofu in the air fryer basket. Lay them in a single layer, with space between each piece. You may need to cook in batches if you have a small fryer. Cook the tofu for 15 to 20 minutes. Shake the basket halfway through to ensure even cooking. You want them golden and crispy on the outside. While the tofu cooks, it’s time to make the honey garlic sauce. In a small saucepan, combine 3 tablespoons of honey, 3 minced garlic cloves, 2 tablespoons of soy sauce, 1 tablespoon of rice vinegar, and 1 teaspoon of sesame oil. If you like a bit of heat, add 1/4 teaspoon of red pepper flakes. Heat the mixture over medium heat. Stir it well and bring it to a gentle simmer. Let it simmer for 3 to 5 minutes until it thickens slightly. This sauce adds a sweet and savory flavor to your crispy tofu bites. After the tofu finishes cooking, transfer it to a large bowl. Pour the honey garlic sauce over the tofu. Toss gently to coat all pieces evenly. Serve it hot, garnished with fresh cilantro and sesame seeds for extra flair. To make your tofu bites crispy, start by pressing the tofu. This step is crucial. Press the tofu for about 20-30 minutes. Use a clean kitchen towel to wrap the tofu. Place a heavy object on top to remove excess moisture. This makes the tofu firmer and helps it soak up flavor. Next, cooking temperature matters. Preheat your air fryer to 375°F (190°C). This temperature helps to get that golden brown color. Place the tofu in a single layer in the air fryer basket. Ensure they don’t touch. This allows the hot air to circulate and crisp them up. Remember to shake the basket halfway through cooking. This helps all sides cook evenly. You can adjust the sweetness to your liking. If you want a sweeter sauce, add more honey. For a spicier kick, increase the red pepper flakes. Mix in a pinch more if you enjoy heat. Consider adding new flavors too. You could stir in some ginger for a fresh twist. Adding lime juice can brighten the dish. If you want a smoky taste, try using smoked soy sauce. Each of these options can take the dish to a new level. Enjoy experimenting! {{image_2}} If you want to switch things up, use tempeh instead of tofu. Tempeh has a nutty taste and a firmer texture. It cooks well in the air fryer too. You can also try chicken alternatives, like seitan or plant-based chicken. These options keep the dish tasty and fun. For a sweet and spicy kick, add chili paste to the sauce. This change gives a nice heat that pairs well with the honey. You can also mix in different spices or herbs. Try ginger for a fresh twist or cumin for warmth. Experiment to find what you love best! To keep your crispy honey garlic tofu bites fresh, store them in an airtight container. Place a paper towel inside to absorb moisture. This helps maintain their crispiness. You can keep them in the fridge for up to three days. After that, they may lose their great taste and texture. To reheat your tofu bites, the air fryer is the best method. Set it to 375°F (190°C) and heat for about 5 minutes. This will help them regain their crunch. If you don’t have an air fryer, use an oven instead. Place them on a baking sheet and heat at 375°F (190°C) for 10 minutes. Here are some tips to keep them crispy: - Do not cover the tofu while reheating. - Avoid using a microwave, as it can make them soggy. Yes, you can make this recipe vegan. To replace honey, use maple syrup or agave nectar. These options provide a similar sweetness. They also blend well with the other flavors in the sauce. Press the tofu for about 20-30 minutes. This step is key as it removes excess moisture. By doing this, the tofu will absorb more flavor and become crispier when cooked. Use a tofu press or wrap the tofu in a clean towel. Place a heavy object on top to help press it down. You can serve these tofu bites with many sides. Try pairing them with steamed rice or quinoa for a full meal. Fresh veggies or a crisp salad also work well. For sauces, consider soy sauce or a spicy chili sauce to add extra flavor. This blog post has covered how to make crispy honey garlic tofu bites. You learned about the key ingredients, cooking steps, and how to achieve the right texture. I shared tips for flavor enhancements and storage, too. You can even try variations with different proteins. Remember, pressing tofu properly creates the best results. Enjoy experimenting with flavors and serving suggestions. Making these tofu bites can be fun and rewarding. Dive in and taste the goodness of your hard work!

Air Fryer Crispy Honey Garlic Tofu Bites Recipe

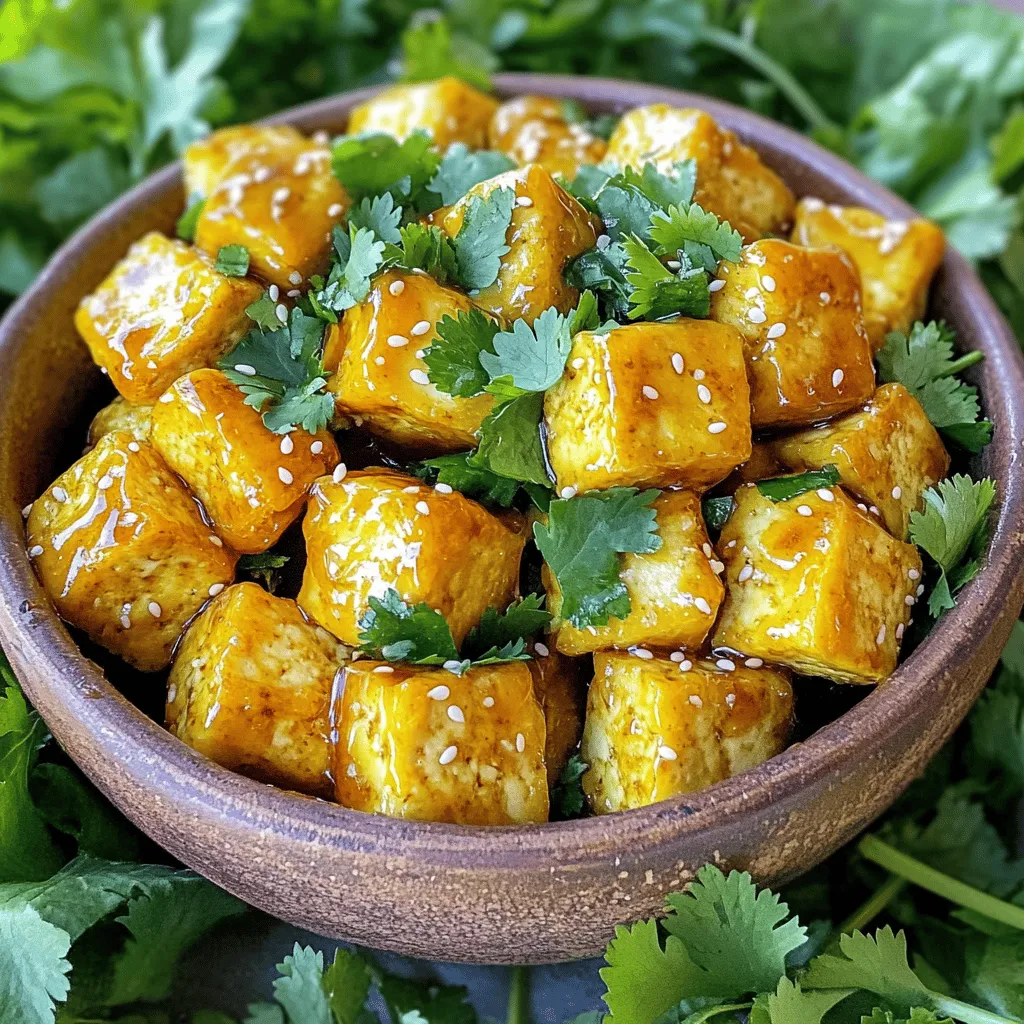
Are you craving a delicious snack that’s easy to make? Look no further! My Air Fryer Crispy Honey Garlic Tofu

To make ranch seasoned oyster crackers, you need these simple items: - 1 (12 oz) package oyster crackers - 1/4 cup vegetable oil - 1 packet ranch dressing mix (about 1 oz) - 1 teaspoon garlic powder - 1/2 teaspoon onion powder - 1/2 teaspoon dried dill - 1/4 teaspoon cayenne pepper (optional) - 1/4 teaspoon black pepper These ingredients blend together to create a tasty snack. You can change the flavor of your crackers by adding some fun extras. Here are a few ideas: - 1/4 teaspoon paprika for a smoky taste - 1 tablespoon grated Parmesan cheese for a cheesy twist - 1/2 teaspoon lemon zest for a fresh kick Feel free to mix and match these options based on what you like. If you don't have certain ingredients, don’t worry! Here are some swaps you can try: - Use olive oil instead of vegetable oil for a richer flavor. - If you lack ranch dressing mix, try a homemade blend of herbs, like parsley and dill. - Substitute garlic powder with fresh minced garlic for a stronger flavor. These substitutions help you create delicious ranch seasoned oyster crackers no matter what you have on hand. {{ingredient_image_1}} First, you need to gather your ingredients. You will need: - 1 (12 oz) package oyster crackers - 1/4 cup vegetable oil - 1 packet ranch dressing mix (about 1 oz) - 1 teaspoon garlic powder - 1/2 teaspoon onion powder - 1/2 teaspoon dried dill - 1/4 teaspoon cayenne pepper (optional) - 1/4 teaspoon black pepper Next, preheat your oven to 350°F (175°C). This step is key for even cooking. In a large mixing bowl, mix the vegetable oil, ranch dressing mix, garlic powder, onion powder, dried dill, cayenne pepper, and black pepper. Whisk these together until smooth. You want all the spices to blend well. Now, it's time to add the oyster crackers. Pour them into the bowl and gently toss them. Make sure each cracker gets coated in that tasty seasoning mix. Spread the seasoned oyster crackers in a single layer on a large baking sheet. I like to use parchment paper for easy cleanup. Bake in the oven for about 10-12 minutes. Stir the crackers halfway through. This helps them cook evenly. You will know they are ready when they turn golden and smell amazing. After baking, remove the sheet from the oven. Let the crackers cool on the baking sheet for a few minutes. This helps them crisp up more. Once cool, transfer them to a serving bowl. For the best results, make sure to coat each cracker evenly with the oil and spices. If you like more heat, add a bit more cayenne pepper. You can also try different spices for a unique flavor. Keep an eye on the baking time. Every oven is different! Stirring halfway through ensures no cracker gets left behind. Trust me, these little snacks will be a hit at your next gathering! To keep your ranch seasoned oyster crackers fresh, store them in an airtight container. They will stay crunchy and tasty this way. Avoid exposing them to moisture. I suggest using a glass jar or a plastic container with a tight lid. These crackers are perfect for snack time or parties. Serve them in a bowl for guests to enjoy. You can also use them as a topping on soups or salads for added crunch. They pair well with cheese dip or salsa, adding extra flavor. Want to boost the taste? Add some extra spices! Here are a few ideas: - Paprika: Adds a smoky flavor. - Cumin: Gives a warm, earthy taste. - Parmesan cheese: Adds a rich, savory touch. Mix these in with your seasoning before baking. You’ll love the new flavors! Pro Tips Even Coating: Make sure to toss the oyster crackers thoroughly in the seasoning mixture to ensure each cracker is evenly coated for maximum flavor. Watch the Time: Keep an eye on the crackers while baking, as oven temperatures can vary. Bake until they are golden brown and fragrant. Spice It Up: Feel free to adjust the cayenne pepper according to your spice preference. You can also add other spices like paprika or chili powder for a different flavor profile. Storage Tips: Store any leftover crackers in an airtight container to keep them crunchy. They can last for up to a week at room temperature. {{image_2}} You can change the flavor of your ranch seasoned oyster crackers easily. Try adding spices like smoked paprika for a smoky kick or lemon zest for a fresh, zesty taste. You could also use barbecue seasoning for a sweet and tangy flavor. For an Italian twist, mix in some Italian herbs like oregano and basil. Each variation adds a fun twist to your snack. You can make these crackers vegan by using a plant-based ranch seasoning mix. Check the label to ensure it’s dairy-free. If you're gluten-free, swap regular oyster crackers for gluten-free ones. There are many brands out there that fit this need. You can enjoy this snack without worrying about your diet. These oyster crackers taste great on their own, but they shine with dips. Try serving them with ranch dip or hummus for added flavor. You can also pair them with guacamole for a creamy contrast. If you like spicy food, a salsa or spicy cheese dip works well too. Each dip adds a new layer to your snack experience. Each serving of ranch seasoned oyster crackers contains about 150 calories. The crackers pack a mix of carbs and fats. The vegetable oil adds healthy fats, while the ranch mix gives flavor without too many extra calories. If you enjoy a little heat, adding cayenne pepper can boost the taste without adding significant calories. - Oyster Crackers: These tiny snacks are low in calories and provide some carbs for energy. - Vegetable Oil: This oil offers healthy fats, which can help with heart health. - Ranch Dressing Mix: It gives flavor and can have herbs that offer some nutrients. - Garlic Powder: Garlic can boost your immune system and add flavor. - Onion Powder: This spice may help lower blood sugar levels. - Dill: This herb can aid digestion and add a fresh taste. - Cayenne Pepper: It may help boost your metabolism and adds a spicy kick. - Black Pepper: This spice can improve digestion and enhance flavors. I recommend serving about 1 ounce, or roughly a small handful, for the best snack experience. This amount allows you to enjoy the flavor without overindulging. The recipe yields about eight servings, making it perfect for sharing at parties or family gatherings. Adjust the serving size based on your preference, but keep in mind that they are hard to resist! You can make ranch seasoned oyster crackers ahead of time. First, follow the recipe steps to mix and bake the crackers. Once they cool, store them in an airtight container. This keeps them fresh for about a week. You can also freeze them for up to three months. To serve, just let them thaw at room temperature. You can find great ranch seasoning at most grocery stores. Look in the spice aisle or the salad dressing section. Brands like Hidden Valley offer good options. You can also shop online for unique blends. Some specialty stores carry homemade or organic options, too. Yes, you can store leftover crackers. Place them in an airtight container. This helps keep them crunchy. Avoid storing them in the fridge, as that adds moisture. For the best taste, eat them within a week. If they start to get soft, you can bake them again for a few minutes to crisp them up. In this blog post, we explored how to make delicious ranch seasoned oyster crackers. We went through the key ingredients, the step-by-step process, and valuable tips for perfect baking. I shared storage advice to keep crackers fresh and serving suggestions to enhance flavor. We discussed different flavor variations and health benefits of these snacks, along with answers to common questions. Enjoy making these crackers; they can be a fun treat or a savory snack. Happy baking and snacking!

Ranch Seasoned Oyster Crackers Flavorful Snack Idea

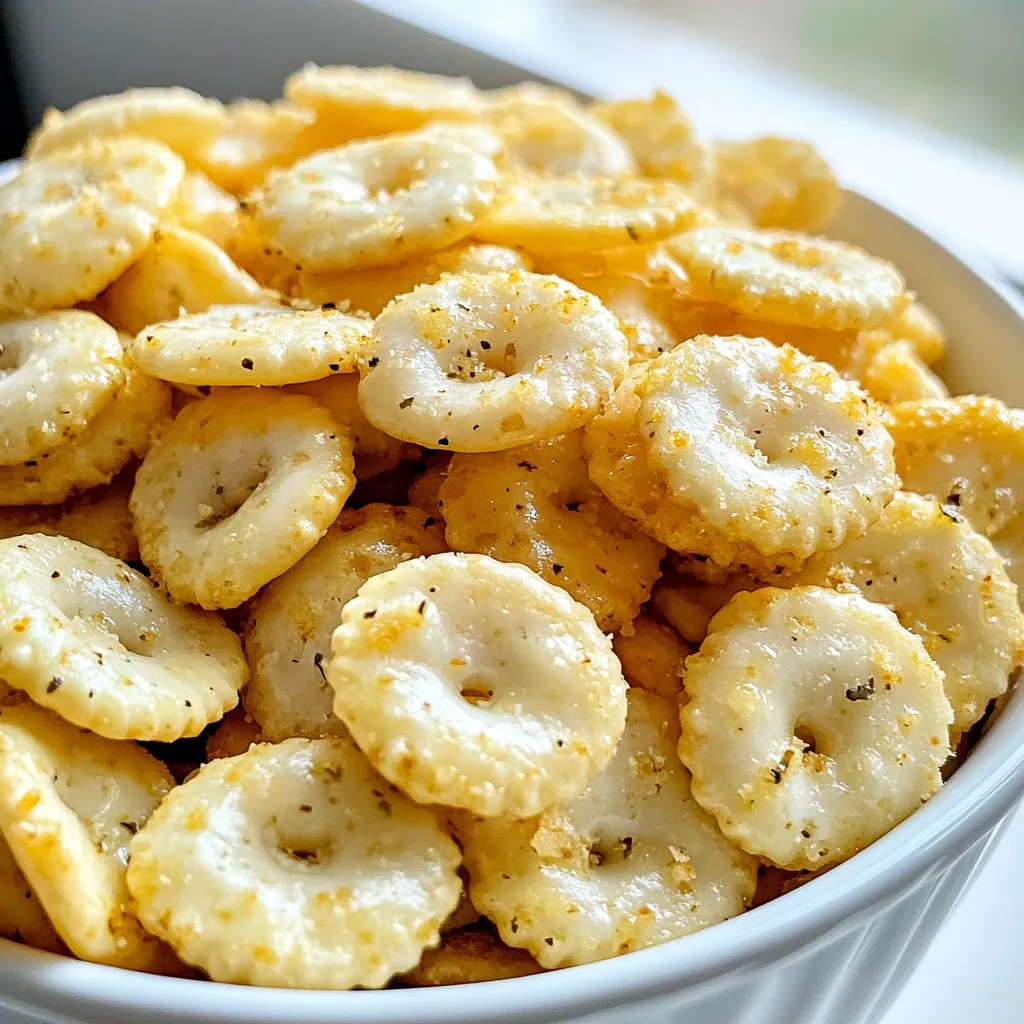
Do you love a crunchy snack that’s full of flavor? Look no further! Ranch Seasoned Oyster Crackers are a fun

To make these tasty fritters, gather these key ingredients: - 2 medium apples, peeled and diced - 1 cup all-purpose flour - 1/2 cup granulated sugar - 1 teaspoon baking powder - 1/2 teaspoon baking soda - 1/2 teaspoon ground cinnamon - 1/4 teaspoon salt - 1/2 cup buttermilk - 1 large egg - 1 teaspoon vanilla extract - Oil for frying - 1/2 cup maple syrup - 1/2 cup powdered sugar Each ingredient plays a role. The apples add sweetness and moisture. The flour and sugar give the fritters structure. The baking powder and soda help them rise. Cinnamon adds warmth and flavor, while buttermilk makes them tender. You can enhance these fritters with a few extras: - Chopped nuts (like walnuts or pecans) - A pinch of nutmeg - A splash of lemon juice Chopped nuts add crunch. Nutmeg brings depth to the flavor. Lemon juice can brighten the taste of the apples. If you need to swap any ingredients, here are some ideas: - Use whole wheat flour for a nuttier taste. - Swap buttermilk with regular milk or yogurt mixed with vinegar. - Maple syrup can be replaced with honey for a different sweetness. These substitutions can still yield a delicious result. Feel free to experiment based on what you have at home! Start by peeling and dicing two medium apples. I like using sweet apples like Fuji or Honeycrisp. Place the diced apples in a bowl. Add one tablespoon of granulated sugar and a dash of cinnamon. This will bring out the apples' natural sweetness. Let the apples sit for about 10 minutes. This step helps the apples release their juices, which adds flavor to the fritters. In a large bowl, mix together one cup of all-purpose flour, half a cup of granulated sugar, one teaspoon of baking powder, half a teaspoon of baking soda, half a teaspoon of ground cinnamon, and a quarter teaspoon of salt. In a separate bowl, whisk together half a cup of buttermilk, one large egg, and one teaspoon of vanilla extract. Pour the wet mixture into the dry ingredients. Gently fold everything together until just combined. Be careful not to overmix. Finally, stir in the prepared apple mixture evenly. Heat oil in a deep frying pan over medium heat. Aim for a temperature of about 350°F or 175°C. Once the oil is hot, scoop out spoonfuls of the batter. Carefully drop them into the oil, forming small fritters. Fry them in batches to avoid overcrowding. Cook for about 3 to 4 minutes on each side. Look for a golden brown color. Once cooked, remove the fritters and place them on a paper towel-lined plate. This will help drain any excess oil. In a small saucepan, combine half a cup of maple syrup with half a cup of powdered sugar. Heat over low heat. Stir the mixture until smooth and warm. This creates a rich glaze that adds a perfect finish to your fritters. Drizzle the warm glaze over each fritter while they are still slightly warm. This helps the glaze to set nicely on the fritters. To get the best fritter texture, use firm apples. Granny Smith or Honeycrisp work great. Dice the apples small to ensure even cooking. Let them sit with sugar and cinnamon. This step helps draw out moisture and adds flavor. When mixing the batter, avoid overmixing. Mix just until combined. This keeps your fritters light and fluffy. Heat your oil to 350°F (175°C) for the right frying temperature. Use a deep frying pan to allow enough space for fritters. Fry them in small batches. This keeps the temperature steady. Cook for about 3-4 minutes on each side. Look for a golden-brown color. Use a slotted spoon to remove the fritters and drain them on paper towels. Serve your fritters warm for the best taste. Arrange them on a nice platter. Dust with powdered sugar for a beautiful finish. Drizzle the warm maple glaze right before serving. For extra coziness, add a small bowl of maple syrup for dipping. You can even pair them with a hot drink like coffee or tea. Enjoy this sweet treat with friends or family for a perfect cozy moment! {{image_2}} You can use many types of apples for fritters. Each kind gives a unique taste. I love using Granny Smith apples. They are tart and hold their shape well. Honeycrisp apples are also a great choice. They add sweetness and crunch. You can even mix different apples for a fun twist. Try combining tart and sweet apples. This mix enhances flavor and texture. Making gluten-free fritters is easy and tasty. Swap all-purpose flour for a gluten-free blend. Look for a mix that has xanthan gum. This helps with the texture. You can also use almond flour or coconut flour. These options give a different taste. Just remember, the batter may need adjusting. Add a bit more liquid if it feels too thick. Nuts and spices bring new flavors to your fritters. Chopped walnuts or pecans add a nice crunch. You can stir them into the batter before frying. If you love spice, try adding nutmeg or ginger. A pinch of cardamom also gives warmth. These additions can make your fritters special. Experiment with different combinations to find your favorite. To keep your fritters fresh, let them cool first. Then, place them in an airtight container. You can stack them with parchment paper in between. This keeps them from sticking together. Store the container in the fridge. They will last for about 2-3 days. When you're ready to enjoy your fritters again, the best way to reheat them is in the oven. Preheat your oven to 350°F (175°C). Place the fritters on a baking sheet lined with parchment paper. Heat them for about 10-15 minutes, until warm. This method helps keep them crispy. You can also use a microwave, but they may get soggy. If you want to save fritters for later, freezing is a great option. First, let them cool completely. Then, lay them out on a baking sheet in a single layer. Freeze them for about an hour. Once frozen, transfer them to a freezer-safe bag or container. They can last in the freezer for up to 2 months. To reheat, bake them from frozen, following the previous reheating tips. Yes, you can make these fritters ahead of time. I recommend frying them and then letting them cool. Store them in an airtight container in the fridge for up to two days. To enjoy them later, just reheat in an oven until warm. The best apples for fritters are tart and firm. I love using Granny Smith apples for their crisp texture and bright flavor. Honeycrisp or Fuji apples also work well. They add a nice sweetness while holding their shape during cooking. To keep fritters from getting soggy, drain them well after frying. Place them on paper towels right away to absorb excess oil. Also, avoid stacking them while they are still hot. This keeps them crispy longer. Yes, you can bake these fritters instead of frying. Preheat your oven to 375°F (190°C). Place the fritters on a baking sheet lined with parchment paper. Bake for about 15-20 minutes until golden brown, flipping halfway through for even cooking. They won't be as crispy, but they'll still taste great! Maple glazed apple fritters are a delight to create. We explored essential and optional ingredients, plus substitutions for flavor. The step-by-step instructions guide you through making the perfect fritters and glaze. You learned tips for texture and serving ideas to enhance your experience. Variations let you customize your fritters with different apples or spices. Remember to store leftovers properly for great taste. Enjoy making and sharing these treats! They are sure to impress anyone who tries them.

Maple Glazed Apple Fritters Cozy and Comforting Treat

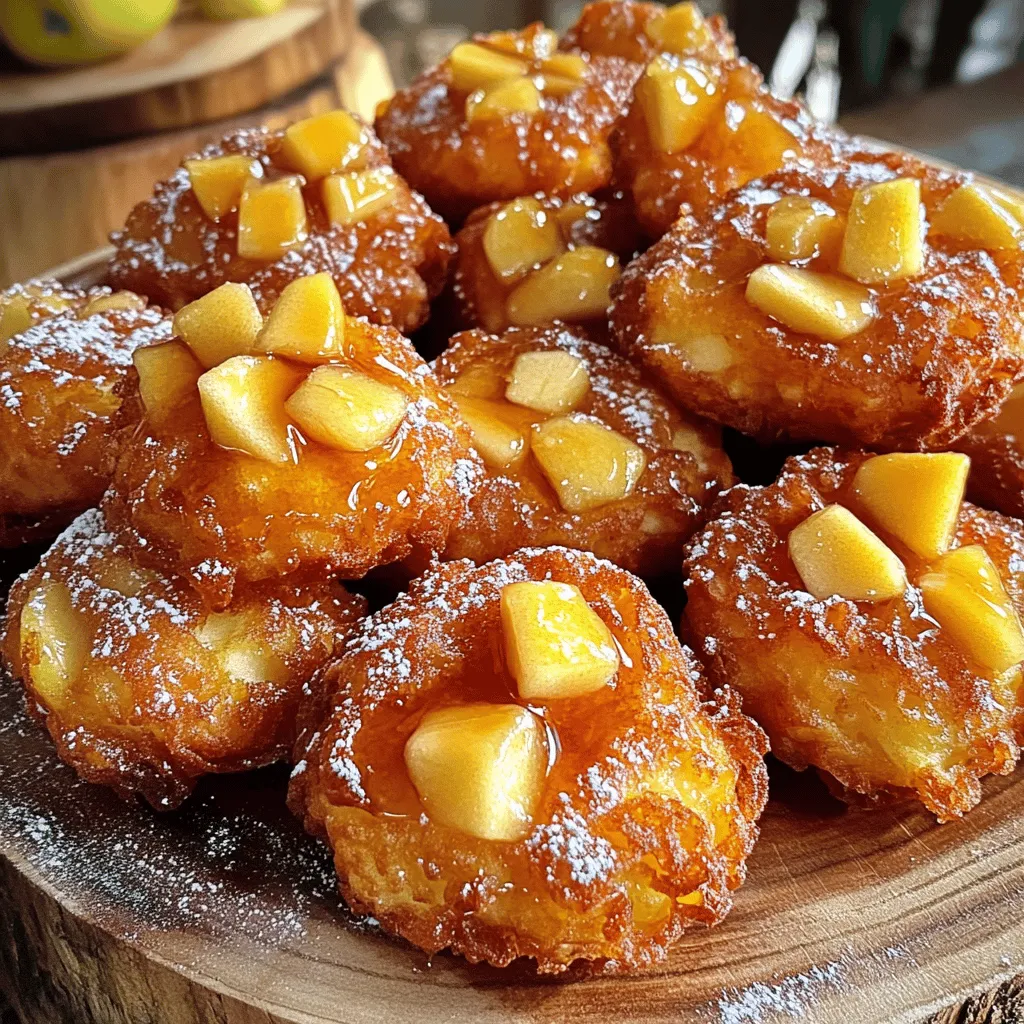
Warm, sweet, and oh-so-cozy, maple glazed apple fritters are a true comfort treat! In this post, I’ll guide you step-by-step

- 1 lb (450g) boneless chicken thighs, cut into bite-sized pieces - 1 cup cornstarch - 1 teaspoon garlic powder - 1 teaspoon onion powder - 1/2 teaspoon salt - 1/2 teaspoon black pepper - 1/2 cup all-purpose flour - 2 large eggs, beaten - Vegetable oil, for frying The chicken thighs bring a juicy and tender bite. They fry up well and soak up flavors nicely. The cornstarch creates that crispy coating we all love. Garlic and onion powder add a depth of flavor. The eggs help the coating stick, creating a perfect crunch. - 1/2 cup sweet chili sauce - 1 tablespoon soy sauce - 1 tablespoon rice vinegar - 1 teaspoon grated fresh ginger - 1 teaspoon minced garlic - 1 teaspoon sesame oil This sauce is the star of the dish. Sweet chili sauce adds that signature sweetness. Soy sauce gives a savory punch. Rice vinegar adds tang, while ginger and garlic bring freshness. Sesame oil rounds out the flavor with a nutty note. - 1 tablespoon chopped green onions Green onions add a fresh touch and a pop of color. They make your dish look fancy and inviting. You can also sprinkle sesame seeds or serve lime wedges on the side. These extras can enhance the dish even more. To start, grab a large bowl. Mix together cornstarch, garlic powder, onion powder, salt, and pepper. This mix gives the chicken flavor and crunch. Cut the boneless chicken thighs into bite-sized pieces. Toss these pieces in the cornstarch mix until they are well coated. This step is key for that crispy texture. Next, set up your breading station. Use three bowls. In the first bowl, place the flour. In the second bowl, beat the two large eggs. You want them fluffy. Now, take the coated chicken pieces. First, dip each piece into the flour, shaking off any extra flour. Then, dip it into the beaten eggs to coat it well. This double dip helps create a thick, crunchy crust. Now, heat vegetable oil in a deep pan or wok. Use about 2 inches of oil and set the heat to medium-high. You want the oil to reach 350°F (175°C). Carefully add the breaded chicken pieces in batches. Do not overcrowd the pan, or they won't fry well. Fry the chicken for 4-5 minutes until they turn golden brown and crispy. When done, remove them and place them on a paper towel-lined plate to drain excess oil. In a small saucepan, combine sweet chili sauce, soy sauce, rice vinegar, grated fresh ginger, minced garlic, and sesame oil. Cook this mix over medium heat. Stir often for about 2-3 minutes until everything heats through. This sauce is sweet and tangy, perfect for the chicken. Once all the chicken is fried, add it to a large mixing bowl. Pour the sweet chili sauce over the chicken. Toss gently to coat each piece evenly. This step adds flavor and keeps the chicken moist. Transfer the crispy sweet chili chicken to a serving platter. For a nice touch, sprinkle chopped green onions on top for garnish. You can also serve it with steamed rice and pickled vegetables. This adds color and flavor to your meal. Enjoy your homemade crispy sweet chili chicken! To get that perfect crispiness, start with dry chicken. Pat the pieces with paper towels. The less moisture, the better. Use cornstarch as your main coating. It creates a light, crispy texture. After coating, let the chicken sit for a few minutes. This helps the coating stick. Fry in small batches. Overcrowding the pan leads to soggy chicken. Fry until golden brown, usually about 4-5 minutes. Keep a close eye on the oil temperature. Too hot can burn the coating, while too cool makes it greasy. Choose an oil with a high smoke point. Good options are vegetable oil or canola oil. These oils can handle the heat needed for frying. Olive oil is not ideal for frying at high heat. It can burn and give off a bad taste. Make sure your oil is deep enough to cover the chicken pieces. About 2 inches is perfect. This ensures even cooking all around. For extra flavor, marinate the chicken before coating. Use a simple mix of soy sauce and garlic. Let the chicken sit in the marinade for at least 30 minutes. This adds depth to the dish. You can also add ginger or sesame oil for more flavor. If you are short on time, even a quick 10-minute soak helps. Just make sure to drain the chicken well before coating. This keeps the coating crispy. {{image_2}} Want to add some fire to your dish? You can make a spicy version of crispy sweet chili chicken. Start by mixing in some red pepper flakes or chili paste into your sweet chili sauce. Adjust the amount based on how much heat you like. You can also sprinkle some cayenne pepper on the chicken before frying. This will give your dish an extra kick. It’s perfect for those who enjoy bold flavors and a little spice in their life. Making your own sweet chili sauce is easy and fun! Here’s a simple recipe you can try: - 1/2 cup sweet chili sauce - 1 tablespoon soy sauce - 1 tablespoon rice vinegar - 1 teaspoon grated fresh ginger - 1 teaspoon minced garlic - 1 teaspoon sesame oil Combine all the ingredients in a small saucepan. Heat over medium. Stir often for 2-3 minutes until it's warm. This sauce is great for dipping and drizzling over your chicken. It adds a fresh taste that store-bought sauces can’t match. If you want to switch things up, try different proteins. You can use shrimp instead of chicken for a seafood twist. Just make sure to cook the shrimp until they turn pink and opaque. You can also use tofu for a plant-based option. Press the tofu to remove extra moisture, then cut it into cubes. Coat the tofu just like the chicken. This way, it will soak up all the flavors and become just as crispy. You can enjoy the same great taste while exploring new flavors. To keep your crispy sweet chili chicken fresh, store it in an airtight container. Allow the chicken to cool to room temperature first. Place the cooled chicken in the container and refrigerate. Use the leftovers within 3 days for the best taste and texture. When ready to eat, reheat in the oven for best results. Preheat your oven to 375°F (190°C). Spread the chicken on a baking sheet. Bake for about 10-15 minutes until heated through and crispy. You can also reheat in a skillet over medium heat. Just add a bit of oil and stir occasionally until hot. If you want to freeze the chicken, do it before adding the sauce. Place the cooled, fried chicken in a freezer-safe bag. Remove as much air as possible. Label the bag with the date and freeze for up to 3 months. To eat, thaw in the fridge overnight. Reheat as mentioned above for a crispy finish. To make the chicken less greasy, use a wire rack after frying. Place the fried chicken on the rack instead of paper towels. This lets excess oil drip away. You can also fry at a higher heat. This helps the chicken cook faster, reducing oil absorption. Yes, you can use chicken breasts. Thighs have more fat, giving a juicier taste. Breasts are leaner but still work well. Just ensure they are cut into similar-sized pieces for even cooking. You can serve it with several sides. Steamed rice pairs well, soaking up the sauce. Fried rice adds flavor and texture. Fresh vegetables, like broccoli or snap peas, give a nice crunch. You can also add pickled veggies for extra zing. To make sweet chili sauce, mix a few simple ingredients. Combine 1/2 cup sweet chili sauce with 1 tablespoon soy sauce, 1 tablespoon rice vinegar, 1 teaspoon grated ginger, and 1 teaspoon minced garlic. Heat this over medium heat for 2-3 minutes. Stir often until warm and fragrant. To keep leftovers crispy, store them in a single layer. Use a wire rack to allow air to circulate. Avoid covering them tightly, as this traps moisture. Reheat in an oven at 375°F (190°C) for about 10 minutes before serving. This helps regain that crispiness. You now know how to make crispy sweet chili chicken. We covered essential ingredients, from chicken to sauce. The step-by-step guide helped you cook perfectly fried chicken and a tasty sauce. You learned tips for crispiness and marinating. We discussed variations for different tastes and how to store leftovers. Keep this recipe handy for great meals. Enjoy making and sharing it with others. Your cooking will shine with these simple steps!

Crispy Sweet Chili Chicken Better Than Takeout Delight

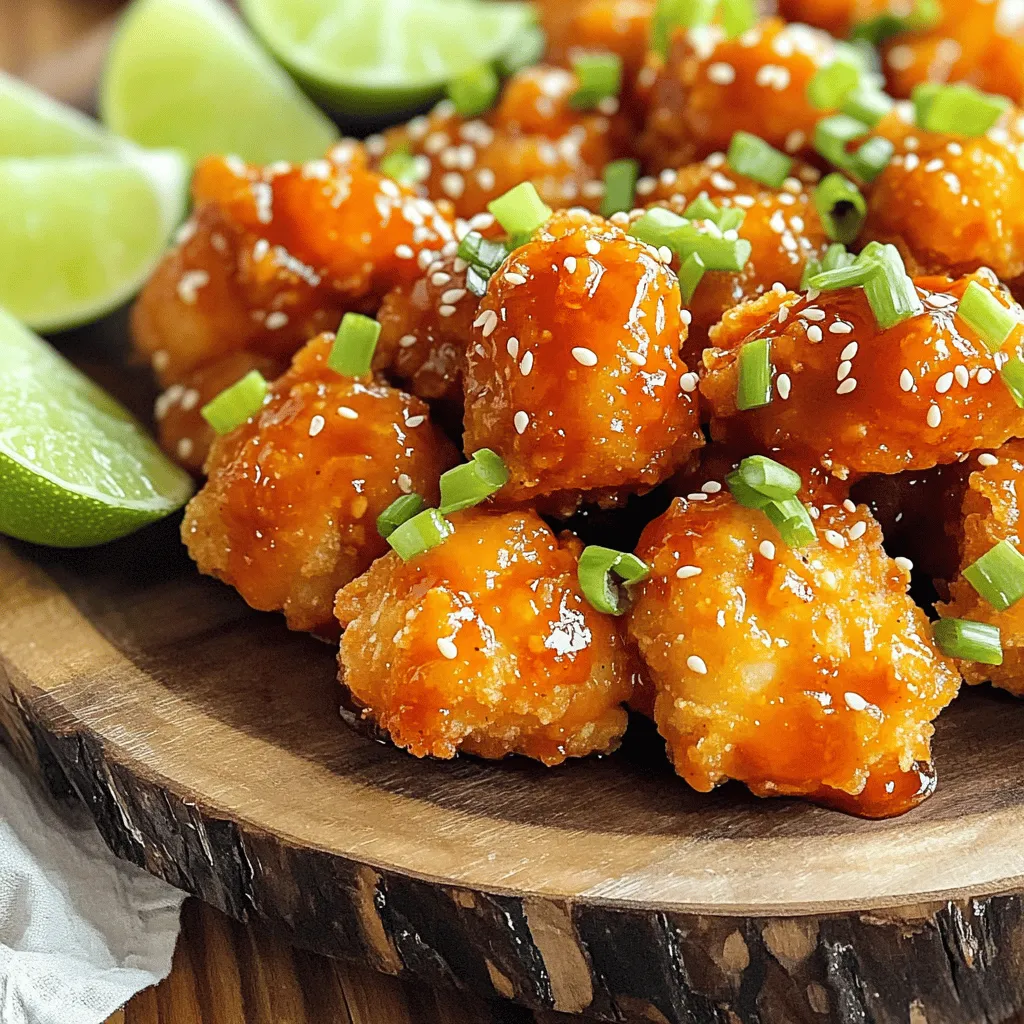
Craving crispy sweet chili chicken that outshines takeout? You’re in the right place! I’ll show you how to create this

- 1 ½ cups all-purpose flour - 1 teaspoon baking powder - 1 teaspoon baking soda - ½ teaspoon salt - 1 teaspoon ground cinnamon - ½ teaspoon ground nutmeg - ¼ teaspoon ground ginger These dry ingredients create the base of our loaf. Each spice adds warmth and flavor. The baking powder and soda help the loaf rise, giving it that perfect texture. - ½ cup granulated sugar - ½ cup brown sugar, packed - ½ cup vegetable oil - 1 cup pumpkin puree - 2 large eggs - 1 teaspoon vanilla extract The sugars add sweetness and depth. The vegetable oil keeps the loaf moist. Pumpkin puree brings in that rich flavor and color. Eggs and vanilla extract help bind everything together. - 8 oz cream cheese, softened - ½ cup powdered sugar - 1 teaspoon vanilla extract - 1 egg yolk This creamy filling takes the loaf to the next level. The cream cheese provides a tangy taste. Powdered sugar sweetens it up, while the egg yolk adds richness. You’ll need a mixing bowl and a hand mixer to whip this up. Gather all these ingredients, and you’ll be ready to create a delightful pumpkin cream cheese swirl loaf. Each bite will be a treat! To start, preheat your oven to 350°F (175°C). This sets the stage for even baking. Next, take a 9x5-inch loaf pan and grease it well. You can use non-stick spray or butter. Make sure the sides are coated, so the loaf comes out easily. In a medium bowl, whisk together the dry ingredients. Combine 1 ½ cups of all-purpose flour, 1 teaspoon of baking powder, 1 teaspoon of baking soda, and ½ teaspoon of salt. Add 1 teaspoon of ground cinnamon, ½ teaspoon of ground nutmeg, and ¼ teaspoon of ground ginger. This mix will add flavor. In a large bowl, mix ½ cup of granulated sugar, ½ cup of brown sugar, and ½ cup of vegetable oil. Stir until well blended. Then, add 1 cup of pumpkin puree, 2 large eggs, and 1 teaspoon of vanilla extract. Mix until smooth. Now, gradually add the dry ingredients to the wet mix. Stir gently until just combined. It’s okay to have a few lumps. Overmixing can make the loaf tough. In a small bowl, combine 8 oz of softened cream cheese, ½ cup of powdered sugar, 1 teaspoon of vanilla extract, and 1 egg yolk. Beat until smooth and creamy. This filling adds richness to your loaf. To create the swirl, pour half of the pumpkin batter into the loaf pan. Spoon dollops of the cream cheese mixture over the batter. Use a knife or toothpick to swirl it. Then, pour the remaining pumpkin batter over the cream cheese mixture and swirl again gently. This creates a beautiful marbled effect. Place the loaf pan in your preheated oven. Bake for 55-65 minutes. To check if it's done, insert a toothpick into the center. If it comes out clean, the loaf is ready. If the top is browning too fast, you can cover it loosely with aluminum foil. Once baked, remove the loaf from the oven. Let it cool in the pan for about 10 minutes. Then transfer it to a wire rack. Allow it to cool completely before slicing. Enjoy the warm, cozy flavors of your pumpkin cream cheese swirl loaf! To make the best pumpkin cream cheese swirl loaf, avoid common mistakes. First, do not overmix the batter. This can lead to a dense loaf. Mix until just combined. Second, measure your flour correctly. Too much flour can dry out the loaf. Use a spoon to fill your measuring cup, then level it off. For dietary restrictions, you can make easy swaps. Use gluten-free flour if needed. Replace the sugar with a sugar substitute for a lower-calorie option. If you want a dairy-free version, try a vegan cream cheese. When serving your loaf, slice it neatly. Arrange the slices on a large platter. This creates an inviting look. You can dust the top with powdered sugar for a nice touch. Garnishes can enhance the flavor too. Serve with a dollop of fresh whipped cream. Add a sprinkle of cinnamon or nutmeg on top for extra flair. You can also add some chopped nuts for a crunchy bite. To make your loaf even more flavorful, consider adding spices. A pinch of allspice or cloves can add warmth. You can also experiment with alternative extracts. Instead of vanilla, use almond extract for a unique twist. Try adding dark chocolate chips or dried fruit for variety. This adds sweetness and texture to every bite. These small changes can turn a good loaf into a great one! {{image_2}} You can easily swap ingredients to make this loaf suit your taste. - Using different types of sugar: You can use coconut sugar or maple sugar instead of granulated sugar. This change can add a unique flavor that complements the pumpkin well. - Alternative flours: If you need a gluten-free option, try using almond flour or gluten-free all-purpose flour. Mix it with a bit of xanthan gum to help with texture. Adding different flavors can make this loaf more exciting. - Adding chocolate, nuts, or fruits: You can fold in chocolate chips, chopped nuts, or dried fruits like cranberries. These additions can provide a delightful crunch or burst of flavor. - Seasonal spice variations: Try adding a pinch of cardamom or a hint of allspice for a more complex flavor. These spices can bring a new twist to your pumpkin loaf. If you want to change the cream cheese filling, there are great options. - Vegan options for cream cheese: Use a store-bought vegan cream cheese or make your own with blended cashews. Just add a bit of lemon juice for tang. - Other fillings for variety: Instead of cream cheese, consider using ricotta or mascarpone. These creamy options can create a different yet delicious swirl. To keep your pumpkin cream cheese swirl loaf fresh, store it in an airtight container. This helps keep moisture in and prevents it from becoming dry. You can also wrap it tightly in plastic wrap. Place it at room temperature for short-term storage. If you plan to eat it within a few days, this method works well. To freeze the loaf, first let it cool completely. Then, wrap it tightly in plastic wrap. After that, place it in a freezer-safe bag or container. Make sure to label it with the date. For the best taste, eat it within three months. When you're ready to enjoy it, take it out of the freezer. Place it in the fridge overnight to thaw. If you're in a hurry, you can thaw it at room temperature for a few hours. Avoid using a microwave, as it can change the loaf's texture. The loaf lasts about 4 to 5 days at room temperature. If stored in the fridge, it can stay fresh for up to a week. Always check for signs of spoilage. If you see mold or notice an off smell, it’s best to toss it. Enjoy your delicious treat while it’s still fresh! Yes, you can use fresh pumpkin. Fresh pumpkin gives a bright flavor. It also has more nutrients. To use fresh pumpkin, roast it first. Cut the pumpkin, remove seeds, and bake until soft. Then puree it until smooth. This might take more time than using canned pumpkin. You can reduce sugar by using less granulated and brown sugar. Try using applesauce or mashed bananas in place of some sugar. For fat, replace some vegetable oil with unsweetened applesauce. You can also use whole wheat flour for more fiber. This way, your loaf stays tasty but becomes a bit healthier. This loaf pairs well with coffee or chai tea. A dollop of whipped cream adds a nice touch. You can also serve it with a side of fresh fruit, like sliced apples or pears. Adding a sprinkle of nuts or granola on top boosts the texture and flavor. Yes, you can double the recipe easily. Just make sure to use a larger loaf pan. You may need to bake it longer. Check for doneness with a toothpick. If the center is not set, bake longer in small increments. Adjust the baking time based on your oven. This blog post covered how to make a delicious Pumpkin Cream Cheese Swirl Loaf. We discussed ingredients, step-by-step instructions, tips, variations, and storage methods. Remember to mix well but avoid overmixing to keep your loaf light. Experiment with flavors and presentations to make your loaf unique. Store it properly for freshness, and enjoy it for up to a week. Baking is fun and rewarding, so get started today with your new skills!

Pumpkin Cream Cheese Swirl Loaf Bakery Delight

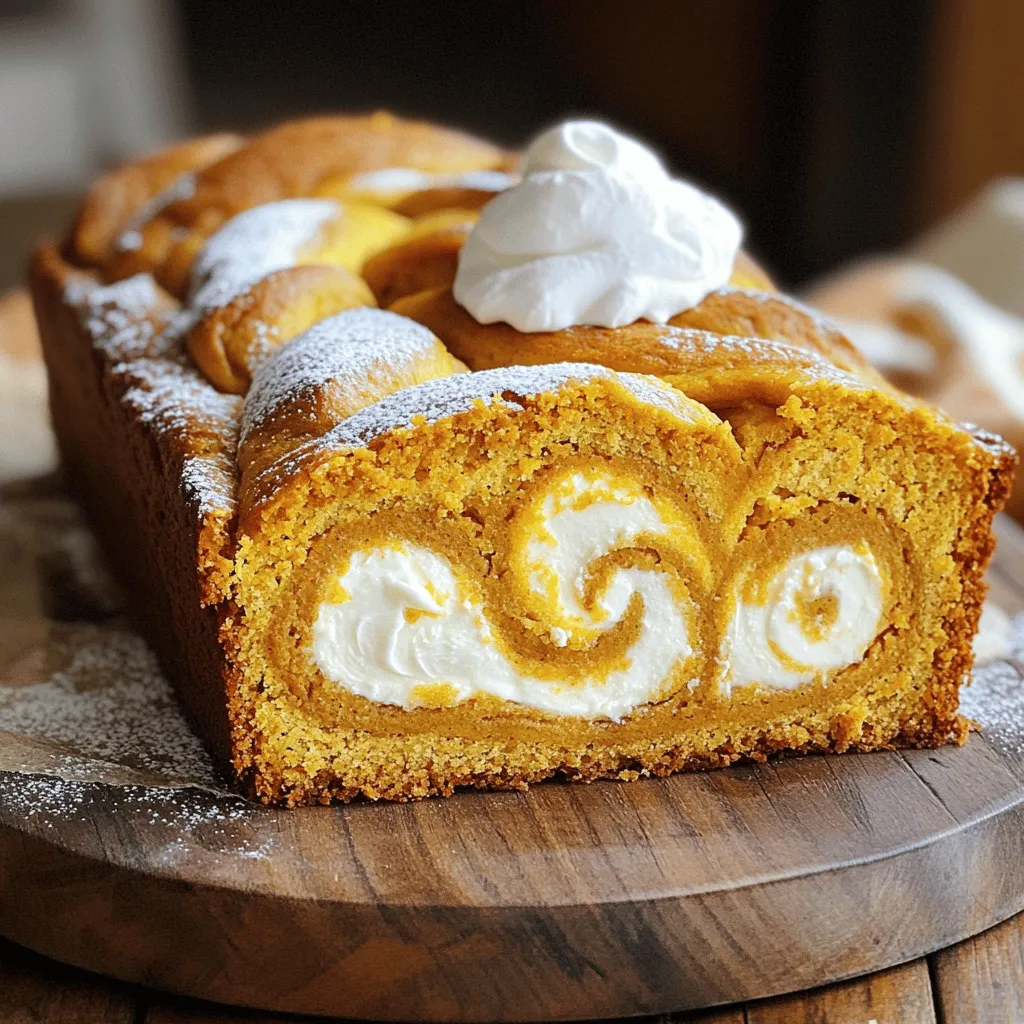
If you’re ready to indulge in the cozy flavors of fall, then my Pumpkin Cream Cheese Swirl Loaf is just

Older posts
Newer posts
← Previous Page1 … Page18 Page19 Page20 … Page130 Next →
© 2025 My Cooking Cast • Built with GeneratePress

Our Policies

  • Privacy Policy
  • GDPR Policy
  • Terms Of Use
  • Copyright Policy
  • Cookie Policy
  • Disclaimer

More Information​

  • Home
  • Contact
  • About
  • Dinner
  • Appetizers
  • Dessert
©2025, My Cooking Cast About Privacy Policy Back To Top