Skip to content
DisclaimerTerms Of UseGDPR PolicyCookie Policy

My Cooking Cast

  • Home
  • Drinks
  • Appetizers
  • Dinner
  • Dessert
  • About
  • Contact
  • Privacy Policy
DisclaimerTerms Of UseGDPR PolicyCookie Policy

Emma

- 1 large head of cauliflower, cut into florets - 6 cloves of garlic, unpeeled - 2 tablespoons olive oil - 1/2 cup unsweetened almond milk (or any milk of choice) - 3 tablespoons unsalted butter (or vegan butter for a plant-based option) - Salt and pepper to taste - Fresh chives, chopped (for garnish) Cauliflower is the star here. Choose a large head for a good amount. The garlic adds that rich flavor. I prefer unpeeled garlic for roasting; it becomes sweet and soft. You can use almond milk for a dairy-free option or any milk you like. Butter adds creaminess, but vegan butter works well too. Salt and pepper are key for flavor. Fresh chives brighten the dish with color and taste. - Baking sheet - Mixing bowl - Immersion blender or food processor - Potato masher (if you prefer a chunkier texture) - Cooking utensils A baking sheet is essential for roasting the cauliflower and garlic. I use a mixing bowl to combine the ingredients after roasting. An immersion blender gives a smooth texture, while a food processor works too. If you want some lumps, a potato masher is a great choice. Make sure to have basic cooking utensils like a spatula and measuring cups ready. 1. Preheating the oven: Set your oven to 425°F (220°C). This heat will help the cauliflower and garlic get nice and tender. 2. Tossing ingredients and initial roasting: Take a large baking sheet. Add the cauliflower florets and six unpeeled garlic cloves. Drizzle them with two tablespoons of olive oil. Sprinkle salt and pepper over them. Toss everything well to coat. Spread the mixture evenly on the sheet. Roast in the oven for about 25-30 minutes. Look for golden brown cauliflower and soft garlic. 1. Techniques for mixing the mash: Once the veggies are done, let the garlic cool for a bit. Squeeze the soft garlic out of its skin into a mixing bowl. Add the roasted cauliflower to the bowl. Then, pour in half a cup of almond milk and three tablespoons of butter. 2. Adjusting texture preferences: Use an immersion blender or a food processor to blend the mixture. Blend until it is smooth and creamy. If you want a chunkier mash, grab a potato masher and mash it by hand. Taste your mash. If you think it needs more flavor, add extra salt, pepper, or butter. 1. Plating tips with garnishing: Serve your mash warm on a plate. To make it pretty, sprinkle some chopped fresh chives on top. This adds a nice green touch. 2. Ideal pairing with main dishes: This roasted garlic cauliflower mash works well with many main dishes. It pairs nicely with roasted chicken, grilled fish, or a hearty vegetable stew. Enjoy the comfort of this creamy dish! To get the best texture from your cauliflower, start with fresh florets. They should be firm and not brown. Cut them evenly for even cooking. When you roast the cauliflower, the edges should crisp up nicely. This gives it a great flavor and a nice bite. Roasting garlic is simple but crucial. Leave the skins on while roasting. This keeps the garlic soft and sweet. After roasting, let it cool a bit. Then, squeeze the soft garlic into your bowl. It will blend smoothly into your mash. If you want to switch from almond milk, you can use regular milk, soy milk, or oat milk. Each will change the flavor slightly. Try them all to find what you like best. For a vegan option, use plant-based butter. It works well to keep the creaminess. Coconut oil can also add a nice flavor while keeping it dairy-free. To make your mash even tastier, add fresh herbs like parsley or thyme. They bring a fresh taste that brightens the dish. You can also use spices like paprika or nutmeg for warmth. Don’t stop at just cauliflower. You can mix in other veggies. Turnips, carrots, or even sweet potatoes can add new flavors. Just roast them along with the cauliflower for a unique twist. {{image_2}} You can add cheese to your mash for a richer taste. A nice sharp cheddar or creamy goat cheese works great. Mix in about a half cup of cheese right before you blend the mash. This makes it extra creamy and delicious. You can also play with spices. A dash of smoked paprika or a pinch of nutmeg gives it a warm kick. Try adding fresh herbs like thyme or rosemary for a fragrant twist. For a keto-friendly version, skip the almond milk and use heavy cream instead. This keeps the carbs low while adding a rich flavor. To make it low-sodium, use fresh herbs and spices instead of salt. Lemon juice can brighten the dish without adding salt. You can also use no-salt butter for a simple swap. You can turn your mash into a tasty dip. Just add some sour cream and serve it with fresh veggies or chips. It’s perfect for parties! You can also use the mash as a filling in other dishes. Stuff it into baked potatoes or use it in tacos for a fun twist. This way, you can enjoy the flavors in many different ways. To keep your roasted garlic cauliflower mash fresh, use airtight containers. Glass or BPA-free plastic containers work best. Make sure to let the mash cool before sealing it. If you have leftovers, they freeze well too. Place them in freezer-safe bags, removing as much air as possible. Label the bags with the date so you know when to use them. When reheating, keep the texture and flavor in mind. The stovetop is the best method. Place the mash in a saucepan over low heat. Stir often to warm it through without drying it out. If using a microwave, heat it in short bursts. Stir in between to ensure even heating. You may need to add a splash of almond milk for creaminess. In the fridge, your mash will stay good for about 3 to 5 days. Always check for signs of spoilage. If it smells bad or shows mold, it’s time to toss it. When frozen, it can last for up to 3 months. Just remember to label it! Yes, you can prepare this dish in advance. To do this, roast the cauliflower and garlic as directed. Once they cool, store them in an airtight container. You can keep it in the fridge for up to three days. When ready to serve, simply reheat and blend with the almond milk and butter. This saves time on busy days. You have several options for milk. If you want a dairy choice, use whole milk or cream. For non-dairy options, try oat milk, soy milk, or coconut milk. Each will change the taste a bit, but all can work well. Just pick what you enjoy most. To add heat, include crushed red pepper flakes or cayenne pepper. You can also mix in a small amount of hot sauce for a bold kick. Another fun option is to sauté some diced jalapeños with the garlic. This gives great flavor and spice. Adjust to your taste for the perfect bite! This blog post shared how to create a tasty cauliflower mash. We covered the key ingredients, kitchen tools, and specific steps for the best results. I gave tips for texture and flavor, with options for dietary needs. You can experiment with variations, store leftovers properly, and reheat them effectively. In conclusion, enjoy being creative with your mash. Try new flavors and methods. Cooking can be fun and rewarding with these simple steps.

Roasted Garlic Cauliflower Mash Creamy Comfort Food

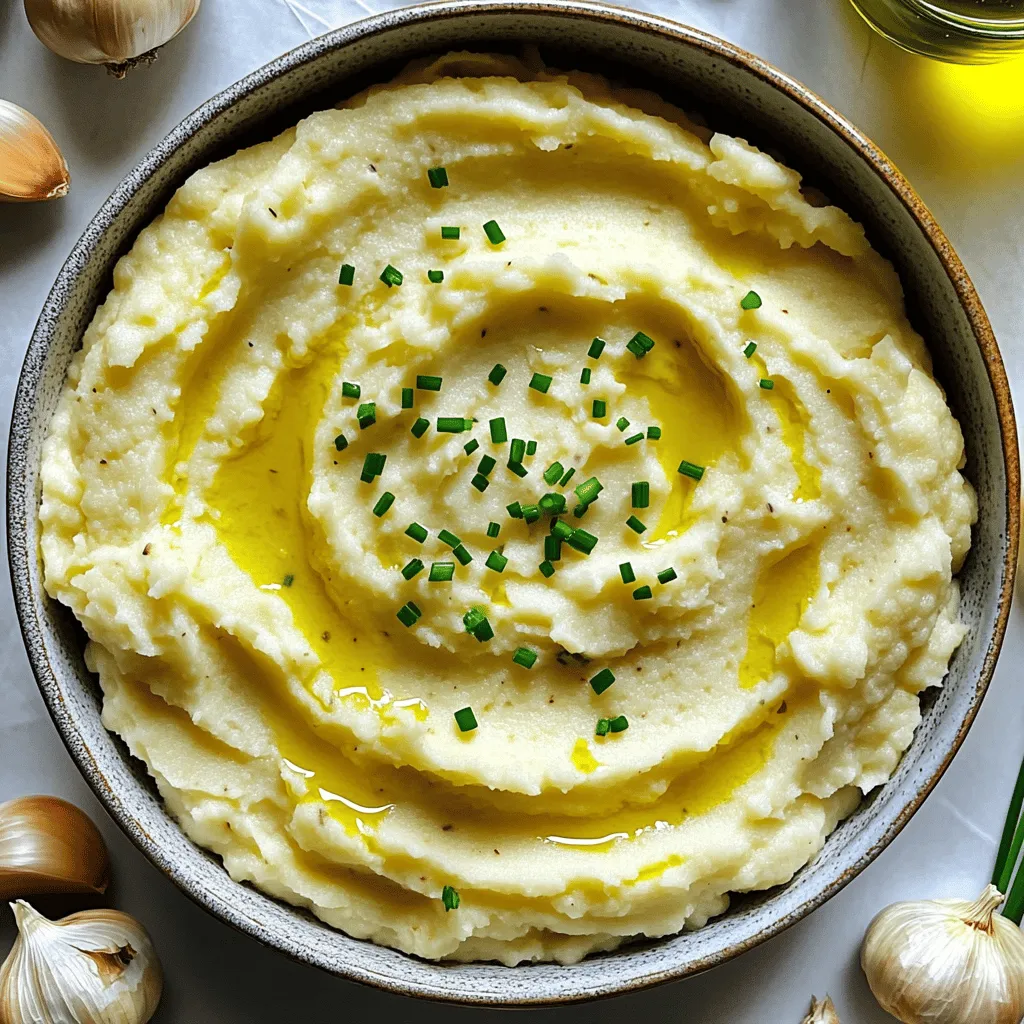
Looking for a healthy twist on comfort food? You’ve found it! My Roasted Garlic Cauliflower Mash serves up creamy goodness

- 1 cup unsalted butter - 1 cup brown sugar, packed - 1/2 cup granulated sugar - 2 large eggs - 1 teaspoon pure vanilla extract - 2 cups all-purpose flour - 1 teaspoon baking powder - 1/2 teaspoon baking soda - 1/4 teaspoon salt - 1/2 cup maple syrup - 1 cup pecans, chopped - Flaky sea salt, for sprinkling on top (optional) Each ingredient plays a key role in flavor and texture. You can use margarine instead of butter, but it won't have the same rich taste. If you need a nut-free option, swap pecans for sunflower seeds. You may also replace all-purpose flour with a gluten-free blend, but check the ratio on the package. For sweetness, use coconut sugar as a substitute for brown sugar. Choosing high-quality ingredients is vital. Use unsalted butter for better control over salt levels. Opt for real maple syrup instead of imitation to get the best flavor. Fresh eggs give a nice lift. When picking pecans, look for whole, unbroken nuts for a crunchier bite. For a finishing touch, flaky sea salt adds a delightful contrast to the sweet blondies. Start by preheating your oven to 350°F (175°C). This step is key for even baking. Next, grab a 9x13 inch baking pan. You can grease the pan with butter or line it with parchment paper. Make sure to leave some overhang. This helps with easy removal later. Now, let’s make brown butter. Place 1 cup of unsalted butter in a medium saucepan over medium heat. Stir it often as it melts. Keep cooking until it turns golden brown. You should smell a nutty scent, which takes about 5-7 minutes. When done, remove the pan from heat and let it cool a bit. In a large mixing bowl, combine 1 cup of brown sugar and 1/2 cup of granulated sugar. Pour in the cooled brown butter and whisk well until smooth. Next, add in 2 large eggs and 1 teaspoon of pure vanilla extract. Whisk again until everything is mixed well. In a separate bowl, whisk together 2 cups of all-purpose flour, 1 teaspoon of baking powder, 1/2 teaspoon of baking soda, and 1/4 teaspoon of salt. Gradually mix these dry ingredients into the wet mixture. Be careful not to overmix, just combine until you see no dry flour. Finally, stir in 1/2 cup of maple syrup and 1 cup of chopped pecans. Mix gently until the nuts are spread evenly through the batter. Pour the batter into your prepared baking pan. Spread it out evenly with a spatula. If you like, sprinkle a pinch of flaky sea salt on top for added flavor. Bake in your preheated oven for 20-25 minutes. You want the edges to be golden and a toothpick inserted in the center should come out with a few moist crumbs. Once baked, let the blondies cool in the pan for at least 10 minutes. After that, use the parchment paper to lift them out. Place them on a wire rack to cool completely. When you are ready to serve, cut them into squares. For a nice touch, dust them with powdered sugar. Pair with a scoop of vanilla ice cream for a sweet treat! To make brown butter, start with unsalted butter. Melt it in a medium saucepan over medium heat. Stir the butter often. Watch closely as it cooks. After about 5-7 minutes, it will turn golden brown. The smell should be nutty and sweet. Remove it from the heat right away to avoid burning. Let it cool slightly before using it in your recipe. One mistake is overcooking the butter. If it burns, the flavor will be bitter. Another mistake is overmixing the batter. Mix just until the dry and wet ingredients combine. This keeps your blondies soft and chewy. Also, remember to measure your ingredients carefully. Too much flour can make them dense. You can add chocolate chips for extra sweetness. A mix of dark and milk chocolate works well. Try adding a pinch of cinnamon for warmth. You can also use walnuts instead of pecans if you prefer. A sprinkle of flaky sea salt on top enhances the sweet flavors. Each option brings a new twist to your blondies! {{image_2}} You can make these blondies nut-free easily. Just skip the pecans. The blondies will still be rich and tasty. You can add sunflower seeds for a nice crunch instead. They will add texture without the nut flavor. Want to mix it up? You can add chocolate chips. Dark, milk, or white chocolate chips work great. Just stir in one cup before you pour the batter into the pan. This adds sweetness and a new depth of flavor. You can also try adding spices like cinnamon or a pinch of nutmeg for warmth. If you need a gluten-free option, use a gluten-free flour blend. Make sure it measures cup for cup like all-purpose flour. You can also use maple syrup instead of granulated sugar for a tasty twist. This keeps the blondies sweet and adds that maple flavor. After baking, let the blondies cool in the pan for at least 10 minutes. Use the parchment paper to lift them out. Place them on a wire rack to cool completely. Once cooled, cut them into squares. Store them in an airtight container. They can last for up to one week at room temperature. For extra freshness, you can refrigerate them. Just remember to bring them back to room temp before serving. These blondies freeze well, making them a great treat for later. First, let them cool completely. Wrap each square tightly in plastic wrap. Then, place them in a freezer-safe bag or container. Label the bag with the date. You can freeze them for up to three months. When you want a blondie, just take it out to thaw. To enjoy your blondies warm, you can reheat them. Place a square on a microwave-safe plate. Heat it for about 10-15 seconds. This warms them up nicely without drying them out. You can also warm them in an oven at 350°F for about 5-10 minutes. They taste best when warm, paired with a scoop of vanilla ice cream! Blondies are a sweet treat, similar to brownies. They have a rich, buttery flavor. Instead of cocoa, they use brown sugar. Blondies are chewy and often include nuts, like pecans. They are great for any gathering or as a snack. Yes, you can use different nuts! Walnuts or almonds work well in this recipe. If you prefer no nuts, just leave them out. The blondies will still taste delicious and sweet. You can tell when the blondies are done by looking at the edges. They should be golden brown. Insert a toothpick into the center. If it comes out with a few moist crumbs, they are ready. If it comes out wet, bake for a few more minutes. Yes, you can make these blondies ahead of time! They stay fresh for a few days. Just store them in an airtight container. For best taste, eat them within three days. You can also freeze them for up to a month. In this post, we covered key ingredients, made brown butter, and shared baking tips for blondies. I included variations to fit different diets and storage tips to keep them fresh. Remember, quality ingredients and careful prep lead to great results. I hope this guide makes your baking fun and easy. Now you can enjoy delicious blondies any time!

Brown Butter Maple Pecan Blondies Delightful Treat

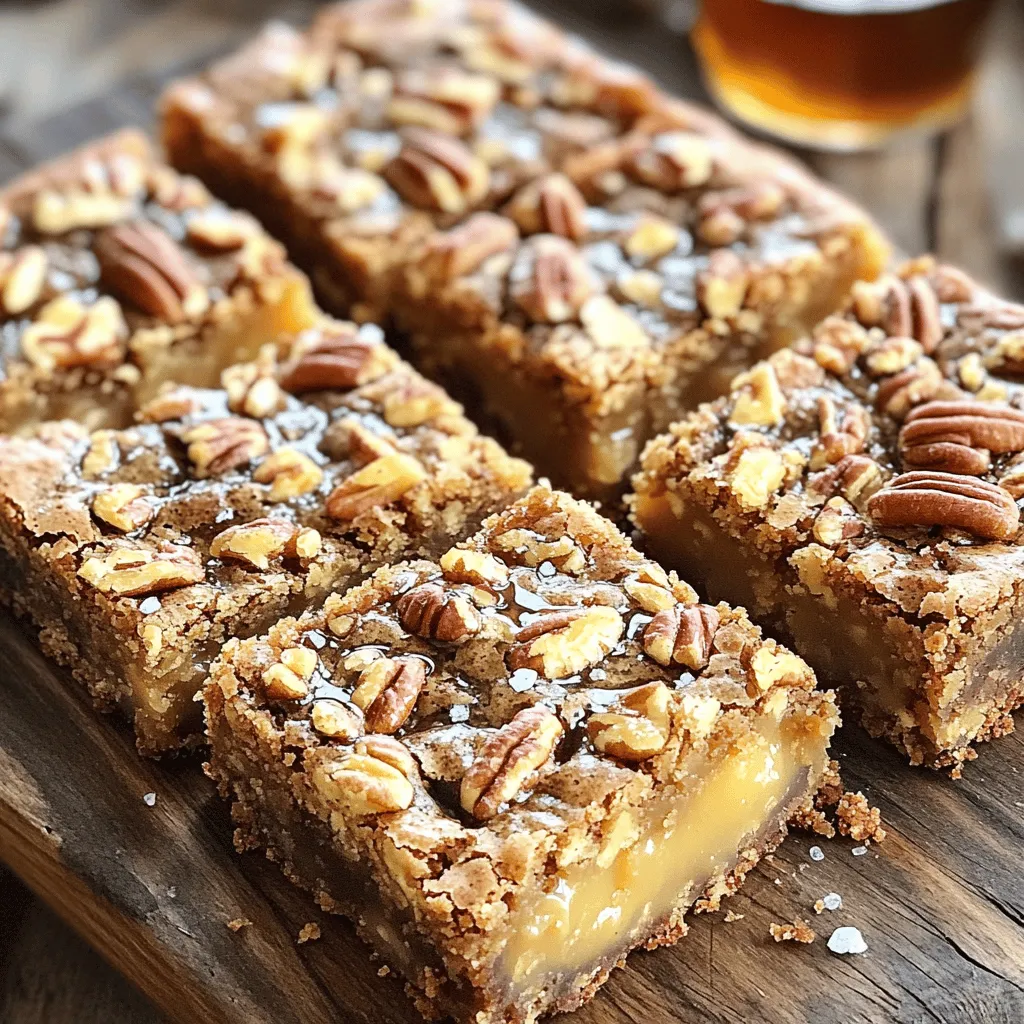
If you love sweet treats, you need to try my Brown Butter Maple Pecan Blondies. These delicious bars mix rich

- 2 tablespoons olive oil - 1 medium onion, diced - 3 cloves garlic, minced - 1 can (28 ounces) crushed tomatoes - 4 cups vegetable broth - 1 teaspoon dried oregano - 1 teaspoon sugar - Salt and pepper to taste - 1 package (9 ounces) refrigerated tortellini - 2 cups fresh spinach, roughly chopped - 1 cup heavy cream or coconut milk - ½ cup fresh basil leaves, chopped - Grated Parmesan cheese for serving - Olive oil: You can use other oils like canola or avocado oil if needed. - Onion: Shallots work well if you prefer a milder taste. - Garlic: Fresh garlic is best, but you can use garlic powder in a pinch. - Crushed tomatoes: Diced tomatoes can substitute if that's what you have on hand. - Vegetable broth: Use chicken broth for a non-vegetarian option. - Dried oregano: Italian seasoning can replace oregano for a different flavor. - Sugar: Honey or maple syrup can balance the acidity if you prefer. - Tortellini: Any fresh or frozen tortellini works great. - Spinach: Kale or Swiss chard are nice substitutes for a heartier green. - Heavy cream: Use coconut milk for a dairy-free option. - Basil: Dried basil can be used, but fresh gives better flavor. - Parmesan cheese: Nutritional yeast is a great dairy-free substitute. - Large pot or Dutch oven: This is key for cooking everything in one pot. - Sharp knife: A good knife helps with dicing and chopping. - Cutting board: Use this to protect your counters while prepping. - Wooden spoon: Perfect for stirring your soup as it cooks. - Measuring cups and spoons: Accurate measurements help keep flavors balanced. - Ladle: For serving the soup easily. - Soup bowls: Choose sturdy bowls for a fun meal experience. To make this soup, gather all your ingredients. You need a large pot and a wooden spoon. The prep time is just 10 minutes. Plan for about 30 minutes total to cook the soup. 1. Heat the olive oil in your pot over medium heat. 2. Add the diced onion. Sauté for about 5 minutes, until it's soft and clear. 3. Mix in the minced garlic. Cook for 1-2 minutes until it smells great. 4. Pour in the crushed tomatoes and vegetable broth. Add the dried oregano, sugar, salt, and pepper. 5. Bring this mix to a simmer. Let it cook for 10-15 minutes. This lets the flavors blend. 6. Add the tortellini. Cook them for about 4-5 minutes until they float and feel tender. 7. Stir in the chopped spinach and heavy cream. Mix until the spinach wilts and the soup gets creamy. 8. Take the pot off the heat. Add the fresh chopped basil. Taste and adjust the salt and pepper. 9. Serve hot. Top with extra basil leaves and grated Parmesan cheese, if you want. - When sautéing the onion, look for a soft, translucent look. - The soup should bubble gently when simmering. - Tortellini are done when they float to the top. To achieve a great flavor in your One-Pot Tomato Basil Tortellini Soup, focus on the basics. Start with fresh ingredients. Fresh garlic and onions really boost the taste. When you add crushed tomatoes, make sure to balance their acidity. A teaspoon of sugar works wonders. It can soften the tangy taste. Don't forget to season well with salt and pepper. Taste your soup as it cooks. This will help you find the best flavor. Serve your soup hot for the best experience. A sprinkle of grated Parmesan cheese adds a nice touch. Fresh basil leaves on top give a burst of flavor. Pair it with crusty bread or a light salad. This makes a complete meal. You can also offer a drizzle of olive oil for extra richness. Avoid overcooking the tortellini. They should float and be tender. If they get too soft, they'll break apart in the soup. Also, add spinach at the end. This keeps it bright and fresh. Don't forget to taste as you go. Adjust the salt and pepper to fit your taste. Lastly, make sure to stir in the basil right before serving. This keeps its flavor vibrant and fresh. {{image_2}} You can easily change up the protein in this soup. Adding cooked chicken or sausage boosts flavor and richness. If you want a meat-free option, use beans like cannellini or chickpeas for protein. These swaps keep the soup hearty while keeping it simple. If you need a gluten-free option, use gluten-free tortellini. Many brands offer tasty choices. For a vegan soup, swap the heavy cream with coconut milk. You can also skip the cheese or use a vegan Parmesan. These changes make the soup fit any diet. Boost the flavor with extra herbs and spices. A pinch of red pepper flakes adds warmth. Fresh thyme or parsley can brighten the dish. You can also drizzle some balsamic vinegar before serving for a tangy kick. These small tweaks give your soup a new twist every time you make it. To store your leftover One-Pot Tomato Basil Tortellini Soup, let it cool first. Once it cools, pour the soup into an airtight container. Seal the container tightly to keep out air and moisture. Place it in the fridge if you plan to eat it soon. Leftovers can last up to three days in the fridge. When you're ready to enjoy your soup again, pour it into a pot. Heat it on the stove over medium heat. Stir it often until it warms through. You can also microwave it in a bowl. Cover the bowl to prevent spills. Heat in short bursts and stir in between until hot. If you want to keep the soup longer, freezing is a great option. First, let the soup cool completely. Then, pour it into freezer-safe bags or containers. Leave some space at the top, as the soup will expand when frozen. This soup can last up to three months in the freezer. When you’re ready to eat it, thaw it overnight in the fridge before reheating. One-Pot Tomato Basil Tortellini Soup stays fresh in the fridge for about 3 to 4 days. Make sure to store it in an airtight container. This keeps the soup tasty and safe to eat. If you want to enjoy it later, label the container with the date you made it. Yes, you can use frozen tortellini in this soup. Just add them straight from the freezer. They may take a little longer to cook. Check the package for cooking times. Frozen tortellini will still taste great and help save time. This soup pairs well with many sides. Here are some ideas: - Crusty bread or garlic bread for dipping - A fresh green salad with a light dressing - Grilled cheese sandwiches for a cozy meal - A cheese platter for a fun appetizer These options will enhance your soup experience and make it feel complete. In this article, we explored the key ingredients for One-Pot Tomato Basil Tortellini Soup. You learned about substitutions and the tools you'll need. We went through clear steps to prepare this dish and shared tips to enhance flavor and avoid common mistakes. You also discovered ways to modify the recipe for different diets and how to store your leftovers. Now, you can enjoy a delicious, easy soup! Follow these steps for great results and share your cooking adventures.

One-Pot Tomato Basil Tortellini Soup Delightful Meal

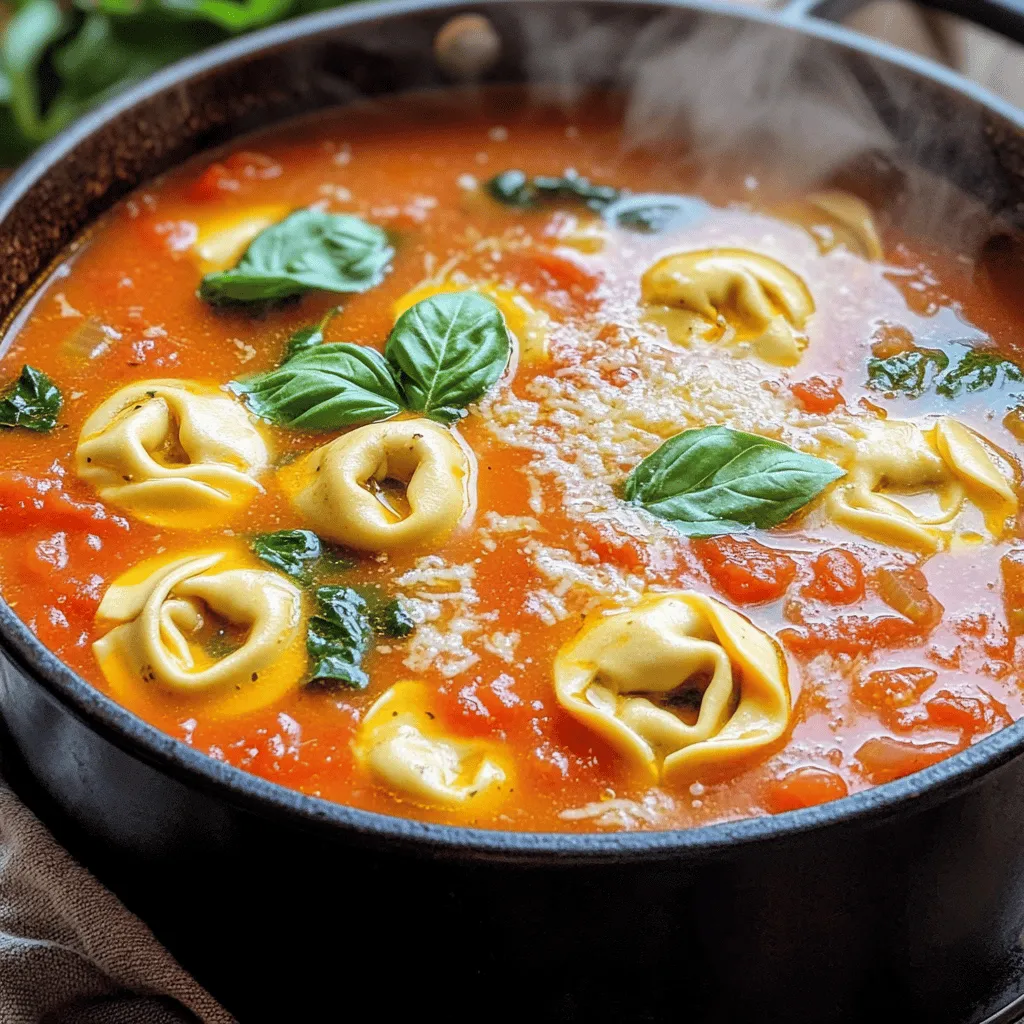
Looking for a cozy, quick meal? You’ll love my One-Pot Tomato Basil Tortellini Soup! This dish combines fresh ingredients and

- 1 lb flank steak, thinly sliced against the grain - 2 cups broccoli florets - 1 cup carrots, julienned - ½ cup soy sauce (low sodium preferred) - 2 tablespoons oyster sauce - 1 tablespoon sesame oil - 2 teaspoons cornstarch - 2 cloves garlic, minced - 1 teaspoon ginger, grated - ½ cup beef broth - Cooked jasmine rice - Sliced green onions - Sesame seeds Gather these ingredients before you start. Flank steak adds a nice texture. Fresh broccoli and carrots provide color and crunch. Low-sodium soy sauce keeps the dish balanced. Oyster sauce adds a rich umami flavor. Sesame oil gives a lovely nutty taste. Use cornstarch to help the beef crisp up. Fresh garlic and ginger add great aroma and depth. Beef broth ties the sauce together and brings moisture. Serve over fluffy jasmine rice. Garnish with green onions and sesame seeds for a beautiful touch. Enjoy your takeout fakeout! First, take a bowl and add ½ cup soy sauce, 2 teaspoons cornstarch, and 1 tablespoon sesame oil. Mix these well. Next, add 1 pound of thinly sliced flank steak to this mix. Make sure every piece is coated. Cover the bowl and place it in the fridge for at least 30 minutes. This step is key for tender and flavorful beef. In another bowl, combine the remaining ½ cup soy sauce, 2 tablespoons oyster sauce, 2 cloves minced garlic, 1 teaspoon grated ginger, and ½ cup beef broth. Stir well until everything blends. This sauce will add depth to your dish. Set it aside for later use. Heat 1 tablespoon of vegetable oil in a large skillet over medium-high heat. Once hot, add 2 cups of broccoli florets and 1 cup of julienned carrots. Stir-fry them for about 3-4 minutes. You want them tender but still crisp. After cooking, remove the vegetables from the skillet and set them aside. In the same skillet, add another tablespoon of vegetable oil. Heat it until shimmering. Carefully add the marinated beef in a single layer. Let the beef sear without stirring for about 2 minutes. This helps it get crispy. After that, stir-fry for an additional minute until it's fully cooked. Now, reduce the heat to medium. Return the cooked broccoli and carrots to the skillet. Pour the sauce mixture over the beef and veggies. Mix everything well. Let it cook for another 2 minutes. This allows the sauce to thicken slightly. To serve, plate the crispy beef and broccoli over a bed of cooked jasmine rice. For a nice touch, garnish with sliced green onions and sesame seeds. Enjoy your homemade takeout-style meal! To get that perfect crisp on your beef, start with flank steak. Slice it thin against the grain. This helps tenderize it. Marinate it with soy sauce, cornstarch, and sesame oil for at least 30 minutes. This not only adds flavor but also aids in crispiness. When frying, use hot oil. Heat vegetable oil until it shimmers. Place the beef in a single layer. Let it sear for two minutes without stirring. This step locks in the crunch. For crispy vegetables, timing is key. Cook broccoli and carrots for just 3-4 minutes. Stir-fry them over high heat. You want them tender but still bright and crunchy. Remove them from the skillet as soon as they are ready. This keeps them crisp and fresh. Don't overcrowd the pan. If needed, cook in batches. To boost flavor, consider adding more seasonings. Extra garlic and ginger can enhance the taste. You can also try a splash of rice vinegar for zing. For a spicy kick, add red pepper flakes. Mix sauces well before adding them to the pan. This ensures even flavor distribution. Garnishing with sliced green onions and sesame seeds adds a nice crunch and visual appeal. {{image_2}} You can easily swap the flank steak for chicken or tofu. Chicken breast works well as a lean option. Simply slice it thinly and marinate like the beef. For a plant-based choice, use firm tofu. Press it to remove excess water, then cut it into cubes. Marinate and fry it until golden. Switch up the veggies based on what you like or have on hand. Bell peppers add sweetness. Snap peas bring a nice crunch. You can also use zucchini or mushrooms. Just remember to cut them into uniform sizes for even cooking. If you need a gluten-free version, use tamari instead of soy sauce. For a low-carb meal, skip the rice and serve the stir-fry on a bed of leafy greens. Adding cauliflower rice can keep it light. These options let everyone enjoy their meal while meeting dietary needs. To keep your Crispy Beef & Broccoli fresh, follow these simple steps. First, let the dish cool down to room temperature. Then, store it in an airtight container. Place it in the fridge. It will last for about 3 to 4 days. This way, you can enjoy your meal later without losing flavor. When you're ready to reheat, aim to keep that crispiness. Use a skillet over medium heat. Add a little oil to the pan before placing your beef and broccoli in it. Stir-fry for a few minutes until hot and crispy. Avoid using the microwave, as it can make the beef soggy. If you want to freeze it, that’s possible too! First, let the dish cool completely. Place it in a freezer-safe bag or container. It can last for about 2 to 3 months in the freezer. When you're ready to eat, thaw it in the fridge overnight. Then, reheat in the skillet as mentioned before for the best taste. Enjoy your Crispy Beef & Broccoli anytime! Yes, you can make Crispy Beef & Broccoli ahead of time. For meal prep, cook the beef and veggies. Store them in airtight containers in the fridge. Keep the sauce separate to avoid sogginess. When ready to eat, reheat in a pan. Add the sauce and stir until hot. This keeps the flavors fresh and the texture nice. To keep the beef crispy, marinate it with cornstarch. This creates a nice coating that fries well. When frying, use hot oil and don't overcrowd the pan. Sear the beef in a single layer. Let it cook undisturbed for two minutes. This gives it a great crisp. Avoid adding the sauce until the beef is cooked. Crispy Beef & Broccoli pairs well with many side dishes. Here are some ideas: - Jasmine rice for a classic touch - Fried rice for extra flavor - Noodles for a different texture - A simple green salad for freshness These sides balance the rich flavors of the dish. Yes, you can use other cuts of beef. Some options are sirloin, ribeye, or skirt steak. Each cut has a different taste and texture. Adjust cooking times based on thickness. For thinner cuts, cook for less time. For thicker cuts, cook a bit longer. Always aim for tender, juicy bites. In this guide, we explored how to create Crispy Beef & Broccoli. We covered the main ingredients, step-by-step cooking instructions, and tips for the perfect dish. You learned about variations, storage methods, and answers to common questions. By using fresh ingredients and proper techniques, you can enjoy a tasty meal. Don't hesitate to try different proteins or veggies to customize your dish. Cooking should be fun and rewarding, so enjoy every bite!

Crispy Beef & Broccoli Takeout Fakeout Delight

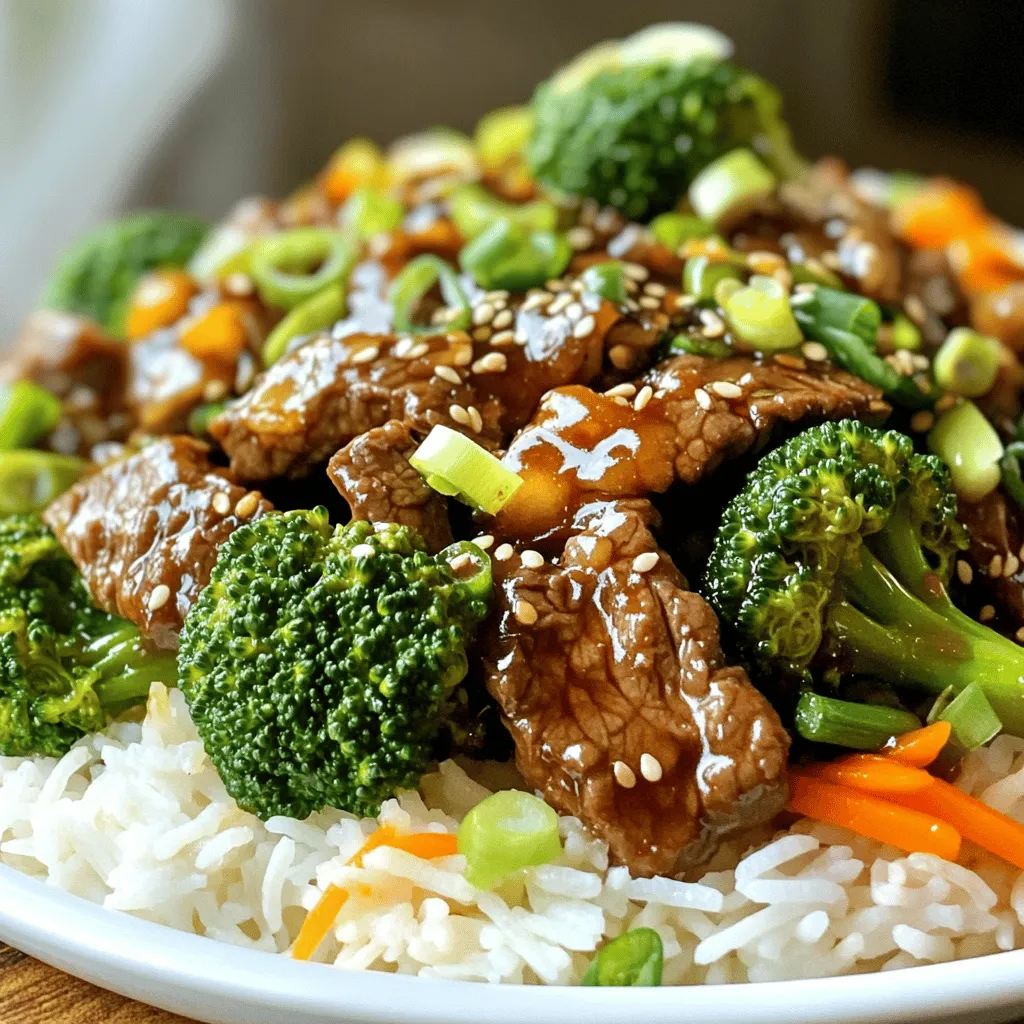
Want a tasty dinner that beats takeout? Join me in making Crispy Beef & Broccoli Takeout Fakeout Delight! This dish

- 2 cups cottage cheese - 1/2 cup Greek yogurt - 1/3 cup caramel sauce - 1 teaspoon vanilla extract - 1/4 teaspoon sea salt - 1 tablespoon maple syrup - 1/2 cup crushed graham crackers - 1/4 cup chopped nuts - Fresh fruit Cottage cheese forms the base of this pudding. It gives a creamy texture and a protein boost. I love using Greek yogurt for its richness. It adds a nice tang that pairs well with the sweet caramel. Caramel sauce is the star here. You can use store-bought or make your own. Just make sure it’s thick and smooth. Vanilla extract brings in lovely flavor notes. A touch of sea salt balances the sweetness beautifully. If you want to make it sweeter, add maple syrup. It gives a warm flavor that matches well. Crushed graham crackers add crunch. They make the pudding more fun to eat. Chopped nuts like pecans or walnuts add a nice bite. Fresh fruit on top, like strawberries or bananas, makes it pretty and fresh. This pudding is a delightful treat you can customize. - In a large bowl, combine 2 cups of cottage cheese and 1/2 cup of Greek yogurt. - Whisk them together until smooth and creamy. - Next, add 1/3 cup of caramel sauce, 1 teaspoon of vanilla extract, and 1/4 teaspoon of sea salt. - If you want it sweeter, include 1 tablespoon of maple syrup. - Stir everything until well mixed and delicious. - In another bowl, mix 1/2 cup of crushed graham crackers and 1/4 cup of chopped nuts. - This will create a tasty, crunchy topping. - Take serving glasses or bowls. Spoon a layer of the cottage cheese mixture into each. - Sprinkle a layer of the graham cracker and nut mix over the pudding. - Repeat the layers until the containers are full. - Finish with a layer of the cottage cheese mix on top. - Drizzle more caramel sauce on top and sprinkle with extra sea salt. - Place the pudding in the fridge for at least 30 minutes. This helps the flavors meld and set. To get a creamy texture, whisk the cottage cheese and Greek yogurt well. Use a sturdy whisk and mix in a circular motion. This helps break down clumps and creates a smooth base. For even better creaminess, blend the mixture in a food processor. When you add the caramel sauce, vanilla extract, and sea salt, mix them in gently. This ensures the flavors combine without losing the airy texture. Garnishing your pudding makes it look fancy. Add fresh fruit like strawberries or bananas on top. A drizzle of caramel sauce adds a nice touch. For flavor pairings, consider serving the pudding with a cup of coffee or herbal tea. The rich taste of caramel pairs well with both. If you want a sweeter pudding, add maple syrup. Just one tablespoon can make a big difference. Stir it in after mixing the other ingredients. You can also use other sweeteners like honey or agave syrup. These options can change the flavor and sweetness to your liking. {{image_2}} You can switch up the flavor of your salted caramel cottage cheese pudding. One popular twist is chocolate salted caramel pudding. To make this, mix in some cocoa powder or melted chocolate into your cottage cheese mix. This gives a rich, chocolatey taste that pairs well with the caramel. Another fun idea is fruit-infused versions. You can add pureed fruits like strawberries or bananas to the base. This adds a fresh taste and vibrant color. You can also top your pudding with fresh fruit slices for extra flavor and a pretty look. If you want a dairy-free version, use dairy-free cottage cheese. There are great brands that make it from almonds or soy. Substitute Greek yogurt with coconut yogurt for a rich, creamy texture. You can still enjoy the great taste without dairy. For gluten-free options, make sure to use gluten-free graham crackers. Many brands offer these alternatives that taste just as good. This way, everyone can enjoy this tasty treat without worry. You can serve this pudding in different ways. Individual servings look great in small glasses or jars. This makes each guest feel special. You can layer the pudding and toppings for a beautiful look. For a family-style presentation, serve it in a large bowl. Let everyone scoop their own servings. This makes it easy for sharing. No matter how you serve it, the taste will shine through. To store your salted caramel cottage cheese pudding, use airtight containers. Glass jars or plastic containers work well. Before you seal them, let the pudding cool down for about 30 minutes. This helps to stop extra moisture from forming inside. For the best quality, keep the pudding in the fridge for up to three days. If you notice any off smells, changes in texture, or mold, it’s best to throw it away. Always check for signs of spoilage before enjoying your leftovers. This pudding is best served cold, but if you want it a bit warmer, you can microwave it. Heat it for just 10 to 15 seconds. Stir well after heating and enjoy! Remember, the pudding tastes amazing chilled, so don’t worry if you prefer to eat it cold. Yes, you can make this pudding ahead of time. It tastes great after chilling. I like to prepare it the night before. Just store it in the fridge. This lets the flavors mix well and makes it creamy. If you want to prepare the layers ahead, keep the toppings separate. Add them just before serving to keep them crunchy. Absolutely! Making homemade caramel sauce is easy and fun. You can control the sweetness and flavor. Just cook sugar until it melts and turns golden. Then add butter and cream. Stir until smooth. If you prefer, store-bought caramel works well too. It saves time and still tastes great. Both options will give you a delicious pudding. Serving this pudding is a fun part! Use small glasses or bowls for a nice look. Layer the mixture and toppings in each container. Start with the cottage cheese mix and then add the graham cracker mix. Top with fresh fruit and a drizzle of caramel. Sprinkle some extra sea salt for flavor. Serve it chilled for a refreshing treat. This recipe for salted caramel cottage cheese pudding offers great taste and texture. You blend key ingredients like cottage cheese and Greek yogurt to create a creamy base. Adding caramel, vanilla, and sea salt elevates the flavor. Don't forget to customize with toppings, sweeteners, or even dietary swaps. You can even prepare it in advance for added convenience. Enjoy sharing this easy treat with friends or family. Simple steps make this dessert a crowd-pleaser, leaving everyone satisfied and happy.

Salted Caramel Cottage Cheese Pudding Delight

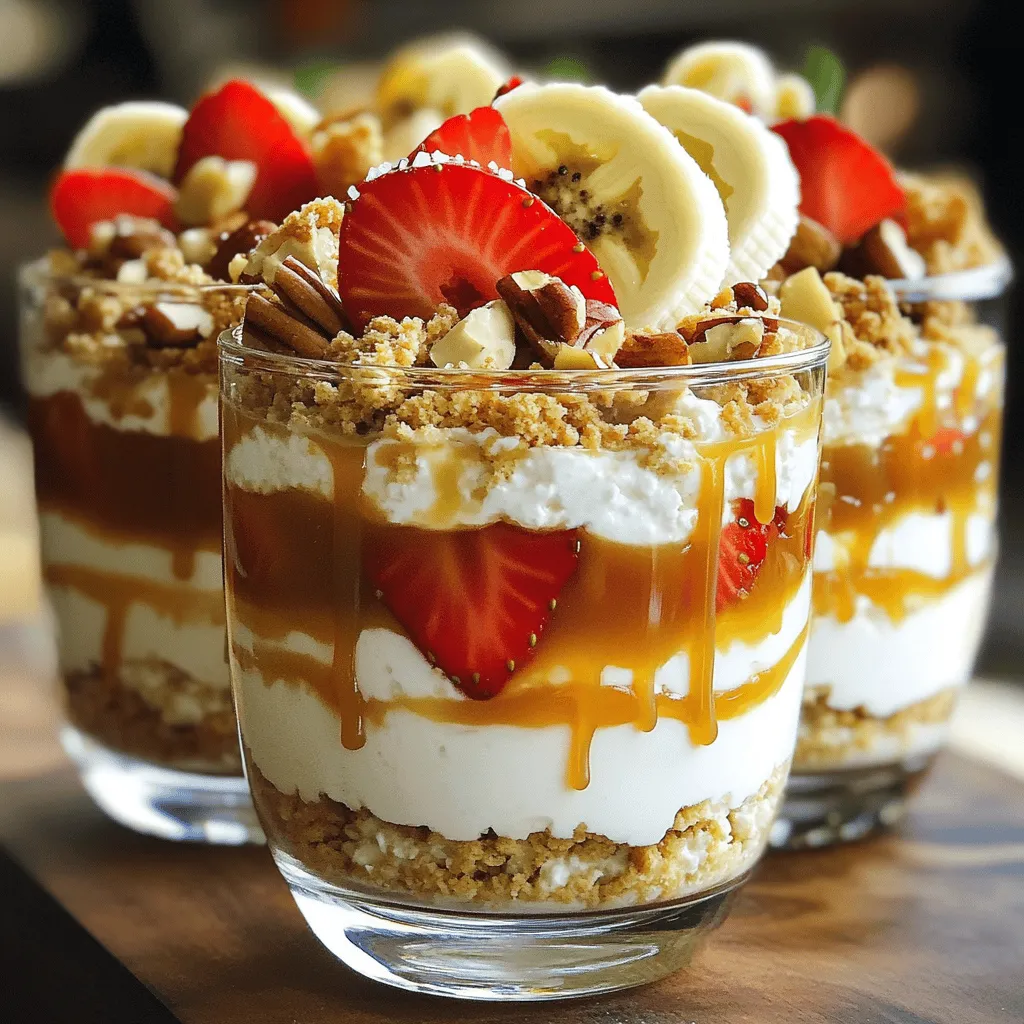
Welcome to my kitchen! Today, I’m excited to share a sweet treat that blends creamy cottage cheese with rich caramel.

- 1 medium head of cauliflower, cut into florets - 3 tablespoons olive oil - 4 cloves garlic, minced - 1/2 cup grated Parmesan cheese - 1 teaspoon Italian seasoning - Salt and pepper to taste These main ingredients create a tasty base for your dish. The cauliflower offers a great texture. Olive oil adds flavor and helps it crisp up nicely. Garlic brings a strong, savory taste, while Parmesan cheese gives a rich, cheesy flavor. Italian seasoning adds a burst of herbs, making every bite enjoyable. - 1/2 teaspoon red pepper flakes (optional) - Fresh parsley, chopped (for garnish) Red pepper flakes can add a spicy kick if you like heat. Fresh parsley is perfect for garnish. It adds color and freshness, making your dish look great. This recipe serves four. Each serving has about: - Calories: 150 - Protein: 5g - Fat: 10g - Carbohydrates: 12g - Fiber: 4g This dish is a smart choice for a healthy snack or side. It is low in carbs and high in fiber, making it filling and nutritious. You can enjoy it guilt-free! Start by washing your medium head of cauliflower. Cut it into small florets. Make sure they are roughly the same size. This helps them cook evenly. In a large bowl, add the cauliflower florets. Pour in 3 tablespoons of olive oil. Mix well, so every piece is covered. Next, add 4 cloves of minced garlic and 1/2 cup of grated Parmesan cheese. Sprinkle in 1 teaspoon of Italian seasoning. If you like heat, add 1/2 teaspoon of red pepper flakes. Season with salt and pepper. Toss everything until the florets are well coated with the mixture. Preheat your air fryer to 400°F (200°C) for about 5 minutes. Place the coated cauliflower florets in the air fryer basket. Arrange them in a single layer. You might need to do this in batches to get them crispy. Cook the cauliflower for 12-15 minutes. Shake the basket halfway through cooking. This ensures even browning. The florets will turn golden brown and crispy when done. Remove them from the air fryer and place them on a serving platter. Garnish with fresh chopped parsley before serving. To get crispy cauliflower, start with dry florets. Pat them with a towel to remove excess moisture. When you coat them with olive oil, use enough to cover each piece. This helps them crisp up nicely. Don’t overcrowd the air fryer basket; give them space to cook. A single layer works best. Shake the basket halfway through cooking to ensure even browning. You can boost the flavor with simple tweaks. Add more garlic for a stronger taste. A little lemon juice can brighten the dish. If you love heat, toss in more red pepper flakes. Fresh herbs, like thyme or rosemary, add a nice touch too. Experiment with smoked paprika or even a splash of balsamic vinegar for a unique twist. Serve your garlic Parmesan cauliflower as a side dish. It pairs great with grilled chicken or fish. You can also use it as a snack or appetizer. For extra fun, serve it with a dip, like ranch or aioli. Garnish with chopped parsley before serving to add color and freshness. Enjoy your delicious creation with friends and family! {{image_2}} You can switch up the flavors in your Air Fryer Garlic Parmesan Cauliflower. Try adding smoked paprika for a smoky taste. You might also enjoy a sprinkle of garlic powder for extra garlic goodness. Lemon zest can add a bright, fresh touch. If you like heat, consider adding more red pepper flakes or even cayenne pepper. Parmesan is great, but there are many cheese options. You can use Pecorino Romano for a sharper flavor. If you want a creamier texture, try mozzarella or provolone. Nutritional yeast is a tasty choice for a dairy-free option. Mixing cheeses can also create a unique flavor profile that’s fun to explore. Feel free to add more veggies to your dish. Broccoli florets pair well with cauliflower. Bell peppers can add color and sweetness. You can also use Brussels sprouts or zucchini for variety. Just be sure to cut them into similar sizes for even cooking. This way, you get a tasty mix and a colorful plate! Store leftover air fryer garlic Parmesan cauliflower in an airtight container. It stays fresh for up to three days. Make sure it cools down first to keep it crispy. When you want a quick snack, just grab a piece from the fridge. To freeze this dish, place the cooled cauliflower in a freezer-safe bag. Remove as much air as possible before sealing. You can freeze it for up to three months. When you’re ready to eat, let it thaw in the fridge overnight. To reheat, use your air fryer. Preheat it to 375°F (190°C). Place the cauliflower in the basket and heat for about 5-7 minutes. This keeps the cauliflower crispy. You can also use a microwave, but it may get soggy. Enjoy your tasty leftovers! You will know the cauliflower is done when it turns golden brown and crispy. The cooking time is about 12-15 minutes at 400°F. I suggest shaking the basket halfway through cooking. This will help it cook evenly. You can also poke a floret with a fork. If it feels tender, it is ready to serve. Yes, you can use frozen cauliflower. Just thaw it and drain any excess water. This step is key to avoid soggy florets. The cooking time may change slightly. Check them after about 10 minutes. You want them crispy, just like fresh cauliflower. If you don’t have Parmesan cheese, you can try other cheeses. Grated pecorino or nutritional yeast work well. Both will give a nice flavor. You can also use a dairy-free cheese for a vegan option. Just make sure it melts well for the best taste. In this blog post, we explored the ingredients needed for a tasty cauliflower dish. We walked through simple steps to prepare, coat, and air fry the florets. I shared tips for crispiness and flavor, plus variations to make it your own. Finally, I covered how to store and reheat leftovers. Remember, cooking is fun and easy. Use this guide to enjoy your cauliflower, and don’t shy away from making it your own!

Air Fryer Garlic Parmesan Cauliflower Delight

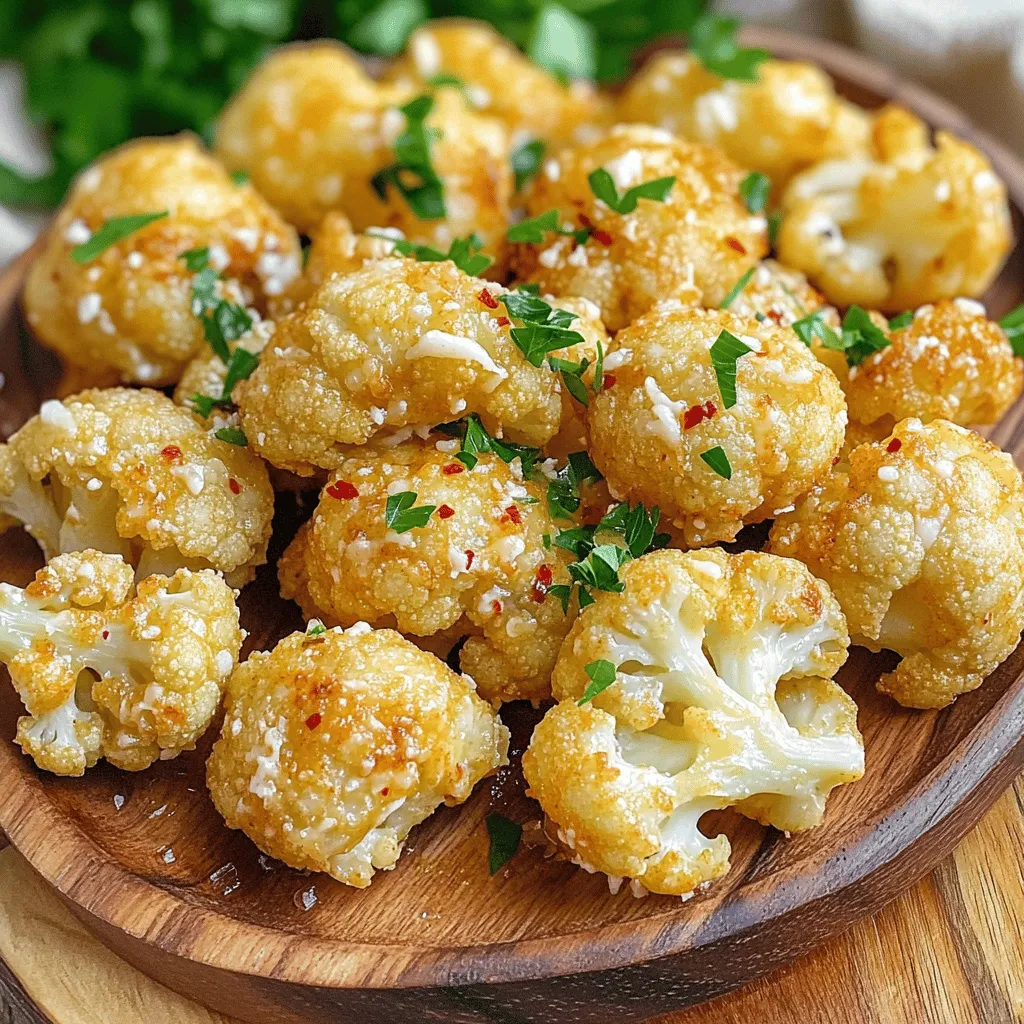
Are you ready to transform simple cauliflower into a crunchy, cheesy delight? This Air Fryer Garlic Parmesan Cauliflower recipe is

- 1 lb boneless, skinless chicken thighs, thinly sliced - 2 tablespoons sesame oil - 1 tablespoon fresh ginger, minced - 2 cloves garlic, minced - 1 bell pepper (red or yellow), sliced - 1 cup broccoli florets - 1 cup sugar snap peas - 3 tablespoons soy sauce (or tamari for gluten-free) - 1 tablespoon honey - 1 tablespoon rice vinegar - 2 green onions, sliced - 1 tablespoon sesame seeds - Salt and pepper to taste - You can add more vegetables like carrots or snap peas for extra crunch. - For a gluten-free meal, use tamari instead of soy sauce. - A large skillet or wok works best for stir-frying. - Use a sharp knife and cutting board for quick prep. - Have mixing bowls ready for sauces and marinating. {{ingredient_image_1}} To start, I take one pound of boneless, skinless chicken thighs and slice them thin. This helps the chicken cook quickly and evenly. I then place the sliced chicken in a large bowl. I add salt and pepper for flavor. Marinate the chicken for about 15 minutes. This step makes a big difference in taste. The longer the chicken sits, the better it tastes. Tips for optimal flavor: - Use fresh chicken for the best taste. - Don’t skip the marinating step. It really enhances the flavor. Next, I make the sauce. In a small bowl, I whisk together three tablespoons of soy sauce, one tablespoon of honey, and one tablespoon of rice vinegar. I also add half of the sesame seeds. This mix gives the dish a sweet and tangy kick. I set this sauce aside for later. Storage tips for leftovers: - Store any leftover sauce in a sealed container in the fridge. - Use the sauce within a week for the best flavor. Now, I heat one tablespoon of sesame oil in a large skillet or wok over medium-high heat. Once the oil is hot, I add the marinated chicken. I stir-fry the chicken until it turns golden brown and is fully cooked, about 5 to 7 minutes. After that, I remove the chicken from the skillet and set it aside. Then, I add another tablespoon of sesame oil to the same skillet. I sauté two cloves of minced garlic and one tablespoon of minced ginger for about 30 seconds. The smell is amazing! After that, I toss in the sliced bell pepper, one cup of broccoli florets, and one cup of sugar snap peas. I stir-fry the veggies for 3 to 4 minutes until they are tender but still crisp. Now it’s time to bring it all together. I return the cooked chicken to the skillet with the veggies. I pour the prepared sauce over everything. I make sure to toss everything together well. This ensures an even coating of sauce on the chicken and vegetables. I heat everything through for another 2 to 3 minutes. To finish, I sprinkle the remaining sesame seeds and sliced green onions over the stir fry. This adds a nice crunch and color. I love serving this dish with steamed rice or noodles. It makes for a complete meal that everyone will enjoy. - Stir-frying cooks food quickly. Use high heat and work fast. - Cut chicken and veggies into small, even pieces for even cooking. - Preheat your skillet or wok before adding oil. This prevents sticking. - Always stir while cooking to avoid burning. - Add a splash of lime juice for brightness. - Try a pinch of red pepper flakes for heat. - Balance flavors with sweet ingredients like honey and salty soy sauce. - Fresh herbs like cilantro can add a pop of flavor at the end. - Chop all veggies ahead of time. Store them in the fridge for quick access. - Marinate chicken the night before for deeper flavor. - You can use frozen vegetables to save time. Just add them directly to the pan. - Pre-mix your sauce and keep it in the fridge for quick meals. Pro Tips Marinate for Maximum Flavor: Allow the chicken to marinate for at least 15 minutes; this enhances the flavor and tenderness of the meat. Prep Your Ingredients Ahead: To ensure a smooth cooking process, chop all vegetables and measure out sauces before cooking begins. Use High Heat: Stir-frying requires high heat for quick cooking. This helps retain the crispness of the vegetables and the juiciness of the chicken. Customize Your Veggies: Feel free to substitute or add your favorite vegetables like carrots, snap peas, or mushrooms for a personal touch! {{image_2}} You can swap the chicken for tofu or shrimp. Tofu works great for a plant-based meal. It absorbs flavors well. Just press it first to remove extra water. Cut it into cubes and sauté until golden. Shrimp cooks quickly and adds a sweet taste. Use about one pound of shrimp for a nice protein boost. Other meat options include beef or pork. Thinly slice them and marinate like chicken. This adds depth to the dish. Get creative with your veggies! You can mix in carrots, snow peas, or zucchini. They add color and crunch. Seasonal veggies like asparagus in spring or squash in fall work well too. Just remember to cut them into similar sizes to cook evenly. Try adding leafy greens like bok choy or spinach. They wilt nicely and add nutrition. Adjust the sauce to fit your taste. If you prefer more sweetness, add extra honey. For a saltier flavor, increase the soy sauce. You can also add extra flavors. A splash of lime juice gives a fresh twist. Try adding sriracha for some heat. A sprinkle of toasted sesame oil boosts the nutty taste. Store your leftover Sesame Ginger Chicken Stir Fry in an airtight container. This keeps it fresh. You can enjoy it for up to three days in the fridge. If you want the best taste, eat it within two days. To freeze, place the cooled stir fry in a freezer-safe bag. Remove as much air as possible. This prevents freezer burn. The stir fry can last up to three months in the freezer. When you're ready to eat, thaw it overnight in the fridge. Reheat it in a skillet over medium heat until hot. For meal prep, divide the stir fry into portions. Use small containers for easy grab-and-go meals. Each portion is perfect for lunch or dinner. You can pair it with rice or noodles for a quick meal. This way, you save time on busy days while enjoying tasty food! Sesame Ginger Chicken Stir Fry lasts about 3 to 4 days in the fridge. To store it, let it cool down first. Place it in an airtight container. This keeps the flavors fresh and the chicken moist. When you're ready to eat, just reheat it on the stove or microwave until hot. Yes, you can make this dish gluten-free. Use tamari instead of soy sauce. Tamari is a great substitute that keeps the same flavor. Make sure all other sauces, like rice vinegar, are also gluten-free. Always check labels for hidden gluten ingredients. You can serve this stir fry with: - Steamed rice - Quinoa - Cauliflower rice - Noodles These options add a nice base to your meal. You can also serve it with a side salad for extra crunch and freshness. To add some heat, try these tips: - Add red pepper flakes while cooking. - Mix in a splash of sriracha to the sauce. - Use fresh sliced chili peppers in the stir fry. Start with a little, then taste before adding more. You can always add more spice, but it’s hard to take it out! Yes, you can use frozen vegetables. They make cooking quick and easy. Just add them to the pan straight from the freezer. You might need to cook them a bit longer. Make sure they are heated through. They can still taste great and keep their crunch! This article covered the essential ingredients and steps for making a tasty Sesame Ginger Chicken Stir Fry. You learned about main and optional ingredients, key equipment, and how to prepare the dish from start to finish. Consider trying different vegetables and proteins to keep meals exciting. Remember, meal prep and proper storage help you enjoy this dish longer. Use this guide to create a flavor-packed meal that fits your taste and needs. Enjoy cooking!

Sesame Ginger Chicken Stir Fry Quick and Flavorful Meal

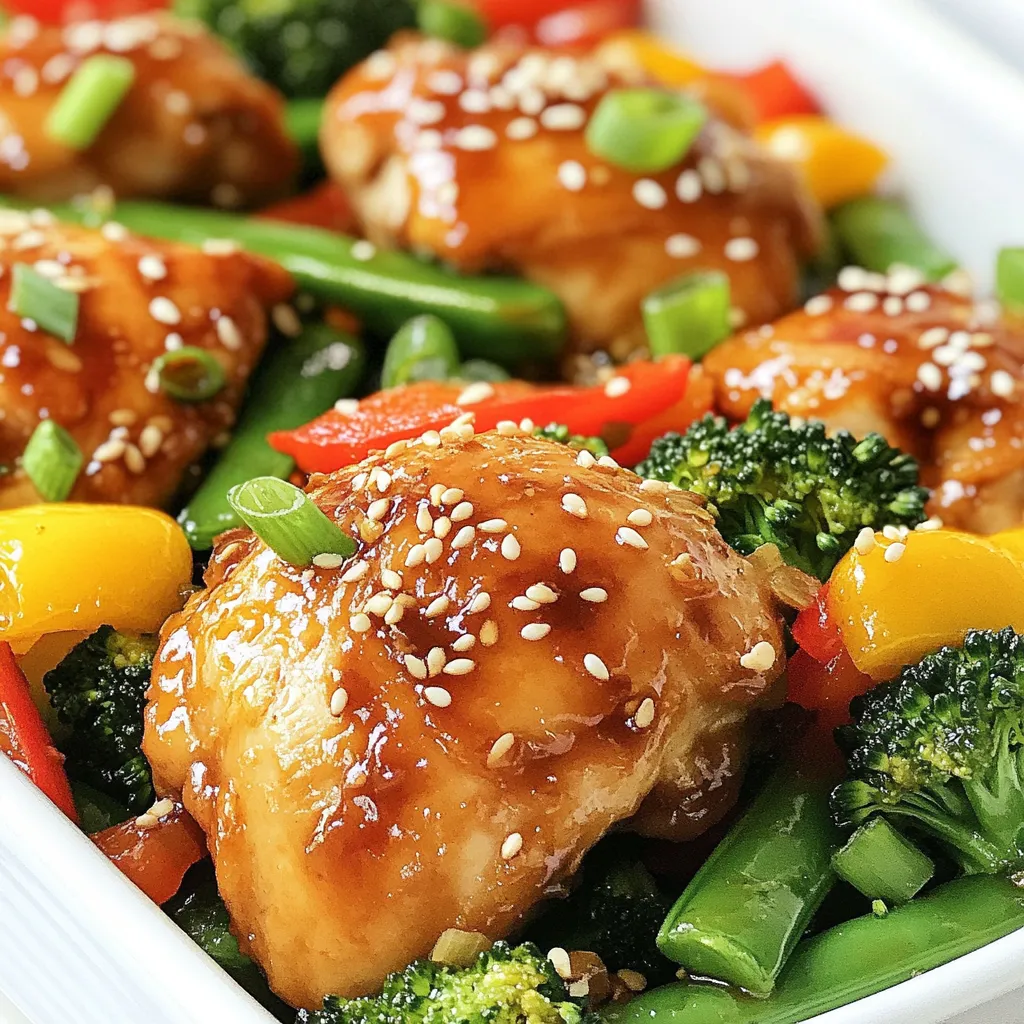
Looking for a quick and tasty meal? You’ll love this Sesame Ginger Chicken Stir Fry! It’s packed with fresh veggies

- 2 lbs boneless, skinless chicken thighs - 4 cups low-sodium chicken broth - 1 cup carrots, sliced - 1 cup celery, chopped - 1 cup frozen peas - 1 medium onion, diced - 3 cloves garlic, minced I love using boneless, skinless chicken thighs for their rich flavor. They stay juicy and tender as they cook. Low-sodium chicken broth adds depth without too much salt. I include carrots, celery, peas, and garlic for a colorful mix. These veggies not only taste great but also add nutrition. - 1 teaspoon dried thyme - 1 teaspoon dried rosemary - 1 tablespoon olive oil - 1 cup heavy cream - 2 cups biscuit mix (like Bisquick) - 2/3 cup milk For seasoning, I use thyme and rosemary. These herbs give the dish an aromatic touch. Olive oil helps sauté the veggies, giving them a nice base. Heavy cream adds richness to the broth. The biscuit mix makes our dumplings fluffy and soft, while milk binds them together. - Fresh parsley, chopped - Salt and pepper to taste Finally, I top the dish with fresh parsley for a pop of color. A sprinkle of salt and pepper enhances the flavors. These simple touches make the dish look and taste great. Enjoy this cozy meal with loved ones! Start by heating 1 tablespoon of olive oil in a skillet over medium heat. Add 1 medium diced onion, 1 cup of sliced carrots, and 1 cup of chopped celery. Toss in 3 minced garlic cloves too. Sauté these vegetables for about 5 minutes. You want them to soften and smell great. Next, transfer the sautéed veggies to your slow cooker. On top of the veggies, layer 2 pounds of boneless, skinless chicken thighs. Pour in 4 cups of low-sodium chicken broth. Add in 1 teaspoon of dried thyme and 1 teaspoon of dried rosemary. Sprinkle salt and pepper to taste. Gently stir everything to mix well. Now, cover your slow cooker. Cook on low for 6 to 7 hours or on high for 3 to 4 hours. The chicken should be tender and fully cooked. Once done, carefully take the chicken out. Shred the chicken using two forks and return it to the pot. Stir in 1 cup of frozen peas and 1 cup of heavy cream. Mix everything well. In a separate bowl, mix 2 cups of biscuit mix with 2/3 cup of milk. This will form your dumpling dough. Drop spoonfuls of the dough over the chicken and veggie mix in the slow cooker. Cover again and cook on high for an extra 30 to 40 minutes. Do not open the lid during this time. The dumplings will become fluffy and delicious. To make your chicken and dumplings shine, try adding more herbs and spices. Here are some suggestions: - Parsley: Fresh parsley adds a bright taste. - Bay Leaves: A couple of bay leaves can deepen the broth flavor. - Paprika: Sweet or smoked paprika gives a unique twist. - Black Pepper: A pinch of fresh black pepper enhances the dish. These flavors blend well with chicken and veggies, making your meal even tastier. Getting the right dumpling texture is key. Here are some tips: - Dough Consistency: The dough should be thick but not too dry. Add milk slowly. - Cooking Time: Cook dumplings on high for 30-40 minutes. Avoid lifting the lid! This keeps the heat in for fluffy dumplings. - Test for Doneness: Insert a toothpick to check. If it comes out clean, your dumplings are done. Following these steps ensures you have light, fluffy dumplings every time. How you serve your dish can make a big difference. Here are some ideas for a lovely presentation: - Use Deep Bowls: Serve the chicken and dumplings in deep bowls. This helps keep the dish warm. - Garnish with Parsley: Sprinkle fresh parsley on top for color and freshness. - Add Crusty Bread: A slice of crusty bread on the side makes a great addition. These simple tips can turn a cozy meal into a beautiful feast. Enjoy your chicken and dumplings! {{image_2}} You can easily swap ingredients to match your taste. If you want to try different meats, use turkey or even pork. For a vegetarian option, replace chicken with hearty mushrooms or jackfruit. You can also change the vegetables. Try adding green beans, corn, or bell peppers for a new twist. Each swap adds its unique flavor to the dish. Making this dish gluten-free is simple. You can use gluten-free biscuit mix and check the broth for gluten. For a dairy-free version, swap heavy cream with coconut milk or almond milk. This keeps the dish creamy without dairy. Always check labels to ensure all ingredients suit your needs. Herbs make this dish shine. If you like bold flavors, add fresh basil or dill. For a spicy kick, consider red pepper flakes or smoked paprika. You can also enhance the taste with a splash of lemon juice or a dash of soy sauce. Each option changes the flavor and makes it fun to explore different tastes in your slow cooker chicken and dumplings. To store leftovers safely, place them in an airtight container. Let the dish cool down before sealing it. Store in the fridge for up to four days. Always label the container with the date. This helps you keep track of how long it has been stored. For best results when freezing, let the dish cool completely. Transfer it to a freezer-safe container. Leave some space at the top, as the dish will expand when frozen. You can freeze it for up to three months. To reheat, thaw in the fridge overnight. Heat in a pot on low, stirring often. In the fridge, chicken and dumplings stay fresh for about four days. In the freezer, they can last up to three months. After that, the quality may decline, but it will still be safe to eat. Always check for any off smells or changes in texture before eating. Yes, you can use frozen chicken thighs. Just add them directly to the slow cooker without thawing. The cooking time will remain the same. The key is to ensure the chicken reaches an internal temperature of 165°F. You can check this with a meat thermometer. Using frozen chicken may add a few minutes to your cooking time. Chicken and dumplings are a hearty dish, so simple sides work well. Here are a few great options: - Crusty bread: Perfect for dipping. - Side salad: A fresh mix of greens adds crunch. - Steamed vegetables: Broccoli or green beans pair nicely. - Mashed potatoes: A creamy side for extra comfort. To check if the dumplings are done, look for these signs: - They should be fluffy and risen above the broth. - A toothpick inserted should come out clean. - They should not feel doughy or wet. When you see these signs, your dumplings are ready to enjoy! This recipe brings together tender chicken, fresh veggies, and fluffy dumplings. You learned how to sauté vegetables, prepare the slow cooker, and mix the biscuit dough. I also shared tips for flavor and how to present your meal. Don't hesitate to swap ingredients or modify for dietary needs. This dish is a cozy classic that you can enjoy in many ways. With proper storage, it stays fresh and delicious for days. Dive into this comfort food and make it your own!

Slow Cooker Chicken and Dumplings with Vegetables Delight

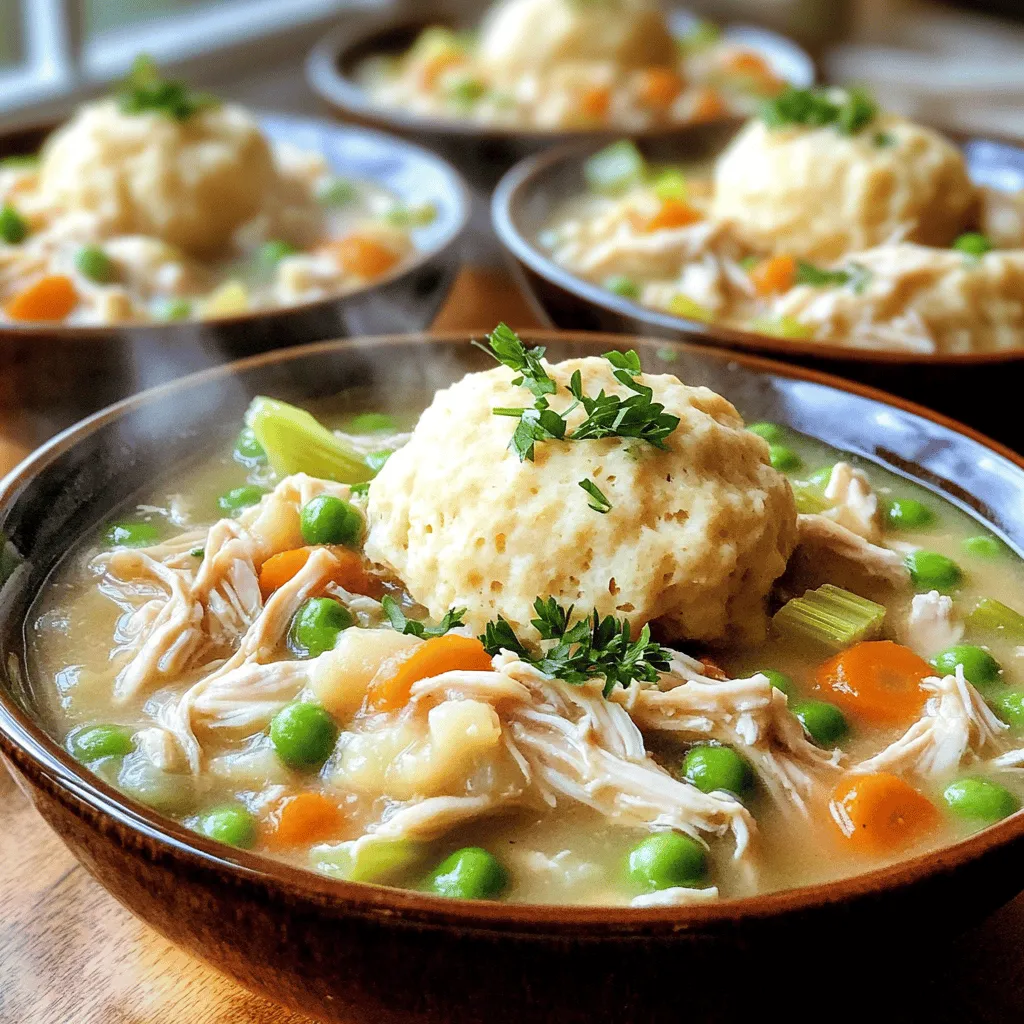
Looking for a cozy meal that warms your soul? My Slow Cooker Chicken and Dumplings with Vegetables Delight is just

For this tasty dish, you need just a few key ingredients: - 4 salmon fillets - 2 large sweet potatoes, peeled and cubed - 1/4 cup BBQ sauce (choose your favorite) - 2 tablespoons olive oil These ingredients come together to create a delicious meal that is both filling and healthy. To add flavor, you will need: - 1 teaspoon garlic powder - 1 teaspoon smoked paprika - Salt and pepper to taste These spices enhance the taste of the salmon and sweet potatoes, making every bite enjoyable. For a nice touch, consider these additions: - Fresh parsley, chopped (for garnish) - Lemon wedges (for serving) These garnishes not only add color but also a burst of freshness to the dish. Feel free to pair this meal with a side salad or steamed veggies for more nutrition. Start by peeling the sweet potatoes. Next, cut them into cubes about one inch big. This size helps them cook evenly. In a large bowl, add the sweet potato cubes. Pour in the olive oil, garlic powder, smoked paprika, salt, and pepper. Toss everything well until the sweet potatoes are fully coated. Spread them out in a single layer on a large baking sheet. This step allows them to roast nicely. While the sweet potatoes roast, you can prepare the salmon. Take your salmon fillets and place them on a baking sheet. If you have room, use the same sheet pan as the sweet potatoes. Line the sheet with parchment paper for easy cleanup. Brush your favorite BBQ sauce generously over each fillet. Make sure each piece is well coated to get that great flavor. Preheat your oven to 425°F (220°C). Roast the sweet potatoes for 15 minutes first. After that, check them and give them a stir. Place the salmon fillets on the pan. Bake everything together for an additional 12 to 15 minutes. You will know it's done when the salmon flakes easily with a fork and the sweet potatoes are tender. Once cooked, let the sheet pan rest for a few minutes before serving. To get sweet potatoes just right, start by cutting them into even cubes. This helps them cook at the same rate. Toss the cubes in olive oil, garlic powder, smoked paprika, salt, and pepper. Make sure they are well-coated. Spread them out in a single layer on the baking sheet. This allows air to circulate and gives a nice caramelization. Roast them until they are tender and golden brown. This takes about 15 minutes. Choosing the right BBQ sauce can make this dish shine. You can go for a sweet sauce, like honey BBQ, for a nice glaze. A smoky sauce adds depth, while a tangy vinegar-based sauce can brighten the flavor. You can even mix sauces for a unique taste. Just pick your favorite sauce and brush it over the salmon. This adds flavor and keeps the fish moist. To make sure your salmon comes out flaky, start with fresh fillets. Place them on the baking sheet and brush them with BBQ sauce. Bake them in the oven until they are cooked through. This usually takes 12-15 minutes. You can tell the salmon is done when it flakes easily with a fork. Let it rest for a few minutes after baking. This helps the juices settle back in, keeping it tender. {{image_2}} You can switch up the salmon for other fish. Try trout or cod for a lighter meal. Both fish cook well and absorb flavors like salmon. If you want a firmer texture, use halibut. Each fish brings its own taste and charm to the dish. Besides garlic powder and smoked paprika, you can explore different seasonings. Try cinnamon for a sweet twist or cumin for a warm flavor. You can even add chili powder for a kick. Mixing these spices adds variety and makes the sweet potatoes pop. If you want a vegetarian option, use chickpeas instead of salmon. Toss them in BBQ sauce and bake. For a heartier choice, try marinated tofu. It absorbs flavors well and bakes nicely. These options give you the same delicious flavor while keeping it plant-based. After your meal, let the salmon and sweet potatoes cool down. Place them in an airtight container. Store the container in the fridge. This keeps them fresh for about three days. Make sure to separate the salmon and sweet potatoes if possible. This way, each will maintain its texture. To reheat, use your oven for the best flavor. Preheat the oven to 350°F (175°C). Place the salmon and sweet potatoes on a baking sheet. Heat for about 10-15 minutes or until warmed through. You can also use a microwave. Just cover the dish to keep moisture in. Heat in short bursts, checking every minute to avoid drying out. If you want to freeze leftovers, wrap each salmon fillet in plastic wrap. Then, place them in a freezer bag. You can freeze sweet potatoes in a separate bag. They will last about three months. When ready to eat, thaw in the fridge overnight. Reheat in the oven for the best results. Yes, you can use frozen salmon. Just thaw it first. Place it in the fridge overnight. If you are short on time, seal it in a bag and put it in cold water for about 30 minutes. Make sure to pat it dry before adding the BBQ sauce. This helps the sauce stick better. You have many choices! Here are a few ideas: - Steamed broccoli - Grilled asparagus - Mixed green salad - Quinoa or brown rice These sides will add color and nutrition. They also pair well with the sweet and smoky flavors of the dish. Check the color and texture of the salmon. It should be opaque and flake easily with a fork. The internal temperature should reach 145°F (63°C). Use a meat thermometer for accuracy. If you don’t have one, a fork test works great too! Just poke the fish gently, and if it flakes, it's ready. This blog post showed you how to make delicious sheet-pan BBQ salmon. We explored key ingredients, prep steps, and cooking tips. You learned how to pick the right herbs and sides for your meal. I shared options for different fish and ways to store leftovers. Remember, cooking can be fun and creative. Try different flavors and enjoy your tasty meals!

Sheet-Pan BBQ Salmon with Roasted Sweet Potatoes Recipe

Craving a delicious and easy dinner? This Sheet-Pan BBQ Salmon with Roasted Sweet Potatoes recipe is the answer! You’ll enjoy

- 1 lb sirloin steak, cut into 1-inch cubes - 8 oz mushrooms, halved (preferably cremini or button) - 4 cloves garlic, minced - 4 tablespoons unsalted butter, melted - 1 tablespoon olive oil The main stars in this dish are sirloin steak and mushrooms. Sirloin gives a great flavor and tenderness. The mushrooms add a nice, earthy taste. Garlic and butter create a rich marinade that makes everything better. Olive oil helps the marinade stick. - 1 teaspoon dried thyme - Salt and pepper to taste - Fresh parsley, chopped, for garnish The seasoning is simple but effective. Dried thyme brings a hint of herbiness. Salt and pepper enhance the flavors. Fresh parsley adds a pop of color and freshness on top. - Air fryer - Mixing bowl - Cooking utensils You will need a few key items for this recipe. An air fryer is essential for that perfect crispiness. A mixing bowl helps you combine the marinade well. Cooking utensils, like a spatula, make handling the steak and mushrooms easy. - Make the garlic butter marinade: In a mixing bowl, mix 4 tablespoons of melted butter with 4 minced garlic cloves, 1 tablespoon of olive oil, 1 teaspoon of dried thyme, and salt and pepper to taste. Stir this well to get a smooth marinade. - Marinate the steak and mushrooms: Add 1 pound of cubed sirloin steak and 8 ounces of halved mushrooms to the bowl. Stir until everything is well coated with the marinade. Let it marinate for at least 15-30 minutes. This helps the steak and mushrooms soak up all the flavors. - Preheat the air fryer: Set your air fryer to 400°F (200°C) and let it preheat for about 5 minutes. This step is key for a good sear. - Cook the first batch of steak bites: Place half of the marinated steak and mushrooms in the air fryer basket. Make sure not to overcrowd it. Cook for 8-10 minutes. Shake the basket halfway through. This ensures even cooking and browning. - Cook the remaining steak bites: After the first batch is done, remove it and repeat with the remaining mixture. This way, you maintain the same great flavor and texture. - Garnish and serve tips: Once all the bites are cooked, sprinkle fresh chopped parsley over them for a pop of color. - Presentation ideas: Serve the steak bites on a nice platter or on individual plates. Drizzle any leftover garlic butter from the bowl over the top for extra flavor. You can also add toothpicks for easy eating. A fresh green salad on the side adds color and crunch. To get the best doneness for your steak bites, aim for medium-rare. This means cooking them to about 135°F (57°C). Use a meat thermometer if you have one. It helps ensure you don’t overcook. Avoid overcrowding in the air fryer. If you add too many steak bites and mushrooms, they won’t cook evenly. Cook in batches instead. This way, each piece gets that perfect crisp. Want to jazz up the flavor? You can add more herbs or spices. Consider rosemary or paprika for a kick. These will give your dish a fresh twist. Using different types of mushrooms can also enhance the dish. Try shiitake or portobello for a richer flavor. Each variety brings its own unique taste to the mix. For the best side dishes to pair, consider a fresh green salad. It adds color and crunch. You can also serve it with rice or mashed potatoes for a hearty meal. Creative serving ideas include using toothpicks for easy eating. Place the steak bites on a platter and drizzle leftover garlic butter over the top. This adds flair and more flavor. {{image_2}} You can swap out sirloin steak for other cuts like ribeye or flank. These cuts add different flavors and textures. If you want a leaner option, try using chicken breast or shrimp. They cook well with garlic butter too. For mushrooms, cremini and button are great choices. However, you can also use portobello or shiitake. Each type brings its own taste and fun texture to the dish. You can easily grill these steak bites. Just marinate them like in the air fryer method. Preheat your grill to medium-high heat. Cook the bites for about 8-10 minutes, turning them often for even cooking. If you prefer baking, heat your oven to 400°F (200°C). Place the marinated steak and mushrooms on a baking sheet. Bake for about 15-20 minutes until they are cooked through. This method is simple and still gives tasty results. For a spicy kick, add red pepper flakes to your garlic butter. This gives the dish heat and depth. You can also mix in some fresh herbs like rosemary or basil for a twist. Want to add cheese? Try sprinkling some grated parmesan or crumbled blue cheese on top before serving. This adds creaminess and richness to your steak bites. After you enjoy your Air Fryer Garlic Butter Steak Bites, store any leftovers right away. Place them in an airtight container. This keeps them fresh for your next meal. Make sure to refrigerate them within two hours of cooking. For best taste, eat leftovers within three days. If you want to save them longer, freezing is a great option. To freeze steak bites, let them cool completely first. Then, place them in a freezer bag. Remove as much air as possible before sealing. They can last up to three months in the freezer. Reheating your steak bites can bring back their delicious flavor. The air fryer is the best way to do this. Preheat your air fryer to 350°F (175°C). Place the steak bites in the basket in a single layer. Heat them for about 5-6 minutes. Check that they are warmed through. If you don’t have an air fryer, you can use the oven. Preheat it to 350°F (175°C). Spread the steak bites on a baking sheet. Heat for about 10-15 minutes. You can also use a microwave, though this may make them less crispy. Heat on medium power for 1-2 minutes, checking often. In the fridge, your steak bites will last about three days. Always check them before eating. Look for any signs of spoilage. If they smell bad or have a strange color, don’t eat them. When frozen, they can last up to three months. For the best taste, try to eat them sooner. Always remember to label your containers or bags with the date. This helps you keep track of how long they have been stored. How long do I marinate the steak bites? You should marinate the steak bites for at least 15-30 minutes. This time allows the garlic butter mixture to soak in and flavor the meat. If you have more time, you can marinate them for a few hours. This extra time enhances the taste even more. Can I use frozen steak? It is best to use fresh steak for this recipe. Frozen steak has more moisture, which can change the texture. If you only have frozen steak, be sure to thaw it completely before marinating. This helps the marinade work better on the meat. What temperature should steak be cooked to? For medium-rare, cook steak to 135°F (57°C). For medium, aim for 145°F (63°C). Use a meat thermometer to check the temperature. This ensures your steak is cooked just the way you like it. Can I add vegetables to the air fryer? Yes, you can add vegetables! Mushrooms work great in this recipe. You can also try bell peppers or zucchini. Just make sure to cut them to a size similar to the steak bites. This helps them cook evenly. Can I double the recipe? Absolutely! You can double the recipe without any issues. Just make sure your air fryer can fit all the steak bites. If not, cook them in batches. What dips go well with steak bites? Steak bites pair well with many dips. Try a creamy garlic aioli or a spicy chimichurri. Barbecue sauce and ranch dressing also make great choices. These dips add more flavor and fun to your meal. This guide covers everything you need for tasty air fryer steak bites. We explored ingredients, preparation steps, and cooking tips for perfect results. Remember to marinate well and monitor cooking times. Don't hesitate to experiment with flavors and variations to suit your taste. Enjoy your steak bites with fun sides and good company. With these tips, you can create meals everyone loves. Dive in and start cooking!

Air Fryer Garlic Butter Steak Bites with Mushrooms Delight

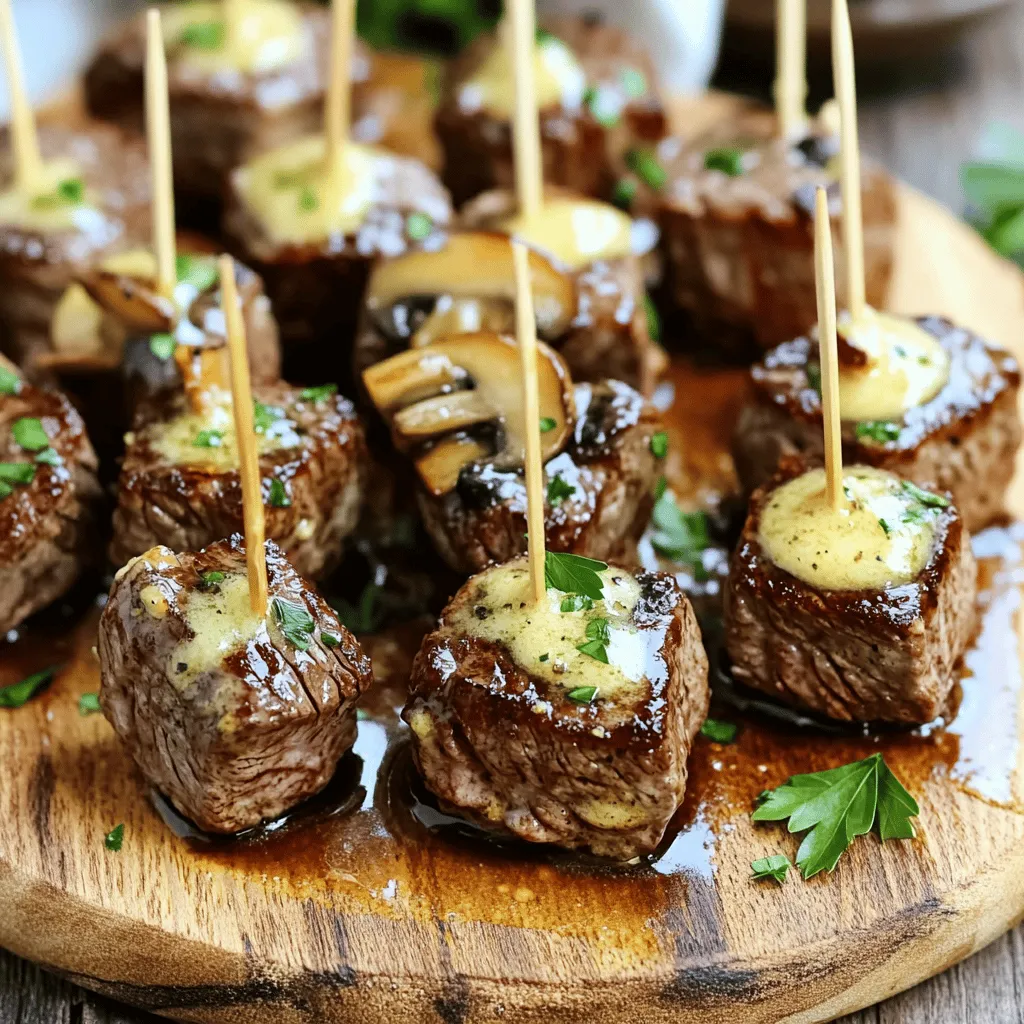
Get ready to savor a quick and tasty meal with my Air Fryer Garlic Butter Steak Bites with Mushrooms! This

Older posts
Newer posts
← Previous Page1 … Page17 Page18 Page19 … Page130 Next →
© 2025 My Cooking Cast • Built with GeneratePress

Our Policies

  • Privacy Policy
  • GDPR Policy
  • Terms Of Use
  • Copyright Policy
  • Cookie Policy
  • Disclaimer

More Information​

  • Home
  • Contact
  • About
  • Dinner
  • Appetizers
  • Dessert
©2025, My Cooking Cast About Privacy Policy Back To Top