Skip to content
DisclaimerTerms Of UseGDPR PolicyCookie Policy

My Cooking Cast

  • Home
  • Drinks
  • Appetizers
  • Dinner
  • Dessert
  • About
  • Contact
  • Privacy Policy
DisclaimerTerms Of UseGDPR PolicyCookie Policy

Emma

- 4 boneless, skinless chicken breasts - 1/4 cup fresh lime juice (about 2 limes) - 2 tablespoons olive oil - 2 tablespoons honey The main stars of this dish are the chicken breasts. They absorb the zesty flavors from the marinade. Fresh lime juice adds brightness, while honey gives a nice sweetness. Olive oil keeps the chicken moist as it cooks. - 2 cloves garlic, minced - 1 tablespoon chili powder - 1 teaspoon cumin - 1/2 teaspoon paprika - 1/2 teaspoon salt - 1/4 teaspoon black pepper These spices make the chicken pop with flavor. The chili powder brings heat, while cumin adds warmth. Paprika gives a lovely color. Salt and pepper round out the taste, enhancing the other flavors. - Fresh cilantro, chopped - Lime wedges Garnishing with cilantro adds a fresh touch. Lime wedges give a burst of citrus when squeezed over the chicken. These optional garnishes elevate your dish and make it visually appealing. {{ingredient_image_1}} Start by whisking together the marinade ingredients. In a bowl, mix the fresh lime juice, olive oil, honey, and minced garlic. Then, add the chili powder, cumin, paprika, salt, black pepper, and lime zest. To achieve the right consistency, ensure all ingredients blend well. The mixture should be smooth and a bit thick, so it sticks to the chicken. If it's too thin, add a touch more honey or olive oil. For the best flavor, marinate the chicken for at least 30 minutes. However, if you can, let it sit for up to 2 hours. This longer time helps the flavors soak in better. To ensure even flavor absorption, place the chicken in a resealable plastic bag or a shallow dish. Pour the marinade over the chicken and turn it to coat well. Seal the bag or cover the dish tightly. This helps the chicken absorb all the tasty flavors. Preheat your grill to medium-high heat. A hot grill gives the chicken nice grill marks and a good sear. Grill the chicken for about 6-7 minutes on each side. Check the doneness by using a meat thermometer. The internal temperature should reach 165°F (75°C). You want the chicken to be nicely charred and cooked through. After grilling, remove the chicken and let it rest for 5 minutes. This helps keep the juices in. Slice it up and enjoy! To get perfect grill marks, start with a clean grill. Preheat it to medium-high heat. Place the chicken at a 45-degree angle to the grates. This angle helps form those nice marks. Flip the chicken only once. Keep it on the grill for 6-7 minutes per side to avoid sticking. Common mistakes include not preheating the grill and overcrowding it. Both can lead to uneven cooking. Always leave space between each chicken piece. This allows for better airflow and cooking. To add extra spice, try a pinch of cayenne pepper or crushed red pepper flakes. Both boost the heat without changing the flavor too much. You can also mix in some jalapeño for a fresh kick. For different herbs, consider using fresh oregano or thyme. Both herbs offer unique flavors and pair well with lime. You can also try adding some fresh mint for a refreshing twist. If you don’t have a grill, you can cook the chicken in the oven. Preheat your oven to 400°F (200°C). Place the marinated chicken on a baking sheet and bake for 20-25 minutes. For stovetop cooking, use a cast-iron skillet. Heat the skillet over medium heat and add a bit of oil. Cook the chicken for about 6-7 minutes on each side. To keep the chicken juicy, let it rest for a few minutes after cooking. This allows the juices to settle. This step is key, no matter the cooking method you choose. Pro Tips Marinate Longer for Flavor: For the best flavor, marinate the chicken for at least 2 hours, or even overnight if possible. This allows the spices and citrus to deeply penetrate the meat. Let Your Grill Get Hot: Ensure your grill is preheated to medium-high heat before adding the chicken. This helps achieve a nice sear and prevents the chicken from sticking. Use a Meat Thermometer: To ensure your chicken is perfectly cooked, use a meat thermometer to check that the internal temperature reaches 165°F (75°C). Rest Before Slicing: Allow the grilled chicken to rest for about 5 minutes before slicing. This helps the juices redistribute, resulting in a juicier bite. {{image_2}} You can change the spice level of your chili lime grilled chicken. If you want it mild, use less chili powder. If you like more heat, add more chili powder or some diced jalapeños. You can also add grated ginger for a fresh, zesty kick. Lime zest adds brightness and enhances that citrus flavor. You don’t have to stick to just lime juice for the marinade. Try using orange juice for a sweeter touch. Soy sauce can add a nice umami flavor if you want something deeper. If you prefer a vegan option, swap the chicken for tofu or tempeh. These alternatives will soak up the marinade well and give you a tasty dish. For sides, think about fresh salads or grilled veggies. Corn on the cob pairs well with this dish, too. You can also serve it with a creamy avocado dip or salsa for added flavor. When plating, slice the chicken and arrange it on a colorful plate. Add cilantro and lime wedges for a bright finish. This makes your meal look as good as it tastes! You can store grilled chicken in the fridge for up to four days. Place it in an airtight container to keep it fresh. This helps lock in moisture and flavor. Make sure to let it cool down before sealing it. This quick cooling step prevents condensation, which can make the chicken soggy. To freeze grilled chicken, first let it cool completely. Then, wrap each piece tightly in plastic wrap or foil. Place the wrapped chicken in a freezer bag and remove as much air as possible. Label the bag with the date. Frozen grilled chicken can last for up to three months. For the best results, thaw chicken in the fridge overnight before cooking. This keeps it juicy and flavorful. When it’s time to reheat your chicken, use the oven for the best results. Preheat the oven to 350°F (175°C). Place the chicken on a baking sheet and cover it with foil. This helps keep moisture in. Heat for about 15-20 minutes or until warm. You can also use a microwave, but be careful. Heat in short bursts and check often to avoid drying it out. Enjoy your flavorful chili lime grilled chicken! For the best flavor, marinate the chicken for at least 30 minutes. If you have more time, aim for 2 hours. This longer time lets the lime juice and spices soak in, making the chicken taste great. If you want a milder flavor, stick to the 30-minute mark. For a bolder taste, go for the full two hours. Always cook chicken to an internal temperature of 165°F (75°C). This temperature ensures the chicken is safe to eat. Use a meat thermometer to check the thickest part of the chicken. Cooking it to this point keeps it juicy and tender. Yes, you can use chicken thighs! They have more fat, which keeps them moist. If you switch to thighs, cook them for about 8-10 minutes on each side. It’s best to check their internal temperature, too. Thighs should also reach 165°F (75°C) when done. This blog post covered grilling chicken with simple ingredients and steps. We explored a tasty marinade, spices, and variations to make your dish stand out. Remember to marinate the chicken well and use the right grilling techniques. For storage, keep it fresh and flavorful. Enjoy experimenting with different flavors and serving ideas. Grilling chicken can be fun and tasty. With these tips, you're ready to impress at your next meal.

Chili Lime Grilled Chicken Flavorful Summer Delight

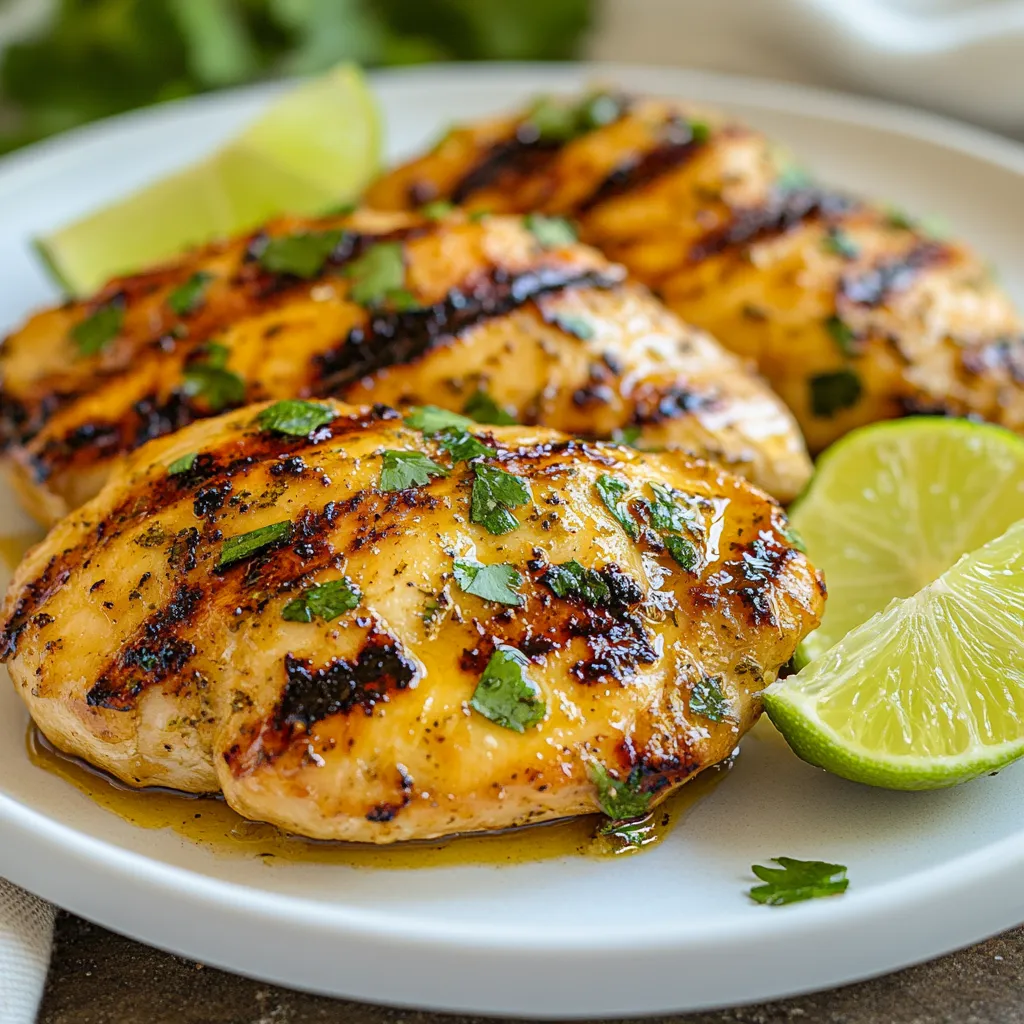
Are you ready for a fresh and zesty summer meal? My Chili Lime Grilled Chicken recipe combines juicy chicken breasts

- 4 bone-in chicken thighs, skin-on - 1/2 cup balsamic vinegar - 1/4 cup honey - 3 cloves garlic, minced - 1 tablespoon Dijon mustard - 2 teaspoons fresh thyme leaves (or 1 teaspoon dried thyme) - Salt and pepper, to taste - 2 tablespoons olive oil - 1 zucchini, sliced into rounds - 1 bell pepper, sliced - 1 cup cherry tomatoes Measuring ingredients helps keep your dish consistent. Use measuring cups and spoons for accuracy. For liquids, pour carefully to avoid spills. For dry ingredients, scoop and level them off. Always check your measurements twice. This will help you get the flavors just right. {{ingredient_image_1}} To make the marinade, start by whisking together the balsamic vinegar, honey, minced garlic, Dijon mustard, thyme, salt, and pepper in a bowl. This mix gives the chicken a sweet and tangy flavor. You need to marinate the chicken for at least 30 minutes. For the best taste, marinate it for 2 hours. This time lets the flavors soak into the meat. Next, preheat your oven to 400°F (200°C). This temperature cooks the chicken evenly. While the oven heats, grab an oven-safe skillet and heat olive oil over medium-high heat. This oil helps the chicken brown nicely. Make sure to remove the chicken from the marinade. Let any extra marinade drip off before placing the chicken in the skillet. Now it’s time to sear the chicken thighs. Place them skin side down in the skillet. Sear them for about 5-7 minutes until the skin turns golden brown. After that, flip the chicken thighs. Add the sliced zucchini, bell pepper, and cherry tomatoes around the chicken in the skillet. Pour the reserved balsamic marinade over everything. Transfer the skillet to your preheated oven. Bake for about 25-30 minutes. The chicken should reach an internal temperature of 165°F (75°C) to be safe to eat. For a crispy skin, switch the oven to broil mode. Broil for an extra 3-5 minutes, but watch closely to avoid burning. Once done, let the chicken rest for 5 minutes before serving. Enjoy the delicious glazed chicken with the fresh vegetables! To make your balsamic glazed chicken thighs even better, marinate them well. I suggest at least 30 minutes, but if you can, aim for 2 hours. This gives the chicken time to soak up the flavors. For an extra kick, try adding herbs like rosemary or spices such as paprika. These can bring out more flavor and make it special. For crispy skin, broiling is key. After baking, switch your oven to broil. Watch closely while it cooks for 3-5 minutes. This step can make a big difference. To avoid burnt skin, make sure to keep the chicken about 6 inches from the heat. You can also check on it halfway to ensure it’s cooking evenly. When it comes to sides for balsamic glazed chicken thighs, think bright and fresh. Roasted vegetables like zucchini, bell peppers, and cherry tomatoes work great. You can also serve it with rice or a light salad. For a nice touch, sprinkle fresh herbs or a squeeze of lemon juice on top before serving. This adds color and flavor to your plate. Pro Tips Marinate Longer for Flavor: Allowing the chicken to marinate for at least 2 hours, or even overnight, will enhance the flavor significantly. Use a Meat Thermometer: To ensure perfectly cooked chicken, use a meat thermometer to check that the internal temperature reaches 165°F (75°C). Customize Your Vegetables: Feel free to substitute or add other vegetables like asparagus or carrots based on your preferences or seasonal availability. Let It Rest: Always let the chicken rest for 5 minutes after baking to retain its juices and ensure a moist, tender bite. {{image_2}} You can easily switch up the main protein in this dish. Try using chicken breast if you want leaner meat. Tofu is a great option for a vegetarian twist. For veggies, feel free to add any favorites. Carrots, broccoli, or asparagus all work well. Adjust the sweetness by using different sweeteners. Maple syrup or agave nectar can replace honey. For more depth, add spices like smoked paprika or cayenne pepper. Fresh herbs like basil or oregano can also enhance the taste. Grilling gives the chicken a smoky flavor. To grill, marinate the chicken, then cook on medium heat for about 6-8 minutes each side. A slow cooker is another easy option. Cook on low for 4-6 hours after marinating. This method makes the chicken very tender and juicy. To keep your balsamic glazed chicken thighs fresh, use airtight containers. Glass or plastic containers work well. Make sure the chicken cools to room temperature before sealing. This helps cut down on moisture. Store leftovers in the fridge for up to four days. When you're ready to enjoy your leftovers, you have some options. You can reheat them in the oven, microwave, or stovetop. - Oven: Preheat to 350°F (175°C). Place chicken on a baking tray. Bake for about 15-20 minutes. This keeps the skin crispy. - Microwave: Place chicken on a microwave-safe plate. Heat in short bursts of 1-2 minutes. Check often to avoid drying it out. - Stovetop: Heat a skillet over medium heat. Add a splash of water or broth to keep it moist. Cook until warmed through. If you want to save some chicken for later, freezing is a great option. Let it cool completely before freezing. Place the chicken in freezer-safe bags or containers. Make sure to remove as much air as possible. This helps prevent freezer burn. You can freeze the chicken for about 2-3 months. To thaw, move the chicken to the fridge the night before you plan to eat it. For quicker thawing, place the sealed bag in cold water for about an hour. Always make sure to reheat it properly after thawing. The best way to marinate chicken thighs is to mix balsamic vinegar, honey, garlic, Dijon mustard, thyme, salt, and pepper in a bowl. Pour this mixture over the chicken and cover it. Place the chicken in the fridge for at least 30 minutes. For more flavor, marinate for 2 hours or longer. This helps the meat soak up all those tasty flavors. Yes, you can use boneless chicken thighs. They will cook faster than bone-in thighs. Adjust the cooking time to about 20-25 minutes in the oven. Always check for doneness to ensure the chicken is safe to eat. Check the internal temperature of the chicken. It should reach 165°F (75°C). You can use a meat thermometer for this. Also, look for clear juices when you cut into the chicken. If the juices run clear, the chicken is done. The meat should no longer be pink in the center. In this post, we explored how to make balsamic glazed chicken thighs. You learned about the main ingredients, how to measure them, and the step-by-step cooking process. Remember to marinate the chicken for the best flavor. I also shared tips for crispy skin and delicious serving ideas. Experiment with variations and storage methods to enjoy your dish later. Cooking can be fun and rewarding. With practice and these techniques, you can create tasty meals every time.

Balsamic Glazed Chicken Thighs Flavorful and Easy Recipe

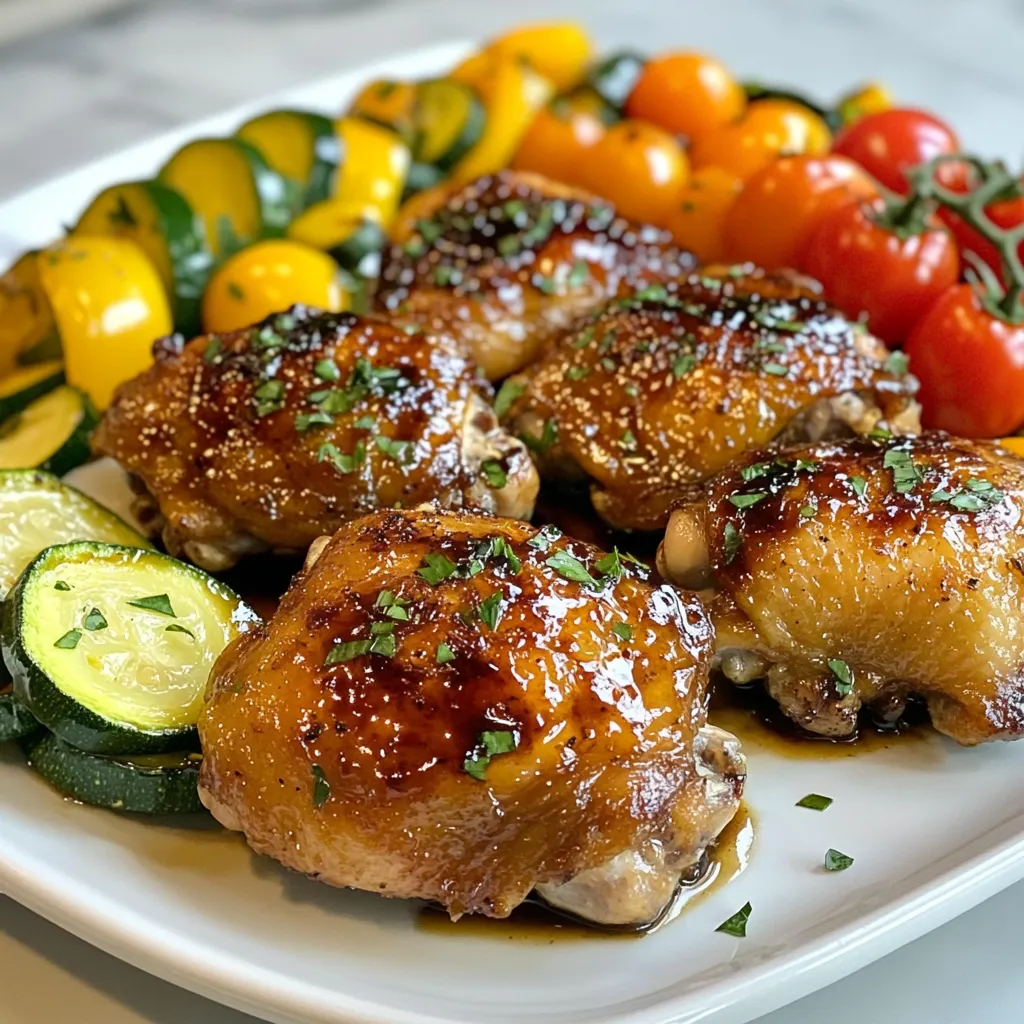
Looking for a simple yet delicious dinner idea? Balsamic Glazed Chicken Thighs are the answer. This recipe is packed with

- 2 cups cooked chicken, shredded - 1 can (15 oz) black beans, rinsed and drained - 1 can (15 oz) corn kernels, drained - 1 can (10 oz) diced tomatoes with green chiles - 1 teaspoon chili powder - 1 teaspoon cumin - 1 teaspoon garlic powder - 1 teaspoon onion powder - 8 small corn tortillas, cut into quarters - 2 cups shredded cheddar cheese - 1 cup sour cream - 1/2 cup fresh cilantro, chopped - Salt and pepper to taste For this dish, I like to use precise measurements. Each ingredient plays a key role. The chicken adds protein, while the beans and corn bring fiber and sweetness. The spices, like chili powder and cumin, give it a warm kick. The cheese melts beautifully, making the dish creamy and rich. You can mix it up with a few optional ingredients. Try adding jalapeños for heat or bell peppers for crunch. Black olives also add a salty touch. If you love avocado, serve slices on the side for creaminess. These extras can enhance the flavor and texture. Feel free to get creative! {{ingredient_image_1}} First, gather all your ingredients. You will need cooked chicken, black beans, corn, and diced tomatoes. Don’t forget the spices: chili powder, cumin, garlic powder, and onion powder. Grab your tortillas and cheese too. Preheat your oven to 350°F (175°C). This helps get a nice golden crust on top. In a large bowl, mix the chicken, beans, corn, tomatoes, and spices. Make sure everything is well combined. Taste the mix and add salt and pepper as needed. This step is key for flavor. Now, let’s layer the casserole. Take a greased 9x13 inch dish. Start with half of the tortilla quarters on the bottom. This forms a great base for your dish. Next, spread half of the chicken mixture over the tortillas. Then, add half of the sour cream. Sprinkle one cup of shredded cheddar cheese on top. Repeat this layering. Add the remaining tortilla quarters, then the rest of the chicken mix, sour cream, and finish with the last of the cheese. Each layer adds a new taste and texture. Cover your casserole with aluminum foil. This keeps the heat inside and helps it cook evenly. Place it in the preheated oven for 25 minutes. After that, remove the foil and bake for another 15 to 20 minutes. You want the cheese to be bubbling and golden. Once it's done, take it out of the oven. Let it sit for 5 to 10 minutes before serving. This helps everything set up. Top it with fresh cilantro for a nice touch. Enjoy your easy and tasty Southwest Chicken Tortilla Casserole! To enhance the taste of your Southwest Chicken Tortilla Casserole, use fresh spices. Fresh spices pack a stronger punch than old ones. Toasting your spices in a dry pan for a minute wakes them up. This simple step boosts the flavor. Try adding lime juice for a zesty kick. A squeeze before serving adds freshness that brightens every bite. You can also adjust the chili powder to match your heat preference. The key to a great casserole is layering. Spread the ingredients evenly for a balanced taste. Make sure to layer the chicken mixture and cheese well. This helps every piece have flavor. Cover the dish with foil at first. This keeps moisture in, ensuring the chicken stays juicy. Uncover it near the end to let the cheese get golden and bubbly. Let the casserole sit after baking. This helps it set and makes serving easier. Serve your casserole straight from the dish. This makes it easy and fun for everyone. Top it with chopped cilantro for a fresh look. Add slices of avocado or a simple green salad on the side. These sides add creaminess and crunch. If you have leftover sour cream, place it on the table. Guests can add it as they like. This dish is great for gatherings or family dinners. Pro Tips Layering is Key: Ensure you spread the ingredients evenly across the layers for consistent flavor in every bite. Cheese Choices: Experiment with different cheeses like pepper jack for added spice or Monterey Jack for a milder flavor. Make Ahead: Prepare the casserole in advance and refrigerate it overnight. Just pop it in the oven when you're ready to bake! Serving Suggestions: Pair with a dollop of guacamole or a side of tortilla chips for a delightful crunch. {{image_2}} You can easily swap out some ingredients in this casserole. For instance, if you don’t have cooked chicken, use shredded rotisserie chicken. You can also try ground turkey or beef for a different twist. If you're out of black beans, pinto beans work great too. For a veggie option, use mushrooms or zucchini instead of meat. You can even replace corn with bell peppers for a fresh crunch. This casserole can fit many diets. For a low-carb version, skip the tortillas. Instead, use cauliflower rice or zucchini slices as layers. If you want a dairy-free dish, use vegan cheese and sour cream. You can also use almond milk or coconut yogurt as a substitute. Gluten-free? Just make sure your tortillas are labeled gluten-free. You can change the taste of this casserole by adding different spices. If you like heat, toss in some cayenne pepper or jalapeños. For a smoky flavor, try smoked paprika. You can also add fresh herbs like oregano or thyme. Want a creamy touch? Add a layer of cream cheese in the middle for richness. These simple swaps keep your Southwest Chicken Tortilla Casserole exciting every time you make it! To store your Southwest Chicken Tortilla Casserole, let it cool first. Place it in an airtight container. You can keep it in the fridge for up to three days. Make sure to cover it well. This helps keep the flavors fresh. When you are ready to eat, just grab it from the fridge. If you want to freeze your casserole, it works well too. Cut it into portions before freezing. Use freezer-safe containers or bags. Label them with the date. This way, you’ll know how long it has been in the freezer. It can last for about three months. When you’re ready to eat, thaw it in the fridge overnight. Reheating is easy! For the best taste, use the oven. Preheat your oven to 350°F (175°C). Place the casserole in an oven-safe dish. Cover it with foil so it doesn’t dry out. Heat for about 20-25 minutes. If you’re in a hurry, you can use the microwave. Just heat it in short bursts. Stir it often until it’s hot all the way through. Enjoy your tasty leftovers! Yes, you can make this casserole ahead. Prepare the dish and layer the ingredients. Cover it tightly with foil. Store it in the fridge for up to 24 hours. When ready to bake, remove it from the fridge. Let it sit for 30 minutes before baking. This helps it cook evenly. Many sides go well with this casserole. Here are a few ideas: - Fresh guacamole - A simple green salad - Corn on the cob - Mexican rice - Sliced avocado These sides add color and flavor to your meal. They also help balance the richness of the casserole. Absolutely! You can use different cheeses. Try Monterey Jack for a mild flavor. Pepper Jack adds spice and heat. You can also use a blend of cheeses for a tasty twist. Just keep in mind that the cheese should melt well. This gives you that gooey goodness everyone loves! This blog post covered the key ingredients and steps to make a delicious casserole. I shared tips to perfect the flavor and discussed various storage methods. Remember, you can adjust ingredients and try different cheeses to suit your taste. This allows you to create a dish that fits your needs. With this knowledge, you can enjoy a satisfying meal tailored just for you. Happy cooking!

Southwest Chicken Tortilla Casserole Easy and Tasty

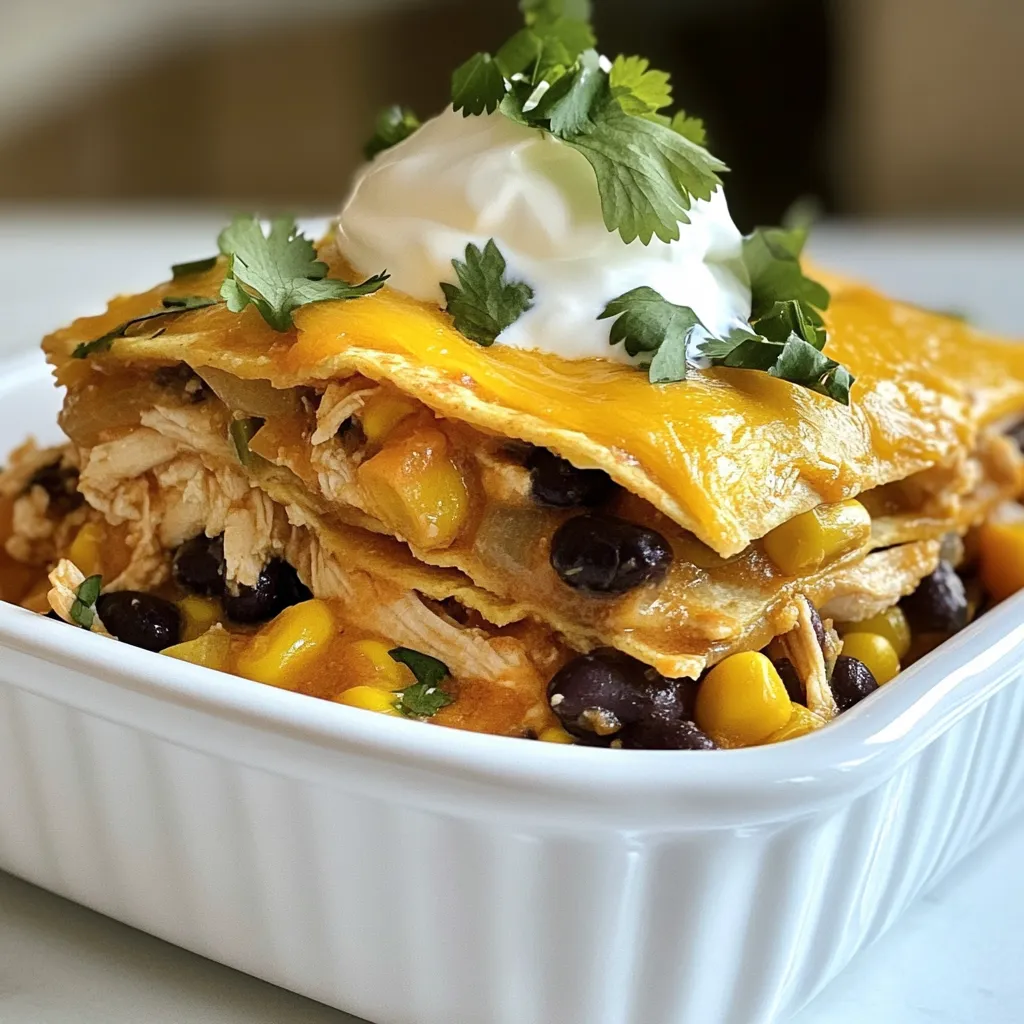
Are you ready for a meal that bursts with flavor? My Southwest Chicken Tortilla Casserole is both easy and tasty!

- 4 chicken thighs, skinless and boneless - 1 cup fresh orange juice - 2 tablespoons grated fresh ginger - 2 cloves garlic, minced - 3 tablespoons honey - 2 tablespoons soy sauce (low sodium) - Zest of 1 orange - 2 tablespoons sesame oil The main flavors in this dish come from fresh orange juice and ginger. The chicken thighs bring moisture and flavor, making them the perfect choice. You will also need honey to add sweetness and soy sauce for that savory touch. - 1 tablespoon cornstarch (optional, for thickening sauce) - Sliced green onions and sesame seeds, for garnish If you want a thicker sauce, use cornstarch. It helps create a nice coating for the chicken. Garnishes like sliced green onions and sesame seeds add color and crunch. - Salt and pepper to taste - 2 tablespoons sesame oil Season the chicken with salt and pepper. Sesame oil gives a rich, nutty flavor that brings everything together. This simple seasoning makes the dish shine without overpowering the other flavors. {{ingredient_image_1}} First, grab a medium bowl. In this bowl, whisk together: - 1 cup fresh orange juice - 2 tablespoons grated fresh ginger - 2 cloves garlic, minced - 3 tablespoons honey - 2 tablespoons soy sauce - Zest of 1 orange Make sure everything mixes well. This marinade brings bright flavors to the chicken. Next, season 4 chicken thighs with salt and pepper. Heat 2 tablespoons of sesame oil in a large skillet over medium-high heat. Once the oil is hot, add the chicken thighs. Sauté them for about 5-6 minutes on each side. You want them to turn golden brown and be fully cooked. After cooking, take the chicken out of the skillet and set it aside on a plate. Now, in the same skillet, pour in your orange juice mixture. Bring it to a simmer. Make sure to scrape any browned bits from the pan. This adds extra flavor to your sauce. If you like a thicker sauce, mix 1 tablespoon of cornstarch with 1 tablespoon of water. Gradually add this mixture to the sauce while stirring. Let it simmer for another 2-3 minutes until it thickens. Return the chicken thighs to the skillet. Coat them well with the sauce. Cook for an extra 2 minutes to ensure the chicken warms through. After this, remove the skillet from the heat. Let it rest for a minute before serving. Enjoy your flavorful Orange Ginger Chicken! To get the best taste, balance sweetness and acidity. Use honey for sweetness and fresh orange juice for tang. Start with a good amount of orange juice. The honey should blend well, giving a nice glaze. Check the doneness of chicken thighs by cutting into one. The meat should be white, with no pink. Use a meat thermometer for best results. Aim for 165°F (75°C). Avoid overcooking to keep the chicken juicy and tender. Make your dish look great by plating it well. Serve the chicken on a platter with the sauce drizzled over. Garnish with sliced green onions and sesame seeds. This adds color and texture. Pair with steamed rice or a fresh salad to complete the meal. Pro Tips Use Fresh Ingredients: Fresh ginger and orange juice will enhance the flavor of the dish significantly compared to their dried or bottled counterparts. Marinate for Extra Flavor: Let the chicken marinate in the orange juice mixture for at least 30 minutes before cooking to infuse more flavor. Adjust Sweetness: Depending on your taste preference, you can add more or less honey to adjust the sweetness of the sauce. Let it Rest: Allow the chicken to rest after cooking for a few minutes; this helps retain the juices and keeps it moist. {{image_2}} You can switch up the protein in this dish. Instead of chicken thighs, try chicken breast for a leaner option. If you prefer plant-based meals, tofu works great. Just press the tofu to remove excess water and cut it into cubes. For seafood lovers, shrimp adds a nice touch. Cook them until they turn pink for best results. Want to spice things up? Add chili flakes to the marinade. This will give your chicken a nice kick. If you like deep flavors, mix in some miso paste. Miso brings a savory taste that pairs well with orange and ginger. You can experiment with these additions to find your favorite flavor. You have options when it comes to cooking. Grilling the chicken gives it a smoky flavor. Use medium heat to avoid burning. Baking is another choice. Place the chicken in a preheated oven at 400°F for about 25 minutes. Stir-frying is quick and keeps the chicken juicy. Just keep an eye on the heat to ensure even cooking. Store your orange ginger chicken in an airtight container. This keeps it fresh. Let the chicken cool to room temperature before sealing it. You can refrigerate it for up to four days. If you want to keep it longer, freeze it for up to three months. Just make sure to label the container with the date. When reheating, you want to keep it moist and flavorful. The best way is to use the stove. Heat a skillet over medium heat. Add a splash of water or broth to the pan. Then, add the chicken. Cover it with a lid to trap steam. This keeps the chicken juicy. You can also use the microwave. Place the chicken in a microwave-safe dish. Add a little water and cover it with a lid or plastic wrap. Heat in short bursts, checking often. In the fridge, orange ginger chicken lasts about four days. In the freezer, it can stay good for about three months. After that, the flavor may fade. Always check for any off smells or changes in texture before eating. You can pair orange ginger chicken with several tasty side dishes. Here are some great options: - Steamed white rice or brown rice - Quinoa for a protein boost - Stir-fried vegetables like broccoli or bell peppers - A fresh green salad with a light vinaigrette - Garlic bread for a crunchy contrast These sides will complement the sweet and zesty flavors well. They add texture and nutrition to your meal. Yes, you can make orange ginger chicken ahead of time. Here are some tips for meal prep: - Marinate the chicken in the orange juice mix the night before. This adds more flavor. - Cook the chicken and sauce, then let them cool. Store them in an airtight container in the fridge. - Reheat the dish gently in a skillet or microwave when you're ready to serve. This makes dinner quick and easy on busy nights! Here’s a breakdown for orange ginger chicken per serving (4 servings total): - Calories: About 290 - Protein: 23g - Carbohydrates: 27g - Fat: 12g - Fiber: 1g - Sugar: 10g This dish is balanced and offers a good amount of protein and flavor. Enjoy it guilt-free! This blog post covered how to make orange ginger chicken. We discussed the key ingredients, like chicken thighs and fresh orange juice, and how to prepare a tasty marinade. You learned cooking methods, tips for perfecting flavor, and ways to present your dish beautifully. Remember, you can customize this recipe by using different proteins or adding more spices. Enjoy experimenting, and don’t hesitate to make this dish your own. With practice, you’ll master the balance of flavors and impress your family and friends.

Orange Ginger Chicken Flavorful and Quick Recipe

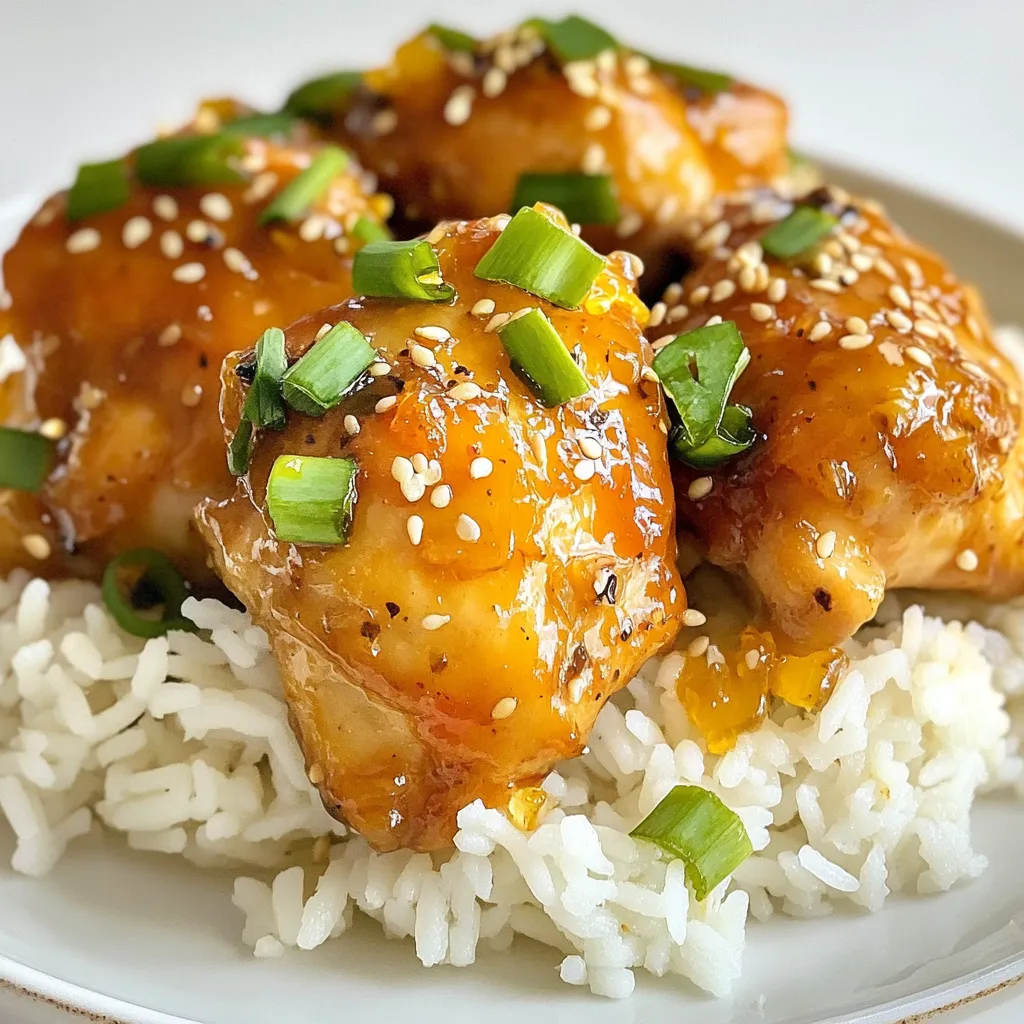
Are you ready to spice up your weeknight dinners? This Orange Ginger Chicken recipe is bursting with flavor and can

To make crispy honey garlic tofu, gather these key items: - 1 block (14 oz) firm tofu, pressed and drained - 1/4 cup cornstarch - 2 tablespoons vegetable oil - 3 cloves garlic, minced - 1/4 cup honey (or maple syrup for a vegan option) - 2 tablespoons soy sauce (or tamari for gluten-free) - 1 tablespoon rice vinegar - 1 teaspoon grated ginger - 1 tablespoon sesame oil - 1 teaspoon chili flakes (optional) - 2 green onions, chopped (for garnish) - Sesame seeds (for garnish) These ingredients create a sweet and savory sauce that perfectly complements crispy tofu. You can swap some ingredients without losing flavor. Here are some ideas: - Tofu: Use extra-firm or silken tofu for a softer texture. - Cornstarch: Try arrowroot powder or potato starch for coating. - Vegetable oil: Olive oil or coconut oil can work well too. - Honey: Maple syrup or agave syrup makes a great vegan substitute. - Soy sauce: Liquid aminos or coconut aminos are good gluten-free options. These changes allow you to customize the dish to your taste or dietary needs. If you want to make this dish fully vegan, use these alternatives: - Honey: Replace it with maple syrup to keep it plant-based. - Soy sauce: Use tamari to ensure it’s gluten-free. These swaps keep the flavors rich and satisfying while respecting a vegan lifestyle. {{ingredient_image_1}} To start, you need to press the tofu. This step removes extra moisture. Wrap the tofu block in a clean towel. Place something heavy on top, like a skillet. Let it rest for about 20 to 30 minutes. This helps the tofu absorb flavors later. After pressing, cut the tofu into cubes or triangles. The size is up to you, but bite-sized pieces work best. Next, toss the tofu in a bowl with cornstarch. Make sure each piece is evenly coated. This coating is key for a crispy texture. Heat vegetable oil in a non-stick skillet over medium heat. Once the oil is hot, add the tofu in a single layer. Don’t overcrowd the pan; you may need to fry in batches. Fry each side for about 3 to 4 minutes. You want them golden brown and crispy. After frying, remove the tofu and place it on paper towels. This helps soak up any excess oil. In the same skillet, lower the heat. Add minced garlic and sauté for about 30 seconds. You want the garlic fragrant, not burnt. Now, add honey (or maple syrup), soy sauce, rice vinegar, and grated ginger. If you like heat, toss in chili flakes. Stir everything together. Let it simmer for 1 to 2 minutes until slightly thick. Finally, return the crispy tofu to the skillet. Gently toss it in the sauce. Make sure every piece gets coated well. To get the tofu nice and crispy, press it well. Use a clean towel and a heavy object. Remove as much moisture as you can. Next, coat the tofu in cornstarch. This step is key for the crunch. Fry it in a single layer, not overcrowding the pan. Let each side cook for about 3-4 minutes. You want golden brown and crispy tofu that you cannot resist. For frying, I recommend using vegetable oil. It has a high smoke point, making it perfect for frying. You can also try canola oil or peanut oil. These oils add a nice flavor without overpowering the dish. Avoid using oils with low smoke points, as they can burn easily. Serve your crispy honey garlic tofu hot. It pairs well with rice or noodles. Add steamed vegetables for extra color and nutrition. To make it look fancy, sprinkle sesame seeds and chopped green onions on top. You can also serve it with a side of soy sauce for dipping. Enjoy your meal with friends or family! Pro Tips Press Tofu Well: Ensure you press the tofu adequately to remove moisture, which helps achieve maximum crispiness during frying. Use a Non-Stick Skillet: A non-stick skillet helps prevent the tofu from sticking and breaking apart during frying. Adjust Sweetness: Feel free to adjust the amount of honey or maple syrup in the sauce based on your preferred sweetness level. Garnish Creatively: Experiment with different garnishes such as chopped cilantro or crushed peanuts for added flavor and texture. {{image_2}} To add a kick to your dish, try spicy honey garlic tofu. Start with the base recipe, but add 1-2 teaspoons of chili paste or sriracha to the sauce. You can also increase the chili flakes to suit your heat level. The spicy sauce blends well with the sweet honey and garlic, creating a tasty balance. This version brings excitement and warmth to your meal. Incorporating vegetables is a great way to boost nutrition. You can add bell peppers, broccoli, or snap peas. Slice the veggies into bite-sized pieces and stir-fry them for a few minutes before adding the tofu. This step keeps the vegetables crisp and fresh. Toss everything in the honey garlic sauce, and you’ll have a colorful and healthy meal. To make this dish gluten-free, swap regular soy sauce for tamari. Tamari tastes similar and works well in this recipe. Always check labels for hidden gluten in sauces and ingredients. This swap ensures everyone can enjoy the crispy honey garlic tofu. You won’t miss out on flavor while making it suitable for gluten-sensitive diets. To store leftover crispy honey garlic tofu, let it cool first. Place it in an airtight container. Keep it in the fridge for up to three days. This helps preserve the flavor and texture. Remember, the tofu may lose some crispiness when stored. To reheat, I suggest using a skillet. Heat the skillet over medium heat. Add a little oil to the pan. Once hot, add the leftover tofu. Cook for about 5 minutes, turning to crisp all sides. This method keeps the tofu tasty and helps regain some crunch. If you want to freeze the tofu, it’s best to do this before adding the sauce. After frying, let the tofu cool. Place it in a freezer-safe bag. It can last up to two months in the freezer. When ready to eat, thaw it in the fridge overnight before reheating. This way, you can enjoy the dish again without waste. Yes, you can use different types of tofu. Firm tofu works best for this recipe. It holds its shape well and gives a nice crunch. If you prefer, you can use extra-firm tofu for even more texture. Silken tofu, however, won’t work. It’s too soft and will break apart. You can use maple syrup as a sweet vegan option. It has a similar taste and texture to honey. Agave nectar is another choice if you want a milder flavor. Both options mix well with the sauce and keep the dish sweet. Yes, this dish is great for meal prep. You can make it ahead and store it in the fridge. Just keep the tofu and sauce separate until you're ready to eat. This keeps the tofu crispy. Reheat it in a skillet to regain that crunch. Crispy honey garlic tofu is easy to make and full of flavor. We covered ingredients, cooking steps, and tips for maximum crispiness. You can also try variations like spicy options or adding veggies. Proper storage and reheating keep it fresh for later. Enjoy experimenting with this dish! With the right steps, you'll impress anyone with your cooking. You now have the tools to make a tasty, healthy meal at home.

Crispy Honey Garlic Tofu Flavorful Vegan Delight

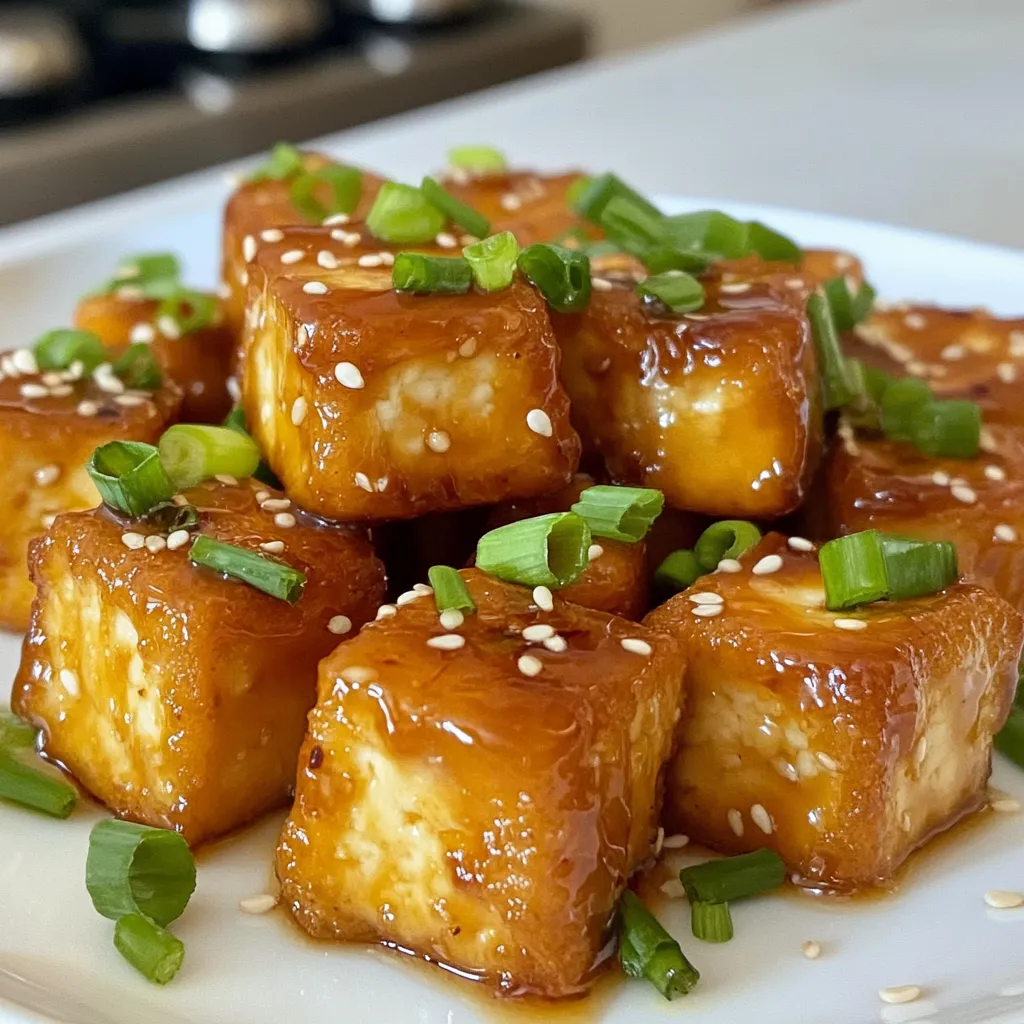
Looking for a tasty vegan dish? You’ve found it with Crispy Honey Garlic Tofu! This recipe brings sweet and savory

To make the Chipotle Lime Shrimp Bowls, gather these ingredients: - 1 lb large shrimp, peeled and deveined - 2 tablespoons chipotle chili powder - 1 tablespoon smoked paprika - 2 tablespoons olive oil - 2 limes (one for juice, one sliced for garnish) - 1 teaspoon garlic powder - Salt and pepper to taste - 1 cup quinoa, rinsed - 2 cups vegetable broth - 1 cup corn (fresh or frozen) - 1 red bell pepper, diced - 1 avocado, diced - Fresh cilantro, for garnish You can add these toppings to make your bowl even better: - Feta cheese - Sliced jalapeños Each serving of Chipotle Lime Shrimp Bowls offers a balanced meal. Here is a rough breakdown: - Calories: Approximately 450 - Protein: 30g - Carbohydrates: 45g - Dietary Fiber: 8g - Fats: 15g This meal is rich in protein and fiber. It is a great choice for a healthy diet. You can adjust the toppings based on your needs. For a lighter version, skip the cheese. Enjoy the vibrant flavors and fresh ingredients! {{ingredient_image_1}} First, take a bowl and put the shrimp inside. Add 2 tablespoons of chipotle chili powder and 1 tablespoon of smoked paprika. Then, pour in 2 tablespoons of olive oil and the juice of 1 lime. Add 1 teaspoon of garlic powder, salt, and pepper to taste. Mix everything well to coat the shrimp. Let it sit for about 15 minutes. This step adds great flavor. Next, grab a medium pot. Bring 2 cups of vegetable broth to a boil. After that, add 1 cup of rinsed quinoa. Cover the pot and lower the heat. Let it simmer for about 15 minutes until fluffy. When done, take it off the heat and let it sit for 5 more minutes. Fluff the quinoa with a fork. This makes a tasty base for your bowl. Now, heat a skillet over medium heat. Add a bit of olive oil to the pan. Once hot, toss in 1 diced red bell pepper and 1 cup of corn. Sauté for about 5 to 7 minutes until the peppers are soft. Lightly season with salt and pepper. These veggies add color and crunch. In another skillet, heat a little olive oil on medium-high. When it’s sizzling, add the marinated shrimp. Cook for about 2 to 3 minutes on each side. They should turn pink and opaque. This step gives you juicy shrimp packed with flavor. To put it all together, take a bowl and start with a layer of quinoa. Next, add the sautéed corn and bell peppers. After that, place the cooked shrimp on top. Finish with diced avocado, fresh cilantro, and lime slices for garnish. This creates a beautiful and tasty dish. When you cook, use fresh ingredients for the best taste. I recommend buying shrimp that is wild-caught. This shrimp often has better flavor than farmed shrimp. Visit your local seafood market or grocery store. Check for shrimp that is firm and smells fresh. For spices, look for chipotle chili powder and smoked paprika in the spice aisle. These add depth to your dish. Fresh herbs can elevate your meal. Buy cilantro close to cooking time for the best flavor. This dish shines with bold flavors. The chipotle chili powder gives a smoky heat. Pair it with lime juice for a bright kick. The sweetness of corn and the crunch of red bell pepper balance the spice. Adding avocado brings creaminess, which makes each bite delightful. For an extra zing, try feta cheese or sliced jalapeños. These toppings add layers of flavor and texture. Keep experimenting with ingredients. Your taste buds will thank you! Meal prepping helps save time during the week. Prepare the quinoa and veggies in advance. Store them in separate containers in the fridge. You can marinate the shrimp a day ahead. This lets the flavors soak in. When ready to eat, just cook the shrimp and assemble your bowl. You can also make extra bowls for lunch. This dish keeps well, so it’s perfect for meal prep. Enjoy a fresh, tasty meal anytime! Pro Tips Marinate for Flavor: Allow the shrimp to marinate for at least 30 minutes if time permits. This will enhance the flavors and make the shrimp even more delicious. Perfectly Cooked Quinoa: To ensure fluffy quinoa, remember to let it sit covered for 5 minutes after cooking. Fluffing with a fork will separate the grains nicely. Customize Your Heat: If you prefer a milder dish, reduce the amount of chipotle chili powder. Alternatively, add sliced jalapeños for an extra kick. Fresh Toppings: Always use fresh cilantro and lime juice for garnish just before serving. This keeps the flavors bright and vibrant in your dish. {{image_2}} You can swap shrimp for other proteins. Chicken works great in this dish. Use the same marinade for chicken. If you like fish, try tilapia or mahi-mahi. Tofu is a fun choice for a plant-based option. Just make sure to press it first to remove extra water. For a vegetarian bowl, skip the shrimp. Add more veggies instead. You could use black beans or chickpeas for protein. Both add a nice texture and flavor. Roasted sweet potatoes also pair well. They give a sweet touch to the dish. Want more heat? Add diced jalapeños when cooking the shrimp. You can also mix in some hot sauce to the marinade. If you crave a smoky flavor, use smoked chipotle sauce instead of chili powder. This will really boost the heat and flavor. To store leftovers, place them in an airtight container. Make sure to cool the bowls first. You can keep them in the fridge for up to three days. Label the container with the date. This way, you won't forget when you made them. If you want to freeze the shrimp bowls, it’s easy! First, let the bowls cool completely. Then, divide the ingredients into freezer-safe bags. Remove as much air as possible before sealing. You can freeze them for up to three months. Just remember, fresh toppings like avocado do not freeze well. To reheat, you have a few options. The microwave works well for quick meals. Heat in short bursts of 30 seconds, stirring in between. If you prefer the oven, preheat it to 350°F and cover the bowls with foil. Bake for about 15-20 minutes or until heated through. Always check the shrimp, as it should be hot but not overcooked. You can serve these bowls with many tasty sides. Here are some ideas: - Black beans for protein. - Fresh salsa for extra flavor. - Tortilla chips for crunch. - A side salad with lime dressing. - Cilantro-lime rice for a filling option. These sides add variety and make a fun meal. Mix and match to find your favorite combo! Yes, you can prep parts of this dish ahead. Here’s how: - Marinate the shrimp a few hours before cooking. - Cook the quinoa earlier and store it in the fridge. - Sauté the veggies and chill them for later use. Assemble your bowls right before serving. This keeps everything fresh and tasty! You can easily change the heat in your Chipotle Lime Shrimp Bowls. Here are some tips: - Add less chipotle chili powder for milder spice. - Use smoked paprika for flavor without heat. - For more heat, add chopped jalapeños as a topping. - Serve with lime wedges to balance the spice. Adjust these elements to fit your taste! This blog post covered how to make tasty Chipotle Lime Shrimp Bowls. We discussed the essential ingredients, cooking steps, and helpful tips. You learned about ingredient choices and variations, like vegetarian options and spicy twists. I also shared how to store your leftovers and answered common questions. Remember, cooking should be fun and easy. Try these bowls for a healthy meal! Enjoy mixing flavors and make it your own.

Chipotle Lime Shrimp Bowls Flavorful and Easy Recipe

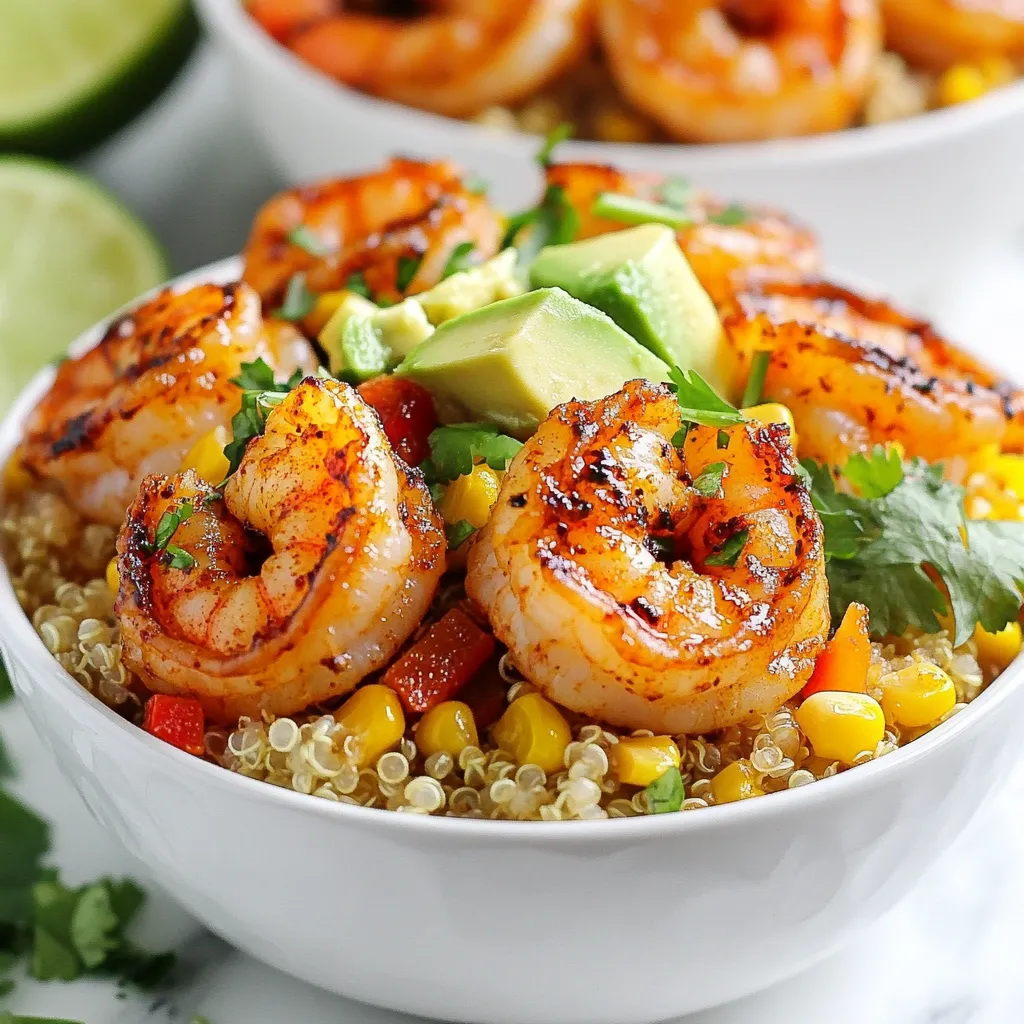
Are you ready to spice up your dinner routine? These Chipotle Lime Shrimp Bowls are packed with flavor and easy

Let’s gather what you need to make this tasty dish. Here is the main ingredients list: - 2 cans of cinnamon roll dough (with icing) - 6 large eggs - 1 cup milk - 1 teaspoon vanilla extract - 1 teaspoon ground cinnamon - 1/4 teaspoon nutmeg - 1/2 cup chopped pecans or walnuts (optional) - 1/4 cup maple syrup (for drizzling) - Powdered sugar (for dusting, optional) Each ingredient plays a key role in making the casserole rich and yummy. The cinnamon roll dough gives the dish its sweet base. Eggs and milk create a creamy custard that binds everything. Vanilla extract adds a lovely aroma, while ground cinnamon and nutmeg bring warmth and spice. If you choose to add nuts, they will offer a nice crunch. Maple syrup adds sweetness, and powdered sugar gives a pretty finish. This combination makes your breakfast a treat for the eyes and taste buds. Enjoy the process of gathering these ingredients. The fun begins once you start cooking! {{ingredient_image_1}} - Preheat your oven to 350°F (175°C). Grease a 9 x 13-inch baking dish with non-stick spray. - Open the cinnamon roll dough. Cut each roll into quarters. Place the pieces evenly in the dish. - In a bowl, whisk together 6 large eggs, 1 cup milk, 1 teaspoon vanilla extract, 1 teaspoon ground cinnamon, and 1/4 teaspoon nutmeg. Mix until smooth. - Pour the egg mixture evenly over the cinnamon roll pieces. Make sure all pieces get coated. - If you like, sprinkle 1/2 cup chopped pecans or walnuts on top for a crunch. - Cover the baking dish with aluminum foil. Bake for the first 25 minutes. - After 25 minutes, remove the foil. Bake for another 15-20 minutes. Look for a golden brown color. - Let the casserole cool for a few minutes after baking. - Drizzle with 1/4 cup maple syrup. Top with the icing from the cinnamon rolls. - If you want, dust with powdered sugar for an extra touch. Serve warm and enjoy! To get a great cinnamon roll casserole, you need even coating. Cut the cinnamon rolls into quarters. Make sure each piece gets soaked in the egg mix. This step is key for flavor and moisture. For fluffiness, add enough milk and eggs. They help the dish rise and stay soft. You can add your own twist to this dish. Spices like nutmeg or ginger can make it special. A pinch of cardamom adds a nice touch too. For toppings, consider nuts or fresh fruit. Chopped apples or berries can brighten each bite. Watch the baking time closely. Overbaking can make it dry. Underbaking leaves it soggy. Use a clean knife to check for doneness. If it comes out clean, it’s ready. Mixing ratios matter too. Too many eggs can make it dense, while too few can make it weak. Pro Tips Use Day-Old Bread: For a more custardy texture, use bread that is a day or two old. This allows it to absorb the egg mixture better. Experiment with Flavors: Feel free to add different spices or extracts such as almond or orange for a unique flavor twist. Let It Sit: Allow the assembled casserole to sit for 30 minutes before baking to enhance the flavors and texture. Make Ahead: This dish can be prepared the night before and stored in the refrigerator. Just add an extra 10-15 minutes to the baking time. {{image_2}} You can mix up the flavors of your cinnamon roll French toast casserole in fun ways. Here are two ideas: - Pumpkin spice cinnamon roll casserole: Use pumpkin spice in place of regular cinnamon. Add pumpkin puree for a rich, warm taste. This version is perfect for fall. - Chocolate chip cinnamon roll casserole: Toss in chocolate chips with the cinnamon rolls. The melting chocolate adds sweetness and richness, making it a favorite among kids. If you or your guests have dietary needs, you can adjust this dish easily: - Gluten-free options for the dough: Look for gluten-free cinnamon roll dough. Many brands offer tasty options that work great in this casserole. - Dairy-free alternatives for the milk: You can use almond milk or oat milk instead of regular milk. These substitutes keep the flavor while meeting dairy-free needs. You can also tailor this dish for special times of the year: - Holiday-themed additions: For Christmas, mix in dried cranberries or a splash of eggnog. They bring festive flavors that make the dish feel special. - Breakfast casserole ideas for special occasions: For birthdays or brunches, add fresh fruit like strawberries or bananas. These bright flavors make the dish even more inviting. After you enjoy your Cinnamon Roll French Toast Casserole, cool it down first. Let it sit for about 30 minutes. Then, store it in an airtight container. This helps keep it fresh. Use containers that seal well to avoid air. You can keep it in the fridge for up to 3 days. You can freeze the casserole if you have leftovers or want to prep ahead. To freeze before baking, wrap the dish tightly in plastic wrap and then foil. This keeps it safe from freezer burn. For freezing after baking, let it cool completely first. Then follow the same wrapping method. When you are ready to eat, thaw it overnight in the fridge. Bake it straight from the fridge for about 30-35 minutes at 350°F. Check that it is heated through. If stored properly, the casserole lasts about 3 days in the fridge. Look for signs of spoilage, like a sour smell or mold. If it looks or smells off, throw it away. Always trust your senses when it comes to food safety! Yes, you can prepare this casserole the night before. Just follow these tips: - Cut the cinnamon rolls and place them in the dish. - Mix the eggs, milk, vanilla, cinnamon, and nutmeg. - Pour the egg mix over the rolls and cover the dish. - Refrigerate overnight. - Bake in the morning, adding 5-10 extra minutes to cook time. To get a crispy top, try these techniques: - Bake without foil during the last 15-20 minutes. - Use a higher oven rack to get more heat on top. - Add a sprinkle of brown sugar before baking for a sweet crunch. Yes, you can use other types of bread. Here are some options: - Use brioche or challah for a richer flavor. - Try croissants for a flaky texture. - Even use regular bread, but cut it into cubes. Each choice will give a different taste and texture, so have fun! This blog post covered an easy and tasty cinnamon roll casserole. I showed you the key ingredients, step-by-step instructions, and creative tips to make it your own. Remember to avoid common mistakes for the best results. You can also explore fun variations for different seasons and diets. Finally, proper storage helps keep leftovers fresh. Enjoy baking this sweet dish, and impress friends and family with your skills!

Cinnamon Roll French Toast Casserole Easy Morning Dish

Wake up to a delicious twist on breakfast with my Cinnamon Roll French Toast Casserole! This easy morning dish combines

To make baked feta pasta, you need simple and fresh ingredients. Here’s what you will gather: - 1 block (8 oz) of feta cheese - 2 cups cherry tomatoes - 3 cloves garlic, minced - 1 teaspoon dried oregano - ½ teaspoon red pepper flakes (adjust to taste) - 2 tablespoons olive oil - 12 oz pasta of your choice (penne or fusilli work well) - Fresh basil leaves, for garnish - Salt and pepper to taste - ½ cup grated Parmesan cheese (optional) These ingredients work together to create a creamy and rich dish. The feta melts beautifully, adding flavor to the sauce. While the main ingredients shine, you can enhance the dish with a few extras. Consider adding: - Lemon zest for brightness - Olives for a briny kick - Spinach or arugula for a fresh green element - Sun-dried tomatoes for depth These optional ingredients can take your baked feta pasta to the next level. They add layers of flavor that make each bite special. You can easily swap ingredients based on what you have at home. Here are some ideas: - Use goat cheese instead of feta for a tangy twist. - Swap cherry tomatoes for diced regular tomatoes if needed. - Try different herbs like thyme or basil if you don’t have oregano. - Use whole wheat or gluten-free pasta for dietary needs. These substitutions keep the dish delicious while making it more accessible for you. Experimenting with swaps can lead to delightful discoveries in flavor! {{ingredient_image_1}} Start by gathering all your ingredients. You will need: - 1 block (8 oz) of feta cheese - 2 cups cherry tomatoes - 3 cloves garlic, minced - 1 teaspoon dried oregano - ½ teaspoon red pepper flakes - 2 tablespoons olive oil - 12 oz pasta (penne or fusilli work well) - Fresh basil leaves for garnish - Salt and pepper to taste - ½ cup grated Parmesan cheese (optional) Once you have everything, preheat your oven to 400°F (200°C). This step is key to getting that nice, soft feta. In a baking dish, mix the cherry tomatoes, minced garlic, dried oregano, red pepper flakes, and olive oil. Season them with salt and pepper. Make sure to coat everything well. Next, place the block of feta cheese right in the center. Drizzle a bit more olive oil over the feta if you like. Bake this in your preheated oven for about 25-30 minutes. The tomatoes will burst, and the feta will turn soft and golden. While the feta and tomatoes are baking, cook your pasta. Follow the package instructions and cook it until it is al dente. This means it should still have a little bite to it. Once done, drain the pasta and set it aside. After the feta and tomatoes are out of the oven, use a fork or spoon to mix them. You want to create a creamy sauce by combining the melted feta with the burst tomatoes. Now, add the cooked pasta to the baking dish. Stir everything together until the pasta is well coated in that creamy sauce. If it feels too thick, add a splash of pasta water. For a cheesy boost, fold in the grated Parmesan cheese if you want. Finally, garnish your dish with fresh basil leaves. This adds a nice touch and flavor. Enjoy your meal! To make the sauce creamy, you need to blend the feta and tomatoes well. After baking, use a fork or spoon to mash the feta into the tomatoes. This creates a rich sauce. If the sauce seems thick, add some pasta water. This will help loosen it while keeping it creamy. The red pepper flakes add heat. If you like it spicy, keep the amount. For less heat, reduce it. You can also use fresh chili for a different flavor. Remember, you can always add more spice later, but it’s hard to take it out once added. I love to serve this dish with fresh basil on top. It adds color and taste. You can pair it with a side salad for crunch. Garlic bread is also a great choice. For a boost, sprinkle some grated Parmesan cheese on top. This adds extra creaminess and flavor. Pro Tips Perfectly Roasted Tomatoes: For a sweeter flavor, use ripe cherry tomatoes and roast them until they burst to release their juices, enhancing the dish's overall taste. Feta Variations: Experiment with flavored feta cheese varieties, such as herb or chili-infused, to add an extra layer of complexity to your baked pasta. Pasta Choice: While penne and fusilli work well, any pasta shape that holds sauce effectively will do. Try using whole wheat or gluten-free pasta for a healthier option. Fresh Herbs Finish: Don’t skip the fresh basil garnish; it brightens the dish and adds a fresh aroma that complements the baked feta and tomatoes beautifully. {{image_2}} If you want a vegetarian version, skip the cheese. Use a block of firm tofu instead of feta. Marinate the tofu in olive oil and spices before baking. This adds flavor and keeps it creamy. For a vegan option, replace Parmesan with nutritional yeast. It gives a cheesy taste without dairy. You can also add more veggies, like spinach or bell peppers, for extra nutrition. For a heartier meal, add protein. Cooked chicken breast works great. Simply chop it into pieces and stir it in with the pasta. Shrimp is another tasty choice. Cook shrimp until pink and juicy, then mix them in. If you prefer plant-based protein, use cubed tofu. Just make sure to season it well before mixing it in. Each option boosts flavor and makes the dish more filling. Baked feta pasta is flexible. You can use any pasta you like. Penne and fusilli are popular, but don’t stop there! Try farfalle, spaghetti, or even gluten-free pasta. Each shape holds sauce differently, giving you varied tastes. Cook the pasta according to the package. You want it al dente for the best texture. Feel free to experiment with different shapes for fun! To store leftovers, let the baked feta pasta cool first. Place it in an airtight container. This helps keep it fresh. You can store it in the fridge for up to three days. Make sure to cover it well. This keeps the flavors locked in. When you're ready to eat, you can easily reheat it. Use the microwave for quick heating. Place a portion on a microwave-safe plate and cover it. Heat it for about one to two minutes. Stir halfway through to ensure even heating. You can also reheat it on the stove. Just add a splash of water or olive oil to help it warm up. This keeps the pasta from drying out. If you want to freeze it, make sure it’s completely cool first. Place it in freezer-safe bags or containers. Squeeze out as much air as you can to prevent freezer burn. It can last for up to three months in the freezer. When ready to eat, thaw it in the fridge overnight. Reheat as mentioned above. This way, you can enjoy your baked feta pasta anytime! I find that penne or fusilli work best for Baked Feta Pasta. These shapes hold sauce well. The ridges catch bits of creamy feta and tomato, making each bite flavorful. You can also use other pasta types, like rotini or farfalle. Just remember to cook the pasta al dente for the best texture. Yes, you can swap out feta for other cheeses. Goat cheese gives a tangy flavor. Cream cheese makes it extra creamy. Ricotta adds a soft texture. Each cheese will change the taste, so pick one you love. Baked Feta Pasta stays good in the fridge for about 3 to 5 days. Store it in an airtight container. If it thickens, add a splash of water or olive oil when reheating. Absolutely! Baked Feta Pasta is perfect for meal prep. Make a big batch and divide it into servings. It saves well and reheats nicely, making weeknight dinners easy and quick. Baked feta pasta is easy to make and packed with flavor. We covered key ingredients, step-by-step cooking, and helpful tips. You can customize it with your favorite add-ins, too. This dish is perfect for a meal prep or quick dinner. Use the storage info to save leftovers. Enjoy your creamy, cheesy pasta whenever you want! Cooking can be fun, and this recipe brings joy to your table. Dive into the world of baked feta pasta, and share it with others.

Baked Feta Pasta Creamy and Easy Weeknight Meal

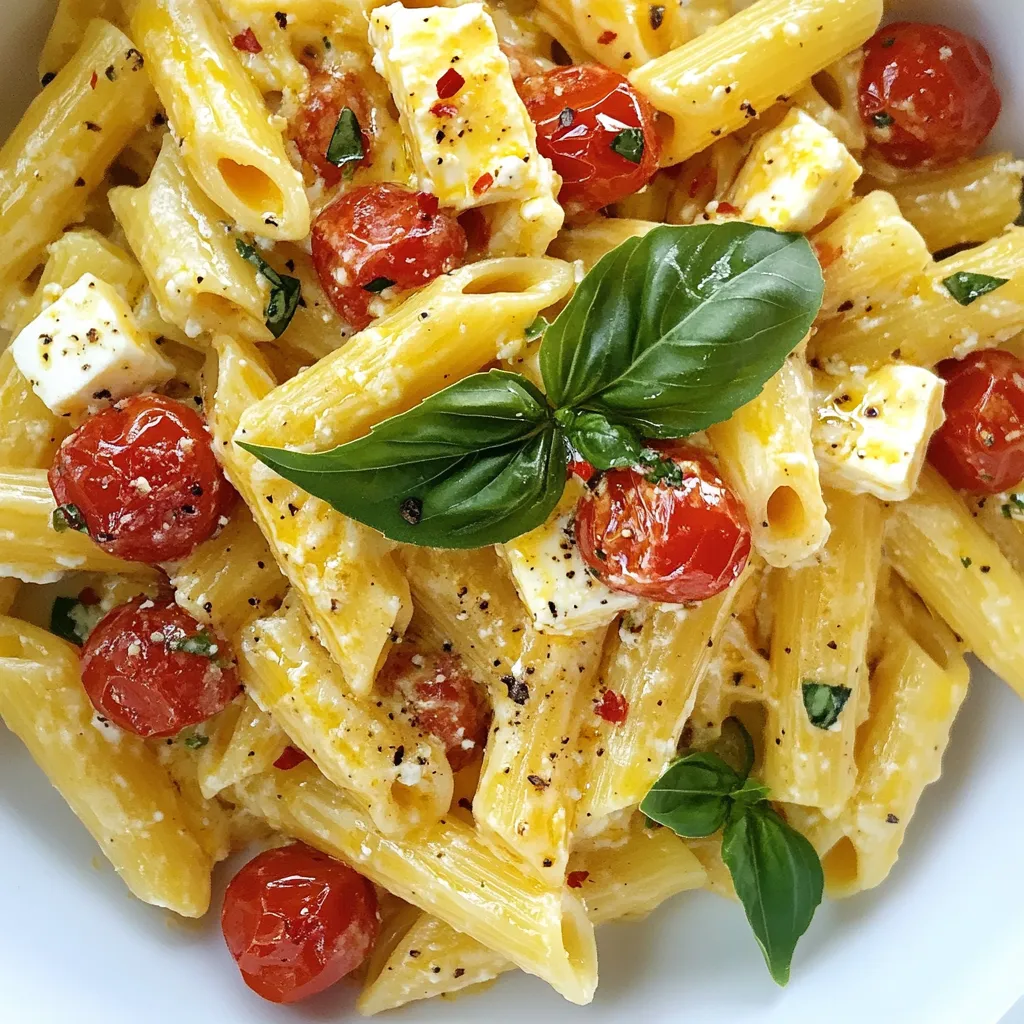
Looking for a quick yet delicious dinner idea? Baked Feta Pasta is your answer! This creamy dish combines simple ingredients

For this crispy orange cauliflower, you need: - 1 medium head of cauliflower, cut into bite-sized florets - Vegetable oil (for frying) The cauliflower should be fresh and firm. This ensures a great texture when cooked. Oil is key for frying, as it helps get that perfect crunch. The batter gives the cauliflower its crispy coating. Gather these items: - 1 cup all-purpose flour - 1 teaspoon cornstarch - 1 teaspoon garlic powder - 1 teaspoon paprika - Salt and pepper to taste - 1 cup sparkling water (chilled) Mixing flour with cornstarch helps create a light and crispy finish. The garlic powder and paprika add depth to the flavor. Use salt and pepper to match your taste. The orange sauce brings sweet and tangy notes. You will need: - Zest of 1 orange - 1/4 cup fresh orange juice - 2 tablespoons honey or maple syrup - 1 tablespoon soy sauce - 1 tablespoon rice vinegar - 1/2 teaspoon red pepper flakes (optional) - Green onions, thinly sliced (for garnish) The zest adds a bright aroma, while the juice gives a fresh kick. Honey or maple syrup balances the sauce's flavors. Add red pepper flakes for a hint of heat if you like spice. Garnish with green onions for a pop of color and taste. This mix of ingredients makes the dish vibrant and full of flavor. Enjoy the cooking process! {{ingredient_image_1}} To start, cut your medium head of cauliflower into bite-sized florets. This helps them cook evenly. Next, grab a medium bowl. In it, mix together one cup of all-purpose flour, one teaspoon of cornstarch, one teaspoon of garlic powder, one teaspoon of paprika, and salt and pepper. Stir until combined. Slowly pour in one cup of chilled sparkling water. Mix gently until you get a smooth batter. The batter should be thick enough to coat each floret well. Now, it’s time to fry! Heat about two inches of vegetable oil in a deep frying pan over medium-high heat. Aim for a temperature of 350°F (175°C). Once the oil is hot, dip each floret into the batter. Make sure they are well-coated. Carefully place the coated florets into the hot oil. Fry them in batches for about four to five minutes. You want them to turn golden brown and crispy. Use a slotted spoon to remove them. Then, drain the excess oil on a paper towel-lined plate. While the cauliflower fries, let’s make the orange sauce. In a small saucepan, combine the zest of one orange, a quarter cup of fresh orange juice, two tablespoons of honey or maple syrup, one tablespoon of soy sauce, one tablespoon of rice vinegar, and half a teaspoon of red pepper flakes if you like some heat. Heat this mixture over medium heat. Bring it to a simmer and cook for three to four minutes. Stir it until it thickens slightly. Once the cauliflower is crispy and the sauce is ready, it’s time to combine them. In a large bowl, toss the crispy cauliflower with the orange sauce. Make sure every piece is evenly coated. Transfer the delicious mixture to a serving dish. For a nice finish, garnish with thinly sliced green onions. Enjoy your Crispy Orange Cauliflower! To get that perfect crunch, start with cold sparkling water. The bubbles help the batter cling to the cauliflower. Make sure your oil is hot enough, around 350°F (175°C). If the oil is not hot, the cauliflower will soak up too much oil. Fry in small batches to keep the oil temperature steady. This ensures that each piece gets golden and crisp. Feel free to tweak the sauce! If you like it sweeter, add more honey or maple syrup. For a kick, increase the red pepper flakes. You can also add garlic or ginger to the orange sauce for extra depth. Taste as you go to find your perfect balance of flavors. The zest of the orange adds freshness, so don’t skip it! Use a deep frying pan or pot for better heat control. A slotted spoon helps you remove the cauliflower easily. Let the fried cauliflower drain on paper towels to soak up excess oil. This keeps them crispy. Serve immediately for the best texture. If you have leftovers, store them in the fridge but know they may lose some crunch. Pro Tips Use Chilled Ingredients: Ensure your sparkling water is well-chilled before mixing it into the batter. Cold batter helps achieve a crispier texture when frying. Control the Oil Temperature: Maintain the oil temperature around 350°F (175°C) while frying. If the temperature is too low, the cauliflower will absorb more oil; too high, and it may burn. Batch Fry for Even Cooking: Fry the cauliflower in small batches to avoid overcrowding the pan. This allows for even cooking and prevents the temperature from dropping too much. Adjust Sauce to Taste: Feel free to modify the sweetness or spice level of the orange sauce according to your preference. Add more honey for sweetness or extra red pepper flakes for heat. {{image_2}} To make this dish vegan, swap out honey for maple syrup. This keeps the sweet taste while staying plant-based. You can also use chickpea flour instead of all-purpose flour. Chickpea flour gives a nice flavor and is healthy too. If you want a crunchier finish, try adding breadcrumbs to the batter. If you crave heat, add more red pepper flakes to the sauce. You could also mix in some hot sauce to the batter for extra spice. Another fun idea is to toss the crispy cauliflower in a spicy chili sauce after frying. This will give it a bold kick that spice lovers will enjoy. Serve your crispy orange cauliflower over rice or quinoa for a full meal. You can also add it to a fresh salad for a nice crunch. If you want to impress guests, plate it with a drizzle of extra orange sauce. Garnish with green onions for color and flavor. This will make your dish look as good as it tastes! Store any leftover crispy orange cauliflower in an airtight container. Place it in the fridge. It stays fresh for up to three days. Make sure to cool it to room temperature before sealing. This helps keep it crispy longer. To reheat, use an oven instead of a microwave. Preheat your oven to 350°F (175°C). Spread the cauliflower on a baking sheet. Heat for about 10-15 minutes. This method makes it crispy again. Check often to avoid burning. You can freeze the cooked cauliflower for later use. Let it cool completely before freezing. Place it in a freezer-safe bag, removing as much air as possible. It can last up to three months in the freezer. To enjoy, thaw it in the fridge overnight before reheating. Yes, you can use frozen cauliflower. Just thaw it first and pat it dry. This step helps remove excess moisture, ensuring a crispier texture. Frozen cauliflower may not fry as evenly as fresh, but it will still taste great. To make Crispy Orange Cauliflower gluten-free, swap all-purpose flour for a gluten-free flour blend. You can also use cornstarch or almond flour. These options will create a crispy coating without any gluten. You can serve this dish with rice or quinoa for a filling meal. Pair it with a fresh salad for a light side. It also goes well with steamed vegetables or noodles. To keep the cauliflower crispy, serve it right away. Avoid covering it, as steam can make it soggy. If you need to hold it, keep it in a warm oven on a wire rack. This method allows air to circulate around the cauliflower, keeping it crisp. Today, we explored a tasty recipe for Crispy Orange Cauliflower. We covered the main ingredients, how to prepare the batter, and make the orange sauce. I shared tips to fry cauliflower perfectly and adjust flavors. You learned about vegan alternatives and serving ideas. I also discussed storage methods and answered common questions. With this knowledge, it’s time to enjoy your cooking journey. Experiment with flavors and create your own unique twist on this dish!

Crispy Orange Cauliflower Flavorful and Easy Recipe

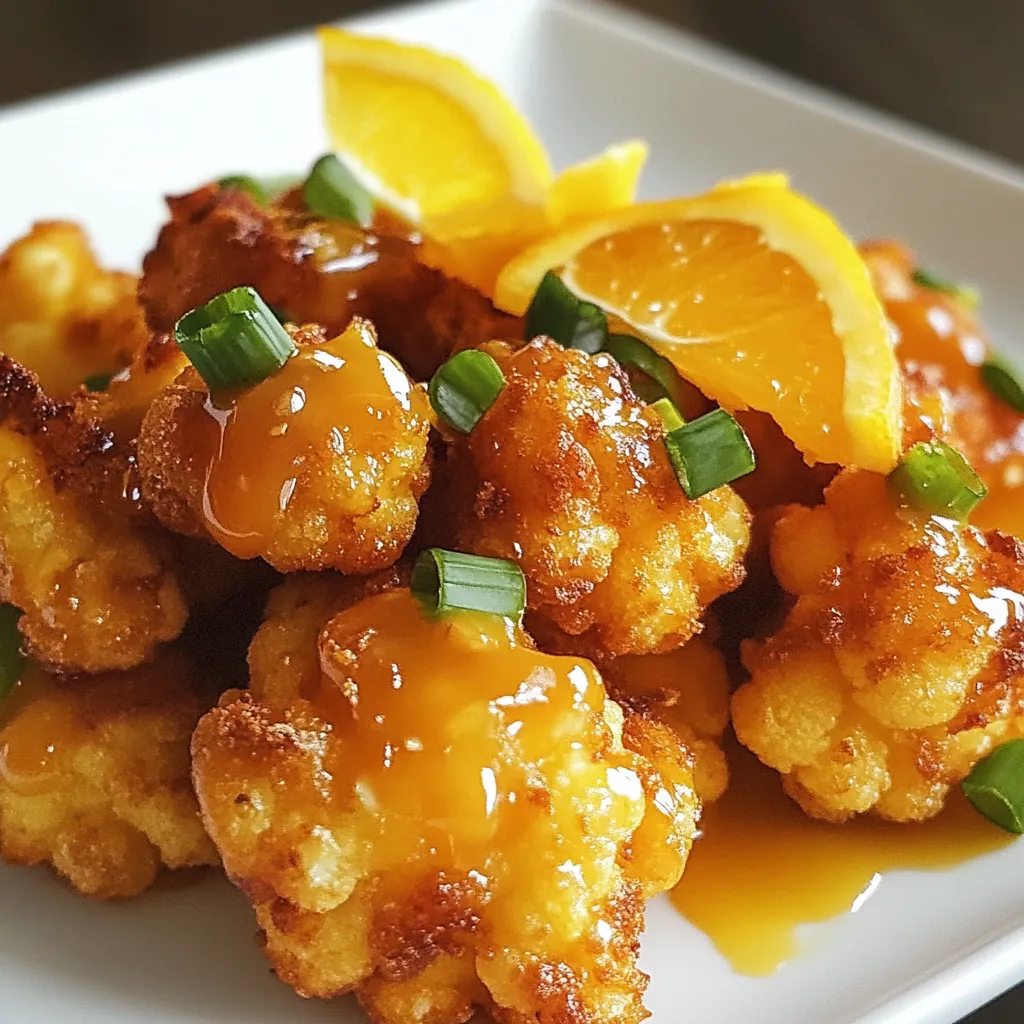
Craving something crispy and zesty? You’ll love my easy recipe for Crispy Orange Cauliflower! This dish combines crunchy bites of

- 1 lb boneless chicken breasts, diced - 4 cups chicken broth - 1 medium onion, finely chopped - 2 cloves garlic, minced - 2 large carrots, diced - 1 cup orzo pasta - 2 large eggs - 1/4 cup fresh lemon juice (about 2 lemons) - 1 tablespoon fresh dill, chopped (or 1 teaspoon dried dill) - 2 tablespoons olive oil - Salt and pepper to taste - Fresh parsley, for garnish This soup is full of bright flavors and warmth. You start with chicken, which gives the soup a rich taste. The broth adds depth, while the vegetables enhance the texture. The carrots not only bring sweetness but also color. I love using orzo pasta because it adds heartiness. It is small and cooks quickly, making it perfect for soup. For the seasoning, lemon juice brightens the dish. Dill adds a fresh herbal note that complements the chicken. The eggs create a creamy and smooth texture. Finally, parsley makes a lovely garnish. It adds freshness and a pop of color. Each ingredient plays a role in making this dish comforting and flavorful. It is simple yet packed with taste. I always recommend using fresh ingredients for the best results. {{ingredient_image_1}} 1. Sautéing onion and garlic Start by heating olive oil in a large pot over medium heat. Add the finely chopped onion and minced garlic. Cook them for about 3-4 minutes. You want them to soften and become fragrant. This step builds a strong flavor base for your soup. 2. Browning the chicken Next, add the diced chicken to the pot. Stir it well and cook for 5-7 minutes. The chicken should become browned on the outside and cooked through. This step adds richness to the soup and locks in the chicken's flavor. 1. Incorporating carrots After the chicken is cooked, stir in the diced carrots. Cook them for another 3 minutes. This adds a sweet crunch and bright color to your soup. 2. Bringing soup to a boil Now, pour in the chicken broth. Bring the mixture to a boil. Once boiling, add the orzo pasta. Reduce the heat to a simmer. Let the soup cook for about 10 minutes. You want the orzo to be al dente, or firm to the bite. 1. Whisking eggs and lemon juice In a separate bowl, whisk together the eggs and fresh lemon juice. Mix them well until smooth. This mixture will give the soup its creamy texture and zesty flavor. 2. Tempering the egg mixture To avoid scrambling the eggs, slowly add a ladle of hot soup broth into the egg mixture while whisking. This process is called tempering. It helps the eggs adjust to the heat so they can combine smoothly with the soup. 1. Combining tempered eggs into the soup Slowly stir the tempered egg mixture back into the pot of soup. Keep stirring constantly. This will create a creamy, lemony texture that makes the soup special. 2. Adding fresh dill and seasoning Finally, stir in the fresh dill. Season with salt and pepper to taste. Allow the soup to heat through for another 2-3 minutes without boiling. This step enhances the soup's flavor and aroma. To make your Greek Lemon Chicken Soup truly shine, balancing acidity is key. The lemon juice adds brightness, but you must season well with salt and pepper. Taste as you go. Adjust the seasoning until it feels just right. This will help lift the soup's flavors. Next, think about the texture. Adding orzo pasta gives a nice bite. Cook it until just al dente. This means it should have a slight firmness. It will soak up the soup’s flavors without turning mushy. One common mistake is ending up with scrambled eggs in the soup. To avoid this, always temper the eggs. Whisk them with hot broth first before adding to the pot. This keeps them smooth and creamy. Another mistake is overcooking the orzo. If you let it cook too long, it will become soft and sticky. Keep an eye on it and take it off the heat when it’s just right. For sides, consider serving crusty bread or a fresh salad. Both add texture and flavor. You can also pair it with a light Greek salad. The freshness balances the warm soup well. For presentation, serve the soup in shallow bowls. Garnish with fresh parsley. This adds a pop of color. You can also sprinkle a bit of extra dill on top. It looks inviting and enhances the taste. Pro Tips Use Fresh Ingredients: Fresh herbs and citrus enhance the flavor significantly, so opt for fresh dill and lemons when possible. Tempering the Eggs: Gradually adding hot broth to the egg mixture helps prevent scrambling, ensuring a smooth and creamy soup. Adjusting Consistency: If the soup becomes too thick after cooking, add a little more chicken broth to achieve your desired consistency. Garnish for Flavor: Fresh parsley not only adds color but also a fresh flavor that complements the lemon-dill notes beautifully. {{image_2}} You can change some ingredients in Greek lemon chicken soup. If you want to swap the chicken, try using turkey or even tofu. Both work well in this dish. For broth, you can use vegetable broth for a lighter taste. If you follow a vegetarian or vegan diet, this soup can still be yours. Replace the chicken with chickpeas or lentils. Use vegetable broth instead of chicken broth. For creaminess, add coconut milk. To make the soup even better, consider adding more spices or herbs. You can try thyme or oregano for a classic touch. Adding a pinch of red pepper flakes can give it a nice kick. If you prefer a tangier flavor, you can modify the acidity. Add more lemon juice or a splash of vinegar. This adds brightness and balances the flavors. After making this soup, let it cool before storing. Place it in a container that seals well. Glass or plastic containers work great. Make sure they are clean and dry. This keeps the soup fresh for about three to four days. If you want to save some for later, label the container with the date. This way, you can track how long it has been in the fridge. To freeze the soup, start by letting it cool completely. Then, pour it into a freezer-safe bag or container. Be sure to leave some space at the top for expansion. Seal it tightly to keep out air. You can freeze it for up to three months without losing flavor. When you are ready to eat, take it out of the freezer and place it in the fridge overnight. This will help it thaw slowly. If you need it fast, you can also thaw it in a pot on low heat. Stir it often to avoid hot spots. When it is warmed through, enjoy a bowl of comforting soup! Greek Lemon Chicken Soup is a classic dish known as Avgolemono. It has roots in Greek cuisine. This dish combines chicken, lemon, and egg to create a creamy soup. It is warm, flavorful, and comforting. You can enjoy it on a cold day or when you feel under the weather. The bright lemon juice adds a refreshing taste, making it unique. Yes, you can prepare this soup ahead of time. Make the soup and let it cool. Store it in the fridge for up to three days. When you want to eat it, just reheat it on the stove over low heat. Stir often to keep it creamy. If the soup thickens too much, add a bit of broth or water. Yes, you can freeze Greek Lemon Chicken Soup. First, let it cool completely. Then, pour it into airtight containers or freezer bags. Make sure to leave some space for expansion. The soup can last up to three months in the freezer. When ready to eat, thaw it in the fridge overnight. Reheat it gently on the stove, stirring to keep its creamy texture. In this article, we explored how to make a comforting bowl of Greek lemon chicken soup. We covered the key ingredients, cooking steps, and helpful tips for the best flavor. Remember to watch out for common mistakes and consider fun variations to customize your dish. Proper storage can keep your leftovers tasty, so take notes on how to freeze and reheat. Enjoy your cooking! It’s simple and rewarding to make this soup at home.

Greek Lemon Chicken Soup Flavorful and Comforting Dish

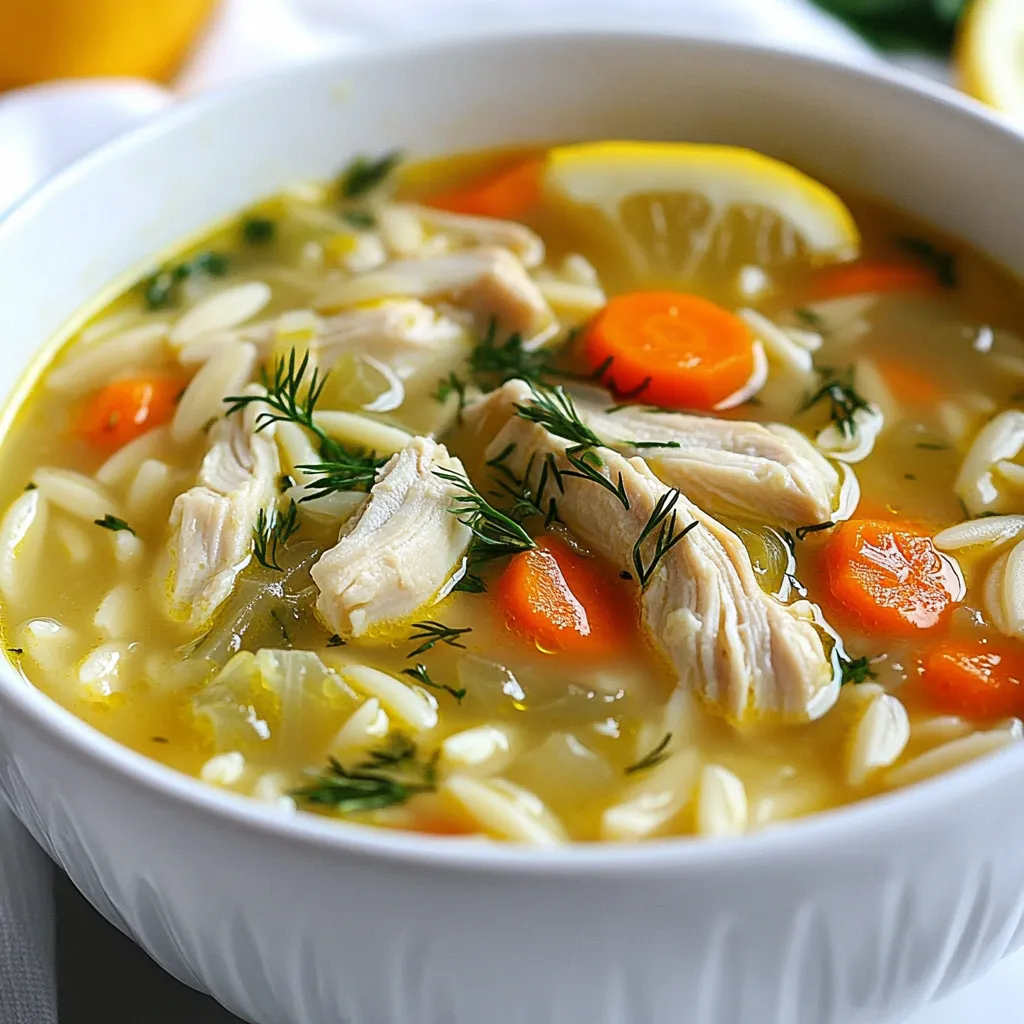
Greek Lemon Chicken Soup is a warm hug in a bowl. This easy recipe bursts with bright flavors and comforting

Older posts
Newer posts
← Previous Page1 … Page127 Page128 Page129 Page130 Next →
© 2025 My Cooking Cast • Built with GeneratePress

Our Policies

  • Privacy Policy
  • GDPR Policy
  • Terms Of Use
  • Copyright Policy
  • Cookie Policy
  • Disclaimer

More Information​

  • Home
  • Contact
  • About
  • Dinner
  • Appetizers
  • Dessert
©2025, My Cooking Cast About Privacy Policy Back To Top