Skip to content
DisclaimerTerms Of UseGDPR PolicyCookie Policy

My Cooking Cast

  • Home
  • Drinks
  • Appetizers
  • Dinner
  • Dessert
  • About
  • Contact
  • Privacy Policy
DisclaimerTerms Of UseGDPR PolicyCookie Policy

Emma

- 2 large cucumbers - 1 cup cooked shrimp, peeled and deveined - 1 ripe avocado, diced - 1 small red onion, finely chopped - 1 ripe tomato, diced - 2 tablespoons fresh lime juice - 1 tablespoon olive oil - Salt and pepper to taste - 1 teaspoon fresh cilantro, chopped (for garnish) You can add more taste to your shrimp avocado cucumber boats. Consider using: - Jalapeño for some heat - Garlic for a bold flavor - Bell peppers for crunch - Lettuce for extra texture Choosing fresh ingredients makes a big difference. Here’s how to pick the best: - Cucumbers: Look for firm cucumbers with dark green skin. Avoid soft spots. - Shrimp: Buy shrimp that is pink and smells fresh. If using frozen, thaw it safely. - Avocado: Choose avocados that yield slightly when pressed. They should not be too hard or mushy. - Onion and Tomato: Select onions with a firm texture and tomatoes that are ripe and fragrant. - Cilantro: Pick fresh cilantro with bright green leaves. Avoid yellow or wilted leaves. {{ingredient_image_1}} 1. Start by slicing your cucumbers in half lengthwise. This gives you the boat shape. 2. Use a spoon to scoop out the seeds gently. This step is key for holding the filling. 3. Place the hollowed-out cucumber halves on a platter. This makes them ready for filling. 4. In a mixing bowl, combine cooked shrimp, diced avocado, chopped red onion, and diced tomato. 5. Drizzle lime juice and olive oil over the mixture. Toss it gently to combine. 6. Season with salt and pepper. Be careful not to mash the avocado. It should stay chunky. 7. Spoon the shrimp mixture evenly into the cucumber boats. Fill them up nicely. 8. Finish by garnishing with fresh cilantro. This adds color and flavor. To make perfect cucumber boats, choose large cucumbers. They should be firm and straight. Slice them carefully to avoid breaking. Use a small spoon for scooping out seeds. A grapefruit spoon works well too. This tool has sharp edges, making it easier to scoop. Cut just enough of the center to create a cavity. You want a nice shape without breaking the skin. If you remove too much, they won’t hold the filling. Serve your shrimp avocado cucumber boats cold. They are great as an appetizer or snack. Pair them with tortilla chips for a crunchy side. You can also add a squeeze of lime on top for extra zest. Keep them chilled until serving to enjoy the fresh flavors. To keep cucumbers fresh, store them in the fridge. Wrap them in a damp paper towel. Put them in a plastic bag. This helps keep moisture in, so they stay crisp. Use them within a week for the best taste. When mixing shrimp and avocado, be gentle. Use a soft spatula to fold the ingredients. This way, the avocado stays chunky and creamy. You want the flavors to blend without mashing the avocado. Add lime juice last to keep the color bright and fresh. You can serve these boats with different dips. Try a spicy mayo or a tangy yogurt sauce. For a crunchy twist, add some chopped nuts or seeds on top. If you want a heartier meal, serve with rice or quinoa. This makes the dish more filling and satisfying. Pro Tips Choose Fresh Shrimp: Always opt for fresh or high-quality frozen shrimp for the best flavor and texture. Perfectly Ripe Avocado: Make sure your avocado is perfectly ripe for the best taste; it should yield slightly to pressure when squeezed. Chill Before Serving: For an extra refreshing dish, chill the cucumber boats in the refrigerator for about 30 minutes before serving. Customize Your Ingredients: Feel free to add other ingredients like corn or bell peppers for additional flavor and crunch. {{image_2}} You can swap shrimp for other proteins. Here are some great options: - Cooked chicken: Diced cooked chicken works well. - Crab meat: Use lump crab for a sweet taste. - Tofu: Firm tofu offers a plant-based choice. - Canned tuna: It’s easy and quick to use. These proteins keep the flavor and texture enjoyable. Simply replace shrimp in the recipe with your choice. Adding herbs and spices can change the taste. Here are some ideas: - Dill: Adds a fresh, bright flavor. - Basil: Gives a sweet and aromatic touch. - Cumin: Adds warmth and earthiness to the dish. - Chili flakes: For a bit of heat, sprinkle some in. Feel free to mix and match these flavors. It’s fun to create your own twist! If you want to make this dish vegan or gluten-free, here are some tips: - Vegan: Replace shrimp with chickpeas or lentils. They add protein and texture. - Gluten-free: This recipe is already gluten-free. Just make sure all ingredients are certified gluten-free. These substitutions keep the dish tasty while meeting your dietary needs. Enjoy the versatility of these shrimp avocado cucumber boats! To keep your shrimp avocado cucumber boats fresh, place them in an airtight container. This helps lock in flavor and prevent drying out. It is best to store them in the fridge. If you separate the shrimp mixture from the cucumbers, they will stay fresh longer. These shrimp avocado cucumber boats taste best cold. If you want to enjoy them warm, you can heat the shrimp mixture gently in a pan. Just make sure not to overcook the shrimp. After heating, let it cool a bit before adding it back to the cucumbers. The shrimp mixture can last up to two days in the fridge. The cucumbers should be eaten within a day for the best taste. If the avocado starts to brown, add a bit more lime juice. This will help keep it fresh longer. Yes, you can use frozen shrimp. Just be sure to thaw them first. You can place them in cold water for about 15 minutes. After thawing, cook them if they are not already cooked. This method makes the shrimp safe and tasty for your dish. If you have allergies, consider these swaps: - Use crab or chicken instead of shrimp. - Try a different oil like avocado oil. - Replace avocado with hummus for a creamy texture without allergens. - For a nut-free dish, skip any nuts or seeds in toppings. These swaps keep your meal delicious and safe. To reduce moisture in cucumbers, try these steps: - Slice cucumbers and sprinkle salt on them. - Let them sit for 10 minutes. - Rinse and pat dry with a paper towel. This method helps keep your cucumber boats from getting soggy. This blog post covered all you need for perfect cucumber boats. First, we discussed essential and optional ingredients, plus tips for freshness. Then, we outlined step-by-step instructions and serving suggestions. I shared tips for keeping ingredients fresh and mixing flavors well. We explored variations for proteins and dietary needs. Lastly, we went over how to store leftovers and answered common questions. Now, you can create delicious cucumber boats with ease. Enjoy your tasty creations!

Mouthwatering Shrimp Avocado Cucumber Boats Recipe

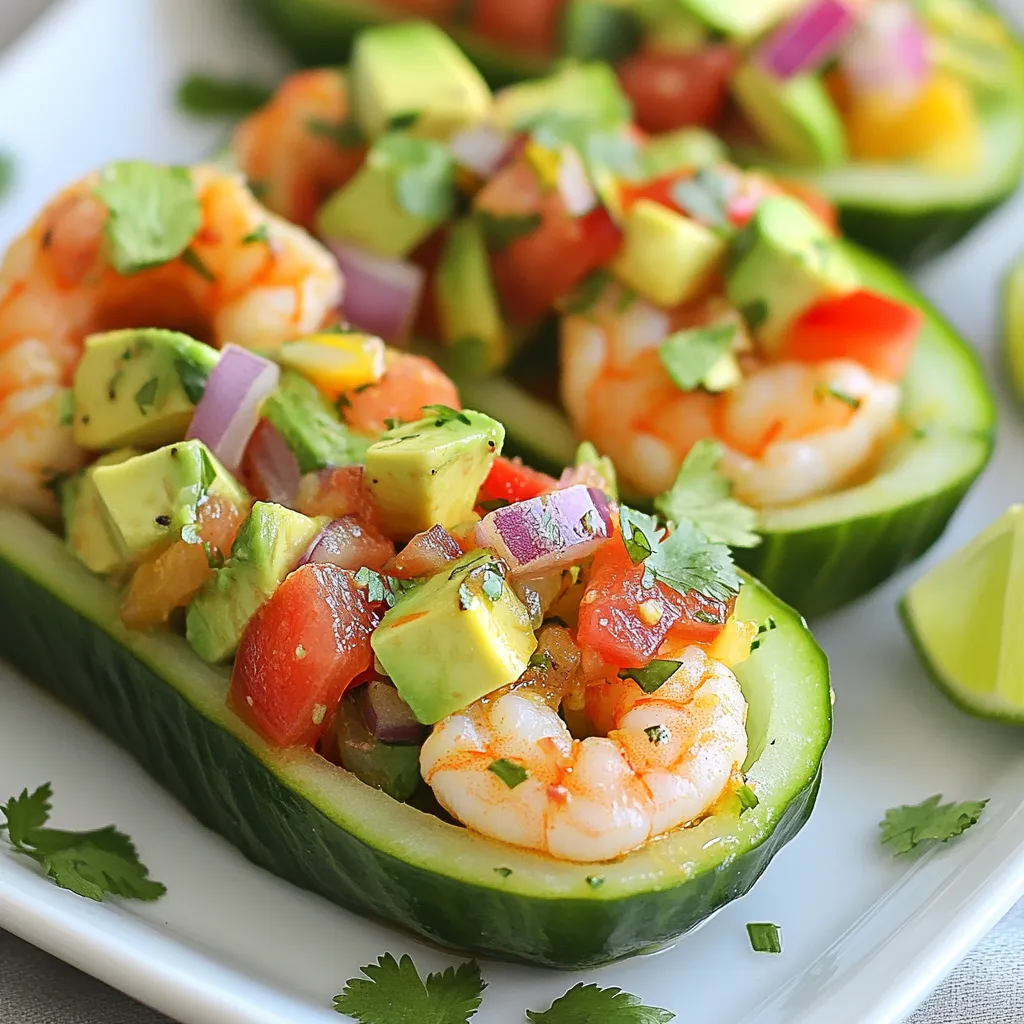
Are you ready to dive into a fresh and delicious dish? These Shrimp Avocado Cucumber Boats are not only tasty

- 8 oz fettuccine pasta - 1 lb large shrimp, peeled and deveined - 2 tablespoons Cajun seasoning - 2 tablespoons olive oil - 3 cloves garlic, minced - 1 cup heavy cream - 1 cup grated Parmesan cheese - 1/2 cup diced bell peppers (red and green) - 1/4 cup chopped green onions - Salt and pepper to taste - Fresh parsley for garnish For Cajun Shrimp Alfredo Pasta, you need a few key items. First, the fettuccine pasta gives the dish its classic structure. I prefer large shrimp for their tender bite and flavor. Cajun seasoning adds the spice that makes this meal pop. Next, we have some extra ingredients. Olive oil serves as a base for cooking. Garlic brings a nice aroma and taste. Heavy cream creates the rich alfredo sauce. Parmesan cheese adds a savory depth. Bell peppers give color and crunch. Green onions lend a fresh touch, while salt and pepper balance the flavors. Finally, fresh parsley is perfect for garnish. It adds a vibrant look and a hint of freshness. Gather these ingredients, and you're ready to create a dish that’s both flavorful and easy! {{ingredient_image_1}} To start, bring a large pot of salted water to a boil. This makes the pasta taste better. Add the fettuccine pasta and cook it until it is al dente. Al dente means it is firm but not hard. This usually takes about 8 to 10 minutes. It is key to check the package for exact time. Once done, drain the pasta in a colander. Set it aside but do not rinse. Rinsing removes the starch that helps the sauce stick. Next, take your shrimp and toss them in a bowl with Cajun seasoning. Make sure each shrimp gets coated well. Cajun spice adds a nice kick to the shrimp. In a large skillet, heat the olive oil over medium heat. When the oil is hot, add the shrimp. Cook them for about 2 to 3 minutes on each side. You want them to turn pink and curl up slightly. Once cooked, remove the shrimp from the skillet and set them aside. In the same skillet, it’s time to make the Alfredo sauce. Start by adding minced garlic and diced bell peppers to the pan. Sauté them for about 2 minutes until they smell good. Then pour in the heavy cream, stirring gently. Bring it to a gentle simmer. This helps the flavors mix. Gradually whisk in the grated Parmesan cheese. Keep stirring until it melts and becomes creamy. Taste the sauce and add salt and pepper as needed. Now, add the cooked fettuccine and shrimp back into the skillet. Toss everything together. Make sure the pasta is well coated in the sauce. This is where all the magic happens. If you find the pasta too dry, add a bit more cream or pasta water. This keeps everything moist and delicious. For the last step, stir in the chopped green onions. This adds a fresh crunch to the dish. Let everything heat through for another minute. This finishes cooking the pasta and shrimp. Now you’re ready to serve! Dish out the Cajun Shrimp Alfredo Pasta into bowls. For a pretty touch, garnish with fresh parsley. Enjoy your meal! Adjusting Thickness and Creaminess To get the right thickness, start with heavy cream. If your sauce is too thick, add a splash of pasta water. This helps thin it out while adding flavor. For creaminess, make sure to whisk in the Parmesan cheese slowly. This helps it melt well. Seasoning for Flavor Balance Taste your sauce as you cook. Add salt and pepper to enhance the flavors. If you want more spice, toss in extra Cajun seasoning. Just a pinch can make a big difference. Avoiding Overcooking Cook your shrimp just until they turn pink. This usually takes about 2-3 minutes per side. Overcooked shrimp become rubbery and tough. Choosing the Right Heat Level Use medium heat when cooking shrimp. It allows for even cooking without burning. If the oil smokes, lower the heat. You want a nice sizzle, not a burn. Best Sides and Pairings Cajun Shrimp Alfredo pairs well with garlic bread or a fresh salad. A crisp green salad adds a nice crunch and balances the creamy pasta. Presentation Tips for Plating When plating, use a large bowl. Twirl the fettuccine for a nice spiral. Top with shrimp, then sprinkle green onions and parsley for color. This makes your dish look gourmet and inviting. Pro Tips Perfect Pasta Texture: Make sure to cook the fettuccine until al dente for the best texture. It will continue to cook slightly when mixed with the sauce. Customize the Spice: Adjust the amount of Cajun seasoning based on your spice preference. You can also add a pinch of cayenne for extra heat if desired. Fresh Ingredients Matter: Use fresh garlic and vegetables for a brighter flavor in your Alfredo sauce. Fresh herbs can also enhance the dish's aroma and taste. Garnish for Appeal: Don't skip the fresh parsley garnish! It not only adds color but also a fresh note that complements the richness of the dish. {{image_2}} You can easily swap proteins in this dish. Try using chicken or sausage instead of shrimp. Chicken thighs work well; they stay moist and full of flavor. You can sauté the chicken in the same way as the shrimp. For sausage, use andouille for a nice kick. Just slice it and cook until browned. If you want a vegetarian option, consider mushrooms or tofu. Both absorb flavors well. Sauté them just like the shrimp, letting them soak up that Cajun spice. To amp up the flavor, add more Cajun seasoning. A pinch more makes the dish spicier. You can also mix in smoked paprika or cayenne for an extra kick. Adding vegetables enhances nutrition and taste. Try spinach, zucchini, or cherry tomatoes. Toss them in with the garlic and peppers for a colorful boost. They add great texture and freshness. If you're looking for gluten-free options, use gluten-free pasta. Many brands offer great alternatives that cook well. Check the package for cooking times. For a low-carb meal, swap pasta for spiralized zucchini or cauliflower rice. Both options work nicely and keep the dish light. Just sauté them briefly to keep their crunch. Enjoy your Cajun Shrimp Alfredo Pasta in a healthier way! To keep your Cajun shrimp Alfredo pasta fresh, use proper containers. Glass or plastic containers with tight lids work best. Store the pasta in the fridge within two hours of cooking. This helps prevent bacteria growth. Cooling is key. Let the pasta cool for about 30 minutes before sealing it. Avoid putting hot food directly in the fridge. This can raise the fridge temperature and spoil other foods. When you're ready to eat leftovers, keep the pasta creamy. Use a skillet over low heat and add a splash of milk or cream. This will help smooth out the sauce. Stir gently as it warms up. Avoid dryness by covering the skillet with a lid. This traps steam and keeps the pasta moist. You can also microwave it in short bursts, stirring in between to prevent hot spots. If you want to save some for later, freezing works well. Portion the pasta into freezer-safe bags or containers. Remove as much air as possible to avoid freezer burn. When you’re ready to eat, thaw in the fridge overnight. For best flavor and texture, reheat on the stove. This keeps the pasta and sauce from getting mushy. Enjoy your delicious meal anytime! - Dairy Alternatives: You can use whole milk or half-and-half. They will make a lighter sauce. If you want more creaminess, try sour cream or cream cheese. - Non-Dairy Options: Coconut cream works well for a rich taste. Cashew cream is another great choice. Both will keep the sauce creamy without dairy. - Visual Cues: Cooked shrimp turn pink and opaque. They also curl into a C shape. If they remain gray or translucent, keep cooking them. - Cooking Times: It usually takes 2-3 minutes per side. For large shrimp, check after 4-6 minutes total cooking time. - Prepping in Advance: You can cook the shrimp and pasta ahead. Store them separately. Make the sauce right before serving for the best taste. - Best Storage Practices: Keep leftovers in airtight containers. Refrigerate for up to 3 days. For longer storage, freeze it in portions to enjoy later. - Common Ingredients: Cajun seasoning often includes paprika, garlic powder, onion powder, cayenne pepper, and black pepper. You might also find thyme and oregano. - Making Your Own Blend: Mix equal parts of paprika and garlic powder. Add a pinch of cayenne and black pepper to taste. Adjust spices to fit your heat preference. We explored the ingredients and steps to create a delicious Cajun Shrimp Alfredo Pasta. You learned how to cook fettuccine, prepare shrimp, and make a creamy sauce. We also shared tips for perfecting your dish and offered variations to suit your taste. Cajun Shrimp Alfredo is easy to love. You can impress your family and friends with it. Enjoy this dish any day of the week!

Cajun Shrimp Alfredo Pasta Flavorful and Easy Recipe

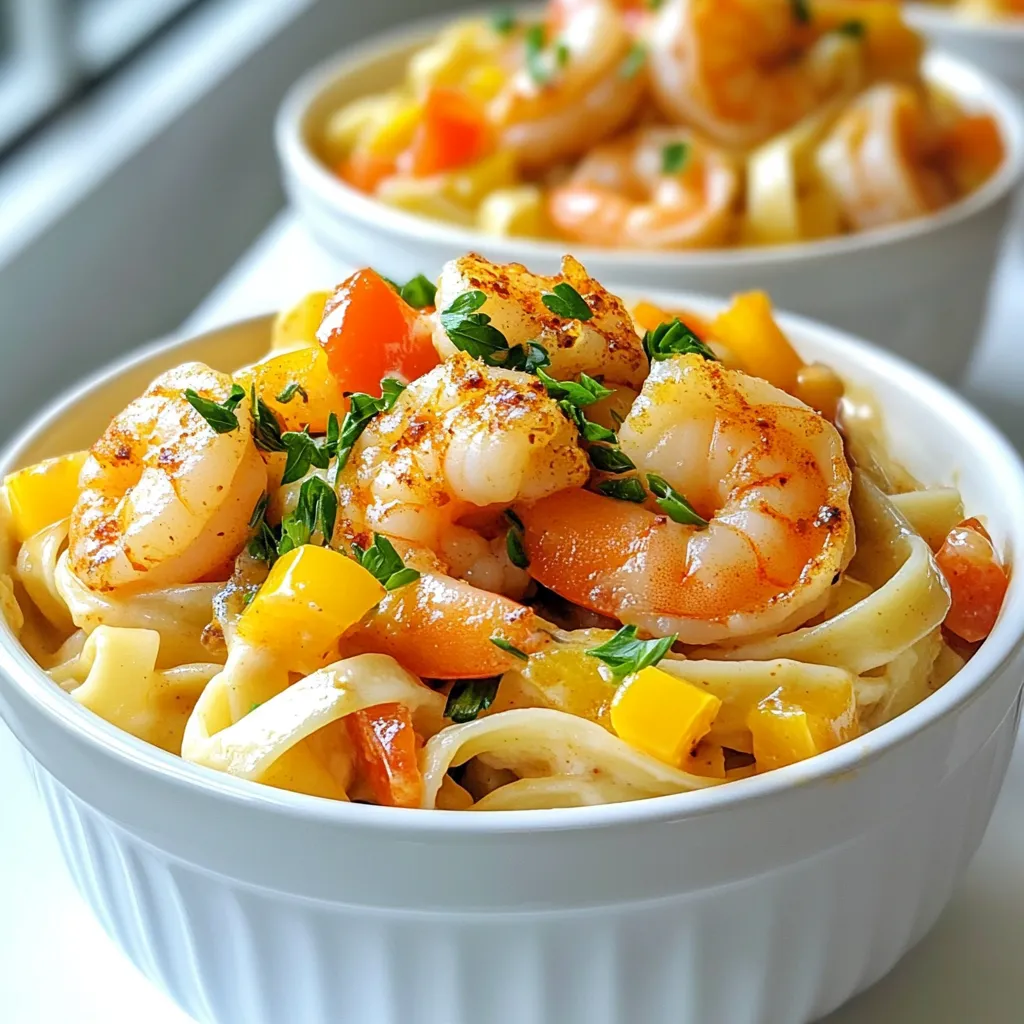
Ready to spice up your dinner routine? This Cajun Shrimp Alfredo Pasta recipe is both flavorful and easy to make!

- 12 oz pasta of your choice (fettuccine or penne work well) - 2 large red bell peppers - 1 cup heavy cream For this creamy roasted red pepper pasta, you can use fettuccine or penne. Both types hold sauce well. The red bell peppers bring sweetness and color. Heavy cream makes the dish rich and smooth. - 3 cloves garlic, minced - 1 tablespoon olive oil - 1/2 cup grated Parmesan cheese Garlic adds a nice kick to the sauce. Olive oil helps roast the peppers. Parmesan cheese gives the dish a savory finish. - 1 teaspoon Italian seasoning - Salt and pepper to taste - Fresh basil leaves for garnish Italian seasoning adds warm flavors. Salt and pepper enhance all the tastes. Fresh basil is a lovely touch for garnish, both in taste and look. This dish is simple but full of flavor. You’ll love how easy it is to make with these ingredients! {{ingredient_image_1}} 1. Preheat your oven to 400°F (200°C). This heat helps roast the peppers well. 2. Cut the red bell peppers in half. Remove the seeds and stems. 3. Line a baking sheet with parchment paper. Place the peppers cut-side down on the sheet. 4. Drizzle a little olive oil over the peppers to help them roast. 1. Roast the peppers in the oven for about 25-30 minutes. You want the skins to get blistered and charred. 2. After roasting, take them out and let them cool for a few minutes. 3. Once cool, carefully peel off the skins. They should come off easily. 1. In a large pot, bring salted water to a boil. 2. Add your pasta and cook according to package instructions until al dente. 3. Make sure to reserve about 1/2 cup of the pasta water before draining the pasta. 1. In a blender, combine the roasted peppers, minced garlic, and heavy cream. 2. Blend until you achieve a smooth and creamy consistency. This will be your sauce. 1. In a large skillet over medium heat, pour in the blended red pepper mixture. 2. Stir in the Italian seasoning. Bring the sauce to a gentle simmer. 3. Add the cooked pasta to the skillet. Toss well to coat the pasta in the sauce. 4. If the sauce is too thick, add some reserved pasta water. Do this a little at a time until you reach the right consistency. 5. Stir in the grated Parmesan cheese. Season with salt and pepper to taste. Mix until the cheese is well incorporated and the sauce is creamy. To get the sauce just right, you can adjust the thickness with reserved pasta water. After you cook the pasta, save half a cup of that water before you drain it. If your sauce feels too thick, add a bit of this water. Stir it in slowly until you reach the right creaminess. This simple trick makes a big difference. You can also enhance the flavors with extra seasonings. If you love a bit of heat, try adding a pinch of red pepper flakes. For a fresh twist, consider adding a squeeze of lemon juice. These small changes can really brighten up the dish. To cook pasta perfectly, aim for al dente. This means the pasta should be firm but not hard. Check the package for cooking times. Start tasting a minute or two before the time is up. Don’t forget to salt your pasta water! Use about one tablespoon of salt per gallon of water. This adds flavor to the pasta as it cooks. If you skip this step, your pasta may taste bland. Garnishing makes your dish look great. Fresh basil leaves add a pop of color. They also bring a fresh flavor. Lightly tear the leaves and sprinkle them on top before serving. For serving, consider adding more Parmesan cheese on top. You can also serve this pasta with a side salad or crusty bread. Adding these items makes the meal feel complete and more inviting. Pro Tips Choosing the Right Pasta: Opt for pasta shapes that hold sauces well, like fettuccine or penne, to ensure every bite is flavorful. Roasting Peppers for Flavor: Don't skip the roasting step! The char adds a depth of flavor that enhances the dish significantly. Adjusting Sauce Consistency: If the sauce is too thick, gradually add reserved pasta water until you reach your desired creaminess. Fresh Herbs for Garnish: Adding fresh basil leaves right before serving brightens the dish and adds a fresh aroma that elevates the overall experience. {{image_2}} You can change some ingredients easily. If you want a lighter sauce, use light cream. For a plant-based option, try coconut cream or almond milk. They will still give you a creamy taste. You can also switch up the pasta. If you need gluten-free pasta, use brown rice pasta or chickpea pasta. Both work well with this dish. Want to make this dish heartier? You can add proteins. Cooked chicken or shrimp fits nicely in this pasta. Simply toss them in with the pasta. For vegetarians, tofu or chickpeas are great choices. Tofu adds texture, while chickpeas bring additional protein. To add more flair, think about spices. Red pepper flakes give a nice kick. You can also use smoked paprika for a deeper flavor. Adding veggies boosts nutrition too. Spinach adds color and nutrients. Mushrooms bring a savory taste that pairs well with the sauce. To keep your creamy roasted red pepper pasta fresh, store it in an airtight container. Glass or plastic containers work well. You can refrigerate it for up to three days. Make sure to let it cool before sealing the container. This way, you avoid steam buildup, which can make your pasta soggy. You can also freeze this dish if you want to save it for later. Place the cooled pasta in a freezer-safe container. Be sure to leave some space at the top for expansion. It can last in the freezer for up to three months. When you’re ready to eat, thaw it overnight in the fridge. Reheat it gently in a skillet. You may need to add a splash of cream or reserved pasta water to keep it creamy. Leftovers can be a great opportunity to get creative. You can use the pasta in a baked casserole. Just add some cheese on top and bake until golden. Another idea is to mix it with fresh veggies for a quick salad. When reheating, use low heat to keep the flavors fresh. Adding a bit of fresh basil or a sprinkle of Parmesan can brighten the dish. For this dish, I recommend using fettuccine or penne. Both types hold the sauce well. Fettuccine has a flat shape that catches the creamy sauce. Penne, with its ridges, helps trap the sauce inside. You can also try other pasta shapes like fusilli or rigatoni for fun variations. Yes, you can make this dish ahead of time. Cook the pasta and sauce separately. Store them in airtight containers in the fridge. When you’re ready to eat, reheat the sauce on low heat. Add the pasta and a splash of reserved water to get the right texture again. To make this dish vegan, swap the heavy cream for coconut cream or cashew cream. Use nutritional yeast instead of Parmesan cheese for a cheesy flavor. Choose a vegan pasta that doesn’t contain eggs. This way, you can still enjoy a creamy dish without dairy. You can boost the flavor by adding more garlic or a pinch of red pepper flakes for heat. A splash of lemon juice brightens the sauce. Fresh herbs like parsley or thyme also enhance the taste. Don’t forget to taste and adjust the seasoning as you go. Yes, you can make this dish gluten-free. Look for gluten-free pasta made from rice, quinoa, or lentils. These options work well and maintain a good texture. Just be sure to follow the cooking time on the package for the best results. This blog post covered making Creamy Roasted Red Pepper Pasta. We explored the key ingredients, from pasta to seasonings. You learned step-by-step instructions for preparation, cooking, and combining. Tips for perfecting the sauce and presenting your dish will help you impress. Variations and storage info help customize your meal. Use leftovers creatively to minimize waste. Experiment with flavors and ingredients to suit your taste. Enjoy creating this dish, and happy cooking!

Creamy Roasted Red Pepper Pasta Deliciously Simple Dish

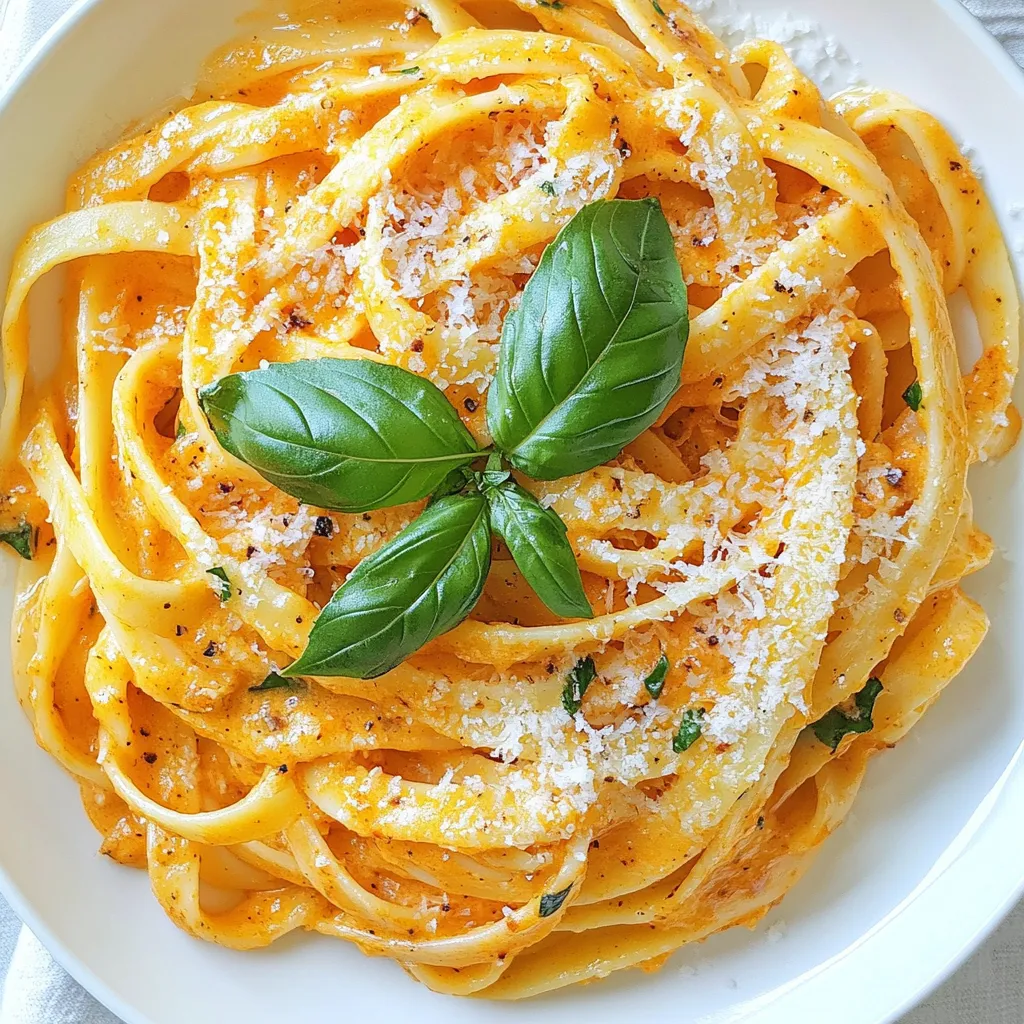
If you crave a meal that’s rich and comforting yet simple to make, you’re in the right place! This Creamy

- 1 cup green or brown lentils, rinsed - 1 medium onion, diced - 3 cloves garlic, minced - 1 bell pepper, diced - 2 carrots, diced - 2 celery stalks, diced - 1 zucchini, diced - 1 can (14 oz) diced tomatoes (with juice) - 2 cups vegetable broth - 1 can (15 oz) kidney beans, drained and rinsed - 1 cup corn (fresh or frozen) These main ingredients form the heart of your veggie packed lentil chili. Lentils are rich in protein and fiber. Fresh veggies add color and nutrients. You get a tasty mix that warms you inside. - 1 tablespoon chili powder - 1 teaspoon cumin - 1 teaspoon smoked paprika - 1/2 teaspoon cayenne pepper (adjust to taste) - Salt and pepper to taste Spices bring life to the chili. Chili powder gives it warmth. Cumin adds earthiness. Smoked paprika gives a nice depth. Adjust cayenne pepper for more or less heat. Salt and pepper enhance all the flavors. - Chopped fresh cilantro or parsley - Avocado slices or sour cream Garnishes make your chili shine. Fresh herbs add brightness. Creamy avocado or sour cream gives richness. These options let you customize your bowl. Enjoy adding your personal touch! {{ingredient_image_1}} To start, heat one tablespoon of olive oil in a large pot over medium heat. Next, add one medium diced onion. Sauté the onion for about 3-4 minutes until it softens. This step builds a tasty base for your chili. Once the onion is ready, stir in three cloves of minced garlic. Cook this for 1-2 minutes until it becomes fragrant. The smell will make your kitchen feel warm and inviting. Now it’s time to add some color. Toss in one diced bell pepper, two diced carrots, and two diced celery stalks. Cook these veggies for about 5 minutes. Stir them occasionally until they soften nicely. This mix adds great flavor and texture to the chili. Finally, include one diced zucchini. Cook for another 3 minutes until it is slightly soft. This veggie blend creates a hearty base for the chili. Now, we can build the chili. Add one cup of rinsed green or brown lentils to the pot. Then, pour in one can of diced tomatoes, including the juice. Add two cups of vegetable broth next. For flavor, mix in one tablespoon of chili powder, one teaspoon of cumin, one teaspoon of smoked paprika, and half a teaspoon of cayenne pepper. Season with salt and pepper to taste. Bring the pot to a boil, then lower the heat. Cover the pot and let it simmer for about 25-30 minutes. Stir occasionally. You want the lentils to be tender but not mushy. This is the heart of your chili! After cooking the lentils, it's time for the final touches. Add one can of drained and rinsed kidney beans and one cup of corn to the pot. This adds protein and sweetness. Stir everything together. Let the chili simmer for another 5 minutes. This step heats the beans and corn through. Before serving, taste and adjust the seasonings if needed. You want it just right, bursting with flavor. Serve hot, and if you like, garnish with chopped fresh cilantro or parsley. Enjoy your veggie-packed lentil chili! To get the best flavor from your chili, start by sautéing your veggies. Heat a tablespoon of olive oil in a large pot. Add diced onion first. Cook it for about 3-4 minutes until it softens. Then, add minced garlic. Cook it for another 1-2 minutes until it smells good. This builds a strong base for your chili. Next, add diced bell pepper, carrots, and celery. Cook them for about 5 minutes. Stir occasionally until they soften. After that, stir in the zucchini. Cook it for another 3 minutes. This way, you ensure all veggies are tender and full of flavor. Lentils need time to cook just right. Green or brown lentils take about 25-30 minutes to become tender. Keep an eye on them, and stir occasionally. You want them soft but not mushy. You may have leftovers after making this chili. Store them in an airtight container. This keeps the chili fresh for up to five days in the fridge. If you want to keep it longer, freeze the chili. It stays good for three months in the freezer. When it’s time to eat your leftovers, you can reheat them easily. The best method is to use the stove. Pour the chili into a pot and heat it on medium. Stir often to make sure it warms up evenly. You can also use a microwave. Just place it in a microwave-safe bowl, cover it loosely, and heat in short bursts. Stir in between to avoid hot spots. Want to amp up the heat? Add more cayenne pepper! If you prefer a milder taste, skip it or use less. You can also mix in other spices. Consider adding more chili powder or smoked paprika. These spices give it depth and warmth. Toppings can change your chili game. Try adding diced avocado for creaminess. A dollop of sour cream adds a nice tang. Fresh cilantro or parsley makes it look great and adds flavor. Tortilla chips on the side give a nice crunch too. Enjoy playing with these ideas to make your chili unique! Pro Tips Cook Lentils Al Dente: To avoid mushy lentils, cook them just until tender but still firm. They will continue to absorb flavors as they sit. Enhance Flavor with Acidity: A splash of lime or lemon juice just before serving can brighten the flavors of the chili significantly. Customize Your Heat Level: Adjust the amount of cayenne pepper according to your spice preference. You can also add fresh jalapeños for an extra kick. Make It Ahead: This chili tastes even better the next day! Prepare it ahead of time and store it in the fridge for a quick meal. {{image_2}} You can easily make this chili vegan. Start by swapping any animal-based broth for vegetable broth. You can also skip any meat or cheese toppings. For added protein, try adding more beans or lentils. You can add chickpeas or black beans. These options keep the dish hearty and filling. Feel free to get creative with your ingredients. Use different beans, like pinto or navy beans, instead of kidney beans. You can also swap in lentils, like red or yellow, for a different texture. Seasonal veggies work great too! In the fall, try adding sweet potatoes or butternut squash. In the summer, fresh corn and bell peppers shine in this dish. Adjusting the spice level can make this chili suit anyone's taste. If you want it mild, skip the cayenne pepper. Instead, focus on the chili powder and cumin for flavor. To spice it up, add more cayenne or fresh jalapeños. You can also use fresh herbs like cilantro or parsley to add a nice kick. You can keep veggie packed lentil chili in the fridge for about 4 to 5 days. Make sure it cools before you store it. Place it in an airtight container. This helps keep it fresh and safe to eat. If you notice any off smells or changes in color, it's best to toss it. Freezing is a great way to save leftovers. To freeze chili, let it cool completely. Then, portion it into freezer bags or containers. Remove excess air from bags to prevent freezer burn. Label the bags with the date. This chili can last in the freezer for up to 3 months. When you're ready to eat, thaw it in the fridge overnight. Reheat it on the stove or in the microwave until hot. Choose containers that seal well. Glass or BPA-free plastic containers work great. They help keep your chili fresh and tasty. If using bags, ensure they are freezer-safe. Avoid using regular plastic bags for long-term storage. They can tear and leak, ruining your meal. To make lentil chili from scratch, follow these steps: 1. Heat oil: In a large pot, add 1 tablespoon of olive oil over medium heat. 2. Sauté onions: Add 1 medium diced onion. Cook for 3-4 minutes until soft. 3. Add garlic: Stir in 3 minced cloves of garlic. Cook for 1-2 minutes. 4. Incorporate veggies: Add 1 diced bell pepper, 2 diced carrots, and 2 diced celery stalks. Cook for about 5 minutes. 5. Add zucchini: Mix in 1 diced zucchini. Cook for another 3 minutes. 6. Combine lentils and spices: Add 1 cup of rinsed lentils, 1 can of diced tomatoes, 2 cups of vegetable broth, 1 tablespoon chili powder, 1 teaspoon cumin, 1 teaspoon smoked paprika, and 1/2 teaspoon cayenne pepper. Season with salt and pepper. 7. Simmer: Bring to a boil, then reduce heat. Cover and simmer for 25-30 minutes. 8. Finish chili: Stir in 1 can of drained kidney beans and 1 cup of corn. Heat for 5 minutes. 9. Serve: Enjoy hot, garnished with cilantro or parsley if desired. This process brings together fresh flavors and hearty lentils for a comforting meal. Yes, you can easily adapt this recipe for a slow cooker. Here’s how: 1. Sauté vegetables: Start by sautéing the onions and garlic in a pan. This step adds flavor. 2. Add ingredients to slow cooker: Transfer the sautéed mix to the slow cooker. Add the remaining veggies, lentils, tomatoes, broth, and spices. 3. Cook: Set your slow cooker to low for 6-8 hours or high for 3-4 hours. 4. Stir in beans and corn: About 30 minutes before serving, add the kidney beans and corn. This method allows the flavors to meld beautifully while you go about your day. You can pair your chili with several delicious sides: - Cornbread: A sweet and crumbly bread complements the chili well. - Tortilla chips: Provide a crunchy texture and fun dipping option. - Rice or quinoa: Serve over a bed of rice or quinoa for extra filling. - Fresh salad: A light salad adds a fresh contrast to the hearty chili. - Avocado slices: Add creaminess and richness to your bowl. These sides enhance the meal and make it more satisfying. Making lentil chili is fun and easy. You start with fresh veggies and lentils, adding spices for flavor. The results are healthy and delicious. You learned tips for storage, reheating, and even spicy variations. Remember, you can tailor this chili to your taste. Make it milder or spicier. Enjoy the warmth of each bowl and share with friends. With simple swaps and toppings, the options are endless. This chili is sure to please everyone. Happy cooking!

Veggie Packed Lentil Chili Healthy Comfort Meal

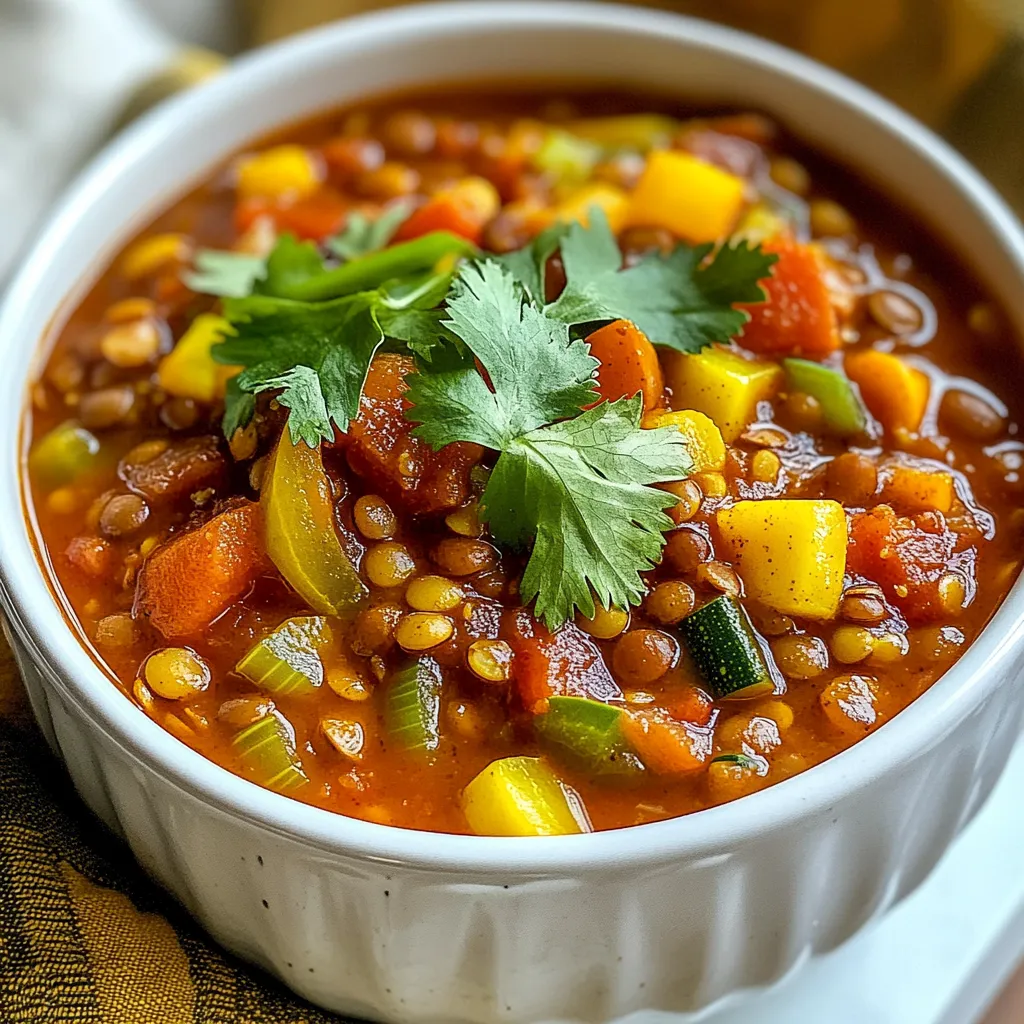
Looking for a warm, filling meal that’s also good for you? Try my Veggie Packed Lentil Chili! This hearty dish

- 1 lb boneless, skinless chicken thighs, diced - 1 cup orzo pasta - 4 cups chicken broth - Zest and juice of 2 lemons - 1 teaspoon dried oregano - 1 teaspoon dried thyme - Salt and pepper to taste - 4 cloves garlic, minced - 1 small onion, diced - 1 cup cherry tomatoes, halved - ½ cup fresh spinach (or kale), roughly chopped - Fresh parsley for garnish Gather these ingredients to create a simple yet flavorful dish. The chicken thighs give a rich taste, while orzo adds a comforting texture. The lemon zest and juice provide a bright flavor that lifts the whole meal. Using fresh garlic and onion gives your dish depth and aroma. Cherry tomatoes add sweetness and color, while spinach provides a nutritious boost. Don't forget the parsley! It adds a fresh finish to your meal. When you have all your ingredients ready, cooking becomes easy and fun. Each element plays an important role in the final dish. Enjoy the process and get excited for the delicious result! {{ingredient_image_1}} - Heat 1 tablespoon of olive oil in a large pot. - Add 1 pound of diced chicken thighs. - Season the chicken with salt and pepper. - Cook for 5-7 minutes until the chicken is brown and cooked through. - Remove the chicken and set it aside. - In the same pot, add 4 cloves of minced garlic and 1 small diced onion. - Cook for 2-3 minutes until the onion is soft and fragrant. - Stir in 1 cup of orzo pasta to toast it for 1-2 minutes. - Pour in 4 cups of chicken broth, zest and juice from 2 lemons, and 1 teaspoon of dried oregano and thyme. - Mix well and bring to a gentle boil. - Lower the heat and cover the pot. - Simmer for 10-12 minutes until the orzo is al dente. - Stir often to keep it from sticking. - Add 1 cup of halved cherry tomatoes and ½ cup of chopped spinach. - Mix with the cooked chicken and cook for about 2 minutes. - Taste and add more salt and pepper if needed. - Ensure chicken is fully cooked before removing. This keeps it safe to eat. - Adjust simmer time based on orzo brand. Different brands may cook at different speeds. - Add red pepper flakes for heat. This gives a nice kick to the dish. - Incorporate fresh herbs like basil or dill. They add bright flavors and freshness. - Serve with a side salad for balance. This adds crunch and freshness to your meal. - Use lemon wedges for added zest. They enhance the dish's bright lemon flavor. Pro Tips Use Fresh Herbs: Fresh herbs like parsley and thyme elevate the flavor of your dish. Add them just before serving to maintain their vibrant taste. Perfectly Cook Orzo: Stir the orzo occasionally while it simmers to prevent sticking and ensure even cooking. Taste it a minute before the timer goes off to check for doneness. Customize Your Veggies: Feel free to add other vegetables such as bell peppers or zucchini. Just make sure they are chopped into small pieces to cook evenly. Leftover Storage: Store any leftovers in an airtight container in the fridge. Reheat gently with a splash of broth to restore the creaminess. {{image_2}} You can switch the chicken for shrimp or tofu. Shrimp cooks fast and adds a nice taste. Tofu gives a great texture for a plant-based option. You can also try pork or beef for a different flavor. Each protein brings its own twist to the dish. If you want to change things up, use rice or quinoa instead of orzo. These options can make the dish gluten-free. Whole wheat orzo is another great choice for a healthier pasta. Each swap gives a unique taste and texture. Feel free to add seasonal vegetables to the mix. Peas or bell peppers add color and nutrients. You can also try zucchini or carrots for extra crunch. Mixing in different veggies keeps the dish fresh and exciting. You can store leftovers in airtight containers. This helps keep the dish fresh. Keep it in the fridge for up to 3 days. After that, the flavors may fade. If you want a longer storage life, freeze the dish. Make sure it cools before you freeze it. Place it in freezer-safe bags or containers. When you're ready to eat, reheat thoroughly before serving. This keeps it safe and tasty. You can use the stovetop or microwave to reheat. For stovetop reheating, add a splash of broth to help rehydrate the orzo. This keeps it from becoming dry. In the microwave, cover the dish to trap steam. This will warm it evenly and keep it moist. Yes, you can prepare this dish ahead of time. If you want to save it for later, refrigerate it in an airtight container. You can also freeze it. Just make sure to let it cool completely before freezing to keep the best texture. Yes, you can use other small pasta options. Pasta like ditalini, small shells, or even farfalle works well in this recipe. Just adjust the cooking time as needed. Each type may cook differently, so check it often. You can easily make this dish healthier. Use less oil to cut fat. Add more vegetables, like zucchini or bell peppers, for extra nutrients. You can also choose leaner cuts of meat, such as chicken breast. This keeps the flavors while making it lighter. This recipe for One Pot Lemon Garlic Orzo with Chicken is simple and full of flavor. You need just chicken, orzo, broth, and tasty spices to create a delicious meal. You can easily change ingredients too, like using shrimp or adding more veggies. Store leftovers in the fridge or freeze for later. Cooking should be fun, and this dish makes it easy to impress your family or friends. Enjoy your cooking journey and feel proud of your meal!

One Pot Lemon Garlic Orzo with Chicken Delight

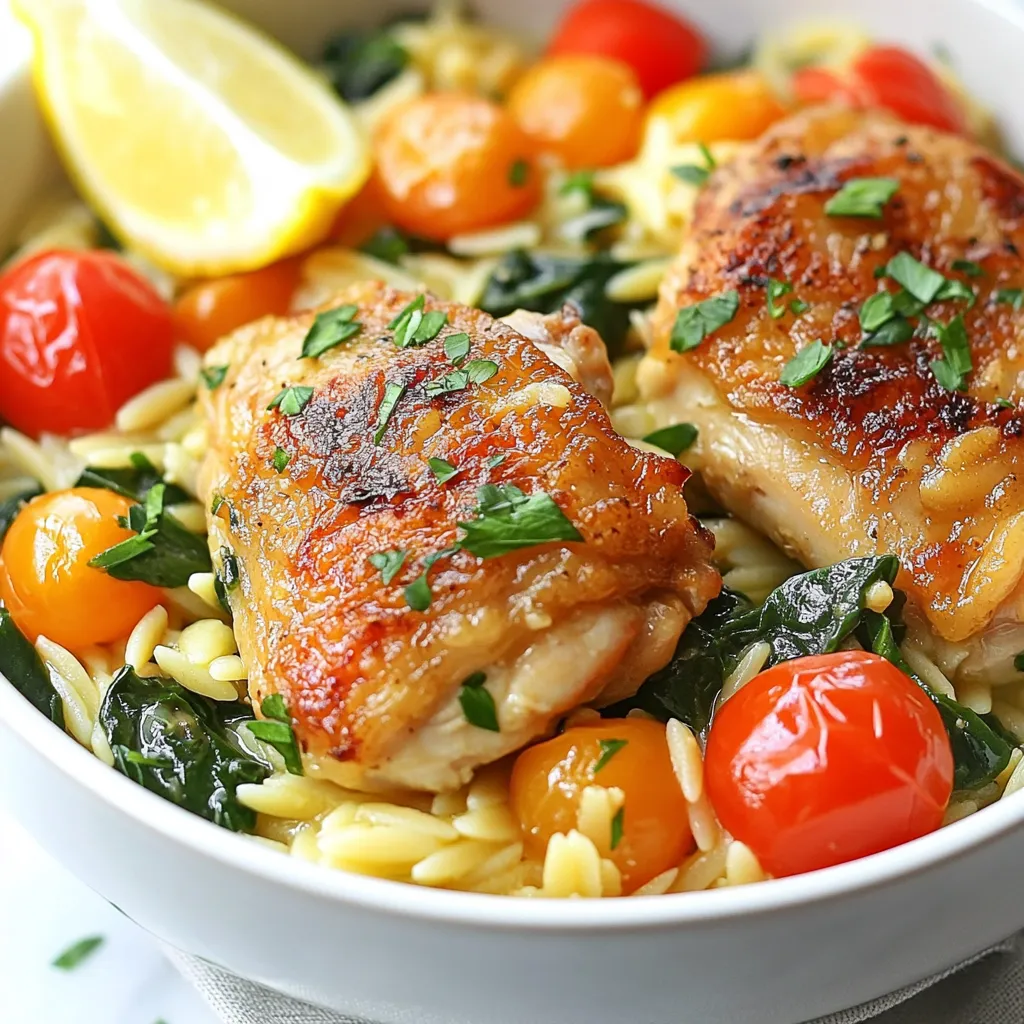
Looking for a quick and delicious meal that will brighten your dinner table? My One Pot Lemon Garlic Orzo with

- 1 cup orzo pasta - 1/2 cup cherry tomatoes, halved - 1/2 cucumber, diced - 1/4 red onion, finely chopped - 1/4 cup fresh dill, chopped - 1/4 cup feta cheese, crumbled - 3 tablespoons olive oil - 2 tablespoons lemon juice (freshly squeezed) - Zest of 1 lemon - Salt and pepper to taste For this Lemon Dill Orzo Salad, I use one cup of orzo pasta. This amount serves about four people. I like to add half a cup of halved cherry tomatoes for a burst of color and taste. A half cucumber, diced, adds a nice crunch. The red onion should be finely chopped to keep the flavor mild. I recommend using a quarter cup of fresh dill. It gives the salad a lovely herbal note. When it comes to cheese, a quarter cup of crumbled feta adds creaminess. For the dressing, I use three tablespoons of olive oil and two tablespoons of fresh lemon juice. Zest from one lemon brightens the flavors. Lastly, don't forget to add salt and pepper to taste. If you can't find orzo, try using quinoa or couscous. Both are great alternatives. If you prefer, you can swap feta cheese for goat cheese or omit it for a vegan version. Fresh dill is best, but you can use dried dill in a pinch. Just use less, as dried herbs are stronger. For a zesty kick, consider adding a pinch of red pepper flakes. You can also add other veggies, like bell peppers or spinach, to customize your salad. {{ingredient_image_1}} Start by boiling a large pot of salted water. Once it boils, add 1 cup of orzo pasta. Cook it for about 8 to 10 minutes. You want it to be al dente, which means it's firm yet cooked. After cooking, drain the orzo in a colander. Rinse it under cold water to stop the cooking. This step is key to keeping it from getting mushy. Make sure to drain it well so that no water remains. While the orzo cooks, grab your chopping board. Dice half a cucumber into small pieces. Cut half a cup of cherry tomatoes in half. Finely chop a quarter of a red onion. Place all these veggies in a large mixing bowl. Their colors will brighten your salad and add fresh flavors. When the orzo cools down, add it to the bowl with the veggies. Gently mix in a quarter cup of chopped dill and a quarter cup of crumbled feta cheese. This adds a creamy texture and a salty kick. In a small bowl, whisk together 3 tablespoons of olive oil, 2 tablespoons of freshly squeezed lemon juice, and the zest of one lemon. Add salt and pepper to taste. Pour this dressing over the salad and toss everything to coat evenly. Cover the salad with plastic wrap or a lid. Refrigerate it for at least 30 minutes. This chill time lets the flavors blend. When ready to serve, give it another gentle toss to mix everything. Enjoy this bright and zesty Lemon Dill Orzo Salad! You can make this lemon dill orzo salad a day before. Just follow the recipe and chill it. This helps the flavors blend well. Keep the salad in an airtight container in the fridge. If you wish, add fresh dill just before serving. It keeps the flavor bright and fresh. Want to boost the taste? Try adding a pinch of garlic powder. You can also mix in some olives for a briny kick. If you like a bit of heat, add red pepper flakes. Fresh herbs, like parsley or basil, can brighten the dish too. Always taste and adjust the seasoning to your liking. Make your salad look stunning! Use a large, clear bowl to show off the colors. You can layer the ingredients for a pretty effect. Garnish with extra dill on top. Placing lemon wedges around the bowl adds flair. Serve with a beautiful serving spoon to complete the look. Pro Tips Cooking Orzo Perfectly: Make sure to cook the orzo in well-salted water and don’t overcook it. It should be al dente, as it will continue to absorb moisture while cooling. Fresh Ingredients Matter: Use fresh dill and freshly squeezed lemon juice for the best flavor. Dried herbs and bottled lemon juice won’t deliver the same bright taste. Chill for Flavor: Letting the salad chill in the refrigerator for at least 30 minutes allows the flavors to meld together, making each bite more delicious. Variations: Feel free to add other vegetables like bell peppers or olives, or swap feta for goat cheese to customize the salad to your taste. {{image_2}} You can make this salad heartier by adding protein. Grilled chicken works well. Simply chop it into bite-sized pieces. Shrimp is another great choice. Cook the shrimp until pink, then toss it in. You can also try canned chickpeas for a vegetarian option. This adds protein and fiber, making the salad more filling. If you need a gluten-free option, swap the orzo for gluten-free pasta. Many brands make rice or corn-based pasta. They cook similarly and taste great with the salad. Quinoa is another good choice. It adds a nice texture and extra protein. Just remember to rinse it to remove the bitter taste. Feel free to get creative with seasonal veggies. In summer, add sweet corn or bell peppers for crunch. In fall, try roasted butternut squash or Brussels sprouts. These veggies enhance flavor and keep the salad fresh and colorful. You can also add fresh herbs like basil or parsley for a pop of flavor. After you enjoy your Lemon Dill Orzo Salad, store any leftovers in an airtight container. This keeps the salad fresh and tasty. Make sure to cool the salad completely before sealing it. If you leave it warm, moisture builds up and can cause sogginess. When stored correctly, this salad lasts up to three days in the fridge. You may notice some texture changes after a day or two. The fresh veggies can lose their crunch. Still, the flavors will meld together, making it even tastier! I do not recommend freezing this salad. The orzo and fresh vegetables will not hold their texture well. If you freeze it, the salad may become mushy after thawing. Enjoy it fresh for the best experience! Yes, you can use dried dill. Use about one tablespoon of dried dill for every quarter cup of fresh dill. Dried herbs are more potent, so start with less. If you love the flavor, you can add more. Fresh dill gives a bright taste, but dried works well too. If you want a different cheese, try goat cheese or ricotta. These cheeses add creaminess and flavor. You can also use a dairy-free cheese if you need a vegan option. Just pick a cheese you enjoy. Each will change the taste a bit, so choose what you like. The salad lasts about 3 to 5 days in the fridge. Keep it in an airtight container. The flavors will get better over time, but the veggies may soften. If you want crunch, eat it sooner. Enjoy your salad fresh for the best taste! We've covered the key ingredients needed for a delicious orzo salad. I provided step-by-step instructions to guide you through cooking and preparing the dish. I shared tips to enhance flavor and ensure great presentation. You learned about variations, like adding protein or making it gluten-free. Finally, the storage info helps you keep leftovers fresh. Now you're ready to create a tasty orzo salad at home. Enjoy your cooking!

Lemon Dill Orzo Salad Fresh and Flavorful Meal

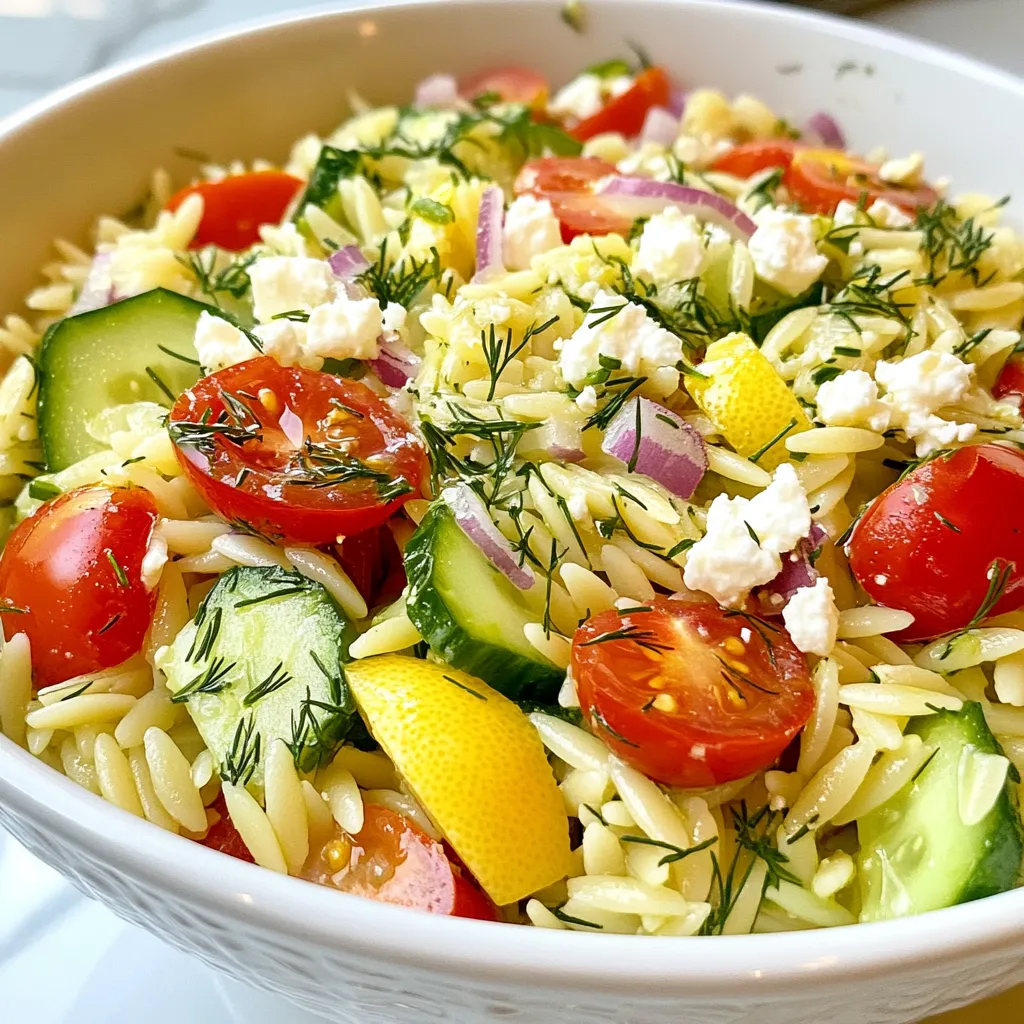
Looking for a fresh and tasty meal? My Lemon Dill Orzo Salad is the perfect choice! It’s bright, flavorful, and

- 500g boneless chicken breast - 1 red bell pepper, sliced - 1 yellow bell pepper, sliced - 1 cup broccoli florets - 1 medium carrot, julienned - 3 cloves garlic, minced - 1 tablespoon fresh ginger, minced - ½ cup sweet chili sauce - 2 tablespoons soy sauce - 2 tablespoons cornstarch - 2 tablespoons vegetable oil - Salt and pepper to taste I love using fresh, colorful veggies in this dish. The red and yellow bell peppers add sweetness. Broccoli gives a nice crunch, while carrots bring a vibrant color. - Chopped green onions - Sesame seeds Garnishes like green onions and sesame seeds make the dish look pretty. They also add extra flavor that brightens each bite. - Cornstarch: You can use arrowroot or potato starch for gluten-free options. - Vegetable oil: Olive oil or coconut oil can work too. For a twist, try using different oils. Each brings its unique taste to the dish. Cornstarch helps thicken sauces and gives chicken a crispy texture. {{ingredient_image_1}} First, take 500g of boneless chicken breast and slice it into thin strips. In a bowl, combine the chicken strips with 2 tablespoons of cornstarch, salt, and pepper. Mix well to coat the chicken evenly. This step helps the chicken become tender and adds flavor. Set the chicken aside for about 15 minutes to let the flavors soak in. Heat 1 tablespoon of vegetable oil in a large skillet or wok over medium-high heat. Add the marinated chicken to the skillet. Stir-fry the chicken until it turns golden brown and is cooked through, which takes about 5-7 minutes. Once done, remove the chicken from the skillet and set it aside. In the same skillet, add another tablespoon of vegetable oil. Toss in 3 cloves of minced garlic and 1 tablespoon of minced ginger. Cook these for about 30 seconds until they smell great. Next, add your sliced red bell pepper, yellow bell pepper, 1 cup of broccoli florets, and 1 medium carrot that you’ve julienned. Stir-fry these vegetables for 3-4 minutes until they are tender but still crisp. Now, return the cooked chicken to the skillet with the vegetables. Pour in ½ cup of sweet chili sauce and 2 tablespoons of soy sauce. Stir everything together to ensure an even coating. Cook for an additional 2-3 minutes until everything is heated through. Taste your stir fry and adjust the seasoning with more salt and pepper if needed. Remove the skillet from the heat. Garnish your dish with chopped green onions and sesame seeds before serving. Enjoy your Sweet Chili Chicken Stir Fry! Marinating your chicken is key. It adds depth and helps the flavors meld. Use cornstarch, salt, and pepper for a great coating. Let the chicken sit for about 15 minutes. This time allows the chicken to soak up all that goodness. When stir-frying, keep the heat high. A hot skillet gives you that nice sear. Stir frequently to avoid burning. To keep your veggies crunchy, add them at the right time. Start with garlic and ginger for flavor. Then add bell peppers, broccoli, and carrots. Cook them for about 3-4 minutes. This keeps them tender but still crisp. Each veggie has a different cook time. Bell peppers need less time than broccoli. Serving matters! Use a large bowl or individual plates. This makes the dish feel special. Pair the stir fry with steamed jasmine rice or quinoa. Both add a nice base. A wedge of lime on the side gives a zesty kick. Garnish with green onions and sesame seeds. This adds color and crunch to your meal. Pro Tips Marinate for Flavor: Allow the chicken to marinate for at least 15 minutes. This helps the cornstarch adhere better and enhances the flavor. High Heat is Key: Stir-frying requires high heat to cook quickly. Make sure your skillet or wok is hot before adding the ingredients. Vegetable Crunch: To maintain the crispness of your vegetables, stir-fry them just until tender-crisp. Overcooking can make them soggy. Customize Your Sauce: Feel free to adjust the amount of sweet chili sauce and soy sauce according to your taste for a more personalized flavor. {{image_2}} For Sweet Chili Chicken Stir Fry, you can try different proteins. Shrimp cooks quickly and adds a nice flavor. Tofu is a great vegetarian choice. If you prefer beef, use thinly sliced flank steak for a hearty meal. You can also mix up your veggies. Try snap peas, zucchini, or even mushrooms for variety. Each swap brings a new twist to the dish. Want to kick up the flavor? Add red pepper flakes for some heat. A squeeze of fresh lime juice brightens up the dish. For a different taste, try using teriyaki sauce or hoisin sauce instead of sweet chili sauce. These sauces can change the flavor profile while keeping it delicious. If you need gluten-free options, use tamari instead of soy sauce. Cornstarch is naturally gluten-free, so it works well for thickening. For a vegetarian version, swap the chicken with tofu. You can keep all the other ingredients the same, and you will have a tasty meal that fits your needs. To store leftovers, let the stir fry cool down first. Place it in an airtight container. This keeps the food fresh and tasty. You can store it in the fridge for 3-4 days. Make sure to reheat it well before eating. To freeze your stir fry, use a freezer-safe container. Leave a little space at the top for expansion. Label it with the date. You can freeze it for up to three months. When you're ready to eat, thaw it overnight in the fridge. To reheat, warm it in a skillet over medium heat until hot. Use leftover ingredients creatively. Toss them into salads or omelets. You can also make wraps or sandwiches. Meal prep is easy with stored stir fry. Just heat it up for lunch or dinner. This way, you enjoy your meal and save time! Making Sweet Chili Chicken Stir Fry takes about 30 minutes. This includes: - Prep time: 15 minutes - Cook time: 15 minutes You can quickly gather the ingredients and prep the chicken. It cooks fast, so you can enjoy a tasty meal in no time! Yes, you can make this recipe in advance. Here are some tips: - Cook the chicken and veggies: You can stir-fry them and store in the fridge. - Reheat when ready: Just heat it in a pan until warm. - Sauce on the side: Keep the sweet chili sauce separate until serving for the best taste. This way, you save time and still enjoy a fresh meal. You can serve this stir fry with several tasty sides. Here are some great options: - Steamed jasmine rice - Quinoa - Noodles - Fresh lime wedges Garnish with chopped green onions and sesame seeds for extra flavor. These sides make your meal more filling and delicious! In this post, we explored how to make a delicious Sweet Chili Chicken Stir Fry. We covered the key ingredients, marinating tips, and cooking techniques to ensure rich flavor and perfect texture. You learned about alternate ingredients and how to store leftovers. Stir-frying is not just quick but fun. With practice, you can create your own tasty versions. Enjoy experimenting and sharing delicious meals with family or friends! Your kitchen can become a place for delightful flavors and shared moments.

Sweet Chili Chicken Stir Fry Flavorful Easy Meal

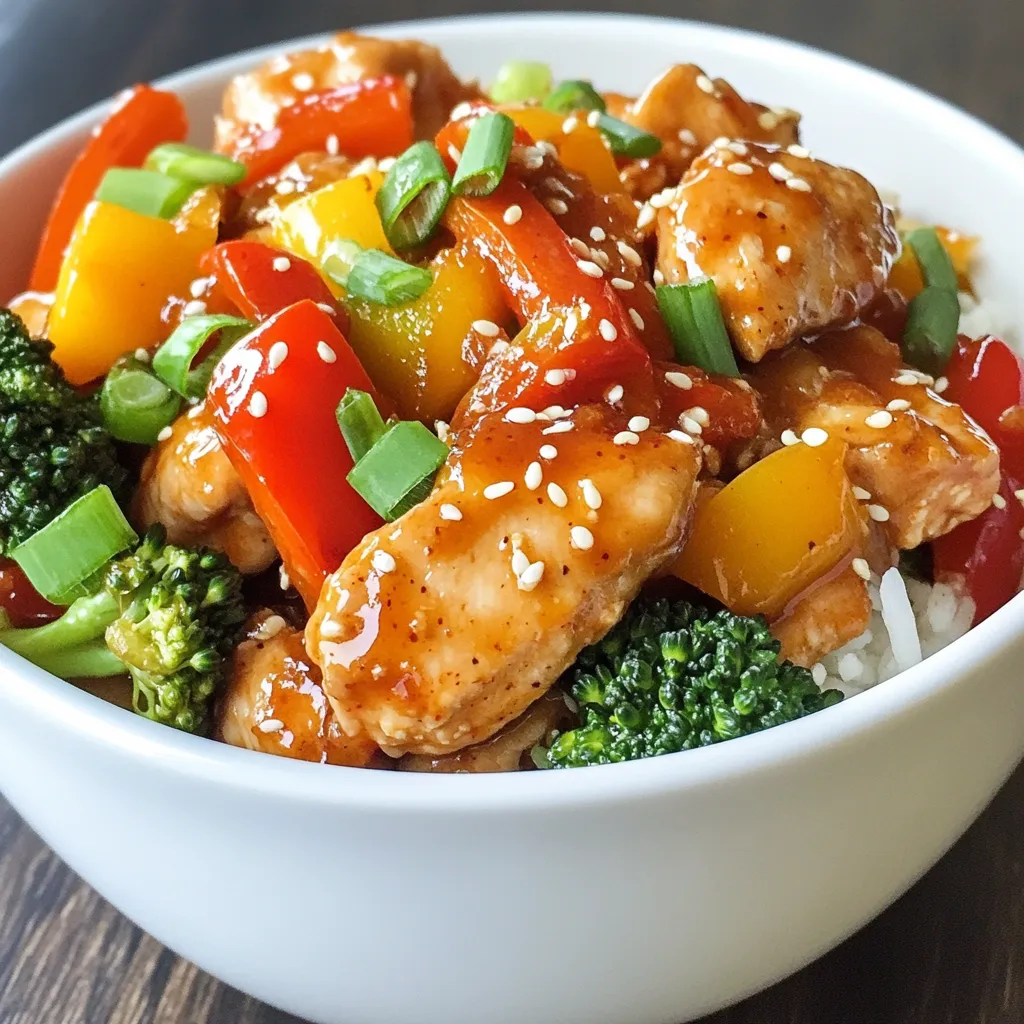
Looking for a quick and tasty meal? My Sweet Chili Chicken Stir Fry checks all the boxes! With tender chicken

- 2 salmon fillets - 1 cup cooked jasmine rice - 1 cup broccoli florets - 1 red bell pepper, thinly sliced - 1 carrot, peeled and julienned - 3 tablespoons soy sauce (low sodium) - 2 tablespoons honey - 1 tablespoon rice vinegar - 1 teaspoon minced garlic - 1 teaspoon grated fresh ginger - 2 green onions, chopped - Sesame seeds, for garnish - Lime wedges Gather these ingredients before you start. Salmon fillets are the star here. They provide a rich, buttery taste. Jasmine rice makes a fluffy base for your bowl. Fresh vegetables like broccoli, bell pepper, and carrot add color and crunch. For the teriyaki sauce, soy sauce brings umami. Honey adds sweetness, while rice vinegar gives it a tangy kick. Minced garlic and grated ginger enhance the flavor. Think about garnishes, too. Chopped green onions add freshness. Sesame seeds give a nice crunch. Lime wedges add a zesty twist. With these ingredients, you can create a tasty and healthy meal in no time! {{ingredient_image_1}} To start, grab a small bowl. In this bowl, whisk together: - 3 tablespoons soy sauce (low sodium) - 2 tablespoons honey - 1 tablespoon rice vinegar - 1 teaspoon minced garlic - 1 teaspoon grated fresh ginger Mix these ingredients well until the honey dissolves. This creates a smooth teriyaki sauce. Set the sauce aside for later use. Next, heat a non-stick pan over medium heat. Add 1 tablespoon sesame oil to the pan. Once hot, place 2 salmon fillets skin-side down. Let them cook for 4-5 minutes without moving them. This helps achieve a nice sear. Now, carefully flip the salmon. Pour half of the teriyaki sauce over the salmon. Cook for another 3-4 minutes. Baste the fillets with the sauce as they cook. The salmon should be flaky and cooked through. While the salmon cooks, prepare a pot for steaming. Add water to the pot and bring it to a simmer. Place the broccoli florets, red bell pepper slices, and julienned carrot in a steamer basket. Steam the vegetables for about 5 minutes. You want them tender but still bright and colorful. This keeps the nutrients intact and adds crunch. Now it’s time to put everything together. Start by placing ½ cup of cooked jasmine rice in each bowl. This will be the base of your meal. Next, add a portion of the steamed vegetables on top of the rice. Make it colorful and inviting. Finally, place one salmon fillet on each bowl of vegetables. Drizzle with the remaining teriyaki sauce. To finish, sprinkle chopped green onions and sesame seeds for extra flavor and crunch. Enjoy your beautiful and tasty Teriyaki Salmon Bowls! To cook salmon well, timing is key. Start with your pan on medium heat. You want the oil hot but not smoking. Place the salmon skin-side down and let it cook for 4-5 minutes. Don't touch it! This lets the skin crisp up. After that, flip the salmon over gently. Pour half of your teriyaki sauce over the fish. Cook for another 3-4 minutes. Check for doneness by using a fork. The salmon should flake easily. If it does, it's ready! To make the teriyaki sauce perfect, you can adjust the ingredients. If you like it sweeter, add more honey. If you want more tang, add a bit of rice vinegar. You can also add extra flavors. Try adding a bit of sesame oil or even some red pepper flakes for heat. These small touches can take your dish to a new level. How you arrange the bowl matters! Start with a base of jasmine rice. Then, add the bright steamed veggies on top. Place the salmon fillet carefully over the vegetables. Don’t forget to drizzle the rest of the teriyaki sauce on top. For a fun touch, add chopped green onions and sesame seeds as a garnish. You can also add a lime wedge for extra flair! Making it look good makes it taste better. Pro Tips Choose Fresh Salmon: Look for salmon fillets that are bright in color and have a fresh scent. Fresh salmon will yield the best flavor and texture. Perfect Rice Cooking: Rinse the jasmine rice under cold water before cooking to remove excess starch. This will help achieve fluffy rice that doesn’t clump together. Customize Veggies: Feel free to substitute the vegetables based on your preference. Other great options include snap peas, zucchini, or bok choy for variety. Marinate for Extra Flavor: For an even richer taste, consider marinating the salmon in the teriyaki sauce for 30 minutes before cooking. {{image_2}} You can switch out the salmon for grilled chicken if you prefer. Chicken absorbs flavors well, just like salmon. If you want a vegetarian option, try tofu. Tofu soaks up the teriyaki sauce nicely. Just press it to remove extra water before cooking. If you need a gluten-free option, use quinoa instead of jasmine rice. Quinoa is packed with protein and has a nice nutty flavor. For those on low-carb diets, cauliflower rice is a great choice. It gives you a similar texture without the carbs. Feel free to use different seasonal vegetables. Fresh veggies add color and taste. You might want to add edamame or snap peas for extra crunch. Both options bring a fun texture and boost the nutrition of your bowl. - Refrigeration guidelines: Store any leftover teriyaki salmon bowls in an airtight container. They can last in the fridge for up to three days. Make sure to cool the bowls completely before sealing. This way, you keep the best flavor and texture. - Freezing options: If you want to keep them longer, freeze the salmon and vegetables separately from the rice. Use freezer-safe containers or bags. They can last for about one month. When ready to eat, thaw overnight in the fridge. - Best methods to retain flavor and texture: The best way to reheat is in the oven. Preheat it to 350°F (175°C). Place the salmon and veggies in a dish, cover with foil, and heat for about 10-15 minutes. This keeps the salmon moist. You can also use a microwave, but be careful not to overheat. - Avoiding overcooking: Check the salmon often while reheating. Heat it just until warm. Overcooking can dry it out and change the texture. Enjoy your leftovers just as much as when they were fresh! Teriyaki salmon lasts about 3 days in the fridge. Store it in an airtight container. Keep it cool to maintain its flavor and texture. If you want it to last longer, consider freezing it. Yes, you can use other fish. Try using trout, tuna, or halibut. These fish absorb flavors well. They also cook similarly to salmon, making them great swaps. I love serving teriyaki salmon bowls with steamed rice. Jasmine rice works best, but you can use brown rice too. Add some crunchy vegetables like cucumbers or pickled radishes. A side of miso soup pairs nicely as well. This blog post covered how to make a delicious teriyaki salmon bowl. We explored key ingredients like salmon, jasmine rice, and fresh veggies. The post provided step-by-step instructions for preparing the teriyaki sauce, cooking the salmon, and steaming the vegetables. I offered tips for perfecting the dish and suggested variations for different diets. Remember, you can store leftovers and enjoy them later. With these easy steps and tips, you can create a tasty meal that your whole family will love. Enjoy your cooking adventure!

Teriyaki Salmon Bowls Flavorful and Easy Recipe

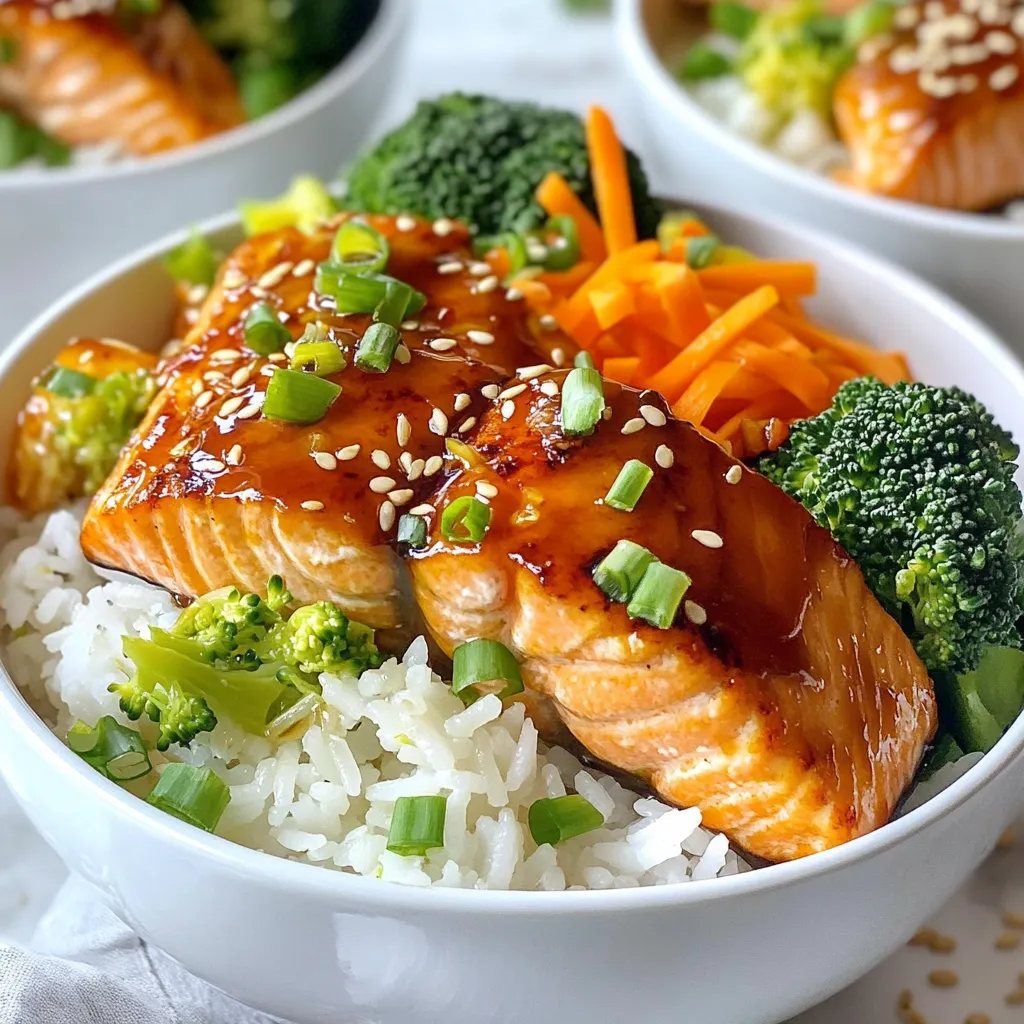
Are you craving a dish that’s quick, tasty, and impressive? Teriyaki Salmon Bowls fit the bill! With juicy salmon, fluffy

- 1 medium head of cauliflower, cut into florets - 1 cup all-purpose flour - 1 cup water - 1 teaspoon garlic powder - 1 teaspoon onion powder - 1 teaspoon smoked paprika - Salt and pepper to taste - 1 cup buffalo sauce (homemade or store-bought) - 8 small corn or flour tortillas - 1 avocado, sliced - ½ cup red cabbage, shredded - ¼ cup fresh cilantro, chopped - Lime wedges for serving To make Buffalo Cauliflower Tacos, you need simple ingredients. The star of the dish is the cauliflower. I use a medium head, cut into small florets. This helps the cauliflower to cook evenly. The batter is made with flour and water. Garlic powder, onion powder, and smoked paprika give it strong flavor. Salt and pepper add taste too. You will also need buffalo sauce. You can make your own or use a store brand. For the tacos, I like to use small corn or flour tortillas. Fresh toppings like avocado, red cabbage, and cilantro add color and texture. Lime wedges are a must for serving. - Pickled jalapeños - Vegan ranch dressing - Shredded cheese Feel free to add more flavor with optional ingredients. Pickled jalapeños can spice things up. If you want a creamy touch, try vegan ranch dressing. Shredded cheese can also enhance the dish, adding richness. - Frank’s RedHot for buffalo sauce - King Arthur for all-purpose flour - La Tortilla Factory for tortillas I trust these brands for their quality and taste. Frank’s RedHot is a classic choice for buffalo sauce. King Arthur flour gives great results in the batter. For tortillas, La Tortilla Factory offers tasty options. You can always choose your favorites, but these brands work well. {{ingredient_image_1}} Start with a medium head of cauliflower. Cut it into small florets. Make sure they are bite-sized so they cook well. Rinse the florets under cold water to clean them. Dry them off with a towel. This helps the batter stick better. Grab a mixing bowl and add 1 cup of all-purpose flour. Then, add 1 teaspoon of garlic powder, 1 teaspoon of onion powder, and 1 teaspoon of smoked paprika. Sprinkle in salt and pepper to taste. Whisk these dry ingredients together. Slowly pour in 1 cup of water while stirring. Keep mixing until the batter is smooth and lump-free. Preheat your oven to 450°F (230°C). Line a baking sheet with parchment paper. Take each floret and dip it into the batter. Make sure each piece is fully coated. Place them on the baking sheet in a single layer. Bake for about 20 minutes. Halfway through, flip the florets to get an even cook. Once they turn golden and crispy, remove them from the oven. In a large bowl, toss the hot cauliflower with 1 cup of buffalo sauce. Make sure they are well coated before serving. To boost the heat, add more buffalo sauce. You can also mix in some hot sauce. For a fun twist, sprinkle cayenne pepper in the batter. This adds a fiery kick. Adjust the spice to match your taste. Remember, you can always add more, but you can't take it out! This recipe is already vegan if you use plant-based ingredients. The flour and buffalo sauce are vegan. Just check the sauce label for hidden dairy. Serve the tacos with avocado and fresh veggies. This adds flavor and keeps it plant-based. Enjoy a tasty meal without any animal products. To get the perfect crunch, coat each floret well in the batter. Spread them out on the baking sheet. Avoid crowding them; this helps them bake evenly. Flip the florets halfway through cooking for even crispiness. Bake until they are golden brown and irresistible. The right texture makes all the difference in your tacos! Pro Tips Choose the Right Cauliflower: Opt for a medium-sized head with tightly packed florets for the best texture and flavor. Make it Spicy: Adjust the amount of buffalo sauce according to your spice preference. You can even add a dash of cayenne pepper to the batter for an extra kick. Customize Your Toppings: Feel free to add other toppings like diced tomatoes, jalapeños, or a drizzle of ranch dressing to enhance the flavor profile. Perfectly Warm Tortillas: To prevent them from tearing, warm the tortillas just until pliable, and consider wrapping them in a kitchen towel to keep warm until serving. {{image_2}} You can change the flavor of your Buffalo cauliflower tacos by using different sauces. Try a tangy BBQ sauce for a sweet twist. A spicy Sriracha sauce adds heat, while ranch dressing offers a creamy taste. If you want to keep it light, a lemon vinaigrette works well too. Each sauce changes the whole vibe of the taco, making it fun to experiment. Toppings can take your tacos to the next level. Besides avocado and red cabbage, add diced tomatoes for freshness. Pickled jalapeños add a kick, while crumbled feta or goat cheese gives a creamy touch. You could also add fresh corn or black beans for extra texture. Each topping can change the taste and color of your dish. The type of tortilla you use can also change your tacos. Corn tortillas are gluten-free and have a nice flavor. Flour tortillas are soft and chewy, perfect for holding all the fillings. For a fun twist, try lettuce wraps for a low-carb option. You could also use whole wheat tortillas for a healthier choice. Experiment with different options to find your favorite! To keep your buffalo cauliflower tacos fresh, first let them cool. Place the tacos in an airtight container. Store them in the fridge for up to three days. If you have leftover cauliflower, store it separately. This keeps the tortillas from getting soggy. When ready to eat, reheat the tacos in a skillet. Heat them over medium heat for about 3-5 minutes. Flip them gently to warm both sides. If using an oven, preheat it to 350°F (175°C). Place the tacos on a baking sheet for about 10 minutes. This helps restore their crispiness. You can freeze the buffalo cauliflower for later use. First, let the cooked cauliflower cool completely. Spread the florets in a single layer on a baking sheet. Freeze them for about an hour, then transfer to a freezer bag. They will stay fresh for up to three months. When you’re ready to use, just reheat directly from the freezer. Yes, you can make these tacos gluten-free. Use gluten-free flour for the batter. Many brands offer good options. You can also try almond flour or chickpea flour. Both work well. Just ensure the buffalo sauce is also gluten-free. Check the label for any hidden gluten. If you want a different flavor, you can use other sauces. Try barbecue sauce for a sweet twist. Sriracha gives a spicy kick. You can even make a yogurt-based sauce for creaminess. Just mix plain yogurt with hot sauce. It will still taste great with the cauliflower. Yes, you can prep some parts in advance. Make the buffalo cauliflower and store it in the fridge. Reheat it before serving to keep it crispy. You can also slice the avocado and shred the cabbage ahead. Just assemble the tacos right before eating for the best taste. You have learned how to make tasty cauliflower tacos. We covered ingredients, steps, tips, and storage. Remember, you can customize your sauce and toppings. Try making these tacos spicy or vegan. For leftovers, store them well and reheat properly. Cauliflower tacos are a fun and healthy meal. Enjoy experimenting with different flavors and ingredients!

Buffalo Cauliflower Tacos Flavorful and Healthy Delight

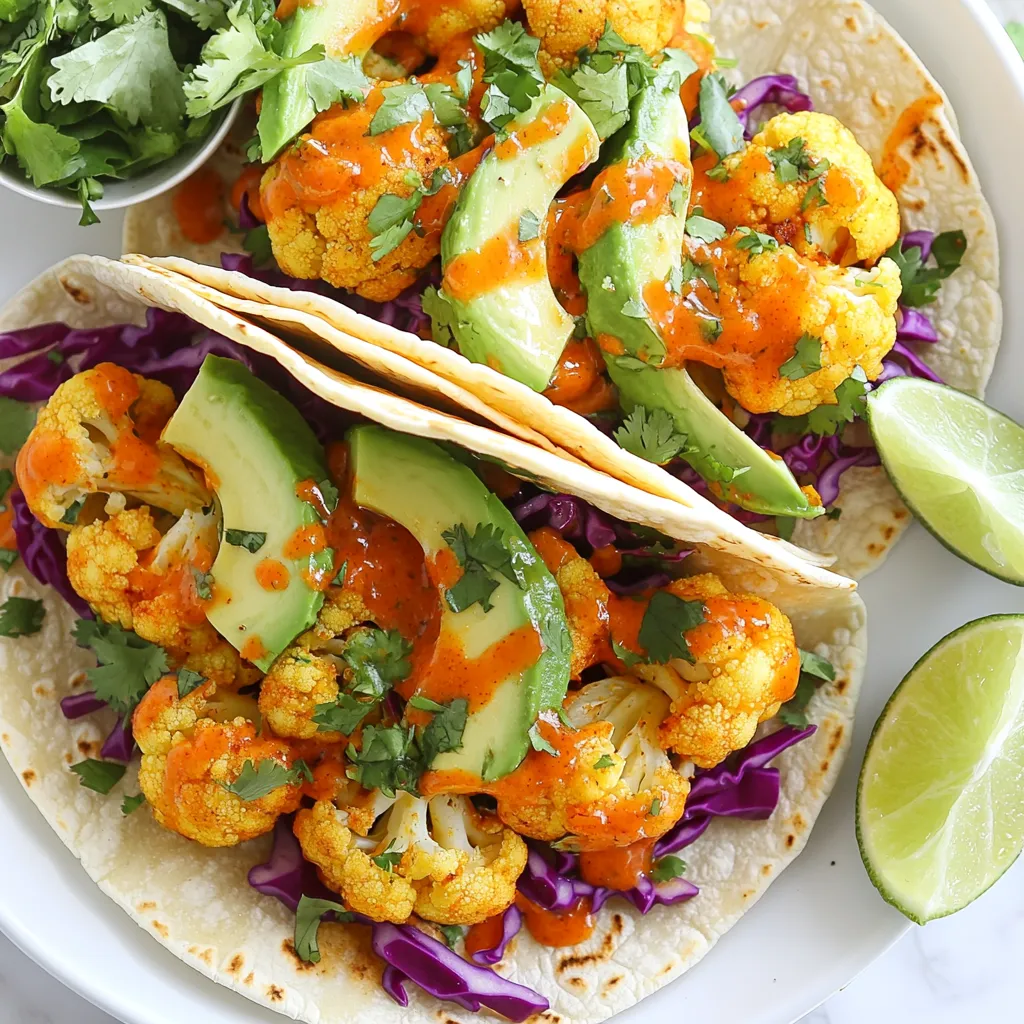
Are you ready to spice up your taco night? Buffalo Cauliflower Tacos offer a healthy twist on a classic favorite.

- 1 block (14 oz) firm tofu, drained and pressed - 1 red bell pepper, sliced - 1 cup broccoli florets - 1 cup snap peas - 3 green onions, chopped - 3 cloves garlic, minced - 1 tablespoon fresh ginger, grated - Zest and juice of 1 lemon - 2 tablespoons soy sauce - 1 tablespoon sesame oil - 2 tablespoons cornstarch - 2 tablespoons vegetable oil - Sesame seeds - Salt and pepper to taste This dish shines with fresh, colorful veggies. The firm tofu gives a hearty texture. I love how the garlic and ginger mix for a fragrant base. Lemon adds a bright zing that lifts the dish. The soy sauce brings a savory depth. You can play with the flavors to suit your taste. Add more lemon for a tangy punch or extra soy for saltiness. The sesame oil gives a nutty finish. Keep it simple or dress it up—your choice! {{ingredient_image_1}} Start by cutting the pressed tofu into bite-sized cubes. This makes it easy to cook and eat. Next, toss the tofu cubes in cornstarch. This step helps the tofu get crispy when cooked. It also adds a nice texture to the dish. Heat one tablespoon of vegetable oil in a large non-stick skillet over medium-high heat. Once the oil is hot, add the tofu cubes. Cook until the tofu turns golden and crispy on all sides, which takes about 8 to 10 minutes. After that, remove the tofu from the skillet and set it aside. This will keep it crispy until you mix it with the veggies. In the same skillet, add another tablespoon of vegetable oil. Sauté the minced garlic and grated ginger for about one minute. You want to cook them just enough for their strong flavors to come out. Then, add the sliced red bell pepper, broccoli florets, and snap peas. Stir-fry these veggies for about 4 to 5 minutes. You want them to be tender but still crisp. Now it's time to bring everything together. Stir in the cooked tofu along with the lemon zest, lemon juice, soy sauce, and sesame oil. Mix everything well until it's heated through, which takes about 2 minutes. Finally, season with salt and pepper to taste. This step helps balance the flavors in your dish. Enjoy this fresh and bright meal! To make great tofu, start by pressing it. This removes extra water. Use a clean towel and a heavy object. Leave it for at least 15 minutes. This makes the tofu firmer and helps it soak up flavors. Next, coat the tofu in cornstarch. This step is key. The cornstarch creates a crispy crust. Toss the tofu cubes well until they are fully coated. This simple trick turns bland tofu into a tasty treat. Add more spices to boost flavor. Try red pepper flakes for heat. A pinch of smoked paprika can add depth. Experiment with herbs like basil for a fresh twist. Balance the acidity of the lemon juice and soy sauce. The lemon gives a bright taste, while soy sauce adds umami. Adjust these to match your preference. A little extra lemon can brighten up the dish even more. Keep your veggies crisp by not overcooking them. Stir-fry them quickly over high heat. This helps retain their bright colors and crunch. Add harder vegetables first. Start with bell peppers and broccoli. Then, add snap peas later. This way, everything cooks evenly and stays fresh. Enjoy the vibrant colors and textures in your stir fry! Pro Tips Press Tofu Well: Ensure the tofu is pressed adequately to remove excess moisture, which helps achieve a crispier texture when frying. Use High Heat: Cooking the tofu and vegetables on medium-high heat allows for a nice sear and retains the crispness of the veggies. Customize Veggies: Feel free to substitute or add your favorite vegetables like carrots, bell peppers, or zucchini for added variety and flavor. Serve Immediately: This dish is best enjoyed fresh. Serve it hot right after cooking to savor the flavors at their peak. {{image_2}} You can swap tofu for other proteins. Chicken works well if you eat meat. Just cut it into cubes and cook it the same way. Tempeh is another great choice. It has a nutty flavor and cooks quickly. For a vegan option, chickpeas or lentils can add protein. Both are tasty and easy to use in this stir fry. Feel free to mix in other vegetables. Carrots and bell peppers add color and crunch. You can also use zucchini or mushrooms. They cook well and absorb flavors nicely. Think about using seasonal vegetables too. In summer, fresh corn or cherry tomatoes brighten the dish. You can change the sauce to suit your tastes. Teriyaki sauce adds a sweet touch. Chili sauce brings heat if you want a kick. For a creamy twist, try adding nut butter. Peanut or almond butter makes the dish rich and smooth. Just stir it in at the end for a different flavor. To keep your Lemon Garlic Tofu Stir Fry fresh, store leftovers properly. Place the stir fry in an airtight container. Glass or plastic containers work well. Make sure to let the dish cool before sealing it. This helps prevent steam buildup, which can make the food soggy. Store the container in the fridge. Your stir fry will stay good for about 3 to 4 days. When you're ready to enjoy leftovers, there are great ways to reheat them. You can use the microwave or the stovetop. If using the microwave, heat in short bursts. Stir the dish between each burst. This helps heat evenly. For stovetop reheating, use a non-stick skillet. Add a splash of water or oil to prevent sticking. Heat over low to medium heat, stirring often. This keeps the tofu crispy and the veggies bright. If you want to save some for later, freezing is an option. However, the texture may change slightly. To freeze, place the cooled stir fry in a freezer-safe bag. Remove as much air as you can before sealing. Your stir fry can last for about 2 to 3 months in the freezer. When you’re ready to eat, defrost it in the fridge overnight. Reheat it in the microwave or on the stovetop, just like before. Enjoy your tasty meal anytime! To make crispy tofu, start with firm tofu. Press the tofu to remove excess water. Cut it into small cubes. Coat each cube with cornstarch. This helps create a crunchy outer layer. Heat oil in a skillet over medium-high heat. Cook the tofu until golden brown on all sides. This usually takes about 8-10 minutes. Keep the heat high for the best crispiness. Yes, you can! Feel free to mix in your favorite vegetables. Carrots, zucchini, or bell peppers work well. You could also try mushrooms or bok choy. Just make sure to cut them small. This helps them cook evenly. Be creative and use what's in season! This stir fry pairs well with many sides. Serve it over rice for a hearty meal. Noodles are another great choice, adding chewiness. You can also enjoy it in a fresh salad. The bright flavors of the stir fry will shine through. Yes, this recipe is both vegan and gluten-free! Tofu is a plant-based protein. The soy sauce can be swapped for a gluten-free version. Just check the label to ensure it fits your needs. Enjoy this healthy dish without worry! This blog post covers a delicious Lemon Garlic Tofu Stir Fry. We discussed key ingredients like firm tofu and fresh vegetables, plus essential seasonings for flavor. I shared step-by-step instructions for preparing and cooking tofu, stir-frying vegetables, and combining everything. Useful tips help you achieve perfect texture and flavor. Incorporate variations and storage tips for easy meal prep. Now, you can create a healthy stir fry that suits your taste. Enjoy exploring flavors and make this dish your own!

Lemon Garlic Tofu Stir Fry Flavorful and Easy Recipe

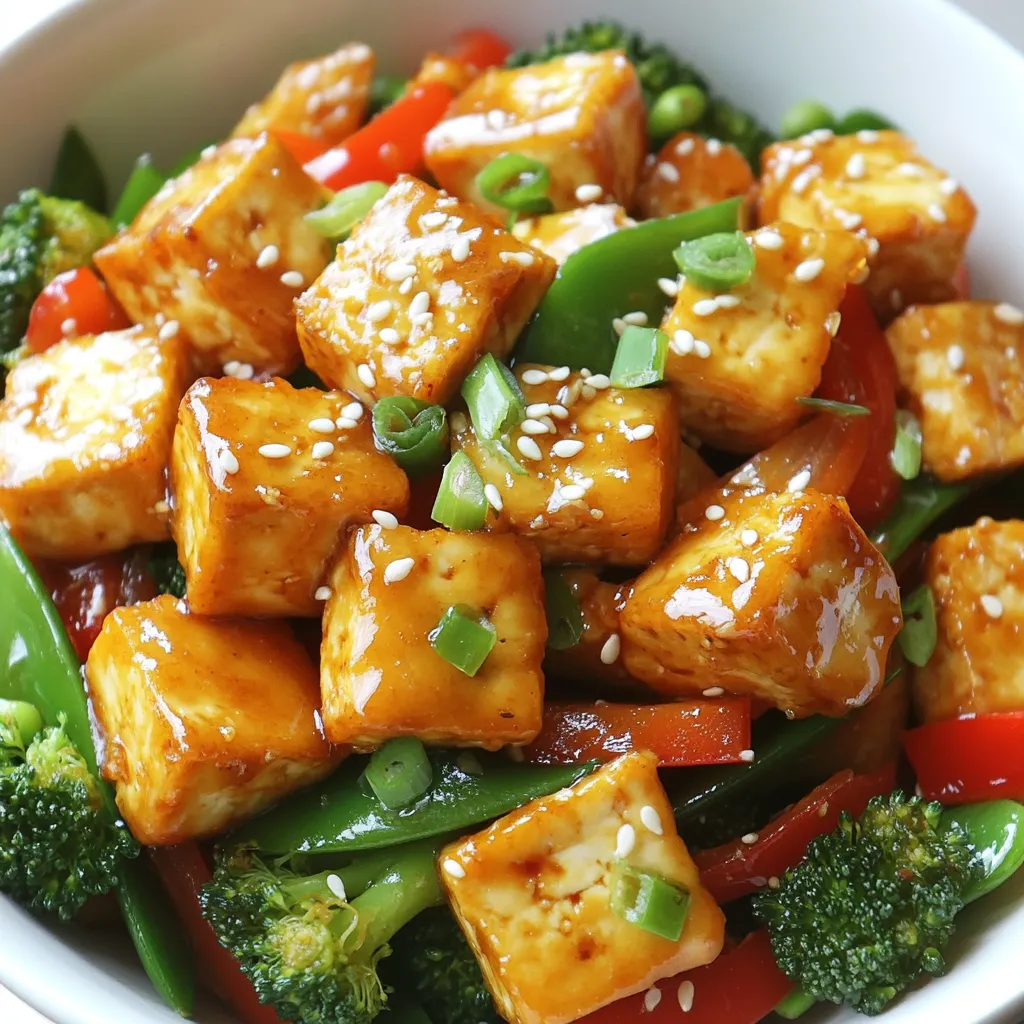
Looking for a quick, tasty meal? My Lemon Garlic Tofu Stir Fry is packed with flavor and super easy to

Older posts
Newer posts
← Previous Page1 … Page126 Page127 Page128 … Page130 Next →
© 2025 My Cooking Cast • Built with GeneratePress

Our Policies

  • Privacy Policy
  • GDPR Policy
  • Terms Of Use
  • Copyright Policy
  • Cookie Policy
  • Disclaimer

More Information​

  • Home
  • Contact
  • About
  • Dinner
  • Appetizers
  • Dessert
©2025, My Cooking Cast About Privacy Policy Back To Top