Skip to content
DisclaimerTerms Of UseGDPR PolicyCookie Policy

My Cooking Cast

  • Home
  • Drinks
  • Appetizers
  • Dinner
  • Dessert
  • About
  • Contact
  • Privacy Policy
DisclaimerTerms Of UseGDPR PolicyCookie Policy

Emma

To make quinoa stuffed sweet potatoes, you need simple and fresh ingredients. Here’s the list: - 4 medium sweet potatoes - 1 cup quinoa, rinsed - 2 cups vegetable broth (or water) - 1 cup black beans, drained and rinsed - 1 red bell pepper, diced - 1 cup corn, fresh or frozen - 1 teaspoon cumin - 1 teaspoon smoked paprika - 1/2 teaspoon salt - 1/4 teaspoon black pepper - 2 ripe avocados, diced - Fresh cilantro, for garnish - Lime wedges, for serving These ingredients create a tasty and filling dish. Sweet potatoes bring sweetness and nutrients. Quinoa adds protein and fiber. Black beans and corn give extra flavor and texture. The spices brighten the dish and make it aromatic. Avocado and cilantro make great toppings. Lime adds a zesty finish! When you gather these items, you set the stage for a hearty meal. Make sure your ingredients are fresh for the best taste! {{ingredient_image_1}} 1. Roasting the sweet potatoes: Start by preheating your oven to 400°F (200°C). Next, take your sweet potatoes and pierce them several times with a fork. This helps steam escape while they cook. Place the sweet potatoes on a baking sheet. Roast them in the oven for about 45 to 60 minutes. They are ready when they feel soft. 2. Checking for doneness: To check if they are done, poke them with a fork. If the fork goes in easily, they are ready. If not, give them more time in the oven. 1. Combining quinoa with liquid: While the sweet potatoes roast, prepare the quinoa. In a medium saucepan, add 1 cup of rinsed quinoa and 2 cups of vegetable broth or water. 2. Cooking and fluffing the quinoa: Bring this mix to a boil. Once it boils, turn the heat down to low. Cover the pot and let it simmer for about 15 minutes. After 15 minutes, check the quinoa. It should be fluffy, and the liquid should be absorbed. Remove it from heat and fluff it with a fork. 1. Combining cooked quinoa with vegetables and spices: In a large mixing bowl, combine the cooked quinoa, 1 cup of drained black beans, 1 diced red bell pepper, and 1 cup of corn. Add 1 teaspoon of cumin, 1 teaspoon of smoked paprika, 1/2 teaspoon of salt, and 1/4 teaspoon of black pepper. Mix everything until well blended. 2. Incorporating sweet potato flesh: Once the sweet potatoes are cool enough to handle, cut each one in half lengthwise. Scoop out a small portion of the flesh. Add this to the quinoa mixture to boost the flavor. 1. Scooping out sweet potatoes: Take the sweet potato halves and scoop out some flesh, but leave enough for support. 2. Stuffing and topping the potatoes: Now, fill each sweet potato half with the quinoa mixture. Press down gently to pack it in. Top each stuffed potato with diced avocado and sprinkle with fresh cilantro. Serve with lime wedges on the side for a zesty touch. To ensure sweet potatoes are tender, I always pierce them with a fork. This step helps steam escape while they roast. Bake them at 400°F for 45-60 minutes until soft. Check with a fork to see if they are done. The flesh should feel very soft. For the best quinoa texture, rinse it well before cooking. This removes the bitter coating called saponin. When cooking, use vegetable broth or water. Bring it to a boil, then lower the heat. Cover the pot and let it simmer for about 15 minutes. When done, fluff the quinoa with a fork for light, airy grains. To boost flavor, I suggest using cumin and smoked paprika. These spices add warmth and depth. You can also mix in garlic powder or onion powder for extra zest. Fresh herbs like cilantro brighten the dish. For toppings, diced avocado adds creaminess. You can also try crumbled feta or a dollop of sour cream. Lime wedges on the side give a fresh, zesty kick. When plating, serve each sweet potato half on a colorful dish. Garnish with fresh cilantro for a pop of green. Arrange lime wedges around the plate for flair. For serving, you can add a side salad or some tortilla chips. This adds a nice crunch and completes the meal. Pro Tips Choose the Right Sweet Potatoes: Look for sweet potatoes that are firm and smooth, avoiding any with bruises or soft spots for the best flavor and texture. Rinse Quinoa Thoroughly: Rinsing quinoa before cooking removes its natural coating, called saponin, which can be bitter. This ensures a more pleasant taste. Customize Your Filling: Feel free to add other ingredients like diced tomatoes, jalapeños, or spices to the quinoa mixture to suit your taste preferences. Serve Warm: For the best experience, serve the stuffed sweet potatoes warm, allowing the flavors to meld together beautifully. {{image_2}} You can easily change the black beans in this recipe. Try using chickpeas or lentils. Both add protein and flavor. For veggies, consider adding spinach or zucchini. They add color and nutrients. You can even toss in some diced tomatoes for extra moisture. Quinoa comes in many colors. You can use red or black quinoa for a fun twist. These varieties add a nutty taste and look great on the plate. If you want to skip quinoa, try using rice or farro. Both options will still give you a hearty filling. To make this dish vegan, skip any animal products. The ingredients are already plant-based. For gluten-free options, check your broth or water for hidden gluten. This recipe is already gluten-free when using the right broth. Enjoy a tasty meal that fits your needs! To store your quinoa stuffed sweet potatoes, let them cool. Place them in airtight containers. This keeps them fresh and tasty. You can also wrap them tightly in plastic wrap. Make sure to use containers that fit well. This helps prevent drying out. You can freeze stuffed sweet potatoes for later. First, let them cool completely. Next, wrap each potato in foil or plastic wrap. Then, place them in a freezer-safe bag. When you want to eat them, thaw overnight in the fridge. Reheat them in the oven at 350°F (175°C) for about 20-25 minutes. Leftovers can stay fresh in the fridge for about 3-5 days. After that, check for signs of spoilage. Look for changes in color or smell. If they smell off or look strange, it’s best to toss them. Enjoy your delicious meal while it's still fresh! Yes, you can prepare quinoa stuffed sweet potatoes in advance. Cook the sweet potatoes and quinoa, then mix them. Store everything in the fridge for up to three days. When you're ready to eat, just reheat in the oven or microwave. This saves time on busy days and makes meals easy. For the best toppings, I suggest using: - Diced avocado - Fresh cilantro - Crumbled feta cheese - Greek yogurt or sour cream - Hot sauce for a kick These toppings add flavor and texture. Feel free to mix and match based on what you like! To check if sweet potatoes are done, pierce them with a fork. If it goes in easily, they’re cooked. The skin should be soft and slightly wrinkled. Cooking time is usually 45-60 minutes at 400°F (200°C). Keep an eye on them to avoid overcooking. Yes, you can swap quinoa for other grains. Some great alternatives include: - Brown rice - Farro - Barley - Couscous These grains will change the taste and texture, so choose what you enjoy most! In this blog post, we explored how to create delicious quinoa stuffed sweet potatoes. We covered key ingredients, step-by-step instructions, helpful tips, and fun variations. With the right techniques, you can enjoy a hearty meal that suits your taste. Remember to store leftovers properly for later. This dish is simple to adapt for different diets and tastes. I hope you try making it at home. Enjoy your cooking journey and savor each bite!

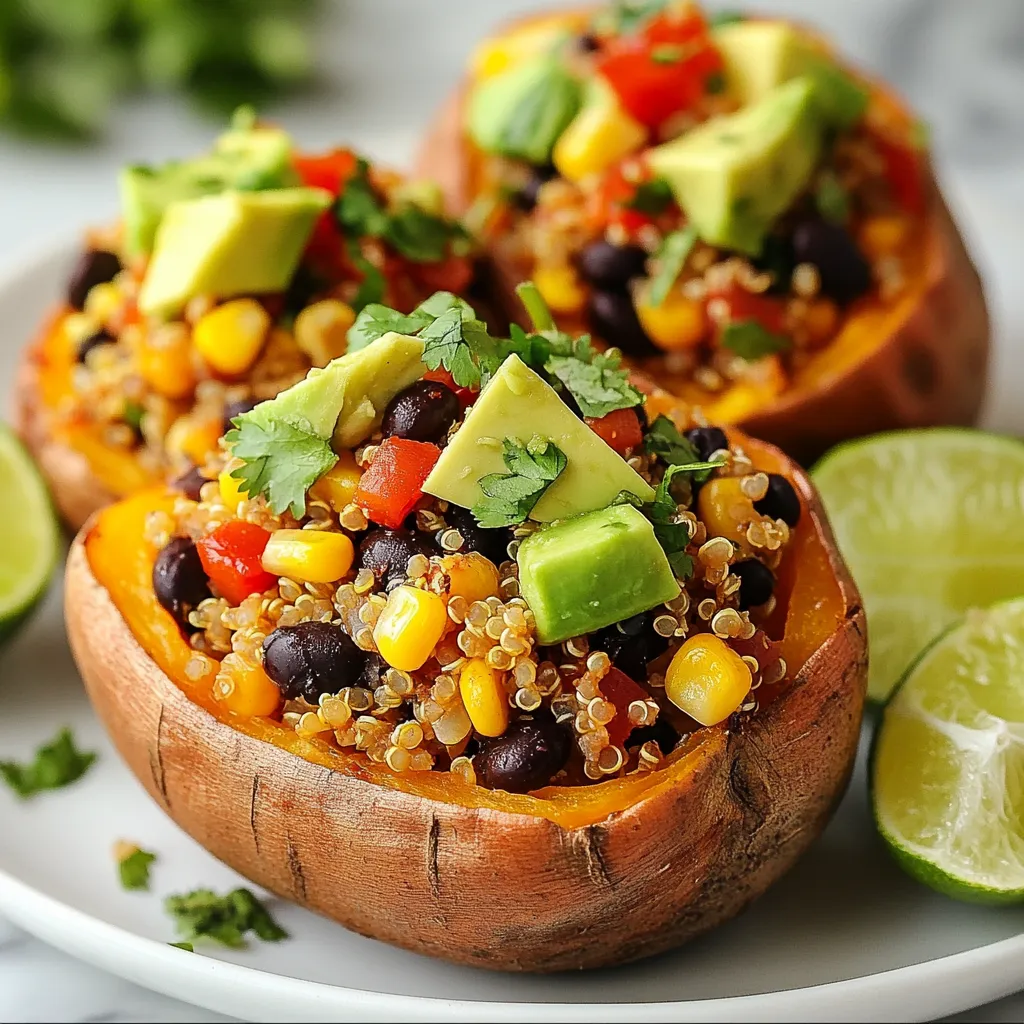
Quinoa Stuffed Sweet Potatoes Flavorful and Nourishing

If you’re looking for a dish that’s both flavorful and nourishing, you’ve found it! Quinoa stuffed sweet potatoes are your

Fresh strawberries are the star of this smoothie. They add a bright, sweet taste. I like to use one cup of hulled and halved strawberries. Choose berries that are ripe and red for the best flavor. You can also freeze them for a chilled smoothie. A ripe banana brings creaminess to the mix. Use one sliced banana for this recipe. It adds natural sweetness and a smooth texture. The riper the banana, the sweeter it will taste. Rolled oats are great for adding fiber. They help keep you full longer. I use half a cup in this smoothie. Oats also make the drink thicker and creamier. Almond milk is my go-to liquid for this smoothie. It gives a nutty flavor and is low in calories. You can use one cup of almond milk, but any milk works. Cow's milk or oat milk are good choices too. For extra sweetness, you can add one tablespoon of honey or maple syrup. This is optional but tasty! A half teaspoon of vanilla extract adds flavor. I also love adding one tablespoon of chia seeds for more nutrition. They add a nice crunch and are great for you. Ice cubes can make the smoothie cool and refreshing, too. {{ingredient_image_1}} First, gather all your ingredients. You need fresh strawberries, a ripe banana, rolled oats, and almond milk. Start by hulling and halving the strawberries. This means you remove the green tops and cut them in half. Next, slice the banana into small pieces. This helps the banana mix well in the blender. If you want more nutrition, you can also measure out chia seeds. Now, it’s time to blend. Add the strawberries, banana, and rolled oats to your blender. Pour in the almond milk next. If you like your smoothie sweeter, add honey or maple syrup. You can also include vanilla extract for a nice flavor. If you want it chilled, toss in a few ice cubes. Blend everything on high speed. It should take about 30 to 60 seconds until the mixture is smooth and creamy. After blending, taste your smoothie. If it needs more sweetness, add a bit more honey or maple syrup. Blend again for a few seconds. This way, you can make it just right for your taste buds. Once you finish blending, pour the smoothie into glasses. You can serve it right away while it's fresh and cool. Enjoy this healthy drink right after making it for the best taste! To get a smooth and creamy drink, use the right mix of ingredients. A good balance is key. Start with 1 cup of almond milk. This amount gives the smoothie a nice flow. If you find it too thick, add more milk, a little at a time. Blend for 30-60 seconds until it is fully mixed. The oats help thicken the drink, so adjust as needed. Frozen fruits make life easier. They stay fresh longer and cut down prep time. If you use frozen strawberries or bananas, skip the ice cubes. This will keep your smoothie cold and smooth. Just remember to blend a bit longer. Frozen fruits create a thick, delicious texture that many people love. You can easily boost the nutrition of your smoothie. Add a tablespoon of chia seeds for fiber and omega-3s. You might also try spinach or kale for more greens. These add-ins blend well and keep the flavor nice. If you want extra protein, toss in some Greek yogurt or nut butter. Each of these options makes your smoothie even better! Pro Tips Use Frozen Fruit: For an extra chilled and creamy texture, consider using frozen strawberries or bananas instead of fresh. This also helps to thicken the smoothie without needing ice cubes. Add Protein: To make this smoothie more filling, add a scoop of your favorite protein powder or a dollop of Greek yogurt. This is especially beneficial for post-workout recovery. Experiment with Milk Alternatives: While almond milk is a great choice, feel free to try other milk alternatives like oat milk or coconut milk for different flavors and nutritional profiles. Customize Sweetness: Depending on the ripeness of your banana and strawberries, you may need less or more sweetener. Always taste before adding additional honey or maple syrup. {{image_2}} You can easily make this smoothie vegan. Just skip honey and use maple syrup for sweetness. Almond milk is a great choice, but you can try coconut milk or oat milk too. Both will add a nice flavor. To boost protein, add a scoop of your favorite protein powder. This change makes the smoothie filling. You can also mix in Greek yogurt if you want extra creaminess. Chia seeds are another option. They add protein and healthy fats. You can use any milk you like in this recipe. Almond milk is light and nutty. Soy milk gives a richer taste and adds more protein. If you prefer, try oat milk for a smooth and sweet flavor. Each choice changes the smoothie’s taste and texture. Experiment to find your favorite! If you have leftover smoothie, pour it into a clean jar. Seal it tightly to keep it fresh. Store the jar in the fridge. This keeps your smoothie good for up to two days. The color may change a bit, but it will still taste great. Always shake or stir the jar before drinking. This helps mix the ingredients again. Freezing is a smart way to save your smoothie. Pour it into ice cube trays or freezer-safe bags. This method makes it easy to grab a portion later. Smoothies can last up to three months in the freezer. When you're ready to enjoy, let it thaw in the fridge overnight. You can also blend frozen cubes directly with a bit of milk for a quick treat. When you’re ready to drink your stored smoothie, check its texture. If it’s thick, add a splash of milk or water. Blend it again until smooth. This helps restore the creamy texture. Taste it one more time. If it needs more sweetness, add a touch of honey or maple syrup. Enjoy your tasty drink! You can store the smoothie for up to 24 hours. Just keep it in the fridge. The flavors remain good, but the texture may change. It can thicken as it sits. To fix this, stir in a little milk before drinking. Yes! You can swap in other fruits. Try blueberries, mangoes, or peaches. Each fruit adds its own flavor and nutrition. Be creative! Mix and match to find your favorite blend. Just keep the same amount of fruit for the best results. Making smoothies ahead is fine. Just store it in a sealed jar. You can have a quick breakfast ready to go. However, the best taste and texture come from fresh smoothies. If you can, blend right before drinking. In this post, we covered how to make a tasty strawberry banana oat smoothie. I shared the best ingredients, from fresh strawberries to rolled oats. You learned step-by-step how to blend and serve it. I also gave tips for great consistency and ways to customize your smoothie. Remember, storing leftovers properly keeps them fresh. Smoothies can be quick and fun, so try different fruits to find your favorite mix. Enjoy your drink knowing it's good for you!

Strawberry Banana Oat Smoothie Healthy and Simple Drink

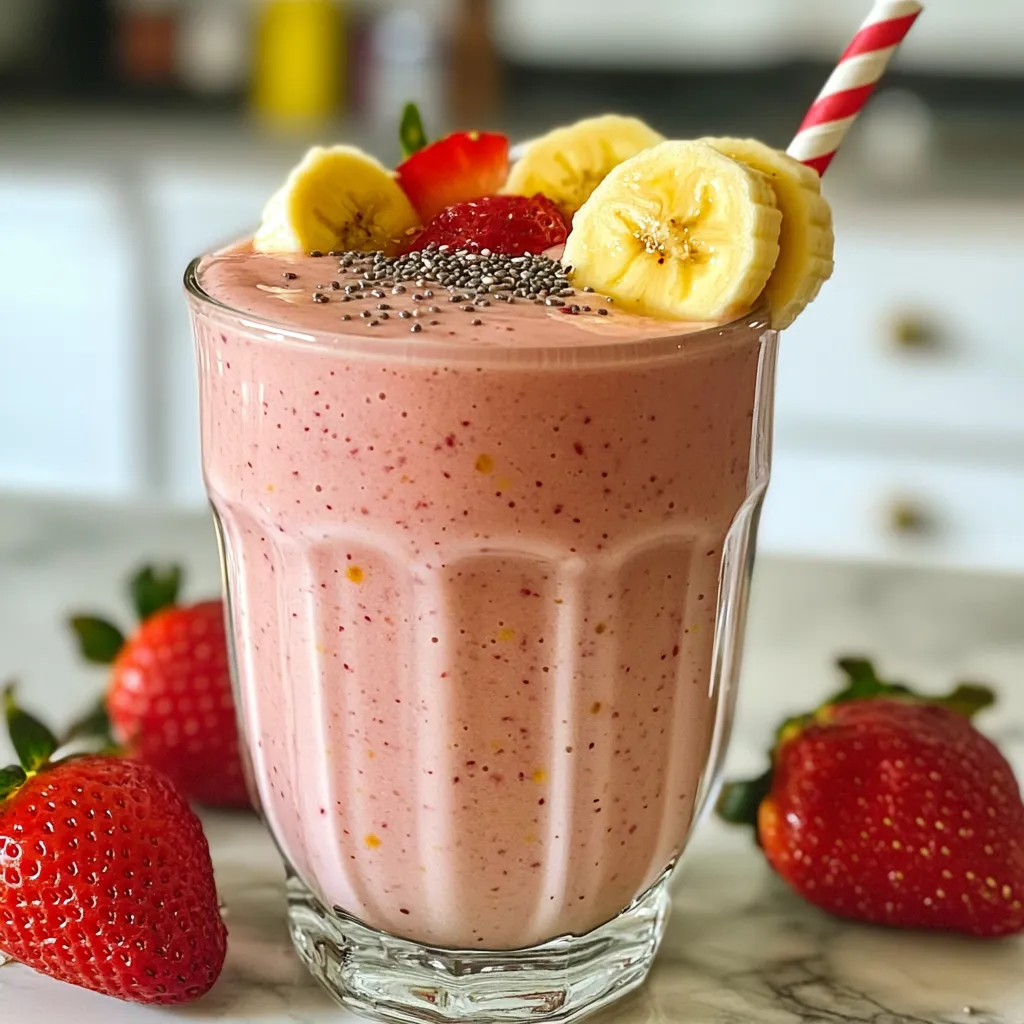
Are you craving a tasty, healthy drink? Try my Strawberry Banana Oat Smoothie! This easy recipe uses fresh strawberries, ripe

- 8 oz fettuccine pasta - 2 salmon fillets (6 oz each) - 2 tablespoons Cajun seasoning - 2 tablespoons olive oil - 1 small onion, finely chopped - 3 cloves garlic, minced - 1 cup heavy cream - 1 cup cherry tomatoes, halved - 1 cup spinach leaves - Salt and pepper to taste - Grated Parmesan cheese for serving - Fresh parsley, chopped for garnish Using fresh ingredients makes a big difference in this dish. Fresh salmon gives you rich flavor. Fresh veggies, like tomatoes and spinach, add color and crunch. Fresh herbs, like parsley, give a nice finish. They all work together to create a tasty meal. Each bite should burst with flavor. Don’t skip on quality; it matters. If you have dietary needs, you can still enjoy this dish. For a gluten-free option, swap the fettuccine for gluten-free pasta. If you’re vegan, use tofu or chickpeas instead of salmon. Replace the heavy cream with coconut cream for a dairy-free version. Use nutritional yeast for a cheesy flavor. These swaps keep the dish delicious and enjoyable for everyone. {{ingredient_image_1}} 1. Start by boiling water in a large pot. Add salt to the water. This helps flavor the pasta. 2. Cook the fettuccine pasta for 8-10 minutes. Look for the word "al dente" on the package. Drain it and leave it aside. 3. While the pasta cooks, prepare the salmon. Sprinkle Cajun seasoning on both sides of the fillets. Make sure they are coated well. 4. Heat olive oil in a large skillet over medium heat. Once hot, place the salmon fillets skin-side down. 5. Cook the salmon for 4-5 minutes on each side. It should flake easily with a fork when done. 6. Remove the salmon from the skillet and set it aside. - Use a non-stick skillet to prevent sticking. - Don’t overcrowd the skillet. Cook in batches if needed. - Check for doneness by using a fork to see if it flakes. - If you want crispier skin, cook a bit longer on the skin side. - Stir the pasta occasionally while it cooks to avoid clumping. - Test the pasta a minute before the package time ends. It should be firm yet tender. - Rinse the pasta with cold water if you're not using it right away. It stops cooking. - Toss the drained pasta with a little olive oil to keep it from sticking. This method ensures a rich and flavorful Creamy Cajun Salmon Pasta. Enjoy crafting this dish with confidence! To boost the flavor of your Creamy Cajun Salmon Pasta, consider these tips: - Use fresh salmon. Fresh fish gives a better taste than frozen. - Adjust the Cajun seasoning. If you love spice, add more seasoning for heat. - Add a splash of lemon juice. This brightens the dish and cuts the creaminess. - Try fresh herbs. Fresh basil or thyme adds depth to the sauce. Here are some pitfalls to watch out for: - Overcooking the salmon. Cook it until it flakes easily, about 4-5 minutes per side. - Not salting the pasta water. Salt enhances the pasta's flavor. - Skipping the resting time for the salmon. Let it rest to keep it moist before flaking. - Not letting the cream simmer. Simmering helps thicken the sauce for a creamy texture. To make your meal even better, try these pairings: - Serve with garlic bread. It’s perfect for soaking up extra sauce. - Pair with a crisp salad. A simple green salad balances the richness of the pasta. - Add a glass of white wine. A chilled Sauvignon Blanc complements the dish well. Pro Tips Fresh Salmon is Best: Opt for fresh salmon fillets for the best flavor and texture. Frozen salmon can work, but it may not have the same richness. Customize Your Spice Level: Adjust the amount of Cajun seasoning according to your spice preference. You can always start with less and add more as needed. Perfectly Cooked Pasta: Make sure to cook the pasta al dente so it holds up well when mixed with the sauce. It will continue to cook slightly once combined. Garnish for Freshness: Always add fresh herbs like parsley at the end to enhance the dish's flavor and presentation. {{image_2}} You can swap salmon for chicken or shrimp. Both options cook quickly and soak up flavor well. For a plant-based meal, try using firm tofu or chickpeas. Both add protein while keeping the dish creamy and rich. Fettuccine is great, but you can use penne, linguine, or even whole wheat pasta. Each type brings a unique shape, which can change the eating experience. Gluten-free pasta is also a great option if you follow that diet. If you like heat, add more Cajun seasoning or a pinch of cayenne pepper. For a milder dish, use less seasoning and maybe add a splash of lemon juice. This adds flavor without the heat. Always taste as you go to find your perfect balance. To store leftover Creamy Cajun Salmon Pasta, first let it cool down. Place it in an airtight container. Make sure to keep any extra sauce separate if possible. This helps the pasta stay fresh longer. You can store it in the fridge for up to 3 days. If you want it to last longer, consider freezing it. When it's time to eat your leftovers, reheat the pasta gently. Use a skillet over low heat. Add a splash of water or milk to help create steam. This keeps the sauce creamy and prevents it from drying out. Stir often to ensure even heating. You can also microwave it in a covered bowl. Just remember to check every 30 seconds to avoid hot spots. If you choose to freeze your Creamy Cajun Salmon Pasta, do so in an airtight container. It will stay fresh for up to 2 months in the freezer. When you are ready to enjoy it again, let it thaw in the fridge overnight. Reheat it as mentioned above. Keep in mind that the texture of the pasta may change a little after freezing, but it will still taste great! You can easily make this dish gluten-free by swapping the fettuccine pasta. Look for gluten-free pasta made from rice, corn, or lentils. Cook it just like regular pasta. The rest of the recipe stays the same. This makes the dish tasty and safe for those with gluten intolerance. Yes, you can use canned salmon if fresh salmon isn't available. Just drain the canned salmon and flake it gently. You can skip the seasoning step since canned salmon is often pre-cooked. Add it to the creamy sauce towards the end. This saves time and still gives you a delicious meal. Pair this pasta with a light salad or some garlic bread. A simple green salad with lemon vinaigrette balances the creamy dish. Garlic bread adds a crunchy texture that complements the pasta. You can also serve roasted vegetables for extra flavor and nutrition. Creamy Cajun Salmon Pasta offers a tasty meal packed with flavor. We covered key ingredients and their fresh importance. I shared easy cooking steps to help you perfect the dish. Expert tips also pointed out common mistakes to avoid. Plus, we explored tasty variations and how to store leftovers effectively. In the end, you can customize this pasta to fit your tastes and needs. Enjoy creating a delicious meal that impresses!

Creamy Cajun Salmon Pasta Rich and Flavorful Dish

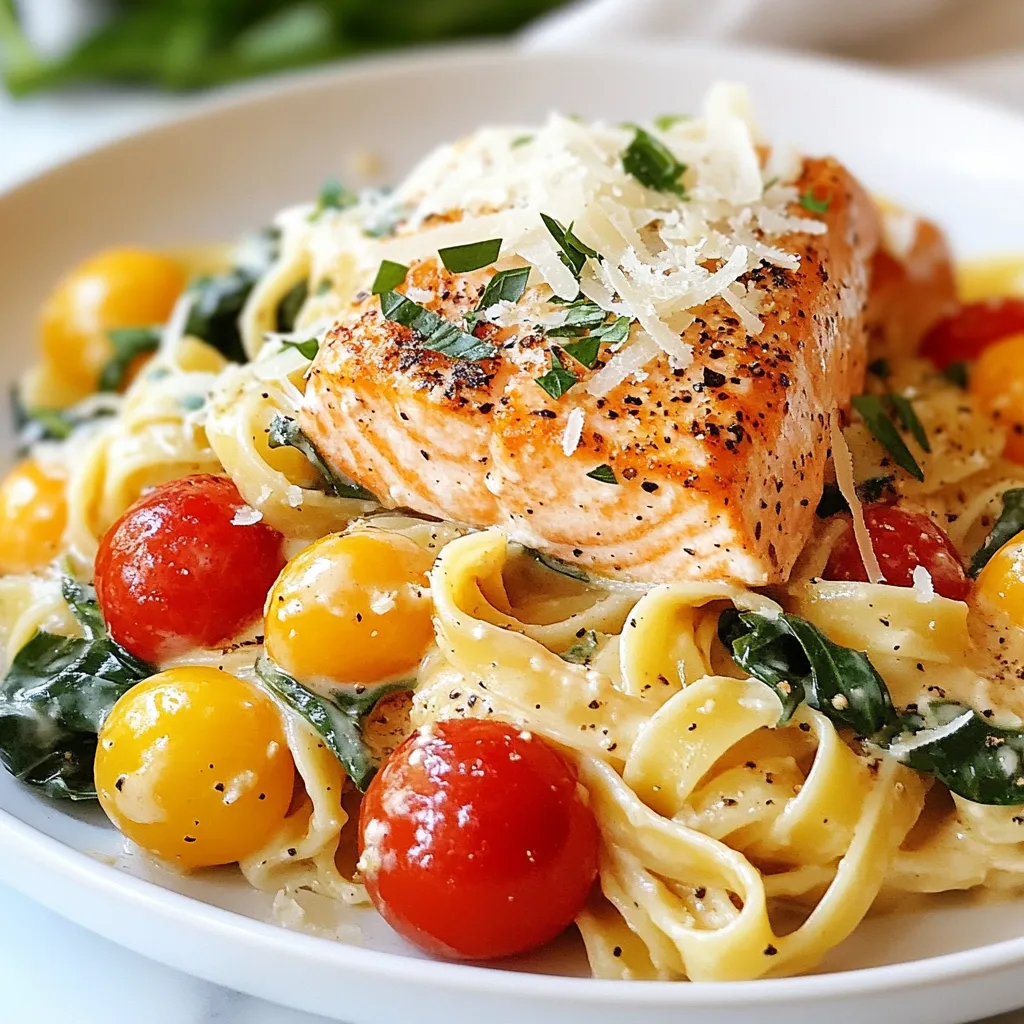
Are you ready to spice up your dinner routine? This Creamy Cajun Salmon Pasta is a rich and flavorful dish

To make creamy sun-dried tomato gnocchi, you need a few key ingredients. Here’s what you’ll need: - 1 package (16 oz) potato gnocchi - 1 cup sun-dried tomatoes, packed in oil, chopped - 1 cup heavy cream - 2 tablespoons olive oil - 2 cloves garlic, minced - 1 teaspoon dried basil - 1 teaspoon dried oregano - Salt and pepper to taste - ½ cup grated Parmesan cheese - Fresh basil leaves for garnish Each ingredient plays a vital role in building flavor. I always choose high-quality ingredients for the best taste. For gnocchi, look for fresh potato gnocchi. Check the pasta aisle for brands that use real potatoes. When it comes to sun-dried tomatoes, choose those packed in oil. They add rich flavor and moisture. For cream, use heavy cream for a luscious sauce. Fresh garlic gives a bold taste, while real Parmesan cheese adds depth. If you want to swap some ingredients, there are great options. You can use fresh gnocchi instead of the packaged kind. For a lighter sauce, try using half-and-half instead of heavy cream. You can replace sun-dried tomatoes with fresh cherry tomatoes. Just sauté them until they burst. For a dairy-free version, use coconut cream instead of heavy cream. Each option brings its own twist to the dish! {{ingredient_image_1}} First, grab a pot and fill it with water. Bring it to a boil over high heat. Add a pinch of salt to the water, which helps flavor the gnocchi. Next, toss in your package of potato gnocchi. Cook it according to the package instructions. You’ll know the gnocchi is ready when it floats to the surface. This usually takes about 2-3 minutes. Use a slotted spoon to remove the gnocchi, and set it aside on a plate. Now, let’s make the creamy sauce. Heat 2 tablespoons of olive oil in a large skillet over medium heat. Once hot, add 2 cloves of minced garlic. Sauté it for about 1 minute until it smells amazing. Then, mix in 1 cup of chopped sun-dried tomatoes. Cook these for 2-3 minutes. This helps blend the flavors together. Next, pour in 1 cup of heavy cream. Stir it well and bring the mix to a gentle simmer. Add 1 teaspoon of dried basil, 1 teaspoon of dried oregano, and some salt and pepper to taste. Let it cook for about 5 minutes until the sauce thickens slightly. Finally, stir in ½ cup of grated Parmesan cheese until it melts into the sauce. It's time to bring it all together! Gently fold the cooked gnocchi into the creamy sauce. Toss it carefully until every piece is coated with that rich sauce. This step is important for flavor. Serve the dish hot. You can garnish with fresh basil leaves and a sprinkle of Parmesan if you want. Enjoy your creamy sun-dried tomato gnocchi! To get a rich, creamy sauce, start with heavy cream. This gives your dish a nice thickness. Don't rush the simmering step. Let your sauce bubble gently for about five minutes. This time helps it thicken naturally. Stir in the Parmesan cheese slowly. This way, it melts well and mixes nicely. If your sauce seems too thick, add a splash of pasta water. This adds creaminess without losing flavor. Always use sun-dried tomatoes packed in oil. This oil adds extra flavor to your dish. Before adding them, chop the tomatoes into small pieces. This helps them blend into the sauce better. Sauté them with garlic for about two to three minutes. This brings out their sweetness and deepens the taste. Keep the heat at medium to avoid burning. Watch closely and stir often. One big mistake is overcooking the gnocchi. Remove them from water once they float. If you leave them too long, they can get mushy. Another common error is skipping the seasoning. Always taste your sauce before serving. Adjust with salt and pepper to enhance the flavors. Lastly, don’t rush the sauce. Let it simmer so all the flavors can come together. These simple tips make a big difference! Pro Tips Fresh Ingredients: Use fresh basil and high-quality sun-dried tomatoes for the best flavor in your sauce. Cheese Variation: Swap out Parmesan for Pecorino Romano for a sharper taste that complements the creaminess. Texture Tip: For added texture, consider tossing in some sautéed spinach or mushrooms before serving. Serve Immediately: This dish is best served fresh, as the gnocchi can become gummy if left in the sauce too long. {{image_2}} You can easily make this dish vegetarian. Simply skip the meat and add more veggies. Spinach or mushrooms work great. They add texture and flavor. You can also use zucchini or bell peppers. Just sauté them with garlic before adding the sun-dried tomatoes. This keeps the dish fresh and colorful. Adding protein is a great way to make this dish heartier. Cooked chicken or shrimp pairs well with the creamy sauce. For shrimp, sauté them in the olive oil until pink before adding the garlic. If you prefer sausage, slice it and cook it in the pan first. Let the flavors blend before adding the other ingredients. This makes the dish filling and balanced. Spices and herbs can elevate the taste of your gnocchi. Try adding red pepper flakes for a little heat. Fresh herbs like parsley or thyme can brighten the dish. Just sprinkle them in during the final mix. A squeeze of lemon juice can add a nice zing, too. Experiment with these to find your perfect flavor. After enjoying your creamy sun-dried tomato gnocchi, store any leftovers in an airtight container. This keeps the flavors fresh longer. Make sure to let the gnocchi cool completely before sealing the container. You can keep it in the fridge for up to three days. To avoid soggy gnocchi, separate the sauce if you can. When you’re ready to enjoy leftovers, reheating is key. Place the gnocchi in a skillet over medium heat. Add a splash of water or cream to help revive the sauce. Stir gently to warm everything through. Heat for about five to seven minutes, or until hot. You can also microwave it in a bowl, covered with a damp paper towel. This helps keep moisture in. If you want to save some creamy gnocchi for later, freezing is a great option. First, let the dish cool completely. Then, portion it into freezer-safe bags or containers. Be sure to remove as much air as possible before sealing. You can freeze it for up to three months. To thaw, move it to the fridge overnight. Reheat as directed above when you’re ready to eat. Yes, you can use fresh gnocchi. Fresh gnocchi cooks faster than packaged. Follow the same steps for cooking. Just keep an eye on them. They float when ready. Using fresh gnocchi adds a soft texture to the dish. It also enhances the flavor. You can use half-and-half for a lighter sauce. It has less fat and still tastes great. Another option is to use Greek yogurt. Mix it with a little milk to thin it out. This gives a creamy feel without too many calories. To boost the sauce flavor, add more herbs. Fresh basil or parsley works well. You can also add a splash of white wine. Let it cook down for extra depth. Red pepper flakes can add heat if you like spice. Lastly, try adding a squeeze of lemon juice for brightness. This blog post covered how to make creamy sun-dried tomato gnocchi. We discussed key ingredients, step-by-step cooking directions, and tips for the perfect dish. You learned about tasty variations and how to store leftovers. Remember, using fresh ingredients and following the steps will boost flavor. Experiment with proteins and herbs to find your favorite twist. With these techniques, you can impress at any meal. Enjoy your cooking journey and savor every bite of your gnocchi!

Creamy Sun-Dried Tomato Gnocchi Flavorful Delight

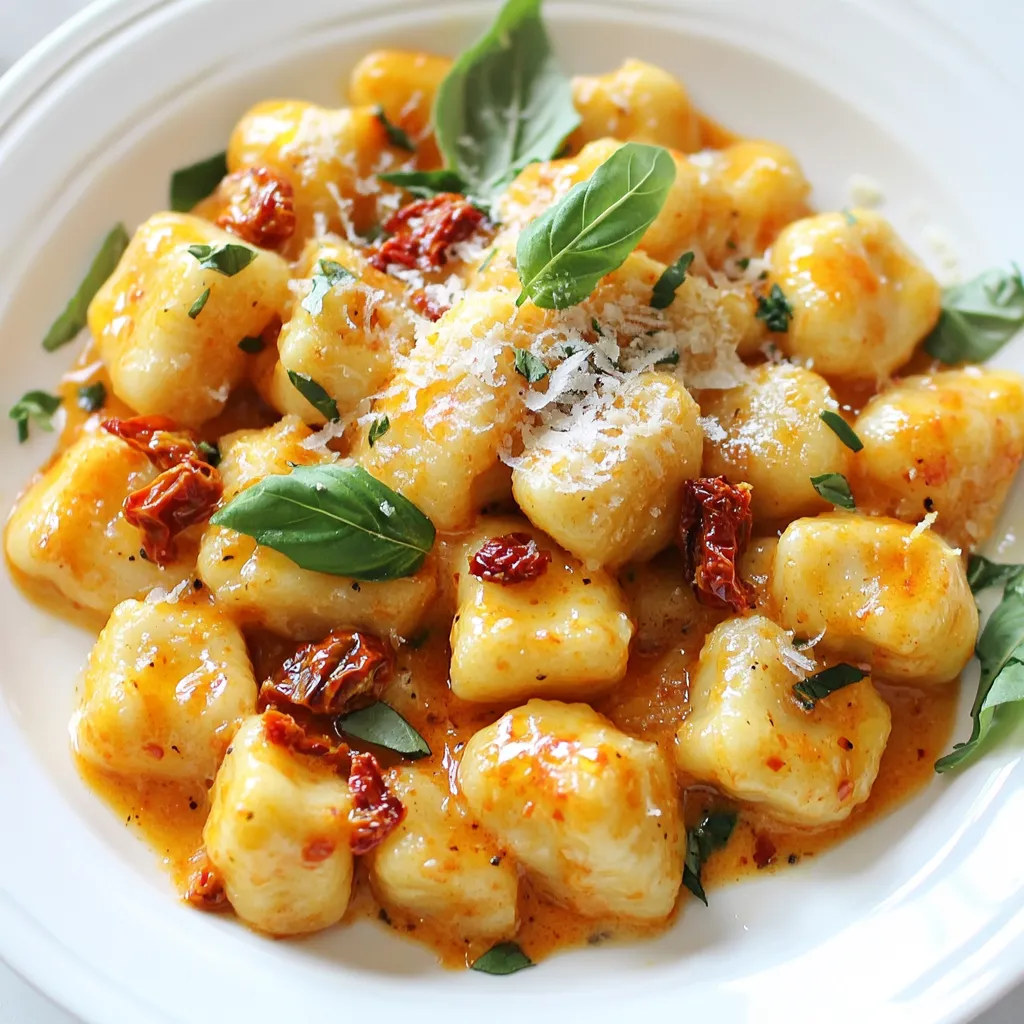
If you’re looking for a tasty meal that impresses, try my Creamy Sun-Dried Tomato Gnocchi! This dish combines soft, pillow-like

- Chicken breast details: - 1 pound chicken breast, cut into 1-inch cubes - Marinade ingredients: - 1/4 cup honey - 1/4 cup lime juice (freshly squeezed) - 2 tablespoons olive oil - 2 cloves garlic, minced - 1 teaspoon ground cumin - 1 teaspoon smoked paprika - Salt and pepper to taste - Vegetables needed: - 1 red bell pepper, cut into 1-inch pieces - 1 green bell pepper, cut into 1-inch pieces - 1 red onion, cut into 1-inch pieces - Fresh cilantro, for garnish - Lime wedges, for serving When choosing chicken breast, look for fresh, firm pieces free of blemishes. The honey and lime juice create a sweet and tangy mix that brings out the best flavors. The spices add depth, making this dish not just tasty but also fragrant. The peppers and onion add color and crunch, balancing the juicy chicken. The marinade is key. It infuses the chicken with flavor and keeps it moist when grilling. I recommend using fresh lime juice for the best taste. The olive oil helps the spices stick to the chicken, creating a nice crust when grilled. This recipe is simple but full of flavor. You can easily adjust the spices based on your taste. Feel free to add more garlic or even some chili powder for heat. Enjoy getting creative with your skewers! {{ingredient_image_1}} First, you will make the marinade. In a medium bowl, add the following ingredients: - 1/4 cup honey - 1/4 cup lime juice (freshly squeezed) - 2 tablespoons olive oil - 2 cloves garlic, minced - 1 teaspoon ground cumin - 1 teaspoon smoked paprika - Salt and pepper to taste Next, whisk these ingredients together until they blend well. You want a smooth mix that smells great. Once you have the marinade ready, add the chicken cubes. Make sure each piece is coated in the marinade. Cover the bowl and put it in the fridge for at least 30 minutes. If you have time, let it sit for up to 2 hours. This step gives the chicken more flavor. While the chicken marinates, it’s time to prepare the skewers. If you are using wooden skewers, soak them in water for about 10 minutes. This helps stop them from burning on the grill. You can skip this step if you use metal skewers. Once the skewers are ready, take the marinated chicken out. Now, thread the chicken cubes, red bell pepper pieces, green bell pepper pieces, and red onion pieces onto the skewers. Alternate the pieces as you go. This makes the skewers colorful and tasty. Before cooking, preheat your grill to medium-high heat. This is key for getting nice grill marks and juicy chicken. When the grill is hot, place the skewers on it. Cook for about 12-15 minutes. Turn the skewers every few minutes to ensure even cooking. You know they are done when the chicken is cooked through and has lovely grill marks. Once finished, take them off the grill and let them rest for a few minutes. This allows the juices to settle, making the chicken even juicier. - Ideal marinating time: Marinate the chicken for at least 30 minutes. For the best taste, let it soak for up to 2 hours. This gives the chicken time to absorb the sweet and tangy flavors. - Flavor enhancement techniques: Use fresh lime juice for a bright taste. Adding minced garlic brings a nice kick. You can also mix in fresh herbs like cilantro or parsley to boost flavor. - How to achieve perfect grill marks: Preheat your grill to medium-high heat. Place the skewers on the grill and do not move them for the first few minutes. This helps to form those beautiful grill marks. - Ensuring chicken is cooked through: Grill the skewers for about 12-15 minutes. Make sure to turn them occasionally. Use a meat thermometer to check that the chicken reaches 165°F (74°C) for safe eating. - Garnishes for presentation: Once cooked, remove the skewers from the grill. Top with fresh cilantro for a pop of color. Serve with lime wedges for an extra zing. - Pairing suggestions: These skewers go great with rice or a fresh salad. A side of grilled corn or a cool yogurt dip can also complement the dish well. Pro Tips Marinate Longer for Flavor: Allow the chicken to marinate for up to 2 hours to enhance the flavor profile, making it juicier and more delicious. Use Fresh Ingredients: Opt for freshly squeezed lime juice and fresh garlic for the best taste and aroma in your skewers. Don't Overcrowd the Skewers: Ensure there's enough space between the chicken and vegetables on the skewers to allow even cooking and proper grill marks. Check Doneness with a Thermometer: Use a meat thermometer to ensure chicken is cooked to an internal temperature of 165°F for safety and perfect texture. {{image_2}} You can switch up proteins for more fun. Shrimp works great with this marinade. Tofu is an awesome choice for a vegetarian option. Both soak up the honey lime taste well. For veggies, try zucchini or mushrooms. They add a different texture and flavor. Feel free to get creative with what you have on hand. Want to change the flavor a bit? Add spices like chili powder for some heat. Fresh herbs like basil or mint can bring new life to the skewers. You can also adjust sweetness by using more or less honey. If you want a tangy kick, add lime zest. It really boosts the lime flavor. You don't have to grill these skewers. You can bake them in the oven too. Preheat your oven to 400°F and place them on a baking sheet. Bake for about 20 minutes or until cooked through. Broiling is another option. Just keep a close eye on them so they don’t burn. Broil for about 8-10 minutes, turning halfway for even cooking. To keep your Honey Lime Chicken Skewers tasty, store leftovers properly. First, let them cool down to room temperature. Then, place the skewers in an airtight container. They last for about three to four days in the fridge. If you want to keep them longer, freezing is a great option. Wrap each skewer tightly in plastic wrap. Then, place them in a freezer-safe bag. They can stay good in the freezer for up to three months. When you're ready to eat, just thaw them overnight in the fridge. Reheating your skewers can be easy and quick. The best way is to use an oven. Preheat your oven to 350°F (175°C). Place the skewers on a baking sheet and cover them with foil. Heat for about 10-15 minutes. This keeps them moist and prevents drying out. If you prefer using a microwave, you can do that too. Place the skewers on a microwave-safe plate and cover them with a damp paper towel. Heat in short bursts of 30 seconds, checking after each. Make sure they are hot all the way through before serving. Enjoying your leftovers should always feel like a special treat! Can I use frozen chicken? Yes, you can use frozen chicken. However, make sure to thaw it first. Thawing helps the chicken absorb the marinade better. It also ensures even cooking on the grill. How long do leftovers last? Leftovers can last in the fridge for 3 to 4 days. To keep them fresh, store them in an airtight container. Make sure they cool down before sealing. What can I serve with honey lime chicken skewers? You can serve these skewers with rice, salad, or grilled veggies. They pair well with a light dipping sauce too. Try a yogurt-based sauce for a refreshing touch. Can I use a grill pan instead of an outdoor grill? Absolutely! A grill pan works well indoors. Just preheat it over medium-high heat. Your skewers will still get those nice grill marks and flavor. What's the best way to know when chicken is properly cooked? The best way is to use a meat thermometer. Chicken should reach an internal temperature of 165°F. If you don’t have one, cut into the thickest piece. The meat should be white with no pink. Can I make it spicy? Yes, you can add heat! Mix in some chili powder or cayenne pepper to the marinade. You can also add sliced jalapeños to the skewers for extra spice. What are alternative marinades I can use? You can try using teriyaki sauce or a soy sauce-based marinade. Citrus-based marinades, like orange or lemon, also work great. Get creative with herbs and spices to find your favorite flavor! You learned how to make delicious honey lime chicken skewers. We covered the key ingredients, step-by-step instructions, and helpful tips. Variations allow you to get creative when cooking. Soak skewers and evenly cook chicken for the best results. Store leftovers safely, and enjoy them later. Remember, you can adjust flavors or try new proteins. With these insights, your skewers will impress anyone. Happy grilling!

Honey Lime Chicken Skewers Juicy and Flavorful Recipe

Looking for a simple, tasty dinner? Try my Honey Lime Chicken Skewers! This recipe brings juicy chicken and fresh veggies

- Firm tofu and its preparation You need 1 block of firm tofu. Press it for 15-30 minutes to remove extra water. This helps the tofu absorb the teriyaki marinade better. - Teriyaki marinade components The teriyaki marinade includes: - 1/4 cup soy sauce - 2 tablespoons honey or maple syrup - 1 tablespoon rice vinegar - 1 tablespoon sesame oil - 1 teaspoon garlic powder - 1 teaspoon ginger powder Mix these ingredients well. This sweet and savory mix brings great flavor to the tofu. - Cooked grains and vegetables For a hearty base, use: - 1 cup cooked brown rice or quinoa - 1 cup broccoli florets - 1/2 red bell pepper, sliced - 1 carrot, julienned - 2 green onions, sliced - Toasted sesame seeds for garnish - Salt and pepper to taste These veggies add color and crunch to your bowl. The grains provide a filling base for the dish. {{ingredient_image_1}} To start, grab a mixing bowl. Combine 1/4 cup of soy sauce, 2 tablespoons of honey or maple syrup, 1 tablespoon of rice vinegar, and 1 tablespoon of sesame oil. Add 1 teaspoon of garlic powder and 1 teaspoon of ginger powder. Mix well until smooth. This marinade gives the tofu a rich, tasty flavor. Next, take your block of firm tofu. Press it to remove excess water, then cut it into cubes. Add the tofu cubes to the marinade. Gently toss them to coat. Let the tofu sit for at least 15 minutes. This step helps the tofu soak up all the flavors. Now, preheat your air fryer to 375°F (190°C). Once hot, place the marinated tofu in the air fryer basket. Make sure the pieces are in a single layer and not crowded. Air fry the tofu for 12 to 15 minutes. Shake the basket halfway through for even cooking. You'll know it's done when the tofu is golden and crispy. While the tofu cooks, prepare the veggies. In a saucepan or steamer, add 1 cup of broccoli florets, 1/2 sliced red bell pepper, and 1 julienned carrot. Lightly steam these for about 3 to 5 minutes, just until they are tender but still bright. This keeps their crunch and color. To serve, start with a generous scoop of cooked brown rice or quinoa in each bowl. Top it with the crispy teriyaki tofu. Arrange the steamed vegetables on the side. For a finishing touch, add sliced green onions and a sprinkle of toasted sesame seeds. Season with salt and pepper to taste before enjoying your meal. Tofu can be tricky if you don’t prepare it right. Start with firm tofu. Press it for at least 15 minutes to remove excess water. This step helps the tofu absorb the teriyaki marinade well. Cut your tofu into even cubes. Consistent sizes ensure even cooking. When marinating, use a bowl that allows the marinade to cover all the pieces. Toss gently to coat every cube. Preheat your air fryer to 375°F (190°C). This makes the tofu crispy. Place the marinated tofu in a single layer. Do not overcrowd the basket; this can lead to soggy tofu. Shake the basket halfway through cooking. This helps all sides crisp up nicely. Check the tofu around the 12-minute mark. If it's golden brown, it’s ready. If not, give it a few more minutes. Serving is key to a great meal. Start with a base of brown rice or quinoa in your bowl. Top with the crispy teriyaki tofu. Arrange steamed vegetables like broccoli, red bell pepper, and carrots around the tofu. Garnish with sliced green onions and toasted sesame seeds for a pop of color and crunch. A sprinkle of salt and pepper adds flavor. Enjoy your beautiful and tasty creation! Pro Tips Press Tofu Well: Make sure to press the tofu thoroughly to remove excess moisture. This helps the tofu absorb the marinade better and achieve a crispier texture when air-fried. Customize Your Vegetables: Feel free to use any seasonal vegetables you have on hand. Zucchini, snap peas, or bell peppers can all work beautifully in this dish. Perfect Marinade Time: For an even richer flavor, let the tofu marinate for at least 30 minutes, or even overnight in the refrigerator if you have time. Garnish for Flavor: Don’t skip the toasted sesame seeds and green onions! They not only add visual appeal but also enhance the dish with extra flavor and texture. {{image_2}} You can switch out the tofu for other proteins. Tempeh works well here. It has a nutty taste and a firm texture. You can also use chickpeas for a hearty, plant-based option. If you prefer meat, chicken or shrimp can fit nicely. Each protein absorbs the teriyaki sauce flavor well. While brown rice is a classic choice, you can try quinoa for a nutty twist. Cauliflower rice offers a low-carb option that still fills you up. Farro or barley can add a chewy texture to your bowl. Feel free to mix and match based on your taste and diet. You can get creative with your veggies. In spring, add asparagus or snap peas for crunch. Summer zucchini or corn can bring a sweet touch. In fall, try roasted sweet potatoes or Brussels sprouts. Winter calls for hearty greens like kale or Swiss chard, which add color and nutrition. Use what’s fresh and in season! To store leftovers, let the tofu bowls cool down first. Place them in an airtight container. Keep the container in the fridge for up to three days. Make sure to separate the tofu from the rice and vegetables to keep them fresh. To reheat, you can use the microwave or the air fryer. For the microwave, place the food in a safe dish. Heat it for about one to two minutes. If you want to use the air fryer, set it to 350°F (175°C). Heat for about five to seven minutes until warm and crispy. You can freeze the marinated tofu before cooking. Just place it in a freezer-safe bag. Squeeze out the air and seal it. The tofu can stay fresh in the freezer for up to two months. To use, thaw it in the fridge overnight before air frying. However, cooked bowls do not freeze well, as the rice and veggies can become mushy when thawed. Yes, this recipe is already vegan! You can use maple syrup instead of honey. Both options create a sweet and tasty teriyaki sauce. Just follow the recipe as is, and you will enjoy a delicious vegan meal. To change the sweetness, you can add more or less maple syrup. Start with a little and taste as you go. If you want it sweeter, add more syrup. If you prefer it less sweet, use less syrup. Simple adjustments make a big difference. Many sides go well with teriyaki tofu bowls. Some options include: - Steamed edamame - Cucumber salad - Miso soup - Pickled vegetables These sides add flavor and texture to your meal. Yes, you can bake or pan-fry the tofu if you don’t have an air fryer. For baking, spread the marinated tofu on a baking sheet. Bake at 400°F (200°C) for about 25-30 minutes. Just flip halfway for even cooking. Pan-frying works too; heat some oil in a pan and cook until golden. Yes, you can prepare several parts ahead. Marinate the tofu and store it in the fridge for a day. You can also cook the grains and chop the veggies in advance. Just store them separately until you are ready to assemble your bowls. This makes mealtime quick and easy! This blog post showed you how to make tasty teriyaki tofu bowls. You learned about key ingredients and step-by-step cooking instructions. I shared tips for great flavor and texture, along with fun variations. You now know how to store leftovers and keep them fresh. With these steps, you can enjoy a healthy meal anytime. Try your own twists to make it even better!

Air Fryer Teriyaki Tofu Bowls Flavorful and Easy Meal

Looking for a quick and tasty meal? You’ve hit the jackpot with these Air Fryer Teriyaki Tofu Bowls! Packed with

To make this bright and tasty Lemon Herb Couscous Salad, you need just a few key ingredients: - 1 cup couscous - 1 1/4 cups vegetable broth - 1/2 cup cherry tomatoes, halved - 1/2 cucumber, diced - 1/4 red onion, finely chopped - 1/4 cup parsley, chopped - 1/4 cup mint leaves, chopped - 1 lemon, zested and juiced - 3 tablespoons olive oil - Salt and pepper to taste These ingredients come together to create a fresh and flavorful dish that is perfect for any occasion. You can add a personal touch to your salad with some optional ingredients: - Feta cheese crumbles - Avocado, diced - Bell peppers, chopped - Olives, sliced Feel free to mix and match based on what you love or have on hand. Adding these extras can enhance both flavor and texture. If you have allergies or dietary restrictions, there are easy swaps you can make: - Swap couscous for quinoa or rice for a gluten-free option. - Use a different broth if you need it to be vegetarian or vegan. - Replace feta cheese with a dairy-free cheese or omit it altogether. These substitutions keep your salad delicious while catering to your needs. {{ingredient_image_1}} To cook couscous well, start with a medium saucepan. Bring 1 1/4 cups of vegetable broth to a boil. This step is key because the broth adds flavor. Once it boils, stir in 1 cup of couscous. Cover the saucepan and take it off the heat. Let it sit for 5 minutes. This helps the couscous soak up all the broth. After 5 minutes, fluff it with a fork. This makes the couscous light and airy. Set it aside to cool while you prepare the salad mix. In a large mixing bowl, combine your fresh ingredients. Start with 1/2 cup of halved cherry tomatoes. Next, add 1/2 cucumber, diced into small pieces. For a bit of crunch, include 1/4 red onion, finely chopped. Now, add 1/4 cup of chopped parsley and 1/4 cup of chopped mint leaves. These herbs will give the salad a bright flavor. Don’t forget to zest and juice 1 lemon. This adds a fresh, tangy taste that really shines through. Now it's time to bring everything together. Add the lemon zest and juice to your bowl of veggies. Pour in 3 tablespoons of olive oil, which makes the salad rich. Season it with salt and pepper to taste. Mix everything well so the flavors blend. Finally, gently fold in the fluffed couscous. Be careful not to mash it. If you like, sprinkle feta cheese crumbles on top before serving. This adds a creamy texture. Enjoy your vibrant Lemon Herb Couscous Salad! To make the best couscous salad, start with fresh ingredients. Use ripe cherry tomatoes and crisp cucumbers. They add great flavor and crunch. Always measure your broth carefully. The right amount helps the couscous cook perfectly. Let the couscous sit covered for five minutes. This time allows it to absorb all the broth. Fluff it gently with a fork. This keeps it light and airy. To boost flavor, try adding more herbs. Chopped basil or cilantro can bring new tastes. You can also mix in some olives for a briny kick. If you like spice, add diced jalapeños. Remember to taste as you go. Adjust salt and pepper to suit your liking. Feta cheese adds creaminess, but it is optional. Feel free to skip it or use a dairy-free version. Presentation makes a big difference. Serve the salad in a large bowl for sharing. For a fancy touch, use individual bowls. Garnish each serving with lemon wedges and fresh herb sprigs. This adds color and makes it look appealing. A sprinkle of extra feta can also enhance the look. Remember to enjoy your beautiful creation! Pro Tips Fresh Ingredients: Use fresh herbs and vegetables to enhance the vibrant flavors of the salad. Chill Before Serving: Allow the salad to chill in the refrigerator for at least 30 minutes for the flavors to meld together. Customizable Additions: Feel free to add other ingredients like bell peppers, olives, or chickpeas for added texture and nutrition. Perfect Lemon Zest: Use a microplane to finely zest the lemon, which will release more essential oils for a stronger flavor. {{image_2}} You can easily make this salad vegan. Just skip the feta cheese. It still tastes great without it. You might also want to add more veggies. Try adding bell peppers or roasted carrots. These will add flavor and color. A sprinkle of nutritional yeast can replace the cheese's creaminess. If you want to make this salad filling, add protein. Chickpeas work well; they are healthy and tasty. Just drain and rinse a can of chickpeas, then mix them in. You could also add grilled chicken or shrimp if you prefer meat. Tofu is another great option for a plant-based protein. Use seasonal vegetables for fresh flavors. In spring, add peas or asparagus. In summer, you can try zucchini or corn. Fall brings great squash options, like butternut or acorn. In winter, consider adding roasted root vegetables. This keeps your salad exciting and reflects what’s fresh. To store your leftover salad, place it in an airtight container. This keeps moisture in and prevents it from getting dry. If you added feta cheese, store it separately. Cheese can make the salad soggy. Keep the salad in the fridge for up to three days. Couscous can dry out easily. To keep it fresh, store it in a covered container. You can also lightly drizzle a bit of olive oil on the couscous. This helps retain moisture and flavor. If the couscous feels dry when you eat it again, add a splash of water. Warm it in the microwave for a few seconds to help it fluff up again. For easy meal prep, make a large batch of this salad. Divide it into portions in small containers. This makes it quick to grab when you are in a rush. You can also freeze the couscous separately. When you want to eat it, simply thaw and mix it with fresh veggies. This way, you enjoy the flavors while saving time on busy days. You can store Lemon Herb Couscous Salad in the fridge for up to three days. Make sure to keep it in an airtight container. The salad tastes fresh for a day or two, but the flavors will blend over time. If you add feta cheese, enjoy it within two days for the best taste. Yes, you can use other grains. Quinoa, farro, or bulgur are great options. Each grain will give a different texture. Quinoa is gluten-free and packed with protein. Farro adds a nutty flavor, and bulgur is quick to cook. Just adjust the cooking time based on the grain you choose. Lemon Herb Couscous Salad is light and nutritious. A serving has about 200 calories. It provides protein, fiber, and healthy fats. The salad is rich in vitamins from the veggies and herbs. Adding feta cheese will increase the protein and calcium content. This salad is great for a healthy meal or side dish. This article shared how to make a tasty Lemon Herb Couscous Salad. We covered required and optional ingredients, plus allergen swaps. Step-by-step instructions showed how to cook couscous and prepare your salad mix. I included tips for flavor, presentation, and storage. You can customize this salad to suit any taste or diet. Enjoy experimenting with seasonal veggies and protein sources. With these insights, you’re ready to create a delicious dish that keeps well for easy meals. Try it, and make it yours!

Lemon Herb Couscous Salad Fresh and Flavorful Recipe

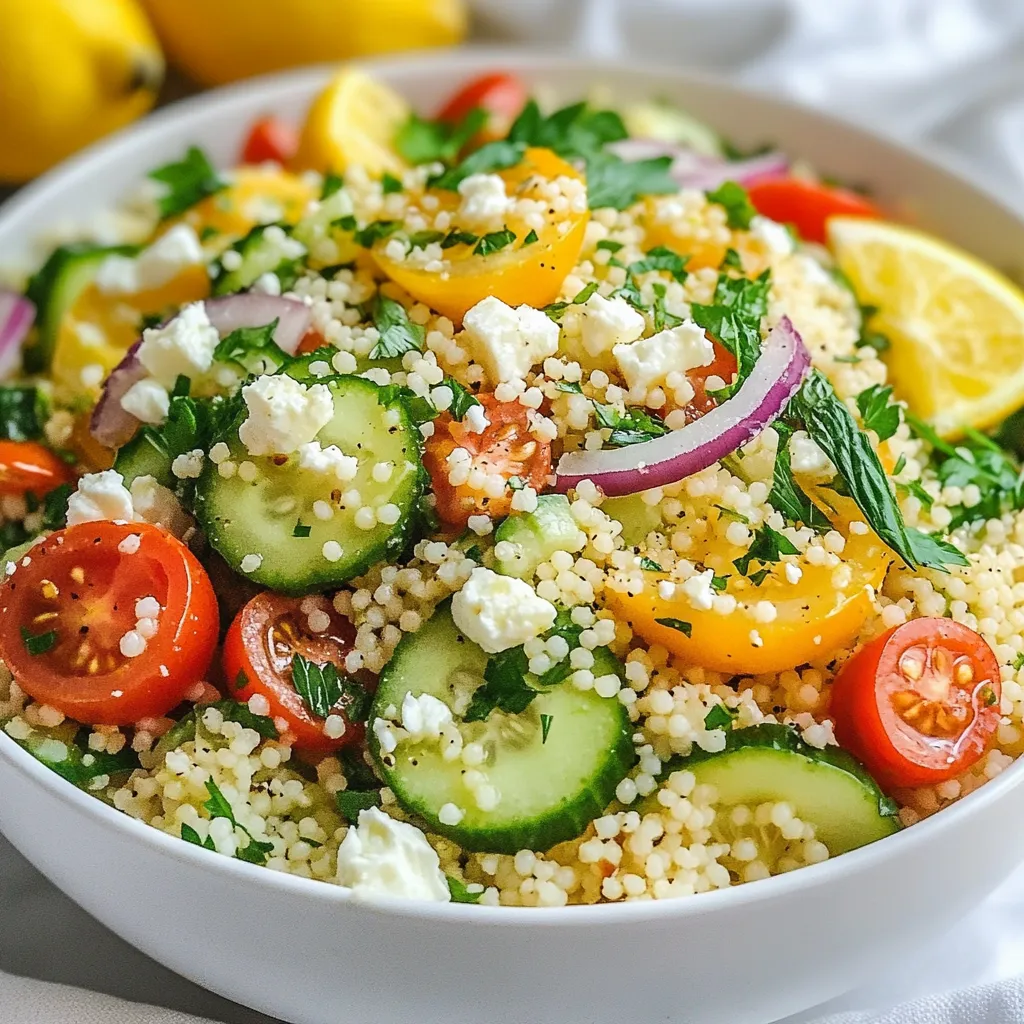
If you want a dish that bursts with flavor and freshness, you’ve found it! My Lemon Herb Couscous Salad is

- 1 medium head of cauliflower, cut into florets - 1 cup all-purpose flour - 1 cup buttermilk (or a dairy-free alternative) - 1 cup breadcrumbs (Panko recommended) - Fresh cilantro - Avocado slices - Crumbled blue cheese or feta (optional) - Lemon wedges for serving - Salt and pepper to taste - Tortilla options: corn or flour For my Buffalo Cauliflower Tacos, I start with a medium head of cauliflower. This veggie brings a nice texture and flavor. I cut it into florets, which makes them easy to handle. The batter needs flour and buttermilk, or a dairy-free choice if you prefer. The flour gives it a nice crunch when baked. I also use breadcrumbs, and Panko works best for that extra crispiness. Next, I add fresh cilantro and avocado slices. They add bright flavors to the tacos. Crumbled blue cheese or feta is optional, but they bring a lovely creaminess. I always serve these tacos with lemon wedges. A squeeze of lemon brightens up the dish and adds freshness. Don’t forget to season with salt and pepper. It really enhances the taste. For tortillas, I like to use small corn or flour ones. They hold everything together well. Each ingredient plays a key role in making these tacos tasty and fun to eat. {{ingredient_image_1}} - Preheat the oven to 450°F (230°C). - Line a baking sheet with parchment paper. Start by getting your oven nice and hot. This helps the cauliflower get crispy. The parchment paper will keep the cauliflower from sticking. - Combine flour, garlic powder, onion powder, smoked paprika, and seasonings. - Mix in the buttermilk until smooth. In a large bowl, mix the flour and seasonings. This adds great flavor. Then, pour in the buttermilk. Stir until the batter is smooth. It should be thick but not lumpy. - Dip cauliflower florets in batter and coat with breadcrumbs. - Bake for 20-25 minutes, flipping halfway. - Toss with buffalo sauce and bake for an additional 5-10 minutes. Now, take your cauliflower florets. Dip each piece into the batter. Let any extra batter drip off. Then, coat each floret in breadcrumbs. This gives them a nice crunch. Place them on the baking sheet. Bake the cauliflower for 20-25 minutes. Flip them halfway through to get an even bake. When they are golden and crispy, take them out. Toss them in buffalo sauce until well coated. Return them to the oven for 5-10 minutes. This makes them spicy and delicious! To get that perfect crunch, use Panko breadcrumbs. They are lighter and crispier than regular breadcrumbs. This helps your cauliflower stay crispy even after baking. Next, focus on the batter. You want it thick enough to coat the florets but not too thick. If it is too runny, the breadcrumbs won’t stick. If it is too thick, it won’t coat well. Aim for a smooth, pourable batter. For tacos, I recommend soft corn or flour tortillas. They hold up well and complement the flavors. If you want a gluten-free option, corn tortillas are the way to go. Add fresh toppings to enhance the dish. Sliced avocado adds creaminess. Crumbled blue cheese or feta gives a salty touch. Fresh cilantro brightens up the flavors. Don’t forget lemon wedges for a zesty finish! Store any leftovers in an airtight container. This keeps them fresh for up to three days. To prevent sogginess, store the cauliflower and tortillas separately. When reheating, use an oven or air fryer. Preheat your oven to 350°F (175°C). Bake for about 10-15 minutes to regain that crispy texture. Avoid the microwave, as it makes the cauliflower soggy. Pro Tips Use Fresh Ingredients: Fresh cauliflower will provide the best flavor and texture. Look for heads that are firm and free of dark spots. Customize the Heat: Adjust the amount of buffalo sauce according to your spice preference. You can mix it with a bit of honey for a sweeter kick! Extra Crunch: For an even crunchier texture, use Panko breadcrumbs instead of regular breadcrumbs. This will elevate the crispiness of the cauliflower. Meal Prep Friendly: Prepare the cauliflower ahead of time and store it in the refrigerator. You can bake it fresh right before serving for a quick meal! {{image_2}} You can switch up the sauce to change the flavor. Try a spicy sriracha sauce for extra heat. You could also use a tangy barbecue sauce for a sweeter note. If you want to adjust the heat of your buffalo sauce, mix in honey for sweetness or add cayenne pepper for more kick. This makes it fun to create your own version! If you want a vegan version, swap the buttermilk for a plant-based milk like almond or oat milk. You can also use a dairy-free yogurt for extra creaminess. For the blue cheese, try using vegan feta or cashew cheese. These substitutes keep the tacos flavorful without using animal products. Feel free to get creative with toppings. Chopped green onions add crunch, while sliced radishes bring a nice bite. You can also try pickled jalapeños for tang. For sides, serve these tacos with a fresh salad or guacamole. Dips like salsa or a creamy avocado dip pair well too! Buffalo cauliflower tacos are packed with vitamins and minerals. Cauliflower is rich in vitamin C, K, and folate. These nutrients help boost your immune system and support bone health. Cauliflower also contains fiber, which aids digestion. When you eat these tacos, you get a healthy dose of nutrients in each bite. Each serving of buffalo cauliflower tacos has about 300 calories. This can change with added toppings. If you add blue cheese or avocado, calories may rise. Still, these toppings add flavor and healthy fats. They enhance the overall taste and nutrition of your meal. These tacos can easily fit into many diets. They are gluten-free if you use gluten-free flour. You can also make low-carb tacos by using lettuce wraps instead of tortillas. This way, you can enjoy the flavors without the extra carbs. Buffalo cauliflower tacos can be a great choice for various dietary needs. Buffalo cauliflower tacos are a fun twist on traditional tacos. They use crispy cauliflower instead of meat. The cauliflower is coated in spicy buffalo sauce, which gives it a bold flavor. This dish became popular due to its great taste and plant-based appeal. Many people love it as a tasty, meatless option. It fits perfectly in a taco, topped with fresh avocado and creamy cheese. Yes, you can prep this recipe ahead of time. You can prepare the cauliflower and coat it in batter. Place the coated florets on a baking sheet, cover them, and store them in the fridge. When you’re ready, just bake them. You can also make the tacos and store them in the fridge without toppings. Just add fresh ingredients right before serving. This way, you save time and still enjoy delicious tacos. Buffalo cauliflower tacos can be spicy, but you can control the heat. The buffalo sauce adds the heat, but you can adjust it. Use less sauce for a milder flavor. You can also choose a milder sauce or mix it with yogurt. This way, you can enjoy the great taste without too much spice. Feel free to experiment to find the perfect level for you. To make these tacos gluten-free, swap out a few ingredients. Use gluten-free flour instead of all-purpose flour. You can also use gluten-free breadcrumbs or skip them entirely. Make sure to check your tortillas. Look for corn tortillas, as they are often gluten-free. With these simple swaps, you can enjoy the same great flavors without gluten. Buffalo cauliflower tacos are a tasty and fun dish. You learned about key ingredients, like cauliflower and Panko breadcrumbs, and how to prepare them. We talked about ways to enhance flavors with sauces and toppings, plus tips for perfecting the crunch. Nutritional details and dietary options help you make smart choices. Remember, these tacos are easy to adapt for any diet. Try making them with your favorite toppings for a fun meal. Enjoy your cooking adventure with these delicious tacos!

Buffalo Cauliflower Tacos Flavorful and Easy Recipe

Are you ready to dive into a delicious twist on taco night? Buffalo Cauliflower Tacos are an explosion of flavor

- 2 ripe avocados - 1 cup cherry tomatoes, halved - 1 cup fresh mozzarella balls (bocconcini) - 1/4 cup fresh basil leaves, chopped - 2 tablespoons balsamic glaze - 1 tablespoon olive oil - Salt and pepper to taste To make Caprese stuffed avocados, you need simple yet fresh ingredients. Start with two ripe avocados. They should feel soft but not mushy. The creaminess of the avocado pairs well with the other flavors. Next, grab a cup of halved cherry tomatoes. Their sweet taste adds brightness to the dish. You will also need a cup of fresh mozzarella balls, known as bocconcini. These little cheese balls add a lovely texture and mild flavor. Chop a quarter cup of fresh basil leaves. Basil brings a fragrant aroma and a burst of freshness. For a touch of tang, you will drizzle balsamic glaze. This glaze adds sweetness and depth. One tablespoon of olive oil will help bring all the flavors together. Lastly, season with salt and pepper to taste for that perfect finish. With these ingredients, you are ready to create your flavorful Caprese stuffed avocados! {{ingredient_image_1}} First, take the ripe avocados. Cut them in half, from top to bottom. Remove the pit carefully. Use a spoon to scoop out a little flesh. This helps create more room for the delicious filling. Set this scooped avocado flesh aside for later. Now, let’s make the filling. In a medium bowl, mix halved cherry tomatoes, fresh mozzarella balls, and chopped basil. Next, add the reserved avocado flesh that you set aside. Drizzle in the olive oil, and sprinkle with salt and pepper to taste. Gently stir until all the ingredients blend together well. It’s time to fill the avocados! Take the caprese mixture and spoon it into each avocado half. Fill them generously to make them look great. Finally, drizzle balsamic glaze over the top. This adds flavor and makes the dish look even more appealing. Enjoy your beautiful Caprese stuffed avocados! To make Caprese Stuffed Avocados, you need ripe avocados. Ripe avocados feel slightly soft when you press them. If they feel too soft, they may be overripe. Overripe avocados can have brown spots and a mushy texture. Always check the skin; it should be dark and smooth. Caprese Stuffed Avocados shine at gatherings. They are perfect for picnics, barbecues, or light lunches. Pair them with fresh bread or a green salad. You can also serve them with a light soup for a complete meal. These avocados look beautiful on any table. Add flavor to your stuffed avocados with spices. A pinch of garlic powder or crushed red pepper can add a nice kick. You can also sprinkle some lemon zest for freshness. For a gourmet touch, try adding sun-dried tomatoes or olives. These small additions elevate the dish and make it even more delightful. Pro Tips Choose Ripe Avocados: Make sure your avocados are ripe for the best flavor and texture. They should yield slightly to gentle pressure when squeezed. Mix Ingredients Gently: When combining the filling ingredients, mix gently to keep the mozzarella balls intact and prevent them from becoming mushy. Use High-Quality Balsamic Glaze: Opt for a good quality balsamic glaze for a richer flavor and a beautiful presentation. Serve Fresh: These stuffed avocados are best enjoyed immediately after preparing them to maintain their freshness and texture. {{image_2}} If you want to change things up, consider alternatives for mozzarella. Try using feta cheese for a tangy kick. You can also use goat cheese, which adds a nice creaminess. For a vegan option, replace mozzarella with vegan cheese. You can even use marinated tofu for a protein boost without dairy. Adding proteins can make your dish heartier. Try adding cooked chicken or shrimp to the filling. This addition works great with the fresh flavors of the tomatoes and basil. You can also change the herbs in the recipe. Instead of basil, use fresh parsley or oregano for a different taste. Don't be afraid to experiment with spices like garlic powder or red pepper flakes for a kick. Using seasonal vegetables can enhance your Caprese stuffed avocados. In summer, add fresh corn or zucchini. In fall, consider using roasted bell peppers or even pumpkin for a unique twist. Seasonal fruits like peaches or strawberries can also be delightful additions, bringing a sweet contrast to the savory flavors. To store leftovers, wrap the stuffed avocados in plastic wrap. Place them in an airtight container. This helps keep them fresh for up to two days. If the avocado turns brown, sprinkle some lemon juice on it. The acid slows down browning. Freezing stuffed avocados is not ideal. The texture of the avocado changes when thawed. If you want to freeze the filling, you can do that. Store the filling in an airtight container. Thaw it in the fridge overnight when you want to use it. Keep your ingredients fresh before you assemble the dish. Store avocados at room temperature until ripe. After they ripen, put them in the fridge. Keep mozzarella in its brine or water until ready to use. Store cherry tomatoes on the counter, away from sunlight. Fresh basil should be in a jar with water, like a flower, to stay vibrant. You can prepare the filling ahead of time. Mix the tomatoes, mozzarella, and basil. Store it in the fridge. Cut the avocados just before serving. This keeps them fresh and green. If you stuff them early, the avocado may turn brown. Use lemon juice to help keep the color. Leftover avocado is great for many things. You can mash it for toast. Use it in smoothies for creaminess. You can mix it into salads for added texture. If you have a lot, make guacamole. Just add lime juice, salt, and some spices for flavor. Yes! You can get creative with your filling. Try adding diced cucumber for crunch. Chopped red onion adds a nice bite. You can mix in olives for a briny taste. For some heat, add jalapeños. Fresh herbs like parsley or dill work well too. Make it your own! Caprese Stuffed Avocados offer a fresh and tasty dish. You start with ripe avocados and fill them with tomatoes, mozzarella, and basil. I shared tips to pick the best avocados and ways to serve your dish. Variations and storage tips keep it fun and flexible for any meal. Enjoy this simple recipe and make it your own. Let your creativity shine with every bite!

Caprese Stuffed Avocados Fresh and Flavorful Delight

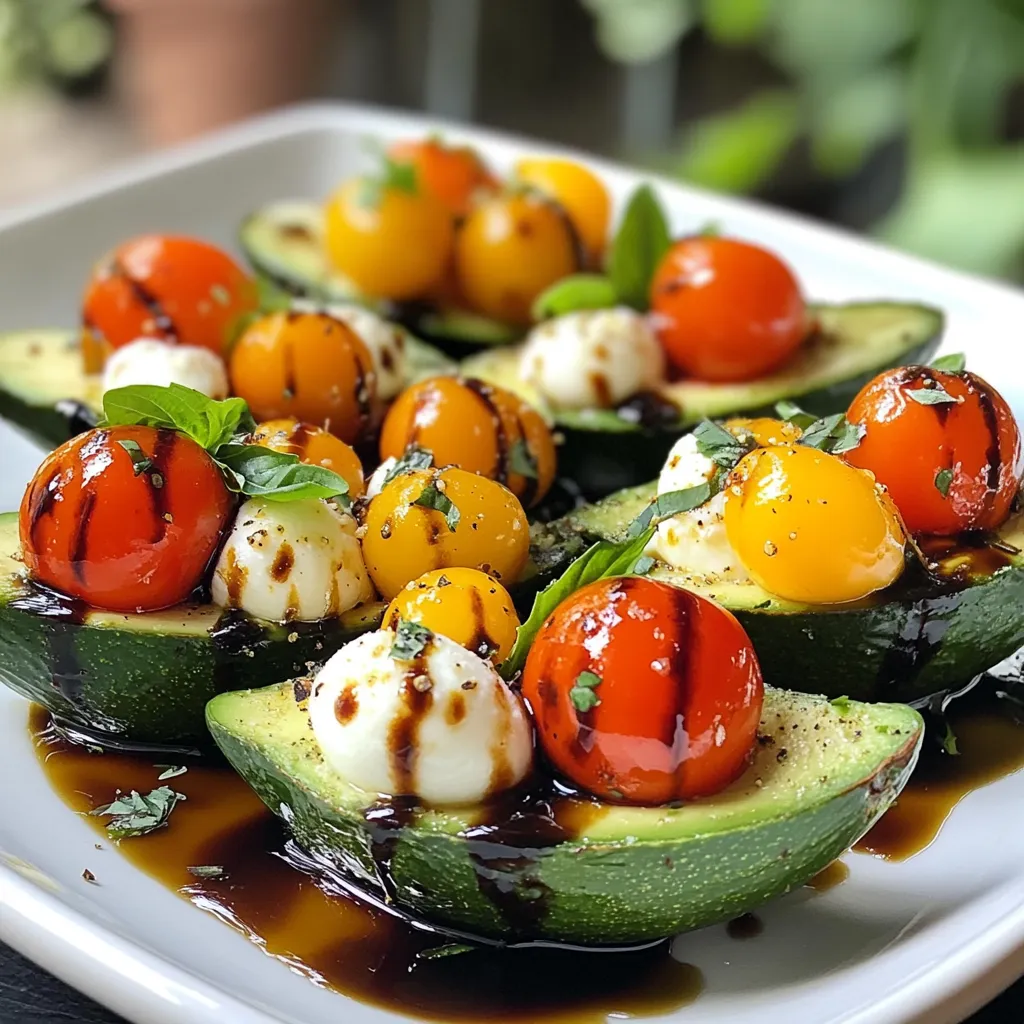
Are you ready for a fresh and tasty treat? Caprese Stuffed Avocados combine creamy avocados with vibrant tomatoes and mozzarella

To make this Southwest Chicken Quinoa Skillet, gather these key ingredients: - 1 cup quinoa, rinsed - 2 cups chicken broth - 1 pound boneless, skinless chicken breast, diced - 1 tablespoon olive oil - 1 red bell pepper, chopped - 1 cup corn (fresh or frozen) - 1 can (15 oz) black beans, rinsed and drained - 1 teaspoon cumin - 1 teaspoon paprika - 1/2 teaspoon chili powder - 1/4 teaspoon cayenne pepper (optional) - Salt and pepper to taste - 1 avocado, sliced (for serving) - Fresh cilantro, chopped (for garnish) - Juice of 1 lime You can add these extras to enhance your dish: - Chopped jalapeños for heat - Lime zest for freshness - Diced tomatoes for moisture - Shredded cheese for creaminess Make sure you have these tools for a smooth cooking process: - Medium saucepan for quinoa - Large skillet for sautéing - Cutting board and knife for prep - Measuring cups and spoons for accuracy - Fork for fluffing quinoa {{ingredient_image_1}} Start by rinsing 1 cup of quinoa under cold water. This helps remove any bitterness. In a medium saucepan, add the rinsed quinoa and 2 cups of chicken broth. Bring this mix to a boil over medium-high heat. Once it boils, lower the heat, cover, and let it simmer for about 15 minutes. You will know it's done when the liquid is absorbed. Fluff the quinoa with a fork and set it aside. This step gives you a tasty base for your skillet. Next, grab a large skillet and heat 1 tablespoon of olive oil over medium heat. Add 1 pound of diced chicken breast. Season the chicken with salt, pepper, 1 teaspoon of cumin, 1 teaspoon of paprika, 1/2 teaspoon of chili powder, and, if you like some heat, 1/4 teaspoon of cayenne pepper. Cook the chicken for about 7 to 10 minutes. Look for a nice brown color and make sure it's cooked through. This step adds great flavor to your meal. Now it's time to add more flavor. Stir in 1 chopped red bell pepper and 1 cup of corn, either fresh or frozen. Cook these for about 3 to 4 minutes until the pepper gets tender. Then, add the cooked quinoa and 1 can of rinsed and drained black beans to the skillet. Gently stir everything together and heat for 2 to 3 minutes. This step creates a hearty, colorful dish. Finish by squeezing the juice of 1 lime over the top and sprinkle with fresh cilantro. Serve hot, garnished with avocado slices if you wish. Enjoy your one-pan meal! To get fluffy quinoa, rinse it first. This removes bitter saponins. Use a fine mesh strainer for best results. Combine one cup of rinsed quinoa with two cups of chicken broth. Bring it to a boil. Then, lower the heat and cover it. Let it simmer for about 15 minutes. Once done, fluff it gently with a fork. This step makes your quinoa light and airy. You can easily modify this dish for dietary needs. If you're vegetarian, swap the chicken for chickpeas or tofu. For a gluten-free option, ensure your broth is gluten-free. You can also use vegetable broth. If you want less spice, reduce the cayenne pepper. For extra flavor, try adding lime zest or different herbs. These simple swaps keep the meal tasty. Serve this dish warm for the best taste. Top with sliced avocado and fresh cilantro. A wedge of lime adds a nice touch too. You can pair it with a side salad for more crunch. It also goes well with tortilla chips for a fun twist. This dish is great for meal prep, making it easy to enjoy all week. Pro Tips Rinse Your Quinoa: Rinsing quinoa before cooking removes its natural coating, called saponin, which can taste bitter. This step ensures a more pleasant flavor in your dish. Cook Chicken Thoroughly: Ensure your chicken is cooked to an internal temperature of 165°F (75°C) for safety. Use a meat thermometer for accuracy. Customize Spice Levels: Adjust the amount of cayenne pepper according to your spice preference. Start with a small amount and increase gradually if you like it spicier. Garnish for Flavor: Fresh cilantro and lime juice not only add a burst of flavor but also enhance the visual appeal of your dish. Don't skip this finishing touch! {{image_2}} You can easily make a vegetarian version of this dish. Just skip the chicken. Instead, add more beans or veggies. Black beans are great, but you can also use chickpeas or kidney beans. For veggies, try zucchini, mushrooms, or spinach. These options keep the meal hearty and tasty. Plus, they add more color to your dish! The key to flavor is in the spices. If you like it spicy, add more cayenne pepper or chili powder. You can also try jalapeños for extra heat. If you prefer it mild, just stick to cumin and paprika. Play around with spices to find what you love. Always taste as you go. That way, you can adjust the heat to your liking. This dish is naturally gluten-free, thanks to quinoa. Just make sure your broth is gluten-free too. Check the label on the chicken broth to be safe. If you want more crunch, add gluten-free tortilla chips on top. They make a great garnish and add texture. Enjoy this meal without worrying about gluten! After you enjoy your Southwest Chicken Quinoa Skillet, store any leftovers. Use an airtight container. Make sure to cool the dish to room temperature first. This keeps the flavors fresh and prevents spoilage. You can keep it in the fridge for up to three days. When you’re ready to eat the leftovers, reheat them well. You can use a microwave or a skillet. If using a microwave, heat in 30-second intervals. Stir between heats to warm evenly. If using a skillet, add a splash of broth to prevent sticking. Heat over low to medium heat until it’s hot. You can also freeze this dish for easy meals later. Divide it into portions before freezing. Use freezer-safe containers or bags. Make sure to remove as much air as possible. This helps prevent freezer burn. It can last up to three months in the freezer. When ready to eat, thaw it in the fridge overnight. Reheat as mentioned above. Quinoa is a tiny, grain-like seed. It cooks up fluffy and light. Quinoa is a complete protein. This means it has all nine amino acids. It is packed with fiber, which helps digestion. Quinoa also has iron and magnesium. These minerals are great for your body. Eating quinoa can help you feel full longer. It is gluten-free, making it safe for those with gluten issues. Yes, you can use other proteins in this dish. If you want a vegetarian option, try black beans or chickpeas. For a different meat, try turkey or shrimp. You can also use tofu for a plant-based choice. Just make sure to adjust cooking times based on your protein choice. This way, everything cooks evenly and tastes great. To add heat, use more cayenne pepper. You can also add diced jalapeños. If you like hot sauce, drizzle some on top before serving. Another option is to use spicy seasonings, like chipotle powder. Remember to taste as you go. Adjusting spice levels lets you find your perfect heat. Enjoy the kick! This blog outlined how to make a delicious quinoa skillet. We covered key ingredients, cooking steps, and handy tips. You learned about variations for different diets and how to store leftovers. Quinoa is healthy and versatile, making it a great meal choice. Remember, you can swap ingredients to fit your taste. Whether you like it spicy or mild, this dish can wow anyone. Enjoy cooking and experimenting!

Southwest Chicken Quinoa Skillet Tasty One-Pan Meal

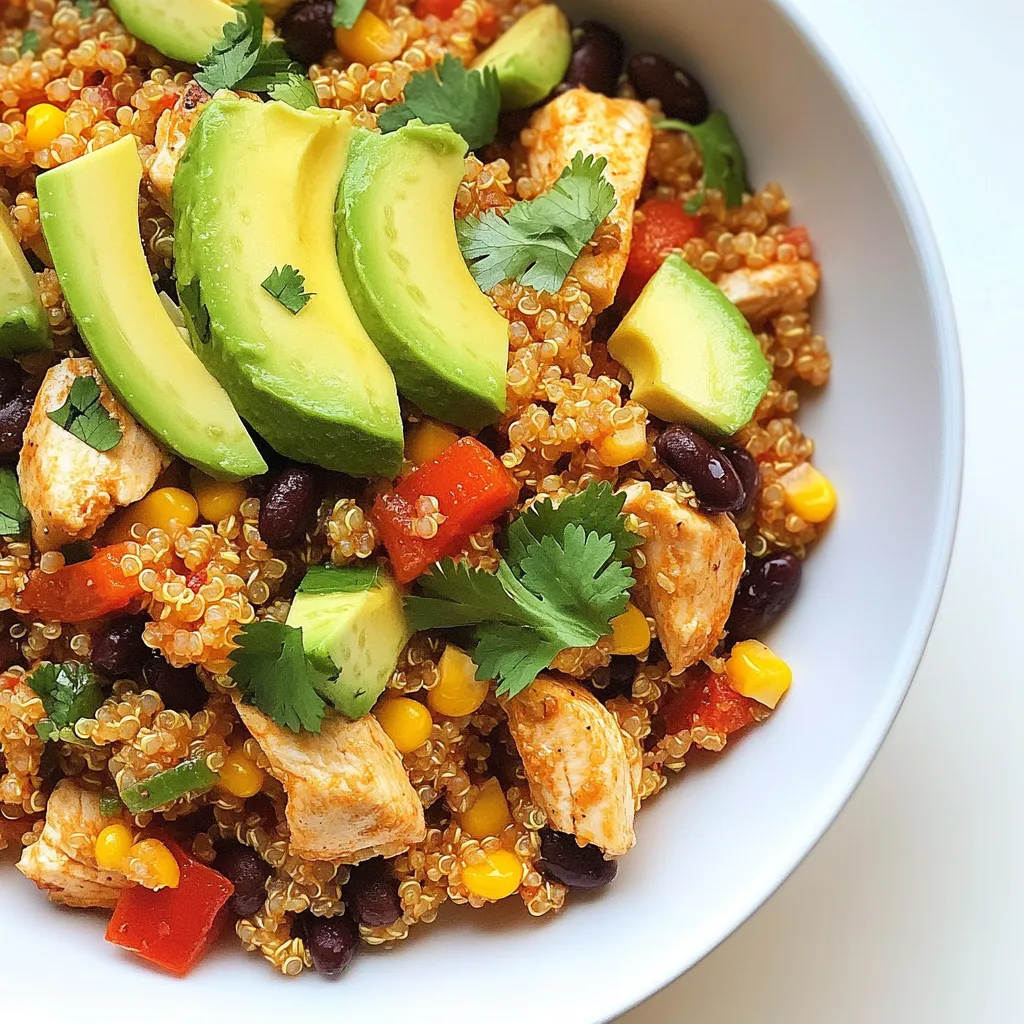
Are you ready for a quick and tasty dinner? This Southwest Chicken Quinoa Skillet is the perfect one-pan meal for

Older posts
Newer posts
← Previous Page1 … Page125 Page126 Page127 … Page130 Next →
© 2025 My Cooking Cast • Built with GeneratePress

Our Policies

  • Privacy Policy
  • GDPR Policy
  • Terms Of Use
  • Copyright Policy
  • Cookie Policy
  • Disclaimer

More Information​

  • Home
  • Contact
  • About
  • Dinner
  • Appetizers
  • Dessert
©2025, My Cooking Cast About Privacy Policy Back To Top