Skip to content
DisclaimerTerms Of UseGDPR PolicyCookie Policy

My Cooking Cast

  • Home
  • Drinks
  • Appetizers
  • Dinner
  • Dessert
  • About
  • Contact
  • Privacy Policy
DisclaimerTerms Of UseGDPR PolicyCookie Policy

Emma

To make the best Crockpot Birria Tacos, you need a few key ingredients: - 2 lbs beef chuck roast, cut into chunks - 1 onion, quartered - 4 cloves garlic, minced - 2 dried guajillo chiles, seeds removed - 2 dried ancho chiles, seeds removed - 1 tablespoon ground cumin - 1 tablespoon ground oregano - 1 teaspoon smoked paprika - 1 teaspoon cinnamon - 4 cups beef broth - 2 tablespoons apple cider vinegar - Salt and pepper, to taste - Corn tortillas - Fresh cilantro, chopped (for garnish) - Lime wedges (for serving) These ingredients create a rich and savory flavor profile. The chiles bring warmth, while the spices add depth. For even more flavor, consider adding these optional ingredients: - Jalapeños for heat - Bay leaves for aroma - A splash of orange juice for sweetness These extras can elevate your tacos to a new level. Don’t hesitate to mix and match based on your taste. If you're missing an ingredient, here are some substitutes: - Beef chuck roast can be replaced with beef brisket. - Dried chiles can be swapped for chili powder. - Beef broth can be replaced with vegetable broth for a lighter taste. Using substitutes can help you work with what you have. Don’t let missing ingredients stop you from enjoying these delicious tacos! {{ingredient_image_1}} To start, I prepare the chiles. I take the guajillo and ancho chiles and remove the seeds. Then, I heat a dry skillet over medium heat. I toast the chiles for about 1-2 minutes. I watch carefully to avoid burning them. Once fragrant, I take them off the heat. I let them cool a little. After that, I transfer the chiles to a blender. Next, I make the sauce. I add the quartered onion and minced garlic to the blender. I also toss in the ground cumin, oregano, smoked paprika, and cinnamon. Then, I pour in the apple cider vinegar and 1 cup of beef broth. I blend everything until it is smooth. In a large bowl, I season the beef chunks with salt and pepper. I make sure every piece is well coated. Now, it’s time to combine everything in the crockpot. I place the seasoned beef chunks inside. Next, I pour the blended sauce over the meat. I add the remaining beef broth to cover the meat completely. I cover the crockpot and set it to cook on low for 8 hours. If I’m in a hurry, I can cook on high for 4-5 hours. When the beef is tender, I take it out and shred it with two forks. This makes it easy to fill the tacos later. To get great shredded beef, let it cook well. Cook the beef on low for a long time. This makes the meat tender and easy to pull apart. After cooking, use two forks to shred the meat. Pull the beef apart in thin strips. This will make your tacos look and taste amazing! Warming tortillas is key for good tacos. Use a dry skillet over medium heat. Place the corn tortillas in the skillet for about 30 seconds on each side. This makes them soft and pliable. You can also wrap them in a damp towel and microwave for about 20 seconds. Either way, warm tortillas help hold the filling well. Birria tacos taste great with fresh toppings. I love using chopped cilantro for a fresh kick. Lime wedges add a nice tang when squeezed over the tacos. You can also serve them with a small bowl of broth for dipping. This adds so much flavor and makes each bite special. Enjoy your delicious creation! Pro Tips Choose the Right Cut: Opt for beef chuck roast as it becomes tender and flavorful when slow-cooked, making it perfect for birria tacos. Toast the Chiles: Toasting the dried chiles enhances their flavor, giving your sauce a richer and more complex taste. Don’t Rush the Cooking: For the best results, cook the birria low and slow. This allows the flavors to meld and the beef to become incredibly tender. Use the Broth: Drizzle some of the flavorful broth over your tacos before serving for an extra layer of taste and moisture. {{image_2}} If you want a meat-free version, try jackfruit. It shreds well and soaks up flavors. Use the same spices and broth. You can also use mushrooms for a rich taste. Portobello or shiitake mushrooms are great choices. Don’t forget to add lime and cilantro for a fresh touch. Tacos can be so much more than just beef. You can use chicken, pork, or even fish. For a fun twist, try adding beans or cheese. You can layer in roasted veggies for extra flavor. Each filling can match the spices you love. Mix and match to find your perfect taco. Want heat? Add more guajillo or ancho chiles. You can also add jalapeños for a kick. If you prefer mild, use fewer chiles. Remove the seeds for less spice. You can make a mild sauce and serve hot salsa on the side. This way, everyone can enjoy their tacos just how they like! To store leftover Birria, let it cool first. Place the beef and broth in a container. Seal it tightly and refrigerate. You can keep it in the fridge for up to four days. For best taste, use it within two days. Always check for any off smells before using. To reheat the tacos, warm the beef in a skillet over low heat. You can add a splash of broth to keep it moist. Heat for about five minutes, stirring often. For tortillas, warm them in a dry skillet for about 30 seconds on each side. This makes them soft again. Build your tacos fresh for the best taste. You can freeze Birria for later. Cool it completely before freezing. Place it in a freezer-safe bag or container. Squeeze out as much air as possible to prevent freezer burn. It can last up to three months in the freezer. To thaw, move it to the fridge overnight. Reheat as mentioned before. Enjoy your Birria later with ease! Birria tacos come from Mexico. They started in the state of Jalisco. This dish began as a stew made with goat meat. Over time, people began using beef, making it more common. Birria is rich in flavor and has a deep red color. It gets its taste from special chiles and spices. People enjoy birria tacos at parties and family gatherings. Yes, you can use different meats for birria tacos. While beef is popular, you can also try lamb or pork. Each meat gives a unique flavor to the dish. Just remember to adjust cooking times based on the meat you choose. Lamb may cook faster, while pork may take longer. Your personal taste will guide you in this choice. You can keep leftover birria in the fridge for up to four days. Make sure to store it in an airtight container. If you want to keep it longer, freeze it for up to three months. When you reheat, it may taste even better. The flavors will have time to blend more. Just be sure to heat it well before serving. Crockpot Birria Tacos are a tasty treat you can make with simple steps. We covered key ingredients, including flavors and substitutes. I shared tips for making the perfect meal, like warming tortillas and shredding beef. You also learned ways to store leftovers and adjust spice levels. Try different fillings or go vegetarian for a twist. Enjoy crafting your own delicious tacos! Your kitchen can be a place of fun and flavor. Dive in and enjoy every bite of your creation!

Crockpot Birria Tacos Flavorful and Easy Recipe

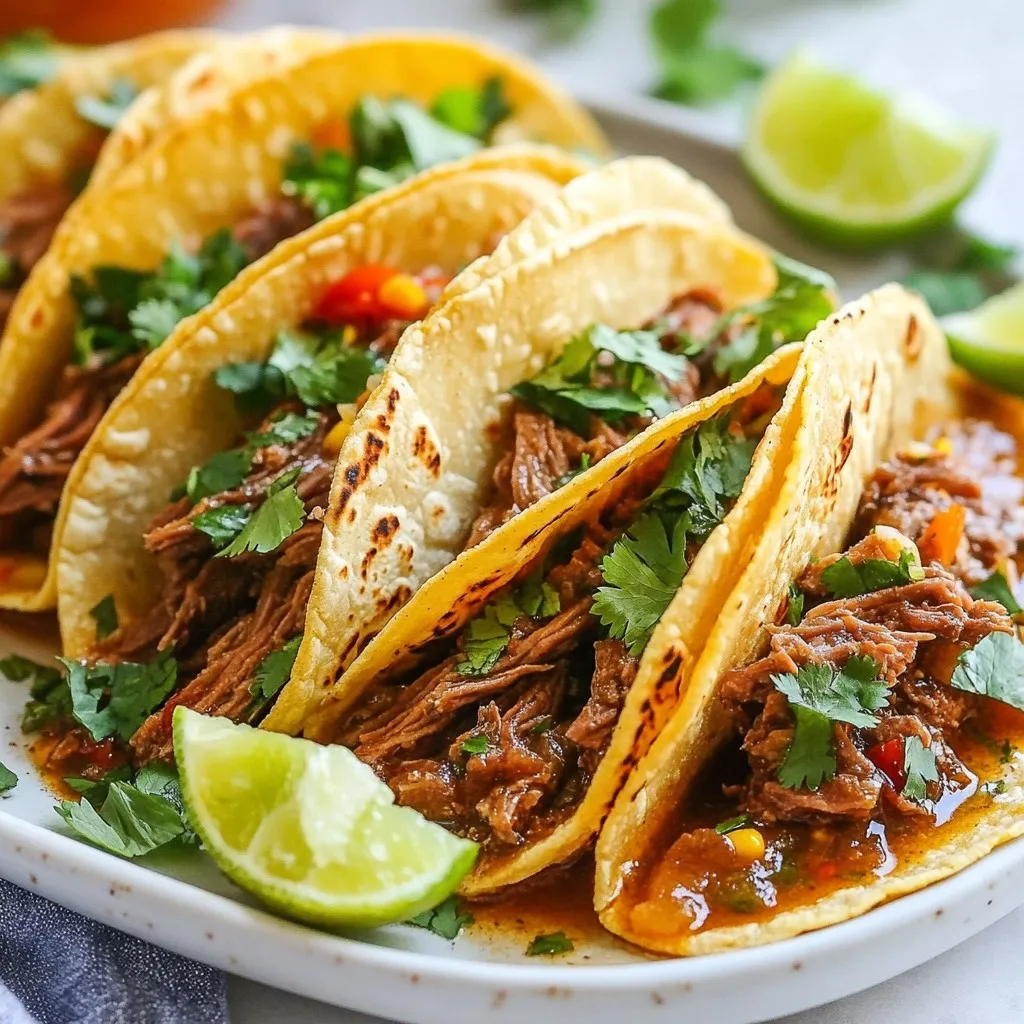
Craving a delicious meal that’s easy to make? You’ll love these Crockpot Birria Tacos! This recipe brings rich flavors straight

- 1 ½ cups all-purpose flour - 1 tsp baking powder - ½ tsp baking soda - ½ tsp salt - ½ cup unsalted butter, softened - 1 cup granulated sugar - 2 large eggs - 2 tbsp lemon zest (about 1 lemon) - 1 tsp vanilla extract - ½ cup buttermilk - 1 cup fresh blueberries (plus extra for garnish) - 2 tbsp powdered sugar (for dusting) - All-purpose flour: This is the base of our cake. It gives structure and texture. - Baking powder and baking soda: These are our leavening agents. They help the cake rise and become fluffy. - Salt: This enhances the flavors in the cake and balances sweetness. - Unsalted butter: I prefer this to control the salt level. Softened butter mixes well into the batter. - Granulated sugar: This adds sweetness and helps the cake brown nicely. - Eggs: They bind the ingredients and add moisture. - Lemon zest: This gives the cake a bright, fresh flavor. Use a zester to avoid the bitter white part of the skin. - Vanilla extract: This adds a warm flavor that complements the lemon. - Buttermilk: It adds moisture and tang, keeping the cake soft. If you don't have buttermilk, you can make a quick substitute with milk and vinegar. - Fresh blueberries: These burst with juice and flavor when baked. They also add beautiful color. - Powdered sugar: This is for dusting on top, giving a nice finish. - 1 cup = 240 ml - 1 tablespoon = 15 ml - 1 teaspoon = 5 ml - 1 ½ cups = 360 ml - ½ cup = 120 ml - 2 tbsp = 30 ml - 2 large eggs = Approximately 100 grams - 1 tsp = 5 grams - ½ tsp = 2.5 grams These conversions help if you use different measuring tools. Always level off your dry ingredients for accuracy. This ensures your cake turns out perfect every time. {{ingredient_image_1}} Start by preheating your oven to 350°F (175°C). This step is key for baking. While the oven heats, take a 9x5-inch loaf pan. Grease it well with butter. Then, dust it with flour. This helps the cake come out easily after baking. In a medium bowl, mix together the dry ingredients. Use 1 ½ cups of all-purpose flour, 1 tsp of baking powder, ½ tsp of baking soda, and ½ tsp of salt. Set this bowl aside. Now, in a large bowl, cream ½ cup of softened unsalted butter with 1 cup of sugar. Use an electric mixer for about 3-4 minutes. The mixture should look light and fluffy. Next, add 2 large eggs, one at a time. Mix well after each egg. Then, stir in 2 tablespoons of lemon zest and 1 teaspoon of vanilla extract. Now, you will combine the dry mix with ½ cup of buttermilk. Do this in parts, starting and ending with the dry mix. Be careful not to overmix. Finally, gently fold in 1 cup of fresh blueberries. Pour the batter into the prepared loaf pan. Spread it evenly across the pan. Bake the cake for 50-60 minutes. Check if it’s done by inserting a toothpick in the center. If it comes out clean, the cake is ready. Let the cake cool in the pan for about 10 minutes. Then, move it to a wire rack to cool completely. For a sweet touch, dust some powdered sugar on top before serving. Add extra blueberries for a nice look. To get a moist and fluffy cake, use room temperature butter and eggs. This helps the batter mix well. When mixing the butter and sugar, aim for a light, fluffy texture. This takes about 3–4 minutes. Always fold in the blueberries gently. This keeps them whole and prevents color bleeding. Adding lemon zest brightens the flavor. It gives the cake a fresh, zesty kick. One common mistake is overmixing the batter. This can make the cake dense. Mix just until combined for a light texture. Also, remember to measure flour correctly. If you pack it too tightly, you may have too much flour. This can lead to a dry cake. Lastly, don’t skip the cooling step. Letting the cake cool in the pan helps it set properly. Using a good mixer helps with the creaming process. An electric mixer is best for getting that fluffy texture. A 9x5-inch loaf pan is perfect for this recipe. It helps the cake bake evenly. A toothpick is essential for checking doneness. If it comes out clean, your cake is ready. Lastly, a wire rack is great for cooling. It keeps air flowing around the cake, preventing sogginess. Pro Tips Use Room Temperature Ingredients: Allow your butter and eggs to sit at room temperature for about 30 minutes before starting. This helps achieve a more even batter and better rise. Don’t Overmix the Batter: When folding in the blueberries, be gentle. Overmixing can lead to a dense cake, so mix just until combined. Check for Doneness: Since ovens can vary, start checking your cake around the 50-minute mark. A toothpick inserted should come out clean when the cake is done. Cool Completely Before Serving: Let the cake cool completely on a wire rack before dusting with powdered sugar. This prevents the sugar from melting into the cake. {{image_2}} You can make this cake gluten-free. Just swap the all-purpose flour for gluten-free flour blend. This blend works well in most recipes. Be sure to check that your other ingredients are gluten-free too. This way, everyone can enjoy a slice. Feel free to mix in other fruits. Chopped strawberries or raspberries add a fun twist. You may also use peaches or blackberries. Each fruit brings its own flavor and color to the cake. Just keep the amount around one cup, similar to the blueberries. Enhance the lemon flavor by adding more lemon zest. You could also stir in some lemon juice. A dash of almond extract can give a nice touch too. For a sweet kick, try adding a sprinkle of cinnamon. Each of these options can take your cake to a new level. To keep your zesty lemon blueberry pound cake fresh, store it at room temperature. Wrap the cake tightly in plastic wrap or place it in an airtight container. This helps keep it moist. It will last for about 3-4 days. If you want to add a little extra flavor, you can sprinkle a bit of powdered sugar on top before storing. Freezing is a great way to save some of this delicious cake for later. First, let the cake cool completely. Wrap it tightly in plastic wrap, then in aluminum foil to prevent freezer burn. You can freeze it for up to 3 months. When you're ready to eat it, move the cake to the fridge overnight to thaw. To enjoy your cake warm, preheat your oven to 350°F (175°C). Remove the wrapping and place the cake on a baking sheet. Heat it for about 10-15 minutes. If you prefer, you can also microwave a slice for about 20-30 seconds. This will give it a soft and cozy feel again. Just be careful not to overheat it! Yes, you can use frozen blueberries in this recipe. Just remember to add them straight from the freezer. Do not thaw them first. This will help keep the cake from turning purple. Also, frozen blueberries may sink a bit more than fresh ones. This can still create a very tasty cake. To check if your cake is done, use a toothpick. Insert it into the center of the cake. If it comes out clean, your cake is ready. If there is wet batter on the toothpick, bake for a few more minutes. Keep checking every five minutes until it is done. If you don’t have buttermilk, you can make a simple substitute. Just mix one cup of milk with one tablespoon of lemon juice or vinegar. Let it sit for about five minutes. This will give you a good buttermilk alternative. You can also use yogurt or sour cream mixed with water. In this blog post, I shared key steps to make a great cake. You learned about the essential ingredients, how to prepare and bake, and tips for the best flavor. I included variations for unique tastes and storage methods for freshness. Always remember to avoid common mistakes for the best results. With these insights, you can create a delicious cake every time. Enjoy baking and get creative with flavors!

Zesty Lemon Blueberry Pound Cake Flavorful Delight

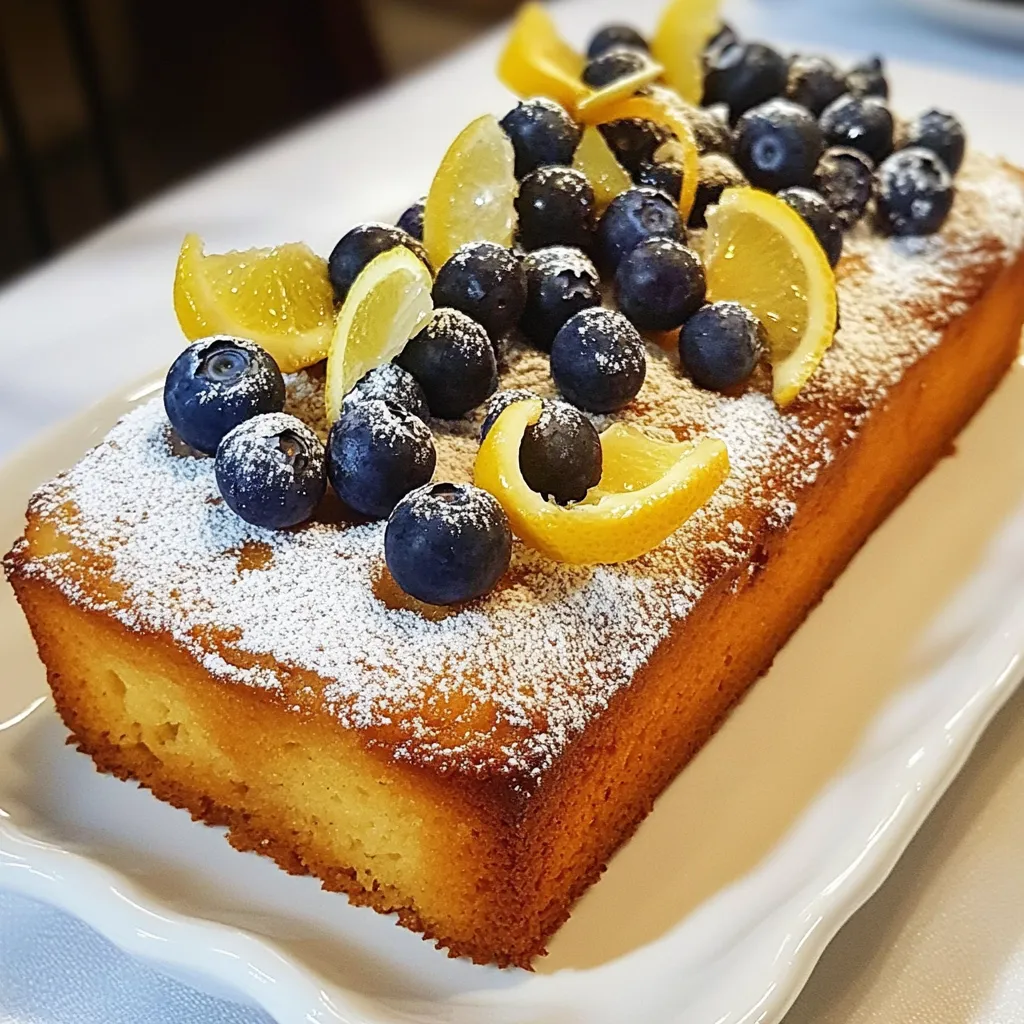
Are you ready to bake something truly delicious? This Zesty Lemon Blueberry Pound Cake is bursting with fresh flavors that

- 1 can (15 oz) chickpeas, drained and rinsed - 1 cup cherry tomatoes, halved - 1 cucumber, diced - ½ red onion, finely chopped - ½ bell pepper (any color), diced - ¼ cup Kalamata olives, pitted and chopped - ¼ cup feta cheese, crumbled - 3 tablespoons olive oil - 2 tablespoons lemon juice - 1 teaspoon dried oregano - Salt and pepper to taste - 4 large whole wheat tortillas or wraps - Lettuce leaves for layering This salad is colorful and fresh. Each ingredient adds a unique taste. Chickpeas are high in protein. They make this wrap filling and healthy. Cherry tomatoes bring sweetness and juiciness. Cucumbers add a nice crunch. Red onion gives a bit of sharpness. Bell pepper adds more color and flavor. Kalamata olives add a salty bite. Feta cheese brings creaminess. Olive oil and lemon juice make a bright dressing. Oregano adds a nice herbal note. For dietary needs, you can change some ingredients. Use black olives instead of Kalamata olives. You can skip the feta for a vegan wrap. If you want gluten-free, use corn tortillas. You can also add more veggies like carrots or spinach. This salad is flexible. Make it your own! {{ingredient_image_1}} To make your Mediterranean chickpea salad, first, gather your ingredients. Use one can of chickpeas. Drain and rinse them well. This step helps remove the salty brine. Next, chop your veggies. Cut the cherry tomatoes in half. Dice the cucumber into small pieces. Finely chop the red onion and bell pepper. For a touch of briny flavor, chop the Kalamata olives. Crumble the feta cheese into small bits. In a large mixing bowl, combine all the veggies and chickpeas. Mix them gently so you don’t mash the chickpeas. Now, it’s time to make the dressing. In a small bowl, whisk together three tablespoons of olive oil, two tablespoons of lemon juice, and one teaspoon of dried oregano. Add salt and pepper to taste. Pour this dressing over your salad mixture. Toss gently to coat everything evenly. Now, prepare your tortillas. Lay out four large whole wheat tortillas on a clean surface. Place lettuce leaves on each tortilla to give a fresh crunch. Spoon a generous amount of the chickpea salad in the center of each tortilla. Leave space at the edges for folding. To wrap, fold the sides of the tortilla over the filling. Then, roll the bottom up tightly. Make sure the filling stays inside. Repeat this process until you use all the filling. Your wraps are now ready! You can serve them right away. If you want to take them on the go, wrap them in foil or parchment paper. Enjoy your fresh and tasty Mediterranean chickpea salad wraps! To make your Mediterranean chickpea salad wraps shine, focus on flavor. You can enhance taste with fresh herbs like parsley or dill. Adding a pinch of garlic powder can also bring out more flavor. For texture, try adding crunchy veggies like radishes or snap peas. These add a nice crunch to each bite. You can also switch up the cheese. Try goat cheese for a tangy twist. To keep the wrap from getting soggy, use fresh, crisp lettuce leaves. Place the leaves first before adding the salad. This creates a barrier that keeps moisture in check. Another trick is to serve the wraps right away. If you need to prep them in advance, keep the salad and tortillas separate. Wrap them tightly in foil or parchment paper to maintain freshness. Pro Tips Storage Tip: To keep your wraps fresh, store the chickpea salad and tortillas separately until you're ready to serve. Customizable Ingredients: Feel free to add or substitute ingredients such as spinach, arugula, or grilled vegetables for extra flavor and nutrition. Serving Suggestion: Pair your wraps with a side of tzatziki or hummus for a delicious dip that complements the Mediterranean flavors. Meal Prep Tip: This salad can be made in advance and stored in the refrigerator for up to 3 days, making it perfect for meal prep. {{image_2}} You can change the flavors in your Mediterranean chickpea salad wraps easily. Try using different veggies like spinach, carrots, or bell pepper. Each adds a unique taste and color. Add proteins like grilled chicken, shrimp, or tofu to make it heartier. To make it vegan, skip the feta cheese or use a plant-based option. You can also replace chicken with chickpeas for a simple vegan twist. If you want a gluten-free wrap, use lettuce leaves instead of tortillas. This keeps it fresh and light. For added crunch, add nuts like walnuts or sunflower seeds. They give a nice texture and flavor. Mix in herbs like parsley or dill for a fresh touch. The options are endless, so feel free to get creative! To keep your Mediterranean chickpea salad wraps fresh, store them in the fridge. Here are the best practices: - Refrigeration: Place the wraps in an airtight container. This helps prevent them from drying out. They stay tasty for up to three days. - Reheating: If you want to warm them, unwrap and heat in a skillet. Use low heat to avoid making them soggy. You can also microwave them for a short time. Just be careful not to overheat. For storage containers, I suggest using glass or BPA-free plastic. These containers are safe and seal well. If you want to keep the filling and wraps separate, use smaller containers. This keeps your wraps crisp and fresh. How long do homemade wraps last in the fridge? Homemade wraps stay fresh in the fridge for about 3 days. Store them in an airtight container. This keeps the flavors in and the wraps soft. Can I make these wraps ahead of time? Yes, you can make these wraps ahead of time. Prepare the salad and wraps, but do not fold them yet. Keep the salad and tortillas separate. This way, the wraps won't get soggy. What other dressings can I use for the salad? You can try different dressings for your salad. A yogurt dressing adds creaminess. Balsamic vinaigrette gives a sweet touch. A simple lemon and olive oil mix works well too. Experiment to find your favorite! In this article, I covered how to make Mediterranean chickpea salad wraps. You learned about ingredients, preparation steps, and helpful tips. The article also shared variations for dietary needs and best storage practices. A good wrap is more than just filling; it’s about flavor and texture. Enjoy experimenting with different veggies and dressings. Whether you're a beginner or a seasoned cook, these wraps can fit your taste. Now you can create delicious, healthy meals at home. Get started and make your own wraps today!

Mediterranean Chickpea Salad Wraps Fresh and Tasty

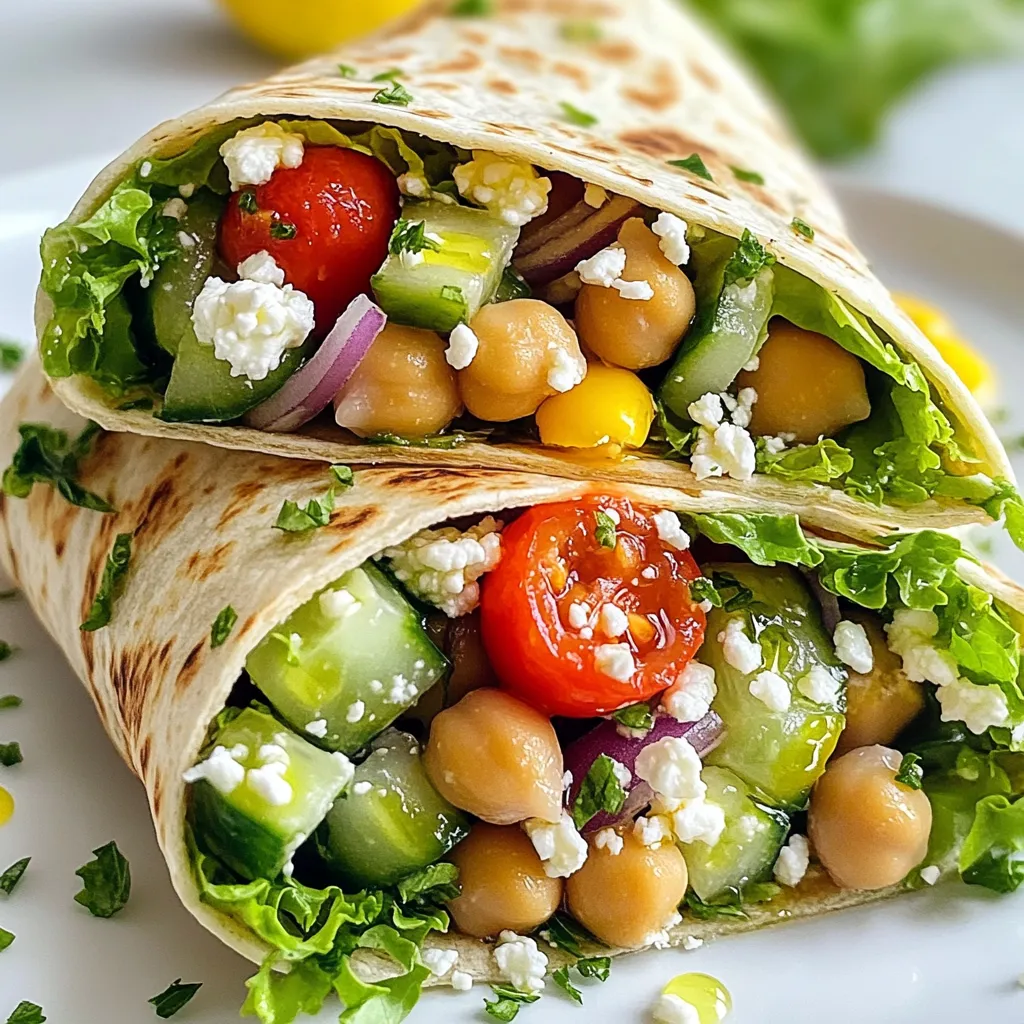
Are you ready to enjoy a fresh and tasty meal? Mediterranean Chickpea Salad Wraps are the perfect blend of flavor

To make honey lime chicken tacos, you need: - 1 lb boneless, skinless chicken thighs - 3 tablespoons honey - 2 tablespoons fresh lime juice - 1 tablespoon olive oil - 2 cloves garlic, minced - 1 teaspoon ground cumin - 1 teaspoon paprika - Salt and pepper to taste - 8 small corn or flour tortillas These ingredients create a simple yet delicious flavor. The chicken thighs provide great taste and texture. Honey brings sweetness, while lime adds a refreshing twist. Garlic, cumin, and paprika make the dish full of flavor. You can add some fun toppings to your tacos. Here are some suggestions: - 1 cup shredded lettuce - 1 avocado, sliced - 1 cup diced tomatoes - Fresh cilantro, for garnish - Lime wedges, for serving These toppings add color and freshness. The creamy avocado balances the sweet and tangy chicken. Crunchy lettuce and juicy tomatoes provide great textures. When it comes to tortillas, you have options. You can use: - Small corn tortillas for a classic taste - Small flour tortillas for a softer bite Corn tortillas bring a traditional flavor. Flour tortillas offer a more tender texture. Choose the one you love best, or try both! {{ingredient_image_1}} Start by grabbing a medium bowl. In it, whisk together these key ingredients: - 3 tablespoons honey - 2 tablespoons fresh lime juice - 1 tablespoon olive oil - 2 cloves garlic, minced - 1 teaspoon ground cumin - 1 teaspoon paprika - Salt and pepper to taste This mix creates a sweet and tangy marinade that makes the chicken shine. Next, take 1 lb of boneless, skinless chicken thighs. Place them in a resealable bag or shallow dish. Pour the marinade over the chicken, ensuring every piece gets coated. Seal the bag or cover the dish. Let it marinate for at least 30 minutes. For more flavor, you can marinate it for up to 2 hours in the fridge. Now it’s time to heat your grill or skillet. Preheat it over medium-high heat. Once hot, take the chicken out of the marinade. Place it on the grill or skillet. Cook each side for about 6-7 minutes. The chicken should be fully cooked when juices run clear, which means it reached an internal temperature of 165°F. After cooking, let the chicken rest for a few minutes before slicing it into thin strips. Warm up 8 small corn or flour tortillas in a dry skillet or microwave until they are soft. To assemble the tacos, lay a few slices of chicken on each tortilla. Top each one with shredded lettuce, avocado slices, and diced tomatoes. For the final touch, add fresh cilantro and serve with lime wedges on the side. Enjoy your tasty Honey Lime Chicken Tacos! For this recipe, I prefer boneless, skinless chicken thighs. They stay juicy and tender when cooked. Chicken breasts can dry out. If you use breasts, watch the cooking time closely. Thighs also soak up the marinade flavors better. You can use any cut you like, but thighs are my go-to for tacos. Marinating the chicken is key to great flavor. I recommend marinating for at least 30 minutes. If you have time, two hours works even better. The honey and lime juice really soak in, making the chicken taste amazing. Don't rush this step; it makes a big difference. Cook the chicken over medium-high heat for best results. I usually grill or use a skillet. Cook each side for about 6 to 7 minutes. The chicken is done when the juices run clear. Use a meat thermometer to check; it should read 165°F. Let the chicken rest for a few minutes before slicing. This keeps it juicy and flavorful for your tacos. Pro Tips Marinade Time: Allow the chicken to marinate for at least 2 hours for maximum flavor infusion. Grill Marks: For beautiful grill marks, avoid moving the chicken too much while it's cooking—let it sear! Perfectly Warm Tortillas: Wrap tortillas in aluminum foil and place them in a low oven (200°F) to keep them warm while you prepare the tacos. Serving Fresh: Assemble tacos just before serving to keep the tortillas crisp and ingredients fresh. {{image_2}} You can switch the chicken for other meats. Try using shrimp or pork. Both cook fast and soak up the flavors well. If you use shrimp, grill them for about 3-4 minutes on each side. For pork, choose tender cuts like loin. Marinate and cook until they reach 145°F for safe eating. If you want a veggie twist, use grilled veggies or beans. Grilled zucchini, bell peppers, and mushrooms add great taste. You can also use black beans or chickpeas for protein. Simply season them like the chicken and grill or sauté until tender. These options keep the tacos tasty and hearty. You can change the flavor of your tacos easily. For a spicy kick, add jalapeños or chili powder to the marinade. If you prefer sweeter flavors, mix in some pineapple juice with the honey. This adds a tropical touch! Experiment with different herbs, like cilantro or mint, to find your favorite taste. To keep your Honey Lime Chicken Tacos fresh, store leftovers in an airtight container. Place the chicken, tortillas, and toppings separately. This helps keep everything crisp. Store the chicken in the fridge for up to three days. When you're ready to enjoy leftovers, reheat the chicken in a skillet. Heat on medium until warm, about five minutes. You can also use the microwave for quick reheating. Just make sure to cover it to keep moisture in. Warm the tortillas briefly in a skillet or microwave, too. If you want to freeze the tacos, it's best to freeze the chicken separately. After cooking, let the chicken cool completely. Place it in a freezer bag and remove as much air as possible. You can freeze the chicken for up to three months. When ready to eat, thaw it in the fridge overnight and reheat as mentioned earlier. If you need a substitute for honey, you can use maple syrup. It adds a nice sweetness. Agave nectar also works well. Both options keep the flavor bright and tangy. Yes, you can substitute olive oil with canola oil or avocado oil. Both oils have a mild taste. They will blend well with the other flavors in the marinade. To check if chicken is done, look for clear juices when you cut it. You can also use a meat thermometer. The chicken should reach an internal temperature of 165°F. These tacos are not spicy. The honey and lime bring sweet and tangy flavors. If you want heat, add jalapeños or chili powder for a kick. Yes, you can prepare the chicken and marinade ahead of time. Marinate the chicken for up to 2 hours. You can also chop the toppings and store them in the fridge. Just warm the tortillas before serving. Honey Lime Chicken Tacos are easy to make and delicious. You start with simple ingredients, from the marinade to the right toppings. Marinating the chicken gives great flavor, while grilling ensures it cooks just right. You can switch up proteins or try vegetarian options, too. Finally, store any leftovers correctly to enjoy later. Remember to ask if you have questions about substitutions or making these tacos on your own. Now, grab your ingredients and start cooking!

Honey Lime Chicken Tacos Fresh and Flavorful Delight

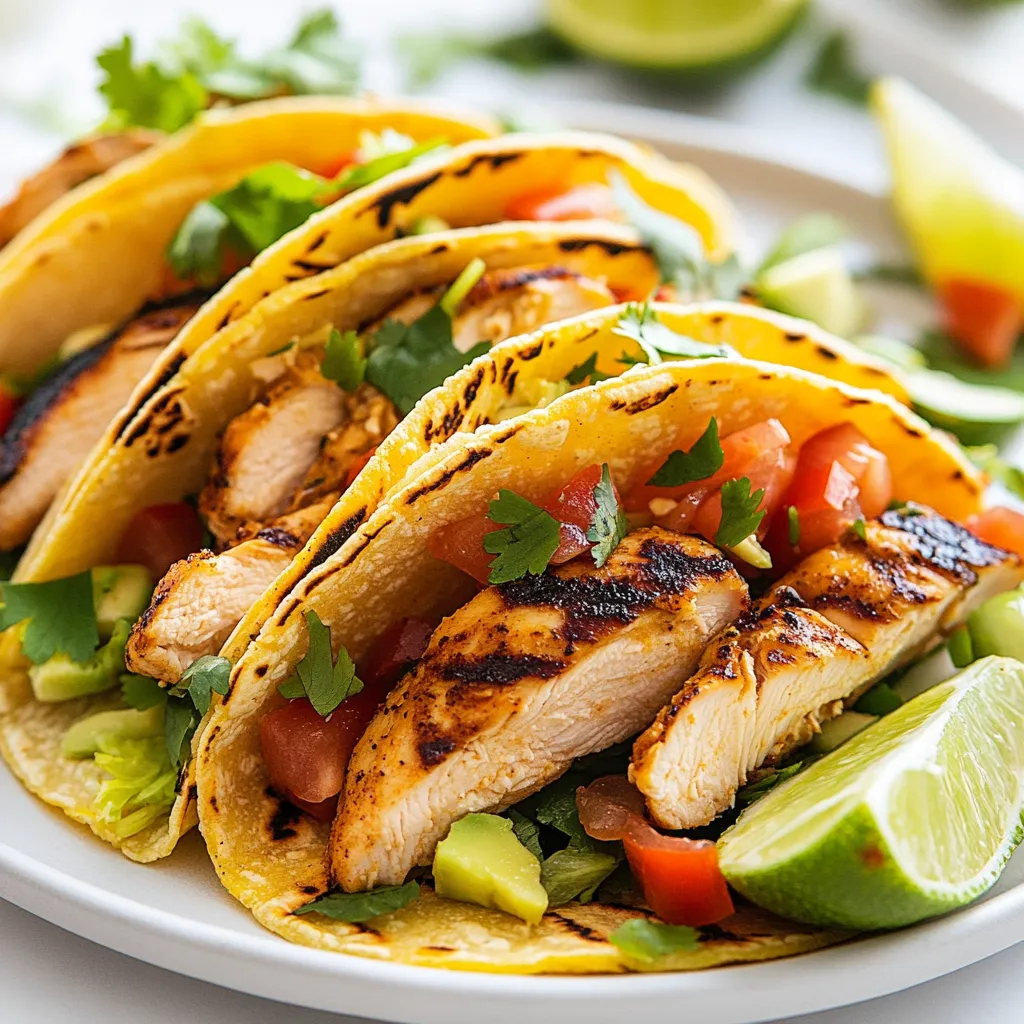
If you want a fresh and tasty dinner, try my Honey Lime Chicken Tacos! These tacos burst with flavor, making

To create the Garlic Herb Butter Shrimp, gather the following items: - 1 pound large shrimp, peeled and deveined - 4 tablespoons unsalted butter - 4 cloves garlic, minced - 1 tablespoon fresh parsley, chopped - 1 tablespoon fresh basil, chopped - 1 teaspoon lemon zest - Juice of 1 lemon - 1/2 teaspoon red pepper flakes (optional) - Salt and black pepper to taste - Lemon wedges for garnish Each ingredient plays a key role in making this dish burst with flavor. The shrimp provide a sweet taste and firm texture. The butter brings richness, while garlic adds a strong, savory note. Fresh herbs like parsley and basil brighten up the dish. Lemon zest and juice offer a refreshing tang. You can adjust the red pepper flakes for spice, making it just the way you like. When you pick your shrimp, look for ones that are firm and smell fresh. Fresh herbs make a difference in taste, so use them if you can. With these ingredients, you're ready to whip up a meal that impresses in just 20 minutes! {{ingredient_image_1}} - Melting the butter Start by placing a large skillet on medium heat. Add 4 tablespoons of unsalted butter. Let it melt until it gets frothy. This should take just a minute or two. The froth shows the butter is ready for the next step. - Sautéing garlic Once the butter is frothy, add 4 minced cloves of garlic. Stir the garlic for about one minute. You want it to smell great but not brown. If it browns, it might taste bitter, and that's not what you want. - Seasoning the shrimp Now, it’s time to add 1 pound of peeled and deveined large shrimp to the skillet. Season them with salt, black pepper, and optional red pepper flakes for heat. Stir well to coat the shrimp with the garlic butter. - Flipping the shrimp Cook the shrimp for about 2 to 3 minutes on one side. When they turn pink, it’s time to flip them over. Cook the other side for another 2 to 3 minutes. The shrimp should be fully cooked and opaque when done. - Adding lemon juice and zest After flipping the shrimp, squeeze the juice of 1 lemon over them. Also, add 1 teaspoon of lemon zest for extra flavor. Toss in 1 tablespoon each of fresh chopped parsley and basil. These herbs bring brightness to the dish. - Serving the dish Once everything is cooked, remove the skillet from heat. Transfer the shrimp to a serving dish. Drizzle any leftover sauce from the skillet over the shrimp. Garnish with lemon wedges and more fresh herbs if you like. Enjoy your meal! - Cooking time for shrimp: Cook shrimp for 2-3 minutes on each side. They turn pink when ready. - Avoiding overcooking: Remove shrimp from heat when they are opaque. Overcooked shrimp become tough and rubbery. To ensure the best texture, always watch the shrimp closely. They cook fast, so timing is key. If you feel unsure, take one out and check. It should be firm but not hard. - Adjusting spice levels: For a mild dish, skip red pepper flakes. Want more heat? Add more flakes or even fresh chilies. - Herb substitutions: If you lack parsley or basil, try chives or cilantro. Each herb brings a unique taste. Feel free to mix your favorite herbs. The key is to balance the flavors, so they complement the garlic and butter. - Pairing with sides: Garlic herb butter shrimp pairs well with rice or pasta. A crisp salad also works well for a fresh touch. - Wine pairings: A chilled white wine, like Sauvignon Blanc, enhances the dish. Its acidity cuts through the richness of the butter. Try these sides and drinks to elevate your meal. They bring out the flavors in the shrimp and make your dinner more enjoyable. Pro Tips Fresh Ingredients Matter: Using fresh shrimp and herbs will enhance the flavor of this dish significantly. If possible, buy shrimp that has been sourced sustainably and is still in its shell for optimal freshness. Perfectly Cooked Shrimp: Shrimp cook quickly; watch for them to turn from translucent to opaque. Overcooking can lead to rubbery shrimp, so keep an eye on the time. Adjusting Heat Levels: If you like it spicy, feel free to increase the amount of red pepper flakes. Conversely, you can omit them entirely for a milder flavor. Serving Suggestions: This dish pairs wonderfully with a side of rice or crusty bread to soak up the delicious garlic herb butter sauce. Consider adding a fresh green salad for a complete meal. {{image_2}} You can switch up the protein in this dish. Scallops make a great choice. They cook fast and soak up flavors well. Fish also works nicely, especially firm types like cod or halibut. For a vegetarian option, try using mushrooms or tofu. Both absorb the garlic herb butter well and add a unique twist. Changing herbs can give your dish a fresh taste. You might add thyme or dill for a new flavor. You could also mix in some fresh cilantro for a bold kick. If you want heat, try adding cayenne pepper or smoked paprika. These spices can elevate the dish and make it even more exciting. You can cook shrimp in different ways. Grilling adds a nice smoky flavor. Just toss the shrimp on the grill for a few minutes per side. Baking is another option. Spread shrimp on a baking sheet and bake at 400°F for about 10 minutes. Both methods keep the shrimp juicy and tender while adding unique tastes. After enjoying your garlic herb butter shrimp, store the leftovers in the fridge. Place them in an airtight container. This keeps the shrimp fresh for up to three days. Make sure the shrimp cools down before sealing. If you need to keep them longer, consider freezing. Seal the shrimp in a freezer bag. Remove as much air as possible to prevent freezer burn. These shrimp can stay tasty in the freezer for up to two months. To reheat, use the stovetop for best results. Heat a skillet on medium-low. Add a little butter or oil to prevent sticking. Place the shrimp in the skillet and cook until heated through. Avoid cooking too long to keep the shrimp tender. You can also use a microwave. Place the shrimp on a microwave-safe plate, cover lightly, and heat in short bursts. Aim for a temperature of 145°F to ensure the shrimp is safe to eat. You can tell shrimp are cooked when they turn pink and curl slightly. The flesh should look opaque. Cook them for about 2-3 minutes on each side. Be careful not to overcook; they can become tough. Yes, you can use frozen shrimp! Just thaw them first. Place them in cold water for about 15-20 minutes. Make sure they are peeled and deveined before cooking. This saves time and still gives great flavor. To add heat, use more red pepper flakes. You can also add chopped fresh chili peppers. If you want a different spice, try a dash of hot sauce or some cayenne pepper. Adjust to your taste! You can prepare the shrimp ahead, but cook them just before serving. If you want to save time, you can mix the garlic and herbs in advance. Store them in the fridge until you're ready to cook. If you don’t have fresh herbs, dried herbs work well. Use about one-third of the amount of dried herbs. For parsley, basil, or both, try using one teaspoon each of the dried versions. You can also try Italian seasoning for a mix! You now have a simple way to make garlic herb butter shrimp. We discussed the key ingredients and step-by-step cooking instructions. I also shared tips for perfect shrimp, different variations, and storage options. This dish is not just tasty; it's flexible too. Feel free to adjust flavors or try different proteins. With practice, you’ll impress your family and friends with this quick meal. Enjoy your cooking adventure!

Garlic Herb Butter Shrimp Flavorful and Quick Meal

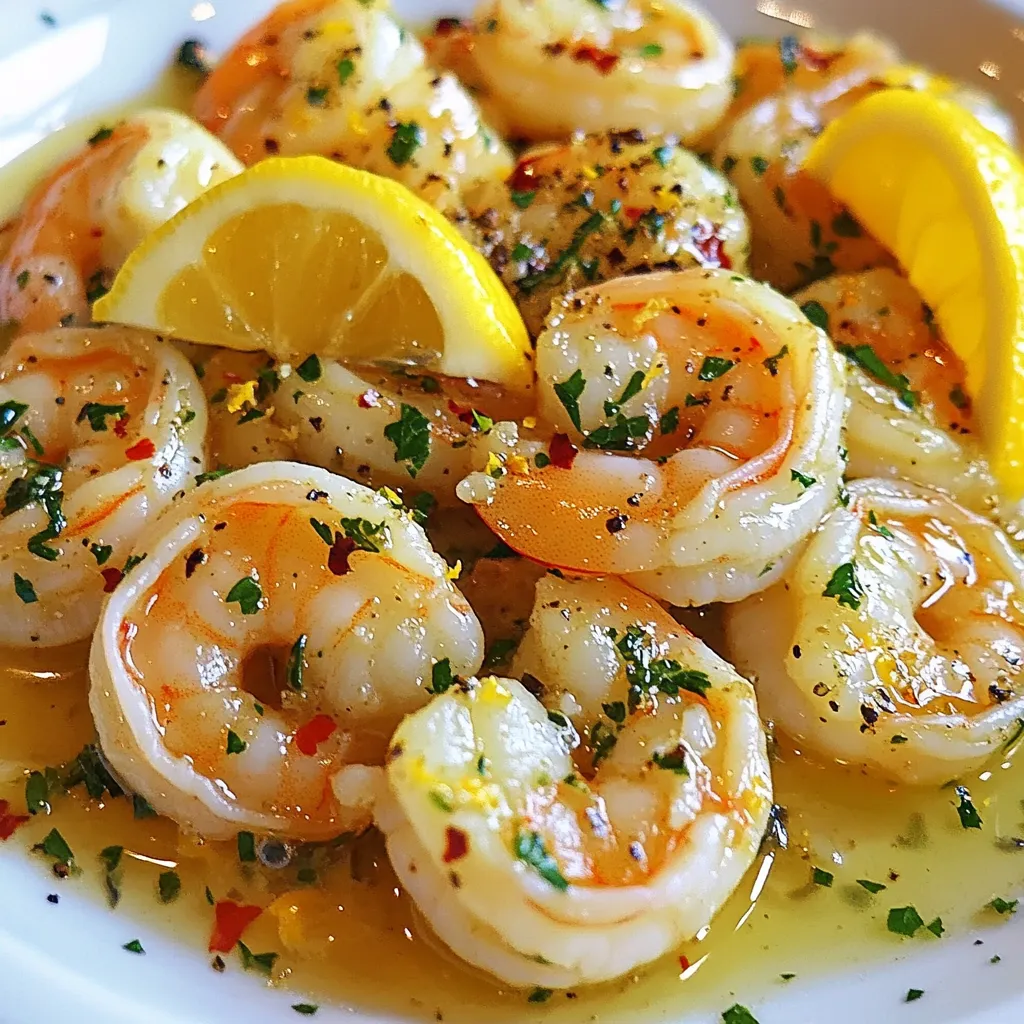
Craving a tasty meal that’s quick to make? Try my Garlic Herb Butter Shrimp! This dish combines juicy shrimp with

- 14 oz firm tofu, drained and pressed - 2 tablespoons cornstarch - 2 tablespoons vegetable oil - 1 red bell pepper, sliced - 1 green bell pepper, sliced - 1 cup snap peas, trimmed - 1 carrot, julienned - 3 green onions, chopped (whites and greens separated) - 2 cloves garlic, minced - 1 tablespoon fresh ginger, minced - 1/4 cup low-sodium soy sauce - 2 tablespoons mirin or apple cider vinegar - 1 tablespoon brown sugar - 1 tablespoon sesame oil - Sesame seeds for garnish This recipe uses simple ingredients. I start with firm tofu, which gives a great texture. The cornstarch helps create a crispy outside when frying. I love using fresh vegetables like bell peppers and snap peas for color and crunch. The ginger and garlic add a nice depth of flavor. The soy sauce and mirin create a sweet and salty balance. When I cook, I prioritize freshness. Using seasonal veggies can enhance the dish. If you can, choose organic options. It's better for you and the planet. Each ingredient plays a role, making this stir-fry both tasty and nutritious. {{ingredient_image_1}} To start, cut the pressed tofu into bite-sized cubes. Make sure they are uniform in size. This helps them cook evenly. Next, toss the tofu cubes in cornstarch until they are fully coated. This coating gives the tofu a nice crunch when fried. Now, heat one tablespoon of vegetable oil in a non-stick skillet over medium-high heat. Add the tofu cubes and fry them for about 8 to 10 minutes. Keep turning the cubes until they turn golden brown on all sides. Once they are crispy, remove them from the skillet and set them aside. In the same skillet, add another tablespoon of oil. Sauté the sliced red and green bell peppers, snap peas, and julienned carrot. Cook them for about 5 minutes, stirring often. It is important to keep the vegetables crisp. You want them tender but still vibrant and crunchy. After the vegetables soften, add minced garlic, ginger, and the white parts of the green onions. Cook this mixture for 1 to 2 minutes. The garlic and ginger will add a wonderful aroma to your dish. In a small bowl, mix the low-sodium soy sauce, mirin, brown sugar, and sesame oil. Pour this sauce over the sautéed vegetables. Stir well to combine. Now, add the fried tofu back into the skillet. Toss everything together so the tofu is coated in the sauce. Cook for another 2 to 3 minutes until everything is heated through. This step brings all the flavors together beautifully. - Pressing Tofu: Start by draining the tofu. Wrap it in a clean towel and place something heavy on top. Let it sit for at least 15 minutes. This step removes extra water. Less water means crispier tofu. - Frying Techniques: Cut the pressed tofu into bite-sized cubes. Toss them in cornstarch for a nice coating. Heat vegetable oil in a non-stick skillet over medium-high heat. Fry the tofu until it’s golden brown on all sides, about 8 to 10 minutes. This creates a crunchy outside with a soft inside. - Additional Seasonings: Try adding a dash of red pepper flakes for heat. You can also use a splash of lime juice for a fresh twist. Fresh herbs like cilantro can brighten the dish too. - Sauce Application: Mix the soy sauce, mirin, brown sugar, and sesame oil in a bowl. Pour the sauce over the veggies and tofu in the skillet. Toss everything well to coat. This ensures every bite is packed with flavor. - Pairing Ideas: Serve your Teriyaki Tofu Stir-Fry over fluffy white rice or with noodles. Both options soak up the sauce well and make a filling meal. - Presentation Tips: Garnish with sesame seeds and the green parts of the green onions. This adds color and makes the dish look appealing. A bright plate makes all the difference! Pro Tips Press Tofu Well: Ensure the tofu is thoroughly pressed to remove excess moisture, allowing it to absorb the flavors of the sauce and achieve a better texture when fried. Use High Heat: Cooking the tofu and vegetables over medium-high heat helps to achieve a nice sear on the tofu and retain the crispness of the vegetables, enhancing the overall flavor and texture. Mix Sauce Beforehand: Combine the sauce ingredients in advance to allow the flavors to meld together. This ensures a more balanced and flavorful finish when added to the stir-fry. Garnish for Flavor: Don’t skip the sesame seeds and green onions as a garnish; they add a fresh crunch and visual appeal, elevating the dish’s presentation and taste. {{image_2}} You can swap tofu for chicken or tempeh. Both options add flavor and protein. - Chicken: Use boneless, skinless chicken breasts. Cut them into bite-sized pieces. Cook them until golden, like the tofu. - Tempeh: This is a great plant-based option. Slice it thin and fry it until it's crispy. Tempeh absorbs flavors well and has a nutty taste. Not a fan of snap peas and bell peppers? No problem! Try different veggies based on what you like. - Broccoli: This is a crunchy option. It cooks quickly and adds great color. - Zucchini: Slice it thin. It cooks fast and brings a fresh taste. - Seasonal Options: In spring, use asparagus. In summer, add corn. In fall, try butternut squash. Each season offers unique flavors. You can change the sauce for different tastes. Here are some ideas. - Spicy: Add red pepper flakes or sriracha for heat. Start with a small amount to find your perfect spice level. - Sweet: For a sweeter sauce, add more brown sugar or a bit of honey. This balances the salty soy sauce. - Gluten-Free: Use tamari instead of soy sauce. It's a great choice for those avoiding gluten. Check labels to ensure all ingredients fit your needs. Experiment with these variations to make the dish your own! To keep your leftover stir-fry fresh, store it in an airtight container. Let it cool before sealing. This helps prevent moisture build-up. Place it in the fridge. It should last for about 3 to 5 days. When ready to eat, reheat it on the stove for best texture. You can freeze Teriyaki Tofu Stir-Fry if you want to save it for later. First, let it cool completely. Then, place it in a freezer-safe container. Seal it tightly to avoid freezer burn. It can last for up to 3 months in the freezer. When you're ready to eat it, defrost it overnight in the fridge. Reheat in a pan over medium heat. Add a splash of water or oil to keep it moist. Fresh Teriyaki Tofu Stir-Fry will taste best within a few days. In the fridge, it stays good for 3 to 5 days. If you freeze it, aim to eat it within 3 months for optimal flavor. After that, the taste and texture may change. The best tofu for stir-fry is firm or extra-firm tofu. These types hold their shape well during cooking. Soft tofu breaks apart easily, which is not ideal for stir-frying. Firm tofu absorbs flavors better, making your dish more tasty. It also gives a nice texture. When choosing tofu, look for a product that is well-pressed and free of excess water. This ensures it fries nicely and gets crispy. Yes, this Teriyaki Tofu Stir-Fry is fully vegan. All ingredients are plant-based, so you can enjoy this dish without any animal products. The tofu provides protein and is a great meat substitute. The sauce includes low-sodium soy sauce, mirin, and brown sugar, which are all vegan-friendly. You can serve this dish with rice or noodles for a complete meal. It’s a tasty option for everyone, whether you’re vegan or not. You can serve Teriyaki Tofu Stir-Fry with many sides. Here are some great ideas: - Steamed jasmine or brown rice - Noodles, like soba or udon - A fresh salad with sesame dressing - Stir-fried vegetables for extra crunch These sides balance the flavors of the stir-fry and make your meal more filling. Enjoy! This blog post shared a simple tofu stir-fry recipe with helpful tips. You learned how to prepare tofu and cook fresh vegetables for the best flavor. We talked about storage methods for leftovers and answered common questions about tofu options and vegan dishes. Use these ideas to create a tasty, easy meal. Don't be afraid to try different flavors and ingredients. Enjoy making your stir-fry unique to you!

Teriyaki Tofu Stir-Fry Quick and Flavorful Recipe

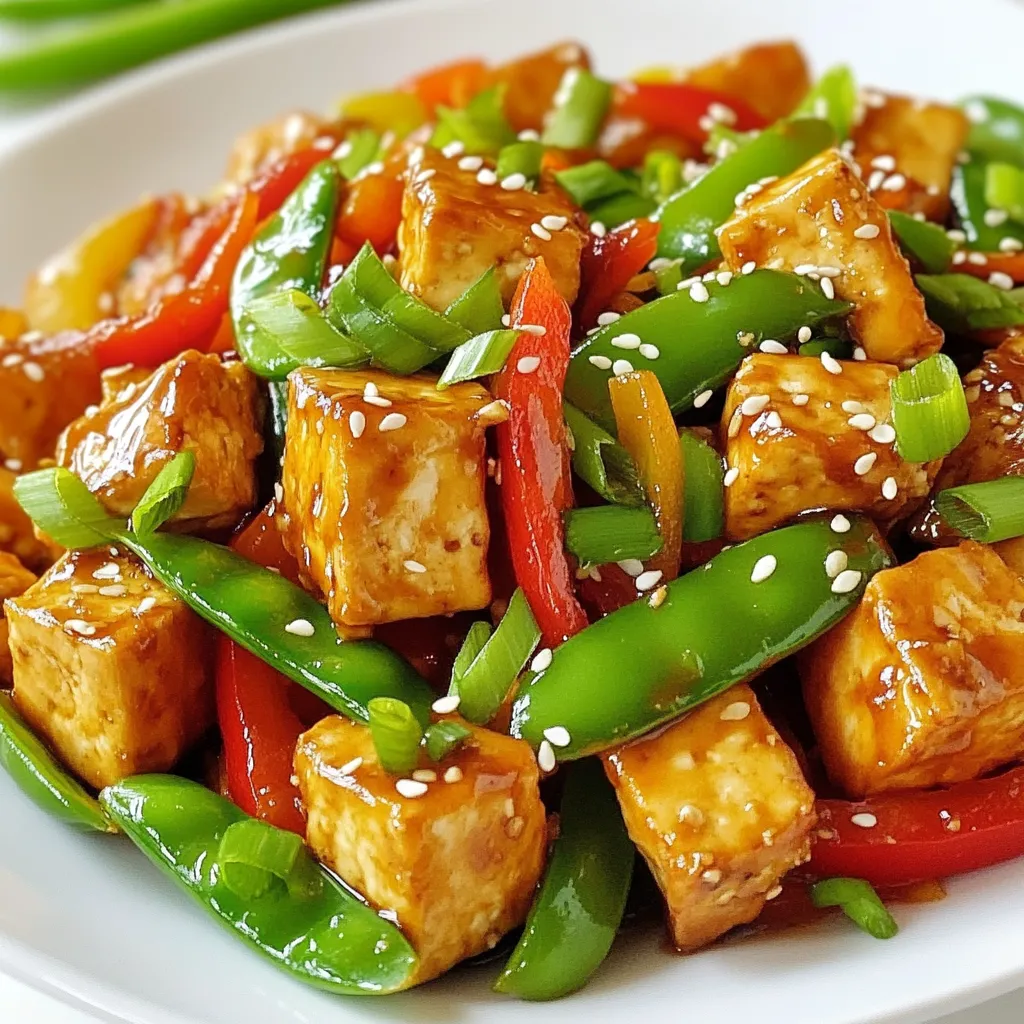
Craving a quick and tasty meal? Try this Teriyaki Tofu Stir-Fry! Packed with vibrant veggies and savory sauce, it’s both

- 1 cup ricotta cheese - 1 cup cherry tomatoes, halved - 1 tablespoon olive oil - 1 teaspoon balsamic vinegar - 1 clove garlic, minced - 1 teaspoon fresh basil, chopped (plus extra for garnish) - Salt and pepper to taste - 4 slices of crusty bread (like sourdough or ciabatta) - A pinch of chili flakes for heat - Medium-sized bowl - Baking sheet or grill pan - Small bowl for mixing - Spoon for serving - Oven or toaster oven {{ingredient_image_1}} First, grab a medium-sized bowl. Add the halved cherry tomatoes, minced garlic, olive oil, balsamic vinegar, chopped basil, salt, and pepper. Mix it well. Let it sit for about 10-15 minutes. This helps the flavors come together nicely. While the tomatoes sit, preheat your oven or toaster oven to 400°F (200°C). Take the slices of crusty bread and place them on a baking sheet. Toast them for about 5-7 minutes. Look for a golden, crispy texture. You can also grill the bread for a smoky flavor! In a small bowl, take your ricotta cheese. Add a pinch of salt and pepper. Mix gently to combine the seasoning into the cheese. This will make your ricotta extra tasty. Once the bread is toasted, spread a generous layer of the seasoned ricotta on each slice. Be sure to cover the entire surface for a rich flavor. Now, spoon the marinated cherry tomato mixture over the ricotta. Spread it evenly across the toasts. If you like some heat, sprinkle a pinch of chili flakes on top. Finally, add extra fresh basil leaves for a beautiful garnish. Serve your Ricotta Tomato Toasts warm. They make a great appetizer or a light meal. Enjoy them with a refreshing drink or a simple salad. For the best Ricotta Tomato Toasts, choose crusty bread. I love sourdough or ciabatta. These types hold the toppings well. They also add a nice crunch. You want a bread that toasts nicely and has great texture. Avoid soft breads; they won't give you that perfect bite. To boost the taste, use fresh ingredients. Fresh basil makes a big difference. Add a pinch of chili flakes if you like heat. The balsamic vinegar adds a sweet tang. Make sure to let the tomato mixture sit. This helps the flavors mix well. A drizzle of quality olive oil on top is a must. It adds richness and depth to your toasts. Prep your ingredients in advance. Chop tomatoes and basil the night before. This way, you save time when cooking. Use a toaster oven for easy toasting. You can toast multiple slices at once. If you are in a rush, skip the marinating step. Just mix everything and go! Your toasts will still taste great. Pro Tips Use Fresh Ingredients: Always opt for the freshest cherry tomatoes and basil to enhance the flavor of your toasts. Experiment with Breads: Try different types of crusty bread, like focaccia or baguette, for a unique twist on the classic toast. Customize Your Seasoning: Feel free to add other herbs like oregano or thyme to the ricotta for extra depth of flavor. Serve Immediately: For the best texture, serve the toasts right after assembling them to maintain the crispiness of the bread. {{image_2}} You can change the toppings for your Ricotta Tomato Toasts. Try adding roasted peppers or olives. Fresh arugula gives a nice peppery taste too. For cheese lovers, sprinkle some feta or goat cheese on top. You can also drizzle honey for a sweet twist. Each topping brings a new flavor. If you want to boost protein, add sliced chicken or smoked salmon. You can also use chickpeas for a vegetarian option. Adding an egg, either poached or fried, makes it a filling meal. These protein options make the dish more satisfying and nutritious. Use seasonal ingredients to keep it fresh. In summer, ripe heirloom tomatoes shine. Fall brings squash or roasted pumpkin. In winter, use sautéed greens or Brussels sprouts. Each season offers unique flavors that enhance your toasts. Adjusting your toppings with the seasons keeps every bite exciting. You can keep leftover Ricotta Tomato Toasts in the fridge. Place the toasts in an airtight container. They stay fresh for about two days. The bread may get soft, but the flavors will still shine. To reheat, simply pop the toasts in a toaster or oven. Heat them at 350°F (175°C) for about 5-10 minutes. This helps the bread regain its crispness. You can also microwave them, but the bread won't be as crunchy. Freezing these toasts is a great option if you have extra. Assemble the toasts but do not add the tomato mixture. Wrap each toast in plastic wrap and place them in a freezer bag. They can last up to a month in the freezer. When ready to eat, thaw them in the fridge overnight and then reheat. Yes, you can use other cheeses. Cream cheese or goat cheese works well. These cheeses offer a creamy texture. They also add a different flavor. Try feta for a salty kick. Just remember, the taste will change. Experiment until you find your favorite! To make Ricotta Tomato Toasts gluten-free, use gluten-free bread. Many brands offer tasty options. Check the labels to ensure they are safe. You can also use lettuce wraps. This way, you skip the bread altogether. Enjoy the same great flavors without the gluten! These toasts pair well with many dishes. A fresh green salad makes a great side. You could also serve them with soup. A light tomato or basil soup complements the flavors. For drinks, try sparkling water with lemon. It adds a nice touch and refreshes the palate. In this post, we explored how to make rich Ricotta Tomato Toasts. We discussed key ingredients, kitchen tools, and easy steps to prepare this dish. I shared tips to enhance flavor and speed up prep time. You also learned about tasty variations and storage options. Remember, this toast is flexible and fun. Feel free to experiment with different toppings. Enjoy creating your perfect Ricotta Tomato Toasts. I can't wait for you to try it!

Ricotta Tomato Toasts Flavorful and Quick Delight

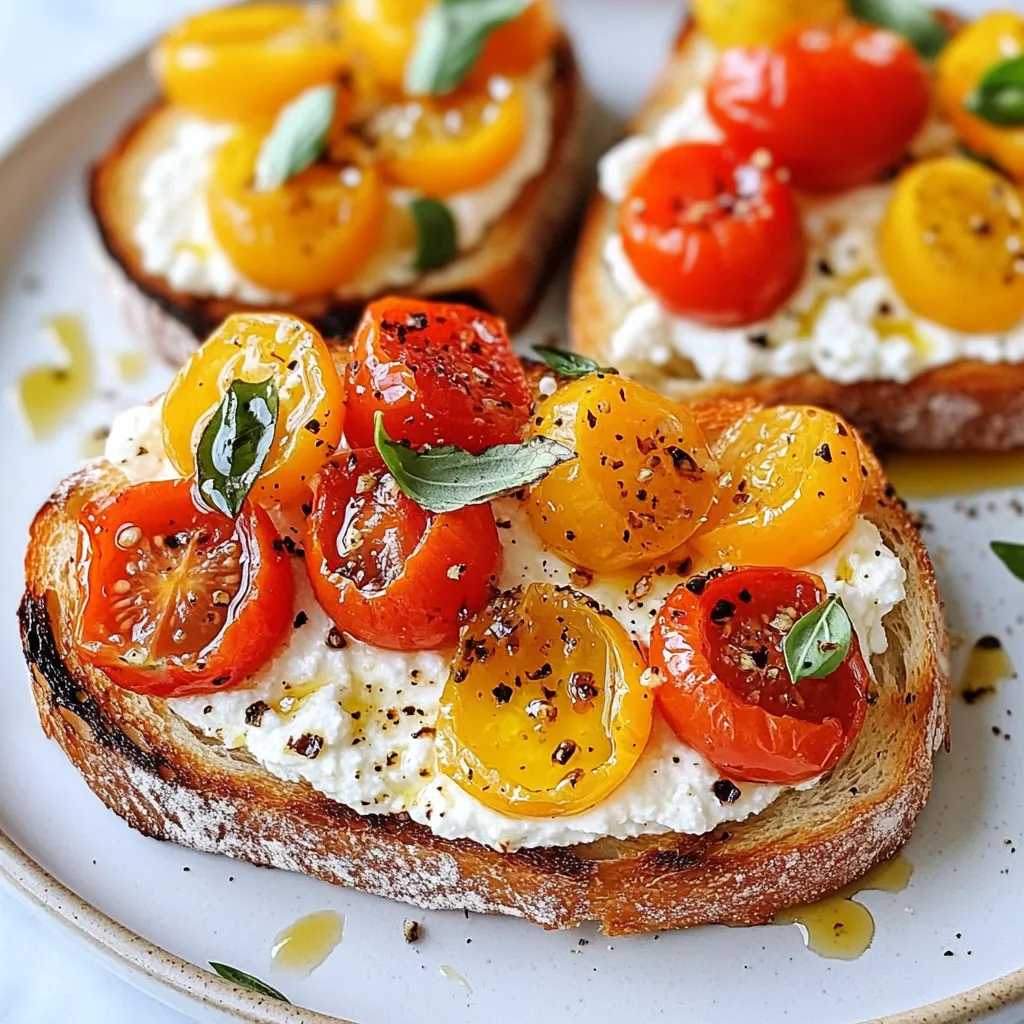
Welcome to a delicious journey with Ricotta Tomato Toasts! These toasts are not only quick to make, but they also

- 2 cups raw almonds - 2 tablespoons pure maple syrup - 1 teaspoon ground cinnamon - 1/4 teaspoon salt - 1 tablespoon coconut oil (optional) This recipe uses simple, wholesome ingredients. Raw almonds form the base. They provide great flavor and healthy fats. Pure maple syrup adds sweetness. It gives a rich taste that balances well with cinnamon. Ground cinnamon brings warmth and spice. Salt enhances all the flavors. Coconut oil is optional, but it adds creaminess. - You can swap maple syrup with honey or agave syrup. - For a nutty twist, try cashews or pecans instead of almonds. These substitutions still yield a tasty spread. Honey offers a different sweetness, while agave syrup is a good vegan option. Cashews create a creamier texture, while pecans add a unique flavor. - Food processor - Baking sheet - Airtight jar for storage A food processor is key. It helps turn almonds into a smooth butter. A baking sheet is needed for roasting the almonds. This step boosts the flavor. Finally, an airtight jar keeps your almond butter fresh. {{ingredient_image_1}} 1. First, preheat your oven to 350°F (175°C). This step gets the almonds ready for roasting. 2. Next, spread the raw almonds evenly on a baking sheet. Make sure they are in a single layer. 3. Roast the almonds in the oven for about 10-12 minutes. Stir halfway through for even cooking. You want them golden and fragrant. This roasting step boosts the flavor of the almonds. 1. After roasting, let the almonds cool for a few minutes. Then, transfer them to a food processor. 2. Blend the almonds on high speed for about 10-12 minutes. Stop to scrape down the sides as needed. 3. At first, the almonds will turn into a meal. Then, they will become a paste. Finally, you will get a smooth almond butter. If it seems too thick, add a bit of coconut oil for creaminess. 1. Once the almond butter is creamy, add the maple syrup, ground cinnamon, and salt. This is where the magic happens! 2. Blend again until everything is mixed well and smooth. Taste and adjust the sweetness or cinnamon to suit your preference. 3. Finally, transfer the almond butter to an airtight jar. Let it cool completely at room temperature before sealing. To get the best texture, blend the almonds long enough. Start with your food processor on high. The nuts will change from a meal to a paste, and finally to creamy almond butter. This process can take about 10 to 12 minutes. Stop every now and then to scrape the sides down. If you want it even creamier, add a tablespoon of coconut oil. This oil makes the almond butter smooth and rich. Want to make it even tastier? Try adding a pinch of nutmeg or a splash of vanilla. Both of these can add new layers of flavor. You can also play with how sweet it is. Add more or less maple syrup based on your taste. Find the perfect balance that makes you smile! Serving this almond butter is fun! Spread it on warm, toasted bread or pair it with apple and banana slices. For gifting, use pretty jars. Label them with the name and add a sprinkle of cinnamon on top for a lovely touch. Your friends will adore the tasty gift! Pro Tips Roasting Time: Ensure you roast the almonds until they are golden brown to enhance their flavor. Keep an eye on them to prevent burning. Blending Technique: Be patient while blending; the almonds need time to release their oils and become creamy. Stop occasionally to scrape down the sides for even blending. Sweetness Adjustment: Taste your almond butter before transferring it to a jar. You can always add more maple syrup or cinnamon to suit your preference. Storage Tips: Store your almond butter in an airtight jar. It can last up to two weeks at room temperature or longer in the fridge. {{image_2}} You can easily switch up the taste of your cinnamon maple almond butter. Here are two fun options: - Chocolate cinnamon almond butter: Add 2 tablespoons of cocoa powder when blending. This gives a rich, chocolatey twist to your spread. - Spicy almond butter with cayenne: Mix in a pinch of cayenne pepper for a kick. This adds warmth and excitement to the creamy texture. Why not blend different nuts and seeds? It’s a great way to create unique flavors. - Mixing with other nuts: Combine almonds with cashews or pecans. This creates a creamy and complex nut butter. You can play with the ratios to find your perfect taste. - Using seeds like sunflower or pumpkin: Add sunflower seeds for a nut-free option. Their nutty flavor brings a fresh twist to your almond butter. Cinnamon maple almond butter can fit many diets. Here are some ideas to adapt the recipe: - Vegan adaptations: This recipe is already vegan! The maple syrup is a great natural sweetener. - Nut-free alternatives: Use sunflower seed butter instead of almond butter. It keeps the creamy texture while being safe for those with nut allergies. To keep your cinnamon maple almond butter fresh, store it in an airtight jar. Glass jars work well to seal in flavor. Always keep it in a cool area, away from direct sunlight. A pantry shelf is a good spot. If your kitchen is warm, consider the fridge. This slows down spoilage and keeps it tasty. Homemade almond butter can last about two weeks at room temperature. If kept in the fridge, it can last up to a month. Always check for signs of spoilage. If you see mold or an off smell, it's time to toss it. Fresh almond butter should smell nutty and sweet. Freezing almond butter is easy. Start by placing it in a freezer-safe container. Leave some space at the top, as it can expand. Seal it well to prevent freezer burn. When you want to use it, move it to the fridge overnight to thaw. If you need it fast, let it sit at room temp for a few hours. Enjoy your almond butter anytime! Cinnamon maple almond butter is a tasty spread. You can use it on toast, pancakes, or waffles. It also works well in smoothies or oatmeal. Adding it to baked goods adds flavor too. You can dip fruits like apples or bananas in it. This spread makes a great snack for kids and adults alike. Yes, you can use roasted almonds. The flavor will be richer and nuttier. They will blend faster into a smooth paste, too. However, the texture might be a bit different. Roasted almonds can make the butter creamier. It may not have the same fresh taste as raw almonds. Both options are delicious, so choose what you like! Cinnamon maple almond butter is quite healthy. Almonds are full of good fats and protein. They help keep you full and give you energy. Maple syrup adds a touch of sweetness but has fewer calories than sugar. Cinnamon can help with blood sugar control. Just remember to enjoy it in moderation. In this blog post, we covered how to make delicious cinnamon maple almond butter from scratch. You learned about the key ingredients, easy steps, and helpful tips for perfect texture. We also explored fun variations and proper storage methods to keep your almond butter fresh. Overall, this recipe is simple and rewarding. It allows you to enjoy a tasty treat while choosing your own ingredients. Now it’s time to start blending and experimenting. Your homemade almond butter awaits!

Cinnamon Maple Almond Butter Simple and Delicious Spread

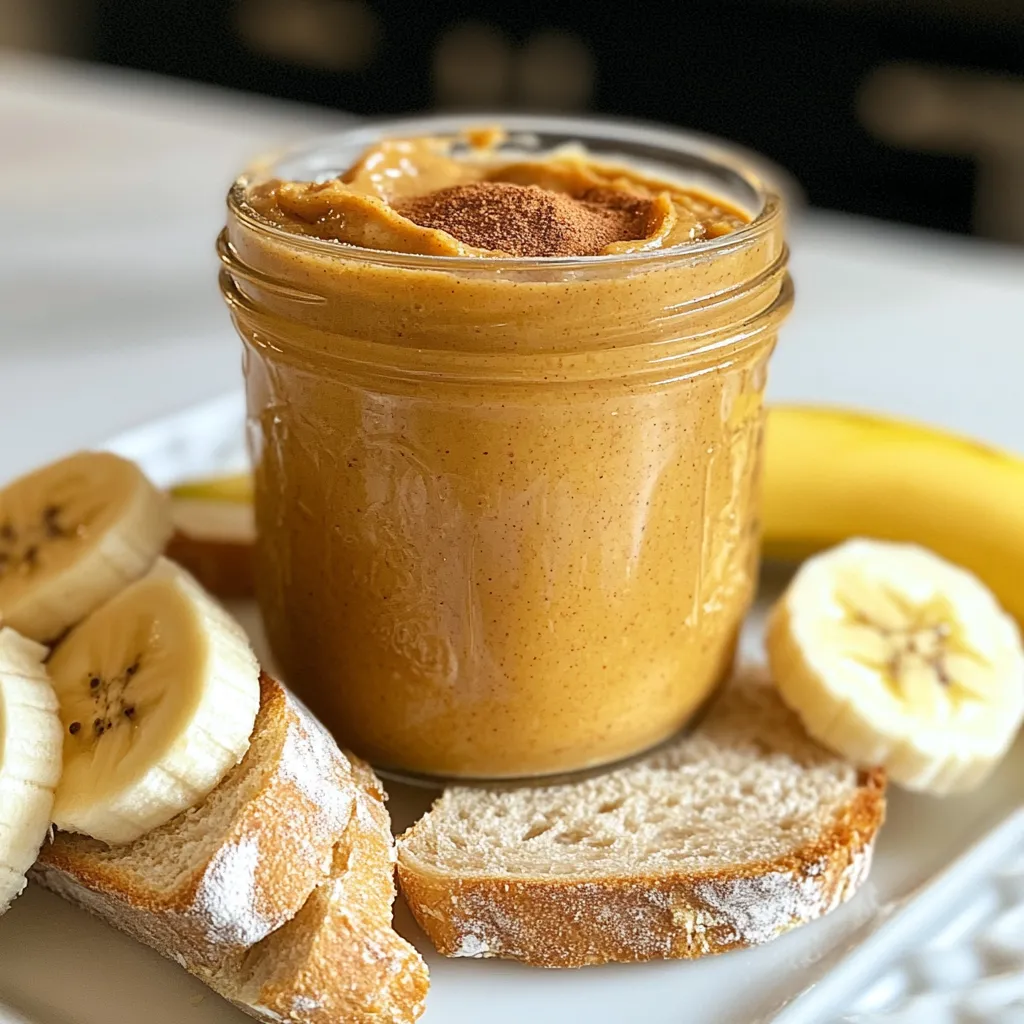
Want to elevate your snack game? With my easy Cinnamon Maple Almond Butter recipe, you’ll create a delicious spread that’s

- 2 boneless, skinless chicken breasts - 6 cups chicken broth - 1 cup orzo pasta - 1 medium onion, finely chopped - 2 cloves garlic, minced - 2 carrots, diced - 2 celery stalks, diced - 3 large eggs - 1/4 cup fresh lemon juice - 1 teaspoon lemon zest - Salt and pepper to taste - Fresh dill, chopped (for garnish) - Olive oil When making Greek Lemon Chicken Soup, I focus on fresh and simple ingredients. First, I use boneless, skinless chicken breasts. They cook quickly and stay tender in the soup. Chicken broth forms the base of the dish, adding depth and warmth. I love orzo pasta for its small size and texture. It cooks quickly and absorbs the soup’s flavors well. Fresh veggies like onion, carrots, and celery give the soup a sweet and savory touch. I always add minced garlic for its fragrant flavor. The egg and lemon mixture is what makes this soup special. The eggs add creaminess, while lemon juice brightens the dish. I finish with lemon zest for an extra burst of flavor. Seasoning is key. Salt and pepper help balance the dish. Finally, I garnish with fresh dill. It adds a pop of color and a fresh taste. Each ingredient plays a part in making this soup nourishing and delicious. {{ingredient_image_1}} First, we need to cook the chicken. Heat 1 tablespoon of olive oil in a large pot. Add the chicken breasts and cook them for about 5 minutes on each side. You want them to be golden brown. Once done, take the chicken out and set it aside. Now, let’s sauté our veggies. In the same pot, add the chopped onion, carrots, and celery. Cook these for about 5 minutes until they soften. Then, add the minced garlic and cook for one more minute. This step fills your kitchen with a lovely aroma. Pour in 6 cups of chicken broth. Bring this broth to a boil over high heat. Once it boils, lower the heat and add the chicken back to the pot. Let it simmer for 15 to 20 minutes. The goal is to ensure the chicken is fully cooked. After simmering, take the chicken out again and set it aside to cool a bit. Add 1 cup of orzo pasta to the broth. Cook this according to the package instructions, which is usually about 8 to 10 minutes. The orzo will soak up the flavors of the broth. While the orzo cooks, we prepare the egg-lemon mix. In a bowl, whisk together 3 large eggs, 1/4 cup of fresh lemon juice, and 1 teaspoon of lemon zest. This mixture adds creaminess and a zing to the soup. Now comes the important part: tempering the eggs. Gradually ladle about 1 cup of the hot broth into the egg mixture. Whisk this well to prevent the eggs from scrambling. After this, slowly pour the tempered egg mixture back into the pot, stirring constantly. Shred the cooked chicken and return it to the soup. Season with salt and pepper to taste. Let the soup simmer for 2 to 3 more minutes. This warms it through and thickens it slightly. Enjoy your Greek lemon chicken soup! - Using Fresh Herbs: Fresh dill adds a bright taste to the soup. You can also use parsley or mint. These herbs boost flavor and make the soup feel fresh. Use a handful of chopped herbs for the best result. - Importance of Lemon Zest: Lemon zest gives a strong citrus flavor. It adds depth without making the soup sour. Just a teaspoon is all you need. Grate the zest finely to mix well. - Ladling the Soup: When serving, ladle the soup gently into bowls. This keeps the ingredients intact and looks nicer. - Suggested Garnishes: Top each bowl with chopped fresh dill. A slice of lemon on the side adds color and a hint of flavor. You can also serve with crusty bread. - Ensuring Creaminess without Scrambling Eggs: To keep the soup creamy, temper the eggs. Slowly mix in hot broth while whisking. This helps avoid scrambled eggs in the soup. - Adjusting for Thickness: If the soup is too thin, let it simmer longer. This will help thicken it naturally. For a thicker soup, you can add more orzo pasta or reduce some broth. Pro Tips Use Fresh Ingredients: Opt for fresh vegetables and herbs to enhance the flavor and aroma of your soup. Perfectly Cooked Orzo: Add orzo to the soup towards the end of cooking to prevent it from becoming mushy. Tempering Eggs: Always temper the eggs with hot broth gradually to avoid scrambling and achieve a silky texture. Garnish Wisely: Fresh dill not only adds flavor but also brightens the presentation, making the soup visually appealing. {{image_2}} You can switch up proteins in Greek lemon chicken soup. Turkey works great as a substitute. It gives a nice flavor and keeps the dish light. You can also try shrimp or tofu for a different taste. For pasta, orzo is a classic choice, but you can use rice or quinoa. These options change the texture while keeping it hearty and filling. If you need gluten-free options, there are many choices for orzo. Look for gluten-free pasta made from rice or corn. These options cook well and blend into the soup nicely. For dairy-free versions, skip the eggs. Instead, use a cornstarch slurry to thicken the soup. This keeps the soup creamy without any dairy. Greek lemon chicken soup changes across Greece. In some areas, cooks add vegetables like spinach or zucchini for extra nutrition. Others use different herbs like parsley or mint for unique flavors. Local ingredients often inspire these variations. For example, in coastal regions, seafood might replace chicken, adding a fresh twist. It’s fun to explore these local takes on a classic dish! To keep your Greek lemon chicken soup fresh, store it properly. First, let the soup cool down. Then, place it in an airtight container. You can keep it in the fridge for up to three days. If you want to save it longer, freezing works well too. Pour the cooled soup into freezer-safe containers. Leave some space at the top for expansion. You can freeze it for up to three months. When it’s time to eat, you can reheat the soup on the stovetop or in the microwave. For the stovetop, pour the soup into a pot and heat it slowly. Stir often to keep it smooth. If using the microwave, put it in a bowl. Heat it in short bursts. Stir in between to avoid hot spots. This way, you keep the taste and texture nice. Understanding freshness is key. The soup tastes best when fresh. If stored in the fridge, try to eat it within three days. After that, the flavor may fade. In the freezer, it stays good for about three months. Just remember, the longer you wait, the more the quality may change. Always check for any off smells or changes before eating. Greek lemon chicken soup is a warm, comforting dish. It combines chicken, orzo pasta, and fresh lemon. This soup is known as Avgolemono in Greece. It has a rich taste from the eggs and lemon. People love it for its bright flavor and light texture. You can serve it warm or cold, making it perfect for any season. To make the soup richer, add cream or Greek yogurt. Stir in a bit of heavy cream after cooking. You can also use more eggs in the egg-lemon mixture. This will give the soup a silkier texture. Another tip is to sauté the chicken in butter instead of olive oil for added flavor. Yes, you can make this soup in advance. Prepare the soup and chill it in the fridge. Store it in an airtight container for up to three days. When ready to serve, heat it on the stove. If the soup thickens, add a little chicken broth to loosen it. Yes, this soup is healthy! It has lean protein from chicken. The fresh veggies add vitamins and minerals. Lemon juice provides vitamin C, which boosts your immune system. Orzo pasta gives you energy from carbohydrates. Overall, it’s a nutritious choice for a meal. This soup pairs well with crusty bread or a fresh salad. You can serve a Greek salad with tomatoes, cucumbers, and olives. A side of roasted vegetables complements the soup nicely. If you want something light, a simple green salad works too. In this blog post, we explored the simple yet delicious steps to make Greek Lemon Chicken Soup. We covered each ingredient, from the chicken and broth to fresh vegetables and seasonings. I shared cooking instructions and tips to enhance flavor and texture. You can even try different variations based on your needs. Remember, this soup stores well and can be enjoyed later. Embrace the warmth and richness of this dish, knowing it fits many diets and preferences. Enjoy your cooking!

Greek Lemon Chicken Soup Nourishing and Simple Recipe

Looking for a warm, comforting dish? Greek Lemon Chicken Soup is both nourishing and easy to make. With tender chicken,

Chia pudding is simple to make and uses fresh, tasty items. Here’s what you need: - Coconut Milk - Chia Seeds - Sweetener Options - Ripe Mango - Flavor Enhancers - Optional Toppings Let’s break these down. Coconut milk gives this pudding a rich, creamy base. You can use canned or carton types. Both work well. The coconut flavor shines through. Chia seeds are the magic ingredient. They soak up liquid and turn into a gel-like texture. This makes the pudding thick and satisfying. I recommend using maple syrup or honey. Both add sweetness and flavor. Adjust the amount to your taste. You can also use stevia or agave for a low-calorie option. Mango brings a fruity burst. Choose a ripe mango for the best sweetness. Peel and dice it before adding it to your pudding. Fresh mango makes every bite delightful. A splash of vanilla extract adds a lovely aroma. A pinch of salt boosts all the flavors. Both are easy to add and make a big difference. Get creative with toppings! You can add shredded coconut, fresh berries, or mint leaves. These add color and extra flavor. Try different combinations to find your favorite. With these ingredients, you’re on your way to a tasty and healthy treat! {{ingredient_image_1}} - Mixing the Ingredients In a medium mixing bowl, add 1 cup of coconut milk. Next, pour in 1/4 cup of chia seeds. Then, add 2 tablespoons of maple syrup. You can swap this for honey if you prefer. Add 1/2 teaspoon of vanilla extract and a pinch of salt. Whisk everything together. Make sure the chia seeds mix well with the coconut milk. - Refrigeration and Waiting Time Cover the bowl with plastic wrap or a lid. Place it in the refrigerator. Let it sit for at least 4 hours or overnight. This waiting time lets the chia seeds swell. They will absorb the liquid and create a thick pudding-like texture. - Final Stirring for Consistency After the waiting time, take the bowl out of the fridge. Stir the mixture well. This breaks up any clumps that may have formed. You want a smooth and creamy pudding. - Portioning the Pudding Grab serving glasses or bowls. Spoon the chia pudding into each one. Make sure to fill them evenly so everyone gets a good portion. This recipe serves four people. - Adding Toppings Now comes the fun part! Top each serving with diced mango. You can add extra toppings too. Consider using shredded coconut, fresh berries, or mint leaves. These add flavor and color to your dish. Enjoy your mango coconut chia pudding! To make great chia pudding, you need to focus on two key steps: mixing and resting. First, when you mix your ingredients, ensure the chia seeds spread evenly. This helps prevent clumps. I whisk them well with the coconut milk and other ingredients. Next, let the mixture rest in the fridge. This allows the chia seeds to absorb liquid and swell. A good time is at least four hours or overnight. The longer they sit, the thicker your pudding will get. When it comes to sweeteners, maple syrup and honey are both good choices. Maple syrup has a rich flavor, while honey adds a lovely floral note. You can pick based on what you like best. If you prefer a sugar-free option, try stevia or monk fruit sweetener. These choices keep the pudding sweet without adding extra sugar. Just remember to taste as you go, so you find the right sweetness for you. Pro Tips Chia Seeds Soaking Time: Ensure that you let the chia seeds soak for at least 4 hours or overnight for the best pudding consistency. Choosing Coconut Milk: Use full-fat canned coconut milk for a creamier texture, or light coconut milk for a lighter option. Mango Ripeness: Choose a ripe mango for natural sweetness and the best flavor. It should give slightly when pressed. Customization Options: Feel free to mix in other fruits or toppings like nuts or seeds to personalize your pudding. {{image_2}} You can play with fruits in mango coconut chia pudding. Try using pineapple or berries. Pineapple adds a tropical twist. Berries give a sweet and tart contrast. You can mix and match fruits for fun flavors. Other great combinations include: - Banana and coconut for a rich taste. - Kiwi and lime for a zesty kick. - Peaches and almonds for a summer vibe. Adding citrus zest can boost the flavor too. Lime or orange zest gives a fresh touch. The choice of fruits can change the look and taste, making each pudding a new treat. If you want to switch it up, try different milk options. You can substitute coconut milk with almond milk or oat milk. Each choice brings its own flavor and texture. Almond milk is light and nutty. Oat milk is creamy and smooth. Here are some ideas for non-dairy milks: - Soy milk for a protein boost. - Cashew milk for a rich, creamy pudding. These alternatives can help people with dietary needs enjoy this treat. They keep the pudding just as delightful while adding new flavors. To keep your mango coconut chia pudding fresh, store it in the fridge. Use an airtight container to lock in the flavors. This pudding stays tasty for about 5 days. If you notice any changes in smell or texture, it's best to discard it. You can enjoy this pudding cold or at room temperature. If you want to warm it, do so gently in the microwave. Stir well after heating. For added fun, top it with fresh mango, berries, or shredded coconut before serving. This will make every bite exciting! How long does it take for chia seeds to thicken? Chia seeds need about 4 hours to thicken. For best results, let them sit overnight. The seeds soak up the liquid and become soft, forming a pudding-like texture. Can I use whole chia seeds or do they need to be ground? You can use whole chia seeds. Grinding them is not necessary. Whole seeds add a nice texture to your pudding and provide great nutrition. Is Mango Coconut Chia Pudding healthy? Yes, this pudding is very healthy! Chia seeds are rich in fiber, protein, and omega-3 fatty acids. Coconut milk adds healthy fats. Mango brings vitamins and sweetness without added sugars. Can I make this recipe ahead of time? Absolutely! This pudding is perfect for meal prep. You can make it up to three days in advance. Just store it in the fridge in an airtight container. What can I substitute for maple syrup? If you don’t have maple syrup, honey works well too. You can also use agave nectar or coconut sugar. Each option will give a unique flavor to your pudding. You learned how to make Mango Coconut Chia Pudding. We covered key ingredients like chia seeds and coconut milk. The step-by-step guide helped simplify the preparation. I shared tips for perfect texture and tasty variations. This pudding is fun to customize, with many fruit options to try. Remember to store it well for freshness. With this knowledge, you can enjoy a healthy treat that delights your taste buds. Happy pudding-making!

Mango Coconut Chia Pudding Delightful and Nutritious

Are you ready to indulge in a tasty and healthy treat? Mango Coconut Chia Pudding is not only delicious but

Older posts
Newer posts
← Previous Page1 … Page124 Page125 Page126 … Page130 Next →
© 2025 My Cooking Cast • Built with GeneratePress

Our Policies

  • Privacy Policy
  • GDPR Policy
  • Terms Of Use
  • Copyright Policy
  • Cookie Policy
  • Disclaimer

More Information​

  • Home
  • Contact
  • About
  • Dinner
  • Appetizers
  • Dessert
©2025, My Cooking Cast About Privacy Policy Back To Top