Skip to content
DisclaimerTerms Of UseGDPR PolicyCookie Policy

My Cooking Cast

  • Home
  • Drinks
  • Appetizers
  • Dinner
  • Dessert
  • About
  • Contact
  • Privacy Policy
DisclaimerTerms Of UseGDPR PolicyCookie Policy

Emma

- 1 block (14 oz) firm tofu, pressed and cubed - 2 cups mixed bell peppers, sliced (red, yellow, and green) - 1 cup broccoli florets - 1 carrot, julienned - 3 cloves garlic, minced - 1 teaspoon grated ginger The main ingredients in this dish create a colorful and tasty mix. Firm tofu brings protein and holds flavors well. The mixed bell peppers add sweetness and crunch. Broccoli adds a nice green touch and nutrients. Carrots lend a sweet bite. Garlic and ginger add depth and warmth to the dish. - 1/4 cup honey - 1/4 cup low-sodium soy sauce - 1 tablespoon sesame oil The sauces and seasonings transform this dish into something special. Honey provides a sweet glaze that balances the savory notes. Low-sodium soy sauce adds umami without too much salt. Sesame oil gives a nutty flavor, enhancing the overall taste. - Sesame seeds, for garnish - Chopped green onions, for garnish The garnishes make your dish look pretty and tasty. Sesame seeds add a slight crunch and nutty taste. Chopped green onions add freshness and a pop of color. These small touches elevate the meal and make it restaurant-worthy. Enjoy your cooking adventure! {{ingredient_image_1}} To start, you need to press the tofu. Place a block of firm tofu on a plate. Cover it with another plate and put something heavy on top. Let it sit for at least 30 minutes. This step removes excess moisture. After pressing, cut the tofu into 1-inch cubes. Next, coat the tofu cubes with cornstarch. Place the cubes in a bowl and sprinkle the cornstarch over them. Toss gently until every piece is evenly coated. This coating helps create a crispy texture when frying. Now, it’s time to fry the tofu. Heat vegetable oil in a large skillet or wok over medium-high heat. Add the coated tofu cubes to the skillet. Fry them for about 5-7 minutes. Turn them occasionally until they turn golden and crispy on all sides. Once done, remove the tofu and set it aside on a plate. Next, stir-fry the vegetables. In the same skillet, add a bit more oil if needed. Toss in the mixed bell peppers, broccoli, and julienned carrot. Stir-fry for about 4-5 minutes. You want the veggies to be tender-crisp, not mushy. Then, push the vegetables to the side of the skillet. Add the minced garlic and grated ginger to the center. Sauté for about 1 minute until fragrant, stirring to avoid burning. Now, it's time to combine everything. Return the crispy tofu to the pan with the vegetables. Drizzle the honey, soy sauce, and sesame oil over the mix. Stir everything together well. Make sure each piece is coated in sauce. Cook for an additional 2-3 minutes until heated through. Taste and adjust seasoning if needed before removing from heat. Tofu can be tricky. Pressing it is key. This step removes water and helps the tofu fry better. Press the tofu for at least 30 minutes. You can use a heavy object, like a skillet. For crispy tofu, coat the cubes in cornstarch. This creates a nice outer layer when fried. Heat your pan well before adding tofu. Fry it until golden brown and crispy on all sides. Sweetness and saltiness matter in this dish. You can adjust the honey and soy sauce to fit your taste. If you like it sweeter, add more honey. For saltiness, use low-sodium soy sauce. You can also try adding spices. Crushed red pepper flakes give heat. A splash of rice vinegar adds tang. These simple tweaks will elevate your dish. Serving is part of the fun! Use a large bowl or platter for an appealing look. Garnish with sesame seeds and chopped green onions. This adds color and texture. Pair your stir fry with steamed rice or quinoa. Both are great at soaking up the sauce. This makes a complete meal that’s both tasty and beautiful. Pro Tips Press Tofu Thoroughly: Ensure the tofu is pressed for at least 30 minutes to remove excess moisture; this helps achieve a crispy texture when frying. Use High Heat: Cooking the tofu and vegetables over medium-high heat allows for a quick stir-fry, preserving the crunchiness of the veggies. Adjust Sweetness: Feel free to adjust the amount of honey in the sauce according to your taste preference for sweetness. Garnish for Flavor: Don't skip on the sesame seeds and green onions as they add a fresh flavor and a beautiful presentation to the dish. {{image_2}} You can swap tofu with tempeh. Tempeh has a nutty taste and firm texture. It works well with the honey garlic sauce. You can also use chicken or shrimp for a meatier option. Each protein adds its own flavor and texture to the dish. Feel free to mix in other veggies. Zucchini, snap peas, or mushrooms are great choices. They all cook quickly and add color. You can use seasonal vegetables too. In spring, asparagus or peas shine. In winter, root veggies like carrots and parsnips work well. To keep it vegan, check all ingredients. Use agave nectar or maple syrup instead of honey. These options give sweetness without animal products. Always confirm that your soy sauce is vegan too. This way, you can enjoy the dish while sticking to a plant-based diet. To store leftover stir fry, let it cool first. Place it in an airtight container. It will stay fresh for up to four days. When reheating, use a skillet for best results. Heat on medium until warmed through. You can also use a microwave. Just cover the dish and heat in short bursts. Yes, you can freeze honey garlic tofu stir fry! To do this, let it cool down completely. Place it in a freezer-safe container. Be sure to leave space for expansion. It can last up to three months in the freezer. When ready to eat, thaw it in the fridge overnight. Reheat in a skillet or microwave. This keeps the flavors intact and the tofu crispy. Yes, you can make this recipe gluten-free. To do this, you need to substitute the soy sauce. Use tamari, a gluten-free soy sauce, instead. It has a similar taste and works well in this dish. Always check labels to ensure no gluten is present in your ingredients. To add some heat to your stir fry, consider these options: - Add sliced jalapeños or serrano peppers for freshness. - Use red pepper flakes for a quick spice boost. - Incorporate sriracha or chili paste in the sauce. Start with a small amount and adjust to your taste. This honey garlic tofu stir fry pairs nicely with: - Steamed jasmine rice for a classic choice. - Quinoa for a protein-packed alternative. - A fresh salad to add a crunchy texture. These sides help balance the flavors and make your meal complete. This stir fry with tofu and colorful veggies offers a tasty and healthy meal. We explored key ingredients, including firm tofu, fresh vegetables, and savory sauces. I shared step-by-step instructions, tips for the perfect texture, and tasty variations to try. In closing, this dish is fun to make and easy to adapt. Try different proteins or veggies to match your taste. Store leftovers properly, and enjoy your meal later. Happy cooking and enjoy your delicious creation!

Honey Garlic Tofu Stir Fry Savory and Simple Meal

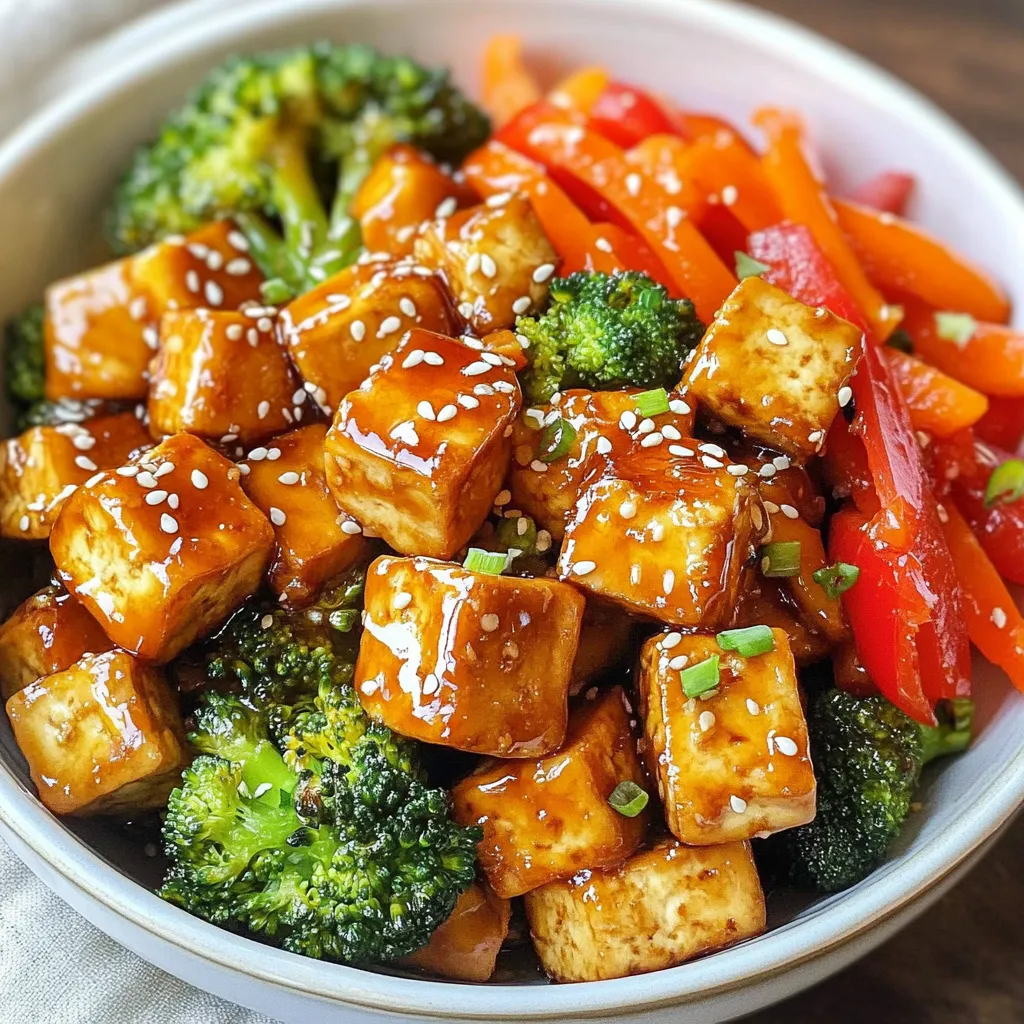
Looking for a quick and tasty meal? Look no further than this Honey Garlic Tofu Stir Fry! It’s packed with

To create delicious pumpkin spice energy bites, you need a few simple ingredients. Each one adds flavor and nutrition. - 1 cup rolled oats - 1/2 cup pumpkin puree - 1/2 cup natural peanut butter (or almond butter) - 1/4 cup honey or maple syrup - 1 teaspoon vanilla extract - 1 teaspoon ground cinnamon - 1/2 teaspoon ground nutmeg - 1/4 teaspoon ground ginger - 1/4 teaspoon salt - 1/4 cup mini dark chocolate chips (optional) - 1/4 cup chopped nuts (walnuts or pecans) These ingredients are easy to find. You can use almond butter if you prefer. Honey or maple syrup gives a nice sweetness. The spices create that warm pumpkin flavor. If you like a little crunch, add the nuts and chocolate chips. They make the bites even more fun to eat! {{ingredient_image_1}} 1. Mixing ingredients in a bowl Start by grabbing a large mixing bowl. Add 1 cup of rolled oats, 1/2 cup of pumpkin puree, and 1/2 cup of natural peanut butter. Pour in 1/4 cup of honey or maple syrup. Then, add 1 teaspoon of vanilla extract. Stir everything until it is well mixed. 2. Adding spices and optional ingredients Now, it’s time to add flavor! Sprinkle in 1 teaspoon of ground cinnamon, 1/2 teaspoon of ground nutmeg, 1/4 teaspoon of ground ginger, and 1/4 teaspoon of salt. Mix again until the spices spread evenly through the mixture. If you want, fold in 1/4 cup of mini dark chocolate chips and 1/4 cup of chopped nuts. This step adds a nice crunch! 3. Refrigeration and portioning out the mixture Cover your bowl with plastic wrap. Place it in the fridge for about 30 minutes. This helps the mix firm up. After that, use a tablespoon or a cookie scoop to take out the mixture. 4. Forming the energy bites With clean hands, roll the mixture into bite-sized balls. Aim for about 1 inch in diameter. Once formed, place the energy bites on a parchment-lined baking sheet or plate. 1. Setting the bites in the refrigerator Put the bites back in the fridge for another 15 minutes. This helps them set nicely. 2. Storing the bites After they’ve set, store your energy bites in an airtight container. Keep them in the fridge, and they will stay fresh for up to a week. Enjoy your tasty and energizing snack! To make your Pumpkin Spice Energy Bites just right, focus on texture. You want them chewy but firm. If they feel too sticky, add more oats. If they are too dry, add a bit more pumpkin puree or nut butter. When rolling the bites, wet your hands slightly. This helps keep the mixture from sticking to your fingers. Use a tablespoon or cookie scoop for even sizes. This makes them easy to grab and enjoy. You can add more flavors to your bites. Try adding a tablespoon of chia seeds or flaxseeds for extra nutrition. For a touch of sweetness, mix in dried fruit like cranberries or raisins. If you have allergies or preferences, you can swap ingredients. Almond butter works well in place of peanut butter. For a vegan option, use maple syrup instead of honey. You can also skip the chocolate chips if you want to keep them healthier. Pro Tips Chill for Better Texture: Refrigerating the mixture before rolling it into balls helps the energy bites hold their shape better. Experiment with Nut Butters: Feel free to substitute peanut butter with almond butter or any other nut butter you prefer for a different flavor profile. Add More Spice: For a spicier kick, increase the amounts of cinnamon, nutmeg, or ginger according to your taste preferences. Customize Add-ins: You can add dried fruits, seeds, or other nuts to the mixture for a personalized touch and additional nutrients. {{image_2}} You can change the flavor of your pumpkin spice energy bites easily. One fun option is to add chocolate chips. This adds a rich, sweet taste that pairs well with the pumpkin spice. Just mix in 1/4 cup of mini dark chocolate chips when you combine your ingredients. The chocolate melts slightly and makes every bite a treat. If you want to make nut-free versions, swap out peanut butter for sunflower seed butter. This keeps the bites creamy and delicious without nuts. You can also skip the nuts in the recipe entirely. The oats and pumpkin provide great texture and flavor on their own. You can customize these bites for different seasons. For a holiday twist, add festive spices like ground cloves or allspice. This makes them perfect for fall gatherings or winter celebrations. You can also shape them like small pumpkins for fun. Another idea is to add superfoods for nutrition. You can mix in chia seeds or hemp seeds for extra protein and healthy fats. This boosts the energy and makes them even more filling. Just a tablespoon of either will do. These simple changes can make your pumpkin spice energy bites even better! This recipe makes about 12 to 15 energy bites. Each serving is one bite. Each serving has around: - Calories: 100 - Protein: 3g - Fats: 5g - Carbs: 10g - Sugars: 4g These bites are a great snack. They provide energy and good nutrition. The oats give fiber, while the pumpkin adds vitamins. Peanut butter offers healthy fats and protein. This snack can help you stay full and energized. Enjoy them as a quick pick-me-up! How long do pumpkin spice energy bites last? These energy bites can last up to one week in the fridge. Store them in an airtight container to keep them fresh. Can I freeze these energy bites? Yes, you can freeze these bites! They freeze well for up to three months. Just thaw them in the fridge before eating. What can I substitute for peanut butter? You can use almond butter or sunflower seed butter. These options work well and keep the bites creamy. Are pumpkin spice energy bites healthy? Yes, they are healthy! They contain oats, pumpkin, and nuts, which provide fiber and nutrients. Can I use fresh pumpkin instead of puree? You can use fresh pumpkin, but it needs to be cooked and blended until smooth. This helps keep the texture right. These pumpkin spice energy bites are easy to make and fun to enjoy. We mixed wholesome ingredients like oats, pumpkin puree, and nut butter to create a tasty treat. Remember to adjust the spices and add optional ingredients like dark chocolate or nuts for extra flavor. In the end, you can enjoy these bites in many ways. They fit into different diets and seasons. Get ready to share them with friends and family!

Pumpkin Spice Energy Bites Tasty and Energizing Snack

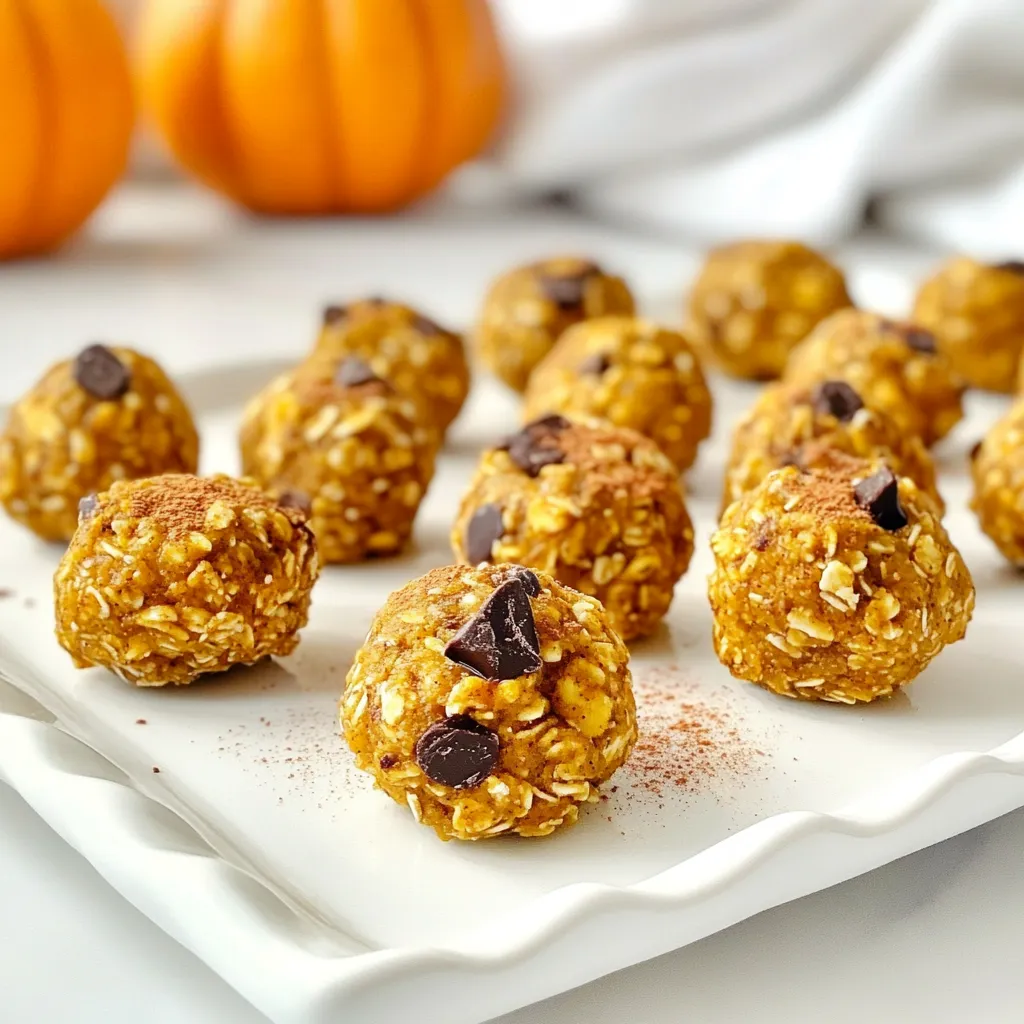
Looking for a quick snack that’s both tasty and energizing? You’ll love these Pumpkin Spice Energy Bites! With their warm

To make creamy spinach stuffed mushrooms, you need a few simple ingredients. Here’s what you’ll need: - 12 large portobello mushrooms, stems removed - 2 cups fresh spinach, chopped - 1 cup cream cheese, softened - 1/2 cup grated parmesan cheese - 1/4 cup breadcrumbs - 2 cloves garlic, minced - 1/4 teaspoon nutmeg - Salt and pepper to taste - 2 tablespoons olive oil - Fresh parsley, chopped (for garnish) These ingredients work in harmony to create a rich and savory filling. The portobello mushrooms serve as the perfect base. They are large and meaty, providing a satisfying bite. Fresh spinach adds color and nutrients, while cream cheese brings creaminess. Parmesan gives a nice salty kick, and garlic adds depth. Breadcrumbs help bind it all together, and nutmeg enhances the flavor profile. Use good-quality ingredients for the best results. Fresh spinach brightens the dish, and high-quality cheeses make the filling extra special. Don't forget to season well with salt and pepper. This step is key to balancing all the flavors. With these ingredients ready, you can create a delicious appetizer that impresses everyone at your table. {{ingredient_image_1}} 1. Preheat your oven to 375°F (190°C). This step is key to a perfect bake. 2. Grab a baking tray and line it with parchment paper. This makes cleanup easy. 3. In a skillet, add 2 tablespoons of olive oil over medium heat. 4. Once hot, add 2 cloves of minced garlic. Sauté for about 1 minute. You want it fragrant but not burnt. 5. Add 2 cups of chopped fresh spinach to the skillet. Cook until it wilts, about 3-4 minutes. 6. Season the spinach with 1/4 teaspoon of nutmeg, salt, and pepper. Remove from heat and let it cool slightly. 1. In a large bowl, combine the cooked spinach with 1 cup of softened cream cheese. 2. Add 1/2 cup of grated parmesan cheese and 1/4 cup of breadcrumbs to the mix. 3. Stir everything well until fully combined. This will be your creamy filling. 1. Take each of the 12 large portobello mushrooms and remove the stems. 2. Generously stuff each mushroom cap with the creamy spinach mixture. 3. Place the stuffed mushrooms on your prepared baking tray. 4. Bake in the preheated oven for 20-25 minutes. Look for tender mushrooms and golden filling. 5. Once done, remove them from the oven and let them cool for a few minutes. 6. Garnish with chopped parsley before serving for a fresh touch. - Choosing the right mushrooms: I prefer large portobello mushrooms for this recipe. They hold up well and have a rich flavor. Make sure they are fresh and free of bruises. Look for mushrooms that are firm and plump. Clean them gently with a damp cloth before using. - Ensuring the filling is creamy: Use softened cream cheese for a smooth texture. This makes mixing easy and ensures every bite is rich. I add grated parmesan for depth and a hint of saltiness. Don't forget to mix in the cooked spinach well. This makes sure the filling is evenly creamy throughout. - Avoiding overcooking the mushrooms: Keep an eye on your baking time. I suggest baking for 20 to 25 minutes. This way, the mushrooms get tender but do not lose their shape. Overcooked mushrooms can become mushy and less enjoyable. - Perfecting the baking time: Every oven is different, so check your mushrooms at 20 minutes. Look for a golden filling and soft caps. If they need more time, check every 2 to 3 minutes. This helps you avoid burning the tops while ensuring they are cooked through. Pro Tips Choose the Right Mushrooms: Opt for large portobello mushrooms for a sturdy base that can hold the creamy filling without falling apart. Enhance the Flavor: Add a splash of lemon juice or a sprinkle of red pepper flakes to the filling for an extra zing. Make Ahead: Prepare the filling and stuff the mushrooms a few hours in advance. Keep them covered in the fridge until you’re ready to bake. Perfect Baking: For an even more golden top, broil the stuffed mushrooms for the last 2-3 minutes of baking, watching closely to prevent burning. {{image_2}} You can switch up the cheeses in this recipe. Cream cheese is rich, but you can try ricotta or goat cheese for a twist. Both add unique flavors. If you want to make it lighter, use low-fat cream cheese. Adding extra vegetables can boost flavor and nutrition. Chopped artichokes or sun-dried tomatoes work well. You can also add bell peppers or zucchini. Just sauté them with the spinach for a few minutes. Enhancing the flavor is easy. Adding spices like red pepper flakes brings heat. Fresh herbs like basil or thyme can add freshness. Mix in some lemon zest for a bright taste. You can also change the breadcrumbs. Panko breadcrumbs give a nice crunch. For a different taste, try using crushed crackers or cornmeal. Each option brings a new texture and flavor to your dish. To store your leftover creamy spinach stuffed mushrooms, let them cool first. Place them in an airtight container. This helps keep them fresh and tasty. Use a container that fits snugly. If you have many mushrooms, stack them carefully to avoid squishing. They stay good in the fridge for up to three days. To reheat stuffed mushrooms, use the oven for the best results. Preheat it to 350°F (175°C). Place the mushrooms on a baking tray. Cover them with foil to keep them moist. Heat for about 10-15 minutes. If you're in a hurry, use the microwave. Place them on a microwave-safe plate. Heat them for about 1-2 minutes. Keep an eye on them to avoid overcooking. This method may change the texture slightly. Enjoy the same great flavor after reheating! Can I make these ahead of time? Yes, you can prepare these stuffed mushrooms ahead of time. After you fill them, cover and store them in the fridge. This keeps them fresh for up to 24 hours. When you are ready, just bake them as directed. What can I serve with Creamy Spinach Stuffed Mushrooms? These tasty mushrooms pair well with many dishes. You can serve them with a fresh salad or garlic bread. They also work great as an appetizer with a dipping sauce like marinara or aioli. How do I know when they are fully cooked? You can tell they are done when the mushrooms feel tender. The filling should be golden and bubbly on top. This usually takes about 20 to 25 minutes in the oven. Can I freeze Creamy Spinach Stuffed Mushrooms? Yes, you can freeze them. Prepare and stuff the mushrooms, then freeze them in a single layer. Once frozen, store them in a container. When you want to eat them, bake directly from frozen. Just add a few extra minutes to the cooking time. You can create a delicious dish with easy steps, fresh ingredients, and smart tips. We covered the list of ingredients you need, plus prep and cooking steps. I shared helpful tips for choosing mushrooms and avoiding common mistakes. You can also explore fun variations to mix it up. Lastly, I provided storage info for leftovers and answered common questions. With this guide, you can enjoy creamy spinach stuffed mushrooms that impress. Dive into cooking and savor your tasty results!

Creamy Spinach Stuffed Mushrooms Tasty and Simple Appetizer

Looking for a quick and tasty appetizer? Let me introduce you to Creamy Spinach Stuffed Mushrooms! These savory bites are

- 1 pound sirloin steak, cut into bite-sized cubes - 1 pound baby potatoes, halved - 4 tablespoons unsalted butter - 5 cloves garlic, minced - 1 teaspoon fresh rosemary, chopped - 1 teaspoon fresh thyme, chopped - Salt and pepper to taste - 2 tablespoons olive oil - Fresh parsley for garnish Each ingredient plays a key role in this dish. The sirloin steak provides rich flavor and tender bites. Baby potatoes add heartiness and texture, making this meal filling. Unsalted butter gives a creamy finish, while garlic adds a fragrant kick. Fresh rosemary and thyme bring depth and earthiness to the dish. I recommend using fresh herbs for the best taste. Dry herbs can work, but fresh really shines here. For the steak, choose high-quality sirloin for a juicy result. You can also swap in other cuts if you prefer. Baby potatoes are ideal, as they cook evenly. You can use red or yellow potatoes, depending on what you have. If you're feeling adventurous, try adding some chopped bell peppers or zucchini for extra color and flavor. Salt and pepper are your friends in this recipe. They enhance every element, so don’t skip them. Fresh parsley is perfect for garnish. It adds a pop of color and freshness just before serving. Gather all these ingredients, and you'll be ready to create a tasty meal that everyone will enjoy! {{ingredient_image_1}} - Heat 2 tablespoons of olive oil in a large skillet. - Add halved baby potatoes and season with salt and pepper. - Cook for 15-20 minutes, stirring often, until golden brown and tender. - Once done, remove them from the skillet and set aside. - Increase the heat to medium-high in the same skillet. - Add cubed sirloin steak and season with salt and pepper. - Cook for 3-4 minutes, stirring often, until browned on all sides and tender. - Reduce the heat to medium. - Add minced garlic, chopped rosemary, and thyme to the skillet. - Cook for about 1 minute until the garlic smells great. - Add 4 tablespoons of unsalted butter to the skillet. - Stir to mix the butter with the steak and herbs until it melts. - Return the cooked potatoes to the skillet. - Stir well to combine with the steak and garlic butter mixture. - Heat through for another 2-3 minutes. - Remove the skillet from heat. - Garnish with fresh parsley for a pop of color. This dish is quick and easy. You will love how the flavors blend. Serve it straight from the skillet for a great look! To cook steak just right, aim for 3-4 minutes for medium-rare. This time lets the meat brown and stay juicy. The best cut for this dish is sirloin. It’s tender and has great flavor. You can add more herbs for extra taste. Try parsley, oregano, or basil. When seasoning potatoes, use salt and pepper. This simple mix brings out their natural taste. I prefer a cast iron skillet for this recipe. It holds heat well and gives a nice sear. If you use non-stick, it may not brown as much. Always let your steak rest for a few minutes. This helps the juices stay inside, making it tender. Pro Tips Use Room Temperature Steak: Allow your steak to sit at room temperature for about 30 minutes before cooking. This helps it cook more evenly. Don't Overcrowd the Skillet: When searing the steak, make sure not to overcrowd the skillet. Cook in batches if necessary to achieve a good sear. Fresh Herbs for Flavor: Use fresh herbs instead of dried for a more vibrant flavor in your garlic butter sauce. Fresh herbs bring out the best in your dish. Rest Your Steak: After cooking, let the steak rest for a few minutes before serving. This allows the juices to redistribute, making it juicier and more flavorful. {{image_2}} You can switch the sirloin steak for chicken or pork. Chicken thighs work well. They stay juicy and cook quickly. Just cut the chicken into bite-sized pieces like the steak. For pork, try pork tenderloin. It offers a mild flavor that pairs nicely with garlic butter. Cook it the same way as the steak. Feel free to add seasonal veggies for color and taste. Bell peppers bring sweetness and crunch. Zucchini is soft and soaks up flavor. You can also use carrots, green beans, or asparagus. Just cut them to match the size of the potatoes. Add them to the skillet when cooking the potatoes for even cooking. Mix up the spices to create fun new flavors. Try adding smoked paprika for a hint of smokiness. You can also use chili powder for a kick. Marinades like teriyaki or soy sauce can change the dish's flavor completely. Just marinate the protein before cooking. Always match the spices to your taste for the best results. To keep your garlic butter steak and potatoes fresh, follow these steps: - Refrigeration: Place leftovers in an airtight container. Store in the fridge for up to 3 days. - Freezing: If you want to freeze, use a freezer-safe container. It can last up to 3 months. Make sure to let it cool before sealing. When it’s time to enjoy your leftovers, follow these tips: - Best methods: The oven works great. Preheat it to 350°F (175°C). Place the steak and potatoes in a baking dish. Cover it with foil to keep moisture in. Heat for about 15-20 minutes. - Stovetop option: Heat a skillet over medium heat. Add a splash of olive oil or butter. Cook for 5-7 minutes, stirring gently until warm. This method keeps the steak tender and juicy. Yes, you can use different potatoes. Here are some options: - Yukon Gold: Creamy texture and buttery flavor. - Red Potatoes: Waxy and hold shape well. - Russet Potatoes: Fluffy when cooked, great for mashing. Each type changes the dish's taste and texture. To cook a medium-rare steak, aim for 130-135°F. - Use a meat thermometer: This ensures accuracy. - Cook time: Sear each side for about 3-4 minutes. Let the steak rest for 5 minutes before slicing. This keeps it juicy. Consider these tasty side dishes: - Steamed green beans: Crisp and fresh. - Caesar salad: Adds crunch and creaminess. - Garlic bread: Perfect for soaking up sauce. These sides balance the meal and enhance flavors. This blog post guided you through making a delicious Garlic Butter Steak and Potatoes dish. You learned about key ingredients, cooking steps, and handy tips. Remember, using fresh herbs enhances flavor and selecting the right steak cut is vital for taste. You can switch proteins or veggies to suit your taste, while proper storage keeps leftovers fresh. Enjoy experimenting with this recipe! Trust your skills and savor every bite.

Garlic Butter Steak and Potatoes Skillet Delight

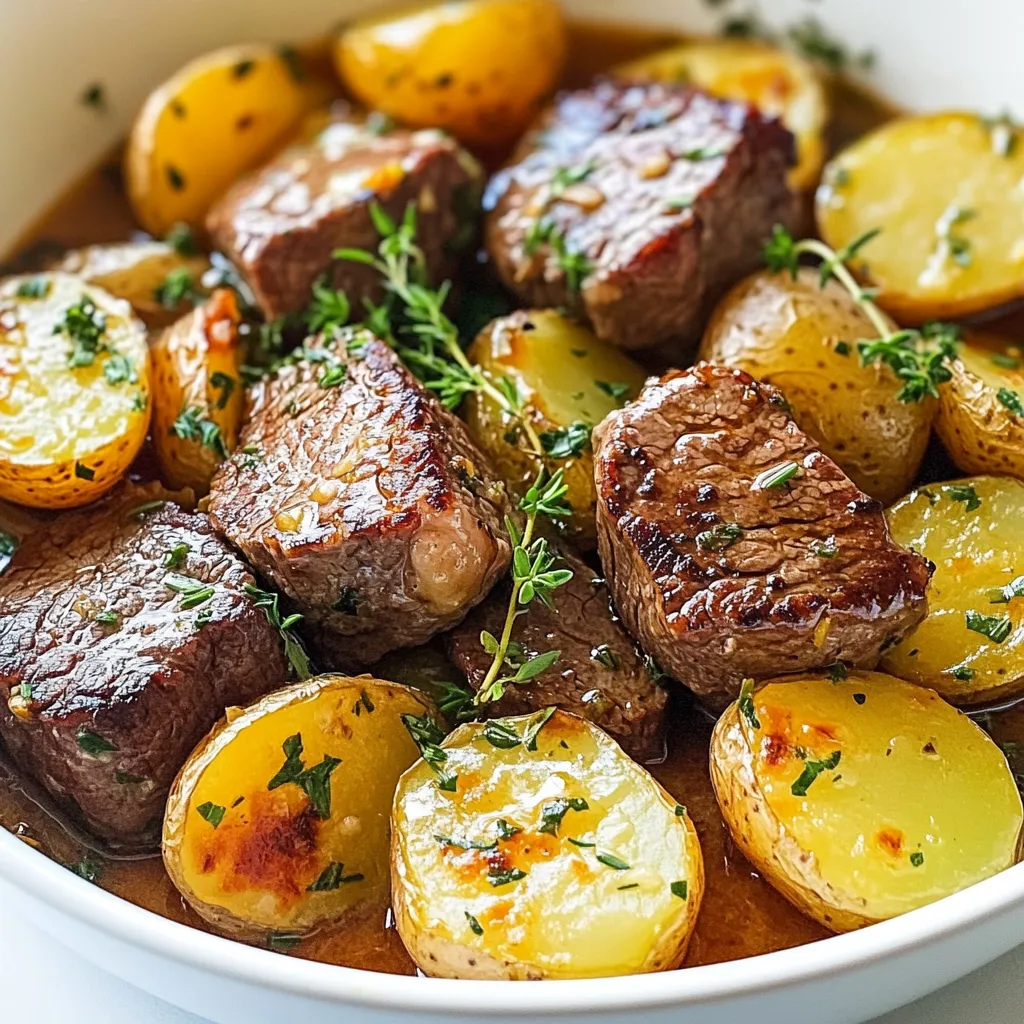
If you love quick, flavorful meals, you’ll adore this Garlic Butter Steak and Potatoes Skillet Delight. Imagine juicy sirloin steak

For a tasty Caprese Pasta Skillet, you need: - 8 ounces fusilli or penne pasta - 2 tablespoons olive oil - 2 cloves garlic, minced - 1 pint cherry tomatoes, halved - 8 ounces fresh mozzarella balls, halved - 1 cup fresh basil leaves, torn - 1 teaspoon balsamic glaze - Salt and pepper to taste - Parmesan cheese, grated (for serving) These ingredients work together to create a fresh and bright meal. The pasta gives you a nice base. The garlic adds flavor, while the cherry tomatoes bring sweetness. The mozzarella makes the dish creamy. Lastly, the basil gives it a wonderful aroma. You can get creative with your Caprese Pasta Skillet. Here are some fun ideas: - Grilled chicken or shrimp for protein - Spinach or arugula for extra greens - Pine nuts for crunch - A sprinkle of red pepper flakes for heat These toppings can change the dish's taste and texture. They also help you customize the meal to fit your mood. If you don’t have something on hand, you can swap ingredients easily. Here are some suggestions: - Use whole wheat pasta for a healthier option - Swap cherry tomatoes for diced regular tomatoes - Try burrata cheese instead of mozzarella for a creamier texture - Use any fresh herbs like parsley or oregano instead of basil These substitutions keep the dish fun and flexible. You can still enjoy a great meal even if you don’t have every ingredient. {{ingredient_image_1}} First, grab a large skillet. Fill it with water and bring it to a boil. Add a good pinch of salt. This helps flavor the pasta. Once boiling, add 8 ounces of fusilli or penne pasta. Cook it as the package says, usually about 8–10 minutes. You want it al dente, which means it should still have a slight bite. When done, drain the pasta and set it aside for later. Now, let’s move on to the fun part. In the same skillet, add 2 tablespoons of olive oil. Heat it over medium heat. Once hot, toss in 2 cloves of minced garlic. Sauté it for about 1 minute until it smells great. Next, add 1 pint of halved cherry tomatoes. Cook them for 4 to 5 minutes. You want them to soften and start to burst. This brings out their sweetness. After that, stir in the pasta, 8 ounces of halved fresh mozzarella balls, and half of the torn basil leaves. Mix everything together well. Add salt and pepper to taste. Now it’s time to drizzle in 1 teaspoon of balsamic glaze. This gives the dish a tangy kick. Toss everything again to combine it all. Remove the skillet from heat. Serve the pasta hot. Garnish with the rest of the basil leaves and a sprinkle of grated Parmesan cheese. You can serve it right in the skillet for a rustic look. Enjoy your quick and tasty meal! To get the best pasta, cook it until it is al dente. This means it should be firm but not hard. Always use a large pot of boiling water. Add a good pinch of salt; this helps flavor the pasta. Stir the pasta often while it cooks. This keeps it from sticking together. Check the package for cooking time, but start tasting a minute or two early. Drain it well, but do not rinse. Rinsing washes away the starch that helps sauces stick. Seasoning is key for a tasty Caprese Pasta Skillet. Start with fresh garlic. Sauté it in olive oil until it smells great. Use a mix of salt and pepper for balance. When you add cherry tomatoes, let them cook until they burst. This releases their sweet juice. The balsamic glaze adds depth and tang. You can also use fresh herbs like basil. Torn basil leaves add a fresh kick at the end. Experiment with additional spices if you like. Just remember, less is often more. Presentation can make your dish even more appealing. You can serve it directly from the skillet for a cozy look. If you prefer individual plates, that works too. Add a few fresh basil leaves on top for a pop of color. A sprinkle of grated Parmesan cheese adds a nice touch. For extra flair, you can drizzle more balsamic glaze on top. This adds flavor and makes the dish look gourmet. Remember, we eat with our eyes first! Pro Tips Use Fresh Ingredients: Fresh mozzarella and basil make a significant difference in flavor. Opt for high-quality ingredients for the best results. Don't Overcook the Pasta: Cook the pasta just until al dente, as it will continue to cook slightly in the skillet with the other ingredients. Customize the Vegetables: Feel free to add other vegetables like spinach or bell peppers for extra flavor and nutrition. Perfect Balsamic Glaze Drizzle: A light drizzle of balsamic glaze enhances the dish's flavor. Use it sparingly to avoid overpowering the other ingredients. {{image_2}} You can add protein to your Caprese Pasta Skillet. Grilled chicken is a great choice. Simply slice the chicken and mix it in with the pasta. Shrimp also works well. Sauté shrimp in olive oil until pink, then combine. If you prefer plant-based options, try adding chickpeas for a healthy boost. They add texture and protein without meat. For a vegetarian twist, replace the mozzarella with vegan cheese. Look for brands that melt well. You can also use grilled zucchini or eggplant as a hearty addition. Both add flavor and texture. Another option is to mix in spinach or kale. They cook down nicely and add nutrients without overpowering the dish. Cheese is key to the dish's flavor. If you want to switch it up, use burrata cheese. It’s creamier and adds a rich taste. Feta cheese can also work well. Crumble it on top for a salty kick. If you want a sharper taste, try goat cheese. It pairs nicely with the tomatoes and basil. Choose any cheese that you love for a personal touch! After enjoying your Caprese Pasta Skillet, let it cool first. Place leftovers in an airtight container. Store in the fridge for up to three days. This dish tastes great even after a day or two! To reheat, you can use the stove or a microwave. For the stove, heat a small amount of olive oil in a pan. Add the pasta and stir until hot. If using a microwave, place the pasta in a bowl. Cover and heat for about 1-2 minutes. Stir halfway to ensure it heats evenly. You can freeze Caprese Pasta Skillet if you want to save some for later. Use a freezer-safe container. Make sure to leave some space for the pasta to expand. It can last up to three months in the freezer. When ready to eat, thaw it in the fridge overnight. Reheat it as mentioned above for best results. Yes, you can use any pasta you like! Fusilli and penne work great. You can also try spaghetti, rotini, or farfalle. Just remember to cook it until al dente. This keeps the pasta firm and tasty in the dish. To make Caprese Pasta Skillet vegan, swap the mozzarella with vegan cheese. You can also use avocado for creaminess. Instead of balsamic glaze, use balsamic vinegar for flavor. This keeps the dish fresh and delicious without dairy. Caprese Pasta Skillet pairs well with a simple green salad. You can add a light vinaigrette for a nice touch. Garlic bread also makes a great side. For drinks, try sparkling water with lemon or a glass of red wine. In this blog post, we explored how to make a delicious Caprese Pasta Skillet. We covered the main ingredients, helpful tips, and fun variations. You can easily swap ingredients and choose your favorite toppings. Remember, the right pasta texture is key for the best taste. Storing and reheating are simple too. Make this meal your own by adding protein or trying different cheeses. Enjoy experimenting and have fun in the kitchen!

Caprese Pasta Skillet Quick and Flavorful Dinner

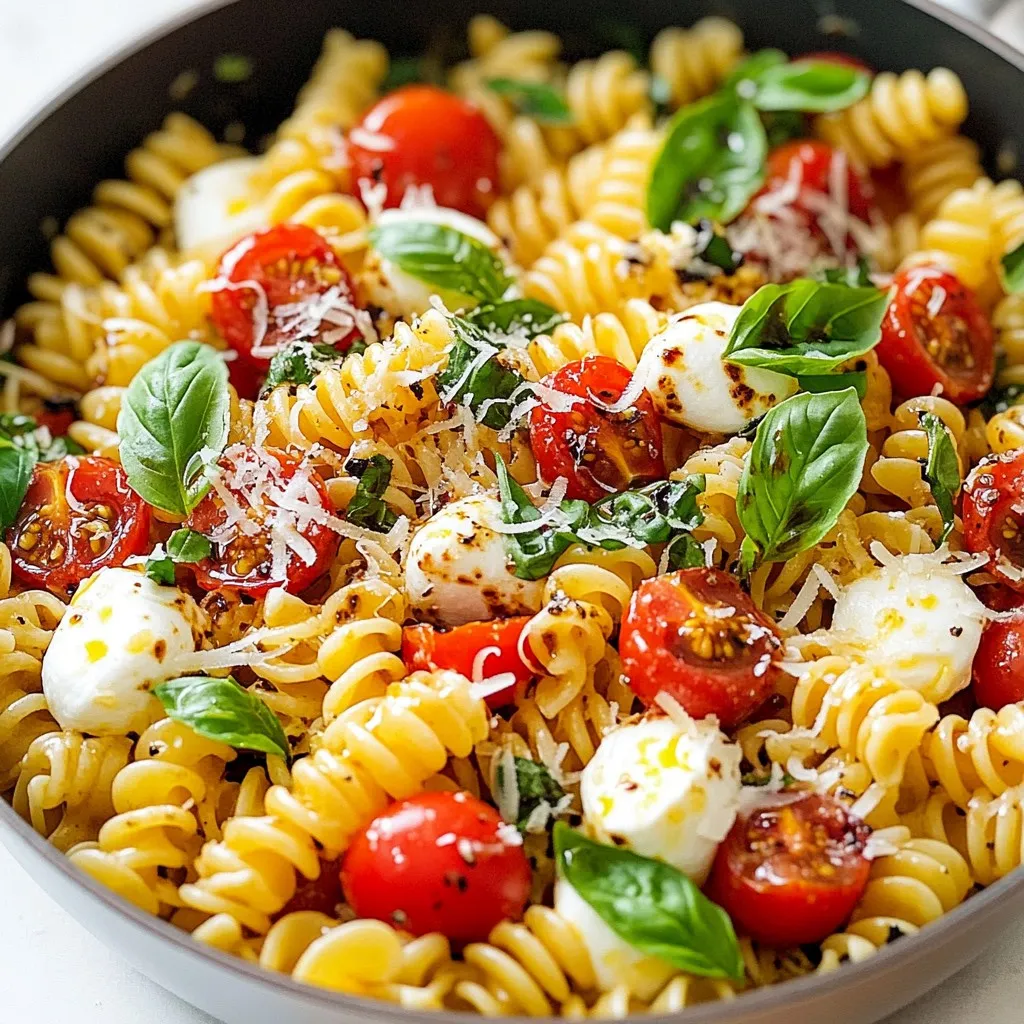
Looking for a fast and delicious dinner? You’ll love my Caprese Pasta Skillet! This dish combines fresh tomatoes, creamy mozzarella,

The main ingredients in this dish include: - 1 lb boneless, skinless chicken breasts, diced - 1 tablespoon olive oil - 1 medium onion, diced - 2 cloves garlic, minced - 1 can (14 oz) diced tomatoes with green chilies - 1 can (15 oz) black beans, rinsed and drained - 1 cup corn kernels (fresh, canned, or frozen) These ingredients create a strong base for your skillet. The chicken gives protein, while the black beans add fiber. The corn brings sweetness, and the tomatoes add a nice tang. Together, they form a colorful and tasty mix. For flavor, we use: - 1 tablespoon chipotle powder (adjust for spice level) - 1 teaspoon ground cumin - 1 teaspoon smoked paprika - Salt and pepper to taste Chipotle powder adds a smoky heat. Cumin brings warmth, and smoked paprika gives depth. Salt and pepper balance the flavors. Adjust the spice to your liking. Taste as you go to find your perfect blend. To elevate the dish, consider these garnishes: - 1/4 cup fresh cilantro, chopped - Tortilla chips, for serving Fresh cilantro adds brightness and a fresh taste. You can sprinkle it on top just before serving. Tortilla chips are perfect for scooping. For a creamy touch, add a drizzle of sour cream or avocado slices. This adds flavor and makes the dish visually appealing. {{ingredient_image_1}} - Gather your ingredients: - 1 lb boneless, skinless chicken breasts, diced - 1 tablespoon olive oil - 1 medium onion, diced - 2 cloves garlic, minced - 1 can (14 oz) diced tomatoes with green chilies - 1 can (15 oz) black beans, rinsed and drained - 1 cup corn kernels - 1 tablespoon chipotle powder - 1 teaspoon ground cumin - 1 teaspoon smoked paprika - Salt and pepper to taste - 1 cup shredded cheddar cheese - 1 cup shredded Monterey Jack cheese - 1/4 cup fresh cilantro, chopped - Tortilla chips for serving Start by prepping the veggies. Dice the onion and mince the garlic. This helps the flavors mix well. Heat the olive oil in a large skillet over medium-high heat. Add the diced chicken. Season with salt, pepper, chipotle powder, cumin, and smoked paprika. Cook until the chicken is cooked through and lightly browned, about 6-7 minutes. Next, add the diced onion and minced garlic. Cook until the onion is soft and see-through, about 3-4 minutes. This step brings out the onion's sweet flavor. Now, stir in the diced tomatoes, black beans, and corn. Mix everything well. Let it simmer on medium heat for about 5-6 minutes. This helps the flavors blend. Turn down the heat to low. Sprinkle both kinds of cheese evenly on top. Cover the skillet and let the cheese melt for about 3-5 minutes. Take the skillet off the heat. Garnish with fresh cilantro for a burst of flavor. Serve the enchilada skillet warm. Add tortilla chips on the side for easy scooping. Enjoy every bite of this hearty meal! To cook chicken well, start with even pieces. Cut the chicken breasts into small, even cubes. This helps them cook at the same speed. Use medium-high heat to get a nice sear. Season the chicken with salt, pepper, and spices before cooking. This adds flavor right away. Cook until the chicken is golden brown and no longer pink inside. This usually takes about 6-7 minutes. Melt cheese for that creamy feel by using low heat. After cooking the other ingredients, reduce the heat to low. Sprinkle the cheese evenly over the top. Cover the skillet with a lid. This traps steam and helps the cheese melt evenly. Let it sit for 3-5 minutes. The cheese will become gooey and delicious, making every bite rich. Adjust the spice in your dish easily. Start with one tablespoon of chipotle powder. Taste the mixture as it simmers. If you want it hotter, add more powder. You can also add diced jalapeños for extra heat. If you prefer less spice, reduce the chipotle powder. You can balance the heat with sour cream or avocado on the side. These cool toppings help tone down the spice if needed. Pro Tips Adjust Spice Level: If you prefer a milder dish, reduce the amount of chipotle powder or replace it with a sweet paprika. Cheese Variations: Experiment with different cheeses like pepper jack for added flavor or a Mexican blend for a unique twist. Make it Vegetarian: Substitute the chicken with diced zucchini or mushrooms and add extra beans for protein. One-Pan Clean-Up: Use a non-stick skillet to make clean-up easier, and consider lining the skillet with parchment paper for even less mess. {{image_2}} You can easily make a tasty vegetarian version of this dish. Start by replacing the chicken with diced bell peppers or zucchini. You can also add mushrooms for more texture. Use the same spices to keep the flavor strong. Swap the chicken for extra beans or lentils for protein. This way, you stay satisfied without meat. To make this dish gluten-free, simply skip the tortilla chips or use gluten-free ones. Check the labels on canned goods like beans and tomatoes to ensure they meet gluten-free standards. The rest of the recipe stays the same! You still get that rich flavor without any gluten worries. Want to boost the flavor even more? Here are some fun ideas. - Black Olives: Add sliced black olives for a briny kick. - Avocado: Toss in some diced avocado for creaminess. - Lime Juice: A squeeze of fresh lime brightens the whole dish. - Spinach or Kale: Mix in some leafy greens for extra nutrients and color. Experiment with these additions to create your perfect Chipotle Chicken Enchilada Skillet! To keep your Chipotle Chicken Enchilada Skillet fresh, let it cool first. Transfer it to an airtight container. You can store it in the fridge for up to three days. Label the container with the date. This helps you keep track of freshness. To reheat, use a skillet over medium heat. Add a splash of water or broth to keep it moist. Stir often to heat evenly. You can also use the microwave. Place a portion in a bowl and cover it with a damp paper towel. Heat for one to two minutes. Check if it's hot all the way through. For long-term storage, freeze the enchilada skillet. Use a freezer-safe container or bag. It can last up to three months in the freezer. When you’re ready to eat, thaw it overnight in the fridge. Reheat it the same way as before for best results. To make this dish spicier, you can add more chipotle powder. Start with an extra half tablespoon. You can also add diced jalapeños or a pinch of cayenne pepper. These will boost the heat without changing the flavors too much. For a fun twist, use spicy salsa in place of the diced tomatoes. Yes, you can use chicken thighs instead of breasts. Thighs are juicier and more flavorful. Just make sure to cut them into small pieces. Cook them the same way as the breasts. They will add a rich taste to the skillet. You can prepare this dish ahead of time. Cook the chicken and mix in the other ingredients, then let it cool. Store it in the fridge for up to two days. When ready to serve, heat it on the stove or in the oven. Add cheese and let it melt before serving. This saves time and keeps the flavors great! This blog covered how to make a tasty Chipotle Chicken Enchilada Skillet. We explored main ingredients, cooking steps, and tips for best results. I shared variations for different diets and advice on storage. You can enhance your dish with optional garnishes or extra flavors. This skillet meal is easy to customize and perfect for sharing. With these simple tips, you’ll make a dish everyone will love. Enjoy your cooking adventure and savor every bite!

Chipotle Chicken Enchilada Skillet Flavor Boost

Welcome to my flavorful world of Chipotle Chicken Enchilada Skillet! If you crave bold taste and easy prep, you’re in

When making Lemon Garlic Shrimp Orzo, you need fresh and flavorful ingredients. Here’s what you will need: - 1 cup orzo pasta - 1 pound medium shrimp, peeled and deveined - 3 tablespoons olive oil - 4 cloves garlic, minced - 1 lemon (juice and zest) - 1 teaspoon red pepper flakes - 1/2 cup cherry tomatoes, halved - 1/4 cup fresh parsley, chopped - Salt and pepper to taste - 1/4 cup feta cheese, crumbled (optional) Each ingredient plays a key role in the dish. The orzo is the base, providing a comforting texture. The shrimp adds protein and flavor, while the garlic and lemon create a bright taste. Use fresh parsley for color and freshness. If you like cheese, feta gives a creamy touch. Feel free to mix things up. Try adding more veggies or different herbs. The beauty of this dish is how you can customize it to your taste. Each ingredient adds to the overall deliciousness of your meal. {{ingredient_image_1}} To cook orzo pasta correctly, start with a large pot of salted boiling water. Add 1 cup of orzo and cook it for about 8-10 minutes. Follow the package instructions for exact times. You want the orzo to be al dente. This means it should be tender but still have a slight bite. To achieve this texture, test the orzo a minute or two before the time is up. Drain the orzo and save 1/2 cup of the pasta water for later. Now, let’s sauté the shrimp. Heat 3 tablespoons of olive oil in a large skillet over medium heat. Once the oil is hot, add 4 cloves of minced garlic and 1 teaspoon of red pepper flakes. Sauté for about 1 minute until the garlic smells great but is not brown. Next, add 1 pound of medium shrimp to the skillet. Season them with salt and pepper. Cook the shrimp for 2-3 minutes on each side. They are ready when they turn pink and opaque. Be careful not to overcook them, as they can become tough. Now, it's time to combine everything. In the skillet with the shrimp, add the cooked orzo, 1/2 cup halved cherry tomatoes, the juice and zest of 1 lemon, and the reserved pasta water. Toss everything together gently. This helps the flavors mix well and ensures every bite is tasty. Make sure everything is heated through before serving. Finally, stir in 1/4 cup of chopped fresh parsley for a fresh touch. If you want, sprinkle 1/4 cup of crumbled feta cheese over the top before serving. Enjoy your Lemon Garlic Shrimp Orzo! To boost flavor, use fresh garlic and lemon. I love using minced garlic for its strong taste. Sauté garlic in olive oil until it smells great. Add lemon juice and zest for a bright kick. You can also adjust spice levels with red pepper flakes. Start with a teaspoon, then add more if you like heat. Serving is key for a great meal. Use a large, shallow bowl for the orzo. This gives it space to shine. Add extra parsley for a fresh touch. Lemon wedges on the side make it pop. They also let guests add more zing! Sauté shrimp with care. Ensure your skillet is hot, but not too hot. Cook shrimp for 2-3 minutes on each side. They should turn pink and opaque. When you drain orzo, save some pasta water. This water adds flavor and helps mix everything well. It’s a secret trick for creamy dishes! Pro Tips Use Fresh Shrimp: For the best flavor and texture, opt for fresh shrimp if available. Frozen shrimp can be used; just ensure they are fully thawed before cooking. Adjust the Heat: The amount of red pepper flakes can be tailored to your heat preference. Start with less and add more if you like a spicier dish. Reserve Pasta Water: Always save some pasta water before draining. It helps to create a creamy sauce when combined with the other ingredients. Garnish Wisely: Fresh herbs and a sprinkle of feta cheese not only enhance the flavor but also add a beautiful touch to your dish presentation. {{image_2}} You can switch up the shrimp for chicken or veggies. Chicken works great, adding a nice flavor. Just cut it into bite-sized pieces. Cook it until it's no longer pink. For veggies, try bell peppers, zucchini, or asparagus. These add color and crunch. You can also change the pasta. While orzo is perfect, you can use penne, fusilli, or even rice. Each type brings a new feel to the dish. Just follow the cooking times on the package for best results. Consider adding other herbs to boost flavor. Basil and thyme are great choices. They add depth and freshness. Simply chop them finely and stir them in at the end. Spices can also change the taste. A pinch of smoked paprika will add warmth. Cumin can bring earthiness. Experiment with what you love. Just start with a little, taste, and adjust as needed. This way, you can create your unique version of lemon garlic shrimp orzo! To keep your Lemon Garlic Shrimp Orzo fresh, let it cool to room temperature. Store leftovers in an airtight container. Place the container in the fridge. This dish stays good for up to three days. Make sure to check for any off smells or changes in texture before eating. You can freeze Lemon Garlic Shrimp Orzo for up to three months. To freeze, use a freezer-safe container or bag. Remove as much air as possible to avoid freezer burn. When ready to eat, thaw it in the fridge overnight. Reheat it gently in a skillet over low heat. Add a splash of water or broth to keep it moist. This way, your dish stays tasty and flavorful. You can keep leftovers of Lemon Garlic Shrimp Orzo in the fridge for about 3 days. Make sure to store it in an airtight container. This keeps it fresh and tasty. If you notice any odd smell or change in color, it’s best to toss it out. Yes, you can make Lemon Garlic Shrimp Orzo ahead of time! To meal prep, cook the orzo and shrimp as directed. Store them separately in the fridge. When you’re ready to eat, just reheat them together in a skillet. This way, the shrimp won’t get overcooked. To make a full meal, you can pair this dish with a light salad or steamed veggies. A crisp green salad with lemon vinaigrette works well. For drinks, try a chilled white wine or sparkling water with lemon. These pairings bring out the dish’s bright flavors. In this article, we covered the tasty Lemon Garlic Shrimp Orzo recipe. You learned about the ingredients, cooking methods, and tips for making it perfect. I shared variations and storage tips to help you enjoy leftovers. This dish is simple yet flavorful, making it a great choice for any meal. Try it out, and adjust the ingredients to fit your taste. Cooking can be fun and rewarding, so enjoy every step along the way!

Lemon Garlic Shrimp Orzo Flavorful and Easy Recipe

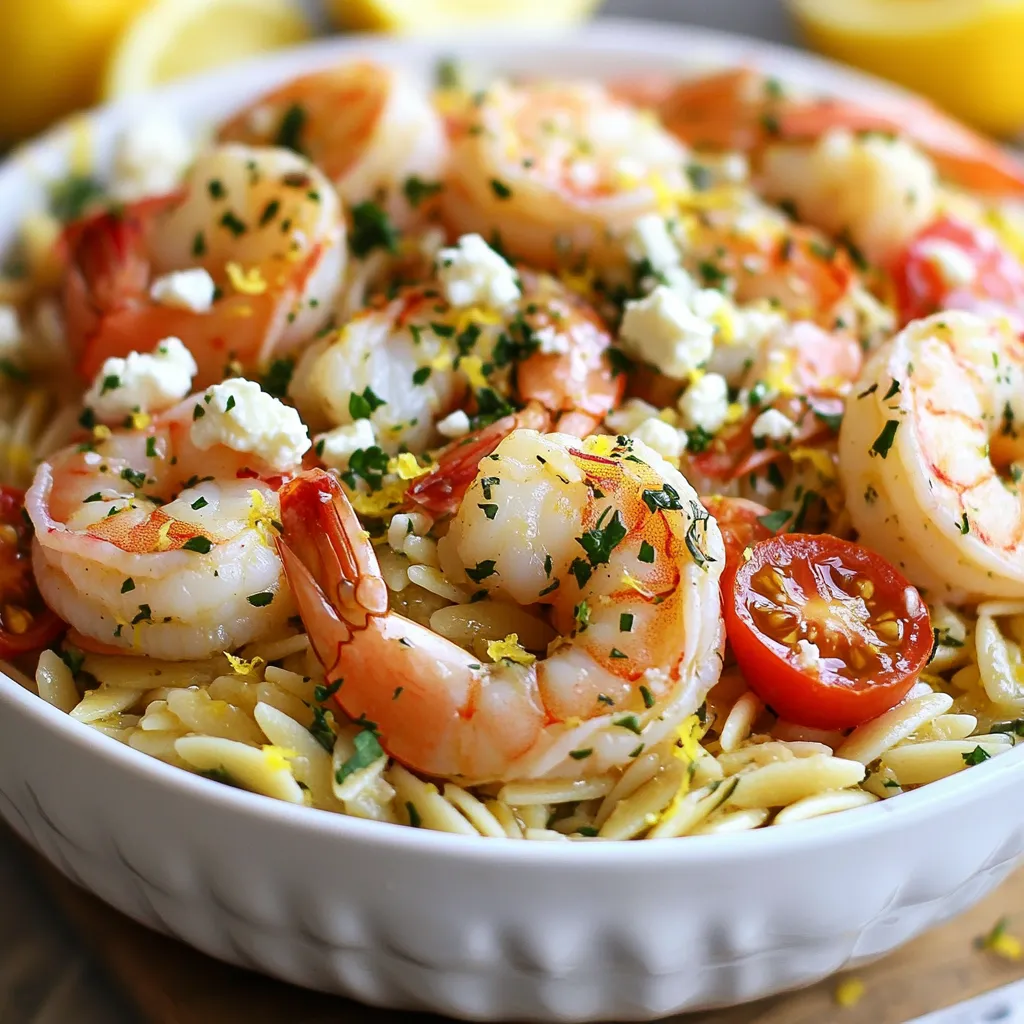
Are you ready for a tasty and quick meal? This Lemon Garlic Shrimp Orzo recipe is simple and packed with

- 6 cups fresh baby spinach, washed and dried - 2 cups strawberries, hulled and sliced - 1/4 cup red onions, thinly sliced Fresh produce forms the heart of this salad. Baby spinach provides a soft, leafy base. It is rich in vitamins and adds vibrant color. Strawberries bring sweet, juicy bursts that contrast nicely with the spinach. Their bright red color makes the dish pop. Red onions add a sharp bite and beautiful color. Their thin slices blend well without overpowering other flavors. - 1/2 cup feta cheese, crumbled - 1/4 cup walnuts, toasted and roughly chopped Feta cheese adds a creamy texture. Its salty flavor balances the sweetness of strawberries. Crumbled feta also enhances the salad's visual appeal. Walnuts add crunch and healthy fats. Toasting them brings out their nutty flavor. They provide a satisfying contrast against the soft spinach and juicy strawberries. - 1/3 cup olive oil - 1/4 cup apple cider vinegar - 2 tablespoons honey - 1/4 cup poppy seeds - Salt and pepper to taste The dressing ties everything together. Olive oil creates a smooth base, while apple cider vinegar adds tang. Honey brings sweetness, helping to balance all flavors. Poppy seeds add a fun crunch and visual interest. Seasoning with salt and pepper enhances the overall taste. This simple dressing complements the fresh ingredients perfectly. {{ingredient_image_1}} Begin by making the dressing. In a small bowl, whisk together the olive oil, apple cider vinegar, honey, poppy seeds, salt, and pepper. You want this to blend well. Taste it to see if it needs more salt or pepper. Adjust as needed. This dressing brings a sweet and tangy flavor to the salad. Now, let’s put the salad together. Start with a large salad bowl and add the fresh baby spinach as your base. Next, layer on the sliced strawberries. They should cover the spinach nicely. Add the crumbled feta cheese next. Then, sprinkle the thinly sliced red onions over the top. Finally, add the toasted walnuts for a nice crunch. Once all the ingredients are in the bowl, drizzle the prepared dressing over the salad. Toss gently to mix everything. This helps ensure each bite has a bit of all the flavors. For a beautiful presentation, serve the salad in a large bowl or on individual plates. Garnish with extra strawberries and a few walnuts on top. This not only looks great but also adds extra flavor. Enjoy the salad right after tossing it for the best taste and freshness. To make a great Strawberry Spinach Poppyseed Salad, start with ripe strawberries. Look for berries that are bright red and slightly firm. If they smell sweet, they are likely perfect. Avoid those with dark spots or signs of mold. Next, choose fresh spinach. Baby spinach is best for this salad. It should be vibrant green and crisp. If the leaves are wilted or yellow, pick another bag. Fresh ingredients make your salad taste better. When making the dressing, you can use different sweeteners. Honey is a classic choice, but maple syrup works well too. For a lower-calorie option, try agave nectar. Each sweetener adds a unique flavor. Balancing the acidity is key. Use apple cider vinegar, but you can swap it for balsamic vinegar for a richer taste. Just remember to adjust the sweetness if you change the vinegar. Aim for a tangy yet sweet dressing. Dress your salad right before serving. This keeps the spinach crisp and prevents sogginess. If you dress it too early, the salad loses its fresh look and taste. For storing leftovers, keep the dressing separate. Use an airtight container for the salad. This way, it stays fresh for one day. If you mix everything together, it will not taste as good the next day. Pro Tips Fresh Ingredients: Always use fresh spinach and strawberries for the best flavor and texture in your salad. Toasting Walnuts: Toast the walnuts in a dry skillet over medium heat for 5-7 minutes to enhance their flavor. Dressing Timing: Dress the salad just before serving to keep the spinach crisp and vibrant. Cheese Variation: For a different flavor profile, try using goat cheese instead of feta cheese. {{image_2}} You can add grilled chicken for a hearty touch. Simply grill the chicken until cooked through. Slice it and lay it over the salad. This will make it a filling meal. Shrimp is another great option. Sauté shrimp in a pan with a bit of olive oil. Cook until they turn pink. Place them on top of your salad for added flavor. If you follow a vegan diet, swap feta cheese for avocado. This keeps the creaminess. You can also add chickpeas for protein. They will make the salad more filling and tasty. For gluten-free options, the basic recipe is already safe. Just make sure your dressing does not contain any gluten. Check labels on your ingredients to be sure. Try adding different fruits for a unique taste. Blueberries or mandarin oranges pair well. They add sweetness and color to the salad. You can also experiment with nuts and seeds. Swap walnuts for almonds or pecans. You could use sunflower seeds for a different crunch. This way, you can keep the salad fresh and exciting. You can store your Strawberry Spinach Poppyseed Salad in the fridge for about three days. To keep the salad fresh, use airtight containers. Glass containers work best, as they do not retain odors. If you use plastic, ensure it is BPA-free. Always store the dressing separately from the salad. This keeps the spinach crisp and fresh. When you're ready to eat, just drizzle the dressing over the salad. Toss it gently to combine. If you have leftovers, serve them cold. The salad tastes great chilled. I do not recommend freezing this salad. The spinach and strawberries lose their texture when frozen. If you want to freeze some of the ingredients, like walnuts, that works well. Just place them in a sealed bag. When you want to use them, thaw in the fridge. This way, you keep the best flavors and textures intact. Yes, you can make this salad ahead of time. However, it is best to keep some parts separate. You can prepare the dressing and store it in the fridge for up to a week. The greens and fruits should be fresh for best taste. I recommend mixing them just before serving. This way, the spinach stays crisp, and the strawberries remain juicy. If you want to prep ahead, chop the spinach, strawberries, and onions. Store them in an airtight container. Just remember to add the dressing right before eating. If you want a dairy-free option, you can use mashed avocado or a nut-based cheese. These options give a creamy texture and flavor. For a tangy taste, try using vegan feta made from almonds or cashews. You can also skip cheese entirely if you prefer. The salad will still be delicious without it. You can easily change this salad for the seasons. In summer, add fresh blueberries or peaches. In fall, try apples or pears. You can also swap walnuts for pecans or almonds based on what's available. In winter, use dried fruits like cranberries or raisins for sweetness. Mixing in seasonal ingredients keeps the salad fresh and exciting all year round. This article covered the key parts of making a tasty Strawberry Spinach Poppyseed Salad. We looked at fresh produce, dairy, and nuts for flavor. You learned how to make the dressing, assemble the salad, and serve it well. I shared tips for selecting the best items and perfecting your dressing. Don’t forget about variations to make it fit your needs or preferences! With these basics, you can enjoy this salad anytime. It's all about fresh taste and simple steps. Now, get creative and make it your own!

Strawberry Spinach Poppyseed Salad Fresh and Flavorful

Looking for a bright, tasty dish that’s easy to make? Try my Strawberry Spinach Poppyseed Salad! This colorful mix features

This roasted veggie quinoa bowl is simple and tasty. Here are the main ingredients you need: - 1 cup quinoa, rinsed - 2 cups vegetable broth - 1 zucchini, diced - 1 bell pepper (any color), diced - 1 cup cherry tomatoes, halved - 1 cup broccoli florets - 2 tablespoons olive oil - 1 teaspoon garlic powder - 1 teaspoon paprika - Salt and pepper to taste You can add fun toppings to make your bowl special: - 1 avocado, sliced - ¼ cup feta cheese (optional) - Fresh parsley, chopped for garnish These toppings add flavor and look great on your dish. This dish is packed with good stuff. Quinoa gives you protein and fiber. It also has essential amino acids. The veggies add vitamins and minerals. - Zucchini is low in calories and high in water. - Bell peppers are rich in vitamin C. - Broccoli has antioxidants and fiber. - Avocado adds healthy fats. This bowl is not just tasty; it supports a healthy diet. Enjoy this colorful meal! {{ingredient_image_1}} First, rinse 1 cup of quinoa. This step removes any bitterness. In a medium pot, combine the rinsed quinoa with 2 cups of vegetable broth. Bring this mix to a boil over high heat. Once it boils, lower the heat to low and cover the pot. Let it simmer for about 15 minutes. The quinoa will absorb the broth and become fluffy. After 15 minutes, remove it from heat but keep it covered for another 5 minutes. This resting time helps the quinoa become even fluffier. While the quinoa cooks, it’s time to prepare the veggies. Take a large baking sheet and spread out your diced zucchini, bell pepper, halved cherry tomatoes, and broccoli florets. These vegetables add color and flavor to the bowl. Drizzle 2 tablespoons of olive oil over the veggies. Then, add 1 teaspoon of garlic powder, 1 teaspoon of paprika, and sprinkle salt and pepper to taste. Toss everything well so each piece of veggie gets coated in oil and spices. This step boosts the flavor and makes them tasty. Now, preheat your oven to 400°F (200°C). Place the baking sheet with the seasoned veggies in the oven. Roast them for about 20-25 minutes. Stir the veggies halfway through to ensure they roast evenly. You want them to become tender and slightly caramelized. This caramelization adds sweetness and depth to the dish. Once done, take the veggies out of the oven. They should look golden and smell amazing. To make great quinoa, start with rinsing it. Rinsing removes the bitter coating called saponin. Use a fine mesh strainer for this step. Next, use two cups of broth for each cup of quinoa. This adds flavor. Bring the broth to a boil, then lower the heat. Cover and let it simmer for 15 minutes. After that, let it sit for 5 minutes. Finally, fluff it gently with a fork. This makes your quinoa light and airy. Roasting veggies brings out their natural sweetness. Cut your zucchini, bell pepper, cherry tomatoes, and broccoli into even pieces. This helps them cook at the same rate. Drizzle them with olive oil, and sprinkle garlic powder and paprika. Toss the veggies well to coat them evenly. Spread them on a baking sheet without crowding. This allows them to caramelize. Roast at 400°F for 20-25 minutes. Stir halfway for even cooking. You want them tender and slightly browned for the best flavor. A beautiful bowl makes the meal more fun. Divide the fluffy quinoa into bowls first. Then, pile on the roasted veggies. Add sliced avocado on top for creaminess. If you like, sprinkle feta cheese for a tangy kick. Fresh parsley adds a pop of color. For an extra touch, drizzle balsamic glaze over the top. Use colorful bowls to make your dish stand out. Enjoy your vibrant and tasty roasted veggie quinoa bowl! Pro Tips Roasting Vegetables: Ensure the veggies are cut into similar sizes for even cooking and caramelization. Flavor Boost: Add fresh herbs like thyme or rosemary to the vegetable mix before roasting for an aromatic twist. Make Ahead: This quinoa bowl can be prepared in advance; just store the components separately and combine them when ready to serve. Protein Addition: For a heartier meal, consider adding grilled chicken, chickpeas, or black beans to the bowl. {{image_2}} You can swap out the veggies in the roasted veggie quinoa bowl. Try using sweet potatoes, carrots, or Brussels sprouts. These options bring new tastes and textures. For a spicy kick, add jalapeños or chili peppers. You can even mix in leafy greens like spinach or kale. Just remember, the key is to choose colorful vegetables. They make your bowl look great and add many vitamins. Quinoa is a great base, but other grains work too. Consider using brown rice, farro, or barley. Each grain offers a unique flavor and texture. For a gluten-free option, try millet or buckwheat. These grains cook similarly to quinoa, making them easy to swap. They also add extra nutrients to your meal. To make your bowl more filling, add proteins. Grilled chicken, shrimp, or tofu are great choices. For a plant-based option, consider chickpeas or black beans. These proteins boost your dish and keep you satisfied longer. You can also sprinkle nuts or seeds on top for extra crunch and flavor. Store your roasted veggie quinoa bowl in an airtight container. Let it cool first. Place it in the fridge for up to 4 days. This keeps the flavors fresh and the veggies crisp. When you want to eat your leftovers, heat them in the microwave. Use a microwave-safe bowl. Heat in 30-second bursts, stirring in between. This keeps the quinoa fluffy and the veggies warm without drying them out. You can freeze the quinoa bowl too. Pack it in a freezer-safe container. It lasts up to 3 months in the freezer. When ready to eat, thaw it overnight in the fridge. Reheat as mentioned before for a delicious meal on the go. Yes, you can easily make this recipe vegan. Just omit the feta cheese. Use plant-based toppings like avocado or nuts. They add creaminess and flavor. You can also use vegetable broth to cook the quinoa, which is already vegan. If you want a substitute for quinoa, try brown rice or farro. Both grains have a nice texture. You can also use couscous or barley. These grains will still give you a hearty base for your bowl. The quinoa bowl lasts about 3 to 5 days in the fridge. Store it in an airtight container. Just make sure the veggies are cool before you store them. Reheat it in the microwave for a quick meal. This post covered key ingredients like quinoa and veggies, along with toppings and nutrition tips. I shared clear steps for prepping and roasting, plus tips for perfect flavors and great presentation. You learned about fun variations and how to store your dish. With this knowledge, you can create tasty and healthy quinoa bowls. Experiment with different veggies and proteins to keep it fresh. Enjoy your cooking!

Roasted Veggie Quinoa Bowl Flavorful and Nutritious

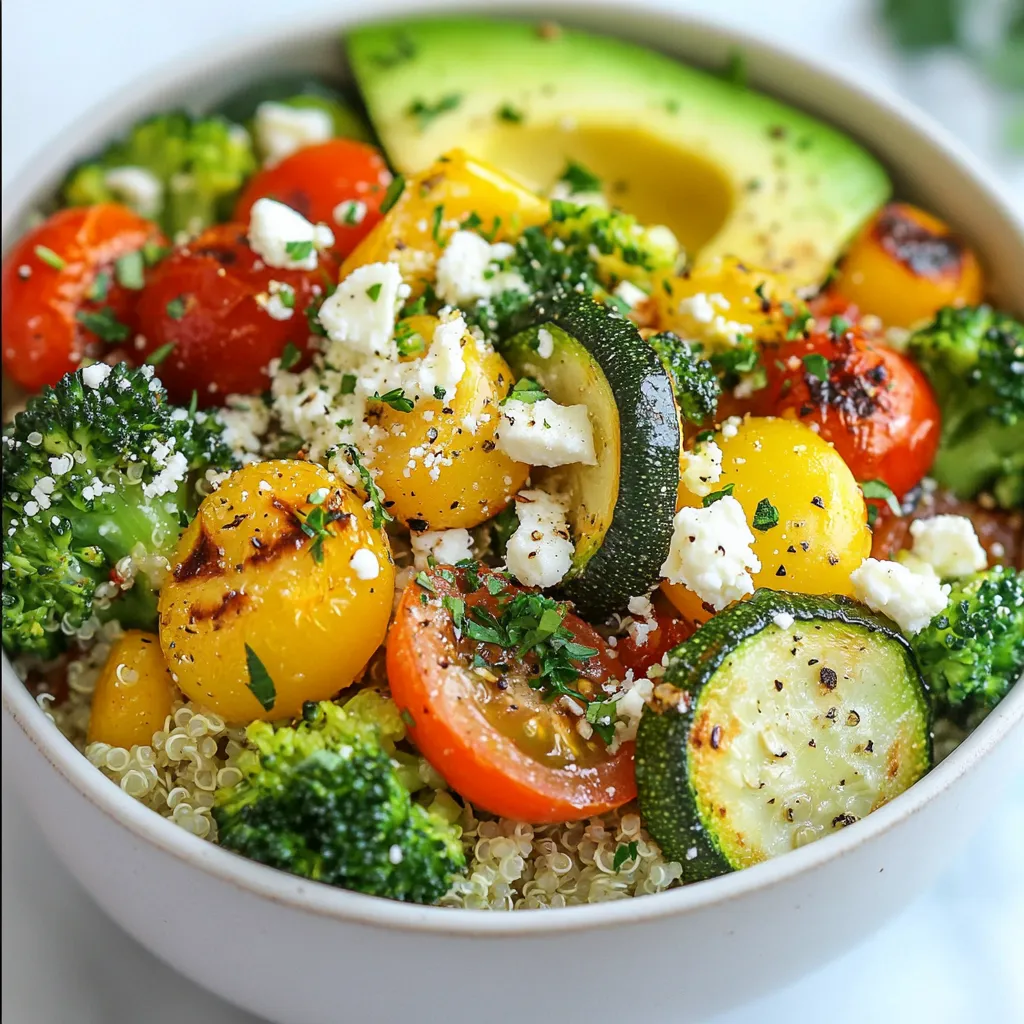
If you want a delicious and healthy meal, you’re in the right place! This Roasted Veggie Quinoa Bowl is packed

- 4 boneless, skinless chicken breasts - 1 cup fresh spinach, chopped - 1 can (14 oz) artichoke hearts, drained and chopped - 1 cup cream cheese, softened - 1/2 cup sour cream - 1/2 cup grated Parmesan cheese - 1 teaspoon garlic powder - 1 teaspoon onion powder - Salt and pepper, to taste - 2 tablespoons olive oil - Fresh parsley, for garnish To make creamy spinach artichoke chicken, gather these simple ingredients. You need boneless, skinless chicken breasts for a tender base. Fresh spinach adds color and nutrition. Artichoke hearts give a delightful flavor and texture. Cream cheese makes the dish rich and creamy. Sour cream adds a tangy note. Grated Parmesan cheese brings a salty kick. Garlic powder and onion powder enhance the taste. Salt and pepper balance everything out. Olive oil helps sear the chicken and adds flavor. Finally, fresh parsley adds a bright touch as a garnish. This mix of ingredients creates a colorful and tasty dish that everyone will love. Each bite offers a blend of creamy textures and vibrant flavors. You will impress your friends and family with this delightful meal! {{ingredient_image_1}} 1. Preheating the oven Set your oven to 375°F (190°C). This heat helps cook the chicken evenly. 2. Searing the chicken In a large skillet, heat 2 tablespoons of olive oil over medium heat. Season the 4 chicken breasts with garlic powder, onion powder, salt, and pepper. Sear them for about 5 minutes on each side. Look for a nice golden brown color. Once done, take the chicken out and set it aside. 3. Cooking spinach and artichokes In the same skillet, lower the heat. Add 1 cup of chopped artichoke hearts and 1 cup of chopped fresh spinach. Cook for 2-3 minutes. You'll know it's ready when the spinach wilts down. 4. Making the creamy mixture In a mixing bowl, combine the cooked spinach and artichokes with 1 cup of softened cream cheese, 1/2 cup of sour cream, and 1/2 cup of grated Parmesan cheese. Mix well until everything blends together. This creamy mixture gives the dish its rich taste. 5. Assembling in the baking dish Take a baking dish and place the seared chicken breasts inside. Spoon the creamy spinach artichoke mixture on top of each chicken breast. Make sure to cover them well. 6. Baking and resting the dish Place the baking dish in the oven. Bake for 25-30 minutes. The chicken should be fully cooked and the topping bubbly. After taking it out, let it rest for 5 minutes to keep it juicy. Garnish with fresh parsley before serving. Enjoy your creamy delight! - Tips for tender chicken: Always start with fresh chicken. You can also pound the chicken slightly to make it even. This helps it cook evenly and stay juicy. - Best way to wilt spinach: Use low heat for the spinach. When you add it to the skillet, stir often. This way, it wilts in just a few minutes. - Customizing the creamy mixture: You can swap the cream cheese with ricotta for a lighter taste. Adding herbs like dill or basil can also give it a fresh kick. - Searing vs. baking: Searing gives the chicken a nice brown crust. This locks in flavor and keeps the chicken moist. Baking finishes the cooking process and warms the creamy topping perfectly. - Importance of resting chicken: Letting the chicken rest after baking helps the juices settle. This makes each bite tender and full of flavor. Just five minutes is enough! Pro Tips Use Fresh Spinach: Fresh spinach will provide a vibrant flavor and texture compared to frozen spinach, which can be watery. Perfectly Cooked Chicken: Ensure your chicken breasts are of uniform thickness for even cooking; consider pounding them to achieve this. Add a Zesty Twist: For an extra flavor kick, squeeze a bit of lemon juice over the dish before serving. Make it Ahead: Prepare the creamy spinach artichoke mixture a day in advance and store in the refrigerator for flavors to deepen. {{image_2}} You can easily change this recipe to fit your taste. For cheese, you might try mozzarella or goat cheese. These options will give a different flavor and creaminess. If you want more veggies, add bell peppers or mushrooms. They will add color and texture. You can also mix in some sun-dried tomatoes for a burst of flavor. If you need a gluten-free option, check your cream cheese. Most brands are gluten-free, but always read labels. For a low-carb meal, skip the sour cream. Use more cream cheese instead. You can also serve this dish with a side salad for a healthy touch. This way, you can enjoy a tasty meal that fits your diet. To keep your creamy spinach artichoke chicken fresh, use airtight containers. Glass containers work well, but plastic ones are fine too. Make sure the chicken cools down before you seal it. Store leftovers in the fridge for up to three days. If you want to save them longer, consider freezing. Use freezer bags and remove as much air as you can. This way, the flavor will stay strong. When it's time to enjoy your leftovers, reheating properly is key. The best way is to use the oven. Preheat it to 350°F (175°C). Place the chicken in a baking dish and cover it with foil. Heat for about 15-20 minutes. This keeps the chicken moist and creamy. You can also use the microwave, but be careful. Heat in short bursts at medium power. Stir the mixture if you can. This helps keep the creaminess intact. Enjoy your tasty meal again! Yes, you can use frozen spinach. Just thaw it and squeeze out the water. This will help keep the dish from getting too watery. I recommend using about 1 cup of thawed spinach. Frozen spinach is a good time-saver. The chicken is done when it reaches an internal temperature of 165°F (75°C). You can use a meat thermometer to check this. The chicken should also look golden brown and no longer be pink inside. Yes, you can make this dish ahead of time. Prepare the chicken and creamy mixture, then store them separately in the fridge. When you're ready to cook, assemble and bake it. This can save time on busy nights. This dish combines chicken, spinach, and artichokes for a tasty meal. You learned about the key ingredients and preparation steps. I shared tips to make chicken tender and ways to personalize your dish. We explored variations for different diets and storage tips to keep leftovers fresh. In conclusion, enjoy your time in the kitchen experimenting with this recipe. Make it your own and savor every bite. Happy cooking!

Creamy Spinach Artichoke Chicken Tasty Dinner Delight

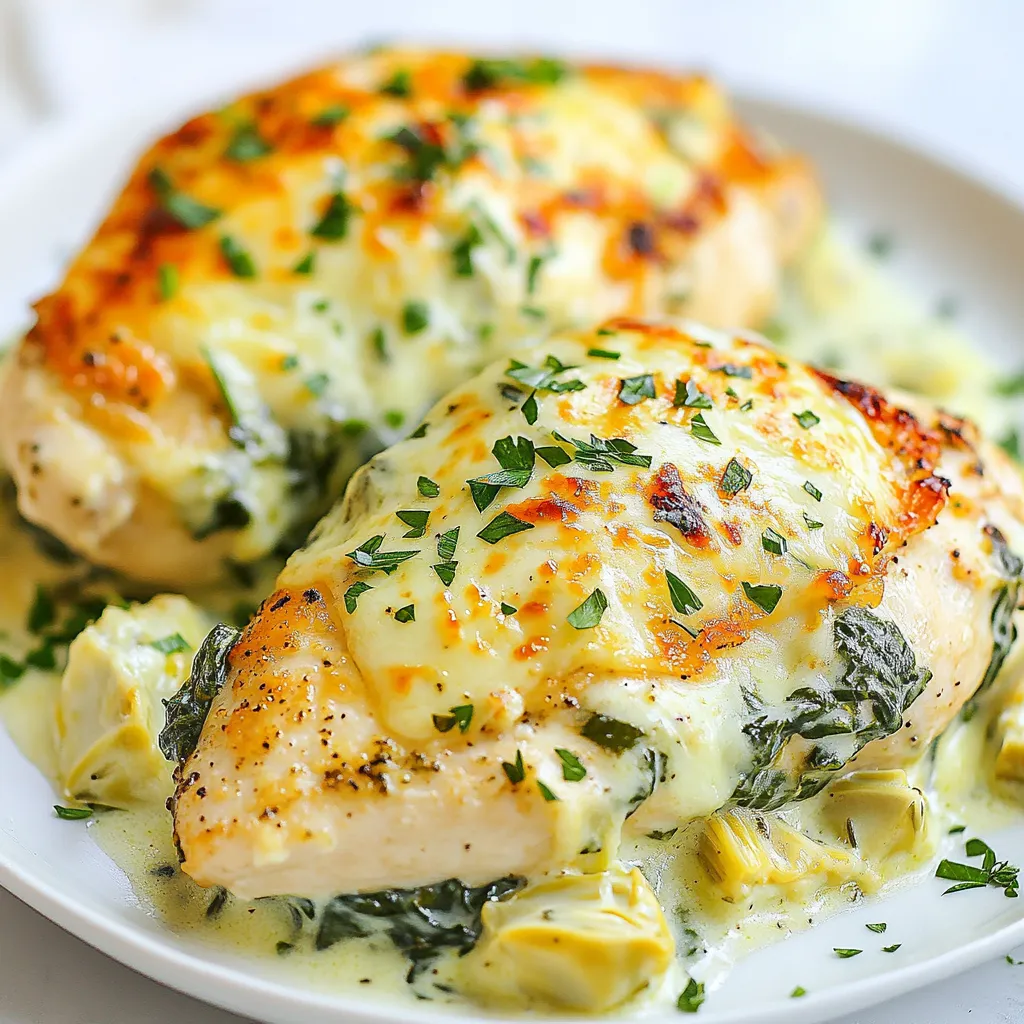
Looking for a delicious and easy dinner idea? You’ll love my Creamy Spinach Artichoke Chicken! This dish has tender chicken,

Older posts
Newer posts
← Previous Page1 … Page121 Page122 Page123 … Page130 Next →
© 2025 My Cooking Cast • Built with GeneratePress

Our Policies

  • Privacy Policy
  • GDPR Policy
  • Terms Of Use
  • Copyright Policy
  • Cookie Policy
  • Disclaimer

More Information​

  • Home
  • Contact
  • About
  • Dinner
  • Appetizers
  • Dessert
©2025, My Cooking Cast About Privacy Policy Back To Top