Skip to content
DisclaimerTerms Of UseGDPR PolicyCookie Policy

My Cooking Cast

  • Home
  • Drinks
  • Appetizers
  • Dinner
  • Dessert
  • About
  • Contact
  • Privacy Policy
DisclaimerTerms Of UseGDPR PolicyCookie Policy

Emma

To make Lemon Herb Quinoa, gather these fresh and tasty items: - 1 cup quinoa, rinsed - 2 cups vegetable broth or water - 1 tablespoon olive oil - 1 small onion, finely chopped - 2 cloves garlic, minced - Zest of 1 lemon - Juice of 1 lemon - 1 teaspoon dried oregano - 1 teaspoon dried thyme - Salt and pepper to taste - 1/4 cup fresh parsley, chopped - 1/4 cup cherry tomatoes, halved (for garnish) - 1/4 cup feta cheese, crumbled (optional) Use high-quality ingredients for the best flavor. Choose organic quinoa if possible. Fresh herbs make a big difference. Pick bright, firm tomatoes for garnish. Use fresh lemon for zest and juice. Good olive oil adds richness. If using feta, select a creamy type for a nice texture. You can easily adjust this recipe to fit your needs. For a gluten-free option, quinoa is already safe. If you want it vegan, skip the feta cheese. You can also swap out the vegetable broth for water. Use different herbs, like basil or dill, for new flavors. If you dislike onions, try leeks or shallots instead. {{ingredient_image_1}} 1. Start by rinsing 1 cup of quinoa under cold water. This helps remove any bitter taste. 2. In a medium saucepan, heat 1 tablespoon of olive oil over medium heat. 3. Add 1 small chopped onion and sauté for about 3-4 minutes until it turns soft. 4. Toss in 2 minced garlic cloves and cook for another minute until you smell the garlic. 5. Now, stir in the rinsed quinoa, lemon zest, 1 teaspoon of dried oregano, and 1 teaspoon of dried thyme. Cook this mixture for 1-2 minutes to toast the quinoa slightly. 6. Pour in 2 cups of vegetable broth or water, and bring it to a boil. 7. Once it boils, reduce the heat to low. Cover the saucepan and let it simmer for 15 minutes. 8. After the time is up, take it off the heat. Let it sit covered for another 5 minutes. 9. Fluff the quinoa with a fork. Add the juice of 1 lemon, salt, and pepper to taste. 10. Mix in 1/4 cup of chopped fresh parsley. 11. Serve it in a dish and top with halved cherry tomatoes and feta cheese, if you like. - Always rinse quinoa before cooking. This step removes bitterness. - Use the right water-to-quinoa ratio. For this recipe, it’s 2 cups of liquid for 1 cup of quinoa. - Avoid stirring too much while it cooks. Stir only before serving. - Let it rest covered after cooking. This helps it become fluffy. - Prep time: 10 minutes - Cook time: 20 minutes - Total time: 30 minutes These steps and tips will lead you to a perfect Lemon Herb Quinoa that is fresh and flavorful. Enjoy the process and the delicious meal! When making Lemon Herb Quinoa, avoid rinsing quinoa too little. Rinsing removes a bitter coating called saponin. Not using enough liquid can lead to dry quinoa. Stick to the 2 cups of broth or water for best results. Also, don’t skip the resting time after cooking. Letting it sit helps the quinoa become fluffy. Store leftover quinoa in an airtight container. Keep it in the fridge for up to five days. If you plan to keep it longer, freeze it in portions. This way, you can easily use it later. When stored correctly, the quinoa stays fresh and tasty. To boost the flavor, try adding fresh herbs like basil or cilantro. You can mix in some chopped mint for a refreshing twist. Using spices like cumin or smoked paprika also adds depth. Experiment with flavors that you enjoy to make this dish your own. Pro Tips Rinse Your Quinoa: Always rinse quinoa under cold water before cooking to remove its natural coating, called saponin, which can give a bitter taste. Toast for Flavor: Toasting quinoa in the olive oil with the onions and garlic enhances its nuttiness and adds depth to the flavor profile. Resting Time: Allowing the cooked quinoa to rest for a few minutes after cooking helps it to firm up and makes it easier to fluff. Fresh Herbs for Brightness: Adding fresh herbs like parsley at the end of cooking preserves their vibrant flavor and color, making the dish more appealing. {{image_2}} You can add seasonal vegetables to your Lemon Herb Quinoa. Think about fresh bell peppers, zucchini, or spinach. These veggies give color and taste. For spring, use asparagus or peas. In summer, try corn or cherry tomatoes. Fall brings in roasted butternut squash or brussels sprouts. Each season offers great choices. Just chop them up and add them while cooking. This way, you keep the dish fresh and vibrant. Adding protein can make this dish more filling. You can mix in cooked chickpeas or black beans for a plant-based protein boost. If you enjoy meat, grilled chicken or shrimp complements the lemon flavor. For a creamy touch, add some crumbled feta cheese. You can also stir in some cooked quinoa for extra texture. Choose what fits your taste and need. Protein not only adds flavor but also makes it a complete meal. This Lemon Herb Quinoa is already vegan and gluten-free. To keep it that way, choose vegetable broth instead of chicken broth. Always check labels on ingredients like canned beans. Ensure no gluten is present. For a nutty flavor, add some toasted sunflower seeds. You can even swap olive oil for avocado oil for a different twist. These changes help maintain the dish’s essence while catering to different diets. Enjoy creating your own version! To store Lemon Herb Quinoa, let it cool first. Place it in an airtight container. Keep it in the fridge. It will stay fresh for about 3 to 5 days. You can also add a bit more lemon juice before storing. This helps keep the flavors bright. To freeze your Lemon Herb Quinoa, use a freezer-safe bag or container. Make sure to remove all air before sealing. Label the bag with the date. You can freeze it for up to 3 months. When ready to use, thaw it in the fridge overnight. Reheat quinoa in the microwave or on the stove. Add a splash of water or broth to keep it moist. Heat until warm, stirring to mix. For the best taste, add fresh parsley and lemon juice after reheating. This keeps the flavors fresh and bright. Quinoa is a small, round seed that cooks like a grain. It is high in protein and fiber. Quinoa is also gluten-free, making it great for many diets. It has all nine essential amino acids, which helps build muscles. Quinoa contains vitamins and minerals, like magnesium and iron. Eating quinoa can help keep your heart healthy and boost your energy. Yes, you can make Lemon Herb Quinoa ahead of time. It stores well in the fridge for up to five days. Just let it cool before storing. Place it in an airtight container to keep it fresh. When you are ready to eat, reheat it in a pan or microwave. You may want to add a splash of lemon juice for extra flavor. Quinoa is done cooking when it is fluffy and the little tails appear. These tails are called germ rings and look like tiny spirals. If all the liquid is gone and the quinoa is soft, it is ready. You can taste a bit to check the texture. If it feels crunchy, give it a few more minutes. You have now learned about all the key parts of making Lemon Herb Quinoa. We covered the right ingredients, cooking steps, and tips for success. I shared ways to store leftovers and different variations to try. Quinoa is healthy and easy to make. You can enjoy it as a side or a meal. Experiment with flavors and find what you love. With this guide, you’re ready to create a tasty dish that fits your needs. Enjoy making it today!

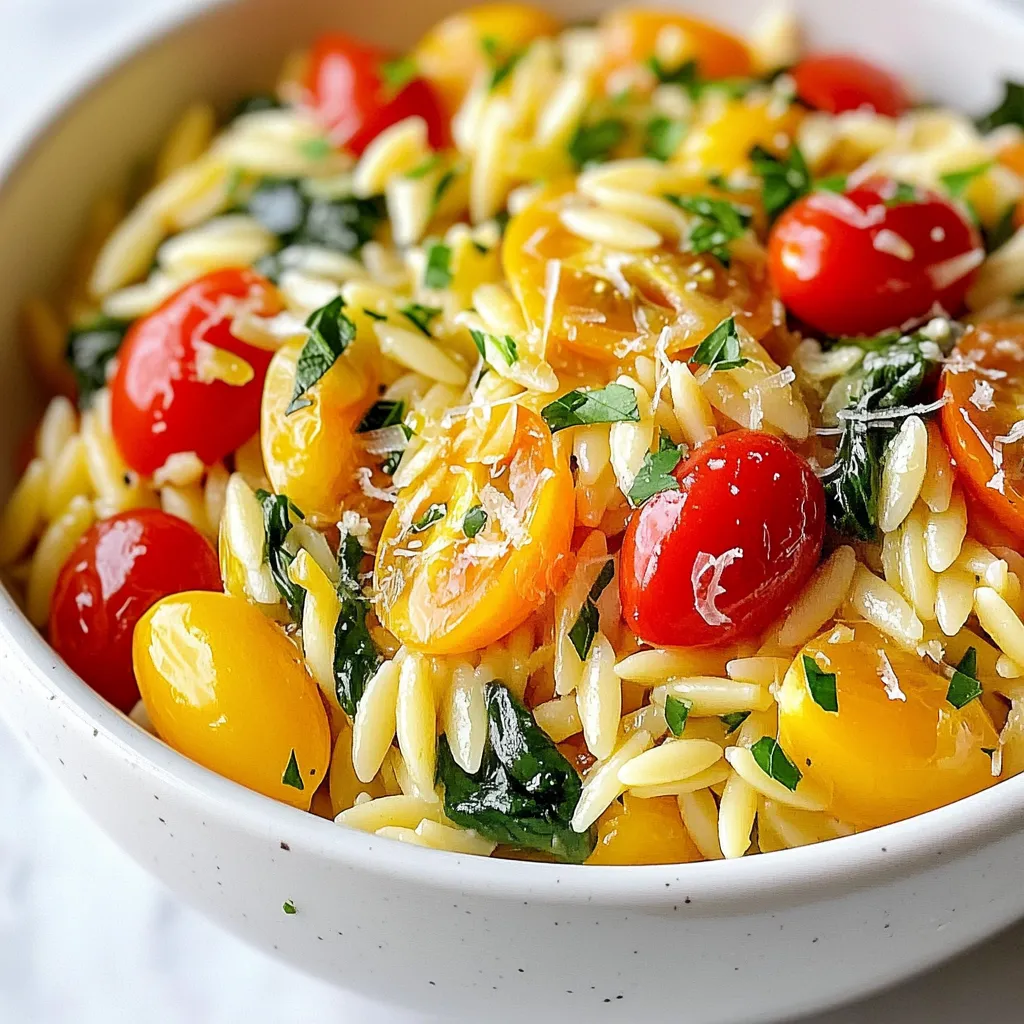
Lemon Herb Quinoa Fresh and Flavorful Recipe

Craving a dish that bursts with fresh flavors and is easy to make? Look no further than my Lemon Herb

To make Chocolate Peanut Butter Overnight Oats, you will need the following items: - Rolled oats: 1 cup - Almond milk (or milk of choice): 2 cups - Peanut butter: 2 tablespoons - Cocoa powder: 1 tablespoon - Maple syrup (or honey): 2 tablespoons - Vanilla extract: 1 teaspoon - Sea salt: A pinch - Toppings: Chopped dark chocolate and crushed peanuts These ingredients will create a creamy and rich breakfast. The rolled oats provide a hearty base. The almond milk adds creaminess and flavor. Peanut butter gives a nutty and satisfying taste. Cocoa powder adds a touch of chocolate goodness. Maple syrup or honey sweetens the mix naturally. Vanilla extract enhances the overall flavor. A pinch of sea salt balances the sweetness. Finally, toppings like dark chocolate and crushed peanuts make it a treat. You can mix and match some ingredients. For instance, you can use different nut butters or milk types. This way, you can create your version of this dish. Enjoy experimenting and finding your favorite mix! {{ingredient_image_1}} - Combine the ingredients in a bowl. - Use a whisk to mix until smooth. - Divide the mixture into jars or containers. Mixing helps blend the flavors. The peanut butter adds creaminess, while cocoa gives a rich taste. Using a whisk ensures that every ingredient mixes well. Make sure to scrape the sides of the bowl for all the goodness. This step only takes about five minutes. - Seal the containers and refrigerate overnight. - This allows the oats to absorb flavors. Refrigerating overnight makes the oats soft and tasty. The longer they sit, the better the taste. This is a great way to save time in the morning. Just grab a jar and go! - Stir the oats and adjust the consistency. - Add toppings before serving. In the morning, stir the oats well. If they seem thick, just add a splash of milk. This will help make them creamy again. Top with chopped dark chocolate and crushed peanuts for extra crunch. Enjoy right from the jar or in a bowl! To evenly mix peanut butter into your oats, start by adding it to the bowl first. Then, pour in the almond milk. This way, the peanut butter blends smoothly. Use a whisk to break up any clumps. Make firm, circular motions to ensure the peanut butter is well-distributed. A fork can work too, but a whisk gives better results. You can adjust the sweetness of your oats to fit your taste. If you like it sweeter, add more maple syrup or honey. Try adding toppings like sliced bananas, berries, or a sprinkle of cinnamon for extra flavor. You can also use different nut butters for a unique twist. You can enjoy your oats straight from the jar for a quick breakfast. If you prefer a bowl, transfer the oats and add toppings. Pair your oats with a side of yogurt or fresh fruit for a balanced meal. This adds extra nutrition and makes it even more filling. Pro Tips Use Old-Fashioned Rolled Oats: They absorb liquid better and provide a hearty texture compared to quick oats. Experiment with Milk Alternatives: Try coconut milk or oat milk for a different flavor profile and creaminess. Sweetener Variations: Swap maple syrup for agave nectar or brown sugar to customize sweetness to your liking. Add Fruits: For added nutrition and flavor, mix in sliced bananas, berries, or apple chunks before refrigerating. {{image_2}} You can boost your overnight oats with fun flavors. Try adding fruit like bananas or berries. Sliced bananas add creaminess and sweetness. Berries give a fresh burst of flavor. You can mix and match too. For an extra nutty taste, use different nut butters. Almond butter or cashew butter are great choices. Each nut butter gives a unique twist to your dish. If you need gluten-free oats, look for certified gluten-free options. Not all oats are gluten-free, so check the label. For a dairy-free choice, almond milk works well, but so do oat milk or coconut milk. Each milk brings its own taste and texture. Choose what fits your diet best. You can change your overnight oats with the seasons. In fall, add pumpkin spice or cinnamon. These spices warm up the flavor. During summer, use fresh peaches or mint for a refreshing taste. For holidays, try topping with crushed candy canes or festive sprinkles. These fun toppings make your oats look pretty and taste special! To keep your oats fresh, use airtight containers. Make sure the lids fit snugly. This helps prevent moisture from getting in. Your Chocolate Peanut Butter Overnight Oats will last in the fridge for up to five days. If you want to enjoy them later, just grab a jar and dig in! If you have leftovers, you can freeze your oats. Pour the oats into freezer-safe containers. Leave some space at the top for expansion. When you want to eat them, take a jar out of the freezer. Let it thaw in the fridge overnight for the best texture. You can also speed it up by placing it in warm water. This way, your oats stay creamy and delicious! Yes, you can use quick oats instead of rolled oats. Quick oats cook faster and absorb liquid more quickly. This may change the texture. Your overnight oats can be creamier and softer. If you love a smoother texture, quick oats are a good choice. To make this recipe vegan, you need to swap a few ingredients. Use almond milk or any plant-based milk. Instead of honey, use maple syrup. The rest of the ingredients are already vegan. You can enjoy delicious overnight oats without any animal products. Overnight oats offer many health benefits. They are high in fiber, which helps digestion. The oats provide long-lasting energy, making them great for breakfast. They can also lower cholesterol and help with heart health. Adding peanut butter gives you protein and healthy fats. I do not recommend preparing overnight oats without refrigeration. The oats need cool conditions to absorb liquid. Without refrigeration, harmful bacteria can grow. If you need to travel, consider using an insulated container with ice packs. This keeps your oats safe and tasty for later. This blog post covered how to make delicious overnight oats. You learned about the main ingredients, step-by-step instructions, and helpful tips. I shared variations and storage methods to keep your oats fresh. In summary, overnight oats are easy to prepare and customizable. You can mix, match, and enjoy them your way. Use this guide to create a nutritious breakfast that suits your taste. Enjoy your mornings with tasty, healthy oats!

Chocolate Peanut Butter Overnight Oats Simple Recipe

Are you ready to indulge in a delicious breakfast? Chocolate Peanut Butter Overnight Oats are simple and oh-so-satisfying! With just

- 1 pound gnocchi - 1 cup sun-dried tomatoes - 2 cups heavy cream - 1 cup grated Parmesan cheese - 1 tablespoon olive oil - 3 cloves garlic, minced - 1 teaspoon Italian seasoning - Salt and pepper to taste - Fresh basil leaves for garnish Gathering the right ingredients is key to making delicious creamy sun-dried tomato gnocchi. You want to choose high-quality items for the best flavor. Start with gnocchi, which can be store-bought or homemade. The texture of gnocchi is soft and pillowy, making it perfect for sauce. Next, grab some sun-dried tomatoes. Look for those packed in oil for added flavor. They add a nice, tangy contrast to the creamy sauce. You’ll need heavy cream to make the sauce rich and smooth. The cream thickens nicely and coats the gnocchi perfectly. Don’t forget the Parmesan cheese; it adds a salty, nutty taste that brings everything together. For the aroma and depth of flavor, use fresh garlic and Italian seasoning. These two ingredients make the dish vibrant and fragrant. Lastly, have salt and pepper on hand to season to your liking and fresh basil leaves to make your dish pop with color. With these ingredients, you’ll create a dish that delights everyone at your table. Enjoy the cooking process and let each ingredient shine! {{ingredient_image_1}} - Bring a large pot of salted water to boil. - Add 1 pound of gnocchi and cook until they float. This usually takes about 2-3 minutes. Once they float, they are ready to drain. Set aside for later. - Heat 1 tablespoon of olive oil in a large skillet over medium heat. - Add 3 minced garlic cloves and sauté for about 30 seconds. You want the garlic to smell great. - Stir in 1 cup of chopped sun-dried tomatoes. Cook for another minute with 1 teaspoon of Italian seasoning. This adds a nice flavor. - Pour in 2 cups of heavy cream and stir to mix. - Bring the mixture to a gentle simmer. Let it cook for about 3-4 minutes. This helps the sauce thicken up. - Gradually add 1 cup of grated Parmesan cheese. Mix until the cheese melts into a creamy sauce. - Season with salt and pepper to taste. - Toss the cooked gnocchi into the creamy sauce. - Gently mix to coat each piece. - Heat everything together for an additional 1-2 minutes. This helps the flavors blend. To make your gnocchi sauce creamy, use heavy cream. It gives the sauce a rich, smooth feel. If you want to thicken the sauce, let it simmer a bit longer. This helps it become nice and thick. You can also add more cheese for extra creaminess. Parmesan cheese melts well and adds flavor. Store-bought gnocchi is quick and easy. Homemade gnocchi has a fresh taste and texture. If you choose store-bought, look for brands like De Cecco or Rana. These brands offer good quality gnocchi. If you have time, try making your own for the best taste. You can add different herbs and seasonings to boost flavor. Basil, thyme, or oregano work well. Experiment with crushed red pepper for a spicy kick. Sun-dried tomatoes come in oil or dry. When using dry tomatoes, soak them in water for a bit. This helps them soften and blend better into the sauce. Pro Tips Quality Ingredients: Use high-quality sun-dried tomatoes packed in oil for a richer flavor. This will enhance the overall taste of your dish. Don’t Overcook the Gnocchi: Keep a close eye on the gnocchi while cooking; they should only be boiled until they float, which indicates they are done. Overcooking can make them mushy. Adjusting Creaminess: If you prefer a lighter sauce, you can substitute half of the heavy cream with chicken or vegetable broth without sacrificing too much flavor. Garnish for Extra Flavor: Adding fresh basil not only enhances the presentation but also brings a fresh, aromatic flavor that complements the creamy sauce beautifully. {{image_2}} You can make this dish even better by adding protein. Try cooking diced chicken in the skillet before adding the sun-dried tomatoes. Cooked shrimp also works well, offering a sweet taste. If you prefer sausage, slice it and add it when cooking the garlic. For vegetarians, consider adding chickpeas or tofu. Both add protein without meat. To boost the nutrition, toss in some veggies. Spinach wilts nicely in the creamy sauce. Just add it right before you mix in the gnocchi. Mushrooms add earthiness, while bell peppers bring a sweet crunch. You can also use seasonal veggies like zucchini or asparagus. These additions keep the dish fresh and colorful. If you need gluten-free gnocchi, look for brands made from potatoes or cauliflower. You can also make your own using gluten-free flour. For the sauce, all ingredients are naturally gluten-free. Just check labels for added gluten in store-bought items. Enjoy this creamy dish without worry! To keep your creamy sun-dried tomato gnocchi fresh, store it in the fridge. Place it in an airtight container. This helps to keep it from drying out or absorbing other flavors. Make sure the dish is cooled to room temperature before sealing it. Enjoy leftovers within three days for the best taste. When reheating, we want to keep the creamy texture. A gentle method works best. Use a skillet over low heat. Add a splash of cream or water to help with moisture. Stir often to prevent sticking. You can also use the microwave. Heat it in short bursts, stirring in between. This way, your gnocchi stays creamy and delicious. Yes, you can freeze creamy gnocchi! However, the texture might change a bit. To freeze, let the dish cool completely. Then, place it in a freezer-safe container. Make sure to leave some space at the top for expansion. To thaw, move it to the fridge overnight. Reheat gently on the stove or in the microwave for the best results. This way, you can enjoy a taste of Italy anytime! Making homemade gnocchi is simple. Here are the steps: - Ingredients: You need 2 pounds of potatoes, 1 cup of all-purpose flour, and 1 egg. - Cook the Potatoes: Boil the potatoes until tender. - Mash: Peel and mash the potatoes until smooth. - Mix: In a bowl, combine the mashed potatoes, flour, and egg. - Knead: Gently knead the dough until it forms a soft ball. - Shape: Roll the dough into long ropes and cut into small pieces. - Form the Gnocchi: Press each piece with a fork for texture. - Cook: Boil the gnocchi until they float. Yes, you can use other types of pasta. Here are some great options: - Penne: A sturdy pasta that holds sauce well. - Farfalle: Its butterfly shape adds fun to the dish. - Fusilli: Twisted shape captures the sauce nicely. - Rigatoni: Large tubes for a hearty bite. These pastas will work well with the creamy sun-dried tomato sauce. You can serve several tasty side dishes with gnocchi. Consider these options: - Garlic Bread: A crunchy side that pairs well with creamy dishes. - Mixed Green Salad: Fresh greens with a light dressing add brightness. - Roasted Vegetables: Carrots or asparagus will add color and flavor. - Grilled Chicken: A protein option that complements the dish nicely. These sides will enhance your meal and create a delightful dining experience. This creamy sun-dried tomato gnocchi combines simple ingredients for a delicious dish. You learned how to create a rich sauce, cook gnocchi, and combine flavors. Experimenting with proteins and veggies can make your dish unique. Use the storage tips to keep leftovers tasty. Enjoy making this meal your own! Each step leads to a satisfying plate. Dishes like this can transform any dinner into a feast.

Creamy Sun-Dried Tomato Gnocchi Delightful and Easy

If you’re craving comfort food that packs a punch, look no further! This Creamy Sun-Dried Tomato Gnocchi recipe is rich,

To make sweet chili garlic shrimp, gather these key items: - 1 pound large shrimp, peeled and deveined - 3 cloves garlic, minced - 1/4 cup sweet chili sauce - 1 tablespoon soy sauce - 1 tablespoon lime juice - 1 tablespoon olive oil - 1 teaspoon fresh ginger, grated - 1/2 teaspoon red pepper flakes (adjust to taste) - Salt and pepper to taste These ingredients work together to create a sweet and savory flavor. The shrimp soak up all the tasty goodness. For a fresh touch, consider these garnishes: - 2 green onions, sliced - Fresh cilantro leaves (optional) Garnishes add color and freshness. They elevate the dish and make it more appealing. If you lack some ingredients, here are a few swaps: - Use frozen shrimp if fresh is not available. - Replace soy sauce with tamari for a gluten-free option. - Swap lime juice with lemon juice for a different zing. - Use garlic powder instead of fresh garlic, if needed. These substitutions keep the dish tasty, even if you don't have everything on hand. {{ingredient_image_1}} To make the marinade, grab a bowl. Add 1/4 cup of sweet chili sauce. Then, toss in 1 tablespoon of soy sauce and 1 tablespoon of lime juice. Next, add 3 cloves of minced garlic and 1 teaspoon of grated fresh ginger. For a little kick, include 1/2 teaspoon of red pepper flakes. Stir all these ingredients together until well mixed. This mix will give the shrimp a tasty sweet and spicy flavor. Now, it's time for the shrimp. Use 1 pound of large shrimp that are peeled and deveined. Place the shrimp in the bowl with the marinade. Make sure each shrimp gets covered well. Once they are coated, cover the bowl with plastic wrap. Put it in the fridge for 15 to 30 minutes. This step helps the shrimp soak up all the great flavors. Heat a large skillet on medium-high heat and add 1 tablespoon of olive oil. When the oil is hot, add the marinated shrimp in a single layer. You may need to cook them in batches. Let them cook for about 2 to 3 minutes on one side. They should turn pink and opaque. After that, flip the shrimp over. Cook for another 2 to 3 minutes. Make sure they are fully cooked but not rubbery. Season with salt and pepper to taste. Once done, take them off the heat and garnish with sliced green onions and optional cilantro leaves. Serve them over jasmine rice or with some sautéed veggies for a great meal! To make sweet chili garlic shrimp perfectly, start with a hot skillet. Heat the olive oil before adding the shrimp. This helps the shrimp cook fast and keeps them juicy. Cook in batches if needed. Crowding the pan makes the shrimp steam instead of sear. Each shrimp should get a nice sear for that great flavor. You can control the heat with red pepper flakes. If you like it spicy, add more flakes. For less heat, reduce the amount. The sweet chili sauce adds a nice balance. This sauce is sweet but has a kick too. Taste your marinade first. Adjust it to fit your taste before marinating the shrimp. Serve your sweet chili garlic shrimp over jasmine rice. The rice soaks up the tasty sauce. You can also pair it with sautéed vegetables. Broccoli and bell peppers work well. They add color and crunch to your meal. For a fresh touch, add a squeeze of lime on top before serving. This brightens the dish and adds zest. Pro Tips Marinate Longer for More Flavor: For an even bolder taste, let the shrimp marinate for up to an hour. This allows the flavors to penetrate the shrimp more deeply. Adjust Spice Level: If you prefer a milder dish, reduce the amount of red pepper flakes or leave them out entirely. You can always add a sprinkle when serving for those who enjoy heat. Use Fresh Shrimp: Whenever possible, opt for fresh shrimp instead of frozen. Fresh shrimp have a better texture and flavor, making your dish even more delightful. Don't Overcook the Shrimp: Keep a close eye on the shrimp while cooking; they only need about 4-6 minutes total. Overcooking can lead to a rubbery texture. {{image_2}} You can switch up the flavors with different sauces. Try teriyaki or hoisin sauce for a sweet twist. For a tangy kick, use a mix of barbecue sauce and honey. If you want a spicy bite, add sriracha or chili paste. Each sauce creates a unique taste for your shrimp. If shrimp isn't your favorite, you can use other proteins. Chicken breast works well with this recipe. Cut it into small pieces and marinate just like the shrimp. Tofu is a great plant-based option. Use firm tofu, cut into cubes, and marinate for the same time. Cook it until golden brown for a tasty dish. For a vegetarian version, try using vegetables. Bell peppers, zucchini, and broccoli can soak up the marinade nicely. Marinate them just like the shrimp. You can also use a mix of mushrooms for a meaty texture. These options bring flavor and color to your meal, making it just as delightful. To keep your sweet chili garlic shrimp fresh, place leftovers in a sealed container. Store them in the fridge. They can last up to three days. Make sure they cool down first. This keeps them safe and tasty. When ready to eat, check for any odd smell or color before reheating. You can freeze sweet chili garlic shrimp for longer storage. Put the shrimp in a freezer-safe bag. Remove as much air as possible before sealing. Label the bag with the date. They can stay fresh for up to three months. When you want to use them, move the bag to the fridge to thaw overnight. Reheat leftovers gently to keep them juicy. You can use a skillet over medium heat. Add a splash of water or broth to keep them moist. Stir often until heated through. You can also use the microwave. Heat them in short bursts, checking often to avoid overcooking. Yes, you can use frozen shrimp. Just remember to thaw them first. Place the shrimp in a bowl of cold water for about 15-20 minutes. This method helps them thaw quickly and safely. After thawing, pat the shrimp dry with a paper towel. This step ensures the marinade sticks well to the shrimp. To make the dish spicier, add more red pepper flakes. You can also use fresh chopped chili peppers. If it’s still not spicy enough, try a dash of hot sauce. Adjust according to your taste. Remember, spice can build up, so add a little at a time. Some great sides include jasmine rice or fried rice. These pair well with the shrimp's sweet and spicy flavors. You can also serve it with sautéed vegetables like bell peppers or broccoli. A simple green salad with a light dressing works well too. These sides create a balanced meal and enhance the shrimp's taste. This blog post walks you through making Sweet Chili Garlic Shrimp. You learned about key ingredients, optional garnishes, and how to switch items if needed. I shared step-by-step instructions for marinating and cooking shrimp. I also included tips for cooking techniques and heat adjustments. You explored sauce variations, storage tips, and answers to common questions. Remember, cooking should be fun and creative. Enjoy experimenting with new flavors and variations. Happy cooking!

Sweet Chili Garlic Shrimp Flavorful and Easy Recipe

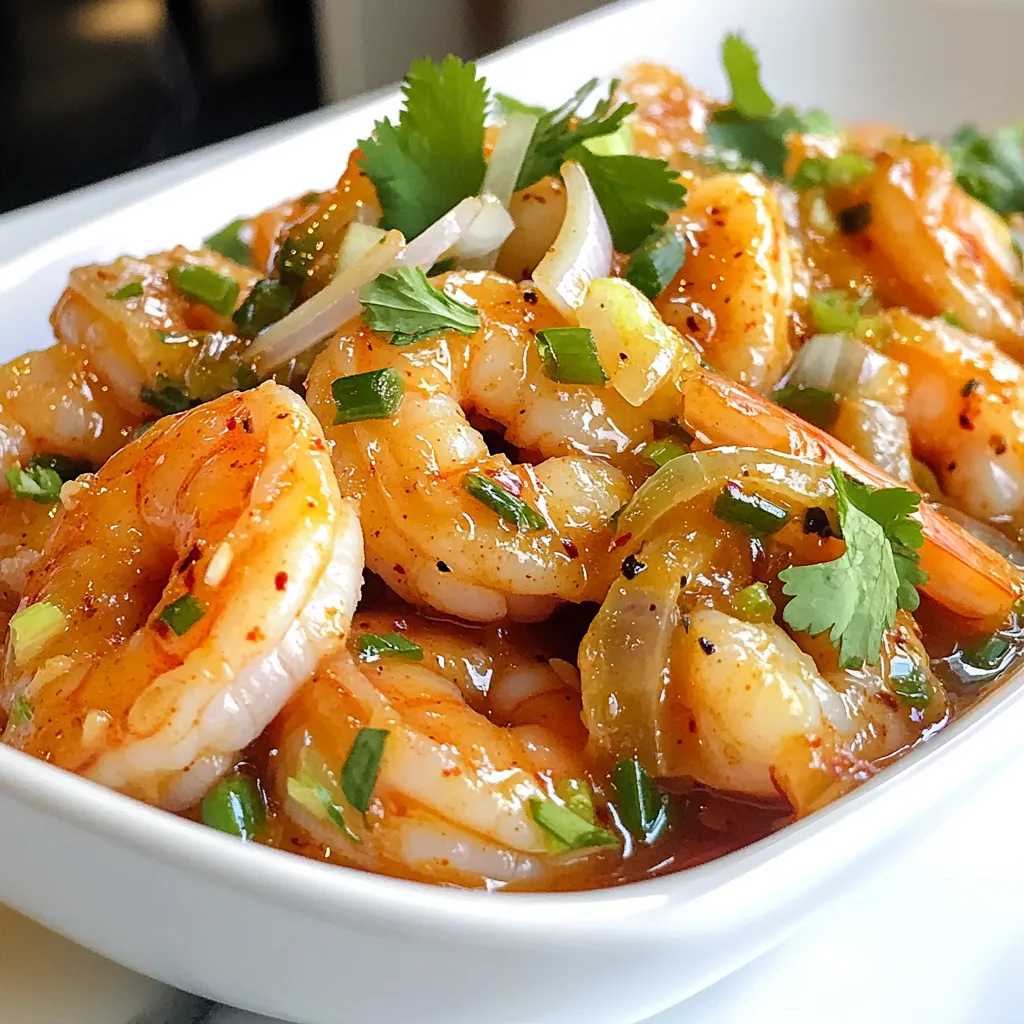
Are you ready to impress your taste buds? My Sweet Chili Garlic Shrimp recipe is a quick and tasty dish

To make One-Pot Lemon Garlic Orzo, gather these simple items: - 1 cup orzo pasta - 2 tablespoons olive oil - 4 cloves garlic, minced - 1 medium yellow onion, diced - 3 cups vegetable broth - 1 cup cherry tomatoes, halved - 1 cup spinach, packed - Zest and juice of 1 lemon - 1 teaspoon dried oregano - Salt and pepper to taste - Fresh parsley, chopped (for garnish) - Grated Parmesan cheese (for serving, optional) If you are missing an ingredient, here are some swaps: - Orzo pasta: You can use any small pasta, like ditalini or couscous. - Olive oil: Canola or avocado oil works well too. - Vegetable broth: Chicken broth or water can replace it. - Spinach: Kale or Swiss chard are good alternatives. - Cherry tomatoes: Diced regular tomatoes will do. - Dried oregano: Italian seasoning or thyme can work in a pinch. Using fresh ingredients is key to great flavor. Here are some tips: - Garlic: Choose firm, plump cloves. They should not be sprouted. - Onions: Look for smooth skin and no soft spots. - Tomatoes: Pick ones that are bright and firm. - Spinach: Get fresh leaves that are vibrant and crisp. - Lemon: A heavier lemon has more juice. - Parsley: Opt for bright green leaves. Avoid yellow or wilted ones. Using fresh ingredients makes your dish pop with flavor and nutrition. This simple meal shines with bright, zesty tastes! {{ingredient_image_1}} To make One-Pot Lemon Garlic Orzo, you need a few fresh ingredients. Start by gathering everything you need: - 1 cup orzo pasta - 2 tablespoons olive oil - 4 cloves garlic, minced - 1 medium yellow onion, diced - 3 cups vegetable broth - 1 cup cherry tomatoes, halved - 1 cup spinach, packed - Zest and juice of 1 lemon - 1 teaspoon dried oregano - Salt and pepper to taste - Fresh parsley, chopped (for garnish) - Grated Parmesan cheese (for serving, optional) Take about 10 minutes to prepare. Dice the onion and mince the garlic. Halve the cherry tomatoes and zest the lemon. This makes cooking easier. Now, let’s cook! First, heat a large saucepan over medium heat. Add the olive oil and let it warm. Add the diced onion. Cook it for about 3-4 minutes. You want it to turn translucent. Next, stir in the minced garlic. Cook for an additional 1-2 minutes. Watch closely so it doesn’t burn. Then, add the orzo pasta. Toast it for 1-2 minutes while stirring. This step gives the orzo extra flavor. Pour in the vegetable broth. Add the cherry tomatoes, lemon zest, lemon juice, and dried oregano. Stir everything well. Bring it to a boil, then reduce the heat to low. Cover the pot and let it simmer for 10-12 minutes. The orzo should be cooked al dente and absorb most of the liquid. After that, stir in the spinach. It will wilt quickly. Season with salt and pepper to taste. Remove from heat and let it sit for a couple of minutes. This helps the dish thicken. Cooking orzo can be fun! Here are some tips to help: - Use a large pot to give orzo space to cook evenly. - Stir often to prevent sticking. - Taste the orzo a minute or two before the time is up. This checks for doneness. - If your orzo is too dry, add a bit more broth. - Don’t forget to let it sit after cooking. This helps all the flavors meld. Enjoy your delicious One-Pot Lemon Garlic Orzo! To boost the flavor of your One-Pot Lemon Garlic Orzo, try these tips. Add more lemon zest for a brighter taste. Fresh herbs like basil or thyme can add depth. You can also toss in a pinch of red pepper flakes for heat. If you love cheese, mix in feta for a tangy finish. A splash of white wine as you cook the garlic can add a rich layer of flavor. When making this dish, avoid these common pitfalls. Don't skip toasting the orzo; it adds a nutty flavor. Be careful not to burn the garlic while cooking. It can turn bitter quickly. Remember to check the orzo often while it simmers. If it cooks too long, it can turn mushy. Lastly, don't forget to season well with salt and pepper. This step is key to bringing out the flavors. For serving, I like to garnish with fresh parsley to add color. A sprinkle of grated Parmesan cheese makes it even better. Serve the orzo with a side of crusty bread. This adds a nice touch for soaking up any extra broth. Pair the dish with a light salad for a complete meal. You can also enjoy it as a side dish next to grilled chicken or fish. Pro Tips Use Fresh Ingredients: Fresh garlic, spinach, and tomatoes will enhance the flavor of this dish significantly compared to using dried or canned alternatives. Don’t Overcook the Orzo: Keep an eye on the cooking time to prevent the orzo from becoming mushy; it should be al dente for the best texture. Customize Your Greens: Feel free to substitute spinach with kale or arugula for a different flavor profile and added nutrients. Garnish Generously: A sprinkle of fresh parsley and a dash of lemon zest on top before serving will add a burst of color and flavor to your dish. {{image_2}} You can easily make this dish vegetarian. Swap vegetable broth for chicken broth to keep it plant-based. Add more veggies like bell peppers, zucchini, or peas for extra color and flavor. Mushrooms also add a nice earthy taste and texture. For a heartier meal, add protein to your orzo. Diced cooked chicken works great. Toss it in when you stir in the spinach. Shrimp is another tasty option. Sauté the shrimp with the garlic and onion for a few minutes before adding the orzo. This will infuse the dish with a lovely seafood flavor. Feel free to get creative with your veggies! Broccoli or asparagus pairs well with the lemon and garlic. Simply chop them into bite-sized pieces and add them during cooking. You can also mix in frozen peas or corn right at the end. They just need a minute to heat through. To store leftovers, let the orzo cool first. Then, place it in an airtight container. Keep it in the fridge for up to three days. Ensure the lid seals tightly to keep the flavors fresh. To reheat, you can use the microwave or a stovetop. If using the microwave, place the orzo in a bowl. Add a splash of broth or water to keep it moist. Heat in 30-second bursts, stirring in between. For stovetop, warm it in a pan over low heat. Stir often to prevent sticking. You can freeze this dish for later. First, cool it completely. Then, portion it into freezer-safe bags. Remove as much air as possible before sealing. Label the bags with the date. You can freeze it for up to three months. When ready to eat, thaw it in the fridge overnight before reheating. Orzo is a type of pasta that looks like rice. It is small and oval-shaped, making it great for soups and salads. I love using orzo because it cooks quickly. You can find it in most grocery stores. It is made from wheat, so it has a nice chewy texture. Yes, you can make this dish gluten-free. Just use gluten-free orzo pasta. Many brands offer gluten-free pasta made from rice or corn. This way, you can enjoy the same great taste without the gluten. Always check the package to ensure it fits your needs. To make more servings, simply double or triple the recipe. This dish serves four, so you can easily adjust it. For every cup of orzo, add two cups of broth. Keep the same amounts for the other ingredients. Just make sure your pot is large enough to hold it all. Stir well and enjoy! In this post, we explored orzo pasta, from its key ingredients to cooking tips. We discussed tasty substitutes and storage methods to keep leftovers fresh. Remember, using fresh ingredients can make a big difference in flavor. Be mindful of common mistakes when cooking orzo. You can also make fun variations with veggies or proteins. With these tips, you'll create delightful dishes with ease. Enjoy your orzo cooking adventure!

One-Pot Lemon Garlic Orzo Tasty and Simple Meal

Are you looking for a quick, tasty meal that packs a punch? Let me introduce you to One-Pot Lemon Garlic

- 1 lb ground chicken (or beef) - 1/2 cup breadcrumbs - 1/4 cup grated Parmesan cheese - 1 large egg - 3 cloves garlic, minced - 1 teaspoon ginger, minced - 1 tablespoon soy sauce - 1 teaspoon red pepper flakes (adjust for spice level) - Salt and pepper to taste - 2 tablespoons olive oil (for frying) For the meatballs, I like to use ground chicken for a lighter dish. Beef also works well if you prefer a richer flavor. The breadcrumbs and Parmesan add great texture and taste. - 1/3 cup honey - 1/4 cup soy sauce - 2 tablespoons rice vinegar - 1 teaspoon sesame oil - 1 teaspoon cornstarch mixed with 2 tablespoons water (to thicken) This sauce is the star of the dish. The honey gives a sweet touch, while the soy sauce adds depth. The rice vinegar adds a tangy kick that balances the sweetness perfectly. - Chopped green onions (for garnish) - Sesame seeds (for garnish) Adding green onions and sesame seeds on top makes the dish pop. They not only add flavor, but also look great on the plate. Feel free to mix in other spices or herbs to suit your taste! {{ingredient_image_1}} To start, grab a large mixing bowl. In this bowl, add: - 1 lb ground chicken (or beef) - 1/2 cup breadcrumbs - 1/4 cup grated Parmesan cheese - 1 large egg - 3 cloves garlic, minced - 1 teaspoon ginger, minced - 1 tablespoon soy sauce - 1 teaspoon red pepper flakes (adjust for spice level) - Salt and pepper to taste Mix everything together until it looks well combined. Make sure the egg and spices mix in well. This step is key for flavor. Now, it’s time to shape the meatballs. Roll the mixture into small balls, about 1 inch wide. Place the meatballs on a baking sheet for easy transfer. Next, heat 2 tablespoons of olive oil in a large skillet over medium heat. Once the oil is hot, add the meatballs in a single layer. This step helps them brown nicely. Cook for about 8-10 minutes until they are golden brown on all sides. They don’t need to be fully cooked yet, as they will finish cooking in the sauce. While the meatballs cook, let’s make the sauce. In a saucepan, mix together: - 1/3 cup honey - 1/4 cup soy sauce - 2 tablespoons rice vinegar - 1 teaspoon sesame oil Set the heat to medium and stir the sauce well. Once it starts to simmer, add 1 teaspoon of cornstarch mixed with 2 tablespoons of water. Stir continuously for about 2-3 minutes until the sauce thickens slightly. Once the meatballs are browned, carefully pour the spicy honey garlic sauce over them in the skillet. Gently stir to coat all the meatballs with the sauce. Let them simmer in the sauce for an extra 5 minutes. This allows the flavors to meld perfectly. After that, remove the skillet from heat and let the meatballs cool slightly before serving. Enjoy the delicious flavors! To make great meatballs, you need the right mix. Use 1 lb of ground chicken or beef. Add 1/2 cup of breadcrumbs and 1/4 cup of grated Parmesan cheese. These ingredients help hold the meatballs together. The egg binds everything well. Mix all these ingredients gently but thoroughly. If you mix too much, the meatballs can turn tough. Roll the mixture into small balls, about 1 inch wide. This size cooks evenly and is easy to eat. If you like spice, add more red pepper flakes. Start with 1 teaspoon for a mild kick. If you want it spicier, go for 2 teaspoons. Always taste the mixture before cooking. You can adjust the spice level easily. If the mix is too spicy, balance it with more breadcrumbs or cheese. Remember, the sauce also adds heat, so keep that in mind. These meatballs shine on a platter. Drizzle them with the spicy honey garlic sauce for a great look. Garnish with chopped green onions and sesame seeds. This adds color and flavor. Serve them as appetizers or with rice for a full meal. You can also add them to a sandwich for a tasty twist. The options are endless! Enjoy your meal. Pro Tips Use Fresh Ingredients: For the best flavor, use fresh garlic and ginger. They will enhance the overall taste of your meatballs and sauce. Adjust Spice Levels: Feel free to modify the amount of red pepper flakes based on your personal heat preference. Start with less and add more if needed. Thicken Your Sauce: If you prefer a thicker sauce, add more cornstarch mixed with water until you reach your desired consistency. Make Ahead: You can prepare the meatballs in advance and freeze them. Just cook them straight from frozen when you're ready to enjoy! {{image_2}} You can switch up the ground chicken for ground beef. Both options make tasty meatballs. If you want a lighter choice, use ground turkey. It works well too. You can also try ground pork for a different flavor. Each meat brings its own taste to the dish. The sauce is key to these meatballs. You can add hoisin sauce for a sweet, rich taste. Sriracha brings heat if you want more spice. If you like a tangy twist, add a bit of lime juice. Feel free to mix and match sauces. Your creativity can make each batch unique. These meatballs are super versatile. Serve them as appetizers at your next party. Just let guests pick them up with toothpicks. You can also serve them over rice or noodles as a main dish. They pair well with a side salad too. For a fun twist, try them in a sub sandwich. Each option offers a new way to enjoy this delicious recipe. To keep your spicy honey garlic meatballs fresh, store them correctly. First, let the meatballs cool down. This step is important to prevent moisture build-up. Place them in an airtight container. You can also use a freezer bag. Just make sure to remove as much air as possible. This keeps them tasty for longer. Reheating meatballs can be tricky. You want to keep them juicy and flavorful. The best way is to use the stove. Heat a skillet over medium heat. Add a little water or broth to the pan. This helps steam the meatballs. Place the meatballs in the skillet and cover it. Heat for about 5-7 minutes, turning them halfway through. You can also microwave them, but add a splash of water and cover them with a wet paper towel. This helps maintain moisture. Freezing meatballs is a smart option. It saves time and effort for future meals. To freeze, first, arrange the cooked meatballs on a baking sheet in a single layer. Place this sheet in the freezer for about an hour. This step prevents them from sticking together. Once frozen, transfer the meatballs to a freezer bag. Label the bag with the date. They can stay frozen for about three months. When you’re ready to use them, thaw in the fridge overnight before reheating. Yes, you can use different meats for meatballs. Ground beef works well too. You can also use turkey or pork. Each meat gives a unique taste. Just ensure it is finely ground. Adjust cooking time based on the meat you choose. For example, beef may take longer than chicken. You can store the meatballs in the fridge for up to four days. Place them in a tight container. Make sure they cool completely before sealing. If you want to keep them longer, freeze them. Frozen meatballs can last up to three months. Just thaw and reheat before serving. These meatballs go great with many sides. Rice or quinoa works well for a hearty meal. You can also serve them with steamed veggies. A fresh salad adds a nice crunch. For a fun twist, try them in a wrap or on a sub. Yes, you can make the sauce ahead of time. Store it in the fridge for up to a week. Just reheat it on the stove before using. If you want to save time, make a double batch! You can use it for other dishes too. You now know how to make flavorful meatballs and a tasty sauce. With the right ingredients and clear steps, you can cook a dish everyone will enjoy. Remember, adjusting the spice or trying new ingredients can make your meal unique. Store leftovers properly and reheat for a great second meal. Explore the variations for fun new tastes. Try these tips and enjoy the experience of cooking!

Spicy Honey Garlic Meatballs Easy and Tasty Recipe

Are you craving a dish that bursts with flavor? Look no further than my Spicy Honey Garlic Meatballs! This easy

- 1 lb white fish fillets (cod or tilapia) - 2 tablespoons olive oil - 1 teaspoon cumin - 1 teaspoon paprika - Salt and pepper to taste - 8 small corn tortillas - 1 ripe mango, diced - 1 red bell pepper, diced - 1/4 red onion, finely chopped - 1 jalapeño, minced (optional) - 1/4 cup fresh cilantro, chopped - Juice of 1 lime - Sliced avocado - Additional lime wedges Using fresh ingredients makes all the difference in this dish. When you choose fish, cod or tilapia works best. They are mild and flaky. The olive oil adds richness. Spices like cumin and paprika give depth to the fish. For the salsa, ripe mango is key. It should be sweet and juicy. Red bell pepper adds crunch and color. Red onion gives a slight bite. If you like heat, add jalapeño. Fresh cilantro brightens the flavors. Lime juice ties everything together with a zesty kick. Don't forget the optional garnishes! Sliced avocado adds creaminess. Extra lime wedges help you adjust the flavor to your liking. Use these fresh ingredients to make your tacos vibrant and tasty. {{ingredient_image_1}} Preheat your oven to 400°F (200°C). This step is key for even cooking. In a bowl, mix olive oil, cumin, paprika, salt, and pepper. Rub this spice mixture all over the fish fillets. Make sure to coat them well for great flavor. Place the seasoned fish on a baking sheet lined with parchment paper. Bake for 15-20 minutes. The fish is done when it flakes easily with a fork. To check doneness, gently poke the thickest part with a fork. If it breaks apart easily, it’s ready. While the fish bakes, let’s make the mango salsa. Dice the ripe mango, red bell pepper, and red onion. If you like heat, chop the jalapeño finely. In a bowl, mix all the diced ingredients with chopped cilantro and lime juice. Add a pinch of salt. Stir gently to combine. Let it sit so the flavors blend. To warm the corn tortillas, heat a skillet over medium heat. Place each tortilla in the skillet for about 30 seconds on each side. This softens them, making them easy to fold. Be careful not to overcook, or they may tear. Once the fish is ready, flake it into bite-sized pieces. Take a warm tortilla and distribute the fish evenly. Top each taco with a generous amount of mango salsa. It adds sweetness and crunch, making every bite special. For a beautiful display, serve the tacos on a wooden board. Arrange extra salsa and avocado slices around them. Garnish the tacos with lime wedges and a sprinkle of fresh cilantro. This adds color and invites everyone to dig in. Serve immediately while they are warm. To make the best fish for tacos, focus on not overcooking. Fish cooks quickly and can dry out fast. Bake it just until it flakes easily with a fork. That’s around 15 to 20 minutes at 400°F. You can also grill or pan-sear the fish. Grilling adds a nice smoky flavor, while pan-searing gives a crispy edge. Both methods work well. To amp up your mango salsa, try adding other fruits. Pineapple or kiwi can add a sweet twist. You can also add spices like chili powder or garlic for extra flavor. Letting the salsa sit for a bit before serving helps the flavors mix. This gives you a tastier salsa that brightens your tacos. Choosing the right tortillas matters. Soft corn tortillas are the best choice for fish tacos. They hold the filling well and add great flavor. To avoid soggy tacos, warm the tortillas in a skillet for about 30 seconds on each side. This keeps them soft but sturdy, so they don’t break apart when you fill them. Pro Tips Fresh Fish is Best: Use the freshest fish available for the best flavor and texture. If possible, buy from a trusted fishmonger or local market. Customize Your Salsa: Feel free to add other ingredients to the salsa, such as diced cucumber or pineapple, for a twist on flavor and texture. Control the Heat: If you like spice, leave the seeds in the jalapeño. For a milder salsa, remove the seeds before mincing. Use a Non-Stick Skillet: When warming the tortillas, a non-stick skillet will help prevent them from sticking and tearing. {{image_2}} You can switch up the fish in your tacos. Salmon or mahi-mahi works great. Both have a nice flavor and texture. If you want a vegetarian option, try tofu or jackfruit. Tofu absorbs flavors well and is a good protein source. Jackfruit has a meaty texture and is perfect for tacos. You can use lime or lemon juice in your salsa. Lime gives a fresh taste, while lemon adds a bright flavor. For a fun twist, add tropical fruits like pineapple or papaya. They add sweetness and texture to the salsa. Mixing these fruits with mango creates a burst of flavor. To make your tacos even better, consider extra toppings. A cabbage slaw adds crunch and freshness. You can also sprinkle cheese on top for creaminess. If you like heat, try spicy sauces or fresh chilies. They can take your tacos to another level. Store your fish tacos in the fridge for best results. Place them in an airtight container. They will last for about two days in the fridge. If you want to keep them longer, freeze them. Wrap the tacos tightly in foil or plastic wrap. They can last up to three months in the freezer. Just know that freezing may change the texture a bit. To reheat the fish, place it in the oven at 350°F (175°C) for about 10 minutes. This keeps the fish flaky and warm. For tortillas, heat them on a skillet for 30 seconds on each side. This helps them stay soft and avoid tears. Don’t microwave them, as this can make them chewy. Keep your mango salsa in a sealed container in the fridge. It should stay fresh for about three days. If you want to freeze it, you can! Just remember to leave some space in the container for expansion. Frozen mango salsa lasts for about two months, but fresh is always better. Yes, you can use frozen fish. Just thaw it in the fridge overnight. This helps keep the fish moist. Once thawed, follow the recipe as usual. You may need to bake it a bit longer. To ripen a mango fast, place it in a paper bag. This traps ethylene gas, speeding up ripening. You can add an apple or banana for extra help. Check the mango daily until it feels soft. To add heat, chop a fresh jalapeño and mix it into the salsa. You can also add hot sauce on top of the tacos. Another option is to use spicy fish seasoning before baking. Yes, you can make the salsa a day ahead. Store it in the fridge in an airtight container. This allows the flavors to blend well. Just give it a stir before serving. Fish tacos go well with a fresh salad or rice. You can also serve them with corn on the cob. For a crunchy option, try tortilla chips with guacamole. These sides enhance the meal nicely. These fish tacos combine fresh ingredients and simple steps to create a tasty dish. You learned to prepare fish with spices, make vibrant mango salsa, and warm tortillas perfectly. Remember, the right fish and fresh flavors can enhance your meal. Experiment with variations and toppings to suit your taste. Enjoy crafting these tacos at home; they are sure to impress! Keep these tips in mind, and your next taco night will be a hit.

Mango Salsa Fish Tacos Flavorful and Easy Recipe

Craving a fresh twist on taco night? Try my Mango Salsa Fish Tacos! This recipe is packed with bright flavors

- 1 lb ground beef (or ground sirloin) - 3 tablespoons soy sauce - 1 tablespoon sesame oil - 2 tablespoons brown sugar - 1 tablespoon gochujang (Korean red chili paste) - 2 cloves garlic, minced - 1-inch piece ginger, grated - 2 green onions, finely chopped (plus extra for garnish) - 1 cup cooked jasmine rice (or cauliflower rice) - 1 cup fresh spinach (or bok choy) - 2 teaspoons sesame seeds (for garnish) - Salt and pepper to taste These ingredients make Korean Beef Bowls a delight. Ground beef gives a savory base. You can use ground sirloin for a leaner dish. Soy sauce adds salt and umami. Sesame oil brings rich flavor and a nutty kick. Brown sugar balances the sauce with sweetness. Gochujang is the star. It adds heat and depth. Garlic and ginger give warmth and aroma. Green onions add freshness and crunch. Jasmine rice serves as the perfect bed for the beef. Spinach or bok choy adds color and nutrients. Finally, sesame seeds make a lovely garnish. Gather these ingredients before you start. They make the meal easy and tasty. You can find most at local stores. Make sure they are fresh for the best results. {{ingredient_image_1}} First, take a large skillet and place it on medium heat. Add one pound of ground beef to the skillet. Cook it for about 5 to 7 minutes. As it cooks, break it apart with a spatula. This helps it brown evenly. If you see extra fat, drain it off carefully. In a small bowl, combine the following ingredients: - 3 tablespoons soy sauce - 1 tablespoon sesame oil - 2 tablespoons brown sugar - 1 tablespoon gochujang (Korean red chili paste) - 2 cloves garlic, minced - 1-inch piece ginger, grated Whisk these together until smooth. This sauce adds a lot of flavor to your beef. Now, take the sauce you made and pour it over the browned beef. Mix it well. Let it simmer for 2 to 3 minutes. This step allows all the flavors to come together. Next, stir in two finely chopped green onions. Season with salt and pepper to taste. In another pot or food steamer, add one cup of fresh spinach. Steam it for about 2 minutes until it becomes wilted. If you prefer, you can sauté the spinach in a bit of oil instead. To put your bowls together, start with a scoop of cooked rice. You can use jasmine rice or cauliflower rice. Next, top it with the beef mixture. Add a handful of the wilted spinach on top. Finally, garnish with 2 teaspoons of sesame seeds and some extra green onions for a nice touch. Enjoy your Korean Beef Bowls! - Adjust gochujang to match your spice level. If you like it hot, add more. - Use fresh ingredients for the best taste. Fresh garlic and ginger make a big difference. - Cook the ground beef until it's fully done. Aim for an internal temperature of 160°F. - Simmer the sauce long enough. Let it meld the flavors for about 2-3 minutes. - Add sides like kimchi or pickled veggies for extra crunch. These add great flavor. - Top your bowls with a fried egg or some extra jalapeños if you want more heat. Pro Tips Use Lean Meat: For a healthier option, opt for lean ground sirloin instead of regular ground beef to reduce fat content. Adjust Spice Level: If you prefer less heat, reduce the amount of gochujang or substitute it with a milder chili paste. Fresh Ingredients: Use fresh ginger and garlic for a more vibrant flavor; they make a significant difference in taste. Meal Prep Friendly: Prepare the beef mixture in advance and store it in the fridge for up to 3 days for quick and easy meals. {{image_2}} You can easily make this dish lower in carbs. Just swap jasmine rice for cauliflower rice. Cauliflower rice is light and fluffy. It adds a nice texture without the carbs. Plus, it absorbs the flavors well. This swap keeps the meal tasty and healthy. Want a lighter meat choice? Try ground turkey or chicken instead of beef. Both options keep the dish lean. They also soak up the flavors of the sauce. If you prefer a vegetarian option, use tofu. Tofu is a great protein source. It adds a nice texture and takes on the sauce's taste. To make your bowls even better, add more veggies. Bell peppers and carrots work great. They bring crunch and color to the dish. Mushrooms are another fantastic addition. They give a rich umami flavor that enhances the taste of the beef. Mixing in these ingredients can boost nutrition and flavor. To keep your Korean Beef Bowls fresh, allow the servings to cool first. This step helps avoid condensation in your container. Once cooled, place the beef, rice, and greens into an airtight container. You can store it in the fridge for up to 3-4 days. This makes it easy to enjoy a quick meal later. If you want to save some for later, freeze individual portions. You can keep them in the freezer for up to 3 months. Be sure to use freezer-safe containers to avoid freezer burn. When you're ready to eat, remember to reheat the beef mixture thoroughly before serving. To reheat, you can use the microwave or warm it on the stove. If you choose the stove, add a splash of water to keep the beef moist. This simple tip helps revive the flavors and texture, ensuring your meal tastes just as good as when you first made it. Gochujang is a Korean red chili paste. It adds heat and depth to dishes. In this recipe, I use one tablespoon of gochujang. This gives the beef a sweet and spicy flavor. You can find gochujang in Asian markets or online. It’s a must-have for authentic Korean cooking. Yes, you can prepare the beef and rice in advance. Cook the beef and sauce, then cool it. Store it in the fridge for up to three days. You can also cook the rice ahead. Just keep it in an airtight container. When ready to eat, reheat the beef and rice together for a quick meal. To make it milder, use less gochujang. You can start with one teaspoon. For a spicier kick, add more gochujang or some red pepper flakes. Taste the mixture as you go. This way, you can find the right heat level for your family. Yes, but you need to use gluten-free soy sauce. Regular soy sauce contains wheat. Look for tamari or a gluten-free brand. This way, everyone can enjoy the dish without worry. Always check labels to ensure safe eating options. Korean beef bowls are easy to make and packed with flavor. You start with ground beef and mix it with a tasty sauce. Adding fresh greens and fragrant rice makes it perfect. You can even adjust the spice level to fit your taste. Whether you stick to tradition or try new twists, these bowls will impress. Enjoy cooking and sharing this delightful meal with family and friends!

Korean Beef Bowls Flavorful and Easy Family Meal

Craving a meal that’s both tasty and simple? Let me introduce you to Korean Beef Bowls, the perfect dish for

To make Apple Cinnamon Baked Oatmeal, gather these fresh ingredients: - 2 cups rolled oats - 1 teaspoon baking powder - 1 teaspoon ground cinnamon - ½ teaspoon salt - 2 cups milk (dairy or plant-based) - ½ cup maple syrup or honey - 1 teaspoon vanilla extract - 2 large apples, peeled, cored, and chopped (preferably Granny Smith or Honeycrisp) - ½ cup raisins or chopped nuts (such as walnuts or pecans, optional) - 2 tablespoons melted coconut oil or butter - Extra cinnamon for sprinkling These ingredients come together for a dish that is warm and comforting. The apples add a sweet and tart flavor. The oats provide a hearty base. You can choose your milk type to fit your diet. Maple syrup or honey adds natural sweetness. You can also add optional ingredients like raisins or nuts. They add texture and extra flavor. If you love a crunch, nuts are a great choice. If you prefer a chew, go for raisins. Both options make this dish even better. Use the best ingredients you can find. Fresh apples and quality oats make a big difference. Enjoy the process of gathering your ingredients. It’s the first step to a delicious meal! {{ingredient_image_1}} 1. Preheat the oven. Start by setting your oven to 350°F (175°C). This step is key for even baking. While it heats, grab your 8x8-inch baking dish. Grease it lightly with coconut oil or butter. This helps the oatmeal come out easily. 2. Combine dry ingredients. In a large bowl, mix together the rolled oats, baking powder, ground cinnamon, and salt. Stir well to ensure everything is combined. This mixture sets the base for your baked oatmeal. 3. Mix wet ingredients. In another bowl, whisk the milk, maple syrup (or honey), vanilla extract, and melted coconut oil. This blend adds flavor and moisture. Make sure it is well mixed so the flavors spread evenly. 4. Combine wet and dry. Pour the wet mixture into the dry mix. Stir gently until just combined. Be careful not to over-mix. Now, fold in the chopped apples and optional raisins or nuts. This adds texture and natural sweetness. 5. Spread the mixture. Transfer the oatmeal mixture into the greased baking dish. Spread it out evenly. This ensures it bakes uniformly. 6. Add extra cinnamon. Sprinkle a little extra cinnamon on top. This boosts the aroma and flavor while baking. 7. Bake. Place the dish in the preheated oven. Bake for 30-35 minutes. Check for doneness when the top is golden brown and the oats are set. 8. Cool and serve. Once baked, remove it from the oven. Let it cool for a few minutes. This helps the squares hold their shape when you cut them. 9. Cut and enjoy. Slice into squares. Serve warm, adding a drizzle of maple syrup or a splash of milk on top for extra delight. To get the best texture in your Apple Cinnamon Baked Oatmeal, follow these tips: - Use rolled oats. They give a nice, chewy bite. Quick oats can turn mushy. - Check your baking time. Ovens vary, so watch for a golden top. - Let it cool for a few minutes before serving. This helps it set and makes cutting easier. When choosing a baking dish, an 8x8-inch glass or ceramic dish works well. It helps the dish bake evenly. If you want to make a larger batch, a 9x13-inch dish is perfect. Just adjust the baking time to ensure it cooks through. For spice variations, feel free to mix it up! Try adding nutmeg for warmth or ginger for a little kick. You can also add chopped walnuts or pecans for added crunch. If you want a sweeter touch, sprinkle brown sugar on top before baking. This creates a caramelized crust that is delicious! These tips will help you make the best Apple Cinnamon Baked Oatmeal. Enjoy every warm, comforting bite! Pro Tips Use Fresh Apples: For the best flavor and texture, opt for fresh, crisp apples like Granny Smith or Honeycrisp, which hold up well during baking. Customize Your Sweetness: Adjust the amount of maple syrup or honey based on your taste preference or the sweetness of the apples used. Make Ahead: Prepare the mixture the night before and refrigerate. Just bake it in the morning for a quick, delicious breakfast. Experiment with Add-ins: Feel free to add other ingredients like shredded carrots, cranberries, or different nuts for a unique twist on the classic recipe. {{image_2}} To make this dish gluten-free, use certified gluten-free oats. These oats are processed in a way that avoids cross-contamination with gluten. For texture, you might want to add a bit of almond flour. This helps create a moist, chewy feel that many love in baked oatmeal. For a vegan version, swap dairy milk for plant-based milk like almond or oat milk. Both add great flavor. Instead of honey, use maple syrup or agave nectar as a sweetener. This keeps the dish sweet while staying plant-based. Get creative with fruits! You can add bananas or mixed berries for a fresh twist. Each fruit brings its own taste and texture. Nuts are another fun addition. Try walnuts or pecans, which add crunch and richness. Don't be afraid to mix and match flavors! To store your apple cinnamon baked oatmeal, let it cool first. Then, cut it into squares. Place them in an airtight container. This keeps the oatmeal fresh in the fridge for up to five days. If you want to keep it longer, freezing is a great option. Wrap each square in plastic wrap and then place them in a freezer-safe bag. This way, they stay tasty for up to three months. When you're ready to eat, just take out what you need. Reheating baked oatmeal is easy and keeps it nice. You can use the microwave or the oven. For the microwave, place a square on a plate. Heat it for 30 seconds to 1 minute. Check if it's warm enough. If not, heat it a bit more. For the oven, preheat it to 350°F (175°C). Place the oatmeal squares on a baking sheet. Heat for about 10 minutes. This helps keep the texture soft and chewy. Enjoy your warm and comforting dish! What type of apples are best for this recipe? I recommend using Granny Smith or Honeycrisp apples. These apples add a nice tartness and hold their shape well during baking. Their sweet-tart flavor pairs perfectly with the warm spices in this dish. Can I use quick oats instead of rolled oats? You can use quick oats, but the texture will change. Quick oats will create a softer, mushier dish. Rolled oats give a heartier, chewier bite. Stick with rolled oats for the best result. How can I make this dish more nutritious? To boost nutrition, you can add chia seeds or flaxseeds. These seeds add healthy fats and fiber. Adding extra fruits, like berries or bananas, also increases vitamins and minerals. Can I double the recipe, and how will that affect baking time? Yes, you can double the recipe. Use a larger baking dish, like a 9x13-inch pan. The baking time may increase by 5 to 10 minutes. Always check for doneness by looking for a golden top and set oats. We covered a simple and tasty apple cinnamon baked oatmeal recipe. You learned about ingredients, baking steps, and storage tips. I shared ways to customize the dish, from gluten-free to vegan options. The right ingredients lead to great flavor. Make it your own by adding fruits or spices. With these tips, you’ll have a delicious breakfast ready to enjoy. Now, it’s your turn to bake and share!

Apple Cinnamon Baked Oatmeal Warm and Comforting Dish

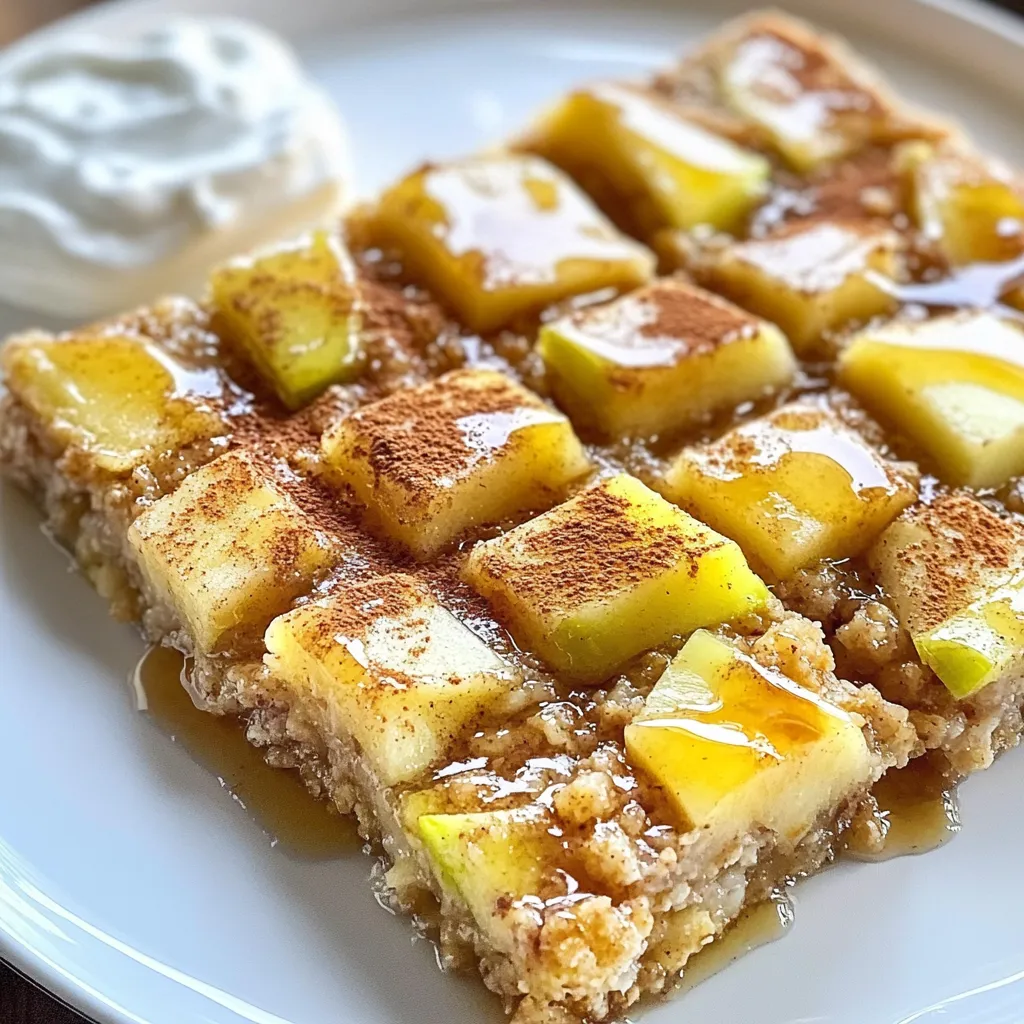
If you crave a warm, comforting dish that fills your kitchen with sweet aroma, look no further! Apple Cinnamon Baked

- 1 cup unsalted butter, softened - 2 cups granulated sugar - 4 large eggs - 1 tablespoon lemon zest - 2 tablespoons fresh lemon juice - 1 teaspoon vanilla extract - 3 cups all-purpose flour - 1 teaspoon baking powder - ½ teaspoon baking soda - ½ teaspoon salt - 1 cup buttermilk - 2 cups fresh blueberries - 1 tablespoon cornstarch To create this delightful lemon blueberry pound cake, you need fresh and high-quality ingredients. Butter adds richness and moisture to the cake, making it soft and tender. Choose unsalted butter for better control over the saltiness. Sugar is key for sweetness and helps with browning. Granulated sugar works best in this recipe. Eggs provide structure and stability to the cake. They also help it rise. Lemon zest brings bright flavor. Use a microplane or grater to get the zest without the bitter pith. Lemon juice adds a tangy taste and balances the sweetness of the cake. Freshly squeezed juice is ideal. Vanilla extract enhances the overall flavor. Always opt for pure vanilla for the best taste. All-purpose flour gives structure to the cake. Make sure to measure accurately for the best results. Baking powder and baking soda are both leavening agents that help the cake rise. They create air pockets, making the cake light. Salt amplifies flavors. A small amount is needed to enhance the taste. Buttermilk keeps the cake moist and tender. It reacts with the baking soda for extra lift. Fresh blueberries add bursts of flavor and color. Toss them with cornstarch to help them stay suspended in the batter. Cornstarch prevents the blueberries from sinking to the bottom. This trick keeps your cake looking beautiful! Gather these ingredients, and you’re ready to make a scrumptious lemon blueberry pound cake! {{ingredient_image_1}} 1. First, preheat your oven to 350°F (175°C). This step is key for a well-baked cake. 2. Next, grease and flour a 10-inch Bundt or loaf pan. This will help your cake come out easily. 3. In a large bowl, cream together the softened butter and sugar. Use a hand mixer or stand mixer. Mix until light and fluffy, about 5 minutes. 4. Now, add the eggs one at a time. Mix well after each egg. Then, add the lemon zest, lemon juice, and vanilla extract. Blend until combined. 1. In another bowl, whisk together the flour, baking powder, baking soda, and salt. This mix is crucial for the cake’s rise. 1. Gradually add the dry ingredients to the wet mixture. Alternate with the buttermilk. Start and end with the flour mix. 2. Mix until just combined; do not overmix. Overmixing can make your cake tough. 3. In a small bowl, toss the blueberries with cornstarch. This helps keep them from sinking. 4. Gently fold the blueberries into the batter using a spatula. Be careful not to crush them. 5. Pour the batter into the prepared pan. Smooth out the top with a spatula. 6. Bake in the preheated oven for 55-65 minutes. Check with a toothpick; it should come out clean. 7. Allow the cake to cool in the pan for 10 minutes. Then, transfer it to a wire rack to cool completely. To ensure a perfect pound cake texture, start with room temperature ingredients. This helps them blend well, giving you a smooth batter. When you cream the butter and sugar, mix until it's light and fluffy. This step is key for a soft cake. Check for doneness by inserting a toothpick into the center of the cake. If it comes out clean, the cake is done. If it’s wet, bake for a few more minutes. If the top browns too quickly, cover it loosely with foil. This keeps the top from burning while the inside finishes baking. For serving, sprinkle powdered sugar on top for a sweet touch. You can also add fresh blueberries and thin lemon slices for color. This makes the cake look fresh and inviting. To store leftovers, wrap the cake in plastic wrap. Place it in an airtight container for best results. You can also slice the cake before storing. This makes it easier to grab a piece later, keeping it neat and tidy. Pro Tips Use Room Temperature Ingredients: Ensuring that your butter, eggs, and buttermilk are at room temperature will help create a smooth batter and contribute to a lighter texture in your pound cake. Don’t Overmix the Batter: Mixing the batter just until combined helps to keep the cake tender. Overmixing can lead to a dense texture, so be gentle when folding in the dry ingredients and blueberries. Coat Blueberries in Cornstarch: Tossing the blueberries in cornstarch before folding them into the batter helps to prevent them from sinking to the bottom of the cake, ensuring an even distribution throughout. Check for Doneness: Every oven is different, so start checking your cake at the 55-minute mark. A toothpick inserted into the center should come out clean or with a few moist crumbs, indicating it’s ready. {{image_2}} You can switch up the berries in this cake. Try raspberries or blackberries. They add a nice twist. Just remember to use the same amount. If you want a gluten-free option, use a gluten-free flour blend. Many blends work well in cakes. Just make sure it has a good mix of starches and proteins. For a fun twist, add herbs like thyme or mint. These herbs pair well with the lemon. Just chop them finely and mix them in. You can also play with the citrus zest. Use lime or orange zest instead of lemon. This change gives a fresh flavor. Experimenting with these flavors can make your cake unique and exciting! For your Lemon Blueberry Pound Cake, choose the right storage method. This cake stays fresh for a few days at room temperature. Store it in an airtight container. Keep it away from direct sunlight and heat. If you want it to last longer, refrigerate it. - Short-term Storage: At room temperature, the cake stays good for 3-4 days. Wrap it in plastic wrap or store it in a container. - Long-term Storage: In the fridge, it stays fresh for about a week. Just make sure to seal it well. Freezing is a great way to keep your cake for later. Follow these steps to freeze and defrost safely. 1. Cool the Cake: Always let your cake cool completely before freezing. This prevents ice crystals from forming. 2. Wrap It Up: Use plastic wrap to cover the cake tightly. Then, place it in a freezer bag or a container. 3. Label and Date: Write the date on the bag or container. This helps you track how long it has been frozen. When you want to enjoy your cake again, here’s how to defrost it: 1. Remove from Freezer: Take the cake out of the freezer. 2. Thaw in Fridge: Place it in the fridge overnight. This keeps it moist. 3. Serve: Once thawed, it’s ready to slice and serve. Enjoy the fresh taste! Can I use frozen blueberries instead of fresh? Yes, you can use frozen blueberries. They work well in this recipe. Just toss them with cornstarch to help keep them from sinking. Frozen blueberries often have more juice, which can make the cake moist and tasty. How can I reduce the sugar in this recipe? To cut down on sugar, use less granulated sugar. You can start with 1 ½ cups instead of 2 cups. This will still keep the cake sweet. You can also use a sugar substitute, but check the conversion on the label for the best results. What are the best serving suggestions for Lemon Blueberry Pound Cake? Slice it and serve it plain, or add a sprinkle of powdered sugar on top. You could also serve it with whipped cream or vanilla ice cream. Fresh blueberries and lemon slices make great garnishes, too. Enjoy it with tea or coffee for a delightful treat! In this blog post, we explored how to make a delicious Lemon Blueberry Pound Cake. We covered the key ingredients, precise steps for preparation, and helpful tips for perfect results. You learned about tasty variations and how to store this sweet treat effectively. Baking can be fun and rewarding. Enjoy the process and share your creation with loved ones! Try new flavors to keep things exciting. Your kitchen adventure is just beginning.

Lemon Blueberry Pound Cake Delightfully Fresh Recipe

If you’re craving a treat that’s both sweet and tart, you’re in for a treat with my Lemon Blueberry Pound

Older posts
Newer posts
← Previous Page1 … Page120 Page121 Page122 … Page130 Next →
© 2025 My Cooking Cast • Built with GeneratePress

Our Policies

  • Privacy Policy
  • GDPR Policy
  • Terms Of Use
  • Copyright Policy
  • Cookie Policy
  • Disclaimer

More Information​

  • Home
  • Contact
  • About
  • Dinner
  • Appetizers
  • Dessert
©2025, My Cooking Cast About Privacy Policy Back To Top