Skip to content
DisclaimerTerms Of UseGDPR PolicyCookie Policy

My Cooking Cast

  • Home
  • Drinks
  • Appetizers
  • Dinner
  • Dessert
  • About
  • Contact
  • Privacy Policy
DisclaimerTerms Of UseGDPR PolicyCookie Policy

Emma

For the base of your smoothie bowl, you need: - 1 cup fresh strawberries, hulled - 1 ripe banana, sliced These fruits bring bright flavors and great nutrition. Strawberries add a sweet, tangy taste. Bananas lend creaminess and natural sweetness, making this bowl tasty and healthy. You can choose your milk: - 1/2 cup Greek yogurt - 1/2 cup almond milk (or any milk of choice) Greek yogurt adds protein and a thick texture. If you want a lighter option, almond milk works well. You can also try oat milk or soy milk for a different flavor. To sweeten your bowl, consider: - 1 tablespoon honey or agave syrup (optional) Adding a sweetener can enhance the flavor. For toppings, I suggest: - Granola - Sliced almonds - Fresh berries - Coconut flakes - Mint leaves These toppings not only add texture but also make your bowl look beautiful. You can mix and match to find your favorite combination. {{ingredient_image_1}} To start making your smoothie bowl, gather your fresh ingredients. You need 1 cup of hulled strawberries and 1 ripe banana. Chop the banana into slices to help it blend smoothly. Next, add these fruits to your blender. Then, pour in 1/2 cup of Greek yogurt and 1/2 cup of almond milk. You can use any milk you like. If you want it sweeter, add 1 tablespoon of honey or agave syrup. Now, toss in 1 tablespoon of chia seeds and 1/4 teaspoon of vanilla extract. This adds flavor and nutrition. Now it’s time to blend! Put the lid on your blender and blend the mixture until it is smooth and creamy. If it seems too thick, add a little more almond milk. Stop to taste the mixture. If you want it sweeter, add more honey and blend again. Pour the smoothie base into a bowl. Use a spatula to smooth the top. This makes it nice and even. Serving your smoothie bowl is fun! You can get creative with toppings. Add a sprinkle of granola for crunch. Place some sliced almonds on top for extra flavor. Use fresh berries to add color and taste. Shredded coconut gives a tropical touch. Finally, add a few mint leaves for a pop of freshness. Serve your smoothie bowl right away with a spoon. Enjoy this bright and tasty treat! To make a smooth and creamy smoothie bowl, blend the ingredients well. Start with fresh strawberries and a ripe banana. These fruits give a thick texture. Use Greek yogurt to add creaminess. If you want it thicker, add less almond milk. For a looser mix, pour in a bit more milk. Always blend until there are no chunks left. Taste your smoothie before serving. If it needs to be sweeter, add honey or agave syrup. Start with one tablespoon and blend again. You can always add more if you want. This way, you control the sweetness. Remember, ripe bananas can add natural sweetness too! Toppings make your smoothie bowl look great. Use granola for crunch. Sliced almonds add a nice texture. Fresh berries keep it colorful. Coconut flakes add a tropical feel. For a pop of green, add mint leaves. Arrange these toppings in a fun way. This will make your bowl look even more inviting! Pro Tips Use Frozen Fruit: For a thicker and colder smoothie bowl, consider using frozen strawberries and bananas instead of fresh ones. This will give you a creamy texture without the need for ice. Customize Your Sweetness: Adjust the sweetness of your smoothie bowl to your taste by starting with less honey or agave syrup, and adding more gradually until you find your perfect balance. Experiment with Toppings: Feel free to get creative with the toppings! Try adding nut butter, seeds, or other fruits like kiwi or mango for a unique flavor and added nutrition. Prep Ahead: For a quick breakfast option, prepare the smoothie base the night before and store it in the fridge. In the morning, just add your toppings and enjoy! {{image_2}} You can switch out strawberries and bananas for fruits in season. Try peaches in summer or apples in fall. Berries like raspberries and blueberries work great too. Each fruit brings its own taste and color. This keeps your smoothie bowl exciting and fresh. Get creative with your choices! If you prefer a dairy-free bowl, use coconut yogurt instead of Greek yogurt. Almond milk is a tasty choice, but soy or oat milk works well too. For sweetness, agave syrup is a great vegan option. This way, you can enjoy a healthy treat without dairy. Want to make your smoothie bowl even better? Add a scoop of protein powder or a tablespoon of nut butter. You can sprinkle in some flaxseeds or hemp seeds for extra nutrition. These add-ons will boost fiber and protein, making your bowl more filling. Enjoy experimenting with different toppings for added health benefits! You can store leftover smoothie bowl in the fridge. Place it in a sealed container. It will stay fresh for up to one day. If you see any brown spots, it's best to toss it. For added taste, try to eat it right away. The flavors are best when fresh. If you want to save the smoothie bowl for later, freezing is a great option. Pour the smoothie base into an ice cube tray or freezer-safe container. It will freeze well for up to one month. When you're ready to eat, just thaw it in the fridge overnight. Blend it again to make it creamy. For toppings, keep them separate from the smoothie base. Store granola, nuts, and berries in airtight containers. They will stay fresh for about a week. If you use coconut flakes, keep them dry to avoid clumping. Fresh mint should stay in a cool place, like the fridge, for a longer life. Always add toppings just before serving for the best crunch and flavor. Yes, you can prepare the smoothie base ahead. Blend the strawberries, banana, yogurt, and milk. Store it in the fridge for up to 24 hours. Just stir it well before serving. However, I recommend adding the toppings right before you eat. This keeps them fresh and crunchy. If you need a substitute, use regular yogurt or plant-based yogurt. Coconut or almond yogurt works well. You can also use silken tofu for a dairy-free option. Just blend it until smooth to keep that creamy texture. To make your smoothie bowl more filling, add a scoop of protein powder or nut butter. You can also mix in oats or a banana. This will give you more energy and help you stay full longer. Yes, you can use seeds instead of nuts for toppings. Sunflower seeds and pumpkin seeds are great choices. Fresh fruits like berries or sliced kiwi add color and taste without nuts. You can also use granola that is nut-free for extra crunch. We’ve covered how to make a delicious smoothie bowl with fresh ingredients and dairy options. I shared tips for blending, serving, and presenting your bowl. You can adjust sweetness and toppings to make it look great. Variations let you explore seasonal fruits and nutritional boosts. Remember these storage tips for freshness. Enjoy creating your own unique smoothie bowls that feel special and taste amazing!

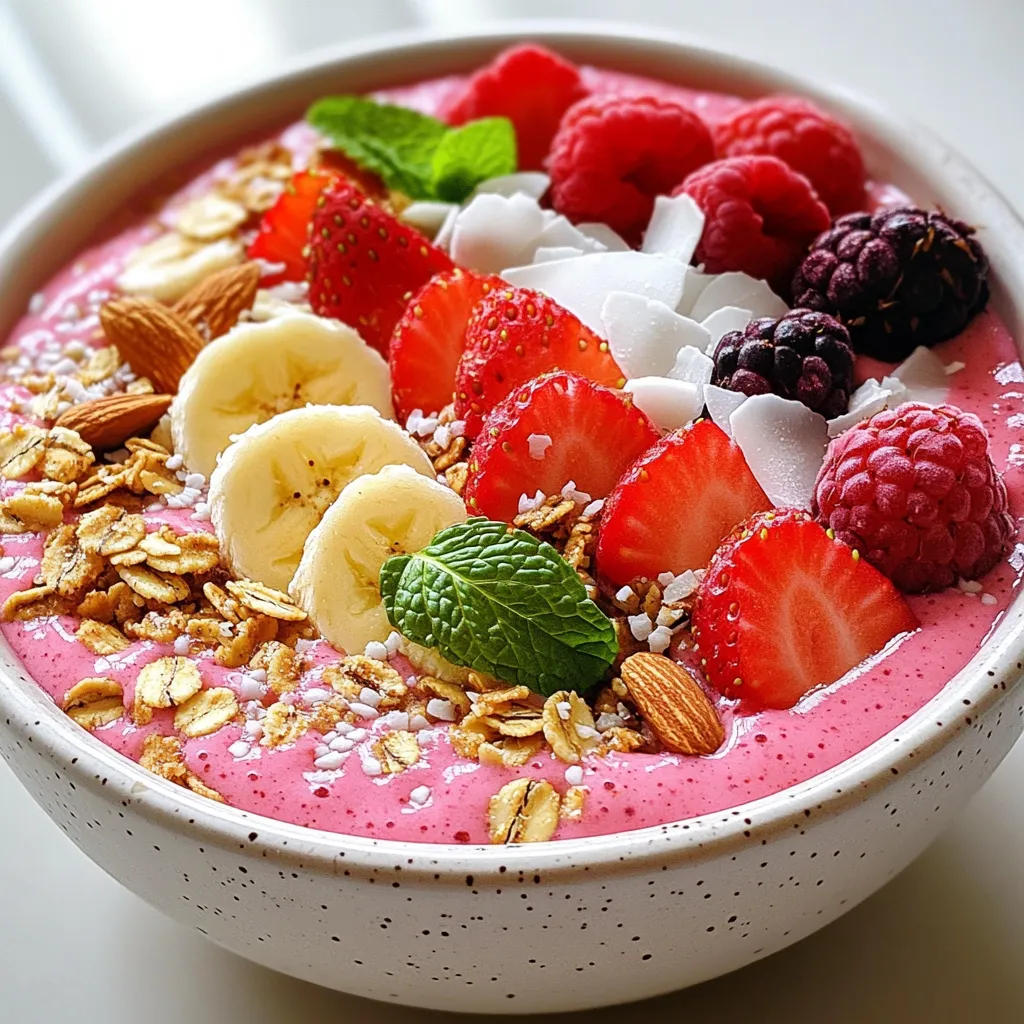
Strawberry Banana Smoothie Bowl Fresh and Tasty Treat

Looking for a fresh and tasty treat to brighten your day? A Strawberry Banana Smoothie Bowl is the perfect blend

- 4 cups mixed salad greens - 1 large apple (sweet variety) - 1/2 cup pecans - 1/4 cup dried cranberries or cherries - 1/4 cup crumbled goat cheese or feta cheese (optional) - 2 tablespoons red onion - 1/4 cup maple syrup - 2 tablespoons apple cider vinegar - 1 tablespoon Dijon mustard - 1/4 cup olive oil - Salt and pepper to taste In this Apple Pecan Salad, each ingredient plays a key role. The mixed salad greens form a fresh base. I love using arugula, spinach, and romaine for varied flavors. You want a sweet apple, like Honeycrisp or Fuji. It adds a nice crunch and sweetness. Toasting the pecans brings out their rich nutty flavor. Just toast them in a skillet over medium heat for about five minutes. The dried cranberries or cherries add a pop of color and sweetness. If you want, crumble goat cheese or feta on top. It adds a creamy, tangy layer. Don't forget the red onion for a bit of sharpness. For the maple vinaigrette, mix maple syrup, apple cider vinegar, Dijon mustard, and olive oil. This dressing is sweet and tangy. Adjust the salt and pepper to your taste. This simple dressing ties all the flavors together in the salad. {{ingredient_image_1}} - First, I preheat a skillet over medium heat. - I add 1/2 cup of pecans to the hot skillet. - I cook them for about 5 minutes. I stir often to avoid burning. - When the pecans smell nice and toasty, I remove them from the heat and set them aside. - In a small bowl, I whisk together 1/4 cup of maple syrup, 2 tablespoons of apple cider vinegar, 1 tablespoon of Dijon mustard, and 1/4 cup of olive oil. - I mix until it looks smooth and well blended. - Then, I taste the vinaigrette and add salt and pepper to fit my liking. I adjust the sweetness or acidity if needed. - In a large bowl, I combine 4 cups of mixed salad greens, 1 large thinly sliced apple, the toasted pecans, 1/4 cup of dried cranberries, and 2 tablespoons of finely chopped red onion. - If I want, I can add 1/4 cup of crumbled goat cheese or feta cheese. - I drizzle the maple vinaigrette over the salad and toss everything gently. - To serve, I like to top the salad with extra pecans and cheese for a pretty look. Choosing the right apple makes a big difference. Sweet apples like Honeycrisp or Fuji work best. They add nice flavor and balance to the salad. Tart apples, like Granny Smith, can also be used. They give a nice contrast but can make the salad more sour. Think about texture too. Crunchy apples hold up well in salads. They stay crisp, which adds to the dish's overall appeal. Avoid softer apples as they may become mushy when mixed. You can add more flavor with spices or extra ingredients. A pinch of cinnamon can bring warmth. You might also try adding a sprinkle of nutmeg for a cozy taste. For extra crunch, consider adding some toasted seeds. Sunflower seeds or pumpkin seeds work well. They add a nice contrast to the pecans and apples. Making your salad look great is key. A simple garnish of extra pecans adds texture. You can also sprinkle some cheese on top for a pop of color. When serving guests, use a large bowl. This allows everyone to see the beautiful colors. You can also use small plates for individual servings. It makes the meal feel special. Pro Tips Choose the Right Apple: Opt for a sweet, crisp apple variety like Honeycrisp or Fuji for the best flavor and texture in your salad. Toast the Pecans: Always toast your pecans to enhance their flavor and add a delightful crunch to your salad. Adjust the Dressing: Taste your vinaigrette and adjust the sweetness or acidity to match your preference. A little extra maple syrup or vinegar can make a big difference! Serve Fresh: For the best taste and texture, serve the salad immediately after tossing with the dressing to keep the greens crisp. {{image_2}} You can boost this salad with protein. If you want meat, add grilled chicken or turkey. They add great taste and fill you up. For a vegetarian option, try chickpeas or quinoa. Both are tasty and healthy. This salad is fun to change with the seasons. In fall or winter, add roasted butternut squash or Brussels sprouts. They add warmth and flavor. In summer, fresh berries are a great swap. Strawberries or blueberries bring a sweet burst. If you need gluten-free options, this salad works well. Just check the labels on your ingredients. For a vegan twist, skip the cheese and use maple syrup. Both options keep the salad delicious and safe for everyone. To keep your Apple Pecan Salad fresh, refrigerate it right away. Use a clean, airtight container. This will help keep the greens crisp. Store it in the fridge for up to two days. If you mix in the dressing, eat it within a day. The greens can wilt if they sit too long. You should not freeze the salad as a whole. Freezing can ruin the texture and taste. However, some parts can freeze well. You can freeze the toasted pecans. They will stay crunchy and fresh. Just seal them in a bag before freezing. Store your greens and dressing separately. This will keep your salad fresh longer. Place the greens in a sealed container with a paper towel. The towel absorbs extra moisture. For the dressing, use a small jar with a lid. This keeps it fresh and ready to use. When you are ready to eat, just mix them together! Yes, you can use other nuts. Almonds, walnuts, or cashews work well. Each nut adds its own flavor. Almonds give a light crunch. Walnuts have a rich taste. Cashews are soft and buttery. Feel free to mix and match for a fun twist! To prep this salad ahead, keep the dressing separate. Chop and store the greens in a bag. Slice apples just before serving to prevent browning. You can toast the nuts in advance too. Store them in an airtight container for freshness. Assemble right before you eat for the best taste! This salad pairs great with grilled chicken. It also goes well with a hearty soup. Try it alongside a sandwich for lunch. You can serve it as a side dish or a light main course. Add a slice of crusty bread to complete your meal! This blog post shared how to create a delicious salad with fresh, healthy ingredients. We covered the key components, like the greens, apples, and nuts, as well as how to make a tasty maple vinaigrette. Remember, you can customize this salad by adding proteins or seasonal veggies. Store it properly to enjoy leftovers. Keep experimenting with flavors and get creative with your presentations. Each bite can be a new experience, so enjoy every salad you make!

Apple Pecan Salad with Maple Vinaigrette Delight

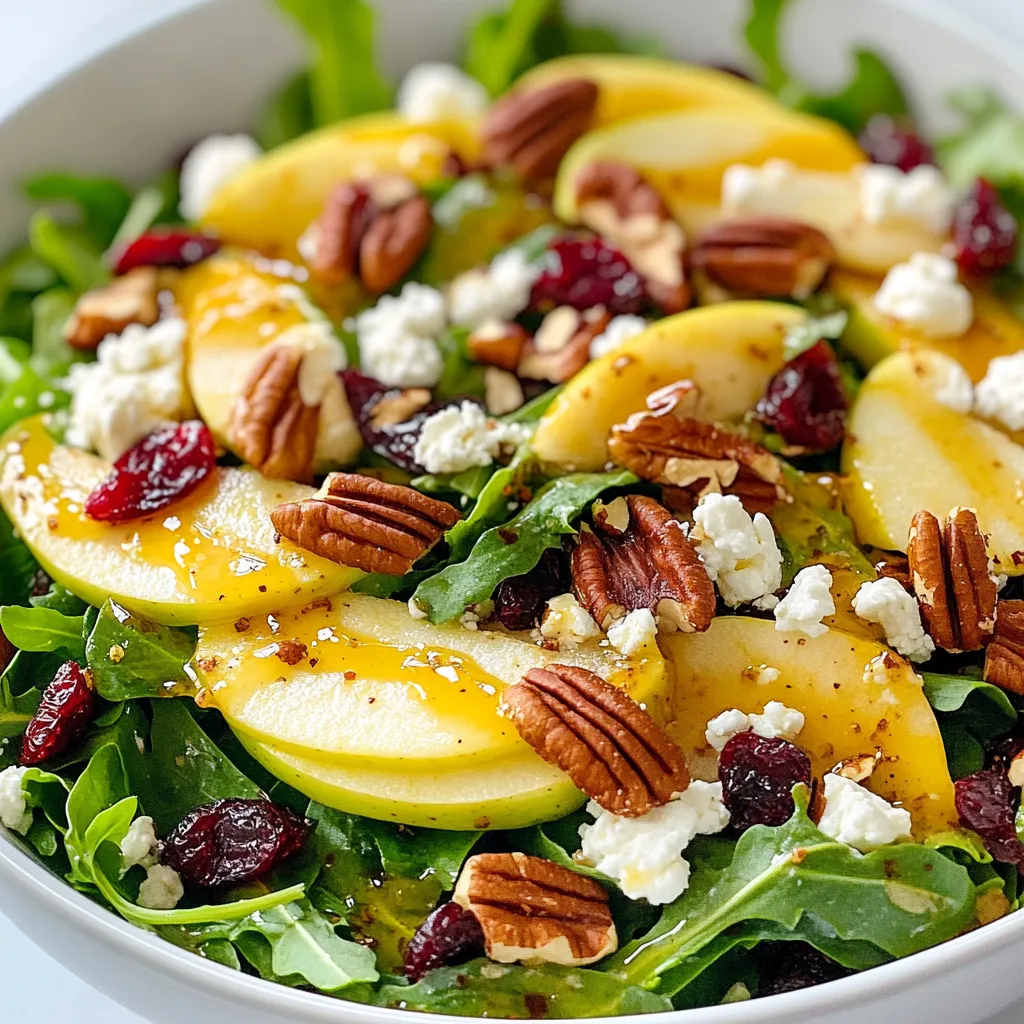
Welcome to a fresh culinary experience! In Apple Pecan Salad with Maple Vinaigrette Delight, you’ll learn to create a vibrant,

- 1 medium spaghetti squash - 2 tablespoons peanut oil - 2 cloves garlic, minced - 1 red bell pepper, sliced - 1 cup bean sprouts - 2 green onions, sliced (white and green parts separated) - 2 large eggs, lightly beaten - 3 tablespoons soy sauce - 1 tablespoon tamarind paste - 1 tablespoon brown sugar - ½ teaspoon red pepper flakes (adjust to taste) - Fresh cilantro, for garnish - Chopped peanuts, for garnish - Lime wedges, for serving The ingredients in this Spaghetti Squash Pad Thai make it unique and tasty. First, we use spaghetti squash instead of traditional noodles. This squash is low in carbs and adds a fun texture. The peanut oil is perfect for cooking. It gives a lovely nutty flavor that helps tie the dish together. Garlic adds a strong and savory taste. The red bell pepper brings color and sweetness. Bean sprouts add crunch, while green onions give a fresh bite. The eggs not only add protein, but they also help bind everything together. For the sauces, soy sauce brings umami, while tamarind paste adds a tangy twist. Brown sugar balances the flavors with sweetness. Red pepper flakes give a kick, which you can adjust based on your spice level. Finally, the garnishes are key. Fresh cilantro adds brightness, while chopped peanuts give crunch. Lime wedges add a zesty finish. All these ingredients work together to create a dish that is full of flavor and fun. {{ingredient_image_1}} - Preheating the oven: Start by preheating your oven to 400°F (200°C). This step is key for even roasting. - Slicing and seasoning the squash: Carefully slice the spaghetti squash in half lengthwise. Scoop out the seeds. Drizzle the inside with olive oil and season with salt and pepper. - Roasting instructions: Place the squash cut-side down on a baking sheet. Roast for 35-40 minutes. The squash should be tender and easy to scrape into strands. - Heating peanut oil and sautéing garlic: In a large skillet or wok, heat 2 tablespoons of peanut oil over medium-high heat. Add 2 minced garlic cloves and sauté for about 30 seconds until fragrant. - Adding vegetables and stir-frying: Next, add 1 sliced red bell pepper and the white parts of 2 sliced green onions. Stir-fry for 3-4 minutes until the veggies are tender-crisp. - Scrambling the eggs and mixing: Push the veggies to one side of the skillet. Pour in 2 lightly beaten eggs on the other side. Scramble the eggs until fully cooked, then mix them in with the veggies. - Making the sauce: In a small bowl, mix 3 tablespoons of soy sauce, 1 tablespoon of tamarind paste, 1 tablespoon of brown sugar, and ½ teaspoon of red pepper flakes. - Adding the sauce to the skillet: Pour the sauce over the cooked veggie and egg mixture in the skillet. Stir well to combine. - Incorporating the spaghetti squash and finishing touches: Turn off the heat and add 1 cup of bean sprouts, mixing until they’re just wilted. Once the spaghetti squash is done, use a fork to scrape it into strands. Add these strands to the skillet and gently toss everything together until heated through. - Look for a squash that feels heavy for its size. - The skin should be hard with a rich yellow color. - Avoid squashes with soft spots or blemishes. - To change the spice level, add more or less red pepper flakes. - For a milder dish, skip the red pepper flakes altogether. - You can swap peanut oil for sesame oil for a different taste. - Soy sauce can be replaced with tamari for a gluten-free option. - Use a large, shallow bowl to plate your dish. - Twist the spaghetti strands into nests for a beautiful look. - Scatter chopped peanuts and cilantro on top for color. - Add lime wedges on the side for a fresh burst of flavor. Pro Tips Choosing the Right Squash: Look for a spaghetti squash that feels heavy for its size and has a firm skin. This indicates freshness and quality. Perfectly Roasted Squash: For even cooking, place the squash cut-side down on the baking sheet to allow steam to circulate while roasting. Adjusting Spice Levels: If you prefer less heat, start with fewer red pepper flakes and add more gradually until it reaches your desired spice level. Serving Suggestions: For added flavor, serve with a sprinkle of lime juice just before eating to brighten the dish. {{image_2}} You can add protein to your Spaghetti Squash Pad Thai. Chicken, shrimp, or tofu work well. For chicken, cut it into small pieces. Cook it in the skillet until it is no longer pink, about 5-7 minutes. Shrimp cooks quickly, about 3-4 minutes until they turn pink. If you prefer tofu, use firm tofu. Cut it into cubes and cook it for 5-6 minutes until golden. If you want a vegetarian or vegan dish, you can skip the eggs. Use scrambled tofu instead. For sauces, replace soy sauce with tamari for gluten-free options. Look for vegan tamarind paste. You can also use nutritional yeast for a cheesy flavor that fits vegan diets. Feel free to play with the veggies in your Pad Thai. Carrots, snap peas, or broccoli add great taste. You can also try different spices. Add ginger for a warm kick or lime juice for zest. Each change can bring a new twist to this classic dish. Store leftovers in an airtight container. Keep it in the fridge for up to three days. Make sure to let it cool to room temperature first. This helps keep the flavors fresh. I find that separating the sauce from the squash helps maintain texture. Reheat in a skillet over medium heat. Stir often to heat evenly. You can also use a microwave. If using the microwave, heat in short bursts. Add a splash of water to keep it moist. This keeps the squash from drying out. To freeze, place in a freezer-safe container. Leave some space for expansion. It can last up to three months. When ready to eat, thaw in the fridge overnight. Reheat in a skillet for best results. You can also use the microwave, but watch the texture. Spaghetti Squash Pad Thai is a fun twist on the classic dish. Instead of rice noodles, we use spaghetti squash. This squash has a mild flavor and a spaghetti-like texture. The main components include: - Spaghetti squash - Peanut oil - Garlic - Red bell pepper - Bean sprouts - Green onions - Eggs These ingredients come together for a tasty and colorful meal. The sauce is made from soy sauce, tamarind paste, brown sugar, and red pepper flakes. This mix gives the dish a sweet, savory, and slightly spicy flavor. Yes, you can easily make this recipe gluten-free. Use gluten-free soy sauce, which is widely available. For a different flavor, you can try tamari, which is a gluten-free soy sauce. Look for brands that are labeled gluten-free. Always check the labels to be sure. To prepare this dish in advance, you can roast the spaghetti squash first. Store the cooked squash in the fridge. Cook the vegetable and egg mix and store that separately. When you're ready to eat, just heat both together in a pan. This will keep the flavors fresh. This blog post covered how to make Spaghetti Squash Pad Thai. We explored key ingredients, sauces, and garnishes. You learned helpful steps for preparing the squash and cooking the dish. Tips on selecting, adjusting, and presenting were shared. Variations for proteins and flavors offer choices for everyone. Lastly, we discussed storage tips to keep your meal fresh. Enjoy making this dish. It’s fun, tasty, and easy!

Spaghetti Squash Pad Thai Flavorful and Simple Delight

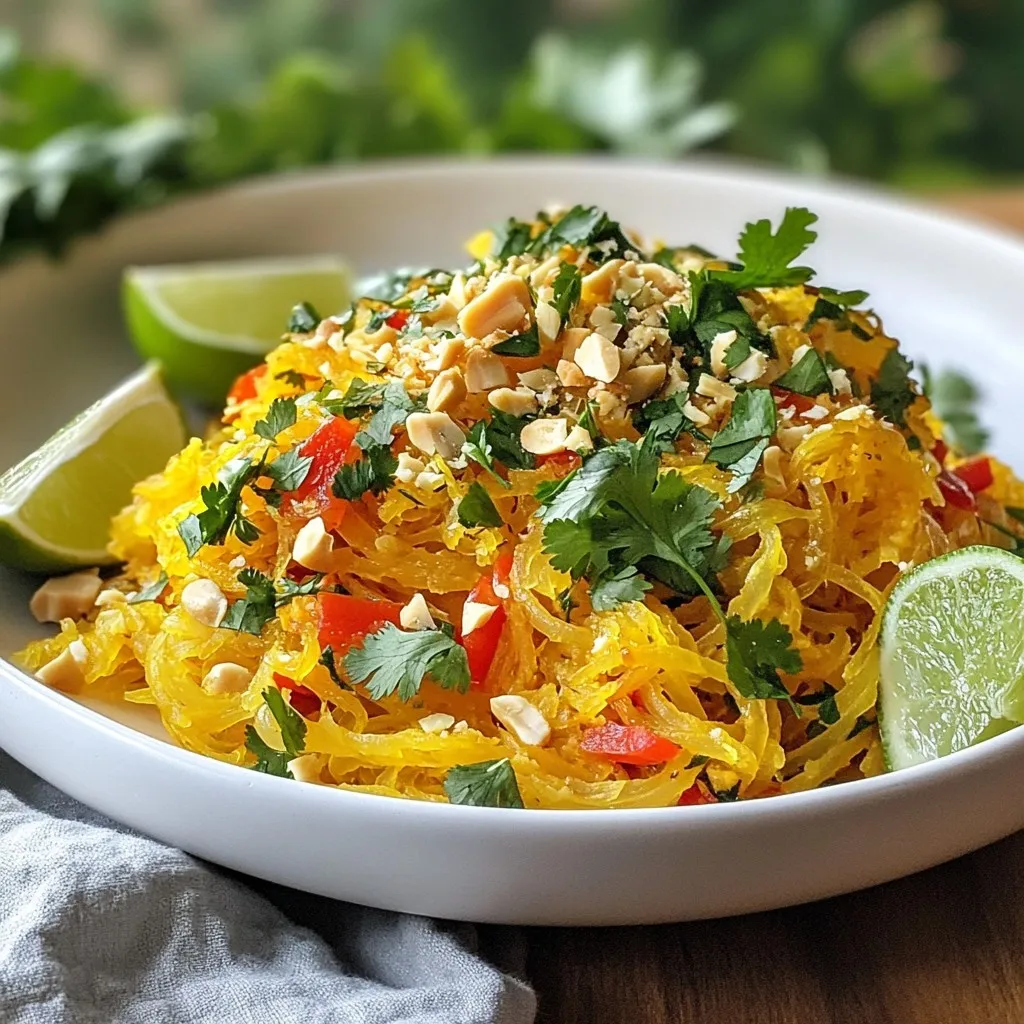
Looking for a healthy twist on a classic dish? My Spaghetti Squash Pad Thai is just what you need! This

To make S’mores Brownie Bites, gather these key ingredients: - 1 cup all-purpose flour - 1/2 cup unsweetened cocoa powder - 1/2 teaspoon baking powder - 1/4 teaspoon salt - 1/2 cup unsalted butter, melted - 1 cup granulated sugar - 2 large eggs - 2 teaspoons vanilla extract - 1 cup chocolate chips (semi-sweet or dark) - 1 cup mini marshmallows - 1/2 cup crushed graham crackers (plus extra for topping) - Optional: Extra chocolate chips for garnish For a twist, try these optional ingredients: - A pinch of cinnamon for warmth - Chopped nuts like walnuts or pecans for crunch - Swirls of peanut butter for a nutty kick You can swap ingredients for different tastes: - Use almond flour for a gluten-free option. - Replace granulated sugar with brown sugar for a richer flavor. - Use coconut oil instead of butter for a dairy-free treat. - Swap regular chocolate chips for white chocolate or butterscotch chips. These choices keep your S’mores Brownie Bites fun and flexible! {{ingredient_image_1}} Start by preheating your oven to 350°F (175°C). Line a mini muffin tin with paper liners or spray it lightly with cooking spray. In a medium bowl, whisk together the all-purpose flour, cocoa powder, baking powder, and salt. Mix these dry ingredients until they are well combined and set them aside. In a large bowl, combine the melted unsalted butter and granulated sugar. Stir them together until the mixture is smooth and creamy. Next, add two large eggs and two teaspoons of vanilla extract to the butter-sugar mix. Beat this mixture until it looks light and fluffy. Now, gradually add the dry mix to your wet ingredients. Stir gently until everything is just combined. Finally, fold in one cup of chocolate chips and half a cup of crushed graham crackers. This will give your brownie bites a tasty texture. Now it’s time to fill your mini muffin tin. Spoon the brownie batter into each cup, filling them about two-thirds full. For extra flavor, top each brownie bite with a few mini marshmallows and a sprinkle of crushed graham crackers. Bake your brownie bites in the preheated oven for 12 to 15 minutes. Watch closely; the edges should be set, but the centers should remain slightly soft. This gives them that gooey, s’mores feel. Once baked, remove the pan from the oven and let it cool for about five minutes. This cooling time helps them firm up a bit. After that, transfer the brownie bites to a wire rack to cool completely. If you want to make them even more special, melt a few extra chocolate chips. Drizzle this melted chocolate over the top just before serving. For a beautiful presentation, serve the brownie bites on a platter with whole graham crackers and chocolate squares. You can even lightly toast some extra marshmallows for a fun touch! To get the best texture, mix the batter gently. Overmixing can make your brownie bites tough. Bake them until the edges are set, but keep the centers a bit soft. This gives a nice, gooey feel. Let them cool slightly in the pan before moving them. This helps them keep their shape. Add extra chocolate chips on top before baking for a richer taste. You can also sprinkle more crushed graham crackers on top. This adds crunch and looks great. For a fun touch, toast a few marshmallows with a kitchen torch. Place these on top for a campfire vibe. Serve them on a pretty platter with whole graham crackers and chocolate squares. One mistake is not preheating the oven. Always do this first. Another is filling the muffin cups too full. Fill them only about 2/3 full to let them rise. Avoid using cold ingredients; they should be at room temperature. This helps the batter mix better and rise nicely. Lastly, don’t skip the cooling time. Letting them cool helps set the texture. Pro Tips Use Quality Chocolate: For the best flavor, choose high-quality chocolate chips. Dark chocolate adds a rich taste that complements the sweetness of the marshmallows. Don't Overbake: Keep an eye on your brownie bites while baking. They should have a slightly soft center for that perfect fudgy texture. Experiment with Flavors: Feel free to add a pinch of sea salt on top before baking or mix in some peanut butter chips for an extra layer of flavor. Storage Tips: Store leftover brownie bites in an airtight container at room temperature for up to three days, or refrigerate for longer freshness. {{image_2}} You can mix up the flavors in your S'mores Brownie Bites. Try adding peanut butter chips for a nutty twist. You can also use white chocolate chips for a sweeter, creamier taste. If you like spice, add a pinch of cinnamon to the batter. For a fruity touch, toss in some chopped strawberries or raspberries. These small changes can make a big difference in flavor. If you're looking for a healthier version, you can swap out some ingredients. Use whole wheat flour instead of all-purpose flour for added fiber. You can also use coconut oil instead of butter for a dairy-free option. For lower sugar, try using a sugar substitute like stevia. If eggs are a concern, you can replace them with flax eggs. Just mix one tablespoon of flaxseed meal with three tablespoons of water for each egg. These brownie bites are great for any event. For birthday parties, serve them on a colorful platter with fun decorations. At a picnic, pack them in a container and enjoy them outdoors. For holiday gatherings, drizzle melted chocolate on top and sprinkle festive decorations. They also make a sweet treat for movie nights. No matter the occasion, these bites will delight everyone! To keep your S’mores brownie bites fresh, store them in an airtight container. Place a piece of parchment paper between layers if stacking. This helps them stay soft and moist. Keep the container at room temperature for up to three days. Avoid the fridge, as it can dry them out. You can freeze these brownie bites for up to three months. First, let them cool completely. Then, wrap each bite in plastic wrap. Place the wrapped bites in a freezer-safe bag or container. When you're ready to enjoy them, thaw overnight in the fridge or at room temperature for a few hours. Reheat your brownie bites in the microwave for about 10-15 seconds. This warms them up without making them dry. For a crispy top, place them in the oven at 350°F for about 5 minutes. Enjoy them warm with a drizzle of chocolate or a scoop of ice cream! Serve S’mores Brownie Bites warm. They taste best fresh out of the oven. Place them on a nice platter. Add whole graham crackers and chocolate squares for fun. You can also toast extra marshmallows for garnish. This gives a nice touch and looks great. Yes, you can make these bites gluten-free! Simply swap all-purpose flour for a gluten-free flour blend. Make sure it works well for baking. Check for brand recommendations. This way, everyone can enjoy these yummy treats! Look for the edges to be set while the middle is soft. This takes about 12 to 15 minutes in the oven. You can also do the toothpick test. Insert a toothpick into the center; it should come out with a few moist crumbs. This means they are done! You learned about making S’mores Brownie Bites. We covered ingredients, steps, and tips. You got suggestions for flavors and how to store them. I hope you feel ready to bake and enjoy these treats. Remember, practice makes perfect. Don't be afraid to try new things. Enjoy your baking journey!

S’mores Brownie Bites Tasty and Fun Dessert Idea

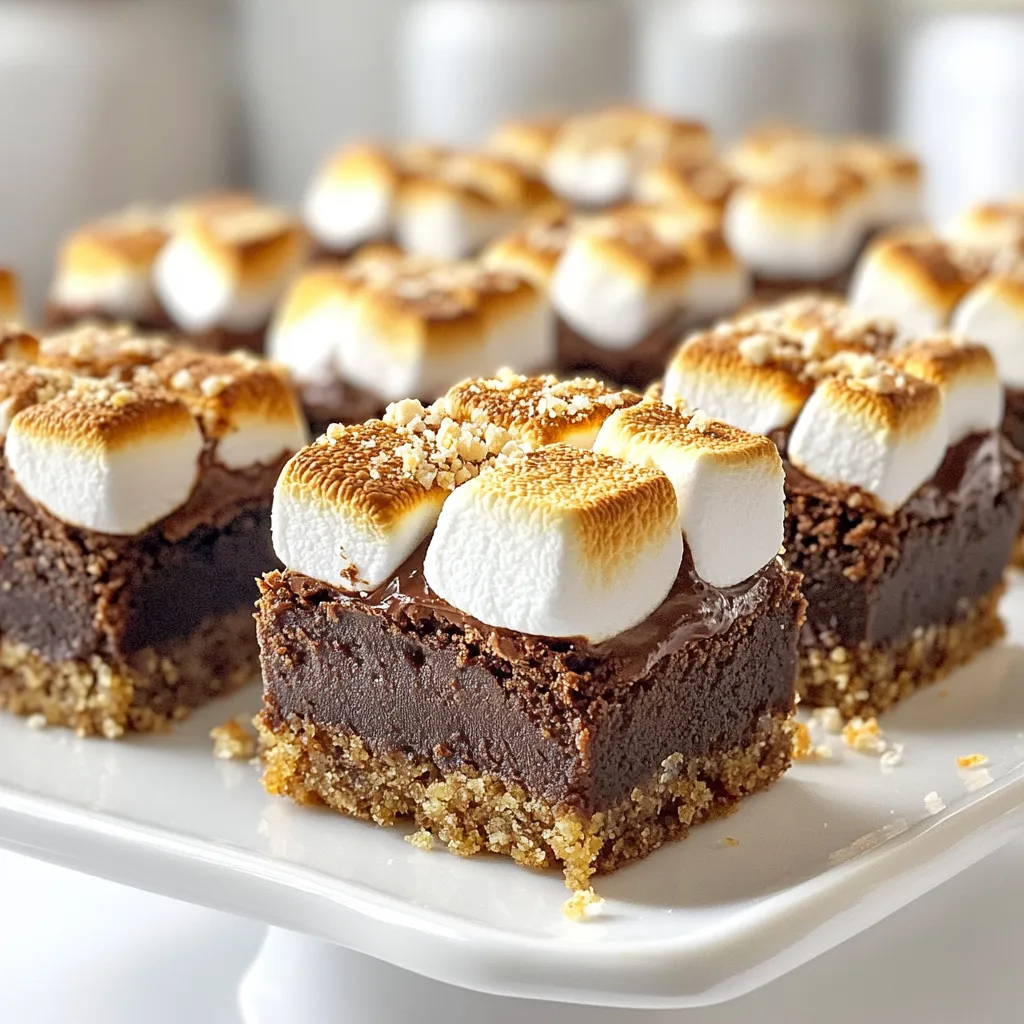
Get ready for a dessert that captures summer’s spirit in a bite! S’mores Brownie Bites are a fun twist on

To make delicious cinnamon sugar churro bites, you will need: - 1 cup all-purpose flour - 1/2 cup water - 1/4 cup butter, cut into cubes - 1 tablespoon granulated sugar - 1/4 teaspoon salt - 1/2 teaspoon baking powder - 1 large egg - 1 cup granulated sugar (for coating) - 2 tablespoons ground cinnamon - Oil for frying For the best flavor and texture, I suggest these brands: - Flour: King Arthur Flour – it has a great texture. - Butter: Kerrygold – it adds a rich taste. - Sugar: Domino – it’s reliable and sweet. - Cinnamon: McCormick – their cinnamon is always fresh and fragrant. You can make some swaps if you need them: - All-purpose flour: Use gluten-free flour for a gluten-free option. - Butter: Coconut oil or vegan butter works well for a dairy-free treat. - Granulated sugar: Use coconut sugar for a less refined option. - Egg: A flax egg (1 tablespoon ground flaxseed + 2.5 tablespoons water) can replace one large egg. These options keep the churro bites tasty while fitting your needs. Enjoy experimenting with flavors! {{ingredient_image_1}} To start, we need to make the dough. Grab a medium saucepan. Add 1/2 cup of water, 1/4 cup of butter, 1 tablespoon of granulated sugar, and 1/4 teaspoon of salt. Turn the heat to medium. Stir as the butter melts. Wait until the mixture starts to boil. Now, remove the pan from the heat. Add 1 cup of all-purpose flour and 1/2 teaspoon of baking powder. Stir until a dough forms. It should be smooth and not sticky. Let it cool for about 5 minutes. After that, add 1 large egg. Mix until the dough is smooth again. This dough is the base for your churro bites. Next, we will fry our churro bites. Heat oil in a deep frying pan over medium-high heat. Aim for about 350°F, or 175°C. While the oil heats, prepare your piping bag. Place the dough into the bag fitted with a star tip. Once the oil is hot, pipe small bites of dough. Aim for about 1 inch long. Cut them with scissors to drop them into the oil. Fry them in batches. Cook each side for about 2-3 minutes, until they are golden brown. Use a slotted spoon to remove them. Drain the churro bites on paper towels to soak up extra oil. Now for the sweet part! In a bowl, mix 1 cup of granulated sugar with 2 tablespoons of ground cinnamon. Once the churro bites are cool enough to handle, toss them in the cinnamon sugar mix. Make sure they are evenly coated. This coating adds that classic churro flavor. Serve them warm and enjoy this tasty treat! To get the best texture for your churro bites, focus on your dough. After mixing in the flour and baking powder, let the dough cool for five minutes. This cooling step makes it easier to add the egg. Make sure the dough is smooth and slightly sticky. This texture helps the churro bites puff up nicely when frying. If the dough is too dry, they won't be as light and airy. One common mistake is frying in oil that is not hot enough. If the oil is too cool, the churro bites soak up too much oil and become greasy. Use a thermometer to check the oil's temperature. Aim for 350°F (175°C). Another mistake is cutting the churro bites too large. Keep them about one inch long. This size ensures even cooking and a perfect texture. Serve your churro bites warm for the best taste. A decorative bowl adds a nice touch. Sprinkle some extra cinnamon sugar on top for a delightful crunch. Pair them with chocolate or caramel sauce for dipping. This extra touch enhances the flavor and makes them more fun to eat. You can also add a scoop of ice cream on the side for a sweet twist! Pro Tips Chill the Dough: Letting the dough cool before frying helps achieve a better texture and prevents the churro bites from being too oily. Perfectly Sized Bites: Aim for uniform size when piping the churro bites to ensure even cooking and consistent texture throughout. Temperature Check: Use a thermometer to maintain oil temperature at 350°F (175°C) for perfect frying; too hot can burn them, too cool can make them greasy. Extra Cinnamon Sugar: Prepare extra cinnamon sugar for tossing after frying; it enhances flavor and makes the churro bites even more irresistible! {{image_2}} You can make cinnamon sugar churro bites gluten-free! Use a gluten-free flour blend instead of all-purpose flour. Look for blends that include xanthan gum. This helps mimic the texture of regular flour. Follow the same recipe steps to make your gluten-free churros. The result? Just as tasty and crispy! Want to spice things up? Try adding flavors to the dough. You can mix in a teaspoon of vanilla extract for a sweet twist. For a chocolatey kick, add cocoa powder. You might also try a pinch of nutmeg or cardamom. Each addition gives a unique taste. Experiment to find your favorite combination! Dipping sauces make these churro bites even better! A rich chocolate sauce pairs well with the sweet cinnamon. You can also try a creamy caramel sauce. For a fruity touch, serve with a berry sauce. Whipped cream is another great option. Choose your favorite sauce to dip and enjoy the sweet goodness! To keep your churro bites fresh, store them in an airtight container. Place parchment paper between layers to avoid sticking. Store them at room temperature for up to two days. If you want to keep them longer, consider freezing. To reheat churro bites, use an oven or an air fryer. Preheat your oven to 350°F (175°C). Place the churro bites on a baking sheet, and heat for about 5-7 minutes. This method helps restore their crispiness. Avoid the microwave, as it makes them soggy. You can freeze churro bites for up to a month. Let them cool completely before freezing. Place them in a single layer on a baking sheet and freeze for about an hour. Once frozen, transfer them to a freezer bag. When ready to eat, reheat them directly from the freezer using the oven or air fryer. This ensures they stay soft and tasty. To make homemade churro bites, you need to follow a simple process. First, gather your ingredients: flour, water, butter, sugar, salt, baking powder, and an egg. Start by heating the water, butter, sugar, and salt in a saucepan until it boils. Remove it from the heat and stir in the flour and baking powder until you form dough. After letting it cool for about five minutes, add the egg and mix until smooth. Next, heat oil in a frying pan until it's about 350°F. Use a piping bag with a star tip to pipe small bites of dough into the hot oil. Fry the churro bites for 2-3 minutes on each side until golden brown. Finally, coat them in a mixture of sugar and cinnamon. It’s that easy! Yes, you can bake churro bites, but they will not be as crispy. To bake, preheat your oven to 375°F. Pipe the churro dough onto a baking sheet lined with parchment paper. Bake for about 15-20 minutes until they are lightly golden. Once baked, roll them in the cinnamon sugar mixture. They may not have the same texture as fried churros, but they are still delicious and a bit healthier. The best way to serve churro bites is warm and fresh. Place them in a decorative bowl and sprinkle with extra cinnamon sugar. You can also add a chocolate or caramel dipping sauce on the side for extra sweetness. This makes them even more fun to eat! Enjoy them with friends or family for a delightful treat. You now have all the tools to make delicious churro bites. We covered the key ingredients and their best brands. I shared tips for perfecting the dough, frying, and coating them in sugar. Don't forget the variations for gluten-free options and fun flavors. Lastly, I provided storage tips to keep your churro bites fresh. Enjoy the joy of making and sharing this tasty treat with friends and family. Happy cooking!

Cinnamon Sugar Churro Bites Irresistible Sweet Treat

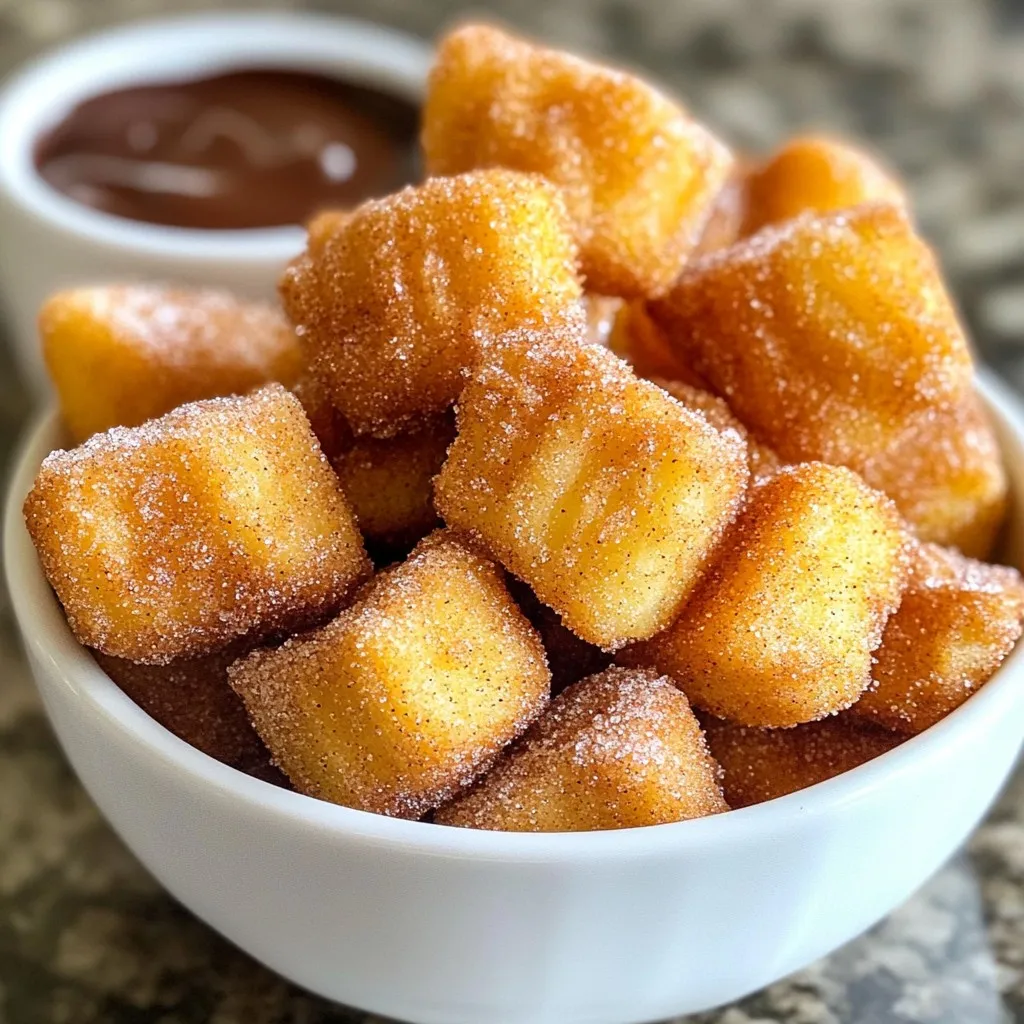
Craving a sweet, crunchy delight? You’re in for a treat! Cinnamon Sugar Churro Bites are the perfect snack. Imagine warm,

- Chicken and pasta components - 2 chicken breasts, sliced - 8 oz fettuccine pasta - Vegetables and seasoning - 2 tablespoons Cajun seasoning - 1 red bell pepper, sliced - 1 green bell pepper, sliced - 1 medium onion, sliced - 3 cloves garlic, minced - Sauce components - 2 tablespoons olive oil - 1 cup heavy cream - 1 cup grated Parmesan cheese - Salt and pepper to taste - Fresh parsley, chopped for garnish For this Spicy Cajun Chicken Pasta, each ingredient plays a key role. The chicken provides protein and heartiness. The fettuccine pasta gives a nice base to soak up the tasty sauce. The Cajun seasoning adds heat and flavor. The bell peppers and onions add crunch and sweetness. Garlic gives a rich aroma that enhances the dish. The heavy cream creates a smooth and creamy sauce. Finally, Parmesan cheese brings a salty kick and depth. Don't forget to have fresh parsley on hand. It adds color and a fresh taste when you serve your dish. This combination of ingredients brings a bold and flavorful meal to your table. Enjoy the cooking process and savor each bite! {{ingredient_image_1}} To start, boil water in a large pot. Add salt to the water. Then, add 8 ounces of fettuccine pasta. Cook according to the package instructions until it is al dente, about 10 minutes. Drain the pasta and set it aside. Next, take 2 chicken breasts and slice them thin. Place the chicken in a bowl. Sprinkle 2 tablespoons of Cajun seasoning over the chicken. Toss the chicken until it is well coated. In a large skillet, heat 2 tablespoons of olive oil over medium-high heat. Add the seasoned chicken. Sauté for about 5-7 minutes until it is golden brown. Once cooked, remove the chicken and set it aside. In the same skillet, add sliced onions and bell peppers. Sauté for 4-5 minutes until they soften. Then, add 3 cloves of minced garlic. Cook for 1 more minute until it is fragrant. Lower the heat and pour in 1 cup of heavy cream. Stir well and let it simmer for 2-3 minutes. Slowly add 1 cup of grated Parmesan cheese to the skillet. Stir continuously until the sauce is smooth and creamy. If the sauce is too thick, add a splash of pasta water. Return the cooked chicken to the skillet. Add the drained fettuccine pasta and toss everything to coat. Season with salt and pepper to taste. Cook for an additional 2-3 minutes to heat everything through. Serve hot and garnish with fresh chopped parsley. Enjoy your flavorful Spicy Cajun Chicken Pasta! To make this dish pop, use fresh ingredients. Fresh bell peppers and garlic lift the flavor. Cajun seasoning is key. You can adjust the spice by adding more or less. If you want extra heat, add a pinch of cayenne pepper. A squeeze of lemon juice brightens the dish. Always taste your sauce. Adjust salt and pepper as needed. Cook the pasta until al dente. This means it should still have a slight bite. Overcooked pasta becomes mushy. When cooking chicken, don't overcrowd the skillet. This helps it brown nicely. Use medium-high heat for a good sear. Stir vegetables just enough to soften them. You want them tender but not mushy. Serve the pasta hot. Garnish with fresh parsley for a pop of color. Pair it with a green salad for a fresh side. Garlic bread also makes a great addition. For a drink, try iced tea or a light beer. Enjoy the meal with family or friends for a fun dinner! Pro Tips Perfectly Cooked Pasta: Always cook pasta until al dente for the best texture; it will continue to cook slightly when mixed with the sauce. Balancing Spice: Adjust the amount of Cajun seasoning based on your spice tolerance; you can always add more later but it's hard to take it out! Cheese Quality Matters: Use freshly grated Parmesan cheese for a creamier texture and better flavor compared to pre-grated options. Leftover Love: This dish stores well in the fridge; reheat gently and add a splash of cream or pasta water to revive the sauce. {{image_2}} You can swap chicken for shrimp or sausage. Shrimp cooks fast and adds a nice touch. Sausage brings a bold flavor with every bite. You may also use tofu for a plant-based option. Just make sure to season your proteins well. Each choice offers a unique twist to your dish. Feel free to add more vegetables to your pasta. Zucchini, spinach, or mushrooms fit well. These veggies add color and nutrients to the meal. Broccoli or asparagus also work nicely. Just sauté them with the onions and peppers for a quick cook. To make this dish dairy-free, use coconut milk instead of heavy cream. It gives a rich flavor without the dairy. Nutritional yeast can replace Parmesan cheese for a cheesy taste. You can also use almond or oat milk, but check for thickness. Adjust seasonings to keep your dish bold and flavorful. After enjoying Spicy Cajun Chicken Pasta, let it cool. Place it in an airtight container. This keeps the flavors fresh. Store it in the fridge for up to three days. If you want to store it longer, consider freezing. To reheat, take your pasta out of the fridge. You can use a microwave or the stove. If using a microwave, heat it in 30-second bursts until warm. If using the stove, add a splash of water or cream to the pan. This keeps the pasta moist. Stir it often until heated through. If you want to freeze the pasta, use a freezer-safe container. You can freeze it for up to three months. When ready to eat, let it thaw in the fridge overnight. Reheat it gently as mentioned above. This way, it will taste almost fresh! Yes, you can make this dish ahead of time. Cook the pasta and chicken, then store them separately in the fridge. When you're ready to eat, heat them in a skillet. Add the sauce and mix until warm. This saves time on busy nights! You can use several spices if you don't have Cajun seasoning. A mix of paprika, garlic powder, onion powder, and black pepper works well. You can also try Creole seasoning for a different flavor. Adjust the mix to suit your taste. The spice level depends on the Cajun seasoning you use. Most are mildly spicy but can pack a punch. If you prefer less heat, use a lighter hand when adding the seasoning. You can also add more cream to tone down the spice. Absolutely! While fettuccine is great for this dish, you can use any pasta you like. Penne, farfalle, or even spaghetti will work well. Just adjust the cooking time based on the pasta type you choose. This dish pairs well with a simple salad or garlic bread. A side of steamed veggies adds color and nutrition. You can also serve it with a glass of white wine for a lovely meal experience. Enjoy! This blog post covered how to make Spicy Cajun Chicken Pasta. We looked at essential ingredients, from chicken to spices. You learned step-by-step instructions, including cooking pasta and preparing chicken. Tips helped to enhance the dish's flavor. We also explored variations with proteins and vegetables. Lastly, we discussed how to store and reheat leftovers. Try this dish yourself, and adjust it to your taste. Happy cooking!

Spicy Cajun Chicken Pasta Bold and Flavorful Recipe

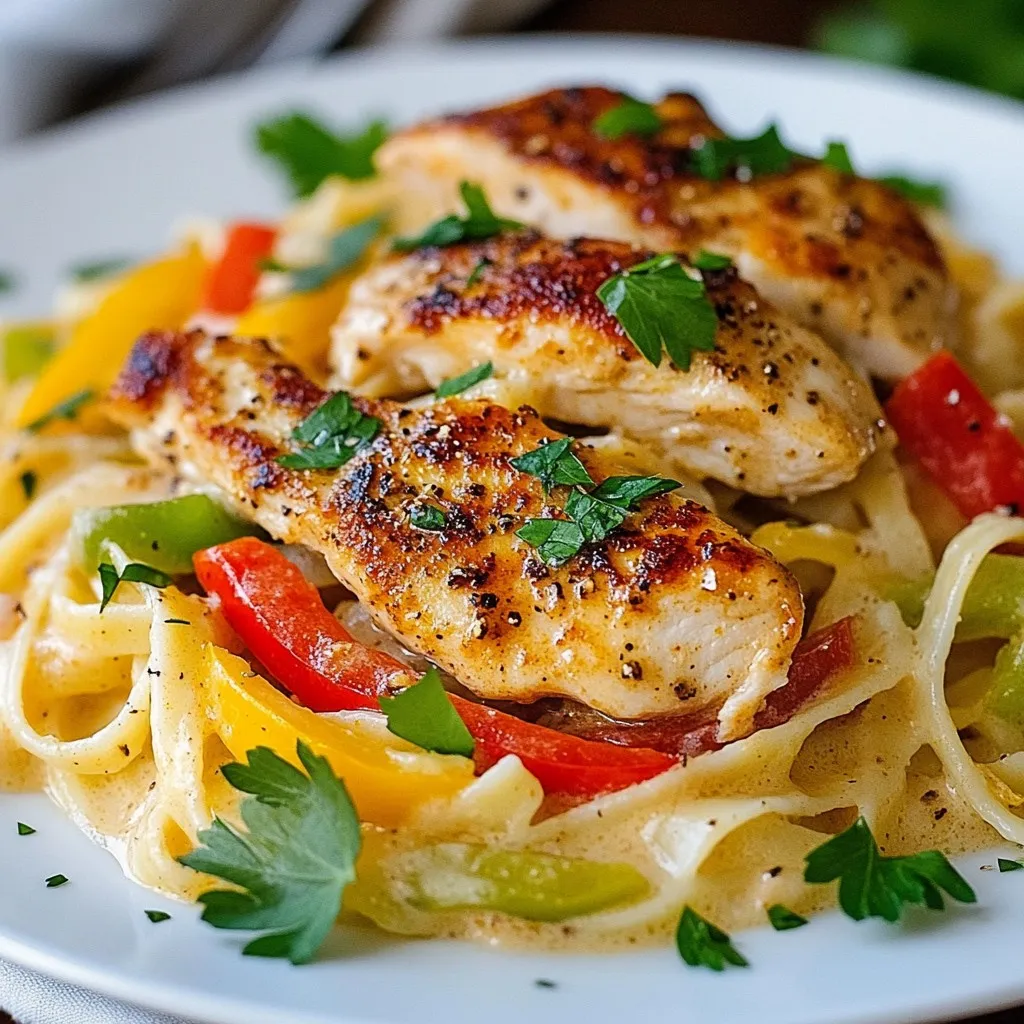
Craving a meal that’s bold and bursting with flavor? Look no further than my Spicy Cajun Chicken Pasta! This dish

- 2 salmon fillets - 1/2 cup soy sauce (low sodium) - 1/4 cup honey - 2 tablespoons rice vinegar - 1 tablespoon grated ginger - 2 garlic cloves, minced - 2 cups cooked jasmine rice - 1 cup steamed broccoli florets - 1 cup shredded carrots - 1/4 cup sliced green onions - Sesame seeds The main ingredients give this dish its rich flavor. Salmon fillets are the star. They provide healthy fats and protein. Low sodium soy sauce adds a savory taste without too much salt. Honey adds sweetness and balances the soy sauce. Rice vinegar brings a bit of tang. For the extra flavor, we use ginger and garlic. They give the dish warmth and depth. Cooked jasmine rice makes a soft and fragrant base. It perfectly absorbs the teriyaki sauce. Toppings make it fun! Steamed broccoli adds color and crunch. Shredded carrots give it a nice sweetness and bright color. Sliced green onions add freshness. Finally, sesame seeds provide a nutty finish. You can mix and match toppings. Feel free to add your favorite veggies. This makes it a personal meal each time. {{ingredient_image_1}} Start by whisking together the following in a small bowl: - 1/2 cup soy sauce - 1/4 cup honey - 2 tablespoons rice vinegar - 1 tablespoon grated ginger - 2 minced garlic cloves This mix creates a sweet and salty teriyaki sauce. The ginger and garlic add depth. You can taste it and adjust if you want it sweeter or saltier. Next, place your two salmon fillets in a shallow dish. Pour half of the teriyaki marinade over the salmon. Make sure it covers the fish well. Let it sit for at least 15 minutes. This step is key for great flavor. Now, heat your grill or grill pan to medium-high. Remove the salmon from the marinade and place it on the grill. Cook each side for 4 to 5 minutes. You want the salmon to be cooked through and flaky. Brush some of the reserved marinade on the fish during the last minute. This makes it extra tasty. While the salmon cooks, get your rice bowls ready. Divide 2 cups of cooked jasmine rice into two bowls. Top the rice with 1 cup of steamed broccoli and 1 cup of shredded carrots. Finally, place the grilled salmon on top. Drizzle any leftover teriyaki sauce over everything for more flavor. Garnish the bowls with sliced green onions and a sprinkle of sesame seeds. Enjoy your meal! How to tell when salmon is cooked You can tell salmon is done when it flakes easily with a fork. The inside should be a light pink color. If it looks bright and shiny, it may need more time. Aim for an internal temperature of 145°F for safety. Tips for grilling salmon Before you grill, make sure your grill is hot. This helps prevent sticking. Use oil on the grill grates or on the salmon itself. Grill the salmon skin-side down first. This helps keep it moist. Flip it gently, and don’t press down. You can add more depth to your teriyaki salmon with spices. Try a pinch of red pepper flakes for heat. A dash of sesame oil adds a nutty flavor. You can also use fresh herbs like cilantro or basil. For a twist, mix in some orange zest or a splash of lime juice. Best methods for cooking jasmine rice To cook jasmine rice, use a rice cooker for the best results. If you don’t have one, a pot works well too. Rinse the rice first to remove excess starch. Use a 1:1.5 rice-to-water ratio. Bring to a boil, then cover and reduce heat. Let it simmer for about 15 minutes. Turn off the heat and let it sit for another 10 minutes. Fluff it with a fork before serving. Pro Tips Marinate Longer for More Flavor: For a deeper flavor, consider marinating the salmon for 30 minutes to an hour instead of just 15 minutes. Perfectly Cooked Salmon: Use a meat thermometer to check for doneness; salmon is perfectly cooked at an internal temperature of 145°F (63°C). Add Variety with Vegetables: Feel free to add other vegetables like bell peppers or snap peas for extra color and nutrition. Serve with Extra Sauce: If you love teriyaki flavor, consider serving extra teriyaki sauce on the side for dipping! {{image_2}} You can switch the salmon for other fish. Tuna or swordfish work well too. If you prefer, try chicken or tofu for a different taste. Each option brings a unique flavor and texture. They all soak up the teriyaki marinade perfectly. Just follow the same marinating and cooking steps in the recipe. Feel free to mix up the veggies. Snap peas, bell peppers, or zucchini add great crunch. You can also toss in some corn or edamame for a pop of color. This dish is flexible, so use what you have on hand. More veggies boost the nutrition and flavor of your rice bowl. If jasmine rice isn’t your thing, try brown rice or quinoa. These grains have more fiber and nutrients. Cauliflower rice is a great low-carb option too. Each grain brings a different taste and texture, making your meal exciting. Experiment with what you like best to find your favorite base. To store teriyaki salmon rice bowls, let them cool before refrigerating. Place the rice, salmon, and veggies in airtight containers. Make sure to keep the sauce separate. This helps keep everything fresh and tasty. You can store the leftovers in the fridge for up to three days. If you want to freeze the leftovers, use freezer-safe containers. Freeze the salmon and veggies together. You can keep the rice in a separate bag. This way, you can enjoy the meal later. Teriyaki salmon rice bowls can last in the freezer for up to three months. Make sure to label the containers with the date. When you're ready to eat, you can reheat the dish. Use the microwave for quick reheating. Place the bowls in the microwave for about two minutes. Stir halfway to heat evenly. You can also reheat on the stovetop. Heat in a pan over medium heat, adding a splash of water for moisture. This method keeps the salmon juicy and the rice fluffy. To make teriyaki salmon, you need a few simple ingredients. Combine low sodium soy sauce, honey, rice vinegar, grated ginger, and minced garlic in a bowl. Whisk these together until smooth. This mix creates a rich teriyaki sauce. You can adjust the sweetness or saltiness by changing the honey or soy sauce amounts. The key is to let your salmon soak in the marinade for at least 15 minutes. This allows the flavors to soak in. Yes, you can use frozen salmon. Thaw it properly before cooking. The best way to thaw salmon is to put it in the fridge overnight. If you’re short on time, place the sealed salmon in cold water for about an hour. After thawing, pat it dry before marinating. This helps the sauce stick better. Cook the salmon as directed in the recipe. It should still be flavorful and tender. Several sides go great with teriyaki salmon rice bowls. Here are some tasty options: - Edamame: Lightly salted edamame offers a nice crunch. - Cucumber salad: A fresh cucumber salad adds a crisp contrast. - Miso soup: Warm miso soup complements the meal perfectly. - Seaweed salad: This adds a unique flavor and texture. These sides enhance the meal and provide balance to the flavors in the rice bowls. This blog post covered how to make teriyaki salmon rice bowls. We looked at key ingredients, like salmon, soy sauce, and jasmine rice. The cooking steps, from marinating the salmon to adding veggies, were clear and easy. I shared tips for perfecting your dish and different variations you can try. In the end, you can enjoy a healthy, tasty meal that’s simple to prepare. Whether you stick with salmon or try something new, this dish is sure to please. Happy cooking!

Teriyaki Salmon Rice Bowls Flavorful and Simple Meal

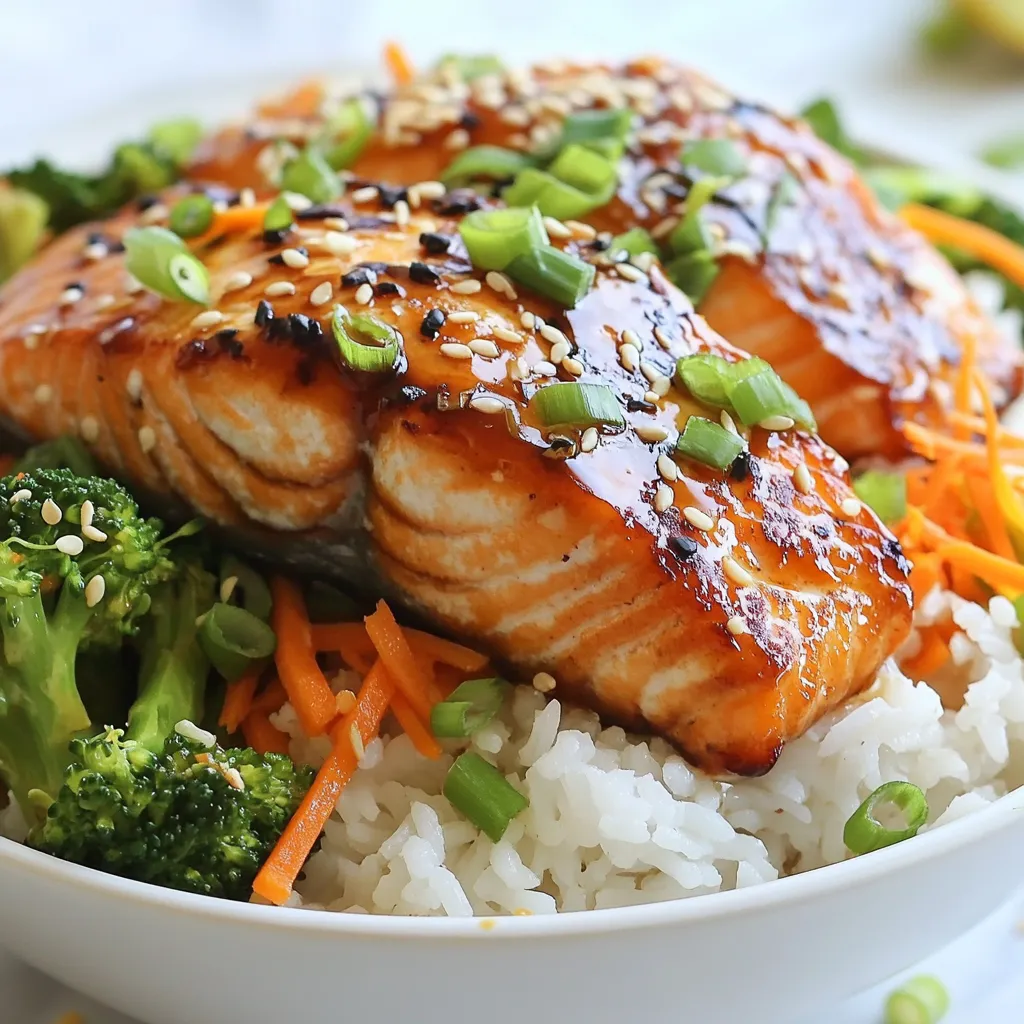
Are you looking for a tasty yet simple dinner? My Teriyaki Salmon Rice Bowls are the answer! This dish combines

To make Buffalo Chicken Pasta Bake, gather these simple items: - 2 cups cooked pasta (penne or rotini work best) - 2 cups shredded cooked chicken - 1 cup buffalo sauce (adjust based on spice preference) - 1 cup ricotta cheese - 1 cup shredded mozzarella cheese - 1/2 cup grated Parmesan cheese - 1/4 cup sour cream - 1 teaspoon garlic powder - 1 teaspoon onion powder - Salt and pepper to taste - 2 green onions, sliced (for garnish) Each ingredient adds a unique flavor, making this dish truly special. You can easily swap some ingredients if needed: - Use rotini pasta if you can’t find penne. - For a lighter option, try shredded turkey instead of chicken. - Swap ricotta with cottage cheese for a different texture. - Use Greek yogurt in place of sour cream for a tangy taste. - If you prefer a milder dish, use less buffalo sauce or a milder brand. These changes can help fit your taste or what you have on hand. While penne and rotini are great choices, you can also consider: - Fusilli: Twists hold sauce well. - Shells: They catch sauce in their pockets. - Bowties: Fun shape adds interest to your dish. Choosing the right pasta makes a big difference. It helps hold all the flavors together and makes every bite enjoyable. {{ingredient_image_1}} First, preheat your oven to 350°F (175°C). This step warms the oven for even cooking. Next, grab a large bowl. Combine the cooked pasta, shredded chicken, and buffalo sauce. Adjust the sauce to your spice level. Then, add ricotta cheese, half of the mozzarella cheese, and sour cream. Don’t forget the garlic powder, onion powder, salt, and pepper. Mix everything well until it's all blended. This ensures each bite has great flavor. Now, take a greased 9x13 inch baking dish. Pour the mixture into it. Use a spatula to spread it evenly. This helps it cook nicely. On top, sprinkle the rest of the mozzarella cheese and the Parmesan cheese. This will create a nice, cheesy crust when baked. Cover the baking dish with aluminum foil. Place it in the oven and bake for 20 minutes. This keeps the dish moist. After 20 minutes, carefully remove the foil. Bake for another 10-15 minutes. You want the cheese to be bubbly and golden. This adds a delicious look and flavor to your dish. When it’s ready, take it out and let it cool for a few minutes. When serving, dish out the pasta bake hot from the oven. Garnish it with sliced green onions for a pop of color. You can also drizzle some extra buffalo sauce on top for added zing. For a full meal, pair it with crunchy celery sticks and ranch dressing. This makes for a tasty and fun dining experience. Enjoy every bite of this flavorful meal! To get the best Buffalo Chicken Pasta Bake, keep these tips in mind: - Choose the Right Pasta: Use penne or rotini. They hold sauce well. - Mix Ingredients Well: Ensure the chicken and sauce coat the pasta evenly. - Don't Skip the Foil: Cover the dish with foil during the first bake. This keeps it moist. - Watch the Cheese: Remove the foil to let the cheese brown nicely. Aim for bubbly edges. Buffalo sauce can vary in heat. Here’s how to adjust spice: - Mild Version: Use less buffalo sauce or mix it with extra ricotta. - Spicy Version: Add more buffalo sauce or sprinkle in some cayenne pepper. - Taste as You Go: Always taste your mix before baking. You can adjust the heat right then. Avoid these common pitfalls for a perfect dish: - Using Cold Ingredients: Make sure your chicken and cheese are at room temp. This helps them combine better. - Overbaking: Keep an eye on the cheese. You want it bubbly, not burnt. - Not Letting It Rest: After baking, let it sit for a few minutes. This helps flavors meld and makes serving easier. Pro Tips Spice Level Adjustment: If you prefer a milder dish, reduce the amount of buffalo sauce or use a milder variety. You can also mix in some cream cheese to tame the heat. Cheese Variations: Feel free to experiment with different cheeses such as cheddar or pepper jack for added flavor. Mixing cheeses can elevate the dish! Pasta Choice: While penne and rotini are great options, any pasta shape that holds sauce well can be used. Just ensure it's cooked al dente for the best texture. Make Ahead: This dish can be assembled ahead of time and stored in the refrigerator. Just adjust the baking time if cooking from cold. {{image_2}} You can swap chicken for veggies. Use cooked cauliflower or chickpeas instead. Mix in your favorite vegetables like bell peppers or spinach. This makes it easy for everyone to enjoy. The buffalo sauce still packs a punch, giving it that spicy kick. You can keep the same creamy texture by using more ricotta or even a vegan cheese. Cheese is key in this dish. Try using sharp cheddar for a stronger flavor. You can also mix in fontina or gouda for a unique twist. Blend different cheeses to find your favorite. Just remember to keep the balance of creamy and melty. It makes each bite delicious and cheesy. If you need a gluten-free meal, pick gluten-free pasta. Many brands offer great options that taste good. You can also check the buffalo sauce to ensure it’s gluten-free. This way, you can enjoy this dish without worry. It’s a simple swap that keeps the flavors intact. To keep your Buffalo Chicken Pasta Bake fresh, let it cool down first. Place it in an airtight container. You can store it in the fridge for up to three days. If you want it to last longer, follow the freezing tips below. Reheating is simple. Preheat your oven to 350°F (175°C). Place a serving on a baking dish. Cover it with foil to keep it moist. Heat for about 20 minutes or until warm. You can also use a microwave. Heat it in a microwave-safe dish for 2-3 minutes, stirring halfway. To freeze this dish, first cool it completely. Transfer it to a freezer-safe container. Be sure to label it with the date. It can stay in the freezer for up to three months. When you’re ready to eat, thaw it overnight in the fridge. Then, reheat as mentioned above. Enjoy your meal even later! Yes, you can make this recipe ahead of time. Simply prepare the pasta bake, cover it tightly, and store it in the fridge. You can assemble it a day before you plan to bake it. When you are ready to cook, just bake it straight from the fridge. You may need to add a few extra minutes to the baking time to heat it through. This makes it easy for busy nights. Buffalo Chicken Pasta Bake is a hearty dish, so you want simple sides. Here are some good options: - Celery sticks with ranch dressing - Side salad with light dressing - Garlic bread for dipping - Steamed broccoli for a healthy touch These sides add crunch and freshness to your meal. They help balance the rich flavors of the pasta bake. Yes, you can use a slow cooker for this recipe. Start by mixing all the ingredients in a bowl. Then, place the mixture in the slow cooker. Cook on low for about 4 to 6 hours or on high for 2 to 3 hours. Just make sure to add the cheese topping about 30 minutes before serving to melt it nicely. This method gives you a warm, comforting meal with less effort. In this blog post, we covered key ingredients for the Buffalo Chicken Pasta Bake. I provided step-by-step instructions to make it easy. You learned helpful cooking tips and tricks to avoid common mistakes. We also explored tasty variations, storage tips, and answered common questions. Making this dish can bring joy to your table. With the right ingredients and steps, you can enjoy a delicious meal. Happy cooking!

Buffalo Chicken Pasta Bake Easy and Flavorful Meal

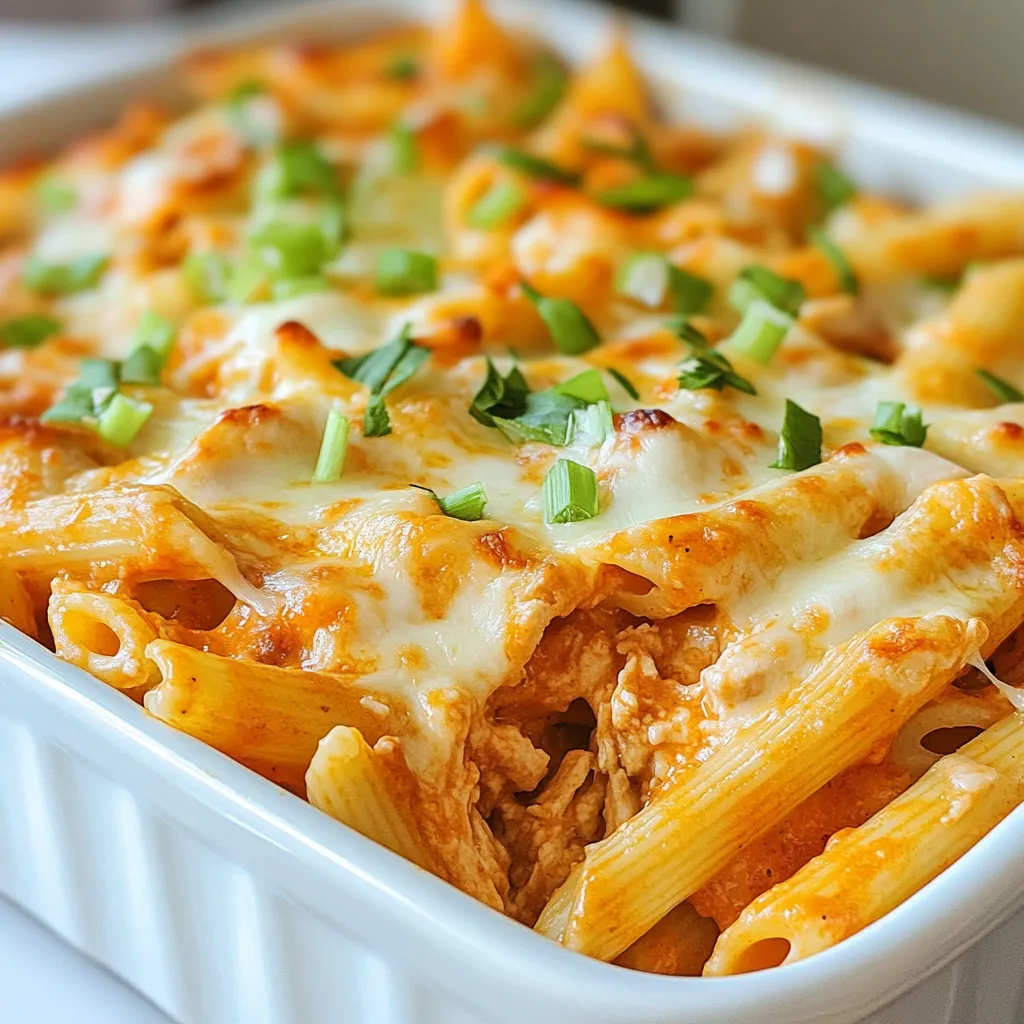
If you’re craving a meal that’s big on flavor and easy to make, you’ve come to the right place! My

- 2 cups fresh cheese tortellini - 1 lb diced chicken breast - 3 tablespoons olive oil - 4 cloves garlic, minced - 1 cup heavy cream - 1 cup chicken broth - 1 cup chopped spinach - 1 teaspoon Italian seasoning - Salt and pepper to taste - 1/2 cup grated Parmesan cheese - Fresh basil for garnish (optional) The right ingredients are key to making creamy garlic chicken tortellini skillet shine. Start with fresh cheese tortellini. This gives your dish a nice texture. Use diced chicken breast for protein. Chicken cooks fast and stays juicy. Olive oil adds flavor and helps cook the chicken. Minced garlic is a must. It brings a strong, tasty aroma. For the sauce, heavy cream gives it a rich and creamy finish. Chicken broth adds depth to the flavor. Spinach adds color and nutrients. Italian seasoning brings all the flavors together. Don’t forget salt and pepper to enhance the taste. For garnishing, I love using grated Parmesan cheese. It melts beautifully and adds a nice bite. Fresh basil on top looks great and adds a fresh taste. This combination of ingredients makes a meal that is both simple and delicious. {{ingredient_image_1}} - Heat 3 tablespoons of olive oil in a large skillet over medium heat. You want it hot enough to cook the chicken well. - Add 1 pound of diced chicken breast to the skillet. Season it with salt, pepper, and 1 teaspoon of Italian seasoning. Cook the chicken for about 6-8 minutes. It should turn golden brown and be fully cooked. Use a spatula to stir it often for even cooking. - Once the chicken is cooked, add 4 minced garlic cloves to the skillet. Sauté them for 1-2 minutes. The garlic will smell amazing and add great flavor. - Pour in 1 cup of chicken broth and 1 cup of heavy cream. Stir everything together to blend the flavors. Bring the mixture to a gentle simmer. This will help the sauce thicken a bit. - Now, add 2 cups of fresh cheese tortellini to the skillet. Cook according to the package instructions, usually about 3-5 minutes. Stir occasionally to prevent sticking. - When the tortellini is tender, stir in 1 cup of chopped spinach and 1/2 cup of grated Parmesan cheese. Cook for another 2 minutes until the spinach wilts and everything is well mixed. Enjoy the creamy goodness! To ensure the chicken is cooked through, use a meat thermometer. The chicken should reach 165°F. This keeps it juicy and safe to eat. Cook it until golden brown. This adds flavor and texture. For a creamy sauce, don’t rush the simmering step. Allow the heavy cream and chicken broth to blend well. Stir often to prevent sticking. If the sauce seems too thick, add a splash of chicken broth. This helps keep it silky and smooth. If you need an alternative for heavy cream, consider using half-and-half or coconut cream. This makes the dish lighter but still tasty. You can also try Greek yogurt for a tangy twist. When it comes to tortellini, fresh is best for this dish. However, if you have frozen tortellini, that works too. Just increase the cooking time by a couple of minutes. Always check the package for specific cooking times. Pair creamy garlic chicken tortellini with a simple side salad. A light green salad enhances the meal without overpowering it. Garlic bread is another great choice. It complements the flavors and adds crunch. For storage, keep any leftovers in an airtight container. They will stay fresh in the fridge for 3-4 days. To reheat, use low heat on the stove. This helps maintain the sauce's creaminess. Pro Tips Use Fresh Tortellini: Fresh tortellini offers a superior texture and flavor compared to dried. If you can find it, opt for fresh for the best results! Adjust the Creaminess: If you prefer a lighter dish, you can substitute half of the heavy cream with additional chicken broth or use a light cream alternative. Add More Veggies: Feel free to toss in other vegetables like bell peppers or mushrooms for added color and nutrition. Leftover Storage: This dish can be stored in an airtight container in the refrigerator for up to three days. Reheat gently on the stove to prevent the tortellini from becoming mushy. {{image_2}} You can switch up the protein in this dish. If you want to use shrimp, it cooks quickly and adds a nice flavor. Just sauté the shrimp until they turn pink. Tofu is a great vegetarian option. Use firm tofu, and sauté it until golden. Both choices work well with the creamy sauce. Want to make the sauce even richer? Add sun-dried tomatoes for a burst of flavor. They bring a sweet and tangy taste that pairs well with the cream. You can also try different cheeses. Mixing in goat cheese or mozzarella can change the texture and taste. Experiment with what you have on hand! To spice things up, add red pepper flakes. This will give the dish a nice kick without overwhelming it. You can also enhance the flavor with fresh herbs like thyme or rosemary. These herbs add a fragrant touch and elevate the dish. Remember to taste as you go, and adjust to your liking! Store leftovers in an airtight container. This keeps the dish fresh. You can keep it in the fridge for 3 to 4 days. Always let it cool down before sealing. To freeze, place the cooled leftovers in a freezer-safe container. Make sure to leave some space for expansion. You can keep it in the freezer for up to 3 months. When you’re ready to eat, thaw it overnight in the fridge. To reheat, use a skillet over low heat. Add a splash of chicken broth or cream to keep the sauce creamy. Stir it gently to avoid a watery sauce. You can also microwave it but stir every minute for even heating. You can use half-and-half or coconut cream. Half-and-half gives a creamy texture but has less fat than heavy cream. Coconut cream works well too, adding a slight coconut flavor. Both options keep the dish rich and delicious. Yes, you can prep this dish ahead. Cook the chicken and make the sauce. Then, store them separately from the tortellini. When ready to eat, cook the tortellini and combine everything. This method keeps it fresh and tasty. This dish lasts about three to four days in the fridge. Always store it in an airtight container. Check for any off smells or changes in texture before eating. If it looks or smells strange, throw it away. This blog covered a delicious creamy garlic chicken tortellini recipe. We explored key ingredients, step-by-step instructions, and handy tips for success. You learned about ingredient substitutions, variations, and how to store leftovers properly. Cooking should be fun and simple. I hope you feel ready to try this recipe. Enjoy making this tasty dish, and don't hesitate to get creative with flavors! Your kitchen adventures await!

Creamy Garlic Chicken Tortellini Skillet Easy Meal

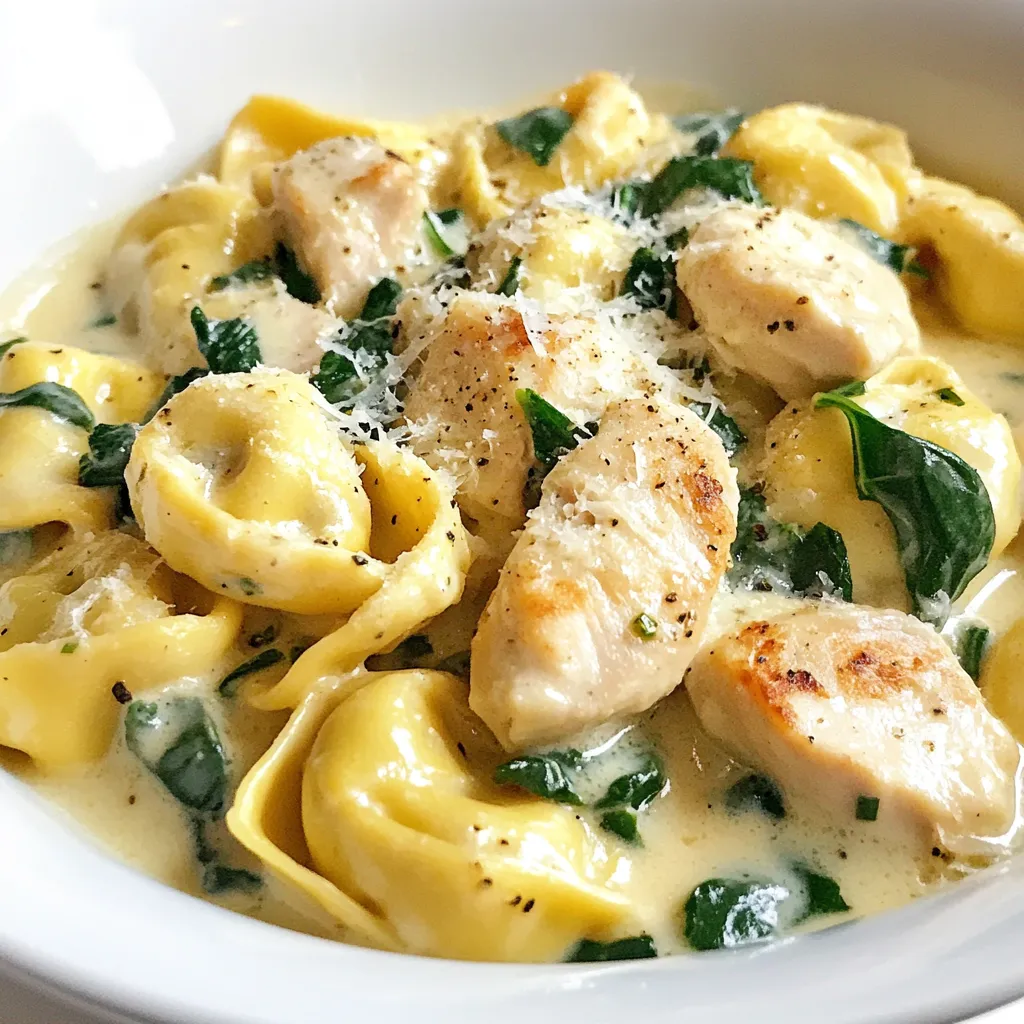
Looking for a quick and tasty dinner idea? This Creamy Garlic Chicken Tortellini Skillet is your answer! It’s easy to

To make Italian Wedding Soup, you need key ingredients that bring flavor and comfort. Here’s what you’ll need: - 1 cup small pasta (like acini di pepe or tiny shells) - 1 tablespoon olive oil - 1 medium onion, finely chopped - 2 cloves garlic, minced - 1 carrot, diced - 1 celery stalk, diced - 6 cups chicken broth - 1 teaspoon dried oregano - 1 teaspoon dried basil - Salt and pepper to taste - 1 cup fresh spinach, roughly chopped - 1 cup cooked meatballs (beef and turkey mix recommended) - Grated Parmesan cheese for serving These ingredients create a warm and hearty soup that is perfect for gatherings or a cozy night in. You can add a few extra ingredients to change the flavor and texture. Here are some ideas: - 1 small zucchini, diced - 1 cup cannellini beans for added protein - 1/2 teaspoon red pepper flakes for a spicy kick - Fresh herbs like parsley or thyme for extra flavor Feel free to mix and match these optional ingredients based on your taste or what you have on hand. Toppings can elevate your Italian Wedding Soup. Here are some great options: - Grated Parmesan cheese - Freshly chopped parsley - Crusty bread on the side - A drizzle of olive oil These garnishes not only look good but also add layers of flavor to each bowl. Enjoy making your Italian Wedding Soup just the way you like it! {{ingredient_image_1}} Start by heating a tablespoon of olive oil in a large pot over medium heat. Once the oil is hot, add one finely chopped onion. Sauté it for about 3 to 4 minutes, until it turns soft and clear. Next, stir in two minced garlic cloves, one diced carrot, and one diced celery stalk. Cook these veggies for about 5 minutes. This mix adds great flavor to the soup. Now, pour in 6 cups of chicken broth. Bring it to a gentle simmer. Add a teaspoon of dried oregano and a teaspoon of dried basil. Season it with salt and pepper to match your taste. Remember to taste the broth and adjust the seasoning if needed. When your broth is simmering, it’s time to add the pasta. Use a cup of small pasta like acini di pepe or tiny shells. Cook the pasta according to the package instructions, which usually takes about 6 to 8 minutes. While the pasta cooks, it's time to add the meatballs. I recommend a mix of beef and turkey for the best flavor. Stir in the cooked meatballs when the pasta is almost done. This ensures they heat through without overcooking. Add 1 cup of roughly chopped fresh spinach to the pot. Cook for another 2 to 3 minutes. You want the spinach to wilt but still stay bright green. Once everything is ready, remove the pot from heat. Let it sit for a few minutes. This helps the soup thicken slightly. Serve your Italian wedding soup hot, and don’t forget to sprinkle some grated Parmesan cheese on top for extra flavor. Enjoy your comforting bowl of soup! To cook the pasta just right, choose small shapes like acini di pepe or tiny shells. These shapes fit well in the soup. Bring a pot of salted water to a boil. Cook the pasta until it's al dente, about 6 to 8 minutes. Drain the pasta and add it to your soup at the end. This keeps it from getting too soft. If you want, you can cook the pasta right in the soup. Just remember to check it often. For the best meatballs, I like to use a mix of beef and turkey. This blend gives a nice flavor and texture. You can make your own meatballs or buy pre-cooked ones. If you choose to make them, mix ground meat with breadcrumbs, egg, and spices. Bake or fry them until they are golden brown. This step adds depth to the soup. If you buy them, look for meatballs that have good seasoning. To boost the soup's taste, use dried oregano and basil. These herbs bring out the classic Italian flavor. I add them early in the cooking process so their flavors infuse the broth. Don’t forget to taste your soup! Adjust the salt and pepper as needed. You can also add a pinch of red pepper flakes for a bit of heat. Fresh herbs like parsley or thyme can be added at the end for a bright finish. Pro Tips Use Homemade Broth: For the best flavor, use homemade chicken broth instead of store-bought. It adds depth and richness to the soup. Perfect Pasta Cooking: To prevent the pasta from becoming mushy, cook it separately and add it to each bowl just before serving. Meatball Variations: Experiment with different meats or even vegetarian meatballs for a unique twist on traditional Italian wedding soup. Add a Zest: A squeeze of fresh lemon juice just before serving can brighten the flavors and enhance the overall taste of the soup. {{image_2}} You can make a tasty vegetarian version of Italian wedding soup. Start by swapping meatballs for plant-based options. Use lentils or chickpeas for protein. For the broth, choose vegetable broth instead of chicken broth. This change keeps the soup rich and full of flavor. Add mushrooms for a meaty texture. You can also toss in some tofu for added protein. Use the same herbs to keep that classic Italian taste. If you want to try different meatballs, you have many options. You can use chicken or pork for lighter meatballs. For a spicy kick, mix in some Italian sausage. If you’re feeling adventurous, try adding cheese to the meat mix. This adds flavor and makes the meatballs juicy. You can even make them gluten-free using oats or almond flour. Each type of meatball gives the soup a unique twist. While spinach is a classic choice, other greens work well too. Kale adds a hearty texture and is packed with nutrients. Swiss chard brings a mild, sweet flavor. You can also use arugula for a peppery bite. Try mixing different greens for a colorful dish. Adding the greens at the end keeps them fresh and vibrant. Each green adds its own flair, making the soup even more enjoyable. To keep your Italian wedding soup fresh, let it cool first. Use an airtight container to store it in the fridge. This soup lasts about three to four days. If you plan to eat it later, don’t add the pasta yet. The pasta can soak up too much broth and become mushy. Freezing is a great way to save leftovers. Pour the cooled soup into freezer-safe containers. Leave some space at the top for expansion. This soup can stay good in the freezer for up to three months. When you're ready to eat it, just thaw it in the fridge overnight. To reheat, pour the soup into a pot over low heat. Stir it often to keep it from sticking. If the soup seems thick, add a splash of chicken broth or water. Heat until it's warm but not boiling. This keeps the flavors fresh and tasty. Enjoy your comforting bowl of soup again! Italian Wedding Soup comes from Italy. The name might confuse some. It does not come from actual weddings. The term "wedding" refers to the way flavors pair together. This soup blends meat and greens in a warm, tasty dish. It reflects the mix of cultures in Southern Italy. Families often enjoy it during special occasions. Yes, you can make Italian Wedding Soup in a slow cooker! It’s simple. Start by sautéing the onion, garlic, carrot, and celery in a pan. After that, transfer them to the slow cooker. Add chicken broth, oregano, and basil. Let it cook on low for about 6 hours. When ready, stir in the pasta, meatballs, and spinach. Cook for an extra 30 minutes. This method makes the soup rich and tasty. To make Italian Wedding Soup gluten-free, swap the pasta. Use gluten-free pasta made from rice or corn. Be sure to check the labels. You can also use zoodles, which are spiralized zucchini. This gives you a fresh twist. The rest of the ingredients are usually gluten-free. Always check if the broth has gluten. Enjoy your cozy, gluten-free soup! Italian Wedding Soup combines rich flavors and warm ingredients. We explored essential and optional ingredients, plus tasty toppings. I shared easy steps to prepare the soup, cook pasta, and make meatballs. You learned key tips to cook pasta perfectly and select quality meatballs. We even looked at fun variations, like vegetarian options and different greens. Lastly, proper storage ensures you enjoy this dish later. With these details, you can create a delicious Italian Wedding Soup that warms the heart. Enjoy your cooking!

Italian Wedding Soup Flavorful and Comforting Dish

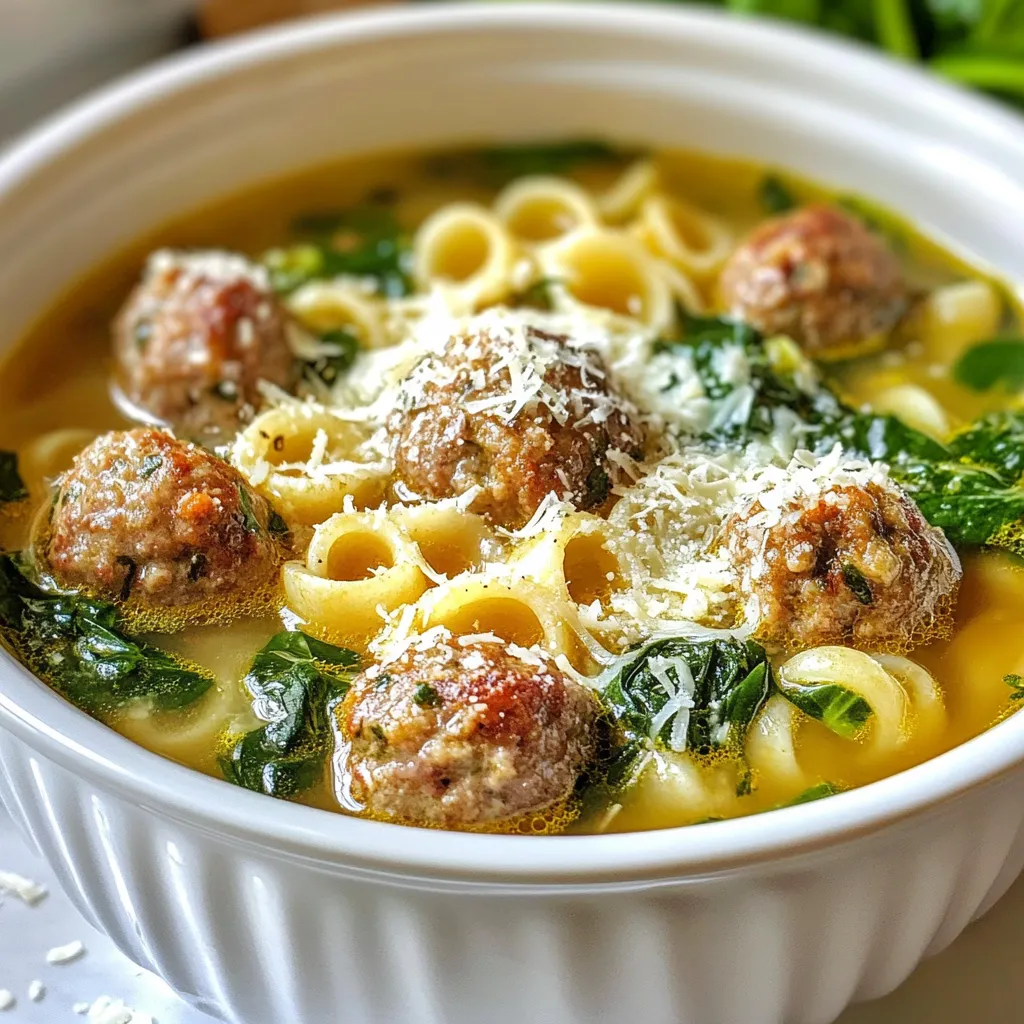
Italian Wedding Soup is a warm hug in a bowl. It blends hearty meatballs, tender greens, and rich broth for

Older posts
Newer posts
← Previous Page1 … Page119 Page120 Page121 … Page130 Next →
© 2025 My Cooking Cast • Built with GeneratePress

Our Policies

  • Privacy Policy
  • GDPR Policy
  • Terms Of Use
  • Copyright Policy
  • Cookie Policy
  • Disclaimer

More Information​

  • Home
  • Contact
  • About
  • Dinner
  • Appetizers
  • Dessert
©2025, My Cooking Cast About Privacy Policy Back To Top