![For a tasty quick veggie stir-fry, you need fresh vegetables. Here are my favorites: - 1 cup broccoli florets - 1 bell pepper (any color), sliced - 1 medium carrot, julienned - 1 cup snap peas - 1 small zucchini, sliced into half-moons - 1 cup baby corn, halved These veggies add color, crunch, and a lot of nutrients. You can mix and match based on what you enjoy or have on hand! To create flavor, you need the right oils and sauces. Here’s what you'll want: - 3 tablespoons vegetable oil - 2 tablespoons soy sauce (or tamari for gluten-free) - 1 tablespoon sesame oil - 1 teaspoon grated fresh ginger - 2 cloves garlic, minced These ingredients bring life to your stir-fry. The oils help with cooking, while the sauces add that savory kick. Garnishes can make your dish even better. Here are some ideas: - 1 tablespoon sesame seeds (optional) - Fresh herbs like cilantro or green onions Adding these at the end gives your dish a nice touch. You can also use what you have for more fun! Check the Full Recipe to see how everything comes together in this quick and easy meal. To start, gather your fresh veggies. You will need: - 1 cup broccoli florets - 1 bell pepper (any color), sliced - 1 medium carrot, julienned - 1 cup snap peas - 1 small zucchini, sliced into half-moons - 1 cup baby corn, halved Wash and chop all the vegetables. Cut them into bite-sized pieces. This helps them cook evenly. Now heat a large skillet or wok over medium-high heat. Add 3 tablespoons of vegetable oil. Once it’s hot, add 2 cloves of minced garlic and 1 teaspoon of grated fresh ginger. Sauté for about 30 seconds. You want to smell that lovely aroma. Next, toss in the broccoli and julienned carrot. Stir them for about 2 minutes. This step helps them soften. After that, add the bell pepper, snap peas, zucchini, and baby corn. Stir-fry for 3 to 4 minutes. You want the veggies to stay bright and crisp-tender. Pour in 2 tablespoons of soy sauce and 1 tablespoon of sesame oil. Toss everything together well. Cook for another minute. You want the sauce to coat all the veggies. Season with salt and pepper to taste. When everything looks good, remove the pan from heat. If you like, sprinkle 1 tablespoon of sesame seeds on top. Serve your quick veggie stir-fry hot over cooked rice or noodles. Enjoy your colorful and healthy meal! For the complete recipe, check out the [Full Recipe]. To get that great crunch in your stir-fry, choose fresh veggies. I love using broccoli, bell peppers, and snap peas. Cut them evenly. This helps them cook at the same pace. Always heat your oil before adding the veggies. This step locks in texture. Stir-fry over high heat. It should cook fast, keeping the veggies crisp. To boost flavor, add ginger and garlic early. They give a warm taste. Use soy sauce and sesame oil for a savory kick. You can try adding a splash of rice vinegar for tang. If you want spice, add red pepper flakes. This gives your dish some heat. You can also sprinkle sesame seeds on top for a nutty crunch. Prep your veggies before you cook. Wash and chop them all at once. Store them in clear bowls. This makes cooking fast and easy. You can also use pre-cut veggies from the store. They save time and still taste great. And remember, keep your cooking area clean. A tidy space helps you focus and enjoy your cooking. For the full recipe, check out the details above. {{image_2}} You can easily add proteins to your stir-fry. Chicken, beef, or shrimp work well. If you prefer plant-based options, tofu or tempeh are great choices. Just cut your protein into bite-sized pieces. Cook them in the pan first. Remove them before adding vegetables. This way, they stay juicy and tender. After cooking the veggies, mix everything back in. This makes your meal filling and tasty. Explore different sauces to change the flavor. You can use teriyaki sauce for a sweet touch. Hoisin sauce adds a unique twist. For spice lovers, try sriracha or chili paste. If you like a tangy taste, add a splash of rice vinegar. Each sauce brings its own flavor, so feel free to experiment. This keeps your stir-fry fresh and exciting every time. Use seasonal vegetables for the best taste. In spring, add asparagus or peas. Summer is perfect for bell peppers and eggplant. Fall brings squash and Brussels sprouts. In winter, you can use hearty greens like kale or Swiss chard. Each season gives you new colors and flavors. Mixing seasonal veggies keeps your dish vibrant and nutritious. Check local markets for fresh options every time you cook this quick veggie stir-fry. To keep your quick veggie stir-fry fresh, store it in an airtight container. Make sure it cools down first. This helps prevent steam from building up inside and making the veggies soggy. If you want to keep each type of vegetable crisp, you can separate them in the container. When you’re ready to eat, reheat your stir-fry in a skillet on medium heat. Add a splash of water or a bit of oil to help bring back moisture. Stir it often to heat evenly. You can also use the microwave if you're short on time. Just cover it loosely and heat in short bursts, stirring in between. Your veggie stir-fry lasts about 3 to 4 days in the fridge. After that, the veggies may lose their crunch and flavor. Always check for any signs of spoilage before eating. If you notice any off smells or textures, it's best to toss it out. Enjoy the flavors while they are fresh! I love using fresh, colorful veggies in a stir-fry. Here are my favorites: - Broccoli florets - Bell peppers (any color) - Carrots (julienned) - Snap peas - Zucchini (sliced) - Baby corn These veggies cook quickly and keep their crunch. You can mix and match as you like. Just remember to cut them into similar sizes. This helps them cook evenly and look pretty on your plate. Yes, you can! To make it gluten-free, use tamari instead of soy sauce. Tamari is a great option that tastes just as good. Always check labels on sauces for hidden gluten. Most fresh veggies are gluten-free, so you're good to go! To keep your veggies crisp, follow these tips: - Start with a hot pan. Heat your oil well before adding veggies. - Add harder vegetables first. Broccoli and carrots need more time to cook. - Stir-fry quickly. Do not let them sit too long. - Avoid overcrowding the pan. Cook in batches if needed. These steps will help keep your stir-fry vibrant and crunchy. For the full recipe, check the earlier section. Enjoy your cooking! This blog post explored how to make a delicious stir-fry using fresh vegetables, oils, and sauces. You learned about preparation, cooking techniques, and tips for perfect crispness. We also covered ways to vary your dish with proteins and seasonal veggies. Storage tips help you keep leftovers fresh, while FAQs answered common questions. In the end, stir-frying gives you a quick, tasty meal that you can customize to your liking. Enjoy your cooking journey!](https://mycookingcast.com/wp-content/uploads/2025/04/334b56e1-b914-4b62-892e-c3d42fae36da.webp)
Quick Veggie Stir-Fry Flavorful and Easy Recipe
Are you looking for a quick and tasty dish? My Quick Veggie Stir-Fry is packed with fresh flavors and easy
Are you looking for a quick and tasty dish? My Quick Veggie Stir-Fry is packed with fresh flavors and easy
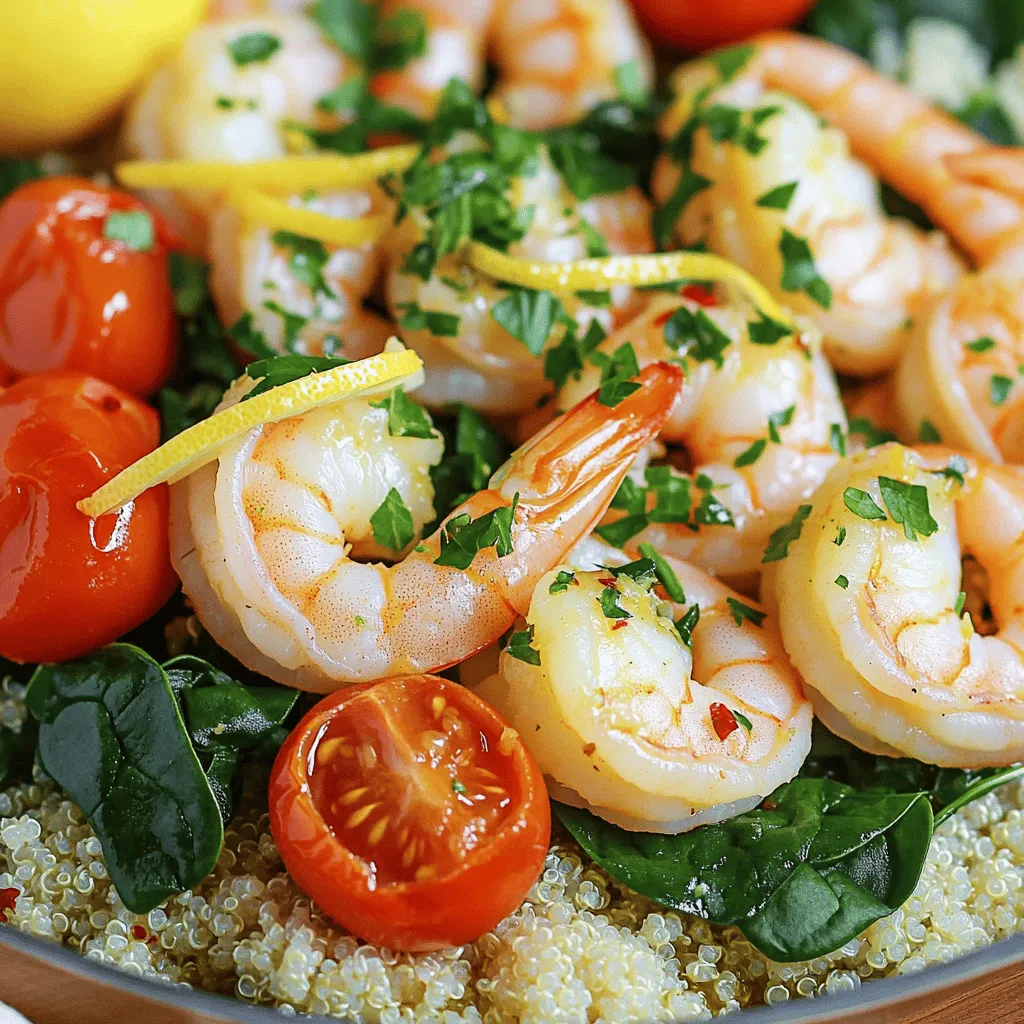
If you want a quick, tasty meal that impresses, you’ve found it! My One-Pan Lemon Garlic Shrimp is flavorful, easy

Are you ready to dive into a cheesy, flavorful delight that will impress your friends? This Creamy Spinach and Artichoke
![- 1 cup strong brewed coffee, cooled - 1 tablespoon cocoa powder (for dusting) - 24 ladyfinger cookies - 1 cup mascarpone cheese - 1 cup heavy whipping cream - 1/2 cup powdered sugar - 1 teaspoon vanilla extract - 2 tablespoons coffee extract (for extra flavor) - Dark chocolate shavings for garnish (optional) Choosing the right coffee Use strong coffee for the best flavor. Brew a fresh cup and let it cool. Avoid instant coffee as it lacks depth. A dark roast works great, adding richness to your dessert. Substituting mascarpone cheese If you can't find mascarpone, use cream cheese. Soften it first to blend smoothly. Mix in a bit of sour cream for a similar taste. This swap keeps the creamy texture without losing flavor. You can find the Full Recipe to guide you through the steps. Enjoy crafting this delightful dessert! To start, gather your tools and equipment. You will need a mixing bowl, a shallow dish, and a spatula. A whisk or mixer is great for whipping cream. You will also need a rectangular or square dish for layering your tiramisu. The layers of this dessert are simple. You will have soaked ladyfingers and a creamy mascarpone mixture. This creates a delightful contrast in texture and taste. First, brew one cup of strong coffee and let it cool. In a shallow dish, mix the cooled coffee with coffee extract. This mixture adds depth to the flavor. Set it aside for later use. In a mixing bowl, whip one cup of heavy cream until soft peaks form. This step is key for a light texture. Gradually add in half a cup of powdered sugar and one teaspoon of vanilla extract. Keep whipping until stiff peaks form. In another bowl, gently fold one cup of mascarpone cheese into the whipped cream mixture. Mix until it is smooth and well combined. This will be the creamy filling that balances the coffee flavor. Take the 24 ladyfinger cookies and quickly dip each one into the coffee mixture for about 1-2 seconds. Make sure they are soaked but not soggy. This is crucial to maintain the structure of the layers. Arrange half of the soaked ladyfingers in a single layer at the bottom of your dish. Spread half of the mascarpone mixture over the ladyfingers, ensuring an even layer. Repeat the process with the remaining ladyfingers and mascarpone mixture. This creates a lovely two-layer dessert that is rich and indulgent. Cover the dish with plastic wrap and refrigerate for at least four hours. For best results, let it chill overnight. This lets the flavors meld and the dessert set perfectly. When ready to serve, dust the top with cocoa powder. You can also add dark chocolate shavings for a touch of elegance. Slice and enjoy your no-bake tiramisu! For the full recipe, refer to the earlier section. Achieving the right texture is key for a great tiramisu. You want a creamy mix, smooth but not runny. Fold the mascarpone gently into the whipped cream. This keeps the air in and makes it light. To avoid soggy ladyfingers, dip them quickly in the coffee mixture. A quick 1-2 second soak is enough. If you soak too long, they get mushy. This will ruin your layers. For serving, a clear dish works best. It shows off the lovely layers. You can use a square or rectangular dish. Just make sure it’s deep enough for all the layers. For garnishing, dust the top with cocoa powder. Add some dark chocolate shavings for a touch of flair. You can also place fresh berries on top for color. It makes each serving pop! One common mistake is overwhipping the cream. This can make it grainy. Stop whipping as soon as you see stiff peaks. Another mistake is skipping the chilling step. Chilling allows the flavors to meld. If you skip this, your tiramisu may taste flat. Chill for at least four hours or overnight for the best flavor. For the full recipe, check out the [Full Recipe]. {{image_2}} You can really play with flavors in your no-bake tiramisu. Here are some ideas: - Adding different extracts: Try almond or hazelnut extract for a new twist. Just a teaspoon can change the whole taste! - Incorporating flavored liqueurs: You can add Kahlua or Amaretto for a rich, adult flavor. Just a splash makes it special. Experimenting with flavors is so much fun. You might find a new favorite! If you have dietary needs, you can still enjoy this dessert. - Gluten-free options: Use gluten-free ladyfingers. They work just as well, and you won’t taste the difference. - Vegan adaptations: Replace mascarpone with coconut cream and use a plant-based whipped cream. It’s creamy and delicious! These options let everyone enjoy tiramisu! Serving your tiramisu in different ways can add a fun touch. Here are some ideas: - Mini Tiramisu cups: Layer the ingredients in small cups. They are cute and perfect for parties. - Tiramisu parfaits: Alternate layers in a glass with fruit or other flavors. This adds color and makes it unique. These serving ideas can make your dessert stand out! For the full recipe, check out the Creamy Coffee Delight Tiramisu. To store no-bake tiramisu, place it in the fridge. Use a tight lid or plastic wrap. This keeps it fresh and stops it from drying out. Avoid touching the surface to keep it smooth. Freezing tiramisu is possible, but it can change the texture. If you want to freeze it, wrap it well. Use plastic wrap and then foil for extra protection. Thaw it in the fridge before serving. No-bake tiramisu lasts about 3 to 4 days in the fridge. Make sure to check for any changes in smell or texture. If it seems off, throw it away. You should not reheat tiramisu. The cream and layers do not hold up well to heat. For serving leftovers, take them straight from the fridge. Add a fresh dusting of cocoa powder for a nice touch. Enjoy your creamy coffee delight! - Can I make no-bake Tiramisu ahead of time? Yes, you can. Make it a day before serving. This lets the flavors blend. It also saves you time. - What can I use instead of ladyfingers? You can use sponge cake or pound cake. Cut them into strips. They will work well in the layers. - Is Tiramisu safe to eat without baking? Yes, Tiramisu is safe to eat. The cream is whipped and chilled. This keeps it fresh and tasty. - What to do if the cream doesn't whip properly? If the cream won’t whip, check if it’s cold. Use cold mixing bowls too. If it is still soft, try again with fresh cream. - How can I fix a runny Tiramisu? For a runny Tiramisu, add more whipped cream. Gently fold it in. Chill it longer to firm it up. For more tasty ideas, check out these links to similar recipes. You can also find video demonstrations on how to make no-bake Tiramisu and other desserts. This will help you get the best results. You now have all the steps to create a delicious no-bake tiramisu. The right ingredients, smart tips, and clear instructions make it simple. Remember to focus on texture and avoid common mistakes. Get creative with flavors and presentation to make it truly yours. Store it properly to enjoy later. Tiramisu is not just dessert; it’s a wonderful experience. Enjoy every bite and share your creation with friends and family. You’ve got this!](https://mycookingcast.com/wp-content/uploads/2025/04/6107225c-e807-4e60-8995-1162e839a99c.webp)
Are you ready to impress your friends with a delightful dessert? This No-Bake Tiramisu recipe is fun and easy to
![- Ripe mangos: Choosing ripe mangos is key. Look for mangos that feel soft when you gently squeeze them. They should have a sweet aroma. Ripe mangos bring out the best flavor in your sorbet. If you pick unripe mangos, your sorbet might taste bland. - Coconut water: This adds a light, natural sweetness. Coconut water keeps the sorbet smooth and refreshing. If you don’t have coconut water, you can use regular water or fruit juice. Just remember, this will change the taste a bit. - Sweeteners: You can use honey or agave syrup. Honey gives a rich flavor, while agave syrup is milder. Adjust the amount based on how sweet you want your sorbet. I often start with less and add more if needed. - Fresh mint leaves: Adding mint makes the sorbet look pretty and adds a refreshing taste. Just a few leaves on top can elevate your dish. - Other fruit toppings: Feel free to get creative! Chopped berries or slices of kiwi also work well. These add color and extra flavor to each scoop. For the full recipe, check out the Tropical Bliss Mango Sorbet section. It’s simple, quick, and perfect for summer! To make great mango sorbet, start with ripe mangos. Ripe mangos are sweet and juicy, giving your sorbet the best flavor. To peel and dice a mango, follow these steps: 1. Wash the mango under cold water. 2. Cut off the sides of the mango, avoiding the pit in the center. 3. Use a knife to score the flesh in a grid pattern, without cutting through the skin. 4. Turn the mango inside out and cut off the diced pieces. This method helps you get nice, bite-sized pieces. If your mangos are not ripe, the sorbet won't taste as good. Once you have your diced mango, it’s time to blend. This step is key for a smooth sorbet. Here’s how to do it: - Add the diced mango to a blender. - Pour in 1/2 cup coconut water, 1/4 cup honey or agave syrup, 1 tablespoon lime juice, and a pinch of sea salt. - Blend until the mixture is smooth and creamy. As you blend, taste the mixture. If it needs more sweetness, add extra honey or agave syrup. This is your chance to make it just right for your taste! Freezing is the final step. This will turn your mixture into a delicious sorbet. Here’s how to freeze it properly: 1. Pour the blended mixture into a shallow dish or loaf pan. This helps it freeze evenly. 2. Cover with plastic wrap or a lid. 3. Place it in the freezer for 4-6 hours or until it is firm. When you’re ready to serve, take the sorbet out of the freezer. Let it sit for about 5-10 minutes at room temperature. This softens it a bit. Finally, use a fork to scrape the surface, creating a light, fluffy texture before you scoop and serve. For the full recipe, check out the Tropical Bliss Mango Sorbet. To enjoy mango sorbet, you must scrape it before serving. This step gives the sorbet a fluffy texture. Use a fork to scrape the surface, allowing air to mix in. This makes each bite light and refreshing. If your sorbet turns out too solid, you can fix it. Let it sit at room temperature for about 10 minutes. This softens it just enough to scoop easily. If it's too soft, place it back in the freezer for a short time. Check it every 30 minutes until it firms up. You can make mango sorbet even better by adding lime juice. Just a tablespoon can brighten the flavor. You might also try using other citrus fruits like lemon or orange. These can add a fun twist to your sorbet. Don't be afraid to mix fruits. Pineapple and berries pair well with mango. This gives you new tastes and colors. Try different fruit combinations to find your favorite mix. You can create endless flavors with just a few tweaks. {{image_2}} You can make mango sorbet even more fun by adding other fruits. Pineapple works great! It adds a tropical touch that pairs well with mango. You can also try berries like strawberries or blueberries. They add a nice burst of color and flavor. Just blend them in with the mango for a new twist. Want to spice things up? Add herbs or spices! Basil gives a fresh taste. Ginger adds a zing that wakes up your taste buds. You can also mix in yogurt for a creamier texture. This makes your sorbet delightful and smooth. Remember, you can always adjust the recipe. Be creative and have fun! For the full recipe, check out the Tropical Bliss Mango Sorbet section. To keep your mango sorbet fresh, use airtight containers. Glass or plastic containers work well. Make sure they are freezer-safe. Fill the containers with the sorbet, leaving some space at the top. This helps the sorbet expand as it freezes. To prevent ice crystals, cover the sorbet with plastic wrap. Press the wrap directly onto the surface of the sorbet. This keeps air out and helps maintain texture. You can also use a lid, but the wrap is best for keeping it smooth. Mango sorbet lasts for about two weeks in the freezer. After this time, it may lose flavor or change texture. To thaw before serving, take the sorbet out of the freezer. Let it sit at room temperature for about 5-10 minutes. This softens it enough to scoop easily. If you need it softer, use a microwave. Set it on low power for 10-15 seconds. Be careful not to melt it! Enjoy your Tropical Bliss Mango Sorbet from the [Full Recipe]. To make dairy-free mango sorbet, you can use coconut water instead of dairy. Coconut water adds a light, tropical flavor and keeps the sorbet creamy. You can also try almond milk or oat milk for a different taste. Both options add creaminess without dairy. Yes, you can use frozen mangos! They are convenient and often just as sweet. However, fresh mangos may have a better flavor and texture. Frozen fruit can also be less juicy. If using frozen mangos, let them thaw slightly for easier blending. You can find store-bought mango sorbet in most grocery stores. Popular brands include Häagen-Dazs, Talenti, and So Delicious. They often offer a range of flavors, including mango with coconut or lime. Always check the ingredient list for added sugars and other ingredients. Mango sorbet typically has around 100 calories per serving. It is low in fat and provides vitamins A and C. Mangos are rich in antioxidants, which are great for health. This treat can be a refreshing snack or dessert without feeling guilty. You can make mango sorbet without a machine! After blending all your ingredients, pour them into a shallow dish. Freeze the mixture for about 4-6 hours. Every hour, stir it with a fork to break up ice crystals. This method gives you a smooth texture without an ice cream maker. For the full recipe, check out the Tropical Bliss Mango Sorbet section. In this article, I shared how to make mango sorbet from fresh ingredients like ripe mangos and coconut water. We discussed simple steps for preparation, blending, and freezing to achieve the best texture. I also provided tips for variations and storage. Mango sorbet is a tasty treat that you can easily customize. With some practice, you can impress friends and family. Enjoy creating this refreshing dessert that brightens any occasion!](https://mycookingcast.com/wp-content/uploads/2025/04/a0fa6162-bfc7-4778-a671-0071fbd30531.webp)
Craving a refreshing treat this summer? Look no further than mango sorbet! It’s sweet, fruity, and simple to make. You
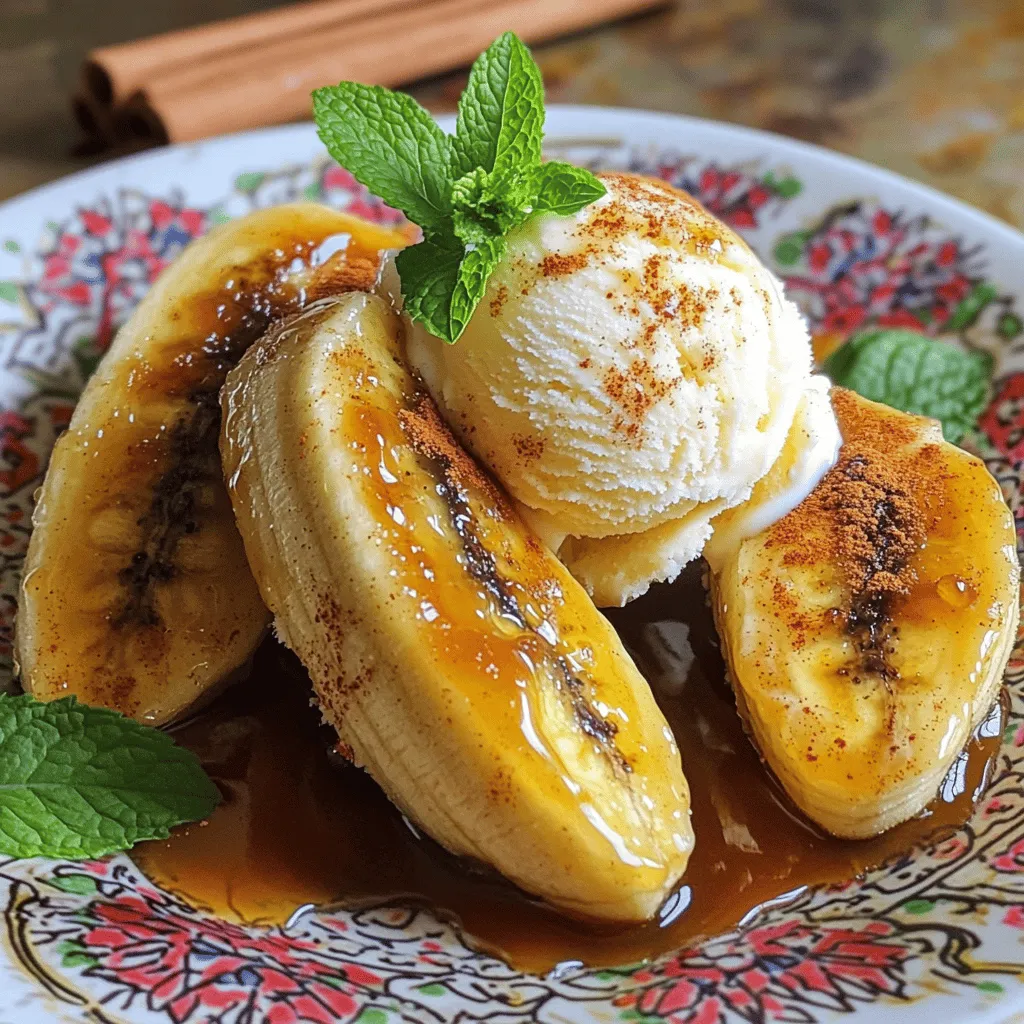
Craving a sweet treat that’s simple yet delightful? Look no further than Fried Bananas with Brown Sugar! This tasty dessert

Are you ready to impress your friends and family with a mouthwatering dessert? This Best Pumpkin Cheesecake will be the
![To make your easy Banoffee pie, gather these simple ingredients: - 1 pre-made digestive biscuit base (or graham cracker crust) - 397g can of sweetened condensed milk - 2 large ripe bananas, sliced - 300ml heavy cream - 2 tablespoons powdered sugar - 1 teaspoon vanilla extract - Cocoa powder or dark chocolate shavings (for garnish) Choosing the right ingredients makes a big difference. For bananas, pick ripe ones that are yellow with a few brown spots. This means they are sweet and soft. When selecting heavy cream, look for a high-fat content. This helps create a rich and fluffy whipped cream. For the biscuit base, ensure it is fresh. A good base gives the pie a nice crunch. Always check the expiration date on the condensed milk. Fresh ingredients make your pie taste better! You can easily adjust this recipe to fit your needs. If you want a gluten-free option, use a gluten-free biscuit base. For a dairy-free pie, try coconut cream instead of heavy cream. You can use maple syrup or agave instead of powdered sugar for a vegan option. These swaps keep the flavors while meeting different dietary needs. Don't hesitate to experiment and find what works best for you! To make the caramel, you need sweetened condensed milk. Pour it into a saucepan. Heat it on low. Stir it well for about 10 to 15 minutes. You want it to thicken and turn brown. If you prefer, use a microwave. Place the milk in a bowl. Heat for 30 seconds at a time. Stir after each time until it thickens. This should take about 2 to 3 minutes. Once your caramel is ready, it’s time to assemble the pie. Take your pre-made biscuit base and pour the caramel over it. Use a spatula to spread it evenly. After that, layer your sliced bananas on top of the caramel. Arrange them nicely for a beautiful look. Next, let’s whip the cream. In a bowl, mix heavy cream, powdered sugar, and vanilla extract. Use an electric mixer and whip until soft peaks form. Be careful not to over-whip; you want fluffy cream. Finally, spread the whipped cream over the bananas. Smooth it out with the spatula. For a lovely finish, dust cocoa powder or sprinkle dark chocolate shavings on top. Chill your pie for at least one hour before serving. Enjoy every bite of this delightful dessert! For the complete recipe, check [Full Recipe]. To make smooth caramel, heat the sweetened condensed milk slowly. Stir it often to avoid burning. You want it to thicken and change color. This takes about 10 to 15 minutes on the stove. If you choose the microwave, heat it in short bursts. Stir well in between to check the texture. The goal is a rich, golden caramel that is not too thick or runny. When whipping cream, use a cold bowl and beaters. This helps the cream whip faster and stay fluffy. Mix in powdered sugar and vanilla for a touch of sweetness. Beat until soft peaks form. Be careful not to over-whip, or it will turn grainy. The perfect cream should be smooth and hold its shape well. For a stunning presentation, slice the pie into wedges. Place each slice on a plate with extra banana slices on top. A light drizzle of caramel adds flair and taste. Dust the pie with cocoa powder or dark chocolate shavings for a fancy touch. Serve it chilled for a refreshing finish. Enjoy your Easy Banoffee Pie with friends and family! For the full recipe, check out the details above. {{image_2}} You can change up your banoffee pie with fun flavors. Try adding chopped nuts for crunch. Peanuts or hazelnuts work well. You can also mix in some caramel sauce for extra sweetness. If you love chocolate, add a layer of chocolate ganache. This makes the pie richer and more indulgent. For a fruit twist, use berries instead of bananas. Strawberries or raspberries add a nice tartness. While I love a classic digestive biscuit base, feel free to experiment. A graham cracker crust is a great choice too. You can even use a chocolate cookie crust for a deeper flavor. For a gluten-free option, try almond flour mixed with butter. This gives a unique taste and texture to your pie. Just ensure your crust is firm enough to hold the filling. If you want a vegan version, swap the condensed milk for coconut cream. This gives a creamy texture and a hint of coconut flavor. Use a plant-based whipped cream made from coconut or almond. For the crust, use vegan cookies or nuts combined with coconut oil. This way, everyone can enjoy banoffee pie, no matter their diet. To keep your Easy Banoffee Pie fresh, store it in the fridge. Use an airtight container or cover it tightly with plastic wrap. This helps keep the pie moist and prevents it from absorbing any odors from the fridge. When stored properly, the pie lasts about 3 to 4 days in the fridge. After that, the bananas may brown, and the crust can become soggy. For the best taste and texture, enjoy it within the first few days. You can freeze the pie, but it may change texture. To freeze, slice the pie and wrap each piece in plastic wrap. Place the wrapped pieces in a freezer bag. You can freeze the pie for up to 2 months. When ready to eat, thaw it in the fridge overnight. The cream might not be as fluffy, but it will still taste great! You can replace condensed milk with coconut milk. Cook it slowly to create a thick caramel. Use brown sugar for sweetness. This method takes longer, but it works well. You can also use homemade caramel sauce for a fresh taste. Just ensure it’s thick enough to hold its shape. Yes, you can use fresh cream, but it won’t hold as well. Whipped cream is light and fluffy. It keeps its shape better on the pie. If you choose fresh cream, serve the pie right away. The pie may lose some height without whipped cream. You can add strawberries, raspberries, or peaches. They bring a fresh twist to the pie. You can mix and match fruits for more flavor. Just ensure the fruit is ripe and sweet. This adds color and makes the dessert more fun. Yes, you can make the pie a day before serving. Just store it in the fridge. This gives the flavors time to blend. Keep the whipped cream separate until serving for best results. This way, the pie stays fresh and tasty. Banoffee pie lasts about 2-3 days in the fridge. After that, the bananas may brown. The whipped cream might lose its fluff. Make sure to cover it well to avoid drying out. Enjoy it within this time for the best taste. Absolutely! You can use an Oreo crust or a graham cracker crust. Even a cookie crust works well. Choose a crust that you enjoy for added flavor. Each type will give the pie a unique twist. It can be gluten-free if you use a gluten-free crust. Many stores sell gluten-free biscuit bases. You can also make one at home using gluten-free cookies. Check the labels to ensure all ingredients are safe for gluten-free diets. Freezing is not recommended due to the bananas and cream. It may change the texture. If you must freeze it, slice the pie first. Wrap each piece well. Thaw in the fridge before serving, but quality may vary. If you don’t like bananas, use cooked apples. They add a nice sweetness and texture. Pears can also work well, adding a different flavor. Just make sure they are ripe and soft for the best results. For more details on making this delicious dessert, check the Full Recipe. In this article, we covered the key ingredients and steps to make delicious banoffee pie. You learned how to select quality ingredients and tasty substitutes. We explored tips for making the perfect caramel and whipping cream. We also discussed fun variations and proper storage methods to keep your pie fresh. Banoffee pie is easy to make and fun to share. Experiment with flavors and enjoy this sweet treat!](https://mycookingcast.com/wp-content/uploads/2025/04/7bd0c108-f29c-4e75-a9c9-37497605bfcd.webp)
If you crave a sweet treat, try my Easy Banoffee Pie. This no-bake dessert combines rich caramel, fresh bananas, and

Looking for a quick and tasty dinner? You’re in the right place! This Instant Pot Honey Garlic Chicken is simple

Are you ready to spice up your snack game? Air Fryer Buffalo Cauliflower Bites offer a crispy, flavorful treat that’s
