Skip to content
DisclaimerTerms Of UseGDPR PolicyCookie Policy

My Cooking Cast

  • Home
  • Drinks
  • Appetizers
  • Dinner
  • Dessert
  • About
  • Contact
  • Privacy Policy
DisclaimerTerms Of UseGDPR PolicyCookie Policy

Emma

- 4 salmon fillets (about 6 ounces each) - 2 tablespoons honey - 2 tablespoons sriracha sauce - 1 tablespoon soy sauce - 1 tablespoon fresh lime juice - 2 cloves garlic, minced - Salt and pepper to taste - 1 tablespoon sesame oil - 1 tablespoon chopped green onions (for garnish) - 1 tablespoon sesame seeds (for garnish) Serve this dish with jasmine rice, quinoa, or roasted vegetables for a complete meal. For a bright look, add a lime wedge. A colorful plate makes the dish even more inviting. The salmon shines against the greens and yellows of the sides. This meal is perfect for family dinners or casual gatherings. You can easily impress your guests with this simple yet flavorful dish. The mix of sweet and spicy flavors will keep them coming back for more. To start, grab a small bowl. Whisk together the honey, sriracha sauce, soy sauce, lime juice, and minced garlic. Mix until it looks smooth. This glaze packs a sweet and spicy punch. If you like it spicier, add more sriracha. For a milder taste, use less. This way, you can make the dish your own. Now, let’s season the salmon fillets. Sprinkle salt and pepper on both sides. Heat sesame oil in a large skillet over medium heat. When the oil is hot, place the salmon in the skillet, skin-side down if you have skin. Cook for about 4-5 minutes. This lets the fish get a nice sear. Carefully flip the salmon using a spatula. Pour the honey sriracha glaze over the fillets. Cook for another 3-4 minutes. Spoon the glaze over the salmon often. This helps it caramelize and adds more flavor. The salmon is ready when it reaches an internal temperature of 145°F. Once cooked, remove the salmon from the skillet. Let it rest for a minute. This step helps keep the juices inside. Now, it’s time to plate. Place the salmon on a plate and drizzle any leftover glaze from the skillet on top. For garnishing, sprinkle chopped green onions and sesame seeds over the salmon. These add color and crunch. Feel free to serve it on a bed of jasmine rice or quinoa for a complete meal. Enjoy your delicious Honey Sriracha Glazed Salmon! To cook salmon just right, focus on the internal temperature. The best target is 145°F. Use a meat thermometer for accuracy. This ensures your salmon is safe to eat and still moist. Avoiding overcooking is key. Salmon cooks quickly, so keep an eye on it. When it starts to flake easily with a fork, it's ready. If you cook it too long, it can dry out. You can boost the flavor by adding herbs or spices. Fresh cilantro or parsley can brighten the dish. A pinch of red pepper flakes adds a nice kick, too. Pairing the salmon with sides like jasmine rice or roasted veggies works well. The rice soaks up the glaze, while veggies add color and nutrients. A good skillet is essential. I recommend a non-stick pan for easy cooking and cleanup. You'll also need basic utensils: a whisk for the glaze and a spatula to flip the salmon. A meat thermometer helps you check the salmon's doneness. Using these tips will help you make a delicious Honey Sriracha Glazed Salmon that impresses everyone! {{image_2}} You can change the glaze to fit your taste. Want more heat? Add extra sriracha or some chili flakes. This gives the dish a spicy kick. If you prefer a sweeter glaze, try maple syrup or agave instead of honey. These options blend well with the other flavors. Each change will create a unique taste! You don’t need to stick to salmon. Chicken breasts work great too. Just remember, cooking times will change. Chicken needs to reach 165°F to be safe. If you want a plant-based option, try tofu. Cut it into thick slices and follow the same cooking steps. Tofu will soak up the glaze, making it tasty. Serving style can change the whole meal. You can make wraps by placing salmon in a tortilla with veggies. This makes for a fun, handheld meal. Another idea is to create a bowl. Start with rice or quinoa, then top with salmon and veggies. You can even serve it as part of a fresh salad. This keeps the meal light and healthy! To keep your Honey Sriracha Glazed Salmon fresh, let it cool first. Place the salmon in an airtight container. Seal it well to prevent air from getting in. Store it in the fridge for up to 3 days. This way, you can enjoy the flavors later. If you notice a change in smell or texture, it’s best to toss it out. If you want to save leftovers for later, freeze the salmon. Wrap each fillet tightly in plastic wrap. Then, place them in a freezer bag or container. Make sure to remove as much air as possible before sealing. You can freeze it for up to 3 months. When you’re ready to eat, thaw the salmon in the fridge overnight. For reheating, place the salmon in a skillet over low heat. Add a splash of water or broth to keep it moist. Heat it until warm. You want to bring back its tasty glaze without drying it out. Enjoy your meal just as if it was fresh! You can use other hot sauces if you want heat. Try chili garlic sauce or sambal oelek. Both add spice and flavor. If you prefer milder options, use a mix of ketchup and hot sauce. This gives a sweet and tangy taste. You can also try harissa for a different flavor profile. The best way to check salmon is by its temperature. Cook it until it reaches 145°F. Use a food thermometer for accuracy. The salmon should look opaque and flake easily with a fork. If it still looks shiny or raw, cook it a little longer. Yes, you can prepare the glaze in advance. Whisk together the honey, sriracha, soy sauce, lime juice, and garlic. Store it in an airtight container in the fridge. This way, you can save time on busy nights. Just make sure to stir it before using. This blog post covered how to make a tasty salmon dish using simple ingredients. We explored main components like salmon, honey, and sriracha for the glaze. You learned about seasoning, cooking techniques, and serving ideas, plus tips for perfect results and flavor twists. As you cook, remember to have fun with it. Experiment with flavors and find what you love. Delicious meals make happy moments. Enjoy your salmon creation and share it with others.

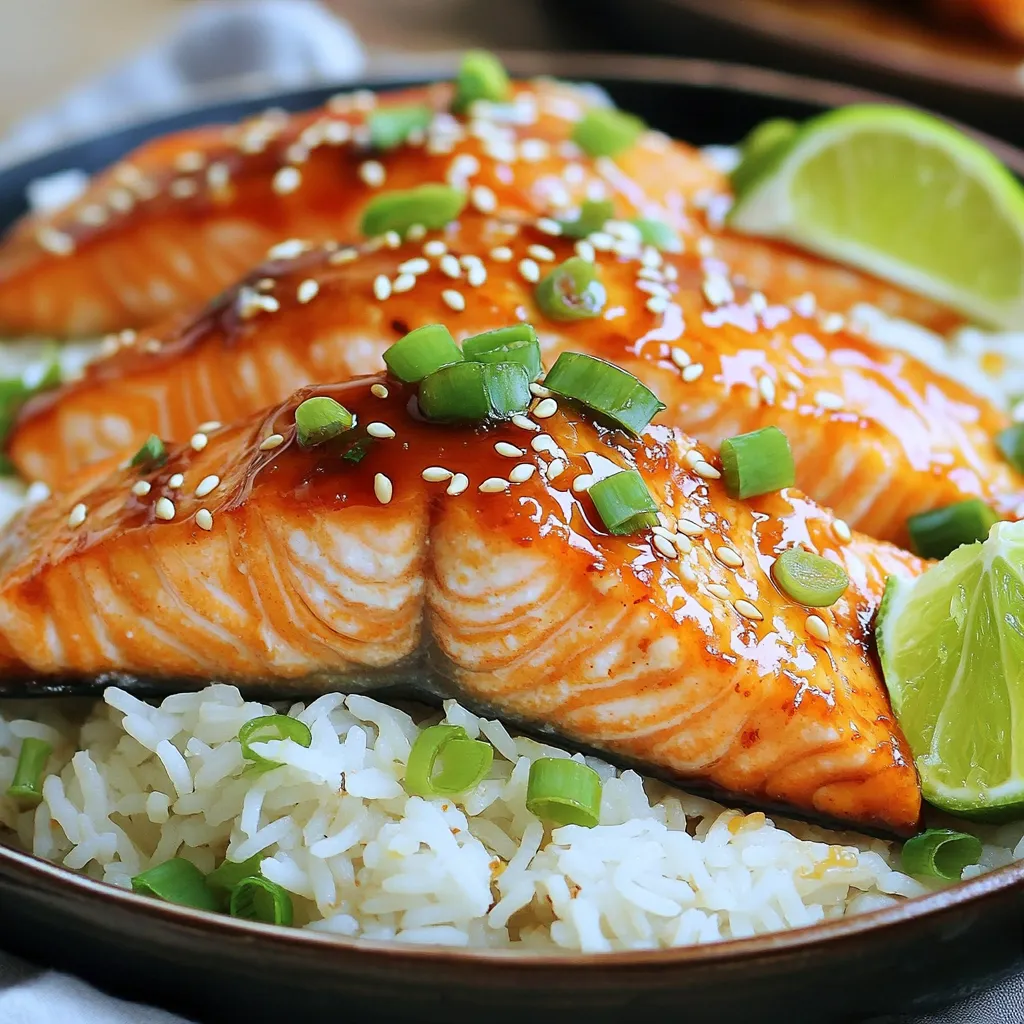
Honey Sriracha Glazed Salmon Quick and Flavorful Dish

Looking for a quick and tasty dinner? You’re in the right place! My Honey Sriracha Glazed Salmon recipe is easy

- 1 cup dairy-free dark chocolate chips - 1/2 cup natural peanut butter (smooth or crunchy) - 2 tablespoons maple syrup - 1/4 cup coconut oil (melted) - 1 teaspoon vanilla extract - A pinch of sea salt - Mini cupcake liners (12 count) When picking dairy-free chocolate, look for brands like Enjoy Life or Hu. They offer great taste and quality. For peanut butter, choose natural varieties without added sugar or oils. Brands like Smucker's Natural or Whole Foods 365 work well. Always check the labels to ensure they fit your needs. Quality ingredients make a big difference in flavor and texture. Start by lining a muffin tin with mini cupcake liners. This step is key because it makes it easy to remove the treats later. Without these liners, your cups may stick to the tin. If you don’t have mini cupcake liners, you can use parchment paper cut into small squares. Just be sure to grease them lightly to prevent sticking. Next, we’ll melt the chocolate. In a microwave-safe bowl, mix the dairy-free dark chocolate chips with half of the melted coconut oil. Heat this in the microwave. Start with 30-second bursts, stirring in between. This method helps achieve a smooth, shiny chocolate. If the chocolate is not melting well, try reducing the heat. Now, let’s make the peanut butter filling. In the same bowl you used for the chocolate, mix the natural peanut butter, the rest of the melted coconut oil, maple syrup, vanilla extract, and a pinch of sea salt. Stir well until the mixture is creamy and smooth. This step ensures that the filling has a nice texture and flavor. When the chocolate base is firm, take the muffin tin from the freezer. Spoon about 1 tablespoon of the peanut butter filling into each liner, right on top of the chocolate layer. After that, melt the remaining dark chocolate using the same microwave method. Pour it over the peanut butter layer, covering it completely. Use a spatula to smooth the tops. Finally, freeze the cups again for 30-40 minutes, or until they are set. This will help your cups hold their shape when you take them out. To keep your vegan chocolate peanut butter cups fresh, use an airtight container. This method prevents moisture and air from ruining the taste. Place a layer of parchment paper between layers if stacking. You can store them in the fridge for up to two weeks or freeze them for three months. Just make sure to separate each cup with parchment paper to avoid sticking. Be careful not to overheat the chocolate. If it gets too hot, it can seize up and become grainy. Always melt chocolate in short bursts. Stir well between intervals to ensure a smooth texture. Another common mistake is uneven layering. Make sure to spread both the chocolate and peanut butter evenly in the liners. This way, every bite will be perfectly balanced. You can add fun toppings or mix-ins to make your cups unique. Try crushed nuts, shredded coconut, or a sprinkle of sea salt on top. If you want a different flavor, add extracts like almond or mint. To make it gluten-free, ensure all ingredients are gluten-free certified. For refined sugar-free options, substitute maple syrup with agave or date syrup. The possibilities are endless, so feel free to get creative! {{image_2}} You can boost flavor in your vegan chocolate peanut butter cups easily. Adding extracts gives a fun twist. Try almond or mint extract. Just a few drops can change the taste. You can also mix in spices for warmth. Cinnamon adds depth, while a pinch of cayenne gives a kick. These small changes make a big difference. If you want to switch things up, try other nut butters. Almond butter works great and has a milder taste. Cashew butter is creamy and smooth too. Just make sure to adjust the recipe a bit. These butters may change the texture. You might need a bit more coconut oil or syrup to keep it smooth. There are many options for vegan chocolate. Different dairy-free chocolate chips can vary in flavor. Dark chocolate is rich, while semi-sweet offers a sweeter bite. You can also make your own chocolate at home. Combine cocoa powder, coconut oil, and maple syrup for a quick chocolate fix. This way, you can control the sweetness and thickness. To keep your vegan chocolate peanut butter cups fresh, you have two main options: refrigerating or freezing. - Refrigerating: Store them in an airtight container in the fridge. They will stay fresh for about one week. This option keeps them slightly soft and easy to bite into. - Freezing: For longer storage, place them in the freezer. They can last up to three months this way. Just remember to wrap each cup in plastic wrap before placing them in a container. Use a glass or plastic container with a tight lid for long-term storage. This method helps avoid freezer burn and keeps the flavors intact. Sometimes, you may have extra chocolate or peanut butter mix left after making your cups. Here are some fun ways to use them: - Using remaining chocolate: You can drizzle the leftover chocolate over fruits like bananas or strawberries. It makes a great snack! You can also dip pretzels or nuts in the chocolate for a crunchy treat. - Creative ways to use leftover peanut butter mix: Spread the leftover peanut butter mix on toast or pancakes. You can also add it to smoothies for extra creaminess and flavor. It’s a quick way to enhance your breakfast! Yes, you can make these treats nut-free. Instead of peanut butter, use sunbutter or soy nut butter. Both options taste great and keep the creamy texture. You can also try pumpkin seed butter for a unique twist. Always check the labels to ensure they are free from allergens. These vegan chocolate peanut butter cups last about one week in the fridge. In the freezer, they can last up to three months. To keep them fresh, store them in an airtight container. This way, they stay tasty and cool for when you want a snack. Yes, you can skip the coconut oil. Use a different oil like canola or grapeseed oil. You can also use vegan butter as a substitute. While the texture may change slightly, your cups will still be delicious. Just make sure the oil you choose is neutral in flavor. Yes, many brands offer vegan chocolate peanut butter cups. Look for brands like Unreal, Hu Chocolate, or NuttZo. These brands use quality ingredients and taste great. Check your local store or shop online for these tasty treats. You learned how to make delicious vegan chocolate peanut butter cups. By using simple ingredients, like dairy-free chocolate and natural peanut butter, you can create a tasty treat. Remember to store them properly to keep them fresh. Avoid common mistakes for the best results. Feel free to personalize your recipe with new flavors or nut butters. Enjoy making your own treats that are both fun and easy!

Vegan Chocolate Peanut Butter Cups Tasty and Simple Treat

Who doesn’t love the classic combination of chocolate and peanut butter? Today, I’m sharing a simple recipe for Vegan Chocolate

- Baby Potatoes: Use small, new potatoes for the best flavor. Varieties like Yukon Gold or red potatoes work well. Their small size ensures even cooking and a nice texture. - Fresh Herbs: I love using rosemary, thyme, and parsley. Rosemary adds a strong aroma. Thyme brings a warm, earthy taste. Parsley gives a fresh pop of color on top. - Other Seasonings: Garlic is key here. It adds depth and richness. Use four cloves, minced for a bold flavor. Olive oil helps the potatoes crisp up nicely. Use three tablespoons for even coating. Sea salt and black pepper balance the flavors. Use one teaspoon of salt and half a teaspoon of pepper for seasoning. These ingredients come together to create a tasty side dish. The mix of herbs and garlic makes each bite full of flavor. First, you need to preheat your oven to 425°F (220°C). This high heat helps the potatoes get crispy. While the oven warms up, grab a baking sheet. Line it with parchment paper or just leave it bare. This will help the potatoes roast nicely without sticking. In a large bowl, combine the halved baby potatoes, minced garlic, and olive oil. Next, add chopped rosemary and thyme. Don’t forget the sea salt and black pepper! Toss everything together well. You want each potato to be coated with oil and herbs. This step is key for flavor. Now, spread the seasoned potatoes out on the baking sheet. Make sure they are in a single layer. If you crowd them, they won’t roast evenly. Place the baking sheet in the preheated oven. Roast the potatoes for 25 to 30 minutes. They should turn golden brown and be fork-tender. Halfway through, shake the pan. This helps them brown on all sides. When they are done, take them out and sprinkle with fresh parsley for a pop of color. Enjoy your tasty garlic herb roasted baby potatoes! To get a crispy outside on your garlic herb roasted baby potatoes, follow a few simple steps. Start by cutting the potatoes in half. This gives more surface area to get that nice, golden crust. Use a high oven temperature, around 425°F (220°C). This heat helps crisp the skins quickly. You can also soak the halved potatoes in water for about 30 minutes. This removes excess starch and leads to a crunchier texture. Make sure you spread the potatoes out in a single layer on the baking sheet. Crowding them will trap steam and make them soggy. If your oven runs hot or cold, watch the potatoes closely. You may need to adjust the cooking time slightly. For flavor boosts, think outside the box! You can mix in some paprika or cayenne pepper for a spicy kick. If you want a smoky taste, try adding smoked paprika. You can also swap out rosemary and thyme for herbs like oregano or basil. Fresh herbs work best, but dried ones can work in a pinch. Just use about one-third the amount. Want a tangy twist? Consider adding lemon zest or a splash of balsamic vinegar. These little changes can take your dish to the next level. Garlic herb roasted baby potatoes pair well with many main dishes. They are great alongside grilled chicken, fish, or even a hearty steak. For a lighter meal, serve them with a fresh salad. Aim for about one cup of potatoes per person as a side. When presenting, consider using a nice serving bowl. Sprinkle extra fresh parsley on top for color. You can also place lemon wedges on the side for a fresh touch. These small details make your dish look appetizing and inviting. {{image_2}} You can change the herbs to create new flavors. Try using fresh basil or oregano instead of rosemary and thyme. Basil adds a sweet note, while oregano gives a warm, earthy taste. Mix and match your favorite herbs. This keeps the dish fresh and exciting. Want some heat? Add spices or peppers to your potatoes. You can sprinkle in red pepper flakes for a kick. You could also toss in diced jalapeños before roasting. This adds a fun twist to the classic recipe. The heat works well with the garlic and herbs. If you love cheese, this variation is for you. Grate some parmesan or cheddar cheese and mix it in with the potatoes. You can add the cheese halfway through roasting. This creates a rich, creamy layer on top of the potatoes. The cheese melts beautifully and pairs well with the herbs. To keep your garlic herb roasted baby potatoes fresh, store them in a sealed container. Let the potatoes cool to room temperature before sealing. Place them in the fridge within two hours after cooking. They will stay good for three to four days. For best results, try not to stack them too much. When it's time to enjoy your leftovers, reheating is key. Use an oven or toaster oven to keep the texture crispy. Preheat your oven to 350°F (175°C). Spread the potatoes on a baking sheet and heat for about 10-15 minutes. This method helps revive their original crunch. You can also use a skillet on medium heat. Just add a little olive oil, and cook until warm. Freezing is a great way to save extra servings. First, let the potatoes cool completely. Place them in a freezer-safe bag or container. Remove as much air as possible to prevent freezer burn. They can stay in the freezer for up to three months. To thaw, transfer them to the fridge overnight. Reheat in the oven for best results. Yes, you can use other types of potatoes for this recipe. Here are some great options: - Yukon Gold: These potatoes are creamy and have a rich flavor. - Red Potatoes: Their waxy texture helps them hold shape well during roasting. - Fingerling Potatoes: These small, elongated potatoes add a unique look and taste. Feel free to experiment with different potatoes. Just remember to cut them into similar sizes for even cooking. To make garlic herb roasted baby potatoes vegan, simply swap out any dairy ingredients. Here are some suggestions: - Olive Oil: This recipe already uses olive oil, which is vegan-friendly. - Butter: If you want a buttery flavor, use a vegan butter substitute. - Garnish: Instead of using cheese or sour cream, stick with the fresh parsley for a pop of color. These simple swaps keep the dish plant-based while still being delicious. Garlic herb roasted baby potatoes pair well with many main dishes. Here are some ideas: - Grilled Chicken: The herbs complement the savory flavor of grilled chicken. - Fish: Baked or grilled fish works nicely with the potatoes' garlic flavor. - Vegetarian Dishes: Serve them alongside a hearty salad or vegetable stir-fry. You can also add a simple dipping sauce, like a garlic aioli, for extra flavor! You can create delicious roasted baby potatoes using simple ingredients and easy steps. From choosing the right potatoes to adding flavor, this guide covers it all. Remember the tips for crispiness and flavor enhancement. Don’t forget to try different herbs or cheese for variety. Store leftovers wisely and reheat properly. Enjoy these potatoes with your favorite dishes for a tasty meal. With these methods, you can impress anyone at your table. Happy cooking!

Garlic Herb Roasted Baby Potatoes Flavorful Side Dish

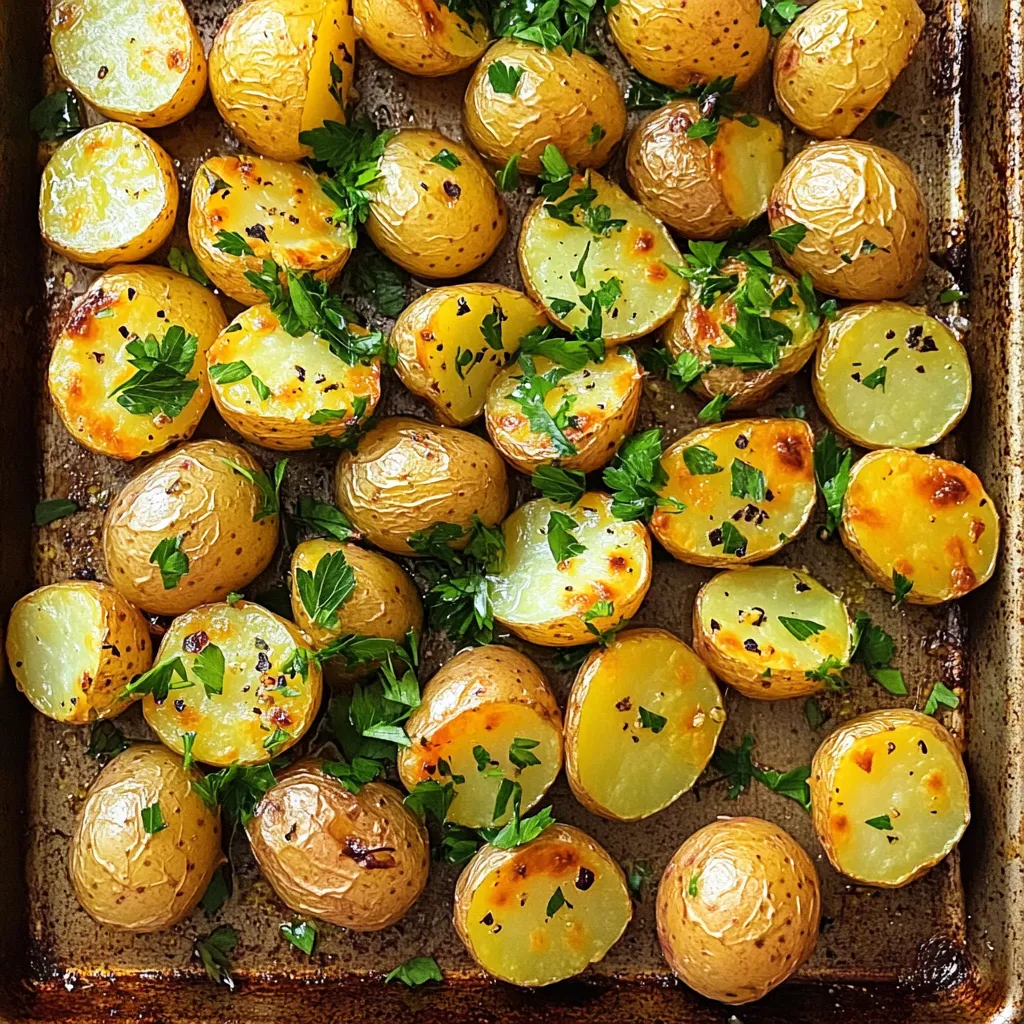
Looking for a side dish that packs a punch? Garlic Herb Roasted Baby Potatoes are your answer! These tender, crispy

To make Cranberry Almond Energy Bites, you need these simple ingredients: - 1 cup rolled oats - 1/2 cup almond butter - 1/2 cup dried cranberries, chopped - 1/4 cup honey or maple syrup - 1/4 cup almond slices - 1/4 teaspoon salt - 1/2 teaspoon vanilla extract - 1/4 teaspoon cinnamon (optional) These ingredients work together to create tasty bites that give you energy. If you don’t have some ingredients, here are good swaps: - Use peanut butter instead of almond butter for a different flavor. - Replace dried cranberries with raisins or chopped dates if you prefer. - Maple syrup can be swapped with agave syrup for a vegan option. - For a nut-free version, try sunflower seed butter instead of almond butter. These substitutions can help you enjoy the recipe even if you lack some items. Each serving of Cranberry Almond Energy Bites, about one bite, has roughly: - Calories: 120 - Protein: 3g - Carbs: 15g - Fat: 6g - Fiber: 2g This energy bite is packed with nutrients, making it a great snack choice. {{ingredient_image_1}} To make these cranberry almond energy bites, you need to gather all your ingredients first. You will need rolled oats, almond butter, dried cranberries, honey or maple syrup, almond slices, salt, vanilla extract, and optional cinnamon. Gather a large mixing bowl and a smaller one for wet ingredients. This makes mixing easy. Start by adding the rolled oats, chopped dried cranberries, almond slices, and salt to the large bowl. Mix these dry ingredients well. In the smaller bowl, combine almond butter, honey or maple syrup, vanilla extract, and cinnamon. Stir this mixture until it looks smooth. Next, pour the wet mixture into the dry ingredients. Use your hands to mix everything together well. Make sure all the oats and cranberries are coated. If the mixture sticks to your hands, wet them a little to help. After mixing, form small balls, about one inch in size. Place the energy bites on a baking sheet lined with parchment paper. Put the baking sheet in the fridge for at least 30 minutes. This helps them firm up. Once they are set, move the energy bites to an airtight container. You can keep them in the fridge for a week or freeze them for longer storage. Mixing and rolling your energy bites is simple. Start by using a large bowl. This gives you space to mix well. Combine the dry ingredients first: rolled oats, chopped cranberries, almond slices, and salt. Make sure these are even. Next, mix the wet ingredients in a smaller bowl. Use almond butter, honey, vanilla, and cinnamon. Stir until it looks smooth. When you pour the wet mix over the dry mix, use your hands to blend well. This helps coat all the oats and cranberries. If the mix feels sticky, dampen your hands with water. This makes rolling easier. Aim for balls about one inch wide. You can change up the flavors in your energy bites. Try using different nuts like walnuts or pecans. You can also swap dried cranberries for other fruits like raisins or apricots. For a bit of crunch, add seeds like chia or flaxseed. If you want a chocolate twist, mix in some cocoa powder or small chocolate chips. Different spices can add a kick too. Try nutmeg or ginger for a warm flavor. This way, you can make the bites your own. How you serve your energy bites can make them even more fun. Place them in a small mason jar for a cute look. You can also use a wooden platter for a rustic vibe. Garnish the jar with a sprig of mint or a few extra cranberries. This adds color and makes it eye-catching. For a fun idea, serve them with a small scoop of yogurt or a fruit dip. Sharing these bites with friends will surely impress anyone! Pro Tips Chill Before Rolling: Refrigerating the mixture for 10-15 minutes before rolling can make it easier to form into balls. Customize Your Ingredients: Feel free to substitute the dried cranberries with other dried fruits like raisins or apricots for a different flavor. Boost the Nutrition: Add a scoop of protein powder or some flaxseeds for an extra nutritional boost. Storage Tips: Keep the energy bites in an airtight container in the fridge for freshness, or freeze them for longer shelf life. {{image_2}} You can mix things up with different flavors. Try adding dark chocolate chips for a sweet twist. You could also use dried cherries instead of cranberries. If you want more crunch, toss in some sunflower seeds or pumpkin seeds. Each addition gives a new taste. Making these energy bites vegan is easy. Just swap honey for maple syrup. This keeps the bites sweet and plant-based. For gluten-free options, choose certified gluten-free oats. This way, everyone can enjoy them without worry. In fall, add pumpkin spice for a cozy flavor. You can also use dried figs or apricots in summer. Fresh berries can work well too, but make sure to dry them first. These swaps let you enjoy seasonal tastes all year long. To keep your cranberry almond energy bites fresh, store them in an airtight container. A glass jar or a sealed plastic bag works well. Make sure the container is dry before adding the bites. This helps prevent moisture from ruining their texture. These energy bites can last up to a week when stored in the fridge. If you want them to stay fresh longer, freezing is a great option. Just make sure to label the container with the date. This way, you know when you made them. To freeze your energy bites, place them in a single layer on a baking sheet. This prevents them from sticking together. After a few hours, transfer them to a freezer-safe container. They can last up to three months in the freezer. When you're ready to eat, just take out the number you want. Let them thaw in the fridge for a few hours, or enjoy them straight from the freezer for a cold treat! You can use peanut butter or sunflower seed butter. Both work well in this recipe. They add a creamy texture and rich flavor. If you choose sunflower seed butter, it is also nut-free. This makes it great for schools or nut-free zones. These energy bites can last up to one week in the fridge. Store them in an airtight container. This keeps them fresh and tasty. If you want to keep them longer, freeze them! Yes, you can make these bites nut-free. Use sunflower seed butter instead of almond butter. You can also skip the almond slices. This way, you still get a tasty snack without nuts! We covered the key ingredients, step-by-step instructions, and helpful tips for making energy bites. You learned about substitutions and nutritional info, plus variations for different diets. Don't forget storage tips for freshness. Feel free to get creative with your flavors. These bites can fit your diet and taste. Enjoy making and sharing your delicious energy bites!

Cranberry Almond Energy Bites Easy and Tasty Recipe

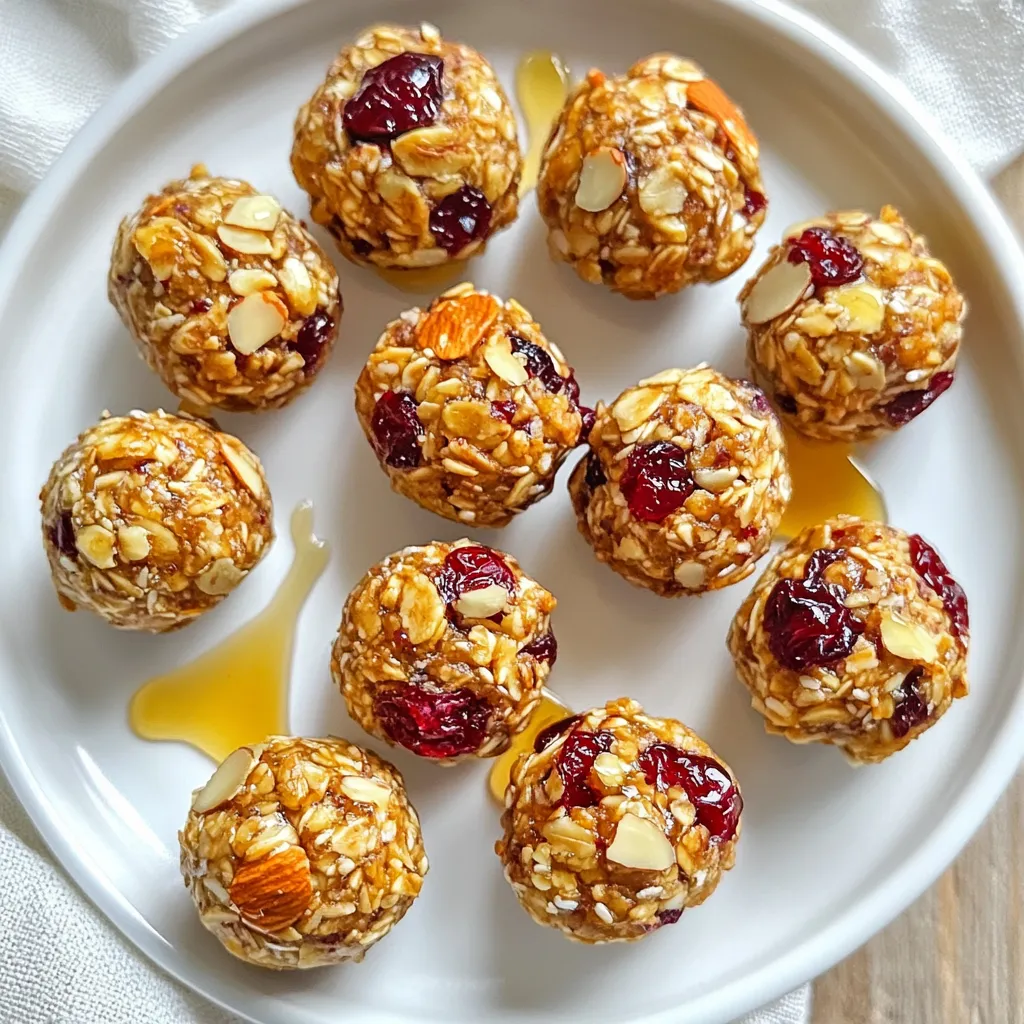
Are you looking for a quick snack that’s both tasty and good for you? Cranberry Almond Energy Bites are the

- 1 package (16 oz) potato gnocchi - 2 tablespoons olive oil - 3 cloves garlic, minced - 1 can (14 oz) crushed tomatoes - 1 cup heavy cream - 1 teaspoon dried basil - 1 teaspoon dried oregano - Salt and pepper to taste - 1 cup fresh spinach, chopped - ½ cup grated Parmesan cheese - Fresh basil leaves for garnish If you don’t have potato gnocchi, try using ricotta gnocchi or even pasta. For olive oil, you can use canola oil or avocado oil. In place of heavy cream, try coconut cream or a mix of milk and butter. If you want a fresh herb flavor, use fresh basil and oregano instead of dried. For a dairy-free option, swap Parmesan cheese with nutritional yeast. Choose gnocchi that feels slightly firm. Look for fresh garlic that has no soft spots. When picking tomatoes, go for a brand with no added sugars or preservatives. Heavy cream should be thick and rich; check the label for high-fat content. For spinach, choose bright green leaves with no wilting. Fresh basil should feel vibrant and aromatic. Always check expiration dates on all packaged items for the best quality. {{ingredient_image_1}} Start by boiling water in a large pot. Add a pinch of salt to the water. Once the water boils, add the potato gnocchi. Cook them until they float, which usually takes about 2 to 3 minutes. This means they are done! Carefully drain the gnocchi and set them aside. It is important to let them rest while you make the sauce. In a large skillet, heat 2 tablespoons of olive oil over medium heat. Add 3 cloves of minced garlic. Sauté the garlic for about 1 minute until it smells good. Next, pour in 1 can of crushed tomatoes. Bring the mixture to a gentle simmer. Then, stir in 1 cup of heavy cream. Add 1 teaspoon each of dried basil and dried oregano, along with salt and pepper to taste. Let the sauce simmer for about 5 minutes. This will help all the flavors mix well. Now it’s time to bring everything together! Add the cooked gnocchi to the skillet. Gently stir to coat the gnocchi in the creamy tomato sauce. Next, fold in 1 cup of chopped fresh spinach. Allow the spinach to cook for about 2 to 3 minutes until it wilts. Finally, remove the skillet from heat. Sprinkle ½ cup of grated Parmesan cheese on top. This will melt slightly and add creaminess. Serve hot and garnish with fresh basil leaves for a lovely touch. To make the sauce creamy, always use heavy cream. It blends well with tomatoes. If you want a lighter version, try half-and-half. You can also add cream cheese for extra richness. Stir it in slowly to avoid lumps. Always let the sauce simmer. This helps all the flavors mix well. For more flavor, add extra herbs. Fresh basil or parsley works great. A dash of red pepper flakes adds a nice kick. You can also toss in some sautéed mushrooms or bell peppers for depth. If you love cheese, try adding more Parmesan. It melts nicely and adds depth to the dish. Use a large skillet for this recipe. A non-stick skillet makes it easier to stir. A cast-iron skillet retains heat well, giving a nice finish. Make sure to have a wooden spoon handy for mixing. For best results, use a lid when simmering. It helps the sauce thicken and keeps it warm. Pro Tips Use Fresh Ingredients: For the best flavor, use fresh garlic and high-quality canned tomatoes. Fresh spinach adds a vibrant taste and texture. Customize Your Seasoning: Feel free to adjust the dried herbs to your liking. Adding a pinch of red pepper flakes can give your dish a nice kick! Don’t Overcook the Gnocchi: Keep an eye on the gnocchi while boiling; they are done when they float to the surface. Overcooking can make them mushy. Serve Immediately: This dish is best enjoyed fresh and hot. If you need to reheat leftovers, do so gently to maintain the creaminess. {{image_2}} If you want a vegetarian dish, this recipe is perfect. The creamy tomato gnocchi skillet already shines with its rich flavors and textures. You can boost the veggie power by adding more fresh vegetables. Try diced bell peppers, mushrooms, or zucchini. They add great taste and color to your meal. You can also swap the Parmesan cheese for a vegan alternative. Nutritional yeast makes a nice cheese substitute. Adding protein can make this dish more filling. You can use cooked chicken or sausage for extra flavor. If you opt for chicken, grill or sauté it first. Cut it into bite-sized pieces, then add it to the skillet with the gnocchi. For sausage, slice it and cook it until brown before adding the sauce. Both options work well with the creamy tomato sauce. If you need a gluten-free dish, you have choices. Look for gluten-free gnocchi made from potato or rice flour. They taste just as good! You can also use gluten-free pasta for a similar effect. Just make sure to check the cooking times, as they may differ from regular gnocchi. This way, you can enjoy a creamy tomato gnocchi skillet without worries. To store leftovers, let the creamy tomato gnocchi cool first. Then, place it in an airtight container. Make sure to seal it well. Store in the fridge for up to three days. If you want to keep it fresh longer, consider freezing. When you are ready to eat, you can reheat the gnocchi. Use a skillet over low heat. Add a splash of water or extra cream to keep it moist. Stir gently until it is hot throughout. You can also use a microwave. Heat it in short bursts, stirring in between. If you want to freeze the gnocchi, do it before adding the cream. Cook the gnocchi and let it cool. Place it in a freezer-safe bag. Lay it flat to save space. When you want to use it, thaw it in the fridge overnight. Then, make the sauce fresh when you’re ready to eat. This keeps the gnocchi and sauce tasting great! Yes, you can use store-bought gnocchi. It’s quick and easy. Most grocery stores offer fresh or frozen options. Just cook it according to the package. This saves time and gives you great taste. To add spice, you can use red pepper flakes. Just sprinkle some into the sauce while it simmers. Start with a small amount and taste. You can always add more spice if you like heat. Another option is to add diced jalapeños for a fresh kick. Gnocchi pairs well with many sides. A simple green salad brings freshness. Garlic bread is great for dipping into the creamy sauce. Roasted vegetables add color and flavor. You can also serve it with a light soup for a full meal. You’ve learned about how to choose and use great ingredients for gnocchi. I shared tips for cooking the gnocchi and making a tasty tomato sauce. Plus, I discussed ways to change up the recipe for different diets. Now, you can store your leftovers easily and even make meal prep simpler. Keep these tips in mind, and you’ll enjoy flavorful gnocchi every time. Happy cooking!

Creamy Tomato Gnocchi Skillet Delightful and Easy Recipe

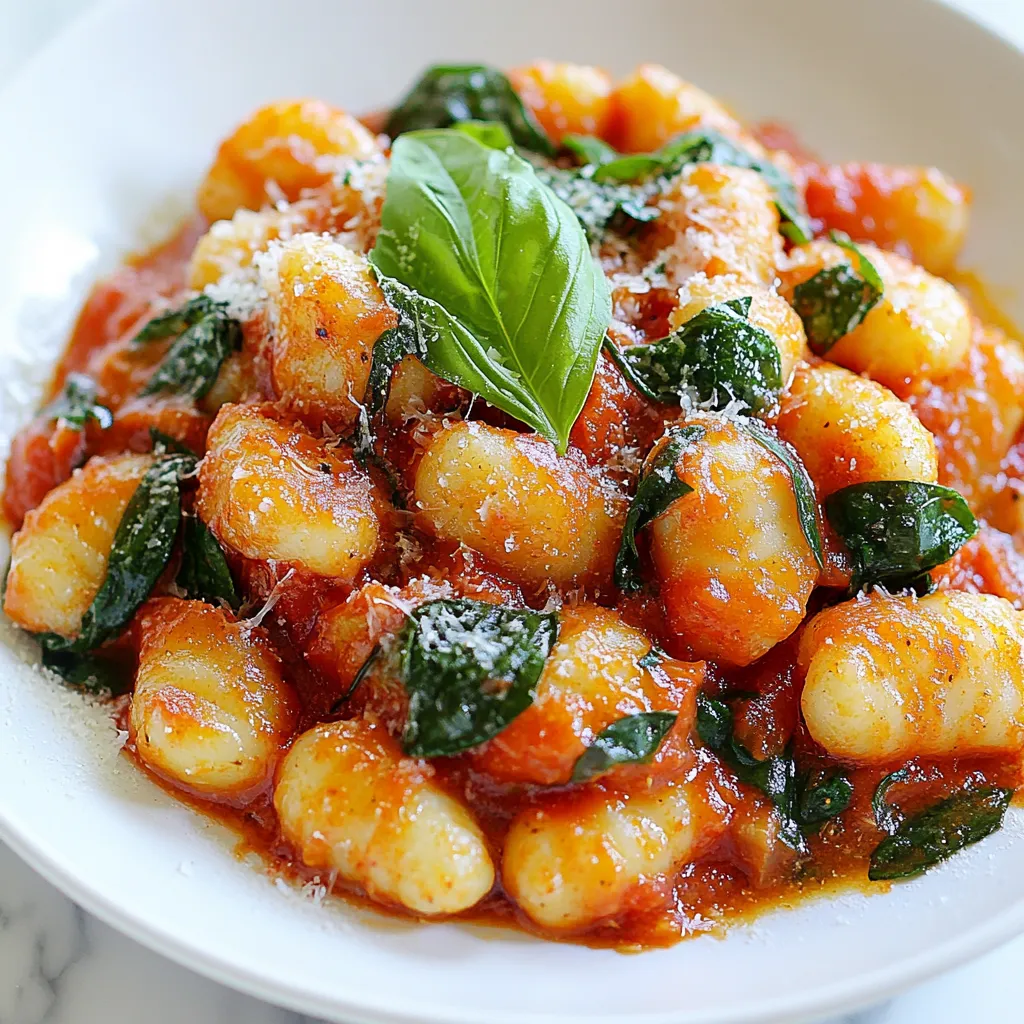
Looking for a quick, delicious dinner? This Creamy Tomato Gnocchi Skillet is the answer! Packed with flavor and easy to

To make these pumpkin spice cheesecake bites, you need the following main ingredients: - 1 cup pumpkin puree - 8 oz cream cheese, softened - 1/2 cup granulated sugar - 1/4 cup brown sugar - 2 large eggs - 1 teaspoon vanilla extract - 1 teaspoon ground cinnamon - 1/2 teaspoon ground nutmeg - 1/2 teaspoon ground ginger - 1/4 teaspoon ground cloves - 1 cup graham cracker crumbs - 1/4 cup unsalted butter, melted Each ingredient plays a key role. The pumpkin puree gives it a rich flavor, while cream cheese adds creaminess. The sugars help sweeten the bites, and the spices bring warmth and depth. You can make these bites even better with some tasty toppings. Here are a few ideas: - Whipped cream for a light touch - Crushed pecans for a crunchy finish These options add visual appeal and flavor. A dollop of whipped cream makes them look fancy. Crushed pecans give a nice crunch that pairs well with the creamy filling. You can adjust the recipe based on what you have. Here are some great swaps: - Use Greek yogurt instead of cream cheese for a lighter option. - Swap granulated sugar with honey or maple syrup for a natural sweetener. - Use gluten-free graham cracker crumbs if you need a gluten-free version. These substitutions can help you tailor the bites to your taste. Feel free to experiment and make them your own! Start by preheating your oven to 325°F (160°C). This helps your bites bake evenly. Next, line a mini muffin tin with paper liners. You can also spray it with non-stick cooking spray. In a medium bowl, mix 1 cup of graham cracker crumbs with 1/4 cup of melted butter. Stir until the crumbs feel like wet sand. Now, take about 1 tablespoon of this mix and press it into each muffin cup. This makes the crust. Bake the crusts for 5 minutes and let them cool slightly. In a large bowl, beat 8 oz of softened cream cheese until it is smooth. This is key for a creamy texture. Add in 1/2 cup granulated sugar, 1/4 cup brown sugar, and 1 cup of pumpkin puree. Crack in 2 large eggs and mix in 1 teaspoon of vanilla extract. Sprinkle in your spices: 1 teaspoon ground cinnamon, 1/2 teaspoon ground nutmeg, 1/2 teaspoon ground ginger, and 1/4 teaspoon ground cloves. Beat the mixture until everything is well combined and creamy. Spoon or pipe the cheesecake filling into your cooled crusts. Fill each cup about 3/4 full. Place the muffin tin back in the oven. Bake for 20-25 minutes. The edges should be set but the centers will jiggle a little. After baking, take them out and let them cool at room temperature for about 10 minutes. Then, refrigerate the bites for at least 2 hours. This helps them firm up nicely. Once chilled, carefully remove the cheesecake bites from the tin. Enjoy them with whipped cream and crushed pecans on top for an extra treat! To make the best pumpkin spice cheesecake bites, texture matters. Start with softened cream cheese. This keeps the filling smooth. Mix it well until there are no lumps. When you add eggs, mix just until combined. Overmixing can make your bites tough. Aim for a creamy, light filling that melts in your mouth. Presentation can make your bites even more tempting. Use mini muffin liners for easy serving. After chilling, top each bite with whipped cream. A sprinkle of crushed pecans adds great flavor and crunch. Arrange the bites on a pretty platter. You can also add a drizzle of caramel sauce for extra flair. Mixing ingredients correctly is key. Always use room temperature ingredients. This helps them blend better. When adding dry spices, make sure they are evenly distributed. Use a spatula to scrape down the sides of your bowl. This ensures all ingredients mix well. A smooth batter means better bites! {{image_2}} You can easily adjust ingredients to fit different diets. For a dairy-free option, use vegan cream cheese. Replace eggs with flaxseed meal or applesauce for a vegan twist. If you want a gluten-free treat, swap graham cracker crumbs for gluten-free cookies. These changes keep the taste while fitting your needs. Add a twist to your bites with different spices. In spring, try adding lemon zest and a hint of cardamom for a fresh taste. In summer, mix in some fresh berries or a hint of mint. For winter, include a touch of peppermint extract to bring a festive feel. Each season offers a chance to explore new flavors. You can serve these bites in many fun ways. Use a mini tartlet shell instead of muffin tins for a fancy look. You could also layer the cheesecake filling with chocolate or caramel sauce for a unique dessert. For a more casual treat, serve them in small cups or jars. Each style offers a new way to enjoy these delicious bites. To keep your Pumpkin Spice Cheesecake Bites fresh, place them in an airtight container. This helps prevent them from drying out. You can stack them if you use parchment paper between layers. Keep them in the fridge for the best taste and texture. You can store these cheesecake bites in the fridge for up to five days. After that, they may lose their creaminess. If you notice any changes in smell or texture, it’s best to toss them. If you want to save some for later, freezing is a great option. Place the cheesecake bites in a single layer on a baking sheet. Freeze them for about two hours until firm. After that, transfer them to a freezer-safe bag. They can last up to three months in the freezer. When you're ready to enjoy them, thaw them in the fridge overnight. Yes, you can make these bites a day before. Just follow all steps, then chill them. This extra time helps the flavors blend. They will taste even better on the next day. Store them in the fridge in an airtight container. Yes, you can easily make this recipe gluten-free. Use gluten-free graham cracker crumbs for the crust. Most brands offer tasty options. Check the labels to ensure they are certified gluten-free. The rest of the ingredients are naturally gluten-free. To reduce the sweetness, cut back on the granulated and brown sugars. You can use half the amount. Another option is to add more spices. The pumpkin and spices will still shine through, even with less sugar. Taste as you mix to find your perfect balance. In this post, we covered how to make Pumpkin Spice Cheesecake Bites. We discussed main ingredients, optional toppings, and ingredient swaps. I shared clear steps for preparing the crust and filling, along with baking tips. You can also explore variations and storage methods. With these insights, you can create tasty bites for any occasion. They’re perfect for fall gatherings or a sweet treat. Enjoy sharing your delicious creation with friends and family!

Pumpkin Spice Cheesecake Bites Delightful Fall Treat

Fall is here, and that means it’s time for cozy flavors! If you love pumpkin spice, you’ll adore these Pumpkin

- 1 pound ground turkey - 1 can (15 oz) pumpkin puree - 1 can (15 oz) black beans, rinsed and drained The main ingredients give this chili its unique taste. Ground turkey is lean and provides protein. Pumpkin puree adds creaminess and a hint of sweetness. Black beans bring fiber and a hearty texture to the dish. - 1 can (15 oz) diced tomatoes (with juices) - 1 can (4 oz) green chilies, diced - 2 cups chicken broth (low sodium) These ingredients add depth and flavor. Diced tomatoes bring acidity that balances the sweetness of pumpkin. Green chilies add a mild heat. Chicken broth helps create a rich, savory base for the chili. - 2 tablespoons chili powder - 1 tablespoon cumin - 1 teaspoon smoked paprika - 1 teaspoon salt - ½ teaspoon pepper Spices are key to making this chili pop. Chili powder gives it a classic chili flavor. Cumin adds warmth and earthiness. Smoked paprika provides a delicious smoky note. Adjust the salt and pepper to suit your taste. To start, heat olive oil in a large skillet over medium heat. Add the diced onion and minced garlic. Sauté these until the onions turn soft and clear, about 3 to 4 minutes. This step builds a great base flavor. Next, add the ground turkey to the skillet. Break it up with a spatula as it cooks. Brown the turkey until it is no longer pink. If there is excess fat, drain it off. This keeps your chili lean and tasty. Now, grab your slow cooker. Combine the sautéed turkey, pumpkin puree, black beans, diced tomatoes, green chilies, and diced green bell pepper. Pour in the chicken broth, and add chili powder, cumin, smoked paprika, salt, and pepper. Mixing these ingredients well is key for flavor. Cover the slow cooker. Cook on low for 6 to 8 hours or on high for 3 to 4 hours. Cooking on low lets the flavors blend well, while high cooks it faster. Either way, you will end up with a warm, hearty dish. Before serving, taste the chili. Adjust the seasonings if you want more flavor. You can add more salt, pepper, or spices as needed. For presentation, serve the chili in bowls. Top each serving with a dollop of sour cream, a sprinkle of shredded cheese, and some fresh cilantro or sliced jalapeños. These toppings add color and flavor, making your dish shine. To enhance the flavor of your chili, focus on seasoning. Start with fresh spices. Use chili powder, cumin, and smoked paprika to add depth. Taste your chili before serving. Adjust the salt and pepper as needed for a balanced flavor. For ingredient selection, fresh produce makes a difference. Use ripe tomatoes and firm peppers. Canned beans should be low-sodium for better control over salt. Choose a quality pumpkin puree, as it is the base of your chili. Check the label for 100% pumpkin with no fillers. When choosing a slow cooker, consider size. A 6-quart model works well for this recipe. It gives enough space for all ingredients. Look for a model with a timer for easier cooking. Adjust cook times based on your settings. For low heat, aim for 6 to 8 hours. If you use high heat, check at 3 to 4 hours. The chili should be hot throughout and flavors should meld together. For toppings, sour cream adds creaminess. Shredded cheese gives a nice flavor. Fresh cilantro brightens the dish. Sliced jalapeños add heat for spice lovers. Pair your chili with corn bread or a fresh salad. A light beer or apple cider complements the flavors. These sides enhance your meal and make it more satisfying. {{image_2}} You can swap out ground turkey for other meats. Lean ground beef or chicken works well. If you want a lighter option, try ground chicken. For a vegan twist, use lentils or chickpeas instead of turkey. They add protein and fiber. You can also use a plant-based meat substitute. Just ensure it's seasoned well, as it may need flavor. Want to boost the taste? Add more veggies! Try corn, carrots, or zucchini. They add nutrition and color. You can even toss in some chopped spinach at the end for a fresh touch. If you like heat, increase the spice. Add more chili powder or toss in fresh jalapeños. A dash of cayenne pepper can give it a nice kick too. Adjust to fit your taste! Switch up the beans or squashes based on the season. In fall, use kidney beans or butternut squash. They add a lovely texture and flavor. You can also explore other fall flavors. Try adding cinnamon or nutmeg for warmth. These spices can enhance the pumpkin and make the chili cozy and inviting. To keep your pumpkin turkey chili fresh, follow these tips: - Refrigeration: Store the chili in airtight containers. Place it in the fridge within two hours of cooking. It stays fresh for about 3 to 5 days. - Freezing Instructions: For longer storage, freeze the chili. Use freezer-safe bags or containers. Leave some space for expansion. It can last up to 3 months in the freezer. When it's time to enjoy leftovers, here are some easy ways to reheat: - Microwave: Place a bowl in the microwave. Heat in 1-minute bursts, stirring in between. This keeps it from overheating. - Stovetop: Pour the chili into a pot over medium heat. Stir occasionally until it’s hot. This method helps maintain the best flavor and texture. It’s important to know how long your chili lasts: - In the fridge: The chili can be kept for 3 to 5 days. - In the freezer: It can last up to 3 months. Signs of spoilage: Always check for off smells, changes in color, or mold. If you notice any of these, it’s best to toss the chili. Enjoy your cooking! Yes, you can use chicken instead of turkey. Ground chicken works well in this recipe. It offers a lean protein option, similar to turkey. You can use breast meat for a lighter dish. Both options keep the chili tasty and healthy. Yes, this chili is gluten-free. Most of the ingredients, like pumpkin and beans, are naturally gluten-free. Just check the labels on canned goods. Some brands may add gluten. Always look for gluten-free labels on chicken broth and diced tomatoes. Absolutely! Adding more vegetables can make this chili even better. Try bell peppers, zucchini, or corn for more taste. You can also toss in some spinach or kale for extra nutrients. Just chop them up and mix them into the slow cooker. This blog post covered the key ingredients and steps for a delicious chili. We explored the main ingredients like ground turkey, pumpkin puree, and black beans. I shared tips for cooking and storing your chili to maintain its flavor and texture. Remember, you can customize your chili with different ingredients to fit your needs. With these steps, I hope you feel ready to make your own perfect chili at home. Enjoy cooking and experimenting with this cozy dish!

Slow Cooker Pumpkin Turkey Chili Flavorful and Easy

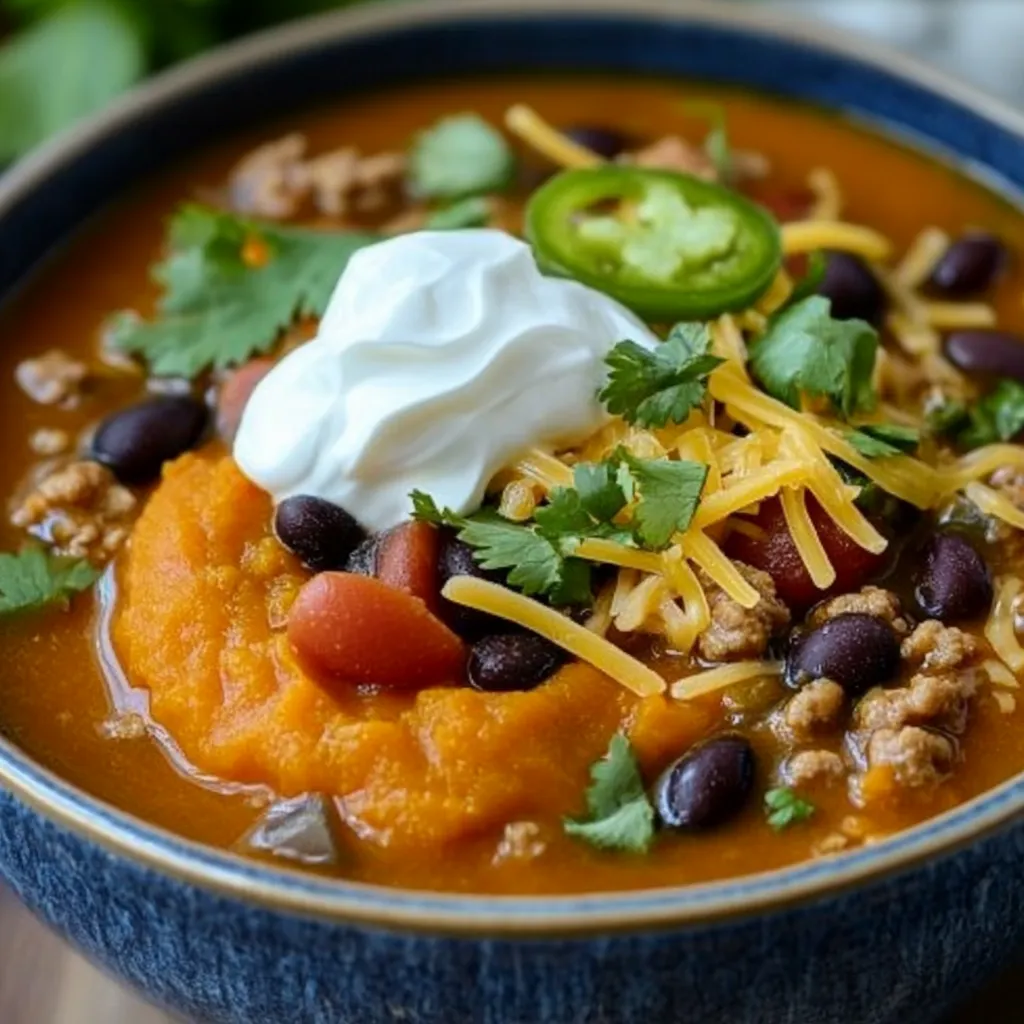
Looking for a cozy dish that warms your heart and tummy? Try my Slow Cooker Pumpkin Turkey Chili! This easy

- 1 medium head of cauliflower, cut into bite-sized pieces - 1 cup all-purpose flour - 1 cup buttermilk (or plant-based milk for a vegan version) - 1 teaspoon garlic powder - 1 teaspoon onion powder - 1/2 teaspoon smoked paprika - 1/2 teaspoon salt - 1/4 teaspoon black pepper - 1 cup panko breadcrumbs - 1/2 cup sweet chili sauce - 1 tablespoon sesame oil - 1 tablespoon chopped green onions (for garnish) - Sesame seeds (for garnish) The main star of this dish is cauliflower. It holds flavor well and has a nice crunch. You will also need flour and buttermilk. The flour gives a sturdy base, while buttermilk adds moisture and flavor. For seasonings, I use garlic powder, onion powder, smoked paprika, salt, and black pepper. Garlic and onion offer warmth, while smoked paprika adds depth. Panko breadcrumbs are key for that extra crunch. They create a crispy outside, giving a lovely contrast to the tender cauliflower. Sweet chili sauce and sesame oil bring sweetness and a hint of heat. Don’t forget the green onions and sesame seeds. They add color and freshness! 1. Preheat the air fryer. Start by setting your air fryer to 400°F (200°C). Let it heat for about 5 minutes. This step is key for a nice crunch. 2. Prepare the cauliflower. Take a medium head of cauliflower and cut it into bite-sized pieces. This helps them cook evenly and makes for easy eating. 1. Dipping in buttermilk. In a bowl, pour 1 cup of buttermilk. Dip each cauliflower piece into the buttermilk. Let the extra drip off. This helps the coating stick well. 2. Dredging in flour mixture. In another bowl, mix 1 cup of all-purpose flour, 1 teaspoon of garlic powder, 1 teaspoon of onion powder, 1/2 teaspoon of smoked paprika, 1/2 teaspoon of salt, and 1/4 teaspoon of black pepper. Dredge each cauliflower piece in this mix, covering it fully. 3. Coating with panko breadcrumbs. Now, take the flour-coated cauliflower and roll it in 1 cup of panko breadcrumbs. Press gently so the crumbs stick well. This gives the bites a crispy texture. 1. Arranging in the basket. Place the coated cauliflower bites in a single layer in the air fryer basket. Avoid overcrowding to ensure they cook evenly. 2. Cooking instructions. Air fry the cauliflower bites for 10-12 minutes. Shake the basket halfway through to help them cook uniformly. 3. Optional extra crispiness. If you prefer your bites extra crispy, air fry for an additional 2-3 minutes. This will give you that perfect crunch. Now, you’re ready to toss these bites in sweet chili sauce for a burst of flavor! To get the best crunch, do not overcrowd the air fryer. If you pack the basket too tightly, the hot air cannot circulate well. This leads to soggy bites instead of crispy ones. Aim for a single layer of cauliflower pieces in the basket. - Space the bites apart. - Cook in batches if needed. For maximum crunch, here are some tips: - Use panko breadcrumbs. They create a lighter, crunchier texture. - Spray a light coat of cooking spray on the coated cauliflower before cooking. This helps brown them nicely. Want to boost the flavor? You can add spices like cayenne pepper for heat or even a touch of cumin for warmth. Here are some ideas: - Try adding paprika for a smoky flavor. - Mix in Italian herbs for a different twist. If you want alternatives to sweet chili sauce, consider these options: - Use sriracha for a spicier kick. - Mix honey and soy sauce for a sweet and savory blend. You can easily make this dish vegan. Just replace buttermilk with plant-based milk like almond or oat milk. For a gluten-free version, swap all-purpose flour for: - Almond flour. - Gluten-free flour blends. This way, everyone can enjoy these tasty bites! {{image_2}} You can change the taste of your cauliflower bites easily. To make them spicy, add hot sauce to the sweet chili sauce. This adds heat and flavor. If you want a sweet and tangy taste, mix honey or lime juice with the sweet chili sauce. This combo gives a zesty kick to your bites. Cauliflower is great, but you can use other veggies too. Broccoli makes a tasty substitute. It cooks well and has a nice crunch. Brussels sprouts also work well. Just cut them into bite-sized pieces. You can even mix different veggies for a colorful snack. Pair your cauliflower bites with dips for extra flavor. A creamy ranch or tangy yogurt dip complements them nicely. You can also serve them on a bed of fresh salad for a healthy twist. For a fun presentation, arrange the bites on a platter and sprinkle them with chopped green onions and sesame seeds. This adds color and makes them look fancy. To keep your sweet chili cauliflower bites fresh, place them in an airtight container. This keeps moisture out and helps them stay crunchy. Store the container in the fridge for up to three days. If you want to save them longer, consider freezing. To reheat leftovers, the air fryer is the best choice. Heat it to 350°F (175°C) and cook for 5-7 minutes. This method helps regain that crispy texture. If you do not have an air fryer, you can use an oven. Preheat it to 350°F (175°C) and place the bites on a baking sheet. Bake for 10-12 minutes, flipping halfway through. You can freeze these bites before or after cooking. If freezing raw, coat them but do not cook. Place them on a baking sheet and freeze until firm. Then, transfer them to a freezer bag. They can stay fresh for about three months. To cook from frozen, increase the air frying time by 5-8 minutes. If you freeze cooked bites, let them cool completely first. When ready to eat, thaw in the fridge overnight and reheat as described above. Yes, you can make these bites in the oven. To do this, follow these steps: 1. Preheat the oven to 425°F (220°C). 2. Prepare the cauliflower as you would for the air fryer. Coat the pieces in buttermilk, flour mix, and panko. 3. Place the coated cauliflower on a baking sheet lined with parchment paper. Make sure to space them out. 4. Bake for 20-25 minutes, flipping halfway through. Look for a golden-brown color and a crispy texture. Making sweet chili sauce is simple. Here is a basic recipe: - Ingredients: - 1 cup sugar - 1/2 cup vinegar - 1/2 cup water - 2 tablespoons cornstarch - 2 tablespoons water (for cornstarch) - 1-2 teaspoons red pepper flakes (adjust for heat) - Instructions: 1. In a pot, combine sugar, vinegar, and water. Bring to a boil. 2. Mix cornstarch with 2 tablespoons of water in a small bowl. Add to the pot. 3. Stir until it thickens. Add red pepper flakes for spice. 4. Remove from heat and let it cool. These bites pair well with many dishes. Here are some ideas: - Rice: Serve over jasmine or brown rice for a complete meal. - Salads: Add to a fresh salad for crunch. - Dips: Try with ranch or creamy dressing for added flavor. - Vegetables: Serve alongside steamed broccoli or carrots for a healthy plate. In this post, we covered how to make delicious air fryer sweet chili cauliflower bites. We explored the key ingredients, including cauliflower, buttermilk, and seasonings. I shared step-by-step instructions for coating and cooking, along with tips for crispiness and flavor. You also learned ways to change the recipe with different vegetables or sauces. Remember, these bites are easy to store and reheat. With some practice, you’ll make a tasty snack or meal that everyone enjoys! Enjoy your cooking adventure!

Air Fryer Sweet Chili Cauliflower Bites Crunchy Snack

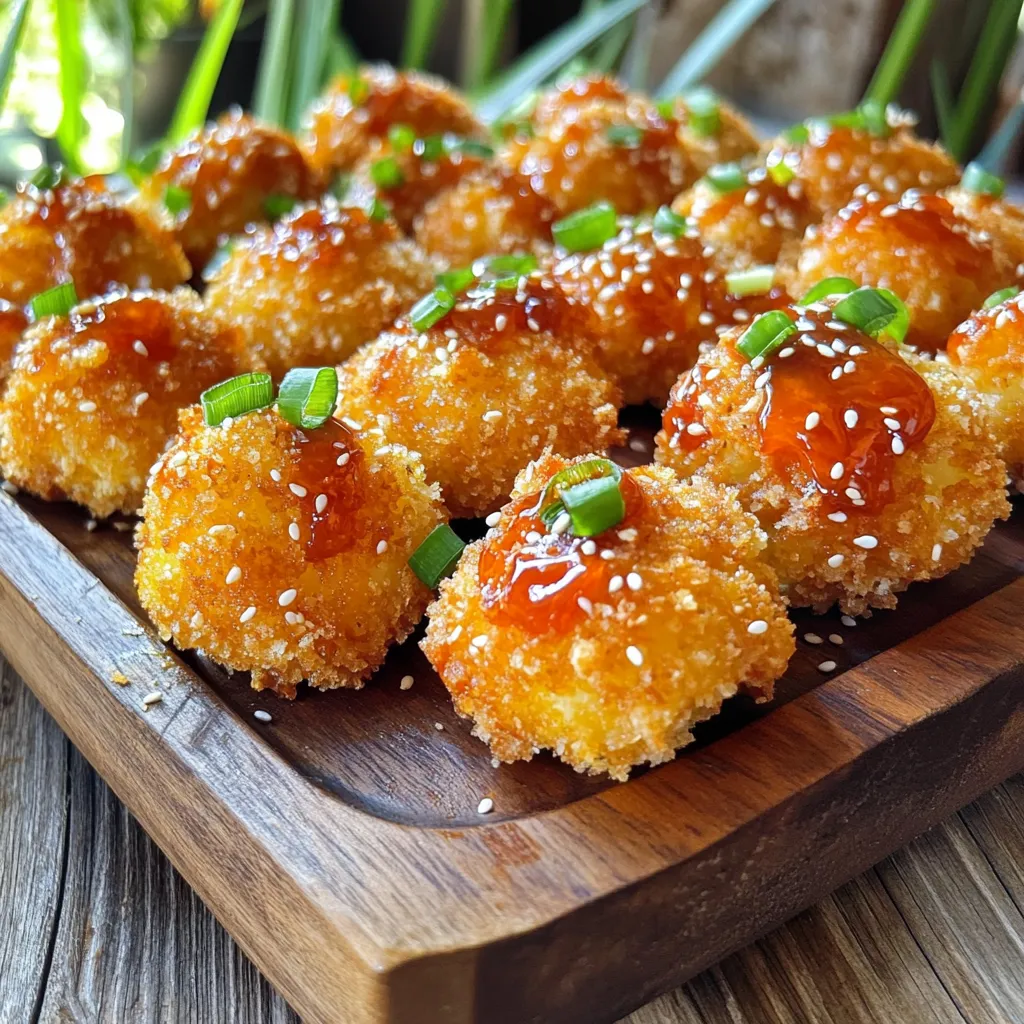
Craving a crunchy snack that’s full of flavor? You need to try these Air Fryer Sweet Chili Cauliflower Bites! They’re

To make this creamy mushroom spinach pasta, gather these simple ingredients: - 8 oz (225g) fettuccine or spaghetti - 2 tablespoons olive oil - 1 medium onion, finely chopped - 3 cloves garlic, minced - 12 oz (340g) mushrooms, sliced (cremini and button work best) - 5 oz (140g) fresh spinach - 1 cup (240ml) heavy cream - ½ cup (50g) grated Parmesan cheese - Salt and pepper to taste - ½ teaspoon nutmeg - Fresh parsley, chopped for garnish You can swap some ingredients for what you have at home. Use whole wheat pasta for a healthier option. If you want a dairy-free dish, try coconut cream instead of heavy cream. For the cheese, nutritional yeast gives a cheesy flavor without dairy. If you can’t find fresh spinach, frozen spinach works too. Just be sure to thaw and drain it well before adding it to the sauce. Garnishes add a nice touch to your dish. Consider using: - Extra grated Parmesan cheese - A sprinkle of red pepper flakes for heat - Toasted pine nuts for crunch - Lemon zest for a bright flavor - Fresh basil or chives for a fresh taste These options can enhance the meal and make it look beautiful on the table. First, fill a large pot with water. Add salt and bring it to a boil. Once boiling, add 8 oz of fettuccine or spaghetti. Cook it until al dente, as per package instructions. Drain the pasta in a colander but keep about ½ cup of the pasta water. Set the pasta aside for later. In a large skillet, pour 2 tablespoons of olive oil. Heat it over medium heat. Add 1 medium onion, finely chopped, and cook until it becomes clear, about 3-4 minutes. Next, stir in 3 cloves of minced garlic. Sauté for another minute until it smells great. Now, it’s time to add some flavor. Turn up the heat to medium-high. Toss in 12 oz of sliced mushrooms, mixing well. Season with a pinch of salt and pepper. Cook for 5-7 minutes. You want the mushrooms to turn golden brown and lose some moisture. Then, add 5 oz of fresh spinach. Cook until it wilts, which takes about 2-3 minutes. Reduce the heat to medium-low. Pour in 1 cup of heavy cream and mix well. Add ½ cup of grated Parmesan cheese, ½ teaspoon of nutmeg, and some salt and pepper to taste. Stir until the cheese melts and the sauce becomes creamy. Now, add the cooked pasta to the skillet. Toss it with the creamy mushroom-spinach sauce. If the sauce seems too thick, add some of the reserved pasta water, a little at a time, until it reaches your desired consistency. Once everything is mixed well, taste the dish and adjust the seasoning. Serve it hot. For a lovely touch, garnish with chopped parsley and a sprinkle of extra Parmesan cheese. Enjoy your delightful meal! To make great pasta, use a large pot with plenty of water. Add a good amount of salt; this adds flavor. Bring the water to a rolling boil before adding the fettuccine or spaghetti. Stir the pasta once you add it to prevent sticking. Cook it until it is al dente, or firm to the bite. Reserve some pasta water, about half a cup, before draining. This water helps thicken your sauce later. For a creamy sauce, use heavy cream as the base. It gives the sauce a rich texture. After cooking the mushrooms and spinach, lower the heat before adding the cream. This prevents the cream from curdling. Stir in grated Parmesan cheese slowly, letting it melt fully into the sauce. If the sauce becomes too thick, add the reserved pasta water a little at a time. This will help you reach the perfect creamy consistency. To boost flavor, don’t skip the onion and garlic. Sauté them together until soft and fragrant. Use a mix of mushrooms, like cremini and button, for depth. A pinch of nutmeg adds warmth and richness. Season with salt and pepper to taste. Always taste the sauce before serving to adjust the seasoning. Fresh parsley on top not only looks nice but adds a fresh taste. {{image_2}} You can easily add protein to this dish. Grilled chicken or shrimp works well. Cook the chicken in the skillet before adding the mushrooms. For shrimp, add them after the garlic. They cook quickly and add a nice flavor. You can also add cooked sausage for a heartier meal. If you want a vegetarian twist, try adding chickpeas or lentils. Both add protein and texture. You can also use tofu for a different protein option. Just sauté it with the onions. Another great option is to add roasted red peppers for a sweet touch. For a gluten-free meal, swap the pasta for gluten-free options. Look for rice or quinoa pasta. These work well with the creamy sauce. Make sure to check the labels for gluten-free certification. You can also try zucchini noodles for a lighter dish. They add a fresh taste and are fun to eat! To keep your creamy mushroom spinach pasta fresh, let it cool down. Place it in an airtight container. Store it in the fridge. Enjoy it within three days for the best taste. Label the container with the date to track freshness. When you're ready to eat, reheat the pasta on the stove. Use low heat to warm it gently. Add a little water or cream to keep it creamy. Stir often to avoid sticking. You can also use the microwave. Heat it in short bursts, stirring in between. This helps it heat evenly. If you want to save some for later, freezing works well. First, let the pasta cool completely. Portion it into freezer-safe bags. Remove as much air as possible before sealing. It can last up to three months in the freezer. To use, thaw it overnight in the fridge, then reheat. You can use half-and-half or coconut milk for a lighter option. If you want a vegan choice, try cashew cream or a blend of silken tofu and almond milk. These alternatives can give you a rich texture without heavy cream. Yes, you can prepare the sauce and cook the pasta ahead of time. Store them separately in the fridge. When you’re ready to eat, just heat them up and combine. This makes meal prep easy and quick. To make this dish vegan, use plant-based cream instead of heavy cream. You can also substitute the Parmesan cheese with nutritional yeast or a vegan cheese. This keeps the flavors while making it plant-based. A mix of cremini and button mushrooms works great. Cremini mushrooms add depth of flavor, while button mushrooms keep it light. You can also try shiitake or portobello for a richer taste, depending on your preference. This pasta dish stays good for about 3 to 5 days in the fridge. Make sure to store it in an airtight container. If you notice any changes in smell or color, it’s best to toss it out. This blog post walks you through making a delicious creamy mushroom spinach pasta. We covered key ingredients, substitutions, and optional garnishes. I shared step-by-step cooking instructions, tips for perfect pasta, and how to achieve a creamy sauce. You can adapt the dish with protein, vegetarian, or gluten-free options. Finally, I explained how to store leftovers and answered common questions. Enjoy making this dish and experiment with flavors. Every bite will be worth it!

Creamy Mushroom Spinach Pasta Delightful Weeknight Meal

Looking for a quick and tasty weeknight dinner? This Creamy Mushroom Spinach Pasta is your answer! Packed with flavor, it

- 1 cup unsalted butter - 1 cup brown sugar - 2 large eggs - 1 teaspoon vanilla extract - 2 cups all-purpose flour - 1 teaspoon baking powder - 1/2 teaspoon baking soda - 1/4 teaspoon salt - 1 1/2 cups diced apples (preferably Honeycrisp) - 1/2 cup caramel sauce (store-bought or homemade) - 1/2 cup chopped walnuts (optional) To make caramel apple blondies, gather your ingredients first. You need unsalted butter for richness. Brown sugar adds sweetness and a nice color. Eggs give structure and moisture. Vanilla extract adds a warm flavor. All-purpose flour is the base for the blondies. Baking powder and baking soda help them rise. A pinch of salt balances the sweetness. For apples, I recommend using a sweet variety like Honeycrisp. They add a lovely texture and flavor. Caramel sauce is key for that gooey goodness. You can use store-bought or make your own if you’re feeling adventurous. Chopped walnuts add a nice crunch, but they are not required. Having everything ready will make your baking process smooth. Enjoy the sweet aromas while you prepare these treats! 1. Preheat your oven to 350°F (175°C). 2. Grease a 9x13 inch baking pan. You can also use parchment paper for easy removal. 3. In a large bowl, mix 1 cup of melted butter with 1 cup of brown sugar. Stir until smooth. 1. Add 2 large eggs one at a time. Mix well after each egg. 2. Pour in 1 teaspoon of vanilla extract and mix again. 3. In another bowl, whisk together 2 cups of all-purpose flour, 1 teaspoon of baking powder, 1/2 teaspoon of baking soda, and 1/4 teaspoon of salt. 4. Gradually add the dry mix to the wet mix. Stir until just combined. 5. Fold in 1 1/2 cups of diced apples and 1/2 cup of chopped walnuts, if you like. 1. Pour half of the batter into the prepared pan. Spread it evenly. 2. Drizzle half of the 1/2 cup of caramel sauce over the batter. 3. Carefully spread the rest of the batter on top. Drizzle with the remaining caramel sauce. 4. Use a knife to gently swirl the caramel into the top layer. 5. Bake for 25-30 minutes. Check doneness by inserting a toothpick in the center. It should come out with a few moist crumbs. 6. Once done, take the pan out of the oven. Let it cool on a wire rack. 7. After cooling, cut into squares and drizzle with extra caramel if you wish. - Ensuring proper measurements Use a kitchen scale for accuracy. This helps you get the right amount of each ingredient. For flour, spoon it into the cup and level it off. Avoid packing it down. - Tips for a marbled caramel effect When you layer the caramel, drizzle it in a zigzag pattern. Then, use a knife to swirl it gently. This creates a beautiful marbled look without mixing it too much. - Best practices for cooling Let the blondies cool in the pan for about 10 minutes. Then, transfer them to a wire rack to cool completely. This helps keep them from getting soggy. - Alternative apples for varying sweetness Try using Granny Smith for a tart taste or Fuji for extra sweetness. Each apple brings a different flavor to your blondies. Choose based on your personal preference! - Options for caramel sauce You can use store-bought caramel for convenience. If you want to make it at home, simply melt sugar and mix in cream. This gives a rich, fresh flavor to your blondies. - Nut substitutions If you’re not a fan of walnuts, try pecans or almonds. You can also skip the nuts for a nut-free version. Each option changes the texture and taste, so pick what you enjoy. {{image_2}} You can make caramel apple blondies even more fun. Try adding spices like cinnamon or nutmeg. Just a pinch can boost the flavor. These spices add warmth and depth to each bite. You can also mix in chocolate chips or other treats. Dark chocolate chips add a rich taste. White chocolate or butterscotch chips bring sweetness. Feel free to experiment based on what you love! If you want a gluten-free option, swap the all-purpose flour. Use a gluten-free flour blend instead. It works just as well and keeps the texture nice. For a vegan option, replace the eggs. You can use flax eggs or applesauce. Also, choose a plant-based butter to keep it dairy-free. These swaps let everyone enjoy this delicious treat! To keep your caramel apple blondies fresh, store them in an airtight container. This will help maintain their moist texture. You can also wrap them tightly in plastic wrap. This way, they can stay fresh for up to five days at room temperature. If you want to keep them longer, refrigerating them works too. Just remember to let them cool completely before sealing. For storage containers, I recommend glass or plastic containers with tight-fitting lids. They help prevent air from entering. Avoid metal containers, as they can affect the taste. If you want to save some blondies for later, freezing them is a smart choice. To freeze, cut the blondies into squares first. Then, wrap each piece in plastic wrap. Place the wrapped pieces in a freezer-safe bag or container. You can keep them in the freezer for up to three months. When you're ready to enjoy them, simply take out the blondies. Let them thaw in the fridge overnight or on the counter for a couple of hours. You can also warm them slightly in the microwave for a few seconds. This will make them taste fresh again! Can I use a different type of caramel sauce? Yes, you can use any caramel sauce you like. Store-bought is easy. Homemade adds a special touch. You can even try flavors like sea salt caramel. How do I know when the blondies are done baking? Check for a toothpick inserted in the center. It should come out with a few moist crumbs, not wet batter. The edges will look golden and set. What’s the best way to cut blondies? Let the blondies cool completely. Use a sharp knife for clean cuts. Wipe the knife between cuts to keep edges neat. Why are my blondies too dry? Overbaking can dry them out. Make sure to check them at 25 minutes. Also, measure your flour correctly. Too much flour will lead to dryness. What can I do if the blondies sink in the middle? This can happen if the batter is too thick. Ensure you mix well and incorporate air. Also, check your baking powder for freshness. Ideal pairings and accompaniments Serve blondies warm with vanilla ice cream. Top with whipped cream and extra caramel sauce. A sprinkle of sea salt can enhance the flavors. Presentation ideas for serving Cut into neat squares and place on a decorative plate. Drizzle extra caramel sauce over the top. Garnish with apple slices or chopped walnuts for a lovely touch. You learned how to make delicious blondies by using simple ingredients. We covered essential steps, like mixing and baking, plus helpful tips for the best results. Whether you prefer apples or want to try different flavors, there are plenty of options. Remember to store leftovers well for fresh snacks later. Now, you can enjoy making these treats or share them with friends! Happy baking!

Caramel Apple Blondies Simple and Sweet Dessert Treat

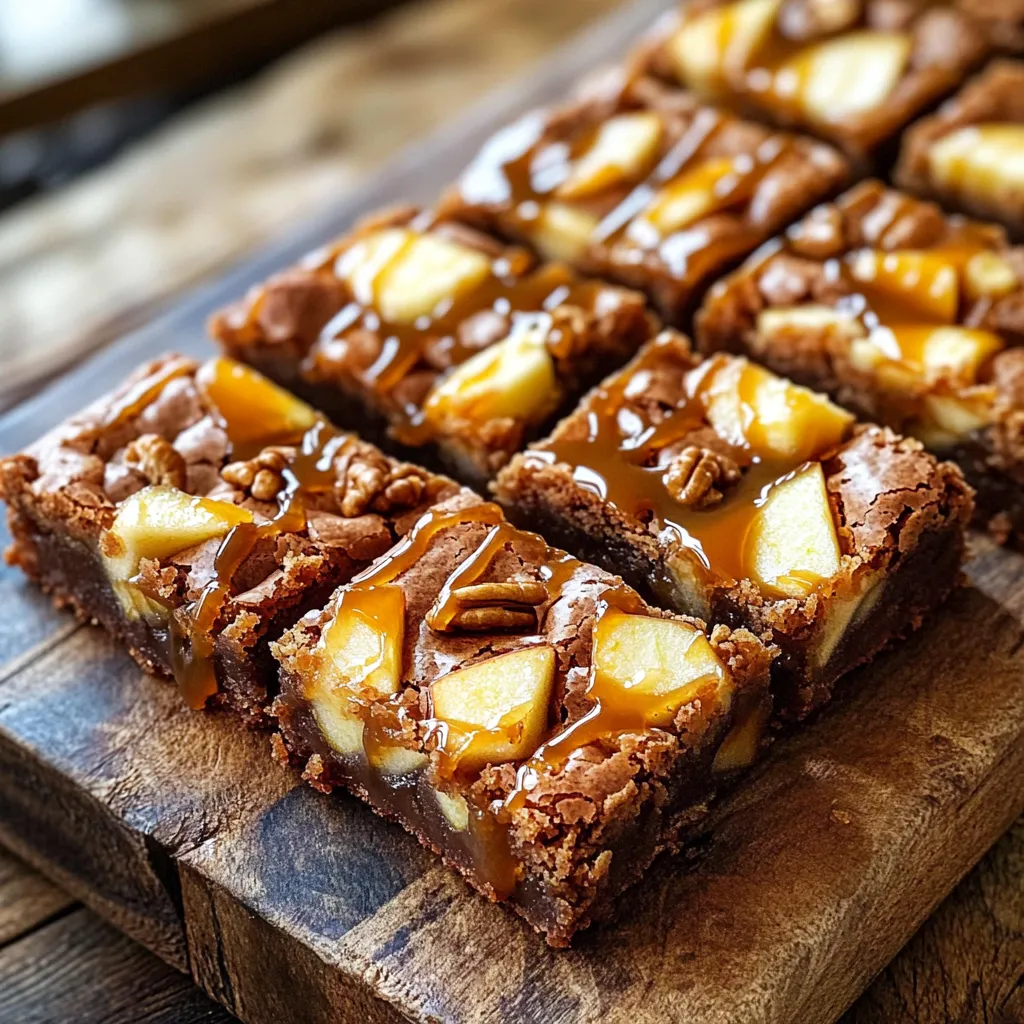
Looking for a fun and easy dessert? These Caramel Apple Blondies are the perfect treat! With rich caramel and fresh

Older posts
Newer posts
← Previous Page1 … Page9 Page10 Page11 … Page130 Next →
© 2025 My Cooking Cast • Built with GeneratePress

Our Policies

  • Privacy Policy
  • GDPR Policy
  • Terms Of Use
  • Copyright Policy
  • Cookie Policy
  • Disclaimer

More Information​

  • Home
  • Contact
  • About
  • Dinner
  • Appetizers
  • Dessert
©2025, My Cooking Cast About Privacy Policy Back To Top