Fall is here, and your kitchen deserves a sweet treat that captures the season! I’m excited to share my easy recipe for Apple Cider Glazed Donuts. With simple ingredients and straightforward steps, you’ll create warm, delicious donuts that brighten any day. Whether you’re a seasoned baker or a novice, this recipe is perfect for you. Get ready to indulge in a cozy bite of autumn goodness!
Ingredients
Main Ingredients Required
– 2 cups all-purpose flour
– 1 cup apple cider
– 1/2 cup granulated sugar
– 1/4 cup brown sugar, packed
– 1/4 cup unsalted butter, melted
– 1 large egg
– 1 teaspoon baking powder
– 1 teaspoon baking soda
– 1/2 teaspoon ground cinnamon
– 1/4 teaspoon ground nutmeg
– 1/4 teaspoon salt
– 1/2 teaspoon vanilla extract
To create these apple cider glazed donuts, you need key ingredients. All-purpose flour gives the donuts structure. Apple cider brings that sweet, fruity flavor. You use both granulated and brown sugar for a rich taste. Eggs and melted butter keep the donuts moist. Baking powder and soda help them rise. Ground cinnamon and nutmeg add warmth and spice.
Glaze Ingredients
– 1 cup powdered sugar
– 2-3 tablespoons apple cider
– 1/2 teaspoon cinnamon
The glaze is simple yet delicious. You need powdered sugar for sweetness and texture. Apple cider adds flavor and helps the glaze stick. A touch of cinnamon rounds out the taste. This glaze makes the donuts shine and taste even better.
Step-by-Step Instructions
Preparation of the Donut Batter
1. Preheat the Oven and Grease the Donut Pan
Start by preheating your oven to 350°F (175°C). While it warms up, take your donut pan and spray it with non-stick spray. This helps the donuts come out easily.
2. Reducing Apple Cider and Mixing Wet Ingredients
In a medium saucepan, pour in 1 cup of apple cider. Heat it over medium heat. Stir it often until it reduces to about 1/2 cup. This step adds a richer flavor to your donuts. Let it cool slightly after reducing. In another bowl, mix the melted butter, egg, reduced apple cider, and vanilla extract. Make sure everything is well combined.
3. Combining Dry Ingredients and Merging with Wet Ingredients
In a large mixing bowl, whisk together the dry ingredients: 2 cups of all-purpose flour, 1/2 cup granulated sugar, 1/4 cup brown sugar, 1 teaspoon baking powder, 1 teaspoon baking soda, 1/2 teaspoon ground cinnamon, 1/4 teaspoon ground nutmeg, and 1/4 teaspoon salt. Gradually add the wet mix to the dry mix. Stir gently until just combined. It’s fine if the batter is a bit lumpy; don’t over mix!
Baking and Cooling Process
1. Filling the Donut Mold and Baking Time
Use a piping bag or a spoon to fill each donut mold about 2/3 full with the batter. Make sure not to overfill. Bake the donuts in the preheated oven for 12-14 minutes. They are done when a toothpick comes out clean.
2. Cooling in the Pan and Wire Rack Transfer
Once baked, remove the donuts from the oven. Let them cool in the pan for about 5 minutes. After that, transfer the donuts to a wire rack to cool completely. This step keeps them from getting soggy.
Making the Apple Cider Glaze
1. Whisking the Glaze Ingredients for Consistency
While the donuts cool, grab a small bowl. Whisk together 1 cup of powdered sugar, 2-3 tablespoons of apple cider, and 1/2 teaspoon of cinnamon until smooth. Adjust the cider amount to get your desired glaze thickness.
2. Dipping the Donuts into the Glaze and Letting It Set
Once the donuts are cool, dip the tops into the glaze. Let the excess drip off before placing them back on the wire rack. Allow the glaze to set for about 10 minutes. This creates a delicious finish for your donuts.
Tips & Tricks
Achieving the Perfect Glaze
To make a great glaze, avoid over-mixing the batter. Over-mixing can make your donuts tough. When you combine wet and dry ingredients, stir gently. It’s okay if a few lumps remain.
For the glaze, you want the right consistency. Start with one cup of powdered sugar. Add two to three tablespoons of apple cider. Mix until smooth. If it’s too thick, add a bit more cider. If it’s too thin, add more sugar. The glaze should coat the donuts well, but not run off.
Baking Tips for Best Results
Using a good donut pan is key. I recommend a non-stick pan for easy removal. This helps keep the shape of your donuts.
To test if your donuts are done, use a toothpick. Insert it into the center of a donut. If it comes out clean, they are ready. If not, bake for a couple more minutes.
Presentation Tips
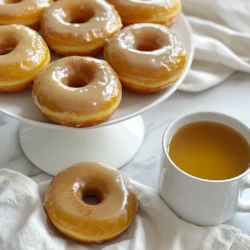
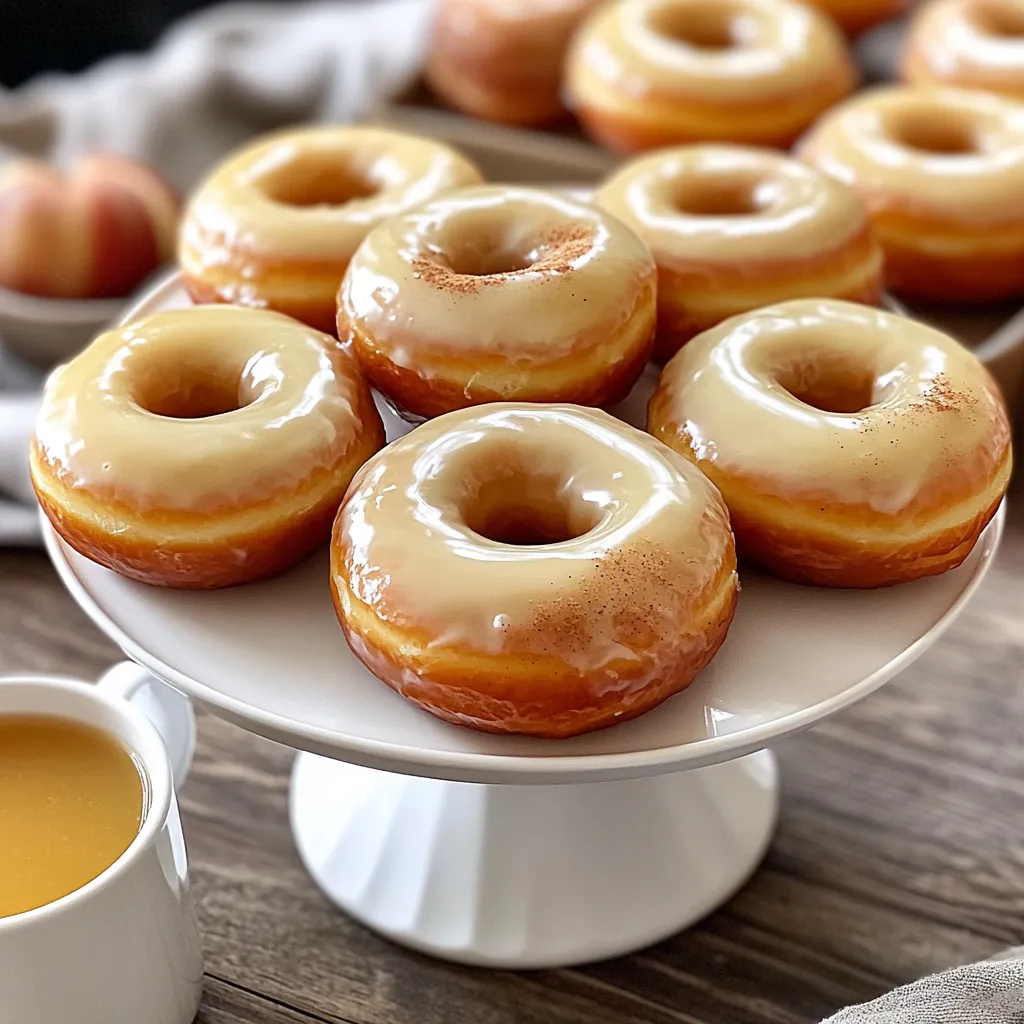
For a beautiful display, arrange your donuts on a tiered cake stand. This makes them look fancy. You can sprinkle a bit of extra cinnamon on top for flair.
Serve your donuts with warm apple cider. The flavors pair well together. It makes for a perfect fall treat. Enjoy the cozy vibes!
Variations
Flavor Variations
You can easily change the flavor of your apple cider glazed donuts. Try adding spices like cardamom or ginger for a warmer taste. These spices blend well with the apple cider and give your donuts a cozy feel.
Another fun twist is to add nuts or chocolate chips. Chopped walnuts or pecans add a nice crunch. If you love chocolate, mix in some mini chocolate chips for sweetness. Both options make the donuts even more delightful.
Dietary Modifications
If you need a gluten-free option, you can use alternative flours. Almond flour or a gluten-free blend works well in this recipe. Just replace the all-purpose flour with your chosen flour type.
For a vegan version, swap out the egg and butter. Use a flax egg instead of the regular egg. To replace the butter, try coconut oil or a vegan butter spread. These changes keep the donuts tasty and friendly for all diets.
Storage Info
How to Store Leftover Donuts
To keep your donuts fresh, store them in an airtight container. This helps keep them from drying out. If you plan to eat them within a few days, place them in the fridge. Make sure to wrap them well with plastic wrap or foil.
For long-term storage, you can freeze the donuts. Place them in a single layer on a baking sheet. Once frozen, transfer them to a freezer bag. Be sure to remove as much air as possible. They can last up to three months in the freezer. When ready to eat, thaw them in the fridge overnight or at room temperature.
Shelf Life
At room temperature, these donuts stay fresh for about two days. If you store them in the fridge, they can last up to a week. However, the glaze may soften. For the best taste, enjoy them fresh or within a few days.
FAQs
Common Questions About Apple Cider Glazed Donuts
Can I use store-bought apple cider?
Yes, you can use store-bought apple cider. It saves time and still tastes great. Just make sure it is not spiced cider.
What can I substitute for eggs in the recipe?
You can use applesauce or mashed banana. One-quarter cup of either can replace one egg. This keeps the donuts moist and adds a slight fruit flavor.
How can I make these donuts healthier?
You can use whole wheat flour instead of all-purpose flour. You can also cut the sugar by half. Using less sugar will still give you tasty donuts.
Donut Baking FAQs
Is a donut pan necessary for this recipe?
A donut pan is best for shape. If you don’t have one, you can use a muffin pan. Just bake them as mini muffins instead.
What to do if I don’t have powdered sugar for the glaze?
You can blend granulated sugar in a blender to make powdered sugar. This works well in a pinch. Just make sure to blend it until fine.
Can I prepare the batter ahead of time?
Yes, you can prepare the batter a few hours ahead. Just cover it and store it in the fridge. Stir it gently before filling the donut pan.
Additional Tips
– Recommended pairings and serving suggestions:
Serve these donuts with warm apple cider. They also pair well with coffee or tea for a cozy treat.
– Best practices for re-glazing donuts after storage:
If your donuts lose their glaze, dip them again. You can also make fresh glaze as needed. Just whisk it until smooth before dipping.
We covered how to make delicious apple cider glazed donuts, outlining each step from ingredients to storage. You learned about the main and glaze ingredients, step-by-step baking, and helpful tips for perfect results. Remember to explore variations and consider dietary needs for a broader appeal.
In baking, patience is key. Enjoy the process and share your creations with others. Happy baking!