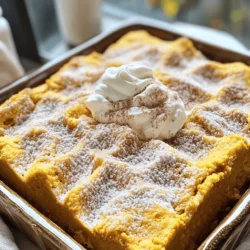
If you crave a warm, spiced treat, you’ll love this Pumpkin Snickerdoodle Coffee Cake recipe. It’s a delightful blend of soft pumpkin, sweet cinnamon, and a hint of vanilla that pairs perfectly with your morning coffee. I’ll guide you through simple steps and helpful tips to make a delicious cake that impresses every time. Let’s dive into baking this cozy favorite and enjoy the flavors of fall together!
Ingredients
Full List of Ingredients
To make a tasty pumpkin snickerdoodle coffee cake, gather these ingredients:
– 1 1/2 cups pumpkin puree
– 1/2 cup vegetable oil
– 1 cup brown sugar, packed
– 1/2 cup granulated sugar
– 3 large eggs
– 1 teaspoon vanilla extract
– 2 cups all-purpose flour
– 1 teaspoon baking powder
– 1 teaspoon baking soda
– 1 teaspoon cinnamon
– 1/2 teaspoon nutmeg
– 1/2 teaspoon salt
– 1/4 teaspoon cream of tartar
– 1/4 cup granulated sugar (for topping)
– 1 tablespoon cinnamon (for topping)
Substitutions for Key Ingredients
If you need to swap some ingredients, here are a few options:
– Pumpkin puree: You can use butternut squash puree. It works well for flavor.
– Vegetable oil: Try melted coconut oil or applesauce for a lighter option.
– Brown sugar: Use white sugar or coconut sugar if you prefer.
– All-purpose flour: A gluten-free blend can replace this if you want a gluten-free cake.
– Eggs: Use flax eggs or applesauce for a vegan option.
Tips for Selecting Fresh Ingredients
To ensure the best taste, focus on fresh ingredients:
– Pumpkin puree: Look for bright orange color. Avoid cans with dents.
– Eggs: Choose eggs that are fresh. Check the date on the carton.
– Spices: Smell your cinnamon and nutmeg. If they lack aroma, they may be old.
– Flour: Make sure your flour is stored in a cool and dry place. Fresh flour is key to good texture.
Using fresh ingredients will enhance your pumpkin snickerdoodle coffee cake. Enjoy the process and the delicious results!
Step-by-Step Instructions
Preparation Steps
1. First, preheat your oven to 350°F (175°C). This step warms your oven for even baking.
2. Next, grease and flour a 9×13-inch baking pan. This will help the cake come out easily.
3. In a large bowl, whisk together:
– 1 1/2 cups pumpkin puree
– 1/2 cup vegetable oil
– 1 cup brown sugar, packed
– 1/2 cup granulated sugar
– 3 large eggs
– 1 teaspoon vanilla extract
Mix until smooth and well combined.
4. In another bowl, sift together:
– 2 cups all-purpose flour
– 1 teaspoon baking powder
– 1 teaspoon baking soda
– 1 teaspoon cinnamon
– 1/2 teaspoon nutmeg
– 1/2 teaspoon salt
Gradually add this dry mix to the wet ingredients. Stir gently until just combined. Avoid overmixing; it keeps the cake light.
5. For the topping, mix:
– 1/4 cup granulated sugar
– 1 tablespoon cinnamon
Set this aside for later.
Baking Process
6. Pour half of the batter into the prepared pan. Smooth it out evenly with a spatula.
7. Sprinkle half of the cinnamon-sugar mixture over the first layer of batter. This adds a sweet crunch.
8. Add the rest of the batter on top, smoothing it out again.
9. Finally, sprinkle the remaining cinnamon-sugar mixture on top. This gives a nice finish.
10. Bake in the preheated oven for 30-40 minutes. Check if it’s done by inserting a toothpick in the center. It should come out clean.
Cooling and Serving Recommendations
11. Once baked, take it out of the oven. Let it cool in the pan for about 10 minutes. This makes slicing easier.
12. Serve warm, and for a special touch, add a dollop of whipped cream or a sprinkle of cinnamon on top. Enjoy your Pumpkin Snickerdoodle Coffee Cake!
Tips & Tricks
Common Baking Mistakes to Avoid
Baking can be tricky. Here are some mistakes to watch for:
– Not measuring ingredients: Use measuring cups and spoons. Accurate amounts matter.
– Overmixing the batter: Mix until just combined. Stop when no dry flour shows.
– Skipping the preheat: Always preheat your oven. It ensures even baking.
– Using old baking powder/soda: Check the dates. Fresh leavening agents work best.
How to Achieve the Perfect Texture
For a soft, moist coffee cake, follow these tips:
– Use room temperature eggs: They mix better, helping the batter blend smoothly.
– Add pumpkin puree: It keeps the cake moist and adds flavor.
– Don’t overbake: Check with a toothpick around 30 minutes. Remove when it comes out clean.
Suggestions for Serving
Serving can elevate your coffee cake experience. Here are some ideas:
– Warm it up: Serve warm for the best taste.
– Add toppings: A dollop of whipped cream or extra cinnamon makes it special.
– Pair with drinks: Enjoy with coffee or tea for a delightful treat.
These tips will help you bake a perfect Pumpkin Snickerdoodle Coffee Cake that everyone loves!

Variations
Gluten-Free Pumpkin Snickerdoodle Coffee Cake
You can make this cake gluten-free. Use a 1-to-1 gluten-free flour blend. This blend replaces all-purpose flour without changing the taste. Follow the same steps in the recipe. You will still enjoy the warm spices and rich pumpkin flavor.
Vegan Adaptations
To make this cake vegan, swap the eggs. Use 1/4 cup unsweetened applesauce for each egg. This keeps the cake moist and fluffy. Replace the vegetable oil with coconut oil or a neutral oil. Use plant-based milk instead of regular milk if you need it. This way, everyone can enjoy a slice!
Flavor Variations: Adding Nuts or Chocolate Chips
You can add nuts or chocolate chips for extra flavor. Try 1 cup of chopped walnuts or pecans. They add a nice crunch. If you prefer sweetness, mix in 1 cup of chocolate chips. Stir them into the batter before baking. This will make your coffee cake even more delightful!
Storage Info
Best Practices for Storing Leftovers
To keep your pumpkin snickerdoodle coffee cake fresh, store it in an airtight container. This helps keep moisture in and prevents it from drying out. You can leave it at room temperature for about three days. If you want it to last longer, refrigeration is a good option. Just remember that cold can change the texture a bit.
Freezing Instructions
If you have extra cake, you can freeze it! First, let the cake cool completely. Then, cut it into slices or keep it whole. Wrap each piece tightly in plastic wrap. Place the wrapped slices in a freezer bag. This will help prevent freezer burn. Your cake will stay good for up to three months in the freezer.
How to Reheat for Optimal Taste
To enjoy your coffee cake again, reheat it gently. You can use a microwave or an oven. If using the microwave, place a slice on a plate and heat for about 15-20 seconds. For the oven, preheat it to 350°F (175°C). Place the cake on a baking sheet and heat for about 10 minutes. This warms it through and keeps it soft. Enjoy the warm flavors just like fresh!
FAQs
Can I make this recipe ahead of time?
Yes, you can make this coffee cake ahead of time. You can bake it a day before your event. Once it cools, wrap it tightly in plastic wrap. Store it at room temperature. To keep it fresh, you can also refrigerate it. Just make sure to bring it back to room temperature before serving. If you want to save time, you can mix the batter the night before. Just store it in the fridge and bake it in the morning.
How do I know when the coffee cake is done?
To check if your coffee cake is done, use a toothpick. Insert it in the center of the cake. If it comes out clean, your cake is ready. If there is batter on the toothpick, it needs more time. Bake it for another five minutes, then check again. The edges should also pull away from the pan slightly. This is a good sign that it is fully baked.
What other toppings can I use for this coffee cake?
You can get creative with the toppings for your coffee cake. Try adding chopped nuts like pecans or walnuts for crunch. You can also use chocolate chips for a sweet touch. A drizzle of caramel or cream cheese glaze adds a nice finish. For a fruity twist, sprinkle some dried cranberries or raisins on top. Whipped cream or a scoop of ice cream can make it even more special when serving.
This blog post shared all you need to bake a delicious coffee cake. We looked at key ingredients and how to pick fresh ones. You learned step-by-step how to prepare, bake, and serve the cake. We covered tips to avoid common mistakes and achieve a great texture. Want to change things up? I shared fun variations and storage tips too. To sum it up, you now have everything to enjoy your baking process. Happy baking, and enjoy every slice!